![]()
Download Article
![]()
Download Article
This wikiHow teaches you how to run macOS High Sierra on your Windows computer. To do this, you will need to download Niresh Catalina. You will also need Transmac or a Mac along with a supported Windows computer and a blank hard drive.
-

1
Check your computer’s specifications. Your Windows computer must have an Intel Core i3, i5, i7 or i9 processor in order to run macOS Catalina, as well as a minimum of four gigabytes of RAM. To check these specs:
- Open Start
.
- Type in system information.
- Click System Information at the top of the menu.
- Look at the name of the processor to the right of the «Processor» heading.
- Scroll down and look at the number to the right of the «Installed Physical Memory» heading.
- Open Start
-
2
Check your computer’s BIOS type. Next to the «BIOS Mode» heading in the System Information menu, check to see whether it says «UEFI» or «BIOS». Keep this information in mind for later.
- You can exit System Information after this point.
Advertisement
-
3
Determine your computer’s bit type. There are two types of computer: 32-bit, and 64-bit. Your computer must be able to support 64-bit operation in order to install macOS.
-
4
Make sure you have access to a recent model of Mac. The Mac in question must be able to download macOS Catalina.
- If your Mac can’t run macOS Catalina, try finding another one.
-
5
Gather the required equipment. In order to install macOS High Sierra on your Windows computer, you will need the following hardware:[1]
- USB drive — Find a flash drive that can hold at least 16 gigabytes.
- Blank hard drive — Find a USB external hard drive that holds at least 100 gigabytes (this is where you’ll install your macOS stuff, so the bigger, the better).
- USB-C adapter — If you’re working with a Mac that doesn’t have traditional USB ports, you’ll need a USB-C-to-USB-3.0 adapter.


Advertisement
-
1
Go to the Hackintosh Zone download site. Go to https://www.hackintoshzone.com/. Make sure you sign in with you account by clicking.
-
2
Click Log in or Register. It’s in the upper-right side of the page. A menu will appear at the top of the page.
-
3
Enter your email address. Do so in the «Email address» field. Make sure this is an email address that you can easily access—you’ll need to log in and verify the email address later.
-
4
Check the «No, create an account now» box. It’s near the bottom of the menu.
-
5
Click Sign up. Doing so takes you to the Create an Account page.
-
6
Enter the required information. Fill out the following fields:
- Name — Enter the name you want to use for your account.
- Password — Enter a password you’d like to use for the login.
- Confirm Password — Repeat the password you entered above.
- Date of Birth — Select the month, day, and year of your birth.
- Location — Type in your country’s name.
-
7
Check the «I agree to the terms and rules» box. It’s near the bottom of the page.
-
8
Click Sign up. This button is at the bottom of the page. Doing so creates your account and sends a confirmation email to your provided email address.
-
9
Go to your email inbox. Go to the email address that you selected for your account. You may have to log in with your email address and the email account’s password to open the inbox.
-
10
Open the confirmation email. Click the email from «tonymacx86.com» to open it.
-
11
Click the confirmation link. Click the link below the «Confirm Account» text in the middle of the email. This will take you back to the Unibeast download site.
-
12
Double-click the Downloads tab. It’s on the right side of the row of tabs that’s near the top of the page. The Downloads page should open.
- If you just see a drop-down menu appear, click the Downloads tab once more.
-
13
Click Hackintosh then download Hackintosh Catalina.
- For example, the current release of
-
14
Click Download Now. It’s in the top-right corner of the page. Doing so will download Unibeast onto your Mac.
-
15
Download Multibeast. This program, which is hosted on the same site as Unibeast, will allow you to install drivers so that you can use things like your PC’s speakers, the Internet, and so on:
- Double-click the Downloads tab again.
- Click Multibeast — High Sierra 10.2.0
- Click Download Now in the upper-right corner of the page.


Advertisement
-
1
Open your Mac’s
App Store. Click the App Store app icon, which is blue with a white «A» on it, in your Mac’s Dock.
-
2
Click the search bar. It’s in the upper-right side of the App Store window.
-
3
Search for High Sierra. Type high sierra into the search bar, then press ⏎ Return.
-
4
Click Download. It’s to the right of the High Sierra icon. Doing so will prompt the installer to begin downloading onto your Mac.
-
5
Wait for the installer window to open. Once it does, you’ll need to close it immediately.[2]
-
6
Press ⌘ Command+Q when the window opens. This will close the installer window.
-
7
Open
Finder. Click the blue face-like icon in your Mac’s Dock.
-
8
Click the Applications folder. It’s on the left side of the Finder window.
-
9
Make sure that the installer is there. The installer will be called «Install macOS High Sierra» or something similar and will have an image of a ridge of mountains on it. As long as the installer is present in the Applications folder, you can proceed.
- If the installer isn’t there, try downloading High Sierra again.


Advertisement
-
1
Plug your USB drive into your Mac. This is the 16-gigabyte minimum flash drive that you’ll use to install macOS High Sierra on your computer.
- If your Mac doesn’t have traditional USB ports on it, attach your USB-C to USB-3.0 adapter first.
-
2
Open Spotlight
. Click the magnifying glass icon in the top-right corner of the screen. A search bar will open.
-
3
Type disk utility into Spotlight. This will search your Mac for the Disk Utility app.
-
4
Click Disk Utility. It’s below the Spotlight search bar. Doing so will open Disk Utility.
-
5
Select your USB drive. Click the USB drive’s name in the upper-left side of the window.
-
6
Click the Erase tab. It’s near the top of the window. A pop-up box will appear.
-
7
Click the «Format» drop-down box. You’ll find this in the middle of the pop-up box. Clicking it prompts a drop-down menu.
-
8
Click OS X Extended (Journaled). This will set your USB drive’s file system to that of your Mac.
-
9
Click the «Scheme» drop-down box. It’s below the «Format» drop-down box.
-
10
Click GUID Partition Map. This option is in the «Format» drop-down menu.
-
11
Click Erase. Doing so will reformat your USB drive to your Mac’s file system.
-
12
Click Done when prompted. You can now proceed with creating your installation drive.


Advertisement
-
1
Open the Unibeast folder. Double-click the Unibeast folder to unzip and open it.
-
2
Open Unibeast. Double-click the Unibeast PKG file to open it.
-
3
Click Open when prompted. Doing so will open the Unibeast setup window.
- If your Mac is currently running macOS Sierra or higher, you’ll have to verify the Unibeast installation before continuing.
-
4
Click Continue four times. It’s in the bottom-right corner of the first four pages of the Unibeast setup window.
-
5
Click Agree when prompted. It’s at the top of the window.
-
6
Select your USB drive, then click Continue. Click the USB drive’s name to select it.
-
7
Select High Sierra, then click Continue. You should see High Sierra in the middle of the page.
-
8
Select a motherboard type. Depending on whether your Windows computer has a UEFI- or a BIOS-type motherboard, your choice will vary:
- UEFI — Click UEFI Boot Mode, then click Continue.
- BIOS — Click Legacy Boot Mode, then click Continue.
-
9
Select a graphics card option if necessary, then click Continue. Check the box next to Inject [card name] for your preferred graphics card settings.
- If your graphics card supports macOS High Sierra by default, skip this step.
-
10
Click Continue. It’s in the bottom-right corner of the page. Doing so will prompt you to enter your Mac’s password.
-
11
Enter your Mac’s password. Type in the password you use to log into your Mac.
-
12
Click OK. This will prompt Unibeast to begin installing to the USB drive. Once the installation process is complete, your USB drive will be ready to install macOS High Sierra on your PC. While the Unibeast installation finishes up, you should change your Windows computer’s boot order.


Advertisement
-
1
Unplug any USB items from your Windows computer. Make sure that you don’t have any USB drives, in particular.
-
2
Enter your computer’s BIOS or UEFI settings page. This process varies from computer to computer, but you will typically restart your computer and then repeatedly press a key (e.g., Del) immediately as the computer begins to start up.
-
3
Locate the «Boot Order» section. This section is normally on the main page of the BIOS, though you may need to use the arrow keys to navigate over to the «Boot» or «Advanced» tab.
- The «Boot Order» section varies from BIOS to BIOS. If you can’t find your BIOS’ «Boot Order» page, consult your motherboard’s manual or look up your computer model online to find direct instruction for your specific BIOS page.
-
4
Select Removable Devices. Use the arrow keys to move the blinking bar down to Removable Devices.
- On some pages, this section may instead be called USB Devices or something similar (e.g., Peripherals).
-
5
Move your selected location to the top of the list. Typically, you’ll press the + key with the boot location you want to use selected until it’s at the top of the «Boot Order» list.
- You can double-check the key that you’re supposed to use in the legend that’s usually on the right side or the bottom of the BIOS page.
-
6
Save your settings and exit the BIOS. Look for the key you’re supposed to press to save and exit in the legend on the right side of the page, then press it. Doing so will shift your Windows computer’s boot priority so that installation USB drive will be selected as the boot point once you plug it in.
- You may have to press another key to confirm this choice.


Advertisement
-
1
Place Multibeast on the USB drive. Open the USB drive’s folder, then drag the Multibeast file into the folder. You’ll need to use Multibeast later, so having it on the flash drive will make using it when necessary as simple as possible.
-
2
Eject the Unibeast USB drive from the Mac. Open the Finder, then click the ⏏ Eject icon to the right of the USB drive’s name in the upper-left corner of the Finder window. After doing so, you can remove your USB drive.
- You should make sure that the Unibeast installation is complete before doing this.
-
3
Shut down your Windows computer. Press and hold the Power button on your Windows computer until your computer shuts down completely. This will usually occur one or two seconds after the computer’s display turns off.
-
4
Plug both the Unibeast USB drive and the blank hard drive into your computer. These should both fit into USB ports on your computer.
-
5
Start your Windows computer. Press the Power button to start the computer. Once the computer has a chance to begin booting, it should select your plugged-in USB drive as a place from which to boot.
-
6
Select your USB drive when prompted, then press ↵ Enter. This will begin the macOS installation process.
-
7
Select a language, then click →. Doing so takes you to the next page of the installer.
-
8
Click Continue twice. It’s in the bottom-right corner of the pages.
-
9
Click Agree when prompted. You’ll see this at the top of the screen.
-
10
Click the Utilities menu item. This menu item is in the top-left side of the screen. A drop-down menu will appear.[3]
-
11
Click Disk Utility. It’s in the drop-down menu.
-
12
Select the blank hard drive. Click the blank hard drive’s name on the left side of the page.
-
13
Click the Erase tab. It’s near the top of the page.
-
14
Format the blank hard drive. Change the following fields:
- Format — Click the drop-down box, then click Mac OS X Extended (Journaled)
- Scheme — Click the drop-down box, then click GUID Partition Map
-
15
Click Erase. Doing so will reformat your blank hard drive for macOS’ file system.
-
16
Click Done when prompted, then close the Disk Utility window. You can now proceed with installing macOS High Sierra on the hard drive.
-
17
Click the blank hard drive’s name, then click Continue. This will both select the hard drive as the installation point and begin installing macOS High Sierra.
-
18
Wait for macOS High Sierra to finish installing. This process should take around 15 minutes.
-
19
Follow the on-screen prompts. You’ll be prompted to enter specific information, such as your name, a password, your preferred language, your location, and so on. Once you complete this setup process, macOS’ software will be completely set up on your Windows computer.


Advertisement
-
1
Open your flash drive. Open
Finder, then click the name of the flash drive from which you installed macOS High Sierra. This will open the flash drive’s window in Finder.
-
2
Double-click the Multibeast file. Doing so will open the Multibeast window.
-
3
Click the Bootloaders tab. It’s at the top of the window.
-
4
Select the proper bootloader. Check the «Clover UEFI Boot Mode» box if you selected the UEFI boot mode for your motherboard during the Unibeast tool creation, or check the «Clover Legacy Boot Mode» box if you used legacy boot mode.
-
5
Click the Drivers tab. You’ll find this option at the top of the window.
-
6
Click Audio. It’s on the left side of the window.
-
7
Select audio drivers. Click the current audio item’s heading in the middle of the window to expand it, then check the box next to your computer’s audio provider’s name.
-
8
Click Misc. This option is on the left side of the window.
-
9
Check the «FakeSMC» box. You’ll find it near the top of the window.
-
10
Click Network. It’s on the left side of the window.
-
11
Select an Internet driver. Click the name of your Internet card, then check the box next to the driver’s name.
-
12
Click the Customize tab. It’s at the top of the window.
-
13
Select the proper graphics options. Check the box next to your computer’s graphics card name, then check the «Fixup» box for your graphics card’s manufacturer.
- For example, to install drivers for a NVIDIA card, you would check both the «NVIDIA Web Drivers Boot Flag» box and the «NVIDIA Graphics Fixup» box.
- Leave the «Inject» options blank.
-
14
Click System Definitions. It’s on the left side of the window.
-
15
Select a Mac which most closely resembles your computer. Click the heading of the type of Mac (e.g., iMac) which resembles your computer, then check the box next to the type of Mac which uses your computer’s graphics card settings.
-
16
Click the Build tab. It’s at the top of the window.
-
17
Select a drive. Click the «Select Install Drive» box on the right side of the window, then click your macOS drive’s name in the resulting drop-down menu.
-
18
Install the drivers. Once you complete this process, you should be able to use your macOS PC with minimal trouble:
- Click Install in the bottom-right corner.
- Click Agree when prompted.
- Enter your Mac’s password when prompted.
- Click Install Helper


Advertisement
Add New Question
-
Question
Will this work on AMD systems?

No, it won’t, unfortunately.
-
Question
Why do high system requirement applications like Android Studio, After Effects, Photoshop, etc., run so smoothly on a Mac but are quite slow in Windows?
This is very much dependent on the hardware you are using. It may be that the Windows PC you are using has lower specs or has other software which is slowing it down.
-
Question
Can I use other virtual programs like VirtualBox or VMWare to use Mac OS?
You can; VMware will be the best for using it because it provides for functions and runs smoothly on Windows. You should allocate 4 GB RAM for Mac OS.
See more answers
Ask a Question
200 characters left
Include your email address to get a message when this question is answered.
Submit
Advertisement
-
If you enjoy macOS on your Windows computer, consider purchasing a Mac to stay Apple-compliant.
-
Windows computers with macOS installed on them are called «Hackintoshes».
-
macOS doesn’t have the proper drivers to run utilities like Wi-Fi or sound on your Windows computer, which is why you’ll need to use Multibeast.
Show More Tips
Thanks for submitting a tip for review!
Advertisement
-
Only do this if your computer has sufficient amount of RAM installed.
-
Installing macOS on a Windows computer violates the Apple End User License Agreement.
Advertisement
References
About This Article
Article SummaryX
Installing macOS on a Windows computer is tricky, but not impossible. You’ll need to download the macOS High Sierra installation file on a Mac and then transfer the installer over to Windows by using a macOS-formatted USB drive running a program called Unibeast; after this point, you can use the USB drive to install macOS over onto a blank hard drive that you’ve also formatted for macOS. Once you’ve installed macOS, it’s a good idea to run Multibeast from the flash drive in order to install drivers needed for things like sound, Internet, and graphics cards.
Did this summary help you?
Thanks to all authors for creating a page that has been read 1,781,454 times.
Is this article up to date?
![]()
Download Article
![]()
Download Article
This wikiHow teaches you how to run macOS High Sierra on your Windows computer. To do this, you will need to download Niresh Catalina. You will also need Transmac or a Mac along with a supported Windows computer and a blank hard drive.
-
1
Check your computer’s specifications. Your Windows computer must have an Intel Core i3, i5, i7 or i9 processor in order to run macOS Catalina, as well as a minimum of four gigabytes of RAM. To check these specs:
- Open Start
.
- Type in system information.
- Click System Information at the top of the menu.
- Look at the name of the processor to the right of the «Processor» heading.
- Scroll down and look at the number to the right of the «Installed Physical Memory» heading.
- Open Start
-
2
Check your computer’s BIOS type. Next to the «BIOS Mode» heading in the System Information menu, check to see whether it says «UEFI» or «BIOS». Keep this information in mind for later.
- You can exit System Information after this point.
Advertisement
-
3
Determine your computer’s bit type. There are two types of computer: 32-bit, and 64-bit. Your computer must be able to support 64-bit operation in order to install macOS.
-
4
Make sure you have access to a recent model of Mac. The Mac in question must be able to download macOS Catalina.
- If your Mac can’t run macOS Catalina, try finding another one.
-
5
Gather the required equipment. In order to install macOS High Sierra on your Windows computer, you will need the following hardware:[1]
- USB drive — Find a flash drive that can hold at least 16 gigabytes.
- Blank hard drive — Find a USB external hard drive that holds at least 100 gigabytes (this is where you’ll install your macOS stuff, so the bigger, the better).
- USB-C adapter — If you’re working with a Mac that doesn’t have traditional USB ports, you’ll need a USB-C-to-USB-3.0 adapter.
Advertisement
-
1
Go to the Hackintosh Zone download site. Go to https://www.hackintoshzone.com/. Make sure you sign in with you account by clicking.
-
2
Click Log in or Register. It’s in the upper-right side of the page. A menu will appear at the top of the page.
-
3
Enter your email address. Do so in the «Email address» field. Make sure this is an email address that you can easily access—you’ll need to log in and verify the email address later.
-
4
Check the «No, create an account now» box. It’s near the bottom of the menu.
-
5
Click Sign up. Doing so takes you to the Create an Account page.
-
6
Enter the required information. Fill out the following fields:
- Name — Enter the name you want to use for your account.
- Password — Enter a password you’d like to use for the login.
- Confirm Password — Repeat the password you entered above.
- Date of Birth — Select the month, day, and year of your birth.
- Location — Type in your country’s name.
-
7
Check the «I agree to the terms and rules» box. It’s near the bottom of the page.
-
8
Click Sign up. This button is at the bottom of the page. Doing so creates your account and sends a confirmation email to your provided email address.
-
9
Go to your email inbox. Go to the email address that you selected for your account. You may have to log in with your email address and the email account’s password to open the inbox.
-
10
Open the confirmation email. Click the email from «tonymacx86.com» to open it.
-
11
Click the confirmation link. Click the link below the «Confirm Account» text in the middle of the email. This will take you back to the Unibeast download site.
-
12
Double-click the Downloads tab. It’s on the right side of the row of tabs that’s near the top of the page. The Downloads page should open.
- If you just see a drop-down menu appear, click the Downloads tab once more.
-
13
Click Hackintosh then download Hackintosh Catalina.
- For example, the current release of
-
14
Click Download Now. It’s in the top-right corner of the page. Doing so will download Unibeast onto your Mac.
-
15
Download Multibeast. This program, which is hosted on the same site as Unibeast, will allow you to install drivers so that you can use things like your PC’s speakers, the Internet, and so on:
- Double-click the Downloads tab again.
- Click Multibeast — High Sierra 10.2.0
- Click Download Now in the upper-right corner of the page.
Advertisement
-
1
Open your Mac’s
App Store. Click the App Store app icon, which is blue with a white «A» on it, in your Mac’s Dock.
-
2
Click the search bar. It’s in the upper-right side of the App Store window.
-
3
Search for High Sierra. Type high sierra into the search bar, then press ⏎ Return.
-
4
Click Download. It’s to the right of the High Sierra icon. Doing so will prompt the installer to begin downloading onto your Mac.
-
5
Wait for the installer window to open. Once it does, you’ll need to close it immediately.[2]
-
6
Press ⌘ Command+Q when the window opens. This will close the installer window.
-
7
Open
Finder. Click the blue face-like icon in your Mac’s Dock.
-
8
Click the Applications folder. It’s on the left side of the Finder window.
-
9
Make sure that the installer is there. The installer will be called «Install macOS High Sierra» or something similar and will have an image of a ridge of mountains on it. As long as the installer is present in the Applications folder, you can proceed.
- If the installer isn’t there, try downloading High Sierra again.
Advertisement
-
1
Plug your USB drive into your Mac. This is the 16-gigabyte minimum flash drive that you’ll use to install macOS High Sierra on your computer.
- If your Mac doesn’t have traditional USB ports on it, attach your USB-C to USB-3.0 adapter first.
-
2
Open Spotlight
. Click the magnifying glass icon in the top-right corner of the screen. A search bar will open.
-
3
Type disk utility into Spotlight. This will search your Mac for the Disk Utility app.
-
4
Click Disk Utility. It’s below the Spotlight search bar. Doing so will open Disk Utility.
-
5
Select your USB drive. Click the USB drive’s name in the upper-left side of the window.
-
6
Click the Erase tab. It’s near the top of the window. A pop-up box will appear.
-
7
Click the «Format» drop-down box. You’ll find this in the middle of the pop-up box. Clicking it prompts a drop-down menu.
-
8
Click OS X Extended (Journaled). This will set your USB drive’s file system to that of your Mac.
-
9
Click the «Scheme» drop-down box. It’s below the «Format» drop-down box.
-
10
Click GUID Partition Map. This option is in the «Format» drop-down menu.
-
11
Click Erase. Doing so will reformat your USB drive to your Mac’s file system.
-
12
Click Done when prompted. You can now proceed with creating your installation drive.
Advertisement
-
1
Open the Unibeast folder. Double-click the Unibeast folder to unzip and open it.
-
2
Open Unibeast. Double-click the Unibeast PKG file to open it.
-
3
Click Open when prompted. Doing so will open the Unibeast setup window.
- If your Mac is currently running macOS Sierra or higher, you’ll have to verify the Unibeast installation before continuing.
-
4
Click Continue four times. It’s in the bottom-right corner of the first four pages of the Unibeast setup window.
-
5
Click Agree when prompted. It’s at the top of the window.
-
6
Select your USB drive, then click Continue. Click the USB drive’s name to select it.
-
7
Select High Sierra, then click Continue. You should see High Sierra in the middle of the page.
-
8
Select a motherboard type. Depending on whether your Windows computer has a UEFI- or a BIOS-type motherboard, your choice will vary:
- UEFI — Click UEFI Boot Mode, then click Continue.
- BIOS — Click Legacy Boot Mode, then click Continue.
-
9
Select a graphics card option if necessary, then click Continue. Check the box next to Inject [card name] for your preferred graphics card settings.
- If your graphics card supports macOS High Sierra by default, skip this step.
-
10
Click Continue. It’s in the bottom-right corner of the page. Doing so will prompt you to enter your Mac’s password.
-
11
Enter your Mac’s password. Type in the password you use to log into your Mac.
-
12
Click OK. This will prompt Unibeast to begin installing to the USB drive. Once the installation process is complete, your USB drive will be ready to install macOS High Sierra on your PC. While the Unibeast installation finishes up, you should change your Windows computer’s boot order.
Advertisement
-
1
Unplug any USB items from your Windows computer. Make sure that you don’t have any USB drives, in particular.
-
2
Enter your computer’s BIOS or UEFI settings page. This process varies from computer to computer, but you will typically restart your computer and then repeatedly press a key (e.g., Del) immediately as the computer begins to start up.
-
3
Locate the «Boot Order» section. This section is normally on the main page of the BIOS, though you may need to use the arrow keys to navigate over to the «Boot» or «Advanced» tab.
- The «Boot Order» section varies from BIOS to BIOS. If you can’t find your BIOS’ «Boot Order» page, consult your motherboard’s manual or look up your computer model online to find direct instruction for your specific BIOS page.
-
4
Select Removable Devices. Use the arrow keys to move the blinking bar down to Removable Devices.
- On some pages, this section may instead be called USB Devices or something similar (e.g., Peripherals).
-
5
Move your selected location to the top of the list. Typically, you’ll press the + key with the boot location you want to use selected until it’s at the top of the «Boot Order» list.
- You can double-check the key that you’re supposed to use in the legend that’s usually on the right side or the bottom of the BIOS page.
-
6
Save your settings and exit the BIOS. Look for the key you’re supposed to press to save and exit in the legend on the right side of the page, then press it. Doing so will shift your Windows computer’s boot priority so that installation USB drive will be selected as the boot point once you plug it in.
- You may have to press another key to confirm this choice.
Advertisement
-
1
Place Multibeast on the USB drive. Open the USB drive’s folder, then drag the Multibeast file into the folder. You’ll need to use Multibeast later, so having it on the flash drive will make using it when necessary as simple as possible.
-
2
Eject the Unibeast USB drive from the Mac. Open the Finder, then click the ⏏ Eject icon to the right of the USB drive’s name in the upper-left corner of the Finder window. After doing so, you can remove your USB drive.
- You should make sure that the Unibeast installation is complete before doing this.
-
3
Shut down your Windows computer. Press and hold the Power button on your Windows computer until your computer shuts down completely. This will usually occur one or two seconds after the computer’s display turns off.
-
4
Plug both the Unibeast USB drive and the blank hard drive into your computer. These should both fit into USB ports on your computer.
-
5
Start your Windows computer. Press the Power button to start the computer. Once the computer has a chance to begin booting, it should select your plugged-in USB drive as a place from which to boot.
-
6
Select your USB drive when prompted, then press ↵ Enter. This will begin the macOS installation process.
-
7
Select a language, then click →. Doing so takes you to the next page of the installer.
-
8
Click Continue twice. It’s in the bottom-right corner of the pages.
-
9
Click Agree when prompted. You’ll see this at the top of the screen.
-
10
Click the Utilities menu item. This menu item is in the top-left side of the screen. A drop-down menu will appear.[3]
-
11
Click Disk Utility. It’s in the drop-down menu.
-
12
Select the blank hard drive. Click the blank hard drive’s name on the left side of the page.
-
13
Click the Erase tab. It’s near the top of the page.
-
14
Format the blank hard drive. Change the following fields:
- Format — Click the drop-down box, then click Mac OS X Extended (Journaled)
- Scheme — Click the drop-down box, then click GUID Partition Map
-
15
Click Erase. Doing so will reformat your blank hard drive for macOS’ file system.
-
16
Click Done when prompted, then close the Disk Utility window. You can now proceed with installing macOS High Sierra on the hard drive.
-
17
Click the blank hard drive’s name, then click Continue. This will both select the hard drive as the installation point and begin installing macOS High Sierra.
-
18
Wait for macOS High Sierra to finish installing. This process should take around 15 minutes.
-
19
Follow the on-screen prompts. You’ll be prompted to enter specific information, such as your name, a password, your preferred language, your location, and so on. Once you complete this setup process, macOS’ software will be completely set up on your Windows computer.
Advertisement
-
1
Open your flash drive. Open
Finder, then click the name of the flash drive from which you installed macOS High Sierra. This will open the flash drive’s window in Finder.
-
2
Double-click the Multibeast file. Doing so will open the Multibeast window.
-
3
Click the Bootloaders tab. It’s at the top of the window.
-
4
Select the proper bootloader. Check the «Clover UEFI Boot Mode» box if you selected the UEFI boot mode for your motherboard during the Unibeast tool creation, or check the «Clover Legacy Boot Mode» box if you used legacy boot mode.
-
5
Click the Drivers tab. You’ll find this option at the top of the window.
-
6
Click Audio. It’s on the left side of the window.
-
7
Select audio drivers. Click the current audio item’s heading in the middle of the window to expand it, then check the box next to your computer’s audio provider’s name.
-
8
Click Misc. This option is on the left side of the window.
-
9
Check the «FakeSMC» box. You’ll find it near the top of the window.
-
10
Click Network. It’s on the left side of the window.
-
11
Select an Internet driver. Click the name of your Internet card, then check the box next to the driver’s name.
-
12
Click the Customize tab. It’s at the top of the window.
-
13
Select the proper graphics options. Check the box next to your computer’s graphics card name, then check the «Fixup» box for your graphics card’s manufacturer.
- For example, to install drivers for a NVIDIA card, you would check both the «NVIDIA Web Drivers Boot Flag» box and the «NVIDIA Graphics Fixup» box.
- Leave the «Inject» options blank.
-
14
Click System Definitions. It’s on the left side of the window.
-
15
Select a Mac which most closely resembles your computer. Click the heading of the type of Mac (e.g., iMac) which resembles your computer, then check the box next to the type of Mac which uses your computer’s graphics card settings.
-
16
Click the Build tab. It’s at the top of the window.
-
17
Select a drive. Click the «Select Install Drive» box on the right side of the window, then click your macOS drive’s name in the resulting drop-down menu.
-
18
Install the drivers. Once you complete this process, you should be able to use your macOS PC with minimal trouble:
- Click Install in the bottom-right corner.
- Click Agree when prompted.
- Enter your Mac’s password when prompted.
- Click Install Helper
Advertisement
Add New Question
-
Question
Will this work on AMD systems?
No, it won’t, unfortunately.
-
Question
Why do high system requirement applications like Android Studio, After Effects, Photoshop, etc., run so smoothly on a Mac but are quite slow in Windows?
This is very much dependent on the hardware you are using. It may be that the Windows PC you are using has lower specs or has other software which is slowing it down.
-
Question
Can I use other virtual programs like VirtualBox or VMWare to use Mac OS?
You can; VMware will be the best for using it because it provides for functions and runs smoothly on Windows. You should allocate 4 GB RAM for Mac OS.
See more answers
Ask a Question
200 characters left
Include your email address to get a message when this question is answered.
Submit
Advertisement
-
If you enjoy macOS on your Windows computer, consider purchasing a Mac to stay Apple-compliant.
-
Windows computers with macOS installed on them are called «Hackintoshes».
-
macOS doesn’t have the proper drivers to run utilities like Wi-Fi or sound on your Windows computer, which is why you’ll need to use Multibeast.
Show More Tips
Thanks for submitting a tip for review!
Advertisement
-
Only do this if your computer has sufficient amount of RAM installed.
-
Installing macOS on a Windows computer violates the Apple End User License Agreement.
Advertisement
References
About This Article
Article SummaryX
Installing macOS on a Windows computer is tricky, but not impossible. You’ll need to download the macOS High Sierra installation file on a Mac and then transfer the installer over to Windows by using a macOS-formatted USB drive running a program called Unibeast; after this point, you can use the USB drive to install macOS over onto a blank hard drive that you’ve also formatted for macOS. Once you’ve installed macOS, it’s a good idea to run Multibeast from the flash drive in order to install drivers needed for things like sound, Internet, and graphics cards.
Did this summary help you?
Thanks to all authors for creating a page that has been read 1,781,454 times.
Is this article up to date?
Содержание
- Руководство по созданию на компьютерах с Windows загрузочной флешки macOS (OS X) для установки macOS на PC (хакинтош)
- Что понадобится для создания загрузочной USB-флешки с macOS Sierra из-под Windows 10?
- Как создать загрузочную USB флешку с macOS Sierra на Windows для установки хакинтош?
- Редактирование файла Config.plist
- Создание загрузочной флешки macOS c помощью Boot Disk Utility
- Как в Windows 10 создать загрузочную флешку с MacOS
- 4 комментария
- Как создать загрузочную флешку macOS из Windows
- Как создать загрузочную флешку в Windows
- Как запустить Mac с флешки
- Артём Суровцев
- Коротко о гибком смартфоне Huawei Mate X
- Лучшие гаджеты и аксессуары за прошедшие 10 лет
- Полный обзор Windows 11. Надо ли устанавливать сейчас или лучше ждать
- Как в iOS 15 общаться по FaceTime с пользователями Android или Windows
- Как скачать и установить Windows 11 уже сейчас. Инструкция
- Пользователи жалуются на обновленный iTunes для Windows. Он не запускается, если язык системы не английский
- Как убрать адреса DNS Google и Cloudflare из настроек подключения интернета на компьютере, смартфоне и роутере
- Обзор Marshall Mode II. Первые внутриканальные наушники от культового музыкального бренда не подвели
- Как настроить в iOS 15 код проверки для двухфакторной аутентификации на сайтах
- 3 функции режима Не беспокоить в iOS, которые делают его полезнее. Например, отключение по геопозиции
- 🙈 Комментарии 13
- Загрузочная флешка macOS High Sierra. 2 простых способа создания
- Совместимые модели
- Подготовительные действия
- Где скачать macOS High Sierra?
- Как сделать загрузочную флешку macOS High Sierra?
- Способ 1 (штатный). С помощью Терминала
- Способ 2. С помощью утилиты DiskMaker X
- Установка macOS High Sierra с флешки
- Порядок установки macOS High Sierra на устройство:
- Как создать загрузочную флешку macOS из Windows
- Как создать загрузочную флешку с Mac OS
- Загрузка macOS
- Совместимость с macOS Mojave
- Подготовка USB-накопителя
- Как создать загрузочную флешку в «Терминале»
- С помощью DiskMaker X
- Создание загрузочной флешки OS X с помощью Install Disk Creator
- Создание загрузочной флешки OS X с помощью Дисковой утилиты на Yosemite и ниже
- Способ 1: UltraISO
- Способ 2: BootDiskUtility
- Способ 3: TransMac
- Как запустить Mac с флешки
Руководство по созданию на компьютерах с Windows загрузочной флешки macOS (OS X) для установки macOS на PC (хакинтош)

В этой подробной инструкции мы расскажем вам как создать загрузочную USB-флешку с macOS Sierra (10.12) на компьютере с Windows 10. Данная процедура понадобится для создания хакинтоша (установка macOS на PC). Аналогичным образом Вы сможете создать загрузочную флешку с более ранними версиями OS X на компьютере с Windows 10, 8 и ниже. Если вам нужно создать загрузочную флешку с macOS для iMac, MacBook или других компьютеров Apple, то прочитать об этом Вы можете в нашей статье тут.
Обычно, для создания загрузочных флешек на баз macOS используется утилита UniBeast, но главная проблема заключается в том, что она доступна только для компьютеров Mac. Наш же способ подразумевает, что вы PC-пользователь и ни Mac, ни MacBook, и далее по списку, в вашем распоряжении нет.
Что понадобится для создания загрузочной USB-флешки с macOS Sierra из-под Windows 10?
Для начала, убедитесь в том, что у вас есть всё необходимое:
Как создать загрузочную USB флешку с macOS Sierra на Windows для установки хакинтош?
Шаг 1 Разархивируйте скачанный образ macOS Sierra при помощи любой общеизвестной утилиты вроде 7-Zip, Winrar и подобных

Шаг 2 Установите утилиту Win32 Disk Imager (жмите Next, I accept the agreement, Next, Next, Next, Next, Install)
Шаг 3 Подключите к PC флешку которую Вы будете использовать в качестве загрузочной
Внимание! Все данные на подключенном USB-накопителе будут стёрты! Обязательно сделайте резервную копию всей важной информации с подключенной флешки!
Шаг 5 В запущенной программе Win32 Disk Imager укажите путь к скачанному образу macOS Sierra (поле «Image File»). Обратите внимание на то, что в окне с проводником в правом нижнем углу в качестве используемого формата данных будут указаны образы IMG, а наш загруженный образ macOS Sierra в формате RAW. Для того чтобы его найти, необходимо в окне проводника выбрать тип файла «.» и тогда у вас будут отображаться все файлы
Шаг 6 Укажите путь к подключенному USB-накопителю (поле «Device»)
Шаг 7 Нажмите кнопку Write и подтвердите намерения нажатием Yes в диалоговом окне (сотрутся все данные на флешке) для начала записи образа на USB-флешку и дождитесь окончания процесса (в среднем, процедура занимает около 10-15 минут)
Шаг 8 После успешного окончания процедуры записи образа, Вы получите соответствующее уведомление «Write Successful». Нажмите кнопку ОК и закройте окно программы
Редактирование файла Config.plist
После успешного создания загрузочной флешки останется заменить конфигурационный файл «Config.plist» на тот, который соответствует вашему графическому процессору.
Шаг 1 Разархивируйте скачанный файл «Config package»
Шаг 2 Перейдите в папку «Desktops» или «Notebooks» в зависимости от того, на настольный компьютер или ноутбук Вы собираетесь ставить хакинтош
Шаг 3 Отыщите «Config.plist» для своего графического процессора на базе Intel, AMD или NVIDIA. Обратите внимание на то, что если Вы не найдёте точную версию своей видеокарты, то можете спокойно выбирать ближайшую
Например, на нашем ноутбуке Acer Aspire 7745G стоит мобильная видеокарта ATI Mobility Radeon HD5850. Прохожу в папку «Notebooks» и копирую файл «Config.plist» из папки «HD5500». Если вас терзают сомнения, то можете отыскать этот файл в сети.
Шаг 4 Откройте созданный загрузочный USB-накопитель и перейдите в папку EVI → CLOVER
Шаг 5 Замените лежащий в корне файл «Config.plist» на тот, который Вы отыскали в «Config package» («Заменить файл в папке назначения»)
Готово! Теперь Вы можете приступать к установке macOS на компьютер или на ноутбук под управлением ОС Windows.
Обратите внимание на то, что размер отформатированной под загрузочную macOS Sierra флешки стал равен всего 200 МБ. Беспокоится не стоит. Необходимый раздел с образом попросту скрыт (его размер составляет чуть больше 6 ГБ)
Для того чтобы вернуть флешку к исходному виду необходимо воспользоваться сторонними программами вроде Acronis Disk Direct Suite.
Создание загрузочной флешки macOS c помощью Boot Disk Utility
Понравилась статья? Поделитесь ею со своими друзьями, а также подписывайтесь на наши страницы в соц.сетях: Facebook, Google+, Twitter и Вконтакте
Источник
Как в Windows 10 создать загрузочную флешку с MacOS

TransMac платная, но у нее есть 15-дневный пробный период, в течение которого программой можно пользоваться без функциональных ограничений.
Скачайте программу с сайта www.acutesystems.com/scrtm.htm, установите и запустите с правами администратора.
Справа на панели вы увидите список ваших дисков, кликните по подключенной к ПК флешке и выберите в меню «Format Disk for Mac».


Подтвердите действие в диалоговом окошке, присвойте флешке произвольное название.

И нажмите «Yes».


После очередного подтверждения операции,

дождитесь завершения записи образа на флешку.

Если вдруг на этапе форматировании флешки в TransMac возникнут проблемы, раздел GPT на накопителе придется создать вручную.
Последовательность выполнения команд приведена на скриншотах ниже, будьте внимательны при определении номера физического диска командой list disk.


Разметив таким образом флешку, перейдите в TransMac и начните с шага с использованием опции «Restore with Disk Image».


4 комментария
разные ос скачал но не один не видить флешка
Источник
Как создать загрузочную флешку macOS из Windows

Когда компьютер Mac внезапно перестал запускаться, а резервной копии macOS под рукой нет, поможет чистая переустановка системы.
Если рядом есть другой Mac, то проблем с созданием загрузочной флешки не возникнет. Сейчас расскажем, как выкрутиться из ситуации с Windows-ПК.
Как создать загрузочную флешку в Windows
1. Для создания флешки скачиваем приложение TransMac.
Утилита распространяете на сайте разработчика по цене $59. К счастью, есть бесплатный 15-дневный триал.
2. Теперь потребуется найти образ для установки macOS.
Официального способа скачать операционную систему из Windows нет. Придется либо искать друга с компьютером Mac, либо пользоваться известными всем сайтами.
Обратите внимание, что для работы утилиты TransMac нужен образ macOS в формате *.dmg
Если удастся найти друга с яблочным компьютером и скачать macOS из Mac App Store, будет проще у него же и сделать нагрузочную флешку по инструкции.

3. Когда образ скачан, а утилита установлена, запускаем TransMac от имени Администратора и соглашаемся на триальный период использования программы.
4. Подключаем к компьютеру флешку (понадобится накопитель емкостью 8ГБ и более)

5. В боковом меню находим подключенный накопитель и через контекстное меню форматируем командой Format Disk for Mac.
Внимание! Данный процесс является необратимым, все данные с флешки будут удалены.
6. После окончания форматирования снова вызываем контекстное меню диска и выбираем пункт Restore with Disk Image.

7. В открывшемся окне проводника указываем скачанный образ для установки macOS.
8. Подтверждаем запись образа на флешку и ждем 20-30 минут, пока процесс не завершится.
Все! Флешка для установки macOS готова.
Как запустить Mac с флешки

Подключаем наш накопитель к компьютеру Mac и включаем его с зажатой клавишей Alt (Option).
Обратите внимание, что для загрузки со внешних накопителей на Mac с чипом T2 нужно произвести некоторые манипуляции.
В меню выбора диска указываем флешку и производим установку macOS.
Следуйте подсказкам мастера установки и через несколько минут получите работоспособный Mac.
![]()
Артём Суровцев
Люблю технологии и все, что с ними связано. Верю, что величайшие открытия человечества еще впереди!
Коротко о гибком смартфоне Huawei Mate X
Лучшие гаджеты и аксессуары за прошедшие 10 лет
Полный обзор Windows 11. Надо ли устанавливать сейчас или лучше ждать

Как в iOS 15 общаться по FaceTime с пользователями Android или Windows

Как скачать и установить Windows 11 уже сейчас. Инструкция

Пользователи жалуются на обновленный iTunes для Windows. Он не запускается, если язык системы не английский

Как убрать адреса DNS Google и Cloudflare из настроек подключения интернета на компьютере, смартфоне и роутере
Обзор Marshall Mode II. Первые внутриканальные наушники от культового музыкального бренда не подвели

Как настроить в iOS 15 код проверки для двухфакторной аутентификации на сайтах

3 функции режима Не беспокоить в iOS, которые делают его полезнее. Например, отключение по геопозиции
🙈 Комментарии 13
Как наоборот сделать загрузочную флешку Windows 7 из-под Mac OS?
Shift-Option-⌘-R
Переустановка версии macOS, входившей в комплект поставки компьютера Mac, или ближайшей к ней версии из доступных.
Option+Command+R
Установит самую свежую доступную версию ОС.
Все работает от Интернет и флэшку делать не нужно!
![]()
![]()
Накой? Ненужны уже сто лет флешки, есть интернет – комп через него сам и восстановится.
Это настолько устаревший способ, что в интернете в каждом форуме про использование TransMac масса комментариев, что он уже НЕ РАБОТАЕТ. Из личного опыта могу сказать, что работающую загрузочную флешку с TransMac вы можете создать только с Lion. С более новыми OS этого не получится. С сайта Apple вы сможете скачать системы только начиная с EL Capitan. Системы выше High Sierra уже не скачивается в виде dmg образа. Если не прав, то поправьте.
Источник
Загрузочная флешка macOS High Sierra. 2 простых способа создания
Не изменяя своим традициям, Apple представила ежегодное осеннее обновление операционной системы. Очередной релиз получил название macOS High Sierra и представляет собой улучшенную предыдущую ОС, без каких-либо глобальных изменений.
Совместимые модели
Опробовать все прелести новой «операциоки» смогут владельцы следующих моделей mac:
Однако специалисты уже отметили, что обновлённая версия ОС содержит в себе приличное количество дополнений и новых функций. Многие из них незаметны для неискушенного пользователя, но тем не менее влияют на уровень функциональности устройства. Отдельного внимания заслуживают обновления, касающиеся изменения файловой системы (APFS). Многие пользователи Apple установили обновление macOS High Sierra после полного удаления предыдущей ОС, а не просто выполнили её бновление. Полный «снос» и установка операционной системы «с нуля» дает ряд преимуществ перед обычным обновлением. Во-первых, вы избавляетесь от системного мусора, который при обновлении ни куда не девается. Во-вторых, имея загрузочную флешку, вы можете обновить все свои устройства, скачав дистрибутив единожды.
Подготовительные действия
Как всегда рассмотрим два самых простых и при этом надежных способа создания загрузочной флешки macOS High Sierra. Что нам понадобится:
Где скачать macOS High Sierra?
Обновлённую ОС нужно скачивать, используя возможности App Store. Удобно, быстро и безопасно. Найти её не составляет труда. Не стоит скачивать ОС со сторонних сайтов. Подобные действия могут отрицательным образом сказаться на общем уровне безопасности. На странице официального магазина Apple нужно кликнуть по странице, открывающей описание новой версии ОС. Далее нажать на кнопку «загрузить» и дождаться окончания загрузки дистрибутива. 
После этого можно переходить к созданию загрузочной флешки для установки на устройство. Загрузочная флешка macOS High Sierra создаётся в несколько этапов. Важно соблюдать последовательность действий. После скачивания образа нужно удостовериться, что он размещается в каталоге /Applications. В данную директорию по умолчанию закачиваются из App Store все файлы. Не стоит менять имя скаченного файла.
Как сделать загрузочную флешку macOS High Sierra?
Способ 1 (штатный). С помощью Терминала
Справедливости ради скажу, что можно сразу скопировать весь текст команды и вставить его в Терминал, но, как правило, данный вариант очень часто сопровождается ошибками синтаксиса либо какими-то другими багами. Так, что лучше несколько минут дольше, но зато наверняка. А если кому-то все же лень танцевать с бубном, то пожалуйста, вот текст команды:
Способ 2. С помощью утилиты DiskMaker X
Установка macOS High Sierra с флешки
Итак, теперь, когда флешка создана (неважно каким способом), то можно приступать к установке её на устройство. Процесс не занимает много свободного времени, но требует строго соблюдения указанной последовательности действий.
Способ подразумевает под собой «чистую» установку ОС с полным удалением информации на жёстком диске. Поэтому заранее нужно позаботиться о заблаговременном создании резервной копии системы. В этом вопросе time machine вам в помощь.
Еще больше интересного и полезного в Telegram-канале @proyabloko
Порядок установки macOS High Sierra на устройство:
1.Флешка вставляется в выбранное устройство Mac. Выполняется его перезагрузка. При включении следует зажать клавишу alt. Если действия выполнены правильно, то появиться соответствующее окошко на мониторе устройства.
2.В открывшемся экране следует выбрать пункт Install macOS High Sierra. Далее открывается новое окошко, где выбирается дисковая утилита и выполняется удаление информации диска устройства (не флешки). Выбирается файловая система APFS.
3.Дисковая утилита закрывается. Нужно вернуться на первоначальную заставку и выбрать опцию по установке ОС. Нужно кликнуть кнопку «продолжить».
4.Принимаются условия по использованию обновлённой программы.
5.Выбирается диск на устройстве, где будет размещена новая версия операционной системы. Далее нужно нажать кнопку «продолжить».
6.Нужно дождаться установки ОС на устройство. Нельзя его выключать. В процессе установки устройство может несколько раз самопроизвольно перегружаться.
7.По окончанию установки появиться итоговый экран. Здесь будет предложено указать язык, выбрать язык клавиатуры, настройки подключения к сети, выполнить привязку к учётной записи. По окончании на мониторе появляется рабочий стол. Можно использовать устройство по назначению и изучить дополнения внесённые в обновлённую программу разработчиками.
Еще больше интересного и полезного в Telegram канале @proyabloko. Подписывайтесь, будет интересно!
Источник
Как создать загрузочную флешку macOS из Windows
Как создать загрузочную флешку с Mac OS
Перед тем, как создавать загрузочный носитель, необходимо скачать образ системы. В данном случае используется не ISO формат, а DMG. Правда, тот же УльтраИСО позволяет конвертировать файлы из одного формата в другой. Поэтому данной программой можно воспользоваться точно таким же образом, как это происходит при записи любой другой операционной системы на флешку. Но обо всем по порядку.
Загрузка macOS
Найдите соответствующую ссылку для загрузки в инструкциях по обновлению для каждой версии ОС macOS:
Установщики для каждой из этих версий macOS загружаются непосредственно в папку «Приложения» в виде приложения с именем «Установка macOS Catalina», «Установка macOS Mojave» или «Установка macOS High Sierra». Если установщик запускается сразу после загрузки, завершите его работу без продолжения установки. Важно! Чтобы получить подходящий установщик, выполняйте загрузку с компьютера Mac, на котором используется ОС macOS Sierra 10.12.5 или более поздней версии либо El Capitan 10.11.6. Корпоративным администраторам следует производить загрузку с сайта Apple, а не с сервера обновления ПО, размещенного в локальной сети.

Совместимость с macOS Mojave
На вашем Mac должно быть не менее 2 ГБ памяти и 12,5 ГБ свободного места на диске либо до 18,5 ГБ свободного места при обновлении из OS X Yosemite или более ранних версий.
macOS Mojave можно установить:
Подготовка USB-накопителя
Вам понадобится флешка емкостью не менее 16 гигабайт. Все нужные вам данные переместите с нее в надежное место, поскольку во время формирования загрузочного накопителя вся располагающаяся на нем информация будет потеряна.
Перед началом создания загрузочного накопителя рекомендую отформатировать его.
Подключите флешку к компьютеру. Откройте «Дисковую утилиту». Выберите вашу флешку из предлагаемого перечня. Нажмите экранную кнопку «Стереть», расположенную в верхней панели инструментов утилиты.
Следующим шагом определите имя накопителя — простое и запоминающееся слово, введенное латиницей. Оно вам вскоре понадобится. В перечне доступных форматов вам нужен «Mac OS Extended (журналируемый)». Схема: «Схема разделов GUID». Нажмите кнопку «Стереть» в диалоговом окне. Форматирование накопителя займет некоторое время.
Как создать загрузочную флешку в «Терминале»
Подключите USB-флешку к Mac и найдите её в Finder.
Выберите в контекстном меню «Переименовать» и задайте новое имя MyVolume.
Откройте «Терминал» через Spotlight или в папке «Программы» → «Утилиты».
Скопируйте и вставьте в окно «Терминала» команду в зависимости от устанавливаемой версии ОС.
sudo /Applications/Install macOS Catalina.app/Contents/Resources/createinstallmedia –volume /Volumes/MyVolume
sudo /Applications/Install macOS Mojave.app/Contents/Resources/createinstallmedia –volume /Volumes/MyVolume
sudo /Applications/Install macOS High Sierra.app/Contents/Resources/createinstallmedia –volume /Volumes/MyVolume
sudo /Applications/Install macOS Sierra.app/Contents/Resources/createinstallmedia –volume /Volumes/MyVolume –applicationpath /Applications/Install macOS Sierra.app
sudo /Applications/Install OS X El Capitan.app/Contents/Resources/createinstallmedia –volume /Volumes/MyVolume –applicationpath /Applications/Install OS X El Capitan.app
Введите пароль администратора.
Подтвердите форматирование флешки, вбив Y и нажав ввод. Будьте осторожны, все данные с неё удалятся.
Дождитесь окончания копирования и извлеките флешку.
С помощью DiskMaker X
Вставьте флешку в USB-разъем.
Загрузите программный инструмент с сайта разработчика.
DMG-образ программы откройте, а затем перетащите на значок каталога «Программы».
Для запуска утилиты применяйте Lauchpad или Spotlight. Для подтверждения применения установленного инструмента в появившемся окне вам понадобится нажать на экранную кнопку «Use this copy».
Кликаем на кнопку «An 8 GB USB thumb drive (ERASE ALL DISK)».
Выберите из перечня флешку, которую вы собираетесь сделать установочной, и подтвердите выбор нажатием кнопки «Choose this disk».
В следующем окне нажмите кнопку «Erase then create the disk». Этим действием вы даете свое согласие на полное удаление всей информации с накопителя и его форматирование. Если на нем остались важные файлы, перед этим шагом у вас еще есть возможность сохранить их в другом месте.
Нажмите одну из кнопок: «I’m more a light mood» (светлая) или «I want to come to the Dark side!» (темная). Таким образом вы определите предпочитаемую тему интерфейса.
Введите пароль администратора данного компьютера.
Создание загрузочного накопителя займет несколько минут. На экран будет выводиться информация о том, на сколько процентов задача выполнена.
Создание загрузочной флешки OS X с помощью Install Disk Creator
По сравнению с предыдущим способом, этот еще проще, так как все операции производятся в одном окне программы:
После чего остается немного подождать пока загрузочная флешка Mac OS X будет создана.
Создание загрузочной флешки OS X с помощью Дисковой утилиты на Yosemite и ниже
Этот способ является последним и самым трудоемким, так как здесь нужно проделать намного больше операций нежели в предыдущих. Плюс ко всему, этим методом нельзя воспользоваться во всех macOS – начиная с El Capitan и выше, это сделать уже невозможно, так как Apple урезала возможности программы Дисковая утилита.
Как и в 3-ем способе, нужно подготовить нашу USB флешку к копированию на нее операционной системы. Поэтому проделываем ее подготовку как описано выше. Далее идем в папку, где у нас находится установочный файл OS X и нажав правую клавишу мыши выбираем Показать содержимое пакета
Переходим в папку Contents → SharedSupport и монтируем файл InstallESD.dmg дважды кликнув на него
Теперь, чтобы продолжать дальше, нам нужно видеть скрытые файлы, для этого открываем Терминал и вводим команду
defaults write com.apple.finder AppleShowAllFiles true;killall Finder
Чтобы снова запретить показ скрытых файлов нужно вместо «true» указать «false»
Теперь мы видим скрытые файлы, открываем смонтированный нами диск InstallESD.dmg. Нам нужен файл BaseSystem.dmg, монтируем его кликнув два раза на нем мышей
Как только файлы скопируются, флешка будет смонтирована автоматически. Открываем ее в Finder и переходим в папку System → Installation, где нам нужно удалить псевдоним (ярлык) на папку Packages
После этого нам осталось только скопировать оригинальную папку Packages, которая находится на ранее смонтированном образе OS X Install ESD, в ту папку оттуда мы удалили одноименный псевдоним (ярлык). По окончанию копирования наша загрузочная флешка с Mac OS X готова!
Способ 1: UltraISO
Итак, чтобы записать на съемный носитель образ Mac OS, выполните ряд простых действий:
Если у Вас возникнут какие-либо трудности, возможно, Вам поможет более подробная инструкция по использованию Ультра ИСО. Если нет, пишите в комментариях, что у Вас не получается.
Способ 2: BootDiskUtility
Небольшая программа под названием BootDiskUtility была создана специально для того, чтобы записывать флешки под Mac OS. На них можно будет загружать не только полноценную операционную систему, а и программы для нее. Чтобы воспользоваться данной утилитой, сделайте следующее:
Способ 3: TransMac
Как видим, процесс создания достаточно простой. К сожалению, других способов выполнить поставленную задачу не существует, поэтому остается пользоваться вышеуказанными тремя программами.
Как запустить Mac с флешки
Подключаем наш накопитель к компьютеру Mac и включаем его с зажатой клавишей Alt (Option).
Обратите внимание, что для загрузки со внешних накопителей на Mac с чипом T2 нужно произвести некоторые манипуляции.
В меню выбора диска указываем флешку и производим установку macOS.
Следуйте подсказкам мастера установки и через несколько минут получите работоспособный Mac.
Источник
High Sierra 10.13.6 вышла еще в конце июля, а через недельку на подходе и Mojave, но обновить материал по установке MacOS на VirtualBox руки дошли только сейчас. Давайте установим и заодно более подробно разберем некоторые моменты, которые судя по комментариям к прошлой статье, вызывали затруднение.
Содержание статьи:
1. Что понадобится для установки MacOS на VirtualBox
- iso-образ MacOS High Sierra: забираем тут
- Последняя версия VirtualBox (в статье 5.2.18): берем с официального сайта
- Скрипты для упрощения процесса настройки виртуальной машины: скачать
2. Настраиваем VirtualBox для установки MacOS
Внимание! Более менее стабильно и прилично, на виртуалке, MacOS работает только с процессорами Intel. Успешных запусков на AMD (попыток было много, на разных поколениях) мне неизвестно.
Запускаем VirtualBox, создаем новую виртуалку и сразу переключаемся в экспертный режим.
Устанавливаем количество выделенной памяти минимум 2048 Мб, оптимально 4096 Мб или больше. Имя виртуальной машины задавайте латиницей, без пробелов – потом будет меньше хлопот, при настройке через консоль. Остальное выбирайте, как на скриншоте.
Нажимаем “Создать”, в следующем окне указываем расположение и объем доступного диска. Можно оставить все по умолчанию.
Виртуальная машина готова. Открываем настройки.
И проверяем, что бы везде было, как на скринах ниже.
Обязательно 2 процессора.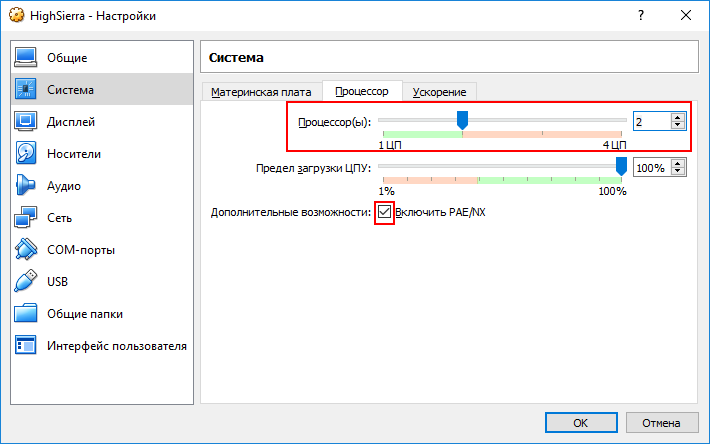
Проверяем включена ли аппаратная виртуализация.
Не забудьте проверить, что поддержка виртуализации включена в BIOS.

Задвигаем ползунок видеопамяти на максимум и убираем чеки с ускорения.
К приводу подкрепляем образ, который вы скачали по ссылкам выше.
Остальные настройки оставляем по умолчанию, сохраняем виртуальную машину и закрываем VirtualBox.
Запускаем консоль – нажимаем сочетание клавиш
Win+R
, пишем
cmd
, нажимаем
Enter
.
Или в поиске
cmd
:
В командной строке выполняем:
|
cd «C:Program FilesOracleVirtualBox» VBoxManage.exe modifyvm «ИмяВашейВиртуалки» —cpuidset 00000001 000106e5 00100800 0098e3fd bfebfbff VBoxManage setextradata «ИмяВашейВиртуалки» «VBoxInternal/Devices/efi/0/Config/DmiSystemProduct» «iMac11,3» VBoxManage setextradata «ИмяВашейВиртуалки» «VBoxInternal/Devices/efi/0/Config/DmiSystemVersion» «1.0» VBoxManage setextradata «ИмяВашейВиртуалки» «VBoxInternal/Devices/efi/0/Config/DmiBoardProduct» «Iloveapple» VBoxManage setextradata «ИмяВашейВиртуалки» «VBoxInternal/Devices/smc/0/Config/DeviceKey» «ourhardworkbythesewordsguardedpleasedontsteal(c)AppleComputerInc» VBoxManage setextradata «ИмяВашейВиртуалки» «VBoxInternal/Devices/smc/0/Config/GetKeyFromRealSMC» 1 |
Или можете запустить готовый скрипт
vbox_macos.cmd
из архива который скачали в начале статьи. Он попросит ввести вас имя вашей виртуальной машины и все остальное сделает сам.

С настройкой виртуальной машины закончили, переходим к установке системы.
3. Установка
Запускаем виртуалку и ждем пока не прогрузится установщик. В результате, вы должны увидеть выбор языка. Выбираем русский и продолжаем.
На следующем экране выбираем дисковую утилиту. Прежде чем продолжать установку, нам необходимо разметить диск.
Запускаем, выбираем наш диск (1 на скрине), нажимаем кнопку “Стереть”(2), задаем имя (3) и опять “Стереть” (4).
После завершения подготовки диска снова попадаем на стартовый экран установщика. Далее все просто, на всякий случай, публикую скрины:
Нажимаем, соответственно, “Продолжить”:
Принимаем условия соглашения:
Выбираем диск и продолжаем:
Все, установка стартовала!
Отлично, установка началась, но это еще только 1 этап. Теперь, надо дождаться пока система не соберется перезагружаться и отключить файл образа. Если не успели, просто выключите виртуальную машину, отключите образ и запустите снова.
У меня несколько раз, после перезагрузки, установщик автоматически не стартовал и вываливался в UEFI Shell. Ни чего страшного в этом нет, лечится элементарно.
Вводим:
|
fs1: cd «macOS Install Data» cd «Locked Files» cd «Boot Files» boot.efi |
Для облегчения набора имен директорий введите первые буквы без кавычек и нажмите
Tab
.
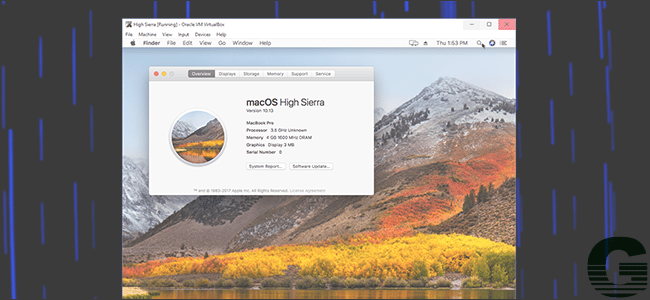
Все, наша установка успешно продолжается. Дальше все очевидно, следуем инструкциям мастера установки. После еще одной перезагрузки, возможно, что достаточно длительной (следите за индикацией виртуального жесткого диска, если моргает, значит все в порядке), мы получаем полноценную MacOS High Sierra.
4. Настраиваем разрешение
Последнее, что нам надо сделать, научить виртуалку работать с тем разрешением, которое нам нужно. Для этого нас снова понадобится командная строка. Выключите виртуальную машину, закройте VirtualBox и запустите командную строку.
Введите:
|
cd «C:Program FilesOracleVirtualBox» VBoxManage setextradata «ИмяВашейВиртуалки» VBoxInternal2/EfiGraphicsResolution 1920×1080 |
Разрешение можете указать любое вместо 1920×1080. Значения разделяет латинская
x
.
Или можете воспользоваться скриптом
vbox_resolution.cmd
.
После этого, при загрузке в первый раз, виртуальная машина может зависнуть. Если это произойдет, просто перезагрузите ее.
На этом, все. Как обычно, если остались какие-то вопросы или возникли сложности – спрашивайте в комментариях.
![]()
630 Views 0
Что в статье:
- 0.1 Введение
- 1 Шаг первый: создайте ISO-файл MacOS High Sierra
- 2 Шаг второй: создайте свою виртуальную машину в VirtualBox
- 3 Шаг третий: настройка виртуальной машины в VirtualBox
- 4 Шаг четвертый: настройка виртуальной машины из командной строки
- 5 Шаг пятый: загрузка и запуск установщика
- 6 Шаг шестой: установщик загрузки второй стадии с виртуального жесткого диска
- 7 Шаг седьмой: войдите в macOS High Sierra
- 8 Шаг восьмой (необязательно): измените разрешение
Введение
Хотите ли вы периодически тестировать веб-сайт в Safari или попробовать некоторое из программного обеспечения в среде Mac. Для этого всего полезно иметь доступ к последней версии macOS на виртуальной машине. К сожалению, это не предусмотрено изначально, поэтому получить macOS, работающий в VirtualBox, мягко говоря, сложно.
Однако это не невозможно. Некоторые из участников форумов InsanelyMac разработали процесс, который работает. Единственное, что не работает, – это звук, который по какой-то причине сильно искажен или вообще отсутствует. Кроме этого недостатка, это macOS High Sierra, плавно работающий в VirtualBox.
Чтобы сделать процесс немного проще для людей, мы объединили методы из нескольких разных потоков форума в единый пошаговый учебник со скриншотами. Давай приступим.
ПРИМЕЧАНИЕ. Чтобы это сработало, вам понадобится доступ к реальному Mac для загрузки High Sierra. Вы могли бы получить High Sierra ISO и другими способами, но мы не рекомендуем это делать. Займите Mac на час у друга, если у вас его нет, и все должно будет в порядке. Все, кроме первого шага, вы можете сделать на вашем ПК с ОС Windows.
Если вы работаете на Mac и хотите использовать виртуальную машину macOS для использования на этом Mac, рекомендуем вместо этого проверить Parallels Desktop Lite, поскольку она может бесплатно создавать виртуальные машины на MacOS и работать с ними намного проще.
Шаг первый: создайте ISO-файл MacOS High Sierra
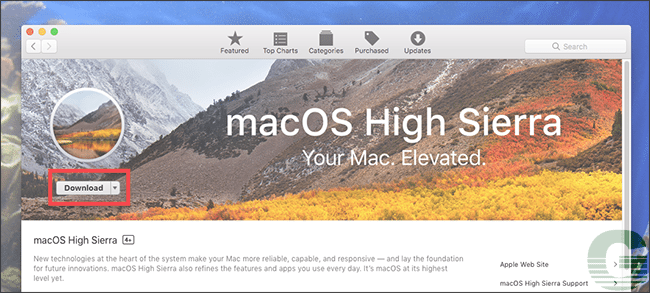
Для начала нам нужно создать ISO-файл установщика macOS High Sierra, чтобы мы могли загрузить его в VirtualBox на нашей машине Windows. Возьмите заимствованный Mac, зайдите в Mac App Store, найдите Sierra и нажмите «Загрузить».
Когда процесс будет завершен, установщик запустится – все в порядке, просто закройте его командой Command + Q. Мы не хотим обновлять Mac вашего друга; нам просто нужны загруженные файлы.
Чтобы преобразовать эти файлы в ISO, нам нужно использовать терминал, который вы можете найти в Приложениях > Утилиты.
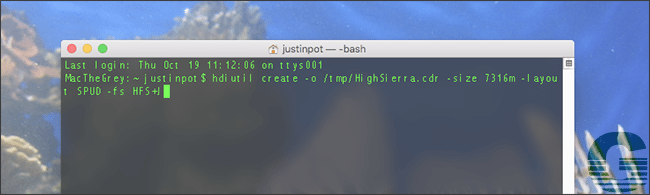
Сначала запустите следующую команду, чтобы создать чистый образ диска:
hdiutil create -o /tmp/HighSierra.cdr -size 7316m -layout SPUD -fs HFS+J
Затем смонтируйте чистый образ:
hdiutil attach /tmp/HighSierra.cdr.dmg -noverify -nobrowse -mountpoint /Volumes/install_build
Теперь восстановим BaseSystem.dmg из установщика на вновь смонтированный образ:
asr restore -source /Applications/Install macOS High Sierra.app/Contents/SharedSupport/BaseSystem.dmg -target /Volumes/install_build -noprompt -noverify -erase
Обратите внимание, что после этого имя нашей точки монтирования места назначения изменилось на «OS X Base System / System». Вы почти закончили! Размонтируйте образ:
hdiutil detach /Volumes/OS X Base System
И, наконец, преобразуйте созданный образ в файл ISO:
hdiutil convert /tmp/HighSierra.cdr.dmg -format UDTO -o /tmp/HighSierra.iso
Переместите ISO на рабочий стол:
mv /tmp/HighSierra.iso.cdr ~/Desktop/HighSierra.iso
И теперь у вас есть загрузочный файл High Sierra ISO!
Скопируйте его на компьютер под управлением Windows, используя большой флеш-накопитель, внешний жесткий диск или локальную сеть.
Шаг второй: создайте свою виртуальную машину в VirtualBox
Затем зайдите на свою машину Windows и установите VirtualBox, если вы еще этого не сделали. Убедитесь, что у вас установлена последняя версия (серьезно, более старые версии могут не работать).
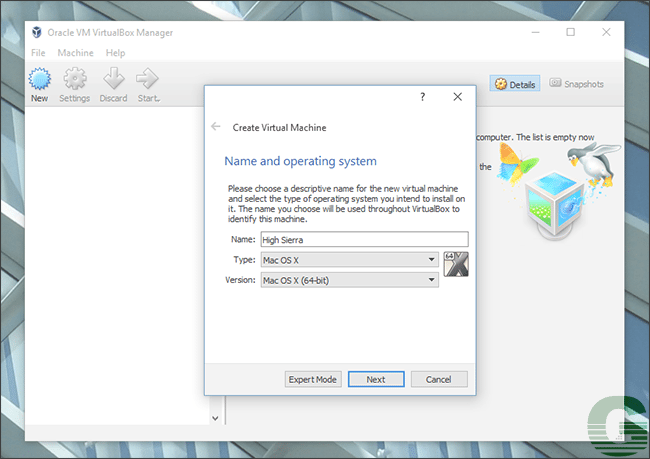
Откройте его и нажмите кнопку «Создать». Назовите свою виртуальную машину «High Sierra» и выберите «Mac OS X» для операционной системы и «Mac OS X (64-разрядная версия)» для версии (на момент написания этой статьи «macOS High Sierra»).
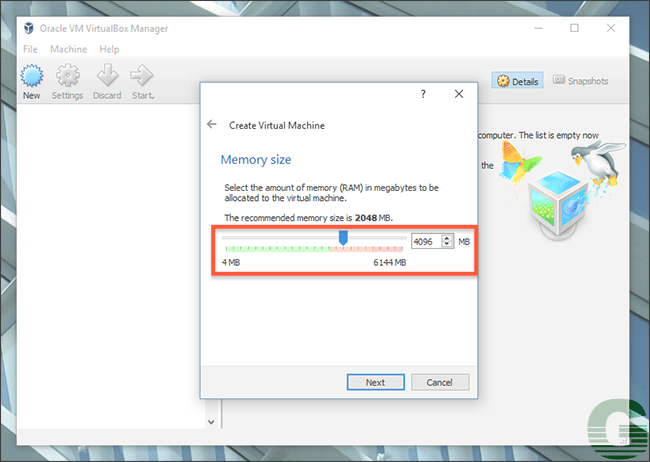
Продолжайте процесс. Для памяти мы рекомендуем использовать как минимум 4096 МБ, хотя вы можете выбрать больше, если у вас достаточно ОЗУ для резервного копирования на вашем компьютере под управлением Windows.
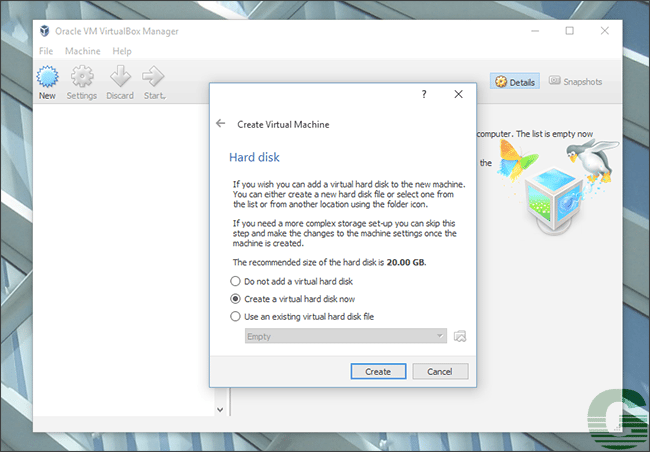
Затем вас спросят о вашем жестком диске. Выберите «Создать виртуальный жесткий диск сейчас» и нажмите «Создать».
Выберите VDI для типа жесткого диска и нажмите «Далее». Вас спросят, хотите ли вы диск с динамическим размером или фиксированным. Мы рекомендуем фиксированный размер, так как он немного быстрее, хотя на вашем компьютере с Windows это займет немного больше места на жестком диске.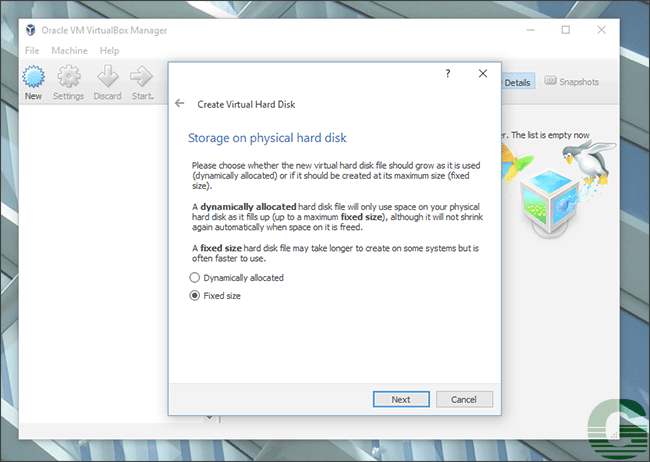
Нажмите Далее. Вас спросят, насколько большой диск вам нужен; мы рекомендуем не менее 25 ГБ, что достаточно для ОС и нескольких приложений. В зависимости от ситуации с хранением вы можете поставить и больше, но меньше ставить не рекомендуется.
Теперь приступим к настройке.
Шаг третий: настройка виртуальной машины в VirtualBox
Вы должны увидеть свою виртуальную машину в главном окне VirtualBox.
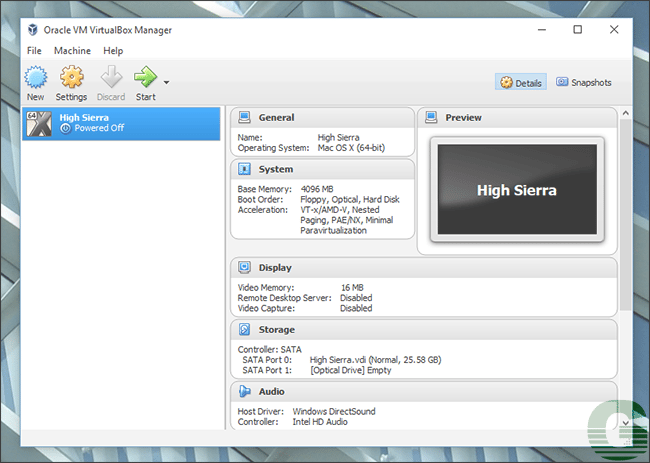
Выберите её, затем нажмите большую желтую кнопку «Настройки». Сначала перейдите в «Систему» на левой боковой панели. На вкладке «Материнская плата» убедитесь, что флажок «Floppy» не установлен.
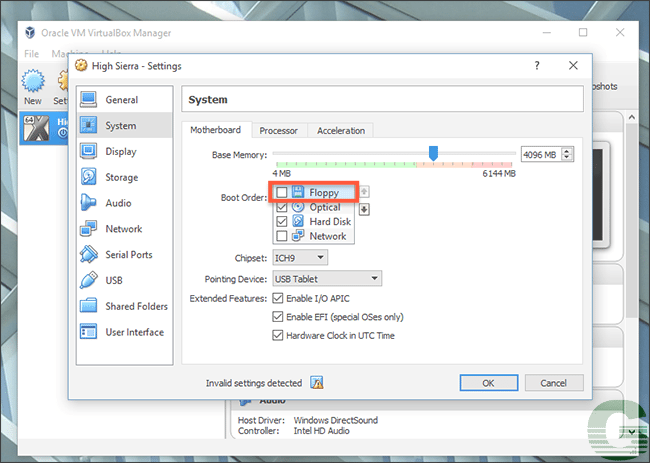
Затем перейдите на вкладку «Процессор» и убедитесь, что на виртуальную машину выделено как минимум два.
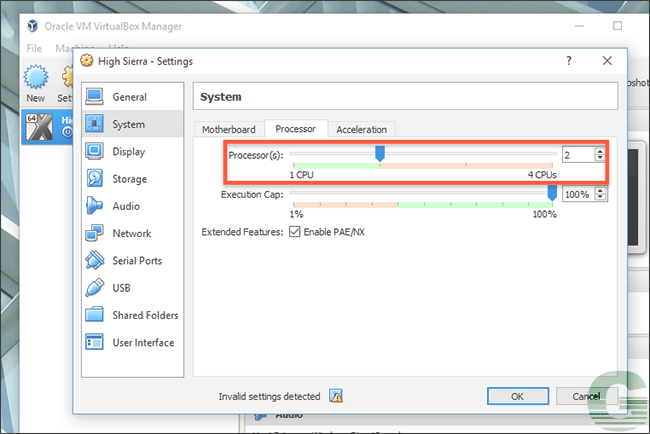
Затем нажмите «Экран» на левой боковой панели и убедитесь, что для видеопамяти установлено значение не менее 128 МБ.
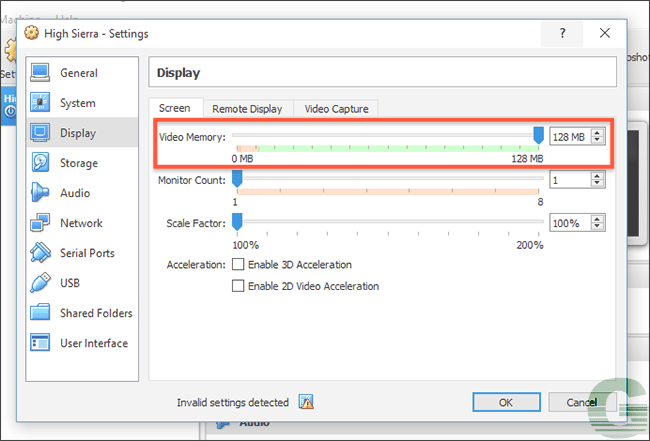
Затем нажмите «Хранилище» на левой боковой панели, затем нажмите «Пустой» CD-привод. Нажмите на значок компакт-диска в верхнем правом углу, затем перейдите к файлу ISO High Sierra, который вы создали ранее.
![]()
Обязательно нажмите «ОК», чтобы завершить все изменения, которые вы сделали, а затем закройте VirtualBox. Нет, серьезно: закройте VirtualBox сейчас, или следующие шаги не сработают.
Шаг четвертый: настройка виртуальной машины из командной строки
Мы сделали несколько настроек, но нам нужно сделать еще немного, чтобы убедить операционную систему, что она работает на реальном Mac. К сожалению, для интерфейса VirtualBox нет никаких вариантов, поэтому вам нужно будет открыть командную строку.
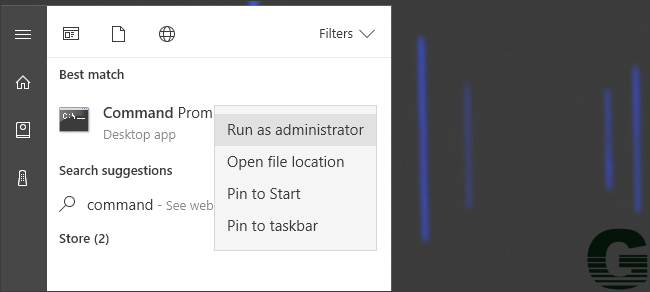
Откройте меню «Пуск», найдите «Командная строка», затем щелкните его правой кнопкой мыши и выберите «Запуск от имени администратора».
Вам нужно запустить ряд команд по порядку. Вставьте следующие команды, нажимая Enter после каждой из них и дождитесь завершения:
cd "C:Program FilesOracleVirtualBox"

VBoxManage.exe modifyvm "High Sierra" --cpuidset 00000001 000306a9 04100800 7fbae3ff bfebfbff

VBoxManage setextradata "High Sierra" "VBoxInternal/Devices/efi/0/Config/DmiSystemProduct" "MacBookPro11,3"

VBoxManage setextradata "High Sierra" "VBoxInternal/Devices/efi/0/Config/DmiSystemVersion" "1.0"

VBoxManage setextradata "High Sierra" "VBoxInternal/Devices/efi/0/Config/DmiBoardProduct" "Mac-2BD1B31983FE1663"

VBoxManage setextradata "High Sierra" "VBoxInternal/Devices/smc/0/Config/DeviceKey" "ourhardworkbythesewordsguardedpleasedontsteal(c)AppleComputerInc"

VBoxManage setextradata "High Sierra" "VBoxInternal/Devices/smc/0/Config/GetKeyFromRealSMC"
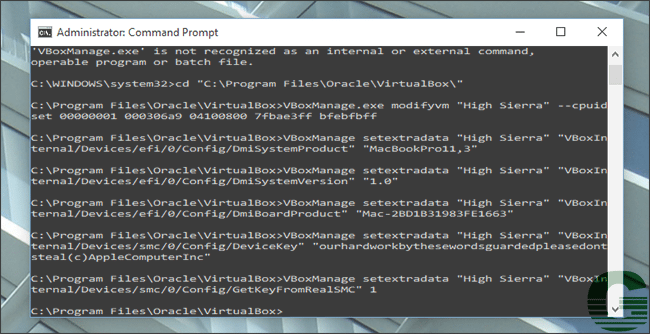
Это оно! Если все сработает, вы не увидите никакой обратной связи; команды будут просто запускаться. Если команда не работает, убедитесь, что ваша виртуальная машина называется «High Sierra»; если это не так, отредактируйте приведенные выше команды, указав имя машины в кавычках. Вперед и закройте командную строку. Теперь мы вернемся к VirtualBox.
Шаг пятый: загрузка и запуск установщика
Повторно откройте VirtualBox, нажмите на машину Sierra и нажмите «Запустить». Ваш компьютер начнет загружаться. Когда это произойдет, вы увидите много лишней информации, но не беспокойтесь об этом. Это нормально, даже некоторые из вещей, которые выглядят как ошибки.
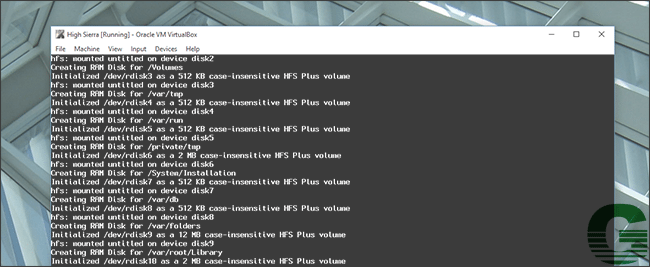
Вы должны только беспокоиться тогда, когда конкретная ошибка зависает в течение пяти минут или более. Просто дайте ему немного поработать. Если вы все сделали правильно, он загрузится.
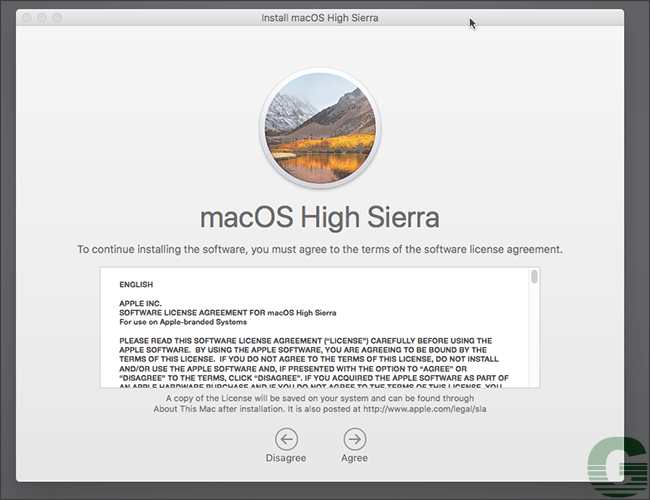
В конце концов вы увидите установщик с просьбой выбрать язык:
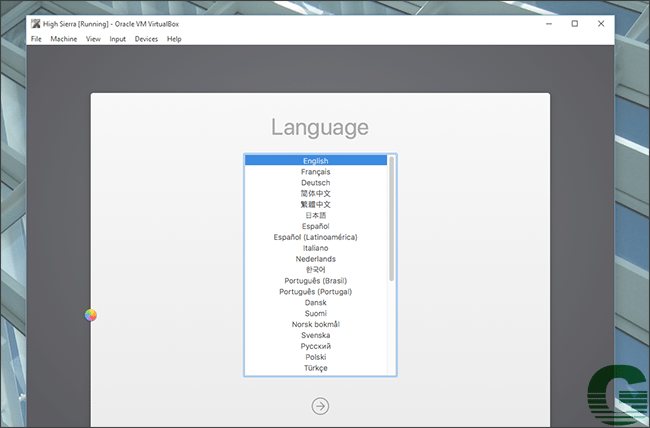
Выберите «Русский» или любой другой язык, который вы предпочитаете, затем нажмите «Далее». Однако перед тем как сделать что-либо еще, нажмите «Дисковая утилита», затем «Продолжить».
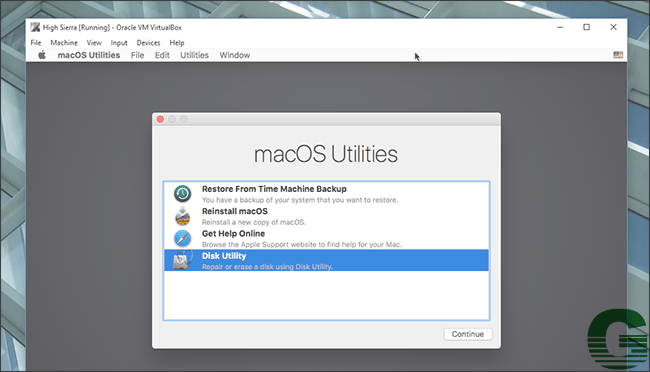
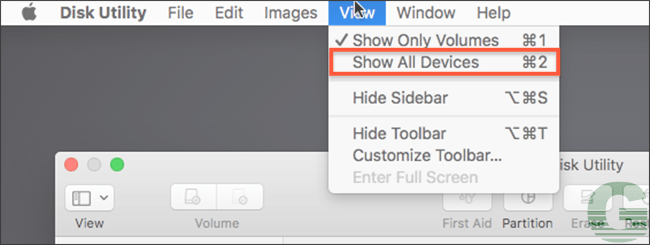
Вы не увидите диск: не паникуйте, High Sierra скрывает пустые диски по умолчанию. В строке меню нажмите «Вид», а затем «Показать все устройства».
Теперь вы должны увидеть свой пустой виртуальный диск на боковой панели. Щелкните по нему, затем нажмите кнопку «Стереть».

Назовите диск «Macintosh HD» и оставьте остальные две настройки как есть: «Mac OS Extended Journaled» и «GUID Partition Map». Не создавайте раздел AFS, потому что он не будет работать, и вам придется начать с нового виртуального жесткого диска. Нажмите «Стереть», затем закройте программу Disk Utility, когда процесс будет завершен. Вы вернётесь в главное окно.
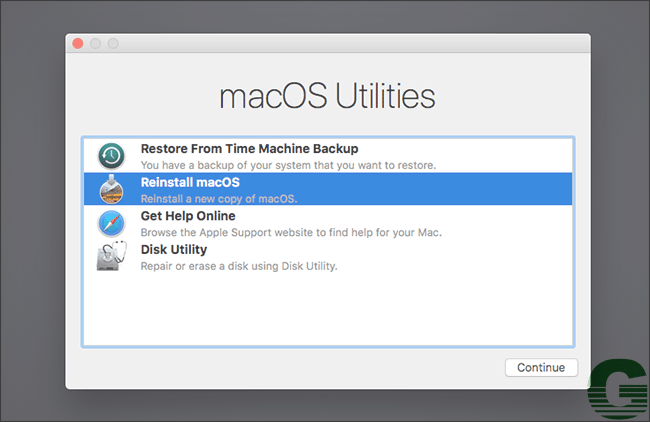
Выберите «Переустановить macOS», затем нажмите «Продолжить». Вам будет предложено согласиться с условиями.
Согласитесь, и вам в конечном итоге будет предложено выбрать жесткий диск; выберите раздел, который вы только что создали.
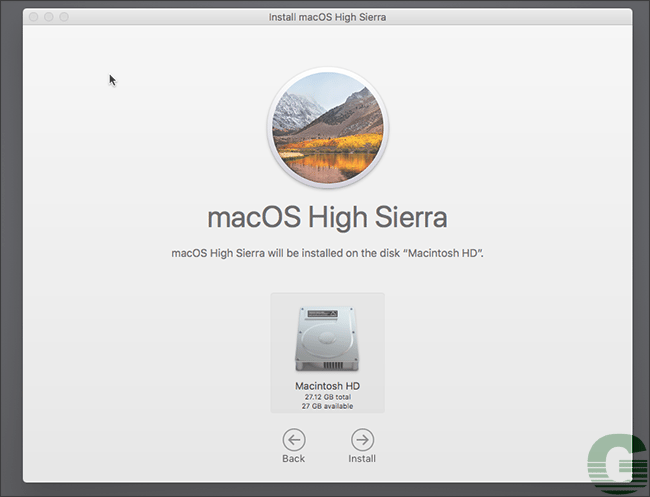
Установка начнется! Это может занять некоторое время, так что будьте терпеливы. В конце концов ваша виртуальная машина перезапустится и вернет вас обратно в программу установки. Не паникуйте: этого и следовало ожидать.
Шаг шестой: установщик загрузки второй стадии с виртуального жесткого диска
На этом этапе установщик скопировал файлы на виртуальный жесткий диск и ожидает оттуда загрузки. По какой-либо причине это не работает на виртуальной машине, поэтому вы снова видите установщик.
Выключите свою виртуальную машину и откройте ее настройки. В разделе «Хранилище» нажмите «HighSierra.iso» на панели «Дерево хранилища», затем щелкните значок компакт-диска в правом верхнем углу и нажмите «Удалить диск с виртуального диска». Это полностью отключит нашу установку ISO.
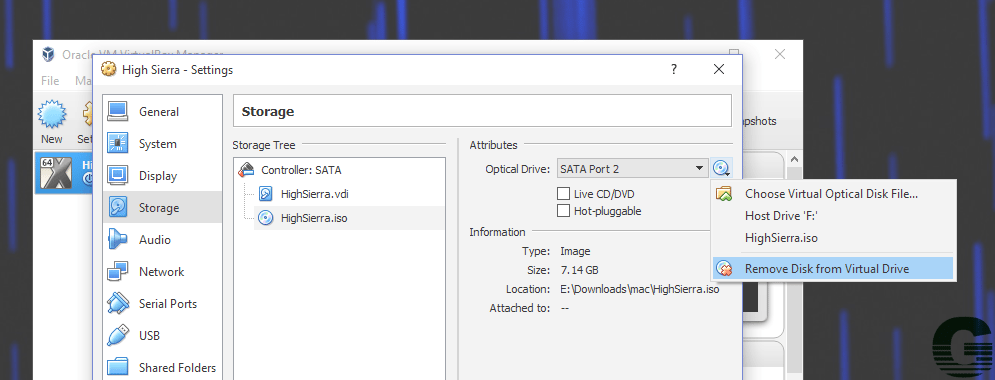
Теперь запустите виртуальную машину, и вы увидите этот прекрасный экран.
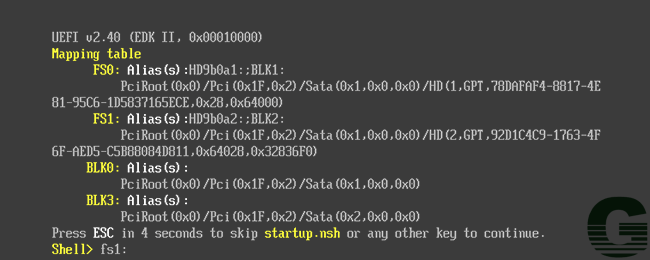
Это внутренняя оболочка EFI, и пока вы видите «FS1», указанную желтым цветом, вы можете использовать ее для запуска остальной части установщика. Нажмите на виртуальную машину и позвольте ей захватить вашу мышь и клавиатуру, затем введите fs1: и нажмите Enter. Это переключит каталоги на FS1, где находится остальная часть установщика.
Затем мы запустим несколько команд, чтобы перейти в нужный каталог:
cd "macOS Install Data"
cd "Locked Files"
cd "Boot Files"
Теперь мы можем запустить сам установщик следующей командой:
boot.efi

Установщик подхватит там, где остановился. Сначала вы увидите серию текстов, как и раньше, но в конце концов вы увидите, как установщик GUI вернется. (Не волнуйтесь, вам нужно только пройти этот процесс).
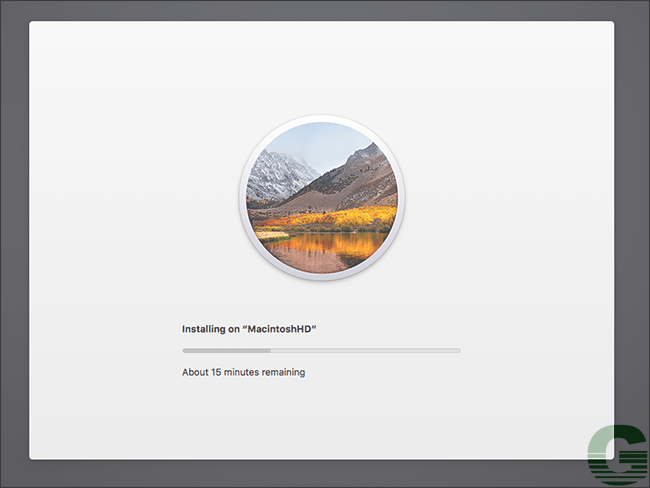
Подождем, нужно немного больше терпения.
Шаг седьмой: войдите в macOS High Sierra
В конце концов, виртуальная машина снова перезагрузится, на этот раз в macOS High Sierra. Если этого не произойдет, попробуйте извлечь ISO из виртуальной машины. Когда High Sierra загружается, вам нужно будет выбрать страну, настроить пользователя и остальную часть процесса начальной настройки.
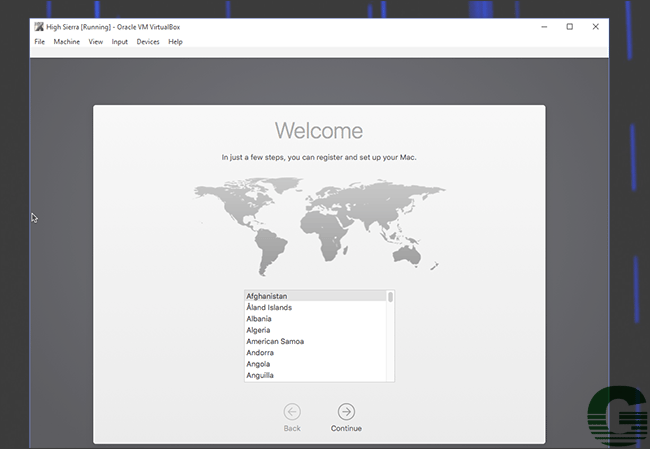
В конце концов, вы попадете на рабочий стол Mac. Ура!
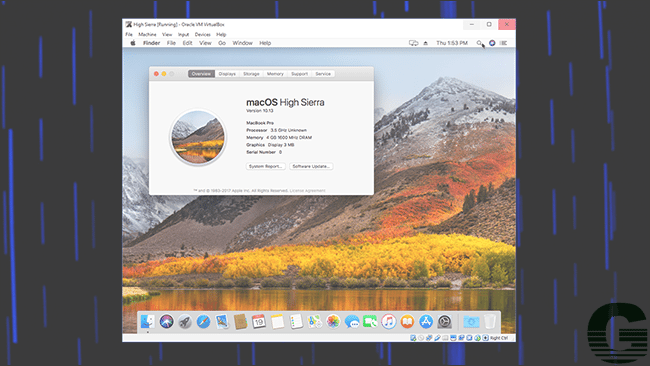
Теперь вы можете попробовать любое программное обеспечение Mac, хотя некоторые функции, такие как FaceTime и Messages, не будут работать, потому что Apple не будет распознавать ваш компьютер как настоящий Mac. Но многие основные вещи должны работать. Получайте удовольствие!
- Проблемы с macOS 10.13 High Sierrа? Мы расскажем как их исправить!
Шаг восьмой (необязательно): измените разрешение
По умолчанию ваша виртуальная машина будет иметь разрешение 1024 × 768, это не так много места для работы. Однако, если вы попытаетесь изменить разрешение внутри macOS, вы не увидите этого. Вместо этого вам нужно ввести несколько команд.
Выключите свою виртуальную машину, выключив macOS: щелкните Apple в строке меню, затем нажмите «Завершить работу». Затем закройте VirtualBox полностью (серьезно, этот шаг не будет работать, если VirtualBox все еще открыт!) И вернитесь в Windows «Командная строка в качестве администратора. Вам нужно запустить следующие две команды:
cd "C:Program FilesOracleVirtualBox"

VBoxManage setextradata "High Sierra" "VBoxInternal2/EfiGopMode" N
Во второй команде вам нужно заменить N числом от одного до пяти, в зависимости от того, какое разрешение вы хотите:
- дает разрешение 800 × 600
- дает разрешение 1024 × 768
- дает вам разрешение 1280 × 1024
- дает вам разрешение 1440 × 900
- дает вам разрешение 1920 × 1200
Запустите VirtualBox, загрузите свою виртуальную машину, и она должна загрузиться с вашим новым разрешением!
С этого момента вы можете открыть VirtualBox для любого тестирования, связанного с Mac, которое вы хотите сделать. Опять же, вы увидите, что во время загрузки появляется много ошибок, но все в порядке; игнорируй их. Кроме того, помните, что звук не будет работать, и не будет таких вещей, как FaceTime или iMessage, для которых требуется реальный Mac. Это не будет идеальным, тем чего можно ожидать от полностью поддерживаемой настройки. Но это macOS, на виртуальной машине, и это неплохо!
Перевод материала от Greatech
Оригинал
Сохрани себе или поделись с другим
Out of all the Apple operating systems, macOS High Sierra is the most manageable and straightforward macOS installation on VirtualBox. Using the VMDK formatted file, we are taking a very intentional path to run the operating system in a virtualization environment.
Like our other guides, we will try to provide simple steps to install macOS High Sierra on VirtualBox on Windows PC. We’ve included screenshots for all the steps to help you through the steps outlined below and have included a detailed video to lead you through the installation visually. You will find the link at the bottom of the page.
What is VirtualBox?
VirtualBox, created by Oracle, is a comprehensive virtual machine app similar to VMware Workstation but packed with the essentials and provided free. This virtual machine application forms a sandboxed setting that can install another operating system separately from the existing operating system. This application makes the virtualization process relatively easy. While installing macOS High Sierra, we will need to make some small modifications to ensure we get the maximum use and the ability to use all its features.
macOS High Sierra – Highlights and Features
Similar to Mojave, Apple builds on a solid platform to advance itself to include more practical features. These new features allow users to work more efficiently, manage their time better, and stay on task. Here are just a few of the highlighted features.
Photos
- Photos app started as a tool to maintain your photo library and sync pictures across devices through the cloud. It’s now a powerful editing software. There is a persistent sidebar that shows your library, Memories, Live Photos, and albums.
- Refined organization – here’s a new filtering drop-down in the list view, so you can drag-and-drop photos into an album or even to the desktop to export it.
Safari
- Block auto-playing videos – set preferences for individual websites or block all autoplay altogether.
- Automatic Reader mode – Set Safari to Reader mode blank-out the page and show just article content.
- Blocks adverts – Set preferences for individual websites or a block all autoplay altogether.
- Split-screen – Split View in Mail and to reply to an email while searching through your inbox.
- Top Hits- Search much more accurately and how recently you’ve read a message
Notes
- Highlighted search words – Easily locate a word in the results.
Siri
- Natural voice – more natural voices similar iOS 11.
Music playback
- Get a personalized playlist and ask it to play something based on a mood.
iCloud
- Improved family sharing – Everyone can use up storage from the same storage plan. Up to 200GB of iCloud storage at $2.99 per or 2TB is $9.99 a month
- Improved file sharing – iCloud Drive enables collaboration.
FaceTime
- Capture a Live Photo – capture a Live Photo using the other person’s camera and mic on their Mac or iOS device. Users are notified whenever a Live Photo is taken. Simply look for the new shutter button
Please Note: All images and files are created only for educational purposes. Any misuse of any files is not our responsibility.
What you need for this installation:
– 6 GB RAM (recommend 8 GB)
– 25 GB HDD (recommend 50 GB)
– At least a dual-core CPU (recommend Quad Core CPU)
– VirtualBox Windows and Expansion Pack (found here)
– macOS High Sierra VMDK image file (found here)
– Command file (download here)
– Screen Resolution File (download here)
Before we begin, we assume that you already have VirtualBox installed on your Windows 10 PC, with the Extension Pack installed. If you have not already done this, you can follow this guide or this video to you ready.
Part 1 – Download macOS High Sierra
- To get the most updated copy of macOS High Sierra, you can head over to Apple’s support website and download the image. These image files are in the DMG format and must be converted to either an ISO file format or a VMDK file format to be used to install a virtual machine. This tutorial will be using the VMDK file format because it allows for an easy installation with VirtualBox. You can get a copy of the VMDK file here. Once downloaded, keep the file in an easily accessible location.
Part 2 – Create Virtual Machine
- Open the Oracle VM Virtual Box Manager. At the main screen, select the ‘New’ icon at the top

2. In the first window, under the ‘Name’ field, type in “HighSierra”. Machine folder can remain as default. In the ‘Type’ drop-down menu, select “Mac OS X”. In the ‘Version’ drop-down menu, select “macOS 10.12 Sierra (64-bit)”. Click ‘Next’
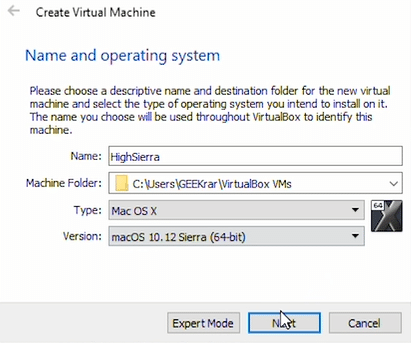
3. In ‘Memory size’, increase the available memory to for 4GB (4096 MB). Click ‘Next’
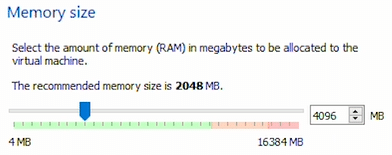
4. In ‘Hard disk’ select the third option, “Use an existing virtual hard disk file”. Click on the folder icon, and find the High Sierra VMDK image file you downloaded in Part 1.
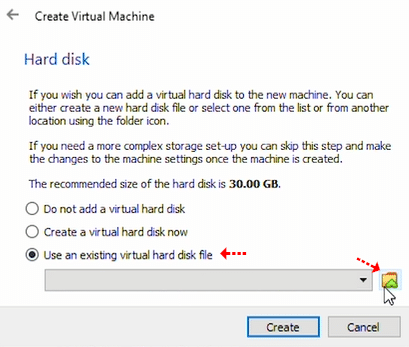
5. Once located, select the file, and click the ‘Open’ button.
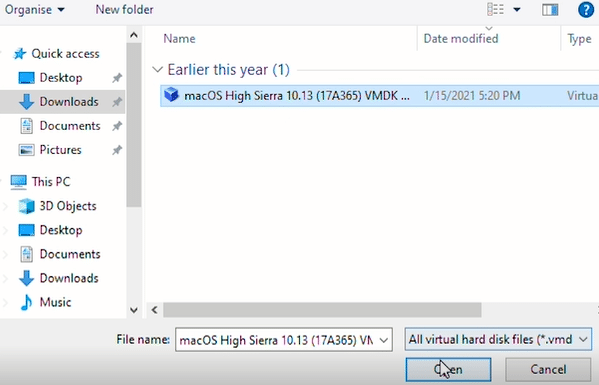
6. In the Hard Disk Selector, ensure you files is selected and click on ‘Choose’
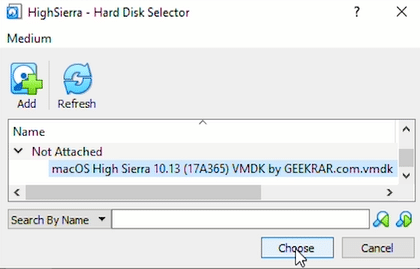
7. Back at the Create Virtual Machine window, click on ‘Create’ button at the bottom.
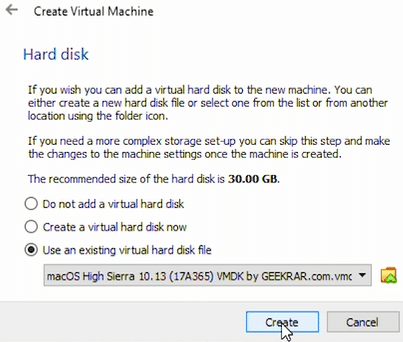
Part 3 – Run Commands
Now we need to modify the VirtualBox Manager to allow us to run the macOS High Sierra smoothly without errors. Open your command prompt window by click on the Start button and type in ‘cmd’. Right-click on it and select ‘Run as administrator.
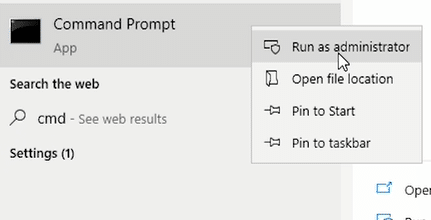
- In the command prompt, run the first line to change the directory to VirtualBox’s default location.
cd "C:Program FilesOracleVirtualBox"
2. Next, assuming you named your virtual machine in Part 1 StepX “HighSierra” you can copy and paste the below lines in the command window and hit enter. If you have a name, change “HighSierra” with whatever you called it, but leaving the quotation marks.
VBoxManage.exe modifyvm "HighSierra" --cpuidset 00000001 000106e5 00100800 0098e3fd bfebfbff
VBoxManage setextradata "HighSierra" "VBoxInternal/Devices/efi/0/Config/DmiSystemProduct" "iMac11,3"
VBoxManage setextradata "HighSierra" "VBoxInternal/Devices/efi/0/Config/DmiSystemVersion" "1.0"
VBoxManage setextradata "HighSierra" "VBoxInternal/Devices/efi/0/Config/DmiBoardProduct" "Iloveapple"
VBoxManage setextradata "HighSierra" "VBoxInternal/Devices/smc/0/Config/DeviceKey" "ourhardworkbythesewordsguardedpleasedontsteal(c)AppleComputerInc"
VBoxManage setextradata "HighSierra" "VBoxInternal/Devices/smc/0/Config/GetKeyFromRealSMC" 1
It will look similar to the below.
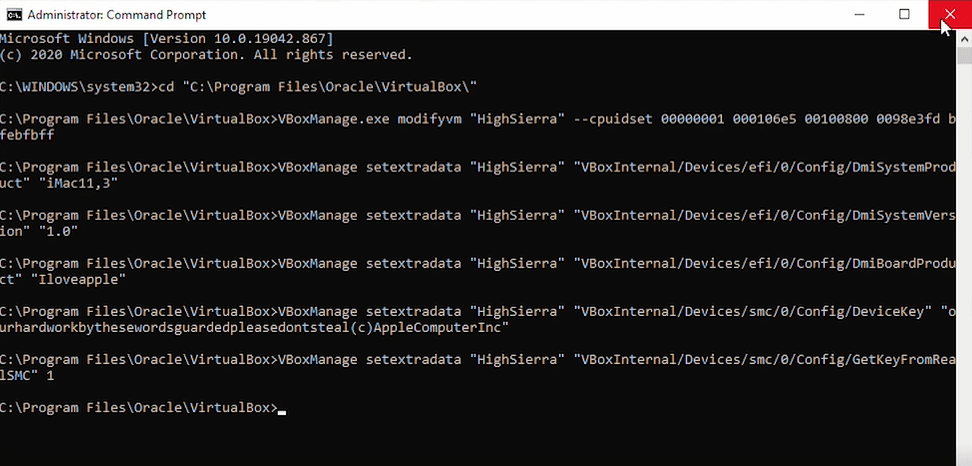
You can now close out of the command prompt and head back to your VirtualBox Manager.
Part 4 – Modify Virtual Machine Settings
We need to open the VirtualBox Manager and modify a couple of settings as the last steps before installing macOS High Sierra.
- Select the newly created ‘HighSierra’ virtual machine on the left side, then click on the orange settings button at the top.
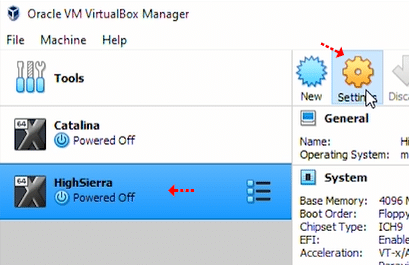
In the menu on the left, select ‘System’, then click on the ‘Motherboard’ tab and ensure we have at least 4096 MB (4GB) of memory. Below we can uncheck the ‘floopy’ for Boot Order.
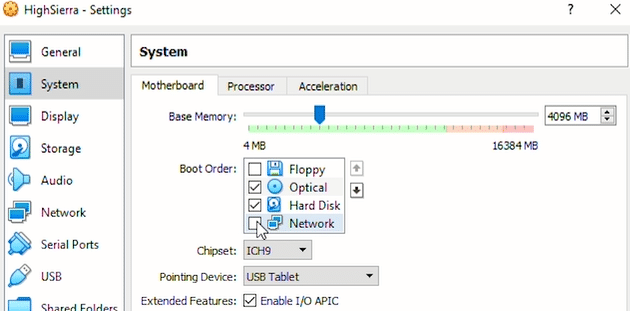
Click the next tab ‘Processor’. Below increase the available processors to atleast 2.
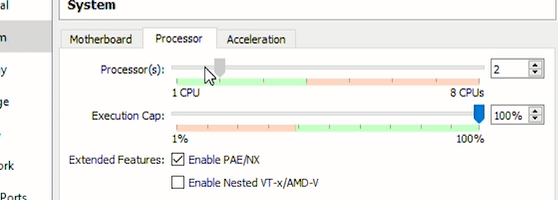
In the left side menu, select Display. Under the first tab ‘Screen’ increase the available memory to the max available amount.
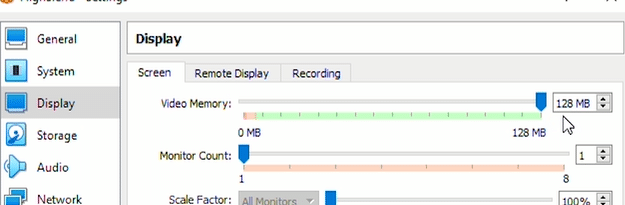
Once complete, click the ‘OK’ to close the window.
Part 5 – macOS High Sierra Setup
At the main VirtualBox Manager window, select the macOS High Sierra virtual machine on the left side, and click the green ‘Start’ button to boot up the machine.
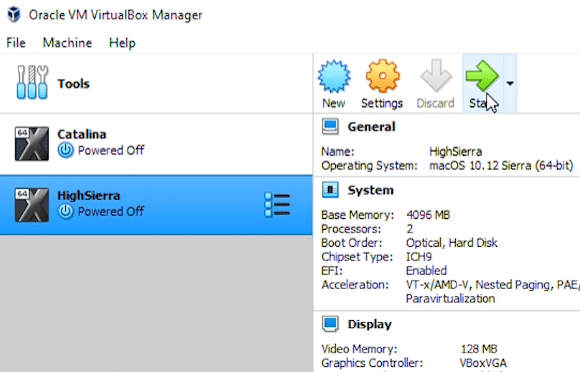
As the operating system boots up and loads the setup files, you will have a terminal window pop up, like below. This is entirely normal and will take a few minutes as it begins.
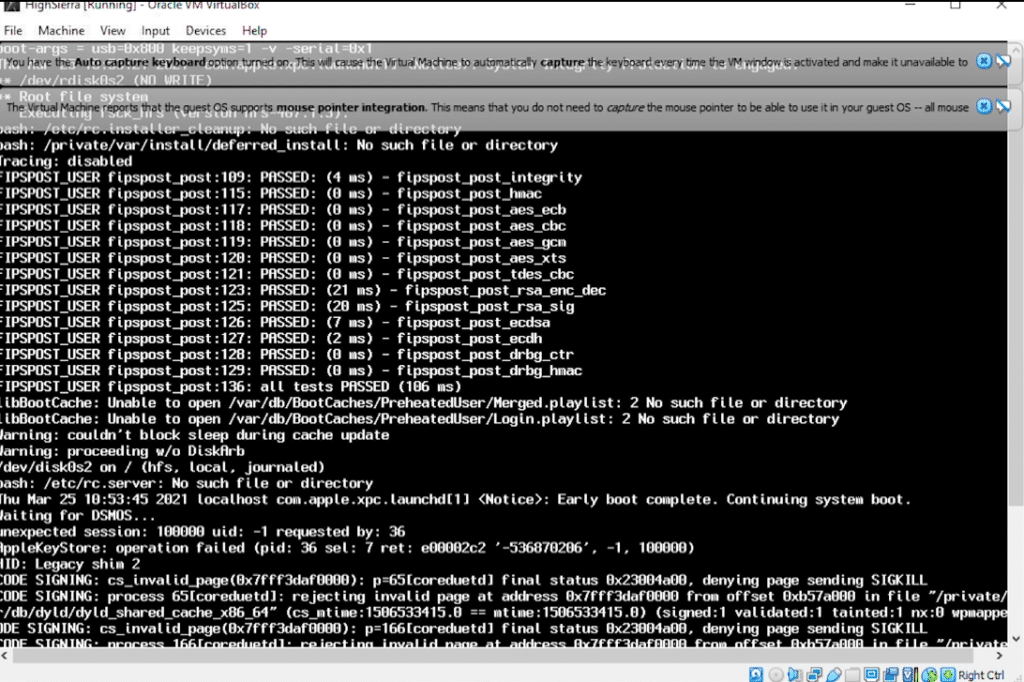
Once loaded, the first screen will ask you to select your region. In this guide, we will be using the United States, but you can use your preference region. Click continue.
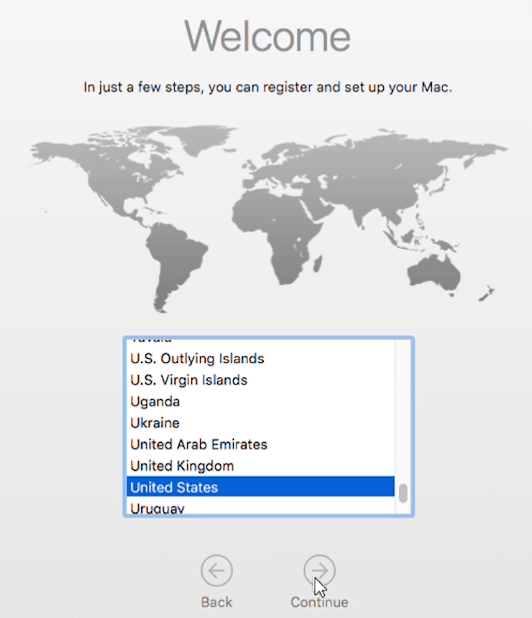
Next is the Keyboard layout. You can leave this as the default unless you require something different. Click continue.
<017>
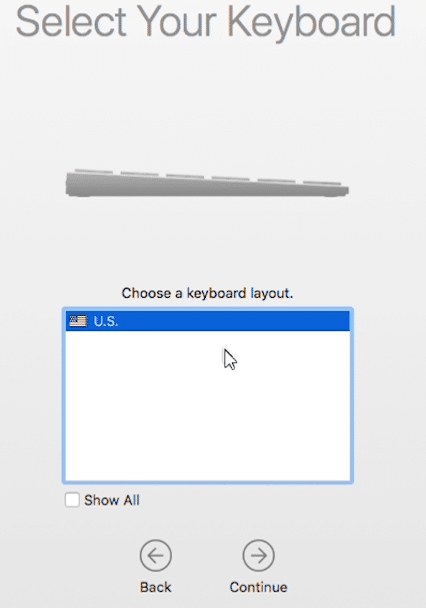
At the ‘Transfer Information to this Mac’ window, select the third option, ‘Don’t transfer any information now.’ Click ‘Continue’.
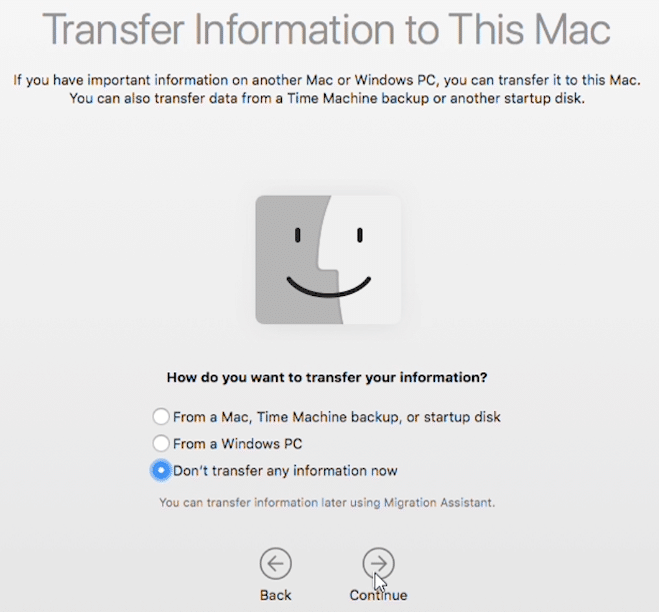
For the ‘Sign In With Your Apple ID’, select ‘Don’t sign in’ and click on ‘Continue.’
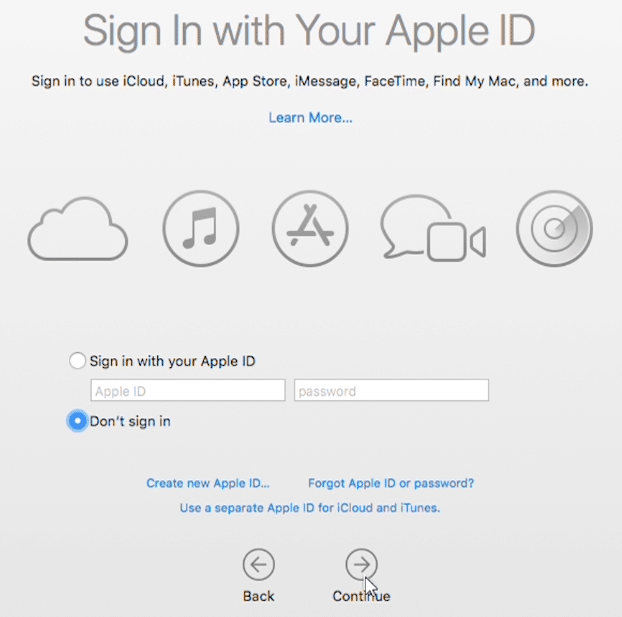
You will need to select the ‘Agree’ option on both windows at the ‘Terms and Conditions’ window to proceed with the installation.
<020>
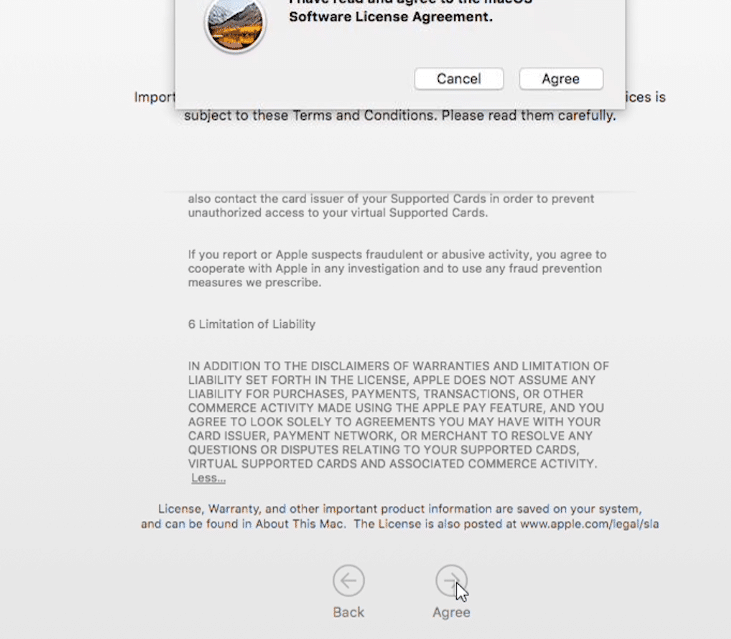
At the ‘Create a Computer Account’ window, you will be creating your user account and password. The user information here will be the main account for this operating system. Fill out the fields and click on ‘Continue.’
<021>
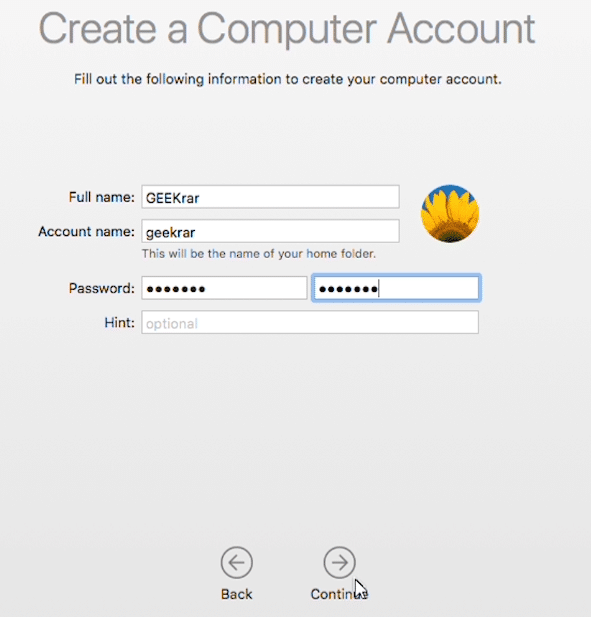
In ‘Express Setup’, leave the default selection and click on ‘Continue.’
<022>

One last dialog box will pop up as an introduction. Click on ‘Continue’ to close out the box, and now you are at the desktop of macOS High Sierra. This concludes the installation of the operating system.
<023>
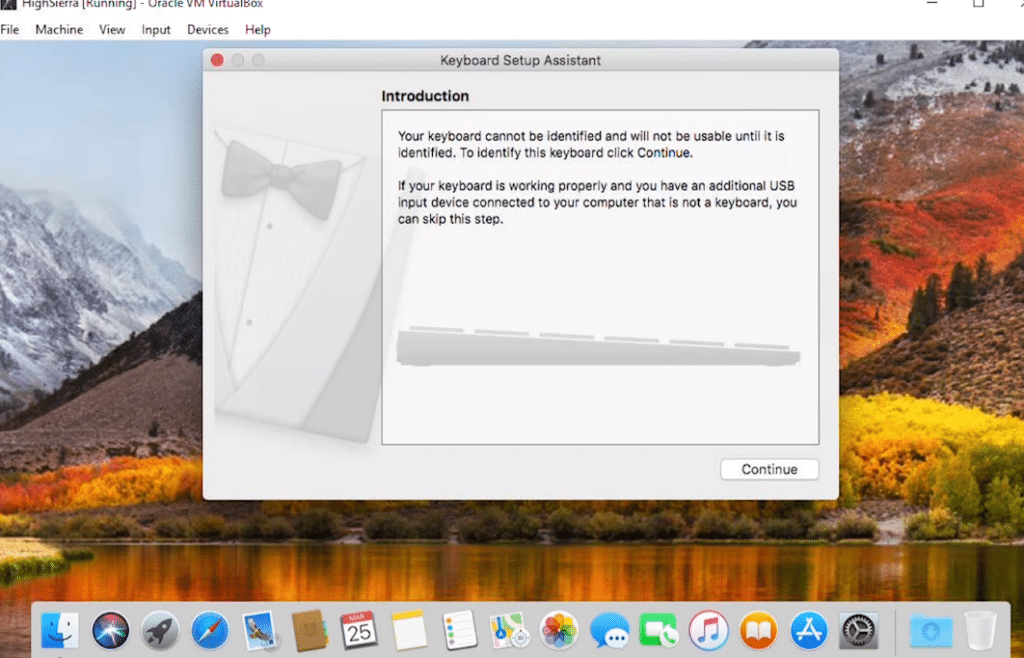
At this point, you can start using the macOS High Sierra as you please. You may notice that if you expand the window, it will not fill the screen. You may want to take an extra step and change the screen resolution with the below method.
Part 6 – Set Screen Resolution
Before changing the screen resolution to the virtual machine, exit out of the virtual machine by going to the File menu and selecting Close at the prompt, select ‘Power off the machine’.
<025>
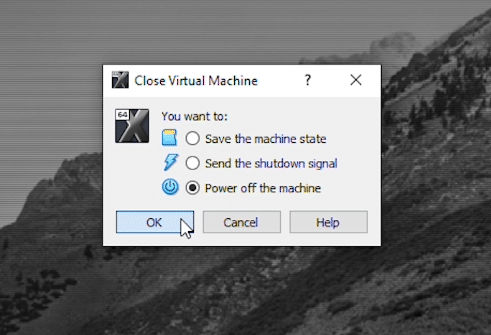
To get the best results, you will want to know the native resolution of your screen (i.e. 1080p is 1920×1080 or 720p is 1280×720) .
At the Windows desktop, click on the Start button and type in ‘cmd’. Right-click on it and select ‘Run as administrator .’
In the command prompt, run the first line to change the directory to VirtualBox’s default location.
cd "C:Program FilesOracleVirtualBox"
Now you want to modify the below line to fit your needs. “HighSierra” is the name of our virtual machine and can be left as is. Where “x” is, replace it with your screen size.
VBoxManage setextradata "HighSierra" VBoxInternal2/EfiGraphicsResolution "x"
The monitor we’re using in this example is 720p, so it will look like this.
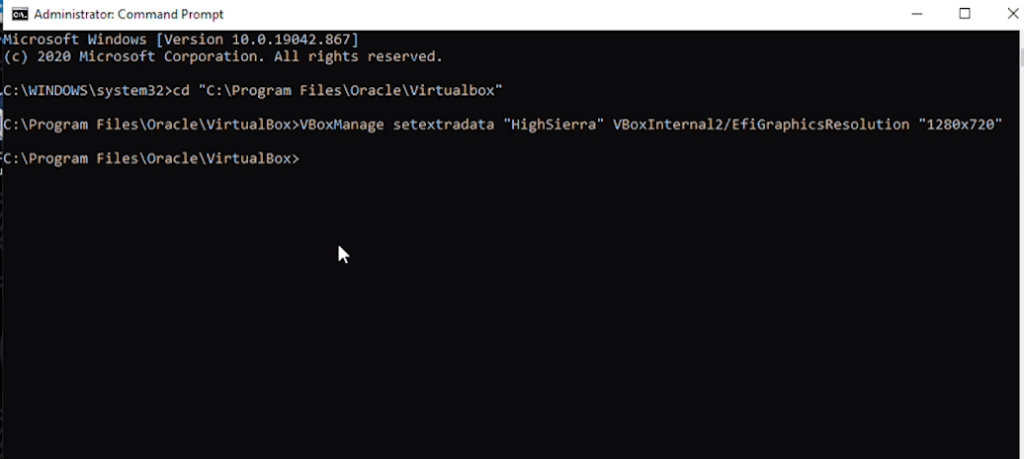
Once you have, it typed in, hit enter and close out of the command prompt.
Go back into the VirtualBox Manager, and start your virtual machine.
As it loads up, the appearance should change. Once you have logged in, you can go the the ‘View’ menu at the top and select ‘Full Screen Mode’.
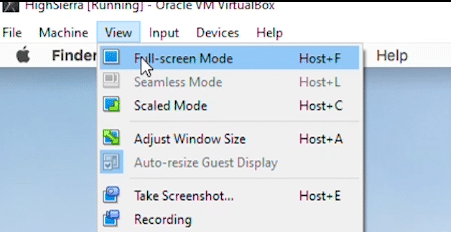
You have now entered full-screen mode and have complete the full installation of macOS High Sierra on VirtualBox on Windows PC.
VIDEO – macOS High Sierra on VirtualBox on Windows PC
Here is a visual guide to walk you through all the steps that we just covered. If you need any help with the installation or have any issues, you can put it in the comments below or put it in the forum.
Зачем качать установочный образ MAC OS с торрента?
- Зачем качать установочный образ MAC OS с торрента?
- Оригинальные установочные образы MAC-OS — torrent файлы
- версия MAC OS
- описание и требования
- torrent файл
- Как сделать загрузочную флешку macOS без Clover с Windows
- Видео как сделать Mac OS USB флешку в Windows с помощью TransMac
- Чистая установка с флешки на макинтоше
- Решение проблем с файловой системой Apple (APFS), Fusion Drive, HDD, SSD
Казалось бы, аппсторе же есть образы для установки и обновления? Небольшая предыстория:
Сдох у моего приятеля диск на его стареньком МАКе, конечно потерялись почти все данные, но самое неприятное комп не работает и заняться нечем…
Поехал он, купил SSD диск по такому случаю. Что бы всё кашерно работало, вроде как, только Samsung или Intel подхватываются без проблем, в смысле trim только на их SSD дисках сам включается. Разобрали его Мак, заменили диск и тут встал вопрос, где блин скачать чистую Хай Сиерру?
Второй комп в семье, старенький ноутбук HP с Windows 7 на борту, ставить на него Айтюнс ради такого дела совсем не хотелось, посему пришлось искать торрент с чистым, установочным образом (в формате DMG) после чего сделали загрузочную USB флешку и уже с нее установили High Sierra. Для Catalina комп оказался слабоват, нужна видеокарта помощнее.
Такая вот история…
Оригинальные установочные образы MAC-OS — torrent файлы
Как сделать загрузочную флешку macOS без Clover с Windows
После того как вы скачали нужный образ, необходимо создать загрузочную флешку, чистую, без кловера и хамелеона, т.к. с этими загрузчиками Ваш МАК может не запуститься, тупо зависнуть на старте. Общеизвестно, что файловые системы macOS и Windows несовместимы, посему, нужна специальная программа для установки.
В нашем случае понадобится портабельная версия TransMAC 11.8 portable — скачать файл — утилита для доступа из Windows к данным, записанным в Macintosh-формате. Она позволяет не только читать и перезаписывать файлы на PC, но также записывать и форматировать накопители в формате HFS, HFS+, HFSX. Работает не только с жёсткими дисками, но и c CDROM и другими сменными носителями.
Видео как сделать Mac OS USB флешку в Windows с помощью TransMac
Чистая установка с флешки на макинтоше
- Шаг первый
1. Смонтировать скачанный образ macOS 10.13.6 High Sierra.dmg
2. Появится окно с файлом «Установка macOS High Sierra.app»
3. Этот файл нужно перенести в папку Программы - Либо используем DiskMaker X или Install Disk Creator, пропускаем всё нижеизложенное и сразу приступаем к четвёртому шагу.
- Шаг второй
Форматируем накопитель в формате Mac OS Extended (журнальный) со схемой разделов GUID:
1. Открываем Дисковую утилиту, выбираем накопитель (флешку).
2. Выбираем вкладку «Раздел диска», в списке разделов выбираем «Раздел 1».
3. Открываем «Параметры», выбираем схему разделов GUID.
4. В графе «Формат» выбираем Mac OS Extended (журнальный).
5. «Имя» — USB. Нажимаем «Применить».
Примечание: в OS X El Capitan и новее формат называется OS X Extended (журналируемый). - Шаг третий
1. Запускаем программу Терминал (Программы/Утилиты/Терминал), вставляем следующую команду (команда вводится без переноса строк — просто скопируйте и вставьте её целиком) и нажимаем Enter, подтверждаем действие вводом пароля администратора:
(несмотря на то, что при вводе пароль отображаться не будет, он всё равно вводится).Код:
sudo /Applications/Install macOS High Sierra.app/Contents/Resources/createinstallmedia --volume /Volumes/USB --applicationpath /Applications/Install macOS High Sierra.app --nointeraction
Через 10-15 минут Терминал завершит создание загрузочной флешки. В процессе увидите следующее:
Erasing Disk: 0%… 10%… 20%… 30%…100%…
Copying installer files to disk…
Copy complete.
Making disk bootable…
Copying boot files…
Copy complete. Done.
Когда появится надпись Done — ваша загрузочная флешка будет готова.
- Шаг четвёртый
Если сделаны все необходимые резервные копии, можно приступать к чистой установке. Перезагружаем компьютер с подключенным USB-накопителем, удерживая alt (Option) при запуске. Выбираем нашу флешку, в появившемся окне переходим в Дисковую утилиту, стираем накопитель нашего Mac (ни в коем случае не перепутать с флешкой) и приступаем к установке.
Как обновить до нужной версии MAC-OS
Качайте образ, затем:
- 1. Монтируем образ диска
- 2. Копируем «Установка macOS High Sierra» в папку «Программы»
- 3. Запускаем скопированное приложение
Решение проблем с файловой системой Apple (APFS), Fusion Drive, HDD, SSD
Файловая система Apple (APFS) является файловой системой по умолчанию на компьютерах начиная с MacOS High Sierra для Mac со всеми флэш-накопителями. APFS поддерживает надежное шифрование, совместное использование пространства, моментальные снимки, быстрый размер каталога и улучшенные основы файловой системы.
Когда вы устанавливаете macOS High Sierra или новее, на томе Mac твердотельного накопителя (SSD) или другого устройства хранения флэш-памяти, этот том автоматически преобразуется в APFS. Приводы Fusion, традиционные жесткие диски (жесткие диски) и не-Mac-тома не конвертируются. Вы не можете отказаться от перехода на APFS.
Компьютеры, оборудованные гибридными системами дисков Fusion Drive, будут и дальше работать на HFS+.
Подробности тут…
Чтобы установить macOS High Sierra и пропустить преобразование HFS+ в APFS нужно выполнить следующие шаги:
— Переместить инсталлятор «Установка macOS High Sierra.app» в папку Программы (Applications);
— Открыть «Терминал» и ввести команду:
/Applications/Install macOS High Sierra.app/Contents/Resources/startosinstall --converttoapfs NOНажать «Enter» и запустить процесс установки macOS.
Ошибка «Экземпляр программы поврежден и не может быть использован для установки macOS»
Если при чистой установке с флешки выдает ошибку с поврежденным установщиком это значит надо поменять дату на компьютере, для чего:
1) Из под рабочей macOS вставляем флешку и заходим на нее. Правой кнопкой мышки по .app-файлу -> Показать содержимое пакета. Далее, идем по пути Contents -> SharedSupport и в этой папке удаляем файл InstallInfo.plist. Грузимся заново с флешки и вуаля!
2) Перед началом инсталлятор сверяется с сервером и выкачивает сертификат (вы должны подключится к сети: вверху справа на «антенки» и подключаемся к своему Wi-Fi). Может возникнуть ошибка «untrusted_cert_file».
Сверху открываем утилиты -> Терминал.
В Терминале пишем:
date MMDDHHMMYY. MM — месяц. DD — день. HH — час. MM — минута. YY — 2 последние цифры года.
Например, сегодня 12 июня 2017 года, текущее время 02:12, значит выглядеть команда в терминале будет так:
Тапаем Enter, закрываем Терминал (cmd + q) и устанавливаем систему.
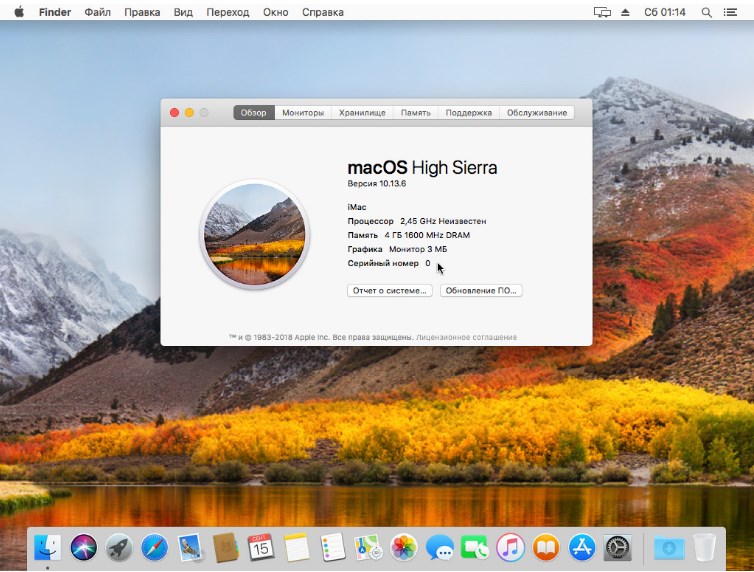
29 января 2020 Разное MacOS
Бывает нужно протестировать проект на MacOS, например в Safari. Или нужно сделать небольшое приложение для IOS и протестировать его на реальном устройстве.
Тут есть 3 варианта. Конечно же самый лучший это реальный Mac. Второй это хакинтош и третий собственно виртуальная ОС.
Виртуальная система на мой взгляд самый оптимальный вариант, потому как для разовых тестов выкладывать баснословные деньги за Mac нет смысла. С хакинтошем отдельная история, но если есть много свободного времени и желания, то можно поднять. Лично я намучившись с установкой и в итоге получив компьютер с медленной и глючной ОС и неработающим модулем Wi-Fi, решил, что это так себе идея.
Содержание
- 1 1. Скачиваем необходимые файлы.
- 2 2. Создаем виртуальную машину.
- 3 3. Установка MacOS High Sierra.
- 4 4. Установка разрешения и решение проблем с видеопамятью.
1. Скачиваем необходимые файлы.
Образ MacOS High Sierra с Google Disk
VirtualBox с официального сайта
Скрипты для авто-настройки виртуальной машины
Образ VM Tool для решения проблем с видеопамятью
2. Создаем виртуальную машину.
Устанавливаем VirtualBox и создаем новую виртуальную машину.
Для тех, у кого в списке версий не появились 64-разрядные системы, необходимо включить виртуализацию в BIOS вашего компьютера. Перезагружаемся и в настройках BIOS находим пункт Virtualization, у вас он может называться несколько иначе, отмечаем в Enabled. Сохраняем настройки BIOSa, перезагружаемся и вновь заходим в VirtualBox.
Включаем расширенные настройки и выбираем такие параметры:
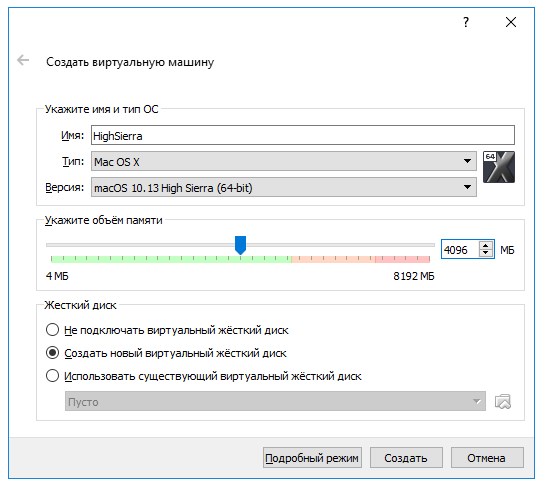
Чем больше оперативной памяти выбрать, тем лучше. Но часть конечно же надо оставить на основную операционную систему.
В следующем окне выбираем примерно следующие параметры:
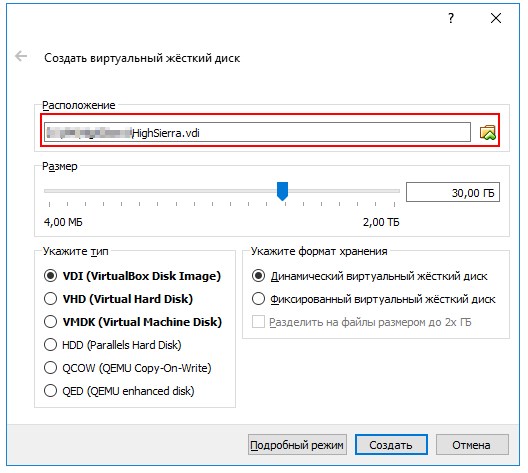
После создания виртуальной машины переходим в ее настройки и выставляем их как на скриншотах ниже:
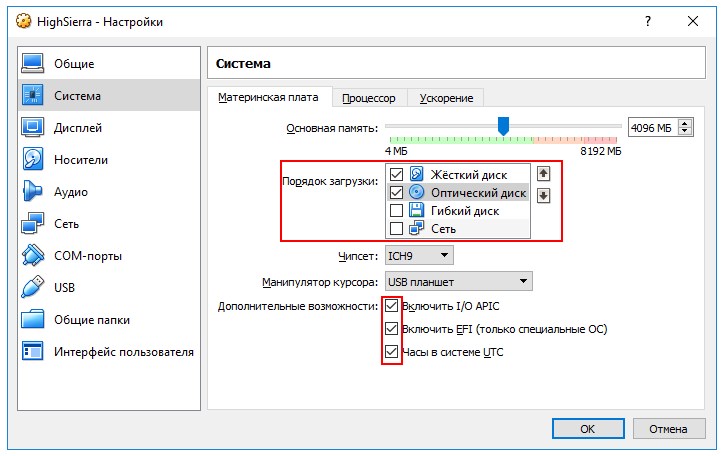
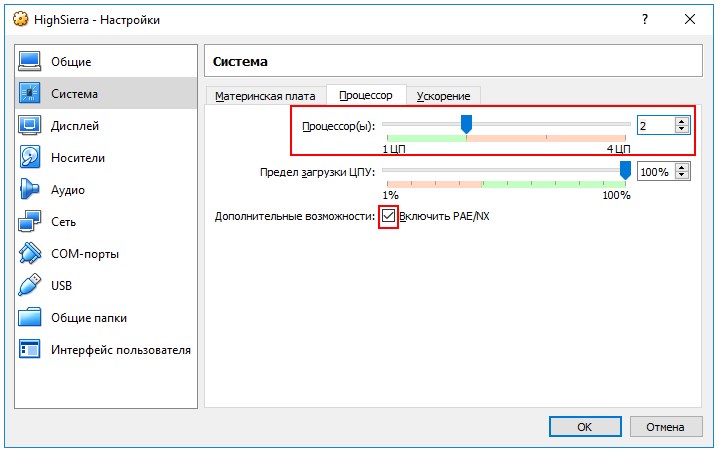


Монтируем скаченный ранее образ системы и сохраняем настройки:
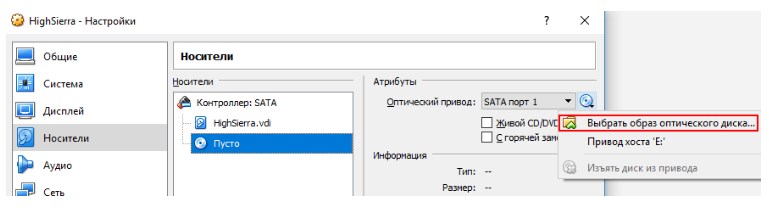
Далее необходимо настроить виртуальную машину с помощью скриптов. Запускаем скрипт vbox_macos.cmd из архива, вводим имя виртуальной машины, в данном случае HighSierra и нажимаем Enter.
Смотрите здесь https://viam.online/oborudovanie/
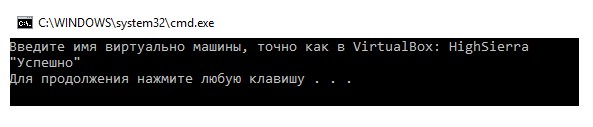
3. Установка MacOS High Sierra.
Выбираем язык и запускаем дисковую утилиту. В появившемся окне выбираем наш виртуальный жесткий диск и нажимаем вверху кнопку стереть. Задаем имя жесткого диска, например macos-hdd.
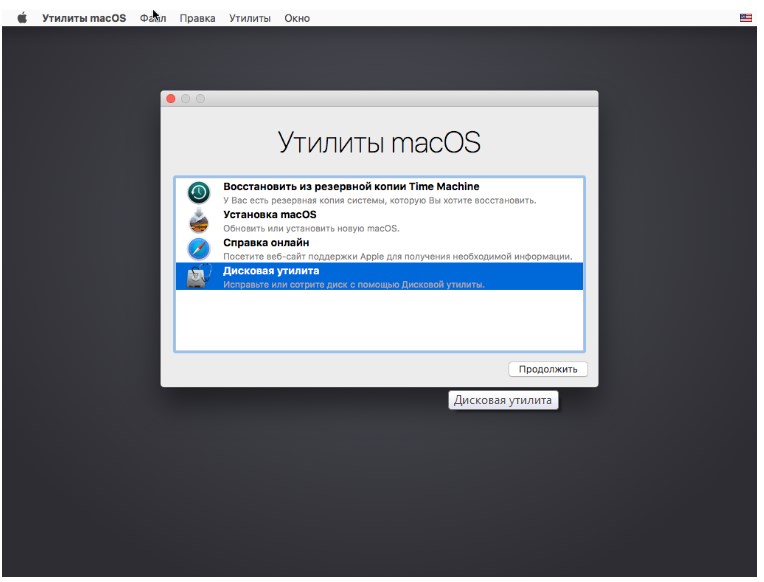
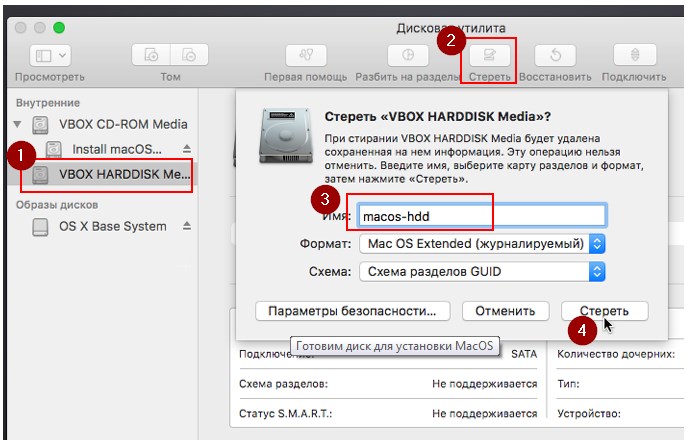
Теперь можно запускать установку macOS.
На этом этапе у меня возникла ошибка, что образ поврежден. В других случаях просто черный экран или ребут. Чтобы это поправить перед нажатием кнопки установка нужно выбрать Утилиты и Терминал в верхнем меню. В терминале вводим следующее:
date 060710102018
Дальше все просто. Принимаем лицензионное соглашение и выбираем жесткий диск, на который будет установлена macOS. Все установка началась.
Во время установки надо дождаться, когда система будет перезапускаться и отключить виртуальный образ установщика из привода.
Если после перезапуска появляется окно Shell, то вводим и продолжаем установку:
fs1:
cd "macOS Install Data"
cd "Locked Files"
cd "Boot Files"
boot.efi
В процессе установки выбираем нужные параметры, имя пользователя и пароль. Тут будет все интуитивно понятно. И в итоге получаем полноценную macOS.
4. Установка разрешения и решение проблем с видеопамятью.
Для установки разрешения запускаем второй скрипт vbox_resolution.cmd из архива и указываем свое разрешение монитора, например 1280×1024. С этим все.
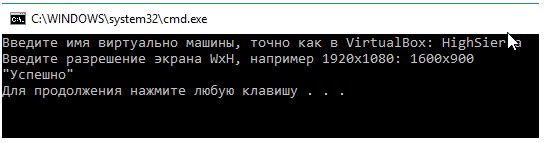
После запуска High Sierra видела только 4 мб видео памяти. Проверить этот параметр можно нажав на значок яблока и Об этом Mac. Для увеличения памяти до выбранных 128 мб необходимо установить Guest Tool. Для этого в настройках виртуальный машины включаем VMSVGA.
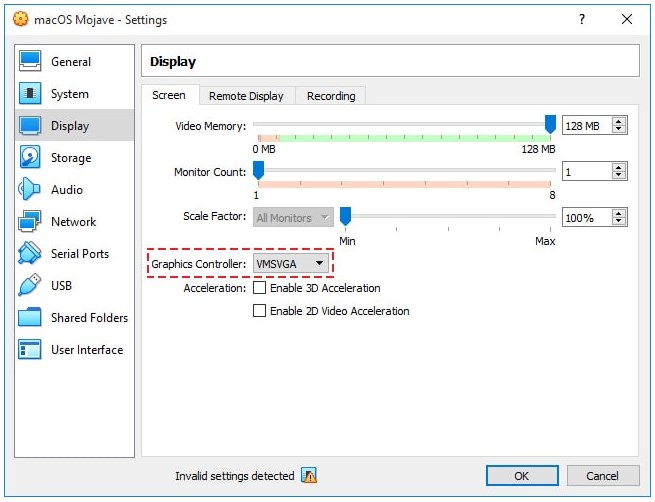
Далее монтируем ранее скачанный образ VM Tool и нажимаем Install VMware Tools. Дайте установщику пять-десять минут, после чего вы должны получить уведомление о «Расширении системы» . После чего выберите опцию «Открыть настройки безопасности».
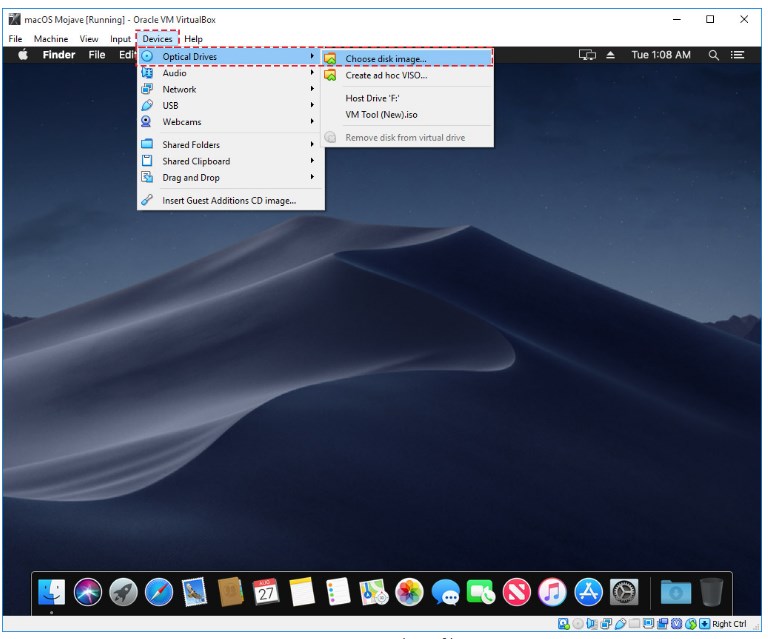
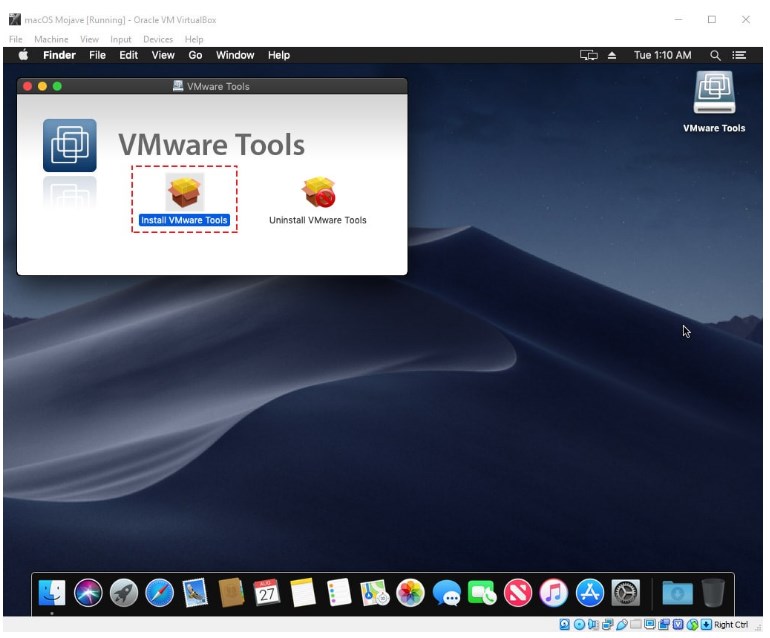

Нажмите «Безопасность и конфиденциальность», затем выберите «Разрешить», чтобы завершить процесс установки.
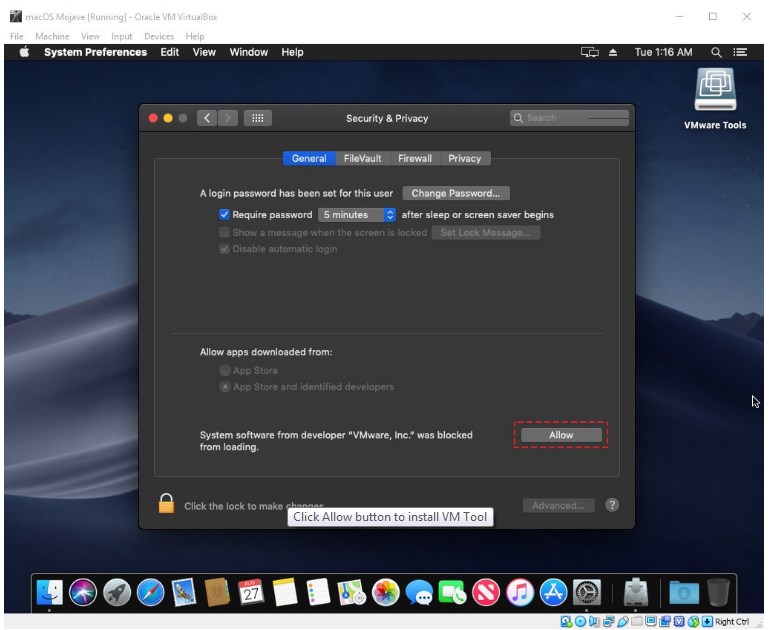
Через десять-двадцать минут вы получите уведомление о том, что установка завершена. Чтобы завершить процесс установки, нажмите кнопку «Перезагрузить», чтобы изменения вступили в силу.
После перезапуска VirtualBox вы можете получить уведомление «Расширение системы заблокировано». Откройте «Меню настроек безопасности», чтобы активировать расширение. Если интеграция прошла успешно, вы должны увидеть 128 мб в меню о системе.

После этих манипуляций разрешение экрана вновь изменится. Чтобы исправить это, необходимо зайти в Терминал и ввести следующую команду, где <width> и <height> соответственно ширина и высота вашего монитора:
Sudo /Library/Application Support/VMware Tools/vmware-resolutionset <width> <height>
 После выхода финальной версии MacOS Sierra вы можете в любое время бесплатно скачать установочные файлы в App Store и установить на свой Mac. Однако, в некоторых случаях может потребоваться чистая установка с USB накопителя или, возможно, создание загрузочной флешки для установки на другой iMac или MacBook (например, в случае, когда запустить ОС на них не получается).
В этой инструкции пошагово описаны способы создания загрузочной флешки MacOS Sierra как на Mac, так и в Windows. Важно: способы позволяют сделать установочный USB накопитель MacOS Sierra, который будет использоваться именно на компьютерах Mac, а не на прочих ПК и ноутбуках. См. также: Загрузочная флешка Mac OS Mojave.
Прежде чем приступать к созданию загрузочного накопителя, загрузите установочные файлы MacOS Sierra на свой Mac или ПК. Чтобы сделать это на Mac, зайдите в App Store, найдите нужное «приложение» (на момент написания находится в списке сразу под «быстрыми ссылками» на странице подборок App Store) и нажмите «Загрузить». Или сразу перейдите на страницу приложения: https://itunes.apple.com/ru/app/macos-sierra/id1127487414
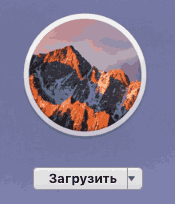
Сразу после завершения загрузки, откроется окно с началом установки Sierra на компьютер. Закройте это окно (Command+Q или через главное меню), необходимые для нашей задачи файлы останутся на вашем Mac.
Если вам требуется скачать файлы MacOS Sierra на ПК для записи флешки в Windows, официальных способов сделать это нет, но можно воспользоваться торрент-трекерами и загрузить нужный образ системы (в формате .dmg).
Создание загрузочной флешки MacOS Sierra в терминале
Первый и, возможно, самый простой способ записать загрузочную флешку MacOS Sierra — использовать Терминал на Mac, но прежде потребуется отформатировать USB накопитель (сообщают, что требуется флешка не менее 16 Гб, хотя, по факту, образ «весит» меньше).
Для форматирования используйте «Дисковая утилита» (можно найти через поиск Spotlight или в Finder — Программы — Утилиты).
- В дисковой утилите, слева выберите вашу флешку (не раздел на ней, а сам USB накопитель).
- Нажмите «Стереть» в меню вверху.
- Укажите любое имя диска (запомните его, не используйте пробелов), формат — Mac OS Extended (журналируемый), Схема разделов GUID. Нажмите «Стереть» (все данные с флешки будут удалены).

- Дождитесь завершения процесса и выйдите из дисковой утилиты.
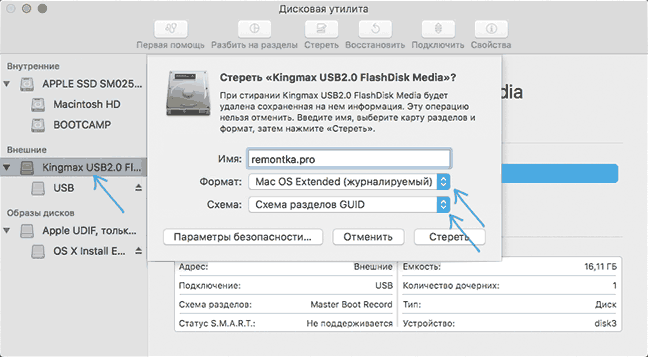
Теперь, когда накопитель отформатирован, откройте терминал Mac (так же, как предыдущую утилиту — через Spotlight или в папке «Утилиты»).
В терминале введите одну простую команду, которая запишет все необходимые файлы Mac OS Sierra на флешку и сделает ее загрузочной. В данной команде замените remontka.pro на имя флешки, которое вы задали в пункте 3 ранее.
sudo /Applications/Install macOS Sierra.app/Contents/Resources/createinstallmedia --volume /Volumes/remontka.pro --applicationpath /Applications/Install macOS Sierra.app --nointeraction
После ввода (или скопировав команду), нажмите Return (Enter), затем введите пароль вашего пользователя MacOS (при этом вводимые символы отображаться не будут даже в виде «звездочек», но они вводятся) и еще раз нажмите Return.
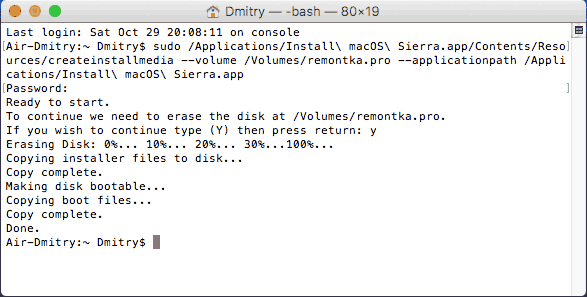
Останется лишь дождаться окончания копирования файлов по завершении которого вы увидите текст «Done.» и приглашение к новому вводу команд в терминале, который теперь можно закрыть.
На этом загрузочная флешка MacOS Sierra готова к использованию: чтобы загрузить ваш Mac с неё, при перезагрузке удерживайте клавишу Option (Alt), а при появлении выбора накопителей для загрузки, выберите вашу флешку.
Программы для записи установочного USB накопителя MacOS
Вместо терминала, на Mac вы можете использовать простые бесплатные программы, которые всё сделают автоматически (кроме загрузки Sierra из App Store, что вам все так же потребуется сделать вручную).
Две самых популярных программы такого рода — MacDaddy Install Disk Creator и DiskMaker X (обе бесплатные).
В первой из них достаточно выбрать флешку, которую нужно сделать загрузочной, а затем указать установщик MacOS Sierra, нажав «Select the OS X Installer». Последнее действие — нажать «Create Installer» и подождать, когда будет готов накопитель.
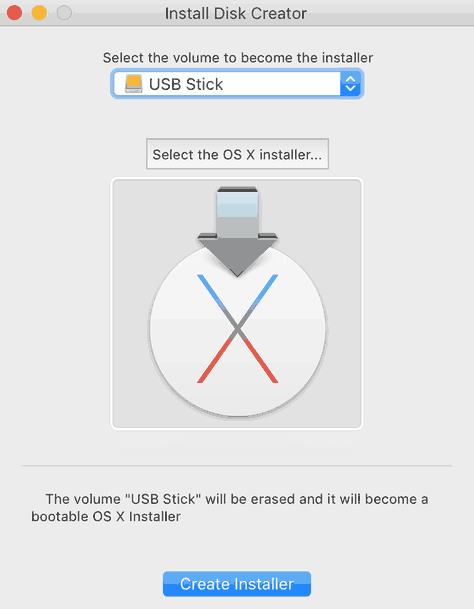
В DiskMaker X всё столь же просто:
- Выберите MacOS Sierra.
- Программа сама предложит вам копию системы, которую обнаружит на вашем компьютере или ноутбуке.

- Укажите USB накопитель, выберите «Erase then create a disk» (данные с флешки будут удалены). Нажмите Continue и введите пароль вашего пользователя, когда потребуется.
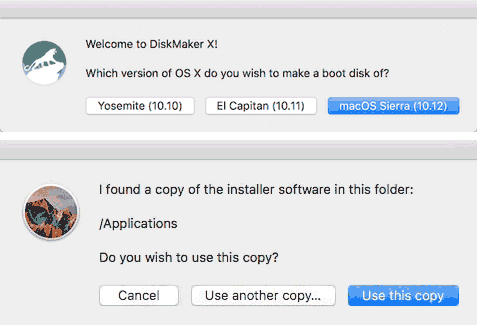
Через некоторое время (зависит от скорости обмена данными с накопителем) ваша флешка будет готова к использованию.
Официальные сайты программ:
- Install Disk Creator — http://macdaddy.io/install-disk-creator/
- DiskMakerX — http://diskmakerx.com
Как записать MacOS Sierra на флешку в Windows 10, 8 и Windows 7
Загрузочная флешка MacOS Sierra может быть создана и в Windows. Как уже упоминалось выше, вам потребуется образ установщика в формате .dmg, а созданный USB будет работать только на Mac.
Чтобы записать образ DMG на флешку в Windows потребуется сторонняя программа TransMac (которая является платной, но первые 15 дней работает бесплатно).
Процесс создания установочного накопителя состоит из следующих шагов (в процессе с флешки будут удалены все данные, о чем вас несколько раз предупредят):
- Запустите TransMac от имени Администратора (придется подождать 10 секунд, чтобы нажать кнопку Run для запуска программы, если вы используете пробный период).
- В левой панели выберите флешку из которой нужно сделать загрузочную с MacOS, кликните по ней правой кнопкой мыши и выберите «Format Disk for Mac», согласитесь с удалением данных (кнопка Yes) и задайте какое-либо имя диска (например, Sierra).

- По завершении форматирования, вновь кликните по флешке в списке слева правой кнопкой мыши и выберите пункт контекстного меню «Restore with Disk Image».
- Согласитесь с предупреждениями о потере данных, а затем укажите путь к файлу образа MacOS Sierra в формате DMG.

- Нажмите Ок, еще раз подтвердите, что предупреждены об утрате данных с USB и дождитесь завершения процесса записи файлов.
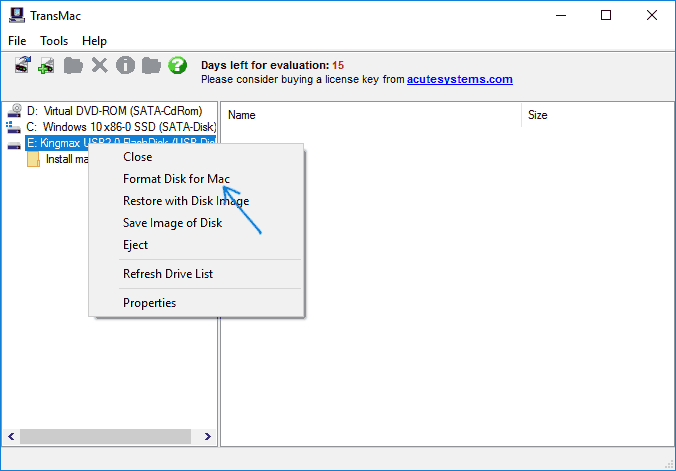
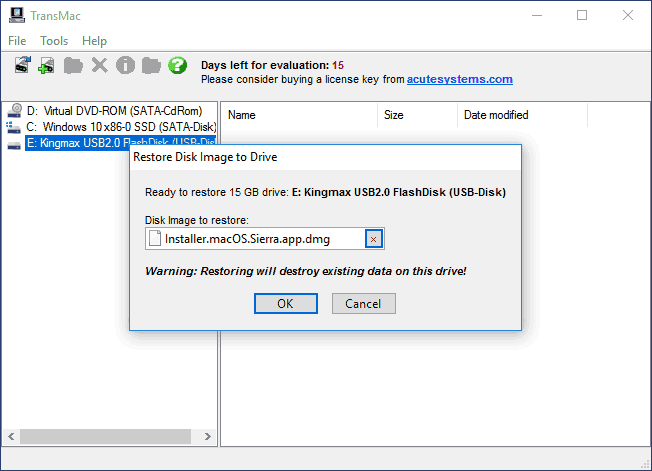
В итоге, загрузочная флешка MacOS Sierra, созданная в Windows готова к использованию, но, повторюсь, использовать её на простых ПК и ноутбуках не получится: установка системы с неё возможна только на компьютеры Apple. Скачать TransMac можно с официального сайта разработчика: http://www.acutesystems.com