Как вы знаете, Java — один из самых популярных языков программирования в мире и его знание существенно увеличит вашу значимость как программиста. Итак, вы решили начать писать на этом языке. Вам понадобится поставить JDK для того, чтобы писать и запускать программы на Java. JDK — набор софта, разработанного Oracle, содержащий в себе компилятор (javac), среду выполнения (Java Runtime Environment), стандартную библиотеку языка, примеры и документацию. Прочитав эту статью, вы узнаете, как установить и настроить JDK на своей системе, что такое среда разработки и какие варианты IDE существуют для Java. Также вы напишете свою первую программу на Java.
Установка Java Development Kit
- Перейдите на сайт Oracle и загрузите JDK для вашей платформы.
- После загрузки извлеките полученный архив и запустите извлеченное приложение.
- В процессе установке выберите вариант «Development Tool» и нажмите «Next».
- Спустя некоторое время установка завершится.
Итак, вы установили Java Development Kit, но это еще не всё. Необходимо настроить его для вашей системы.
Настройка JDK на примере Windows
- Перейдите в папку
%ProgramFiles%Java%версия установленного вами jdk%bin, нажмите на свойства любого файла в этой папке и скопируйте путь к нему. - Перейдите в свойства вашего компьютера, откройте вкладку «Дополнительно», нажмите «Переменные среды…». В открывшемся окне создайте новую переменную, назовите её
Path, в её значение вставьте скопированный ранее путь. - Теперь самое важное. Откройте командную строку и наберите
javac, чтобы убедиться, что JRE установлен и настроен. Если выдаётся список аргументов к командеjavac, то поздравляю, вы успешно установили и настроили всё, что необходимо для использования Java!
После установки JDK и JRE не помешает установить на компьютер одну из IDE.
Установка IDE
Для начала разберёмся, что такое IDE.
IDE (Integrated Development Environment) — это комплекс программных средств, используемый программистами для разработки программного обеспечения. IDE позволяет с лёгкостью писать, запускать, отлаживать и тестировать код.
Для написания сложных программ целесообразно использовать IDE. Мы рассмотрим наиболее популярные.
Блокнот
Да, и в блокноте можно писать код! Для разработки вам потребуется всего лишь установить JDK и указать путь к ней. Пишете код в блокноте, компилируете с помощью командной строки. Тем не менее, для разработки сложных программ это не самый лучший вариант из-за отсутствия каких-либо дополнительных возможностей, присутствующих в продвинутых IDE.
NetBeans
NetBeans — выбор профессиональных Java-разработчиков. В ней есть уникальные возможности и инструменты, которые позволят вам сделать вашу программу кроссплатформенной, а код удобочитаемым. NetBeans поддерживает не только Java, но и другие языки программирования для десктоп- и веб-разработки. Она полностью бесплатна, скачать её можно с официального сайта. Вот лишь некоторые её возможности:
- форматирование кода;
- установка сторонних библиотек;
- простой графический интерфейс;
- и многое, многое другое…
Eclipse
Eclipse, как и Netbeans — одна из наиболее популярных IDE. Она предоставляет впечатляющий интуитивно понятный интерфейс и производительную среду разработки, позволяющую комфортно разрабатывать приложения на Java. Скачать Eclipse можно бесплатно с официального сайта. Преимущества:
- возможность форматировать код так, как вам удобно;
- поддержка разбиения кода на модули;
- лёгкость использования одного и того же кода в разных проектах;
- перетаскивание (drag-and-drop);
- просмотр содержимого библиотек;
- удобный интерфейс.
IntelliJ IDEA
IntelliJ IDEA — известная IDE для Java, написанная, как ни странно, на Java. Укомплектована уникальными инструментами и позволяет без проблем ориентироваться в программе. Нахождение ошибок и отладка кода никогда не были такими легкими, как с IntelliJ IDEA.
JCreator
JCreator — продвинутая и самая быстрая IDE для Java, написанная на C++.
Пишем свою первую программу
Итак, вы установили и настроили JDK, JRE и IDE для Java. Каков следующий шаг? Конечно же, написать программу, чтобы окончательно убедиться, что всё работает и вы готовы к изучению языка. Вы познакомитесь с базовой структурой кода на Java и создадите свою первую программу! Стоит отметить, что перед изучением Java следует ознакомиться хотя бы с самыми простыми принципами объектно-ориентированного программирования.
Структуру программы на Java можно представить так:

Структура программы на Java
В файле с исходным кодом содержится несколько классов — это части программы, имеющие определённые функции. Хорошей практикой считается разбиение программы на несколько файлов с исходным кодом, каждый со своим назначением. В классах содержатся методы — действия, которые могут выполнять объекты данного класса. В методе содержатся команды, с помощью которых вы можете получить желаемый результат.
Перед тем, как приступить к созданию программы, необходимо создать проект, а в нём и файл, в котором будет содержаться ваш код. Рассмотрим создание проекта на IDE Eclipse, но в остальных IDE процесс отличается не сильно. Cверху выберите «File», затем наведите курсор на «New», в открывшемся меню выберите «Java Project». В появившемся окне введите имя проекта и другие нужные вам настройки (если не уверены, что делать, то можно просто оставить все как есть) и нажмите «Next». Готово, вы создали проект! Осталось лишь создать в нём класс, в котором вы напишете свою первую программу. Щёлкните правой кнопкой мыши по вашему проекту (он должен появиться справа) и выберите «New» → «Class». Присвойте новому классу имя (в данном примере — это first) и нажмите «Finish».
Приступим к написанию вашей первой программы. По традиции — это программа, выводящая на экран «Hello, world!».
 public class first{
     public static void main(String args[])
     {
         System.out.println("Hello, world!");
     }
 }
Разберём по частям написанное нами:
public— это модификатор доступа, определяющий, из какой части программы может использоваться наш класс. В вашем примереpublic— это весь код;class— ключевое слово, показывающее, что вы объявляете класс, а не что-либо иное;first— имя вашего класса. Круглые скобки определяют начало и конец кода класса;public static void main(String args[])— объявление публичного статического метода (то есть который можно вызвать, не создавая объект класса). Метод в примере ничего не возвращает и принимает в качестве аргументов массив строк. Единственная команда в этом методе выводит в консоль сообщение «Hello, world!». Заметьте, вместоprintlnможно написатьprint, разница лишь в том, что в случае сprintlnдополнительно выведется символ переноса строки.
Хорошо, вы написали вашу первую программу. Теперь её надо запустить. Для этого просто нажмите белую стрелочку в зеленом кружке на верхней панели (при наведении курсора на неё должно высветиться «Run»). После нажатия внизу откроется консоль, в которой вы увидите сообщение «Hello, world»! Поздравляю, вы написали вашу первую программу на Java и готовы погрузиться в увлекательный мир этого языка!
Полезные ссылки для дальнейшего изучения
Вот несколько ресурсов, которые помогут вам в изучении Java:
- документация Oracle по стандартной библиотеке языка;
- уроки по Java от Oracle;
- теория объектно-ориентированного программирования;
- хорошая книга-самоучитель;
- большое количество интересных и полезных статей про Java на русском языке.
Java сама по себе является платформой, которая обеспечивает работу на устройстве всех приложений и игр,
поддерживающих данный язык программирования. С течением времени, язык стал менее распространен, на замену
ему пришел JavaScript, но встретить сайт, работающий по этой технологии еще вполне вероятно. Такие сайты
не будут взаимодействовать и отвечать на Ваши запросы, что является признаком того, что программа не
установлена на девайсе. Также есть игры, типа Minecraft, которым для работы она понадобится. А возможно
будет использоваться для самого освоения навыков программирования на языке Java.
Для того чтобы установить эту программу, помимо загрузки, а также установки, необходимо ещё будет
проверить качество установленного расширения.
Как загрузить Джаву
- 1. Найдите программу и нажмите “скачать”.
- 2. По запросу выберите автономное скачивание Windows Offline, при таком скачивании доступ к Интернету
не важен. - 3. Место для сохранения выберите на рабочем столе. В перечне будет указано выполнить или сохранить,
щелкните сохранить в локальную систему. - 4. На этом этапе закройте абсолютно все используемые вкладки, включая браузер.
- 5. Для корректной установки нажмите два раза по иконке Java.
- 6. Кликните установить (Install), примите все условия лицензионного соглашения, чтобы установка
совершилась. - 7. При установке будет предложен список с дополняющими и похожими продуктами. Могут быть установлены в
то же время, что и Java. Выбрав нужный для себя вариант нажмите Далее (Next). - 8. На завершающих этапах будут всплывать окна о всевозможных нюансах загрузки и в конце кнопка Закрыть
(Close). Программное обеспечение установлено.
Далее проводится проверка установки по проверочному дополнению, которое будет указано. Желательно
перезапустить компьютер для более корректной работы.
Что делать с этой программой?
Загружая, пользователь получает весь пакет JRE, который включает в себя библиотеки Java, классы платформы
и Java Virtual Machine. Программным обеспечением является этот же пакет, который используется при работе с
браузером. Он запускает и синхронизирует язык под устройство, отображая необходимое. Если быть точнее, то
его работа начинается только при работе в Интернет, тогда и начинается поддержка приложение и сайтов на
Java.
Рекомендуется всегда проверять обновления версий и использовать новейшие для правильной работы программы,
устанавливайте безопасность непосредственно на самом сайте. Удаляйте старые версии, информацию по их
удалению тоже можно найти на официальной странице, очищайте кэш, а также не лишним будет установить
автоматическое обновление версий. Чтобы обезопасить устройство от вирусов, существует настройка системы
безопасности. Она может самостоятельно блокировать или предупреждать о вредоносных сайтах или приложениях.
Программное обеспечение не сложно установить, а также запустить на Windows 10, оно имеет много проверок
качества, несомненно необходимо каждому ноутбуку или компьютеру для активного пользователя или геймера.
by Matthew Adams
Matthew is a freelancer who has produced a variety of articles on various topics related to technology. His main focus is the Windows OS and all the things… read more
Updated on May 27, 2022
- The JDK (Java Development Kit) is a collection of tools required for developing and testing programs in the language.
- You can easily download JDK 11 from the official Oracle website in no time.
- Also, find out how to check if you have JDK installed on the PC.
Java is an object-orientated programming language that programmers use to develop Java software. For that, they need to download a JDK 11 (Java Development Kit) installer for Windows.
Java 18 is the latest JDK development kit for Windows, Linux, and macOS platforms. If you are a beginner and looking for regular updates for a prolonged period, we recommend going with Java SE 11.
So without further ado, let’s walk you through the process to download JDK 11 installer for Windows.
How do I check if my computer is compatible with JDK 11?
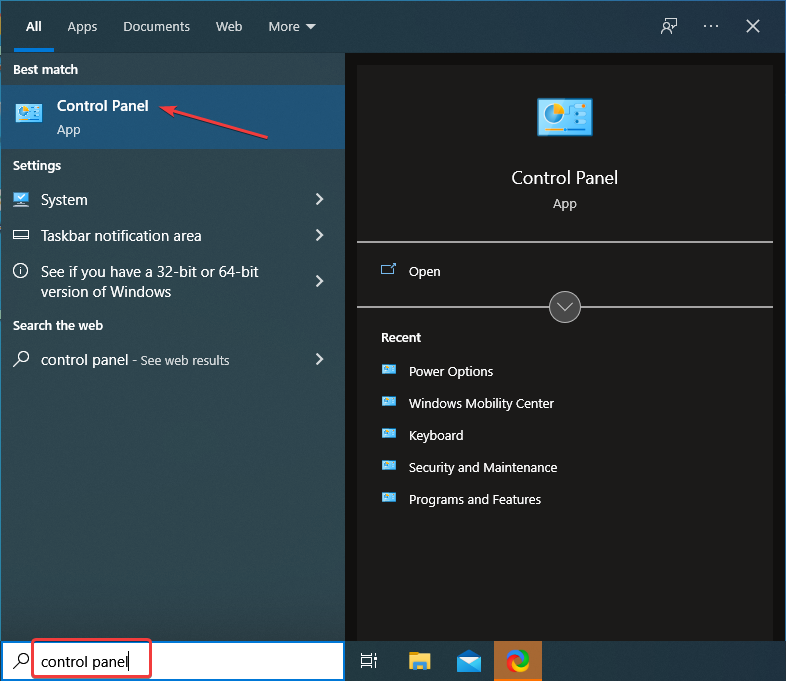
- Press Windows + S to launch the Search menu, enter Control Panel in the text field, and click on the relevant search result.

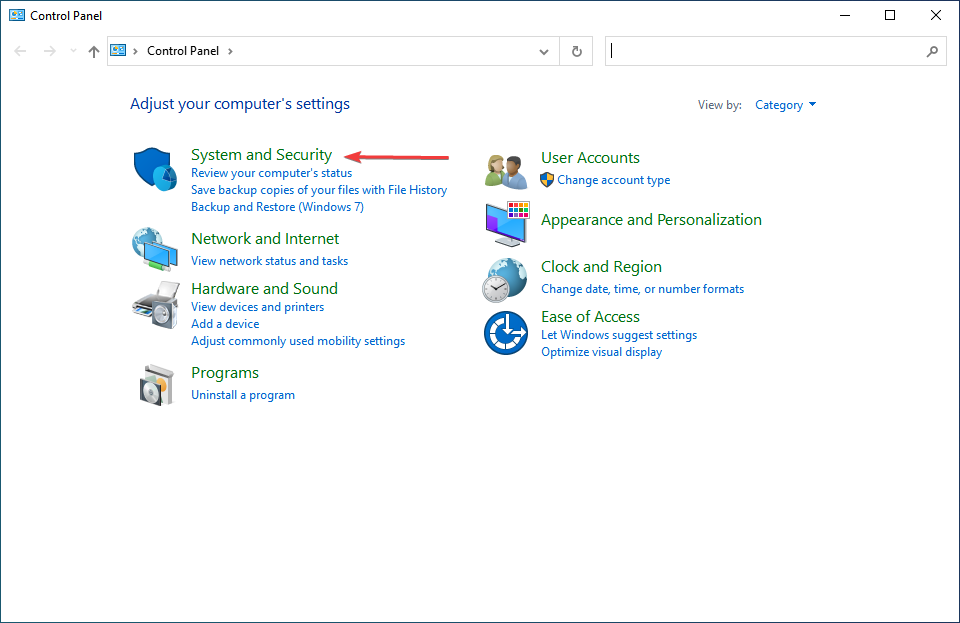
- Next, select System and Security from the options listed here.

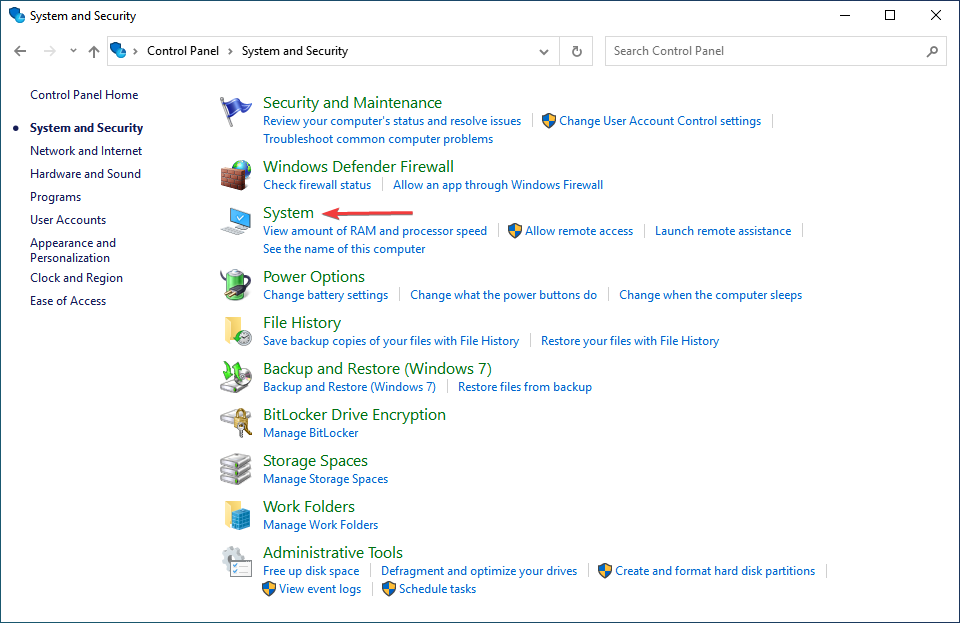
- Click on the System entry.
- Now, check the System type here.

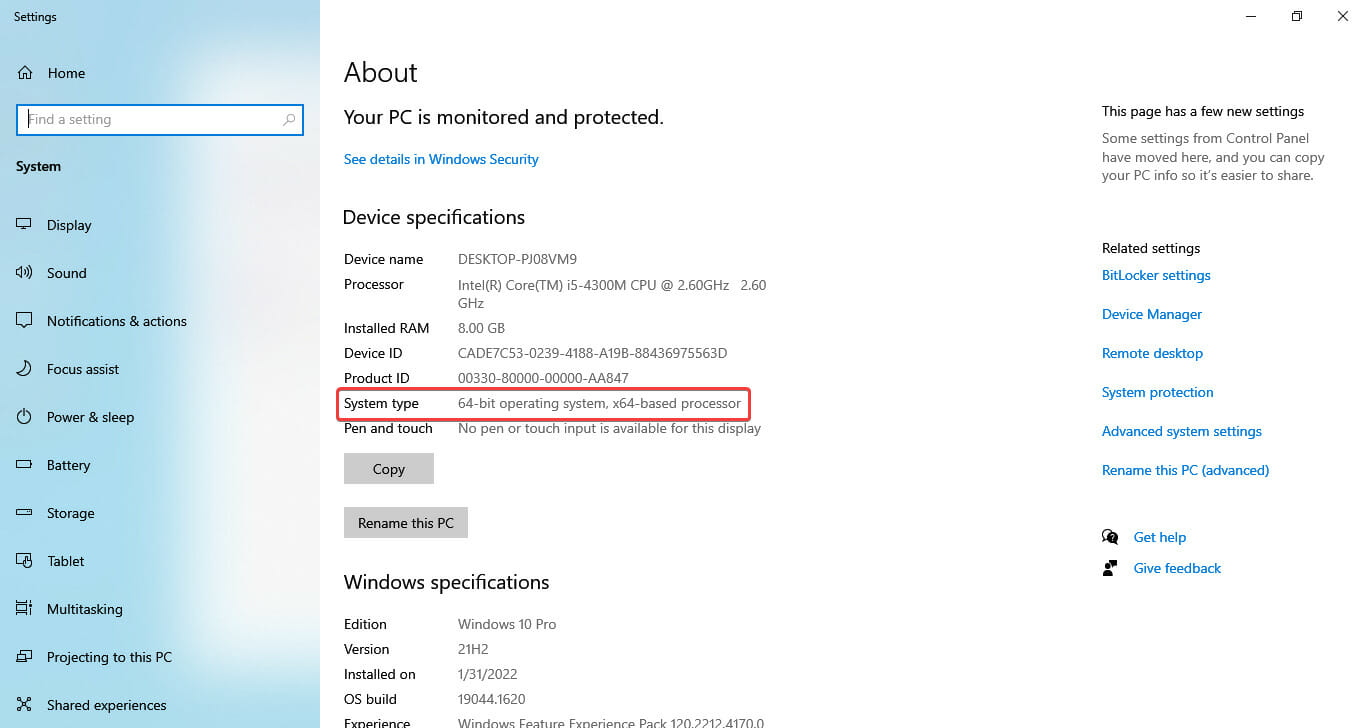
Before you proceed to install JDK 11, it’s imperative to check that your computer meets the system requirements for it. The platform is compatible with Windows 11, Windows 10, 8, and 7, but you need to be running the 64-bit version of the OS.
If the System type reads 64-bit, you can install JDK 11, but in case it says 32-bit, you would have to either upgrade or go with a different version of JDK that supports 32-bit architecture.
Once you have verified that your PC is compatible, let’s go straight to the process to download JDK 11 installer in Windows 10.
How can I install JDK 11 in Windows 10?
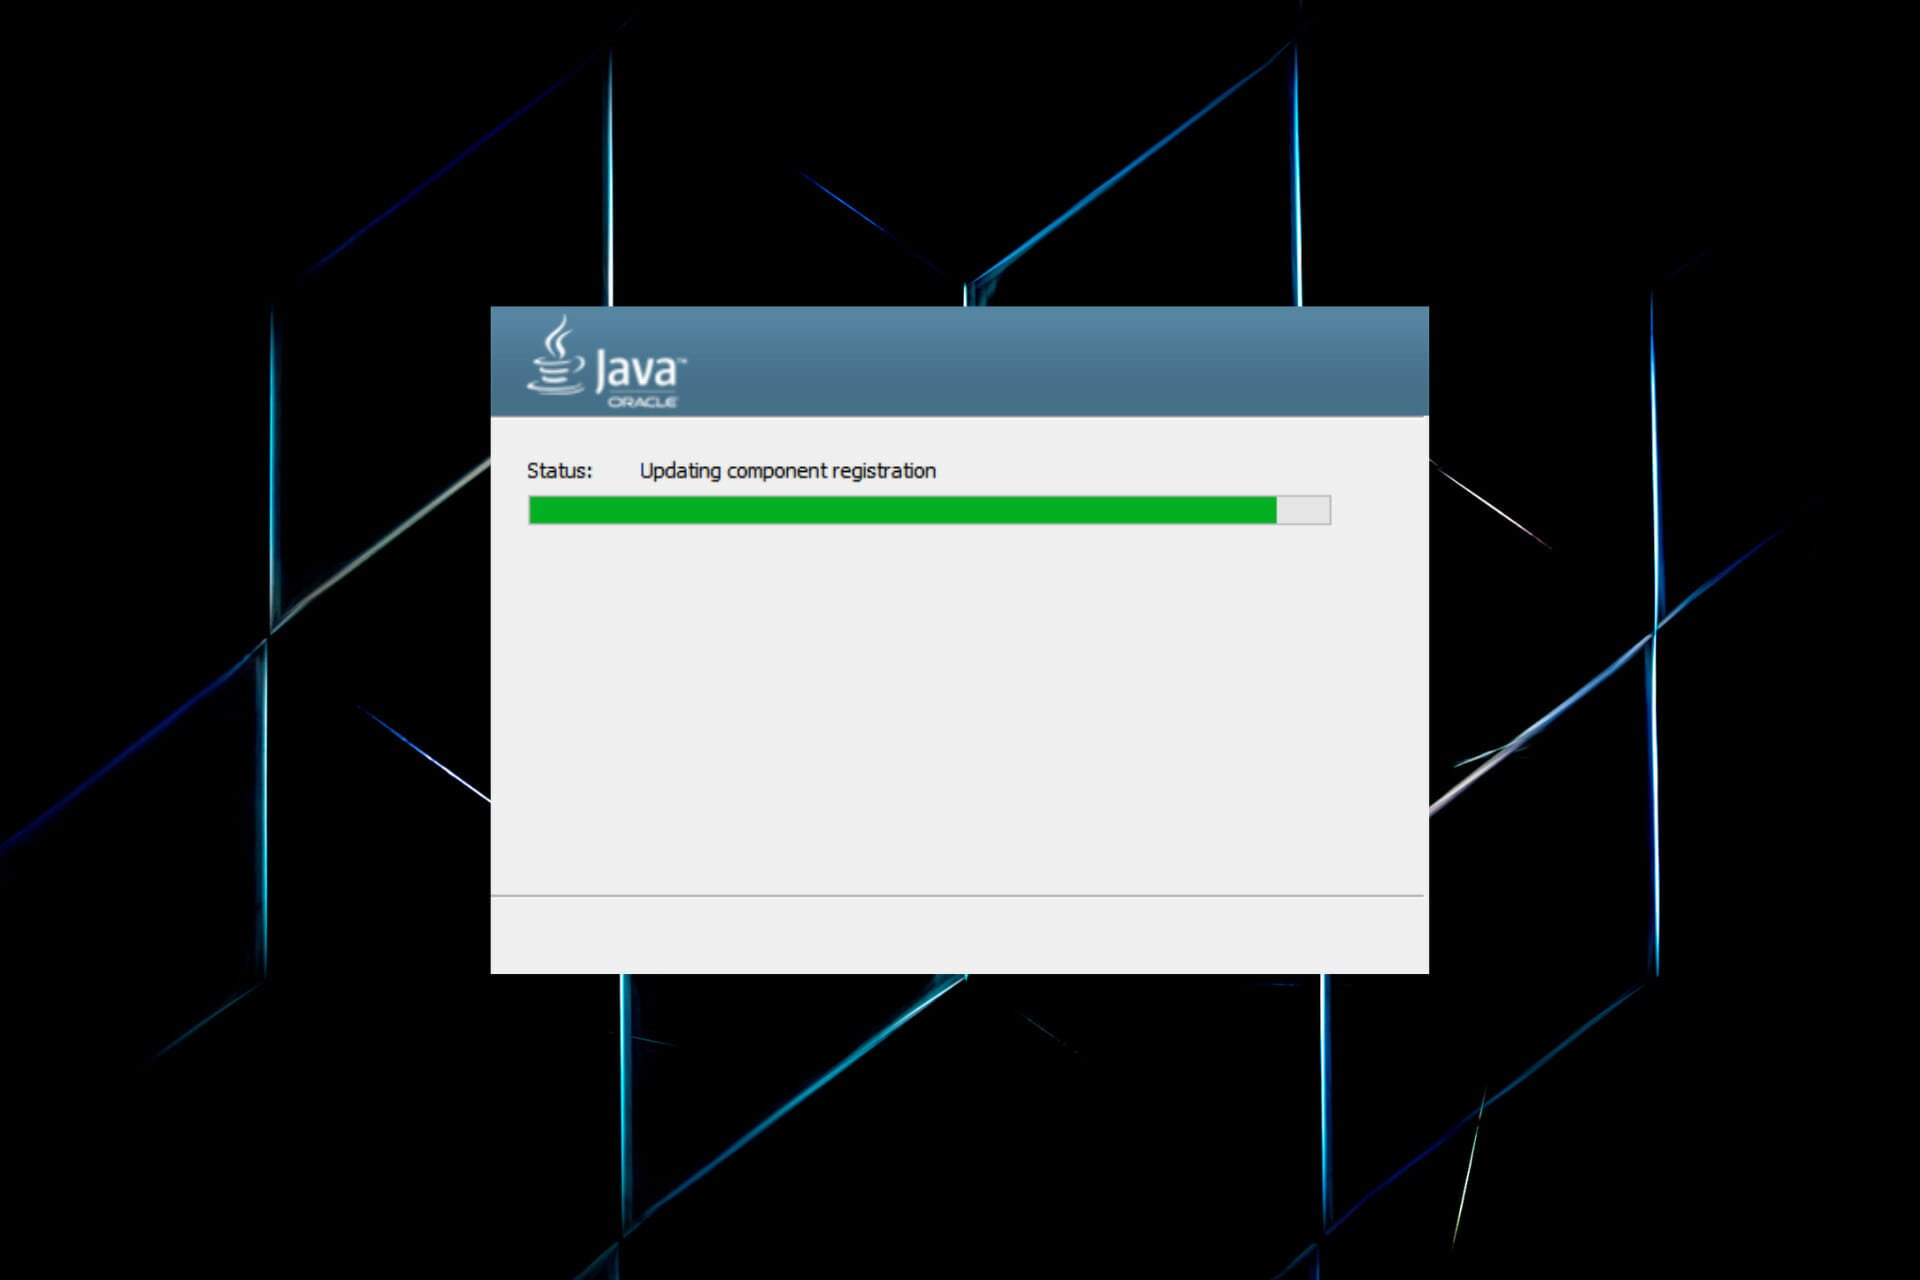
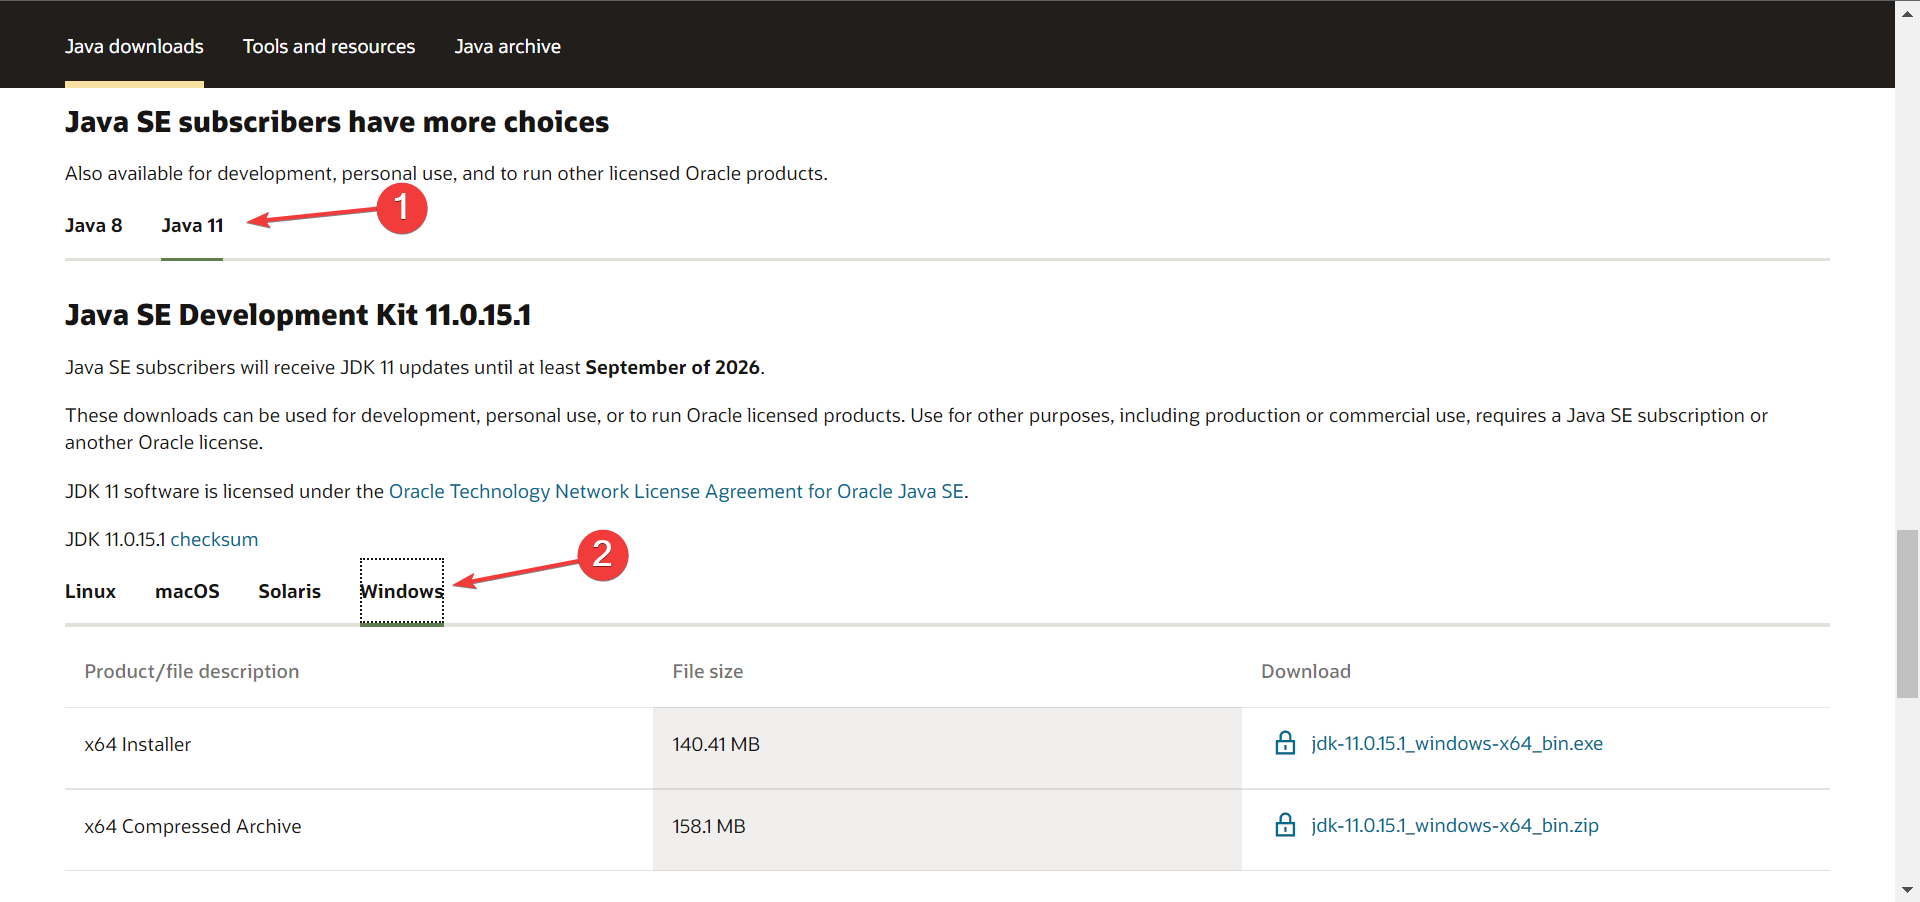
1. Download and install Java SE 11
- To get Java SE 11, open the Java SE Downloads page in a browser.
- Scroll down, select Java 11, and then click on the Windows option from the available ecosystems.

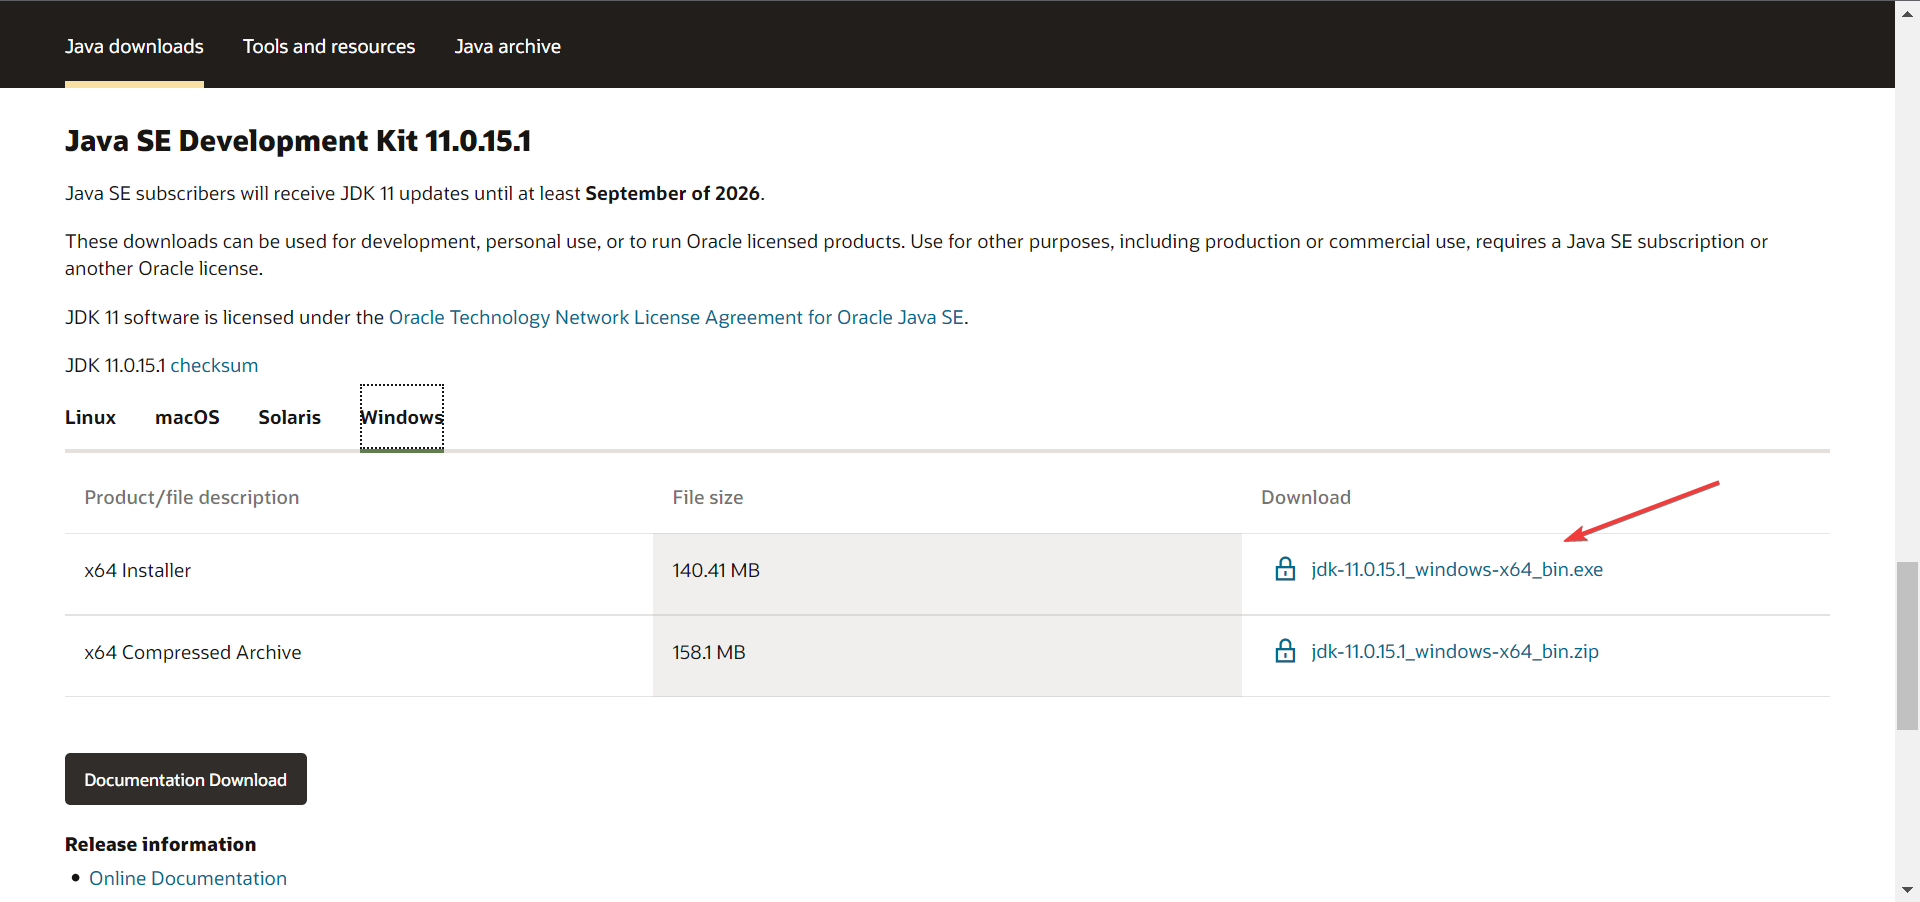
- Next, click on the download link next to the installer package (.exe file).
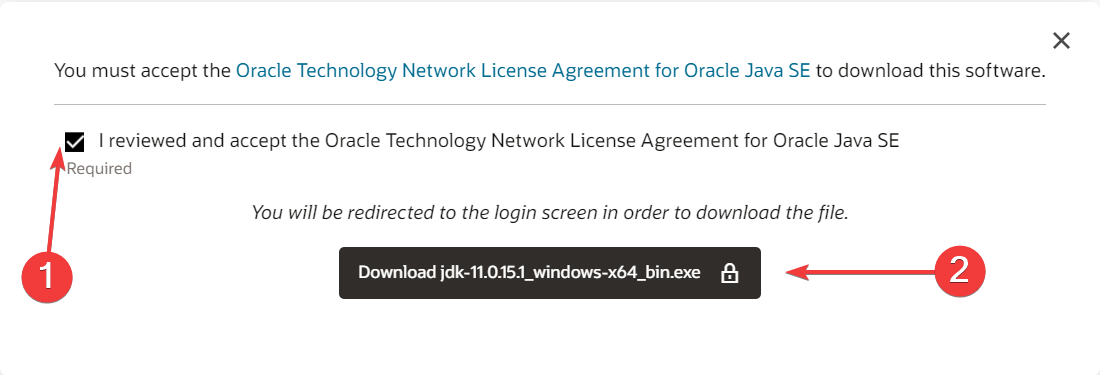
- Tick the checkbox for I reviewed and accept the Oracle Technology Network License Agreement for Oracle Java SE, and then click on the download button at the bottom.

- If you have already signed up, enter the credentials to log in. Otherwise, you can create an account to proceed.
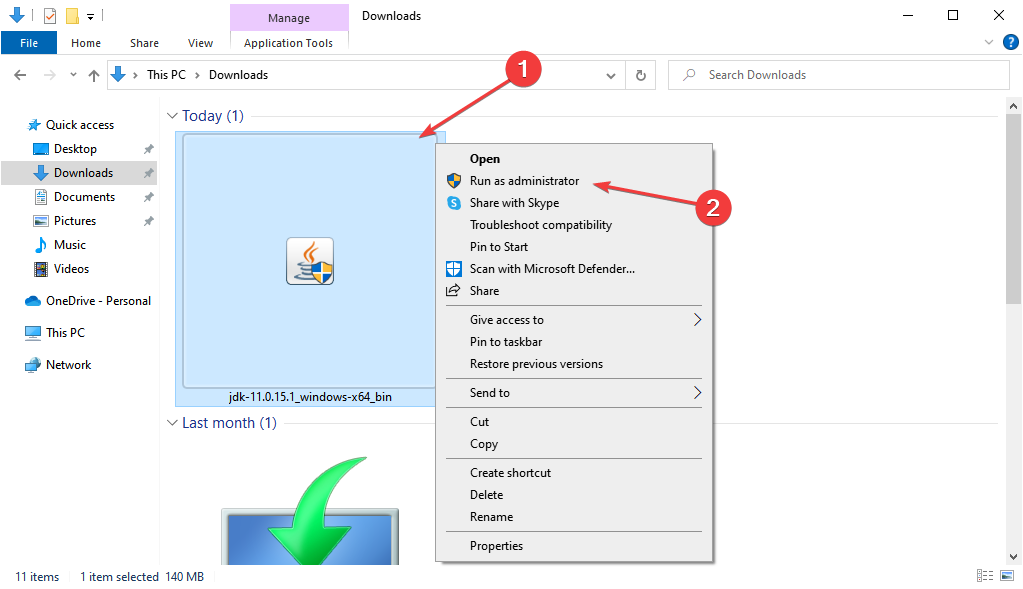
- Once the download is completed, press Windows + E to launch the File Explorer and head to the location where the downloaded file is stored.
- Now, right-click the jdk-11.0.15.1_windows-x64_bin (version may differ) file, and select Run as administrator from the context menu.

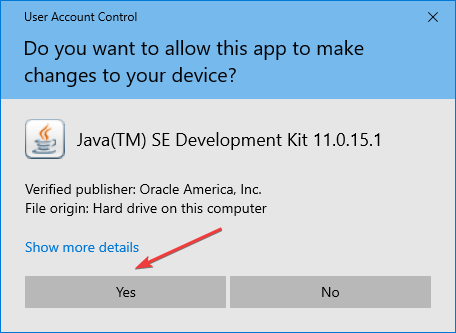
- Click Yes in the UAC (User Account Control) prompt that pops up.

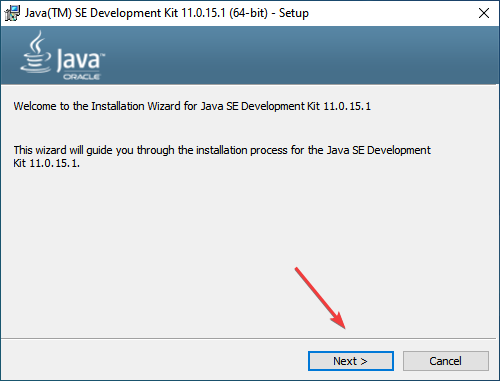
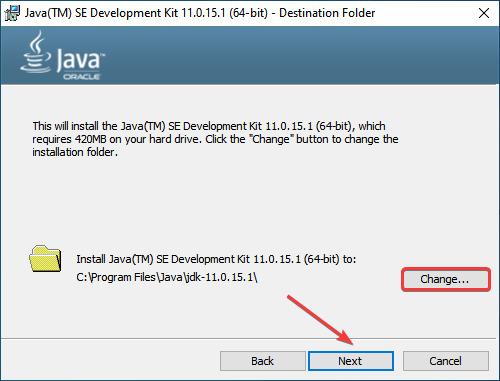
- Click the Next button.

- You can click Change to select an alternative folder to install Java SE 11 or click on Next to continue with the default location right away.
- Now, wait for the installation to complete.
Some PC issues are hard to tackle, especially when it comes to corrupted repositories or missing Windows files. If you are having troubles fixing an error, your system may be partially broken.
We recommend installing Restoro, a tool that will scan your machine and identify what the fault is.
Click here to download and start repairing.
Once it’s done, you have completed half the task, i.e, downloaded and installed JDK 11 in Windows 11. However, you still have to set up a path variable for it to get things up and running. Follow the steps in the next section to do that.
2. Set Up a Path Environment Variable
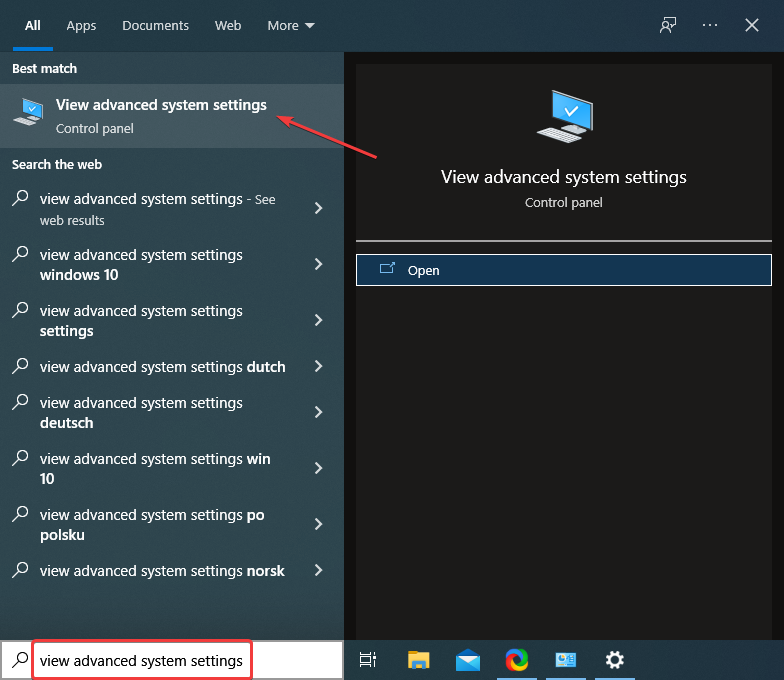
- Press Windows + S to launch the Search menu, enter View advanced system settings in the text field, and click on the relevant search result.

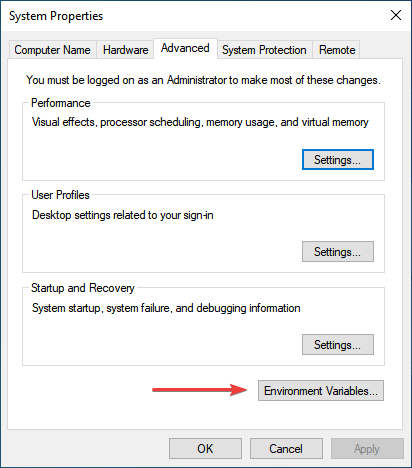
- Click on the Environment Variables button in the Advanced tab.

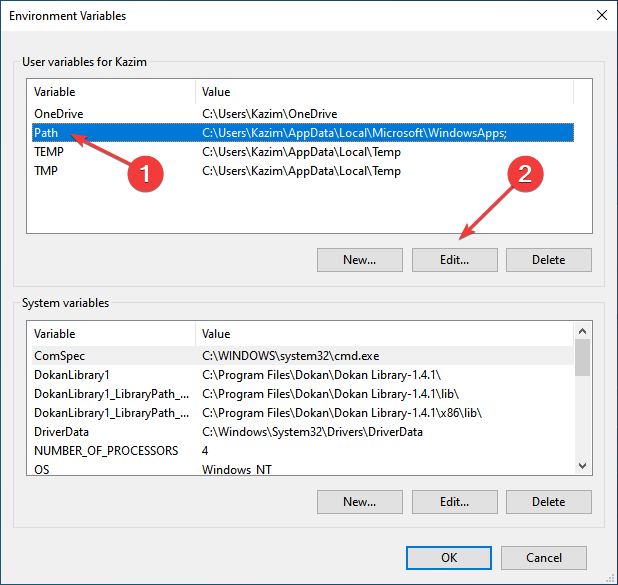
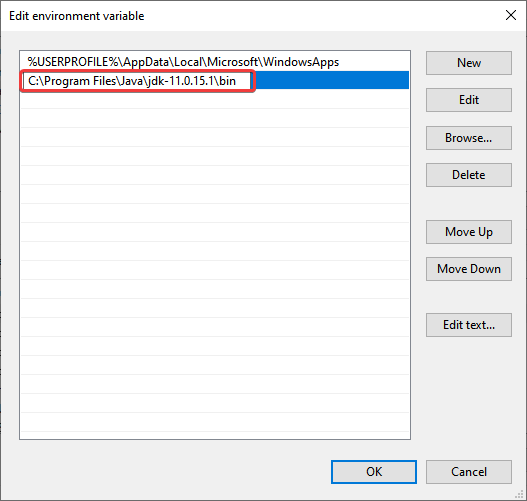
- Select the PATH variable, and click on the Edit button.

- Next, click on New on the right.

- Paste the full JDK 11 bin folder path as given below. It may differ on your computer if you have changed the location earlier during the installation process, so make sure to verify it once.
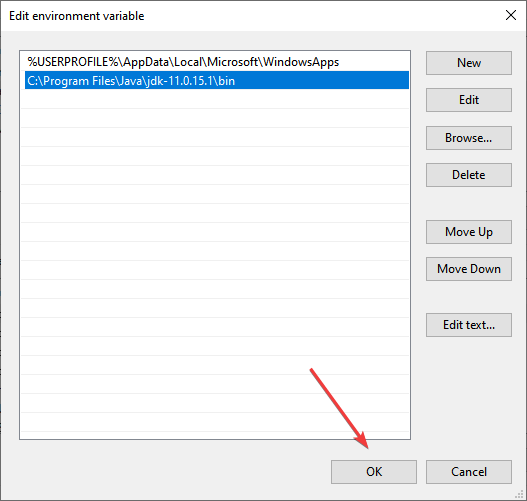
C:Program FilesJavajdk-11.0.15.1bin - Click the OK button after entering the bin folder path.
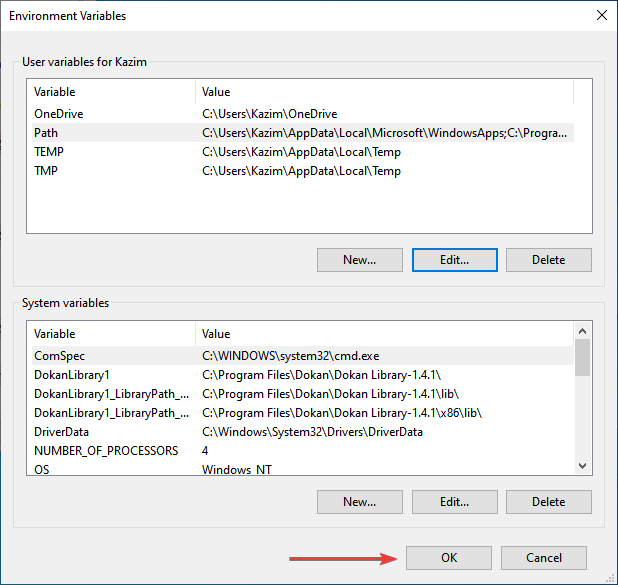
- Again, click OK in the Environment Variables window to save the changes.

That’s it! You can start working on it right away.
- Norton Won’t Uninstall: 5 Ways to Remove it by Force
- Fix: Password Protected Sharing not Turning Off on Windows
- Windows Photo Gallery Not Working: 3 Fixes That You Can Use
- How to Uninstall uTorrent: 5 Ways to Completely Remove it
How do I check if JDK 11 is installed on my computer?
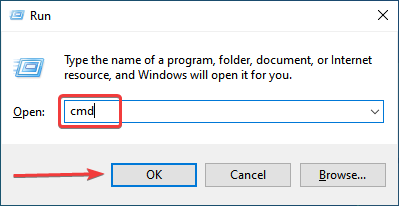
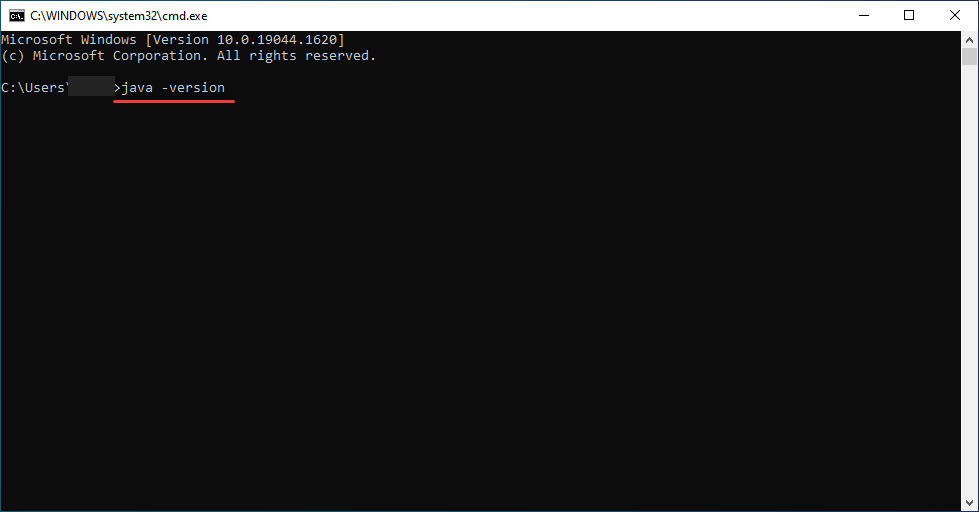
- Press Windows + R to launch the Run command, enter cmd in the text field, and either click OK or hit Enter to launch the Command Prompt.

- Now, type or paste the following command and hit Enter to view the Java version.
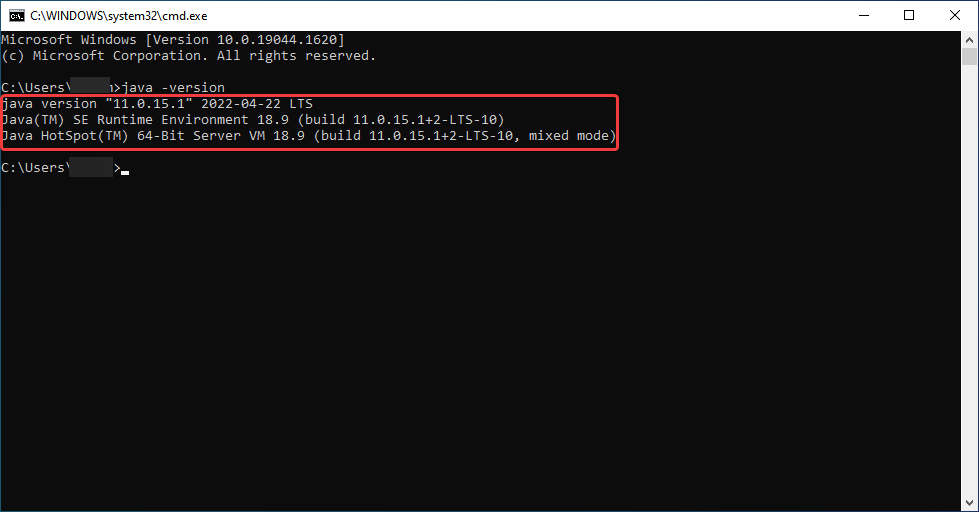
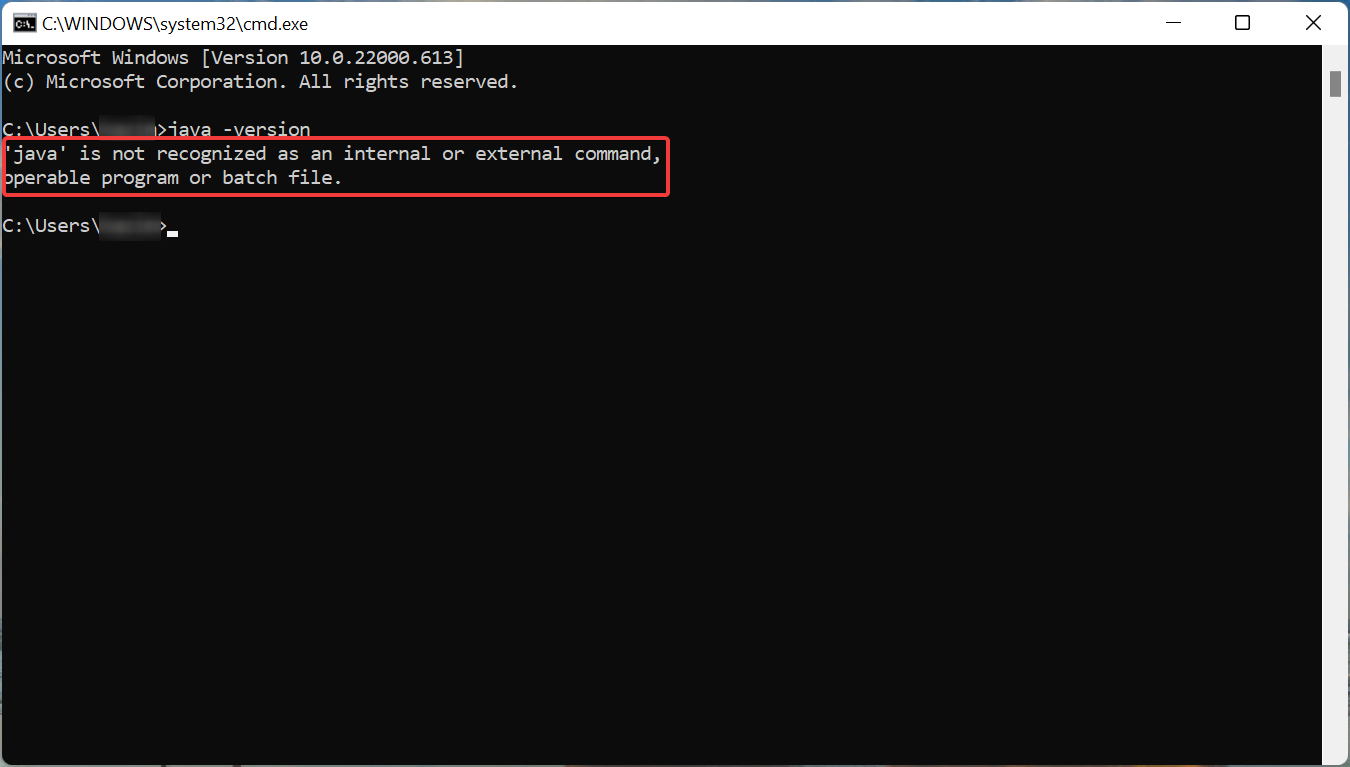
java -version
- If the Command Prompt lists the version number along with other relevant information, you have JDK installed on the computer.
- However, if you receive a response that ‘java’ is not recognized as an internal or external command, operable program or batch file, it means that you don’t have JDK installed yet, and can follow the steps above to get it.

While earlier, there were ways to download JDK 11 Windows installer without login, you now have to create an account. Looks like Oracle found a way to disable all these.
So, that’s how users can download and install JDK 11 in Windows 10 for free. Thereafter, they can compile their Java code text files with the javac command. Also, the methods listed here would help download JDK 11 in Windows 7 as well.
Besides, find out how to install Java in Windows 11, in case you are running the latest iteration of the OS from Microsoft.
If you have any other queries, drop a comment in the section below.
![]()
Newsletter
by Matthew Adams
Matthew is a freelancer who has produced a variety of articles on various topics related to technology. His main focus is the Windows OS and all the things… read more
Updated on May 27, 2022
- The JDK (Java Development Kit) is a collection of tools required for developing and testing programs in the language.
- You can easily download JDK 11 from the official Oracle website in no time.
- Also, find out how to check if you have JDK installed on the PC.
Java is an object-orientated programming language that programmers use to develop Java software. For that, they need to download a JDK 11 (Java Development Kit) installer for Windows.
Java 18 is the latest JDK development kit for Windows, Linux, and macOS platforms. If you are a beginner and looking for regular updates for a prolonged period, we recommend going with Java SE 11.
So without further ado, let’s walk you through the process to download JDK 11 installer for Windows.
How do I check if my computer is compatible with JDK 11?
- Press Windows + S to launch the Search menu, enter Control Panel in the text field, and click on the relevant search result.
- Next, select System and Security from the options listed here.
- Click on the System entry.
- Now, check the System type here.
Before you proceed to install JDK 11, it’s imperative to check that your computer meets the system requirements for it. The platform is compatible with Windows 11, Windows 10, 8, and 7, but you need to be running the 64-bit version of the OS.
If the System type reads 64-bit, you can install JDK 11, but in case it says 32-bit, you would have to either upgrade or go with a different version of JDK that supports 32-bit architecture.
Once you have verified that your PC is compatible, let’s go straight to the process to download JDK 11 installer in Windows 10.
How can I install JDK 11 in Windows 10?
1. Download and install Java SE 11
- To get Java SE 11, open the Java SE Downloads page in a browser.
- Scroll down, select Java 11, and then click on the Windows option from the available ecosystems.
- Next, click on the download link next to the installer package (.exe file).
- Tick the checkbox for I reviewed and accept the Oracle Technology Network License Agreement for Oracle Java SE, and then click on the download button at the bottom.
- If you have already signed up, enter the credentials to log in. Otherwise, you can create an account to proceed.
- Once the download is completed, press Windows + E to launch the File Explorer and head to the location where the downloaded file is stored.
- Now, right-click the jdk-11.0.15.1_windows-x64_bin (version may differ) file, and select Run as administrator from the context menu.
- Click Yes in the UAC (User Account Control) prompt that pops up.
- Click the Next button.
- You can click Change to select an alternative folder to install Java SE 11 or click on Next to continue with the default location right away.
- Now, wait for the installation to complete.
Some PC issues are hard to tackle, especially when it comes to corrupted repositories or missing Windows files. If you are having troubles fixing an error, your system may be partially broken.
We recommend installing Restoro, a tool that will scan your machine and identify what the fault is.
Click here to download and start repairing.
Once it’s done, you have completed half the task, i.e, downloaded and installed JDK 11 in Windows 11. However, you still have to set up a path variable for it to get things up and running. Follow the steps in the next section to do that.
2. Set Up a Path Environment Variable
- Press Windows + S to launch the Search menu, enter View advanced system settings in the text field, and click on the relevant search result.
- Click on the Environment Variables button in the Advanced tab.
- Select the PATH variable, and click on the Edit button.
- Next, click on New on the right.
- Paste the full JDK 11 bin folder path as given below. It may differ on your computer if you have changed the location earlier during the installation process, so make sure to verify it once.
C:Program FilesJavajdk-11.0.15.1bin - Click the OK button after entering the bin folder path.
- Again, click OK in the Environment Variables window to save the changes.
That’s it! You can start working on it right away.
- Norton Won’t Uninstall: 5 Ways to Remove it by Force
- Fix: Password Protected Sharing not Turning Off on Windows
How do I check if JDK 11 is installed on my computer?
- Press Windows + R to launch the Run command, enter cmd in the text field, and either click OK or hit Enter to launch the Command Prompt.
- Now, type or paste the following command and hit Enter to view the Java version.
java -version - If the Command Prompt lists the version number along with other relevant information, you have JDK installed on the computer.
- However, if you receive a response that ‘java’ is not recognized as an internal or external command, operable program or batch file, it means that you don’t have JDK installed yet, and can follow the steps above to get it.
While earlier, there were ways to download JDK 11 Windows installer without login, you now have to create an account. Looks like Oracle found a way to disable all these.
So, that’s how users can download and install JDK 11 in Windows 10 for free. Thereafter, they can compile their Java code text files with the javac command. Also, the methods listed here would help download JDK 11 in Windows 7 as well.
Besides, find out how to install Java in Windows 11, in case you are running the latest iteration of the OS from Microsoft.
If you have any other queries, drop a comment in the section below.
![]()
Newsletter
Introduction
The Java Development Kit (JDK) is software used for Java programming, along with the Java Virtual Machine (JVM) and the Java Runtime Environment (JRE). The JDK includes the compiler and class libraries, allowing developers to create Java programs executable by the JVM and JRE.
In this tutorial, you will learn to install the Java Development Kit on Windows.
Prerequisites
- A system running Windows 10.
- A network connection.
- Administrator privileges.
Note: Develop your core app services on PNAP’s Bare Metal Cloud servers to ensure superior performance. It’s cloud native and the perfect environment for the entire SDLC.
Check if Java Is Installed
Before installing the Java Development Kit, check if a Java version is already installed on Windows. Follow the steps below:
- Open a command prompt by typing cmd in the search bar and press Enter.
- Run the following command:
java -version
The command outputs the Java version on your system. If Java isn’t installed, the output is a message stating that Java isn’t recognized as an internal or external command.
Download Java for Windows 10
Download the latest Java Development Kit installation file for Windows 10 to have the latest features and bug fixes.
- Using your preferred web browser, navigate to the Oracle Java Downloads page.
- On the Downloads page, click the x64 Installer download link under the Windows category. At the time of writing this article, Java version 17 is the latest long-term support Java version.
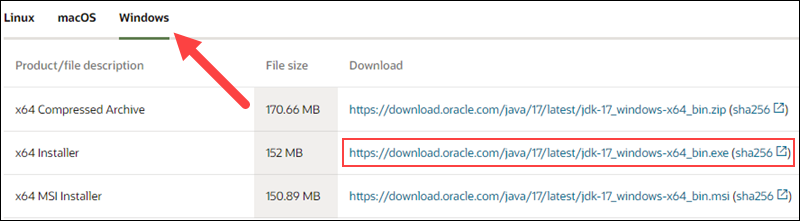
Wait for the download to complete.
After downloading the installation file, proceed with installing Java on your Windows system.
Follow the steps below:
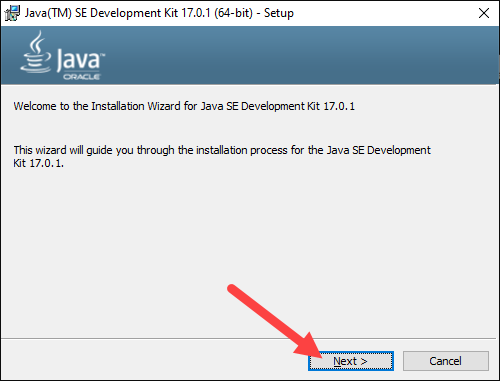
Step 1: Run the Downloaded File
Double-click the downloaded file to start the installation.
Step 2: Configure the Installation Wizard
After running the installation file, the installation wizard welcome screen appears.
1. Click Next to proceed to the next step.
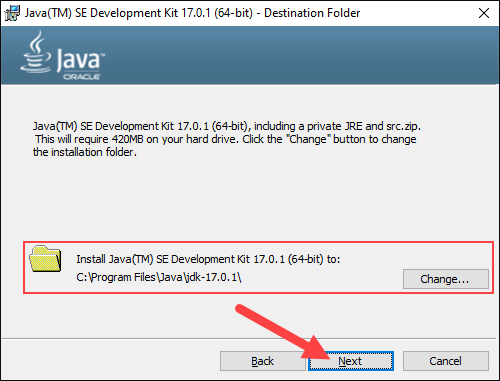
2. Choose the destination folder for the Java installation files or stick to the default path. Click Next to proceed.
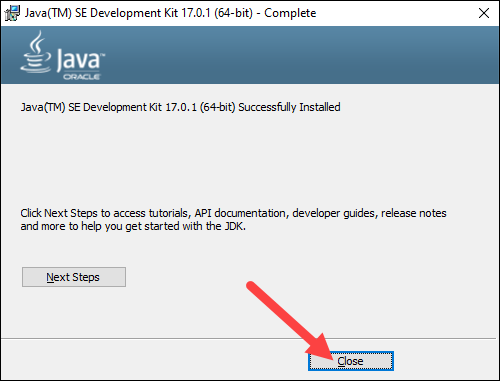
3. Wait for the wizard to finish the installation process until the Successfully Installed message appears. Click Close to exit the wizard.
Set Environmental Variables in Java
Set Java environment variables to enable program compiling from any directory. To do so, follow the steps below:
Step 1: Add Java to System Variables
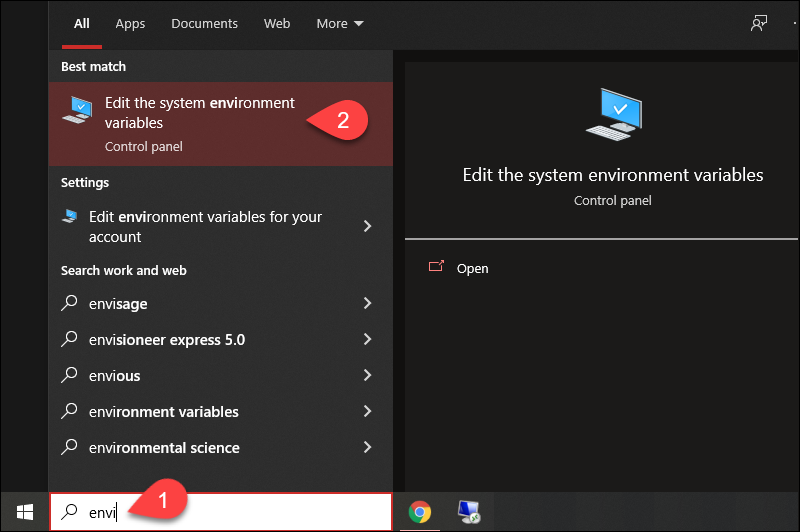
1. Open the Start menu and search for environment variables.
2. Select the Edit the system environment variables result.
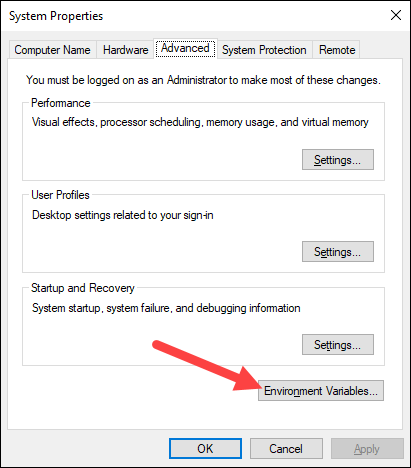
3. In the System Properties window, under the Advanced tab, click Environment Variables…
4. Under the System variables category, select the Path variable and click Edit:

5. Click the New button and enter the path to the Java bin directory:
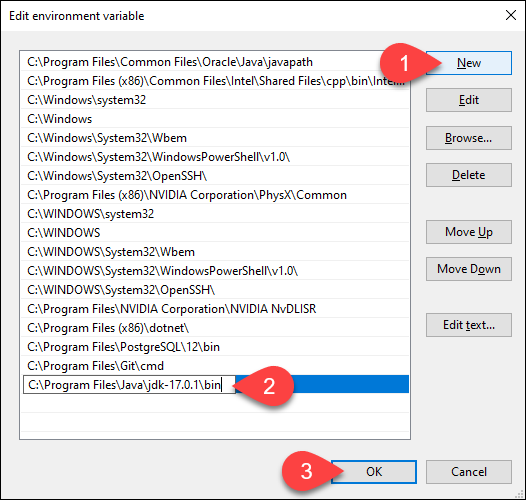
Note: The default path is usually C:Program FilesJavajdk-17.0.1bin.
6. Click OK to save the changes and exit the variable editing window.
Step 2: Add JAVA_HOME Variable
Some applications require the JAVA_HOME variable. Follow the steps below to create the variable:
1. In the Environment Variables window, under the System variables category, click the New… button to create a new variable.
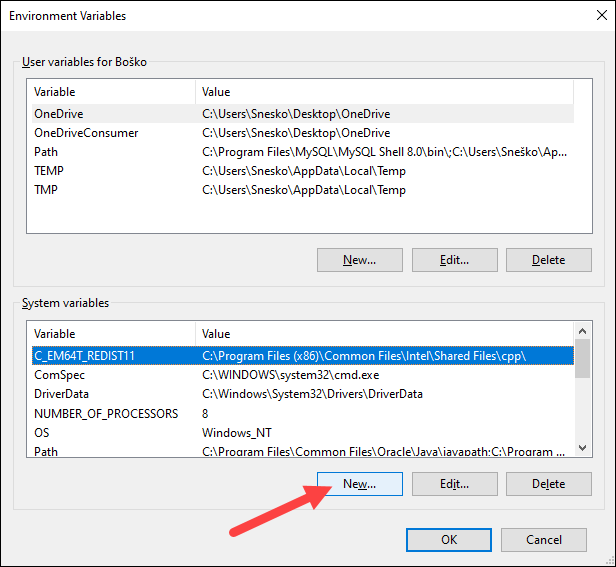
2. Name the variable as JAVA_HOME.
3. In the variable value field, paste the path to your Java jdk directory and click OK.
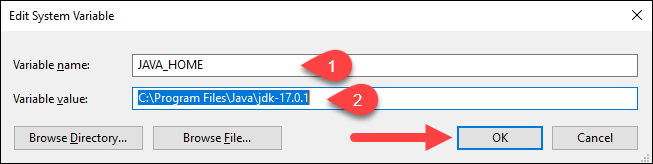
4. Confirm the changes by clicking OK in the Environment Variables and System properties windows.
Test the Java Installation
Run the java -version command in the command prompt to make sure Java installed correctly:

If installed correctly, the command outputs the Java version. Make sure everything works by writing a simple program and compiling it. Follow the steps below:
Step 1: Write a Test Java Script
1. Open a text editor such as Notepad++ and create a new file.
2. Enter the following lines of code and click Save:
class HelloWorld{
	public static void main(String args[]){
		System.out.println("Hello world!");
		}
}
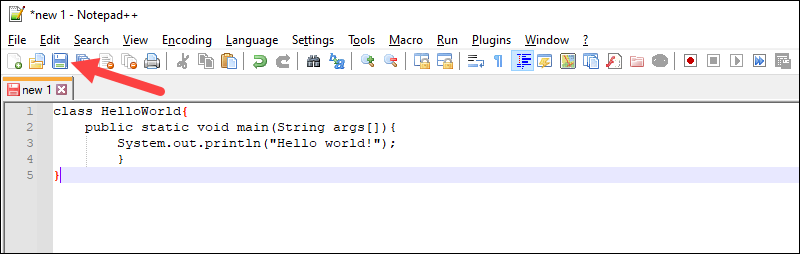
3. Name the file and save it as a Java source file (*.java).
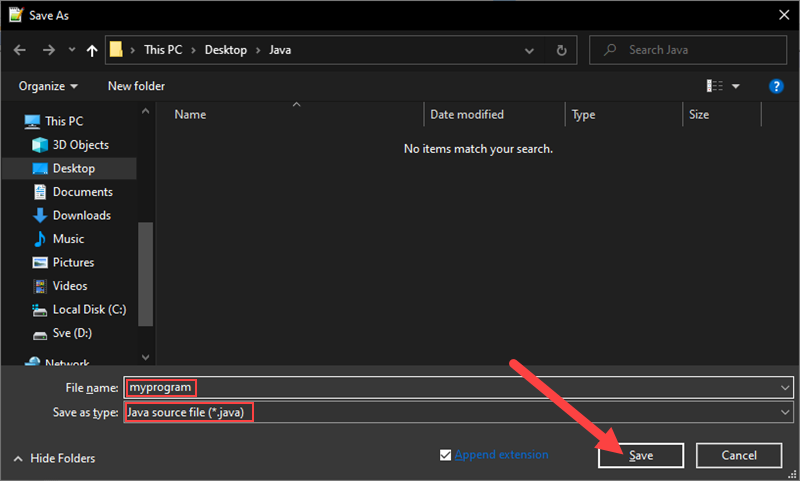
Note: When using Notepad, select All files for the Save as type option and add the .java extension to the file name.
Step 2: Compile the Test Java Script
1. In the command prompt, change the directory to the file’s location and use the following syntax to compile the program:
javac [filename]For example:

After a successful compilation, the program generates a .class file in the file directory.
2. Run the program with the following syntax:
java [filename]
The output shows that the program runs correctly, displaying the Hello world! message.
Conclusion
This tutorial showed how to install the Java Development Kit on a Windows system. If you are interested in learning more about Java, read our list of 13 best Java IDEs for writing, debugging, and testing Java code.