Содержание
- Шаг 1: Загрузка установщика с официального сайта
- Шаг 2: Инсталляция JDK
- Шаг 3: Настройка операционной системы
- Шаг 4: Проверка работы JDK
- Вопросы и ответы

Начинающие разработчики, изучающие язык программирования Java, сталкиваются с надобностью установки на свой компьютер фирменного компонента под названием JDK (Java Development Kit), ведь в нем присутствует необходимый компилятор и стандартные библиотеки, позволяющие реализовывать привычные функции на этом ЯП. Большинство даже самых неопытных программистов знают, как инсталлировать подобные файлы на свой компьютер, однако некоторые сталкиваются с трудностями при попытке установки и настройки компонента. Поэтому сегодня мы хотим затронуть эту тему, детально расписав процесс добавления JDK в Windows 10.
Шаг 1: Загрузка установщика с официального сайта
Весь процесс начинается с загрузки всего одного файла формата EXE с официального сайта. Если вы уже сделали это или прекрасно знаете, как производится подобная задача, просто переходите к следующему шагу. В противном случае ознакомьтесь с этой инструкцией.
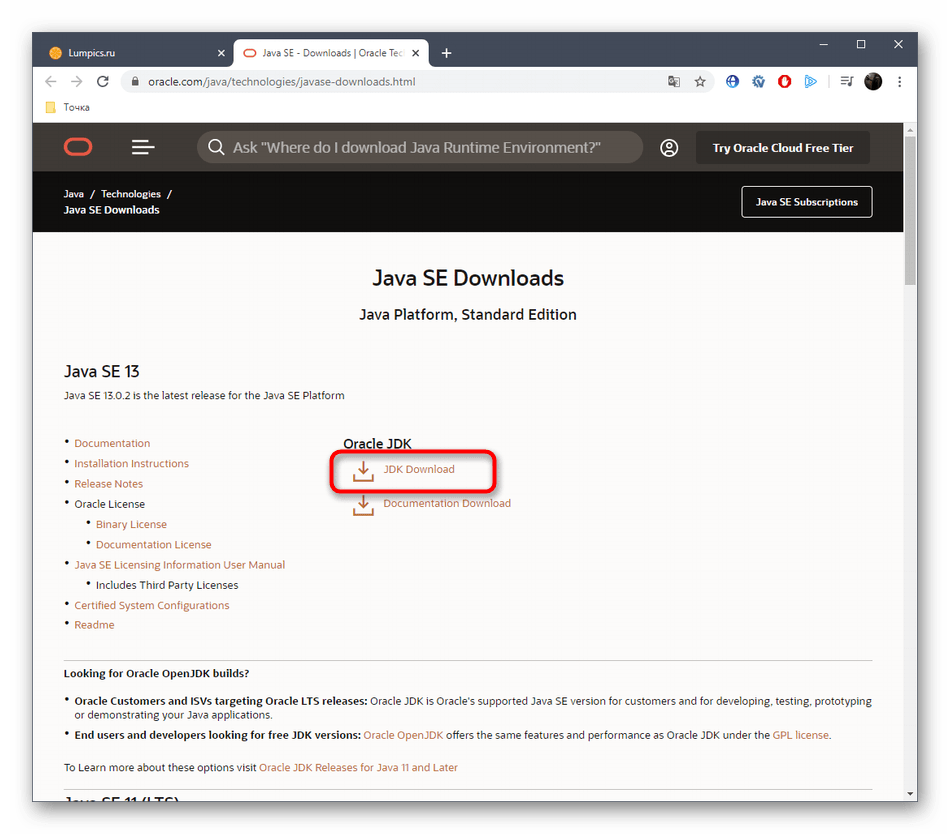
Перейти на официальный сайт Oracle
- Воспользуйтесь ссылкой выше, чтобы попасть на официальный сайт Oracle. Там вас интересует строка «JDK Download». Нажмите по ней левой кнопкой мыши, чтобы начать загрузку компонента.
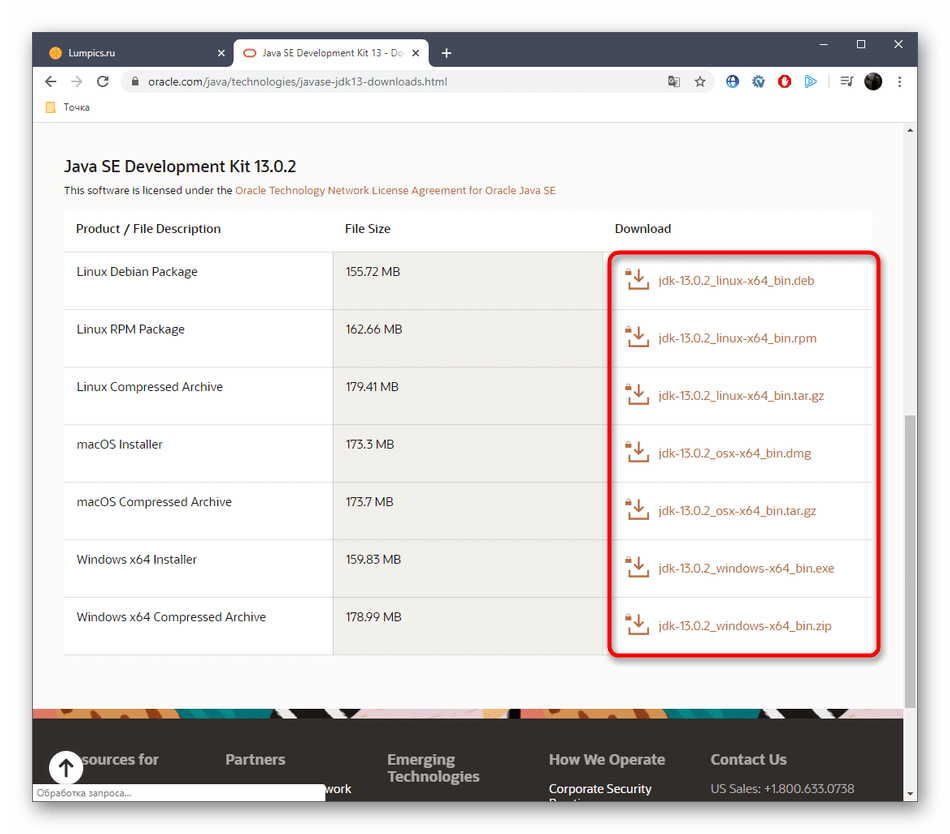
- Следующим этапом будет выбор версии для своей операционной системы. В нашем случае будет выбран «Windows x64 Installer». Обратите внимание, что на 32-битных системах Java Development Kit не поддерживается.
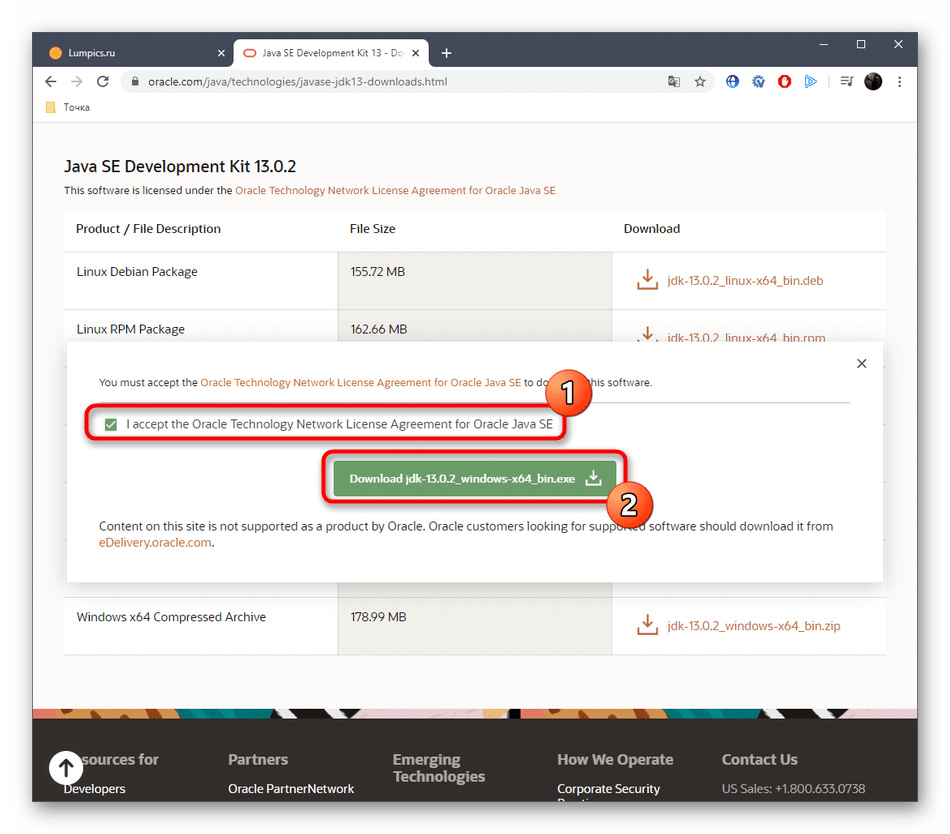
- После нажатия по соответствующей кнопке откроется всплывающее окно, где следует подтвердить лицензионное соглашение, а уже потом кликнуть по активной кнопке, чтобы начать скачивание исполняемого файла.
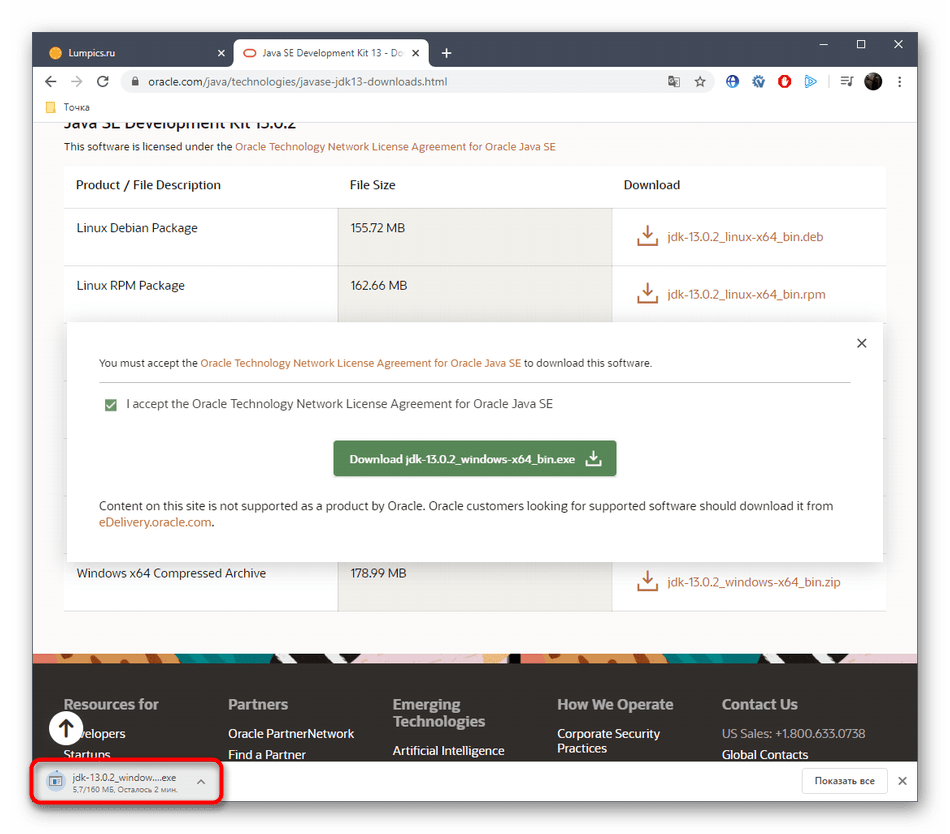
- Ожидайте завершения загрузки, а затем запустите полученный объект прямо из браузера или папки, куда он был помещен.
Этот этап выполняется еще проще предыдущего, поскольку от пользователя требуется только следовать инструкциям, отобразившимся в открытом окне. Однако давайте на нем тоже остановимся более детально, чтобы больше ни у кого не возникло вопросов по этой теме.
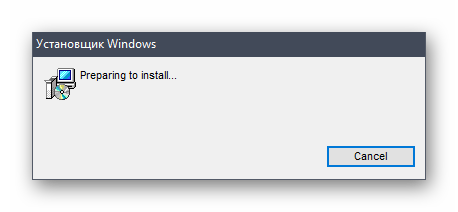
- После открытия исполняемого файла начнется подготовка к инсталляции. Это не займет много времени, а вам нужно лишь не закрывать активное окно.
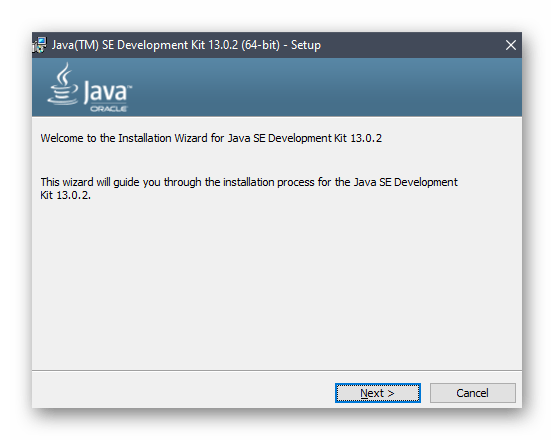
- При открытии приветственного меню переходите к следующему шагу, щелкнув по кнопке «Next».
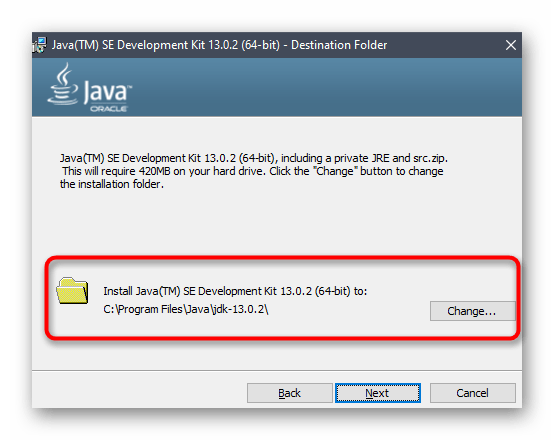
- Убедитесь в правильности выбранной папки для инсталляции. По умолчанию JDK будет установлен на системный раздел жесткого диска. Вы можете изменить путь, если это необходимо.
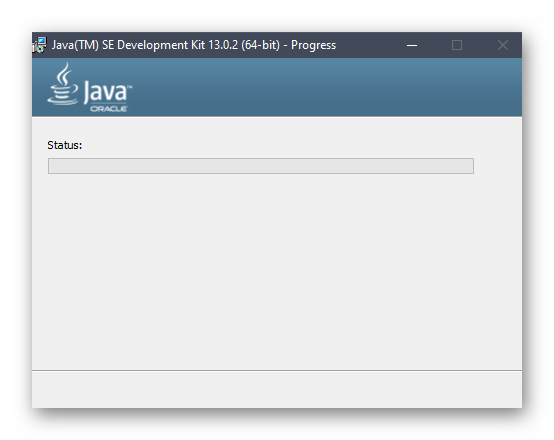
- Начнется процедура установки, занимающая несколько минут. Продолжительность зависит от скорости жесткого диска и общего быстродействия операционной системы.
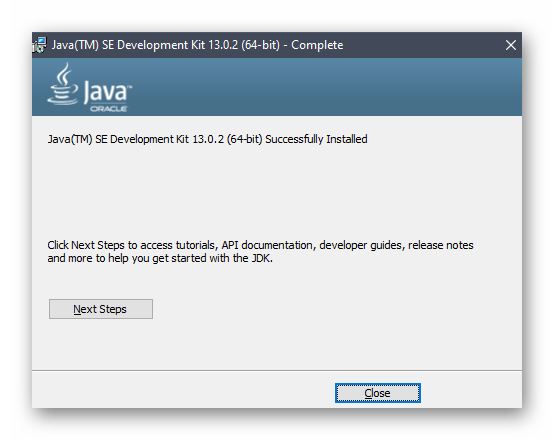
- Вы получите уведомление о том, что инсталляция прошла успешно. В этом же окне находится кнопка «Next Steps». При нажатии на нее откроется страница в браузере, где будет находиться вся сопутствующая документация и уроки по взаимодействию с установленным компонентом.
Шаг 3: Настройка операционной системы
Этот этап считается самым важным и сложным, поскольку именно от него зависит корректность функционирования установленного компонента в дальнейшем. Суть заключается во внесении новых переменных окружения, что позволит работать компилятору и встроенным в JDK библиотекам. Производится конфигурация следующим образом:

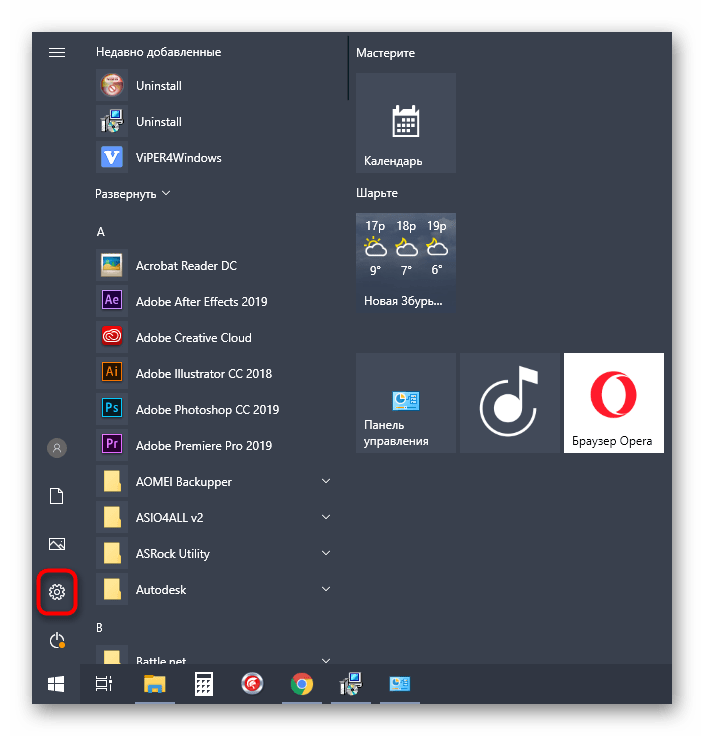
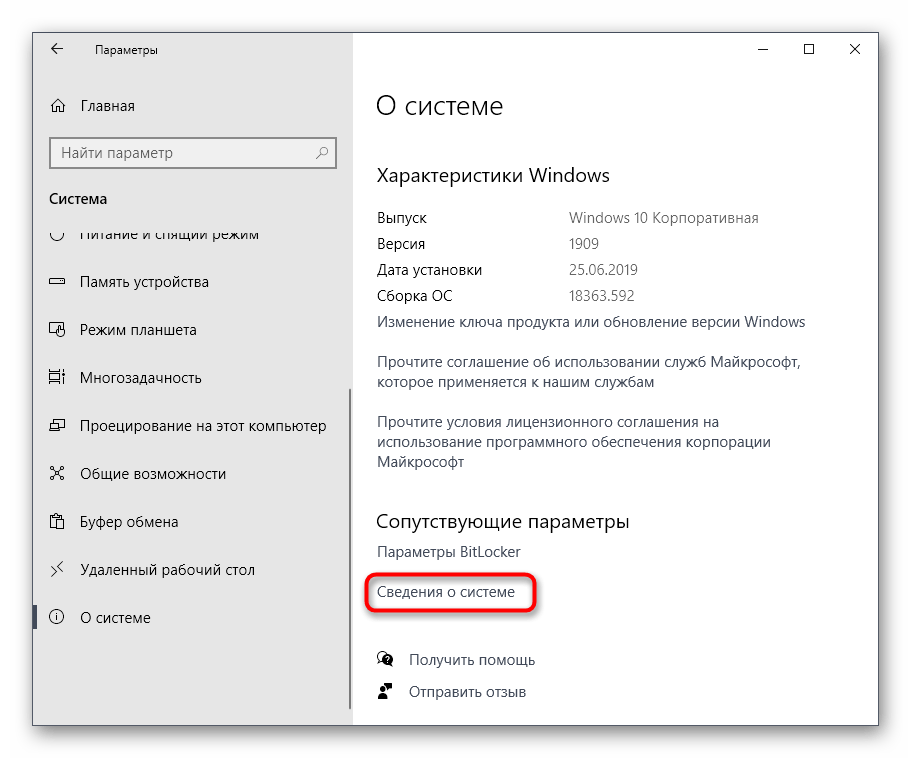
- Откройте «Пуск» и перейдите в меню «Параметры», кликнув по специально отведенной кнопке на левой панели.
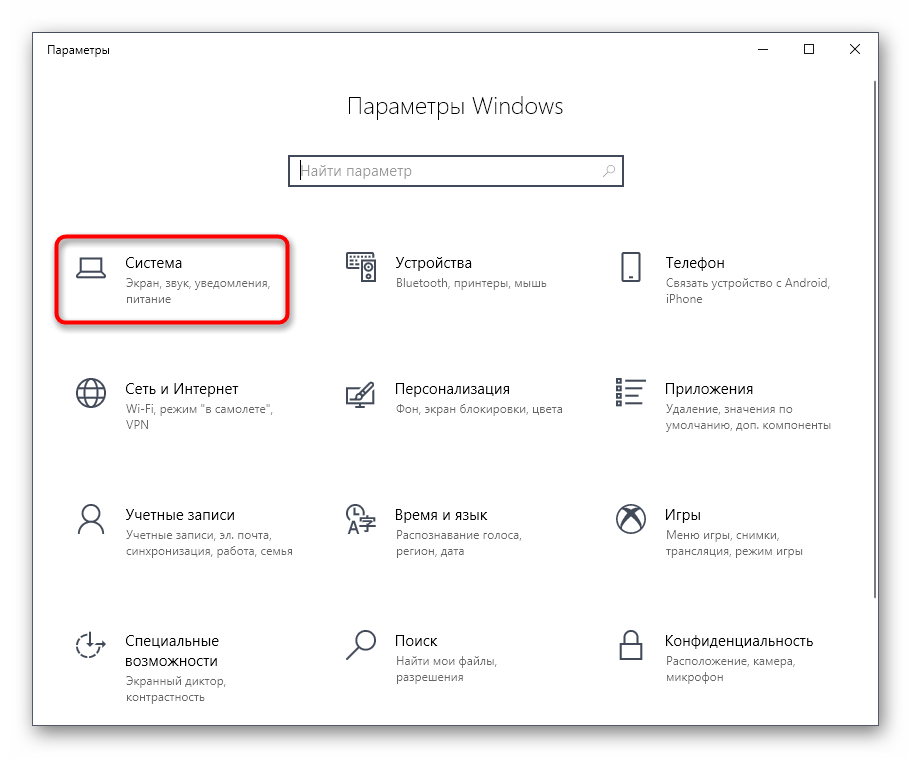
- Здесь вам нужен раздел «Система».
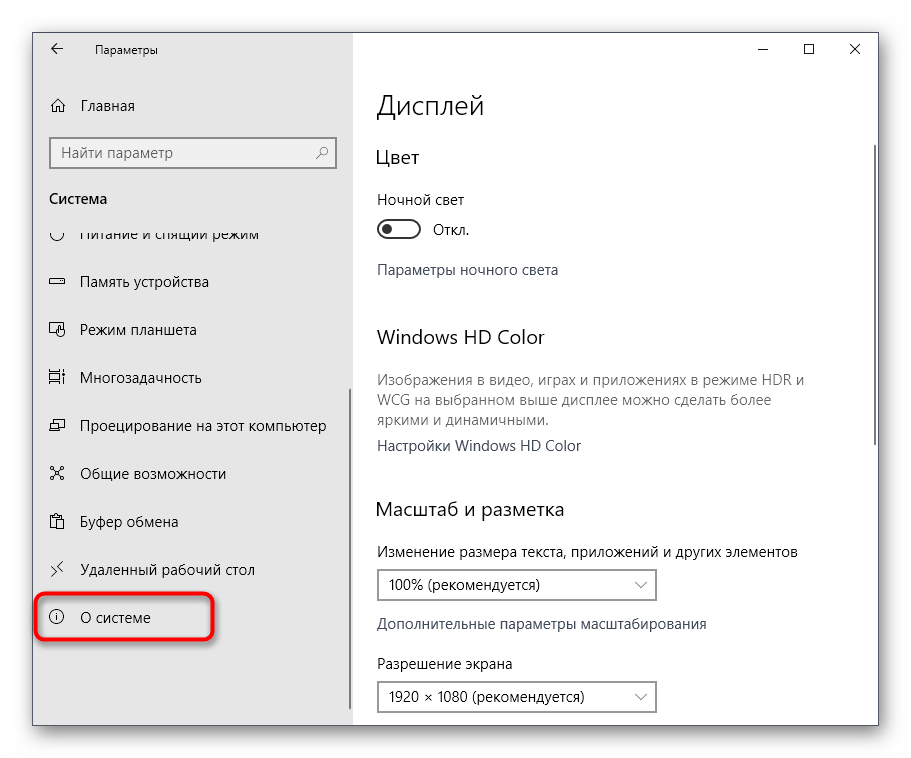
- Опуститесь вниз и выберите категорию «О системе».
- Внизу окна находится надпись «Сведения о системе», по которой и следует нажать для перехода в необходимое меню.
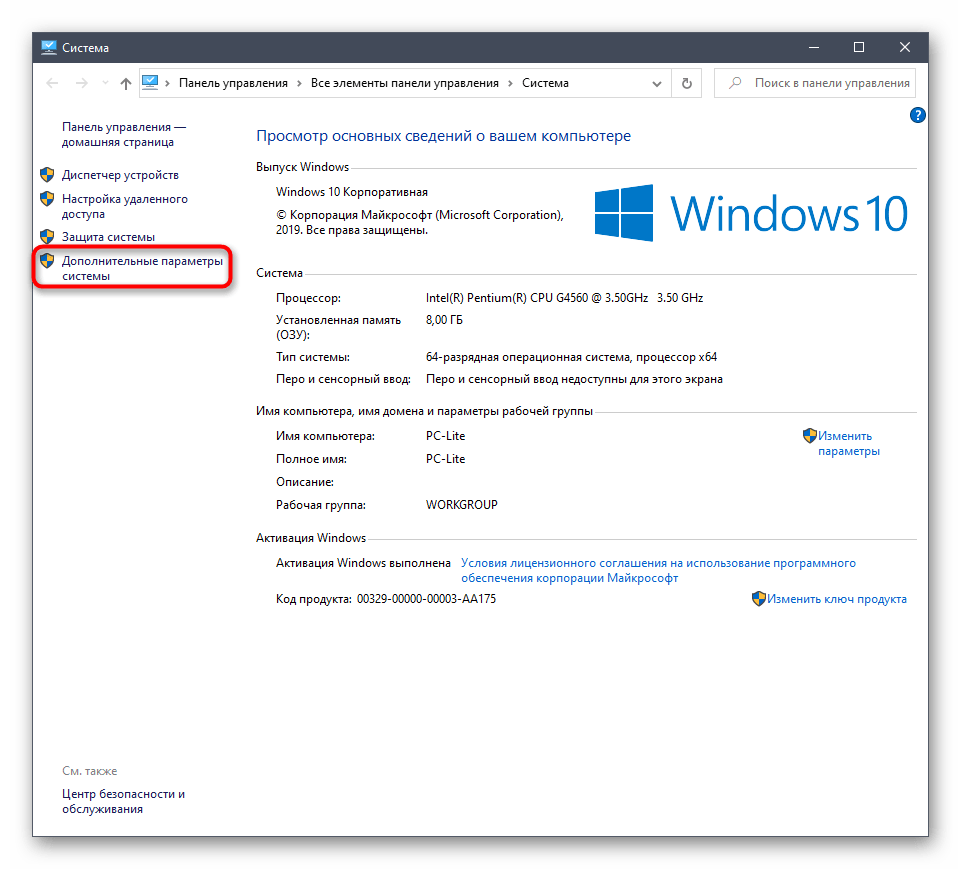
- Откроется категория Панели управления «Система». Здесь на левой панели щелкните по кликабельной надписи «Дополнительные параметры системы».
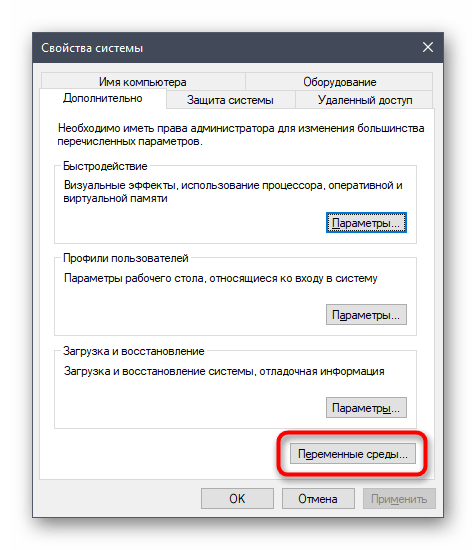
- Отобразится окно «Свойства системы», где на первой же вкладке «Дополнительно» воспользуйтесь кнопкой «Переменные среды».
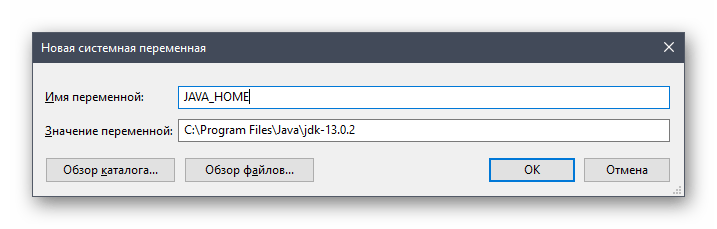
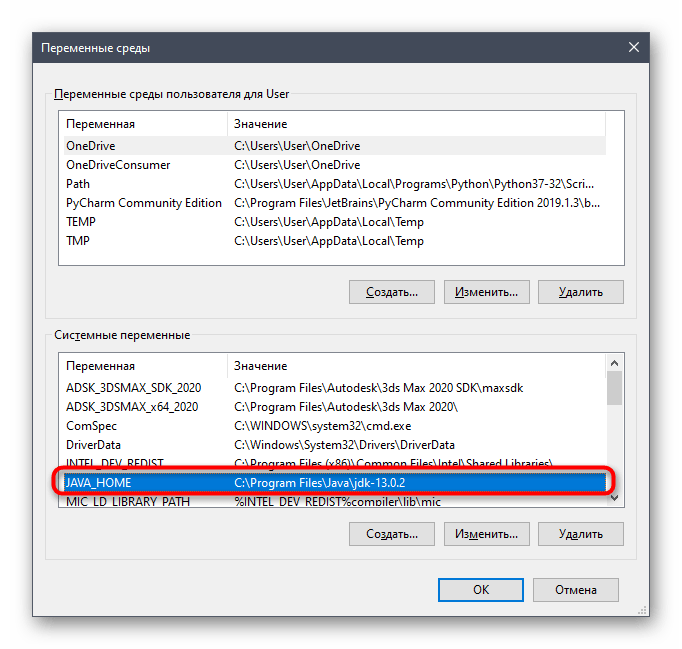
- Добавьте новую переменную для системы, кликнув по кнопке «Создать».
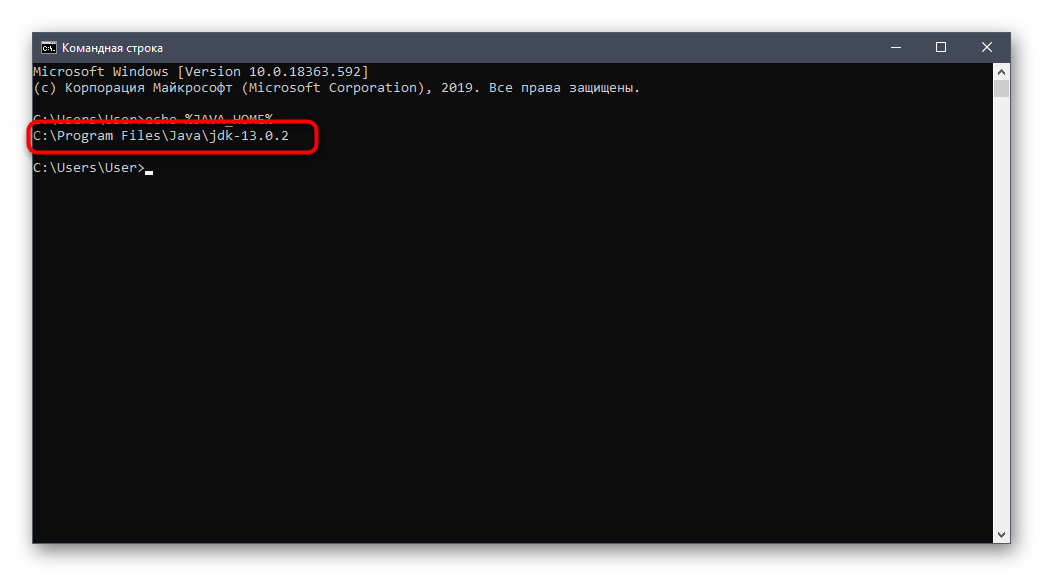
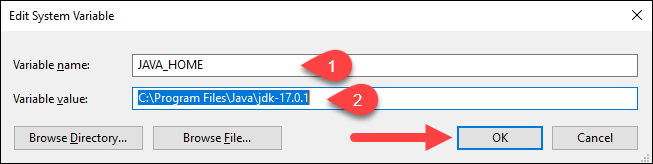
- Задайте ей название. По умолчанию используется «JAVA_HOME», поэтому и мы рекомендуем придерживаться этого правила. В поле «Значение переменной» вставьте путь к папке JDK. Стандартно он имеет вид
C:Program Filesjavajdk-13.0.2, где 13.0.2 — номер установленной версии компонента. - Сохраните изменения и убедитесь в том, что новая строка появилась в блоке «Системные переменные».
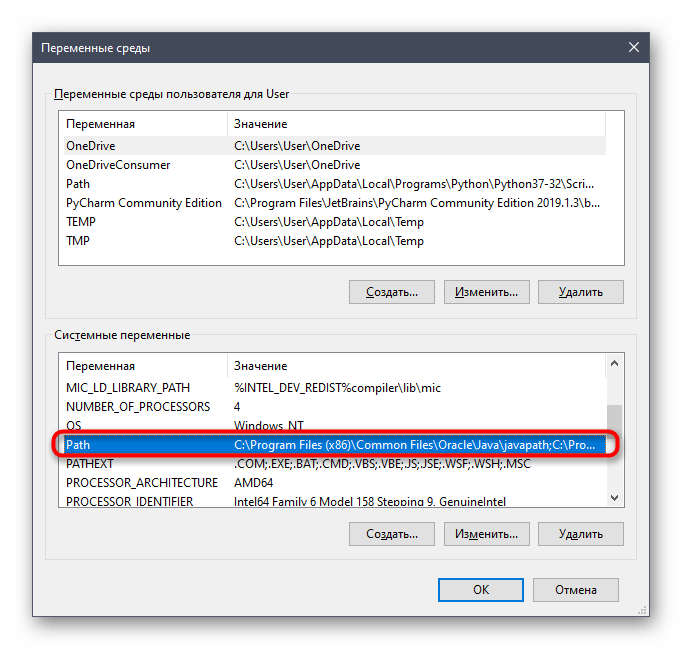
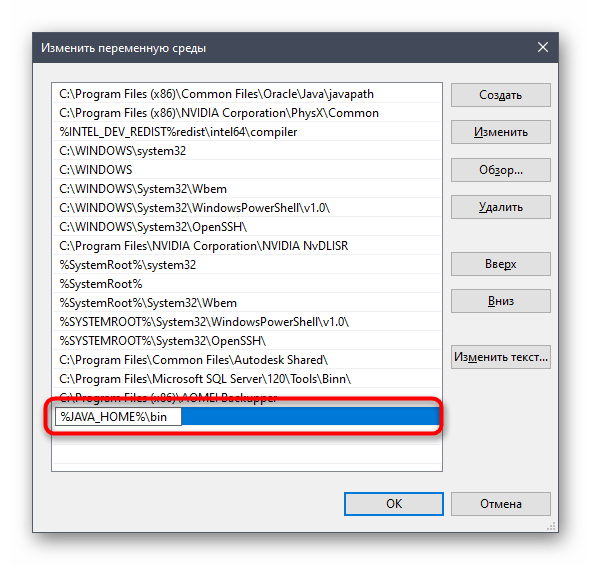
- После этого там же отыщите переменную «Path» и щелкните по ней дважды, чтобы открыть окно редактирования.
- Пропишите там
%JAVA_HOME%bin, указав тем самым только что созданную переменную, и сохраните изменения.

По завершении данной операции рекомендуется перезагрузить компьютер, чтобы все изменения вступили в силу. Уже после этого можно смело переходить к тестированию функционирования JDK или сразу к работе с языком программирования, если проверка работоспособности не требуется.
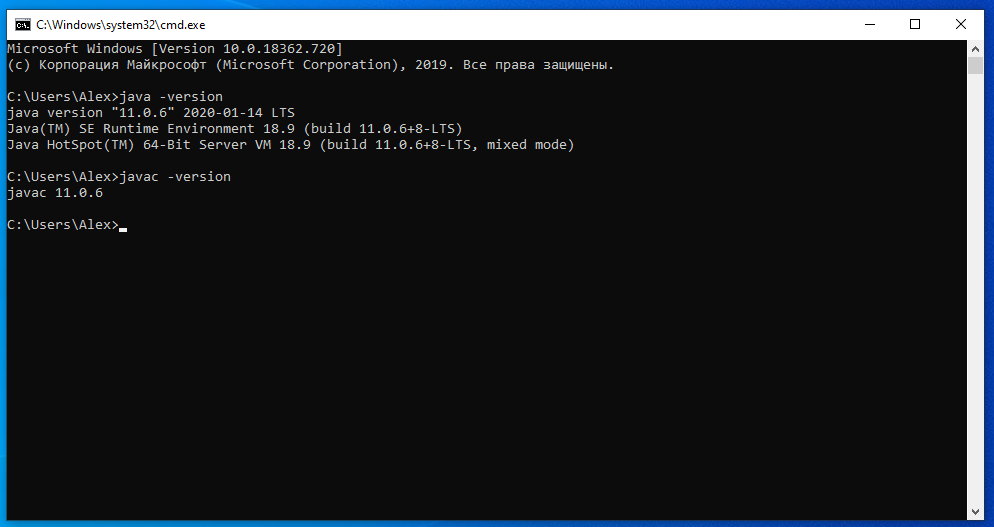
Шаг 4: Проверка работы JDK
Завершающий этап сегодняшнего материала заключается в проверке работоспособности Java Development Kit, что иногда требуется сделать для подтверждения корректной обработки запросов компилятором и успешной интеграции библиотек. Осуществляется эта задача через стандартную консоль путем ввода всего двух команд.
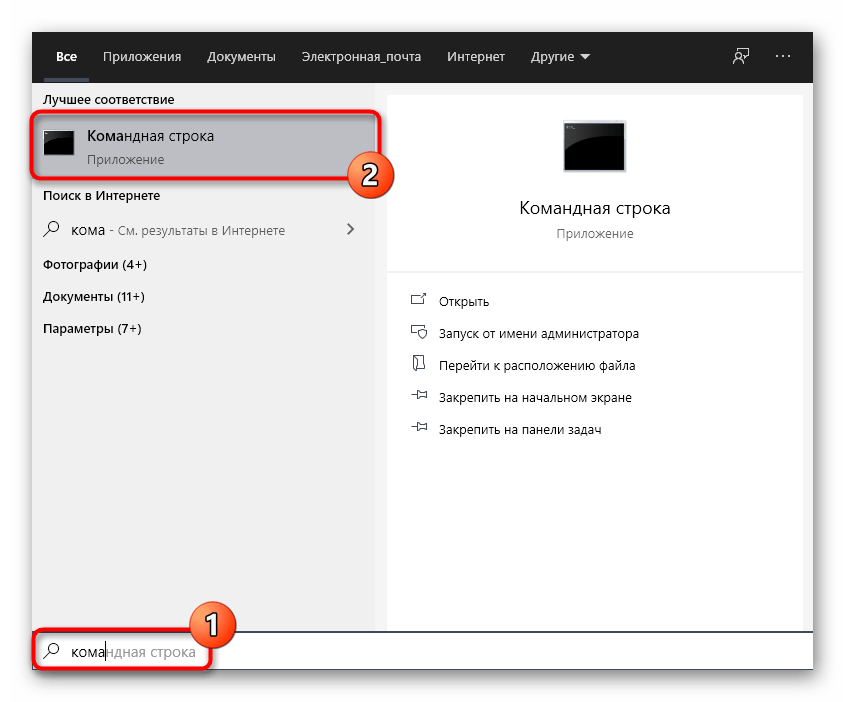
- Откройте приложение «Командная строка» любым удобным методом, например, отыскав ее через «Пуск».
- Введите там echo
%JAVA_HOME%и нажмите на клавишу Enter для активации команды. - Следующей строкой отобразится место сохранения всех файлов компонента и будет означать то, что переменная функционирует корректно.
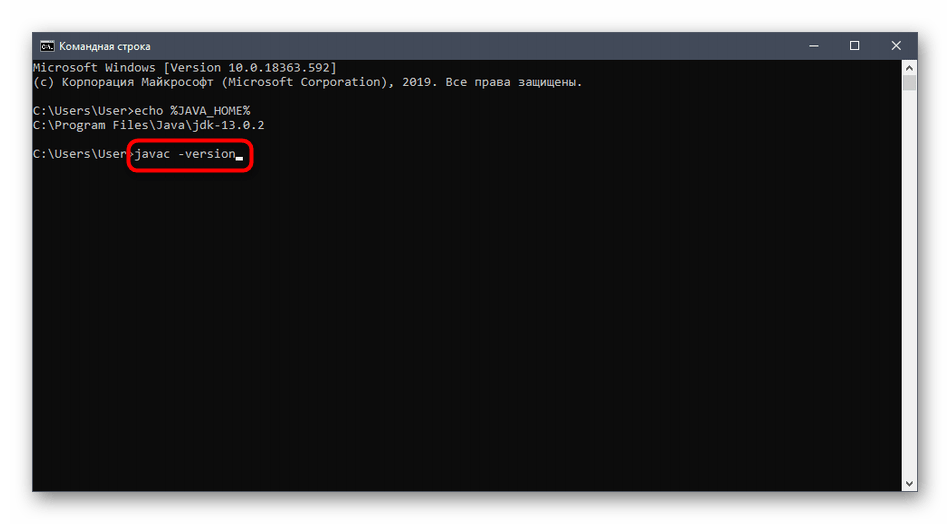
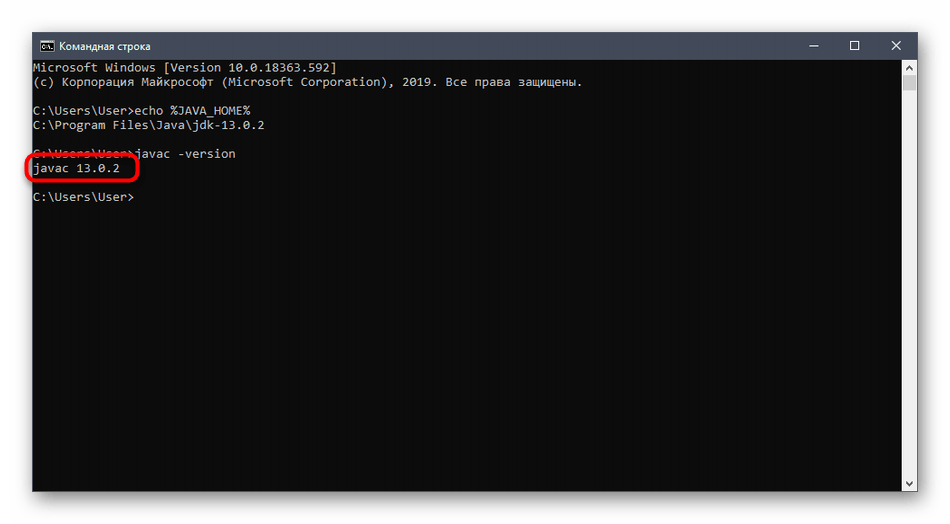
- Далее напишите
javac -versionи снова активируйте эту команду. - В результате вы получите строку с информацией о текущей рабочей версии JDK.

Установка JDK не займет много времени и в большинстве случаев производится без каких-либо дополнительных трудностей. Сразу после этого можно приступать к написанию кода на Java и быть уверенным в том, что он корректно скомпилируется, а библиотеки будут подключены.
Еще статьи по данной теме:
Помогла ли Вам статья?
Introduction
The Java Development Kit (JDK) is software used for Java programming, along with the Java Virtual Machine (JVM) and the Java Runtime Environment (JRE). The JDK includes the compiler and class libraries, allowing developers to create Java programs executable by the JVM and JRE.
In this tutorial, you will learn to install the Java Development Kit on Windows.
Prerequisites
- A system running Windows 10.
- A network connection.
- Administrator privileges.
Note: Develop your core app services on PNAP’s Bare Metal Cloud servers to ensure superior performance. It’s cloud native and the perfect environment for the entire SDLC.
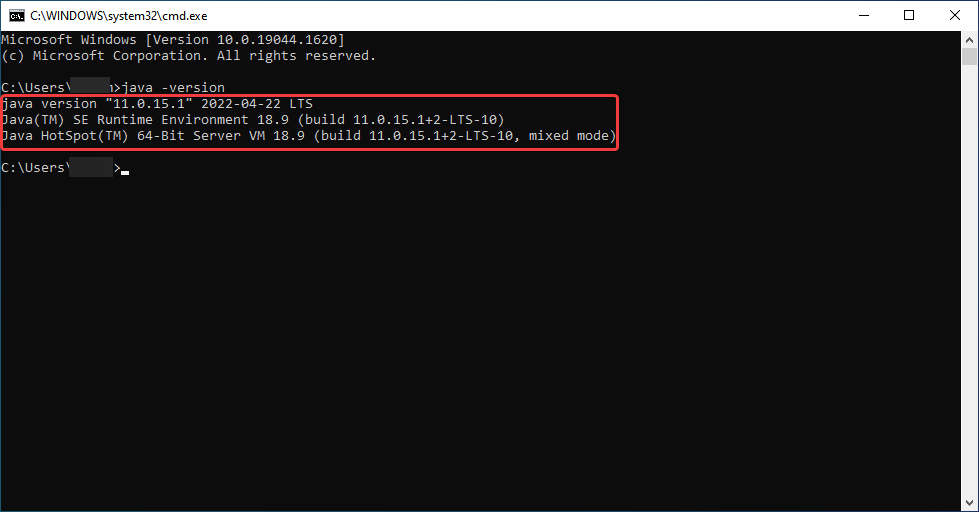
Check if Java Is Installed
Before installing the Java Development Kit, check if a Java version is already installed on Windows. Follow the steps below:
- Open a command prompt by typing cmd in the search bar and press Enter.
- Run the following command:
java -version
The command outputs the Java version on your system. If Java isn’t installed, the output is a message stating that Java isn’t recognized as an internal or external command.
Download Java for Windows 10
Download the latest Java Development Kit installation file for Windows 10 to have the latest features and bug fixes.
- Using your preferred web browser, navigate to the Oracle Java Downloads page.
- On the Downloads page, click the x64 Installer download link under the Windows category. At the time of writing this article, Java version 17 is the latest long-term support Java version.
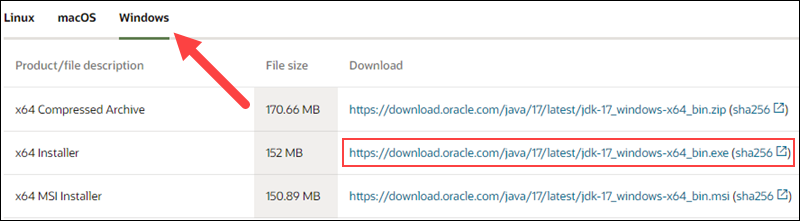
Wait for the download to complete.
After downloading the installation file, proceed with installing Java on your Windows system.
Follow the steps below:
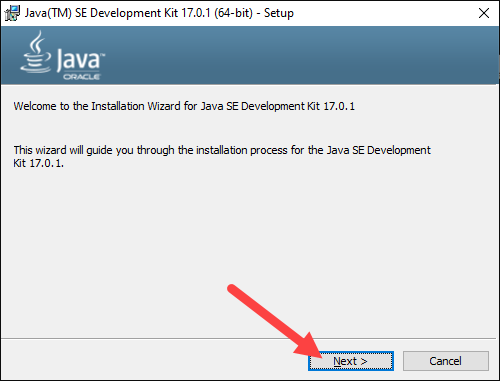
Step 1: Run the Downloaded File
Double-click the downloaded file to start the installation.
Step 2: Configure the Installation Wizard
After running the installation file, the installation wizard welcome screen appears.
1. Click Next to proceed to the next step.
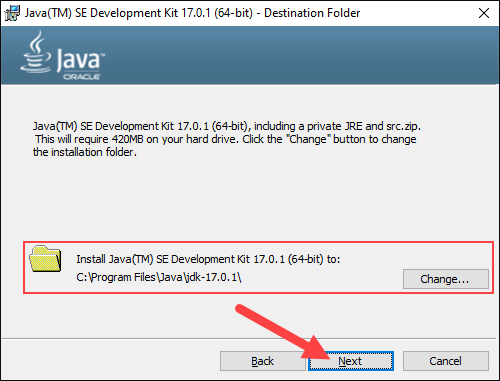
2. Choose the destination folder for the Java installation files or stick to the default path. Click Next to proceed.
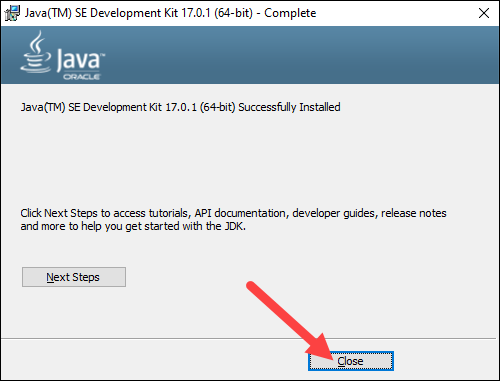
3. Wait for the wizard to finish the installation process until the Successfully Installed message appears. Click Close to exit the wizard.
Set Environmental Variables in Java
Set Java environment variables to enable program compiling from any directory. To do so, follow the steps below:
Step 1: Add Java to System Variables
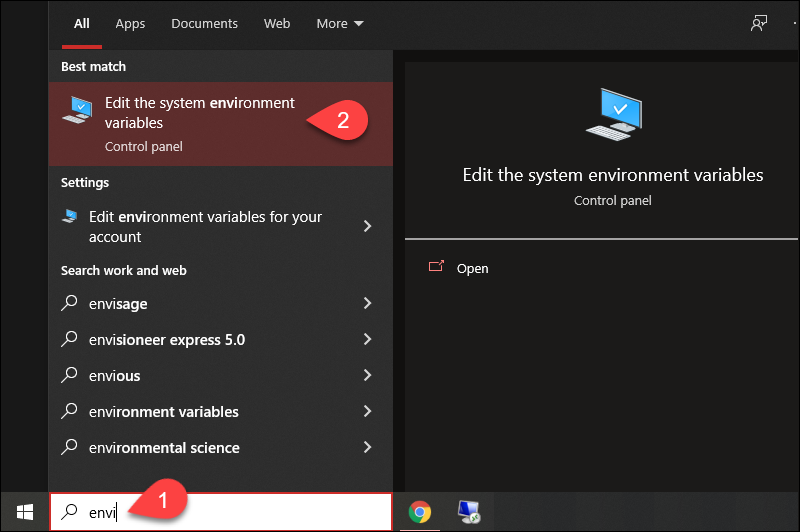
1. Open the Start menu and search for environment variables.
2. Select the Edit the system environment variables result.
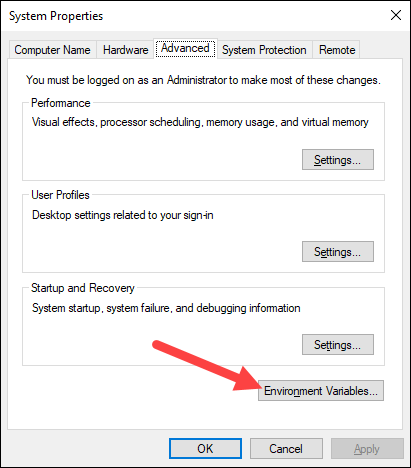
3. In the System Properties window, under the Advanced tab, click Environment Variables…
4. Under the System variables category, select the Path variable and click Edit:

5. Click the New button and enter the path to the Java bin directory:
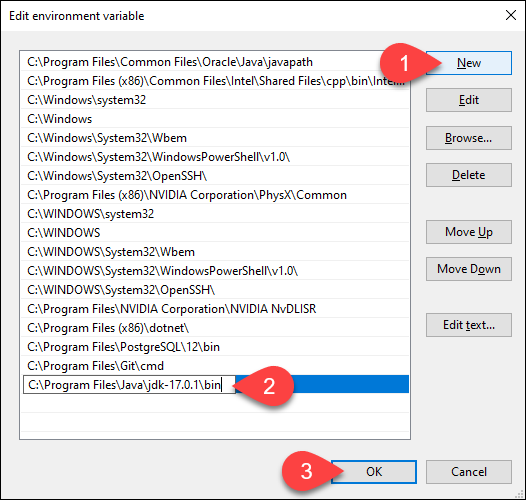
Note: The default path is usually C:Program FilesJavajdk-17.0.1bin.
6. Click OK to save the changes and exit the variable editing window.
Step 2: Add JAVA_HOME Variable
Some applications require the JAVA_HOME variable. Follow the steps below to create the variable:
1. In the Environment Variables window, under the System variables category, click the New… button to create a new variable.
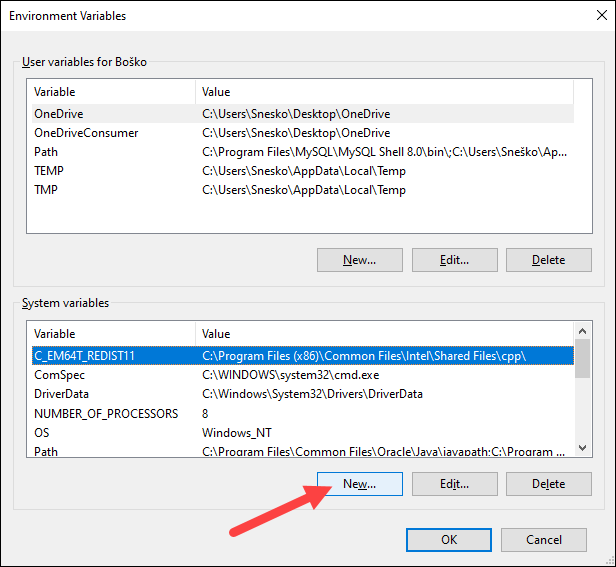
2. Name the variable as JAVA_HOME.
3. In the variable value field, paste the path to your Java jdk directory and click OK.
4. Confirm the changes by clicking OK in the Environment Variables and System properties windows.
Test the Java Installation
Run the java -version command in the command prompt to make sure Java installed correctly:

If installed correctly, the command outputs the Java version. Make sure everything works by writing a simple program and compiling it. Follow the steps below:
Step 1: Write a Test Java Script
1. Open a text editor such as Notepad++ and create a new file.
2. Enter the following lines of code and click Save:
class HelloWorld{
	public static void main(String args[]){
		System.out.println("Hello world!");
		}
}
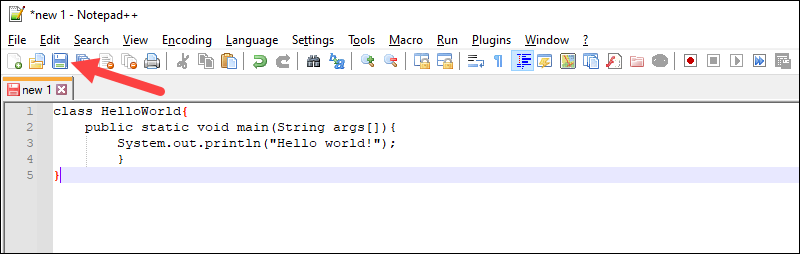
3. Name the file and save it as a Java source file (*.java).
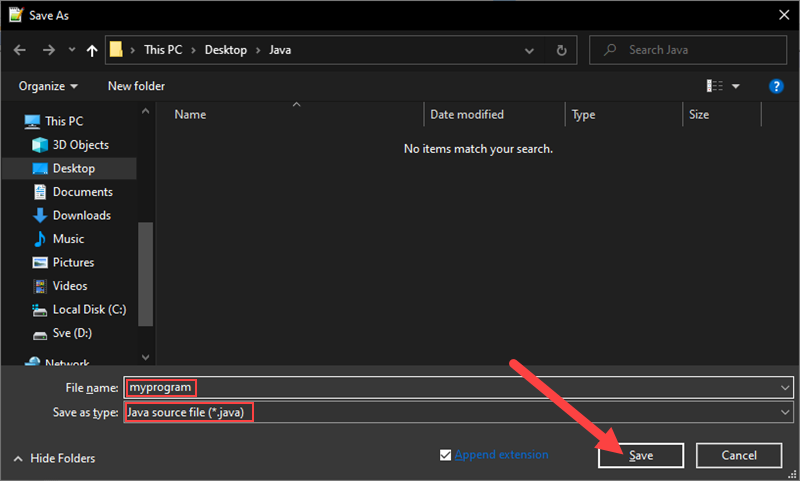
Note: When using Notepad, select All files for the Save as type option and add the .java extension to the file name.
Step 2: Compile the Test Java Script
1. In the command prompt, change the directory to the file’s location and use the following syntax to compile the program:
javac [filename]For example:

After a successful compilation, the program generates a .class file in the file directory.
2. Run the program with the following syntax:
java [filename]
The output shows that the program runs correctly, displaying the Hello world! message.
Conclusion
This tutorial showed how to install the Java Development Kit on a Windows system. If you are interested in learning more about Java, read our list of 13 best Java IDEs for writing, debugging, and testing Java code.
by Matthew Adams
Matthew is a freelancer who has produced a variety of articles on various topics related to technology. His main focus is the Windows OS and all the things… read more
Updated on May 27, 2022
- The JDK (Java Development Kit) is a collection of tools required for developing and testing programs in the language.
- You can easily download JDK 11 from the official Oracle website in no time.
- Also, find out how to check if you have JDK installed on the PC.
Java is an object-orientated programming language that programmers use to develop Java software. For that, they need to download a JDK 11 (Java Development Kit) installer for Windows.
Java 18 is the latest JDK development kit for Windows, Linux, and macOS platforms. If you are a beginner and looking for regular updates for a prolonged period, we recommend going with Java SE 11.
So without further ado, let’s walk you through the process to download JDK 11 installer for Windows.
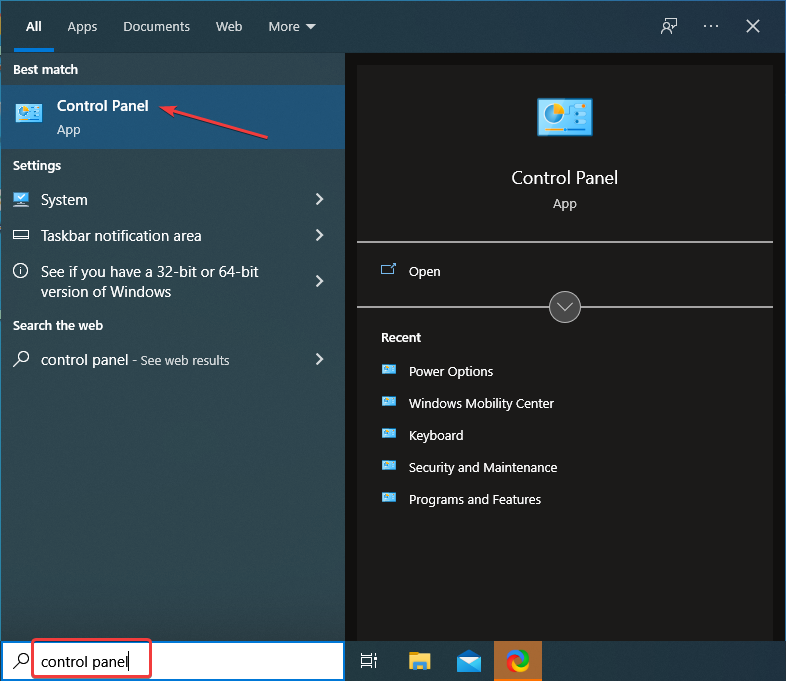
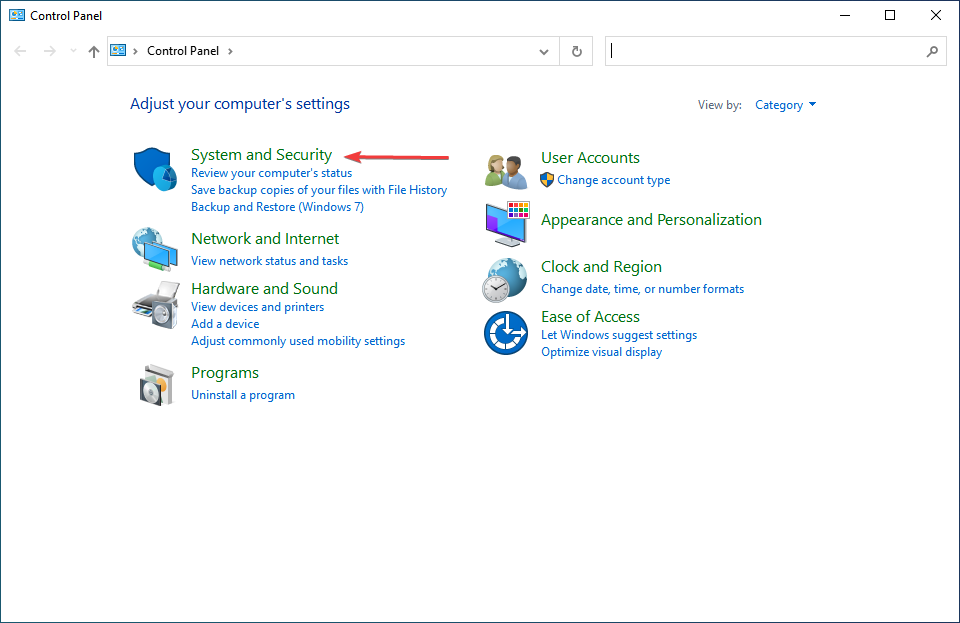
How do I check if my computer is compatible with JDK 11?
- Press Windows + S to launch the Search menu, enter Control Panel in the text field, and click on the relevant search result.

- Next, select System and Security from the options listed here.

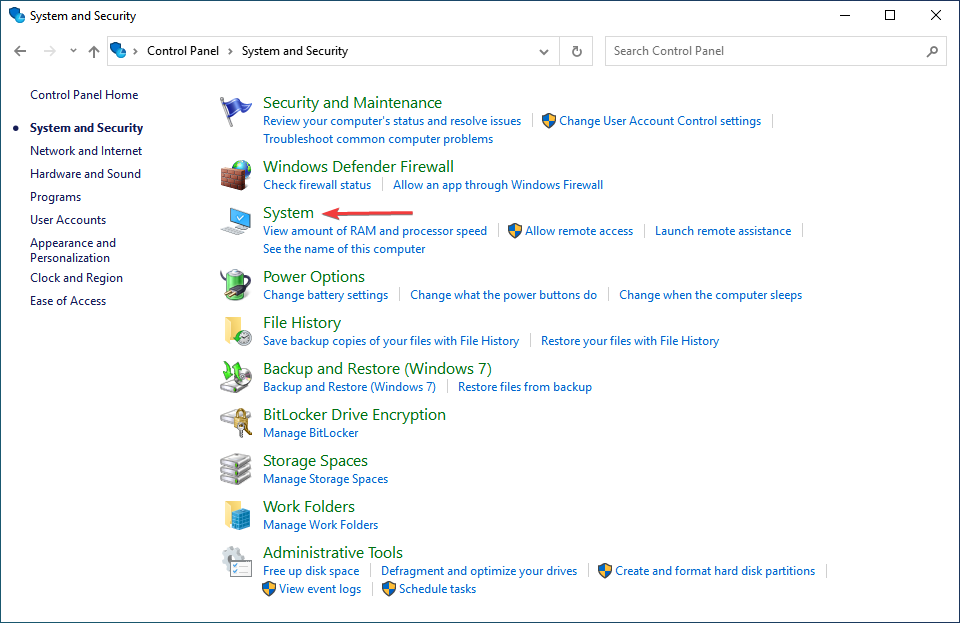
- Click on the System entry.
- Now, check the System type here.

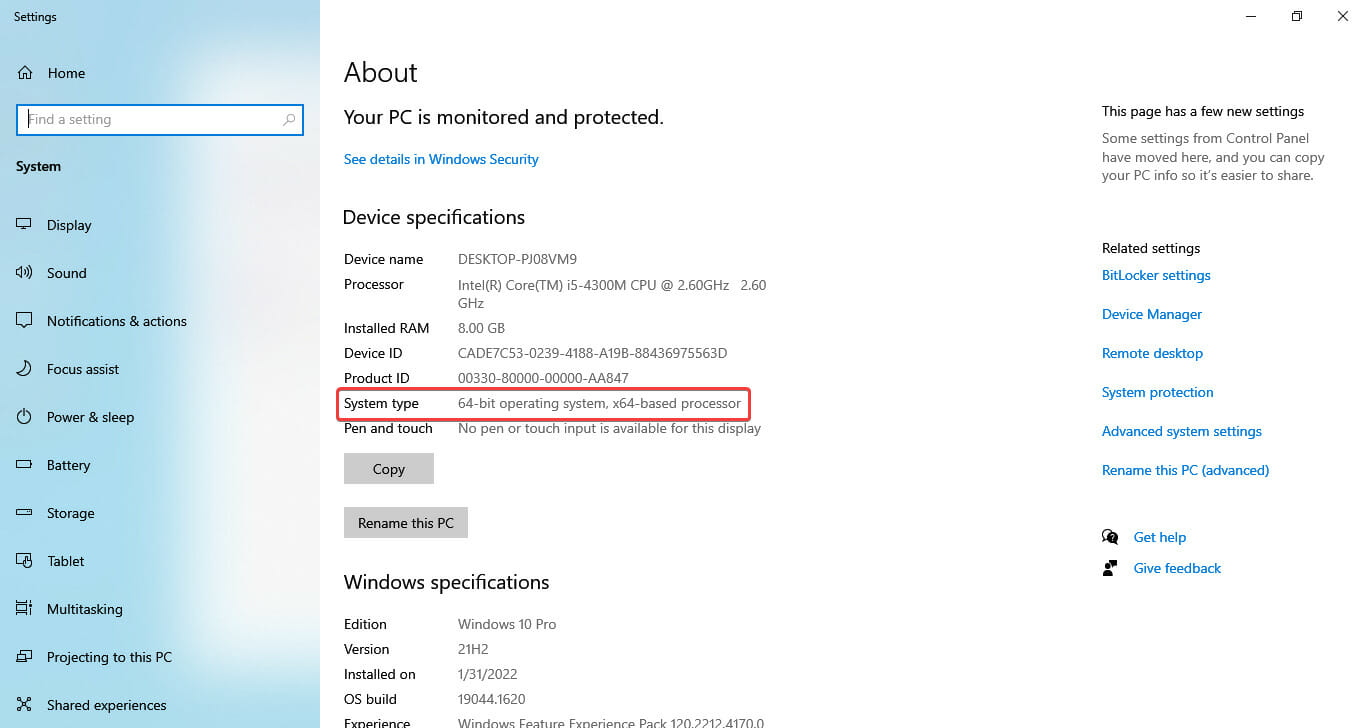
Before you proceed to install JDK 11, it’s imperative to check that your computer meets the system requirements for it. The platform is compatible with Windows 11, Windows 10, 8, and 7, but you need to be running the 64-bit version of the OS.
If the System type reads 64-bit, you can install JDK 11, but in case it says 32-bit, you would have to either upgrade or go with a different version of JDK that supports 32-bit architecture.
Once you have verified that your PC is compatible, let’s go straight to the process to download JDK 11 installer in Windows 10.
How can I install JDK 11 in Windows 10?
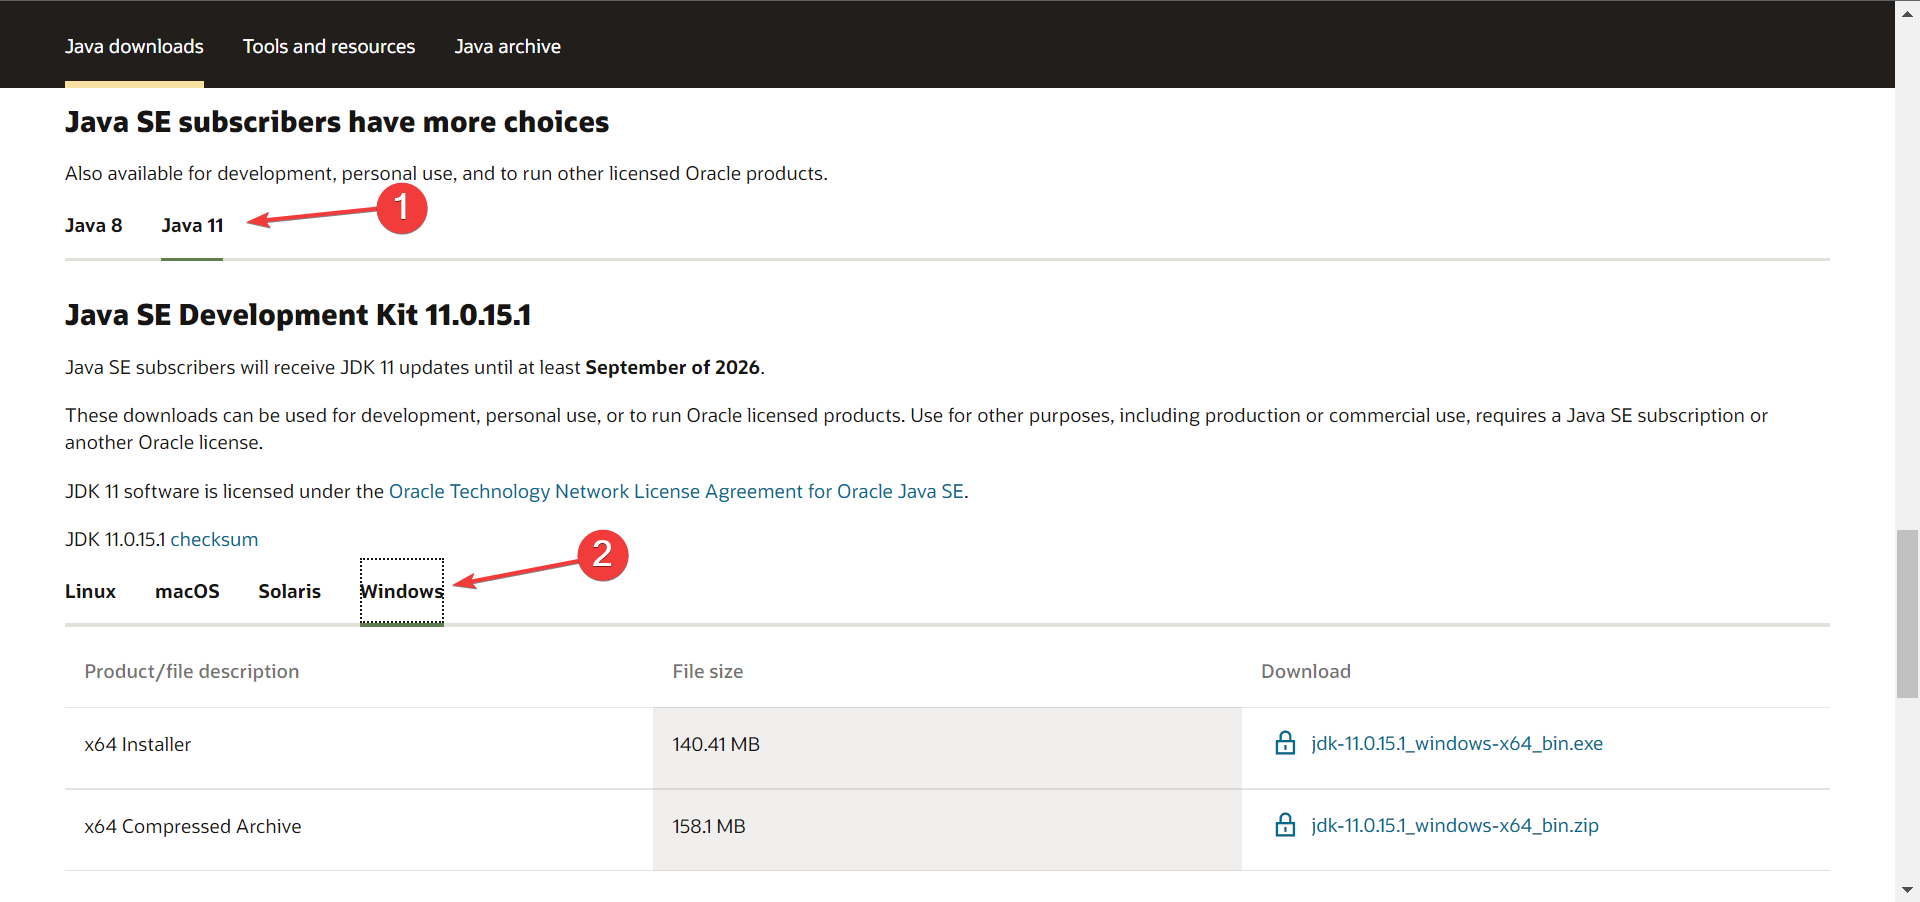
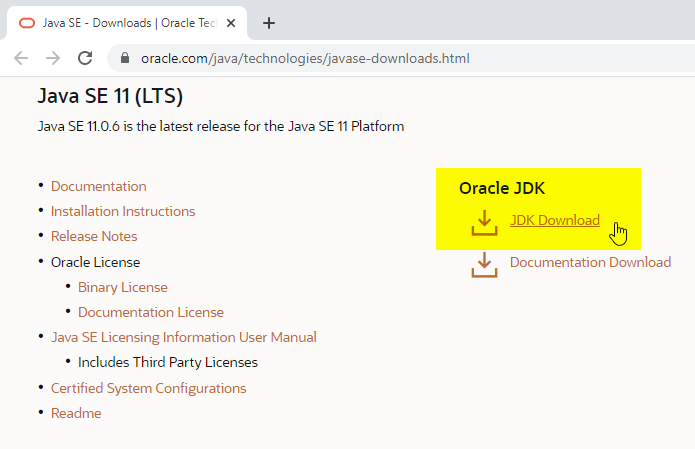
1. Download and install Java SE 11
- To get Java SE 11, open the Java SE Downloads page in a browser.
- Scroll down, select Java 11, and then click on the Windows option from the available ecosystems.

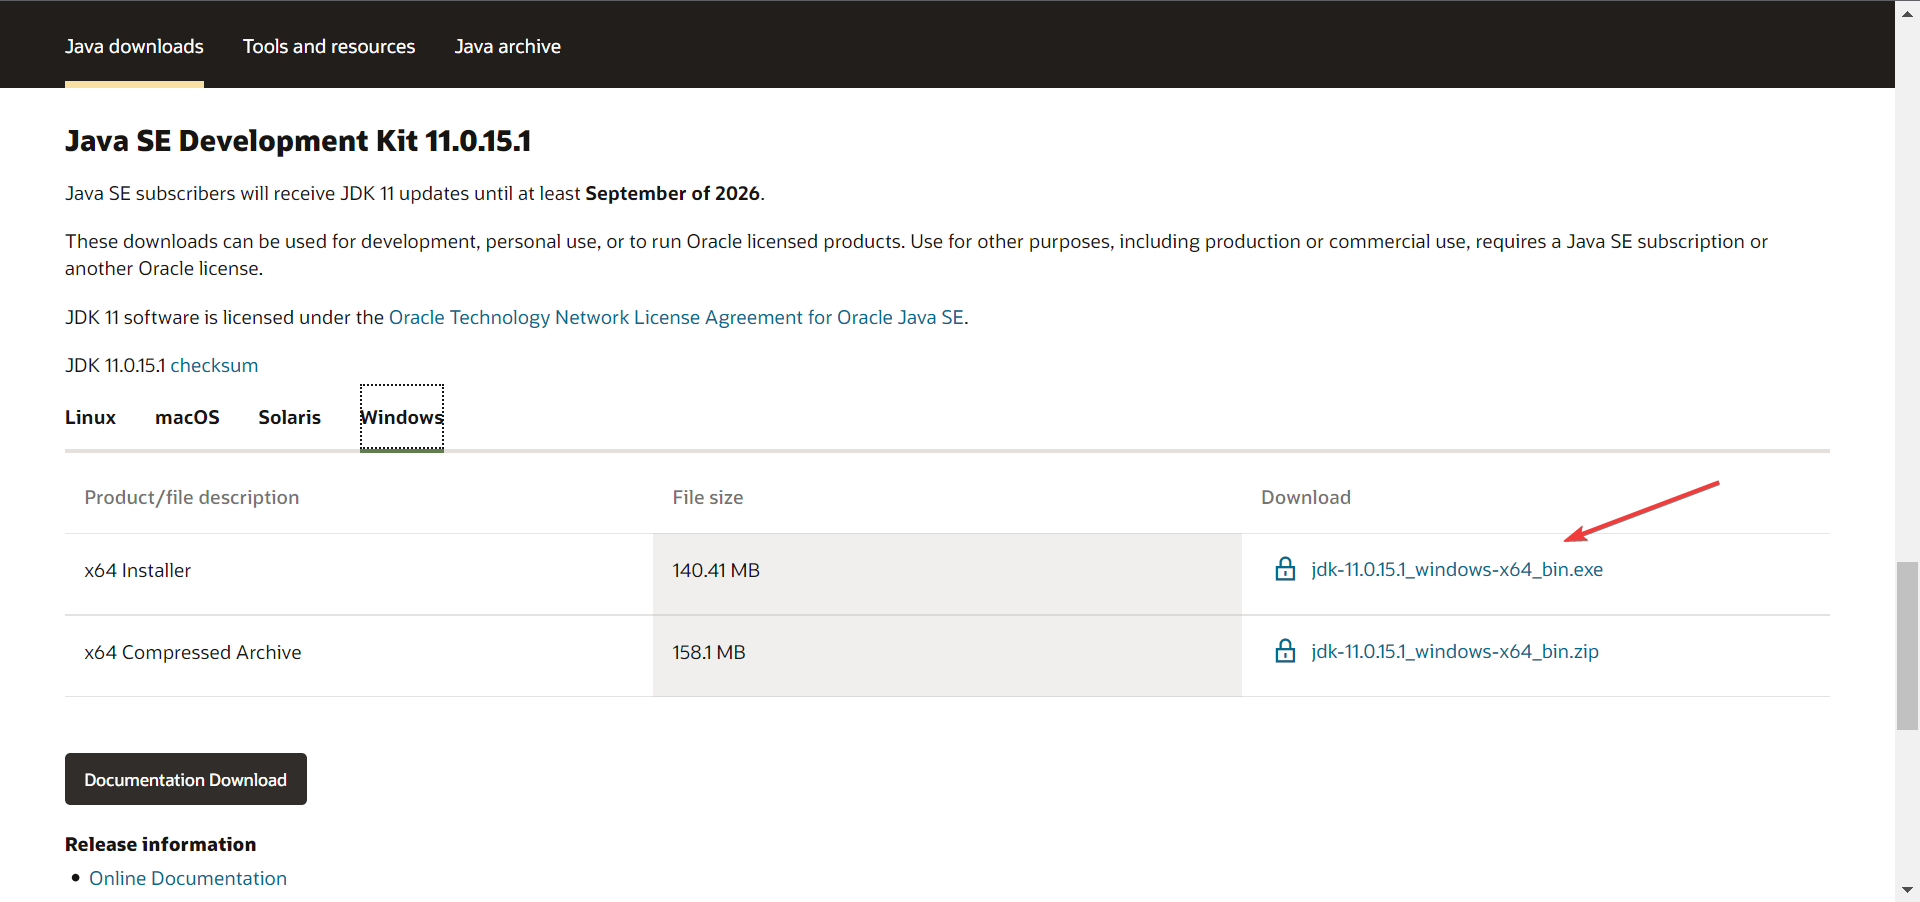
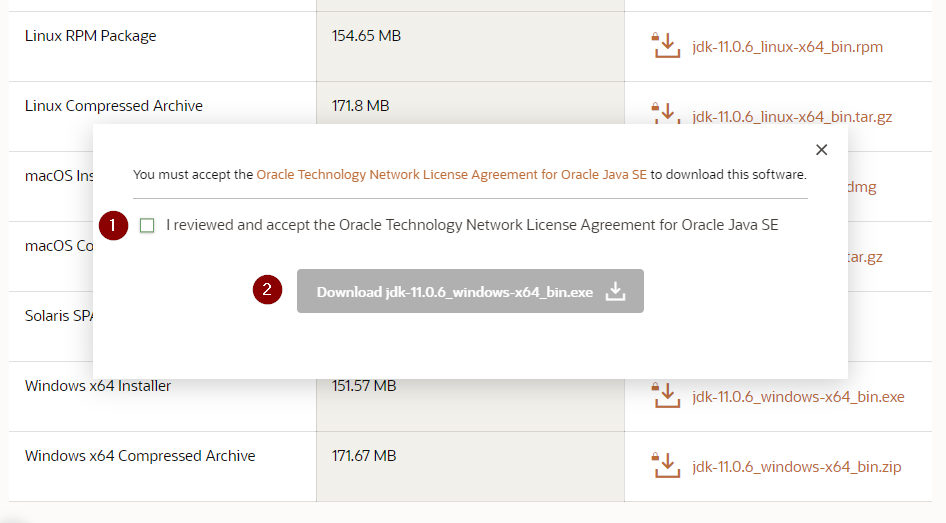
- Next, click on the download link next to the installer package (.exe file).
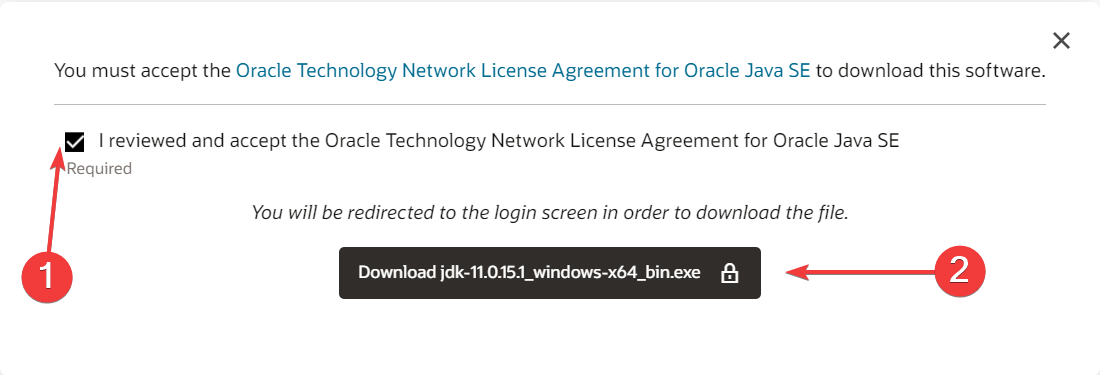
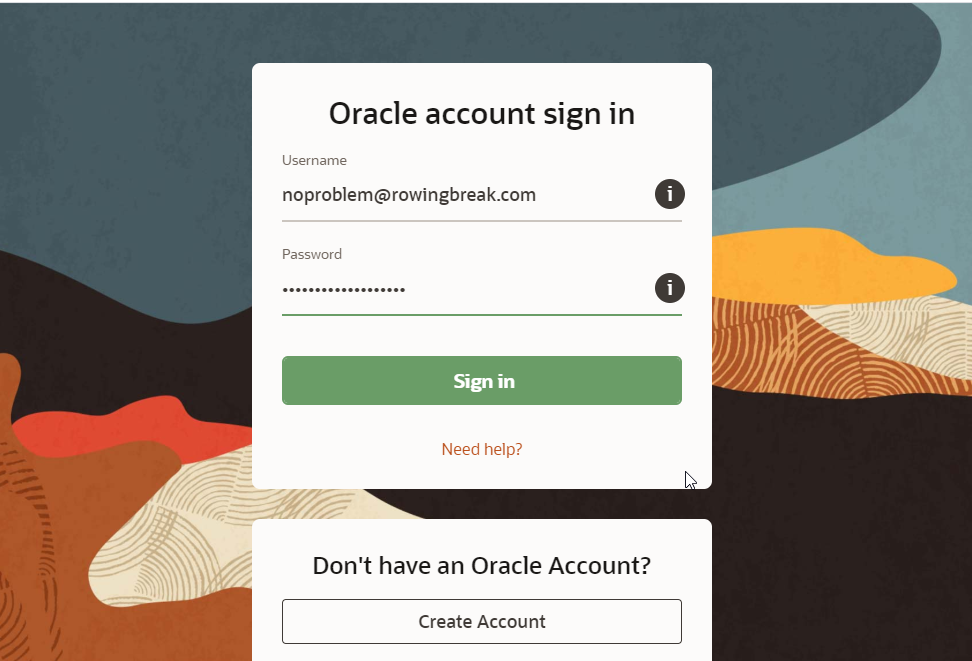
- Tick the checkbox for I reviewed and accept the Oracle Technology Network License Agreement for Oracle Java SE, and then click on the download button at the bottom.

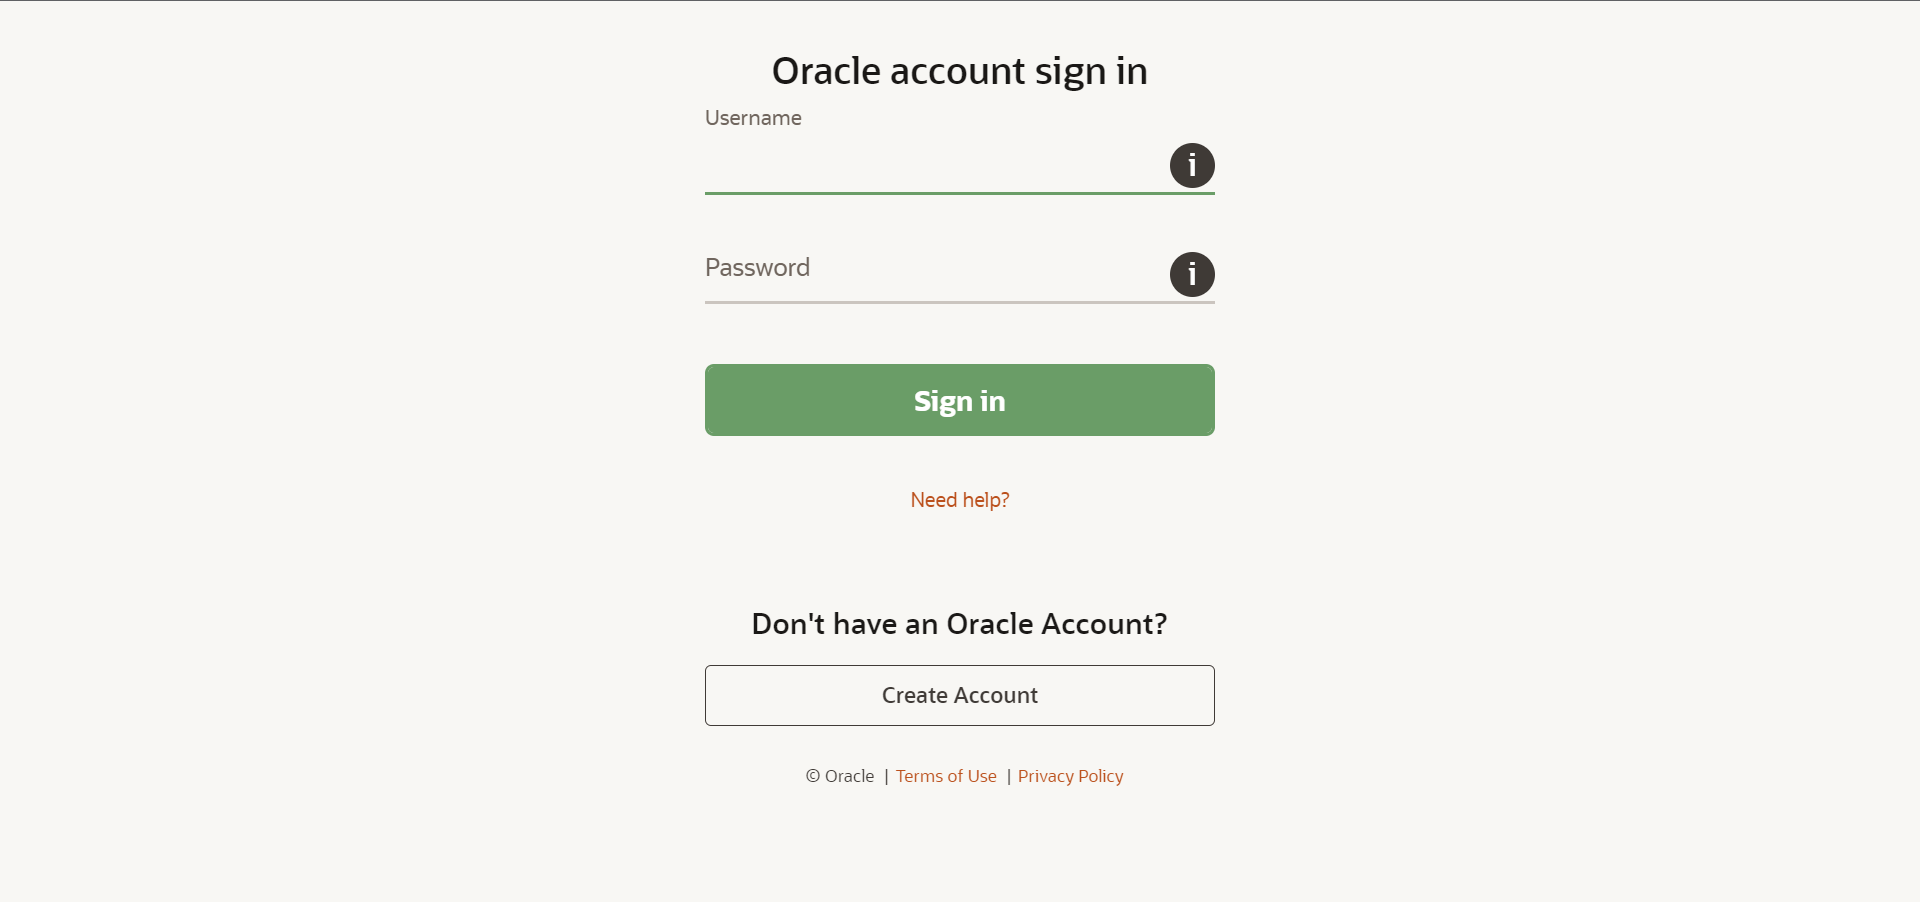
- If you have already signed up, enter the credentials to log in. Otherwise, you can create an account to proceed.
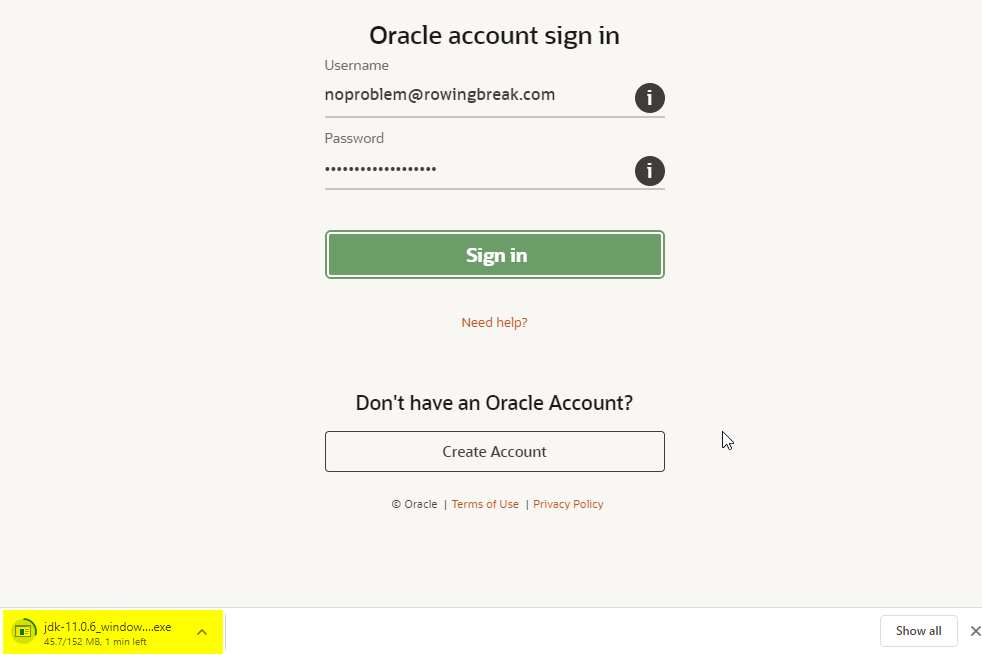
- Once the download is completed, press Windows + E to launch the File Explorer and head to the location where the downloaded file is stored.
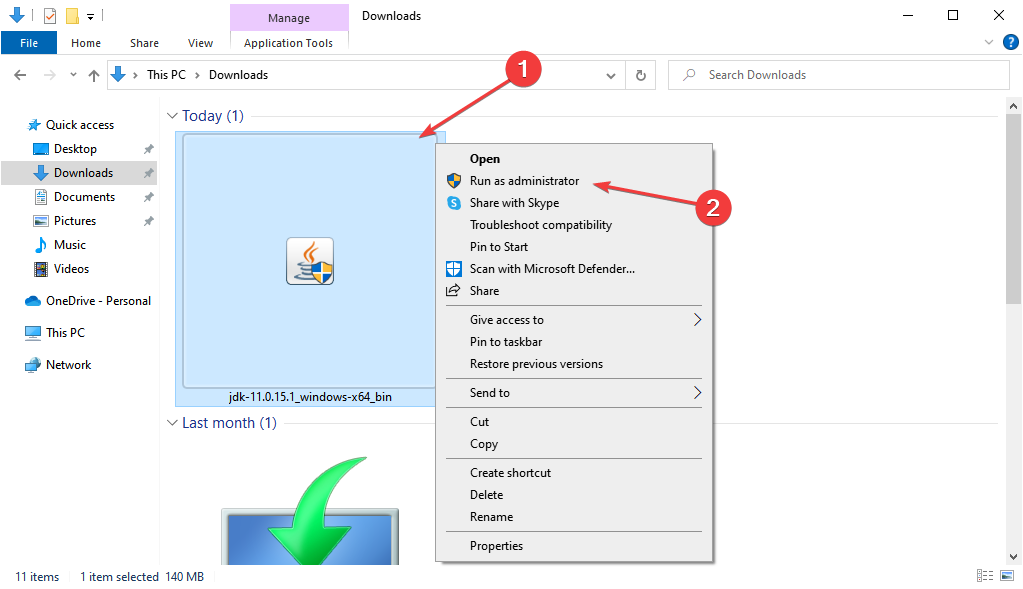
- Now, right-click the jdk-11.0.15.1_windows-x64_bin (version may differ) file, and select Run as administrator from the context menu.

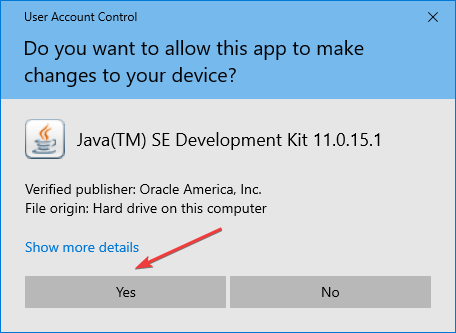
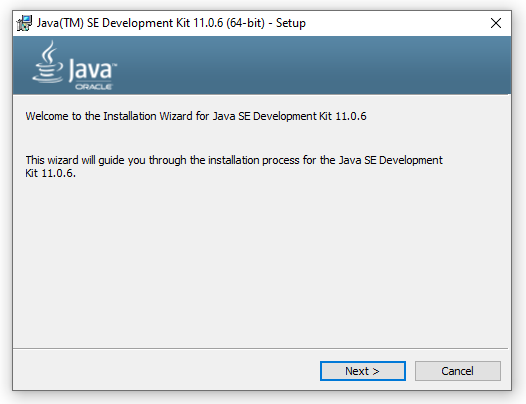
- Click Yes in the UAC (User Account Control) prompt that pops up.

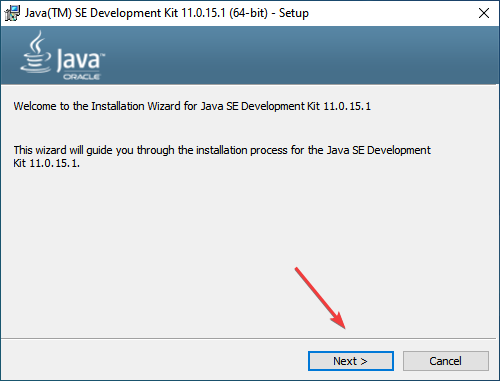
- Click the Next button.

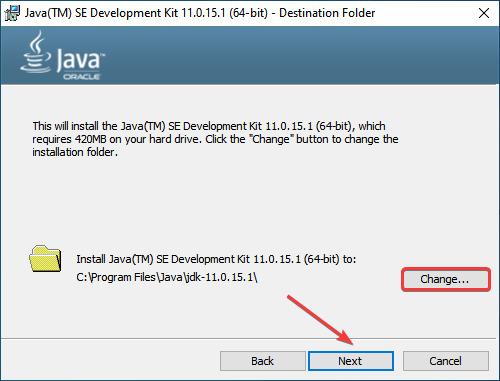
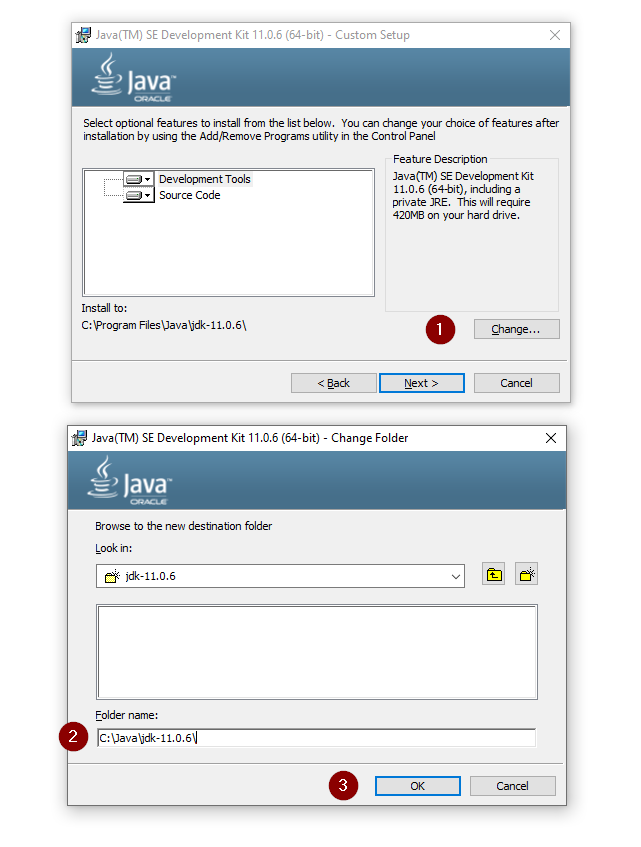
- You can click Change to select an alternative folder to install Java SE 11 or click on Next to continue with the default location right away.
- Now, wait for the installation to complete.
Some PC issues are hard to tackle, especially when it comes to corrupted repositories or missing Windows files. If you are having troubles fixing an error, your system may be partially broken.
We recommend installing Restoro, a tool that will scan your machine and identify what the fault is.
Click here to download and start repairing.
Once it’s done, you have completed half the task, i.e, downloaded and installed JDK 11 in Windows 11. However, you still have to set up a path variable for it to get things up and running. Follow the steps in the next section to do that.
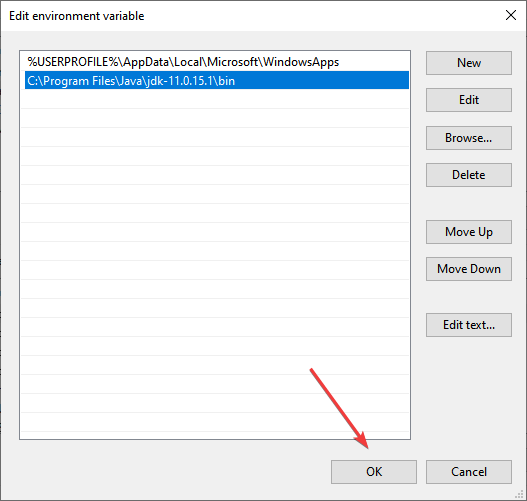
2. Set Up a Path Environment Variable
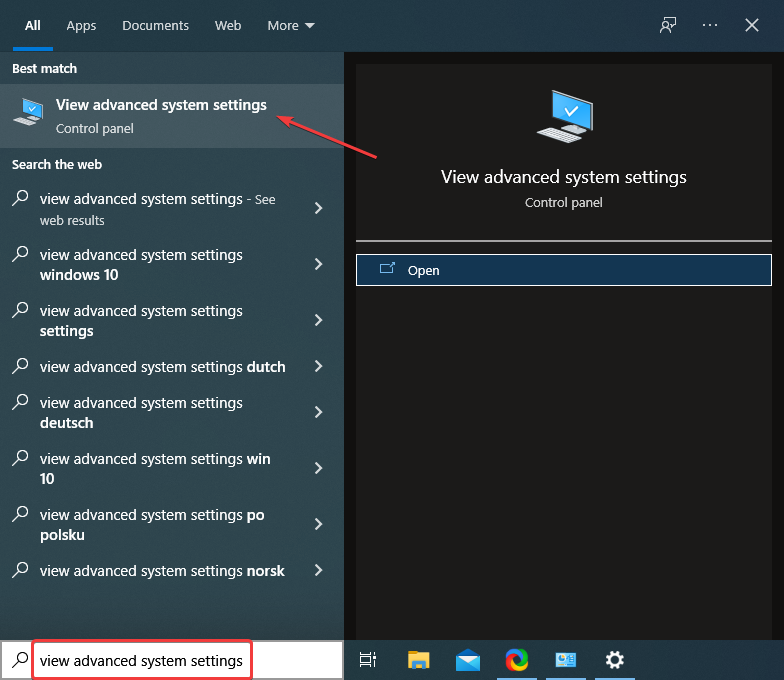
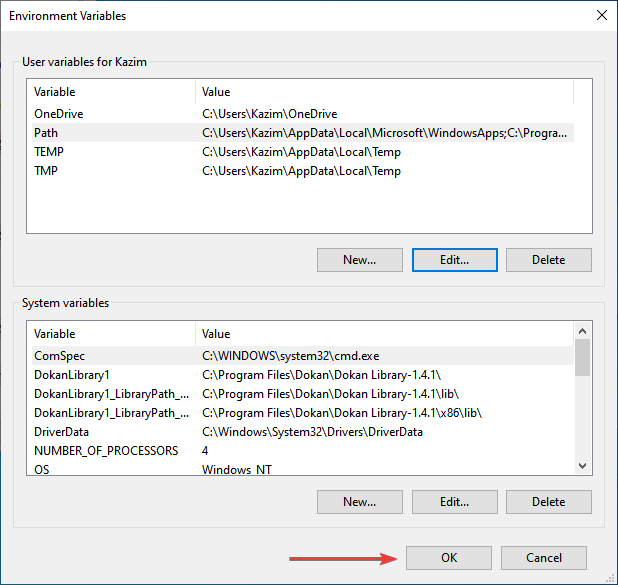
- Press Windows + S to launch the Search menu, enter View advanced system settings in the text field, and click on the relevant search result.

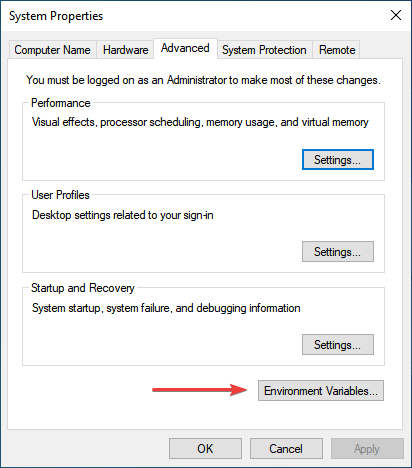
- Click on the Environment Variables button in the Advanced tab.

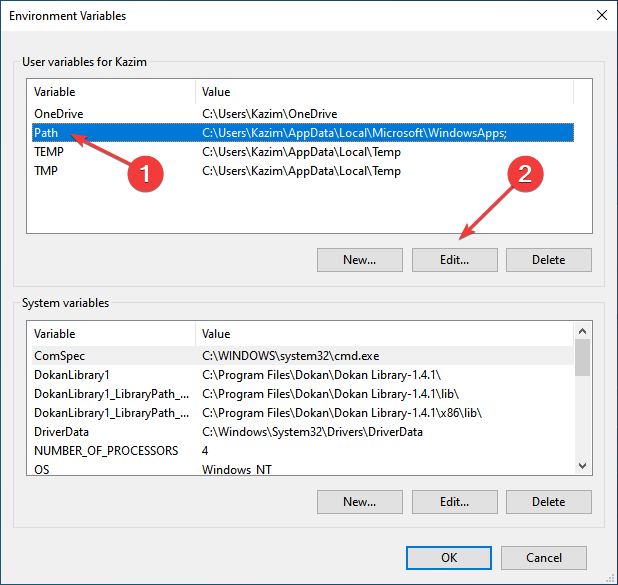
- Select the PATH variable, and click on the Edit button.

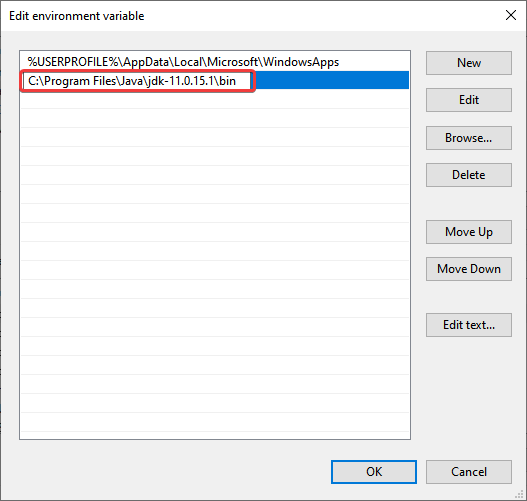
- Next, click on New on the right.

- Paste the full JDK 11 bin folder path as given below. It may differ on your computer if you have changed the location earlier during the installation process, so make sure to verify it once.
C:Program FilesJavajdk-11.0.15.1bin - Click the OK button after entering the bin folder path.
- Again, click OK in the Environment Variables window to save the changes.

That’s it! You can start working on it right away.
- Norton Won’t Uninstall: 5 Ways to Remove it by Force
- Fix: Password Protected Sharing not Turning Off on Windows
- How to Uninstall uTorrent: 5 Ways to Completely Remove it
- Windows Photo Gallery Not Working: 3 Fixes That You Can Use
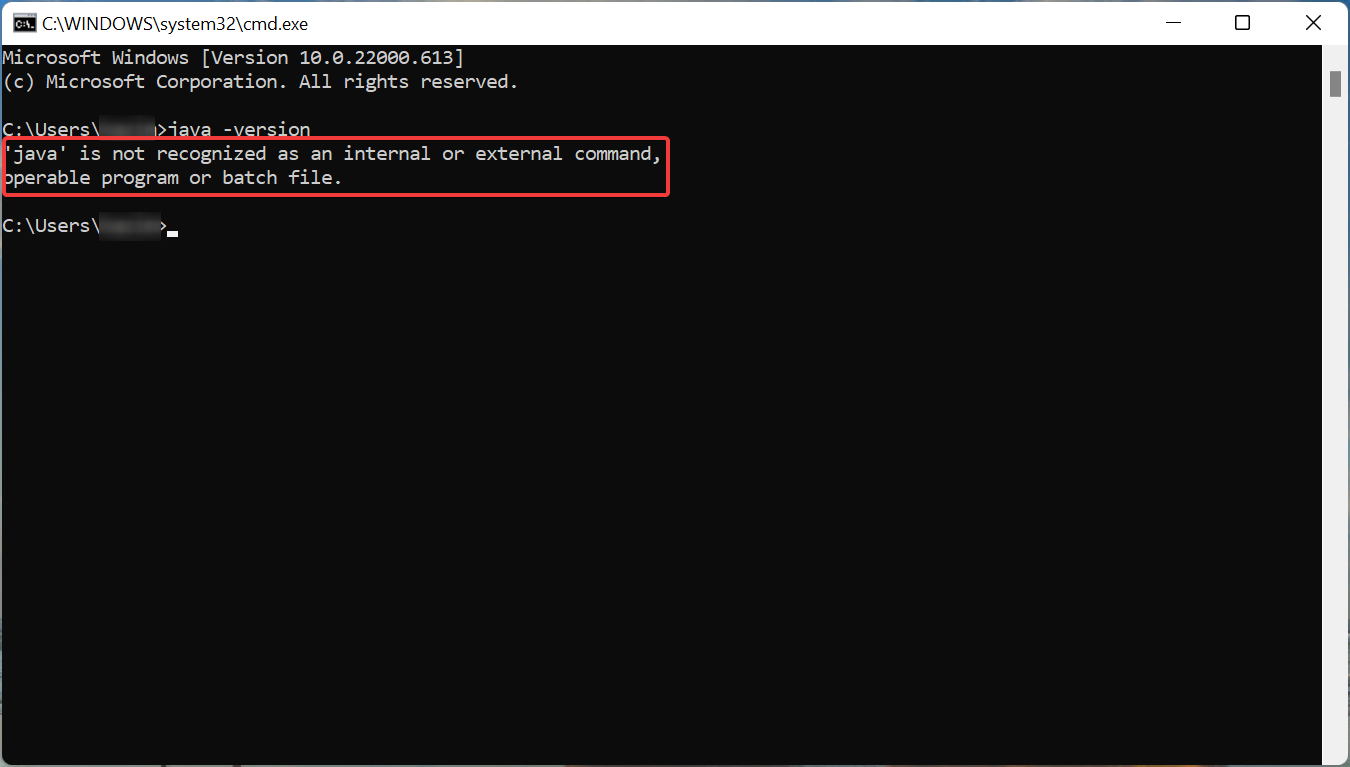
How do I check if JDK 11 is installed on my computer?
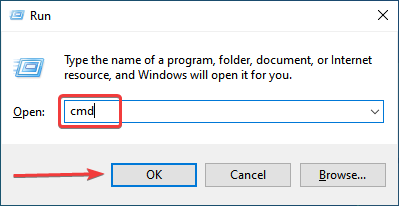
- Press Windows + R to launch the Run command, enter cmd in the text field, and either click OK or hit Enter to launch the Command Prompt.

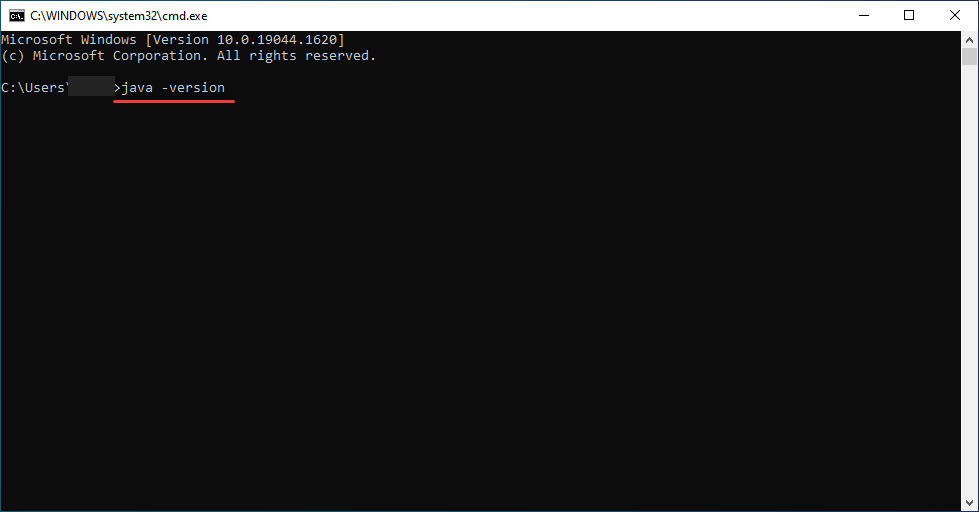
- Now, type or paste the following command and hit Enter to view the Java version.
java -version
- If the Command Prompt lists the version number along with other relevant information, you have JDK installed on the computer.
- However, if you receive a response that ‘java’ is not recognized as an internal or external command, operable program or batch file, it means that you don’t have JDK installed yet, and can follow the steps above to get it.

While earlier, there were ways to download JDK 11 Windows installer without login, you now have to create an account. Looks like Oracle found a way to disable all these.
So, that’s how users can download and install JDK 11 in Windows 10 for free. Thereafter, they can compile their Java code text files with the javac command. Also, the methods listed here would help download JDK 11 in Windows 7 as well.
Besides, find out how to install Java in Windows 11, in case you are running the latest iteration of the OS from Microsoft.
If you have any other queries, drop a comment in the section below.
![]()
Newsletter
by Matthew Adams
Matthew is a freelancer who has produced a variety of articles on various topics related to technology. His main focus is the Windows OS and all the things… read more
Updated on May 27, 2022
- The JDK (Java Development Kit) is a collection of tools required for developing and testing programs in the language.
- You can easily download JDK 11 from the official Oracle website in no time.
- Also, find out how to check if you have JDK installed on the PC.
Java is an object-orientated programming language that programmers use to develop Java software. For that, they need to download a JDK 11 (Java Development Kit) installer for Windows.
Java 18 is the latest JDK development kit for Windows, Linux, and macOS platforms. If you are a beginner and looking for regular updates for a prolonged period, we recommend going with Java SE 11.
So without further ado, let’s walk you through the process to download JDK 11 installer for Windows.
How do I check if my computer is compatible with JDK 11?
- Press Windows + S to launch the Search menu, enter Control Panel in the text field, and click on the relevant search result.
- Next, select System and Security from the options listed here.
- Click on the System entry.
- Now, check the System type here.
Before you proceed to install JDK 11, it’s imperative to check that your computer meets the system requirements for it. The platform is compatible with Windows 11, Windows 10, 8, and 7, but you need to be running the 64-bit version of the OS.
If the System type reads 64-bit, you can install JDK 11, but in case it says 32-bit, you would have to either upgrade or go with a different version of JDK that supports 32-bit architecture.
Once you have verified that your PC is compatible, let’s go straight to the process to download JDK 11 installer in Windows 10.
How can I install JDK 11 in Windows 10?
1. Download and install Java SE 11
- To get Java SE 11, open the Java SE Downloads page in a browser.
- Scroll down, select Java 11, and then click on the Windows option from the available ecosystems.
- Next, click on the download link next to the installer package (.exe file).
- Tick the checkbox for I reviewed and accept the Oracle Technology Network License Agreement for Oracle Java SE, and then click on the download button at the bottom.
- If you have already signed up, enter the credentials to log in. Otherwise, you can create an account to proceed.
- Once the download is completed, press Windows + E to launch the File Explorer and head to the location where the downloaded file is stored.
- Now, right-click the jdk-11.0.15.1_windows-x64_bin (version may differ) file, and select Run as administrator from the context menu.
- Click Yes in the UAC (User Account Control) prompt that pops up.
- Click the Next button.
- You can click Change to select an alternative folder to install Java SE 11 or click on Next to continue with the default location right away.
- Now, wait for the installation to complete.
Some PC issues are hard to tackle, especially when it comes to corrupted repositories or missing Windows files. If you are having troubles fixing an error, your system may be partially broken.
We recommend installing Restoro, a tool that will scan your machine and identify what the fault is.
Click here to download and start repairing.
Once it’s done, you have completed half the task, i.e, downloaded and installed JDK 11 in Windows 11. However, you still have to set up a path variable for it to get things up and running. Follow the steps in the next section to do that.
2. Set Up a Path Environment Variable
- Press Windows + S to launch the Search menu, enter View advanced system settings in the text field, and click on the relevant search result.
- Click on the Environment Variables button in the Advanced tab.
- Select the PATH variable, and click on the Edit button.
- Next, click on New on the right.
- Paste the full JDK 11 bin folder path as given below. It may differ on your computer if you have changed the location earlier during the installation process, so make sure to verify it once.
C:Program FilesJavajdk-11.0.15.1bin - Click the OK button after entering the bin folder path.
- Again, click OK in the Environment Variables window to save the changes.
That’s it! You can start working on it right away.
- Norton Won’t Uninstall: 5 Ways to Remove it by Force
- Fix: Password Protected Sharing not Turning Off on Windows
- How to Uninstall uTorrent: 5 Ways to Completely Remove it
How do I check if JDK 11 is installed on my computer?
- Press Windows + R to launch the Run command, enter cmd in the text field, and either click OK or hit Enter to launch the Command Prompt.
- Now, type or paste the following command and hit Enter to view the Java version.
java -version - If the Command Prompt lists the version number along with other relevant information, you have JDK installed on the computer.
- However, if you receive a response that ‘java’ is not recognized as an internal or external command, operable program or batch file, it means that you don’t have JDK installed yet, and can follow the steps above to get it.
While earlier, there were ways to download JDK 11 Windows installer without login, you now have to create an account. Looks like Oracle found a way to disable all these.
So, that’s how users can download and install JDK 11 in Windows 10 for free. Thereafter, they can compile their Java code text files with the javac command. Also, the methods listed here would help download JDK 11 in Windows 7 as well.
Besides, find out how to install Java in Windows 11, in case you are running the latest iteration of the OS from Microsoft.
If you have any other queries, drop a comment in the section below.
![]()
Newsletter
В этой статье мы установим JDK 11 на Windows. Java Development Kit (JDK) – это набор программ и библиотек для разработки программ на Java. Если вы хотите разрабатывать на Java программы, сперва вам нужно установить актуальную версию JDK.
В данной статье мы покажем, как установить JDK 11. Эта версия LTS (long time support), которая будет поддерживаться до сентября 2022 года. Вы можете установить любую другую версию JDK на ваш вкус, используя эту инструкцию.
Скачайте нужный дистрибутив JDK
Зайдите на страницу загрузки JDK и нажмите JDK Download
На следующей страницу выберите дистрибутив «Windows x64 Installer»:

Появится всплывающее окно. Согласитесь с условиями лицензии и нажмите кнопку Download:
Для скачивания вам потребуется залогиниться в существующую учётную запись Oracle. Если у вас её нет, вы можете создать новую учётную запись.
Если вам лень заморачиваться с созданием учётных записей, найдите работающий логин/пароль на сайте bugmenot
Начнётся скачивание инсталлятора. По окончанию загрузки запустите установку:
На этапе выбора компонентов укажите путь установки. Я крайне рекомендую вам заменить стандартный путь C:Program Files путём, не содержащих пробелов, например, C:Javajdk-11
Установка началась:

Через несколько минут установка завершится:

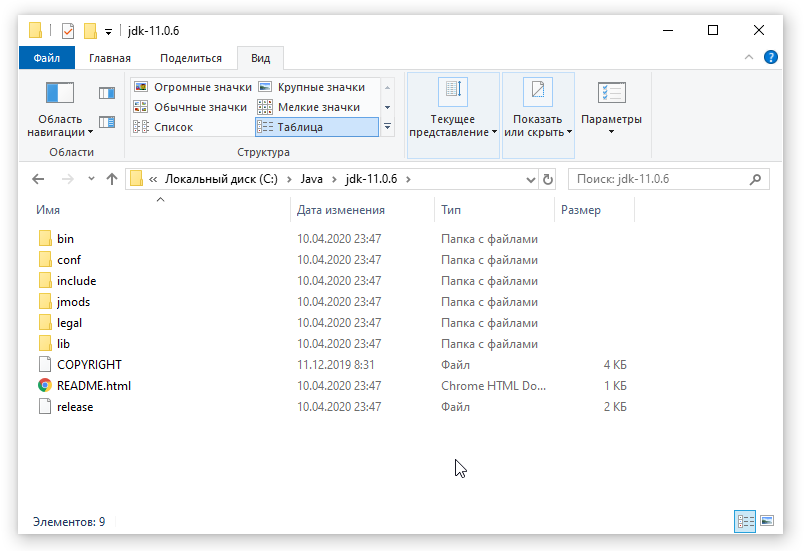
Для проверки вы можете зайти в указанный вами путь и проверить, что там есть следующий контент:
Настройка переменных окружения
После успешной установки JDK, крайне желательно объявить переменную окружения JAVA_HOME. Эта переменная используется многими программами и инструментами из стандартного набора Java разработчика.
Для этого откройте окно «Этот компьютер» → «Свойства»:
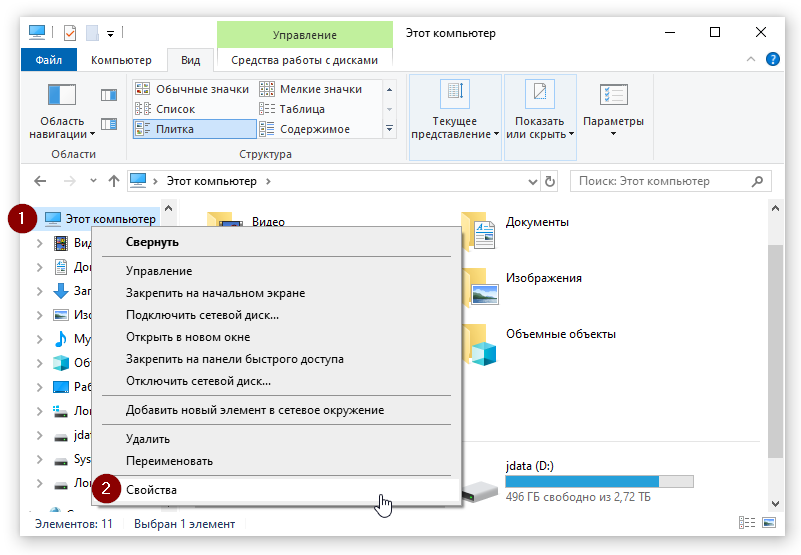
Затем откройте окно «Дополнительные параметры системы» и в нём нажмите кнопку «Переменные среды…»

В окне «Переменные среды» нажмите кнопку «Создать…»

В появившемся окне введите следующие значения:
Имя переменной: JAVA_HOME
Значение переменной: <тот путь, который вы указали при установке>

Затем найдите системную переменную Path и измените её:
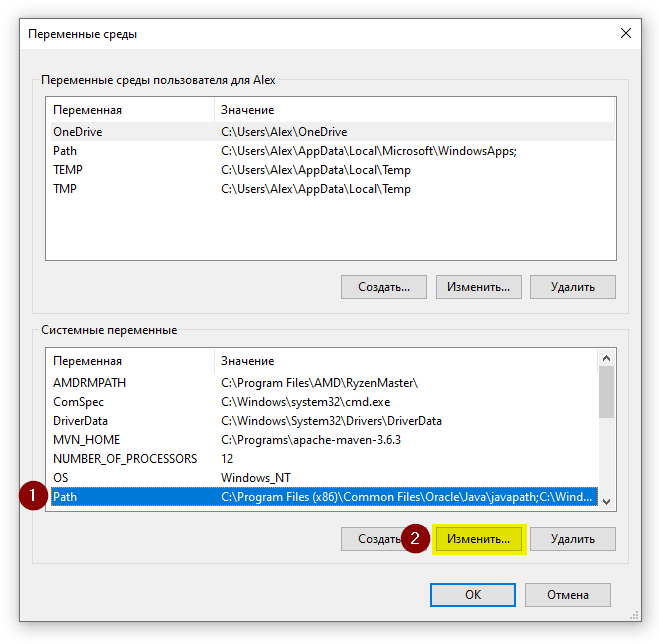
Нажмите кнопку «Создать», и укажите в новой строке значение %JAVA_HOME%bin

Также, если вы видите в этом списке путь к программе javapath (как на скриншоте), удалите его.
Проверка установки
После установки переменных окружения откройте консоль (Win+R, cmd)

Откроется консоль:
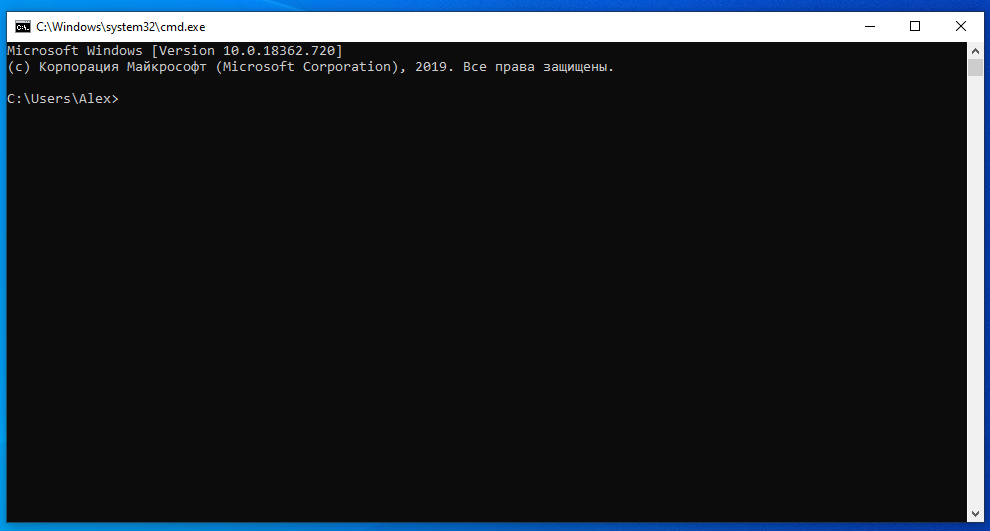
Последовательно выполните две команды:
java -version
javac -version
Если вы видите вывод наподобие этого, значит, вы корректно установили JDK и правильно указали переменные окружения. Вы готовы написать свою программу на Java!
Резюме
В данном уроке мы научились устанавливать JDK и настраивать перменные окружения. В следующих уроках мы установим основные инструменты Java программиста.