Скажу сразу, что вы все делаете на свой страх и риск, поэтому если не уверены в своих силах, то лучше для начала установите систему на виртуальную машину. Об этом мы тоже поговорим. Также будем работать не с последней версией macOS Big Sur (к слову, она уже доступна для установки), а с Beta-версией, которая стабильно запускается на загрузчике OpenCore. Судя по данным пользователей, на загрузчике Clover появляются проблемы во время установки. Я не гарантирую, что Hackintosh на базе macOS Big Sur запустится на вашем компьютере — все зависит от железа, а если вы устанавливаете на ноутбук, то и от его модели.
Загрузчики macOS — специальные программы, позволяющие запустить операционную систему macOS на устройстве не от Apple. По сути, это порт macOS на другое железо. Самые популярные — OpenCore и Clover. Их функционал практически идентичен, за исключением пары моментов. Также на одном устройстве может работать OpenCore, а на другом Clover — когда речь идет за Hackintosh, то все индивидуально, как вам удобно. Но о фишках того или иного загрузчика я рассказывать не буду — сегодня мы поговорим об установке через OpenCore.
Как установить macOS Big Sur на VMWare?
Но перед тем, как устанавливать macOS Big Sur на физический жесткий диск вашего компьютера, разберем, как установить систему на виртуальную машину VMWare. Этот метод хорош тем, что дает возможность попробовать операционную систему Mac без форматирования жесткого диска с Windows.
- Установите VMWare — скачать ее можно с официального сайта.
- Далее нужно разблокировать функцию установки macOS 11. Для этого необходимо дополнительно загрузить unlocker по ссылке, открыть его от имени администратора (файл win-install.cmd), дождаться загрузки дополнительных файлов и снова запустить VMWare.
- Нажимаем на Создать новую виртуальную машину.
- Следуем инструкции на экране.
- В списке операционных систем появилась Apple MacOS X — выбираем macOS 11.0 или 11.1.
- Продолжаем настраивать виртуальную машину. Выделяем не менее 36 ГБ виртуального жесткого диска, минимум 2 или рекомендовано 4 гигабайта оперативной памяти, 2 ядра процессора, а в строке CD/DVD нужно выбрать скачанный образ macOS Big Sur.
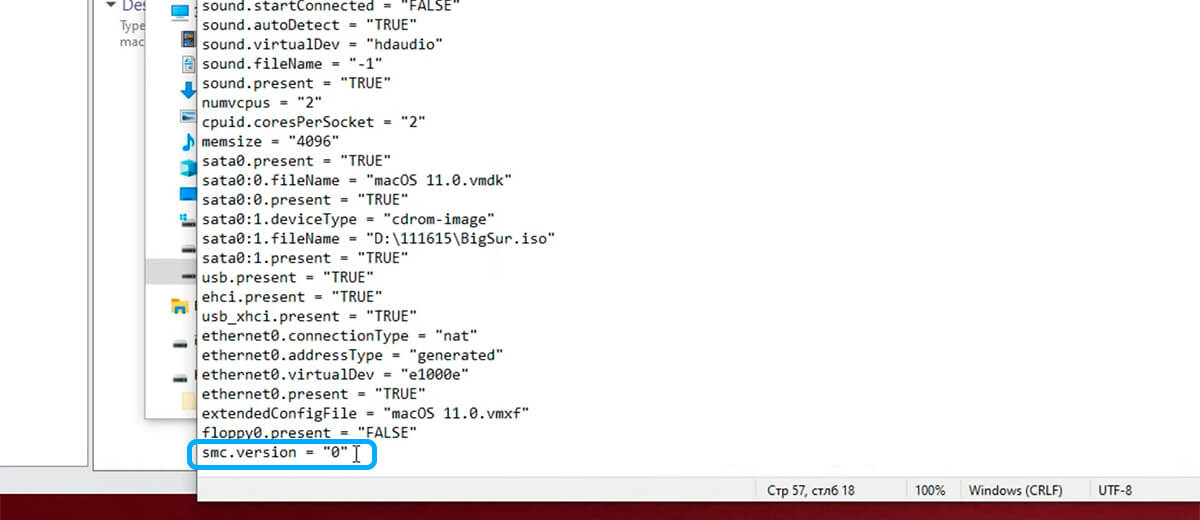
- Откройте папку с виртуальной машиной и найдите 2-килобайтный файл xxxxxxxx.vmx (где х — это название виртуальной машины).
- Откройте файл с помощью Блокнота и в конце вставьте строчку smc.version = «0» и сохраните изменения.
- Запустите виртуальную машину.
- Должно появиться яблоко, после чего откроется меню установки macOS Big Sur.
- Необходимо отформатировать виртуальный диск и установить систему в соответствии с инструкцией.


После установки и первой настройки macOS Big Sur можно заметить, что разрешение очень низкое, его поменять нельзя, а сам интерфейс тормозит. Чтобы это исправить необходимо:
- Скачать ISO-образ VMWare Tools.
- Зайти в дополнительные параметры виртуальной машины — CD/DVD.
- Вместо образа системы нужно поставить недавно скачанный ISO-файл VMWare Tools.
- Включите виртуальную машину и откройте файл VMWare Tools на рабочем столе macOS Big Sur.
- Нажмите Install VMWare Tools.
- Следуйте подсказкам установщика на экране.
- После завершения установки будет предложено перезагрузить виртуальную машину — соглашаемся, нажав на Перезагрузить сейчас.
После включения видеопамяти будет выделяться больше и разрешение дисплея виртуальной машины будет соответствовать вашему монитору или экрану ноутбука.
Как установить macOS Big Sur на PC с помощью загрузчика OpenCore?
Создаем загрузочную флэшку macOS Big Sur с загрузчиком OpenCore.
- Скачиваем образ macOS Big Sur Beta 2 вместе с загрузчиком OpenCore или (на свой страх и риск) macOS 11.1 Final.
- Также загружаем с Интернета утилиту R-Drive Image, которая понадобится для создания загрузочной флэшки.
- Берем USB-накопитель объемом не менее 16 ГБ и подключаем к компьютеру.
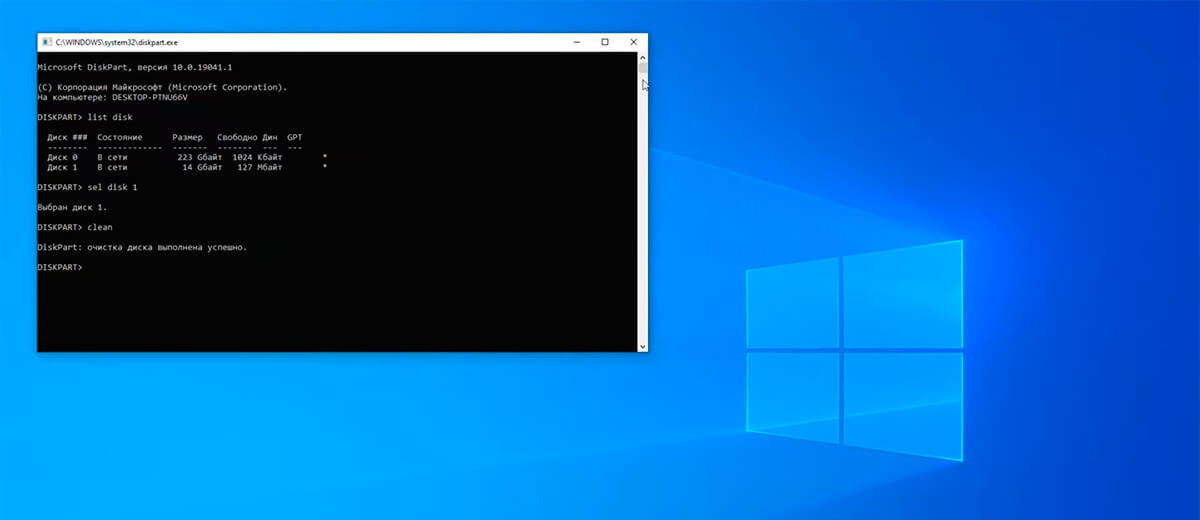
- Открываем программу Выполнить, нажав комбинацию клавиш Ctrl+R, и вводим diskpart.
- Вводим команду list disk и нажимаем клавишу Enter.
- Появится список подключенных к компьютеру дисков — запоминаем название флэшки (ее можно определить по объему), в нашем случае это disk 1.
- Вводим sel disk 1.
- Вводим слово clean, после чего накопитель будет очищен.
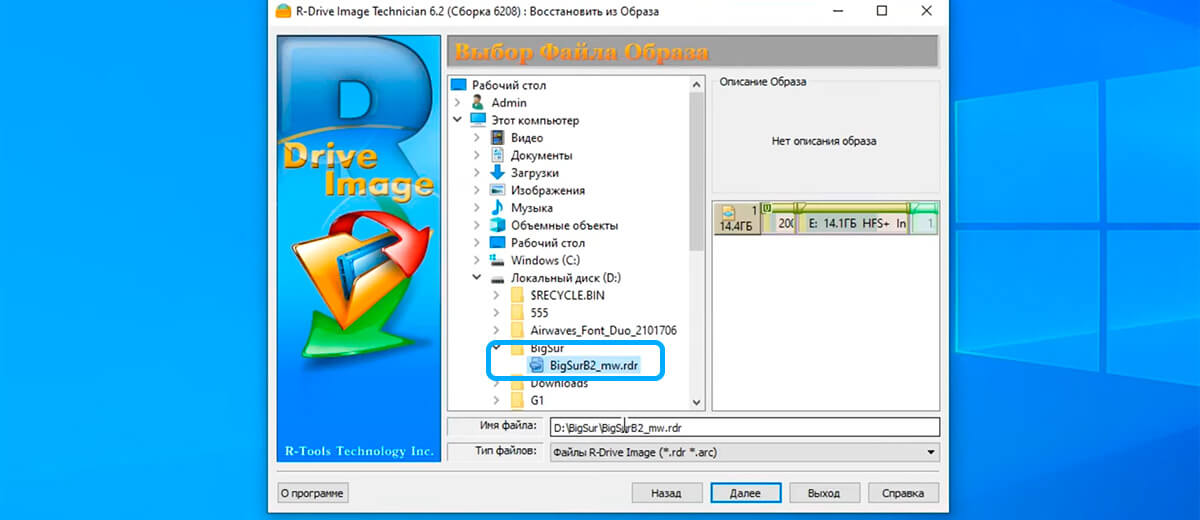
- Открываем программу R-Drive Image.
- Нажимаем Далее — Восстановить из образа.
- Выберите скачанный образ macOS Big Sur с разрешением .rdr и нажмите Далее.
- Нужно выбрать загрузочный раздел и USB-накопитель — выбираем флэшку в качестве источника и приемника (смотрите по объему).
- Несколько раз нажмите Далее, после чего Начать.

Настройка BIOS
Теперь, когда мы создали нашу загрузочную флэшку, необходимо зайти в BIOS компьютера. У разных марок компьютеров кнопка входа в биос разная, но зачастую это Del или F12. Теперь BIOS нужно настроить. Найдите и отключите следующие параметры:
- Виртуализацию Intel VT-d и VT-x.
- Fast Boot.
- Secure Boot.
- Network Boot.
- Установите параметр Boot Mode — UEFI.
- Параметр SATA Mode — AHCI.
- Укажите в разделе DVMT Memory 128 или 64 МБ.
- Установите загрузочный носитель — в нашем случае это флэшка.
- Сохраните изменения и перезагрузитесь.
Установка macOS Big Sur на ПК
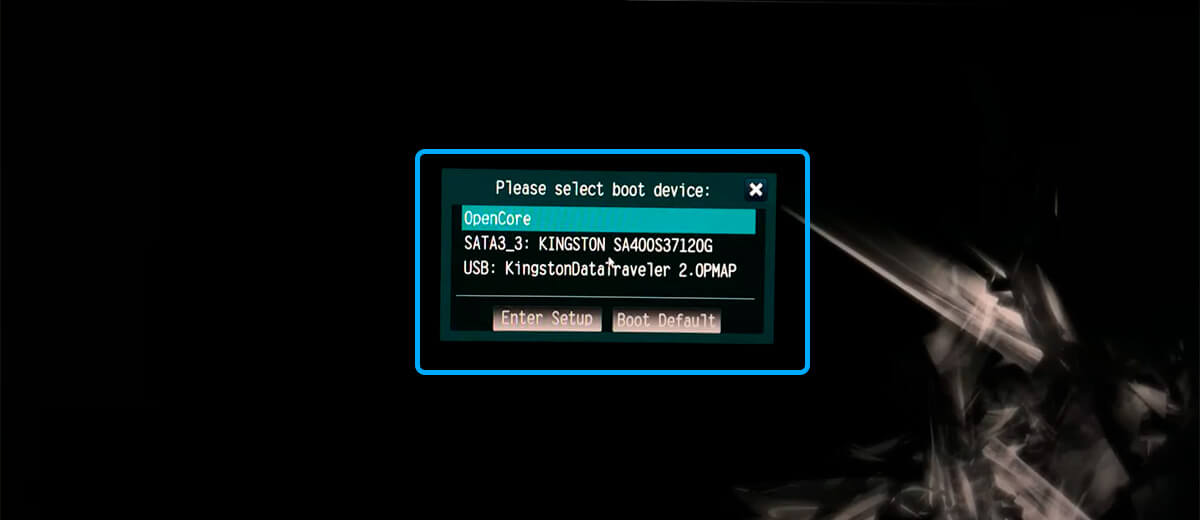
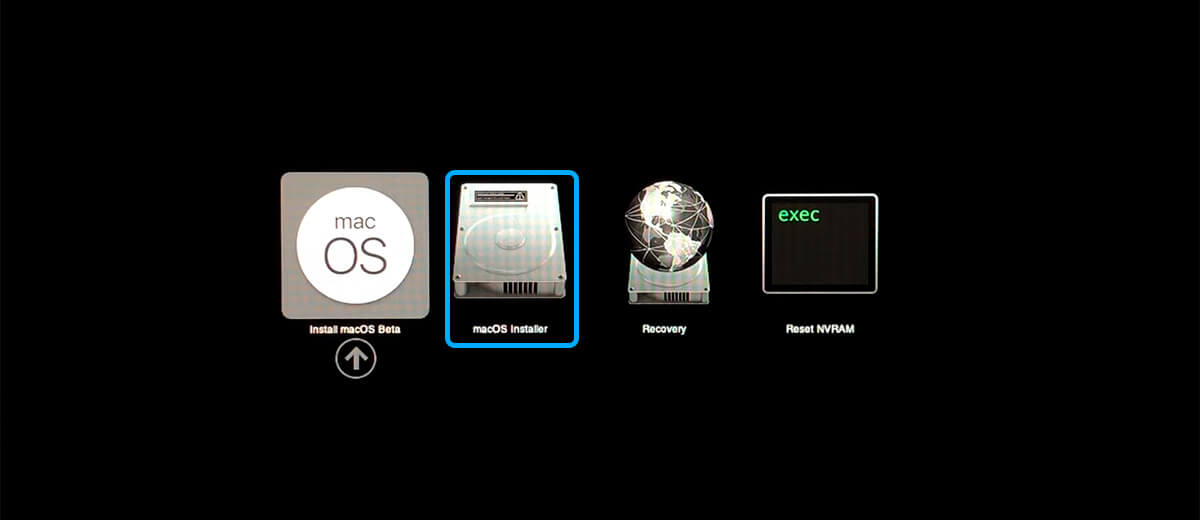
Начинается самое интересное — вход в загрузчик OpenCore. Ваш компьютер должен загрузиться с USB-накопителя, после чего появится две кнопки: Install macOS Beta и Reset NVRAM. Нажимаем первую. Бывает, что загрузка дальше огромного полотна различных команд на черном экране не проходит. В таком случае, перезагрузите ПК и нажмите кнопку Reset NVRAM, после чего снова нажмите Установить macOS Beta. На ноутбуках бывает проблема, что после нескольких команд экран становится черным, а сам загрузчик зависает. Решение простое — подключите к ноутбуку внешний монитор или телевизор по HDMI-кабелю, а после установки выберите нужный дисплей для отображения картинки. К слову, если что-то не получается, вы можете перейти по ссылке и найти проблему — здесь собрана целая электронная книга по OpenCore. Продолжаем устанавливать macOS Big Sur на ПК.


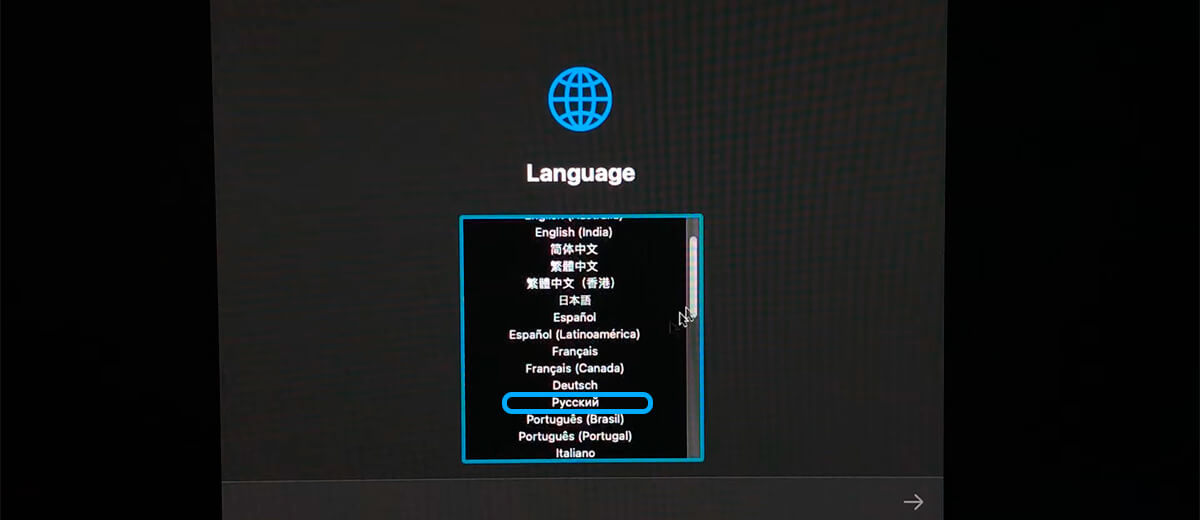
- Когда загрузчик прошел, на экране появится яблоко, а после чего привычное окно приветствия с выбором языка.
- Далее нужно зайти в Дисковую утилиту.
- Нажмите Вид — Показать все устройства.
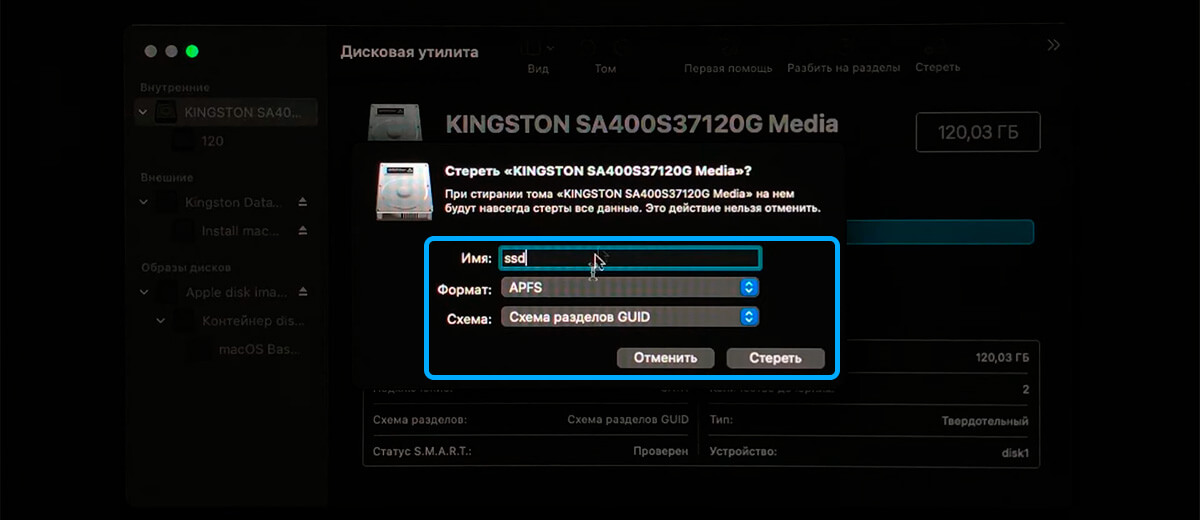
- Выберите жесткий диск и нажмите Стереть.
- Сначала дайте ему имя, например, Macintosh.
- Далее выберите тип форматирования — APFS.
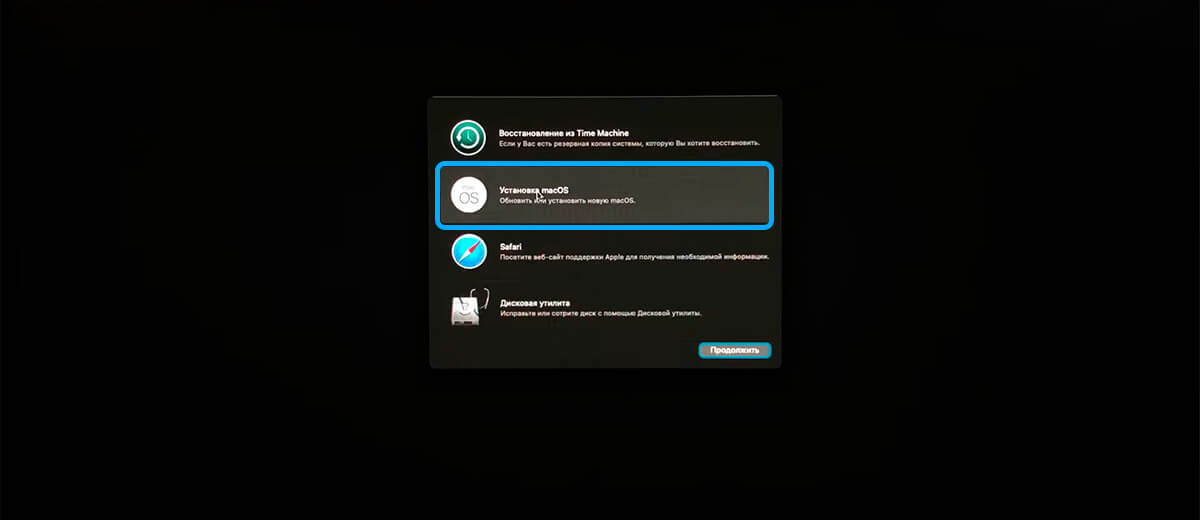
- Если форматирование прошло, закройте дисковую утилиту и нажмите Установить macOS.
- Следуйте инструкциям на экране.
- После выбранного диска начните установку. Произойдет копирование файлов, после чего ПК перезагрузится.
- После перезагрузки нужно нажать кнопку macOS Installer.
- Установка продолжится еще на некоторое время.
- Снова компьютер перезагрузится, и снова нужно выбрать macOS Installer.
- Далее macOS Big Sur запустится и необходимо будет произвести первую настройку.

Настройка конфигуратора OpenCore
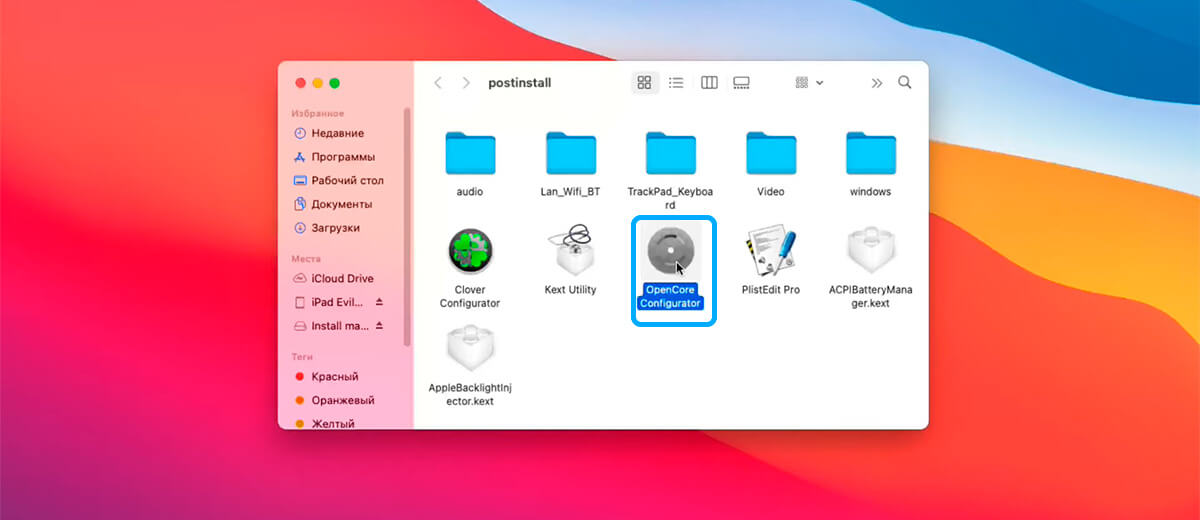
Я рассказал как установить бета-версию, но система сможет обновиться и до финальной сборки. Вы можете в любой момент настроить значения загрузчика, в том числе, изменить название компьютера или произвести некоторые изменения в конфигураторе загрузчика. Чтобы это сделать нужно зайти в папку postinstall, которую необходимо перенести с корневого раздела флэшки на рабочий стол. Теперь обязательно нужно произвести некоторые манипуляции с конфигуратором загрузчика, чтобы запускать macOS Big Sur без USB-накопителя.
- Найдите в папке postinstall файл OpenCore Configurator.
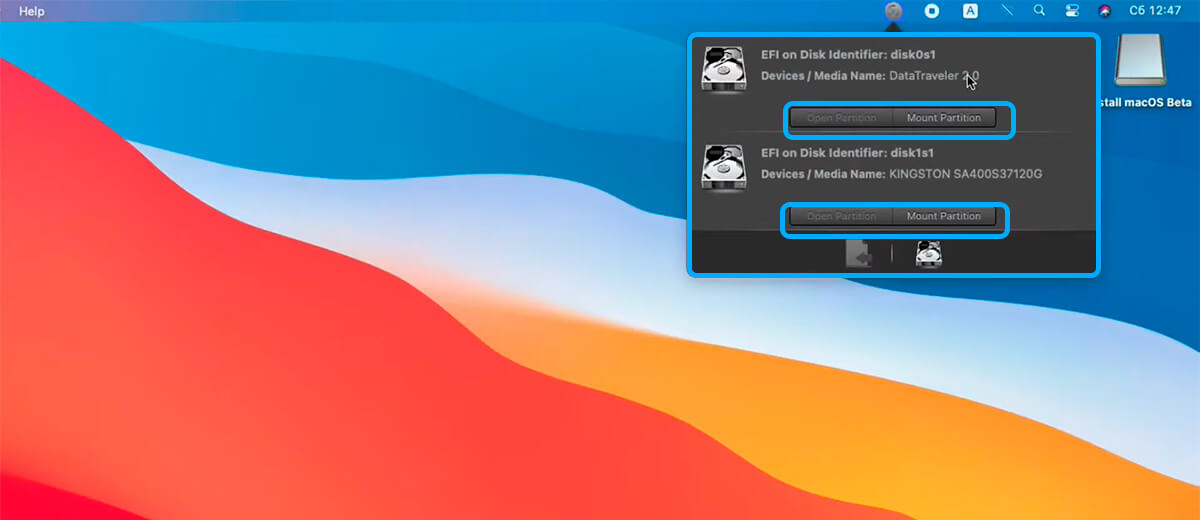
- Необходимо вмонтировать в ОС загрузочные разделы флэшки и жесткого диска с системой.
- Вверху в панели меню находим соответствующий значок конфигуратора, нажимаем и в контекстном меню возле каждого диска нужно кликнуть по mount partition.
- После монтирования жесткого диска на рабочем столе появится накопитель EFI с одноименной папкой, которую нужно перенести в загрузочную область HDD.
- Теперь можно запускать систему без использования USB-накопителя.

Часто после установки не работает сеть и звук в системе. Чтобы это исправить необходимо:
- Снова монтируем раздел EFI в панели меню.
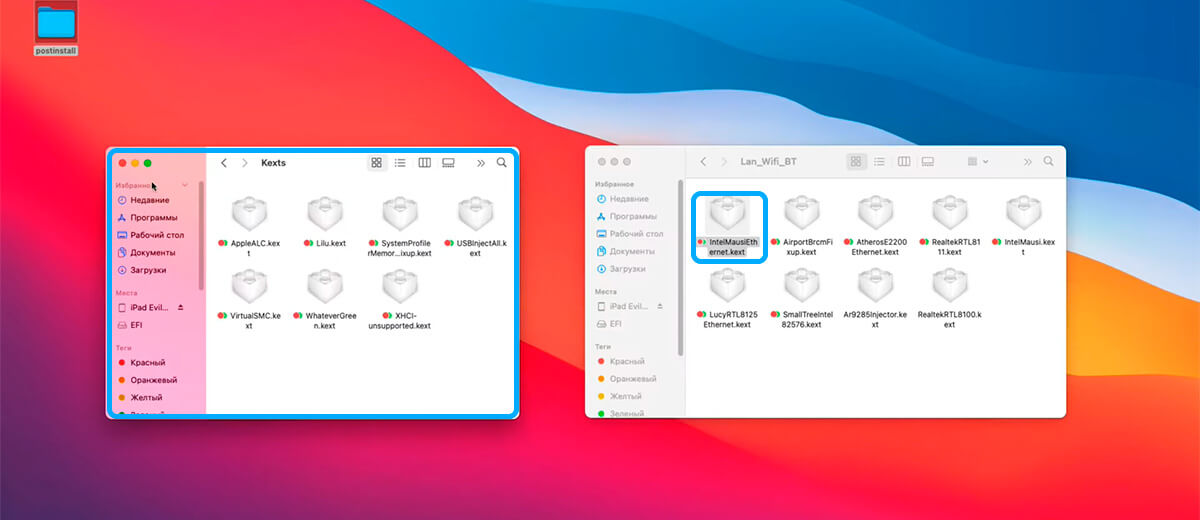
- Находим специальные файлы .kext для вашей сетевой и звуковой карты в папке postinstall. Если не подойдет, тогда нужно найти в Интернете специально под ваше оборудование. Иными словами, это как драйвера в Windows.
- Переходим по пути EFI/OC/Kexts и туда скидываем файлы kext.
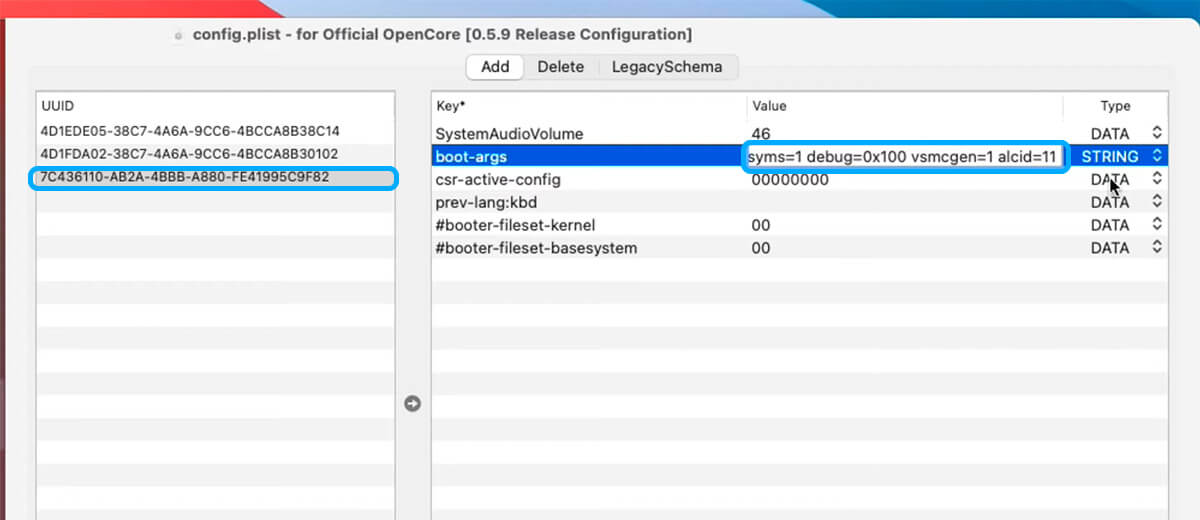
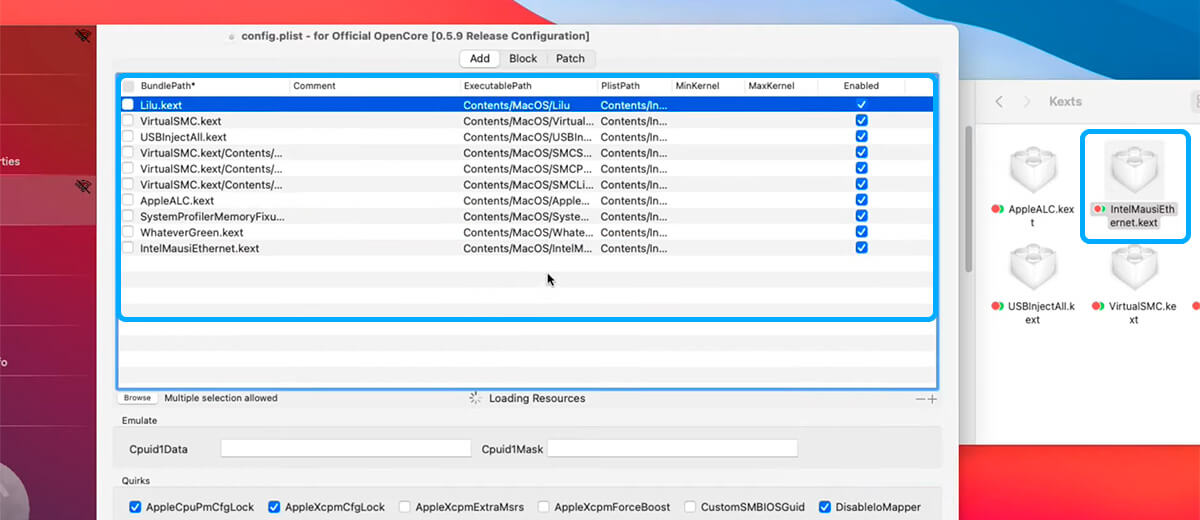
- Теперь запускаем в папке postinstall файл config с помощью системного редактора или проводим все действия сразу в OpenCore Configurator.
- Во вкладке NVRAM, открываем третью строчку и в параметр bootargs дописываем значение alcid = x (где х — это значение именно вашей модели звуковой карты, все значения конфигураторов под разное железо можно найти на GitHub или другом ресурсе, связанном с Hackintosh).
- Заходим в раздел Kernel и перетаскиваем файл kext сетевой карты из папки EFI/OC/Kexts.
- Сохраните изменения, закройте конфигуратор, выгрузите EFI-разделы в панели меню из системы и перезагрузите ОС.

Итог
Как видим, установить macOS Big Sur на обычный ПК может показаться сложной задачей, но если к ней отнестись ответственно, то она будет успешно выполнена. Дам совет: найдите все kext-файлы и значения параметров на GitHub заранее, чтобы потом не возникало никаких проблем. Также предлагаю вашему вниманию инструкцию по установке macOS Big Sur на ПК, где все понятно рассказано.
На этом инструкция, как установить macOS Big Sur на ПК закончена. Если вам интересно узнать о загрузчиках и о различных подводных камнях OpenCore и Clover, то пишите в комментариях — постараемся все предельно ясно объяснить. Также задавайте вопросы — я на них с удовольствием отвечу. Заходите в наш Telegram и не забывайте комментировать новости и посты. Всего доброго!
Apple has announced the next major release of macOS at WWDC 2020. Available today in developer beta and coming to all users in fall 2020. macOS Big Sur will be a free software update later this year. In the meantime, the developer beta is available on https://developer.apple.com/macos/ and for public beta in July.
This OS has new features that include an all-new iOS inspired design, Control Center arriving for Mac, a revamped Safari with greater privacy controls, Apple’s new translation software that uses on-device processing, and more.
Macs compatible with macOS Big Sur (macOS 11):
- 2015 and later MacBook
- 2013 and later MacBook Air
- Late 2013 and later MacBook Pro
- 2014 and later iMac
- 2017 and later iMac Pro
- 2014 and later Mac mini
- 2013 and later Mac Pro
And Accordingly, the following models capable of running macOS Catalina will not be able to be upgraded to macOS Big Sur:
- 2012 and Early 2013 MacBook Pro
- 2012 MacBook Air
- 2012 and 2013 iMac
- 2012 Mac mini
Tip: before reading the rest of the article, it’s recommended to navigate to the Required File section of this post and download macOS Big Sur then you’ve time to read the item until the downloading gets complete.
Steps to Install macOS Big Sur on VirtualBox on Windows
- Install VirtualBox on Windows PC
- Install/Update VirtualBox Extension
- Create a New Virtual Machine & Customize it
- Run VirtualBox Code to the Command Prompt
- Start the Virtual Machine
- Perform Clean Installation of macOS Big Sur
- Summary
Important Note:
Before we get started, make sure your system can support Virtualization Technology (VT), and it is enabled from BIOS so that you should be able to run Virtualization software like Virtualbox or VMware. Also, you should have a 64-bit Windows operating system with at least 2 GB Ram and 20 GB of free storage, however, we recommend you at least 4 GB of RAM or higher so you can store more files and install more apps on macOS Big Sur.
Furthermore, if you have an SSD, it’s highly recommended to use it as storage because SSD is much faster then mechanical hard drive (HDD ) and macOS run on SSD very smooth. Anyway, it is not 100% compulsory but if you have, don’t hesitate to use it.
Required Files
- Download Virtualbox
- Download Virtualbox Code
- macOS Big Sur Beta 11.0 (20A4299v) Dev Beta 1
- macOS Big Sur Beta 11.0 (20A4300b) Dev Beta 2
- macOS Big Sur Beta 11.0 (20A5343j) Dev Beta 4/Public Beta 1
- macOS Big Sur 11.0.1 (20B29) Initial public release Latest
Note: You can create macOS Big Sur ISO Image.
Recommendation: It’s highly recommended to create a new drive on your Windows PC and install macOS Big Sur on that drive.
Step 1: Install VirtualBox on Windows PC
From the “Required File” section of this post, you should have downloaded VirtualBox as well and if you didn’t, download VirtualBox’s latest version and install it on your Windows system. If you’ve already installed VirtualBox, then you can skip this step. Other than that, double click on VirtualBox Setup and click Next for a couple of times and you’re done with the installation.
This slideshow requires JavaScript.
Step 2: Install or Update VirtualBox Extension
This step is not 100% percent necessary but it’s highly recommended to do this step because macOS Big Sur might not be compatible with VirtualBox and for this reason, it will cause a problem during the installation. Download VirtualBox Extension and follow the steps below.
#1. Open up VirtualBox, navigate to Tools>Pereferences>Extensions.3
#2. Click on Plus icon and select VirtualBox extension which you’ve downloaded at the beginning of this section. Click Install or Upgrade and then click OK button.
#3. Finally, you should see something like the screenshot below.

Update Virtualbox Extension
Step 3: Create a New Virtual Machine & Customize it
Creating a virtual machine for macOS Big Sur is the same when you create a virtual machine for the Windows Operating system or Linux. We will use the ISO image of macOS Big Sur to do the installation process.
Note: We’ll make the VMDK as well if we receive lots of requests for that. Otherwise, there is no point because you can install macOS Big Sur with iso image as well.
#1. Open up your VirtualBox application and click New.
#2. Type a name for your Virtual Machine. Click Expert Mode and choose the following options then click Create.

Expert Mode
- Name the VM
- Virtual Machine Location (a separate drive is recommended)
- Type (Mac OS X)
- Version (Mac OS X 64-bit)
- Memory 4 GB (recommended 8 GB or higher)
- Create a virtual hard disk
Your setting should look something like the screenshot below.

Create New Virtual Machine
#3. Select where you want to save your virtual hard disk. Also, make sure to increase the size of the disk. From virtual hard disk, type make sure to select VHD. If you select dynamic allocated, your VM speed will not be good but it’s good that does not allocate the specified storage at once, unlike fixed-size type.

Create Virtual Hard Disk
#3. It’s time to customize some of the settings according to your choice. Click Settings and from the pane choose System. On the Motherboard, tab uncheck Floppy disk and move it down. If you’re not happy with your memory setting still, you can change it.
#4. Click the Processor tab and select a minimum of two processors or higher.

Increase the Processor
#5. Navigate to the Display menu then increase the Video memory to 128 MB.

Increase Video Memory
It’s time to select your macOS Big Sur ISO file. Click Storage and then select on Empty. Click on DVD icon and choose your macOS Big Sur ISO file.

Select ISO Image
Make sure your macOS Big Sur ISO file is on the top, not your Disk because if your disk is on the top, your VM might not boot. Just change the SATA port number to 0 for your iso image. It’s not 100% compulsory.

ISO Image SATA 0
Step 4: Run VirtualBox Code to the Command Prompt
Once you’ve created and customized your virtual machine, it’s time to run some codes in order to install macOS Big Sur on VirtualBox.
First, you should notice your virtual machine name because later on, we will use it. Open the VirtualBox code which you should have downloaded from the Required File section of this post.
#1. When you opened VirtualBox code via notepad or any other text editor, use the replace function of the program to replace the VM Name to your virtual machine name. See the picture below to get an idea of how it’s done.
cd "C:Program FilesOracleVirtualBox"
VBoxManage.exe modifyvm "VM Name" --cpuidset 00000001 000106e5 00100800 0098e3fd bfebfbff
VBoxManage setextradata "VM Name" "VBoxInternal/Devices/efi/0/Config/DmiSystemProduct" "iMac19,1"
VBoxManage setextradata "VM Name" "VBoxInternal/Devices/efi/0/Config/DmiSystemVersion" "1.0"
VBoxManage setextradata "VM Name" "VBoxInternal/Devices/efi/0/Config/DmiBoardProduct" "Mac-AA95B1DDAB278B95"
VBoxManage setextradata "VM Name" "VBoxInternal/Devices/smc/0/Config/DeviceKey" "ourhardworkbythesewordsguardedpleasedontsteal(c)AppleComputerInc"
VBoxManage setextradata "VM Name" "VBoxInternal/Devices/smc/0/Config/GetKeyFromRealSMC" 1
Replace VM Name
Tip: It’s highly important that you should quit the VirtualBox program before executing the code. If you don’t do it, your virtual machine might not proceed to the installation step.

Exit VirtualBox
#2. Once you replaced the “VM Name” with your virtual machine name, then run the code one by one to the command prompt (CMD). You can open the command prompt by pressing Windows+X key in Windows 10 or click windows key and type CMD and run command prompt as administrator.
This slideshow requires JavaScript.
Step 5: Start the Virtual Machine
Starting macOS Big Sur with the older version of the Mac Operating system was a bit different, but with new macOS Big Sur still, it’s easy to set it up.
#1. Open the VirtualBox app then click the Start button. A black screen with a few yellow & white text will appear on the screen.

Start Virtual Machine
#2. Once you started the VM then you’ll see some code running in the background. Just wait until you see the Apple logo.
This slideshow requires JavaScript.
#3. Select a Language and click Continue arrow.

Select Language
#4. Select Disk Utility and click Continue.

Select Disk Utility
#5. Select your main Virtual Disk and click the Erase button. Make sure to check the size of the disk and you should not erase the wrong disk.

Erase Virtual Disk
#6. Name your Disk that you want to install macOS Big Sur on it. I’ll name here macOS HD. Once typed a name then click the Erase button.

Name the Virtual Disk
#7. Close Disk utility.

Close Disk Utility
#8. Select Install macOS and click Continue.

Install macOS
#9. Click Continue.

macOS Big Sur Beta
#10. Agree to terms and Conditions.

Agree to the Terms & Conditions
#11. Select the installation disk and click Continue. Once you click continue it’ll take around 29 minutes to complete the first part of the installation.
NOTE: If you get the Operation Couldn’t be Completed BiErrorDomain Error 3 then follow this step by step guide below.
Fix the Operation Couldn’t be Completed BiErrorDomain Error 3
This is a very common error with macOS Big Sur beta version 1 that most people have faced. Just use our VirtualBox code and it should work without any error.
- Fix the Operation Couldn’t be Completed BiErrorDomain Error 3

Installation Disk
Step 6: Perform Clean Installation of macOS Big Sur
- Once you hit enter, a whole bunch of code will run on the screen, but you should not worry about it. Wait for a few minutes, and you should see the macOS Big Sur installation window. Have a cup of coffee until the installation complete because it’s going to take around 29 minutes to finish.
- Once the installation part complete, your system will reboot, and after the restart, you should see macOS Big Sur Welcome page.
- Select the following options. You can change most of the settings later on, so don’t worry about that for now.
- Select your Country and click Continue.
- Choose a Keyboard Layout and click Continue. If you don’t agree with preset options then you customize it. Just click Customize Settings.
- You can turn on the Accessibility features now with macOS Big Sur. You’ve several options with accessibility like vision, motor, hearing, and cognitive. If you don’t want to set up right now just click Not Now button to skip them.
- Read Data & Privacy and click Continue.
- Now, you can transfer your data from your previous Mac or from your Windows PC. If you don’t want to transfer anything right now, just click the Not Now button to continue.
- Click on Set Up Later then Don’t Sign In. You can add your Apple ID later.
- Click Agree to the Terms and Conditions and click Continue.
- Fill out the Full name, Account name, Password, and Hint then click Continue.
- If you want to customize Express Set Up, you can click on Customize Settings otherwise click on Continue.
- On the Analytics page click Continue.
- On-Screen Time, click Set up Later.
- Select an appearance theme and click Continue. Here you choose your dark mode if you want.
- Wait for a few seconds and you’ll see the login screen now.
- Well done 👍👌😮 you’ve installed macOS Big Sur on VirtualBox Successfully.

Welcome to macOS Big Sur VBox
Click on the image below to see the full resolution
This slideshow requires JavaScript.
Summary
Basically, in this article, I’ve shown you the step by step pictorial guide on how to install macOS Big Sur on VirtualBox on Windows computer. After reading and following this guide, you should have done the following;
- Downloaded VirtualBox with its Extension
- Installed VirtualBox on your system
- Installed & upgraded VirtualBox extension
- Created a new virtual machine for macOS Big Sur
- Customized macOS Big Sur VM
- Executed the VirtualBox code to the CMD
- And finally performed a clean installation of macOS Big Sur.
Related: How to install macOS Big Sur on VMware on Windows.
We are ready to keep receiving your feedback about this article, and other posts on wikigain. Your suggestion and feedback are highly appreciated.
Warning: All the content of this site is copyright protected, and no-one has the right to copy-paste our materials.
A Hackintosh is a non-Mac computer system, made with PC parts, that runs the macOS operating system. In this tutorial, you will learn how to create a Hackintosh.
You will learn how to install macOS Big Sur (or any other version of macOS) using OpenCore.
The main benefit of a Hackintosh compared to an official Macintosh computer, is that it is WAY cheaper. I created a Hackintosh computer that matches the Mac Pro specs for about 1/3rd the price of a Mac Pro. Some people have been able to create a Hackintosh for under $100.
This tutorial will focus mainly on how to install macOS on your hardware. I also created a video version that shows how to build a complete machine and then install macOS on it.
The video shows how to use a computer with macOS to create a macOS installer for your Hackintosh. In this written tutorial, you will learn how to create the macOS installer using macOS or Windows.
You can watch the video here:
It is not illegal to create a Hackintosh for personal use but it does go against Apple’s End User License Agreement. So don’t plan on taking this into an Apple store for repair. And in many places it is illegal to sell a Hackintosh.
The Hardware
Many computer parts work for Hackintoshes. But some do not. Check this website to see what hardware is compatible with a Hackintosh.
In the video above I demonstrate step-by-step how to build a computer that will work as a Hackintosh. In the video description is a list of the specific parts I used.
If you want to be safe, you can use exact parts I used in my build but it is possible to install macOS on a wide variety of hardware.
Downloading MacOS and Creating a Bootable USB Installer
For this step, you will need a USB drive that is at least 16GB. The process is different depending on if you are setting up the bootable USB installer using macOS or Windows. The process is much simpler to do on macOS, but it still possible on Windows.
If you can, find a Mac machine to use to create the bootable USB installer. But I’ll cover the steps for macOS and Windows.
Using MacOS to Create the MacOS Installer
There are a few programs you’ll need during this process so start by downloading them. Here are links for what you will need followed by the download instructions.
- ProperTree — Click the «Code» button, then «Download Zip»
- MountEFI — Click the «Code» button, then «Download Zip»
- OC_GEN-X — Download the zip file for the most recent release.
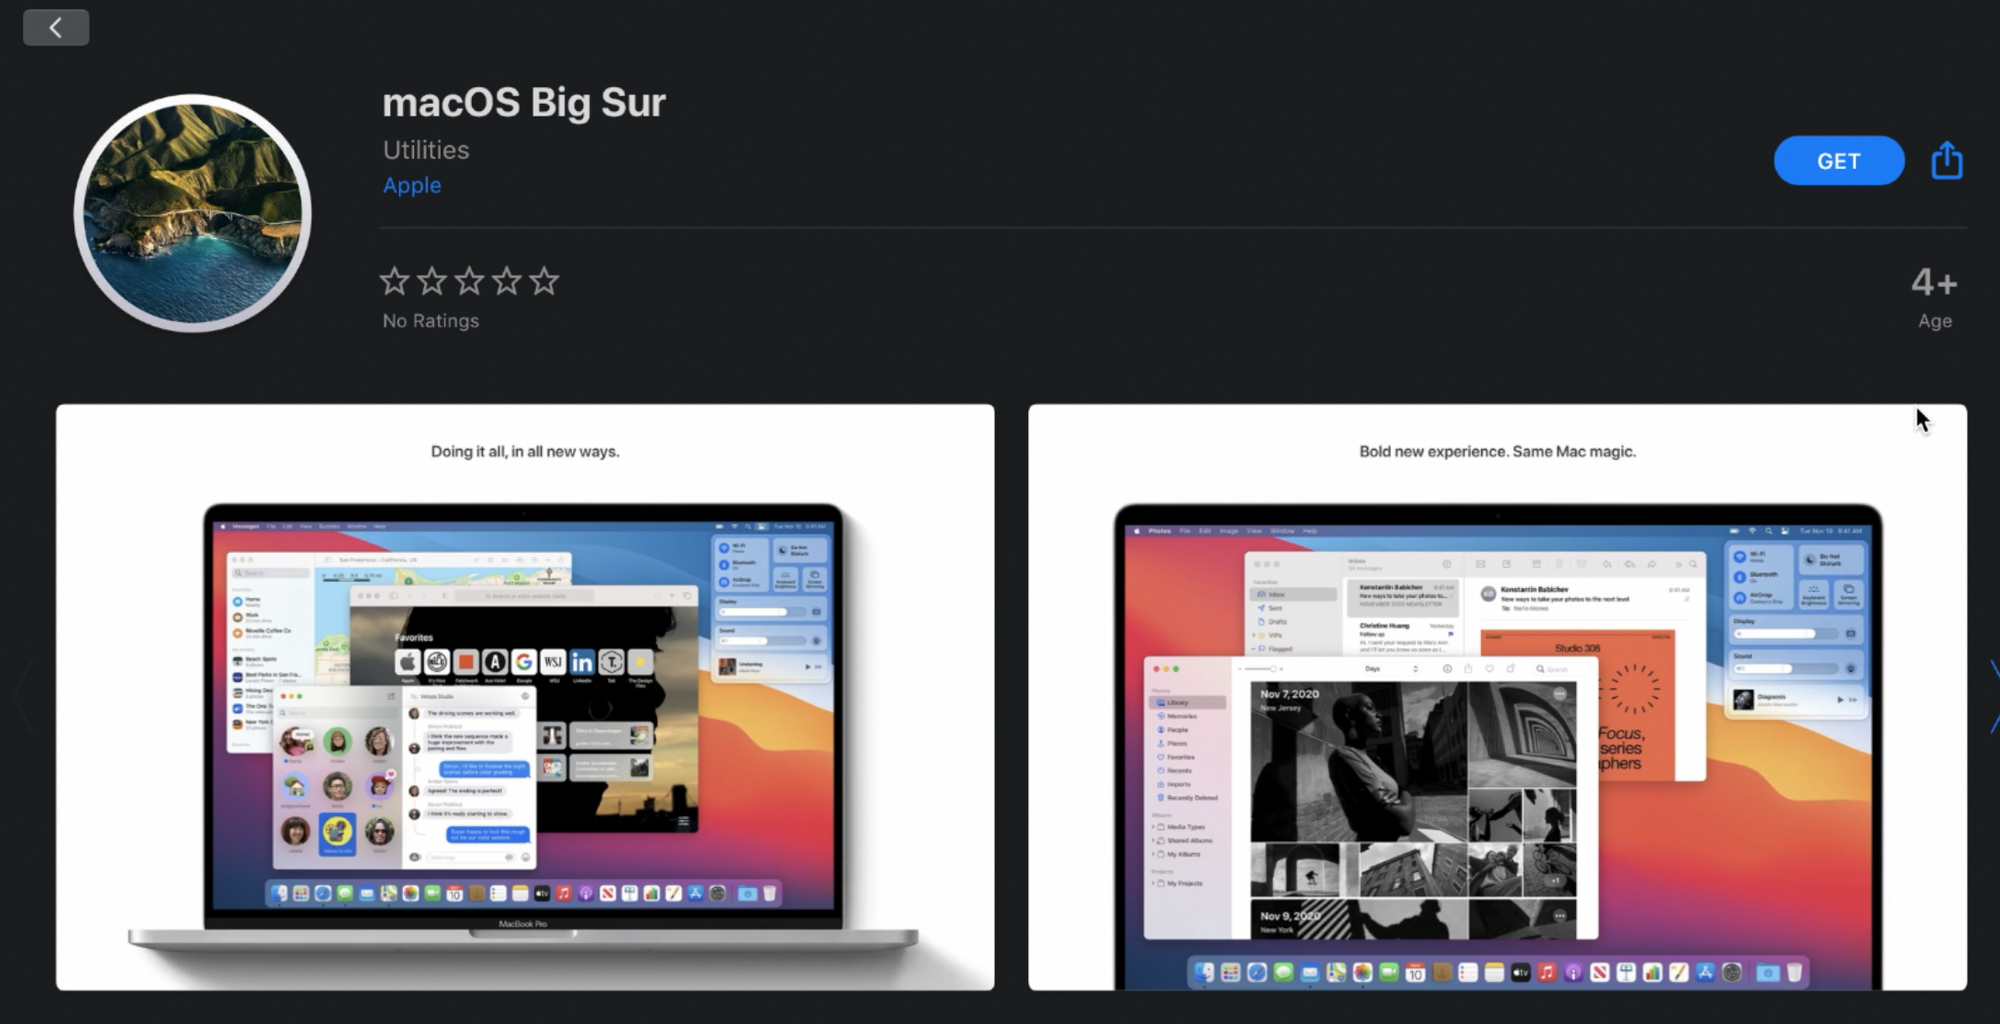
Open up the App store on macOS. Search for «Big Sur». Click «Get», and then «Download».
Format your USB drive using Disk Utility. To get into Disk Utility, just click the magnifying glass and type «Disk Utility.
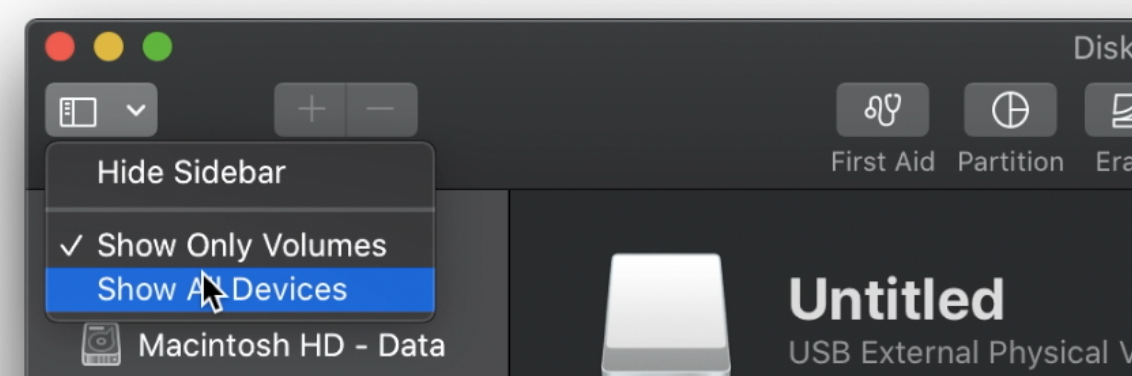
Once Disk Utility is open, make sure that the view is set to show all devices.
Click the USB drive, then click «Erase» in the top menu.
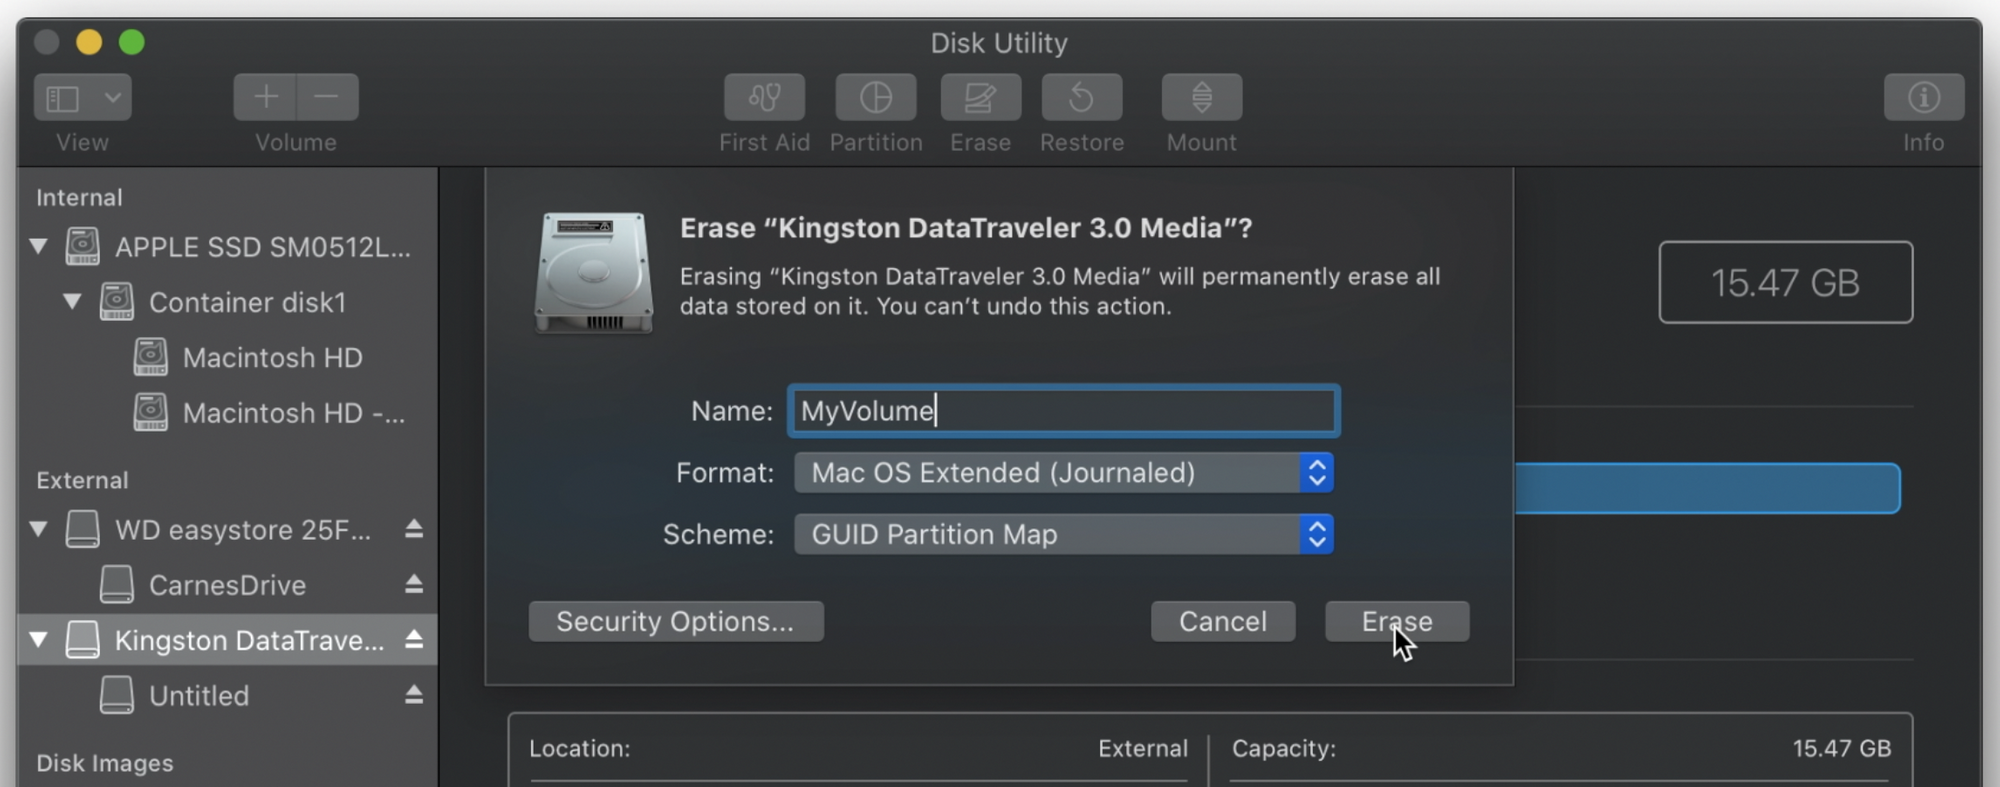
Name the drive «MyVolume». Make sure the format is Mac OS Extended (Journaled) and that the scheme is GUID Partition Map. Then click the «Erase» button.
After the USB drive is prepared, open the Terminal in MacOS. You will use a command in the terminal to make the USB drive into a bootable installer for macOS.
If you are installing macOS Big Sur, type the following command:
sudo /Applications/Install macOS Big Sur.app/Contents/Resources/createinstallmedia --volume /Volumes/MyVolume
If you are installing a different version of macOS, you can find the command for the version you are installing here.
You’ll have to wait a bit for this to install. After this is done, open the OC_Gen-X program you downloaded earlier.
To open the program, you will have to right-click the icon, select «open», then select «open» again.
This is a software wizard that helps us easily prepare what we need to install MacOS on our particular hardware setup. It will go out and get everything we need except the SSDTs and put them in a folder for you.
You can also do this is a more manual method by following the OpenCore Install Guide. But this program simplifies things for us quite a bit and it is not available for Windows.
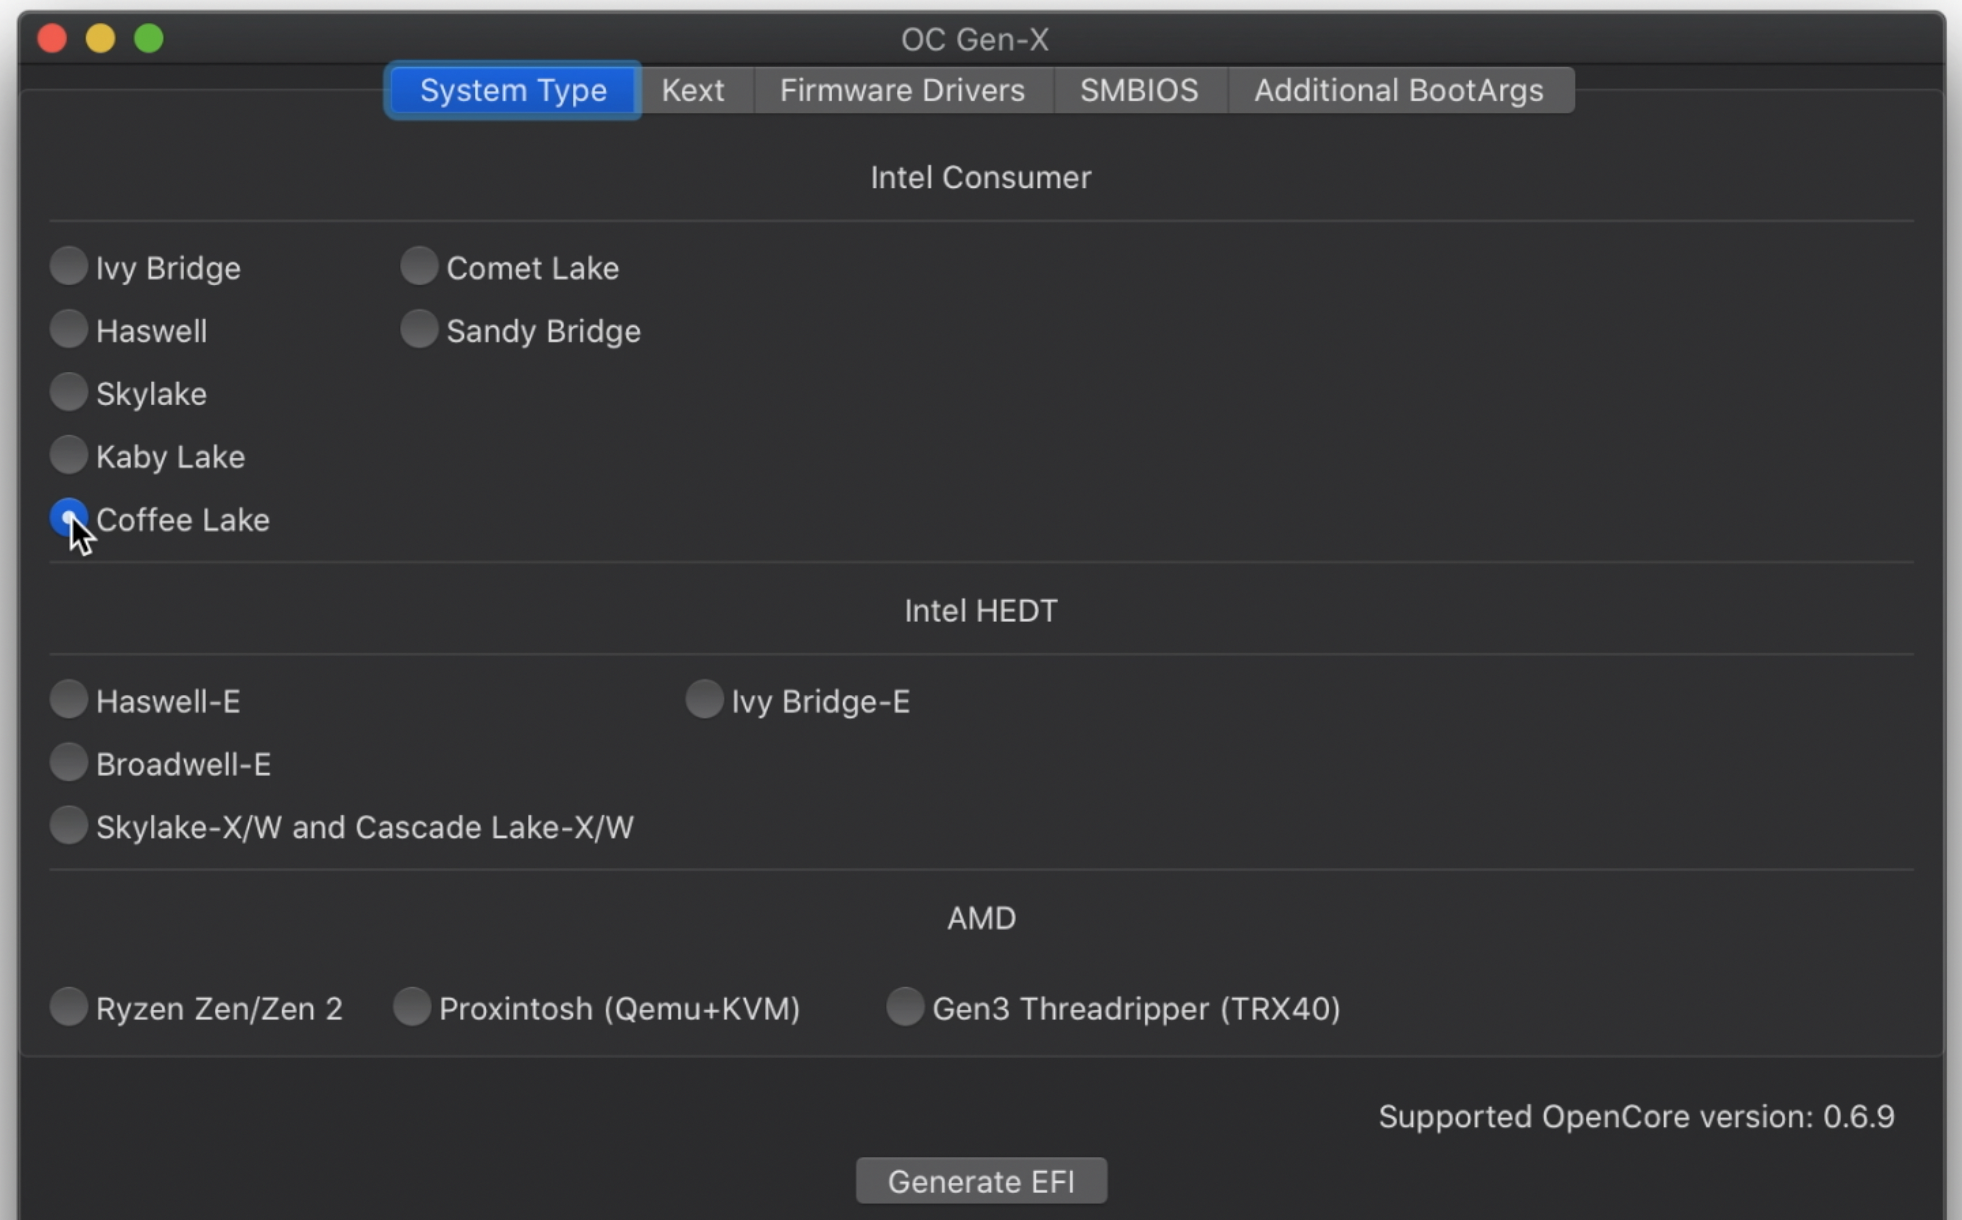
On this first screen under «System Type» choose the type of processor you have. Look in your processor’s documentation to determine the name of the microarchitecture it uses. Getting this right is very important.
The type of processor I used is «Coffee Lake».
For most of the tabs in this program you can keep the default settings.
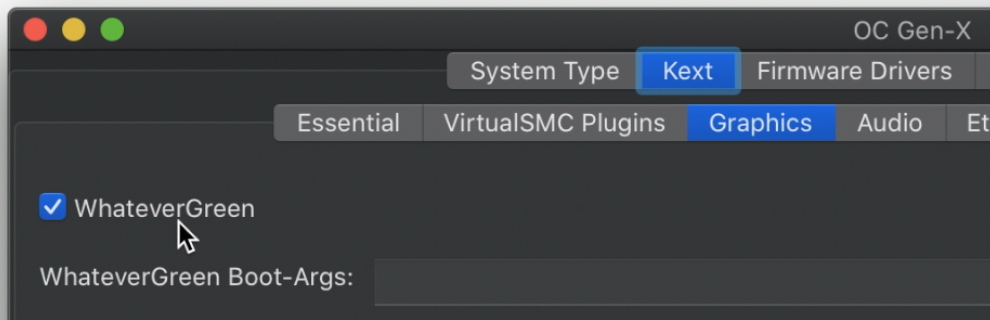
Under «Graphics» select «WhateverGreen» and under «Audio» select «AppleALC». Under «Ethernet» select «IntelMausi». These are very commonly used options but there is a small chance your settings will be different depending on your hardware and specific use case.
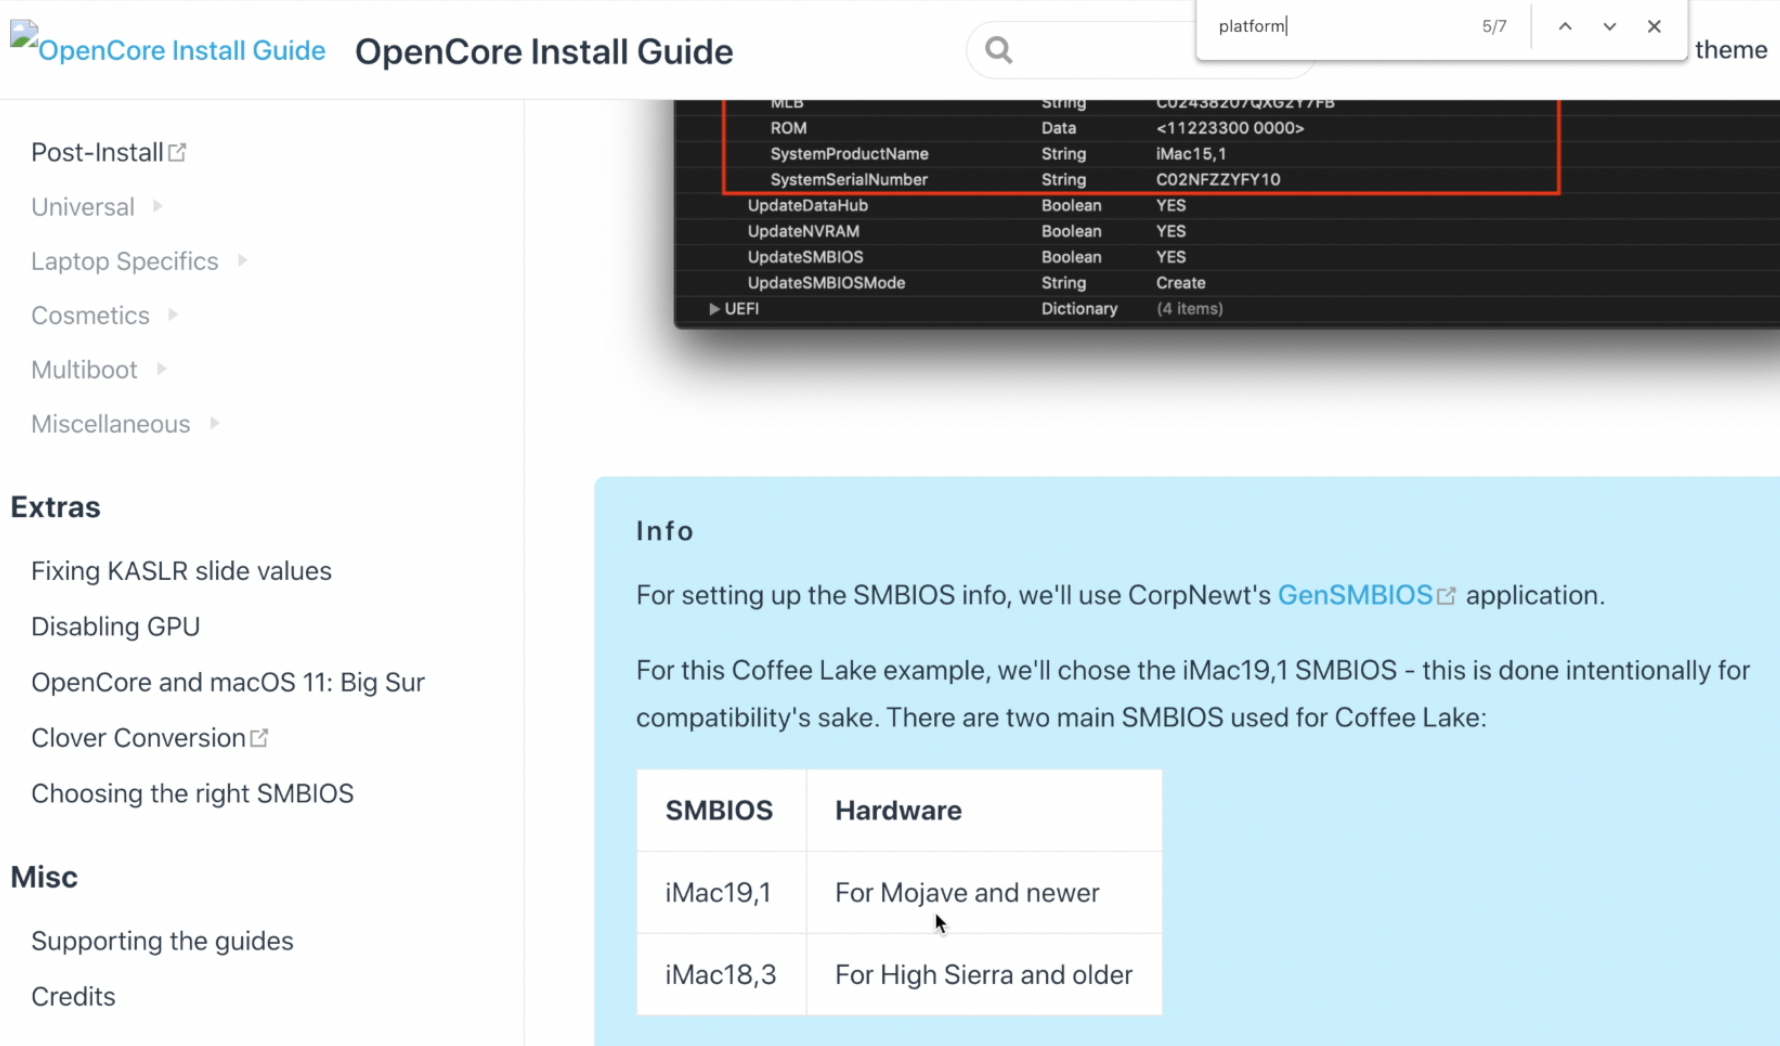
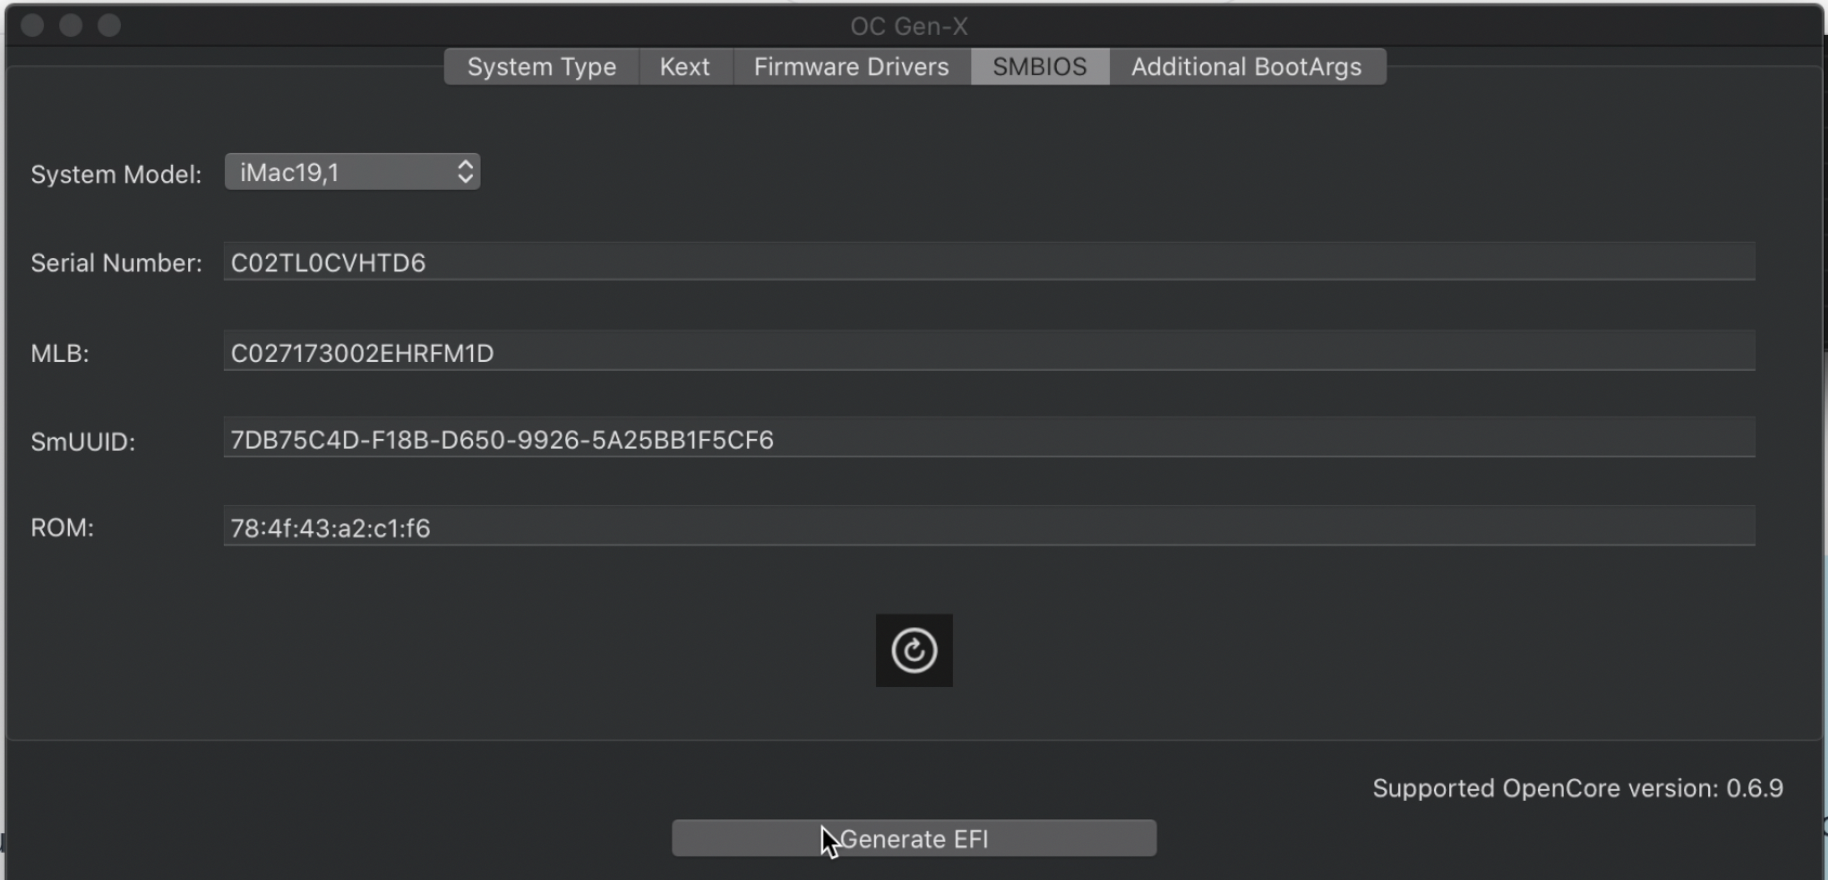
The SMBIOS is important and you will have to specify the correct System Model on that tab. For my setup I used «iMac19,1» but it could be different for you if you are using a different processor of a different operating system version.
To figure out what System Model to use, go to the Open Core Install Guide.
Select the section on the left side for your processor type (in my case it is «Coffee Lake»). Then find the heading «PlatformInfo». Scroll down a bit and you will see a table with the SMBIOS to use.
After selecting the appropriate System Model, click the «Generate EFI» button at the bottom.
An EFI folder has now been created on your desktop. We will now make some modifications to the contents.
You’ll need to get the SSDT files. This is different depending on your processor.
You can find the list of the exact SSDT’s you need at this link. Just select your processor type and download each of the required SSDTs.
Here are the links for the SSDTs needed for my Coffee Lake system.
- SSDT-PLUG-DRTNIA
- SSDT-EC-USBX-DESKTOP
- SSDT-AWAC
- SSDT-PMC
Once all of those files are downloaded, move them into your EFI folder. They should be moved to this subfolder: EFI/ACPI/OC
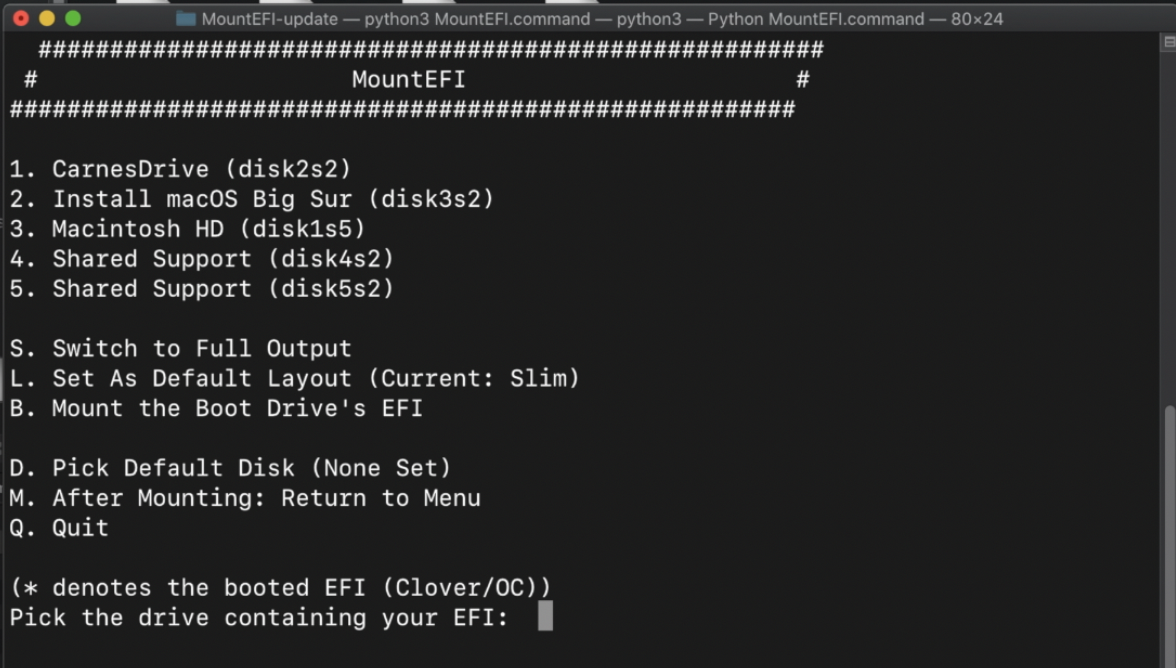
Now you will will use the MountEFI program downloaded earlier to mount the hidden EFI partition on the USB drive.
Right-click on MountEFI.command and click «open», then «open» again.
Select your USB drive. It should have a name like «Install macOS Big Sur» since we made it into a bootable installer for MacOS. In the screenshot below, it is option 2.
You now have a mounted EFI partition and an EFI folder from OC Gen-X. Drag the EFI folder into the EFI partition.
Open ProperTree.command which you downloaded earlier. Like before you can open it by right-clicking and selecting «open».
Once ProperTree is running, go to «File -> Open». Select the EFI partition, then the «OC» folder, then open the «config.plist» file.
The first thing we need to do is to inject all of the files in the EFI folder into the «config.plist» file.
So go to «File», then select «OC Snapshot». Make sure you’re on the EFI partition. Go to the «EFI» folder, then the «OC» folder. And click the «Choose» button.
A dialog box could pop up here about what version to use. If this happens, click «Yes».
Now go back to «File», then select «OC Clean Snapshot» and select «Choose».
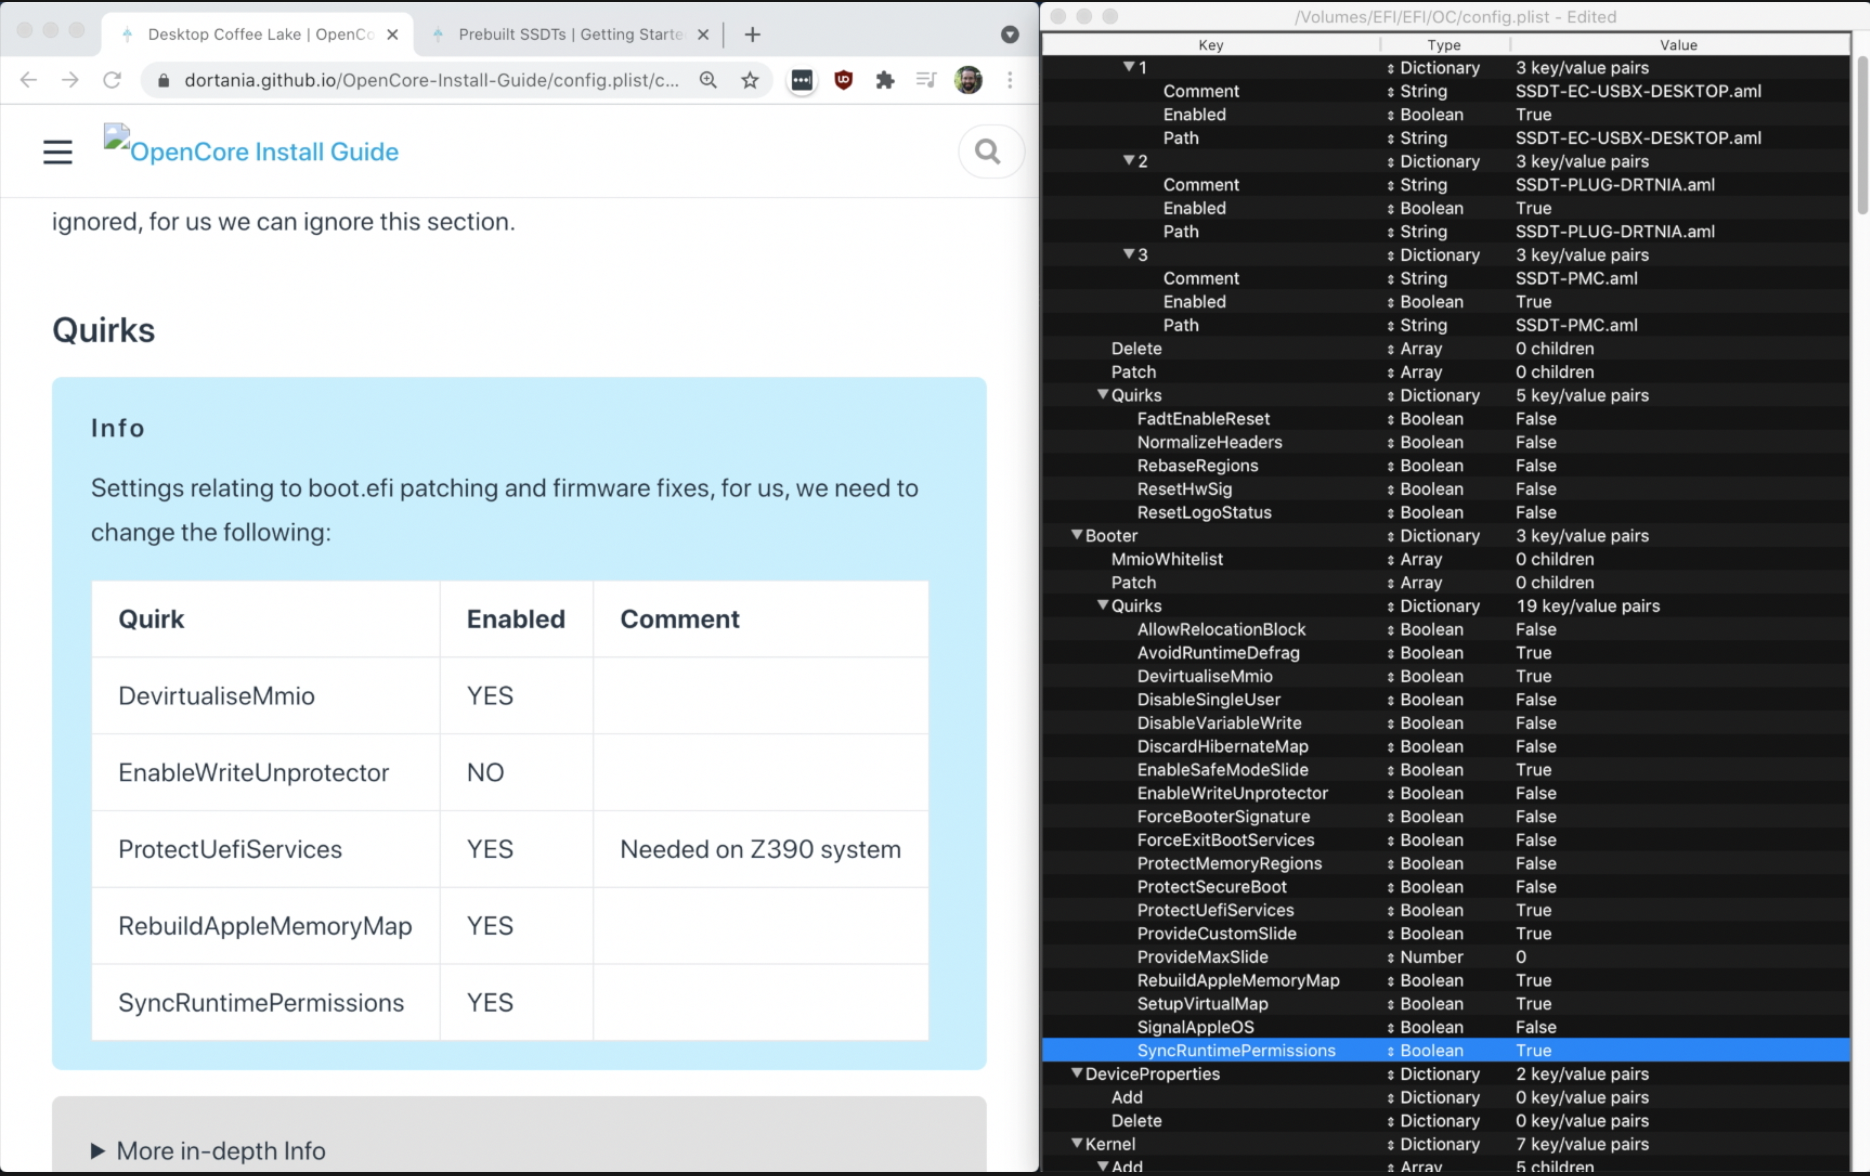
The OC Gen-X program helped simplify all the required setup. At this point you should verify that everything is setup correctly according the the official install guide.
Here is the guide for Coffee Lake. If you are using a different type of processor, just select your type in the left menu.
You can verify the quirks are set correctly in the config.plist file. They should all be correct.
You need to do additional setup in the config.plist file to make sure the onboard graphics work. Find the «DeviceProperties» section, and then copy the following characters to add.
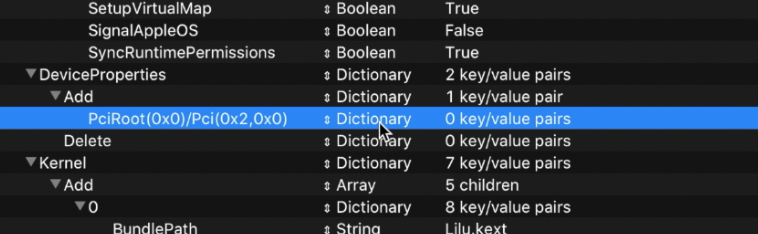
PciRoot(0x0)/Pci(0x2,0x0)
Note that this if you processor is not Coffee Lake, the exact thing you need to add under «DeviceProperties» could be different. Search for «Device Properties» in the OpenCore guide for your processor type to confirm what to add under «DeviceProperties» in the config.plist file.
Under «DeviceProperties», click on «Add». Then right click and choose «New child under ‘Add’ (+)».
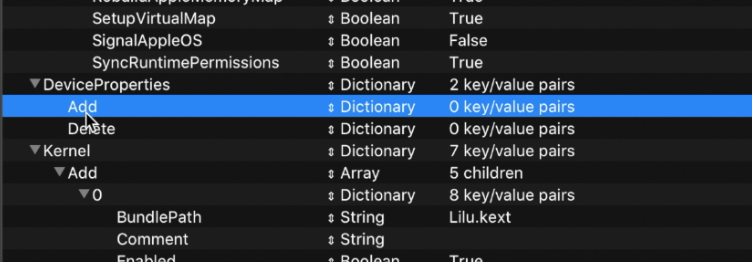
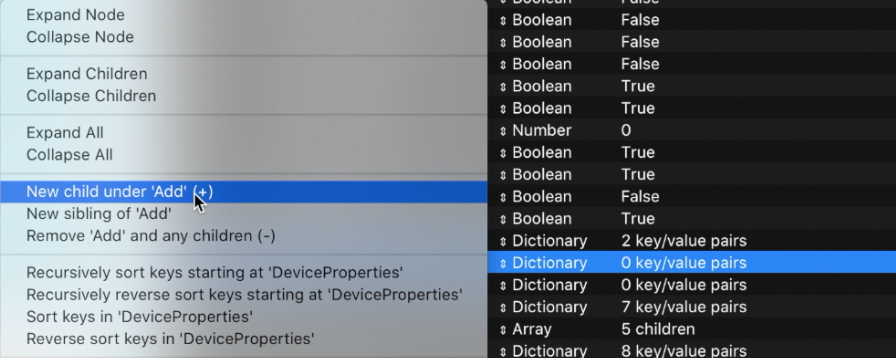
Double-click where it says «New String» and just paste the text into the field and hit enter. Then select in the next column where it says «String» and make sure that it is set to «Dictionary».
Next, we need to add more children under it and it should eventually look like this:
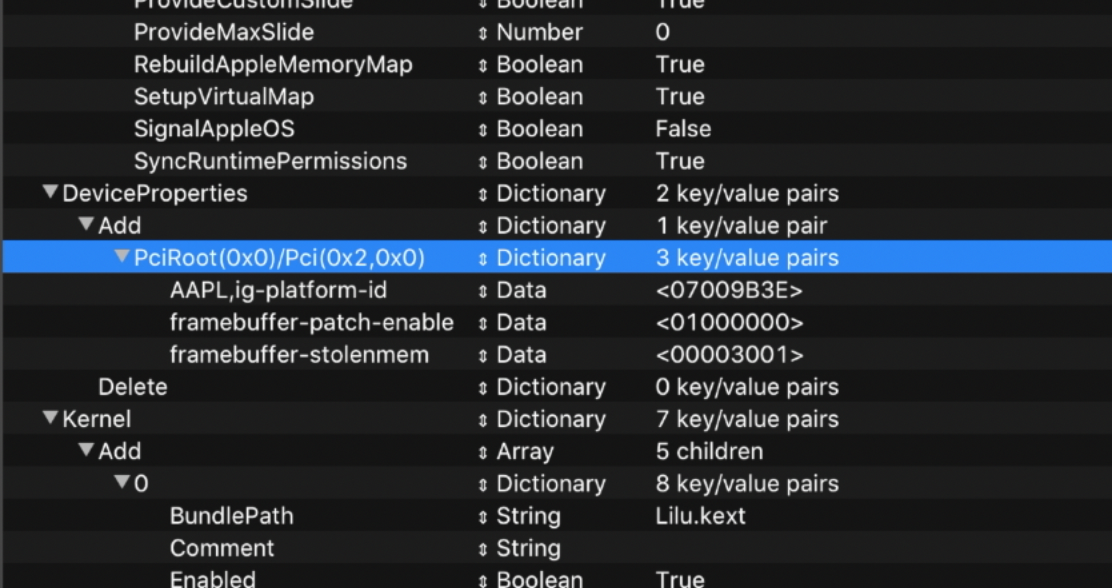
Below is the text from the image above that you need to add (if you system is Cofee Lake).
| Name | Type | Value |
|---|---|---|
| AAPL,ig-platform-id | Data | 07009B3E |
| framebuffer-patch-enable | Data | 01000000 |
| framebuffer-stolenmem | Data | 00003001 |
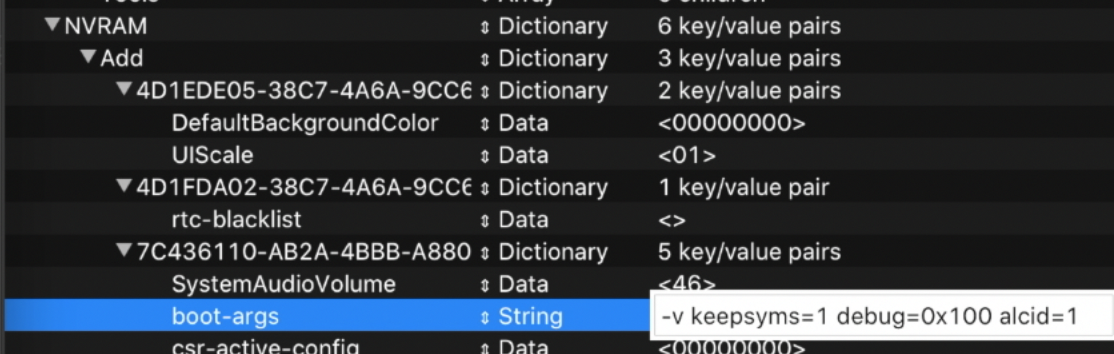
Now in the config.plist file, find the NVRAM section.
Update the «boot-args» so the text is «-v keepsyms=1 debug=0x100 alcid=1».
Now we’ll change the language to English. So next to where it says «prev-lang:kbd», change «data» to «String» and set the value to «en-US:0» and hit enter.

If you want a different language just go to this link to find what language code to use.
The config.plist file is now done. So go to «file», then «save». You are now completely done setting up the bootable drive. So just eject the drive, and then you can plug it in to your Hackintosh.
Skip the next Windows section and go to the heading «BIOS Setup».
Using Windows to create the macOS Installer
The first step to creating a macOS installer on Windows is to download OpenCore. Make sure to download the zip file for the most recent release.
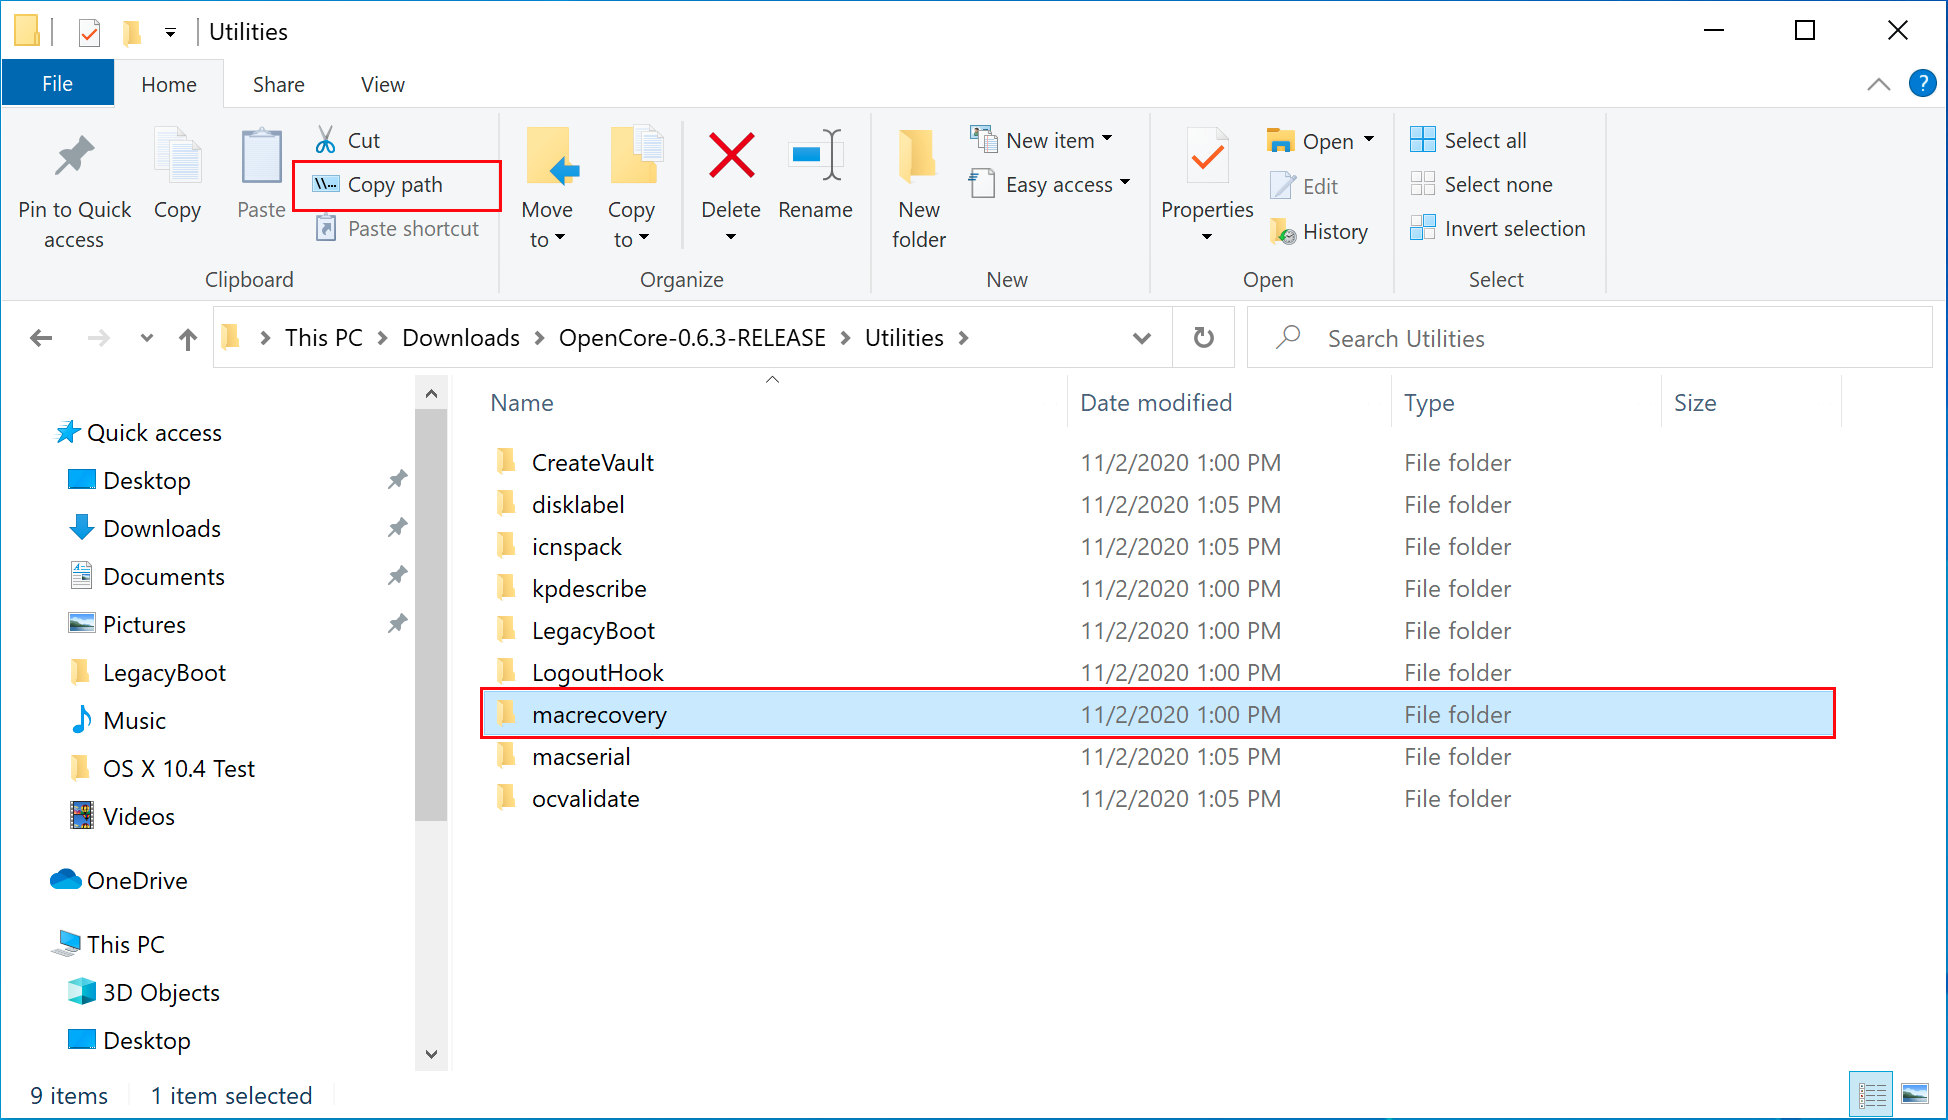
Unzip OpenCore and then go to /Utilities/macrecovery/. Next copy the folder path for the macrecovery folder:

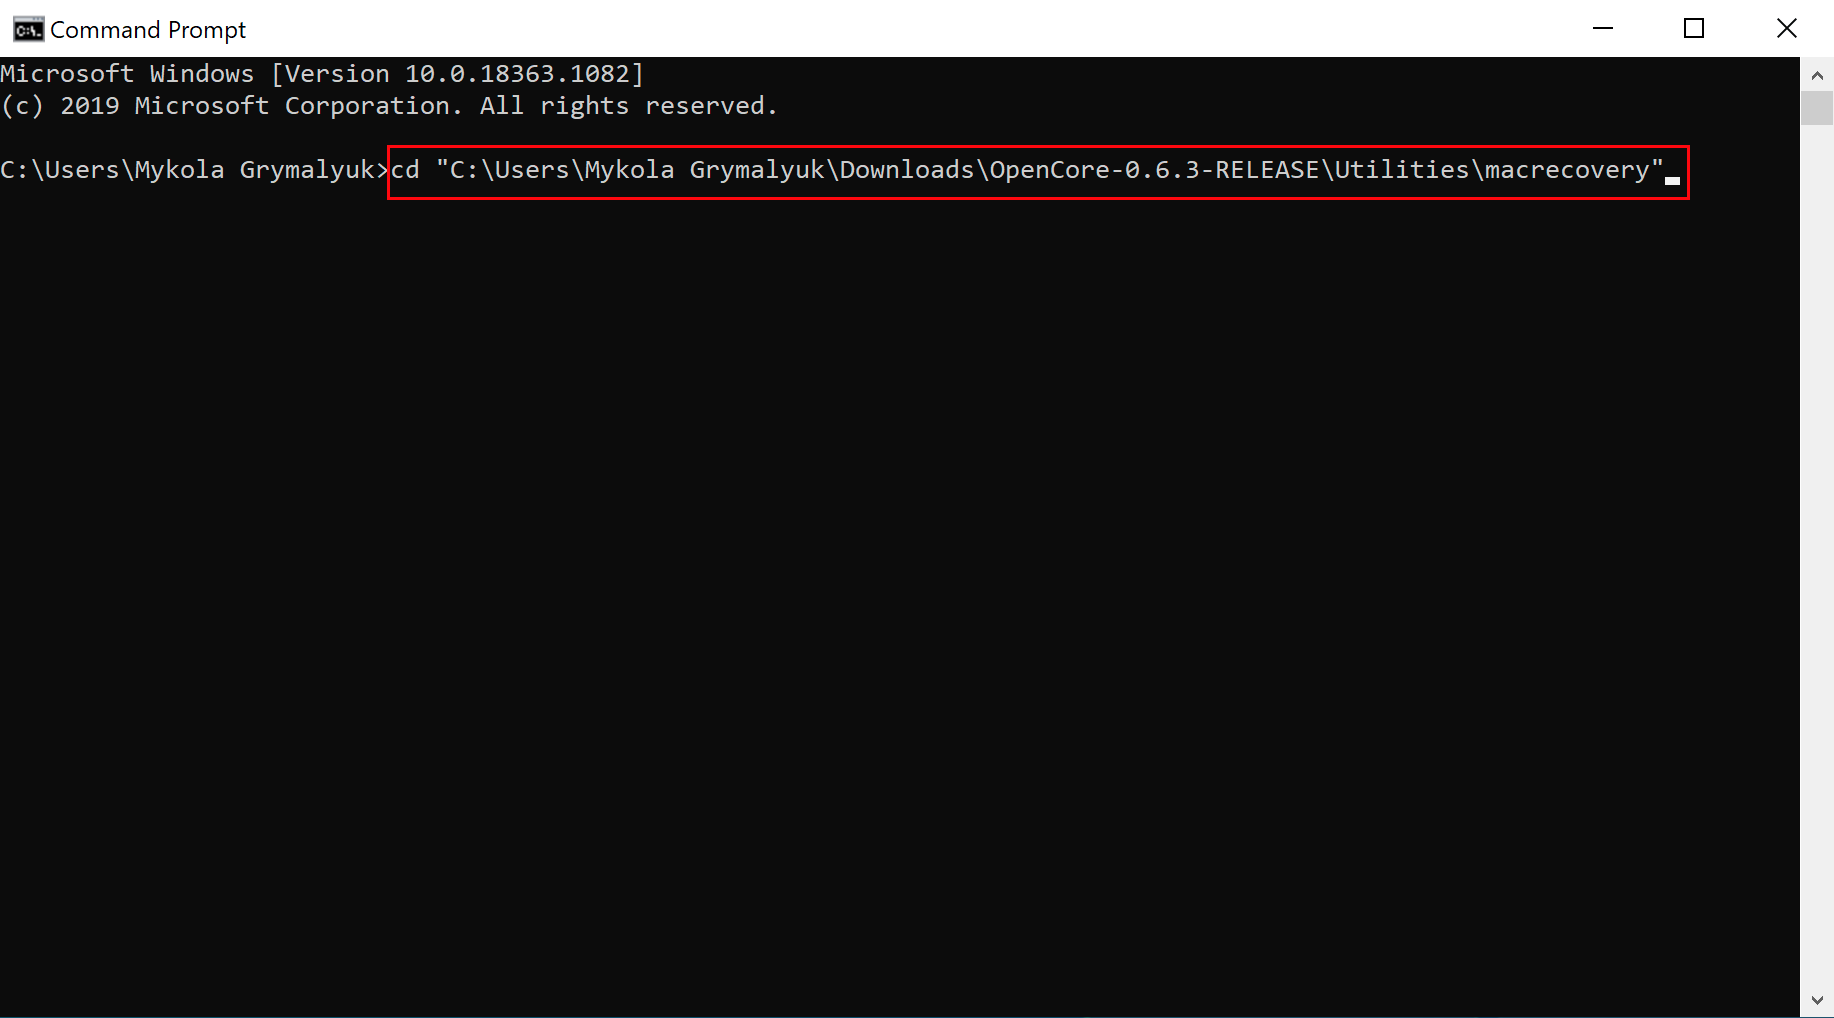
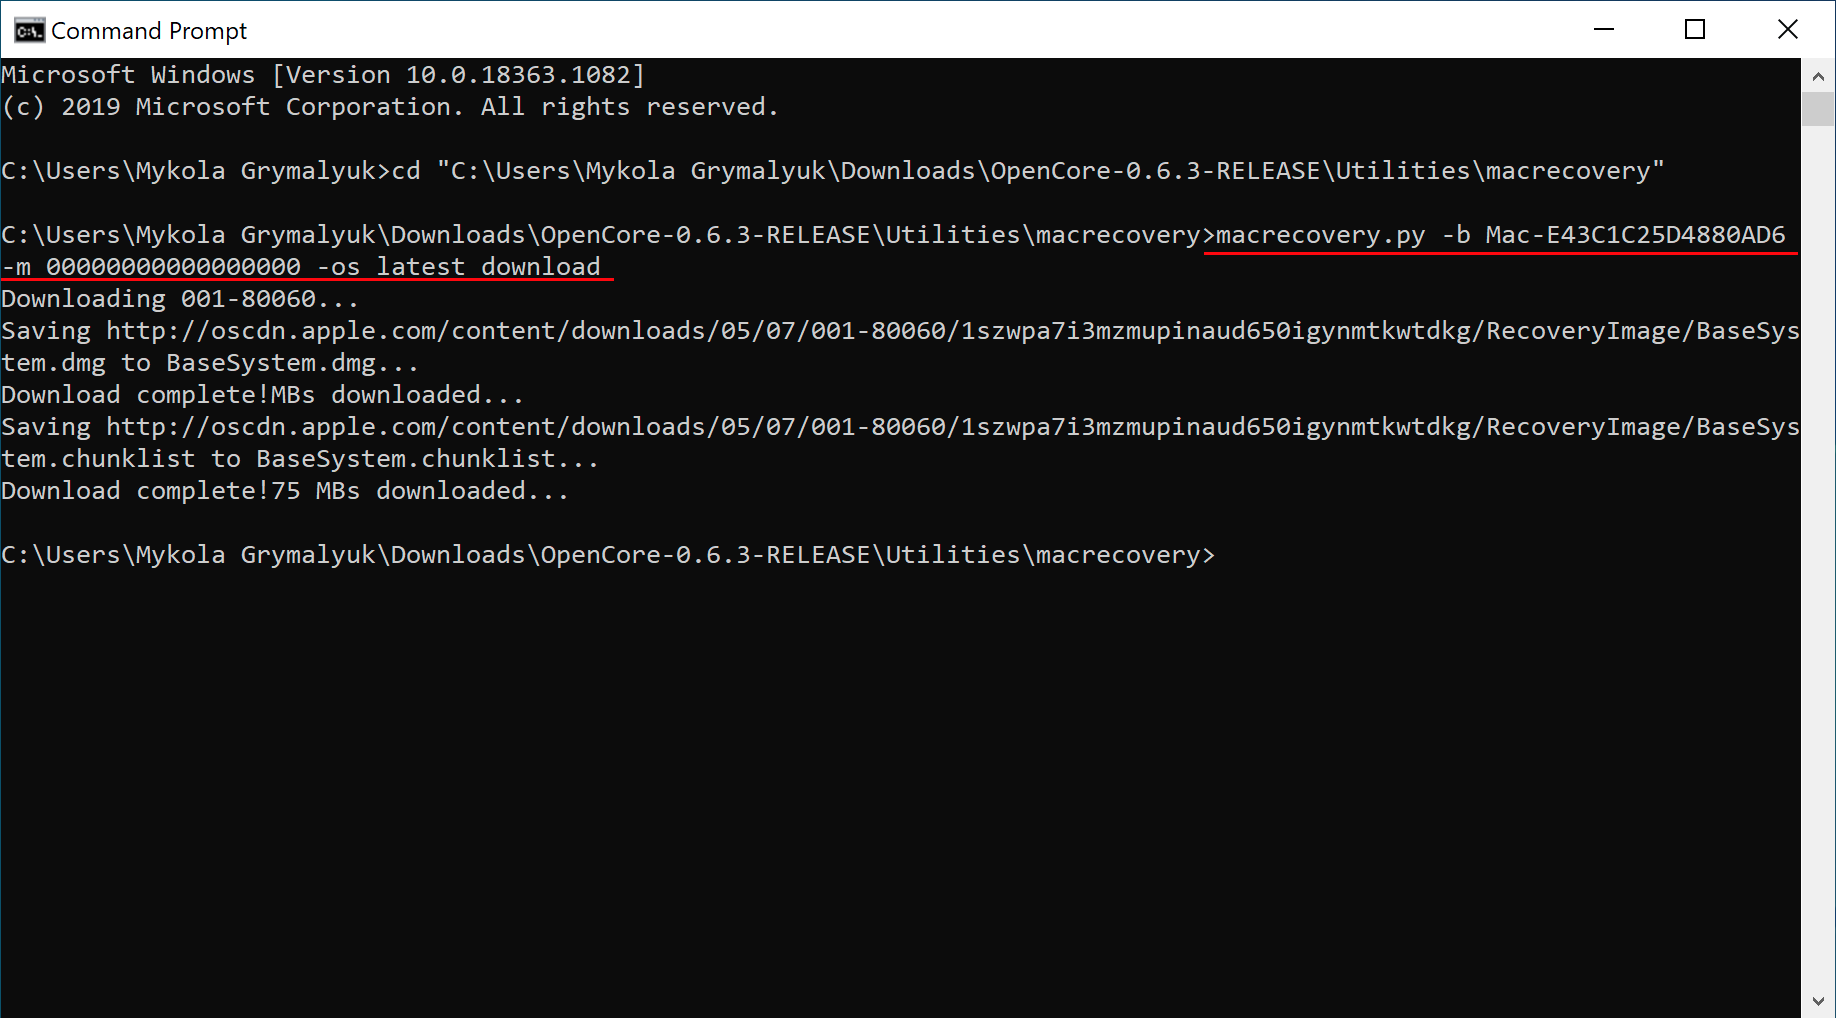
Open a Command Prompt and change directories into the macrecovery folder that you just copied using the command cd [PASTE_FOLDER_NAME].
It should look something like this:

Now in the Command Prompt, run one of the following commands depending on what version of macOS you want. If you don’t already have Python, you will have to install it first.
# Mojave(10.14)
python macrecovery.py -b Mac-7BA5B2DFE22DDD8C -m 00000000000KXPG00 download
# Catalina(10.15)
python macrecovery.py -b Mac-00BE6ED71E35EB86 -m 00000000000000000 download
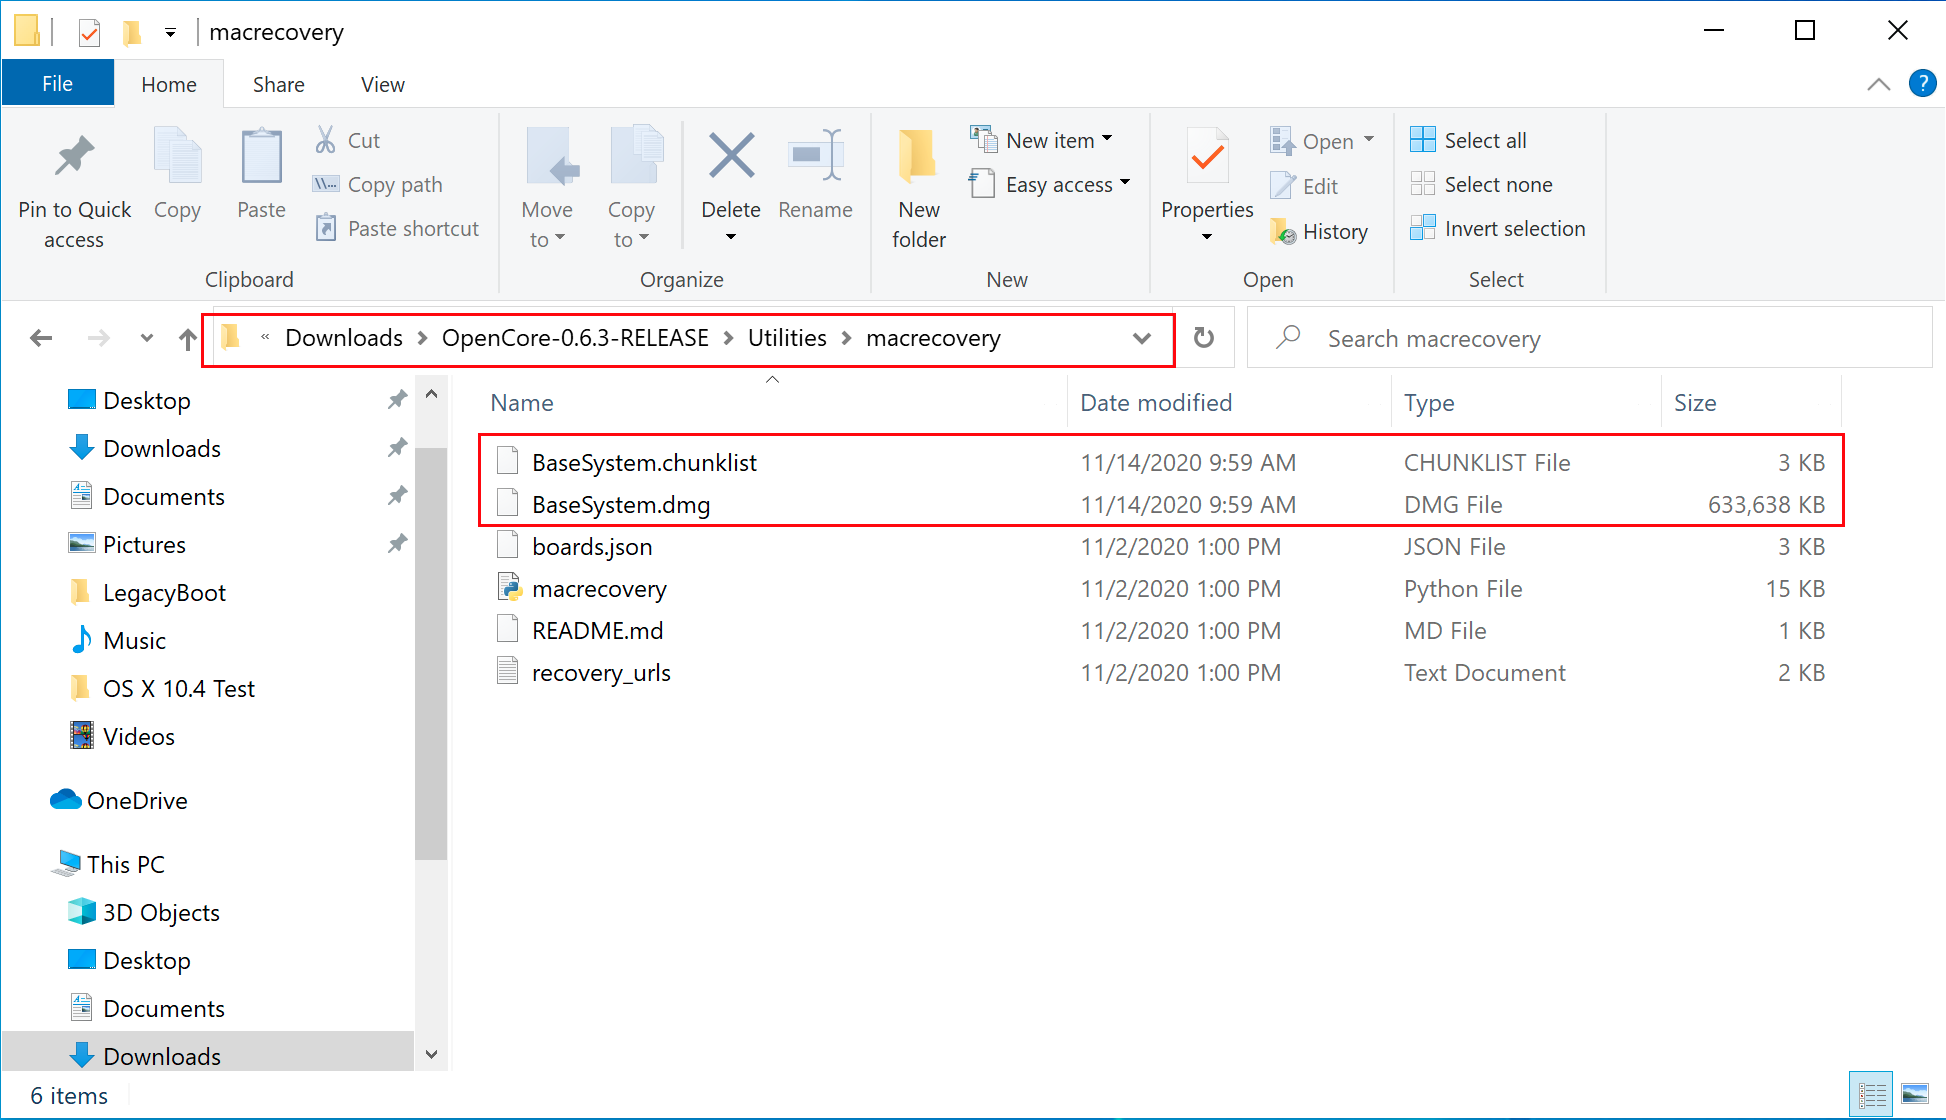
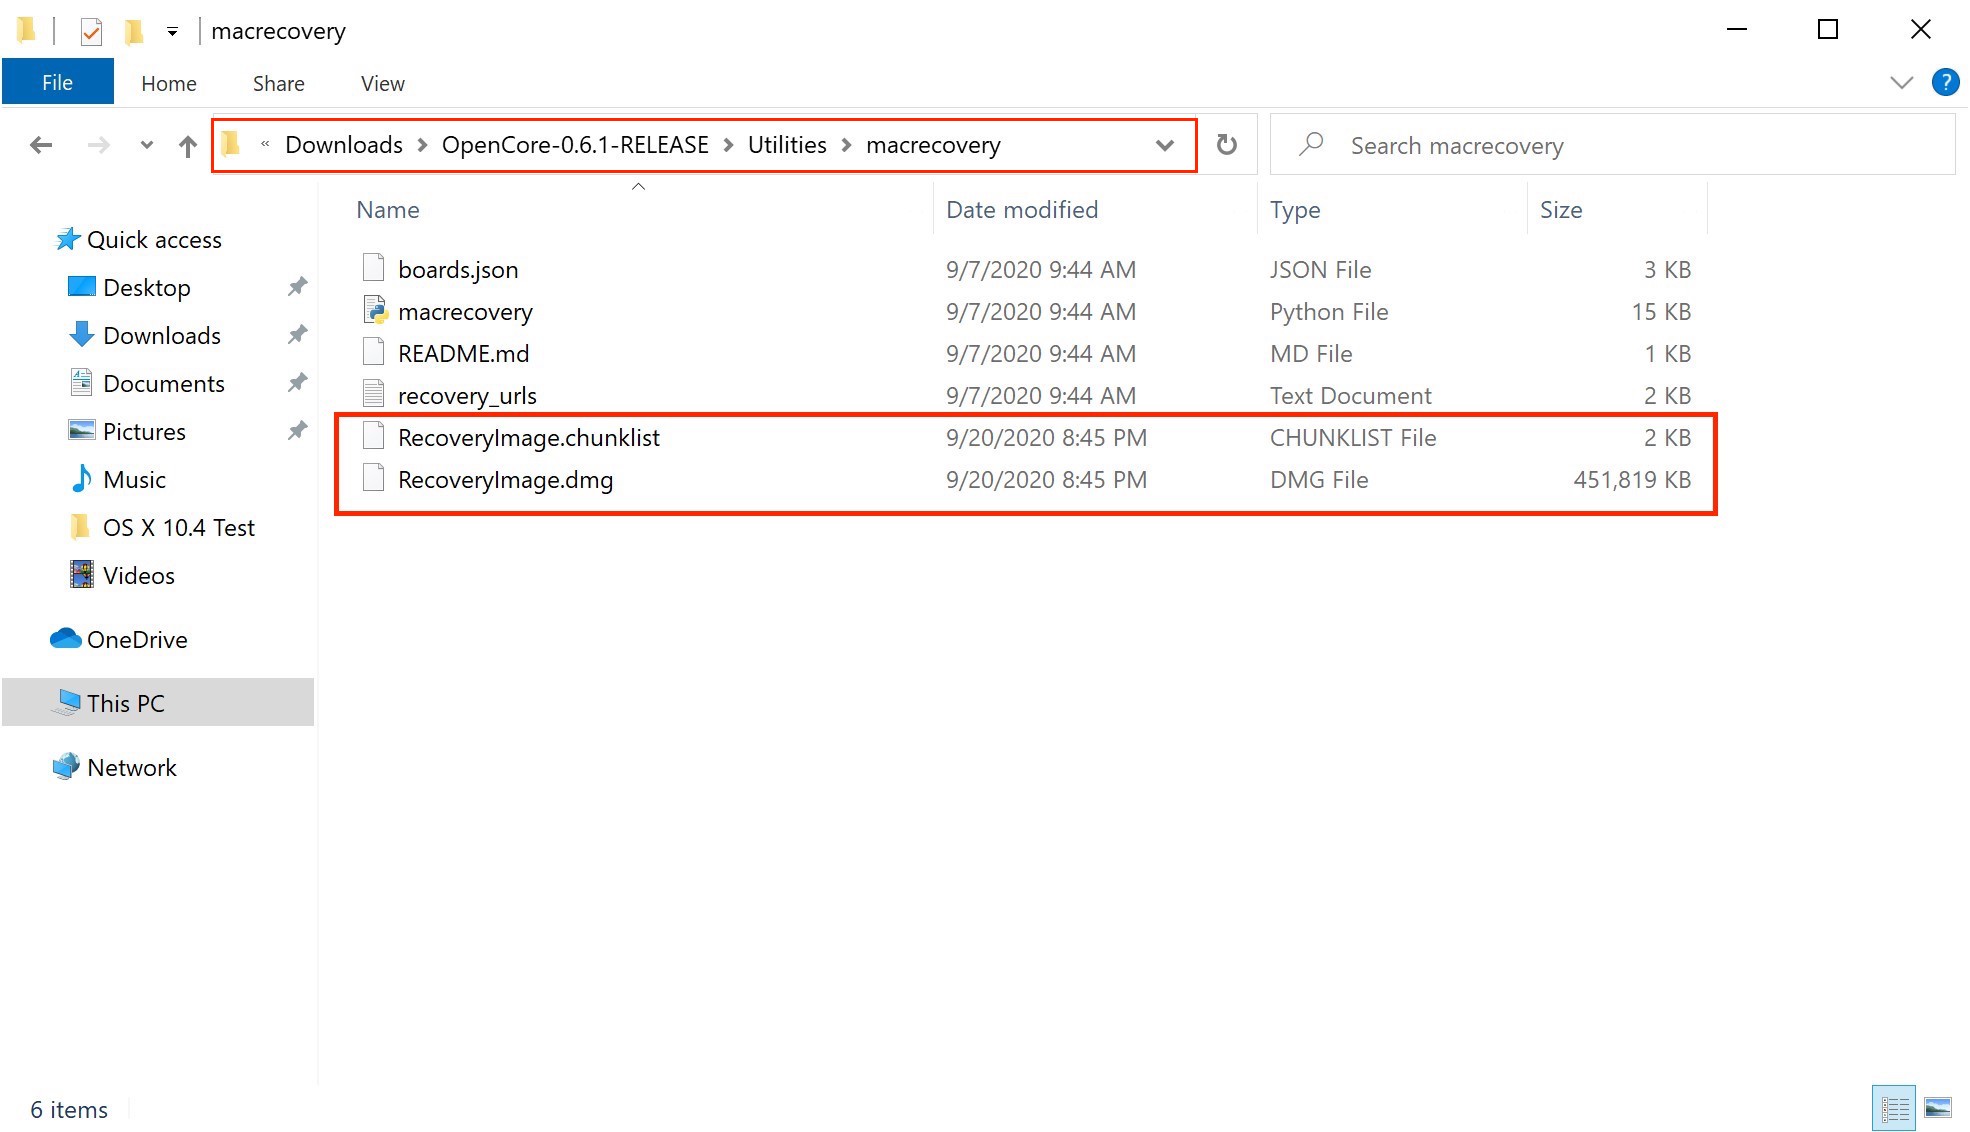
# Big Sur(11)
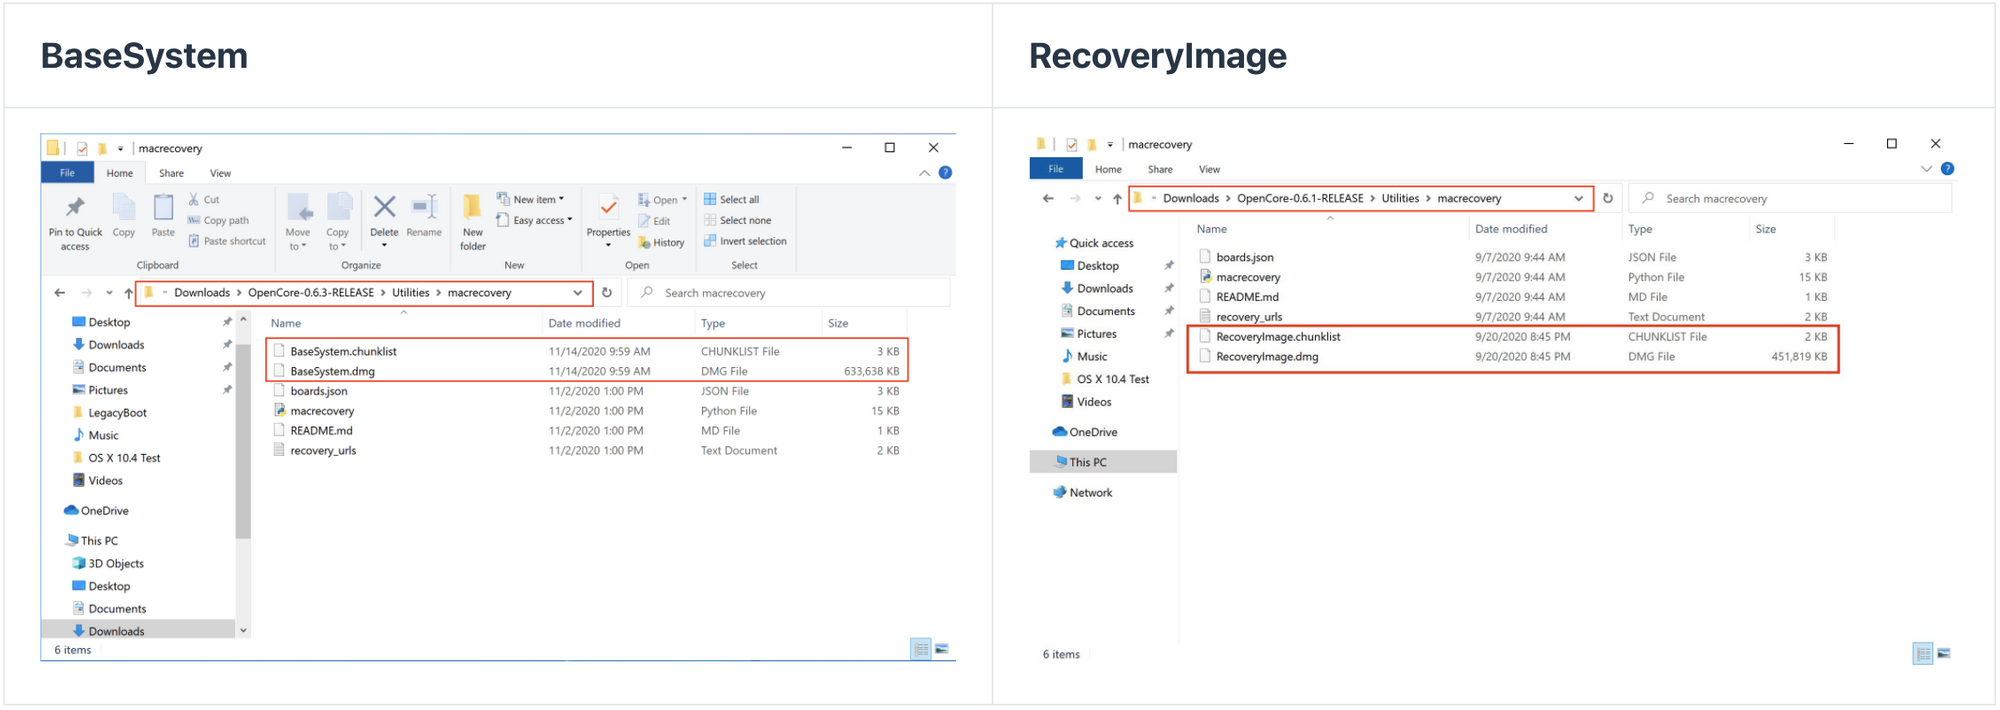
python macrecovery.py -b Mac-E43C1C25D4880AD6 -m 00000000000000000 downloadThis will take some time, however once you’re finished you should get either BaseSystem or RecoveryImage files:
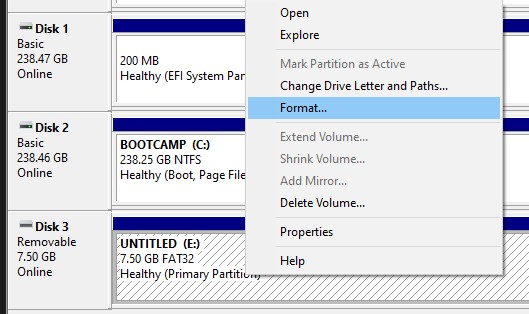
Now open up Disk Management and format the USB drive as FAT32. Follow these steps from the OpenCore Docs:
- Right click the Start Button on your task bar and select Disk Management.
- You should see all of your partitions and disks. On the bottom half, you’ll see your devices. Find your USB.
- You’ll want to format the USB to have a FAT32 partition.
- If you have multiple partitions on the USB, right click each partition and click Delete Volume for your USB.
- Right click the unallocated space and create a new simple volume. Make sure it is FAT32 and at least a gigabyte or two big. Name it «EFI».
- Otherwise, right click the partition on the USB and click Format and set it to FAT32.

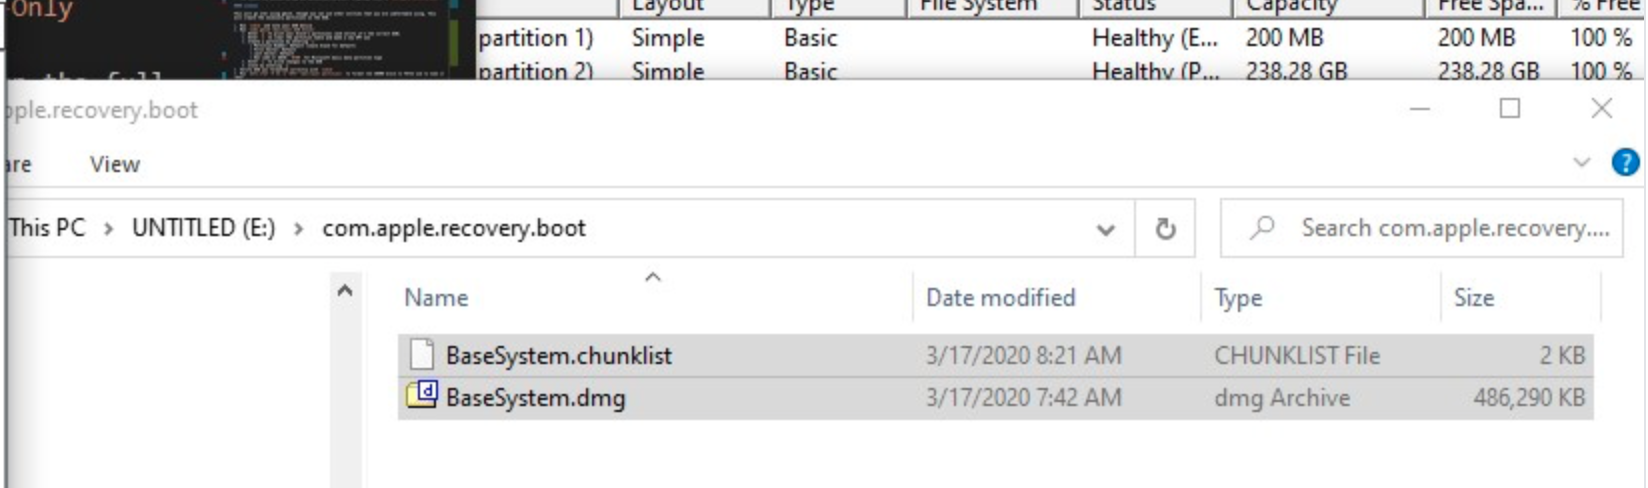
Next, go to the root of this USB drive and create a folder called com.apple.recovery.boot. Then move the downloaded BaseSystem or RecoveryImage files. Please ensure you copy over both the .dmg and .chunklist files to this folder:
Now grab OpenCorePkg you downloaded earlier and open it:

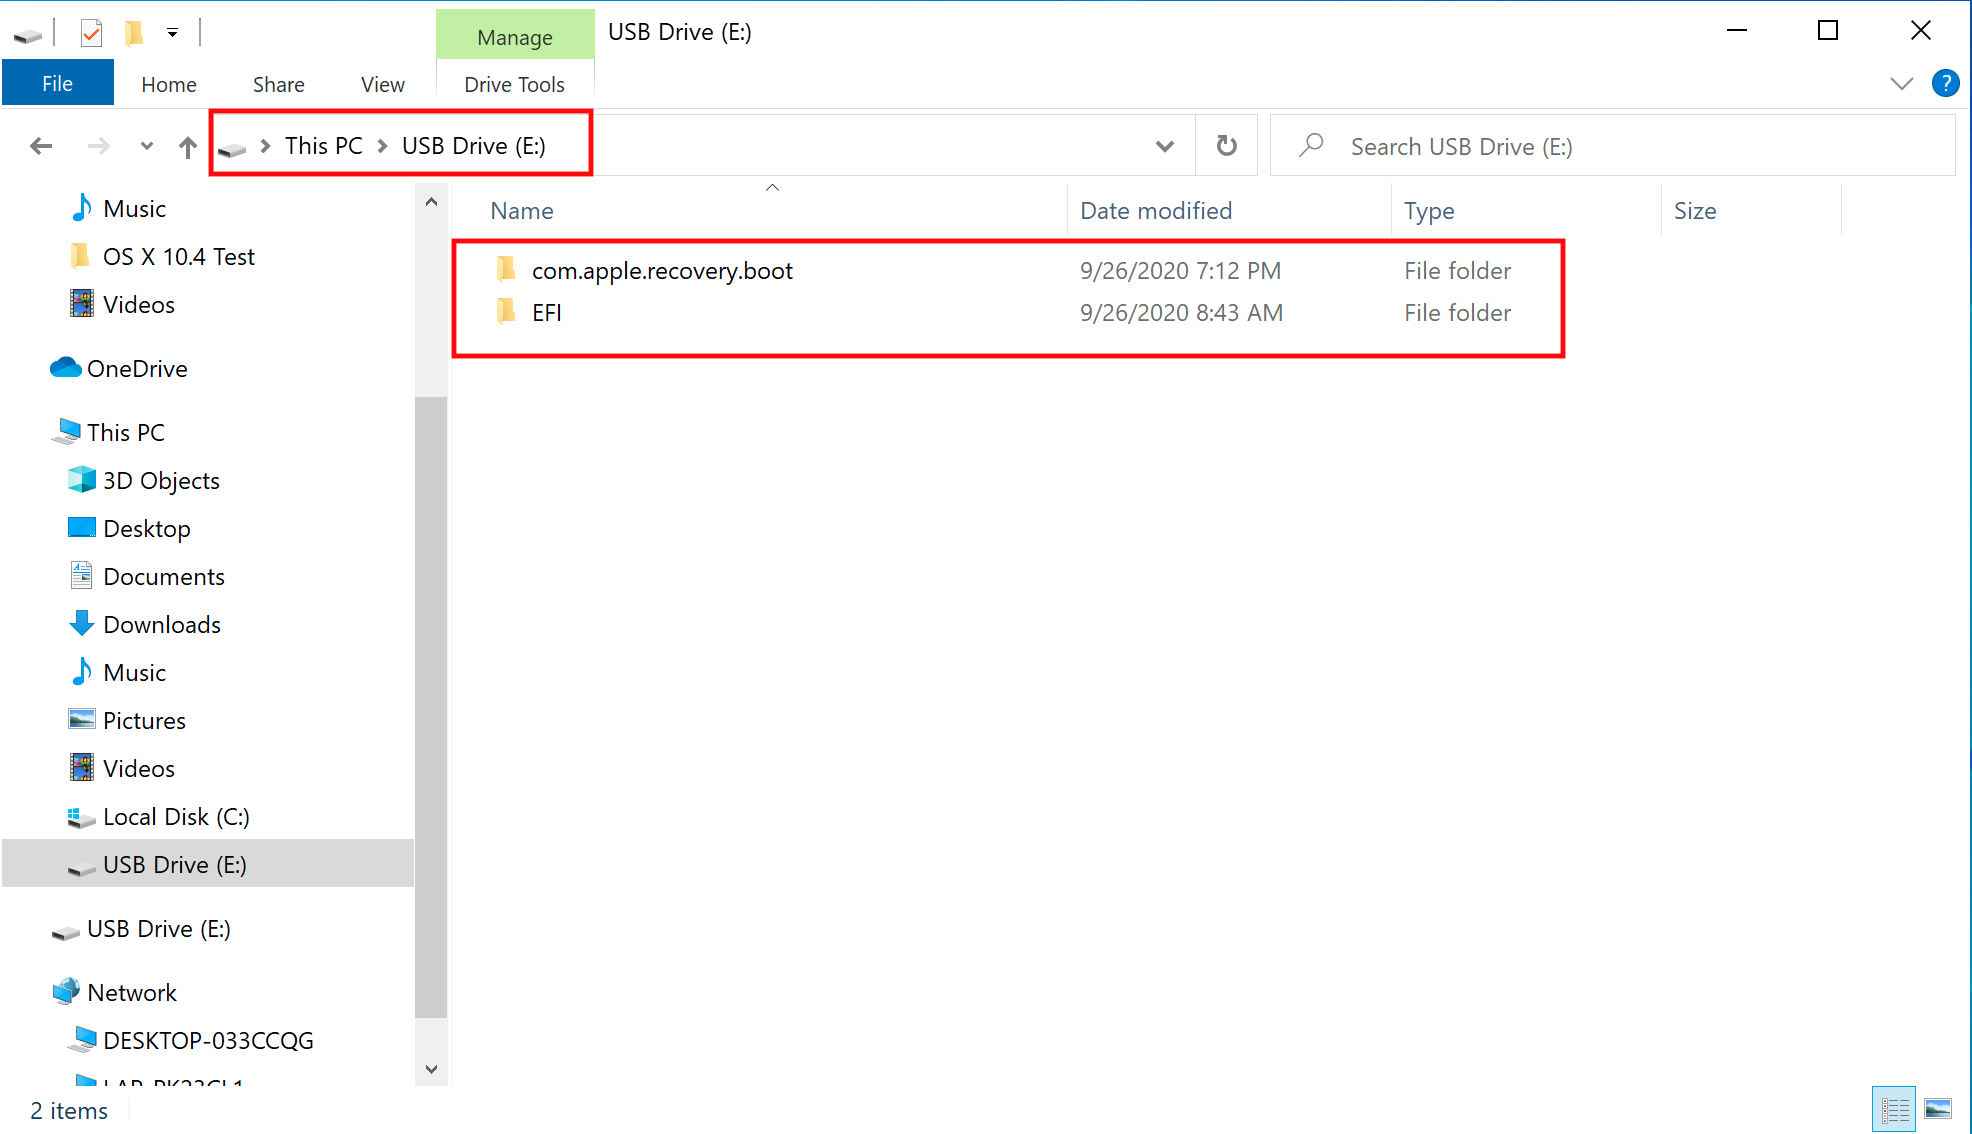
Here we see both IA32(32 Bit CPUs) and X64(64 Bit CPUs) folders, choose the one that’s most appropriate to your hardware and open it. Next grab the EFI folder inside and place this on the root of the USB drive along side com.apple.recovery.boot. Once done it should look like this:
At this point you will have to continue setting up your EFI folder. Because of the complexity of this step and all the different possible options depending on your setup, you should follow along with the official documentation for the next few steps.
Here are the links to the instructions for the next steps when using Windows to create the bootable USB installer. Note that the screenshots in the documentation show a mac but the steps apply to Windows as well. For setup using a mac, you don’t have to go through these steps because there is a wizard that does all of them automatically.
Adding The Base OpenCore Files
Gathering Files
Getting started with ACPI
BIOS Setup
I’ll show you how I setup my BIOS for my Hackintosh. The BIOS software is specific to my motherboard and yours may look a little different. If yours looks different, do you best to find equivalent setting in you software, if yours looks different. Note that BIOS setting are easy to experiment with and you don’t have to have all the same settings as me to get everything working.
Boot the computer up and then hit the «Delete» key to get into the BIOS.
Most setting can be left as the default. Here are the settings that should be updated:
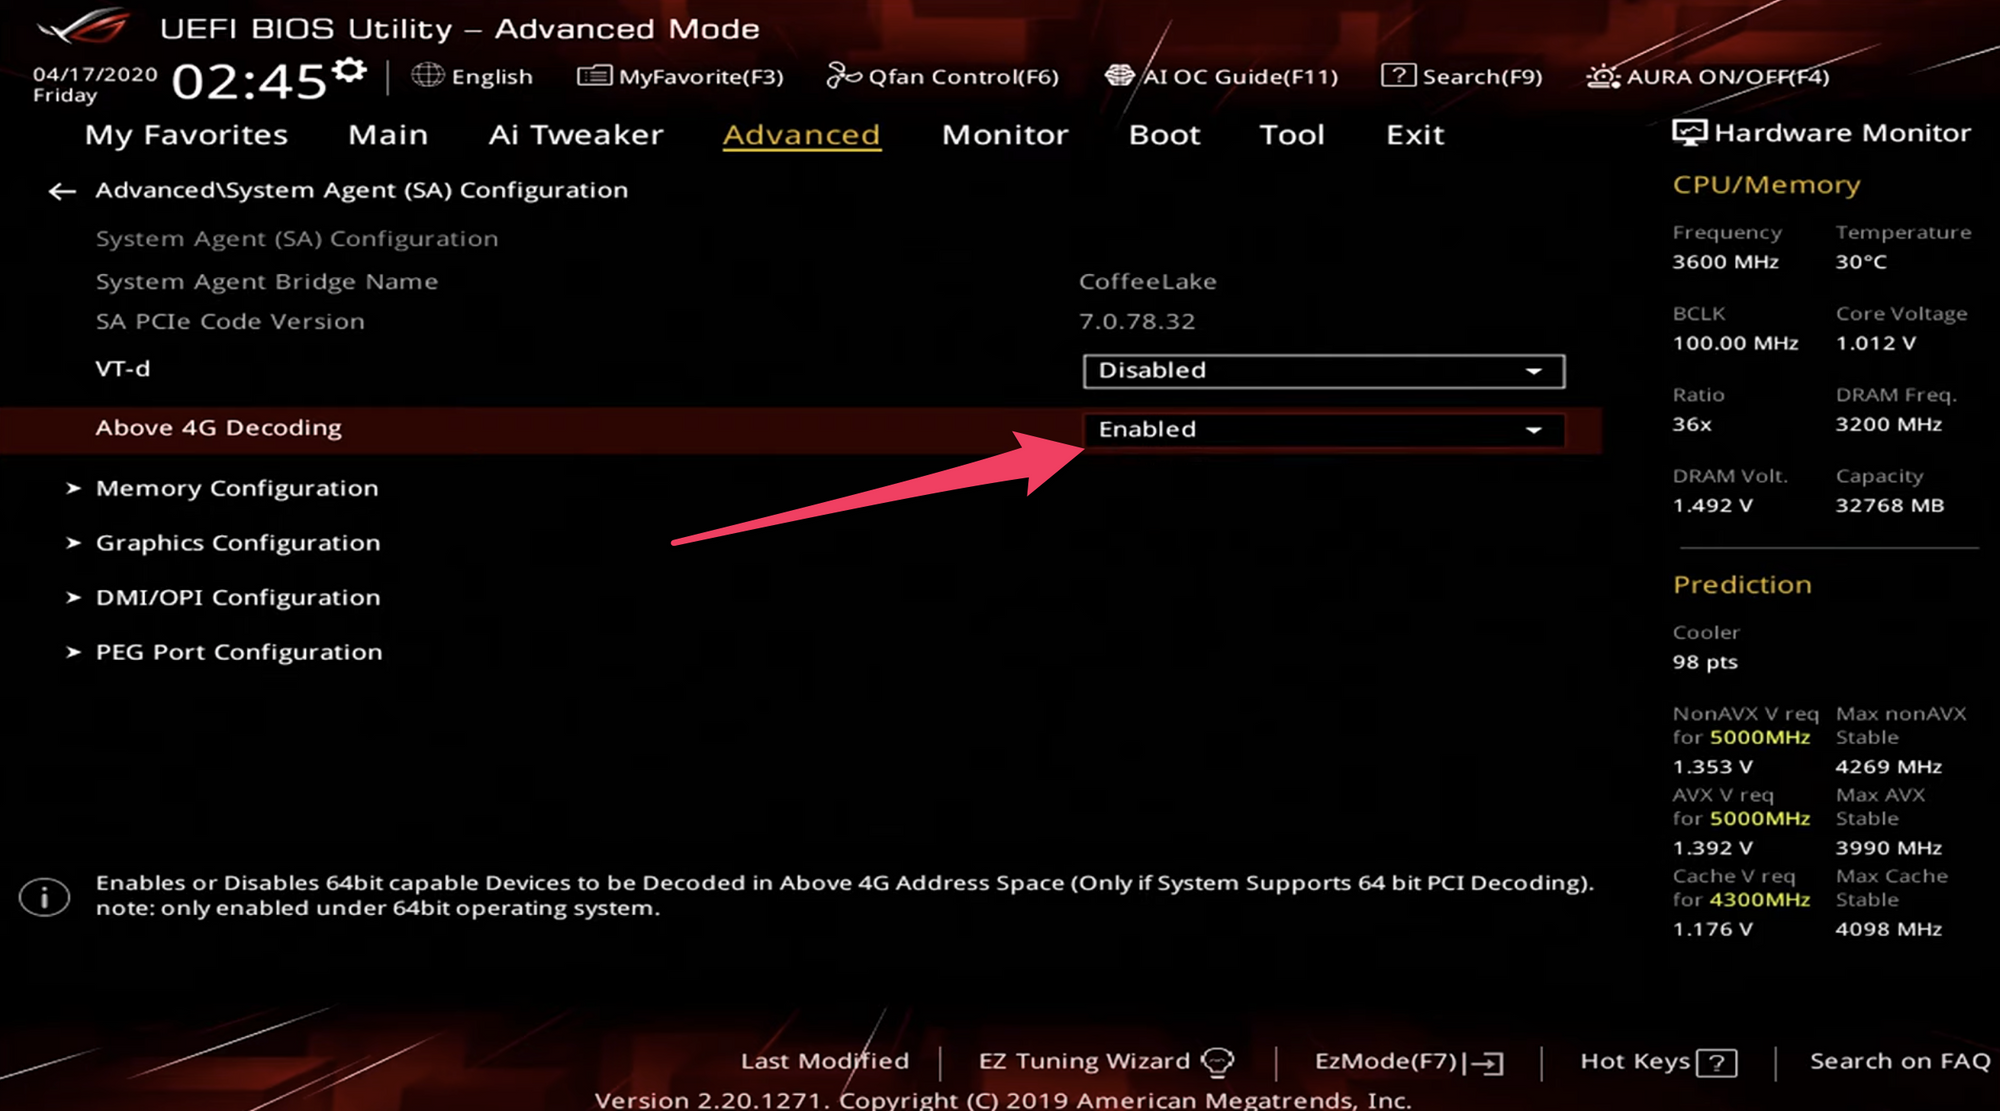
Under Advanced, «Above 4G Decoding» should be Enabled.
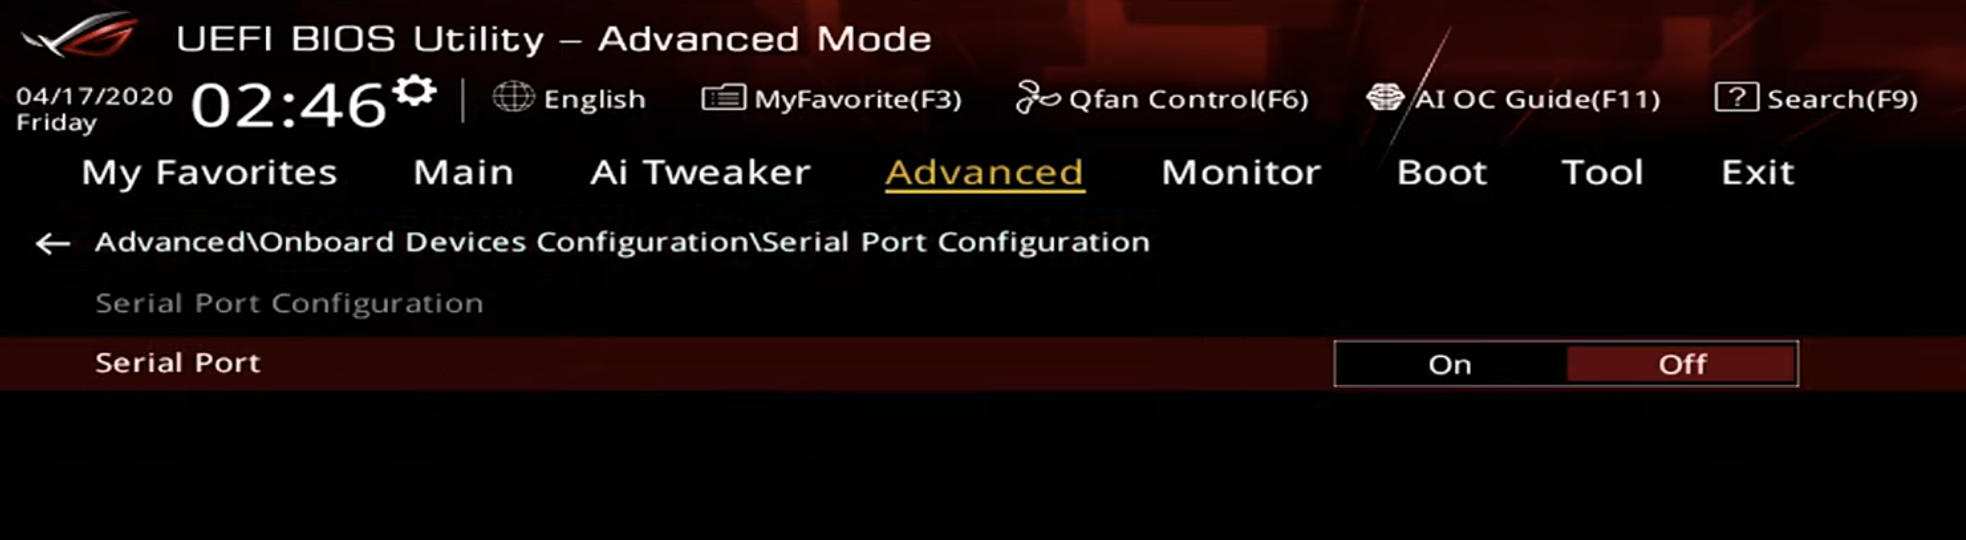
Under Advanced, and then under Serial Port Configuration, turn «Serial Port» to Off.
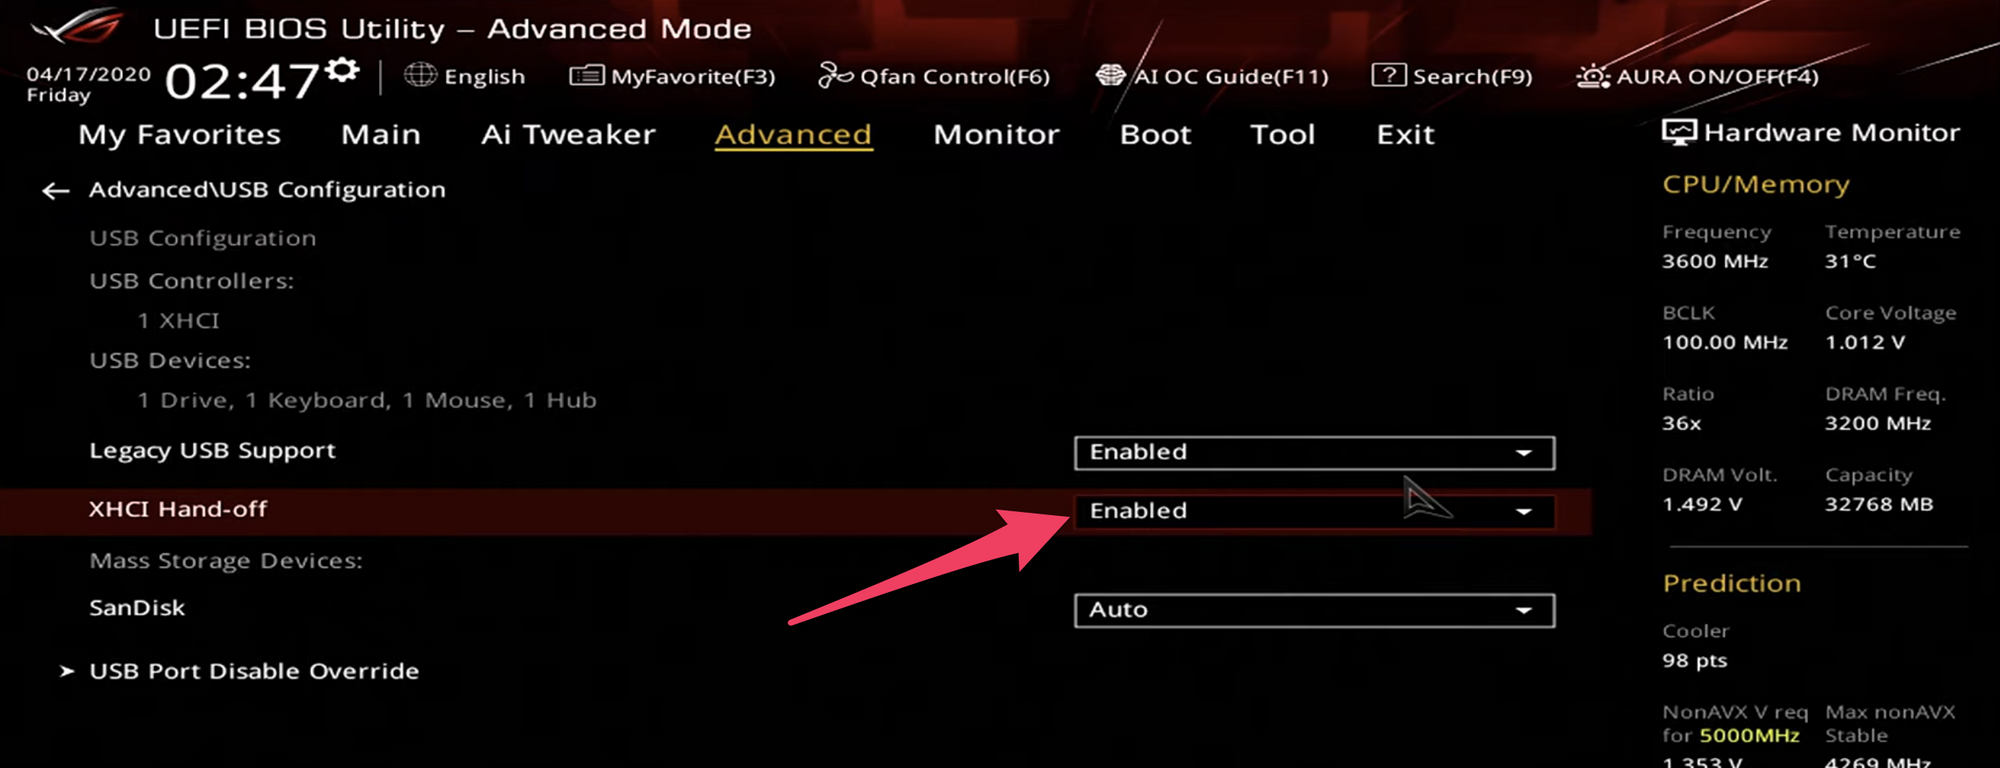
Under Advanced, and then under USB Configuration, set «XHCI Hand-off» to Enabled.

Under Boot, and then under Boot Configuration, set «Fast Boot» to Disabled

Under Boot, and then under Secure Boot, set «OS Type» to Windows UEFI mode.
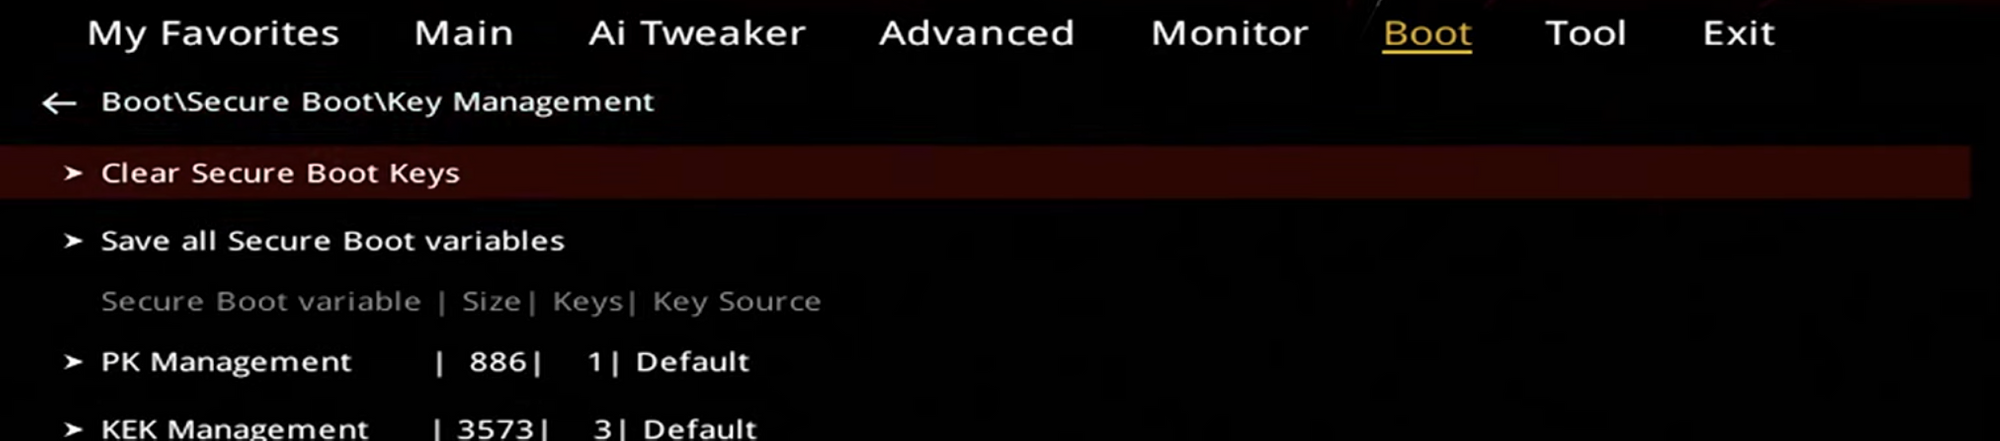
The final thing you need to do is to go under Boot > Secure Boot > Key Management. Then select «Clear Secure Boot Keys».
Now go to Exit and select «Save Changes & Reset».
MacOS Setup
After the computer restarts, hit F12 to get into the boot menu. Choose «Install MacOS Big Sur (External).
The next few screenshots are a little blurry since I was videotaping my monitor and did not focus correctly. Sorry about that.
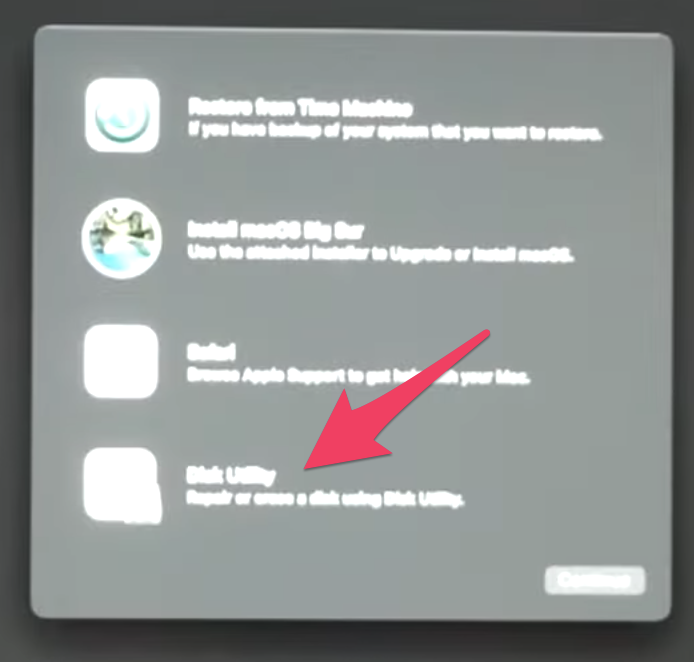
After it loads, the macOS Utilities screen should appear. Select «Disk Utility».
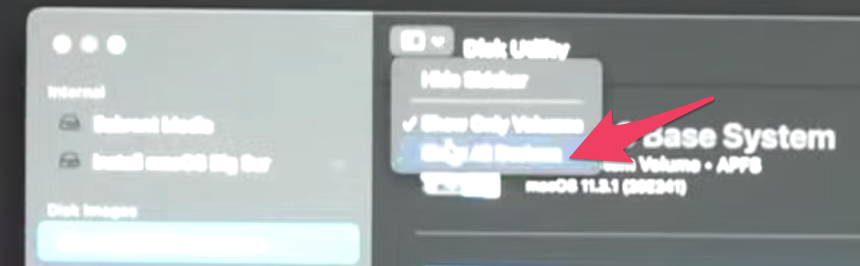
Click the dropdown menu toward the top and click «Show All Devices». Then select your hard drive and click «Erase» at the top.
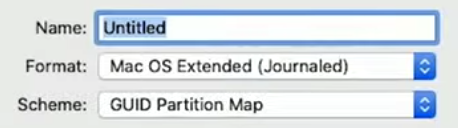
You can name the drive anything you like. For Format, make sure to choose «Mac OS Extended (Journaled) and for Scheme choose «GUID Partition Map»
After the drive is erased, close Disk Utility and select «Install MacOS Big Sur». You will have to choose the hard drive you just formatted. And then you will have to wait as macOS is installed.
The computer should restart back into the boot menu. Select «MacOS Installer».
At this point you will set up the computer just like you would a brand new Mac computer. After the setup, macOS Big Sur will load.
There is one more thing left to do. You have to copy the EFI folder from the hidden EFI partition on the USB stick to the EFI partition on the hard drive you installed macOS on.
On the new Hackintosh, go to the web browser and download MountEFI. This is the same program you used before, if you created the installer on a mac. After clicking the link, click the «Code» button, then «Download ZIP».
Go to the downloads folder and and right click on MountEFI.command and open it.
Use the program to mount the EFI partitions from both the hard drive on your Hackintosh and the USB drive called «Install MacOS Big Sur». First select one, then the other.
After both partitions are mounted, you will need to copy the EFI folder from the USB EFI partition over to the hard drive EFI partition.

At this point you can restart the computer and take out the USB drive. The Hackintosh is complete!
Learn to code for free. freeCodeCamp’s open source curriculum has helped more than 40,000 people get jobs as developers. Get started
A Hackintosh is a non-Mac computer system, made with PC parts, that runs the macOS operating system. In this tutorial, you will learn how to create a Hackintosh.
You will learn how to install macOS Big Sur (or any other version of macOS) using OpenCore.
The main benefit of a Hackintosh compared to an official Macintosh computer, is that it is WAY cheaper. I created a Hackintosh computer that matches the Mac Pro specs for about 1/3rd the price of a Mac Pro. Some people have been able to create a Hackintosh for under $100.
This tutorial will focus mainly on how to install macOS on your hardware. I also created a video version that shows how to build a complete machine and then install macOS on it.
The video shows how to use a computer with macOS to create a macOS installer for your Hackintosh. In this written tutorial, you will learn how to create the macOS installer using macOS or Windows.
You can watch the video here:
It is not illegal to create a Hackintosh for personal use but it does go against Apple’s End User License Agreement. So don’t plan on taking this into an Apple store for repair. And in many places it is illegal to sell a Hackintosh.
The Hardware
Many computer parts work for Hackintoshes. But some do not. Check this website to see what hardware is compatible with a Hackintosh.
In the video above I demonstrate step-by-step how to build a computer that will work as a Hackintosh. In the video description is a list of the specific parts I used.
If you want to be safe, you can use exact parts I used in my build but it is possible to install macOS on a wide variety of hardware.
Downloading MacOS and Creating a Bootable USB Installer
For this step, you will need a USB drive that is at least 16GB. The process is different depending on if you are setting up the bootable USB installer using macOS or Windows. The process is much simpler to do on macOS, but it still possible on Windows.
If you can, find a Mac machine to use to create the bootable USB installer. But I’ll cover the steps for macOS and Windows.
Using MacOS to Create the MacOS Installer
There are a few programs you’ll need during this process so start by downloading them. Here are links for what you will need followed by the download instructions.
- ProperTree — Click the «Code» button, then «Download Zip»
- MountEFI — Click the «Code» button, then «Download Zip»
- OC_GEN-X — Download the zip file for the most recent release.
Open up the App store on macOS. Search for «Big Sur». Click «Get», and then «Download».
Format your USB drive using Disk Utility. To get into Disk Utility, just click the magnifying glass and type «Disk Utility.
Once Disk Utility is open, make sure that the view is set to show all devices.
Click the USB drive, then click «Erase» in the top menu.
Name the drive «MyVolume». Make sure the format is Mac OS Extended (Journaled) and that the scheme is GUID Partition Map. Then click the «Erase» button.
After the USB drive is prepared, open the Terminal in MacOS. You will use a command in the terminal to make the USB drive into a bootable installer for macOS.
If you are installing macOS Big Sur, type the following command:
sudo /Applications/Install macOS Big Sur.app/Contents/Resources/createinstallmedia --volume /Volumes/MyVolume
If you are installing a different version of macOS, you can find the command for the version you are installing here.
You’ll have to wait a bit for this to install. After this is done, open the OC_Gen-X program you downloaded earlier.
To open the program, you will have to right-click the icon, select «open», then select «open» again.
This is a software wizard that helps us easily prepare what we need to install MacOS on our particular hardware setup. It will go out and get everything we need except the SSDTs and put them in a folder for you.
You can also do this is a more manual method by following the OpenCore Install Guide. But this program simplifies things for us quite a bit and it is not available for Windows.
On this first screen under «System Type» choose the type of processor you have. Look in your processor’s documentation to determine the name of the microarchitecture it uses. Getting this right is very important.
The type of processor I used is «Coffee Lake».
For most of the tabs in this program you can keep the default settings.
Under «Graphics» select «WhateverGreen» and under «Audio» select «AppleALC». Under «Ethernet» select «IntelMausi». These are very commonly used options but there is a small chance your settings will be different depending on your hardware and specific use case.
The SMBIOS is important and you will have to specify the correct System Model on that tab. For my setup I used «iMac19,1» but it could be different for you if you are using a different processor of a different operating system version.
To figure out what System Model to use, go to the Open Core Install Guide.
Select the section on the left side for your processor type (in my case it is «Coffee Lake»). Then find the heading «PlatformInfo». Scroll down a bit and you will see a table with the SMBIOS to use.
After selecting the appropriate System Model, click the «Generate EFI» button at the bottom.
An EFI folder has now been created on your desktop. We will now make some modifications to the contents.
You’ll need to get the SSDT files. This is different depending on your processor.
You can find the list of the exact SSDT’s you need at this link. Just select your processor type and download each of the required SSDTs.
Here are the links for the SSDTs needed for my Coffee Lake system.
- SSDT-PLUG-DRTNIA
- SSDT-EC-USBX-DESKTOP
- SSDT-AWAC
- SSDT-PMC
Once all of those files are downloaded, move them into your EFI folder. They should be moved to this subfolder: EFI/ACPI/OC
Now you will will use the MountEFI program downloaded earlier to mount the hidden EFI partition on the USB drive.
Right-click on MountEFI.command and click «open», then «open» again.
Select your USB drive. It should have a name like «Install macOS Big Sur» since we made it into a bootable installer for MacOS. In the screenshot below, it is option 2.
You now have a mounted EFI partition and an EFI folder from OC Gen-X. Drag the EFI folder into the EFI partition.
Open ProperTree.command which you downloaded earlier. Like before you can open it by right-clicking and selecting «open».
Once ProperTree is running, go to «File -> Open». Select the EFI partition, then the «OC» folder, then open the «config.plist» file.
The first thing we need to do is to inject all of the files in the EFI folder into the «config.plist» file.
So go to «File», then select «OC Snapshot». Make sure you’re on the EFI partition. Go to the «EFI» folder, then the «OC» folder. And click the «Choose» button.
A dialog box could pop up here about what version to use. If this happens, click «Yes».
Now go back to «File», then select «OC Clean Snapshot» and select «Choose».
The OC Gen-X program helped simplify all the required setup. At this point you should verify that everything is setup correctly according the the official install guide.
Here is the guide for Coffee Lake. If you are using a different type of processor, just select your type in the left menu.
You can verify the quirks are set correctly in the config.plist file. They should all be correct.
You need to do additional setup in the config.plist file to make sure the onboard graphics work. Find the «DeviceProperties» section, and then copy the following characters to add.
PciRoot(0x0)/Pci(0x2,0x0)
Note that this if you processor is not Coffee Lake, the exact thing you need to add under «DeviceProperties» could be different. Search for «Device Properties» in the OpenCore guide for your processor type to confirm what to add under «DeviceProperties» in the config.plist file.
Under «DeviceProperties», click on «Add». Then right click and choose «New child under ‘Add’ (+)».
Double-click where it says «New String» and just paste the text into the field and hit enter. Then select in the next column where it says «String» and make sure that it is set to «Dictionary».
Next, we need to add more children under it and it should eventually look like this:
Below is the text from the image above that you need to add (if you system is Cofee Lake).
| Name | Type | Value |
|---|---|---|
| AAPL,ig-platform-id | Data | 07009B3E |
| framebuffer-patch-enable | Data | 01000000 |
| framebuffer-stolenmem | Data | 00003001 |
Now in the config.plist file, find the NVRAM section.
Update the «boot-args» so the text is «-v keepsyms=1 debug=0x100 alcid=1».
Now we’ll change the language to English. So next to where it says «prev-lang:kbd», change «data» to «String» and set the value to «en-US:0» and hit enter.
If you want a different language just go to this link to find what language code to use.
The config.plist file is now done. So go to «file», then «save». You are now completely done setting up the bootable drive. So just eject the drive, and then you can plug it in to your Hackintosh.
Skip the next Windows section and go to the heading «BIOS Setup».
Using Windows to create the macOS Installer
The first step to creating a macOS installer on Windows is to download OpenCore. Make sure to download the zip file for the most recent release.
Unzip OpenCore and then go to /Utilities/macrecovery/. Next copy the folder path for the macrecovery folder:
Open a Command Prompt and change directories into the macrecovery folder that you just copied using the command cd [PASTE_FOLDER_NAME].
It should look something like this:
Now in the Command Prompt, run one of the following commands depending on what version of macOS you want. If you don’t already have Python, you will have to install it first.
# Mojave(10.14)
python macrecovery.py -b Mac-7BA5B2DFE22DDD8C -m 00000000000KXPG00 download

# Catalina(10.15)
python macrecovery.py -b Mac-00BE6ED71E35EB86 -m 00000000000000000 download

# Big Sur(11)
python macrecovery.py -b Mac-E43C1C25D4880AD6 -m 00000000000000000 download
This will take some time, however once you’re finished you should get either BaseSystem or RecoveryImage files:
Now open up Disk Management and format the USB drive as FAT32. Follow these steps from the OpenCore Docs:
- Right click the Start Button on your task bar and select Disk Management.
- You should see all of your partitions and disks. On the bottom half, you’ll see your devices. Find your USB.
- You’ll want to format the USB to have a FAT32 partition.
- If you have multiple partitions on the USB, right click each partition and click Delete Volume for your USB.
- Right click the unallocated space and create a new simple volume. Make sure it is FAT32 and at least a gigabyte or two big. Name it «EFI».
- Otherwise, right click the partition on the USB and click Format and set it to FAT32.
Next, go to the root of this USB drive and create a folder called com.apple.recovery.boot. Then move the downloaded BaseSystem or RecoveryImage files. Please ensure you copy over both the .dmg and .chunklist files to this folder:
Now grab OpenCorePkg you downloaded earlier and open it:
Here we see both IA32(32 Bit CPUs) and X64(64 Bit CPUs) folders, choose the one that’s most appropriate to your hardware and open it. Next grab the EFI folder inside and place this on the root of the USB drive along side com.apple.recovery.boot. Once done it should look like this:
At this point you will have to continue setting up your EFI folder. Because of the complexity of this step and all the different possible options depending on your setup, you should follow along with the official documentation for the next few steps.
Here are the links to the instructions for the next steps when using Windows to create the bootable USB installer. Note that the screenshots in the documentation show a mac but the steps apply to Windows as well. For setup using a mac, you don’t have to go through these steps because there is a wizard that does all of them automatically.
Adding The Base OpenCore Files
Gathering Files
Getting started with ACPI
BIOS Setup
I’ll show you how I setup my BIOS for my Hackintosh. The BIOS software is specific to my motherboard and yours may look a little different. If yours looks different, do you best to find equivalent setting in you software, if yours looks different. Note that BIOS setting are easy to experiment with and you don’t have to have all the same settings as me to get everything working.
Boot the computer up and then hit the «Delete» key to get into the BIOS.
Most setting can be left as the default. Here are the settings that should be updated:
Under Advanced, «Above 4G Decoding» should be Enabled.
Under Advanced, and then under Serial Port Configuration, turn «Serial Port» to Off.
Under Advanced, and then under USB Configuration, set «XHCI Hand-off» to Enabled.
Under Boot, and then under Boot Configuration, set «Fast Boot» to Disabled
Under Boot, and then under Secure Boot, set «OS Type» to Windows UEFI mode.
The final thing you need to do is to go under Boot > Secure Boot > Key Management. Then select «Clear Secure Boot Keys».
Now go to Exit and select «Save Changes & Reset».
MacOS Setup
After the computer restarts, hit F12 to get into the boot menu. Choose «Install MacOS Big Sur (External).
The next few screenshots are a little blurry since I was videotaping my monitor and did not focus correctly. Sorry about that.
After it loads, the macOS Utilities screen should appear. Select «Disk Utility».
Click the dropdown menu toward the top and click «Show All Devices». Then select your hard drive and click «Erase» at the top.
You can name the drive anything you like. For Format, make sure to choose «Mac OS Extended (Journaled) and for Scheme choose «GUID Partition Map»
After the drive is erased, close Disk Utility and select «Install MacOS Big Sur». You will have to choose the hard drive you just formatted. And then you will have to wait as macOS is installed.
The computer should restart back into the boot menu. Select «MacOS Installer».
At this point you will set up the computer just like you would a brand new Mac computer. After the setup, macOS Big Sur will load.
There is one more thing left to do. You have to copy the EFI folder from the hidden EFI partition on the USB stick to the EFI partition on the hard drive you installed macOS on.
On the new Hackintosh, go to the web browser and download MountEFI. This is the same program you used before, if you created the installer on a mac. After clicking the link, click the «Code» button, then «Download ZIP».
Go to the downloads folder and and right click on MountEFI.command and open it.
Use the program to mount the EFI partitions from both the hard drive on your Hackintosh and the USB drive called «Install MacOS Big Sur». First select one, then the other.
After both partitions are mounted, you will need to copy the EFI folder from the USB EFI partition over to the hard drive EFI partition.
At this point you can restart the computer and take out the USB drive. The Hackintosh is complete!
Learn to code for free. freeCodeCamp’s open source curriculum has helped more than 40,000 people get jobs as developers. Get started
- Поддерживаемая версия: 0.6.9
В то время как вам не нужна чистая установка macOS чтобы использовать OpenCore, некоторые пользователи предпочитают иметь свежую версию ОС с обновлением их Boot Manager.
Чтобы начать, вам нужно:
-
USB флешка объемом 4 Гб
-
Для USB-накопителей объемом свыше 16 Гб для форматирования в FAT32 используйте Rufus
-
macrecovery.py (opens new window)
- Требуется установленный Python (opens new window)
# Скачивание macOS
Получение устаревших установщиков очень простое, для начала получите копию OpenCorePkg (opens new window) и перейдите в /Utilities/macrecovery/. Затем скопируйте путь к папке macrecovery:
Отсюда, вы захотите открыть Командную Строку и «cd» в папку macrecovery, путь которой мы скопировали ранее:
Теперь запустите одну из следующих команд, в зависимости от того, какую версию macOS вы хотите (Обратите внимание на то, что эти скрипты написаны на Python (opens new window), пожалуйста, установите его, если вы ещё это не сделали):
- Примечание к macOS 11, Big Sur: Так как эта ОС совершенна новая, есть некоторые проблемы с определенными системами, которые нужно решить. Для получения дополнительной информации, смотрите здесь: OpenCore и macOS 11: Big Sur
- Для начинающих пользователей, мы рекомендуем macOS 10.15, Catalina
- Примечание к GPU Nvidia: напоминание о том, чтобы проверить, поддерживает ли ваше оборудование новые ОС, смотрите Аппаратные ограничения
Это займёт некоторое время, однако когда вы закончите, вы должны получить BaseSystem или RecoveryImage файлы:
| BaseSystem | RecoveryImage |
|---|---|
 |
 |
Теперь, когда наш установщик загружен, мы дальше захотим отформатировать USB.
# Создание установщика
Здесь мы будем форматировать наш USB накопитель и записывать на него macOS. Для этого у нас есть несколько вариантов:
- Через Управление Дисками
- На базе графического интерфейса, самый простой вариант
- Поддерживаются системы только с UEFI(напр. 2012 г.+)
- Через Rufus
- На базе графического интерфейса, самый простой вариант
- Для USB-накопителей большего размера (16Гб+)
- Через diskpart
- На базе командной строки, требует немного больше работы
- Требуется для устаревших (Legacy) систем (т.е. не UEFI, до 2012 г.)
# Через Управление Дисками
Просто откройте Управление Дисками, и отформатируйте ваш USB накопитель в FAT32:
- Щелкните правой кнопкой мыши (ПКМ) по кнопке «Пуск» на вашей панели задач (task bar) и выберите Управление Дисками
- Вы должны видеть все разделы и диски. В нижней половине, вы видете ваши накопители. Найдите свой USB накопитель.
- Вы захотите отформатировать USB накопитель, чтобы он имел раздел в FAT32
- Если у вас есть множество разделов на USB накопителе, щелкните правой кнопкой мыши по каждому разделу и кликните Удалить том (Delete Volume) на вашем USB накопителе (Это удалит ваши данные, убедитесь, что вы имеете резервные копии, и после удалите только разделы с вашего USB накопителя)
- Щелкните ПКМ по нераспределенному (unallocated) пространству и создайте новый простой том. Убедитесь в том, что он в FAT32 и не меньше одного-двух гигабайтов. Назовите его «EFI».
- В противном случае, щелкните ПКМ по разделу на USB накопителе, щелкните форматировать (Format) и поставьте его в FAT32.
Далее, перейдите в корень USB накопителя и создайте папку с названием com.apple.recovery.boot. Дальше, переместите загруженные BaseSystem или RecoveryImage файлы. Пожалуйста, убедитесь, что вы скопировали .dmg и .chunklist файлы в эту папку:

Теперь возьмите OpenCorePkg, который вы ранее загрузили и откройте его:
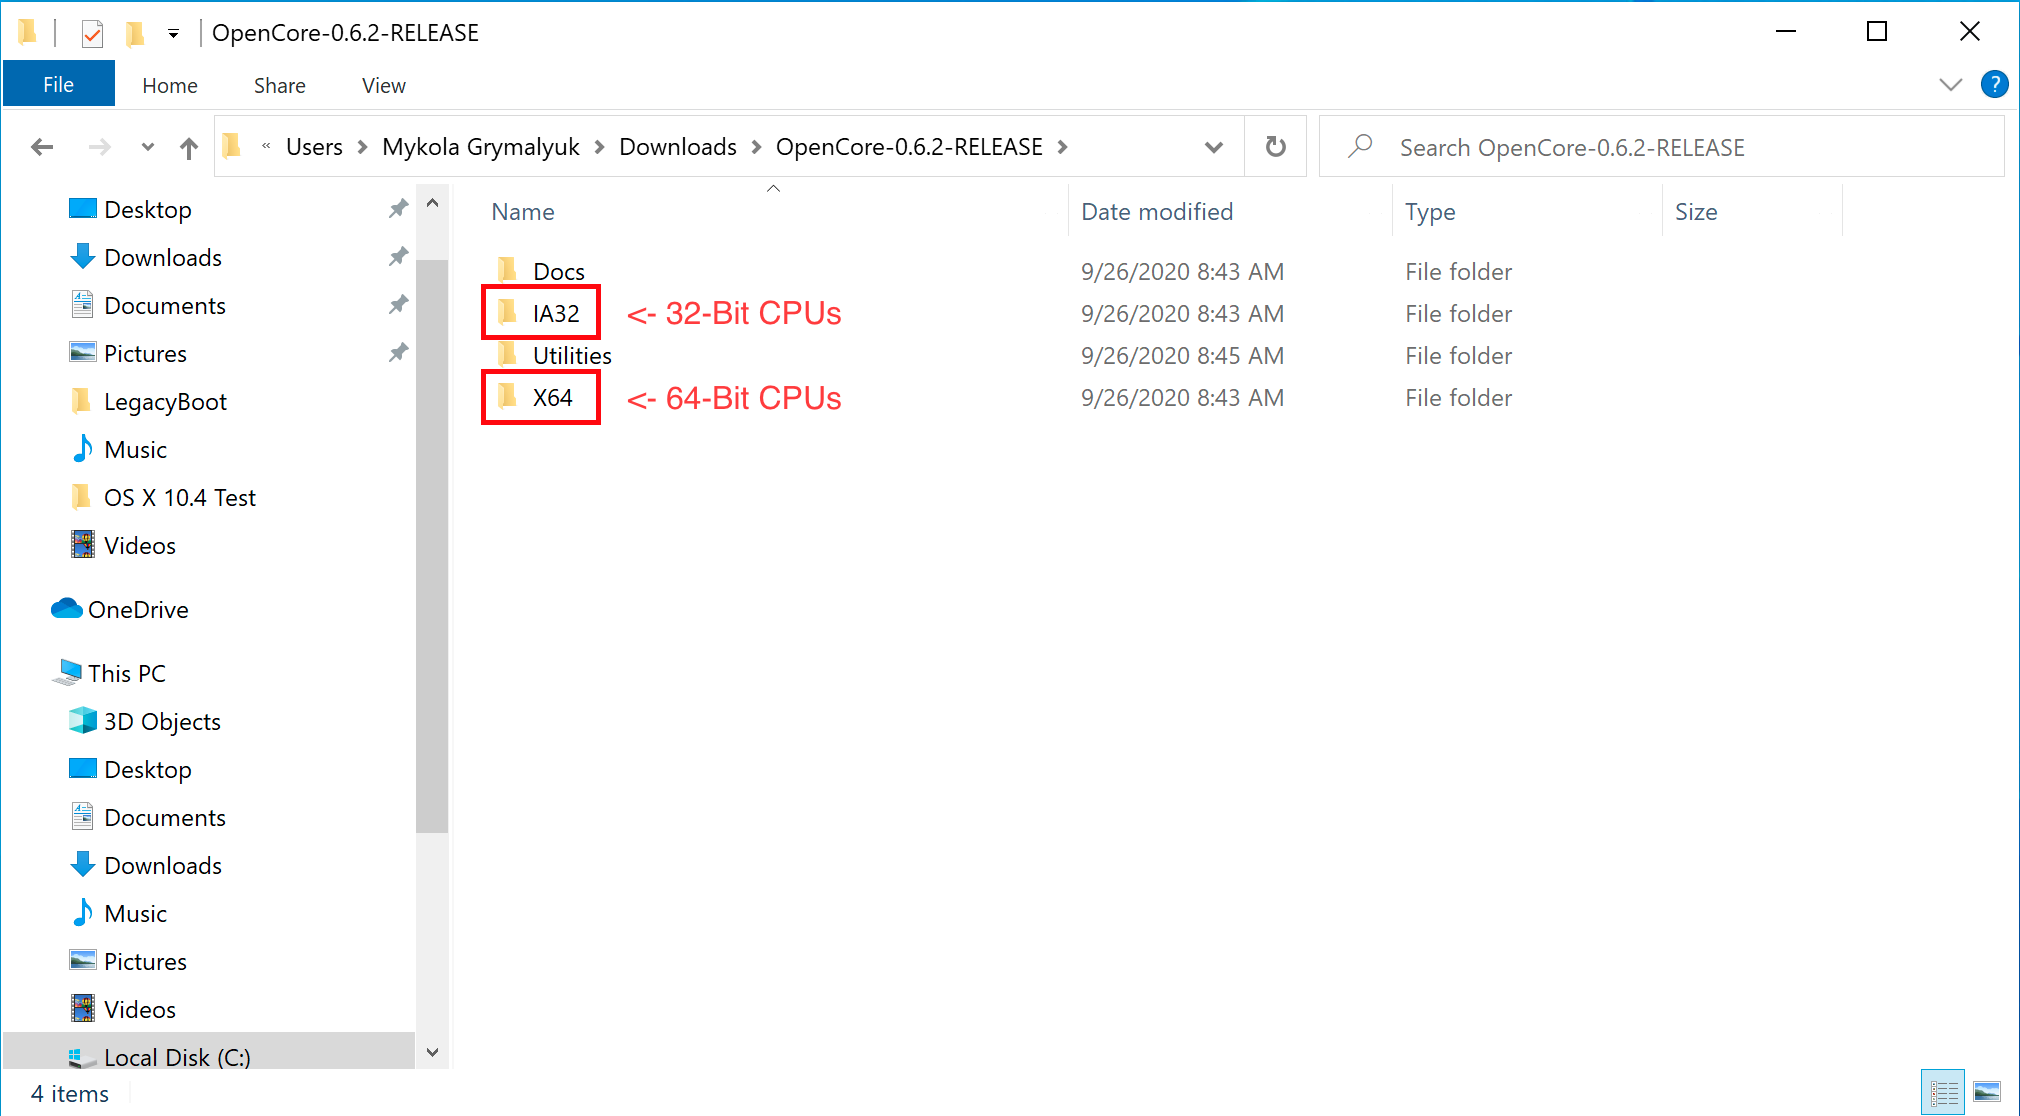
Здесь мы видим папки IA32 (32-битные процессоры) и X64 (64-битные процессоры), выберите подходящую для вашего оборудования, и откройте её. Затем возьмите папку EFI внутри и поместите в корень USB накопителя, рядом с com.apple.recovery.boot. После этого, оно должно выглядеть так:

# Через Rufus
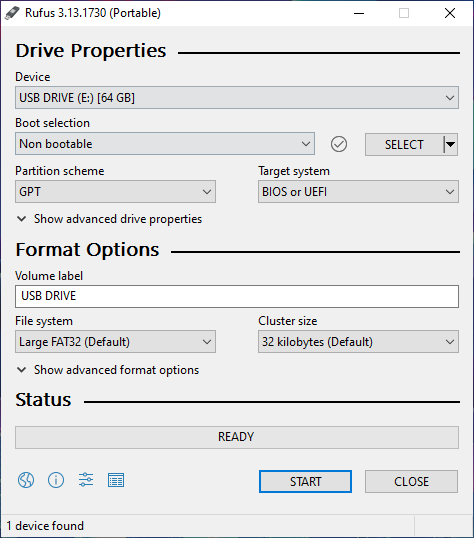
- Загрузите Rufus (opens new window)
- Выберите метод загрузки как незагрузочный образ
- Выберите файловую систему Large FAT32
- Кликните по кнопке Старт
- Удалите все файлы autorun в разделе USB-накопителя
Далее, перейдите в корень USB накопителя и создайте папку с названием com.apple.recovery.boot. Дальше, переместите загруженные BaseSystem или RecoveryImage файлы. Пожалуйста, убедитесь, что вы скопировали .dmg и .chunklist файлы в эту папку:
Теперь возьмите OpenCorePkg, который вы ранее загрузили и откройте его:
Здесь мы видим папки IA32 (32-битные процессоры) и X64 (64-битные процессоры), выберите подходящую для вашего оборудования, и откройте её. Затем возьмите папку EFI внутри и поместите в корень USB накопителя, рядом с com.apple.recovery.boot. После этого, оно должно выглядеть так:
# Через diskpart
через diskpart
Нажмите Windows + R и введите diskpart.
Теперь запустите следующее:
Далее, перейдите в корень USB накопителя и создайте папку с названием com.apple.recovery.boot. Дальше, переместите загруженные BaseSystem или RecoveryImage файлы. Пожалуйста, убедитесь, что вы скопировали .dmg и .chunklist файлы в эту папку:
Теперь возьмите OpenCorePkg, который вы ранее загрузили и откройте его:
Здесь мы видим папки IA32 (32-битные процессоры) и X64 (64-битные процессоры), выберите подходящую для вашего оборудования, и откройте её. Затем возьмите папку EFI внутри и поместите в корень USB накопителя, рядом с com.apple.recovery.boot. После этого, оно должно выглядеть так:
Настройка установки в Legacy
Если ваше оборудование не поддерживает UEFI, смотрите инструкции ниже.
Для начала, вам понадобится следующее:
- 7-Zip (opens new window)
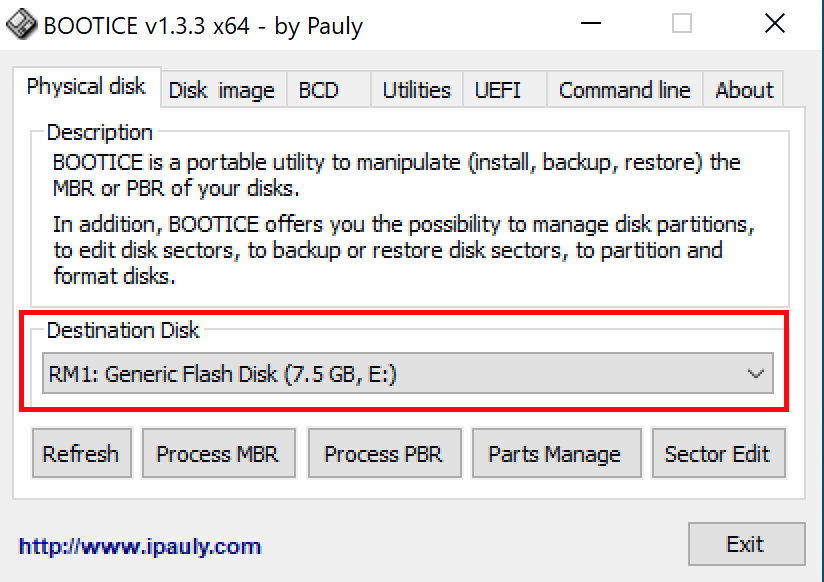
- BOOTICE (opens new window)
- OpenCorePkg (opens new window)
Далее, откройте BOOTICE и убедитесь, что вы выбрали правильный накопитель.
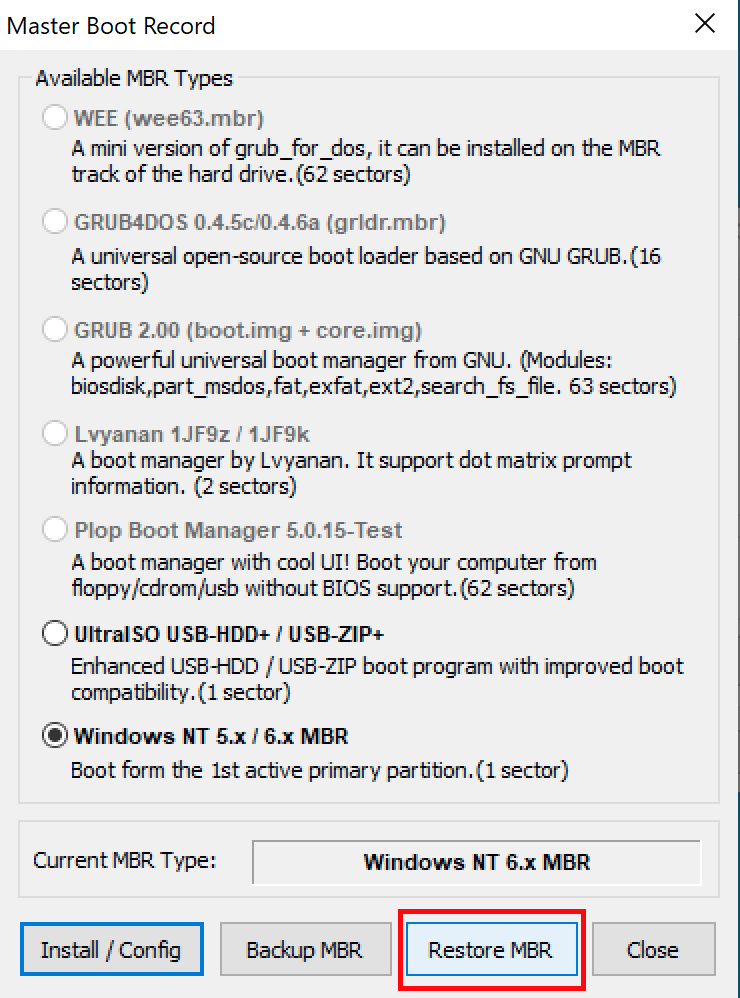
Затем, войдите в «Process MBR», потом нажмите на «Restore MBR» и выберите boot0 файл из Utilities/LegacyBoot/ в OpenCorePkg:
| Восстановление MBR | Восстановление boot0 файла |
|---|---|
 |
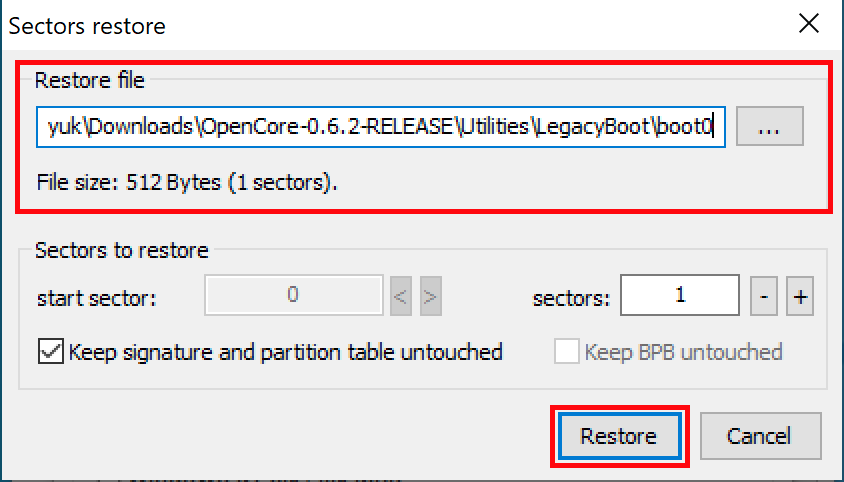 |
После, вернитесь на главный экран и выберите «Process PBR», затем «Restore PBR». Здесь, выберите Boot1f32 файл из Utilities/LegacyBoot/ в OpenCorePkg:
| Восстановление PBR | Восстановление boot1f32 файла |
|---|---|
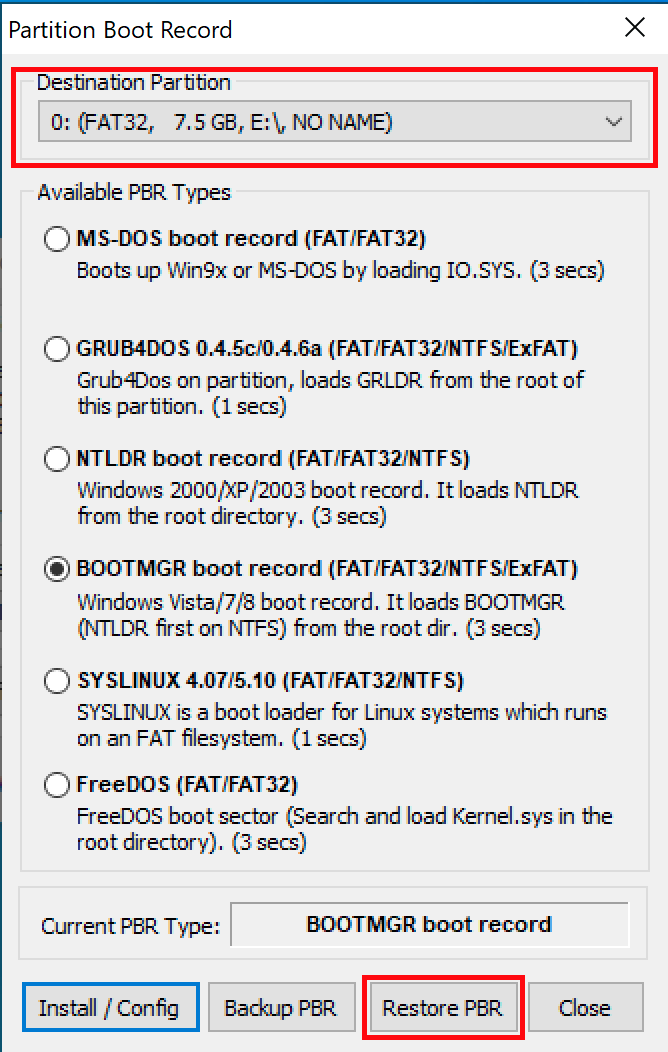 |
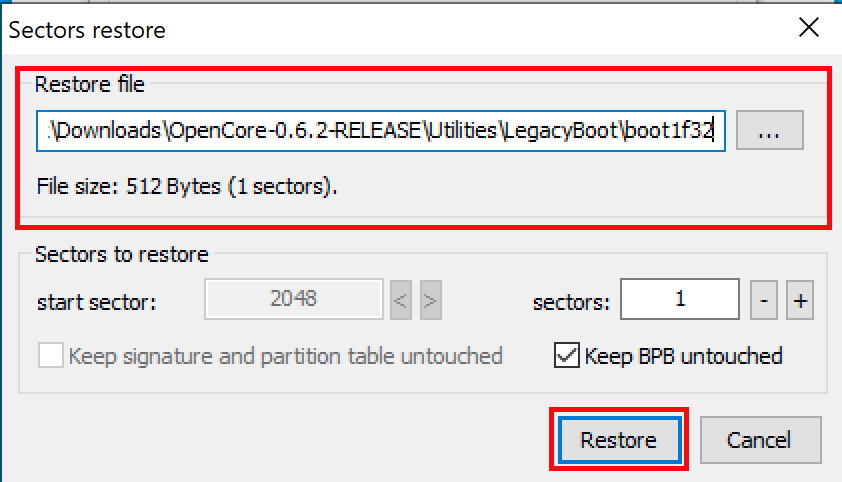 |
Как только это будет сделано, вернитесь к вашему USB накопителю и сделайте последнюю вещь. Возьмите либо bootx64(64-битные процессоры), либо bootia32(32-битные процессоры) файл из Utilities/LegacyBoot/ и поместите его в корень вашего накопителя. Переименуйте этот файл в boot, чтобы DuetPkg мог правильно функционировать:
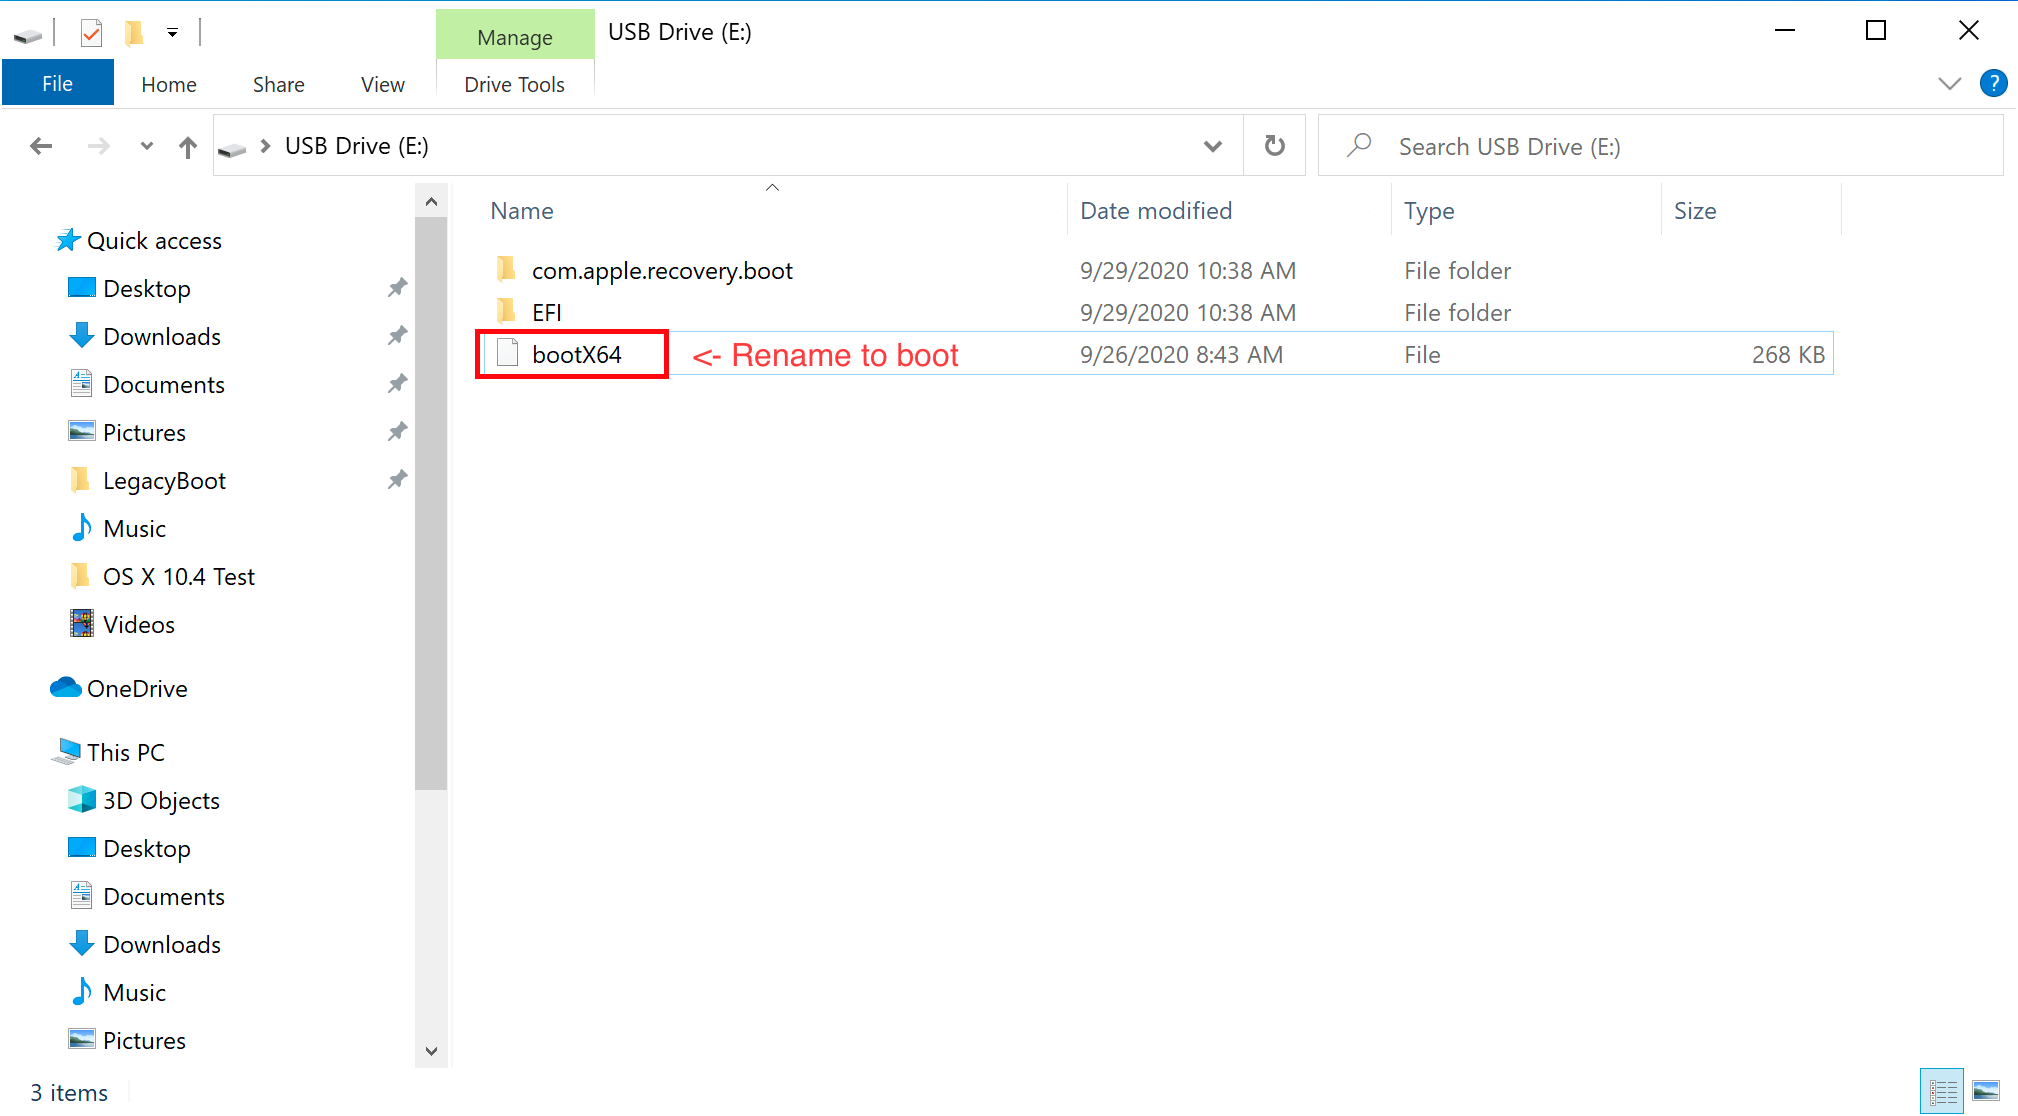
# Теперь, когда это всё сделано, перейдите к Настройке EFI, чтобы закончить работу

Вы заинтересованы в запуске macOS Big Sur или Monterey на ПК с Windows? Если вы не хотите тратить деньги на Mac, вы можете использовать виртуальную машину и по-прежнему опробовать macOS благодаря VirtualBox.
Прежде чем вы начнете делать предположения, это не сверхсложная установка Hackintosh. Вместо этого вы будете запускать VirtualBox изначально на своем компьютере с Windows и устанавливать macOS в качестве гостевой операционной системы в VirtualBox. В отличие от Hackintosh, вам не нужно какое-либо специальное оборудование для установки и запуска macOS на вашем компьютере. С VirtualBox вы можете установить несколько операционных систем на один компьютер и легко переключаться между ними по своему желанию. Операционные системы в основном работают в приложении, которое виртуализирует оборудование, а сама ОС не знает разницы.
Если вы заинтересованы в запуске macOS Big Sur или macOS Monterey в Windows с помощью VirtualBox, прочтите эту статью.
Требования для запуска macOS в VirtualBox
Это будет довольно долгая процедура, но мы сделаем ее максимально простой. Однако, прежде чем вы начнете, вам необходимо загрузить VirtualBox и некоторые дополнительные важные файлы. Следующие ссылки могут быть полезны для загрузки файлов, необходимых для беспроблемного запуска macOS Big Sur на вашей виртуальной машине VirtualBox. Однако вам нужно будет получить файл ISO для последней версии macOS Big Sur самостоятельно. Вы также можете использовать другую версию macOS, при условии, что у вас тоже есть ISO этой версии.
Производительность будет зависеть от того, насколько быстрым будет компьютер, на котором запущен VirtualBox, поэтому, очевидно, чем лучше ПК, тем лучше, что macOS будет работать на нем виртуализировано.
Теперь, когда у вас есть все необходимые файлы, загруженные на ваш компьютер, вы готовы продолжить процедуру. Это руководство предназначено только для образовательных целей.
- Установите программное обеспечение VirtualBox на свой компьютер. После этого щелкните файл VirtualBox Extension Pack, который вы скачали.

- При нажатии на пакет расширений откроется VirtualBox в Windows со всплывающим окном, предлагающим установить. Нажмите «Установить», чтобы завершить этот шаг.

- Вы успешно установили пакет расширений. Теперь вы готовы создать свою виртуальную машину. Нажмите «Создать» в программном обеспечении VirtualBox.

- Здесь укажите допустимое имя для вашей виртуальной машины. Например, «macOS Big Sur», как показано ниже. Убедитесь, что выбран тип Mac OS X и выбрана 64-разрядная версия. Когда вы закончите, нажмите «Экспертный режим», чтобы перейти к следующему шагу.

- На этом шаге вы выберете размер памяти или RAM, которые будут выделены для вашей виртуальной машины. Рекомендуется установить половину общей системной оперативной памяти для гостевой ОС. Убедитесь, что выбрано «Создать виртуальный жесткий диск сейчас», а затем нажмите «Создать».

- Теперь используйте ползунок, чтобы установить размер виртуального жесткого диска в соответствии с вашими предпочтениями. Хотя это зависит от того, сколько свободного места на вашем компьютере имеется, мы рекомендуем выделить 100 ГБ для виртуальной машины. Выберите «VMDK (диск виртуальной машины)» в качестве типа файла жесткого диска и нажмите «Создать».

- Теперь нажмите «Настройки» в VirtualBox, как показано на скриншоте ниже.

- Перейдите в категорию «Система» и нажмите «Процессор» в верхнем меню. Вы сможете использовать ползунок для настройки распределения процессора. Рекомендуется выделить для виртуальной машины половину числа ядер вашего процессора. Имейте в виду, что если у вас 4-ядерный / 8-поточный процессор, он будет отображаться в VirtualBox как 8 ядер ЦП. В этом случае вы можете установить 4 ядра для распределения процессора.

- Затем нажмите «Display» на левой панели и переместите ползунок полностью вправо для «Video Memory».

- Теперь перейдите в категорию «Хранилище» и нажмите «Очистить» в разделе «Устройства хранения». Затем щелкните значок оптического диска справа и выберите «Создать виртуальный оптический диск» в раскрывающемся меню.

- Вы можете нажать «Добавить», чтобы найти ISO-файл macOS Big Sur, который вы загрузили с помощью проводника. Выберите файл ISO и нажмите «Выбрать».

- Теперь нажмите «ОК», чтобы выйти из настроек VirtualBox и закрыть приложение VirtualBox.

- Откройте «Командную строку» на вашем ПК. Обязательно запустите командную строку от имени администратора.

- Теперь откройте текстовый файл кода VBox в Блокноте. Скопируйте / вставьте первую командную строку в командную строку и нажмите «Enter».

- Затем вам нужно будет вставить оставшиеся строки, но перед этим вам нужно будет заменить «Имя вашей виртуальной машины» на имя, которое вы использовали при настройке своей машины в VirtualBox. Например, в данном случае это «macOS Big Sur». После его замены скопируйте / вставьте все оставшиеся строки в командной строке и нажмите «Enter».
- Теперь снова откройте VirtualBox и нажмите «Пуск». Подождите пару минут, пока VirtualBox выполнит операцию. Теперь вы должны увидеть прогресс установки macOS в VirtualBox. Это займет несколько минут, но как только это будет сделано, вы можете следовать инструкциям на экране, чтобы настроить свой Mac, что аналогично настройке любого нового устройства Apple.
- Хотя на вашем компьютере установлена и работает macOS, мы еще не закончили. Разрешение по умолчанию для macOS или любой гостевой ОС, которую вы устанавливаете на VirtualBox, составляет 1024 × 768, что, вероятно, не то, что вам нужно. Однако это можно изменить с помощью кода разрешения экрана macOS. Закройте VirtualBox, запустите командную строку от имени администратора и скопируйте / вставьте первую строку из файла кода разрешения экрана. Щелкните «Enter».

- Теперь убедитесь, что вы используете свое имя виртуальной машины и замените значение разрешения во второй строке кода в соответствии с разрешением вашего монитора или личными предпочтениями. Затем скопируйте / вставьте эту строку в командную строку. Нажмите «Enter» и выйдите из CMD.


В следующий раз, когда вы запустите виртуальную машину, VirtualBox загрузит macOS с более высоким разрешением экрана.
Вот проверка на реальность. Не ожидайте, что ваша виртуальная машина macOS будет работать где-либо почти так же быстро, как настоящий Mac или Windows, изначально работающая на компьютере. Ожидается вялый опыт. Производительность виртуальной машины также будет сильно зависеть от оборудования вашей системы.
При этом установка macOS на компьютер с Windows практически намного проще с таким программным обеспечением, как VirtualBox, и может значительно помочь вам решить, хотите ли вы переключиться на Mac. Вы можете подключить свои устройства iOS к своему виртуальному Mac, как настоящий Mac, опробовать различные программы, приложения и многое другое.
Эта процедура в первую очередь ориентирована на macOS Big Sur, но она работает так же и с другими последними выпусками macOS, при условии, что у вас есть файл ISO для этой конкретной версии. Если вы хотите обновить macOS, установленный на вашей виртуальной машине, до последней версии программного обеспечения, вы можете обновить системное программное обеспечение, как обычно на реальном Mac.
Аналогичным образом VirtualBox также можно использовать для виртуальной установки и запуска Windows на Mac. Процесс довольно похож, если у вас есть необходимые файлы, в основном Windows ISO и VirtualBox.
Вы запустили macOS в VirtualBox в Windows? Что вы думаете об этом процессе и о том, как все это работает? Расскажите нам о своем опыте и мыслях в комментариях.
 Хусайни 3 минуты чтения
 Хусайни 3 минуты чтения
В этой статье я собираюсь показать вам, как создать загрузочную флешку macOS Big Sur в Windows. Как вы все знаете, macOS Big Sur — новейшая операционная система для компьютеров Mac. Как и любая операционная система, macOS Big Sur также имеет свои собственные функции и функции, которые каждый хочет попробовать хотя бы раз. Поэтому напрямую установить macOS Big Sur на компьютер как-то сложно. Но с помощью загрузочного USB вы можете полностью установить macOS Big Sur на свой компьютер Mac.
Если ваша операционная система была повреждена и вы не можете переустановить операционную систему, эта статья поможет вам создать загрузочную систему macOS Big Sur на ПК с Windows. Но все еще есть люди, которые не знают реальной процедуры этого. Для создания загрузочной загрузки macOS Big Sur требуется только файл DMG macOS Big Sur и стороннее программное обеспечение.
Для этой цели я собираюсь показать вам три простых метода, которые наверняка покажут вам процедуру это. Просто следуйте одному из этих методов, и только от вас зависит, какой метод вы выберете.
Оглавление
- Создание загрузочного диска macOS 11 Big Sur USB с UUByte DMG Editor
- Как установить TransMac на Windows
- Открыть администратор TransMac
- Итог
li>
Содержание
- Создайте загрузочную флешку macOS 11 Big Sur с помощью UUByte DMG Editor
- Как установить TransMac на Windows
- Откройте TransMac Administrator
- Итог
Создайте загрузочную флешку macOS 11 Big Sur с помощью UUByte DMG Editor
Шаг 1. Сначала вам необходимо загрузить и установить UUByte DMG Редакторы на вашем ноутбуке или компьютере.
Шаг 2. Затем вам необходимо подключить USB-накопитель или DVD-диск к компьютеру или ноутбуку.
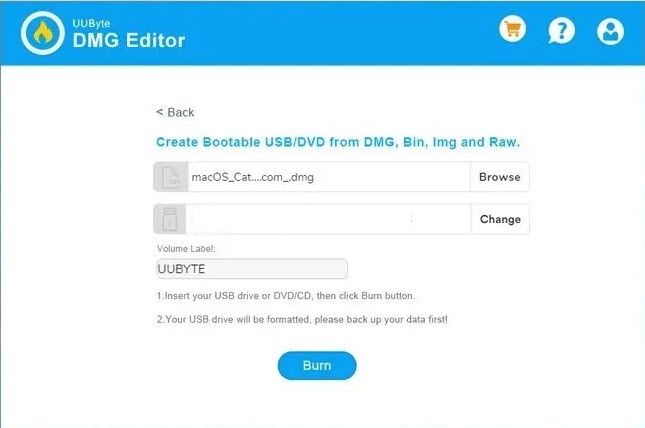
Шаг 3. Теперь откройте приложение после нажмите кнопку Записать
Шаг 4. Выберите файл macOS Big Sur DMG, нажав кнопку Браузер.
< р>Шаг 5. Когда вы выбираете файл macOS Big Sur DMG, затем выберите имя USB или DVD, после чего нажмите Записать
Шаг 6. Затем подождите 10 минут после что ваш загрузочный USB-накопитель готов.
 UUByte DMG Editor
Как установить TransMac на Windows
Шаг 1. Перейдите в папку, в которую вы скачали TransMac.
Шаг 2. Найдя TransMac, дважды щелкните по нему.
Шаг 3. Когда вы дважды щелкнете по нему, вы окажетесь на странице TransMac.
Шаг 4. Теперь я прошу вас прочитать информацию, прежде чем мы продолжим, а затем проверьте I Примите Соглашение после этого нажмите на кнопку Далее.
Шаг 5. На этом этапе мы собираемся установить приложение, выберите место, куда вы хотите установить его, затем нажмите Далее.
Шаг 6. Теперь снова нажмите Далее.
Шаг 7. Наконец, нажмите Установить для установки на вашем ноутбуке или компьютере.
Шаг 8. По завершении установки нажмите Готово.
Откройте TransMac Administrator
После успешной установки TransMac подключите USB-накопитель, который вы собираетесь использовать для загрузочного USB-накопителя macOS 11. После этого откройте приложение TransMac от имени администратора и выполните следующие действия.
Шаг 1. Нажмите правой кнопкой мыши на USB-накопителе в левой части экрана. После этого нажмите Восстановить с помощью образа диска.
Шаг 2. Нажмите ОК.
Шаг 3. Теперь выберите файл macOS 11 Big Sur DMG, нажав Три точки, после чего нажмите ОК.
Шаг 4. Нажмите Да.
Шаг 5. Когда вы нажмете «да», дождитесь загрузки, тогда вам нужно иметь терпимость.
Связанное руководство:
- Как восстановить удаленные файлы в macOS Big Sur
- Как удалить/удалить приложение в macOS Big Sur
- Установите Ubuntu в Windows 10 с помощью VMware Workstation
Итог
Все было о том, как создать загрузочную флешку macOS Big Sur в Windows. Если вы хотите загрузить свою macOS big sur, я буду здесь, чтобы помочь вам. Я надеюсь, что после прочтения этой статьи вы узнаете что-то о macOS big sur bootable. Если вы столкнулись с какой-либо проблемой при выполнении шагов, не стесняйтесь оставлять комментарии в разделе комментариев ниже.
 Хусайни 3 минуты чтения LinkedIn Tumblr Pinterest Reddit ВКонтакте Поделиться по электронной почте Печать
Прежде чем углубляться в «инструкции», вам необходимо загрузить и установить основные инструменты. В руководстве подробно описано, как создавать виртуальные машины macOS с помощью Oracle VirtualBox Manager (VirtualBox) и VMware Workstation Player (VMware Player).
- Загрузите последнюю версию VirtualBox . В этом руководстве используется VirtualBox 6.1.22.
- Загрузите последнюю версию VMware Player . В этом руководстве используется VMware Player 16.
Вам также понадобится копия macOS. Big Sur — последняя версия macOS.
В этом руководстве основное внимание уделяется установке macOS Big Sur на виртуальной машине, работающей на оборудовании Intel, с использованием VirtualBox или VMware Player.
К сожалению, у меня нет доступа к какому-либо оборудованию AMD, поэтому я не могу предоставить руководство.
Однако есть фрагмент кода, который требуется любому, кто использует систему AMD, для загрузки macOS Big Sur с использованием VMware на оборудовании AMD.
Запуск виртуальной машины MacOS Big Sur такой же, как и для версии Intel, но использует немного другой фрагмент кода. Вы можете найти руководство и фрагмент кода в разделе ниже.
Загрузите виртуальный образ macOS Big Sur
Воспользуйтесь приведенными ниже ссылками для загрузки, чтобы загрузить образ MacOS Big Sur для VirtualBox и VMware.
Скачать: образ виртуальной машины macOS Big Sur
Скачать: VMware Player Patch Tool
Как создать виртуальную машину MacOS Big Sur с VirtualBox
Перед созданием виртуальной машины macOS вам необходимо установить VirtualBox Extension Pack. Он включает исправления для поддержки USB 3.0, мыши и клавиатуры, а также другие полезные патчи VirtualBox.
Скачать : VirtualBox Extension Pack для Windows (бесплатно)
Прокрутите вниз, выберите Все поддерживаемые платформы для загрузки, затем дважды кликните, чтобы установить.
1. Создайте виртуальную машину MacOS Big Sur.
Откройте VirtualBox. Выберите New . Введите macOS .
VirtualBox будет определять ОС по мере ввода и по умолчанию будет использовать Mac OS X. Вы можете оставить все как есть.
Что касается имени виртуальной машины, сделайте его чем-нибудь запоминающимся, но легким для ввода. Вам нужно будет ввести это имя в серии команд, и вводить сложное имя несколько раз очень неприятно!
Затем установите объем оперативной памяти, который может использовать виртуальная машина macOS. Я бы посоветовал минимум 4 ГБ, но чем больше вы можете отдать от хост-системы, тем лучше вам будет.
Помните, что вы не можете назначить больше оперативной памяти, чем доступно вашей системе, и вам нужно оставить некоторую память доступной для операционной системы хоста.
Теперь выберите «Создать жесткий диск сейчас» и выберите « Создать» . На следующем экране выберите Virtual Hard Disk , затем установите размер диска как минимум 50 ГБ, но в идеале больше, если вы можете сэкономить место. Для macOS Big Sur требуется не менее 35 ГБ дискового пространства.
2. Измените настройки виртуальной машины macOS Big Sur.
Пока не пытайтесь запускать виртуальную машину MacOS Big Sur. Перед запуском виртуальной машины вам необходимо внести некоторые изменения в настройки. Кликните правой кнопкой мыши виртуальную машину macOS и выберите «Настройки».
- В разделе «Система» удалите дискету из порядка загрузки. Убедитесь, что набор микросхем установлен на ICH9.
- Выберите вкладку «Процессор». Назначьте два процессора. Если у вас есть ЦП с запасом мощности (например, Intel Core i7 или i9 с несколькими дополнительными ядрами), подумайте о назначении большего количества. Однако это не жизненно важно.
- Убедитесь, что установлен флажок Включить PAE / NX .
- В разделе «Дисплей» установите для параметра «Видеопамять» значение 128 МБ.
- Теперь в разделе « Хранилище» выберите чистый диск в разделе «Устройства хранения». Затем выберите значок диска рядом с оптическими приводами. Найдите и выберите образ диска MacOS Big Sur.
- Наконец, перейдите на вкладку USB и выберите USB 3.0, затем нажмите OK.
3. Используйте командную строку для добавления пользовательского кода в VirtualBox.
Еще не время запускать виртуальную машину MacOS Big Sur. В своей текущей конфигурации VirtualBox не работает с образом вашего диска macOS.
Чтобы его запустить и запустить, вам нужно по существу пропатчить VirtualBox, прежде чем виртуальная машина macOS заработает. Для этого вам нужно ввести код с помощью командной строки. Все подробности ниже.
Начните с закрытия VirtualBox. Команды не будут выполняться должным образом, если VirtualBox или любой из связанных с ним процессов запущен.
После закрытия нажмите клавиши Win + X, затем выберите в меню Командная строка (администратор). Если в вашем меню отображается только параметр PowerShell, введите команду в строку поиска меню «Пуск». Затем кликните правой кнопкой мыши «Лучшее совпадение» и выберите «Запуск от имени администратора». Используйте следующую команду, чтобы найти каталог Oracle VirtualBox:
cd "C:Program FilesOracleVirtualBox"Теперь введите следующие команды одну за другой. Настройте команду в соответствии с именем вашей виртуальной машины. Например, моя виртуальная машина называется macOS Big Sur.
Вот команды:
VBoxManage.exe modifyvm "macOS Big Sur" --cpuidset 00000001 000106e5 00100800 0098e3fd bfebfbff
VBoxManage setextradata "macOS Big Sur" "VBoxInternal/Devices/efi/0/Config/DmiSystemProduct" "iMac19,1"
VBoxManage setextradata "macOS Big Sur" "VBoxInternal/Devices/efi/0/Config/DmiSystemVersion" "1.0"
VBoxManage setextradata "macOS Big Sur" "VBoxInternal/Devices/efi/0/Config/DmiBoardProduct" "Mac-AA95B1DDAB278B95"
VBoxManage setextradata "macOS Big Sur" "VBoxInternal/Devices/smc/0/Config/DeviceKey" "ourhardworkbythesewordsguardedpleasedontsteal(c)AppleComputerInc"
VBoxManage setextradata "macOS Big Sur" "VBoxInternal/Devices/smc/0/Config/GetKeyFromRealSMC" 1
После выполнения команд и предположения, что вы не обнаружили ошибок, закройте командную строку.
4. Загрузите виртуальную машину macOS Big Sur.
Снова откройте VirtualBox. Дважды кликните виртуальную машину macOS, чтобы запустить ее. Вы увидите длинный текстовый поток, за которым следует логотип Apple. На следующем экране выберите нужный язык, затем «Продолжить».
- Затем выберите Дисковую утилиту. Вы создаете чистый диск для установки macOS Big Sur.
- В Дисковой утилите выберите VBOX HARDDISK MEDIA в столбце Внутренний диск.
- После выбора диска перейдите к опции «Стереть» в верхней части утилиты.
- Дайте вашему диску имя, установите Формат на Mac OS Extended (с журналом), а схему — на карту разделов GUID.
- Выберите Стереть.
- После завершения вы можете выйти из Дисковой утилиты и вернуться к экрану восстановления Big Sur. Отсюда вы должны выбрать Установить macOS Big Sur.
- Выберите диск, который вы создали в Дисковой утилите, а затем нажмите «Продолжить».
Теперь установка говорит, что это займет несколько минут. Однако, по моему опыту, это было неправильно. Первоначальный этап установки занял около 15 минут, но затем вы попадаете на второй экран установки после перезапуска виртуальной машины macOS Big Sur.
Начальное время установки на этом экране начинается примерно с 29 минут. Однако, как только он достигнет Менее минуты, и у вас появится надежда — не надо.
Для завершения установки с этого момента потребовался еще час, но я также читал отчеты о людях, ожидающих более трех часов. Хуже того, невозможно определить, идет ли установка, вы просто зря теряете время.
Если у вас есть время, оставьте его на несколько часов, и, надеюсь, когда вы вернетесь, вы увидите приветственную страницу macOS Big Sur.
После завершения настройки macOS сделайте снимок в VirtualBox. Отправляйтесь машины -> Сделать снимок, дайте снимоку имя, и ждите его в процессе. Если что-то сломается или виртуальная машина Big Sur повредится, вы можете вернуться к моментальному снимку, чтобы восстановить ранее исправную установку.
Как создать виртуальную машину MacOS Big Sur с помощью VMware Workstation Player
Предпочитаете VMware VirtualBox? Вы можете создать виртуальную машину MacOS Big Sur с помощью VMware, которая работает точно так же, как VirtualBox. И, как и в случае с VirtualBox, VMware также требует установки исправлений, прежде чем виртуальная машина MacOS Big Sur заработает.
Эта часть руководства подходит для систем Intel и AMD. Пользователи AMD должны использовать второй фрагмент кода при редактировании файла VMX виртуальной машины. Прочтите руководство, чтобы понять, что именно это означает.
1. Патч VMware Workstation Player.
- В разделе «Загрузить виртуальный образ macOS Big Sur» находится средство исправления VMware Player. Прежде чем приступить к дальнейшим действиям, загрузите средство исправления.
- Перейдите в папку, в которую вы скачали средство исправления. Распакуйте содержимое архива. Этот процесс лучше всего работает, когда папки находятся на одном диске (например, корневая папка VMware и извлеченный архив находятся на диске C: ).
- Убедитесь, что VMware полностью закрыта. В папке Unlocker кликните правой кнопкой мыши командный сценарий win-install и выберите «Запуск от имени администратора». Сценарий откроет окно командной строки, и запустится сценарий исправления.
Обрати внимание. Сценарий пролетает незаметно, и вам нужно следить за любыми сообщениями «Файл не найден».
Наиболее частой причиной появления сообщения «файл не найден» или «система не может найти указанный файл» является установка VMware Workstation Player в другом месте, отличном от папки по умолчанию, и выполнение исправления из другого каталога.
По завершении установки патча вы можете открыть VMware.
2. Создайте виртуальную машину MacOS Big Sur с помощью VMware.
- Выберите «Создать новую виртуальную машину». Выберите «Я установлю операционную систему позже».
- Теперь выберите Apple Mac OS X и измените версию на macOS 10.16. Если вы не видите параметры macOS, значит, патч установился неправильно.
- Затем вам нужно выбрать имя для вашей виртуальной машины MacOS Big Sur. Выберите что-нибудь, что легко запомнить, затем скопируйте путь к файлу в удобное место — оно вам понадобится, чтобы мгновенно внести некоторые изменения.
- На следующем экране установите размер диска 50 ГБ или больше и выберите «Сохранить виртуальный диск как один файл». Завершите работу мастера создания виртуального диска, но пока не запускайте виртуальную машину.
3. Измените настройки виртуальной машины macOS Big Sur.
Прежде чем вы сможете загрузить виртуальную машину, вы должны отредактировать спецификацию оборудования.
- На главном экране VMware выберите виртуальную машину macOS Big Sur, затем кликните правой кнопкой мыши и выберите «Настройки».
- Увеличьте объем памяти виртуальной машины как минимум до 4 ГБ. Вы можете выделить больше, если у вас есть свободная оперативная память.
- В разделе «Процессоры» измените количество доступных ядер на 2 (или больше, если доступно).
- Теперь выберите Новый CD / DVD (SATA) —> Использовать файл образа ISO. Перейдите к ISO-файлу macOS Big Sur и выберите его.
- Закройте окно «Оборудование» и выберите «Готово».
Однако пока не запускайте виртуальную машину VMware Workstation Player macOS Big Sur. Осталось внести некоторые изменения в файлы конфигурации.
4. Отредактируйте файл MacOS Big Sur VMX для оборудования Intel.
Этот раздел предназначен для пользователей Intel и включает в себя последний набор изменений, которые необходимо внести перед включением виртуальной машины VMware macOS Big Sur!
Закройте VMware. Перейдите в место, где вы сохранили виртуальную машину MacOS. Местоположение по умолчанию:
C:UsersYOURNAMEDocumentsVirtual MachinesYOUR MAC OS X FOLDERПерейдите к macOS Big Sur.vmx, кликните правой кнопкой мыши и выберите Открыть с помощью -> Блокнот (или любой другой текстовый редактор). Прокрутите файл конфигурации до конца и добавьте следующую строку:
smbios.reflectHost = "TRUE"
hw.model = "MacBookPro14,3"
board-id = "Mac-551B86E5744E2388"
smc.version = "0"
Сохранить, затем выйти.
Теперь вы можете открыть VMware, выбрать виртуальную машину MacOS Big Sur и запустить ее!
5. Отредактируйте файл MacOS Big Sur VMX для оборудования AMD.
Этот раздел предназначен для пользователей AMD . Как и в предыдущем разделе, пользователи AMD также должны отредактировать файл VMX, прежде чем продолжить. Редактирование AMD включает на несколько строк больше, чем версия Intel, но вы можете скопировать и вставить данные в файл.
Закройте VMware. Перейдите в место, где вы сохранили виртуальную машину MacOS. Местоположение по умолчанию:
C:UsersYOURNAMEDocumentsVirtual MachinesYOUR MAC OS X FOLDERПерейдите к macOS Big Sur.vmx, кликните правой кнопкой мыши и выберите Открыть с помощью -> Блокнот (или любой другой текстовый редактор). Прокрутите файл конфигурации до конца и добавьте следующие строки:
smc.version = “0”
cpuid.0.eax = “0000:0000:0000:0000:0000:0000:0000:1011”
cpuid.0.ebx = “0111:0101:0110:1110:0110:0101:0100:0111”
cpuid.0.ecx = “0110:1100:0110:0101:0111:0100:0110:1110”
cpuid.0.edx = “0100:1001:0110:0101:0110:1110:0110:1001”
cpuid.1.eax = “0000:0000:0000:0001:0000:0110:0111:0001”
cpuid.1.ebx = “0000:0010:0000:0001:0000:1000:0000:0000”
cpuid.1.ecx = “1000:0010:1001:1000:0010:0010:0000:0011”
cpuid.1.edx = “0000:0111:1000:1011:1111:1011:1111:1111”
smbios.reflectHost = “TRUE”
hw.model = “MacBookPro14,3”
board-id = “Mac-551B86E5744E2388”Сохранить, затем выйти.
Теперь вы можете открыть VMware, выбрать виртуальную машину MacOS Big Sur и запустить ее!
6. Настройте и установите виртуальную машину MacOS Big Sur.
После запуска виртуальной машины MacOS Big Sur вам нужно будет настроить накопитель перед установкой.
- Затем выберите Дисковую утилиту. Вы создаете чистый диск для установки macOS Big Sur.
- В Дисковой утилите выберите VMware Virtual SATA Hard Drive Media в столбце Внутренний диск.
- После выбора диска перейдите к опции «Стереть» в верхней части утилиты.
- Дайте вашему диску имя, установите формат на APFS и схему на карту разделов GUID.
- Выберите Стереть.
- После завершения вы можете выйти из Дисковой утилиты и вернуться к экрану восстановления Big Sur. Отсюда вы должны выбрать Установить macOS Big Sur.
- Выберите диск, который вы создали в Дисковой утилите, а затем нажмите «Продолжить».
Процесс установки занимает некоторое время, но он быстрее, чем VirtualBox. После загрузки macOS Big Sur вы можете настроить операционную систему по своему усмотрению.
7. Установите VMware Tools на виртуальную машину MacOS Big Sur.
Теперь вам нужно установить VMware Tools, который представляет собой набор утилит и расширений, которые улучшают работу с мышью, производительность видео и другие полезные вещи.
Запустив виртуальную машину macOS, перейдите в Player -> Manage -> Install VMware Tools.
Установочный диск появится на рабочем столе macOS. Когда появится этот параметр, выберите «Установить VMware Tools», а затем разрешите ему доступ к съемному тому. Следуйте инструкциям установщика, который потребует перезапуска по завершении.
Поиск проблемы
При установке виртуальной машины macOS на VMware Player Workstation может произойти несколько ошибок.
- Если вы не видите «Apple Mac OS X» во время мастера создания виртуальной машины, вам необходимо повторно посетить процесс исправления. Убедитесь, что все процессы, связанные с VMware Player, отключены.
- Если при запуске виртуальной машины вы получаете сообщение «Mac OS X не поддерживается с двоичной трансляцией», есть большая вероятность, что вам нужно активировать виртуализацию в конфигурации BIOS / UEFI.
- Если вы получаете сообщение «Неустранимая ошибка VMware Player: (vcpu-0)» при запуске виртуальной машины, вам необходимо вернуться к файлу конфигурации macOS Big Sur.vmx, чтобы убедиться, что вы добавили дополнительную строку и сохранили правку.
- Если вы используете оборудование AMD и застряли на логотипе Apple, сначала выключите виртуальную машину. Теперь зайдите в Настройки -> Параметры -> Общие. Измените гостевую операционную систему на Microsoft Windows и версию на Windows 10 x64. Нажмите ОК, затем попробуйте снова включить виртуальную машину. После прохождения логотипа Apple выключите виртуальную машину, затем снова установите для параметра гостевой операционной системы значение Apple Mac OS X, выбрав правильную версию.
Виртуальные машины macOS для оборудования AMD
Apple использует оборудование Intel для питания настольных компьютеров и ноутбуков. Настроить виртуальную машину macOS с использованием оборудования Intel проще, поскольку спецификации оборудования очень похожи.
С AMD все наоборот. Поскольку Apple не разрабатывает macOS на оборудовании AMD, создание виртуальной машины macOS в системе AMD сложнее. Однако вы можете посмотреть следующий видеоурок, чтобы узнать, как установить macOS Big Sur на виртуальную машину VMware с использованием оборудования AMD.
Установка виртуальной машины macOS Big Sur завершена
У вас есть два варианта выбора виртуальной машины macOS Big Sur. Оба варианта отлично подходят, если вы хотите попробовать macOS, прежде чем переходить с Windows, и насладиться одними из лучших предлагаемых приложений Apple.
На чтение 7 мин Просмотров 3к. Обновлено 29.04.2021
Установить последнюю версию macOS на компьютер с Windows всегда интересно. Хорошо то, что нам не нужно беспокоить существующую ОС хоста или изменять загрузчик, чтобы иметь другую ОС. Мы будем использовать технологию виртуализации, чтобы использовать существующее оборудование для размещения другой ОС. В этом посте я расскажу о предустановленном образе VMware последней версии macOS 11.0 Big Sur (который сейчас находится на стадии бета-тестирования) и о том, как использовать его на вашем компьютере с Windows.
Big Sur 11.0 — это значительный скачок по сравнению с их именной серией. Все их более ранние ОС, выпущенные еще в 2000 году, начинаются с серии 10.x, а с этим выпуском она переходит на 11.x. Что нового в этой версии, вы можете узнать на официальном сайте. Надеюсь, окончательная версия будет доступна для публики к концу 2020 года. А пока у нас есть возможность поиграть с бета-версиями. Поскольку бета-версии не всегда стабильны для установки на ваш физический компьютер Mac, всегда лучше попробовать виртуальную машину.
Пользовательский интерфейс претерпел огромные изменения, и вы будете впечатлены с первого взгляда. К счастью, при правильной работе инструментов VMware работа с графикой внутри виртуальной машины на этом образе на компьютере с Windows приятна.
Содержание
- Системные требования для запуска Big Sur на VMware
- Зачем использовать предустановленный образ Big Sur macOS 11.0
- Шаги по загрузке и использованию предустановленного образа VMware для macOS 11.0 Big Sur VMware
- Подробные шаги
- Дополнительная настройка и перекрестная проверка
- Заключение
Системные требования для запуска Big Sur на VMware
Этот предустановленный образ VMware создан с 4 ГБ ОЗУ, но у вас есть возможность настроить его перед включением. Если на вашем физическом компьютере достаточно аппаратных ресурсов, выделите его в соответствии со следующей конфигурацией.
- 4 ядра процессора
- 8 ГБ ОЗУ (минимум 4 ГБ)
- Храните файлы виртуальной машины на SSD-диске
- Рабочая станция VMware / проигрыватель VM
- Настольный компьютер или ноутбук с поддержкой VT
- Разблокировка VMware
Зачем использовать предустановленный образ Big Sur macOS 11.0
Установка macOS на оборудование сторонних производителей — непростая задача. У вас должен быть рабочий компьютер Mac, чтобы загрузить операционную систему из Apple App Store. После загрузки необходимо выполнить несколько сложных шагов, чтобы сделать эти файлы DMG Apple загрузочными на обычной платформе X86, включая VMware. Нам нужно создать загрузочный ISO-файл с компьютера Mac. Это может быть не для всех пользователей.
После этого в конфигурации виртуальной машины VMware необходимо выполнить дополнительные настройки и настройки, чтобы загрузить файл ISO в VMware для продолжения установки. После нескольких минут ожидания установки следует установить инструменты VMware.
В целом это длительная процедура. Более чем трудоемкая работа, она может быть недоступна для всех, если у вас нет физического компьютера Apple или уже работающей виртуальной машины MacOS.
Чтобы решить все эти проблемы и сэкономить время, вы можете просто использовать предустановленный образ для загрузки, импорта в VMware Workstation или Player и использовать его на своем компьютере с Windows.
Шаги по загрузке и использованию предустановленного образа VMware для macOS 11.0 Big Sur VMware
Вот краткое описание шагов, которые мы будем делать, чтобы установить macOS 11.0 Big Sur в ОС Windows с помощью предварительно установленного файла VMware VMDK.
- Загрузите предустановленный образ VMware Sysprobs и извлеките его.
- Обновляйте свою рабочую станцию или проигрыватель VMware.
- Разблокируйте VMware
- Импортируйте файл VMware VMX из извлеченного места и используйте виртуальную машину macOS 11.0. Наслаждаться!
Подробные шаги
1) Загрузите предустановленный образ VMware ниже. Это торрент-файл, правильно созданный мной. Пожалуйста, подождите некоторое время после загрузки. Это около 17 ГБ в формате 7z.
Этот файл содержит файл диска Big Sur VMDK и файл конфигурации.
2) Извлеките предустановленный образ с помощью 7-Zip или Win RAR. На выходе будет около 23 ГБ. Эта виртуальная машина настроена на 100 ГБ дискового пространства. Итак, убедитесь, что у вас достаточно свободного места в том месте, где вы распаковываете.

3) Убедитесь, что у вас установлена последняя версия рабочей станции или плеера VMware.
4) Разблокируйте рабочую станцию VMware для поддержки macOS в качестве гостевой ОС.
Это очень важный шаг. Apple не поддерживает виртуализацию своей ОС на оборудовании стороннего производителя (но это можно сделать на устройствах Apple). С помощью этого средства разблокировки мы заставляем рабочую станцию VMware поддерживать виртуальную машину macOS.
Загрузите последнюю версию Unlocker со страницы разработчика здесь.
Прочтите наше руководство о том, как использовать средство разблокировки VMware в Windows 10.
После успешной разблокировки при попытке создать новую виртуальную машину вам будет предоставлен следующий вариант. Это только для подтверждения. В этом случае не создавайте новую виртуальную машину.

5) Теперь откройте файл VMX из извлеченного места. Это откроет настройки виртуальной машины.

6) Здесь вы можете настроить параметры оборудования в зависимости от мощности вашего физического компьютера. Если вы можете назначить больше ядер процессора и ОЗУ, это значительно повысит производительность виртуальной машины. Я доволен своим 4 ГБ и 4-ядерным процессором.

7) Мощность ВМ сейчас.
Вы можете получить сообщение ниже, поскольку эта виртуальная машина создана из другого местоположения компьютера. Нажмите на опцию «Я скопировал».

 Виртуальная машина MacOS 11.0 Big Sur запросит пароль для входа в систему. У этого предустановленного образа имя учетной записи «Sysprobs» и пароль «sysprobs123».

9) Вы должны без проблем приземлиться на рабочий стол.

10) Я настоятельно рекомендую сделать снимок, прежде чем переходить к каким-либо дополнительным действиям.
Эта сборка ОС устанавливается из ванильного ядра на новую виртуальную машину. Он не обновляется и не перезаписывается из других более старых операционных систем. Следовательно, его можно обновить до будущих выпусков из App Store без каких-либо изменений или настроек.

Дополнительная настройка и перекрестная проверка
Мало что можно настроить, чтобы сделать эту виртуальную машину полезной.
a) Network
Сеть заработала из коробки. По умолчанию он был настроен в режиме NAT. Если у вас есть доступ в Интернет на главном компьютере, виртуальная машина будет подключаться к гостевой виртуальной машине.

б) Общая папка VMware между Big Sur и Windows 10
Если вам нужно передать данные между виртуальной машиной macOS 11 Big Sur и хостом Windows 10, настройка общей папки VMware — идеальный способ. Вместо создания общих сетевых ресурсов или включения совместного использования буфера обмена этот метод может быть легко реализован для эффективной передачи данных.

Заключение
Я надеюсь, что это руководство и предустановленный образ VMware для macOS 11.0 Big Sur будут полезны для тестирования и экспериментов с новейшей ОС от Apple.
Этот метод предназначен только для тестирования и обучения. Хотя производительность виртуальной машины не так уж плоха на компьютере с Windows 10 в качестве гостевой виртуальной машины, настоятельно рекомендуется использовать оборудование Apple для их ОС, чтобы получить максимальные преимущества.
Поскольку Big Sur в настоящее время находится в стадии бета-тестирования, я буду обновлять этот пост и файл VMDK, как только будет доступна окончательная общедоступная версия. Но, как я упоминал ранее, эту сборку можно обновить до любого выпуска от Apple. Следовательно, вы можете бесплатно обновиться до последней бета-версии или финальной версии после создания снимка.
Если вы считаете этот пост полезным, поделитесь и оставьте свои комментарии о проблемах и заметках об успехе, с которыми вы столкнулись при установке, а также о производительности этой виртуальной машины на вашем оборудовании Windows.
In this guide, we will walk you through all the steps to install macOS Big Sur in VirtualBox Windows. We will show you each step with screenshots and have a video to walk you through visually. Because there may be issues with system compatibility with installations like this, check out our forum. The new GEEKrar forum is a great place to post questions or find fixed to frequently occurring issues.
What is macOS Big Sur
macOS Big Sur is the 17th release of the Mac operating system for Macintosh computers and is the successor to macOS Catalina. The OS was officially released to the public on November 12, 2020, and is available for a series of Mac computers and can also be installed virtually, like we are in this guide.
What you need for this installation:
– Windows 10
– 8 GB RAM
– 60 GB of free disk space
– VirtualBox Windows and Expansion Pack (found here)
– macOS Big Sur ISO image file (found here)
– A command file (download here)
Please Note: All image files are created only for educational purposes. Any misuse of any files is not our responsibility.
Step 1 – Creating a Virtual Machine
To begin, we need to install VirtualBox Windows. If you have done already, this article will walk you through the full process. Once VirtualBox is up and running, we want to ensure that you have your command file and Big Sur ISO file handy. We will need them to proceed.
1-a. In the Oracle VM VirtualBox Manager, like the blue ‘New’ icon at the top
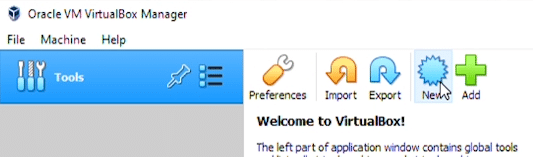
1-b. In the first window, we will be naming and identifying the type of virtual machine we’re creating. In the Name field, type in ‘BigSur.’ Machine Folder field can remain as the default unless you have a reason to change it. The Type will be Mac OS X. Version will be ‘macOS 10.13 High Sierra (64-bit).
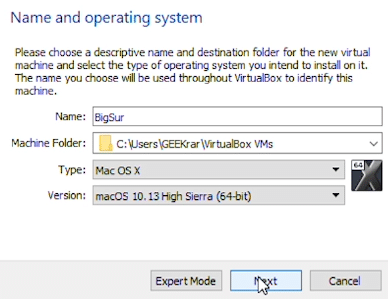
1-c. Under Memory size, we want to increase the available memory to at least 8GB of RAM. Click Next
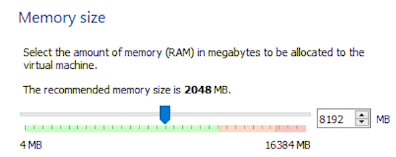
1-d. ‘Hard disk,’ we will leave the default ‘Create a virtual hard disk now’ and click ‘Create.’
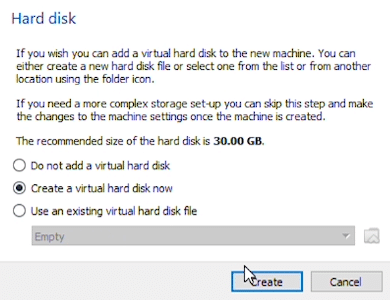
1-e. The ‘hard disk file type’ will also remain with the default VHD (Virtual Hard Disk). Click Next.
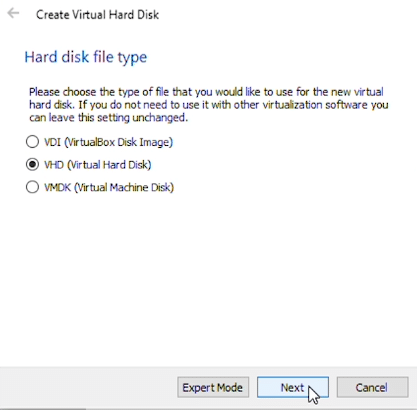
1-f. ‘Storage on physical hard disk’ will be Dynamically allocated.
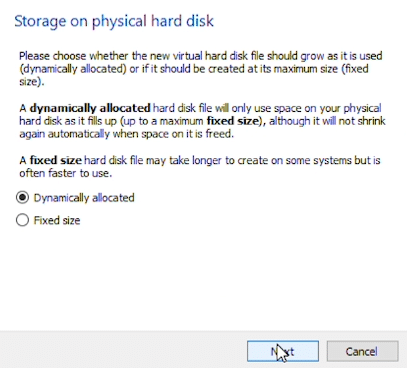
1-g. In ‘File location and size,’ we’re leaving the default folder path, but below in the disk size, we want to increase it to at least 60GB. I have tried 40GB and 50GB with many issues. So 60 or greater is strongly suggested. Once complete, click ‘Create’ and finish the first step.

Step 2 – Modifying VirtualBox with Command File
Now that the new VirtualBox is created, we need to run a few commands to modify it and proceed with running macOS Big Sur. If you haven’t downloaded the command file text, click here to get it.
2-a. Open the text file, go to the ‘Edit’ menu at the top, and then down to ‘Replace…” Here we want to type “VBoxNAME” in the ‘Find what’ field. In the ‘Replace with’ field, type in the name you called the VirtualBox (step2). Click the ‘Replace all’ button, and this should convert all items with the new file name.
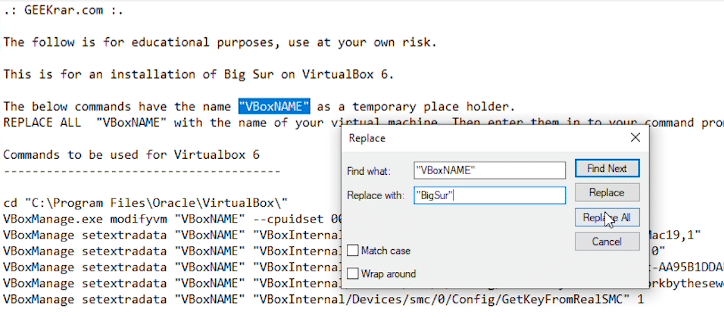
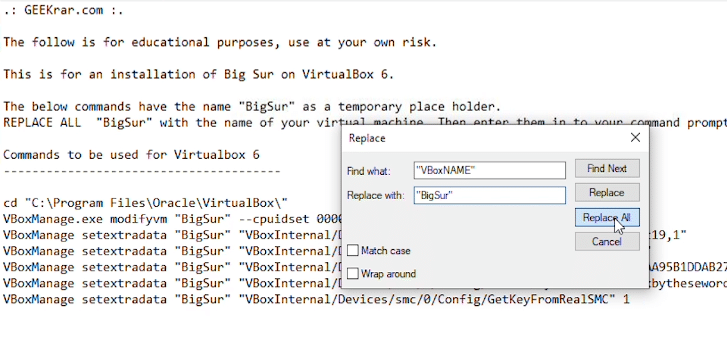
2-b. Now head over the command prompt (Start, type ‘cmd’ hit enter), paste the first line, and hit enter. (run command prompt as administrator)
cd "C:Program FilesOracleVirtualBox"
2-c. This command will shift us to the VirtualBox windows directory, and we will be ready for the next commands.
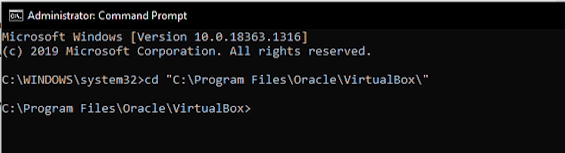
2-d. Before proceeding, verify that you are in the above directory. If you are not there, you must navigate there now before proceeding.
Highlight and copy the next six lines, paste them in the command window, and hit enter.
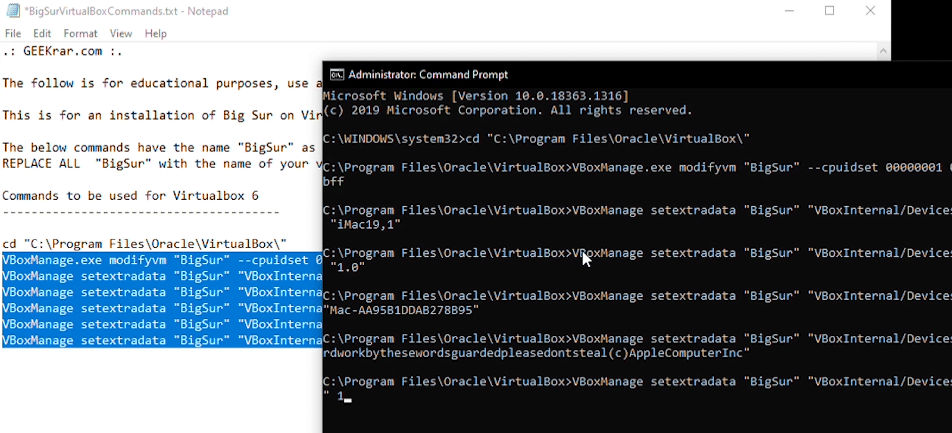
2-e. Once done, we can close out all the windows and start to load macOS Big Sur in VirtualBox Windows.
Step 3 – Setup for install macOS Big Sur in VirtualBox Windows
During this step, we will need to have the macOS Big Sur ISO file available. If you haven’t already downloaded it, click here to get it.
3-a. First, open VirtualBox and select the newly created install macOS Big Sur virtual machine on the left, then click the ‘Start’ button at the top.
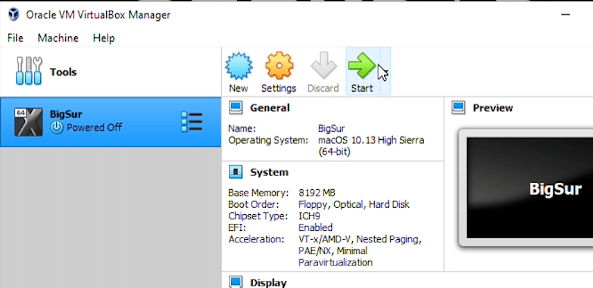
3-b. We will be prompted to ‘Select start-up disk,’ click on the folder icon to the right
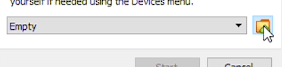
3-c. At the ‘Optical Disk Selector,’ click the ‘Add’ icon, and navigate to the folder where you have the Big Sur ISO file downloaded. Once selected, click on ‘Open’ and back at the window with the Big Sur ISO selected, click on ‘Choose.’
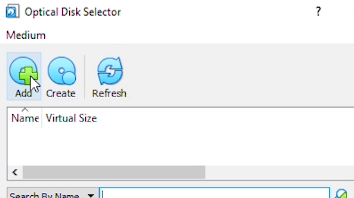
3-d. Back at the ‘Select start-up disk window, we should now have the BigSur ISO populated in the field, and we are ready to click ‘Start.’
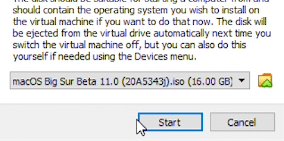
3-e. The macOS Big Sur operating system will begin to load. This step may take a few minutes, but a prompt will pop up to select a language to continue when it’s done.
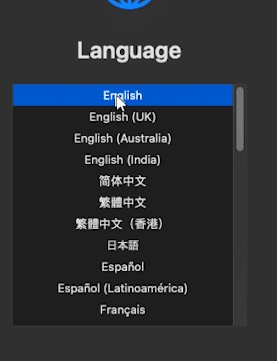
3-f. We now want to prep the drive for installation. We will format the drive to allow macOS Big Sur to be installed. Click on ‘Disk Utility,’ then continue.
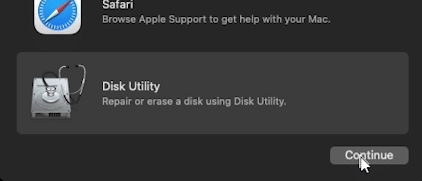
3-g. In the Disk Utility window, select the VBOX HARDDISK option on the left and the ERASE icon at the top.
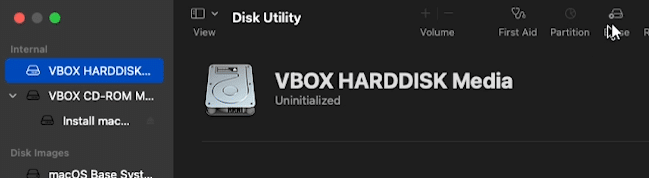
3-h. In the Name field, give the drive a label, leave the other options as default, and click Erase. This will format the drive for macOS. When the formatting is complete, click on ‘Done,’ and you can close out of the Disk Utility window.

3-i. Now we are ready to start installing macOS Big Sur. Click on the option that says ‘Install macOS’ and click on the Continue button.
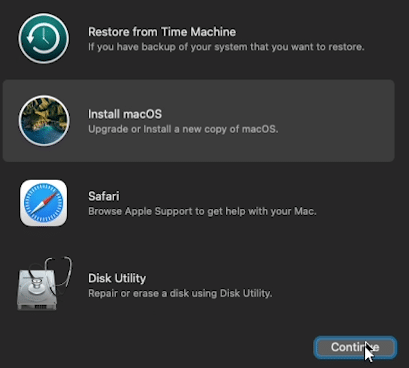
3-j. You will be prompted twice for the terms of the software license agreement. To proceed, click on ‘Agree’ for both.
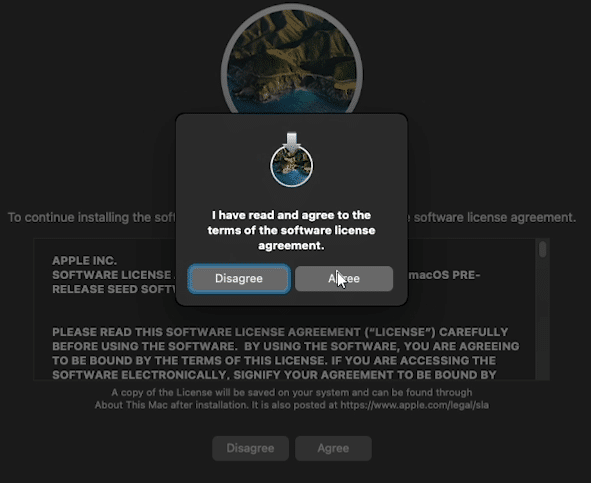
3-k. We will select a drive, which should be the only drive available, and click on Continue.
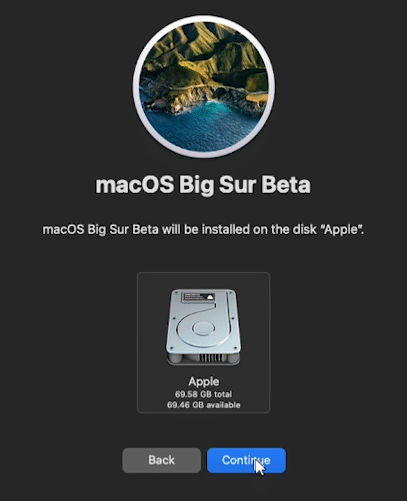
3-l. Now the macOS Big Sur is going to copy over and install. This process will take 15-30m to complete.
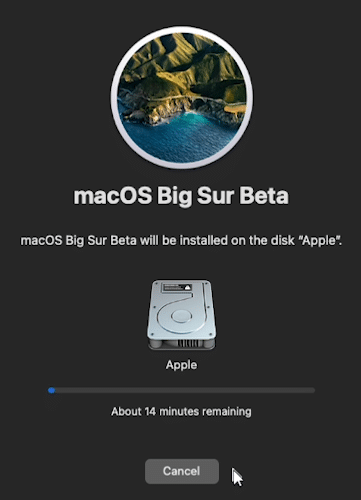
3-m. After the files have been copied over, we need to wrap up the installation with some customization details. Select Your Country or Region will prompt you to select your location, then click Continue.
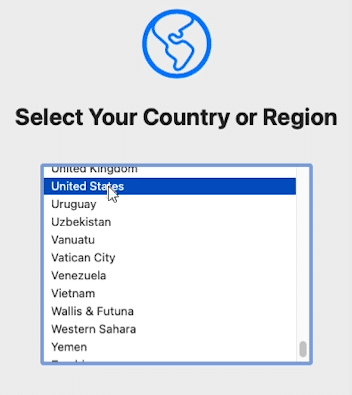
3-n. Under the Written and Spoken Languages, you can leave the default settings. If you want to change these, you can click the customize option at the bottom left, or click on Continue.
3-o. For Accessibility, Data & Privacy, and Migration Assistant options, you can click on Continue.
At the Sign In with Your Apple ID, select the option ‘Set Up Later’ at the bottom left and ‘Skip’ when prompted.
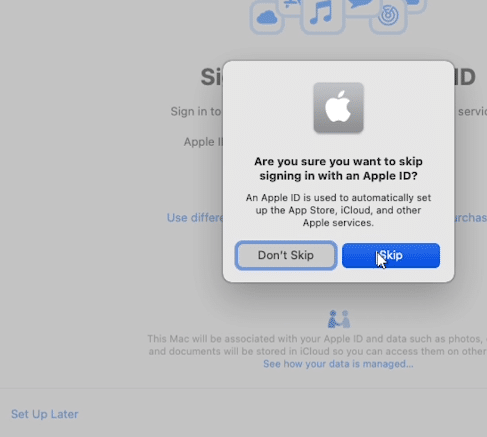
3-p. For Terms and Conditions, you will be prompted twice. Select ‘Agree’ both times to proceed.
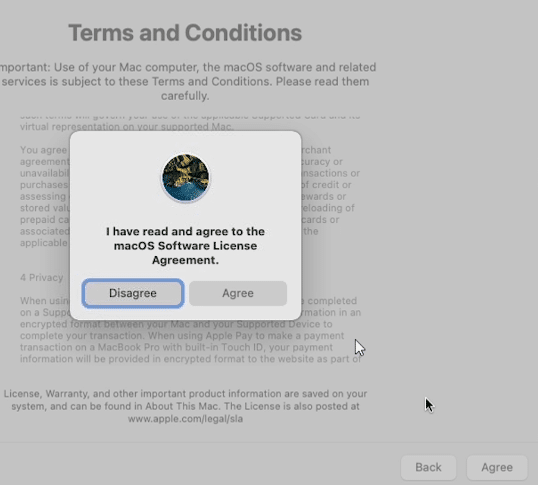
3-q. At the Create a Computer Account window, enter a Name and password for your user profile and click on Continue.
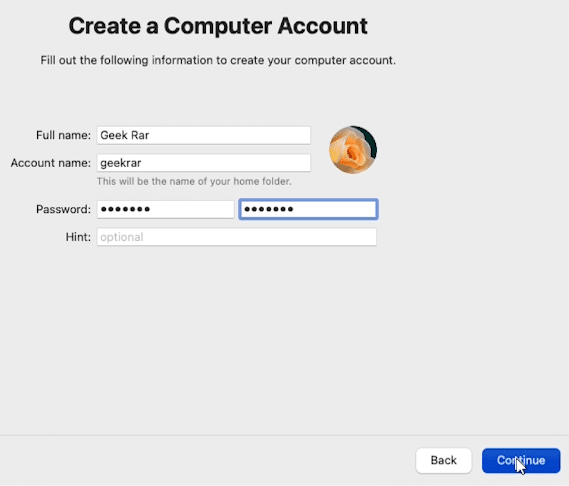
3-r. Next, for Express Setup, Analytics, and Screen Time, we can click Continue. Your virtual machine will complete its setup and reboot. After starting, a login screen will appear—type in the password you have assigned when creating the user profile.
3-s. Lastly, a prompt for a Feedback Assistant will appear. You can either continue with it or close it out.
Now, you will see the macOS Big Sur desktop for the first time. The installation is complete! You can begin using the desktop and install any applications you’d like.
Any questions? Check out our forum some posted fixes and documentation