На чтение 7 мин Просмотров 10.4к. Опубликовано 01.12.2020
Содержание
- Как установить и настроить принтер Canon i-SENSYS MF3010 самостоятельно
- Подключение МФУ
- Установка драйвера
- Инструкция по установке принтера без диска
- Настройка МФУ
- Практическое использование МФУ
Если вы являетесь счастливым обладателем принтера Canon i-SENSYS MF3010, вам следует побеспокоиться о его правильном подключении к ПК, а также о корректной установке соответствующих драйверов. Без совершения таких манипуляций, к сожалению, ваше МФУ не сможет вас порадовать качественной работой.
Как установить и настроить принтер Canon i-SENSYS MF3010 самостоятельно
Хорошо, когда приобретает Canon i-SENSYS MF3010 опытный пользователь. Ему будет совершенно несложно самостоятельно разобраться во всех нюансах, которые возникают при работе с многофункциональными устройствами. Иное дело, когда установить принтер Canon i-SENSYS MF3010 необходимо новичку, не ориентирующемуся ни в одном техническом вопросе, связанном с таким устройством.
Рекомендуем таким новичкам тщательно ознакомиться с инструкцией, которая обязательно имеется в комплекте, если Canon i-SENSYS MF3010 приобретается в торговом заведении.
Если же вам предложили приобрести МФУ с рук по заманчивой стоимости, не тревожьтесь, если после приобретения вы не обнаружили такого важного для вас руководства пользователя. Мы поможем вам сориентироваться в действиях, связанных с установкой и настройкой МФУ, после которых принтер сможет вас порадовать качественной работой.
Подключение МФУ
Если вы приобрели МФУ Canon i-SENSYS MF3010, для его корректной работы важно выполнить изначально два основных требования:
- корректно установить драйверы;
- установить заправленный картридж.
Игнорировать установку драйвера для МФУ нельзя, поскольку драйвер представляет собой специальную программу, которая позволяет управлять устройством, отправлять задания на печать. Соответственно, каждый принтер сопровождается своим конкретным драйвером. В противном случае, устанавливая неподходящий драйвер, невозможно будет обеспечить связь компьютера с принтером.

Установка драйвера
Итак, понимая, что драйвер является наиважнейшим инструментом, позволяющим обеспечить уверенную связь ПК с МФУ, перво-наперво после приобретения устройства пользователь должен установить эту специальную программу.
Чаще всего драйвер имеется в комплекте, поэтому достаточно пересмотреть содержание упаковки, найти в ней хранящийся диск. В очень редких случаях принтер может реализовываться в торговых заведениях без такого диска. Однако в этих случаях производитель не забывает о своих клиентах, он выставляет на своём официальном сайте соответствующие драйверы. А также драйверы можно найти и скачать и из других источников в интернете.
Перед непосредственной закачкой инсталляционных файлов рекомендуется возобновить в своей памяти информацию относительно того, какая операционная система установлена на ПК. В момент выбора будут предложены пользователям несколько вариантов архивов для скачивания, подходящих:
- для Windows 7 или Windows 8;
- 32 или 64-битной системы.
При посещении некоторых ресурсов вам будет всего лишь достаточно ввести модель принтера, а встроенные плагины автоматически определят вашу операционную систему и её разрядность. После этого сразу же предложат вам файл для закачки.
Чаще всего драйверы скачиваются в архиве, поэтому перед их дальнейшим использованием, сначала разархивируйте архив.
Теперь отсоедините свой принтер от компьютера, зайдите в папку, в которую вы разархивировали драйвер. В этой папке вы найдёте файл Setup с расширением .exe. Именно по этому файлу кликните двойным щелчком, чтобы активировать его и запустить процесс установки. Теперь на экране возникнет окно мастера установки. Собственно говоря, следует подчиниться рекомендациям этого мастера, выполнять всё, что он просит и нажимать кнопку «Далее».
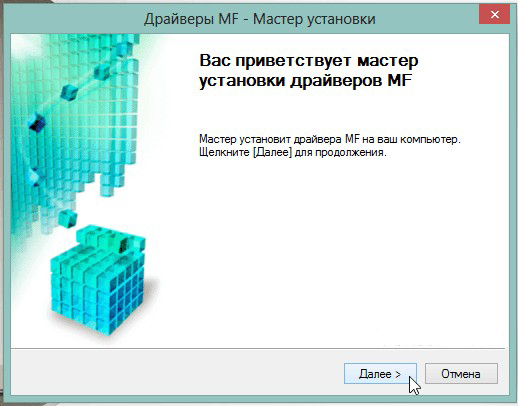
Когда мастер приблизится к завершающему этапу установки, он обязательно укажет пользователю на подключение вашего устройства к ПК. Подсоедините принтер к компьютеру при помощи USB-кабеля. На этом установка драйверов завершается, соответственно, принтер будет готов к выполнению задач.
Иногда может потребоваться перезагрузка операционной системы, чтобы все изменения вступили в силу. Если такое требование поступило, не ленитесь, перезагрузите свой компьютер.
Инструкция по установке принтера без диска
Если отсутствует в комплекте диск с драйверами для МФУ Canon i-SENSYS MF3010, новички не знают, как установить принтер, поэтому начинают теряться в догадках. На самом деле, принтер можно установить даже при отсутствии драйверов, при этом не нужно предварительно проводить поиск и заранее их скачивать.
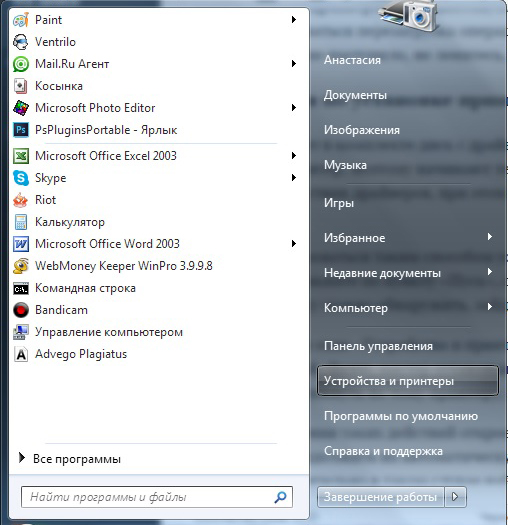
Чтобы воспользоваться таким способом установки МФУ, первоначально подключите принтер к компьютеру. После этого кликните по пункту «Пуск», с правой стороны вы обнаружите строку «Устройства и принтеры». Такую же строку можно обнаружить, зайдя в «Панель управления».
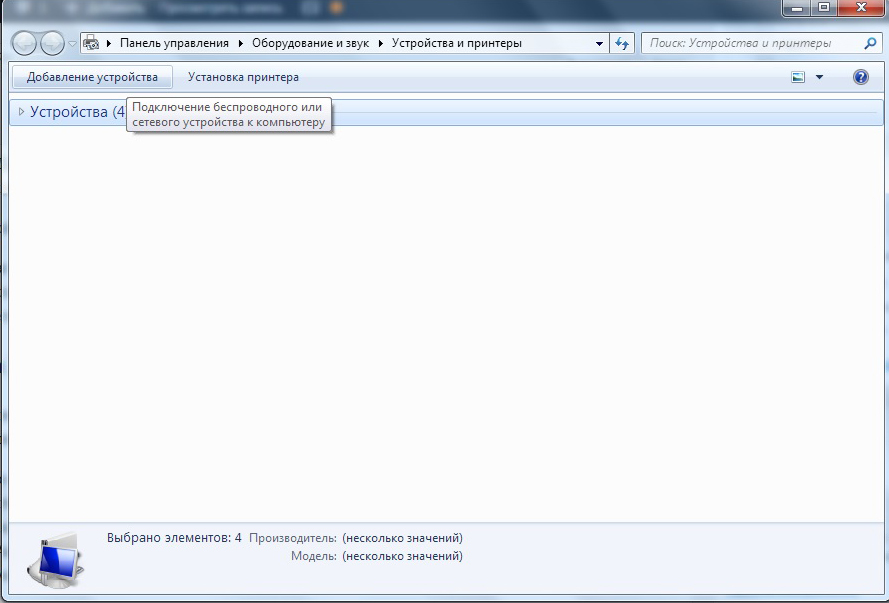
В открывшемся окне «Устройства и принтеры», вы легко обнаружите кнопку «Добавление устройства», кликните по ней. Далее, мастер установки определит все принтеры, которые он готов будет подключить. Вам остаётся кликнуть по тому принтеру, который вы в настоящий момент стремитесь подключить.
После выполнения таких действий откроется новое окно, в котором будет предложено установить драйверы с диска или продолжить их автоматическую установку. Конечно же, вы должны нажать на кнопку «Далее», мастер самостоятельно в таком случае найдёт нужные драйверы и осуществит их инсталляцию.
Настройка МФУ
После успешной инсталляции драйверов ваш принтер готов к работе. Теперь можно на нём осуществлять печать, сканирование, создавать копии. Если у вас пока что отсутствует практический опыт работы с МФУ, вы ещё не умеете сканировать, тогда вам полезно ознакомиться с инструкцией Canon i-SENSYS MF3010, указывающей, как сканировать любые документы.
Акцентируем внимание на том, какие изменения в настройки можно вносить, чтобы обеспечить максимальный результат.
Практическое использование МФУ
После того как ваш принтер будет готов к работе, можно осуществить печать пробной страницы. А также можно вывести на печать любой созданный вами ранее документ. Правильно настроенный принтер безукоризненно выполнит все обозначенные вами задачи.
Вы также можете не сразу отправлять документ на печать, а первоначально зайти в «Свойства» устройства. В этом окне вы можете изменить заводские настройки, сориентировать МФУ на выполнение действий, которые вам важны в конкретный момент:
- печать нескольких копий одновременно;
- печать не всего документа, а отдельного фрагмента или определённых страниц;
- выбор определённого формата листа;
- выбор иной ориентации страницы;
- выставление различного уровня качества печати.
Если печатать всё-таки умеет большинство пользователей, то сканировать ранее приходилось не всем. По этой причине изначально при возникновении необходимости осуществить сканирование документов у некоторых пользователей возникает ступор. Они не понимают, как осуществляются такие действия.
На самом деле процесс сканирования несложен, достаточно ознакомиться с нашими рекомендациями или соответствующим разделом руководства для пользователя.
Итак, если для вас важно начать сканировать документы, зайдите в «Пуск», перейдите в уже знакомый пункт меню «Устройства и принтеры». После того как откроется основное окно, вы обнаружите в нём перечисленные принтеры, которые готовы к работе, выберите своё МФУ, кликните по нему один раз, чтобы оно выделилось. Теперь чуть ниже адресной строки вы увидите панель меню с указанием нескольких параметров.
Вам нужно найти параметр «Начать сканирование», кликните по нему, и автоматический процесс запустится. Появится ещё одно окно, в котором вы, как пользователь, можете внести некоторые изменения. Однако такие изменения первоначально, на начальных ознакомительных этапах, вносить не нужно. Нажимайте на кнопку внизу «Сканировать», и устройство выполнит установленные вами перед ним задачи.
Как видите, процесс сканирования тоже несложен. Копировать документы ещё проще, достаточно поместить документ, закрыть верхнюю крышку и нажать на соответствующую кнопку, расположенную на корпусе самого МФУ.
Найти такую кнопку будет просто, поскольку она сопровождается значком, в котором изображены две копии документа, а также ниже этого значка имеется соответствующее название.
Кроме этого, проблема может возникать на фоне вирусного вмешательства. Вирусы часто оставляют после себя негативные следы, в том числе серьёзно повреждают драйверы. В этом случае придётся осуществить повторную установку драйверов, чтобы восстановить нормальное функционирование многофункционального устройства.
Содержание
- canon mf3010 как пользоваться сканером
- Установка и подключение МФУ
- Выполняем сканирование
- Как сканировать документ в Windows 10
- Совместим ли Ваш сканер с Windows 10
- Сканер Windows
- Факсы и сканирование
- Как сканировать через принтер canon (+mf3010)?
- Установка и подключение МФУ
- Выполняем сканирование
- Как включить сканер Canon mf3010: руководство пользователя
- Canon MF3010 – как сканировать документы
- Установка драйвера на сканер Canon MF3010
- Как сканировать на принтере Canon MF3010 – инструкция
- Canon i sensys MF3010 – как сканировать при помощи приложений
- Как настроить сканер Canon MF3010
- Примечание
canon mf3010 как пользоваться сканером
Современные модели принтеров Сanon выполняют несколько функций, в том числе и сканирование документов. В этой статье мы подробно расскажем, как сканировать через принтер canon (+mf3010), а также как установить драйвер устройства.
Установка и подключение МФУ
Все необходимое программное обеспечение для принтера идет с ним в комплекте – в виде диска. Если же вы купили Сanon не в специализированном магазине, а с рук, и установочного диска при нем не оказалось, тогда советуем воспользоваться интернетом – скачать драйвера на официальном сайте компании-производителя или найти их в специальном приложении driverplus.ru. Вам необходимо знать модель принтера и указать вид операционной системы и ее разрядность.
Драйвер помогает вашему компьютеру «видеть» подключенное МФУ, поэтому без него выполнять сканирование не получится. Инструкция по установке драйвера прилагается, и следуя ей вы сможете самостоятельно выполнить установку программы.
После того, как вы установите драйвер, принтер будет готов к работе и выполнению задач по копированию, печати и сканированию документов. Может быть потребуется перезагрузить систему, чтобы внесенные изменения активировались.
Если МФУ отказывается выполнять свои функции, тогда стоит проверить качество подключения устройства к компьютеру. Быть может проблема кроется в отхождении кабеля-USB. Причина также может заключаться в вирусном заражении вашей техники. в этом случае придется выполнить повторную установку драйверов.
Выполняем сканирование
Чтобы отсканировать нужный документ, зайдите в меню «Пуск», дальше «Устройства и принтеры».
В открывшемся окошке вы увидите доступные (подключенные) устройства, из списка выберите нужное МФУ Сanon mf3010 и кликните по нему мышкой. Появится панель с несколькими параметрами.
Здесь вносите необходимые корректировки в настройках – указываете цвет скан-копии, тип файла, разрешение, папку, в которую будет сохранена копия. Находите команду «Сканировать» и запускаете процесс.
В создании этой статьи участвовала наша опытная команда редакторов и исследователей, которые проверили ее на точность и полноту.
Команда контент-менеджеров wikiHow тщательно следит за работой редакторов, чтобы гарантировать соответствие каждой статьи нашим высоким стандартам качества.
Из данной статьи вы узнаете, как сканировать документы на компьютере с помощью многофункционального принтера Canon. Это можно сделать на компьютере с Windows и с Mac OS X.

Данная инструкция на русском языке предназначена для МФУ Canon i-SENSYS MF3010, описывает принцип работы и основные моменты эксплуатации устройства.
Производитель настойчиво рекомендует перед включением МФУ внимательно изучить настоящую инструкцию.
Источник
Как сканировать документ в Windows 10

О тличный способ сохранить конфиденциальные письменные документы, контракты и завещания — хранить их в цифровом виде. В этом руководстве показано, как сканировать документ в Windows 10 без установки сторонних инструментов.
Как правило, Вы можете сканировать документ с помощью программного обеспечения, предоставленного производителями. Принтеры и сканеры обычно поставляются с оптическим диском, содержащим необходимые драйверы и инструменты. Производители также предоставляют свои драйверы и инструменты онлайн, если на Вашем ПК нет оптического привода.
В этом руководстве используются два «родных» инструмента в Windows: Сканер Windows и Факсы и сканирование.
Конечно, всегда по умолчанию используется программное обеспечение Вашего производителя, настроенного для Вашего конкретного сканера. Однако если Вы не хотите, чтобы на Вашем компьютере были установлены инструменты сторонних производителей, Вам следует воспользоваться двумя решениями Microsoft.
Совместим ли Ваш сканер с Windows 10
Прежде чем двигаться дальше, нам нужно сделать пару замечаний. Во-первых, производитель Вашего сканера может предоставить драйверы для Windows 10, но само устройство может не поддерживать платформу.
Например, универсальный принтер Canon PIXMA MG3520 со встроенным сканером. «Рекомендованные» драйверы датируются июлем 2015 года, хотя Canon выпустила новый пакет спустя шесть месяцев. Это все еще трехлетнее программное обеспечение.
Тем не менее, часть сканера этого принтера AIO не будет отображаться в родных инструментах Windows, но будет работать правильно — фактически используя беспроводное соединение — через программное обеспечение Canon.
Если Вы столкнетесь с подобными проблемами, у Вас может быть более старый принтер или сканер, который не полностью совместим с Windows 10. Устройство может также потребовать прямого USB-соединения, если оно используется за пределами сторонних инструментов производителя. Для принтеров AIO Вам может потребоваться настроить его сетевые настройки, чтобы Ваш компьютер с Windows 10 распознавал компонент сканера в дополнение к общему блоку принтера.
Сканер Windows
Этот инструмент представляет собой визуальное обновление для более старой версии программы Факсы и сканирование. Оно обеспечивает большинство тех же функций, в зависимости от Вашего принтера, но не содержит компоненты факса и электронной почты.
Перейдите в магазин приложений Microsoft и установите Сканер Windows (бесплатно) и нажмите синюю кнопку «Получить». После установки на Вашем компьютере нажмите кнопку «Запустить» во всплывающем уведомлении в Windows 10.

Вы также можете получить доступ к новому приложению «Сканер» — из меню «Пуск».

С открытым приложением Ваш сканер должен появиться в списке слева. Вы также увидите опцию «Тип файла» вместе со ссылкой «Больше». Нажмите на эту ссылку для просмотра полного меню приложения Сканер.

С помощью «Цветового режима» Вы можете сканировать документы в полноцветном режиме, в оттенках серого или в черно-белых тонах. Между тем, настройка «Разрешение (DPI)» позволяет переключаться на различные DPI.

Настройка «Тип файла» предоставляет четыре параметра: JPEG, PNG, TIFF и Bitmap. Форматы JPEG и TIFF обычно предлагают высококачественные результаты, хотя файлы TIFF также поддерживают прозрачный фон. Файлы PNG идеально подходят для публикации в Интернете, а файлы BMP представляют собой необработанные, несжатые изображения.
Наконец, вы увидите опцию «Конечная папка». По умолчанию она настроена на «Сканы» и помещает отсканированные документы в папку «Сканы», расположенную в папке «Изображения». Правильный путь:
Нажмите на ссылку «Сканы», и появится «Проводник». Здесь Вы можете создать новую папку или выбрать текущее местоположение и нажать кнопку «Выбор папки».

Когда Вы будете готовы к сканированию, вставьте документ в устройство подачи или поднимите крышку сканера. Для последнего поместите документ на стекло лицевой стороной вниз и закройте крышку.
Вы можете нажать «Просмотр», чтобы протестировать сканирование и при необходимости внести коррективы, прежде чем завершить работу кнопкой «Сканировать».

Факсы и сканирование
Эта программа впервые появилась в Windows Vista. В отличие от более нового приложения Microsoft для сканирования, в этой версии предусмотрены дополнительные параметры, такие как встроенный инструмент для отправки сканирования по электронной почте, поэтому Вам не нужно искать файл через приложение «Почта», браузер или сторонний почтовый клиент.
Вы можете найти программу «Факсы и сканирование», расположенную в папке «Пуск».

После того, как приложение будет открыто, нажмите «Новое сканирование» на панели инструментов.

Во всплывающем окне «Новое сканирование» убедитесь, что в программе установлен сканер по умолчанию. Если нет, нажмите кнопку «Изменить».
Затем выберите профиль сканирования. В качестве опции щелкните выбор «Добавить профиль» в списке, чтобы создать настраиваемый профиль для повторного использования.

Выберите источник Вашего сканера. Здесь может быть только один вариант «Планшетный». Если у Вас есть принтер AIO, в котором есть устройство подачи, Вы можете увидеть две дополнительные опции: «Устройство подачи (сканирование с одной стороны)» и «Устройство подачи (сканирование с обеих сторон)».
Если Ваш принтер или сканер поддерживает устройство подачи, и Вы выбрали эту опцию, Вы увидите настройку для целевого формата бумаги. Нажмите на настройку, и появится длинный список размеров.
Затем выберите свой цветовой формат (Цветное, Оттенки серого или Черно-белый), а затем тип файла (BMP, JPG, PNG или TIF) и разрешение.
Для разрешения по умолчанию установлено значение 200, но Вы можете вручную увеличивать или уменьшать количество точек, в которые принтер помещает каждый дюйм. Как правило, чем Выше число, тем лучше разрешение. Однако, если Вы сканируете некачественный документ, увеличение разрешения не поможет.
Наконец, отрегулируйте яркость и контрастность соответственно.

Когда вы закончите, нажмите кнопку «Просмотр», чтобы увидеть результаты. Если предварительное сканирование выглядит великолепно, нажмите кнопку «Сканировать». Если нет, измените настройки и снова нажмите кнопку «Просмотр» для другого теста. Нажмите кнопку «Сканировать», когда Вы будете удовлетворены настройками.
Источник
Как сканировать через принтер canon (+mf3010)?
Современные модели принтеров Сanon выполняют несколько функций, в том числе и сканирование документов. В этой статье мы подробно расскажем, как сканировать через принтер canon (+mf3010), а также как установить драйвер устройства.
Установка и подключение МФУ
Все необходимое программное обеспечение для принтера идет с ним в комплекте – в виде диска. Если же вы купили Сanon не в специализированном магазине, а с рук, и установочного диска при нем не оказалось, тогда советуем воспользоваться интернетом – скачать драйвера на официальном сайте компании-производителя или найти их в специальном приложении driverplus.ru. Вам необходимо знать модель принтера и указать вид операционной системы и ее разрядность.
Драйвер помогает вашему компьютеру «видеть» подключенное МФУ, поэтому без него выполнять сканирование не получится. Инструкция по установке драйвера прилагается, и следуя ей вы сможете самостоятельно выполнить установку программы.
После того, как вы установите драйвер, принтер будет готов к работе и выполнению задач по копированию, печати и сканированию документов. Может быть потребуется перезагрузить систему, чтобы внесенные изменения активировались.
Если МФУ отказывается выполнять свои функции, тогда стоит проверить качество подключения устройства к компьютеру. Быть может проблема кроется в отхождении кабеля-USB. Причина также может заключаться в вирусном заражении вашей техники. в этом случае придется выполнить повторную установку драйверов.
Выполняем сканирование
Чтобы отсканировать нужный документ, зайдите в меню «Пуск», дальше «Устройства и принтеры».
В открывшемся окошке вы увидите доступные (подключенные) устройства, из списка выберите нужное МФУ Сanon mf3010 и кликните по нему мышкой. Появится панель с несколькими параметрами.
Здесь вносите необходимые корректировки в настройках – указываете цвет скан-копии, тип файла, разрешение, папку, в которую будет сохранена копия. Находите команду «Сканировать» и запускаете процесс.
Источник
Как включить сканер Canon mf3010: руководство пользователя
Многофункциональные принтеры удобны тем, что на них можно не только печатать, но и сканировать. Сегодня отдельно
сканеры уже почти никто и не покупает. МФУ – это далеко не новинка, но многие из старых моделей прижились и по сей
день продаются и приносят пользу своим обладателям. Один из таких долгоиграющих принтеров – это Canon mf3010.
Расходники на Canon всегда пользуются спросом. Если вам требуются оригинальные картриджи Canon, проходите сюда. Здесь вы найдёте всё необходимое для техники
Canon.
Как правило, всё необходимое ПО для принтера идёт с ним вместе на диске. Однако, если устройство было куплено с рук,
или диск куда-то затерялся, то драйверы всегда можно скачать на официальном сайте производителя. Там нужно его
просто подобрать по модели принтера, операционной системе компьютера и её разрядности, и скачать.

Кнопка Scan или «Скан.» есть и на самом устройстве, но она приводит к немедленной распечатке листа, что требуется
далеко не всегда. Особенно, если на дисплее принтера выскакивают ошибки типа Е3 или Е5, неисправности с картриджем.
Отсканировать документ с принтера Canon mf3010 можно даже через Paint. В меню «Файл» среди прочих функций есть пункт
«Со сканера или камеры». Он открывает мастера настройки сканируемого изображения. Можно, например, выбрать цветное
оно будет или чёрно-белое. По нажатию кнопки «Сканировать» изображение появится в рабочей области Paint, где его
можно править и сохранять на компьютер.
Полезными программами для сканирования через принтер Canon mf3010 могут стать PaperScan Free и MF Toolbax.
Источник
Canon MF3010 – как сканировать документы

Многофункциональное устройство Canon MF3010 полностью удовлетворяет требованиям малого офиса. При помощи этого принтера можно скопировать нужные документы, отправить на печать отчеты и отсканировать бумажные носители для их хранения в электронном варианте. Пользователь открыл крышку сканера, положил лист с информацией, закрыл крышку и… И что дальше? Чтобы у вас не возникало вопросов, как сканировать документ на принтере Canon MF3010, командой сервисного центра TonFix был создан данный материал.
Установка драйвера на сканер Canon MF3010
Перед тем, как подключить принтер к ноутбуку или ПК, необходимо установить нужные драйвера. Без них компьютер не видит МФУ, не получится отсканировать документы и будет закрыт ряд других функций копировально-печатной техники. Чаще всего в комплекте поставки предусмотрен диск с необходимым программным обеспечением. При покупке принтера б/у и в ряде других случаев возможна установка МФУ без диска.
При скачивании драйверов из интернета посещайте только официальный сайт Canon. Далее необходимо выполнить несложные действия:

Как сканировать на принтере Canon MF3010 – инструкция
МФУ подключен к компьютеру и все нужные драйверы установлены? Тогда откройте сканер и положите документ на стекло планшета. На MF3010 сканирование выполняется достаточно просто.
1. Зайдите в [ПУСК]. Затем перейдите в раздел [Панель управления]. Выберите категорию [Устройства и принтеры]. Если вы не видите такой надписи, то в правом верхнем углу измените вид просмотра на [Крупные значки].
2. Перед вами откроется список принтеров, к которым установлены драйвера. Кликните правой кнопкой мыши на Canon MF3010, выберите «начать сканирование» из контекстного меню.
Если вы все еще не понимаете, как сканировать с принтера на компьютер, рекомендуем ознакомиться с другим нашим материалом. Вот и все. Этих манипуляций достаточно, чтобы выполнить стандартное сканирование документа и сохранить его на ПК.
Canon i sensys MF3010 – как сканировать при помощи приложений
Canon MF Toolbox – это официальное приложение. Его можно скачать из интернета или воспользоваться загрузочным диском, который идет в комплекте поставки. Следуйте советам мастера установки, установите драйвера и подключите ПК к МФУ.
Также вы можете воспользоваться программой PaperScan Free. С принтера Canon MF3010 сканировать на Windows 10 проще именно вторым приложением. Официальная MF Toolbox может некорректно работать на данной операционной системе.
Как настроить сканер Canon MF3010
Перед началом сканирования MF Toolbox выдаст следующее окно:

На этом основная настройка сканера Canon MF3010 завершена.
Примечание
 Надеемся что наша инструкция, как сканировать на Canon MF3010 была полезной. Если вы решили распечатать отсканированный документ, не забудьте заправить картридж и проверить наличие бумаги в лотке. Сервисный центр TonFix обслуживает лазерные принтеры Canon в Киеве с 2006 года. У нас можно купить картриджи Canon по выгодной цене и с бесплатной доставкой по Украине.
Источник
Чтобы отсканировать нужный документ, зайдите в меню «Пуск», дальше «Устройства и принтеры». В открывшемся окошке вы увидите доступные (подключенные) устройства, из списка выберите нужное МФУ Сanon mf3010 и кликните по нему мышкой. Появится панель с несколькими параметрами.
- Убедитесь, что сканер или принтер включен.
- Разместите оригинальные документы на рабочей поверхности сканера или принтера. Размещение оригиналов (сканирование с компьютера)
- Запустите программу IJ Scan Utility.
- Щелкните Авто (Auto). Начинается сканирование.
Как отсканировать документ на компьютер с принтера Canon?
Кликаем по иконке принтера правой кнопкой мышки и выбираем «Начать сканирование«. В открывшемся окошке задаем необходимые параметры, жмем «Просмотр и если нас все устраивает — нажимаем «Сканировать.
Зайти по пути «Панель управленияОборудование и звукУстройства и принтеры». Кликаем по иконке принтера правой кнопкой мышки и выбираем «Начать сканирование«. В открывшемся окошке задаем необходимые параметры, жмем «Просмотр» и если нас все устраивает — нажимаем «Сканировать».
Как сканировать документы на сканере?
- Поднимите крышку готового к работе устройства (должно быть включенным). .
- Положите документ или фото, с которого хотите получить скан, текстом или изображением на стекло. .
- Опустите крышку принтера (сканера) вниз.
- Можете приступать к сканированию.
Canon MF3010 – как сканировать документы
Многофункциональное устройство Canon MF3010 полностью удовлетворяет требованиям малого офиса. При помощи этого принтера можно скопировать нужные документы, отправить на печать отчеты и отсканировать бумажные носители для их хранения в электронном варианте. Пользователь открыл крышку сканера, положил лист с информацией, закрыл крышку и… И что дальше? Чтобы у вас не возникало вопросов, как сканировать документ на принтере Canon MF3010, командой сервисного центра TonFix был создан данный материал.
Установка драйвера на сканер Canon MF3010
Перед тем, как подключить принтер к ноутбуку или ПК, необходимо установить нужные драйвера. Без них компьютер не видит МФУ, не получится отсканировать документы и будет закрыт ряд других функций копировально-печатной техники. Чаще всего в комплекте поставки предусмотрен диск с необходимым программным обеспечением. При покупке принтера б/у и в ряде других случаев возможна установка МФУ без диска.
При скачивании драйверов из интернета посещайте только официальный сайт Canon. Далее необходимо выполнить несложные действия:
- 1 Введите в поле поиска модель аппарата – MF3010.
- 2 Выберите операционную систему. Сайт самостоятельно определяет используемую ОС, но если выбор произведен некорректно, выберите нужный пункт из выпадающего списка.
- 3 Выберите предпочитаемый язык. По умолчанию – русский
- 4 Нажмите кнопку [Загрузить].
- 5 После скачивания файла, откройте мастер установки и следуйте его рекомендациям.
- 6 Перезагрузите ПК.
Как сканировать на принтере Canon MF3010 – инструкция
МФУ подключен к компьютеру и все нужные драйверы установлены? Тогда откройте сканер и положите документ на стекло планшета. На MF3010 сканирование выполняется достаточно просто.
1. Зайдите в [ПУСК]. Затем перейдите в раздел [Панель управления]. Выберите категорию [Устройства и принтеры]. Если вы не видите такой надписи, то в правом верхнем углу измените вид просмотра на [Крупные значки].
2. Перед вами откроется список принтеров, к которым установлены драйвера. Кликните правой кнопкой мыши на Canon MF3010, выберите «начать сканирование» из контекстного меню.
Если вы все еще не понимаете, как сканировать с принтера на компьютер, рекомендуем ознакомиться с другим нашим материалом. Вот и все. Этих манипуляций достаточно, чтобы выполнить стандартное сканирование документа и сохранить его на ПК.
Canon i sensys MF3010 – как сканировать при помощи приложений
Canon MF Toolbox – это официальное приложение. Его можно скачать из интернета или воспользоваться загрузочным диском, который идет в комплекте поставки. Следуйте советам мастера установки, установите драйвера и подключите ПК к МФУ.
Также вы можете воспользоваться программой PaperScan Free. С принтера Canon MF3010 сканировать на Windows 10 проще именно вторым приложением. Официальная MF Toolbox может некорректно работать на данной операционной системе.
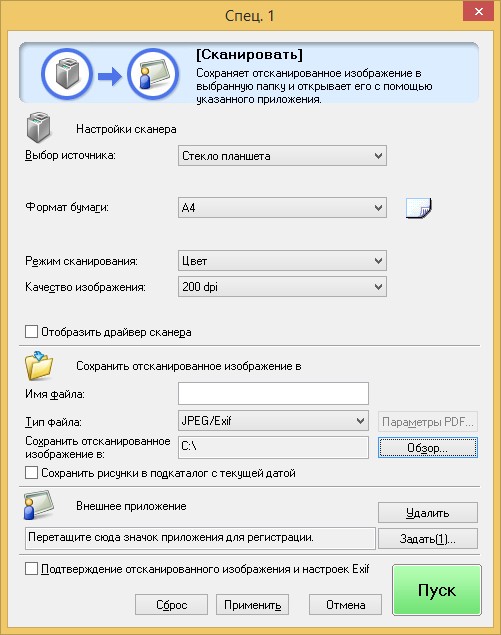
Как настроить сканер Canon MF3010
Перед началом сканирования MF Toolbox выдаст следующее окно:
- 1 Выбор источника. Здесь ничего менять не нужно.Формат бумаги. По умолчанию A4, но если вы сканируете документ другого формата, то значение необходимо поменять. Если формат бумажного носителя указан некорректно, могут возникнуть трудности с его ориентацией во время распечатки.
- 2 Режим сканирования. Если вы пытаетесь разобраться в МФУ Canon MF3010, как сканировать цветные или монохромные документы, то регулируется это в данном поле.
- 3 Качество изображения. Чем выше разрешение, тем лучше разрешение документа после сохранения.
- 4 Имя файла. Задайте нужное название для скан-документа.
- 5 Тип файла. Укажите нужное расширение для док-та. В формате JPEG файлы сохраняют первоначальный вид и не поддаются редактированию. Если в последующем планируется вносить изменения в скан-копию, то выбирайте тип PDF. Формат документа tiff используется для передачи глубины цветных изображений. Как сканировать в один файл PDF Canon MF3010? Для этого необходимо выбрать в разделе [Тип файла] значение [PDF (Multiple Pages)].
- 6 Сохранить отсканированное изображение в. Выберите место сохранения файла, кликнув по кнопке [Обзор…].
На этом основная настройка сканера Canon MF3010 завершена.
Примечание
Надеемся что наша инструкция, как сканировать на Canon MF3010 была полезной. Если вы решили распечатать отсканированный документ, не забудьте заправить картридж и проверить наличие бумаги в лотке. Сервисный центр TonFix обслуживает лазерные принтеры Canon в Киеве с 2006 года. У нас можно купить картриджи Canon по выгодной цене и с бесплатной доставкой по Украине.
Как отсканировать документ и отправить его по электронной почте?
- Загрузите документ.
- Нажмите клавишу СКАНИРОВАНИЕ.
- C помощью стрелок ↑ или ↓ выберите Скан. в E-mail.
- Нажмите Скан. в E-mail.
- (Для сетевого подключения) Нажмите Компьютер. .
- Нажмите Ч/б Старт или Цвет Старт.
- Выберите Инструменты > Создать PDF > Сканер > [предустановки документа]. .
- Нажмите Сканировать.
Как настроить сканер MF 3010?
Чтобы отсканировать нужный документ, зайдите в меню «Пуск», дальше «Устройства и принтеры». В открывшемся окошке вы увидите доступные (подключенные) устройства, из списка выберите нужное МФУ Сanon mf3010 и кликните по нему мышкой. Появится панель с несколькими параметрами.
Откройте Панель управления из меню Пуск, перейдите в Центр управления сетями и общим доступом и выберите Просмотр сетевых компьютеров и устройств. Кликните правой кнопкой мыши на значок сканера и выберите «Установить», так вы сделаете его доступным для других компьютеров в сети.
Если вы не нашли нужный картридж, обратитесь к нам любым удобным способом.
Мы найдем подходящий вариант, даже если он не представлен на сайте.
Многофункциональные принтеры удобны тем, что на них можно не только печатать, но и сканировать. Сегодня отдельно
сканеры уже почти никто и не покупает. МФУ – это далеко не новинка, но многие из старых моделей прижились и по сей
день продаются и приносят пользу своим обладателям. Один из таких долгоиграющих принтеров – это Canon mf3010.
Расходники на Canon всегда пользуются спросом. Если вам требуются оригинальные картриджи Canon, проходите сюда. Здесь вы найдёте всё необходимое для техники
Canon.
Как правило, всё необходимое ПО для принтера идёт с ним вместе на диске. Однако, если устройство было куплено с рук,
или диск куда-то затерялся, то драйверы всегда можно скачать на официальном сайте производителя. Там нужно его
просто подобрать по модели принтера, операционной системе компьютера и её разрядности, и скачать.
Драйвер – это такая программа, которая связывает МФУ и компьютер, без этой связи ни печатать, ни сканировать не
получится. Установка этой программы обычно простая, методом «далее-> далее -> готово». Для надёжности и избегания
незначительных ошибок после установки драйвера принтер и компьютер перезагружаются.
Самый простой способ отсканировать документ на Canon mf3010 без печати – это обратиться к меню «Устройства и
принтеры», найти там нужный принтер, нажать правой кнопкой мыши, в появившемся контекстном меню выбрать «Начать
сканирование». Откроется программа сканирования, в которой можно настроить некоторые существенные параметры. В Win10
есть отличия в названиях пунктов, тут надо пройти по пути «Все параметры» -> «Устройства» -> «Принтеры и сканеры» ->
«Управление» -> «Начать сканирование».
Кнопка Scan или «Скан.» есть и на самом устройстве, но она приводит к немедленной распечатке листа, что требуется
далеко не всегда. Особенно, если на дисплее принтера выскакивают ошибки типа Е3 или Е5, неисправности с картриджем.
Отсканировать документ с принтера Canon mf3010 можно даже через Paint. В меню «Файл» среди прочих функций есть пункт
«Со сканера или камеры». Он открывает мастера настройки сканируемого изображения. Можно, например, выбрать цветное
оно будет или чёрно-белое. По нажатию кнопки «Сканировать» изображение появится в рабочей области Paint, где его
можно править и сохранять на компьютер.
Полезными программами для сканирования через принтер Canon mf3010 могут стать PaperScan Free и MF Toolbax.
Возможно вам будет интересно
Содержание
- Canon MF3010 – как сканировать документы
- Установка драйвера на сканер Canon MF3010
- Как сканировать на принтере Canon MF3010 – инструкция
- Canon i sensys MF3010 – как сканировать при помощи приложений
- Как настроить сканер Canon MF3010
- Примечание
- Как сканировать через принтер canon (+mf3010)?
- Установка и подключение МФУ
- Выполняем сканирование
- Как сканировать документ в Windows 10
- Совместим ли Ваш сканер с Windows 10
- Сканер Windows
- Факсы и сканирование
- canon mf3010 как пользоваться сканером
- Установка и подключение МФУ
- Выполняем сканирование
- Сканирование документов в Windows 10 и 7
- «Факсы и сканирование» в Windows 7
- Как отсканировать документ на Виндовс 10
- Проверяем совместимость
- Устанавливаем сканер
- Программы для работы
- «Мастер» от производителя техники
- Приложение «Сканер»
- Видеоинструкция
- Если сканер не работает
- Утилита устранения неисправностей
- Ручная установка оборудования
- Конфликты
Canon MF3010 – как сканировать документы
Многофункциональное устройство Canon MF3010 полностью удовлетворяет требованиям малого офиса. При помощи этого принтера можно скопировать нужные документы, отправить на печать отчеты и отсканировать бумажные носители для их хранения в электронном варианте. Пользователь открыл крышку сканера, положил лист с информацией, закрыл крышку и… И что дальше? Чтобы у вас не возникало вопросов, как сканировать документ на принтере Canon MF3010, командой сервисного центра TonFix был создан данный материал.
Установка драйвера на сканер Canon MF3010
Перед тем, как подключить принтер к ноутбуку или ПК, необходимо установить нужные драйвера. Без них компьютер не видит МФУ, не получится отсканировать документы и будет закрыт ряд других функций копировально-печатной техники. Чаще всего в комплекте поставки предусмотрен диск с необходимым программным обеспечением. При покупке принтера б/у и в ряде других случаев возможна установка МФУ без диска.
При скачивании драйверов из интернета посещайте только официальный сайт Canon. Далее необходимо выполнить несложные действия:
Как сканировать на принтере Canon MF3010 – инструкция
МФУ подключен к компьютеру и все нужные драйверы установлены? Тогда откройте сканер и положите документ на стекло планшета. На MF3010 сканирование выполняется достаточно просто.
1. Зайдите в [ПУСК]. Затем перейдите в раздел [Панель управления]. Выберите категорию [Устройства и принтеры]. Если вы не видите такой надписи, то в правом верхнем углу измените вид просмотра на [Крупные значки].
2. Перед вами откроется список принтеров, к которым установлены драйвера. Кликните правой кнопкой мыши на Canon MF3010, выберите «начать сканирование» из контекстного меню.
Если вы все еще не понимаете, как сканировать с принтера на компьютер, рекомендуем ознакомиться с другим нашим материалом. Вот и все. Этих манипуляций достаточно, чтобы выполнить стандартное сканирование документа и сохранить его на ПК.
Canon i sensys MF3010 – как сканировать при помощи приложений
Canon MF Toolbox – это официальное приложение. Его можно скачать из интернета или воспользоваться загрузочным диском, который идет в комплекте поставки. Следуйте советам мастера установки, установите драйвера и подключите ПК к МФУ.
Также вы можете воспользоваться программой PaperScan Free. С принтера Canon MF3010 сканировать на Windows 10 проще именно вторым приложением. Официальная MF Toolbox может некорректно работать на данной операционной системе.
Как настроить сканер Canon MF3010
Перед началом сканирования MF Toolbox выдаст следующее окно:

На этом основная настройка сканера Canon MF3010 завершена.
Примечание
 Надеемся что наша инструкция, как сканировать на Canon MF3010 была полезной. Если вы решили распечатать отсканированный документ, не забудьте заправить картридж и проверить наличие бумаги в лотке. Сервисный центр TonFix обслуживает лазерные принтеры Canon в Киеве с 2006 года. У нас можно купить картриджи Canon по выгодной цене и с бесплатной доставкой по Украине.
Источник
Как сканировать через принтер canon (+mf3010)?
Современные модели принтеров Сanon выполняют несколько функций, в том числе и сканирование документов. В этой статье мы подробно расскажем, как сканировать через принтер canon (+mf3010), а также как установить драйвер устройства.
Установка и подключение МФУ
Все необходимое программное обеспечение для принтера идет с ним в комплекте – в виде диска. Если же вы купили Сanon не в специализированном магазине, а с рук, и установочного диска при нем не оказалось, тогда советуем воспользоваться интернетом – скачать драйвера на официальном сайте компании-производителя или найти их в специальном приложении driverplus.ru. Вам необходимо знать модель принтера и указать вид операционной системы и ее разрядность.
Драйвер помогает вашему компьютеру «видеть» подключенное МФУ, поэтому без него выполнять сканирование не получится. Инструкция по установке драйвера прилагается, и следуя ей вы сможете самостоятельно выполнить установку программы.
После того, как вы установите драйвер, принтер будет готов к работе и выполнению задач по копированию, печати и сканированию документов. Может быть потребуется перезагрузить систему, чтобы внесенные изменения активировались.
Если МФУ отказывается выполнять свои функции, тогда стоит проверить качество подключения устройства к компьютеру. Быть может проблема кроется в отхождении кабеля-USB. Причина также может заключаться в вирусном заражении вашей техники. в этом случае придется выполнить повторную установку драйверов.
Выполняем сканирование
Чтобы отсканировать нужный документ, зайдите в меню «Пуск», дальше «Устройства и принтеры».
В открывшемся окошке вы увидите доступные (подключенные) устройства, из списка выберите нужное МФУ Сanon mf3010 и кликните по нему мышкой. Появится панель с несколькими параметрами.
Здесь вносите необходимые корректировки в настройках – указываете цвет скан-копии, тип файла, разрешение, папку, в которую будет сохранена копия. Находите команду «Сканировать» и запускаете процесс.
Источник
Как сканировать документ в Windows 10
О тличный способ сохранить конфиденциальные письменные документы, контракты и завещания — хранить их в цифровом виде. В этом руководстве показано, как сканировать документ в Windows 10 без установки сторонних инструментов.
Как правило, Вы можете сканировать документ с помощью программного обеспечения, предоставленного производителями. Принтеры и сканеры обычно поставляются с оптическим диском, содержащим необходимые драйверы и инструменты. Производители также предоставляют свои драйверы и инструменты онлайн, если на Вашем ПК нет оптического привода.
В этом руководстве используются два «родных» инструмента в Windows: Сканер Windows и Факсы и сканирование.
Конечно, всегда по умолчанию используется программное обеспечение Вашего производителя, настроенного для Вашего конкретного сканера. Однако если Вы не хотите, чтобы на Вашем компьютере были установлены инструменты сторонних производителей, Вам следует воспользоваться двумя решениями Microsoft.
Совместим ли Ваш сканер с Windows 10
Прежде чем двигаться дальше, нам нужно сделать пару замечаний. Во-первых, производитель Вашего сканера может предоставить драйверы для Windows 10, но само устройство может не поддерживать платформу.
Например, универсальный принтер Canon PIXMA MG3520 со встроенным сканером. «Рекомендованные» драйверы датируются июлем 2015 года, хотя Canon выпустила новый пакет спустя шесть месяцев. Это все еще трехлетнее программное обеспечение.
Тем не менее, часть сканера этого принтера AIO не будет отображаться в родных инструментах Windows, но будет работать правильно — фактически используя беспроводное соединение — через программное обеспечение Canon.
Если Вы столкнетесь с подобными проблемами, у Вас может быть более старый принтер или сканер, который не полностью совместим с Windows 10. Устройство может также потребовать прямого USB-соединения, если оно используется за пределами сторонних инструментов производителя. Для принтеров AIO Вам может потребоваться настроить его сетевые настройки, чтобы Ваш компьютер с Windows 10 распознавал компонент сканера в дополнение к общему блоку принтера.
Сканер Windows
Этот инструмент представляет собой визуальное обновление для более старой версии программы Факсы и сканирование. Оно обеспечивает большинство тех же функций, в зависимости от Вашего принтера, но не содержит компоненты факса и электронной почты.
Перейдите в магазин приложений Microsoft и установите Сканер Windows (бесплатно) и нажмите синюю кнопку «Получить». После установки на Вашем компьютере нажмите кнопку «Запустить» во всплывающем уведомлении в Windows 10.
Вы также можете получить доступ к новому приложению «Сканер» — из меню «Пуск».
С открытым приложением Ваш сканер должен появиться в списке слева. Вы также увидите опцию «Тип файла» вместе со ссылкой «Больше». Нажмите на эту ссылку для просмотра полного меню приложения Сканер.
С помощью «Цветового режима» Вы можете сканировать документы в полноцветном режиме, в оттенках серого или в черно-белых тонах. Между тем, настройка «Разрешение (DPI)» позволяет переключаться на различные DPI.
Настройка «Тип файла» предоставляет четыре параметра: JPEG, PNG, TIFF и Bitmap. Форматы JPEG и TIFF обычно предлагают высококачественные результаты, хотя файлы TIFF также поддерживают прозрачный фон. Файлы PNG идеально подходят для публикации в Интернете, а файлы BMP представляют собой необработанные, несжатые изображения.
Наконец, вы увидите опцию «Конечная папка». По умолчанию она настроена на «Сканы» и помещает отсканированные документы в папку «Сканы», расположенную в папке «Изображения». Правильный путь:
Нажмите на ссылку «Сканы», и появится «Проводник». Здесь Вы можете создать новую папку или выбрать текущее местоположение и нажать кнопку «Выбор папки».
Когда Вы будете готовы к сканированию, вставьте документ в устройство подачи или поднимите крышку сканера. Для последнего поместите документ на стекло лицевой стороной вниз и закройте крышку.
Вы можете нажать «Просмотр», чтобы протестировать сканирование и при необходимости внести коррективы, прежде чем завершить работу кнопкой «Сканировать».
Факсы и сканирование
Эта программа впервые появилась в Windows Vista. В отличие от более нового приложения Microsoft для сканирования, в этой версии предусмотрены дополнительные параметры, такие как встроенный инструмент для отправки сканирования по электронной почте, поэтому Вам не нужно искать файл через приложение «Почта», браузер или сторонний почтовый клиент.
Вы можете найти программу «Факсы и сканирование», расположенную в папке «Пуск».
После того, как приложение будет открыто, нажмите «Новое сканирование» на панели инструментов.
Во всплывающем окне «Новое сканирование» убедитесь, что в программе установлен сканер по умолчанию. Если нет, нажмите кнопку «Изменить».
Затем выберите профиль сканирования. В качестве опции щелкните выбор «Добавить профиль» в списке, чтобы создать настраиваемый профиль для повторного использования.
Выберите источник Вашего сканера. Здесь может быть только один вариант «Планшетный». Если у Вас есть принтер AIO, в котором есть устройство подачи, Вы можете увидеть две дополнительные опции: «Устройство подачи (сканирование с одной стороны)» и «Устройство подачи (сканирование с обеих сторон)».
Если Ваш принтер или сканер поддерживает устройство подачи, и Вы выбрали эту опцию, Вы увидите настройку для целевого формата бумаги. Нажмите на настройку, и появится длинный список размеров.
Затем выберите свой цветовой формат (Цветное, Оттенки серого или Черно-белый), а затем тип файла (BMP, JPG, PNG или TIF) и разрешение.
Для разрешения по умолчанию установлено значение 200, но Вы можете вручную увеличивать или уменьшать количество точек, в которые принтер помещает каждый дюйм. Как правило, чем Выше число, тем лучше разрешение. Однако, если Вы сканируете некачественный документ, увеличение разрешения не поможет.
Наконец, отрегулируйте яркость и контрастность соответственно.
Когда вы закончите, нажмите кнопку «Просмотр», чтобы увидеть результаты. Если предварительное сканирование выглядит великолепно, нажмите кнопку «Сканировать». Если нет, измените настройки и снова нажмите кнопку «Просмотр» для другого теста. Нажмите кнопку «Сканировать», когда Вы будете удовлетворены настройками.
Источник
canon mf3010 как пользоваться сканером
Современные модели принтеров Сanon выполняют несколько функций, в том числе и сканирование документов. В этой статье мы подробно расскажем, как сканировать через принтер canon (+mf3010), а также как установить драйвер устройства.
Установка и подключение МФУ
Все необходимое программное обеспечение для принтера идет с ним в комплекте – в виде диска. Если же вы купили Сanon не в специализированном магазине, а с рук, и установочного диска при нем не оказалось, тогда советуем воспользоваться интернетом – скачать драйвера на официальном сайте компании-производителя или найти их в специальном приложении driverplus.ru. Вам необходимо знать модель принтера и указать вид операционной системы и ее разрядность.
Драйвер помогает вашему компьютеру «видеть» подключенное МФУ, поэтому без него выполнять сканирование не получится. Инструкция по установке драйвера прилагается, и следуя ей вы сможете самостоятельно выполнить установку программы.
После того, как вы установите драйвер, принтер будет готов к работе и выполнению задач по копированию, печати и сканированию документов. Может быть потребуется перезагрузить систему, чтобы внесенные изменения активировались.
Если МФУ отказывается выполнять свои функции, тогда стоит проверить качество подключения устройства к компьютеру. Быть может проблема кроется в отхождении кабеля-USB. Причина также может заключаться в вирусном заражении вашей техники. в этом случае придется выполнить повторную установку драйверов.
Выполняем сканирование
Чтобы отсканировать нужный документ, зайдите в меню «Пуск», дальше «Устройства и принтеры».
В открывшемся окошке вы увидите доступные (подключенные) устройства, из списка выберите нужное МФУ Сanon mf3010 и кликните по нему мышкой. Появится панель с несколькими параметрами.
Здесь вносите необходимые корректировки в настройках – указываете цвет скан-копии, тип файла, разрешение, папку, в которую будет сохранена копия. Находите команду «Сканировать» и запускаете процесс.
В создании этой статьи участвовала наша опытная команда редакторов и исследователей, которые проверили ее на точность и полноту.
Команда контент-менеджеров wikiHow тщательно следит за работой редакторов, чтобы гарантировать соответствие каждой статьи нашим высоким стандартам качества.
Из данной статьи вы узнаете, как сканировать документы на компьютере с помощью многофункционального принтера Canon. Это можно сделать на компьютере с Windows и с Mac OS X.
Данная инструкция на русском языке предназначена для МФУ Canon i-SENSYS MF3010, описывает принцип работы и основные моменты эксплуатации устройства.
Производитель настойчиво рекомендует перед включением МФУ внимательно изучить настоящую инструкцию.
Источник
Сканирование документов в Windows 10 и 7

Эта инструкция подскажет Вам, как сканировать в Windows 10 или 7 правильно. Но перед этим сперва нужно технику добавить на компьютер или ноутбук, установить драйвера и только тогда проводить сканирование документов или фотографий со своего принтера (МФУ). Сам процесс выполняется через специальные программы для таких целей. Это могут быть: приложение «Сканер» в 10-й версии ОС от Майкрософт (можно бесплатно скачать с «магазина»), встроенная служба «Факсы и сканирование» или фирменный «мастер работы» от компании производителя оборудования.
Некоторым пользователям после установки сложно найти сканер на ПК или создать ярлык программы, а кому-то даже запустить, чтобы что-то отсканировать. Детально расскажем, как выйти из такой ситуации. Cложнее, если система не видит устройство, оно не работает или не открывается. Но решение проблем такого плана тоже есть.
«Факсы и сканирование» в Windows 7
Ранее указанные параметры сканирования можно сохранить в отдельный профиль, чтобы не настраивать повторно.

Как отсканировать документ на Виндовс 10
Проверяем совместимость
Перед началом всех процедур стоит выяснить некоторые важные моменты совместимости. Как показывает практика, даже если есть драйвера, скачанные на сайте производителя, Windows 10 может конфликтовать с оборудованием. Так, к примеру, МФУ компании Canon рекомендуют использовать программное обеспечение более старого образца. Оно отмечено как рекомендуемое. А потому сканер в Windows 10 может работать не совсем корректно. К такому развитию событий следует быть готовым.
Если устройство старое, то драйверов к нему может вовсе не существовать. А также часто наблюдаются проблемы со сканированием по сети из «десятки». ОС их попросту не видит. А потому требуется прямое соединение через провод USB, хотя и это не гарантия корректной работы.
Если ранее свой МФУ Вы использовали только как принтер, а сейчас пробуете на нем отсканировать документ, то убедитесь, что установлены драйвера не только на печать, но и на сканер. Для многих моделей это разные пакеты файлов.
Устанавливаем сканер
Подключение сканера к компьютеру сводится к «связыванию» USB проводом и установкой драйверов. Последние могут быть скопированы системой Виндовс 7, а тем более 10, автоматически. Но если сканер уже старый, то ОС идентифицирует такую технику как неопознанную. В таком случае придется нужные файлы «дров» скачать с сайта производителя техники. Тогда все сводится к таким простым шагам:
Программы для работы
«Мастер» от производителя техники
Приложение «Сканер»
Это встроенный инструмент, который является усовершенствованной и визуально другим вариантом старой утилиты «Факсы и сканирование». А в плане возможностей инструмент потерял подержку работы с факсами и отправку сканов по электронной почте.
Чтобы воспользоваться инструментом, его сначала нужно скачать и установить из магазина приложений Microsoft. Несмотря на название — это бесплатно. Возможен вариант, что приложение уже установлено На ПК. Найдите его через строку поиска Windows. Значок программы имеет вот такой вид. 
Нажмите по нему, чтобы запустить.
Когда приложение откроет свое окно, то слева увидите модель сканера. Ее при необходимости можно сменить. Ниже — тип файлов, в который будет сохраняться результат сканирования. Кроме «PNG» доступны к выбору JPEG, TIFF и Bitmap. Все зависит от целей и дальнейшего применения оцифрованных документов. 
По ярлыку «Больше» откройте остальные настройки. Среди них:
Когда все нужные настройки произведены можно приступать непосредственно к самому сканированию. Принимать листы разные сканеры могут одним или несколькими способами. Это могут быть автоподатчик документов или крышка со стеклом. При втором варианте 100% класть бумагу нужно заполненной стороной вниз. Крышку обязательно закрыть. При автоматической подаче, скорее всего, также, но все зависит от конкретной модели.
Для предварительного отображения результата используйте кнопку «Просмотр», а для получения готового скана — «Сканировать».

Видеоинструкция
Если сканер не работает
Утилита устранения неисправностей
Первым делом при возникновении каких-либо проблем в работе любого оборудования, будь то принтер или сканер, стоит воспользоваться штатными возможностями устранения. Переходим в раздел с устройствами и находим проблемное. Вызываем контекстное меню, в нем кликаем на пункт «Поиск неисправностей». 

Ждем окончания работы утилиты.
Ручная установка оборудования
Если сканера и вовсе нет среди оборудования в соответствующем разделе, то стоит попробовать его добавить ручным способом. Для этого:
Конфликты
Но также проблема может возникать из-за автоматической установки встроенного ПО для сканирования от производителя вместе с драйверами. В таком случае его следует удалить (по возможности). Или можно отключить стандартную утилиту операционной системы Windows. Выполнить то и другое можно через оснастку «Программы и компоненты». Она находится в «Панели управления».

Приложение от сканера найдите в списке справа, а затем нажмите кнопку удалить. Для встроенного в Виндовс воспользуйтесь включением и отключением компонентов. Ярлык слева.

Найдите раздел «Службы печати документов», а в нем «Факсы и сканирование Windows». И напротив него уберите галочку. После перезагрузите компьютер, чтобы изменения вступили в силу.
Источник
- Manuals
- Brands
- Canon Manuals
- All in One Printer
- i-SENSYS MF3010
- User manual
-
Contents
-
Table of Contents
-
Troubleshooting
-
Bookmarks
Quick Links
Related Manuals for Canon i-SENSYS MF3010
Summary of Contents for Canon i-SENSYS MF3010
-
Page 2: Table Of Contents
Important Safety Instructions Important Safety Instructions Installation Power Supply Handling Maintenance and Inspections Consumables Others Installation and Handling Basic Operation Parts and Their Functions Front Side Back Side Interior Paper Cassette Operation Panel and Display Using the Quick Reference Guide Energy Saving Functions (Sleep Mode) How to Operate Menus Setting List…
-
Page 3
Printable Area Copy Basic Copy Operations Registering the Quantity that You Frequently Copy (Up to Twenty-nine Copies) Adjusting the Density Enlarging/Reducing Copy Copying Both Sides of Cards onto One Side (ID Card Copy) Copying Two Documents onto One Sheet (2 on 1 Copy) Selecting Copy Type (Speed Priority/Resolution Priorlty) Emphasizing the Outline of an Image (Sharpness) Print… -
Page 4
Installation and Uninstallation Problems Miscellaneous Problems Printing Results are Not Good Paper Curls Paper Creases Printing is Uneven White Specks or Spots Appear on the Printout The Toner does Not Flow Well into the Paper Vertical Streaks Appear on the Output Toner Smudges and Spatters Appear around Text and Images The Printout is Too Dark Printed Bar Codes Cannot be Scanned… -
Page 5: Important Safety Instructions
Important Safety Instructions 030E-000 Please read these «Important Safety Instructions» thoroughly before using the machine. These instructions are intended to prevent injuries to you and other persons as well as equipment damage. Failure to follow these instructions could result in serious personal injury, product damage, or improper operation. Please follow the instructions in this manual.
-
Page 6: Important Safety Instructions
Important Safety Instructions 030E-001 Please read the following safety warnings and precautions before using the machine. «Installation» «Power Supply» «Handling» «Maintenance and Inspections» «Consumables» «Others»…
-
Page 7: Installation
If these items are dropped or spilled inside the machine, immediately turn off the power switches of the machine and computer (1) and disconnect the interface cable if it is connected (2). Then, unplug the power plug from the AC power outlet (3) and contact your local authorized Canon dealer. CAUTION Do not install the machine in unstable locations, such as on unsteady platforms or inclined floors, or in locations subject to excessive vibrations, as this may cause the machine to fall or tip over, resulting in personal injury.
-
Page 8
to drop the machine, resulting in personal injury. «Relocating the Machine»… -
Page 9: Power Supply
Power Supply 030E-003 WARNING Do not damage or modify the power cord. Also, do not place heavy objects on the power cord or pull on or excessively bend it. This can cause electrical damage, resulting in fire or electrical shock. Keep the power cord away from all heat sources.
-
Page 10: Handling
Then, unplug the power plug from the AC power outlet and contact your local authorized Canon dealer. Continued use can result in a fire or electrical shock.
-
Page 11
remarks and instructions for safety. Never open covers other than those indicated in this manual. Do not remove the caution label attached to the cover of the laser scanner unit. If the laser beam should escape and enter your eyes, exposure may cause damage to your eyes. -
Page 12: Maintenance And Inspections
Check the power cord and plug regularly. The following conditions may result in fire, so please contact your local authorized Canon dealer or the Canon help line. There are burn marks on the power plug.
-
Page 13
When removing jammed paper or when inspecting the inside of the machine, do not expose yourself to the heat emitted from the fixing unit and its surroundings for a prolonged period of time. Doing so may result in low temperature burns, even though you did not touch the fixing unit and its surroundings directly, as this may result in burns. -
Page 14: Consumables
Consumables 030E-006 WARNING Do not dispose of used toner cartridges in open flames. This may cause the toner to ignite, resulting in burns or fire. Do not store toner cartridges or paper in a location exposed to open flames. This may cause the toner or paper to ignite, resulting in burns or fire.
-
Page 15: Others
Others 030E-007 WARNING If you are using a cardiac pacemaker This machine generates a low level magnetic field. If you use a cardiac pacemaker and feel abnormalities, please move away from this machine and consult your physician immediately.
-
Page 16: Installation And Handling
Installation and Handling 030E-008 To make sure safe and trouble-free operation, the following installation requirements must be observed. Read the instructions carefully before installing the machine. Temperature and Humidity Conditions Power Supply Requirements Installation Requirements Installation Space Maintenance and Inspections Customer Support IMPORTANT Important Safety Instructions…
-
Page 17
Miscellaneous precautions The maximum power consumption of the machine is 960 W or less. Electrical noise or a dramatic voltage drop may result in improper operation and irretrievable data loss. Installation Requirements A location that has sufficient free space A location that has good ventilation A location that has a flat, even surface A location that can withstand the weight of the machine IMPORTANT… -
Page 18
The machine is designed to make sure safe use and be maintenance-free. If a problem occurs during operation, see «Troubleshooting.» When the problem cannot be resolved after referring to the appropriate trouble shooting section, contact your local authorized Canon dealer or the Canon help line. -
Page 19: Basic Operation
Basic Operation 030E-009 This chapter describes the features and useful functions of the machine. The following sections give a brief overview of the machine and instructions on how to use the machine efficiently. Read these sections thoroughly before using the machine. Learning about parts of the «Parts and Their…
-
Page 20: Parts And Their Functions
Parts and Their Functions 030E-00A This section describes the parts of the machine and their functions. «Front Side» «Back Side» «Interior» «Paper Cassette» «Operation Panel and Display»…
-
Page 21: Front Side
Front Side 030E-00C (1) Platen Glass Cover Protects the platen glass. (2) Output Tray Extension Extend this tray to load large size documents. (3) Lift Handles Hold this handles to lift or transport the machine. (4) Power Switch Used to switch the machine ON or OFF. (5) Platen Glass Load paper.
-
Page 22: Back Side
Back Side 030E-00E (1) Rating Label The current value indicated in this rating label shows the average power current consumption. (2) USB Port Connect the USB cable. (3) Power Socket Connect the power cord.
-
Page 23: Interior
Interior 030E-00F (1) Scanning Platform Open this cover to replace the toner cartridge or clear paper jams. (2) Toner Cover Open this cover to replace the toner cartridge or clear paper jams. (3) Toner Guides Used to insert the toner cartridge so that the protrusion on the side of the toner cartridge fits into these guides. (4) Transfer Roller Used to transfer toner onto paper.
-
Page 24: Paper Cassette
Paper Cassette 030E-00H (1) Paper Guides Adjust these guides to fit the document.
-
Page 25: Operation Panel And Display
Operation Panel and Display 030E-00J Operation Panel Viewing the Display Operation Panel NOTE When [ ], [ ], and [ ] are on at a time A service error is occurring. «When a Service Error Has Occurred» Viewing the Display Copy settings, menu setting items, or setting values are displayed.
-
Page 26
Cancellation is processing after the [ ] key was pressed. Sleep state «Energy Saving Functions (Sleep Mode)» The toner cover is open. A service error has occurred. «When a Service Error Has Occurred» Resetting the settings Setting value limit display (For each copy setting, the display turns off when an attempt is made to exceed the upper or lower setting limits by pressing the [ + ] or [ — ] keys.) -
Page 27: Using The Quick Reference Guide
Using the Quick Reference Guide 030E-06H Place this guide near the printer for effective usage. Front side (operating instruction page) (1) Description of Various Copy «Basic Copy Operations» «Adjusting the Density» «Enlarging/Reducing Copy» «Copying Both Sides of Cards onto One Side (ID Card Copy)» «Copying Two Documents onto One Sheet (2 on 1 Copy)»…
-
Page 28
(1) If a Paper Jam Has Occurred «Removing Jammed Paper» A : Cover Open «How to Operate Menus» B : Service Error «When a Service Error Has Occurred» (3) No Paper «Loading Paper»… -
Page 29: Energy Saving Functions (Sleep Mode)
Energy Saving Functions (Sleep Mode) 030E-00K A function is provided that transitions the printer into an energy saving mode with low power consumption (sleep function) when it is not used for a set period of time. After 5 minutes* has elapsed during which time data is not received from the computer and there are no changes to the printer, it transitions into the sleep mode.
-
Page 30: How To Operate Menus
How to Operate Menus 030E-00L This section describes haw to operate or set up the menu. To cancel operations Press [ ], and then press [ ] (Menu setting key). It cancels operations without saving the settings and returns to a status where normal operation is possible. Operating results Operating procedures Press […
-
Page 31
Press [ ] (Menu setting key), exit the menu operation. The menu indicator turns off. -
Page 32: Setting List
Setting List 030E-064 Copy Setting List Menu Setting List Copy Setting List The following copy settings are available for the printer. You can switch the copy settings by pressing [ ] (Copy setting key). Setting value Function name Indicator Reference (Default value) Display Detail…
-
Page 33
100% (magnification) 110% Enlarging/reducing 120% copy ] indicator «Enlarging/Reducing Copy» (Default value: 0) 130% 140% 150% 160% 170% 180% 190% ±0 200% NOTE Indicator display The display is changed for each of [ ], [ ], and [ ] indicators according to the status. Blinking : The function indicator in the setting process blinks. -
Page 34
copies copies copies copies Custom copy «Registering the Quantity that You Frequently Copy (Up to quantity copies Twenty-nine Copies)» (Default value: ±0) copies copies copies copies ±0 copies ±1 copies ±2 copies ±3 copies ±4 copies ±5 copies ±6 copies ±7 copies ±8… -
Page 35
Heavy Paper Paper type setting «Setting a Paper Type» (Default value: 1) Rough Paper Envelope Transparency Label Speed Priority Copy type setting «Selecting Copy Type (Speed (Default value: 1) Priority/Resolution Priorlty)» Resolution Priorlty Sharpness setting «Emphasizing the Outline of an Image (Default value: 0) (Sharpness)»… -
Page 36
Special Mode h «Special Mode» (Default value: 0) Cleaning the Fixing «Cleaning the Fixing Unit» Unit Printing the User «Printing the User Data List» Data List Upgrading «Upgrading Firmware» Firmware «Initializing Menus» Initializing Menus… -
Page 37: Toner Cartridges
Toner Cartridges 030E-00R For more information on the toner cartridges, see the following sections. «About the Supplied Toner Cartridge» «About Replacement Toner Cartridges» «Handling Toner Cartridges» «Storing Toner Cartridges» «Purchasing Consumables»…
-
Page 38: About The Supplied Toner Cartridge
About the Supplied Toner Cartridge 030E-00S The average yield of the toner cartridge that comes with the machine is as follows. Canon Cartridge Average yield : 700 sheets 725 Starter The average yield is on the basis of «ISO/IEC 19752″…
-
Page 39: About Replacement Toner Cartridges
«ISO/IEC 19752» is an ISO standard method for «the determination toner cartridge yield for monochrome electrophotographic printers and multi-function devices that contain printer components.» IMPORTANT About replacement toner cartridges For optimum print quality, replace the toner cartridge with the Genuine Canon Toner. Model name Supported Canon genuine toner cartridge MF3010…
-
Page 40: Handling Toner Cartridges
Be careful of counterfeit toner cartridges. Please be aware that there are counterfeit Canon toner cartridges in the marketplace. Use of counterfeit toner cartridge may result in poor print quality or machine performance.
-
Page 41
Canon is not responsible for any malfunction, accident or damage caused by the use of counterfeit toner cartridge. For more information, see http://www.canon.com/counterfeit. -
Page 42: Storing Toner Cartridges
Storing Toner Cartridges 030E-00X Be aware of the following points when storing a new toner cartridge or handling the toner cartridge that was taken out of the machine for maintenance or relocating the machine somewhere. IMPORTANT Precautions when storing toner cartridges To use toner cartridges in a safe and trouble-free manner, store them in a place that fulfills the following conditions.
-
Page 43: Purchasing Consumables
Purchasing Consumables 030E-00Y To purchase replacement toner cartridges, contact your local authorized Canon dealer. To find a dealer near, contact the Canon help line.
-
Page 44: Placing Documents
Placing Documents 030E-010 This section describes how to place documents on the platen glass. Before placing the documents on the platen glass, see «Attention (Placing Documents).» Open the platen glass. Place your document face down. Align the document with the appropriate paper size marks. If the document does not match any of the paper size marks, align the center of your document with the arrow mark.
-
Page 45
Close the platen glass gently. The machine is ready to scan or copy the document. When scanning or copying is complete, remove the document from the platen glass. -
Page 46: Attention (Placing Documents)
Attention (Placing Documents) 030E-011 CAUTION Precautions when closing the platen glass Be careful not to get your fingers caught. This may cause personal injury. Do not press down the feeder forcefully. This may damage the platen glass and cause personal injury.
-
Page 47: Loading Paper
Loading Paper 030E-012 This section describes how to load paper in the paper cassette. NOTE To set your choice of paper type By default, the paper type is set to <Plain (16 lb Bond-24 lb Bond)>. To use a different paper type, you need to change the default settings.
-
Page 48: In The Paper Cassette
In the Paper Cassette 030E-013 Before loading paper in the paper cassette, see «Attention (Loading Paper).» Spread the paper guides a little wider than the paper size. Gently load the paper stack into the paper cassette with the print side face up, until the edge of the paper stack meets the back of the paper cassette.
-
Page 49
(3) Loosen any stiff corners of the envelopes and flatten curls as shown in the figure. (4) Align the edges of the envelopes on a flat surface. (5) Gently load the envelopes into the paper cassette with the print side face up, until the edge of the envelope stack meets the back of the paper cassette. -
Page 50
Adjust the rear paper guide to the paper length without space. Pull out the output tray extension and lift the paper stopper. Set the paper type loaded in the tray. «Setting a Paper Type»… -
Page 51: Attention (Loading Paper)
Attention (Loading Paper) 030E-014 CAUTION Adjust the paper guides to the paper width without space. Handle paper carefully not to cut your hands with the edges of the paper. IMPORTANT Be sure to align the paper guides with the width of the paper. If the paper guides are too loose or too tight, this may result in misfeeds or paper jams.
-
Page 52: Paper Loading Capacity
Paper Loading Capacity 030E-015 Paper type Paper cassette Plain paper (Ex. 80 Approx. 150 sheets g/m²) Heavy paper (Ex. Approx. 100 sheets 91 g/m²) Heavy paper (Ex. Approx. 60 sheets 128 g/m²) Transparency Approx. 100 sheets Label Approx. 50 sheets Envelope Approx.
-
Page 53: Paper Loading Orientation
Paper Loading Orientation 030E-016 When printing on paper that has a preprinted letterhead or logo Load paper as shown below. : Feeding direction) Portrait orientation Landscape orientation 1-sided printing (with the printed side face up) (with the printed side face up) Printing on envelopes Load envelopes with the front side (non-glued side) face up as shown below.
-
Page 55: Setting A Paper Type
Setting a Paper Type 030E-017 After loading paper in the cassette, change the menu settings according to the paper type. Operating results Operating procedures Press [ ] (Menu setting key), and then start the menu operation. When the menu is operating, the menu indicator blinks. Press [ ] or [ ] until «P»…
-
Page 56
Press [ ] to confirm the setting. Press [ ] (Menu setting key) to exit the menu operation. The menu indicator turns off. -
Page 57: Setting The Auto Shutdown Time
Setting the Auto Shutdown Time 030E-06K By enabling this setting, you can set the machine to automatically shut down. The machine automatically turns OFF the main power switch after the specified period of idle time has elapsed since entering the sleep mode. Operating results Operating procedures Press […
-
Page 58
Press [ ] (Menu setting key) to exit the menu operation. The menu indicator turns off. -
Page 59: Initializing Menus
Initializing Menus 030E-018 You can reset the following settings to the default value. Paper type settings Registering the quantity Setting copy type Setting sharpness Setting special mode The quantity registered in «F» Operating results Operating procedures Press [ ] (Menu setting key), and then start the menu operation.
-
Page 60: Printing The User Data List
Printing the User Data List 030E-019 Print the user data list. The following items are printed. Controller ROM version Country/region code No. of printed pages/No. of scanned pages Registering the quantity Paper type settings Setting copy type Setting sharpness Setting special mode Operating results Operating procedures Load A4 or Letter size paper.
-
Page 61
Press [ ] (Menu setting key) to exit the menu operation. The menu indicator turns off. -
Page 62: Upgrading Firmware
Upgrading Firmware 030E-01C This section describes the procedure to upgrade the printer firmware. For details on the procedure for upgrading the firmware, see the manual supplied with the firmware. IMPORTANT Performing only when it is necessary Upgrade the printer firmware only when it is necessary. Operating results Operating procedures Press […
-
Page 63: Locating The Serial Number
Locating the Serial Number 030E-01A The serial number (a character string of three letters and a 5-digit number) is written on the rating label on the rear side of the machine.
-
Page 64: Specifications
Specifications 030E-01F Note that specifications are subject to change without notice.
-
Page 65: Machine Specifications
Machine Specifications 030E-01H Machine Specifications Type Personal Desktop 220 to 240 V, 50/60 Hz (Power requirements can vary by country. They depend on where you Power Supply purchased the product.) Maximum: 960 W or less Power Consumption Average consumption during standby mode: Approx. 2.5 W Average consumption during sleep mode: Approx.
-
Page 66: Copy Specifications
Copy Specifications 030E-01J Copy Specifications Speed priority: 600 dpi x 400 dpi Scan Resolution Resolution priority: 600 dpi x 600 dpi Speed priority: 600 dpi x 400 dpi Output Resolution Resolution priority: 600 dpi x 600 dpi Direct 1:1 ± 1.0 % Copy Ratio Zoom 0.50 to 2.00, 10 % increments Copy Speed (A4…
-
Page 67: Printer Specification
Printer Specification 030E-01K Printer Specification Printing Method Indirect electrostatic system (On-demand fixing) Paper Capacity Approx. 150 sheets (60 to 80 g/m²) Output Tray Capacity (a fresh Approx. 100 sheets (60 to 80 g/m²) stack of A4 size paper) Print Speed (A4 18 ppm Plain Direct) Speed priority: 600 dpi x 400 dpi…
-
Page 68: Scanner Specifications
Scanner Specifications 030E-065 Scanner Specifications Type Color scanner Maximum Scan up to 216 mm x 297.0 mm Size Optical resolution up to 600 x 600 dpi Scan Resolution Software interpolation resolution 9600 dpi x 9600 dpi Color: 8 seconds/sheet Scan Speed (A4, 300 x 300 dpi)* Grayscale: 3 seconds/sheet Hi-Speed USB…
-
Page 69: Document Type
Document Type 030E-01R «Supported Document Types» «Scan Area»…
-
Page 70: Supported Document Types
Supported Document Types 030E-01S Plain paper Heavy paper Photograph Type Small documents (for example, index cards) Special types of paper (for example, tracing paper, transparencies, etc.) Booklet (thickness not specified) Size (W x L) Maximum 216 mm x 297 mm Weight Maximum 2 kg Paper Capacity…
-
Page 71: Scan Area
Scan Area 030E-01U Make sure that your scan area fits within the shaded area, as shown in the illustrations on the following page. Note that the margins indicated in the illustrations are for your reference. Actual margins can vary. Place the document face down. Copy Scan * A4 size paper only…
-
Page 72: Paper
Paper 030E-01W «Supported Paper Types» «Printable Area»…
-
Page 73: Supported Paper Types
Supported Paper Types 030E-01X Paper Size The following paper sizes are supported. : Supported Paper Source Paper Size Paper cassette A4 (210 mm x 297 B5 (182 mm x 257 A5 (148 mm x 210 Legal (216 mm x 356 mm) Letter (216 mm x 279 mm) Statement (140 mm…
-
Page 74
mm x 250 mm) Envelope DL (110 mm x 220 mm) Custom Paper Size Make sure the flap is folded. You can set custom paper size of Width: 127 to 356 mm and Length: 76.2 to 216 mm. Specify the paper size in portrait orientation (Height Width) and within the range that can be defined. -
Page 75
Should you smell something burning, immediately turn OFF the machine, unplug the power plug from the AC power outlet, and contact your local authorized Canon dealer or the Canon help line. Continued use may lead to a fire or electrical shock. -
Page 76: Printable Area
Printable Area 030E-01Y The shaded area in the illustration on the following page represents the printable area (A4 size paper). Note that the margins indicated in the illustration are for your reference. Actual margins can vary. When an envelope is printed, the margin is 3/8″ (10 mm) on top, bottom, right, and left.
-
Page 77: Copy
Copy 030E-020 This chapter describes how to use the copy functions. Using the copy functions for the «Basic Copy Operations.» first time See the following sections. «Copying Both Sides of Cards onto One Side (ID Card Copy)» Using various copy «Copying Two Documents onto One Sheet (2 on 1 Copy)»…
-
Page 78: Basic Copy Operations
Basic Copy Operations 030E-021 For details on each key function for the operation panel and the display, see the following items. «Operation Panel and Display» <Before copying> If the [ ] indicator is on or other than [1] is displayed, the previous copy settings are remained. In this case, press [ ] to reset the copy settings.
-
Page 79
«Copying Both Sides of Cards onto One Side (ID Card Copy)» «Copying Two Documents onto One Sheet (2 on 1 Copy)» «Enlarging/Reducing Copy» You cannot set [ ] (2 on 1/ID card cop) and [ ] (enlarge/reduce copies) at a time. «Operation Panel and Display»… -
Page 80: Registering The Quantity That You Frequently Copy (Up To Twenty-Nine Copies)
Registering the Quantity that You Frequently Copy (Up to Twenty-nine Copies) 030E-026 You can call a registered quantity using one-touch button to copy by registering a copy quantity. You can register the copy quantity up to twenty-nine copies. «Basic Copy Operations» <Before registering the copy quantity>…
-
Page 81: Adjusting The Density
Adjusting the Density 030E-027 Operating results Operating procedures Place the document. «Placing Documents» «Supported Paper Types» Press [ ] or [ ] to specify the copy quantity. Specify the copy quantity first. You can set the copy quantity to «F» or «1» to «9.» You can register the custom copy quantity (user-defined number up to twenty-nine copies) to «F.»…
-
Page 82
«Setting List» Press [ ] to start copying. <Canceling copy jobs> Press [… -
Page 83: Enlarging/Reducing Copy
Enlarging/Reducing Copy 030E-028 You can specify a copy ratio (50 to 200%) in 10% increments. Operating results Operating procedures Place the document. «Placing Documents» «Supported Paper Types» Press [ ] or [ ] to specify the copy quantity. Specify the copy quantity first. You can set the copy quantity to «F»…
-
Page 84
Change the ratio. 50% to 90% 100% 110% to 190% 200% ±9 «Setting List» Press [ ] to start copying. <Canceling copy jobs> Press [ You cannot perform the enlarged or reduced copy when combined with the following functions. «Copying Both Sides of Cards onto One Side (ID Card Copy)» «Copying Two Documents onto One Sheet (2 on 1 Copy)»… -
Page 85: Copying Both Sides Of Cards Onto One Side (Id Card Copy)
Copying Both Sides of Cards onto One Side (ID Card Copy) 030E-02A You can copy both sides of cards onto one side. <Before copying> If the [ ] indicator is on or other than [1] is displayed, the previous copy settings are remained.In this case, press [ ] to reset the copy settings.
-
Page 86
nine Copies)» Press [ ] (Copy setting key) to specify the density settings if necessary. «Adjusting the Density» Press [ ] (Copy setting key) to to blink the [ indicator. Press [ ] or [ ] to display «C». Press [ ]. -
Page 87
Place the card with a 5 mm space created from the left edge of the platen glass. Place the card to fit in the left half of the platen glass. Press [ ]. The reverse side of the card is scanned. After scanning, printing starts. -
Page 88: Copying Two Documents Onto One Sheet (2 On 1 Copy)
Copying Two Documents onto One Sheet (2 on 1 Copy) 030E-029 You can copy the two documents onto one sheet by reducing the size. <Before copying> If the [ ] indicator is on or other than [1] is displayed, the previous copy settings are remained. In this case, Press [ ] and reset the settings.
-
Page 89
number of quantity, or want to copy more than 10 sets. «Registering the Quantity that You Frequently Copy (Up to Twenty-nine Copies)» Press [ ] (Copy setting key) to specify the density settings if necessary. «Adjusting the Density» Press [ ] (Copy setting key) to blink the [ ] indicator. -
Page 90
Press [ ] to scan the second document. After scanning, printing starts. -
Page 91: Selecting Copy Type (Speed Priority/Resolution Priorlty)
Selecting Copy Type (Speed Priority/Resolution Priorlty) 030E-02C Select whether to set priority on copy speed or resolution to copy. Operating results Operating procedures Place the document. «Placing Documents» «Supported Paper Types» Press [ ] or [ ] to specify the copy quantity. Specify the copy quantity first.
-
Page 92
Press [ ] or [ ] to change the setting values. The display and the copy type are matched as follows. Display Copy type Speed priority Resolution priority «Supported Paper Types» Press [ ] to confirm the setting. Press [ ] (Menu setting key) to exit the menu operation. -
Page 93: Emphasizing The Outline Of An Image (Sharpness)
Emphasizing the Outline of an Image (Sharpness) 030E-02E You can emphasize the outline of the image in the documents or decrease the contrast. Operating results Operating procedures Place the document. «Placing Documents» «Supported Paper Types» Press [ ] or [ ] to specify the copy quantity.
-
Page 94
Press [ ] to set the menu to be able to change the settings. Press [ ] or [ ] to change the setting values. <Pressing [ ] to decrease the values> It is appropriate when you want to copy documents clearly such as photos. -
Page 95: Print
Print 030E-02F This chapter describes how to print from your computer to the machine. Once you have the printer driver installed on your computer, you can print your document files to the machine efficiently. In addition, the printer driver offers various finishing options, such as scaling and gutters. Preparing for printing Preparing to use the «Preparing to Print from Your…
-
Page 96: Preparing To Print From Your Computer
Preparing to Print from Your Computer 030E-066 In order to print, install the printer driver in the printer. See the Starter Guide. NOTE About the printer driver The printer driver is software required for printing from an application. The printer driver will convert application software’s print data to print data for the printer.
-
Page 97: Setting Up Printer Sharing
Setting Up Printer Sharing 030E-02J Once you have set up a print server on your network, you can efficiently manage print jobs through the print server. Additionally, you can install the alternate printer driver for the machine on your computer from the network by adding it to the print server.
-
Page 98
Insert the User Software CD-ROM into the slot on your computer and click [Additional Drivers]. Install the alternate printer driver. The installation dialog box appears when the alternate printer driver is selected and [OK] is clicked. Browse to the folder where the printer driver files are stored and follow onscreen instructions. -
Page 99: Printing Fundamentals
Printing Fundamentals 030E-02K This section explains the basic printing method using the printer driver, how to set the printer options, and how to display the online help. NOTE To use the printer, you need an appropriate printer driver. Refer to the Starter Guide and install the printer driver. «Printing»…
-
Page 100: Printing
Printing 030E-02L This section explains the basic printing method using the printer driver. NOTE Printing methods may differ depending on the application you are using. For details, see the instruction manuals provided with the application. The display may differ according to the operating system, as well as the type and version of the printer driver. The machine may not be able to print data such as color photos if the data size of a single page is too large.
-
Page 101
NOTE For information on available printing functions, view the online help to find what you can configure in each sheet. (See «Viewing the Online Help.») Click [Print] (or [OK]). Printing begins. -
Page 102: Configuring The Default Print Settings
Configuring the Default Print Settings 030E-02R This section describes how to access the printer setup screen from [Control Panel] and how to specify printing functions beforehand. The printer whose settings you have specified will print with the same settings every time. When printing, you can change the settings specified beforehand whenever required.To change the settings, configure them in the [Print] dialog box from the application (see «Printing»).
-
Page 103
Specify the desired settings in the printer driver screen -> click [OK]. Click the tabs for the [Page Setup], [Finishing], and [Quality] sheets, and then specify the desired items. Note For information on available printing functions, view the online help to find what you can configure in each sheet. (See «Viewing the Online Help.») -
Page 104: Viewing The Online Help
Viewing the Online Help 030E-02S You can display the online help by clicking [Help] on the printer driver screen. The online help includes additional information about each printing option. If the e-Manual does not provide the information you need, see the online help. NOTE The display may differ according to the operating system, as well as the type and version of the printer driver.
-
Page 105: Printing On Custom Paper Size
Printing on Custom Paper Size 030E-030 Checking available custom paper size Custom paper sizes with width of 76.2 to 216.0 mm and height of 127.0 to 356.0 mm can be used with this printer. Loading custom paper size Load paper in the paper cassette. «In the Paper Cassette»…
-
Page 106: Registering A Custom Paper Size
Registering a Custom Paper Size 030E-02X Combinations of printer driver settings corresponding to a variety of printing purposes are provided with the printer driver as «profiles». This enables you to print documents according to a desired objective by simply selecting a profile from the [Profile] list.
-
Page 107: Canceling Print
Canceling Print 030E-02U You can cancel the job that is currently printing. If multiple jobs are printing, see the following to select and cancel the jobs using the print queue (Windows function). «Selecting and Canceling Jobs» NOTE Displaying Job Processing Operating results Operating procedures Press […
-
Page 108: Selecting And Canceling Jobs
Selecting and Canceling Jobs 030E-02Y Display the print queue. 1. Display the printer folder. «Basic Windows Operations» 2. Double-click the icon for this printer. Right-click the job you want to cancel, and select [Cancel] from the popup menu. If the job is not displayed Other user’s jobs are not displayed.
-
Page 109: Scan
Scan 030E-031 This chapter describes how to save scanned data to your computer. You can easily save the documents that were scanned by computer operation. The machine provides a wide variety of scan settings for you to choose from. You can save a scanned document in the «Searchable PDF»…
-
Page 110: Preparing To Use The Scan Functions
Preparing to Use the Scan Functions 030E-067 To scan documents, perform the following steps. Step Check your operating «System Requirements (Scan)» environment. Step See the Starter Guide. Install the scanner driver.
-
Page 111: System Requirements (Scan)
System Requirements (Scan) 030E-033 Hardware requirements IBM or IBM-compatible PC A computer having a USB port with the USB class driver installed Supported Operating Systems Windows 2000 Professional Windows XP Professional/Home Edition Windows XP Professional x64 Edition Windows Vista (32-bit/64-bit) Windows 7 (32-bit/64-bit) NOTE The following server operating systems are not supported.
-
Page 112: Basic Scan Flow
Basic Scan Flow 030E-034 The following three scanning methods are available: «Scanning Using the MF Toolbox» Scanning can be performed using the machine’s available scanning software. You can fine-tune the scan settings based on your scan needs. «Scanning an Image Using an Application» Scanning can be performed using your application.
-
Page 113: Scanning Using The Mf Toolbox
File» [Paper Size] in Step 6 is set to «fit the image.» Double-click the [Canon MF Toolbox 4.9] icon on the desktop. The MF Toolbox starts. Click one of the MF Toolbox command buttons based on your purpose of the scan.
-
Page 114
computer. (The following applications may not be registered as the MF Toolbox command buttons after installation, if the MF Toolbox is installed beforehand.) [OCR]: Presto! PageManager [PDF]: Presto! PageManager These applications are supported on Windows XP 64-bit Edition. Specify the scanner settings as needed. Click [Apply] to save the settings. -
Page 115
(1) Specify the settings as needed. «Using the ScanGear MF» for more information. (2) Click [Scan]. Scanning starts. -
Page 116: Scanning An Image Using An Application
Scanning an Image Using an Application 030E-036 You can scan an image from a TWAIN- or WIA- (Windows XP/Windows Vista/Windows 7 only) compliant application and use the image in that application. The procedure varies depending on the application. This section shows an example. Place your document.
-
Page 117: Scanning Using The Wia Driver (Windows Xp/Windows Vista/Windows 7 Only)
Scanning Using the WIA Driver (Windows XP/Windows Vista/Windows 7 Only) 030E-037 Before scanning with the WIA driver, see «Attention (WIA Driver).» This section describes how to scan documents using the WIA driver. Scanning from the [Scanner and Camera Wizard] dialog box (Windows XP only) Scanning from the [Windows Fax and Scan] dialog box (Windows Vista/Windows 7 only) Scanning Using Windows Live Photo Gallery (Windows Photo Gallery) (Windows XP/Windows Vista/Windows 7 only) Scanning using an application (Windows XP/Windows Vista/Windows 7 only)
-
Page 118
[Custom] Click [Custom settings] to specify advanced settings in the [Properties] dialog box. Click [Preview] and drag [ ] to specify the scanning area. Click [Next]. Specify the name, file format, and location where the group of pictures is saved. Select one of the following file formats. -
Page 119
Make your selection and click [Next]. Click [Finish]. Scanning from the [Windows Fax and Scan] dialog box (Windows Vista/Windows 7 only) You may not be able to access the dialog box, depending on your current edition of Windows Vista/Windows 7. Place your document. -
Page 120
Open the [Windows Fax and Scan] dialog box. «Basic Windows Operations» Click [New Scan] on the toolbar. Double-click the scanner icon when the following screen appears. Specify the scan settings. «[New Scan] Dialog Box» for more information. Click [Scan]. Scanning Using Windows Live Photo Gallery (Windows Photo Gallery) (Windows XP/Windows Vista/Windows 7 only) Place your document. -
Page 121
Start [Windows Live Photo Gallery] (or [Windows Photo Gallery]). For [Windows Live Photo Gallery] From the [Start] menu, select [All Programs] -> [Windows Live] -> [Windows Live Photo Gallery]. For [Windows Photo Gallery] From the [Start] menu, select [All Programs] -> [Windows Photo Gallery]. Open the [Import Pictures and Videos] dialog box. -
Page 122
Scanning using an application (Windows XP/Windows Vista/Windows 7 only) When the WIA driver is displayed, use the following steps. For the instructions on how to display the WIA driver, see «Scanning an Image Using an Application». Place your document. «Placing Documents» «Supported Document Types»… -
Page 123
[Picture type] Specify the color type. [Reset] Restore all the settings to the defaults. NOTE The options that are displayed in the [Advanced Properties] tab and their default values. These vary across the selected image type. Click [Preview] and drag [ ] to specify the scanning area. Click [Scan]. -
Page 124: Attention (Wia Driver)
Attention (WIA Driver) 030E-038 Scanning from the [Scanner and Camera Wizard] dialog box (Windows XP only) NOTE To save more than one picture in the same location Sequential numbers are automatically added to the end of the file names. Scanning from the [Windows Fax and Scan] dialog box (Windows Vista/Windows 7 only) NOTE When scanning is complete The scanned images are displayed within the [Windows Fax and Scan] folder.
-
Page 125: [New Scan] Dialog Box
[New Scan] Dialog Box 030E-039 [Scanner] Display a list of available scanners. Click [Change] and select the scanner. Select one of the following document types. [Add profile] [Documents] [Last used settings] [Photo (Default)] NOTE [Profile] When [Add profile] is selected Add new profiles in the [Add New Profile] dialog box.
-
Page 126: Using The Mf Toolbox
Using the MF Toolbox 030E-03A The following can be specified in the MF Toolbox: Specifying scan settings Saving scanned images Configuring an application (an e-mail client application) Previewing the scanned image and entering Exif information (Viewing the scanned image) Specifying scan settings You can specify the scan mode, resolution, original document size, and file size of the scanned images.
-
Page 127
JPEG/EXIF 75 to 600 dpi TIFF [Image Quality] PDF (1 page) PDF (multiple 75 to 400 dpi pages) PDF (additional pages) When [Mail] is selected, supported resolutions vary, depending on the [Upper Limit of Attached File] setting specified. When this check box is checked, the settings for [Scanner Settings] are unselectable. [Display the When [Start] is clicked, the [ScanGear MF] dialog box appears for you to specify advanced Scanner Driver]… -
Page 128
[PDF (Add Page)] Add the scanned image to the last page of a PDF file created by the MF Toolbox. NOTE File formats supported by command buttons [Save as Type] You can select the option when [Scan Mode] is set to [Grayscale], [Color], or [Color (Magazine)]. -
Page 129
Click [Set], select the e-mail application, and click [OK]. (To specify an application other than e-mail client software, you can drag and drop its icon directly to the dialog box.) NOTE When scanning using the [Mail] command button The MF Toolbox supports the following e-mail applications. Microsoft Outlook Express Microsoft Outlook Microsoft Exchange… -
Page 130
(2) Press [Start]. The scanned image is displayed in the [Scanned Image] dialog box. See the following instructions to specify the file format and location where the image is saved. NOTE When scanning using the [OCR] command button This check box is unselectable. When scanning using the [PDF] command button You can only preview the scanned image and specify the location where the image is saved. -
Page 131: Combining Multiple Documents Into One Pdf File
You can combine multiple documents into one PDF file. Place your documents on. «Placing Documents» «Supported Document Types» Double-click the [Canon MF Toolbox 4.9] icon on the desktop. The MF Toolbox starts. Click [PDF]. Select [PDF (Multiple Pages)] for [Save as Type].
-
Page 132
Specify the required settings as needed and click [OK]. [Create Searchable Convert character data within the document to text data to create a searchable PDF file. PDF] Select the document language. When you select [English] from the drop-down list and set [Text Language] [Image Quality] to [300 dpi] or a higher dpi for [Scanner Settings], character data can be more accurately scanned. -
Page 133: Using The Scangear Mf
Using the ScanGear MF 030E-03E Using the ScanGear MF, you can display previews of images and specify advanced scan settings before performing scans. «Using Simple Mode» «Using Advanced Mode» «Defining a Scan Area (Cropping Frame)» «Setting Resolution»…
-
Page 134: Using Simple Mode
Using Simple Mode 030E-03F Scanning in simple mode Simple mode toolbar Adding/Deleting the output size Scanning in simple mode Display the ScanGear MF. Start the ScanGear MF using either of the following methods. Selecting [Display the Scanner Driver] in the MF Toolbox Starting from an application Select a document type for [Select Source].
-
Page 135
Click [Preview]. The preview of the image is displayed. Select the purpose of the scan for [Select Purpose]. [Print (300dpi)] [Image Display (150dpi)] [OCR (300dpi)] «Setting Resolution» Select the output size of the scanned image. The options displayed in the window vary depending on the purpose of the scan specified in Step 4. Click [ ] to choose the orientation of the output size between landscape and portrait. -
Page 136
Display the information of the scanned image. Adding/Deleting the output size The [Add/Delete the Output Size] dialog box appears when [Add/Delete] for [Output Size] is selected. You can add or delete output sizes within this dialog box. [Output Size List] Display the registered output size name. -
Page 137: Using Advanced Mode
Using Advanced Mode 030E-03H Scanning in advanced mode Advanced mode toolbar Advanced mode settings Scanning in advanced mode Display the ScanGear MF. Start the ScanGear MF using either of the following methods. Selecting [Display the Scanner Driver] in the MF Toolbox Starting from an application Click [Advanced Mode].
-
Page 138
Click [Preview]. The preview of the image is displayed. Specify scan areas if you want to scan specific areas within the document. «Defining a Scan Area (Cropping Frame)» Click [Scan]. Advanced mode toolbar To perform all tasks using commands available on the toolbar, you need to display the image in the preview area. Delete the preview image. -
Page 139
Favorite Settings You can register frequently used input settings, output settings, image settings, color settings, and preferences as favorite settings. Once these settings have been registered as favorite settings, you can apply them to the entire image or specific scan areas of the image displayed in the preview area. IMPORTANT The following cannot be registered as favorite settings: Width and height values set for [Input Settings] and [Output Settings]… -
Page 140
Select to scan black and white printed photos or scan printed photos in black and white. The image is expressed in 256 shades, from 0 up to 255. [Color Mode] [Color] Select to scan color printed photos. The image is expressed in 256 colors (8 bits) for each R(ed), G(reen) and B(lue) color channel. -
Page 141
[Color], [Color (Documents)], or [Grayscale] is selected for [Color Mode]. Correct the fading of the image, as well as increase saturation to enhance obscure, tinted images. This setting is unselectable when no image is displayed in the preview area. [None] No fading correction is made. -
Page 142
When [Use Unsharp Mask] is set to [ON] Some moiré patterns may be generated if [Use Descreen] is set to [ON]. If this happens, set [Use Unsharp Mask] to [OFF]. To reflect the changes Scan the document again. Color Settings Using Color Settings command buttons, you can adjust the brightness and contrast of the entire image, specify highlights and shadows, and adjust the contrast and color balance of the image. -
Page 143
Select [Red], [Green], or [Blue] to adjust each color, or select [Master] to adjust all three colors when [Color] or [Color (Documents)] is selected for [Color Mode]. [Channel] Adjust gray when [Grayscale] is selected for [Color Mode]. Click to move the tool to the part of the image (or the selected scan area) in the preview area ] (Black-point that you want to be the darkest part. -
Page 144
Threshold You can adjust the threshold setting. By adjusting the threshold, you can sharpen text within the document and reduce print-through that often happens to newspapers. NOTE Threshold The brightness of color and gray images can be specified as a value from 0 up to 255, while the brightness of black and white images is expressed in black and white including all shades between black and white. -
Page 145
[Preview] tab Select the preview mode when you start the ScanGear MF. [Automatically Execute Preview] The preview starts automatically when the ScanGear MF is started. [Preview at the Start [Display Saved Preview Image] of ScanGear] Display the last previewed image. [None] No preview image is displayed. -
Page 146
Select the color correction type. [Recommended] Reproduce vividly the colors of a document displayed on the screen. [Color Matching] [Color Correction] Automatically match the colors of the image to those of the scanner, monitor, and color printer. When this option is selected, the color command buttons in the [Advanced Mode] tab are disabled. -
Page 147: Defining A Scan Area (Cropping Frame)
Defining a Scan Area (Cropping Frame) 030E-03J You can select or deselect scan frames (cropping areas) for images displayed in the preview area. Selecting the cropping area automatically Defining a cropping frame Defining multiple cropping frames Deleting cropping frames Selecting the cropping area automatically Display the preview.
-
Page 148
Defining multiple cropping frames You can define multiple cropping frames. Display the image in the preview area. Click [ ] (Crop) on the toolbar. Click on the preview image and drag around the contours/border of the area you want to select. Click the outer rim of the cropping frame already defined and drag the frame to add. -
Page 149: Setting Resolution
Setting Resolution 030E-03K A scanned image is a group of dots which contain color and brightness information. The density of these dots is called the «resolution». The «dpi (dots per inch)» means the maximum dots a printer can print per inch. Set the resolution by specifying the following options.
-
Page 150: Troubleshooting
Troubleshooting 030E-03L This chapter describes how to handle paper jams and printout problems. Clearing jams «Clearing Jams.» When a problem has occurred (Read See «Troubleshooting.» this section before requesting service.) When print quality is «Printing Results are Not Good.» not good When you want to uninstall the «Uninstalling the…
-
Page 151: Clearing Jams
Clearing Jams 030E-03S If the [ ] indicator is blinking, a paper jam occurs inside the printer. Follow the procedures in this section to remove the jammed paper. «Removing Jammed Paper» WARNING When removing the jammed paper Use caution to avoid cutting your hands. When removing jammed paper or when inspecting the inside of the machine Do not allow necklaces, bracelets, or other metal objects to touch the inside of the machine, as this may result in burns or electrical shock.
-
Page 152
Touching the transfer roller (A) may damage the machine. NOTE Do not force the jammed paper out of the machine. Contact your local authorized Canon dealer or the Canon help line for assistance, if needed. -
Page 153: Removing Jammed Paper
Removing Jammed Paper 030E-03U Follow onscreen instructions to remove jammed paper. Inside the printer Hold the operation panel. Lift the scanning platform. When you cannot lift the scanning platform Make sure that the platen glass is completely closed. Do not try to forcefully lift the scanning platform, as this may damage the machine. The platen glass may not be completely closed when a thick document such as books is placed inside.
-
Page 154
Open the toner cover. Remove the toner cartridge. Remove the jammed paper by pulling it out gently. -
Page 155
When the leading edge of the jammed paper is not visible Do not pull out the paper forcibly and proceed to Step 7. Remove the jammed paper by pulling it out gently. (1) Gently pull any jammed paper downward from the space between the fixing unit (A) and roller (B) until the leading edge emerges from the machine. -
Page 156
Close the toner cover. When you cannot close the toner cover Make sure that the toner cartridge is properly set inside the machine. Do not try to forcefully close the toner cover, as this may damage the machine. Lower the scanning platform. The machine is ready to print. -
Page 157
Load paper in the paper cassette. -
Page 158: Troubleshooting
Troubleshooting 030E-068 If a problem occurs while the machine is in use, try the actions suggested in this section before contacting technical support. Check the following first. Is the power switched ON? Has the power switch been just turned ON? Is the machine in the sleep mode? Are the [Paper Jam] or [Paper] Indicators blinking? Is anything other than «1»…
-
Page 159
OFF the main power switch, disconnect the power cord, and contact the Canon help line. If you continue to experience problems after trying the actions suggested in this section, see the following sections to solve the problems. -
Page 160: Paper Feeding Problems
Paper Feeding Problems 030E-040 Paper is not fed at all, or more than one sheet is fed simultaneously (multi-feeds). Paper jams occur repeatedly. Paper is not fed at all, or more than one sheet is fed simultaneously (multi-feeds). Make sure that the paper is properly loaded. «Loading Paper»…
-
Page 161: Cannot Print, Or The Images On Printouts Are Spotted Or Distorted
Cannot Print, or the Images on Printouts are Spotted or Distorted 030E-041 Load the type of paper that meets the paper specifications. Is the appropriate «Supported Paper Types» paper type loaded Change the settings for paper type. in the machine? «Setting a Paper Type»…
-
Page 162: Copying Problems
Copying Problems 030E-042 See the following sections. The copy output is hardly readable and copied poorly. The copy output is askew. The copy output is hardly readable and copied poorly. The copy output is too light or has uneven density. Vertical white streaks appear on the copy output.
-
Page 163: The Copy Output Is Hardly Readable And Copied Poorly
The Copy Output is Hardly Readable and Copied Poorly 030E-043 Remove all the obstructions. Is the output tray slot blocked? Load the document properly. Is the «Placing Documents» document Load the paper properly. or paper «Loading Paper» loaded properly? Load the type of paper that meets the paper specifications. Is the «Supported Paper Types»…
-
Page 164
using. If the copy result is not satisfactory, try to copy your document on the other side. the correct? -
Page 165: Printing Problems
Printing Problems 030E-044 See the following sections. The printout is hardly readable and printed poorly. The printout is printed askew. Cannot print documents from a computer. The printout is hardly readable and printed poorly. The printout is too light or has uneven density. Vertical white streaks appear on the printout.
-
Page 166: Cannot Print Documents From A Computer
Cannot Print Documents from a Computer 030E-045 When a print job remains in the print queue without being processed due to an Are there any unexpected interruption, the machine may not respond. Delete the job and try to print it jobs again.
-
Page 167: Scanning Problems
Scanning Problems 030E-046 See the following sections. Cannot scan a document. Cannot scan multiple documents to create a combined multi-page PDF file. During scanning, a computer connected to the machine freezes or is disconnected. In the event that applications installed from the User Software CD-ROM that comes with the machine are not properly registered in the MF Toolbox.
-
Page 168
Register the appropriate application in the MF Toolbox. «Using the MF Toolbox» Scanned images are spotted or distorted. Clean the platen glass and feeder’s scanning area. Scanned images cannot be displayed correctly if displayed smaller than the actual size, depending on the application. Scale the images to 100 %. -
Page 169: Cannot Scan A Document
Cannot Scan a Document 030E-069 Restart your computer. Is your computer working properly? Install it. Has the MF See the Starter Guide. Toolbox been installed? Connect the USB cable directly to a computer and scan your document to see if it works Is your properly.
-
Page 170
See the Starter Guide. Cameras] Windows? -
Page 171: Installation And Uninstallation Problems
The [Canon] folder remains in the Start menu after the software has been uninstalled. Uninstall the MF Toolbox first before uninstalling the MF drivers. If you uninstall the MF drivers first, the [Canon] folder may remain after the MF Toolbox has been uninstalled.
-
Page 172: Miscellaneous Problems
Should you smell something burning, immediately turn OFF the machine, unplug the power plug from the AC power outlet, and contact your local authorized Canon dealer or the Canon help line. Continued use may lead to a fire or electrical shock.
-
Page 173: Printing Results Are Not Good
To contact your local authorized Canon dealer When a problem occurs that is not suggested in the e-Manual, or a problem persists if you follow the instructions, or you cannot determine the nature of the problem, contact your local authorized Canon dealer.
-
Page 174: Paper Curls
Paper Curls 030E-04C Try one of the following to solve the problem. <Cause 1> Damp paper is used. Replace the paper stack with new unopened one. Solution 1 «Supported Paper Types» Follow the steps in the procedure below when plain paper (60 to 90 g/m²) is loaded. Solution 2 1.
-
Page 175: Paper Creases
Paper Creases 030E-04E Try one of the following to solve the problem. <Cause 1> The paper stack is not loaded correctly. Load the paper stack is not loaded correctly. Solution «Loading Paper» <Cause 2> Damp paper is used. Replace the paper stack with new unopened one. Solution «Supported Paper Types»…
-
Page 176: Printing Is Uneven
Printing is Uneven 030E-04F Try one of the following to solve the problem. <Cause 1> Paper is too moist or Too dry. Replace the paper stack with new unopened one. Solution «Supported Paper Types» <Cause 2> Toner is nearly empty. To view the onscreen instructions, see the following.
-
Page 177: White Specks Or Spots Appear On The Printout
White Specks or Spots Appear on the Printout 030E-04H Try one of the following to solve the problem. <Cause 1> The paper type loaded is not appropriate. Make sure that the number of sheets or the paper type loaded in the paper cassette meets the paper Solution specifications.
-
Page 178: The Toner Does Not Flow Well Into The Paper
The Toner does Not Flow Well into the Paper 030E-04J Try one of the following to solve the problem. <Cause 1> The paper type setting specified is not appropriate. Select the appropriate paper type setting. Solution «Setting a Paper Type» <Cause 2>…
-
Page 179: Vertical Streaks Appear On The Output
Vertical Streaks Appear on the Output 030E-04K Try one of the following to solve the problem. <Cause 1> Due to the paper type or usage conditions, vertical streaks appear on the output. Replace the paper stack with new unopened one. Solution 1 «Supported Paper Types»…
-
Page 180: Toner Smudges And Spatters Appear Around Text And Images
Toner Smudges and Spatters Appear around Text and Images 030E-04L Try one of the following to solve the problem. <Cause 1> The paper type loaded is not appropriate. Make sure that the number of sheets or the paper type loaded in the paper cassette meets the paper Solution specifications.
-
Page 181: The Printout Is Too Dark
The Printout is Too Dark 030E-04R Try one of the following to solve the problem. <Cause 1> The copy density setting specified is not appropriate. Adjust the <Density> or <Correct Density> to a lower level from the operation panel. Solution «Adjusting the Density»…
-
Page 182: Printed Bar Codes Cannot Be Scanned
Printed Bar Codes Cannot be Scanned 030E-04S Try one of the following to solve the problem. <Cause> A bar code cannot be scanned correctly when printing it using the default print settings. Change the [Special Print Mode] setting to [Special Settings 1] in the print driver. «Special Mode»…
-
Page 183: Images May Be Partially Cut Off On The Output
Images may be partially cut off on the output 030E-06J Try one of the following to solve the problem. <Cause> The print speed is prioritized, and [Output Adjustment Mode] is set to [Off]. Change the settings for [Output Adjustment Mode] to [On] in the printer driver. «Viewing the Online Help»…
-
Page 184: Uninstalling The Software
Have the installation software ready in case you want to re-install the drivers). Quit all running applications on your computer. To uninstall the printer/scanner driver From the [Start] menu, click [(All) Programs] -> [Canon] -> [MF3010] -> [Uninstall Drivers]. Click [Delete]. Click [Yes] to confirm the uninstallation.
-
Page 185
To uninstall the MF Toolbox From the [Start] menu, click [(All) Programs] -> [Canon] -> [MF Toolbox 4.9] -> [Toolbox Uninstall]. Click [Remove]. Click [Exit]. -
Page 186: When A Service Error Has Occurred
When a Service Error Has Occurred 030E-06F The service error has occurred when the error number appears on the display and [ ] indicator and [ ] indicator light up. NOTE Error numbers 7KH HUURU QXPEHU DSSHDUV RQ WKH GLVSOD DQG VZLWFKHV LQ RUGHU RI ( [ [[[ UHSUHVHQWV D WUHHGLJLW number).
-
Page 187: When A Problem Cannot Be Resolved
When a Problem cannot be Resolved 030E-03R If you cannot solve the problem after having referred to the information in this chapter, contact your local authorized Canon dealer or the Canon help line. Please have the following information ready when contacting the Canon Customer Care Center: Product name (MF3010) Serial number (a character string of three letters and a 5-digit number;…
-
Page 188: Maintenance
Maintenance 030E-04W This chapter describes how to clean the machine, replace toner cartridges, make adjustments, and transport the machine. When the machine is dirty «Cleaning the Exterior.» When the inside of the machine is dirty «Cleaning the Inside of the Machine.»…
-
Page 189: Cleaning The Machine
Cleaning the Machine 030E-04X See following sections to clean the components of the machine. «Cleaning the Exterior» «Cleaning the Inside of the Machine» «Cleaning the Fixing Unit» «Cleaning the Platen Glass»…
-
Page 190: Cleaning The Exterior
Cleaning the Exterior 030E-04Y «Attention (Cleaning the Machine)» in advance. Clean the exterior of the machine and ventilation slots. Turn OFF the power switch and disconnect the power cord. Clean the exterior of the machine with a soft, well wrung out cloth dampened with water or a mild detergent diluted with water.
-
Page 191: Cleaning The Inside Of The Machine
Cleaning the Inside of the Machine 030E-050 «Attention (Cleaning the Machine)» in advance. Clean the machine’s print area at regular intervals so that toner powder, as well as paper dust and other debris, do not accumulate inside the machine. Turn OFF the power switch and disconnect the power cord. Hold the operation panel.
-
Page 192
Open the toner cover. Remove the toner cartridge. Remove toner powder, as well as paper dust and other debris from the inside of the machine, using a clean, soft, dry, and lint-free cloth. Insert the toner cartridge. Fit the protrusions (A) on both sides of the toner cartridge into the guides located on both sides of the machine and slide the toner cartridge into the machine until the toner cartridge comes to rest and is held against the back of the machine. -
Page 193
Close the toner cover. When you cannot close the toner cover Make sure that the toner cartridge is properly set inside the machine. Do not try to forcefully close the toner cover, as this may damage the machine. Lower the scanning platform. Connect the power cord and turn ON the power switch. -
Page 194: Cleaning The Fixing Unit
Cleaning the Fixing Unit 030E-051 The fixing unit may be dirty under the following conditions. Clean the fixing unit. When black streaks appear on the output When replacing the toner cartridge Operating results Operating results Load A4 or Letter size plain paper. «In the Paper Cassette»…
-
Page 195: Cleaning The Platen Glass
Cleaning the Platen Glass 030E-052 «Attention (Cleaning the Machine)» in advance. Follow the steps in the procedure below to clean the platen glass and the under surface of the platen glass cover. Turn OFF the power switch and disconnect the power cord. Open the platen glass.
-
Page 196
Connect the power cord and turn ON the power switch. -
Page 197: Attention (Cleaning The Machine)
Attention (Cleaning the Machine) 030E-053 «Maintenance and Inspections» in «Important Safety Instructions». Before cleaning the machine, note the following. Use a soft cloth to avoid scratching the components. Do not clean the machine components with tissue paper, paper towels, or similar materials. These materials tend to stick to the components or generate static charges.
-
Page 198
When a job is waiting to be printed The job is deleted when you turn OFF the power switch. -
Page 199: Replacing Toner Cartridges
Replacing Toner Cartridges 030E-054 When the toner nearly runs out, white streaks appear on the output, or the output is partially faded. No message appears on the screen, if the toner nearly runs out. Replace the toner cartridge when white streaks appear on the output, or the output is partially faded.
-
Page 200: Before Replacing The Toner Cartridge
Before Replacing the Toner Cartridge 030E-055 «Attention (Replacing the Toner Cartridge)» in advance. When the toner nearly runs out, follow the steps in the procedure below before replacing the toner cartridge. The machine continues printing until the toner runs out completely. Hold the operation panel.
-
Page 201
Open the toner cover. Remove the toner cartridge. Gently shake the toner cartridge five or six times to evenly distribute the toner inside the cartridge. -
Page 202
Insert the toner cartridge. Fit the protrusions (A) on both sides of the toner cartridge into the guides located on both sides of the machine and slide the toner cartridge into the machine until the toner cartridge comes to rest and is held against the back of the machine. Close the toner cover. -
Page 203: Replacing The Toner Cartridge
Replacing the Toner Cartridge 030E-056 «Attention (Replacing the Toner Cartridge)» in advance. Hold the operation panel. Lift the scanning platform. When you cannot lift the scanning platform Make sure that the platen glass is completely closed. Do not try to forcefully lift the scanning platform, as this may damage the machine. The platen glass may not be completely closed when a thick document such as books is placed inside.
-
Page 204
Open the toner cover. Remove the toner cartridge. Take out the new toner cartridge from the protective bag. Tear the notch with both hands to open the protective bag. -
Page 205
Gently shake the toner cartridge five or six times to evenly distribute the toner inside the cartridge. Place the toner cartridge on a flat surface, lift the tab, and gently pull the sealing tape completely out. The full length of the sealing tape is approximately 50 cm. Insert the toner cartridge. -
Page 206
When you cannot close the toner cover Make sure that the toner cartridge is properly set in the machine. Do not try to forcefully close the toner cover, as this may damage the machine. Lower the scanning platform. -
Page 207: Attention (Replacing The Toner Cartridge)
Please be aware that there are counterfeit Canon toner cartridges in the marketplace. Use of counterfeit toner cartridge may result in poor print quality or machine performance. Canon is not responsible for any malfunction, accident or damage caused by the use of counterfeit toner cartridge. For more information, see http://www.canon.com/counterfeit.
-
Page 208
Do not touch the toner cartridge memory (A) or the electrical contacts (B). This may result in damage to the cartridge. Do not open the drum protective shutter (A). Print quality may deteriorate if you touch or damage the drum inside the drum protective shutter (A). Do not touch or open the drum protective shutter (A). -
Page 209
When disposing of the removed sealing tape Dispose of the packing materials in accordance with local regulations. Keep the protective bag. Keep the protective bag for storing the toner cartridge. You will need it when you remove the toner cartridge for machine maintenance or other purposes. -
Page 210: Special Mode
Special Mode 030E-058 Use the Special Mode settings to fix print quality problems. Read the following carefully before changing the settings. IMPORTANT Use default settings in normal operation Change the settings only when the problems noted below occur. Settings That Can Be Specified From the Operation Panel Settings Default settings are highlighted in bold.
-
Page 211
The more effective the setting becomes, the slower the print speed. Due to the paper type (for example, heavy paper) or usage conditions (for example, dry conditions), toner smudges and spatters appear on the output. When this occurs, set this setting to <On>. Special Mode h The print quality may become lower when this setting is enabled, depending on the paper type used (for example, thin paper) or usage… -
Page 212
Click the [Finishing] tab. NOTE For the instructions on how to access the printer driver screen, see «Printing» and «Configuring the Default Print Settings.» Click [Advanced Settings]. -
Page 213: Relocating The Machine
Relocating the Machine 030E-059 «Attention (Relocating the Machine)» in advance. Follow the steps in the procedure below to relocate the machine somewhere else for maintenance and other purposes. Turn OFF the machine and all the computers connected to the machine. Disconnect all cables and the power cord from the machine.
-
Page 214
Fold the paper stopper and push the output tray extension into the machine. NOTE When paper is left in the output tray Remove the paper from the output tray. Remove the paper stack from the paper cassette. NOTE When the front paper guide is pulled out from the paper cassette Push the guide into the paper cassette. -
Page 215
Relocate the machine. Make sure that all the covers and trays are closed and hold the lift handles with the front side of the machine facing you. Check the weight of the machine before lifting, carrying, and relocating it. «Machine Specifications» Carefully set the machine down at the new installation site. -
Page 216: Attention (Relocating The Machine)
Attention (Relocating the Machine) 030E-05A WARNING When relocating the machine Be sure to turn OFF the power switch on the machine and your computer, and unplug the power plug and interface cables. Failure to do so can damage the cables or cords, resulting in a fire or electrical shock. CAUTION Set the machine down slowly and carefully.
-
Page 217: Appendix
Appendix 030E-05C «Basic Windows Operations»…
-
Page 218: Basic Windows Operations
Basic Windows Operations 030E-05E How to Open the Printer Folder How to Display the [Scanners and Cameras] or [Scanners and Cameras Properties] Screen How to Display [Windows Fax & Scan] Screen How to Display the Top Screen of CD-ROM How to Check the Windows Vista/7 Process Version How to Open the Printer Folder Windows 2000 From the [Start] menu, select [Settings] and [Printers].
-
Page 219
How to Display the Top Screen of CD-ROM If you cannot display the top screen when setting CD-ROM, perform the following operations. The CD-ROM drive name is indicated as «D:» in this manual. The CD-ROM drive name may differ depending on the computer you are using. -
Page 220: Disclaimers
030E-05F The information in this document is subject to change without notice. CANON INC. MAKES NO WARRANTY OF ANY KIND WITH REGARD TO THIS MATERIAL, EITHER EXPRESS OR IMPLIED, EXCEPT AS PROVIDED HEREIN, INCLUDING WITHOUT LIMITATION, THEREOF, WARRANTIES AS TO MARKETABILITY, MERCHANTABILITY, FITNESS FOR A PARTICULAR PURPOSE OF USE OR NON-INFRINGEMENT.
-
Page 221: Copyright
No part of this publication may be reproduced, transmitted, transcribed, stored in a retrieval system, or translated into any language or computer language in any form or by any means, electronic, mechanical, magnetic, optical, chemical, manual, or otherwise, without the prior written permission of Canon Inc.
-
Page 222: Trademarks
Trademarks 030E-05J Canon and the Canon logo are registered trademarks of Canon Inc. in the United States and may also be trademarks or registered trademarks in other countries. Apple, Mac OS, and Macintosh are trademarks or registered trademarks of Apple Inc. in the U.S. and/or other countries.
-
Page 223: Contact Us
30-2, Shimomaruko 3-chome, Ohta-ku, Tokyo 146-8501, Japan CANON MARKETING JAPAN INC. 16-6, Konan 2-chome, Minato-ku, Tokyo 108-8011, Japan CANON U.S.A., INC. One Canon Plaza, Lake Success, NY 11042, U.S.A. CANON EUROPA N.V. Bovenkerkerweg, 59-61, 1185 XB Amstelveen, The Netherlands CANON CHINA CO. LTD.
-
Page 224: Using The E-Manual
Using the e-Manual 030E-05L This chapter describes how to use the e-Manual. You can view the content of the e-Manual anytime once you have it installed on your computer, without needing to keep the CD-ROM handy. See «Installing the e-Manual.» The e-Manual provides several search tools for you to quickly find the right information, allowing for fast access.
-
Page 225: How To Use The E-Manual
How to Use the e-Manual 030E-05R Click the following links to see the system requirements and learn how to install/uninstall and use the e-Manual. System Requirements Installing the e-Manual Uninstalling the e-Manual…
-
Page 226: System Requirements
System Requirements 030E-05S You can view the e-Manual in a Web browser. Supported (tested) browsers include the following. Windows: Internet Explorer 6.0/7.0/8.0 Firefox 2.x/3.x Mac OS: Safari 2.x/3.x Firefox 2.x/3.x NOTE Java scripting Enable Jave scripting in your browser before using the e-Manual.
-
Page 227: Installing The E-Manual
Installing the e-Manual 030E-05U Install the e-Manual provided on the CD-ROM that comes with the machine on your computer. Follow the steps in the procedure below. Insert the User Manual CD-ROM into the slot on your computer. Perform the following procedure. (1) Select your language.
-
Page 228
Double-click the [MF3010 e-Manual] on the desktop. When a security warning message appears Perform the following procedure. 1. Click the information bar and select [Allow Blocked Content] from the pop-up menu. 2. Click [Yes]. NOTE Viewing the e-Manual Directly from the CD-ROM You can also view the e-Manual directly from the CD-ROM without installing it on the computer. -
Page 229: Uninstalling The E-Manual
The process of removing the e-Manual to restore the computer to the same state as before the e-Manual was installed is called uninstallation. When uninstalling the e-Manual, delete the file manually in the following location. The [MF3010 e-Manual] folder in «C:Documents and Settings(the user name)My DocumentsCanonMFPManuals». The [MF3010 e-Manual] short cut icon on the desktop.
-
Page 230: Screen Layout Of The E-Manual
Screen Layout of the e-Manual 030E-05X This section describes the screen layout of the e-Manual. The «Top Page» is the default home page that appears when the e-Manual is started. The «Topic Page» is the page displayed the main contents. The «Contents Page»…
-
Page 231: Top Page
Top Page 030E-05Y (1) Select from functions Provide a link to the selected content, to let you to learn how to use the functions of the machine. (2) First of all… Provide a link to the selected content, to describe the safety instructions, features of the machine, and how to configure and use the machine efficiently (for example, loading paper and using the sleep mode.) (3) Place This Guide near the MF3010 Click to see Using the Quick Reference Guide.
-
Page 232: Topic Page
Topic Page 030E-060 (1) Category contents Display the contents of the selected category. Click the content that you want to view in the left column. The entire section is displayed in the right column (topic page). Click [ ] to expand the selected content, or click [ ] to collapse it.
-
Page 233: Contents Page
Contents Page 030E-061 (1) Categories Show the categories of the e-Manual. Click a category to view its details. (2) Whole contents Show all the categories and sections of the e-Manual. Click a category or section to view its details.
-
Page 234: Search Method
Search Method 030E-062 (1) [Enter keyword(s) here] Enter a keyword in the keyword/text field located on the upper right hand corner of the «Top» or «Topic page», and click [ ]. The search box appears. You can also enter your query in the search box. Additionally, more than one keyword can be entered by adding space in between.
-
Page 235: Viewing The E-Manual
Viewing the e-Manual 030E-063 Symbols Used in This Manual The following is a list of warnings and cautions provided in the e-Manual, to explain handling restrictions, precautions, and instructions that should be observed for your safety. WARNING Indicates a warning concerning operations that may lead to death or injury to persons if not performed correctly. To use the machine safely, always pay attention to these warnings.
-
Page 236
Microsoft Windows 2000 Windows 2000 Microsoft Windows XP Windows XP Microsoft Windows Vista operating system Windows Vista Microsoft Windows 7 operating system Windows 7 Microsoft Windows Server 2003 Windows Server 2003 Microsoft Windows Server 2008 Windows Server 2008 Microsoft Windows operating system Windows…
Содержание
- 1 Скачать программу Canon MF Toolbox 4.9 (русский):
- 2 У приложения canon mf toolbox немало достоинств
- 3 Программа характеризуется следующими особенностями:
- 4 Скачать Canon MF ToolBox для Виндовс 10 бесплатно
- 5 Как установить драйвер в Windows 10
Canon MF Toolbox — это очень хорошая программа для работы в офисе (или дома) если Вы используете оборудование компании Canon. Суть заключается в том, что данная программа позволяет быстро, качественно и просто выполнять операции, связанные со сканированием документов. Через интерфейс Canon Toolbox можно отсканировать документ в формат картинки, PDF, распознать отсканированный документ или сразу отправить его на почтовый ящик. В случае если Вы пользуетесь МФУ или принтером с автоматической системой подачи бумаги в сканер, то данная программа позволит в режиме автомата отсканировать огромную стопу документов, причем сможет это сделать даже с двухсторонним сканированием, если сканер позволяет выполнять операцию переворота бумаги. Огромным плюсом данной программы является очень простой и понятный интерфейс, а также минимальный размер, занимаемый на диске и в оперативной памяти. Я нашел рабочий вариант на русском и английском языках, качайте тот, который нужен именно в Вашей ситуации. Файлы закреплены ниже на данной странице для бесплатного скачивания!Внимание!!! Обнаружил что не на все МФУ и сканеры может подойти предложенный мной установщик. Рекомендую следующий порядок действий для установки:1. Скачать и установить первый архив canon-mf-toolbox-4_9_11_rus.zip. Если после запуска установленного приложения Вы получите ответ, что сканер не поддерживается, то удаляем установленную программу.2. Скачиваем и устанавливаем ToolBox_4911mf18_Win_EN.exe . Обычно после запуска данной программы все работает, но будет на английском языке. Если это не устраивает, то удаляем данное приложение и устанавливаем вариант 3.3. Скачиваем и устанавливаем ToolBox4911mf18WinRU.zip, проверяем работу. У меня после такова алгоритма программа запускалась и был русский язык интерфейса. Если просто сразу поставить данную версию программы, то можно получить ответ что сканер не поддерживается. Версия программы: 4.9.11Поддержка русского языка: ДАПоддержка ОС: 10 / 8.1 / 8 / 7 / XP ( 32|64 ) Скриншоты к программе:
[9,82 Mb] (cкачиваний: 1871) [9,47 Mb] (cкачиваний: 251) [9,83 Mb] (cкачиваний: 167)Офисные приложенияПохожее кино Zoiper 3.15
 ScanTool (программа для сканирования)
 CDBurnerXP
 XnRetro
 AVS Document Converter of your page —>
 Программа Canon MF Toolbox интересна для пользователей, использующих сканеры Canon. Данное приложение увеличивает быстроту сканирования во много раз и позволяет улучшить работу с копиями после сканирования. Поэтому нужно скачать canon mf toolbox 4.9 64 бит, чтобы экономить время и получать удовольствие от работы.
В настоящее время большинство профессий связаны с оформлением документов, значит, многие пользователи ПК могут пользоваться русской версией Canon MF Toolbox, работа которой максимально удобная, эффективная и простая. Программа легко и быстро запускается. Кроме того, в этом приложении пользователю доступна самостоятельная настройка сканера.

Русская версия программы облегчает работу пользователю. Она используется для многофункциональных МФУ, принтеров и сканеров, произведенных компанией Canon. Утилита выпущена производителем бесплатной, чтобы даже не профессиональные пользователи могли с помощью этой утилиты легко и свободно пользоваться офисной техникой.
Для корректной работы данного ПО с имеющимся оборудованием необходимо установить все драйверы и назначить сканер или МФУ устройством для сканирования по умолчанию. Также потребуется скачать net framework 2.0 для windows 10, любо обновить его. Это программная платформа, которая представляет собой общеязыковую среду исполнения, без которой запуск и работа MF Toolbox будет невозможна.

У приложения canon mf toolbox немало достоинств
Утилита обладает следующими достоинствами:
- Отсутствием предъявления больших требований к операционным системам, установленным на ПК.
- Бесплатное скачивание и использование.
- Доступность и понятность при установке и настройке утилиты.
- Наличие русскоязычной версии.
- Поддержка операционной системы Windows 10.
- Обладает простым и понятным интерфейсом.
- Сканированные документы имеют высокое качество. Пользователям не придется разочаровываться, когда он получит готовый документ после сканирования даже с помощью устаревшей модели сканера.
- Можно одновременно работать на нескольких устройствах в больших офисах.
Приложение полезно пользователям, которые работают с документами, поскольку она позволяет обрабатывать документы быстро и качественно. Для установки программы можно воспользоваться официальным сайтом компании-производителя либо специальным установочным диском, который продается одновременно с офисными приборами.
С помощью приложения canon mf toolbox для Виндовс 10 сложная документальная работа становится легкой и регулируемой автоматической системой. Все отсканированные документы легко и быстро редактируются. Главная панель отображает значок каждого параметра. Пользователь выбирает необходимые, составляет алгоритм и сохраняет. В следующий раз, открыв программу, он не будет тратить время на поиски требуемых параметров.
Программа характеризуется следующими особенностями:
- Возможностью отправлять документы, используя почту или интерфейс приложения.
- Возможность настраивать сканер самостоятельно.
- Документы сканируются с высоким качеством.
- Экономится время во время офисной работы.
- Высокая степень производительности.
- Документы сканируются в облегченном процессе.
- Наличие интуитивно понятного, удобного и доступного даже новичкам интерфейса.
- Способностью автоматически определять подключённые к ПК сканеры.
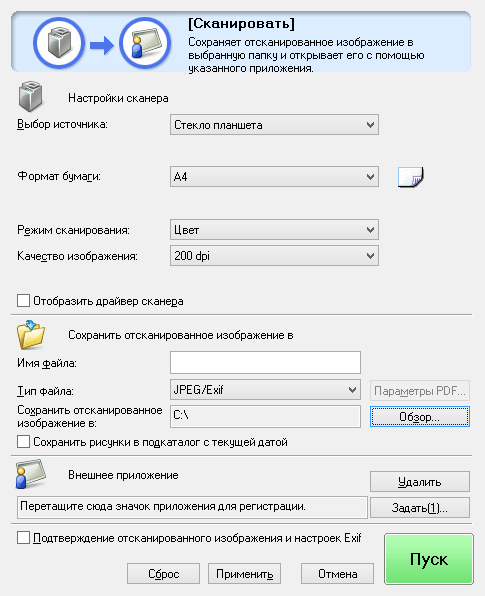
Кроме того, утилита предоставляется пользователям по бесплатной лиценции и поддерживает большинство моделей оборудования производителя. Файлы отсканированных документов можно сохранять в любом формате. Установив утилиту canon mf toolbox, настроив и запустив ее русскую версию, можно работать, не устанавливая дополнительные приложения, утилиты или другое программное обеспечение.
Если персональный компьютер сломается, пользователю не нужно приобретать новое приложение, поскольку оно сохраняется на жестком диске. Если его нет, достаточно скачать бесплатно canon mf toolbox 4.9 64 bit с интернета.
Скачать Canon MF ToolBox для Виндовс 10 бесплатно
Скачать Canon MF Toolbox для Windows 10
Скачали файл Canon MF Toolbox для Виндовс 10?! Оставьте свое мнение в комментариях.
Комментарии к программе Canon MF Toolbox для Виндовс 10
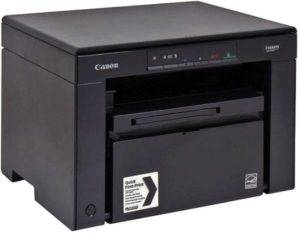
Windows XP / Vista / 7 / 8 / 8.1 / 10
Варианты разрядности: x32/x64
Размер драйвера: 17 MB (x32) и 19 MB (x64)
Нажмите для скачивания (x32):
Нажмите для скачивания (x64):
Инструкция к оборудованию
- Ознакомьтесь с
- Скачайте
Как установить драйвер в Windows 10
Принтер Canon i-SENSYS MF3010 – отличное устройство для черно-белой печати, которое также включает в себя функции копирования и сканирования. Для настройки МФУ не нужно выполнять много действий. Вам достаточно подключить принтер через USB-кабель, приложенный в комплекте, а затем установить фирменный драйвер. Скачать нужную утилиту именно для данной модели вы можете по ссылке, представленной в начале статьи.
После того, как загрузка файла завершилась, вам необходимо зайти в папку, где сохранены все скачанные через браузер материалы. Здесь найдите файл с названием Canon i-SENSYS MF3010 и запустите его. После этого на экране появится приветственное окно мастера установки. Жмем кнопку «Далее» и переходим к следующему шагу.
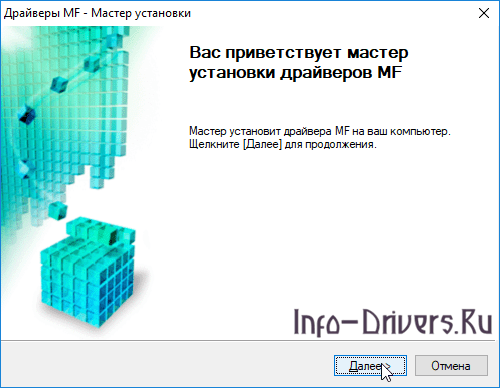
На следующем этапе программа предложит ознакомиться с лицензионным соглашением. Для согласия жмем на «Да» и переходим дальше.
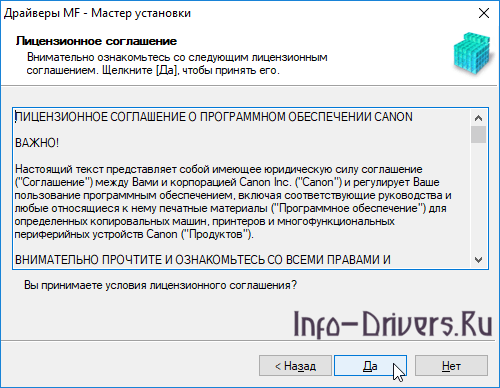
Теперь начнется установка необходимых файлов. Данный процесс не займет больше пары минут. После этого появится завершающее окно, которое необходимо закрыть кнопкой «Выход».
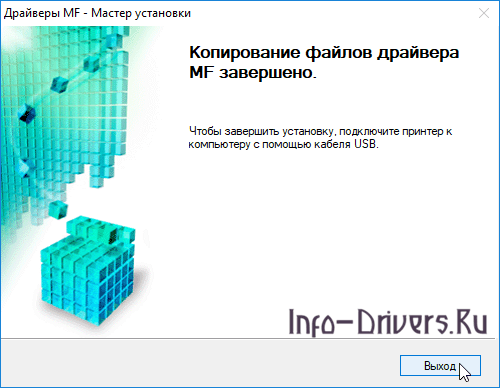
Обратите внимание на то, что утилита попросит подключить принтер к компьютеру после завершения установки. Но сделать это можно и перед инсталляцией драйвера. После закрытия программы можно приступать к работе с МФУ от Canon!
Используемые источники:
- https://4dvs.ru/120-mf-toolbox-49.html
- http://nawindows10.ru/canon-mf-toolbox.html
- https://info-drivers.ru/canon/i-sensys-mf3010-driver.html
Содержание
- Сканирование на принтере от Canon
- Сканируем на принтерах Canon
- Способ 1: Кнопка на принтере
- Способ 2: Фирменная утилита IJ Scan Utility
- Способ 3: Программы для сканирования документов
- Способ 4: Стандартное средство Windows
- Инструкция как сканировать на принтере Canon MF3010
- Как установить и настроить принтер Canon i-SENSYS MF3010 самостоятельно
- Подключение МФУ
- Установка драйвера
- Инструкция по установке принтера без диска
- Настройка МФУ
- Практическое использование МФУ
Сканирование на принтере от Canon
Сейчас многие пользователи активно приобретают принтеры разных моделей. Среди лидеров по продажам подобного оборудования находится компания Canon, которая помимо принтеров прославилась МФУ и сканерами. Однако начинающим юзерам бывает проблематично разобраться со всей функциональностью приобретенного устройства, в частности это касается и сканирования. Сегодня мы бы хотели продемонстрировать доступные методы выполнения этой операции на девайсах от этого производителя.
Сканируем на принтерах Canon
Для осуществления сканирования, соответственно, устройство должно обладать специальным блоком, отвечающим за создание электронной копии документа. Такие блоки помещаются в принтеры, МФУ или же ими выступают отдельные модели, называющиеся сканерами. Вне зависимости от типа девайса принцип сканирования практически идентичен и доступен к выполнению разными способами. Предлагаем детально ознакомиться со всеми известными.
Способ 1: Кнопка на принтере
Абсолютно на всех моделях, в функциональность которых встроен сканер, имеется нужная кнопка, запускающая этот процесс. От пользователя требуется только произвести ряд действий, чтобы активировать копирование документа:
- Подключите принтер к сети и включите его, затем подключите к компьютеру.
- Поднимите крышку сканера и положите документ необходимой стороной вниз.

- Нажмите на отведенную кнопку для начала сканирования.
- На экране монитора должно появиться уведомление о том, что идет прогрев сканера и нельзя открывать крышку.
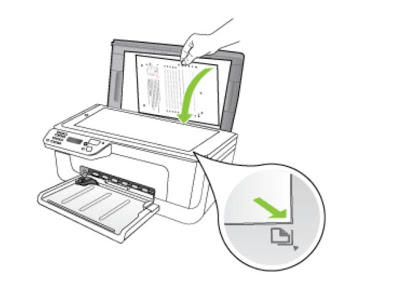
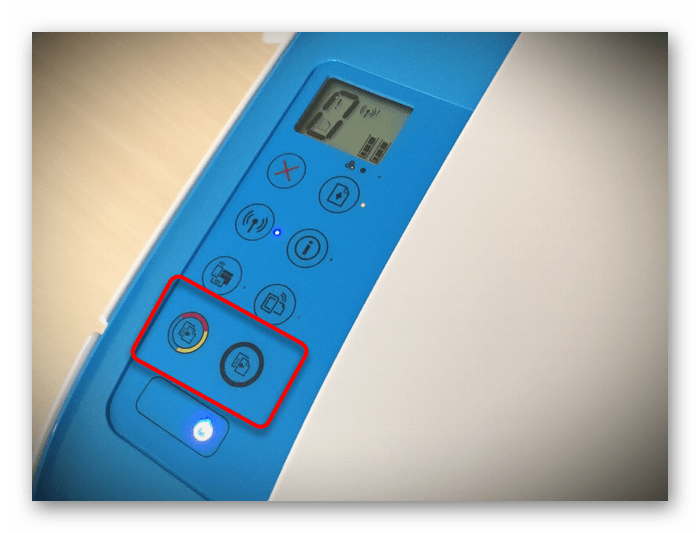
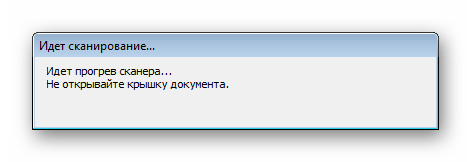
Теперь вы можете достать документ, поместить на его место новый лист и точно таким же образом создать его электронную копию. Как видите, ничего сложного в проведении этой операции нет.
Способ 2: Фирменная утилита IJ Scan Utility
Компания Canon специально для выпускаемого оборудования создала отдельное программное обеспечение под названием IJ Scan Utility. Оно выполняет функцию предварительной настройки сканирования, что позволяет в итоге получить необходимый документ в нужном формате. Инсталлируется IJ Scan Utility вместе с драйвером принтера, с идущего в комплекте CD или скачивается отдельно с официального сайта. После успешной установки можно переходить непосредственно к копированию.
- В первую очередь запустите саму IJ Scan Utility и выберите активное устройство.
- Затем переходите к настройке дополнительных параметров.
- В появившемся окне присутствует возможность создать установки для каждого типа сканирования. Например, выбирается место сохранения, указывается средство просмотра по умолчанию, выбирается имя для каждого файла. Со всеми расширенными настройками рекомендуем ознакомиться самостоятельно, изучив упомянутое меню.
- Далее остается выбрать только тип сканирования, исходя из собственных потребностей.
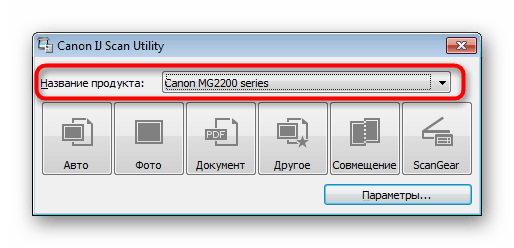

Стоит заметить, что в последнее время Canon не особо активно поддерживают разработку рассмотренной утилиты, поэтому не исключено, что на сайте с ПО к модели принтера или на диске вы не обнаружите ее. В таком случае советуем воспользоваться другими приведенными в этой статье методами.
Способ 3: Программы для сканирования документов
Сейчас на просторах интернета присутствует множество самого разнообразного софта, выполняющего различные задачи. Среди всего бесконечного списка находятся и приложения, позволяющие осуществлять сканирование документов. Их преимущество перед стандартными средствами заключается в наличии расширенных функций, например, моментальной отправки копии в печать, что и делает их востребованными в определенных кругах пользователей. Далее мы хотим показать процесс работы в таком обеспечении на примере Scanitto Pro.
- Скачайте и установите программу. После запуска первым делом выберите устройство, с которого в дальнейшем будет осуществляться сканирование.
- Задайте параметры изображения в соответствии со своими потребностями. Функциональность Scanitto Pro позволяет настроить режим, яркость, контрастность, разрешение, масштаб и формат готового файла.
- Далее нажмите на «Просмотр» или «Сканирование», чтобы запустить эту операцию.
- По окончании справа появится снимок. Щелкните по нему дважды ЛКМ, если хотите перейти к редактированию.
- В открывшемся редакторе имеется возможность подогнать размер, повернуть картинку, обрезать ее или тут же отправить в печать.

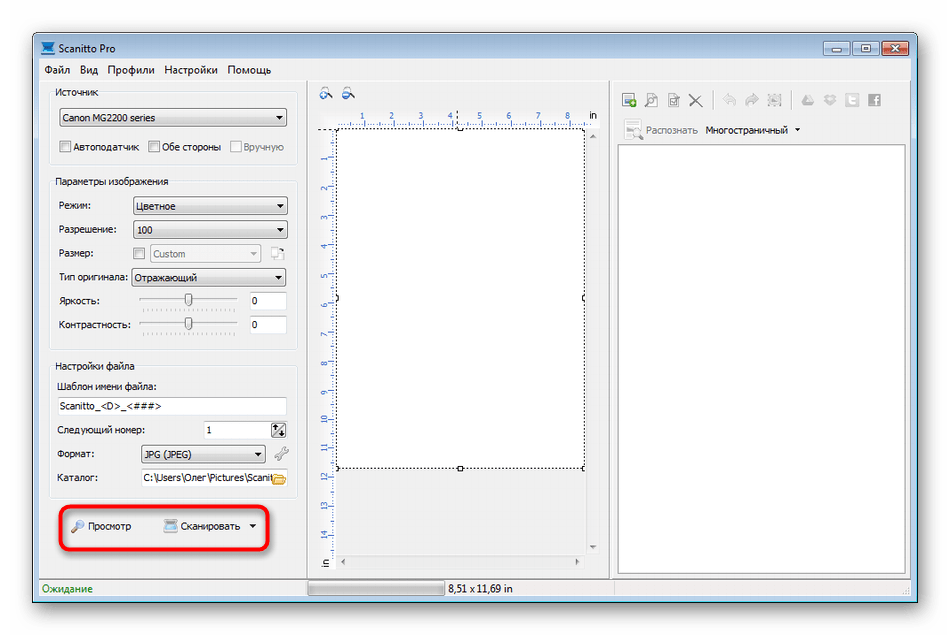
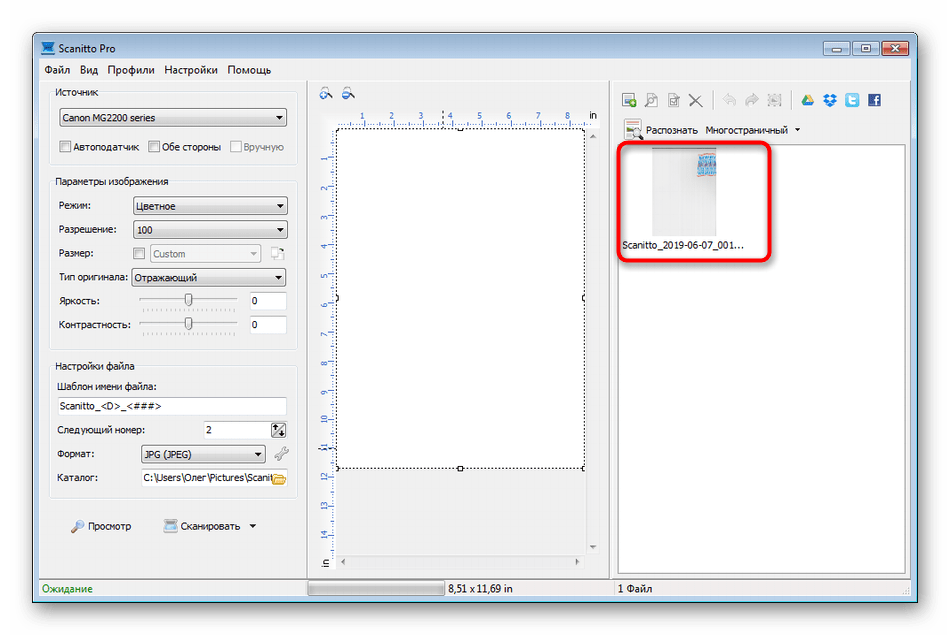

Помимо упомянутого выше программного обеспечения существует еще множество платных и бесплатных аналогов, предоставляющих похожую функциональность с определенными особенностями. Поэтому каждый пользователь с легкостью найдет подходящий для себя вариант. Мы же советуем ознакомиться с дополнительным материалом по этой теме, перейдя по указанной ниже ссылке.
Способ 4: Стандартное средство Windows
В операционной системе Windows присутствует установленное по умолчанию средство, позволяющее быстро и удобно сканировать документы с принтера. Его особенность заключается в наличии предварительной конфигурации и сортировке уже готовых файлов. Вся процедура выглядит следующим образом:
- Перейдите в меню «Пуск» и через поиск отыщите приложение «Факсы и сканирование Windows».
- В самом инструменте начните новое сканирование, кликнув на отведенную кнопку.
- Убедитесь в том, что выбран правильный девайс.
- Задайте дополнительные настройки, например, формат конечного файла, цветовой формат, яркость и контрастность.
- Щелкните на кнопку для начала сканирования.
- По завершении вы получите документ, который можно просмотреть.
- Остается только сохранить его в подходящем расширении на компьютере или съемном носителе.
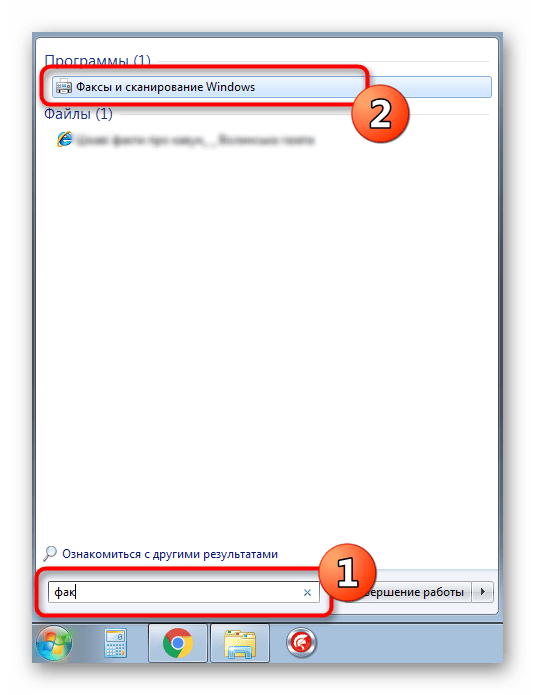
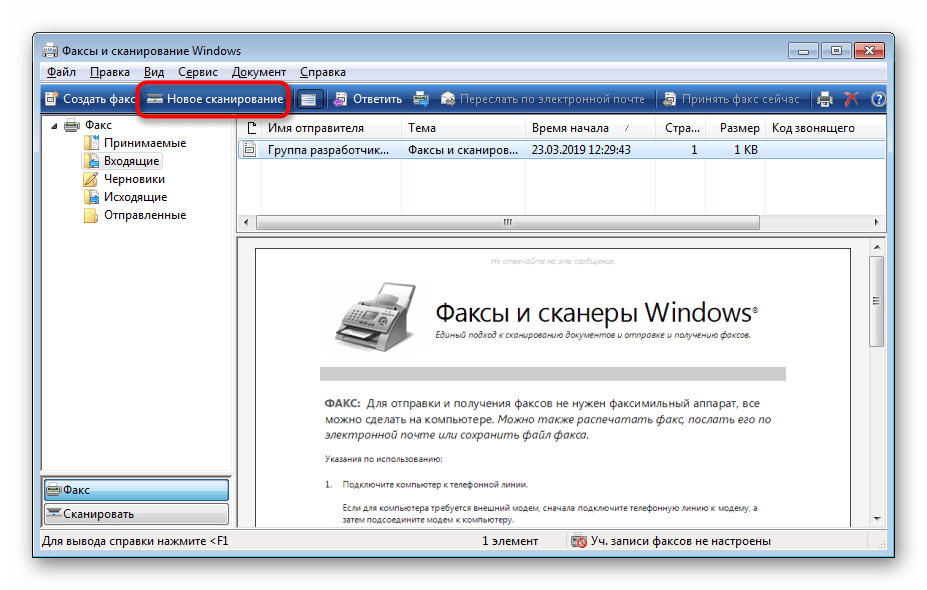
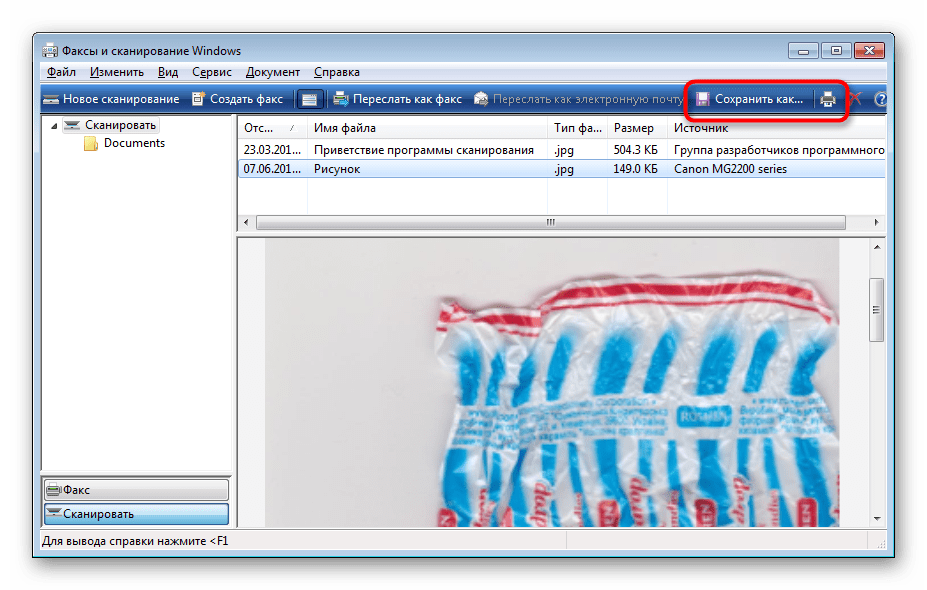
Сегодня вы были ознакомлены с четырьмя методами сканирования с принтера Canon на компьютер. После этого можно переходить непосредственно к печати. К слову, описание этой операции тоже описано в отдельной статье на нашем сайте, ознакомление с которой доступно по указанной ниже ссылке.
Источник
Инструкция как сканировать на принтере Canon MF3010

Если вы являетесь счастливым обладателем принтера Canon i-SENSYS MF3010, вам следует побеспокоиться о его правильном подключении к ПК, а также о корректной установке соответствующих драйверов. Без совершения таких манипуляций, к сожалению, ваше МФУ не сможет вас порадовать качественной работой.
Как установить и настроить принтер Canon i-SENSYS MF3010 самостоятельно
Хорошо, когда приобретает Canon i-SENSYS MF3010 опытный пользователь. Ему будет совершенно несложно самостоятельно разобраться во всех нюансах, которые возникают при работе с многофункциональными устройствами. Иное дело, когда установить принтер Canon i-SENSYS MF3010 необходимо новичку, не ориентирующемуся ни в одном техническом вопросе, связанном с таким устройством.
Рекомендуем таким новичкам тщательно ознакомиться с инструкцией, которая обязательно имеется в комплекте, если Canon i-SENSYS MF3010 приобретается в торговом заведении.
Если же вам предложили приобрести МФУ с рук по заманчивой стоимости, не тревожьтесь, если после приобретения вы не обнаружили такого важного для вас руководства пользователя. Мы поможем вам сориентироваться в действиях, связанных с установкой и настройкой МФУ, после которых принтер сможет вас порадовать качественной работой.
Подключение МФУ
Если вы приобрели МФУ Canon i-SENSYS MF3010, для его корректной работы важно выполнить изначально два основных требования:
- корректно установить драйверы;
- установить заправленный картридж.
Игнорировать установку драйвера для МФУ нельзя, поскольку драйвер представляет собой специальную программу, которая позволяет управлять устройством, отправлять задания на печать. Соответственно, каждый принтер сопровождается своим конкретным драйвером. В противном случае, устанавливая неподходящий драйвер, невозможно будет обеспечить связь компьютера с принтером.
Установка драйвера
Итак, понимая, что драйвер является наиважнейшим инструментом, позволяющим обеспечить уверенную связь ПК с МФУ, перво-наперво после приобретения устройства пользователь должен установить эту специальную программу.
Чаще всего драйвер имеется в комплекте, поэтому достаточно пересмотреть содержание упаковки, найти в ней хранящийся диск. В очень редких случаях принтер может реализовываться в торговых заведениях без такого диска. Однако в этих случаях производитель не забывает о своих клиентах, он выставляет на своём официальном сайте соответствующие драйверы. А также драйверы можно найти и скачать и из других источников в интернете.
Перед непосредственной закачкой инсталляционных файлов рекомендуется возобновить в своей памяти информацию относительно того, какая операционная система установлена на ПК. В момент выбора будут предложены пользователям несколько вариантов архивов для скачивания, подходящих:
- для Windows 7 или Windows 8;
- 32 или 64-битной системы.
При посещении некоторых ресурсов вам будет всего лишь достаточно ввести модель принтера, а встроенные плагины автоматически определят вашу операционную систему и её разрядность. После этого сразу же предложат вам файл для закачки.
Чаще всего драйверы скачиваются в архиве, поэтому перед их дальнейшим использованием, сначала разархивируйте архив.
Теперь отсоедините свой принтер от компьютера, зайдите в папку, в которую вы разархивировали драйвер. В этой папке вы найдёте файл Setup с расширением .exe. Именно по этому файлу кликните двойным щелчком, чтобы активировать его и запустить процесс установки. Теперь на экране возникнет окно мастера установки. Собственно говоря, следует подчиниться рекомендациям этого мастера, выполнять всё, что он просит и нажимать кнопку «Далее».
Когда мастер приблизится к завершающему этапу установки, он обязательно укажет пользователю на подключение вашего устройства к ПК. Подсоедините принтер к компьютеру при помощи USB-кабеля. На этом установка драйверов завершается, соответственно, принтер будет готов к выполнению задач.
Иногда может потребоваться перезагрузка операционной системы, чтобы все изменения вступили в силу. Если такое требование поступило, не ленитесь, перезагрузите свой компьютер.
Инструкция по установке принтера без диска
Если отсутствует в комплекте диск с драйверами для МФУ Canon i-SENSYS MF3010, новички не знают, как установить принтер, поэтому начинают теряться в догадках. На самом деле, принтер можно установить даже при отсутствии драйверов, при этом не нужно предварительно проводить поиск и заранее их скачивать.
Чтобы воспользоваться таким способом установки МФУ, первоначально подключите принтер к компьютеру. После этого кликните по пункту «Пуск», с правой стороны вы обнаружите строку «Устройства и принтеры». Такую же строку можно обнаружить, зайдя в «Панель управления».
В открывшемся окне «Устройства и принтеры», вы легко обнаружите кнопку «Добавление устройства», кликните по ней. Далее, мастер установки определит все принтеры, которые он готов будет подключить. Вам остаётся кликнуть по тому принтеру, который вы в настоящий момент стремитесь подключить.
После выполнения таких действий откроется новое окно, в котором будет предложено установить драйверы с диска или продолжить их автоматическую установку. Конечно же, вы должны нажать на кнопку «Далее», мастер самостоятельно в таком случае найдёт нужные драйверы и осуществит их инсталляцию.
Настройка МФУ
После успешной инсталляции драйверов ваш принтер готов к работе. Теперь можно на нём осуществлять печать, сканирование, создавать копии. Если у вас пока что отсутствует практический опыт работы с МФУ, вы ещё не умеете сканировать, тогда вам полезно ознакомиться с инструкцией Canon i-SENSYS MF3010, указывающей, как сканировать любые документы.
Акцентируем внимание на том, какие изменения в настройки можно вносить, чтобы обеспечить максимальный результат.
Практическое использование МФУ
После того как ваш принтер будет готов к работе, можно осуществить печать пробной страницы. А также можно вывести на печать любой созданный вами ранее документ. Правильно настроенный принтер безукоризненно выполнит все обозначенные вами задачи.
Вы также можете не сразу отправлять документ на печать, а первоначально зайти в «Свойства» устройства. В этом окне вы можете изменить заводские настройки, сориентировать МФУ на выполнение действий, которые вам важны в конкретный момент:
- печать нескольких копий одновременно;
- печать не всего документа, а отдельного фрагмента или определённых страниц;
- выбор определённого формата листа;
- выбор иной ориентации страницы;
- выставление различного уровня качества печати.
Если печатать всё-таки умеет большинство пользователей, то сканировать ранее приходилось не всем. По этой причине изначально при возникновении необходимости осуществить сканирование документов у некоторых пользователей возникает ступор. Они не понимают, как осуществляются такие действия.
На самом деле процесс сканирования несложен, достаточно ознакомиться с нашими рекомендациями или соответствующим разделом руководства для пользователя.
Итак, если для вас важно начать сканировать документы, зайдите в «Пуск», перейдите в уже знакомый пункт меню «Устройства и принтеры». После того как откроется основное окно, вы обнаружите в нём перечисленные принтеры, которые готовы к работе, выберите своё МФУ, кликните по нему один раз, чтобы оно выделилось. Теперь чуть ниже адресной строки вы увидите панель меню с указанием нескольких параметров.
Вам нужно найти параметр «Начать сканирование», кликните по нему, и автоматический процесс запустится. Появится ещё одно окно, в котором вы, как пользователь, можете внести некоторые изменения. Однако такие изменения первоначально, на начальных ознакомительных этапах, вносить не нужно. Нажимайте на кнопку внизу «Сканировать», и устройство выполнит установленные вами перед ним задачи.
Как видите, процесс сканирования тоже несложен. Копировать документы ещё проще, достаточно поместить документ, закрыть верхнюю крышку и нажать на соответствующую кнопку, расположенную на корпусе самого МФУ.
Найти такую кнопку будет просто, поскольку она сопровождается значком, в котором изображены две копии документа, а также ниже этого значка имеется соответствующее название.
Кроме этого, проблема может возникать на фоне вирусного вмешательства. Вирусы часто оставляют после себя негативные следы, в том числе серьёзно повреждают драйверы. В этом случае придётся осуществить повторную установку драйверов, чтобы восстановить нормальное функционирование многофункционального устройства.
Источник