Время прочтения
4 мин
Просмотры 255K
Доброго времени суток, Хабр! Хочу представить интересный, по моему мнению, способ создания msi-инсталляторов для любого программного обеспечения и, как следствие, развертывание его средствами GPO. Подчеркну, что описанный метод не подразумевает создание «слепков» системы, а использует нативные инсталляторы софта, при чем для создания msi применяются только бесплатные для коммерческого использования продукты.
Введение, пара ссылок и дисклеймер
Каждый нормальный инсталлятор ПО имеет возможность автоматической установки с определенными или заложенными по умолчанию параметрами. Суть моего метода проста и заключается в том, чтобы запаковать нативный инсталлятор в «контейнер» msi и запустить его с необходимыми параметрами командной строки. В сети куча информации по автоматической установке того или иного приложения, и я не буду заострять на этом внимание. Наша цель, повторюсь, — установка ПО средствами групповых политик. Кстати, некоторые из вас могут возразить, что установку можно производить через ZAW, но, к сожалению, данный метод применим только для установки с правами текущего пользователя и не может применяться для централизованной автоматической установки приложений.
Интересный цикл статей по установке ПО через ГП. Для новичков рекомендую прочитать все, чтобы потом не спрашивать, чем отличается тип установки «назначенный» от «публичный».
Необходимый софт. Exe to MSI Converter freeware и всем известная orca Первый нужен для того, чтобы создать msi из exe, а вторая — чтобы получившийся msi-ник смог установиться через групповые политики.
Метод не претендует на полную уникальность и в некоторых местах могут встречаться излишества, которых можно было бы избежать, но это связанно отсутствием желания и необходимости слишком глубоко вникать в параметры таблиц msi-пакетов. Первоначальной целью ставилось быстро найти бесплатный способ создания msi и после нескольких часов, проведенных в чтении зарубежных форумов и бесконечных перезагрузках виртуальной машины, метод был найден. Также, статья — это не обзор интерфейса программ, и скриншотов вы не увидите.
Создание и подготовка пакета
Пример установки будет произведен для Mozilla Firefox, т. к. это широко известный продукт, не имеющий msi-инсталлятора от разработчиков.
- Запускаем exe to msi и указываем в нем путь к exe-установщику firefox. По ранее найденной в сети информации становится понятно, что по-тихому установить огнелиса можно с параметрами -ms -ira. Их-то и указываем во втором поле exe to msi и жмем «Build MSI».
- Казалось бы все, msi-пакет готов. Действительно, запустив получившийся результат мы получим установленный в системе firefox и в статье можно было бы ставить точку. К сожалению, не все так просто. Текущий пакет установки не пригоден для развертывания через GPO и при загрузке компьютера вы будете получать совершенно ничего не объясняющие ошибки в логах «произошла неисправимая ошибка…» А все дело в том, что разработчики exe to msi тоже хотят есть и их бесплатный продукт генерирует msi «не по правилам».
- Ну что ж, берем орку и открываем в ней наш эмсиайник.
- Первым делом находим в левом списке таблицу Property и обращаем внимания на два поля — ProductCode и UpgradeCode. Эти два поля должны быть уникальны для каждого продукта, а наш exe to msi генерит всегда одинаковые. Ну что ж, не беда, жмем в верхнем меню View -> Summary Information, находим поле PackageCode и жмем New GUID. Получившийся результат копируем в буфер обмена и вставляем в ProductCode. Повторяем для UpgradeCode и наконец для самого PackageCode. Тут же в Summary Information правим поле Title на Mozilla Firefox, остальное по желанию. Это, по сути, ни на что не влияет.
- Опять же в таблице Property меням ProductName на Mozilla Firefox (я до кучи меняю еще ARPCONTACT и Manufacturer). Можно так же поставить правильное значение для ProductVersion.
- Вроде бы GUID и прочие «IDы» поменяли, но как показывает практика, этого недостаточно. Жмите в orca Tools –> Validate, снимите птицу Show INFO Messages и нажимайте Go.
- Как видите, вылезла куча ошибок на наличие/отсутствие некоторых таблиц и значений. Я не стал заморачиваться и просто взял первый попавшийся (7zip x64 9.20) небольшой msi и скопировал оттуда 4 недостающие таблицы (через Export-Import, естественно): _Validation, AdminExecuteSequence, AdminUISequence и AdvtExecuteSequence. На самом деле, я уверен, что можно создать «правильный» msi-инсталлятор, без лишнего мусора, но не забывайте, наша цель всего лишь запустить родной setup приложения в тихую.
- После добавления таблиц проходим снова Tools –> Validate (к слову, первый раз проверку можно вообще не делать и сразу импортировать таблицы). Если вы тоже взяли за основу msi от 7zip, то результатом будет шесть эрроров, которые необходимо устранить. Жмите Close, удаляйте лишние поля, отмеченные красным.
- В конце можно еще раз проверить валидацию и убедиться что остались лишь ничем не мешающие варнинги. Сохраняем msi.
- Вот в принципе и все, осталось добавить msi в ГП и назначить необходимые свойства.
Нюансы
- При установке описанным выше методом у вас появятся как бы две копии софта. Первая — собственно нужное приложение, а вторая — исходный msi-ник, ведь мы же его как бы поставили. В принципе, это ни на что не влияет, кроме как на отображение в «Установка и удаление программ», и то, только в Windows XP (если вы ничего не меняли, кроме указанного мной). Минусом может быть появление лишних программ при автоматической инвентаризации софта, если вы ее используете.
- Автоматически удалить приложение теми же средствами развертывания не получится. Точнее получится, но удалится только и так не нужный msi-контейнер. Ну можно повозиться со свойствами msi при его создании, чтобы оно захватывало с собой установленное ранее приложение, так же втихую. Я такой задачи не ставил.
- При установке обновлений ПО нужно указывать в свойствах ГП приложения, чтобы оно заменяло предыдущее, т.е обязательно предварительно удаляло старое. Это гарантирует, что у вас не будут плодиться те самые никому не сдавшиеся левые дубли приложений в «установке и удалении программ».
- Чтобы установить приложение, имеющее дистрибутив из нескольких файлов, вам придется сначала упаковать его в exe, который при запуске сам распакуется и даст команду для тихой установки. Рекомендую создавать sfx-архивы средствами того же 7-zip.
- Ничего не мешает ставить ПО через скрипты автозагрузки. Более того, такой метод более гибкий, и я давно его использую через свои скрипты. Вот только использование родных средств ГП получается намного быстрее, т. к. простое создание msi из exe занимает пару минут.
- Windows 7 почему-то не пишет «Установка управляемого приложения…», а просто говорит «пожалуйста, подождите». При первом развертывании всей кучи софта разом или при установке тяжелого приложения это может сподвигнуть юзера на звонок админу или нажатие кнопки резет.
На этом вроде бы все, надеюсь было интересно, делитесь опытом.
«Слепок» — это наименее предпочтительный способ создания инсталляционных пакетов.
Дистрибутивы бывают двух типов. Основанные на Windows Installer и не основанные на нем. В первую категорию попадают не только те дистрибутивы, в которых вы явно видите файл .msi. Пример — Adobe Reader. С сайта adobe скачивается единственный файл инсталлятора (.exe-файл), но, тем не менее, установка идет с использованием Windows Installer. Сюда же, конечно, относится и Office. Дистрибутивы, устанавливающиеся с помощью Windows Installer, легко кастомизировать, и с ними возникает гораздо меньше проблем, чем с дистрибутивами второго типа. Кастомизация этого типа дистрибутивов осуществляется созданием файлов с расширением .mst, которые вместе с имеющимся .msi осуществляют установку программы с теми параметрами, которые вы зададите при создании .mst.
Дистрибутивы второго типа встречаются сейчас все реже и реже. Из распространенных можно привести, например WinAmp. Даже последняя его версия не использует Windows Installer. Для распространения таких пакетов их нужно перепаковывать. Существует два способа перепаковки (возможно, существует больше, но я знаю два). Первый способ вы назвали — это слепок. Второй — это мониторинг процесса инсталляции. То есть, на тестовой машине запускается программа для перепаковки, из под нее, в свою очередь, запускается установка WinAmp, и программа перепаковки следит за всеми изменениями в файлах, реестре и т.д., которые делает инсталлятор WinAmp’а. Такой способ занимает меньше времени, имеет меньшую вероятность попадения «левых» файлов в пакет. Хотя и при использовании этого способа рекомендуют делать пакеты с абсолютно чистой машины.
Что касается софта — я видел его немного, но упомянутый здесь AdminStudio мне лично очень понравился. Он умеет делать и .mst-файлы, и перепаковывать старые инсталляционные пакеты обоими способами, да и вообще он много чего умеет, в частности, обнаруживать потенциальные конфликты между приложениями еще до установки. Кроме того, с ним идет отличная документация, описывающая весь процесс управления развертыванием приложений «от и до».
-
Помечено в качестве ответа
7 июля 2009 г. 10:14
Как подготовить старые приложения к работе с Windows Installer с помощью WinINSTALL LE
Любой инструмент, облегчающий инсталляцию — а еще важнее, удаление программ — приносит ощутимую пользу. Поэтому мне нравится принцип универсальности, заложенный в файлах Windows Installer (.msi-файлах). Но готовые к работе с Windows 2000, приведенные к типу .msi приложения встречаются редко, поэтому каждый, кто хочет широко использовать файлы.msi, должен научиться создавать их. Это позволяет делать поставляемый вместе с Windows 2000 Server инструмент WinINSTALL Limited Edition (LE) фирмы VERITAS Software, обеспечивающий преобразование в .msi-формат. Однако процесс создания безупречного .msi-файла требует времени и усилий.
Когда-то для установки приложения было достаточно скопировать на жесткий диск пару файлов, возможно, указав при этом другой каталог. Но большинство современных прикладных программ состоит из множества файлов, в том числе отдельной программы специально для установки приложения. Как правило, программы установки выполняют несколько функций. Во-первых, они создают один или два каталога программы для хранения программных файлов и данных. Во-вторых, они размещают динамические библиотеки (DLL) на жестком диске машины, но не всегда в каталогах нового приложения; часто DLL размещаются в каталоге winnt или winntsystem32 (несмотря на возможность конфликтов прикладных DLL, сохраненных в этих каталогах, с библиотеками DLL операционной системы и других приложений). В-третьих, большинство приложений ассоциированы с определенными расширениями файлов и должны сохранить ряд параметров конфигурации, поэтому программа установки заносит расширение файла и параметры конфигурации в реестр. Наконец, инсталляторы приложений обычно помещают отдельный пункт в меню Start, Programs. Из этого перечня операций видно, почему программы установки так велики — им необходимо выполнять множество задач.
Администратору неудобно переносить программу установки и сопутствующие файлы на настольный ПК каждого пользователя и лично контролировать процедуру установки, ему нужен централизованный способ установки прикладных программ без вмешательства пользователя. Такой функциональностью располагает Active Directory (AD), но пользоваться файлами установки нелегко; для AD предпочтительны приложения в формате .msi. Но большинство поставщиков пока не выпускает свои продукты в .msi-формате. Поэтому, чтобы использовать AD для развертывания приложений, необходимо преобразовать большинство из них в формат .msi. WinINSTALL LE бесплатно поставляется в составе Windows 2000 Server (в папке valueadd3rdpartymgmtwinstle на компакт-диске с Windows 2000), и многие администраторы отдадут предпочтение именно этому решению.
СТРОИМ ПАКЕТ .MSI
Для создания .msi-файлов в WinINSTALL LE используется метод моментального снимка, проверенный временем способ описания и инкапсуляции приложений. Чтобы сгенерировать .msi-файл для прикладной программы, следует приступать к работе на <чистом>, ранее не эксплуатировавшемся настольном ПК, который я называю прототипом — я всегда пользуюсь утилитой Symantec Ghost или службами Microsoft Remote Installation Services (RIS), чтобы очистить диск прототипа и начать с чистого листа.
Прежде чем инсталлировать приложение, следует запустить программу discoz.exe пакета WinINSTALL LE, которая составляет список файлов, каталогов и элементов реестра на прототипе — другими словами, discoz.exe генерирует моментальный снимок исходного состояния системы. Затем на прототипе устанавливается новое приложение и проводится его настройка в соответствии с требованиями пользователя. Для фиксирования любых изменений реестра компьютер следует перезагрузить — иногда эта операция необязательна, но она никогда не вредит. Затем программа discoz.exe запускается вновь. Она генерирует постинсталляционный моментальный снимок, отмечая все новые файлы, изменения в реестре и программные ярлыки. Discoz.exe собирает всю информацию об изменениях в указанном пользователем месте и строит соответствующий .msi-файл. В .msi-файле содержится информация об изменениях каталогов, файлов и реестра, а также набор инструкций для Windows Installer.
Я опускаю подробности работы Windows Installer, ограничившись двумя рекомендациями. Во-первых, при подготовке WinINSTALL к созданию предварительного моментального снимка программа спрашивает, следует ли выполнить расширенную проверку реестра (Enhanced Registry Scan). Проверка всегда полезна, этот флажок следует отметить. Во-вторых, система подсказки WinINSTALL предлагает не держать discoz.exe на прототипе. Лучше установить discoz.exe на другом ПК и выделить в общее пользование каталог программы в каталоге Program Files второго компьютера. Следует подсоединиться к этому общему каталогу и запустить discoz.exe из него.
ИНСТАЛЛЯЦИЯ ПАКЕТА
Теперь пришло время взглянуть на каталог .msi-файла, в котором отражены файлы и структура устанавливаемого приложения. Работая над данной статьей, я создал .msi-файл для Lotus Organizer 6. Данный пакет содержал каталог с именем Lotus, и применение .msi-файла заставляет Windows Installer создать и заполнить файлами каталог с этим именем. В моем пакете есть также каталог с именем winnt, из чего я заключил, что фирма Lotus создала Organizer с нарушением правил установки. Из каталога .msi-файла можно узнать и точный объем пространства, занимаемого приложением на жестком диске — в .msi-файле нет сжатых файлов, которые уменьшают размер установленного приложения.
Получив .msi-версию прикладной программы, можно инсталлировать приложение одним из трех способов. Во-первых, просто дважды щелкнуть на msi-файле. Во-вторых, использовать команду Msiexec /i, чтобы неявно загрузить файл из командной строки. Например, команда, показанная на Экране 1, инсталлирует пакет pilotdesk.msi из каталога pilotdesk в каталоге приложений на server1 (как и большинство параметров команд в Windows, ключ /i нечувствителен к регистру.) В-третьих, можно воспользоваться политиками Group Policy, чтобы создать политику развертывания программного обеспечения (это тема для отдельной статьи).
После ряда экспериментов я убедился, что Windows Installer нельзя вызвать двойным щелчком на .msi-файле или командой Msiexec /i из командной строки: эти методы не позволили инсталлировать Organizer, когда я зарегистрировался в качестве пользователя без административных полномочий. Но когда я задействовал групповую политику Group Policy для нового .msi-файла, чтобы назначить Organizer тому же пользователю, а затем зарегистрировался от имени этого пользователя, и выбрал пункты меню Start, Programs, Organizer, то Organizer был установлен без проблем.
Почему же мне не удалось инсталлировать .msi-файл Organizer двойным щелчком мыши или по команде Msiexec? Во-первых, программа Setup приложения Organizer размещает некоторые файлы в каталогах winnt и winntsystem32, а по умолчанию пользователи без специальных полномочий могут только просматривать файлы в этих каталогах. Во-вторых, программа Setup приложения Organizer производит запись в два раздела реестра: HKEY_LOCAL_MACHINESOFTWARE и HKEY_CURRENT_USERSoftware. Для каждой учетной записи пользователя имеется собственный раздел HKEY_CURRENT_USERSoftware, в который пользователи могут беспрепятственно вносить изменения. Но только владелец учетной записи System и члены локальной группы Administrators могут производить запись в раздел HKEY_LOCAL_MACHINE.
Тогда почему же удалось успешно провести инсталляцию с помощью Group Policy? Потому что операционной системе не было известно, что Msiexec выполнялась по запросу от имени моей учетной записи. Windows 2000 исходила из того, что Msiexec была запущена с учетной записью System, которая имеет право выполнять запись в каталоги winnt и winntsystem32. Windows Installer организован в виде службы отчасти потому, что Windows Installer может работать с учетной записью пользователя, отличной от записи пользователя, зарегистрировавшегося на рабочей станции в данный момент. Windows Installer может работать даже в случаях, когда на компьютере не зарегистрирован никто, например, в случае с такими службами, как Microsoft IIS.
После того, как .msi-файл Organizer был связан с моей учетной записью с помощью политик Group Policy, обнаружилось досадное обстоятельство: инсталляция Organizer происходила всякий раз, когда я регистрировался, независимо от того, была запущена программа или нет. Это случилось потому, что Organizer не только внес свое имя в стандартное меню программ, но и поместил свой ярлык в мою папку Startup. В процессе регистрации ярлык активизировался, и начиналась установка Organizer. Поэтому я перестроил систему на прототипе и удалил элемент Organizer из папки Startup.
Автоматический вызов некоторых других приложений, для которых мною были созданы .msi-файлы, происходил по другой причине: им соответствовали элементы в менее известном разделе HKEY_CURRENT_USERSoftwareMicrosoft WindowsCurrentVersionRun (элементы некоторых программ могут размещаться и в файле параметров конфигурирования win.ini, хотя я не встречал их уже несколько лет). Из всего сказанного можно сделать вывод, что нужно быть готовым несколько раз перестраивать .msi-файл, не забывая каждый раз проверять его.
ИСПОЛЬЗОВАНИЕ ПОДРУЧНЫХ СРЕДСТВ
Мне часто задают вопрос, зачем нужно предоставлять учетные записи уровня Administrator пользователям, разрешая им устанавливать программы на своих машинах. Теперь ответ на этот вопрос очевиден: подобно Lotus Organizer, многие программы установки приложений производят запись в каталоги и разделы реестра, недоступные пользователям, не имеющим административных прав. Но приложениям нет необходимости размещать DLL в системных каталогах или записывать элементы в раздел реестра HKEY_LOCAL_MACHINE.
Если необходимо использовать приложение, которое инсталлирует DLL в системном каталоге, можно попробовать два приема. Во-первых, следует попытаться переместить все файлы, записанные приложением в каталоги winnt и winntsystem32, в каталог приложения. После того, как я проделал эту операцию, Organizer продолжал работать. Во-вторых, можно переименовать раздел приложения в разделе HKEY_LOCAL_MACHINESOFTWARE (если программа установки переименовала какие-нибудь разделы) и посмотреть, будет ли приложение работать по-прежнему. Organizer не работал. Другой вариант — добавить локальную группу Authenticated Users в группу пользователей, имеющих право вносить изменения в HKEY_LOCAL_MACHINESOFTWARE, хотя при этом несколько понизится уровень безопасности системы. Но самое лучшее решение — известить поставщиков ПО, что вы не купите следующую версию программы, если она не будет выполнена в соответствии со спецификациями Windows 2000.
Марк Минаси — редактор Windows NT Magazine, имеет сертификат MCSE; является автором книги «Mastering Windows NT Server 4.0» (издательство Sybex). С ним можно связаться по адресу: mark@minasi.com.
![]() The following article uses options that are available starting
The following article uses options that are available starting
with the Enterprise edition and project
type.
This tutorial will guide you in creating an MSI Wrapper over one
or more EXE installers.
When it comes to create an MSI installer for an application that
comes in a different installer package file format, the recommended
approach is to repackage it.
In this way, you can take full advantage of Windows Installer technology.
However, there might be scenarios when you just need to wrap the EXE file into an MSI package without to be needed to repackage it.
A common usage scenario is when you have a package to be deployed through GPO but also need to
include some EXE installers which need to be executed silently. Because
feature-based prerequisites can only be included with full UI, the only
solution is the use the «MSI from EXE(s)» project type.
For this tutorial we’ll convert the 7-zip File Manager into a
.MSI. We will use the Advanced Installer tool as an EXE to MSI converter.
![]() Please keep in mind the following steps are for illustration purposes
Please keep in mind the following steps are for illustration purposes
only, thus you can convert as many .EXE packages as you need into a single
.MSI installer.
- 1. Start a “Convert” > «MSI from EXE(s)» project
- 2. Enter details about your product
- 3. Set project and package paths
- 4. Configure .EXE packages
- 4.1 Include an .EXE package
- 5. Set Package Options
- 6. Build project
- 7. Video tutorial
1. Start a “Convert” > «MSI from EXE(s)» project
If Advanced Installer is not currently running, launch it by
double-clicking its desktop icon or selecting it from the «Start» menu.
On the application’s Start Page you can choose
“Convert” > “MSI from EXE(s)”
project type.

The Wizard will be launched assisting you to include and
configure the .EXE packages into the main .MSI.
2. Enter details about your product
Configure the product details for your .MSI
installer:

3. Set project and package paths
In this dialog you can specify project location and output
folder. By default the package name will be the same as the project name
but you can change this later:

![]() You can change these settings later in the Configuration Settings Tab from Builds Page.
You can change these settings later in the Configuration Settings Tab from Builds Page.
4. Configure .EXE packages
In this dialog you can choose the location of the .EXE packages
you want to include either from disk ([ Add From
Disk… ] button) or from URL ([ Add From
URL… ] button):

4.1 Include an .EXE package
We will use the [ Add From Disk… ] button to
include the 7-zip File Manager .EXE installer. The Configure
Package dialog will pop up allowing you to change its install
time configuration:

![]() Each of the .EXE packages included this way will be added as
Each of the .EXE packages included this way will be added as
post-install prerequisites. You can change these settings later in
their Setup Files Tab
from Prerequisites Page — Installer Project.
5. Set Package Options
This dialog allows you configure general installation package
options. For this example you can leave the default:

Show MSI information in Program and Features (Add or
Remove Programs) applet in Control Panel — If disabled, this
option prevents the product from being displayed in the «Add or Remove
Programs» applet from Control Panel.
![]() These settings and more related can be changed later in the Install Parameters, Prerequisites Page — Installer Project or
These settings and more related can be changed later in the Install Parameters, Prerequisites Page — Installer Project or
Product Details Tab.
6. Build project
![]() Choose to build the project or press
Choose to build the project or press
[ Finish ] to continue configuring it. You managed to convert the EXE packages into an MSI installer.

7. Video tutorial

exe to msi. Как создать пакет msi из exe-файла.
Иногда системным администраторам(и не только) бывает нужно иметь пакет приложения в формате msi, а некоторые приложения доступны только в виде exe -файла.
Для решения этого вопроса есть несколько программ для конвертации exe to msi, но они, практически все, платные или требуют танцев с бубном.
Мы геройствовать не будем и поищем легкий путь.))
Первый способ:
На просторах интернета мне попалась бесплатная утилита Free Msi Wrapper (http://legacy.averbouch.biz/fr/free-msi-wrapper/). (Ссылка недавно перестала работать, в конце статьи есть ссылка на скачивание с Яндекс-Диска).
Утилита имеет простой и интуитивно понятный интерфейс
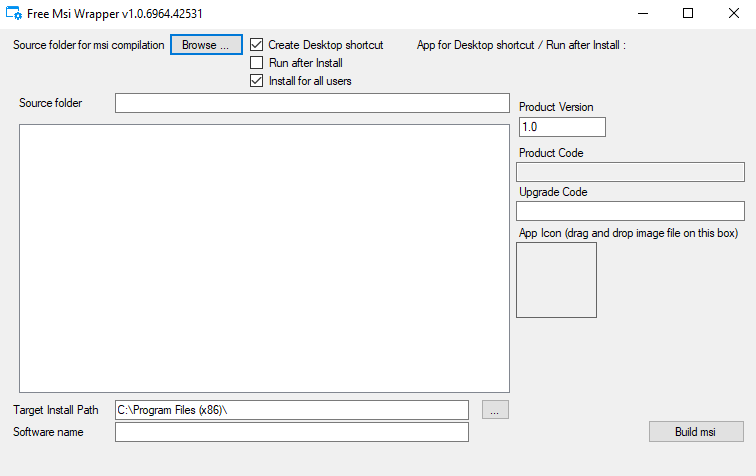
В поле Source Folder укажите папку с exe-файлом, который нужно конвертировать в msi, в поле Target Path укажите папку по умолчанию, в которую будет предлагать устанавливаться создаваемый msi. Укажите имя пакета msi в поле Software Name и отметьте нужные галки в верхней части окна программы. После этого нажмите кнопку Build msi, укажите папку для сохранения готового msi и дождитесь окончания работы программы.
Ваш msi готов.
Скачать утилиту можно по ссылке с Яндекс Диска.
Еще один способ:
- Для реализации необходимо следующий софт:
-
- Exe to MSI Converter freeware ExetomsiSetup.msi External: http://www.exetomsi.com/freeware
- Superorca SuperOrcaSetup.exe External:http://www.pantaray.com/msi_super_orca.html
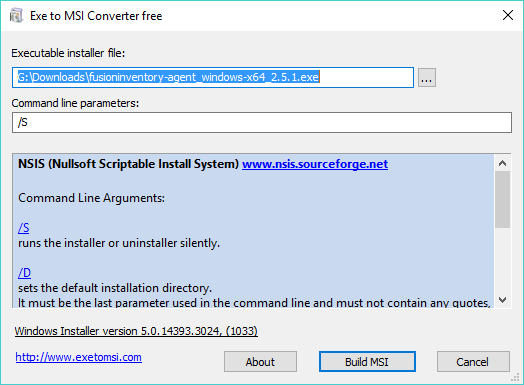
2. Запустите «Exe to MSI Converter freeware». Выберите установщик, параметры командной строки установите /S. Соберите пакет нажав «Build MSI»
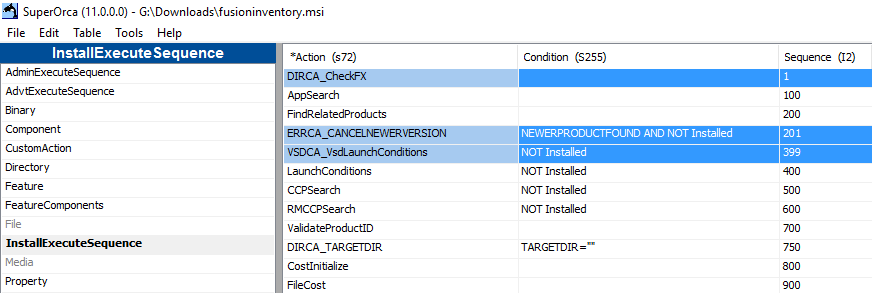
3. Откройте полученный пакет с помощью «SuperOrca». Удалите строки в таблице InstallExecuteSequence:
-
- DIRCA_CheckFX
- ERRCA_CANCELNEWERVERSION
- VSDCA_VsdLaunchConditions
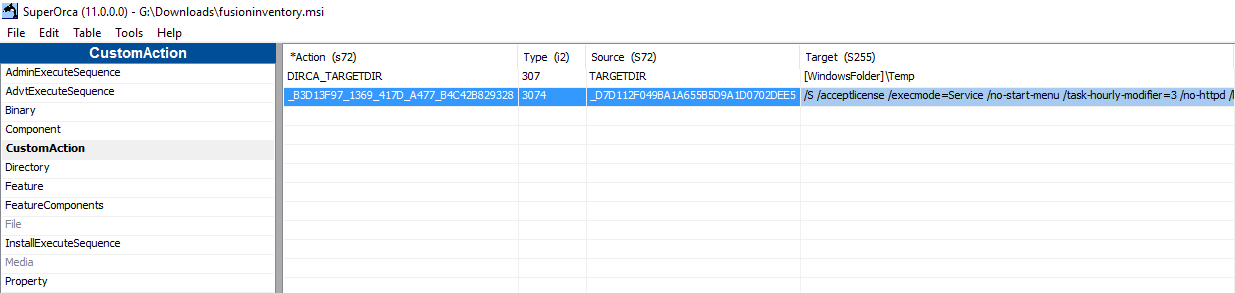
4. В таблице CustomAction измените параметры командной строки, если необходимо
5. Пересоберите пакет «Tools > Rebuild MSI file»
Готовый пакет можно разворачивать через групповые политики
Основным объектом верхнего уровня в терминах WiX является продукт (Product).Одна инсталляция устанавливает один продукт. Продуктом имеет уникальный идентификатор GUID, который представляет собой уникальное 128-битное число.
Следующим (после продукта) уровнем иерархии является пакет (Package). Он может включать один или несколько файлов — обычно файлы инсталляции msi, msm (MS Merge Modules) и архивы cab.
Весь продукт состоит из опций (Features). Опции — это то, что видит пользователь при инсталляции и что он может выбрать (или не выбирать) для инсталляции. Опции имеют иерархическую структуру: одни features могут содержать в себе другие.
Каждый отдельный элемент инсталляции, такой как файл, ключ реестра и т.д., называется компонентом (Component). Компоненты также имеют уникальные ключи GUID (не зависимо от устанавливаемого пакета).
Сборка пакета msi происходит в два этапа:
candle.exe Sample.wxs
на выходе — файл wixobj
light.exe Sample.wixobj
на выходе — пакет msi.
Мне нужно создать инсталлятор msi, который бы мог запускаться с правами непривилегированного пользователя, скачивать powershell-скрипт с http-сервера и запускать его (для распространения средствами SCCM).
wxs-файл, с помощью которого создается нужный msi выглядит так:
<?xml version="1.0" encoding="UTF-8"?>
<Wix xmlns="http://schemas.microsoft.com/wix/2006/wi"  xmlns:util="http://schemas.microsoft.com/wix/UtilExtension">
<Product Id="*" Name="WSL and XServer for Windows" Language="1033" Version="0.0.1" Manufacturer="Sberleasing" UpgradeCode="121F564B-ACAB-DEAD-BEEF-C9B8C11C381A">
   <Package Id="*" InstallerVersion="305" InstallScope="perMachine" InstallPrivileges="elevated" Compressed="yes" />

   <Media Id="1" />

   <Property Id="MSIUSEREALADMINDETECTION" Value="1" />

   <Condition Message="Installation requires Administrator privileges">
      <![CDATA[Privileged]]>
   </Condition>

   <Directory Id="TARGETDIR" Name="SourceDir">
      <Component Id="Component_WSL_and_XServer_for_Windows" Guid='1b3844ef-ACAB-DEAD-BEEF-7786e2d5a6c7' />
   </Directory>

   <Property Id='POWERSHELL'>C:WindowsSystem32WindowsPowerShellv1.0powershell.exe</Property>
   <!-- My custom actions  install scripts-->
   <CustomAction Id="RunInstallScript"
                 Property="POWERSHELL"
                 ExeCommand='-windowstyle hidden -command $url="http://nexus.rdleas.ru/repository/files/JavaDeveloperTools_SetupScripts/Setup_WSL.ps1"; iex ((New-Object System.Net.WebClient).DownloadString($url))'
                 Return='check' />

   <Feature Id="Feature_WSL_And_XServer" Title='WSL and XServer For Windows' Level="1">
      <ComponentRef Id="Component_WSL_and_XServer_for_Windows" />
   </Feature>

   <InstallExecuteSequence>
      <Custom Action="RunInstallScript" After="InstallFinalize"></Custom>
   </InstallExecuteSequence>

   <MajorUpgrade Schedule="afterInstallInitialize" AllowDowngrades="no" DowngradeErrorMessage="ok" AllowSameVersionUpgrades="yes" />

</Product>
</Wix>
Инсталлятор не устанавливает никаких файлов. Он просто создает запись об установленном компоненте и запускает скрипт.
- Download source — 818.7 KB
- Download PDF — 4.7 MB
Introduction
There are number of ways provided by Microsoft to create a setup project for windows application.
But when I started to create one, I got nothing but queries and confusions of how to start and where to start. There are numerous articles I found explaining to create a setup project, but some did not work, and some did not have a live example to follow.
The driving force for me to write this article is my QC team, who accept the main application for testing, and who also verified my setup installer with their 100% effort. And guess what, they successfully found bugs in that too.
In this article I would like to explain a step by step process to create a windows application and a setup installer for the same in a very simple manner, that is easy to understand and follow knowing that there are a number of other ways to do the same thing.
Start the Show
First, let’s create a simple one form windows application, with only a text box and a button.
Creating a windows application is just for the sake of having one to install.
I gave the name CreatingInstaller to my windows application, obviously you can choose your own.
Adding a new Windows Form Application in my solution and adding a text box and button to the default form resulted in the figure as shown below. Decorate the control properties however you want.

Just wanted to write few lines of code, so I binded the button’s click event to show text box’s text

Primary Objective
So far so good. Now let’s create an installer for the same windows application. Right click on the solution and add a new project to your solution like in following figure:

And add a setup project by Other project Types->Setup and Deployment->Visual Studio Installer
The project will be added to the solution. Now open the file system editor by clicking on the project and select the option to open file system editor, like in below figure:
You’ll get to see Application Folder, User’s Desktop and User’s Program Menu.
Right click on Application Folder and add an output project. Out project specifies the project we are creating an installer to, like in the following figure:

Select CreatingInstaller (i.e. the windows application project name) in the add output project window and select it as a primary output as shown below and click OK.

The Primary output will be added as shown below, having type defined as Output.

In the meanwhile, let’s add some more functionality to our windows application. Let’s read a file and show its output in a message box upon a button click. Therefore, just add a text file. I called it Sample.txt to the bindebugInput folder, input is the custom folder I created to place my txt file.
Write a few lines of code just to read the txt file from the Startup path. In my case bindebug, it could also be binrelease as per the project build, and specify the file folder name and file name to read the content. I chose to keep my txt file at the startup path so that I could explain how we can create files and folders at the time of installation. Now we also need this Input folder and a Sample.txt file at the time of installation to be located at the location of installed application.
For file operations I added the namespace System.IO though it is unnecessary to do so.

Therefore, running the application will show two message boxes, one after the other showing text box text and text from Sample.txt file.

Now this folder creation logic has to be implemented in our setup project, so that when the application installs, it has all the pre-requisites required to run the application, like the Input folder and the Sample.txt file.
So, right click on Application Folder in File system editor and add a folder. The folder will be created just below the Application Folder, name that folder Input.

Right-click on folder, select properties, and mark the Always Create property to True. That means the folder will always be created whenever we run the installer, after a fresh build release.

Create Shortcuts
You can decorate your form to add an icon to it, and that icon will also be required at the time of installation to create a shotcut icon to our application. Add an icon to the form like in below mentioned figure:

Time to add the Sample.txt file. Right click the Input folder created and Add file to it, browse for the Sample.txt file in the Windows Application project we created earlier.

To create a shortcut to the application, right click on Primary output in middle window pane and select Create shortcut to Primary output, name that shortcut as CreatingInstaller.
Select the properties of the shortcut, by right clicking it and add an icon to it. This icon will be created on the desktop when the application launches. The below figures explain how to add an icon.


Cut the shortcut created at Application Folder and Paste it under User’s Desktop Folder.

For shortcuts to be created at the User’s Program Menu, add a new folder to the User’s Program Menu. This will be created at the program’s menu location in that folder. Create a new shortcut pointing to the primary output as we did when we created a desktop shortcut. The three images below describe the process:

Name the folder CreatingInstaller.
Right click on middle window pane to create a new shortcut.

Select shortcut source to primary output selected.
Also add icon to shortcut, as done for Desktop shortcut.

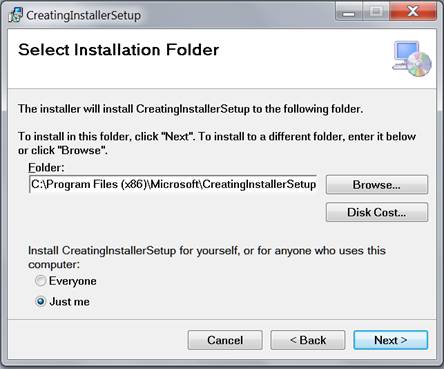
Right click Application folder to set the properties of where to install the application.
Uninstall
We always have an option to uninstall the application from the control panel’s Programs and Features list, but how about creating our own uninstaller? That is also under the programs menu so we do not have to disturb the control panel.
Step 1
Right click on File System on target Machine and Add Special Folder->System Folder as shown in below figure.

Step 2
Right click on the newly created system folder and browse for the msiexec.exe file in the local System.Windows32 folder. This file takes responsibility to install and uninstall the application based on certain parameters specified.
Set the properties of the file exactly as shown in the figure:

Step 3
Now create a new shortcut under the User’s program Menu and point its source to msiexec as shown below. You can add more icons and a name to your shortcut. I have given it the name «Uninstall.»

Step 4
Press F4 key by selecting the setup project. We see a list of properties, which we can customize as per out installation needs, like Product name, Author, Installation location. I’ll not go into a deep discussion about all of this, as they are quite easy to understand and set.
Just take a note of the product code shown below in the list of properties. We would need product code as a parameter to msiexec for uninstallation.

Step 5
Right click the Uninstall shortcut and set the arguments property as shown in below figure:
/x {product code} /qr

/x is for uninstalltion.
You can get the whole detailed list of parameters and their use at http://technet.microsoft.com/en-us/library/cc759262(v=ws.10).aspx. Chose whichever one you like.

Step 6
Save all and Rebuild the setup project.
Job Done!
Now our setup is ready to install our windows application.
Just browse the debug folder location of Setup project. We find an msi and a setup.exe. You can run either to initiate setup.
When we started we saw a setup wizard with screens that welcomed the user, asked for the location to install (while the default location was already set.)


After completing the wizard, click the close button.
Now that the job is done we can see our shortcuts to the application created at desktop and User’s Program Menu like in below given figure.
Now if we navigate out to the installation location we can also see the Input folder created and the Sample.txt file resting inside it.
Run the application and see the output.

Click on uninstall to remove the application. The wizard launches as shown below:

Custom Actions
Just wanted to give a glimpse of Custom Actions we can define, while creating the setup.
Custom actions are the actions which contain customized functionality apart from default one at the time of installation and uninstallation. For example, my QC team reported a bug that when running the application while simultaneously in background uninstalling the application, the application still keep on running. As per them it should show a message or close during the uninstallation. It was hard to explain to them the reason for this, so I opted for implementing their desire in the setup project.
- Just add an installer class to the windows application we created earlier. When we open the installer class we can see the events specified for each custom action i.e. for Installation, Uninstallation, Rollback, Commit.

My need was to write code for the uninstallation, so I wrote few lines to fulfill the need.
The code contains the logic to find the running EXE name at the time of uninstallation. If it matches my application EXE name, it kills the process. Not going into more details to it.Just want to explain the use of custom actions.
using System;
using System.Collections;
using System.Collections.Generic;
using System.ComponentModel;
using System.Configuration.Install;
using System.Diagnostics;
using System.Linq;


namespace CreatingInstaller
{
    [RunInstaller(true)]
    public partial class Installer1 : System.Configuration.Install.Installer
    {
        public override void Install(IDictionary savedState)
        {
            base.Install(savedState);

        }


        public override void Rollback(IDictionary savedState)
        {
            base.Rollback(savedState);

        }

        public override void Commit(IDictionary savedState)
        {
            base.Commit(savedState);

        }


        public override void Uninstall(IDictionary savedState)
        {
            Process application = null;
            foreach (var process in Process.GetProcesses())
            {
                if (!process.ProcessName.ToLower().Contains("creatinginstaller")) continue;
                application = process;
                break;
            }

            if (application != null && application.Responding)
            {
                application.Kill();
                base.Uninstall(savedState);
            }
        }

    }
}
- Click on the Custom Actions Editor after selecting the CreatingInstallerSetup project.

- We see the custom action editor pane on left window. Right click it to add a custom action and select the primary output in the Application Folder.

- We see primary output added as custom actions now. at the time of uninstallation my custom action will be fired and the application will be closed while uninstalling it.


.NET Framework
What if the installation machine does not have a .NET framework? We can specify our own package supplied with installation so that our application does not depend on the .NET framework of the client machine, but points to the package we supplied to it to run.
Right click on Setup project, to open properties window.
Here we can specify pre-requisites for the application to install. Just click on Prerequisites button and in the opened prerequisites window, select the checkbox for the .NET Framework application that needs to follow, and select the radio button at number 2 (i.e. Download prerequisites from the same location as my application.) Press OK, but save the project and re-build it.

Now when we browse the Debug folder of the Setup project we see two more folders as a result of the actions we performed just now.
Now this whole package has to be supplied to the client machine for the installation of the application.

Now re-install the application from setup.exe, and launch it using shortcuts.
Conclusion
The tutorial covers the basic steps for creating the installation project. I did not go very deep explaining the registry or license agreements though. There are many things to be explored to understand and master this topic. However, this article was just a start for a developer to play around with setup and deployments. Happy Coding!
Akhil Mittal is an Ex-Microsoft MVP(Most Valuable Professional), C# Corner MVP, Codeproject MVP, a blogger, author and likes to write/read technical articles. Akhil has an experience of around 12 years in developing, designing, architecting enterprises level applications primarily in Microsoft Technologies. Akhil enjoys working on technologies like MVC, Web API, Entity Framework, Angular, C# and BlockChain. Akhil is an MCP( Microsoft Certified Professional) in Web Applications (MCTS-70-528, MCTS-70-515) and .Net Framework 2.0 (MCTS-70-536). Visit Akhil Mittal’s personal blog CodeTeddy for some good and informative articles.
LinkedIn: https://www.linkedin.com/in/akhilmittal/
- Download source — 818.7 KB
- Download PDF — 4.7 MB
Introduction
There are number of ways provided by Microsoft to create a setup project for windows application.
But when I started to create one, I got nothing but queries and confusions of how to start and where to start. There are numerous articles I found explaining to create a setup project, but some did not work, and some did not have a live example to follow.
The driving force for me to write this article is my QC team, who accept the main application for testing, and who also verified my setup installer with their 100% effort. And guess what, they successfully found bugs in that too.
In this article I would like to explain a step by step process to create a windows application and a setup installer for the same in a very simple manner, that is easy to understand and follow knowing that there are a number of other ways to do the same thing.
Start the Show
First, let’s create a simple one form windows application, with only a text box and a button.
Creating a windows application is just for the sake of having one to install.
I gave the name CreatingInstaller to my windows application, obviously you can choose your own.
Adding a new Windows Form Application in my solution and adding a text box and button to the default form resulted in the figure as shown below. Decorate the control properties however you want.
Just wanted to write few lines of code, so I binded the button’s click event to show text box’s text
Primary Objective
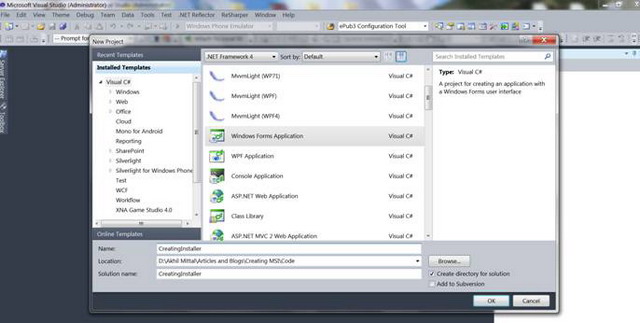
So far so good. Now let’s create an installer for the same windows application. Right click on the solution and add a new project to your solution like in following figure:
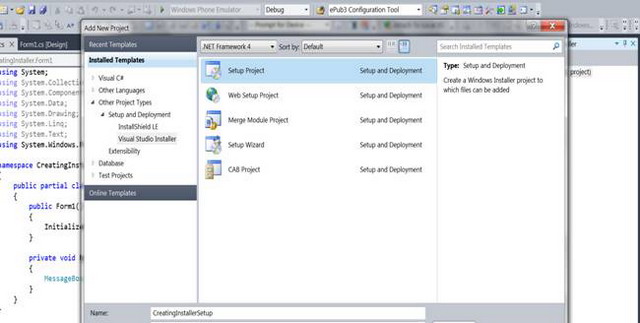
And add a setup project by Other project Types->Setup and Deployment->Visual Studio Installer
The project will be added to the solution. Now open the file system editor by clicking on the project and select the option to open file system editor, like in below figure:
You’ll get to see Application Folder, User’s Desktop and User’s Program Menu.
Right click on Application Folder and add an output project. Out project specifies the project we are creating an installer to, like in the following figure:
Select CreatingInstaller (i.e. the windows application project name) in the add output project window and select it as a primary output as shown below and click OK.
The Primary output will be added as shown below, having type defined as Output.
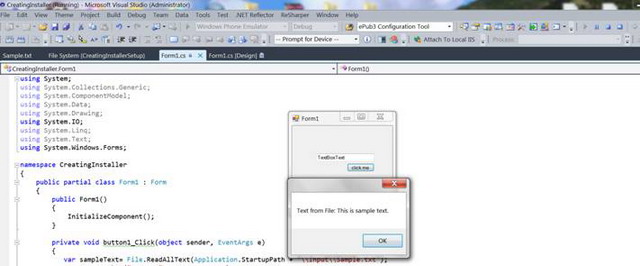
In the meanwhile, let’s add some more functionality to our windows application. Let’s read a file and show its output in a message box upon a button click. Therefore, just add a text file. I called it Sample.txt to the bindebugInput folder, input is the custom folder I created to place my txt file.
Write a few lines of code just to read the txt file from the Startup path. In my case bindebug, it could also be binrelease as per the project build, and specify the file folder name and file name to read the content. I chose to keep my txt file at the startup path so that I could explain how we can create files and folders at the time of installation. Now we also need this Input folder and a Sample.txt file at the time of installation to be located at the location of installed application.
For file operations I added the namespace System.IO though it is unnecessary to do so.
Therefore, running the application will show two message boxes, one after the other showing text box text and text from Sample.txt file.
Now this folder creation logic has to be implemented in our setup project, so that when the application installs, it has all the pre-requisites required to run the application, like the Input folder and the Sample.txt file.
So, right click on Application Folder in File system editor and add a folder. The folder will be created just below the Application Folder, name that folder Input.
Right-click on folder, select properties, and mark the Always Create property to True. That means the folder will always be created whenever we run the installer, after a fresh build release.
Create Shortcuts
You can decorate your form to add an icon to it, and that icon will also be required at the time of installation to create a shotcut icon to our application. Add an icon to the form like in below mentioned figure:
Time to add the Sample.txt file. Right click the Input folder created and Add file to it, browse for the Sample.txt file in the Windows Application project we created earlier.
To create a shortcut to the application, right click on Primary output in middle window pane and select Create shortcut to Primary output, name that shortcut as CreatingInstaller.
Select the properties of the shortcut, by right clicking it and add an icon to it. This icon will be created on the desktop when the application launches. The below figures explain how to add an icon.
Cut the shortcut created at Application Folder and Paste it under User’s Desktop Folder.
For shortcuts to be created at the User’s Program Menu, add a new folder to the User’s Program Menu. This will be created at the program’s menu location in that folder. Create a new shortcut pointing to the primary output as we did when we created a desktop shortcut. The three images below describe the process:
Name the folder CreatingInstaller.
Right click on middle window pane to create a new shortcut.
Select shortcut source to primary output selected.
Also add icon to shortcut, as done for Desktop shortcut.
Right click Application folder to set the properties of where to install the application.
Uninstall
We always have an option to uninstall the application from the control panel’s Programs and Features list, but how about creating our own uninstaller? That is also under the programs menu so we do not have to disturb the control panel.
Step 1
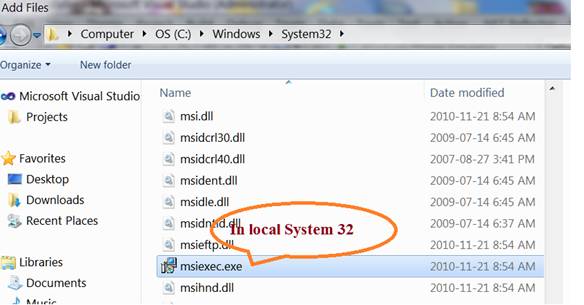
Right click on File System on target Machine and Add Special Folder->System Folder as shown in below figure.
Step 2
Right click on the newly created system folder and browse for the msiexec.exe file in the local System.Windows32 folder. This file takes responsibility to install and uninstall the application based on certain parameters specified.
Set the properties of the file exactly as shown in the figure:
Step 3
Now create a new shortcut under the User’s program Menu and point its source to msiexec as shown below. You can add more icons and a name to your shortcut. I have given it the name «Uninstall.»
Step 4
Press F4 key by selecting the setup project. We see a list of properties, which we can customize as per out installation needs, like Product name, Author, Installation location. I’ll not go into a deep discussion about all of this, as they are quite easy to understand and set.
Just take a note of the product code shown below in the list of properties. We would need product code as a parameter to msiexec for uninstallation.
Step 5
Right click the Uninstall shortcut and set the arguments property as shown in below figure:
/x {product code} /qr

/x is for uninstalltion.
You can get the whole detailed list of parameters and their use at http://technet.microsoft.com/en-us/library/cc759262(v=ws.10).aspx. Chose whichever one you like.
Step 6
Save all and Rebuild the setup project.
Job Done!
Now our setup is ready to install our windows application.
Just browse the debug folder location of Setup project. We find an msi and a setup.exe. You can run either to initiate setup.
When we started we saw a setup wizard with screens that welcomed the user, asked for the location to install (while the default location was already set.)
After completing the wizard, click the close button.
Now that the job is done we can see our shortcuts to the application created at desktop and User’s Program Menu like in below given figure.
Now if we navigate out to the installation location we can also see the Input folder created and the Sample.txt file resting inside it.
Run the application and see the output.
Click on uninstall to remove the application. The wizard launches as shown below:
Custom Actions
Just wanted to give a glimpse of Custom Actions we can define, while creating the setup.
Custom actions are the actions which contain customized functionality apart from default one at the time of installation and uninstallation. For example, my QC team reported a bug that when running the application while simultaneously in background uninstalling the application, the application still keep on running. As per them it should show a message or close during the uninstallation. It was hard to explain to them the reason for this, so I opted for implementing their desire in the setup project.
- Just add an installer class to the windows application we created earlier. When we open the installer class we can see the events specified for each custom action i.e. for Installation, Uninstallation, Rollback, Commit.
My need was to write code for the uninstallation, so I wrote few lines to fulfill the need.
The code contains the logic to find the running EXE name at the time of uninstallation. If it matches my application EXE name, it kills the process. Not going into more details to it.Just want to explain the use of custom actions.
using System;
using System.Collections;
using System.Collections.Generic;
using System.ComponentModel;
using System.Configuration.Install;
using System.Diagnostics;
using System.Linq;


namespace CreatingInstaller
{
    [RunInstaller(true)]
    public partial class Installer1 : System.Configuration.Install.Installer
    {
        public override void Install(IDictionary savedState)
        {
            base.Install(savedState);

        }


        public override void Rollback(IDictionary savedState)
        {
            base.Rollback(savedState);

        }

        public override void Commit(IDictionary savedState)
        {
            base.Commit(savedState);

        }


        public override void Uninstall(IDictionary savedState)
        {
            Process application = null;
            foreach (var process in Process.GetProcesses())
            {
                if (!process.ProcessName.ToLower().Contains("creatinginstaller")) continue;
                application = process;
                break;
            }

            if (application != null && application.Responding)
            {
                application.Kill();
                base.Uninstall(savedState);
            }
        }

    }
}
- Click on the Custom Actions Editor after selecting the CreatingInstallerSetup project.
- We see the custom action editor pane on left window. Right click it to add a custom action and select the primary output in the Application Folder.
- We see primary output added as custom actions now. at the time of uninstallation my custom action will be fired and the application will be closed while uninstalling it.
.NET Framework
What if the installation machine does not have a .NET framework? We can specify our own package supplied with installation so that our application does not depend on the .NET framework of the client machine, but points to the package we supplied to it to run.
Right click on Setup project, to open properties window.
Here we can specify pre-requisites for the application to install. Just click on Prerequisites button and in the opened prerequisites window, select the checkbox for the .NET Framework application that needs to follow, and select the radio button at number 2 (i.e. Download prerequisites from the same location as my application.) Press OK, but save the project and re-build it.
Now when we browse the Debug folder of the Setup project we see two more folders as a result of the actions we performed just now.
Now this whole package has to be supplied to the client machine for the installation of the application.
Now re-install the application from setup.exe, and launch it using shortcuts.
Conclusion
The tutorial covers the basic steps for creating the installation project. I did not go very deep explaining the registry or license agreements though. There are many things to be explored to understand and master this topic. However, this article was just a start for a developer to play around with setup and deployments. Happy Coding!
Akhil Mittal is an Ex-Microsoft MVP(Most Valuable Professional), C# Corner MVP, Codeproject MVP, a blogger, author and likes to write/read technical articles. Akhil has an experience of around 12 years in developing, designing, architecting enterprises level applications primarily in Microsoft Technologies. Akhil enjoys working on technologies like MVC, Web API, Entity Framework, Angular, C# and BlockChain. Akhil is an MCP( Microsoft Certified Professional) in Web Applications (MCTS-70-528, MCTS-70-515) and .Net Framework 2.0 (MCTS-70-536). Visit Akhil Mittal’s personal blog CodeTeddy for some good and informative articles.
LinkedIn: https://www.linkedin.com/in/akhilmittal/