Создание анимации в C#
В данном уроке используется среда программирования Microsoft Visual studio 2012. Алгоритм работы аналогичен и для других сред программирования.
Перед тем, как приступить к данному уроку, следует ознакомиться с предыдущим уроком : Как начать работать с графикой в Microsoft C#
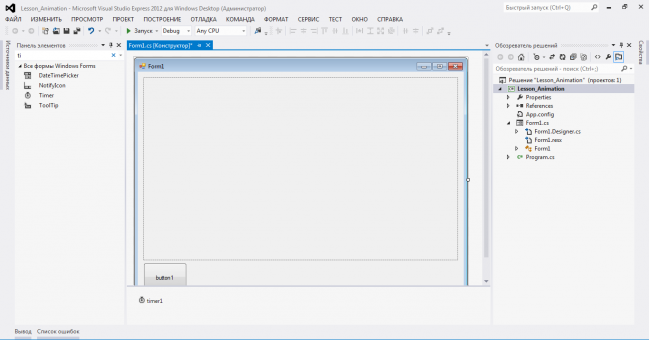
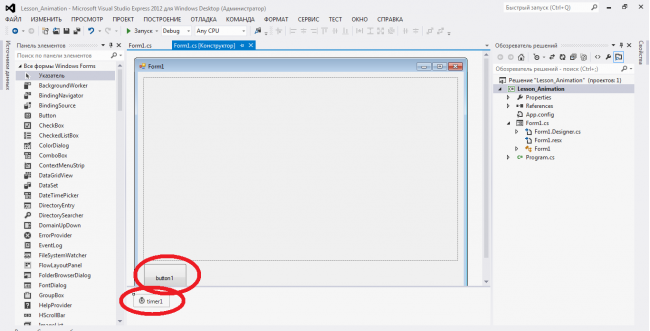
Сначала создаем свой проект, в котором и будем работать. Разместим на форме (Form1) объекты : PictureBox, Timer и Button следующим образом:
Теперь попробуем создать какую-нибудь примитивную анимацию, при помощи PictureBox и Timer, которая запустится после нажатия на кнопку (Button).
Следовательно для этого будем обрабатывать событие нажатия на кнопку и событие «срабатывания» таймера. Также заведем все нужные для рисования объекты и переменные.
Далее приведен код программы и скриншоты, которые содержат все необходимое пояснение реализации анимации.
using System;
using System.Collections.Generic;
using System.ComponentModel;
using System.Data;
using System.Drawing;
using System.Linq;
using System.Text;
using System.Threading.Tasks;
using System.Windows.Forms;

namespace Lesson_Animation
{
    public partial class Form1 : Form
    {
        Graphics gr;       //объявляем объект - графику, на которой будем рисовать
        Pen p;             //объявляем объект - карандаш, которым будем рисовать контур
        SolidBrush fon;    //объявляем объект - заливки, для заливки соответственно фона
        SolidBrush fig;    //и внутренности рисуемой фигуры


        int rad;          // переменная для хранения радиуса рисуемых кругов
        Random rand;      // объект, для получения случайных чисел

        public Form1()
        {
            InitializeComponent();
        }

        //опишем функцию, которая будет рисовать круг по координатам его центра
        void DrawCircle(int x, int y)
        {
            int xc, yc;
            xc = x - rad;
            yc = y - rad;
            gr.FillEllipse(fig, xc, yc, rad, rad);

            gr.DrawEllipse(p, xc, yc, rad, rad);

        }

        // для перехода к данной функции сделайте двойной щелчок по кнопке (Button)
        // добавленной на форму. См. на фото, после кода
        private void button1_Click(object sender, EventArgs e)
        {
            gr = pictureBox1.CreateGraphics();  //инициализируем объект типа графики
                                                // привязав  к PictureBox

            p = new Pen(Color.Lime);           // задали цвет для карандаша
            fon = new SolidBrush(Color.Black); // и для заливки
            fig = new SolidBrush(Color.Purple);

            rad = 40;                          //задали радиус для круга
            rand = new Random();               //инициализируем объект для рандомных числе

            gr.FillRectangle(fon, 0, 0, pictureBox1.Width, pictureBox1.Height); // закрасим черным
                                                                  // нашу область рисования

            // вызываем написанную нами функцию, для прорисовки круга
            // случайным образом выбрав перед этим координаты центра
            int x,  y;

            for (int i = 0; i < 15; i++)
            {
                x = rand.Next(pictureBox1.Width);
                y = rand.Next(pictureBox1.Height);
                DrawCircle(x, y);
            }

            timer1.Enabled = true;  //включим в работу наш таймер,
            // то есть теперь будет происходить событие Tick и его будет обрабатывать функция On_Tick (по умолчанию)

        }

        // для получения данной функции перейдите к конструктору формы
        // и сделайте двойной щелчок по таймеру, добавленному на форму. См. на фото после кода
        private void timer1_Tick(object sender, EventArgs e)
        {

            //сначала будем очищать область рисования цветом фона
            gr.FillRectangle(fon, 0, 0, pictureBox1.Width, pictureBox1.Height);


            // затем опять случайным образом выбираем координаты центров кругов
            // и рисуем их при помощи описанной нами функции
            int x, y;

            for (int i = 0; i < 15; i++)
            {
                x = rand.Next(pictureBox1.Width);
                y = rand.Next(pictureBox1.Height);
                DrawCircle(x, y);
            }

        }
    }
}
После этого, можно запустить программу и после нажатия на кнопку увидите простую анимацию – случайное перемещение кругов по черному фону, как показано ниже:
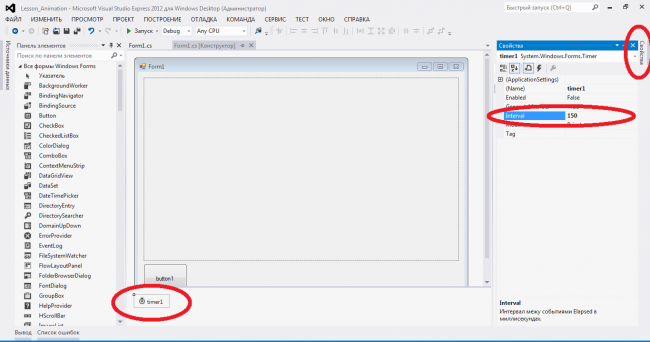
Для того, чтобы анимация соответствовала требованиям иногда необходимо менять так называемый тик таймера, т.е. промежуток выполнения очередного шага анимации. Это выполняется в Инспекторе объектов. Нужно выбрать элемент Timer, нажать на кнопку Свойства и там выбрать и изменить параметр Interval (выражается в миллисекундах) В данном примере Interval равен 150 мс.
Ниже прикреплен архив данного проекта.
| Прикрепленный файл | Размер |
|---|---|
| Skopinskiy_LessonAnimation.zip | 54.79 кб |
public
void
LoadImages()
{
DirectoryInfo Folder;
DialogResult result =
this.folderBrowserDlg.ShowDialog();
imageselected =
false;
if
(result == DialogResult.OK)
{
Folder =
new
DirectoryInfo(folderBrowserDlg.SelectedPath);
var imageFiles = Folder.GetFiles("*.jpg")
.Concat(Folder.GetFiles("*.gif"))
.Concat(Folder.GetFiles("*.png"))
.Concat(Folder.GetFiles("*.jpeg"))
.Concat(Folder.GetFiles("*.bmp")).ToArray();
// Here we filter all image files
pnlThumb.Controls.Clear();
if
(imageFiles.Length > 0)
{
imageselected =
true;
TotalimageFiles = imageFiles.Length;
}
else
{
return;
}
int
locnewX = locX;
int
locnewY = locY;
ctrl =
new
PictureBox[TotalimageFiles];
AllImageFielsNames =
new
String[TotalimageFiles];
int
imageindexs = 0;
foreach
(FileInfo img in
imageFiles)
{
AllImageFielsNames[imageindexs] = img.FullName;
loadImagestoPanel(img.Name, img.FullName, locnewX, locnewY, imageindexs);
locnewX = locnewX + sizeWidth + 10;
imageindexs = imageindexs + 1;
}
CurrentIndex = 0;
StartIndex = 0;
LastIndex = 0;
DrawImageSlideShows();
}
}
// This Function will display the Thumb Images.
private
void
loadImagestoPanel(String imageName, String ImageFullName, int
newLocX, int
newLocY, int
imageindexs)
{
ctrl[imageindexs] =
new
PictureBox();
ctrl[imageindexs].Image = Image.FromFile(ImageFullName);
ctrl[imageindexs].BackColor = Color.Black;
ctrl[imageindexs].Location =
new
Point(newLocX, newLocY);
ctrl[imageindexs].Size =
new
System.Drawing.Size(sizeWidth - 30, sizeHeight - 60);
ctrl[imageindexs].BorderStyle = BorderStyle.None;
ctrl[imageindexs].SizeMode = PictureBoxSizeMode.StretchImage;
// ctrl[imageindexs].MouseClick += new MouseEventHandler(control_MouseMove);
pnlThumb.Controls.Add(ctrl[imageindexs]);
}
Here we call the above function in Load Image Click Event.In this function load and display all the Images from the selected folder.
6. Once Image loaded we need highlight the selected and current image. For this we call the below function which will check for the current image and set the image border and Increase the Size of the present image.
#region Highlight The Current Slected image
public
void
HighlightCurrentImage()
{
for
(int
i = 0; i <= ctrl.Length - 1; i++)
{
if
(i == CurrentIndex)
{
ctrl[i].Left = ctrl[i].Left - 20;
ctrl[i].Size =
new
System.Drawing.Size(sizeWidth + 10, sizeHeight);
ctrl[i].BorderStyle = BorderStyle.FixedSingle;
}
else
{
// ctrl[i].Location = new Point(newLocX, newLocY);
ctrl[i].Size =
new
System.Drawing.Size(sizeWidth - 20, sizeHeight - 40);
ctrl[i].BorderStyle = BorderStyle.None;
}
}
}
#endregion
7.This is the important function of User control where we do the Animation for the selected current Image.This function will be called in
Timer Tick event. After the Animation is finished we stop the timer and activate the main timer to load next image.From main Timer we create the Random no from 1 to 11 and activate the sub timer. Sub timer is used to display the animation.
#region Draw Animation on selected Image
public
void
drawAnimation()
{
try
{
switch
(SlideType)
{
case
0:// Small to big
SmalltoBigImage_Animation();
break;
case
1:// left to right
LefttoRight_Animation();
break;
case
2:// Rectangle Transparent
Transparent_Bar_Animation();
break;
case
3:// Right to Left
RighttoLeft_Animation();
break;
case
4:// Top to Bottom
ToptoBottom_Animation();
break;
case
5:// Bottom to Top
BottomTop_Animation();
break;
case
6:// Rectangle Vertical Block Transparent
Vertical_Bar_Animation();
break;
case
7:// Random Block Transparent
Random_Bar_Animation();
break;
case
8:// Rectangle Horizontal Block Transparent
Horizontal_Bar_Animation();
break;
case
9:// Text Transparent
Transparent_Text_Animation();
break;
case
10:// Random Circle and Bar Transparent
Random_Circle_Animation();
break;
default:
// In Default there is no animation but load next image in time intervals.
picImageSlide.Width = pnlImg.Width;
picImageSlide.Height = pnlImg.Height;
timer1.Enabled =
true;
timer1.Start();
break;
}
}
catch
(Exception ex)
{
}
}
// Small to Big Size Image
private
void
SmalltoBigImage_Animation()
{
int
leftConstant_adjust = 40;
int
topconstant_adjust = 30;
if
((picImageSlide.Width < (MINMAX * pnlImg.Width)) &&
(picImageSlide.Height < (MINMAX * pnlImg.Height)))
{
picImageSlide.Width = Convert.ToInt32(picImageSlide.Width * ZOOMFACTOR);
picImageSlide.Height = Convert.ToInt32(picImageSlide.Height * ZOOMFACTOR);
picImageSlide.Left = Convert.ToInt32(picImageSlide.Left - leftConstant_adjust);
if
(picImageSlide.Top <= 0)
{
picImageSlide.Left = 0;
picImageSlide.Top = 0;
}
picImageSlide.Top = Convert.ToInt32(picImageSlide.Top - topconstant_adjust);
picImageSlide.SizeMode = PictureBoxSizeMode.StretchImage;
}
else
//In else part i check for the animation completed if its completed stop the timer 2 and start the timer 1 to load the next image.
{
picImageSlide.Width = pnlImg.Width;
picImageSlide.Height = pnlImg.Height;
Start_Stop_Timer_1(true);
// Start the Timer 1 to load the next Image
Start_Stop_Timer_2(false);//
Stop the Timer 2 to stop the animation till the next image loaded.
}
}
//Left to Right Animation
private
void
LefttoRight_Animation()
{
picImageSlide.Invalidate();
if
(picImageSlide.Location.X >= 10)
{
picImageSlide.Left = 0;
Start_Stop_Timer_1(true);
// Start the Timer 1 to load the next Image
Start_Stop_Timer_2(false);//
Stop the Timer 2 to stop the animation till the next image loaded.
}
else
{
picImageSlide.Left = xval;
xval = xval + 100;
}
picImageSlide.Width = pnlImg.Width;
picImageSlide.Height = pnlImg.Height;
}
//Left to Right Animation
private
void
Transparent_Bar_Animation()
{
// picImageSlide.Invalidate();
if
(opacity >= 90)
{
Start_Stop_Timer_1(true);
// Start the Timer 1 to load the next Image
Start_Stop_Timer_2(false);//
Stop the Timer 2 to stop the animation till the next image loaded.
opacity = 100;
}
// picImageSlide.Refresh();
Graphics g = Graphics.FromImage(picImageSlide.Image);
g.FillRectangle(new
SolidBrush(Color.FromArgb(58, Color.White)), 0, 0, picImageSlide.Image.Width, picImageSlide.Image.Height);
opacity = opacity + 10;
picImageSlide.Image = PictuerBoxFadeIn(picImageSlide.Image, opacity);
//calling ChangeOpacity Function
}
// Right to Left Animation
private
void
RighttoLeft_Animation()
{
picImageSlide.Invalidate();
if
(xval_Right <= 100)
{
picImageSlide.Left = 0;
xval_Right = 0;
Start_Stop_Timer_1(true);
// Start the Timer 1 to load the next Image
Start_Stop_Timer_2(false);//
Stop the Timer 2 to stop the animation till the next image loaded.
}
else
{
picImageSlide.Left = xval_Right;
xval_Right = xval_Right - 100;
}
picImageSlide.Width = pnlImg.Width;
picImageSlide.Height = pnlImg.Height;
}
// Top to Bottom Slide Animation
private
void
ToptoBottom_Animation()
{
picImageSlide.Invalidate();
if
(yval + 60 >= 30)
{
picImageSlide.Top = 0;
Start_Stop_Timer_1(true);
// Start the Timer 1 to load the next Image
Start_Stop_Timer_2(false);//
Stop the Timer 2 to stop the animation till the next image loaded.
}
else
{
picImageSlide.Top = yval;
yval = yval + 100;
}
picImageSlide.Width = pnlImg.Width;
picImageSlide.Height = pnlImg.Height;
}
// Bottom to Top Slide Animation
private
void
BottomTop_Animation()
{
picImageSlide.Invalidate();
if
(yval_Right <= 0)
{
picImageSlide.Left = 0;
xval_Right = 0;
Start_Stop_Timer_1(true);
// Start the Timer 1 to load the next Image
Start_Stop_Timer_2(false);//
Stop the Timer 2 to stop the animation till the next image loaded.
}
else
{
picImageSlide.Top = yval_Right;
yval_Right = yval_Right - 100;
}
picImageSlide.Width = pnlImg.Width;
picImageSlide.Height = pnlImg.Height;
}
// vertical transparent Bar Animation
private
void
Vertical_Bar_Animation()
{
if
(opacity_new <= 0)
{
Start_Stop_Timer_1(true);
// Start the Timer 1 to load the next Image
Start_Stop_Timer_2(false);//
Stop the Timer 2 to stop the animation till the next image loaded.
opacity_new = 100;
}
// picImageSlide.Refresh();
Graphics g2 = Graphics.FromImage(picImageSlide.Image);
recBlockYval = 0;
barheight = barheight + 100;
g2.DrawRectangle(Pens.Black, recBlockXval, recBlockYval, barwidth, barheight);
g2.FillRectangle(new
SolidBrush(Color.FromArgb(opacity_new, Color.White)), recBlockXval, recBlockYval, barwidth - 1, barheight - 1);
opacity_new = opacity_new - 10;
recBlockXval = recBlockXval + barwidth + 4;
picImageSlide.Refresh();
}
// Random bar and Circle transparent Animation
private
void
Random_Bar_Animation()
{
if
(opacity_new <= 0)
{
Start_Stop_Timer_1(true);
// Start the Timer 1 to load the next Image
Start_Stop_Timer_2(false);//
Stop the Timer 2 to stop the animation till the next image loaded.
opacity_new = 100;
}
// picImageSlide.Refresh();
Graphics g3 = Graphics.FromImage(picImageSlide.Image);
recBlockXval = 0;
barwidth = barwidth + 100;
// g3.DrawRectangle(Pens.Black, rnd.Next(0, 200), rnd.Next(0, 200), rnd.Next(100, 600), rnd.Next(60, 400));
g3.FillRectangle(new
SolidBrush(Color.FromArgb(opacity_new, Color.White)), rnd.Next(10, 600), rnd.Next(10, 600), rnd.Next(100, 600), rnd.Next(60, 400));
opacity_new = opacity_new - 5;
recBlockYval = recBlockYval + barheight + 4;
//recBlockYval = recBlockYval + 100;
//barheight = barheight + 100;
picImageSlide.Refresh();
}
//Horizontal transparent Bar Animation
private
void
Horizontal_Bar_Animation()
{
if
(opacity_new <= 0)
{
Start_Stop_Timer_1(true);
// Start the Timer 1 to load the next Image
Start_Stop_Timer_2(false);//
Stop the Timer 2 to stop the animation till the next image loaded.
opacity_new = 100;
}
recBlockXval = 0;
barwidth = barwidth + 100;
Graphics g4 = Graphics.FromImage(picImageSlide.Image);
g4.DrawRectangle(Pens.Black, recBlockXval, recBlockYval, barwidth, barheight);
g4.FillRectangle(new
SolidBrush(Color.FromArgb(opacity_new, Color.White)), recBlockXval, recBlockYval, barwidth - 1, barheight - 1);
opacity_new = opacity_new - 10;
recBlockYval = recBlockYval + barheight + 4;
picImageSlide.Refresh();
}
// transparent text Animation
private
void
Transparent_Text_Animation()
{
if
(opacity_new <= 0)
{
Start_Stop_Timer_1(true);
// Start the Timer 1 to load the next Image
Start_Stop_Timer_2(false);//
Stop the Timer 2 to stop the animation till the next image loaded.
opacity_new = 100;
}
// picImageSlide.Refresh();
Graphics g5 = Graphics.FromImage(picImageSlide.Image);
g5.DrawString("Shanu Slide Show",
new
Font("Arial", 86),
new
SolidBrush(Color.FromArgb(opacity_new, Color.FromArgb(this.rnd.Next(256),
this.rnd.Next(256),
this.rnd.Next(256)))),
rnd.Next(600), rnd.Next(400));
opacity_new = opacity_new - 5;
picImageSlide.Refresh();
}
// Random Circle Animation
private
void
Random_Circle_Animation()
{
if
(opacity_new <= 0)
{
Start_Stop_Timer_1(true);
// Start the Timer 1 to load the next Image
Start_Stop_Timer_2(false);//
Stop the Timer 2 to stop the animation till the next image loaded.
opacity_new = 100;
}
// picImageSlide.Refresh();
Graphics g6 = Graphics.FromImage(picImageSlide.Image);
recBlockXval = 0;
barwidth = barwidth + 100;
// g3.DrawRectangle(Pens.Black, rnd.Next(0, 200), rnd.Next(0, 200), rnd.Next(100, 600), rnd.Next(60, 400));
g6.FillRectangle(new
SolidBrush(Color.FromArgb(opacity_new, Color.White)), rnd.Next(10, 600), rnd.Next(10, 600), rnd.Next(400, 800), rnd.Next(60, 400));
g6.FillPie(new
SolidBrush(Color.FromArgb(opacity_new, Color.FromArgb(this.rnd.Next(256),
this.rnd.Next(256),
this.rnd.Next(256)))), rnd.Next(600), rnd.Next(400), rnd.Next(400, 800), rnd.Next(400), 0, 360);
opacity_new = opacity_new - 5;
recBlockYval = recBlockYval + barheight + 4;
//recBlockYval = recBlockYval + 100;
//barheight = barheight + 100;
picImageSlide.Refresh();
}
//for the Image Transparent
public
static
Bitmap PictuerBoxFadeIn(Image img, int
opacity)
{
Bitmap bmp =
new
Bitmap(img.Width, img.Height);
Graphics g = Graphics.FromImage(bmp);
ColorMatrix colmat =
new
ColorMatrix();
colmat.Matrix33 = opacity;
ImageAttributes imgAttr =
new
ImageAttributes();
imgAttr.SetColorMatrix(colmat, ColorMatrixFlag.Default, ColorAdjustType.Bitmap);
g.DrawImage(img,
new
Rectangle(0, 0, bmp.Width, bmp.Height), 0, 0, img.Width, img.Height, GraphicsUnit.Pixel, imgAttr);
g.Dispose();
// return the new fade in Image
return
bmp;
}
#endregion
8.After completion save,Build and run the project.
Now we create a Windows application and add test our «SHANUImageSlideShow_Demo» User Control.
I need to knock out a quick animation in C#/Windows Forms for a Halloween display. Just some 2D shapes moving about on a solid background. Since this is just a quick one-off project I really don’t want to install and learn an entire new set of tools for this. (DirectX dev kits, Silverlight, Flash, etc..) I also have to install this on multiple computers so anything beyond the basic .Net framework (2.0) would be a pain in the arse.
For tools I’ve got VS2k8, 25 years of development experience, a wheelbarrow, holocaust cloak, and about 2 days to knock this out. I haven’t done animation since using assembler on my Atari 130XE (hooray for page flipping and player/missile graphics!)
Advice? Here’s some of the things I’d like to know:
- I can draw on any empty widget (like a panel) by fiddling with it’s OnPaint handler, right? That’s how I’d draw a custom widget. Is there a better technique than this?
- Is there a page-flipping technique for this kind of thing in Windows Forms? I’m not looking for a high frame rate, just as little flicker/drawing as necessary.
Thanks.
Post Mortem Edit … «a couple of coding days later»
Well, the project is done. The links below came in handy although a couple of them were 404. (I wish SO would allow more than one reply to be marked «correct»). The biggest problem I had to overcome was flickering, and a persistent bug when I tried to draw on the form directly.
- Using the OnPaint event for the Form: bad idea. I never got that to work; lots of mysterious errors (stack overflows, or ArgumentNullExceptions). I wound up using a panel sized to fill the form and that worked fine.
- Using the OnPaint method is slow anyway. Somewhere online I read that building the PaintEventArgs was slow, and they weren’t kidding. Lots of flickering went away when I abandoned this. Skip the OnPaint/Invalidate() and just paint it yourself.
-
Setting all of the «double buffering» options on the form still left some flicker that had to be fixed. (And I found conflicting docs that said «set them on the control» and «set them on the form». Well controls don’t have a .SetStyle() method.) I haven’t tested without them, so they might be doing something (
thisis the form):this.SetStyle(ControlStyles.UserPaint, true); this.SetStyle(ControlStyles.OptimizedDoubleBuffer, true); this.SetStyle(ControlStyles.AllPaintingInWmPaint, true);
So the workhorse of the code wound up looking like (pf is the panel control):
    void PaintPlayField()
    {
        Bitmap bufl = new Bitmap(pf.Width, pf.Height);
        using (Graphics g = Graphics.FromImage(bufl))
        {
            g.FillRectangle(Brushes.Black, new Rectangle(0, 0, pf.Width, pf.Height));
            DrawItems(g);
            DrawMoreItems(g);
            pf.CreateGraphics().DrawImageUnscaled(bufl, 0, 0);
        }
    }
And I just called PaintPlayField from the inside of my Timer loop. No flicker at all.
- Download source code — 11.4 KB
Introduction
This article is meant to explain how to add animations to a Windows Form. The first section will briefly explain the process behind by designing a Windows Form. Next will be an example of drawing on a Form using the Graphics class. Finally, the article will conclude with code that can either be compiled on the DOS prompt of the .NET Framework, or built using the separate files that comprise the Visual Studio project.
When working with Windows Forms, the Form object is used to represent any window in your application. This includes the top-most main windows in an SDI (Single-Document Interface), as well as the parent and child windows of an MDI (Multiple Document Interface) application. To create a main window, you must:
- Derive a custom class from
System.Windows.Forms.Form. - Configure the application’s
Mainmethod to callApplication.Run(), passing an instance of your newFormderived class as an argument:
using System;
using System.Windows.Forms;
public class MainForm : Form
{
    public MainForm(){}

    public static int Main(string[] args)
    {
        Application.Run(new MainForm());
        return 0;
    }
  }
}
In the world of Windows Forms, a blank form will often have controls dragged and dropped onto it. A control is an element on the form which has properties that are set. The dragging and dropping of the controls onto the design surface of Visual Studio 2005 to then set their properties cause the IDE to generate code that defines the Form file in one Form.cs file and one Form.Designer.cs file. But, suppose we want to use graphics on a form that we want to draw on a form or a control.
Furthermore, suppose we want to build another window inside of the main window in order to achieve animation. To draw on a control or form, you must first:
- Create a
Graphicsobject by calling theSystem.Windows.Forms.CreateGraphicsmethod. - Create a
Penobject. - Call a member of the
Graphicsclass to draw on the control using thePen. Here is an example:
(File: DrawLine.cs; To compile: c:WindowsMicrosoft.NETFrameworkv2.0.50727>csc.exe /target:winexe DrawLine.cs.)
using System;
using System.Drawing;
using System.Drawing.Drawing2D;
using System.Collections;
using System.ComponentModel;
using System.Windows.Forms;
using System.Data;

public class MainForm : System.Windows.Forms.Form
{

    private System.ComponentModel.Container components;

    public MainForm()
    {
        InitializeComponent();
        CenterToScreen();
        SetStyle(ControlStyles.ResizeRedraw, true);
    }

    protected override void Dispose( bool disposing )
    {
        if( disposing )
        {
            if (components != null)
            {
                components.Dispose();
            }
        }
        base.Dispose( disposing );
    }


#region Windows Form Designer generated code

    private void InitializeComponent()
    {
        this.AutoScaleBaseSize = new System.Drawing.Size(5, 13);
        this.ClientSize = new System.Drawing.Size(292, 273);
        this.Text = "Fun with graphics";
        this.Resize += new System.EventHandler(this.Form1_Resize);
        this.Paint += new System.Windows.Forms.PaintEventHandler(this.MainForm_Paint);
    }
#endregion

    [STAThread]
    static void Main()
    {
        Application.Run(new MainForm());
    }

    private void MainForm_Paint(object sender, System.Windows.Forms.PaintEventArgs e)
    {
        Graphics g = this.CreateGraphics();


        Pen p= new Pen(Color.Red, 7);

        g.DrawLine(p, 1, 1, 100, 100);
    }

    private void Form1_Resize(object sender, System.EventArgs e)
    {
    }
}
If compiled on the DOS prompt of the .NET Framework directory, you will see a line that forms a 60 degree angle. Try to picture a parallel line where the ends are connected to form a square. If the line were to move counterclockwise, it would form a rotation that, if traced, would form a path. In video, the frame rate is the number of single frames per second the human eye sees. While it appears as normal motion, it is actually a set of frames, normally 60, that display per second while there is a horizontal and vertical sync rate. Graphics, however, portray motion by animation. Animation is accomplished by instantiating the System.Windows.Forms.Timer class, which takes care of triggering a regular call to a method by a thread on the window. Note that animation occurs inside of the main window, so another window has to be built, one, in this case, that will rotate.
As stated, the Microsoft Visual Studio 2005 IDE generates code so that the properties of the controls are set to actually define the component as fields, while a control is an element on the form. If you download the example and run the solution file, you should see the animation. Because the .NET Framework 2.0 supports partial classes, we can sort of split two source code files down to form one Form file. The zip file for download contains the entire project in C#. The code below is meant to run on the command-line. The reader should note the program.cs, Form1.cs, and Form1.Desinger.cs files that comprise the project. After examining the source and how it is divided, examine the single source code file presented below:
using System;
using System.Drawing;
using System.Windows.Forms;
using System.Drawing.Drawing2D;

public partial class AnimForm : Form {
    private float angle;
    private Timer timer = new Timer();
    private BufferedGraphics bufferedGraphics;

    public AnimForm() {
        BufferedGraphicsContext context = BufferedGraphicsManager.Current;
        context.MaximumBuffer = new Size( this.Width + 1, this.Height + 1 );
        bufferedGraphics = context.Allocate( this.CreateGraphics(),
        new Rectangle( 0, 0, this.Width, this.Height) );
        timer.Enabled = true;
        timer.Tick += OnTimer;
        timer.Interval = 20;
        timer.Start();
    }

    private void OnTimer( object sender, System.EventArgs e ) {
        angle ++;
        if (angle > 359)
            angle = 0;
        Graphics g = bufferedGraphics.Graphics;
        g.Clear( Color.Black );
        Matrix matrix = new Matrix();
        matrix.Rotate( angle, MatrixOrder.Append );
        matrix.Translate( this.ClientSize.Width / 2,
            this.ClientSize.Height/ 2, MatrixOrder.Append );
        g.Transform = matrix;
        g.FillRectangle( Brushes.Azure, -100, -100, 200, 200 );
        bufferedGraphics.Render( Graphics.FromHwnd( this.Handle ) );
    }

    [System.STAThread]
    public static void Main() {
        Application.Run( new AnimForm() );
    }
}
This example of animation is not meant as a substitute for studying the GDI+ library and the the .NET base classes involved. The code should be self-explanatory. Remember, the coordinates start at the upper left hand corner of a window. Comments and corrections are welcome.
References
- Practical .NET2 and C#2 by Patrick Smacchia
This member has not yet provided a Biography. Assume it’s interesting and varied, and probably something to do with programming.
Просмотров 2.4к. Обновлено 11 октября 2019
Урок из серии: «Программирование на Visual Basic.NET для школьников»
В предыдущем уроке вы узнали, как можно анимировать рисунок, созданный с помощью графических методов Visual Basic.NET.
В этом уроке рассказывается, как перемещать на экране объекты Windows Form изменяя свойства Top и Left этих объектов, управлять скоростью анимации с помощью объекта таймер.
Мы создадим проект, в котором с помощью командных кнопок можно будет управлять движением графического поля PictureBox, содержащего рисунок.
Справочная информация
| Свойство | Описание |
| Left | Горизонтальная (по оси x) координата левого края объекта. Может быть использовано для горизонтального перемещения объекта (влево или вправо). |
| Top | Вертикальная (по оси y) координата верхнего края объекта. Может быть использовано для вертикального перемещения объекта (вверх или вниз). |
| Location | Координаты верхнего левого угла объекта. Может быть использовано для перемещения объекта в указанное место. |
Чтобы переместить объект в горизонтальном направлении, нужно присвоить свойству Left объекта новое значение:
объект.Left = по-горизонтали
здесь объект — это имя объекта формы, который вы хотите переместить, а по-горизонтали — это новая горизонтальная (по оси x) координата левого края объекта, измеренная в пикселях.
Оператор программы
PictureBox1.Left = 300
перемещает объект PictureBox1 в точку, расположенную в 300 пикселях справа от левого края окна.
Чтобы переместить объект на относительное расстояние, вы должны добавлять или вычитать пиксели из текущего значения свойства Left.
Оператор
PictureBox1.Left = PictureBox1.Left + 50
переместить объект PictureBox1 на 50 пикселей вправо.
Аналогично, вы можете изменить вертикальное положение объекта на форме, установив его свойство Top, или добавляя или вычитая пиксели из текущего значения свойства Top.
Чтобы переместить объект одновременно в вертикальном и горизонтальном направлении, можно использовать комбинацию значений свойств Left и Top.
Например, чтобы переместить объект PictureBox1 в координаты (300, 200), можно ввести следующий программный код:
PictureBox1.Left = 300
PictureBox1.Top = 200
Если вы планируете делать много перемещений объекта (например, для создания анимационного эффекта), то вместо этих двух операторов рекомендуется использовать один оператор, изменяющий свойство Location объекта:
объект.Location = New Point(по-горизонтали, по-вертикали)
где по-горизонтали, по-вертикали — координаты x и y левого верхнего угла объекта в пикселях.
Например, оператор
PictureBox1.Location = New Point(300, 200)
перемещает объект PictureBox1 в точку с координатами (300, 200).
Чтобы с помощью свойства Location выполнить относительное перемещение, требуются изменить свойства Location.X и Location.Y.
Например, операторы
PictureBox1.Location = New Point(PictureBox1.Location.X - 50, _
PictureBox1.Location.Y - 40)
перемещают объект PictureBox1 на 50 пикселей влево и на 40 пикселей вверх.
Проект «Перемещение иконки»
Задание. Создать проект, который будет анимировать область вывода изображений, содержащую значок солнца (Sun.ico). Для обнаружения верхнего края формы использовать свойство Top формы, а для обнаружения нижнего края — свойство Size.Height. Значок солнца должен перемещаться вверх-вниз между этими двумя границами каждый раз, когда вы щелкаете на кнопке.
Файл с графическим изображением скачать по прямой ссылке: //gospodaretsva.com/wp-content/uploads/2011/12/SUN.ico
- В среде программирования Bisual Basic.NET cоздайте проект с именем «Перемещение иконки»
- Разместите на форме:
- две кнопки: Button1, Button2;
- графическое поле PictureBox1-это объект программы, который вы будете анимировать;
- таймер Timer1.

Таймер будет управлять скоростью анимации. Вспомните, что таймер сам по себе не отображается на форме, так что он показывается под формой в области компонент, предназначенной для невидимых объектов.
- Установите для формы и элементов управления следующие свойства:
Объект Свойство Значение Button1 Text Пореместить вверх Button2 Text Переместить вниз PictureBox1 Image «C:Documents and SettingsУченикМои документыsun.ico» Width 20 Height 20 SizeMode StretchImage Timer1 Enabled False Interval 75 Form1 Text Простая анимация - Откройте редактор кода. Ниже строки «Код, автоматически созданный конструктором форм Windows» введите объявление переменной:
Dim GoingUp As Boolean 'GoingUp хранит текущее направление
Это объявление делает переменную GoingUp видимой для всех процедур событий формы.
Используется переменную типа Boolean потому, что у нас в этой программе есть только два возможных направления перемещения — вверх и вниз.
- Для кнопки Переместить вверхв процедуре Button1_Click поместите следующий код:
GoingUp = True  'направление перемещения - вверх
Timer1.Enabled = True 'включить таймер
- Для кнопки Переместить вниз в процедуре Button2_Click поместите код:
GoingUp = False  'Направление перемещения - вниз
Timer1.Enabled = True
Эта процедура очень похожа на процедуру события Button1_Click, за исключением того, что она меняет направление на движение вниз.
- Отобразите форму, дважды щелкните мышью на объекте Timer1, чтобы создать заготовку для процедуры Timer1_Tick. Введите следующий код:
 If GoingUp = True Then
   'перемещаем область вывода изображений вверх
   If PictureBox1.Top > 10 Then
      PictureBox1.Location = New Point(PictureBox1.Location.X - 10, _
		PictureBox1.Location.Y - 10)
   End If
Else
   'перемещаем область вывода изображений вниз
   If PictureBox1.Top < (Me.Size.Height - 75) Then
      PictureBox1.Location = New Point(PictureBox1.Location.X + 10, _
		PictureBox1.Location.Y + 10)
   End If
End If
Как только таймер будет включен, программный код этой процедуры будет выполняться каждые 75 миллисекунд.
Оператор ветвления проверяет значение логической переменной GoingUp.
Если она имеет значение True (направление перемещения — вверх), значок солнца перемещается на 10 пикселей влево и на 10 пикселей вверх.
Иначе значок перемещается вниз до тех пор, пока не будет достигнута граница формы.
Нижняя граница вычисляется как разность между высотой формы Me.Size.Height (Объект Me представляет саму форму) и значением 75.
- Запустите проект. Щелкните на кнопке Переместить вверх. Значок солнца переместится по диагонали вверх, как показано ниже.

Через некоторое время объект остановится около верхнего края формы.
- Щелкните на кнопке Переместить вниз. Значок солнца переместится обратно вниз в нижний правый угол формы.
- Чтобы заставить его перемещаться быстрее, нужно уменьшить значение Interval для объекта таймера. Чтобы замедлить движение, нужно увеличить параметр Interval.
- Когда закончите работать с программой, закройте окно, чтобы остановить демонстрацию.


В этом уроке вы узнали, как с помощью свойств Top, Left, Location и таймера можно анимировать объекты Windows Form.
В следующем уроке начнем создавать проект «Графический редактор».
Следующий урок: Проект Графический редактор.
До встречи на следующем уроке.
- Download sample project — 179.2 KB
Introduction
There are a lot of techniques for bringing animation in your Windows application — simple and complex techniques. Here, I can explain a simple technique for giving animation or moving effects for your Windows Forms or any other controls.
Using the Code
Follow these steps:
- Create a solution (e.g.:
SimpleAnimation) - Place your controls on it:
e.g.: - Split Container —
scnrMain - Buttons —
btnAnimation1,btnAnimation2,btnReset,btnQuit - Panel —
pnlMain - Add a timer control (e.g.:
tmrMain) - Write your code as follows:
using System;
using System.Collections.Generic;
using System.ComponentModel;
using System.Data;
using System.Drawing;
using System.Linq;
using System.Text;
using System.Windows.Forms;

namespace SimpleAnimation
{
    public partial class frmMain : Form
    {


        int scnrWidth;
        int scnrHeight;
        int pnlWidth;
        int pnlHeight;

        public frmMain()
        {
            InitializeComponent();
        }


        public void frmMain_Load(object sender, EventArgs e)
        {
            pnlMain.Width = 0;
            pnlMain.Height = 0;

            scnrWidth = scnrMain.Panel2.Width;
            scnrHeight = scnrMain.Panel2.Height;
            pnlWidth = pnlMain.Width;
            pnlHeight = pnlMain.Height;
        }


        private void btnAnimation1_Click(object sender, EventArgs e)
        {
            tmrMain.Enabled = true;
            btnAnimation1.Enabled = false;
            btnAnimation2.Enabled = false;
        }


        private void tmrMain_Tick(object sender, EventArgs e)
        {
            while(pnlWidth < scnrWidth || pnlHeight < scnrHeight)
            {
                if (pnlMain.Width < scnrWidth)
                {
                    pnlMain.Width = pnlWidth + 1;
                    pnlWidth++;
                }
                if (pnlMain.Height < scnrHeight)
                {
                    pnlMain.Height = pnlHeight + 1;
                    pnlHeight++;
                }
                break;
            }
        }


        private void btnAnimation2_Click(object sender, EventArgs e)
        {
            pnlMain.Height = scnrHeight;
            while (pnlMain.Width < scnrWidth)
            {
                pnlMain.Width++;
            }
            btnAnimation2.Enabled = false;
            btnAnimation2.Enabled = false;
        }


        private void btnReset_Click(object sender, EventArgs e)
        {
            pnlMain.Width = 0;
            pnlMain.Height = 0;

            scnrWidth = scnrMain.Panel2.Width;
            scnrHeight = scnrMain.Panel2.Height;
            pnlWidth = pnlMain.Width;
            pnlHeight = pnlMain.Height;
            btnAnimation1.Enabled = true;
            btnAnimation2.Enabled = true;
            tmrMain.Enabled = false;
        }


        private void btnQuitApp_Click(object sender, EventArgs e)
        {
            while (this.Height>60)
            {
                this.Height--;
            }
            Application.Exit();
        }
    }
}
The sample project will be as shown in Figure 1:
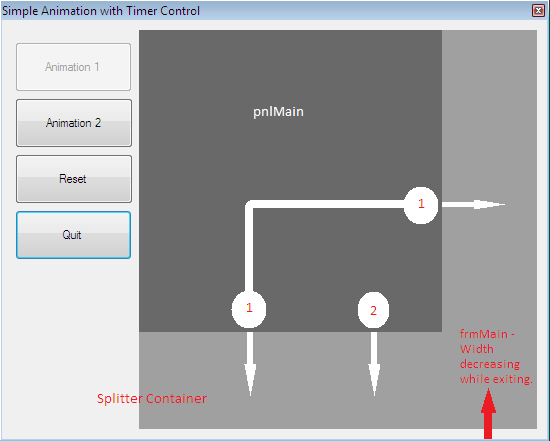
Figure 1
Thank you for using my tip.
Enjoy programming…
He is a Commerce Graduate and working as an Accountant. He learned Programming because of his passion and craze. He is a beginner in .NET. His favourite language is C# and favourite database is MySQL.
He loves playing guitar and listening to music.
- Download sample project — 179.2 KB
Introduction
There are a lot of techniques for bringing animation in your Windows application — simple and complex techniques. Here, I can explain a simple technique for giving animation or moving effects for your Windows Forms or any other controls.
Using the Code
Follow these steps:
- Create a solution (e.g.:
SimpleAnimation) - Place your controls on it:
e.g.: - Split Container —
scnrMain - Buttons —
btnAnimation1,btnAnimation2,btnReset,btnQuit - Panel —
pnlMain - Add a timer control (e.g.:
tmrMain) - Write your code as follows:
using System;
using System.Collections.Generic;
using System.ComponentModel;
using System.Data;
using System.Drawing;
using System.Linq;
using System.Text;
using System.Windows.Forms;

namespace SimpleAnimation
{
    public partial class frmMain : Form
    {


        int scnrWidth;
        int scnrHeight;
        int pnlWidth;
        int pnlHeight;

        public frmMain()
        {
            InitializeComponent();
        }


        public void frmMain_Load(object sender, EventArgs e)
        {
            pnlMain.Width = 0;
            pnlMain.Height = 0;

            scnrWidth = scnrMain.Panel2.Width;
            scnrHeight = scnrMain.Panel2.Height;
            pnlWidth = pnlMain.Width;
            pnlHeight = pnlMain.Height;
        }


        private void btnAnimation1_Click(object sender, EventArgs e)
        {
            tmrMain.Enabled = true;
            btnAnimation1.Enabled = false;
            btnAnimation2.Enabled = false;
        }


        private void tmrMain_Tick(object sender, EventArgs e)
        {
            while(pnlWidth < scnrWidth || pnlHeight < scnrHeight)
            {
                if (pnlMain.Width < scnrWidth)
                {
                    pnlMain.Width = pnlWidth + 1;
                    pnlWidth++;
                }
                if (pnlMain.Height < scnrHeight)
                {
                    pnlMain.Height = pnlHeight + 1;
                    pnlHeight++;
                }
                break;
            }
        }


        private void btnAnimation2_Click(object sender, EventArgs e)
        {
            pnlMain.Height = scnrHeight;
            while (pnlMain.Width < scnrWidth)
            {
                pnlMain.Width++;
            }
            btnAnimation2.Enabled = false;
            btnAnimation2.Enabled = false;
        }


        private void btnReset_Click(object sender, EventArgs e)
        {
            pnlMain.Width = 0;
            pnlMain.Height = 0;

            scnrWidth = scnrMain.Panel2.Width;
            scnrHeight = scnrMain.Panel2.Height;
            pnlWidth = pnlMain.Width;
            pnlHeight = pnlMain.Height;
            btnAnimation1.Enabled = true;
            btnAnimation2.Enabled = true;
            tmrMain.Enabled = false;
        }


        private void btnQuitApp_Click(object sender, EventArgs e)
        {
            while (this.Height>60)
            {
                this.Height--;
            }
            Application.Exit();
        }
    }
}
The sample project will be as shown in Figure 1:
Figure 1
Thank you for using my tip.
Enjoy programming…
He is a Commerce Graduate and working as an Accountant. He learned Programming because of his passion and craze. He is a beginner in .NET. His favourite language is C# and favourite database is MySQL.
He loves playing guitar and listening to music.