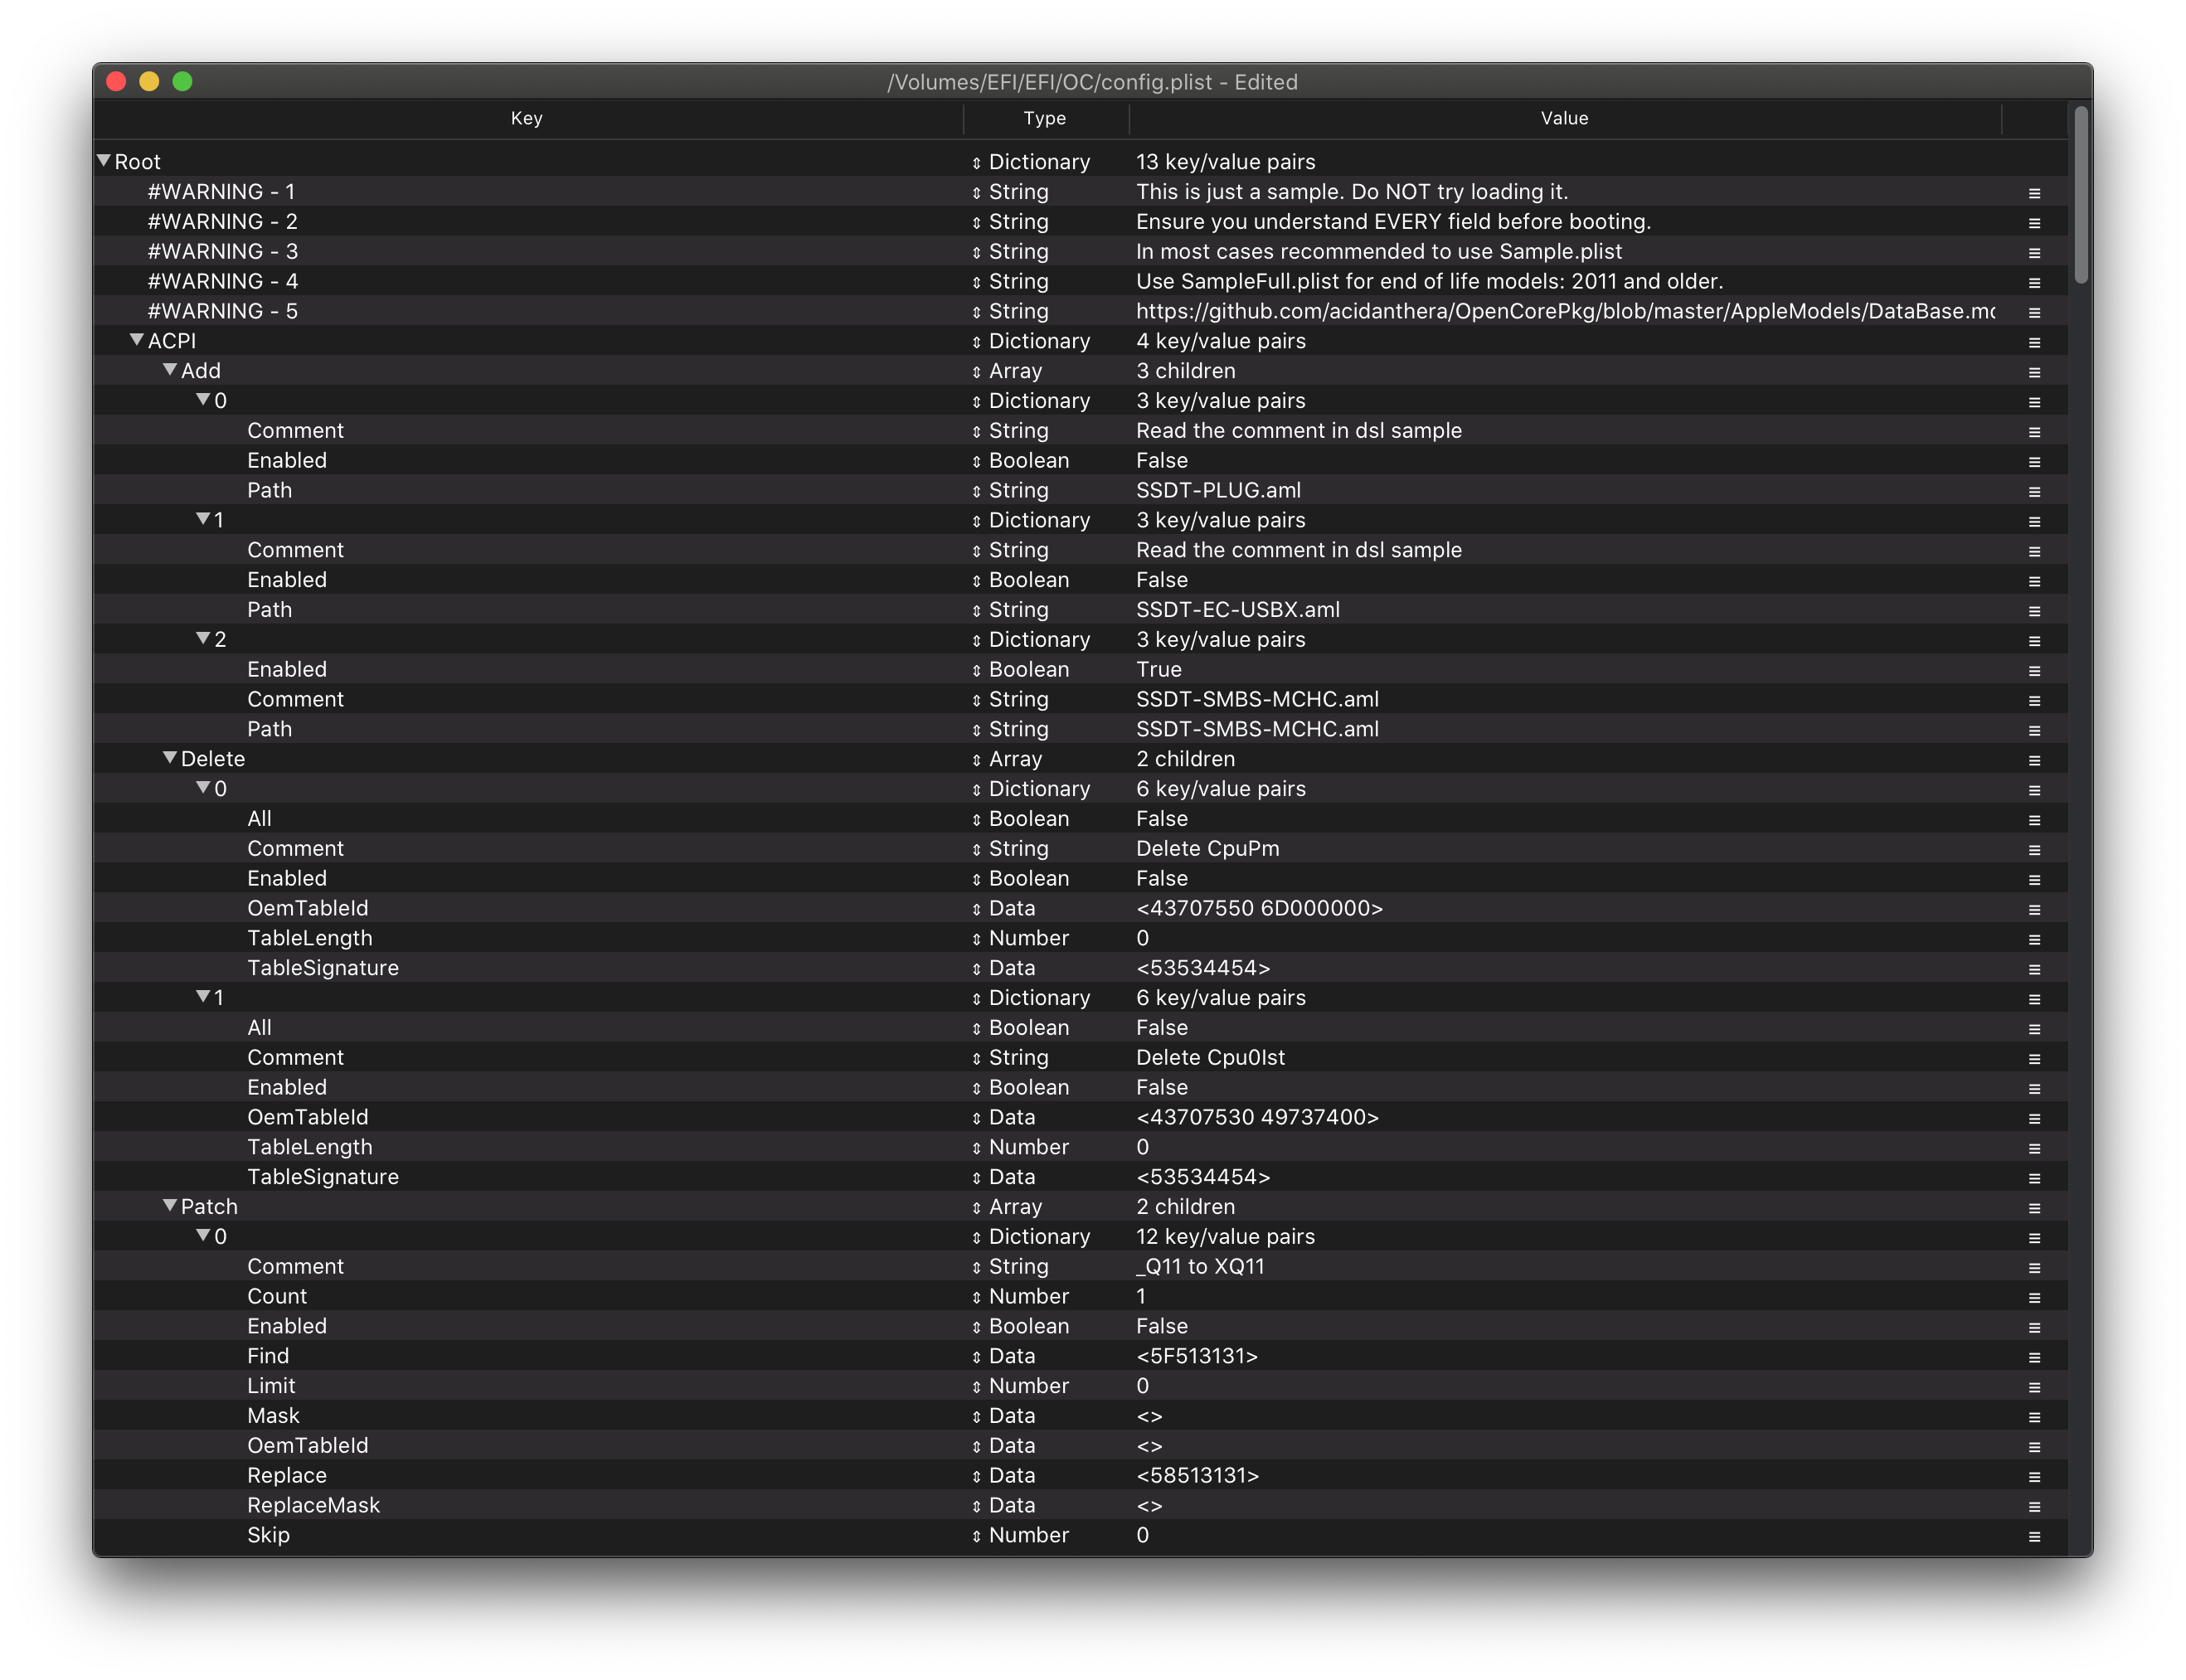
Во многих инструкциях о том как установить свой первый Хакинтош почему-то упускают один главный и важный шаг — создание файла plist.config. Исправляем данную ситуацию.
Ранее мы рассказывали что необходимо, чтобы установить хакинтош:
- Выбор железа для Хакинтош
- Скачивание образа macOS
- Настройка BIOS / UEFI
- Значение аргументов (ключей) загрузки
- Создание загрузочной флешки
- С помощью терминала
- В Windows с помощью (BDU) Boot Disk Utility
- С помощью UniBeast в macOS
- Скачать kext для Хакинтош
- Куда и как установить Kext для Хакинтош?
- Какие драйверы устанавливать в drivers64UEFI
- Создание config.plist для установки Хакинтош <
- Установка Хакинтош
- Установить загрузчик Clover на системный диск
- Установка драйвера Nvidia Web Driver
- Как завести звук на Хакинтош?
- Как завести USB?
- Изменить таймер запуска Хакинтош
- Включить ускорение Intel Quick Sync Video на Хакинтош
- Как перенести файлы с Mac в Windows
- Не удается установить программы, срабатывает защита
- Настройка Windows клавиатуры в Mac
- USB Bluetooth адаптер «отваливается»
- Сбивается время в Windows
Не понятно почему, но большинство сайтов просто забывают рассказать пользователям которые пытаются установить свой первый Хакинтош о таком файле как config.plist.
Данный файл отвечает за то чтобы система стартовала и работала, не возникали баги и вносить различные фиксы.
Это довольно тяжёлый этап, для того чтобы начать установку Хакинтоша, так как в зависимости от железа нужно вносить свои правки, а так как у всех компьютеры разные, настройка config.plist становиться индивидуальной. Но все же я попытаюсь рассказать основную информацию, а далее вам стоит попытаться свой личный config.plist и если пойдет все хорошо установить систему, либо же попросить на профильном форуме, чтобы вам помогли до настроить файл конфигурации.
Предыдущий шаг: скачивание драйверов UEFI
Может быть и есть люди, которые создали полностью рабочий вариант config.plist в Windows, но сделать это будет очень трудно, либо с помощью web-инструмента. Поэтому создавать данный файл будем в виртуальной машине macOS. О том как их создать читайте в наших прошлых статьях:
- Установка macOS Virtualbox
- Установка macOS VmWare
Как по мне проще и легче установить в VmWare…
Теперь же необходим инструмент с помощью которого будет мастерить config.plist — скачиваем Clover Configurator и запускаем его.
Настройка config.plist для установки в Clover Configurator
Переходим сразу же на вкладку под названием «SMBIOS». В этой вкладке вам необходимо подобрать максимально похожий Mac.
 Для этого необходимо знать какой процессор установлен на вашем компьютере и близок к тому, что установлен в настоящем iMac или MacBook, MacPro.
 Почти половина дела сделано, переходим во вкладку «System Parameters».
В выпадающем списке Inject Kexts выбираем «Yes» и ставим галочку напротив «Inject System ID». Это необходимо чтобы kext-ы которые мы приготовили, были загружены.
Переходим во вкладку «ACPI». Здесь вам необходимо включить различные Fix (как минимум те что указаны на скриншоте), так как в противном случае может возникнуть паника ядра и система «упадет», а может и нет. Об этом вы узнаете путем личных экспериментов.
Если у вас процессор Haswell, то рекомендуется поставить «1» напротив Plugin Type

Переходим во вкладку «Boot». Ставим как минимум одну галочку напротив -v и устанавливаем таймаут.
Возможно необходимо будет указать и другие ключи, но об этом вы узнаете позже сами экспериментальным путем.
Переходим во вкладку «Devices» и ставим все галочки USB, кроме последнего пункта.
Теперь на панели выбираем «Files» — «Save», чтобы сохранить созданный только что файл config.plist. 
Еще раз напомню, что минимум необходимых настроек которые необходимо внести в config.plist и возможно его вам необходимо дорабатывать под себя!
Готовые config.plist для разных поколений процессоров
Если вам лень или настройка конфига вам слишком сложна по первой, то лучше воспользоваться, универсальными файлами config.plist, составленными для определенных поколений CPU:
- Ivy Bridge
- Haswell
- Skylake
- Kaby Lake
- Coffee Lake
Они еще требуют доработки, но более или менее подходят многим.
Далее файл config.plist необходимо переместить на загрузочную флешку, раздел EFI, папка Clover.
В следующей статье я расскажу вам как установить macOS (Hackintosh) на компьютер.
Следующий шаг: Значение аргументов при загрузке Хакинтош
У вас еще остались дополнительные вопросы? Задавайте их в комментариях, рассказывайте о том, что у вас получилось или наоборот!
Вот и все! Оставайтесь вместе с сайтом Android +1, дальше будет еще интересней! Больше статей и инструкций читайте в разделе Статьи и Хаки Android.
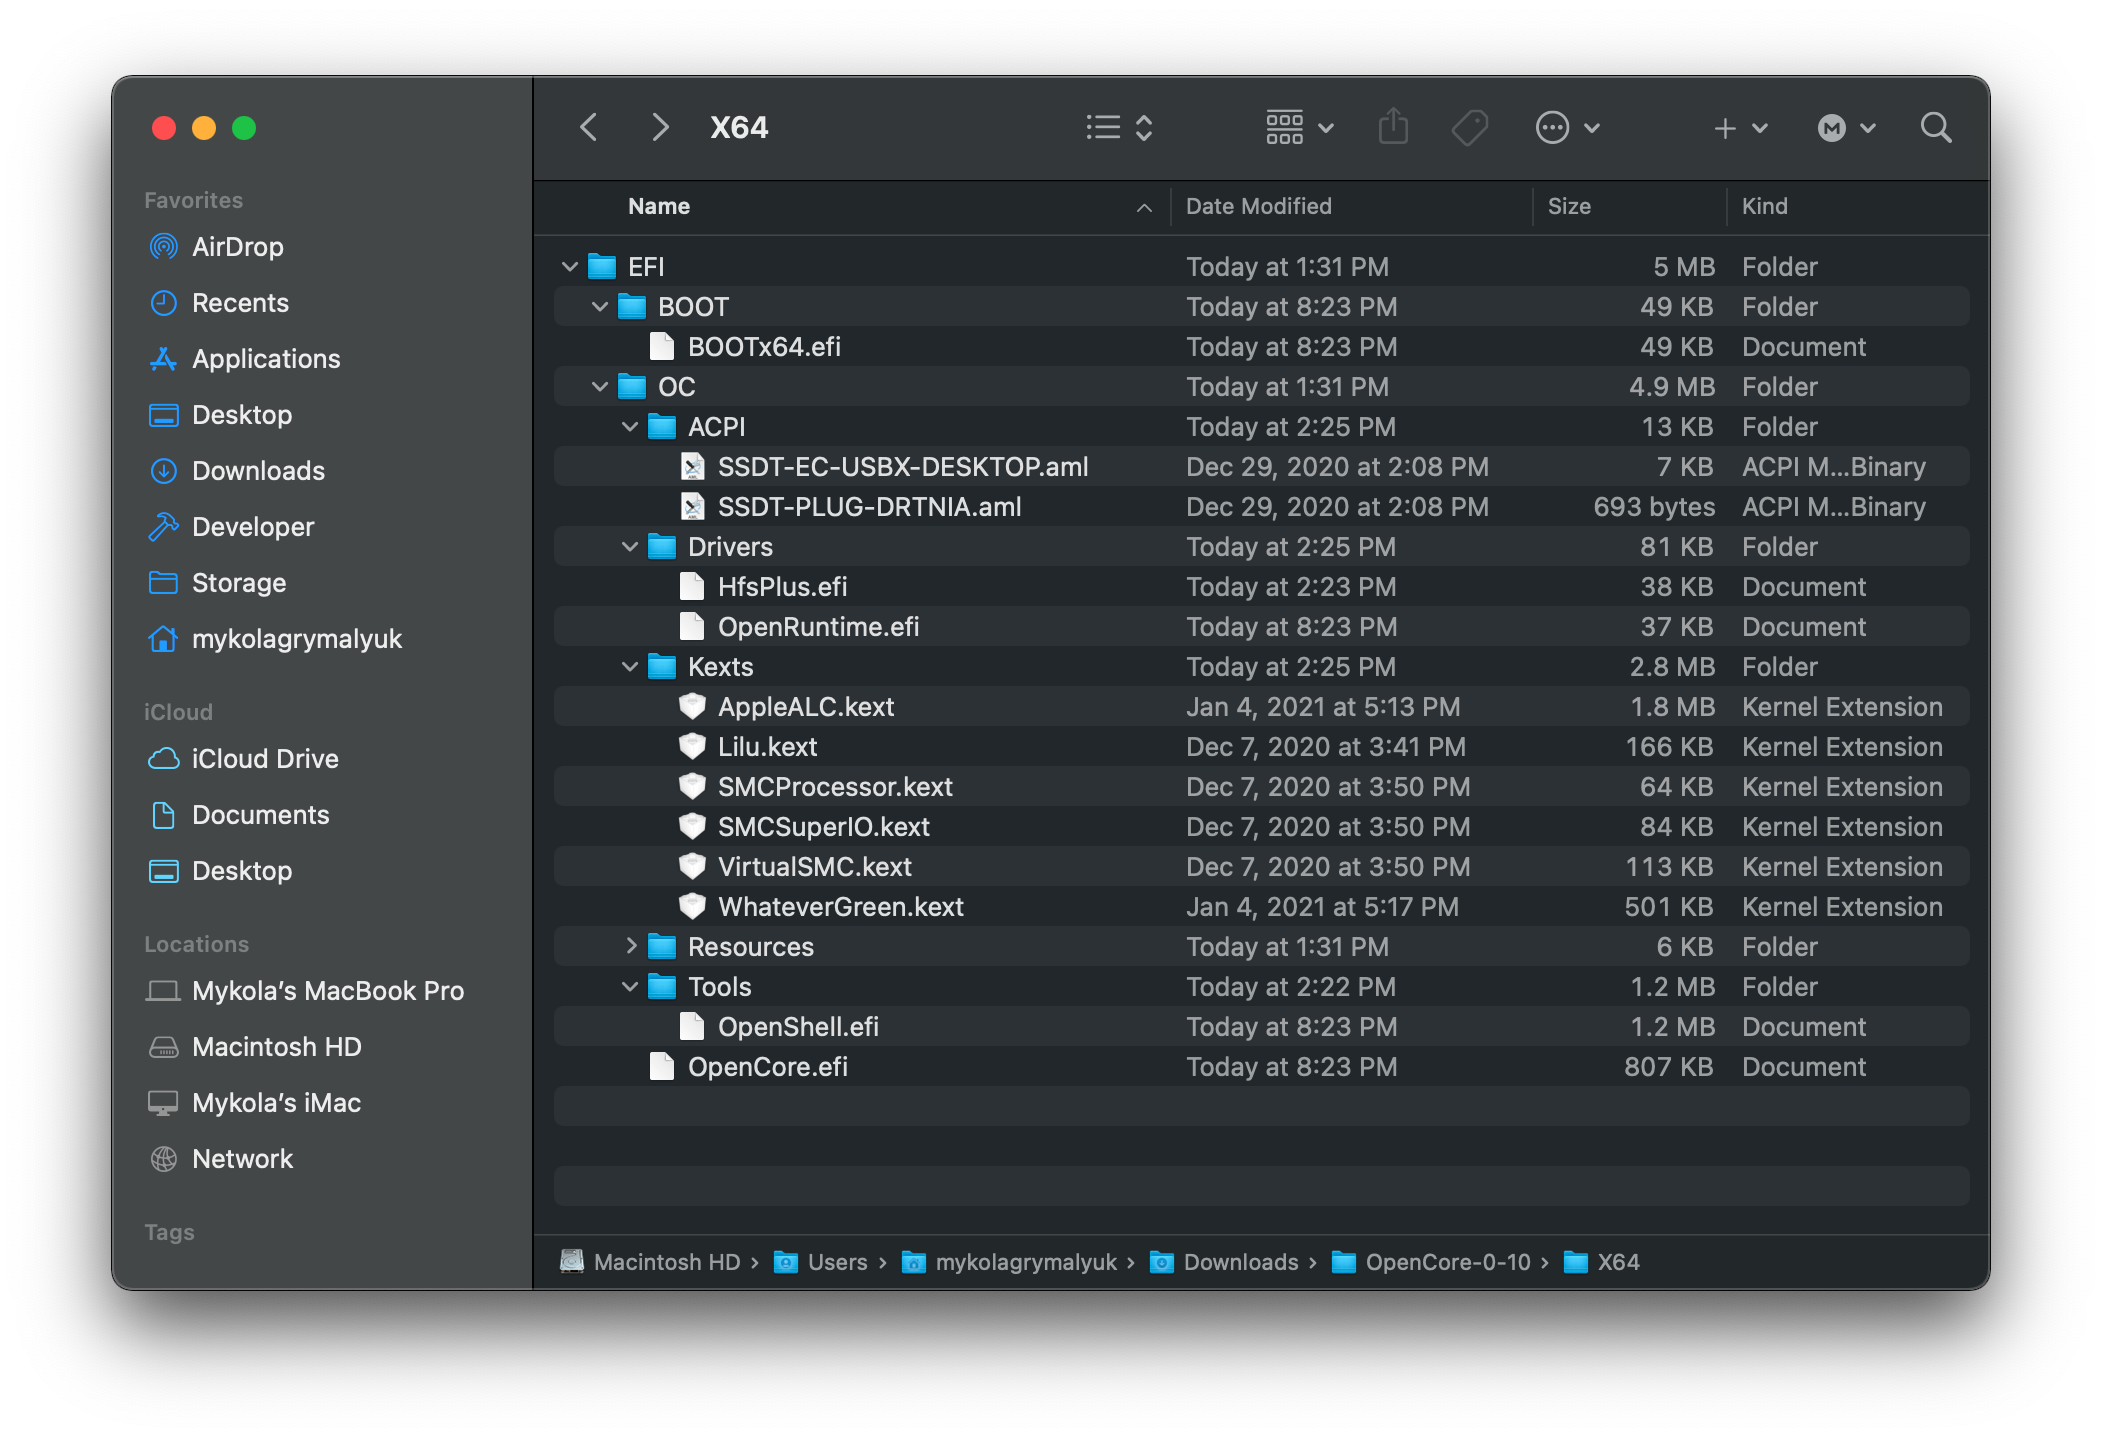
Теперь, когда у нас есть все наши кексты(.kext), SSDT(.aml) и драйверы прошивки, ваш USB должен выглядеть примерно так:
- Примечание: Ваш USB будет выглядеть по-другому, у каждой системы разные требования.
# Создание вашего config.plist
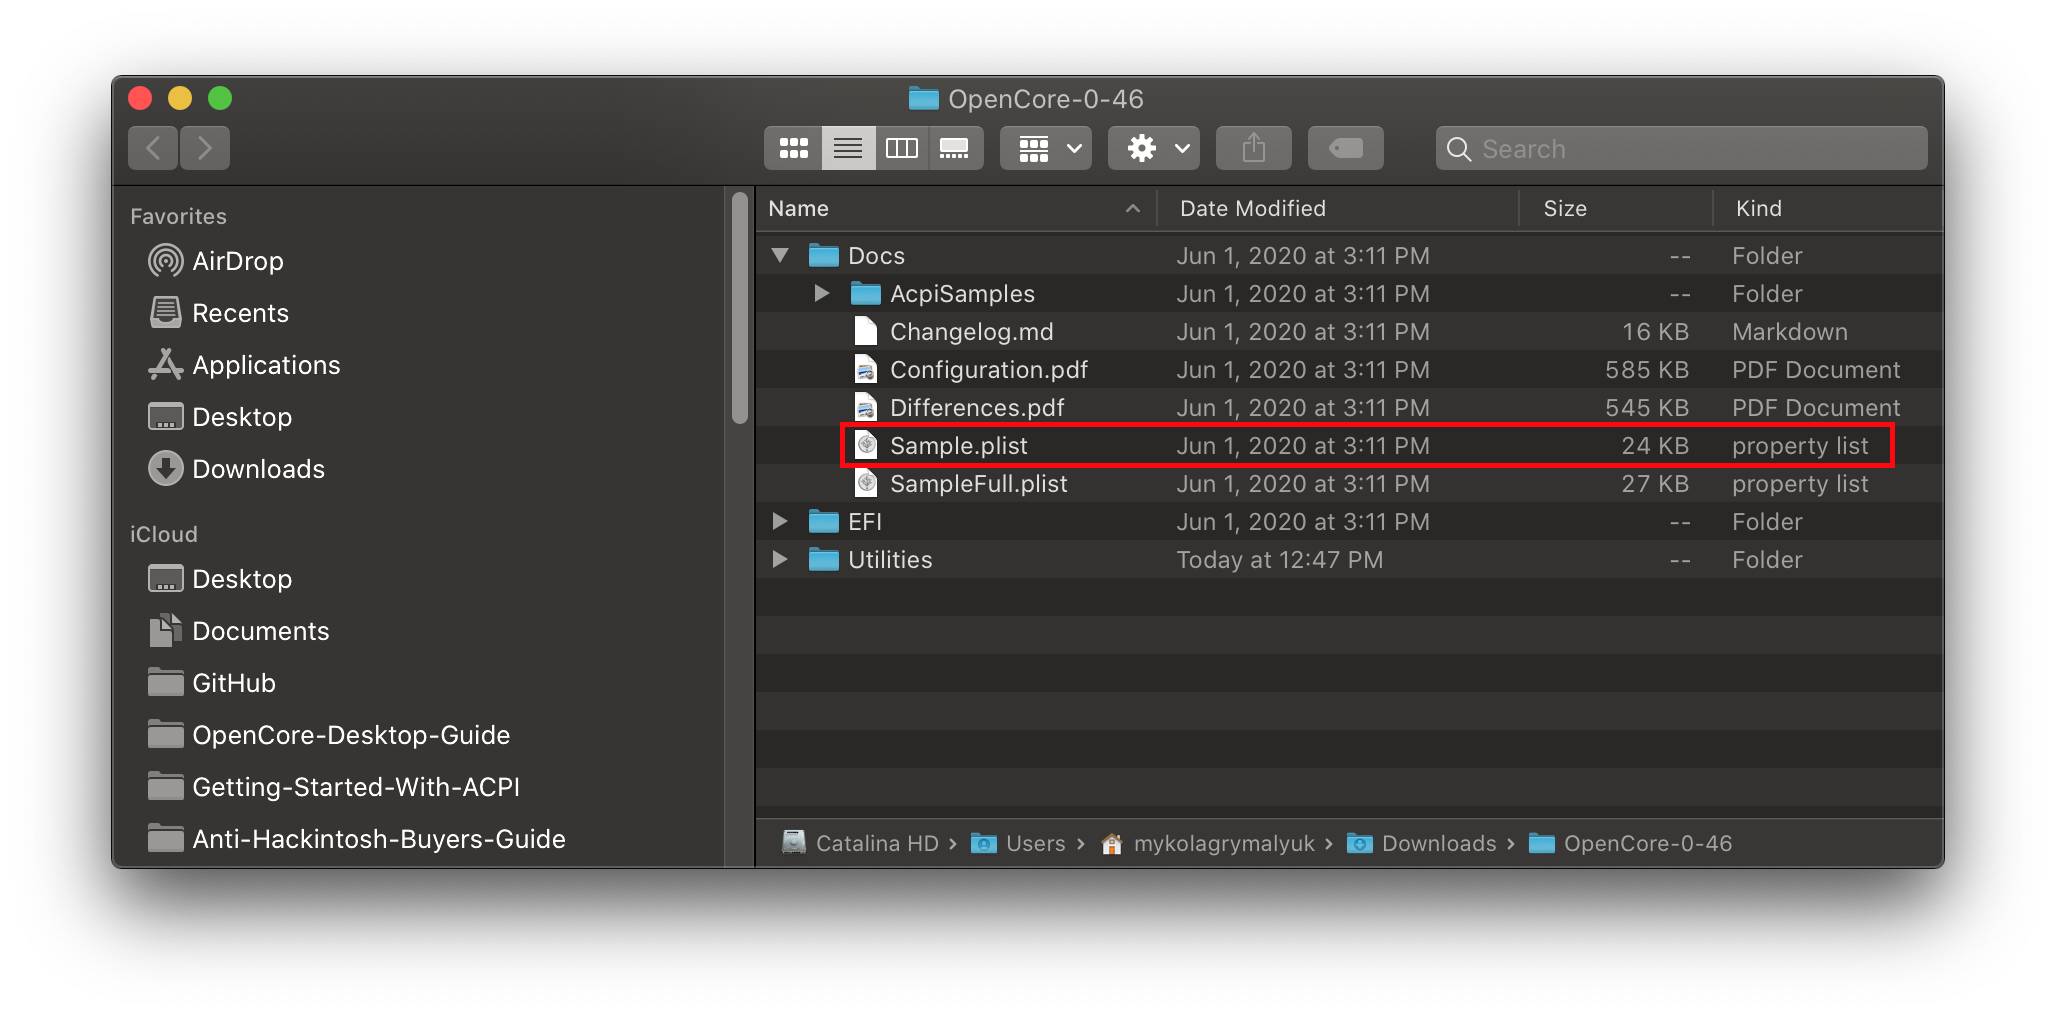
Для начала, нам нужно взять sample.plist из OpenCorePkg (opens new window), он будет находится в папке Docs:
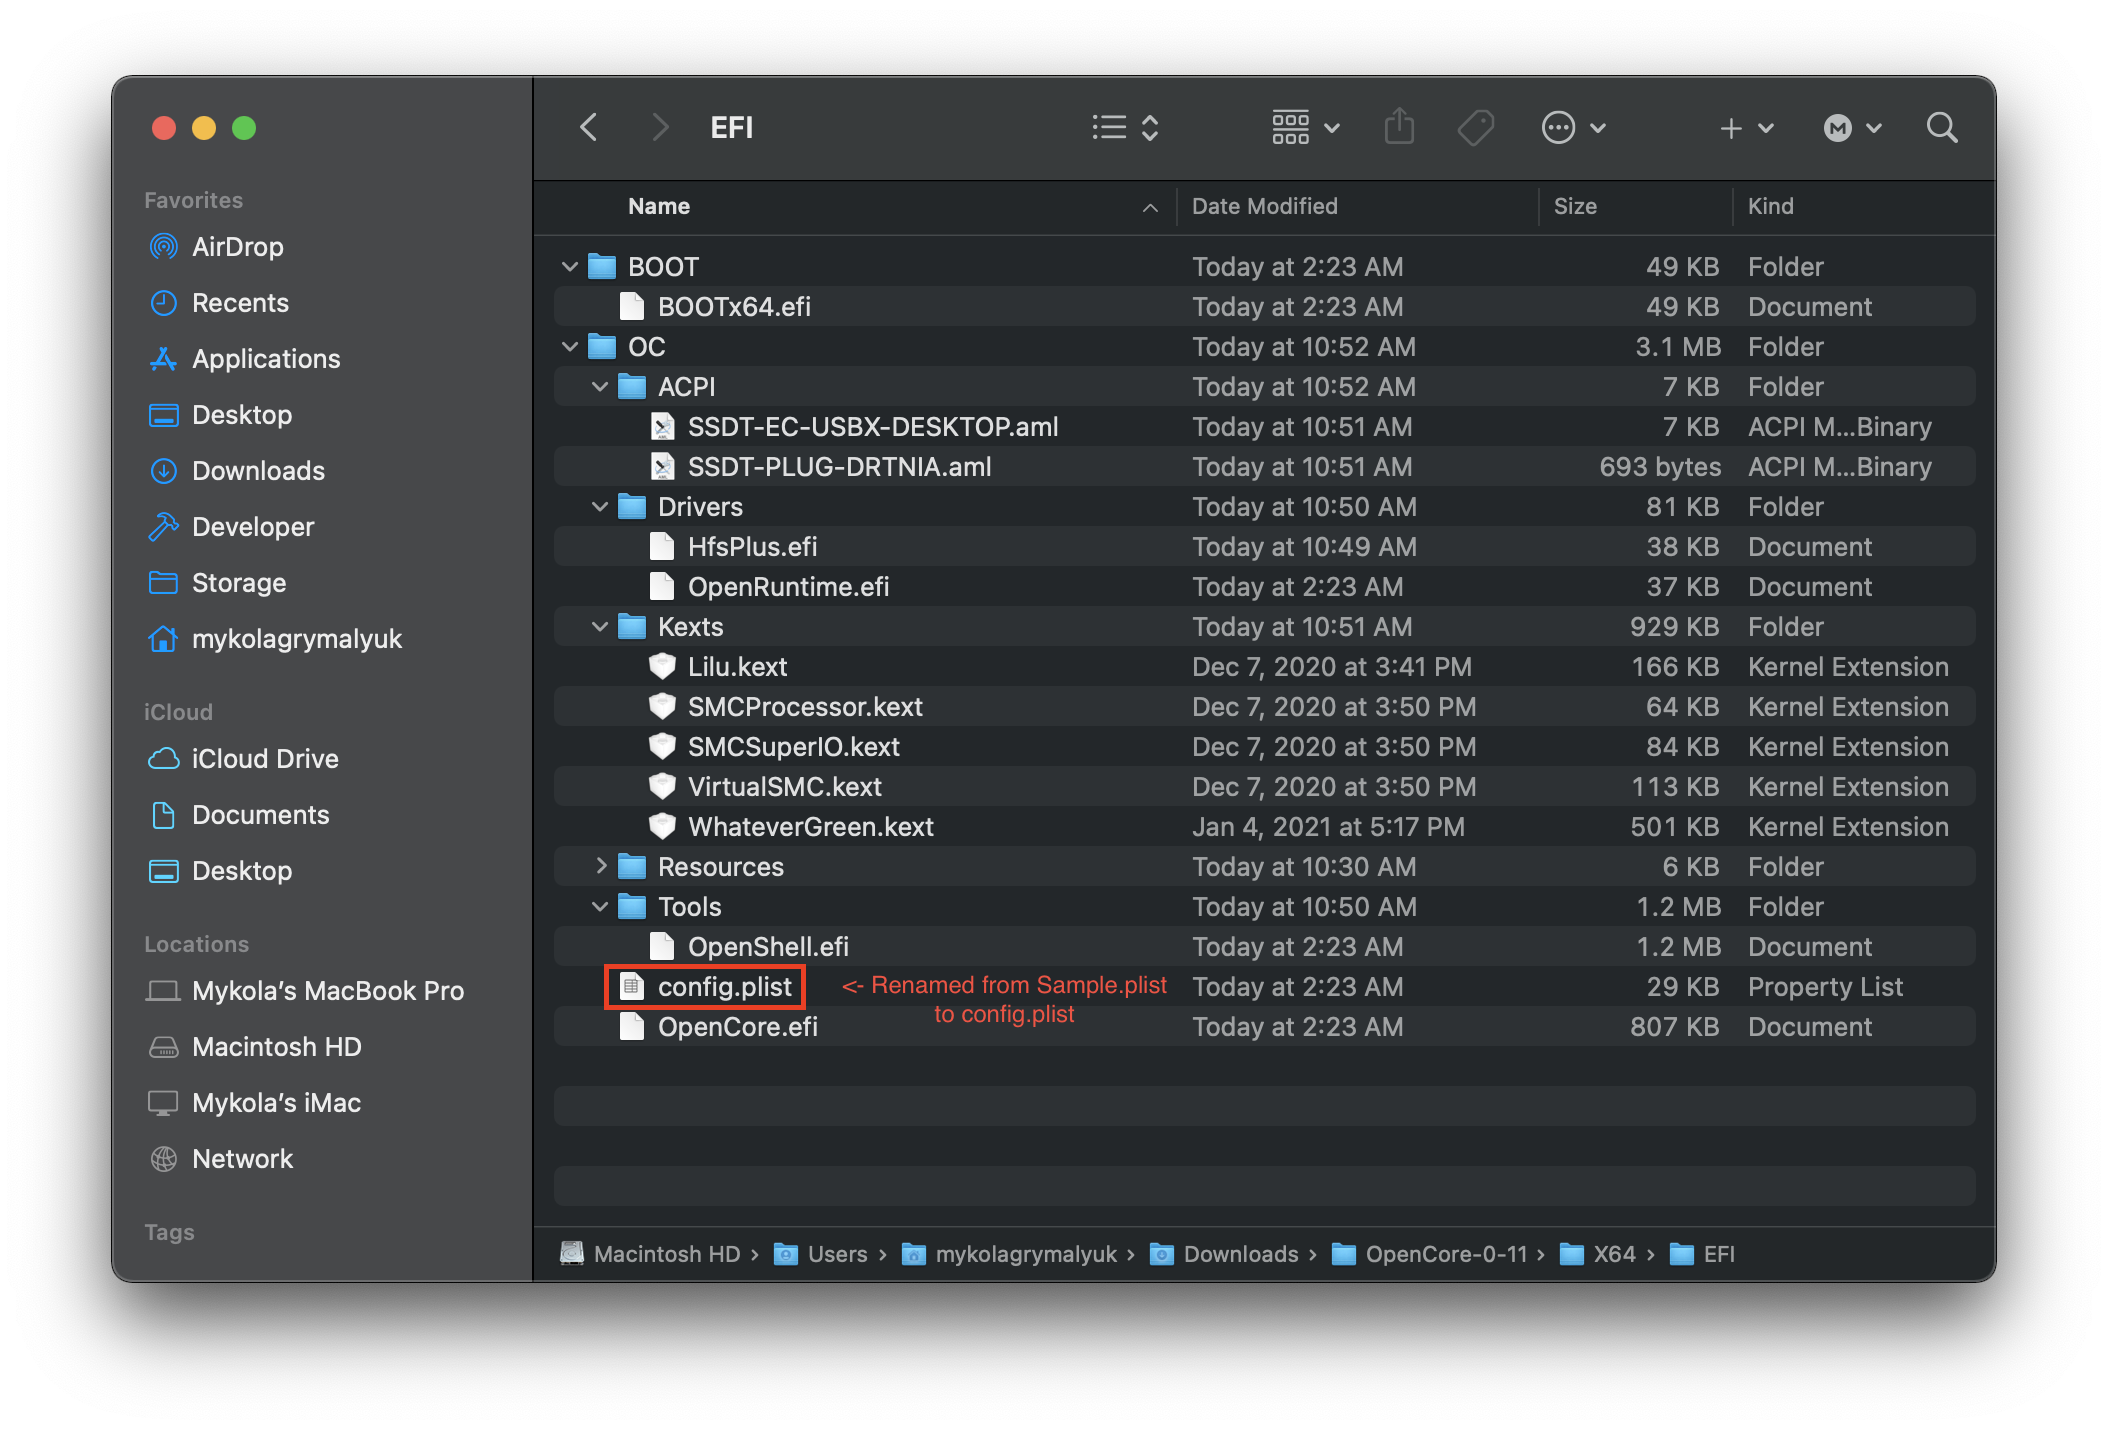
Дальше, давайте переместим его на EFI раздел USB(будет называться BOOT в Windows) в EFI/OC/, и переименуем его в config.plist:
# Добавление ваших SSDT, кекстов и драйверов прошивки
Для остальной части этого руководства, вам нужно будет как-то редактировать plist. И в нашем руководстве мы будем использовать ProperTree и GenSMBIOS, чтобы помочь автоматизировать часть утомительной работы:
- ProperTree (opens new window)
- Универсальный plist редактор
- GenSMBIOS (opens new window)
- Для генерации наших SMBIOS данных
Далее, давайте откроем ProperTree и отредактируем наш config.plist:
ProperTree.command- Для macOS
- Подсказка: есть утилита
buildapp.commandв папкеScripts, которая превратит ProperTree в отдельное приложение для macOS
ProperTree.bat- Для Windows
Когда запустите ProperTree, откройте ваш config.plist нажатием Cmd/Ctrl + O и выберите файл config.plist на вашем USB.
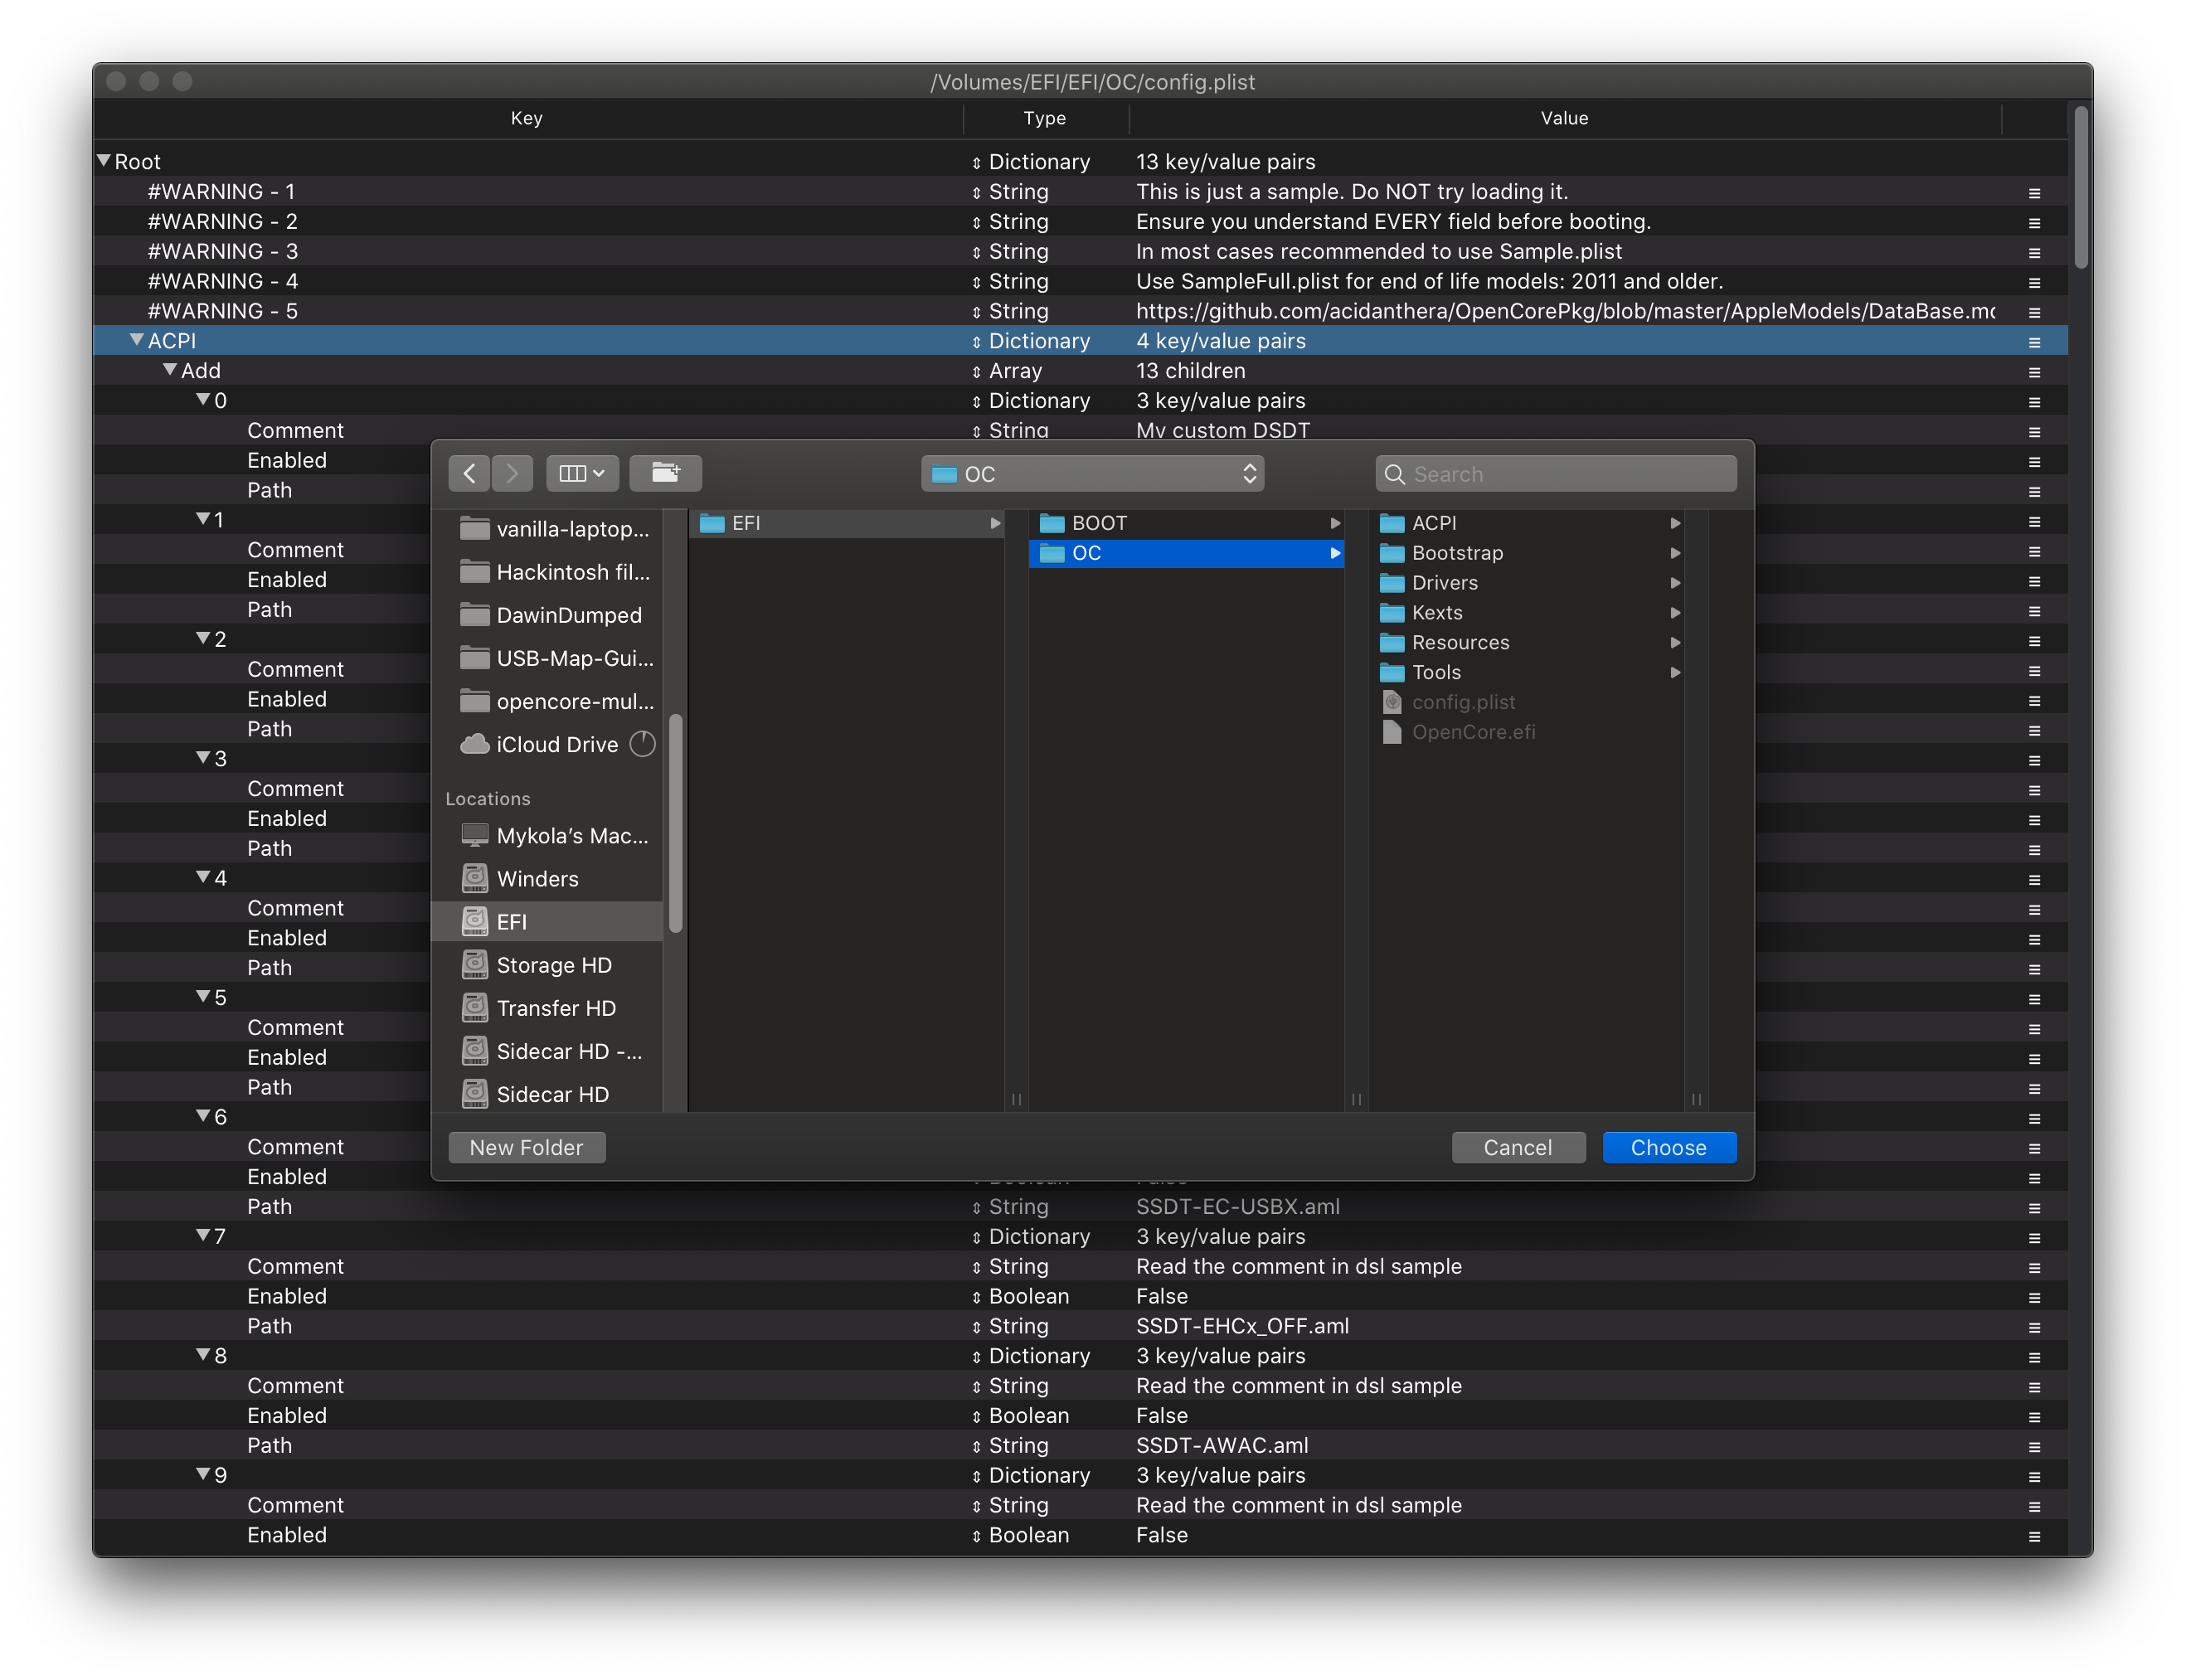
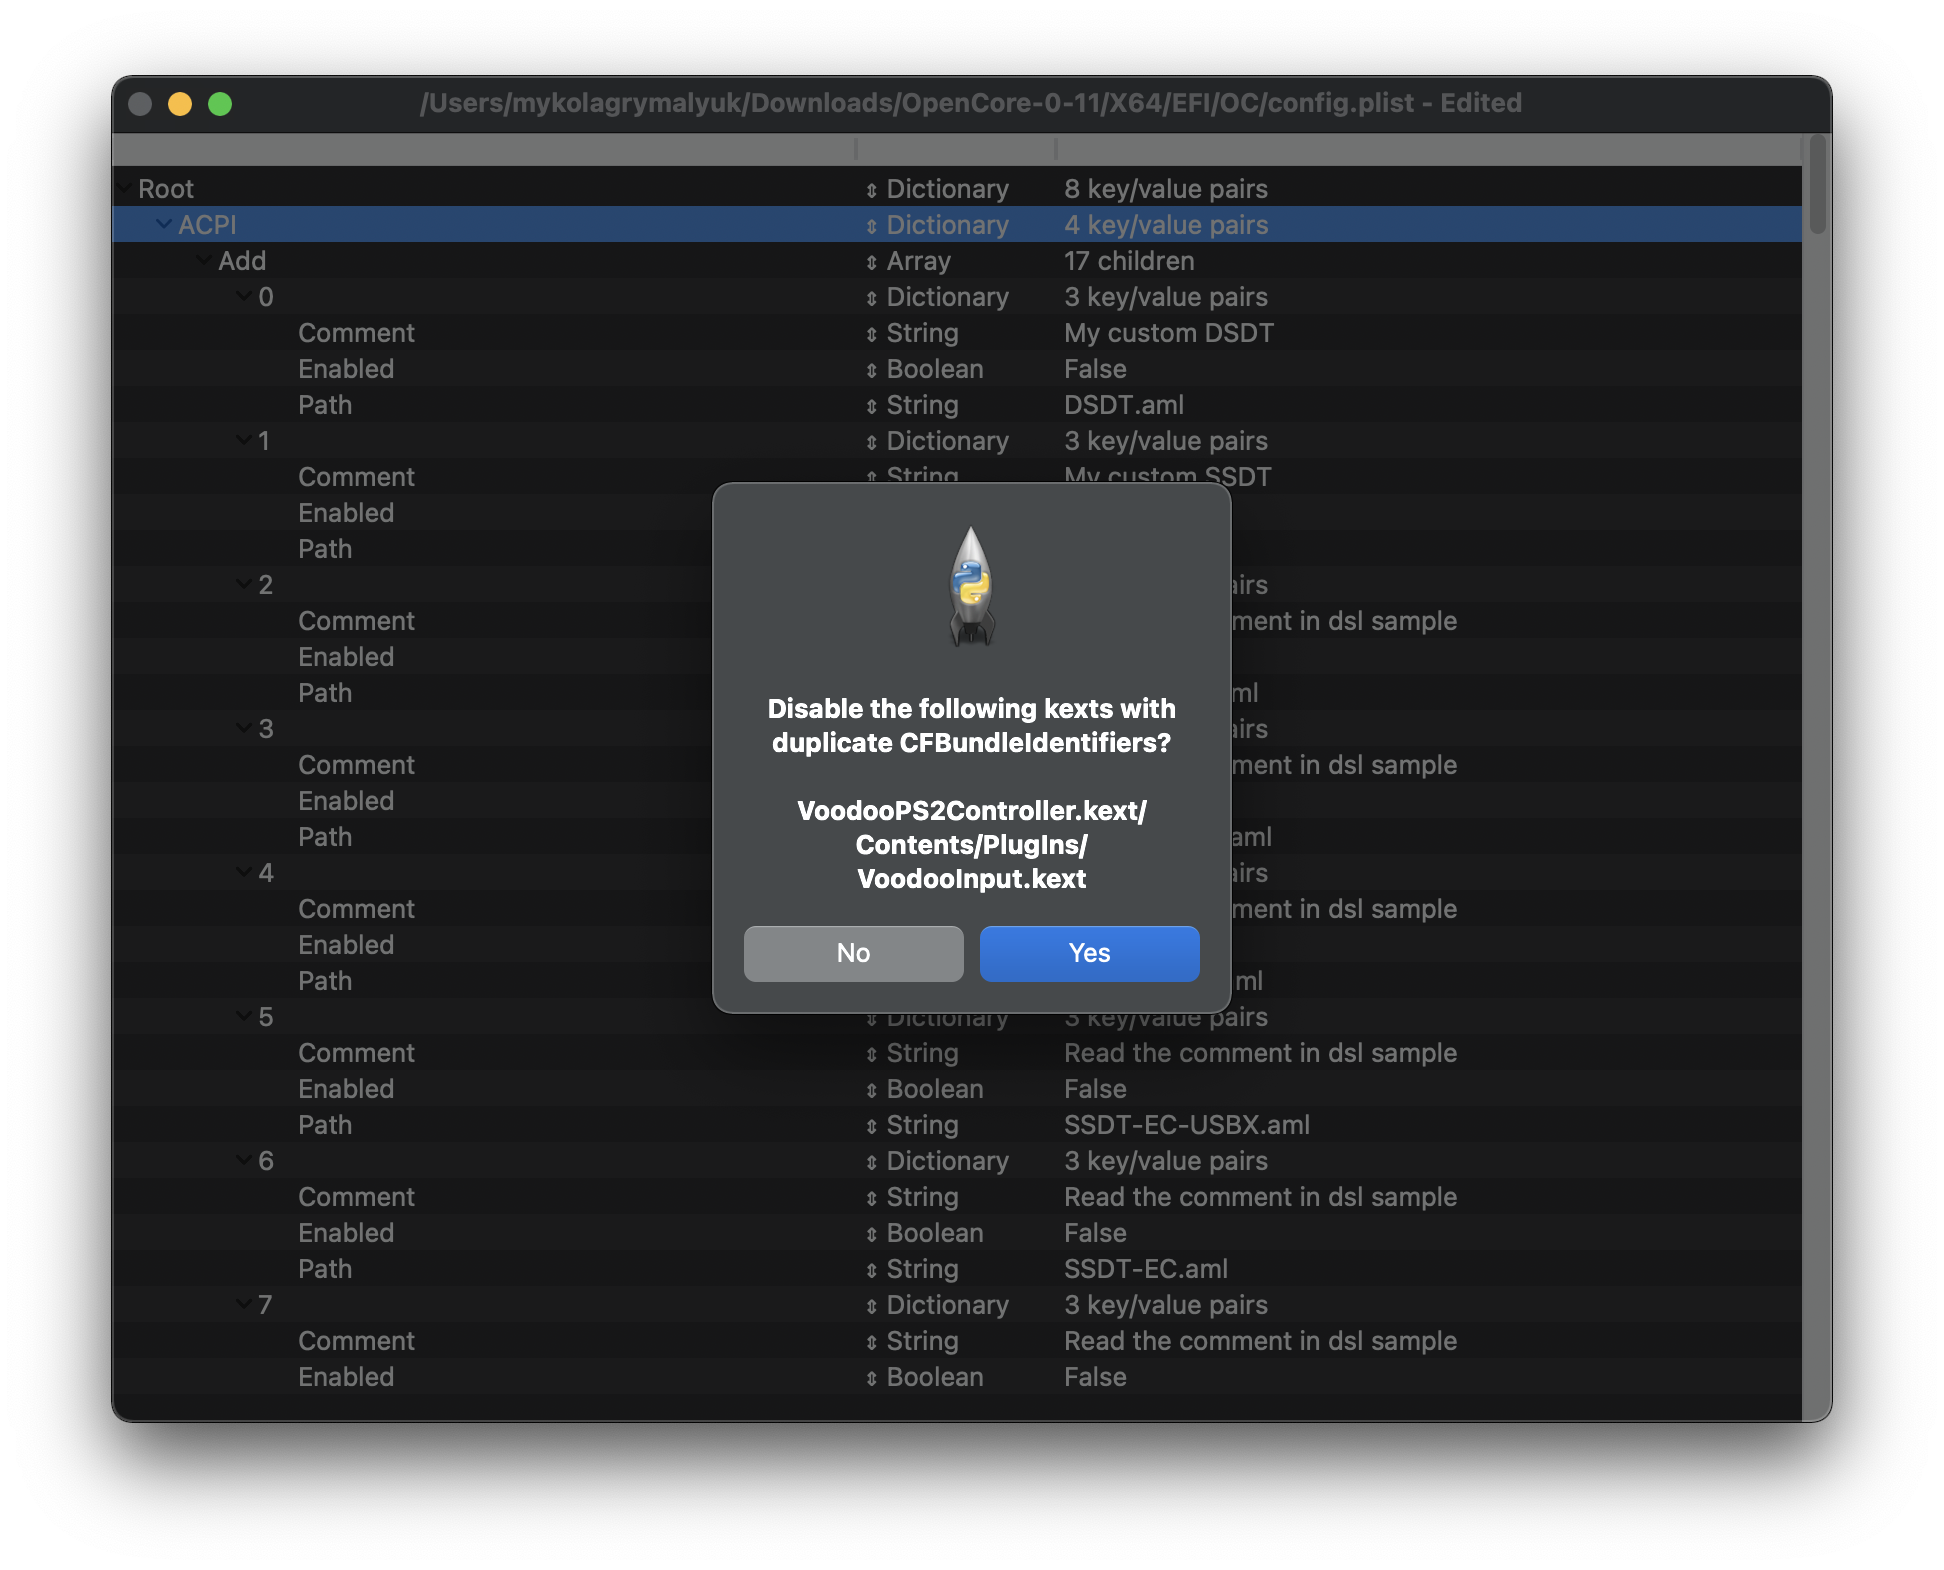
После того как открыли конфиг, нажмите Cmd/Ctrl + Shift + R и выберите вашу EFI/OC папку, чтобы совершить «Clean Snapshot»:
- Это удалит все записи из config.plist и затем добавит все ваши SSDT, кексты и драйверы прошивки в конфиг
- Cmd/Ctrl + R это другая опция, которая добавит все ваши файлы, но оставит записи отключенными, если они были настроены таким образом раньше, полезно при решении проблем, но нам сейчас не нужно
Когда всё сделано, вы увидите ваши SSDT, кексты и драйверы прошивки заполненными в config.plist:
- Примечание: Если у вас появится окно «Disable the following kexts with Duplicate CFBundleIdentifiers?», нажмите «Yes». Это делается для того, чтобы убедиться, что у вас не будут инжектироваться дублирующиеся кексты, поскольку некоторые кексты могут иметь одни и те же плагины(например, VoodooInput находящийся как в VoodooPS2, так и в VoodooI2C)
Если вы хотите немного почистить файл, вы можете удалить записи #WARNING. Хотя они оставаясь там не вызывают проблем, поэтому это личное предпочтение.
# Выбор вашей платформы
Теперь наступает важная часть — выбор пути конфигурации. У каждой платформы есть свои уникальные особенности, которые вам необходимо учитывать, поэтому очень важно знать свое оборудование. Смотрите ниже, что делать дальше:
# Настольные Intel
- Примечание: Серия Intel NUC считается мобильным оборудованием, для этих ситуаций мы рекомендуем следовать разделу Intel ноутбуки
| Кодовое название | Серия | Выход |
|---|---|---|
| Yonah, Conroe и Penryn | E8XXX, Q9XXX, etc 1 (opens new window), etc 2 (opens new window) | 2006-2009 г. |
| Lynnfield и Clarkdale | 5XX-8XX | 2010 г. |
| Sandy Bridge | 2XXX | 2011 г. |
| Ivy Bridge | 3XXX | 2012 г. |
| Haswell | 4XXX | 2013-2014 г. |
| Skylake | 6XXX | 2015-2016 г. |
| Kaby Lake | 7XXX | 2017 г. |
| Coffee Lake | 8XXX-9XXX | 2017-2019 г. |
| Comet Lake | 10XXX | 2020 г. |
# Ноутбуки Intel
| Кодовое название | Серия | Выход |
|---|---|---|
| Clarksfield и Arrandale | 3XX-9XX | 2010 г. |
| Sandy Bridge | 2XXX | 2011 г. |
| Ivy Bridge | 3XXX | 2012 г. |
| Haswell | 4XXX | 2013-2014 г. |
| Broadwell | 5XXX | 2014-2015 г. |
| Skylake | 6XXX | 2015-2016 г. |
| Kaby Lake и Amber Lake | 7XXX | 2017 г. |
| Coffee Lake и Whiskey Lake | 8XXX | 2017-2018 г. |
| Coffee Lake Plus и Comet Lake | 9XXX-10XXX | 2019-2020 г. |
| Ice Lake | 10XXX | 2019-2020 г. |
# Intel HEDT
Этот раздел включает оборудование как для энтузиастов, так и серверное.
| Кодовое название | Серия | Выход |
|---|---|---|
| Nehalem и Westmere | 9XX, X3XXX, X5XXX, etc 1 (opens new window), 2 (opens new window) | 2008-2010 г. |
| Sandy/Ivy Bridge-E | 3XXX, 4XXX | 2011-2013 г. |
| Haswell-E | 5XXX | 2014 г. |
| Broadwell-E | 6XXX | 2016 г. |
| Skylake/Cascade Lake-X/W | 7XXX, 9XXX, 10XXX | 2017-2019 г. |
# AMD
| Кодовое название | Серия | Выход |
|---|---|---|
| Bulldozer/Jaguar | Непонятно (opens new window) | AMD реально были плохи в названиях раньше (opens new window) |
| Zen | 1XXX, 2XXX, 3XXX, 5XXX | 2017-2020 г. |
- Примечание:
Threadripper 3его поколения(39XX) не поддерживаются, однако 1ое и 2ое поколение поддерживается- Последние версии BIOS и OpenCore решили эту проблему, теперь поддерживаются все платформы на Threadripper
Последнее обновление: 3 месяца назад
config.plist Setup
Now that we’ve got all our Kexts(.kext), SSDTs(.aml) and firmware drivers(.efi), your USB should start to look something like this:

- Note: Your USB will look different, everyone’s system will have different requirements.
Creating your config.plist
First we’ll want to grab the Sample.plist from the OpenCorePkg, this will be located under the Docs folder:

Next lets move it onto our USB’s EFI partition(will be called BOOT on Windows) under EFI/OC/, and rename it to config.plist:

Adding your SSDTs, Kexts and Firmware Drivers
For the rest of this guide, you’re gonna need some form of plist editing. And for our guide, we’ll be using ProperTree and GenSMBIOS to help automate some of the tedious work:
- ProperTree
- Universal plist editor
- GenSMBIOS
- For generating our SMBIOS data
Next, let’s open ProperTree and edit our config.plist:
ProperTree.command- For macOS
- Pro tip: there’s a
buildapp.commandutility in theScriptsfolder that lets you turn ProperTree into a dedicated app in macOS
ProperTree.bat- For Windows
Once ProperTree is running, open your config.plist by pressing Cmd/Ctrl + O and selecting the config.plist file on your USB.
After the config is opened, press Cmd/Ctrl + Shift + R and point it at your EFI/OC folder to perform a «Clean Snapshot»:
- This will remove all the entries from the config.plist and then adds all your SSDTs, Kexts and Firmware drivers to the config
- Cmd/Ctrl + R is another option that will add all your files as well but will leave entries disabled if they were set like that before, useful for when you’re troubleshooting but for us not needed right now

Once done, you’ll see your SSDTs, Kexts and firmware drivers populated in the config.plist:

- Note: If you get a pop up «Disable the following kexts with Duplicate CFBundleIdentifiers?», press «Yes». This is to ensure you don’t have duplicate kexts being injected, as some kexts may have some of the same plugins(ie. VoodooInput is in both VoodooPS2 and VoodooI2C’s plugin folder)

If you wish to clean up the file a bit, you can remove the #WARNING entries. Though they cause no issues staying there, so up to personal preference.
::: danger
The config.plist must match the contents of the EFI folder. If you delete a file but leave it listed in the Config.plist, OpenCore will error and stop booting.
If you make any modifications, you can use the OC snapshot tool (Cmd/Ctrl + R) in ProperTree to update the config.plist.
:::
Selecting your platform
Now comes the important part, selecting the configuration path. Each platform has their own unique quirks that you need to account for so knowing your hardware is super important. See below for what to follow:
Intel Desktop
- Note: Intel’s NUC series are considered mobile hardware, for these situations we recommend following the Intel Laptop Section
| Code Name | Series | Release |
|---|---|---|
| Yonah, Conroe and Penryn | E8XXX, Q9XXX, etc 1, etc 2 | 2006-2009 era |
| Lynnfield and Clarkdale | 5XX-8XX | 2010 era |
| Sandy Bridge | 2XXX | 2011 era |
| Ivy Bridge | 3XXX | 2012 era |
| Haswell | 4XXX | 2013-2014 era |
| Skylake | 6XXX | 2015-2016 era |
| Kaby Lake | 7XXX | 2017 era |
| Coffee Lake | 8XXX-9XXX | 2017-2019 era |
| Comet Lake | 10XXX | 2020 era |
Intel Laptop
| Code Name | Series | Release |
|---|---|---|
| Clarksfield and Arrandale | 3XX-9XX | 2010 era |
| Sandy Bridge | 2XXX | 2011 era |
| Ivy Bridge | 3XXX | 2012 era |
| Haswell | 4XXX | 2013-2014 era |
| Broadwell | 5XXX | 2014-2015 era |
| Skylake | 6XXX | 2015-2016 era |
| Kaby Lake and Amber Lake | 7XXX | 2017 era |
| Coffee Lake and Whiskey Lake | 8XXX | 2017-2018 era |
| Coffee Lake Plus and Comet Lake | 9XXX-10XXX | 2019-2020 era |
| Ice Lake | 10XXX | 2019-2020 era |
Intel HEDT
This section includes both enthusiast and server based hardware.
| Code Name | Series | Release |
|---|---|---|
| Nehalem and Westmere | 9XX, X3XXX, X5XXX, etc 1, 2 | 2008-2010 era |
| Sandy/Ivy Bridge-E | 3XXX, 4XXX | 2011-2013 era |
| Haswell-E | 5XXX | 2014 era |
| Broadwell-E | 6XXX | 2016 era |
| Skylake/Cascade Lake-X/W | 7XXX, 9XXX, 10XXX | 2017-2019 era |
AMD
| Code Name | Series | Release |
|---|---|---|
| Bulldozer/Jaguar | It’s weird | AMD was really bad with naming back then |
| Zen | 1XXX, 2XXX, 3XXX, 5XXX | 2017-2020 era |
- Note: Threadripper 3rd gen(39XX) are not supported, 1st and 2nd gen however are supported
- Latest BIOS and OpenCore version has resolved this issue, all Threadripper platforms are now supported
Содержание
- # Настройка config.plist
- # Создание вашего config.plist
- # Добавление ваших SSDT, кекстов и драйверов прошивки
- # Выбор вашей платформы
- # Настольные Intel
- # Ноутбуки Intel
- # Intel HEDT
- # config.plist Setup
- # Creating your config.plist
- # Adding your SSDTs, Kexts and Firmware Drivers
- # Selecting your platform
- # Intel Desktop
- # Intel Laptop
- # Intel HEDT
- Создание и настройка config.plist для установки Хакинтош
- Создание plist.config для установки Хакинтош
- Настройка config.plist для установки в Clover Configurator
- Готовые config.plist для разных поколений процессоров
- Полезный SOFT Хакинтошника
- Clover configurator
- PlistEdit Pro
- Загрузчик Clover EFI Bootloader
- EFI Mounter-v2.app
- Yosemite Disk Utility для El Capitan
- Config plist редактировать в windows
- About
# Настройка config.plist
Теперь, когда у нас есть все наши кексты(.kext), SSDT(.aml) и драйверы прошивки, ваш USB должен выглядеть примерно так:
# Создание вашего config.plist
Для начала, нам нужно взять sample.plist из OpenCorePkg
# Добавление ваших SSDT, кекстов и драйверов прошивки
Для остальной части этого руководства, вам нужно будет как-то редактировать plist. И в нашем руководстве мы будем использовать ProperTree и GenSMBIOS, чтобы помочь автоматизировать часть утомительной работы:
Далее, давайте откроем ProperTree и отредактируем наш config.plist:
Когда запустите ProperTree, откройте ваш config.plist нажатием Cmd/Ctrl + O и выберите файл config.plist на вашем USB.
После того как открыли конфиг, нажмите Cmd/Ctrl + Shift + R и выберите вашу EFI/OC папку, чтобы совершить «Clean Snapshot»:
Когда всё сделано, вы увидите ваши SSDT, кексты и драйверы прошивки заполненными в config.plist:
# Выбор вашей платформы
# Настольные Intel
(opens new window) 2006-2009 г. Lynnfield и Clarkdale 5XX-8XX 2010 г. Sandy Bridge 2XXX 2011 г. Ivy Bridge 3XXX 2012 г. Haswell 4XXX 2013-2014 г. Skylake 6XXX 2015-2016 г. Kaby Lake 7XXX 2017 г. Coffee Lake 8XXX-9XXX 2017-2019 г. Comet Lake 10XXX 2020 г.
# Ноутбуки Intel
| Кодовое название | Серия | Выход |
|---|---|---|
| Clarksfield и Arrandale | 3XX-9XX | 2010 г. |
| Sandy Bridge | 2XXX | 2011 г. |
| Ivy Bridge | 3XXX | 2012 г. |
| Haswell | 4XXX | 2013-2014 г. |
| Broadwell | 5XXX | 2014-2015 г. |
| Skylake | 6XXX | 2015-2016 г. |
| Kaby Lake и Amber Lake | 7XXX | 2017 г. |
| Coffee Lake и Whiskey Lake | 8XXX | 2017-2018 г. |
| Coffee Lake Plus и Comet Lake | 9XXX-10XXX | 2019-2020 г. |
| Ice Lake | 10XXX | 2019-2020 г. |
# Intel HEDT
Этот раздел включает оборудование как для энтузиастов, так и серверное.
Источник
# config.plist Setup
Now that we’ve got all our Kexts(.kext), SSDTs(.aml) and firmware drivers(.efi), your USB should start to look something like this:

# Creating your config.plist
First we’ll want to grab the sample.plist from the OpenCorePkg


# Adding your SSDTs, Kexts and Firmware Drivers
For the rest of this guide, you’re gonna need some form of plist editing. And for our guide, we’ll be using ProperTree and GenSMBIOS to help automate some of the tedious work:
Next, let’s open ProperTree and edit our config.plist:
Once ProperTree is running, open your config.plist by pressing Cmd/Ctrl + O and selecting the config.plist file on your USB.
After the config is opened, press Cmd/Ctrl + Shift + R and point it at your EFI/OC folder to perform a «Clean Snapshot»:

Once done, you’ll see your SSDTs, Kexts and firmware drivers populated in the config.plist:


If you wish to clean up the file a bit, you can remove the #WARNING entries. Though they cause no issues staying there, so up to personal preference.
# Selecting your platform
Now comes the important part, selecting the configuration path. Each platform has their own unique quirks that you need to account for so knowing your hardware is super important. See below for what to follow:
# Intel Desktop
(opens new window) 2006-2009 era Lynnfield and Clarkdale 5XX-8XX 2010 era Sandy Bridge 2XXX 2011 era Ivy Bridge 3XXX 2012 era Haswell 4XXX 2013-2014 era Skylake 6XXX 2015-2016 era Kaby Lake 7XXX 2017 era Coffee Lake 8XXX-9XXX 2017-2019 era Comet Lake 10XXX 2020 era
# Intel Laptop
| Code Name | Series | Release |
|---|---|---|
| Clarksfield and Arrandale | 3XX-9XX | 2010 era |
| Sandy Bridge | 2XXX | 2011 era |
| Ivy Bridge | 3XXX | 2012 era |
| Haswell | 4XXX | 2013-2014 era |
| Broadwell | 5XXX | 2014-2015 era |
| Skylake | 6XXX | 2015-2016 era |
| Kaby Lake and Amber Lake | 7XXX | 2017 era |
| Coffee Lake and Whiskey Lake | 8XXX | 2017-2018 era |
| Coffee Lake Plus and Comet Lake | 9XXX-10XXX | 2019-2020 era |
| Ice Lake | 10XXX | 2019-2020 era |
# Intel HEDT
This section includes both enthusiast and server based hardware.
Источник
Создание и настройка config.plist для установки Хакинтош
Во многих инструкциях о том как установить свой первый Хакинтош почему-то упускают один главный и важный шаг — создание файла plist.config. Исправляем данную ситуацию.
Ранее мы рассказывали что необходимо, чтобы установить хакинтош:
Создание plist.config для установки Хакинтош
Может быть и есть люди, которые создали полностью рабочий вариант config.plist в Windows, но сделать это будет очень трудно, либо с помощью web-инструмента. Поэтому создавать данный файл будем в виртуальной машине macOS. О том как их создать читайте в наших прошлых статьях:
Как по мне проще и легче установить в VmWare…
Теперь же необходим инструмент с помощью которого будет мастерить config.plist — скачиваем Clover Configurator и запускаем его.
Настройка config.plist для установки в Clover Configurator
Переходим сразу же на вкладку под названием «SMBIOS». В этой вкладке вам необходимо подобрать максимально похожий Mac. Для этого необходимо знать какой процессор установлен на вашем компьютере и близок к тому, что установлен в настоящем iMac или MacBook, MacPro.
Почти половина дела сделано, переходим во вкладку «System Parameters».
В выпадающем списке Inject Kexts выбираем «Yes» и ставим галочку напротив «Inject System ID». Это необходимо чтобы kext-ы которые мы приготовили, были загружены.
Переходим во вкладку «ACPI». Здесь вам необходимо включить различные Fix (как минимум те что указаны на скриншоте), так как в противном случае может возникнуть паника ядра и система «упадет», а может и нет. Об этом вы узнаете путем личных экспериментов.
Если у вас процессор Haswell, то рекомендуется поставить «1» напротив Plugin Type
Возможно необходимо будет указать и другие ключи, но об этом вы узнаете позже сами экспериментальным путем.
Переходим во вкладку «Devices» и ставим все галочки USB, кроме последнего пункта.
Теперь на панели выбираем «Files» — «Save», чтобы сохранить созданный только что файл config.plist.
Еще раз напомню, что минимум необходимых настроек которые необходимо внести в config.plist и возможно его вам необходимо дорабатывать под себя!
Готовые config.plist для разных поколений процессоров
Если вам лень или настройка конфига вам слишком сложна по первой, то лучше воспользоваться, универсальными файлами config.plist, составленными для определенных поколений CPU:
Они еще требуют доработки, но более или менее подходят многим.
Далее файл config.plist необходимо переместить на загрузочную флешку, раздел EFI, папка Clover.
В следующей статье я расскажу вам как установить macOS (Hackintosh) на компьютер.
У вас еще остались дополнительные вопросы? Задавайте их в комментариях, рассказывайте о том, что у вас получилось или наоборот!
Вот и все! Оставайтесь вместе с сайтом Android +1, дальше будет еще интересней! Больше статей и инструкций читайте в разделе Статьи и Хаки Android.
Источник
Полезный SOFT Хакинтошника
Clover configurator
Программа очень сильно облегчающая настройку конфигурационного файла config.plist для загрузчика Clover. В ней каждый сможет внести изменения в файл, даже не имея за плечами серьезных навыков.
Также в программе предусмотрена функция монтирования и размонтирования EFI разделов, что очень удобно.
Но все же стоит иметь в виду, что не верно поставленная галочка в настройках может вызвать панику при загрузке Хакинтоша, так же возможны некоторые ошибки в самом config.plist после редактирования.

PlistEdit Pro
 PlistEdit Pro — продвинутый редактор для файлов настроек plist. С PlistEdit Pro, пользователи могут легко изменять эти файлы и оказывать более полный контроль над своими системами. Вы можете использовать PlistEdit Pro в ваших разработках, а также использовать встроенный файловый браузер, который позволяет исследовать и изменять настройки параметров системы.
Так же с помощью данного редактора редактируют config.plist для загрузчика Clover EFI, но редактирование в нем потребует от пользователя уже более продвинутых познаний.
Покупаем лицензию, либо ищем на просторах инета бесплатно…
Загрузчик Clover EFI Bootloader

По сути это он из инструментов, который и позволяет нам устанавливать, загружать, а в последствии и работать в операционной системе Mac OS на PC компьютерах.
Инсталятор загрузчика уже имеет ряд драйверов, которые делают загрузку возможным. Но все же после установки, пользователю прийдется приложить усилия для настройки config.plist и дополнением его файлов требуемыми кекстами.
Для установки рекомендуется использовать самую новую версию загрузчика, но по некоторым сведениям последние версии уже не поддерживают версии Mac OS ниже 10.10, поэтому перед выбором версии ознакомьтесь с этой статьей.
Инструкция по настройке Clover — «Клевер цвета Хаки 4000»
EFI Mounter-v2.app
 EFI Mounter-v2.app — программа для монтирования и размонтирования EFI разделов. Программа позволяет выбрать жесткий диск на котором расположен нужный вам раздел EFI, очень проста в использовании…
Yosemite Disk Utility для El Capitan
 Начиная с версии системы Mac OS X El Capitan, разработчиками компании Apple дисковая утилита была максимально упрощена.
Yosemite Disk Utility для El Capitan позволяет пользоваться старой дисковой утилитой, которая была в более ранних версиях Mac OS X и обладала рядом преимуществ перед нынешней урезанной версией, таких как:
К сожалению, пока нет аналогов для MacOS Sierra 10.12…
Источник
Config plist редактировать в windows

Clover Configurator Pro Download here
A full configurator for Clover V2 bootloader. Made with latest Swift 5, has its own parser (each entry will remains sorted as you leave it before closing the file). All the code comes from me, with the only exception of the handy Sparkle.framenwork to keep the app up-to date (and off course Clover), so that giving credit is pretty easy unlike my competitors that have the bad habit of silently include third party software in their application w/o mention them (use class-dump and take a look). Run in macOS 10.11 +
p.s. (I use «competitors» word here to underline what I think my «competitors» think of me, but this app doesn’t even have a donate button)
Why this name? Ok, «Clover» is an opensource bootloader, whould say also that my name is among the Clover’s credit (at boot time push the info button) because I wrote the MatchOS set of functions (and other minor things here and there in the build system), unlike my competitors. «Configurator» is a common word, «Pro» stand for «Professional» since this is a real Plist Editor like Xcode has or any other commercial app. but this is totally free!
I forgot something? where are their Copyright notice?? some infrigment? Ok understood, same story! )
App icon by Mirone.
Clover Configurator Pro is a professional Plist editor and is totally free! True, but what if you don’t want all the Clover facilities to show up? go to the Preferences and mark as active the following: 
from now on, Clover Configurator Pro is only a Plist Editor!
Editing the config.plist
Clover Configurator Pro can automatically load the config.plist used to boot the OS automatically, just ensure this option is enabled in the Preferences: 
What if you want to load another one? Simple, open the «Clover Manager» under the «View» menu: 
right click on the desired disk and choose one (boot partition is green colored on dark appearance, red otherwise). The partition must be mounted. Or if the file is elsewhere just drag it to the applications icon, or right clik on the file you want to open.
How to edit something for Clover? Well, that is the easy part, just right click with the mouse over any entry of the config.plist:


if a key does not yet exist or your is a new empty document just right click on the root 
Depending on what’s on your Preferences, you have two way:
/src by default) and mark as active the relative option in the Preferences.
Open the «Clover Manager» under the «View» menu:


Clover is out of date?
Clover Configurator Pro keeps Build_Clover.command always up to date and you can use it to download and build always the latest Clover revision available. To do that take a look at the «Build_Clover» menu. Mind that Xcode must be installed and its clt selected.
Wants some info about your disks or partitions?
The Clover Manager is expandable:

all the info you wants are there. You can also apply filters for slices (partitions), mounted or ESPs if you have more than one.
Under the view menu you will find confortable having a text to data encoder/decoder, a hex to base64 encoder/decoder The boot-log viewer and the NVRAM editor The NVRAM editor is cool and can help you editing or understand your NVRAM in a clear way.
Clover Configurator Pro has a Dark appearance?
Did not like it? Go to the Preferences and disable «Start in dark mode. Applied on next run.», restart the app, and everything will be different:

Clover Configurator Pro is multi language : actually Italian and English are available at 100%, Portoguese is at 90% (thanks to Mirone), but you can translate it easily by making a copy of Base.strings into your locale identifier suggested directly by Clover Configurator Pro in the upper right corner of the Preferences: 
You can find localization files at this dedicated repository here, Fork it edit the file, or as I said make a new one naming it as CCP suggested you. Open a pull request at the CCP-Locale-Bundle repository with the translated file, so that We can keep track of changes
adding more functionalities after a good debugging.
For any possible bug open an issue here on github, I’ll be happy to solve it
About
A free Plist Editor with some optional facilities for Clover UEFI boot loader
Источник
Config.plist Basics
The config.plist resides at /Volumes/EFI/EFI/CLOVER/config.plist and is one of the tougher files to work with for those new to the Hackintosh world. We’ll go into some of the basics of the structure here, then break out into different sections for different hardware config setup.
What Is It?
The config.plist is an XML property list. XML is a markup language that shares a lot of similarities with HTML. This means you’ve got a few different data types available to you, and most of the structure revolves around keeping track of opening and closing tags.
The Structure
When Clover explores a config.plist it expects to have certain parts in certain spots. The order and scope of your config are very important as putting information in the wrong spot can effectively hide it from Clover. You can view the general layout that Clover expects on the Clover Wiki.
Data Types
There are a few major data types we’ll run into when working with the config. I’ll outline the most common here. Note — I’m only using the opening tags here, when actually working with the following types we’ll need to make sure we clean up after ourselves and close our tags.
Strings
<string>This is a string</string>
Strings are just text. Not terribly crazy — you will see them used a lot for comments and other such things.
Integers
<integer>1</integer>
These are just whole numbers. Again, nothing too wild here.
Data
<data>RXh0ZXJuYWw=</data>
While this looks similar to the strings above, it’s actually the base64 representation of some data. Wtf does that mean? You can read up on it here, but in summation — it’s a slick way to save binary data in a text format without it getting lost when copied, moved, etc. What’s even more crazy is that you can take the above base64 data and convert it to ASCII via the following in Terminal.app:
echo RXh0ZXJuYWw= | python -m base64 -d && echo
This will output External on the next line. We use the && echo to output a newline after our text is spit out — this makes it easier to read.
You can also convert from ASCII to base64 (handy for working with ACPI renames — more about that later) with the following in Terminal.app:
echo -n External | base64
This will spit out RXh0ZXJuYWw= which is exactly what we’d expect.
Note — Many plist editors (Clover Configurator, Xcode, etc) will display data as hexadecimal instead of base64, so make sure you pay attention to which you’re using.
Booleans
<true/> or <false/>
These are boolean values. You can think of them as on/off values. Unlike the other types listed here, these are both an opening and closing tag at once so they don’t require a matching tag.
Arrays
<array>
    <string>Bob</string>
    <string>Jim</string>
    <string>Chris</string>
</array>
This is an unordered list of items. If we wanted to gather up a collection of names, we could store them as <string> values in our <array> like the above example. They are accessed by index (which is just the number they’re at in the list).
Dictionaries
<dict>
    <key>Name</key>
    <string>Bob</string>
    <key>Age</key>
    <integer>20</integer>
    <key>Knows XML</key>
    <true/>
</dict>
This denotes a dictionary. These, like arrays are great for storing extra collections of data, but instead of being index based, they utilize key/value organization. As you can see from the above example, we are able to store specific data about Bob through the use of these key/value pairs. All the keys are just text (like our strings).
Examples
Let’s go over some before/after examples with some pretend config.plist data to hopefully remove some of the mystery that happens in this wizard’s closet.
Change True/False
In this first example, we’re just going to change a boolean value from true to false, or vise versa. I’ll use the Disabled value inside a KextsToPatch entry to make this actually a real-world example. First, I’ll give us the KextsToPatch entry we’ll be working with:
<dict>
    <key>Comment</key>
    <string>External icons patch</string>
    <key>Disabled</key>
    <false/>
    <key>Find</key>
    <data>
    RXh0ZXJuYWw=
    </data>
    <key>InfoPlistPatch</key>
    <false/>
    <key>Name</key>
    <string>AppleAHCIPort</string>
    <key>Replace</key>
    <data>
    SW50ZXJuYWw=
    </data>
</dict>
Whew, that might look like a lot up front, but we’ll break things down. Firstly, I’ll go over what the different keys mean:
Comment— this is just a comment to describe what the patch is doing.Disabled— this is a bit counter-intuitive, but it’s a boolean value that determines whether or not this patch is disabled. If set to<true/>, the patch will be disabled, and Clover will ignore it. If set to<false/>the patch is not disabled, and it will be applied.InfoPlistPatch— this is a boolean value that tells Clover if we’re patching the Info.plist of the kext instead of the binary.Name— this is the actual kext we intend to patch.Find— this is the base64 data we want to look for in the binary to patch.Replace— this is what we will be replacing theFinddata with (if we find it).
Alright, now I’ll explain what this patch is actually for. Via the information in this patch, Clover will look for the AppleAHCIPort kext and search for RXh0ZXJuYWw= (which becomes External when we decode the data) and replace it with SW50ZXJuYWw= (which becomes Internal when we decode it). The end result is that drives that are hot-pluggable (and normally considered external drives) will be displayed as internal drives and not have the orange icon on the desktop. This patching happens on the fly, and is non-destructive — meaning that the AppleAHCIPort kext remains untouched on the system.
So — I guess at this point, I should explain how we would change a boolean value to disable this patch. I mentioned before how the Disabled key works — wo we’ll change the <false/> on the next line to <true/> which sets this patch to disabled like so:
<dict>
    <key>Comment</key>
    <string>External icons patch</string>
    <key>Disabled</key>
    <true/>
    <key>Find</key>
    <data>
    RXh0ZXJuYWw=
    </data>
    <key>InfoPlistPatch</key>
    <false/>
    <key>Name</key>
    <string>AppleAHCIPort</string>
    <key>Replace</key>
    <data>
    SW50ZXJuYWw=
    </data>
</dict>
Not too scary, right?
Adding a New Dict to an Array
This is one that I see quite often that can be a bit overwhelming for new folks. If you are told to add a new patch to config.plist -> ACPI -> DSDT -> Patches, we’d first pop open our config.plist and see what we’re working with.
We’ll assume for this example that the config looks like so:
<?xml version="1.0" encoding="UTF-8"?>
<!DOCTYPE plist PUBLIC "-//Apple//DTD PLIST 1.0//EN" "http://www.apple.com/DTDs/PropertyList-1.0.dtd">
<plist version="1.0">
<dict>
    <key>ACPI</key>
    <dict>
        <key>DSDT</key>
        <dict>
            <key>Fixes</key>
            <dict>
                <key>FixHPET</key>
                <true/>
                <key>FixIPIC</key>
                <true/>
                <key>FixRTC</key>
                <true/>
                <key>FixTMR</key>
                <true/>
            </dict>
            <key>Patches</key>
            <array>
                <dict>
                    <key>Comment</key>
                    <string>change OSID to XSID (to avoid match against _OSI XOSI patch)</string>
                    <key>Disabled</key>
                    <false/>
                    <key>Find</key>
                    <data>
                    T1NJRA==
                    </data>
                    <key>Replace</key>
                    <data>
                    WFNJRA==
                    </data>
                </dict>
                <dict>
                    <key>Comment</key>
                    <string>change _OSI to XOSI</string>
                    <key>Disabled</key>
                    <false/>
                    <key>Find</key>
                    <data>
                    X09TSQ==
                    </data>
                    <key>Replace</key>
                    <data>
                    WE9TSQ==
                    </data>
                </dict>
            </array>
As we look down the config, starting at the top, we can follow that path I outlined before. We see ACPI, and under that DSDT. Then underneath DSDT is Fixes and in-line with that is Patches. We’re not concerned with the Fixes section currently, so we’ll just ignore that and focus on the Patches.
Firstly, I’ll point out that under the <key>Patches</key> is an opening array tag (<array>) — and then we have 2 dictionaries — each with similar keys to what we worked with in the prior example (Comment, Disabled, Find, Replace). After the dictionaries, we see the closing array tag (</array>). Our goal is to add a new dictionary in between the <array> and </array> tags while also avoiding slicing up the other existing dictionaries. The data that we’ll be adding looks like so:
<dict>
    <key>Comment</key>
    <string>change SAT0 to SATA</string>
    <key>Disabled</key>
    <false/>
    <key>Find</key>
    <data>
    U0FUMA==
    </data>
    <key>Replace</key>
    <data>
    U0FUQQ==
    </data>
</dict>
Like I mentioned prior, arrays are unordered — that means it doesn’t matter whether we put our new dictionary before the existing 2, after them, or in between them. I’m going to add it to the end though — just above that last </array> tag like so:
<?xml version="1.0" encoding="UTF-8"?>
<!DOCTYPE plist PUBLIC "-//Apple//DTD PLIST 1.0//EN" "http://www.apple.com/DTDs/PropertyList-1.0.dtd">
<plist version="1.0">
<dict>
    <key>ACPI</key>
    <dict>
        <key>DSDT</key>
        <dict>
            <key>Fixes</key>
            <dict>
                <key>FixHPET</key>
                <true/>
                <key>FixIPIC</key>
                <true/>
                <key>FixRTC</key>
                <true/>
                <key>FixTMR</key>
                <true/>
            </dict>
            <key>Patches</key>
            <array>
                <dict>
                    <key>Comment</key>
                    <string>change OSID to XSID (to avoid match against _OSI XOSI patch)</string>
                    <key>Disabled</key>
                    <false/>
                    <key>Find</key>
                    <data>
                    T1NJRA==
                    </data>
                    <key>Replace</key>
                    <data>
                    WFNJRA==
                    </data>
                </dict>
                <dict>
                    <key>Comment</key>
                    <string>change _OSI to XOSI</string>
                    <key>Disabled</key>
                    <false/>
                    <key>Find</key>
                    <data>
                    X09TSQ==
                    </data>
                    <key>Replace</key>
                    <data>
                    WE9TSQ==
                    </data>
                </dict>
                <dict>
                    <key>Comment</key>
                    <string>change SAT0 to SATA</string>
                    <key>Disabled</key>
                    <false/>
                    <key>Find</key>
                    <data>
                    U0FUMA==
                    </data>
                    <key>Replace</key>
                    <data>
                    U0FUQQ==
                    </data>
                </dict>
            </array>
More Examples
I’ll try to keep my ears open for more plist editing examples that people have issues with, and add them as needed.
Home > Configuration
Table of Contents
- Creating a configuration file
- Config.plist structure
Creating a configuration file
Clover will perform an automatic configuration based on the computer’s hardware. Nevertheless, an automatic unit is never perfect and this is why the user can permanently change several parameters in the configuration file config.plist or on the fly in the GUI. The configuration file is written in XML but it can be handy to view it as a text file. It can be edited by simple text editors or by plist editors like PlistEdit. Clover is shipped with two variants of this file: a full-size version with all possible configuration options and a minimal version.
The configuration file (config.plist) must be put in the EFI/CLOVER folder.
Some general rules:
If you do not know what value a parameter needs, exclude it from the config file completely!
Do not leave a parameter without a value.
Last but not least, do not set a value you do not understand!
The following way of creating a configuration file is offered:
- Install the minimal version, which only uses safe parameters
- Load Clover’s GUI and enter the Options menu (by pressing O)
- Browse all options and try to understand what is set and why
- Fix what you understand and leave the rest like it is
- Load the OS. If it doesn’t load, repeat from step 2 until it starts
In the OS start the Terminal and enter:
/usr/local/bin/clover-genconfig >config.plist
This way you get a nearly complete configuration file with the parameters used to successfully load the OS. Some more manual work is needed to finish it.
A new way is as follows:
Rev 4504
Now clover-genconfig is able to produce all your injection keys used at last successful boot including automatic properties when inject=YES. But not including _DSM methods.
- Boot as usual. New or old Clover revision.
- Use new clover-genconfig to produce your current config.plist.
- Update Clover to revision > 4500
- Update you config.plist to switch off all injection including Graphics, Audio, LAN, USB
- Disable all AddProperties and Arbitrary.
- Insert new produced Device->Properties dictionary which will include all your old properties.
Enjoy!
Config.plist structure
-
ACPI
- ResetAddress and ResetValue
- smartUPS
- PatchAPIC
- HaltEnabler
- UseSystemIO
- DSDT
- Name
- FixMask
- Fixes
- Patches
- DropOEM_DSM
- SlpSmiAtWake
- SuspendOverride
- ReuseFFFF
- Rtc8Allowed
- SSDT
- DropOem
- Generate
- CStates
- PStates
- EnableC2
- EnableC4
- EnableC6
- EnableC7
- PLimitDict
- UnderVoltStep
- MinMultiplier
- MaxMultiplier
- DropTables
-
Boot
- Arguments
- Legacy
- Timeout
- DefaultVolume
- DefaultLoader
- IgnoreNVRAMBoot
- Debug
- Fast
- XMPDetection
- Secure
- NeverHibernate
- CustomLogo
-
CPU
- FrequencyMHz
- BusSpeedkHz
- QPI
- Type
- Latency
- C2
- C4
- C6
-
Devices
- Inject
- Properties
- FakeID
- Audio
- Inject
- ResetHDA
- AFGLowPowerState
- USB
- Inject
- FixOwnership
- AddClockID
- HighCurrent
- UseIntelHDMI
- AddProperties
- NoDefaultProperties
-
Disable Drivers
-
GUI
- TextOnly
- Theme
- ScreenResolution
- ConsoleMode
- Language
- CustomIcons
- Mouse
- Scan
- Entries
- Tool
- Legacy
- Kernel
- Hide
- Custom
- Entries
- Legacy
- Tool
-
Graphics
- Inject
- Intel
- ATI
- NVidia
- VRAM
- LoadVBios
- DualLink
- PatchVBios
- PatchVBiosBytes
- EDID
- VideoPorts
- FBName
- NVCAP
- display-cfg
- ig-platform-id
- Inject
-
KernelAndKextPatches
- Debug
- KernelCpu
- FakeCPUID
- AppleIntelCPUPM
- KernelPm
- AppleRTC
- KernelLapic
- KernelHaswellE
- KextsToPatch
- ForceKextsToLoad
- ATIConnectorsController
-
RtVariables
- MLB
- ROM
- CsrActiveConfig
- BooterConfig
- MountEFI
- LogEveryBoot
- LogLineCount
-
SMBIOS
- ProductName
- Family
- SmUUID
- FirmwareFeatures
- SerialNumber
- BoardSerialNumber
- BiosVersion
- BiosReleaseDate
- BoardType
- Mobile
- ChassisType
- ChassisAssetTag
- Trust
- Memory
- Slots
-
SystemParameters
- CustomUUID
- InjectSystemID
- BacklightLevel
- InjectKexts
- NoCaches
- NvidiaWeb
-
Become a Premium Member for $25/year with no ads to improve your community experience.
You should upgrade or use an alternative browser.

- Joined
- Jul 22, 2018
- Messages
- 4,411
- Motherboard
-
Supermicro X11SPA-T
- CPU
-
Intel Xeon W-3275 28 Core
- Graphics
-
2xAMD RX 580 8GB
- OS X/macOS
-
12.0.x
- Bootloader
-
- OpenCore (UEFI)
- Mac
-
- Mac mini
- MacBook Pro
- Mobile Phone
-
- Android
- iOS
-
#1
The config.plist is a system configuration file for the Hackintosh and allows to boot macOS. Without a config.plist, no machine can boot into macOS.
A basic config.plist file is automatically created while installing Clover Boot loader at /EFI/Clover/. If the config.plist is already present, it will be renamed as backup config.plist or remain untouched. The config.plist which is installed by Clover Boot loader, is the default config.plist and is not optimised for all the systems. It can boot into some installation but when talking about the majority, it will fail to boot on most of the newer machines and high end builds.
Also, it’s a good idea to create a config.plist for each specific system which will exclude the errors and trouble while installation and you can easily boot into macOS installation. The configuration file is written in XML and can be edited using a text editor. But we don’t recommend you to use a text editor as it has a chance of config.plist file corruption. The best way to edit a config.plist is to use some specific tools like Clover Configurator, Xcode, Plist Editor Pro etc..
This guide covers a creation of basic config.plist which will allow to boot most of the systems. However, for few systems, such as Xeon, High End CPUs, Workstations, Server, X99, X299, you might need to tweak your config.plist.
For Laptop users, a separate thread is available. Follow the guide here for Laptops.
Notes:
- It’s good to have a minimal configuration and options set before you install. Once you install, you can add the other options later on. This will cause less trouble and speedup the installation process.
- As it’s a basic config.plist creation guide, so only important sections has been discussed. This will only allow to boot off your system. It will not enable any other hardware.
Background
Since the release of Clover v5123, OpenCore is integrated to enable boot into Big Sur. The guide discuss about all the configurations for each supported Intel CPU series.
This guide covers the creation of config.plist on the following.
- Clarkdale
- Sandy Bridge
- Ivy bridge
- Haswell
- Skylake
- Kaby Lake
- Coffee Lake
- Comet Lake
Download Tool
The very first step is to get Clover Configurator which will help in creating, modifying or editing a config.plist. The Clover Configurator is available for download in the Downloads section of our forum.
Installing Clover Configurator
After downloading, copy the Clover configurator to Applications folder.
You can also use Clover Configurator from your Desktop or any other location but having it in Applications is a good idea.
Clarkdale
| Support | Compatibility |
| OS X/macOS | OS X Snow Leopard and above |
| IGPU Support | No, IGPU support. Requires a discrete GPU |
| Legacy/UEFI | Most of the motherboard doesn’t supports UEFI |
Creating a config.plist
Open Clover Configurator
There are several sections, starting with the first one
- USB
- Audio
- Discrete GPU Power Management
- iGPU Power Management
- SATA
On a Desktop, the common renames are :
Acpi
Clover Configurator Section ACPI sections are as follows:
Under DSDT, patches section, you can implement the necessary ACPI patches for optimising the ACPI system components with DSDT and SSDT.
The common patches includes:
| Renames | Purpose |
| change EHC1 to EH01, change EHC2 to EH02 | USB Rename for USB |
| change PEGP to GFX0 | GPU Rename for GPU PM |
| change HDAS to HDEF | Audio Rename for Audio Function |
Extras
| Options | Value | Description |
| DMAR | YES | |
| FixHeaders |
Boot
| Boot Args | Purpose |
| -v | Enables verbose mode which provides the logs on your screen to check the installation or booting progress. It helps to identify the errors, if any |
| nv_disable=1 | If you’re having NVIDIA GPU and cannot reach the installation screen or unable to boot into your Desktop after the installation, use this boot arg to disable the NVIDIA drivers and install the drivers at the time of postinstallation |
| agdpmod=pikera | If you’re using Navi based AMD GPU, you need to use this boot arg to fix black screen at boot. |
Extras
| Options | Description |
| Default Boot Volume | Use the name of your target disk. Only recommended after postinstallation. |
| Legacy | PBR |
| XMPDetection | YES |
| Timeout | This set delay when Clover Bootloader loads. Set it to value of 5. You can increase or decrease as per your requirement. If you don’t want any delay, select «Fast». |
| Never Hibernate | YES |
Boot Graphics
The Boot Graphics section is have very less importance and recommended to leave it untouched.
Cpu
The CPU section is usually untouched for all systems. This option can help if your CPU is not detected automatically by the macOS or has wrong information of your CPU such as different name or Unknown CPU.
All the other values should be untouched and not recommended to modify as it can lead to a unstable system. The values such as Frequency, Bus Speed, are automatically controlled by BIOS. For overclocking, you can set the options in BIOS/UEFI.
Devices
| Options | |
| Inject | Use Layout ID as per your Audio Codec in reference to AppleALC layout ID. Only applies when you use AppleALC which is the recommended method to enable Audio. |
| ResetHDA | YES |
Disable Drivers
This section allows you to disable the certain drivers from /EFI/Clover/drivers/UEFI
It’s recommended to leave it untouched.
GUI
The Clover GUI has other sub sections such as Mouse, Scan, Themes, Volumes, etc..
| Options | Value | Description |
| Mouse | Enabled | The mouse option allows the use of Mouse within Clover Menu and also allows to change certain mouse properties such as click function. |
| Language | en-US:0 | You can use the language for Clover as per your requirement. en-US:0 sets as an English language. |
| Screen Resolution | Your monitor’s screen resolution. For a custom resolution, add the resolution in the field box. | |
| Theme | Use the name of the theme which you selected while installing Clover Boot loader. The theme section allows to set the Clover Theme. Such as BGM. If you’re using any other theme, you can set the theme name here. | |
| Hide Volume | Preboot | Add the volume names which you want to hide at Clover page. It’s recommended to hide «Preboot» volume. This section hides the volumes in Clover menu. For High Sierra and later, it’s recommended to hide Preboot and Prebooter Volumes. You can also hide other volumes as per your requirements.
Preboot is only recommended for High Sierra and later. |
Graphics
This section allows to control the Graphics functions with the Framebuffer, VRAM, ports and other stuffs.
When using a AMD or a NVIDIA GPU, it’s recommended to leave it untouched. However, for some old ATI/AMD and NVIDIA Cards, it might be required to set few options.
Kernel and Kext Patches
| Options | Value | Comment |
| PanicNoKextDump | YES | |
| AppleIntelCPUPM | YES | This is a temporary fix to reach the installer. Once the installation is finished, it’s recommended to use SSDT for CPU PM and disable this option. |
| DellSMBIOSPatch | NO | Only applicable if you’re using Dell Motherboard |
KextsToPatch
This section allows you to patch kexts without editing them directly.
The patches such as TRIM and NVMe drives, Boot Graphics Glitch can be achieved from here. It’s recommended to leave it blank, untouched. At post-installation, you can add the necessary patches.
To enable TRIM function, follow the guide here.
Rt Variables
This section holds ROM, SIP etc..
| ROM | UseMacAddr0 |
| BooterConfig | 0x28 |
| CsrActivConfig | 0x67 |
SMBIOS
This section is the important section and has various impact on your system.
The SMBIOS should be set according to your System Configuration depending on your CPU.
| Options | Value | Comment |
| SMBIOS | iMac | |
| Memory | NO | If your system is unable to recognise the correct amount of RAM, you’ll need to add your RAM information here. By default, it’s not recommended unless you have such issue. |
Note :
- Note hat «Serial Number», «Board Serial Number» and «SmUUID» are unique SMBIOS credentials, which should not be revealed in public. They are unique for each system and mandatory for activation of iMessage and FaceTime.
- This should be configured at the time of post installation.
System Parameters
This section has a small function but has a great importance.
Quirks
| Quirks | Value | Description |
| AvoidRunTimeDefrag | YES | Only applicable to macOS Big Sur. |
| DevirtualiseMmio | ||
| DisableSingleUser | ||
| DisableVariableWrite | ||
| DiscardHibernateMap | ||
| EnableSafeModeSlide | ||
| EnableWriteUnprotector | ||
| ForceExitBootServices | ||
| ProtectMemoryRegions | ||
| ProvideCustomSlide | ||
| SetupVirtualMap | YES and NO | Use YES only if your motherboard is UEFI compatible. |
| SignalAppleOS | ||
| ProtectSecureBoot | ||
| ProtectUefiServices | ||
| RebuildAppleMemoryMap | YES | |
| SyncRuntimePermissions | ||
| ProvideMaxSlide | ||
| DummyPowerManagement | ||
| FuzzyMatch | YES | |
| KernelArch | ||
| KernelCache | ||
| AppleCpuPmCfgLock | YES | |
| AppleXcpmCfgLock | YES | |
| AppleXcpmExtraMsrs | ||
| AppleXcpmForceBoost | ||
| DisableIoMapper | YES | |
| ExternalDiskIcons | ||
| LapicKernelPanic | ||
| PowerTimeoutKernelPanic | YES | |
| ThirdPartDrives | ||
| XhciPortLimit | YES | If you have no USB 3.0 ports, it’s recommended to disable this option. |
| IncreasePciBarSize | ||
| DisableRtcChecksum | ||
| DisableLinkeditJettison | YES | |
| ExtendBTFeatureFlags | ||
| LegacyCommpage |
Sandy Bridge
| Support | Compatibility |
| OS X/macOS | OS X Snow Leopard and above |
| IGPU Support | IGPU is only supported upto macOS High Sierra officially. For using it on Mojave and later, use Chris111 work. |
| Legacy/UEFI | Most of the motherboard doesn’t supports UEFI. |
Creating a config.plist
Open Clover Configurator
There are several sections, starting with the first one
- USB
- Audio
- Discrete GPU Power Management
- iGPU Power Management
- SATA
On a Desktop, the common renames are :
Acpi
Clover Configurator Section ACPI sections are as follows:
Under DSDT, patches section, you can implement the necessary ACPI patches for optimising the ACPI system components with DSDT and SSDT.
The common patches includes:
| Renames | Purpose |
| change EHC1 to EH01, change EHC2 to EH02 | USB Rename for USB |
| change PEGP to GFX0 | GPU Rename for GPU PM |
| change HDAS to HDEF | Audio Rename for Audio Function |
Extras
| Options | Value | Description |
| DMAR | YES | |
| FixHeaders |
Boot
| Boot Args | Purpose |
| -v | Enables verbose mode which provides the logs on your screen to check the installation or booting progress. It helps to identify the errors, if any |
| nv_disable=1 | If you’re having NVIDIA GPU and cannot reach the installation screen or unable to boot into your Desktop after the installation, use this boot arg to disable the NVIDIA drivers and install the drivers at the time of postinstallation |
| agdpmod=pikera | If you’re using Navi based AMD GPU, you need to use this boot arg to fix black screen at boot. |
Extras
| Options | Description |
| Default Boot Volume | Use the name of your target disk. Only recommended after postinstallation. |
| Legacy | PBR |
| XMPDetection | YES |
| Timeout | This set delay when Clover Bootloader loads. Set it to value of 5. You can increase or decrease as per your requirement. If you don’t want any delay, select «Fast». |
| Never Hibernate | YES |
Boot Graphics
The Boot Graphics section is have very less importance and recommended to leave it untouched.
Cpu
The CPU section is usually untouched for all systems. This option can help if your CPU is not detected automatically by the macOS or has wrong information of your CPU such as different name or Unknown CPU.
All the other values should be untouched and not recommended to modify as it can lead to an unstable system. The values such as Frequency, Bus Speed, are automatically controlled by BIOS. For overclocking, you can set the options in BIOS/UEFI.
Devices
| Options | |
| Inject | Use Layout ID as per your Audio Codec in reference to AppleALC layout ID. Only applies when you use AppleALC which is the recommended method to enable Audio. |
| ResetHDA | YES |
| Device | Properties Key | Properties Value | Value Type | Purpose |
| PciRoot(0x0)/Pci(0x2,0x0) | AAPL,snb-platform-id | 10000300 | DATA | Used to enable IGPU with full acceleration. |
| device-id | 26010000 | DATA | Device ID for IGPU. | |
| PciRoot(0x0)/Pci(0x1b,0x0) | layout-id | XX | NUMBER | Used to enable Onboard Audio. A new approach is to use alcid=XX in boot args |
Disable Drivers
This section allows you to disable the certain drivers from /EFI/Clover/drivers/UEFI
It’s recommended to leave it untouched.
GUI
The Clover GUI has other sub sections such as Mouse, Scan, Themes, Volumes, etc..
| Options | Value | Description |
| Mouse | Enabled | The mouse option allows the use of Mouse within Clover Menu and also allows to change certain mouse properties such as click function. |
| Language | en-US:0 | You can use the language for Clover as per your requirement. en-US:0 sets as an English language. |
| Screen Resolution | Your monitor’s screen resolution. For a custom resolution, add the resolution in the field box. | |
| Theme | Use the name of the theme which you selected while installing Clover Boot loader. The theme section allows to set the Clover Theme. Such as BGM. If you’re using any other theme, you can set the theme name here. | |
| Hide Volume | Preboot | Add the volume names which you want to hide at Clover page. It’s recommended to hide «Preboot» volume. This section hides the volumes in Clover menu. For High Sierra and later, it’s recommended to hide Preboot and Prebooter Volumes. You can also hide other volumes as per your requirements.
Preboot is only recommended for High Sierra and later. |
Graphics
This section allows to control the Graphics functions with the Framebuffer, VRAM, ports and other stuffs.
When using a AMD or a NVIDIA GPU, it’s recommended to leave it untouched. However, for some old ATI/AMD and NVIDIA Cards, it might be required to set few options.
Kernel and Kext Patches
| Options | Value | Comment |
| PanicNoKextDump | YES | |
| AppleIntelCPUPM | YES | This is a temporary fix to reach the installer. Once the installation is finished, it’s recommended to use SSDT for CPU PM and disable this option. |
| DellSMBIOSPatch | NO | Only applicable if you’re using Dell Motherboard |
KextsToPatch
This section allows you to patch kexts without editing them directly.
The patches such as TRIM and NVMe drives, Boot Graphics Glitch can be achieved from here. It’s recommended to leave it blank, untouched. At post-installation, you can add the necessary patches.
To enable TRIM function, follow the guide here.
Rt Variables
This section holds ROM, SIP etc..
| ROM | UseMacAddr0 |
| BooterConfig | 0x28 |
| CsrActivConfig | 0x67 |
SMBIOS
This section is the important section and has various impact on your system.
The SMBIOS should be set according to your System Configuration depending on your CPU.
| Options | Value | Comment |
| SMBIOS | iMac | |
| Memory | NO | If your system is unable to recognise the correct amount of RAM, you’ll need to add your RAM information here. By default, it’s not recommended unless you have such issue. |
Note :
- Note hat «Serial Number», «Board Serial Number» and «SmUUID» are unique SMBIOS credentials, which should not be revealed in public. They are unique for each system and mandatory for activation of iMessage and FaceTime.
- This should be configured at the time of post installation.
System Parameters
This section has a small function but has a great importance.
Quirks
| Quirks | Value | Description |
| AvoidRunTimeDefrag | YES | |
| DevirtualiseMmio | ||
| DisableSingleUser | ||
| DisableVariableWrite | ||
| DiscardHibernateMap | ||
| EnableSafeModeSlide | YES | |
| EnableWriteUnprotector | YES | |
| ForceExitBootServices | ||
| ProtectMemoryRegions | ||
| ProvideCustomSlide | ||
| SetupVirtualMap | YES | |
| SignalAppleOS | ||
| ProtectSecureBoot | ||
| ProtectUefiServices | ||
| RebuildAppleMemoryMap | YES | |
| SyncRuntimePermissions | ||
| ProvideMaxSlide | 0 | |
| DummyPowerManagement | ||
| FuzzyMatch | YES | |
| KernelArch | ||
| KernelCache | ||
| AppleCpuPmCfgLock | YES | |
| AppleXcpmCfgLock | YES | |
| AppleXcpmExtraMsrs | ||
| AppleXcpmForceBoost | ||
| DisableIoMapper | YES | |
| ExternalDiskIcons | ||
| LapicKernelPanic | NO | Only required for HP Motherboards |
| PowerTimeoutKernelPanic | YES | |
| ThirdPartDrives | ||
| XhciPortLimit | YES | If you have no USB 3.0 ports, it’s recommended to disable this option. |
| IncreasePciBarSize | ||
| DisableRtcChecksum | ||
| DisableLinkeditJettison | YES | |
| ExtendBTFeatureFlags | ||
| LegacyCommpage |
Ivy Bridge
| Support | Compatibility |
| OS X/macOS | OS X Lion and above |
| IGPU Support | IGPU is only supported upto macOS Catalina officially. |
Creating a config.plist
Open Clover Configurator
There are several sections, starting with the first one
- USB
- Audio
- Discrete GPU Power Management
- iGPU Power Management
- SATA
On a Desktop, the common renames are :
Acpi
Clover Configurator Section ACPI sections are as follows:
Under DSDT, patches section, you can implement the necessary ACPI patches for optimising the ACPI system components with DSDT and SSDT.
The common patches includes:
| Renames | Purpose |
| change EHC1 to EH01, change EHC2 to EH02 | USB Rename for USB |
| change PEGP to GFX0 | GPU Rename for GPU PM |
| change HDAS to HDEF | Audio Rename for Audio Function |
Extras
| Options | Value | Description |
| DMAR | YES | |
| FixHeaders |
Boot
| Boot Args | Purpose |
| -v | Enables verbose mode which provides the logs on your screen to check the installation or booting progress. It helps to identify the errors, if any |
| nv_disable=1 | If you’re having NVIDIA GPU and cannot reach the installation screen or unable to boot into your Desktop after the installation, use this boot arg to disable the NVIDIA drivers and install the drivers at the time of postinstallation |
| agdpmod=pikera | If you’re using Navi based AMD GPU, you need to use this boot arg to fix black screen at boot. |
Extras
| Options | Description |
| Default Boot Volume | Use the name of your target disk. Only recommended after postinstallation. |
| Legacy | PBR |
| XMPDetection | YES |
| Timeout | This set delay when Clover Bootloader loads. Set it to value of 5. You can increase or decrease as per your requirement. If you don’t want any delay, select «Fast». |
| Never Hibernate | YES |
Boot Graphics
The Boot Graphics section is have very less importance and recommended to leave it untouched.
Cpu
The CPU section is usually untouched for all systems. This option can help if your CPU is not detected automatically by the macOS or has wrong information of your CPU such as different name or Unknown CPU.
All the other values should be untouched and not recommended to modify as it can lead to an unstable system. The values such as Frequency, Bus Speed, are automatically controlled by BIOS. For overclocking, you can set the options in BIOS/UEFI.
Devices
| Options | |
| Inject | Use Layout ID as per your Audio Codec in reference to AppleALC layout ID. Only applies when you use AppleALC which is the recommended method to enable Audio. |
| ResetHDA | YES |
| Device | Properties Key | Properties Value | Value Type | Purpose |
| PciRoot(0x0)/Pci(0x2,0x0) | AAPL,snb-platform-id | 0A006601 | DATA | Used to enable IGPU with full acceleration. |
| device-id | 3A1E0000 | DATA | Device ID for IGPU. | |
| PciRoot(0x0)/Pci(0x1b,0x0) | layout-id | XX | NUMBER | Used to enable Onboard Audio. A new approach is to use alcid=XX in boot args |
Disable Drivers
This section allows you to disable the certain drivers from /EFI/Clover/drivers/UEFI
It’s recommended to leave it untouched.
GUI
The Clover GUI has other sub sections such as Mouse, Scan, Themes, Volumes, etc..
| Options | Value | Description |
| Mouse | Enabled | The mouse option allows the use of Mouse within Clover Menu and also allows to change certain mouse properties such as click function. |
| Language | en-US:0 | You can use the language for Clover as per your requirement. en-US:0 sets as an English language. |
| Screen Resolution | Your monitor’s screen resolution. For a custom resolution, add the resolution in the field box. | |
| Theme | Use the name of the theme which you selected while installing Clover Boot loader. The theme section allows to set the Clover Theme. Such as BGM. If you’re using any other theme, you can set the theme name here. | |
| Hide Volume | Preboot | Add the volume names which you want to hide at Clover page. It’s recommended to hide «Preboot» volume. This section hides the volumes in Clover menu. For High Sierra and later, it’s recommended to hide Preboot and Prebooter Volumes. You can also hide other volumes as per your requirements.
Preboot is only recommended for High Sierra and later. |
Graphics
This section allows to control the Graphics functions with the Framebuffer, VRAM, ports and other stuffs.
When using a AMD or a NVIDIA GPU, it’s recommended to leave it untouched. However, for some old ATI/AMD and NVIDIA Cards, it might be required to set few options.
Kernel and Kext Patches
| Options | Value | Comment |
| PanicNoKextDump | YES | |
| AppleIntelCPUPM | YES | This is a temporary fix to reach the installer. Once the installation is finished, it’s recommended to use SSDT for CPU PM and disable this option. |
| DellSMBIOSPatch | NO | Only applicable if you’re using Dell Motherboard |
KextsToPatch
This section allows you to patch kexts without editing them directly.
The patches such as TRIM and NVMe drives, Boot Graphics Glitch can be achieved from here. It’s recommended to leave it blank, untouched. At post-installation, you can add the necessary patches.
To enable TRIM function, follow the guide here.
Rt Variables
This section holds ROM, SIP etc..
| ROM | UseMacAddr0 |
| BooterConfig | 0x28 |
| CsrActivConfig | 0x67 |
SMBIOS
This section is the important section and has various impact on your system.
The SMBIOS should be set according to your System Configuration depending on your CPU.
| Options | Value | Comment |
| SMBIOS | iMac | |
| Memory | NO | If your system is unable to recognise the correct amount of RAM, you’ll need to add your RAM information here. By default, it’s not recommended unless you have such issue. |
Note :
- Note hat «Serial Number», «Board Serial Number» and «SmUUID» are unique SMBIOS credentials, which should not be revealed in public. They are unique for each system and mandatory for activation of iMessage and FaceTime.
- This should be configured at the time of post installation.
System Parameters
This section has a small function but has a great importance.
Quirks
| Quirks | Value | Description |
| AvoidRunTimeDefrag | YES | |
| DevirtualiseMmio | ||
| DisableSingleUser | ||
| DisableVariableWrite | ||
| DiscardHibernateMap | ||
| EnableSafeModeSlide | YES | |
| EnableWriteUnprotector | YES | |
| ForceExitBootServices | ||
| ProtectMemoryRegions | ||
| ProvideCustomSlide | ||
| SetupVirtualMap | YES | |
| SignalAppleOS | ||
| ProtectSecureBoot | ||
| ProtectUefiServices | ||
| RebuildAppleMemoryMap | YES | |
| SyncRuntimePermissions | ||
| ProvideMaxSlide | 0 | |
| DummyPowerManagement | ||
| FuzzyMatch | YES | |
| KernelArch | ||
| KernelCache | ||
| AppleCpuPmCfgLock | YES | |
| AppleXcpmCfgLock | YES | |
| AppleXcpmExtraMsrs | ||
| AppleXcpmForceBoost | ||
| DisableIoMapper | YES | |
| ExternalDiskIcons | ||
| LapicKernelPanic | NO | Only required for HP Motherboards |
| PowerTimeoutKernelPanic | YES | |
| ThirdPartDrives | ||
| XhciPortLimit | YES | If you have no USB 3.0 ports, it’s recommended to disable this option. |
| IncreasePciBarSize | ||
| DisableRtcChecksum | ||
| DisableLinkeditJettison | YES | |
| ExtendBTFeatureFlags | ||
| LegacyCommpage |
Haswell
| Support | Compatibility |
| OS X/macOS | OS X Mountain Lion and above |
Creating a config.plist
Open Clover Configurator
There are several sections, starting with the first one
- USB
- Audio
- Discrete GPU Power Management
- iGPU Power Management
- SATA
On a Desktop, the common renames are :
Acpi
Clover Configurator Section ACPI sections are as follows:
Under DSDT, patches section, you can implement the necessary ACPI patches for optimising the ACPI system components with DSDT and SSDT.
The common patches includes:
| Renames | Purpose |
| change EHC1 to EH01, change EHC2 to EH02 | USB Rename for USB |
| change PEGP to GFX0 | GPU Rename for GPU PM |
| change HDAS to HDEF | Audio Rename for Audio Function |
Extras
| Options | Value | Description |
| DMAR | YES | |
| FixHeaders |
Boot
| Boot Args | Purpose |
| -v | Enables verbose mode which provides the logs on your screen to check the installation or booting progress. It helps to identify the errors, if any |
| nv_disable=1 | If you’re having NVIDIA GPU and cannot reach the installation screen or unable to boot into your Desktop after the installation, use this boot arg to disable the NVIDIA drivers and install the drivers at the time of postinstallation |
| agdpmod=pikera | If you’re using Navi based AMD GPU, you need to use this boot arg to fix black screen at boot. |
Extras
| Options | Description |
| Default Boot Volume | Use the name of your target disk. Only recommended after postinstallation. |
| Legacy | PBR |
| XMPDetection | YES |
| Timeout | This set delay when Clover Bootloader loads. Set it to value of 5. You can increase or decrease as per your requirement. If you don’t want any delay, select «Fast». |
| Never Hibernate | YES |
Boot Graphics
The Boot Graphics section is have very less importance and recommended to leave it untouched.
Cpu
The CPU section is usually untouched for all systems. This option can help if your CPU is not detected automatically by the macOS or has wrong information of your CPU such as different name or Unknown CPU.
All the other values should be untouched and not recommended to modify as it can lead to an unstable system. The values such as Frequency, Bus Speed, are automatically controlled by BIOS. For overclocking, you can set the options in BIOS/UEFI.
Devices
| Options | |
| Inject | Use Layout ID as per your Audio Codec in reference to AppleALC layout ID. Only applies when you use AppleALC which is the recommended method to enable Audio. |
| ResetHDA | YES |
| Device | Properties Key | Properties Value | Value Type | Purpose |
| PciRoot(0x0)/Pci(0x2,0x0) | AAPL,ig-platform-id | 0300220D | DATA | Used to enable IGPU with full acceleration. |
| device-id | 12040000 | DATA | Device ID for IGPU. Only applicable for Intel HD 4600 | |
| framebuffer-patch-enable | 01000000 | DATA | ||
| framebuffer-stolenmem | 00003001 | DATA | ||
| framebuffer-fbmem | 00009000 | DATA | ||
| PciRoot(0x0)/Pci(0x1b,0x0) | layout-id | XX | NUMBER | Used to enable Onboard Audio. A new approach is to use alcid=XX in boot args |
Disable Drivers
This section allows you to disable the certain drivers from /EFI/Clover/drivers/UEFI
It’s recommended to leave it untouched.
GUI
The Clover GUI has other sub sections such as Mouse, Scan, Themes, Volumes, etc..
| Options | Value | Description |
| Mouse | Enabled | The mouse option allows the use of Mouse within Clover Menu and also allows to change certain mouse properties such as click function. |
| Language | en-US:0 | You can use the language for Clover as per your requirement. en-US:0 sets as an English language. |
| Screen Resolution | Your monitor’s screen resolution. For a custom resolution, add the resolution in the field box. | |
| Theme | Use the name of the theme which you selected while installing Clover Boot loader. The theme section allows to set the Clover Theme. Such as BGM. If you’re using any other theme, you can set the theme name here. | |
| Hide Volume | Preboot | Add the volume names which you want to hide at Clover page. It’s recommended to hide «Preboot» volume. This section hides the volumes in Clover menu. For High Sierra and later, it’s recommended to hide Preboot and Prebooter Volumes. You can also hide other volumes as per your requirements.
Preboot is only recommended for High Sierra and later. |
Graphics
This section allows to control the Graphics functions with the Framebuffer, VRAM, ports and other stuffs.
When using a AMD or a NVIDIA GPU, it’s recommended to leave it untouched. However, for some old ATI/AMD and NVIDIA Cards, it might be required to set few options.
Kernel and Kext Patches
| Options | Value | Comment |
| PanicNoKextDump | YES | |
| AppleIntelCPUPM | YES | This is a temporary fix to reach the installer. Once the installation is finished, it’s recommended to use SSDT for CPU PM and disable this option. |
| DellSMBIOSPatch | NO | Only applicable if you’re using Dell Motherboard |
KextsToPatch
This section allows you to patch kexts without editing them directly.
The patches such as TRIM and NVMe drives, Boot Graphics Glitch can be achieved from here. It’s recommended to leave it blank, untouched. At post-installation, you can add the necessary patches.
To enable TRIM function, follow the guide here.
Rt Variables
This section holds ROM, SIP etc..
| ROM | UseMacAddr0 |
| BooterConfig | 0x28 |
| CsrActivConfig | 0x67 |
SMBIOS
This section is the important section and has various impact on your system.
The SMBIOS should be set according to your System Configuration depending on your CPU.
| Options | Value | Comment |
| SMBIOS | iMac | |
| Memory | NO | If your system is unable to recognise the correct amount of RAM, you’ll need to add your RAM information here. By default, it’s not recommended unless you have such issue. |
Note :
- Note hat «Serial Number», «Board Serial Number» and «SmUUID» are unique SMBIOS credentials, which should not be revealed in public. They are unique for each system and mandatory for activation of iMessage and FaceTime.
- This should be configured at the time of post installation.
System Parameters
This section has a small function but has a great importance.
Quirks
| Quirks | Value | Description |
| AvoidRunTimeDefrag | YES | |
| DevirtualiseMmio | ||
| DisableSingleUser | ||
| DisableVariableWrite | ||
| DiscardHibernateMap | ||
| EnableSafeModeSlide | YES | |
| EnableWriteUnprotector | YES | |
| ForceExitBootServices | ||
| ProtectMemoryRegions | ||
| ProvideCustomSlide | ||
| SetupVirtualMap | YES | |
| SignalAppleOS | ||
| ProtectSecureBoot | ||
| ProtectUefiServices | ||
| RebuildAppleMemoryMap | YES | |
| SyncRuntimePermissions | ||
| ProvideMaxSlide | 0 | |
| DummyPowerManagement | ||
| FuzzyMatch | YES | |
| KernelArch | ||
| KernelCache | ||
| AppleCpuPmCfgLock | YES | |
| AppleXcpmCfgLock | YES | |
| AppleXcpmExtraMsrs | ||
| AppleXcpmForceBoost | ||
| DisableIoMapper | YES | |
| ExternalDiskIcons | ||
| LapicKernelPanic | NO | Only required for HP Motherboards |
| PowerTimeoutKernelPanic | YES | |
| ThirdPartDrives | ||
| XhciPortLimit | YES | If you have no USB 3.0 ports, it’s recommended to disable this option. |
| IncreasePciBarSize | ||
| DisableRtcChecksum | ||
| DisableLinkeditJettison | YES | |
| ExtendBTFeatureFlags | ||
| LegacyCommpage |
Broadwell
| Support | Compatibility |
| OS X/macOS | OS X Mountain Lion and above |
Creating a config.plist
Open Clover Configurator
There are several sections, starting with the first one
- USB
- Audio
- Discrete GPU Power Management
- iGPU Power Management
- SATA
On a Desktop, the common renames are :
Acpi
Clover Configurator Section ACPI sections are as follows:
Under DSDT, patches section, you can implement the necessary ACPI patches for optimising the ACPI system components with DSDT and SSDT.
The common patches includes:
| Renames | Purpose |
| change EHC1 to EH01, change EHC2 to EH02 | USB Rename for USB |
| change PEGP to GFX0 | GPU Rename for GPU PM |
| change HDAS to HDEF | Audio Rename for Audio Function |
Extras
| Options | Value | Description |
| DMAR | YES | |
| FixHeaders |
Boot
| Boot Args | Purpose |
| -v | Enables verbose mode which provides the logs on your screen to check the installation or booting progress. It helps to identify the errors, if any |
| nv_disable=1 | If you’re having NVIDIA GPU and cannot reach the installation screen or unable to boot into your Desktop after the installation, use this boot arg to disable the NVIDIA drivers and install the drivers at the time of postinstallation |
| agdpmod=pikera | If you’re using Navi based AMD GPU, you need to use this boot arg to fix black screen at boot. |
Extras
| Options | Description |
| Default Boot Volume | Use the name of your target disk. Only recommended after postinstallation. |
| Legacy | PBR |
| XMPDetection | YES |
| Timeout | This set delay when Clover Bootloader loads. Set it to value of 5. You can increase or decrease as per your requirement. If you don’t want any delay, select «Fast». |
| Never Hibernate | YES |
Boot Graphics
The Boot Graphics section is have very less importance and recommended to leave it untouched.
Cpu
The CPU section is usually untouched for all systems. This option can help if your CPU is not detected automatically by the macOS or has wrong information of your CPU such as different name or Unknown CPU.
All the other values should be untouched and not recommended to modify as it can lead to an unstable system. The values such as Frequency, Bus Speed, are automatically controlled by BIOS. For overclocking, you can set the options in BIOS/UEFI.
Devices
| Options | |
| Inject | Use Layout ID as per your Audio Codec in reference to AppleALC layout ID. Only applies when you use AppleALC which is the recommended method to enable Audio. |
| ResetHDA | YES |
| Device | Properties Key | Properties Value | Value Type | Purpose |
| PciRoot(0x0)/Pci(0x2,0x0) | AAPL,ig-platform-id | 07002216 | DATA | Used to enable IGPU with full acceleration. |
| framebuffer-patch-enable | 01000000 | DATA | ||
| framebuffer-stolenmem | 00003001 | DATA | ||
| framebuffer-fbmem | 00009000 | DATA | ||
| PciRoot(0x0)/Pci(0x1b,0x0) | layout-id | XX | NUMBER | Used to enable Onboard Audio. A new approach is to use alcid=XX in boot args |
Disable Drivers
This section allows you to disable the certain drivers from /EFI/Clover/drivers/UEFI
It’s recommended to leave it untouched.
GUI
The Clover GUI has other sub sections such as Mouse, Scan, Themes, Volumes, etc..
| Options | Value | Description |
| Mouse | Enabled | The mouse option allows the use of Mouse within Clover Menu and also allows to change certain mouse properties such as click function. |
| Language | en-US:0 | You can use the language for Clover as per your requirement. en-US:0 sets as an English language. |
| Screen Resolution | Your monitor’s screen resolution. For a custom resolution, add the resolution in the field box. | |
| Theme | Use the name of the theme which you selected while installing Clover Boot loader. The theme section allows to set the Clover Theme. Such as BGM. If you’re using any other theme, you can set the theme name here. | |
| Hide Volume | Preboot | Add the volume names which you want to hide at Clover page. It’s recommended to hide «Preboot» volume. This section hides the volumes in Clover menu. For High Sierra and later, it’s recommended to hide Preboot and Prebooter Volumes. You can also hide other volumes as per your requirements.
Preboot is only recommended for High Sierra and later. |
Graphics
This section allows to control the Graphics functions with the Framebuffer, VRAM, ports and other stuffs.
When using a AMD or a NVIDIA GPU, it’s recommended to leave it untouched. However, for some old ATI/AMD and NVIDIA Cards, it might be required to set few options.
Kernel and Kext Patches
| Options | Value | Comment |
| PanicNoKextDump | YES | |
| AppleIntelCPUPM | YES | This is a temporary fix to reach the installer. Once the installation is finished, it’s recommended to use SSDT for CPU PM and disable this option. |
| DellSMBIOSPatch | NO | Only applicable if you’re using Dell Motherboard |
KextsToPatch
This section allows you to patch kexts without editing them directly.
The patches such as TRIM and NVMe drives, Boot Graphics Glitch can be achieved from here. It’s recommended to leave it blank, untouched. At post-installation, you can add the necessary patches.
To enable TRIM function, follow the guide here.
Rt Variables
This section holds ROM, SIP etc..
| ROM | UseMacAddr0 |
| BooterConfig | 0x28 |
| CsrActivConfig | 0x67 |
SMBIOS
This section is the important section and has various impact on your system.
The SMBIOS should be set according to your System Configuration depending on your CPU.
| Options | Value | Comment |
| SMBIOS | iMac | |
| Memory | NO | If your system is unable to recognise the correct amount of RAM, you’ll need to add your RAM information here. By default, it’s not recommended unless you have such issue. |
Note :
- Note hat «Serial Number», «Board Serial Number» and «SmUUID» are unique SMBIOS credentials, which should not be revealed in public. They are unique for each system and mandatory for activation of iMessage and FaceTime.
- This should be configured at the time of post installation.
System Parameters
This section has a small function but has a great importance.
Quirks
| Quirks | Value | Description |
| AvoidRunTimeDefrag | YES | |
| DevirtualiseMmio | ||
| DisableSingleUser | ||
| DisableVariableWrite | ||
| DiscardHibernateMap | ||
| EnableSafeModeSlide | YES | |
| EnableWriteUnprotector | YES | |
| ForceExitBootServices | ||
| ProtectMemoryRegions | ||
| ProvideCustomSlide | ||
| SetupVirtualMap | YES | |
| SignalAppleOS | ||
| ProtectSecureBoot | ||
| ProtectUefiServices | ||
| RebuildAppleMemoryMap | YES | |
| SyncRuntimePermissions | ||
| ProvideMaxSlide | 0 | |
| DummyPowerManagement | ||
| FuzzyMatch | YES | |
| KernelArch | ||
| KernelCache | ||
| AppleCpuPmCfgLock | YES | |
| AppleXcpmCfgLock | YES | |
| AppleXcpmExtraMsrs | ||
| AppleXcpmForceBoost | ||
| DisableIoMapper | YES | |
| ExternalDiskIcons | ||
| LapicKernelPanic | NO | Only required for HP Motherboards |
| PowerTimeoutKernelPanic | YES | |
| ThirdPartDrives | ||
| XhciPortLimit | YES | If you have no USB 3.0 ports, it’s recommended to disable this option. |
| IncreasePciBarSize | ||
| DisableRtcChecksum | ||
| DisableLinkeditJettison | YES | |
| ExtendBTFeatureFlags | ||
| LegacyCommpage |
Skylake
| Support | Compatibility |
| OS X/macOS | OS X El Capitan and above |
Creating a config.plist
Open Clover Configurator
There are several sections, starting with the first one
- USB
- Audio
- Discrete GPU Power Management
- iGPU Power Management
- SATA
On a Desktop, the common renames are :
Acpi
Clover Configurator Section ACPI sections are as follows:
Under DSDT, patches section, you can implement the necessary ACPI patches for optimising the ACPI system components with DSDT and SSDT.
The common patches includes:
| Renames | Find* [HEX] | Replace [HEX] | Disabled | Purpose |
| change GFX0 to IGPU | 47465830 | 49475055 | NO | IGPU Rename for IGPU PM. Only use if you’re using IGPU |
| change PEGP to GFX0 | 50454750 | 47465830 | NO | GPU Rename for GPU PM |
| change HECI to IMEI | 48454349 | 494D4549 | NO | |
| change MEI to IMEI | 4D45495F | 494D4549 | NO | |
| change HDAS to HDEF | 48444153 | 48444546 | NO | Audio Rename for Audio Function |
| Renames | Purpose |
| change EHC1 to EH01, change EHC2 to EH02 | USB Rename for USB |
| change PEGP to GFX0 | GPU Rename for GPU PM |
| change HDAS to HDEF | Audio Rename for Audio Function |
| Options | Value | Description |
| DMAR | YES | |
| FixHeaders |
Boot
| Boot Args | Purpose |
| -v | Enables verbose mode which provides the logs on your screen to check the installation or booting progress. It helps to identify the errors, if any |
| nv_disable=1 | If you’re having NVIDIA GPU and cannot reach the installation screen or unable to boot into your Desktop after the installation, use this boot arg to disable the NVIDIA drivers and install the drivers at the time of postinstallation |
| agdpmod=pikera | If you’re using Navi based AMD GPU, you need to use this boot arg to fix black screen at boot. |
| Options | Description |
| Default Boot Volume | Use the name of your target disk. Only recommended after postinstallation. |
| Legacy | PBR |
| XMPDetection | YES |
| Timeout | This set delay when Clover Bootloader loads. Set it to value of 5. You can increase or decrease as per your requirement. If you don’t want any delay, select «Fast». |
| Never Hibernate | YES |
Boot Graphics
The Boot Graphics section is have very less importance and recommended to leave it untouched.
Cpu
The CPU section is usually untouched for all systems. This option can help if your CPU is not detected automatically by the macOS or has wrong information of your CPU such as different name or Unknown CPU.
All the other values should be untouched and not recommended to modify as it can lead to an unstable system. The values such as Frequency, Bus Speed, are automatically controlled by BIOS. For overclocking, you can set the options in BIOS/UEFI.
Devices
| Options | |
| Inject | Use Layout ID as per your Audio Codec in reference to AppleALC layout ID. Only applies when you use AppleALC which is the recommended method to enable Audio. |
| ResetHDA | YES |
| Device | Properties Key | Properties Value | Value Type | Purpose |
| PciRoot(0x0)/Pci(0x2,0x0) | AAPL,ig-platform-id | 00001219 | DATA | Used to enable IGPU with full acceleration. |
| framebuffer-patch-enable | 01000000 | DATA | ||
| framebuffer-stolenmem | 00003001 | DATA | ||
| framebuffer-fbmem | 00009000 | DATA | ||
| PciRoot(0x0)/Pci(0x1b,0x0) | layout-id | XX | NUMBER | Used to enable Onboard Audio. A new approach is to use alcid=XX in boot args |
Disable Drivers
This section allows you to disable the certain drivers from /EFI/Clover/drivers/UEFI
It’s recommended to leave it untouched.
GUI
The Clover GUI has other sub sections such as Mouse, Scan, Themes, Volumes, etc..
| Options | Value | Description |
| Mouse | Enabled | The mouse option allows the use of Mouse within Clover Menu and also allows to change certain mouse properties such as click function. |
| Language | en-US:0 | You can use the language for Clover as per your requirement. en-US:0 sets as an English language. |
| Screen Resolution | Your monitor’s screen resolution. For a custom resolution, add the resolution in the field box. | |
| Theme | Use the name of the theme which you selected while installing Clover Boot loader. The theme section allows to set the Clover Theme. Such as BGM. If you’re using any other theme, you can set the theme name here. | |
| Hide Volume | Preboot | Add the volume names which you want to hide at Clover page. It’s recommended to hide «Preboot» volume. This section hides the volumes in Clover menu. For High Sierra and later, it’s recommended to hide Preboot and Prebooter Volumes. You can also hide other volumes as per your requirements.
Preboot is only recommended for High Sierra and later. |
Graphics
This section allows to control the Graphics functions with the Framebuffer, VRAM, ports and other stuffs.
When using a AMD or a NVIDIA GPU, it’s recommended to leave it untouched. However, for some old ATI/AMD and NVIDIA Cards, it might be required to set few options.
Kernel and Kext Patches
| Options | Value | Comment |
| PanicNoKextDump | YES | |
| AppleIntelCPUPM | YES | This is a temporary fix to reach the installer. Once the installation is finished, it’s recommended to use SSDT for CPU PM and disable this option. |
| DellSMBIOSPatch | NO | Only applicable if you’re using Dell Motherboard |
KextsToPatch
This section allows you to patch kexts without editing them directly.
The patches such as TRIM and NVMe drives, Boot Graphics Glitch can be achieved from here. It’s recommended to leave it blank, untouched. At post-installation, you can add the necessary patches.
To enable TRIM function, follow the guide here.
Rt Variables
This section holds ROM, SIP etc..
| ROM | UseMacAddr0 |
| BooterConfig | 0x28 |
| CsrActivConfig | 0x67 |
SMBIOS
This section is the important section and has various impact on your system.
The SMBIOS should be set according to your System Configuration depending on your CPU.
| Options | Value | Comment |
| SMBIOS | iMac | |
| Memory | NO | If your system is unable to recognise the correct amount of RAM, you’ll need to add your RAM information here. By default, it’s not recommended unless you have such issue. |
Note :
- Note hat «Serial Number», «Board Serial Number» and «SmUUID» are unique SMBIOS credentials, which should not be revealed in public. They are unique for each system and mandatory for activation of iMessage and FaceTime.
- This should be configured at the time of post installation.
System Parameters
This section has a small function but has a great importance.
Quirks
| Quirks | Value | Description |
| AvoidRunTimeDefrag | YES | |
| DevirtualiseMmio | ||
| DisableSingleUser | ||
| DisableVariableWrite | ||
| DiscardHibernateMap | ||
| EnableSafeModeSlide | YES | |
| EnableWriteUnprotector | YES | |
| ForceExitBootServices | ||
| ProtectMemoryRegions | ||
| ProvideCustomSlide | ||
| SetupVirtualMap | YES | |
| SignalAppleOS | ||
| ProtectSecureBoot | ||
| ProtectUefiServices | ||
| RebuildAppleMemoryMap | YES | |
| SyncRuntimePermissions | ||
| ProvideMaxSlide | 0 | |
| DummyPowerManagement | ||
| FuzzyMatch | YES | |
| KernelArch | ||
| KernelCache | ||
| AppleCpuPmCfgLock | YES | |
| AppleXcpmCfgLock | YES | |
| AppleXcpmExtraMsrs | ||
| AppleXcpmForceBoost | ||
| DisableIoMapper | YES | |
| ExternalDiskIcons | ||
| LapicKernelPanic | NO | Only required for HP Motherboards |
| PowerTimeoutKernelPanic | YES | |
| ThirdPartDrives | ||
| XhciPortLimit | YES | This quirk is similar to 15 port limit patch. It’s advised to map your USB ports at the time of postinstallation. |
| IncreasePciBarSize | ||
| DisableRtcChecksum | ||
| DisableLinkeditJettison | YES | |
| ExtendBTFeatureFlags | ||
| LegacyCommpage |
Kaby Lake
| Support | Compatibility |
| OS X/macOS | OS X El Capitan and above |
Creating a config.plist
Open Clover Configurator
There are several sections, starting with the first one
- USB
- Audio
- Discrete GPU Power Management
- iGPU Power Management
- SATA
On a Desktop, the common renames are :
Acpi
Clover Configurator Section ACPI sections are as follows:
Under DSDT, patches section, you can implement the necessary ACPI patches for optimising the ACPI system components with DSDT and SSDT.
The common patches includes:
| Find* [HEX] | Replace [HEX] | Disabled | Purpose | |
| change GFX0 to IGPU | 47465830 | 49475055 | NO | IGPU Rename for IGPU PM. Only use if you’re using IGPU |
| change PEGP to GFX0 | 50454750 | 47465830 | NO | GPU Rename for GPU PM |
| change HECI to IMEI | 48454349 | 494D4549 | NO | |
| change MEI to IMEI | 4D45495F | 494D4549 | NO | |
| change HDAS to HDEF | 48444153 | 48444546 | NO | Audio Rename for Audio Function |
| Options | Value | Description |
| DMAR | YES | |
| FixHeaders |
Boot
| Boot Args | Purpose |
| -v | Enables verbose mode which provides the logs on your screen to check the installation or booting progress. It helps to identify the errors, if any |
| nv_disable=1 | If you’re having NVIDIA GPU and cannot reach the installation screen or unable to boot into your Desktop after the installation, use this boot arg to disable the NVIDIA drivers and install the drivers at the time of postinstallation |
| agdpmod=pikera | If you’re using Navi based AMD GPU, you need to use this boot arg to fix black screen at boot. |
| Options | Description |
| Default Boot Volume | Use the name of your target disk. Only recommended after postinstallation. |
| Legacy | PBR |
| XMPDetection | YES |
| Timeout | This set delay when Clover Bootloader loads. Set it to value of 5. You can increase or decrease as per your requirement. If you don’t want any delay, select «Fast». |
| Never Hibernate | YES |
Boot Graphics
The Boot Graphics section is have very less importance and recommended to leave it untouched.
Cpu
The CPU section is usually untouched for all systems. This option can help if your CPU is not detected automatically by the macOS or has wrong information of your CPU such as different name or Unknown CPU.
All the other values should be untouched and not recommended to modify as it can lead to an unstable system. The values such as Frequency, Bus Speed, are automatically controlled by BIOS. For overclocking, you can set the options in BIOS/UEFI.
Devices
| Options | |
| Inject | Use Layout ID as per your Audio Codec in reference to AppleALC layout ID. Only applies when you use AppleALC which is the recommended method to enable Audio. |
| ResetHDA | YES |
| Device | Properties Key | Properties Value | Value Type | Purpose |
| PciRoot(0x0)/Pci(0x2,0x0) | AAPL,ig-platform-id | 00001259 | DATA | Used to enable IGPU with full acceleration. |
| framebuffer-patch-enable | 01000000 | DATA | ||
| framebuffer-stolenmem | 00003001 | DATA | ||
| framebuffer-fbmem | 00009000 | DATA | ||
| PciRoot(0x0)/Pci(0x1b,0x0) | layout-id | XX | NUMBER | Used to enable Onboard Audio. A new approach is to use alcid=XX in boot args |
Disable Drivers
This section allows you to disable the certain drivers from /EFI/Clover/drivers/UEFI
It’s recommended to leave it untouched.
GUI
The Clover GUI has other sub sections such as Mouse, Scan, Themes, Volumes, etc..
| Options | Value | Description |
| Mouse | Enabled | The mouse option allows the use of Mouse within Clover Menu and also allows to change certain mouse properties such as click function. |
| Language | en-US:0 | You can use the language for Clover as per your requirement. en-US:0 sets as an English language. |
| Screen Resolution | Your monitor’s screen resolution. For a custom resolution, add the resolution in the field box. | |
| Theme | Use the name of the theme which you selected while installing Clover Boot loader. The theme section allows to set the Clover Theme. Such as BGM. If you’re using any other theme, you can set the theme name here. | |
| Hide Volume | Preboot | Add the volume names which you want to hide at Clover page. It’s recommended to hide «Preboot» volume. This section hides the volumes in Clover menu. For High Sierra and later, it’s recommended to hide Preboot and Prebooter Volumes. You can also hide other volumes as per your requirements.
Preboot is only recommended for High Sierra and later. |
Graphics
This section allows to control the Graphics functions with the Framebuffer, VRAM, ports and other stuffs.
When using a AMD or a NVIDIA GPU, it’s recommended to leave it untouched. However, for some old ATI/AMD and NVIDIA Cards, it might be required to set few options.
Kernel and Kext Patches
| Options | Value | Comment |
| PanicNoKextDump | YES | |
| AppleIntelCPUPM | YES | This is a temporary fix to reach the installer. Once the installation is finished, it’s recommended to use SSDT for CPU PM and disable this option. |
| DellSMBIOSPatch | NO | Only applicable if you’re using Dell Motherboard |
KextsToPatch
This section allows you to patch kexts without editing them directly.
The patches such as TRIM and NVMe drives, Boot Graphics Glitch can be achieved from here. It’s recommended to leave it blank, untouched. At post-installation, you can add the necessary patches.
To enable TRIM function, follow the guide here.
Rt Variables
This section holds ROM, SIP etc..
| ROM | UseMacAddr0 |
| BooterConfig | 0x28 |
| CsrActivConfig | 0x67 |
SMBIOS
This section is the important section and has various impact on your system.
The SMBIOS should be set according to your System Configuration depending on your CPU.
| Options | Value | Comment |
| SMBIOS | iMac | |
| Memory | NO | If your system is unable to recognise the correct amount of RAM, you’ll need to add your RAM information here. By default, it’s not recommended unless you have such issue. |
Note :
- Note hat «Serial Number», «Board Serial Number» and «SmUUID» are unique SMBIOS credentials, which should not be revealed in public. They are unique for each system and mandatory for activation of iMessage and FaceTime.
- This should be configured at the time of post installation.
System Parameters
This section has a small function but has a great importance.
Quirks
| Quirks | Value | Description |
| AvoidRunTimeDefrag | YES | |
| DevirtualiseMmio | ||
| DisableSingleUser | ||
| DisableVariableWrite | ||
| DiscardHibernateMap | ||
| EnableSafeModeSlide | YES | |
| EnableWriteUnprotector | YES | |
| ForceExitBootServices | ||
| ProtectMemoryRegions | ||
| ProvideCustomSlide | ||
| SetupVirtualMap | YES | |
| SignalAppleOS | ||
| ProtectSecureBoot | ||
| ProtectUefiServices | ||
| RebuildAppleMemoryMap | YES | |
| SyncRuntimePermissions | ||
| ProvideMaxSlide | 0 | |
| DummyPowerManagement | ||
| FuzzyMatch | YES | |
| KernelArch | ||
| KernelCache | ||
| AppleCpuPmCfgLock | YES | |
| AppleXcpmCfgLock | YES | |
| AppleXcpmExtraMsrs | ||
| AppleXcpmForceBoost | ||
| DisableIoMapper | YES | |
| ExternalDiskIcons | ||
| LapicKernelPanic | NO | Only required for HP Motherboards |
| PowerTimeoutKernelPanic | YES | |
| ThirdPartDrives | ||
| XhciPortLimit | YES | This quirk is similar to 15 port limit patch. It’s advised to map your USB ports at the time of postinstallation. |
| IncreasePciBarSize | ||
| DisableRtcChecksum | ||
| DisableLinkeditJettison | YES | |
| ExtendBTFeatureFlags | ||
| LegacyCommpage |
Coffee Lake
| Support | Compatibility |
| OS X/macOS | OS X High Sierra and above |
Creating a config.plist
Open Clover Configurator
There are several sections, starting with the first one
- USB
- Audio
- Discrete GPU Power Management
- iGPU Power Management
- SATA
On a Desktop, the common renames are :
Acpi
Clover Configurator Section ACPI sections are as follows:
Under DSDT, patches section, you can implement the necessary ACPI patches for optimising the ACPI system components with DSDT and SSDT.
The common patches includes:
| Find* [HEX] | Replace [HEX] | Disabled | Purpose | |
| change GFX0 to IGPU | 47465830 | 49475055 | NO | IGPU Rename for IGPU PM. Only use if you’re using IGPU |
| change PEGP to GFX0 | 50454750 | 47465830 | NO | GPU Rename for GPU PM |
| change HECI to IMEI | 48454349 | 494D4549 | NO | |
| change MEI to IMEI | 4D45495F | 494D4549 | NO | |
| change HDAS to HDEF | 48444153 | 48444546 | NO | Audio Rename for Audio Function |
| Options | Value | Description |
| DMAR | YES | |
| FixHeaders |
Boot
| Boot Args | Purpose |
| -v | Enables verbose mode which provides the logs on your screen to check the installation or booting progress. It helps to identify the errors, if any |
| nv_disable=1 | If you’re having NVIDIA GPU and cannot reach the installation screen or unable to boot into your Desktop after the installation, use this boot arg to disable the NVIDIA drivers and install the drivers at the time of postinstallation |
| agdpmod=pikera | If you’re using Navi based AMD GPU, you need to use this boot arg to fix black screen at boot. |
| Options | Description |
| Default Boot Volume | Use the name of your target disk. Only recommended after postinstallation. |
| Legacy | PBR |
| XMPDetection | YES |
| Timeout | This set delay when Clover Bootloader loads. Set it to value of 5. You can increase or decrease as per your requirement. If you don’t want any delay, select «Fast». |
| Never Hibernate | YES |
Boot Graphics
The Boot Graphics section is have very less importance and recommended to leave it untouched.
Cpu
The CPU section is usually untouched for all systems. This option can help if your CPU is not detected automatically by the macOS or has wrong information of your CPU such as different name or Unknown CPU.
All the other values should be untouched and not recommended to modify as it can lead to an unstable system. The values such as Frequency, Bus Speed, are automatically controlled by BIOS. For overclocking, you can set the options in BIOS/UEFI.
Devices
| Options | |
| Inject | Use Layout ID as per your Audio Codec in reference to AppleALC layout ID. Only applies when you use AppleALC which is the recommended method to enable Audio. |
| ResetHDA | YES |
| Device | Properties Key | Properties Value | Value Type | Purpose |
| PciRoot(0x0)/Pci(0x2,0x0) | AAPL,ig-platform-id | 07009B3E or 00009B3E | DATA | Used to enable IGPU with full acceleration. |
| framebuffer-patch-enable | 01000000 | DATA | ||
| framebuffer-stolenmem | 00003001 | DATA | ||
| framebuffer-fbmem | 00009000 | DATA | ||
| PciRoot(0x0)/Pci(0x1b,0x0) | layout-id | XX | NUMBER | Used to enable Onboard Audio. A new approach is to use alcid=XX in boot args |
Disable Drivers
This section allows you to disable the certain drivers from /EFI/Clover/drivers/UEFI
It’s recommended to leave it untouched.
GUI
The Clover GUI has other sub sections such as Mouse, Scan, Themes, Volumes, etc..
| Options | Value | Description |
| Mouse | Enabled | The mouse option allows the use of Mouse within Clover Menu and also allows to change certain mouse properties such as click function. |
| Language | en-US:0 | You can use the language for Clover as per your requirement. en-US:0 sets as an English language. |
| Screen Resolution | Your monitor’s screen resolution. For a custom resolution, add the resolution in the field box. | |
| Theme | Use the name of the theme which you selected while installing Clover Boot loader. The theme section allows to set the Clover Theme. Such as BGM. If you’re using any other theme, you can set the theme name here. | |
| Hide Volume | Preboot | Add the volume names which you want to hide at Clover page. It’s recommended to hide «Preboot» volume. This section hides the volumes in Clover menu. For High Sierra and later, it’s recommended to hide Preboot and Prebooter Volumes. You can also hide other volumes as per your requirements.
Preboot is only recommended for High Sierra and later. |
Graphics
This section allows to control the Graphics functions with the Framebuffer, VRAM, ports and other stuffs.
When using a AMD or a NVIDIA GPU, it’s recommended to leave it untouched. However, for some old ATI/AMD and NVIDIA Cards, it might be required to set few options.
Kernel and Kext Patches
| Options | Value | Comment |
| PanicNoKextDump | YES | |
| AppleIntelCPUPM | YES | This is a temporary fix to reach the installer. Once the installation is finished, it’s recommended to use SSDT for CPU PM and disable this option. |
| DellSMBIOSPatch | NO | Only applicable if you’re using Dell Motherboard |
KextsToPatch
This section allows you to patch kexts without editing them directly.
The patches such as TRIM and NVMe drives, Boot Graphics Glitch can be achieved from here. It’s recommended to leave it blank, untouched. At post-installation, you can add the necessary patches.
To enable TRIM function, follow the guide here.
Rt Variables
This section holds ROM, SIP etc..
| ROM | UseMacAddr0 |
| BooterConfig | 0x28 |
| CsrActivConfig | 0x67 |
SMBIOS
This section is the important section and has various impact on your system.
The SMBIOS should be set according to your System Configuration depending on your CPU.
| Options | Value | Comment |
| SMBIOS | iMac | |
| Memory | NO | If your system is unable to recognise the correct amount of RAM, you’ll need to add your RAM information here. By default, it’s not recommended unless you have such issue. |
Note :
- Note hat «Serial Number», «Board Serial Number» and «SmUUID» are unique SMBIOS credentials, which should not be revealed in public. They are unique for each system and mandatory for activation of iMessage and FaceTime.
- This should be configured at the time of post installation.
System Parameters
This section has a small function but has a great importance.
Quirks
| Quirks | Value | Description |
| AvoidRunTimeDefrag | YES | |
| DevirtualiseMmio | YES | |
| DisableSingleUser | ||
| DisableVariableWrite | ||
| DiscardHibernateMap | ||
| EnableSafeModeSlide | YES | |
| EnableWriteUnprotector | NO | |
| ForceExitBootServices | ||
| ProtectMemoryRegions | ||
| ProvideCustomSlide | ||
| SetupVirtualMap | YES | |
| SignalAppleOS | ||
| ProtectSecureBoot | ||
| ProtectUefiServices | ||
| RebuildAppleMemoryMap | YES | |
| SyncRuntimePermissions | YES | |
| ProvideMaxSlide | 0 | |
| DummyPowerManagement | ||
| FuzzyMatch | YES | |
| KernelArch | ||
| KernelCache | ||
| AppleCpuPmCfgLock | YES | |
| AppleXcpmCfgLock | YES | |
| AppleXcpmExtraMsrs | ||
| AppleXcpmForceBoost | ||
| DisableIoMapper | YES | |
| ExternalDiskIcons | ||
| LapicKernelPanic | NO | Only required for HP Motherboards |
| PowerTimeoutKernelPanic | YES | |
| ThirdPartDrives | ||
| XhciPortLimit | YES | This quirk is similar to 15 port limit patch. It’s advised to map your USB ports at the time of postinstallation. |
| IncreasePciBarSize | ||
| DisableRtcChecksum | ||
| DisableLinkeditJettison | YES | |
| ExtendBTFeatureFlags | ||
| LegacyCommpage |
Comet Lake
| Support | Compatibility |
| macOS | macOS Catalina and above |
Creating a config.plist
Open Clover Configurator
There are several sections, starting with the first one
- USB
- Audio
- Discrete GPU Power Management
- iGPU Power Management
- SATA
On a Desktop, the common renames are :
Acpi
Clover Configurator Section ACPI sections are as follows:
Under DSDT, patches section, you can implement the necessary ACPI patches for optimising the ACPI system components with DSDT and SSDT.
The common patches includes:
| Find* [HEX] | Replace [HEX] | Disabled | Purpose | |
| change GFX0 to IGPU | 47465830 | 49475055 | NO | IGPU Rename for IGPU PM. Only use if you’re using IGPU |
| change PEGP to GFX0 | 50454750 | 47465830 | NO | GPU Rename for GPU PM |
| change HECI to IMEI | 48454349 | 494D4549 | NO | |
| change MEI to IMEI | 4D45495F | 494D4549 | NO | |
| change HDAS to HDEF | 48444153 | 48444546 | NO | Audio Rename for Audio Function |
| Options | Value | Description |
| DMAR | YES | |
| FixHeaders |
Boot
| Boot Args | Purpose |
| -v | Enables verbose mode which provides the logs on your screen to check the installation or booting progress. It helps to identify the errors, if any |
| nv_disable=1 | If you’re having NVIDIA GPU and cannot reach the installation screen or unable to boot into your Desktop after the installation, use this boot arg to disable the NVIDIA drivers and install the drivers at the time of postinstallation |
| agdpmod=pikera | If you’re using Navi based AMD GPU, you need to use this boot arg to fix black screen at boot. |
| Options | Description |
| Default Boot Volume | Use the name of your target disk. Only recommended after postinstallation. |
| Legacy | PBR |
| XMPDetection | YES |
| Timeout | This set delay when Clover Bootloader loads. Set it to value of 5. You can increase or decrease as per your requirement. If you don’t want any delay, select «Fast». |
| Never Hibernate | YES |
Boot Graphics
The Boot Graphics section is have very less importance and recommended to leave it untouched.
Cpu
The CPU section is usually untouched for all systems. This option can help if your CPU is not detected automatically by the macOS or has wrong information of your CPU such as different name or Unknown CPU.
All the other values should be untouched and not recommended to modify as it can lead to an unstable system. The values such as Frequency, Bus Speed, are automatically controlled by BIOS. For overclocking, you can set the options in BIOS/UEFI.
Devices
| Options | |
| Inject | Use Layout ID as per your Audio Codec in reference to AppleALC layout ID. Only applies when you use AppleALC which is the recommended method to enable Audio. |
| ResetHDA | YES |
| Device | Properties Key | Properties Value | Value Type | Purpose |
| PciRoot(0x0)/Pci(0x2,0x0) | AAPL,ig-platform-id | 07009B3E or 00009B3E | DATA | Used to enable IGPU with full acceleration. |
| framebuffer-patch-enable | 01000000 | DATA | ||
| framebuffer-stolenmem | 00003001 | DATA | ||
| framebuffer-fbmem | 00009000 | DATA | ||
| PciRoot(0x0)/Pci(0x1C,0x1)/Pci(0x0,0x0) or PciRoot(0x0)/Pci(0x1C,0x4)/Pci(0x0,0x0) | device-id | F2150000 | DATA | Used for Intel i225V Ethernet. Only applicable if you have Intel i225V Onboard Ethernet Controller |
| PciRoot(0x0)/Pci(0x1b,0x0) | layout-id | XX | NUMBER | Used to enable Onboard Audio. A new approach is to use alcid=XX in boot args |
Disable Drivers
This section allows you to disable the certain drivers from /EFI/Clover/drivers/UEFI
It’s recommended to leave it untouched.
GUI
The Clover GUI has other sub sections such as Mouse, Scan, Themes, Volumes, etc..
| Options | Value | Description |
| Mouse | Enabled | The mouse option allows the use of Mouse within Clover Menu and also allows to change certain mouse properties such as click function. |
| Language | en-US:0 | You can use the language for Clover as per your requirement. en-US:0 sets as an English language. |
| Screen Resolution | Your monitor’s screen resolution. For a custom resolution, add the resolution in the field box. | |
| Theme | Use the name of the theme which you selected while installing Clover Boot loader. The theme section allows to set the Clover Theme. Such as BGM. If you’re using any other theme, you can set the theme name here. | |
| Hide Volume | Preboot | Add the volume names which you want to hide at Clover page. It’s recommended to hide «Preboot» volume. This section hides the volumes in Clover menu. For High Sierra and later, it’s recommended to hide Preboot and Prebooter Volumes. You can also hide other volumes as per your requirements.
Preboot is only recommended for High Sierra and later. |
Graphics
This section allows to control the Graphics functions with the Framebuffer, VRAM, ports and other stuffs.
When using a AMD or a NVIDIA GPU, it’s recommended to leave it untouched. However, for some old ATI/AMD and NVIDIA Cards, it might be required to set few options.
Kernel and Kext Patches
| Options | Value | Comment |
| PanicNoKextDump | YES | |
| AppleIntelCPUPM | YES | This is a temporary fix to reach the installer. Once the installation is finished, it’s recommended to use SSDT for CPU PM and disable this option. |
| DellSMBIOSPatch | NO | Only applicable if you’re using Dell Motherboard |
KextsToPatch
This section allows you to patch kexts without editing them directly.
The patches such as TRIM and NVMe drives, Boot Graphics Glitch can be achieved from here. It’s recommended to leave it blank, untouched. At post-installation, you can add the necessary patches.
To enable TRIM function, follow the guide here.
Rt Variables
This section holds ROM, SIP etc..
| ROM | UseMacAddr0 |
| BooterConfig | 0x28 |
| CsrActivConfig | 0x67 |
SMBIOS
This section is the important section and has various impact on your system.
The SMBIOS should be set according to your System Configuration depending on your CPU.
| Options | Value | Comment |
| SMBIOS | iMac | |
| Memory | NO | If your system is unable to recognise the correct amount of RAM, you’ll need to add your RAM information here. By default, it’s not recommended unless you have such issue. |
Note :
- Note hat «Serial Number», «Board Serial Number» and «SmUUID» are unique SMBIOS credentials, which should not be revealed in public. They are unique for each system and mandatory for activation of iMessage and FaceTime.
- This should be configured at the time of post installation.
System Parameters
This section has a small function but has a great importance.
Quirks
| Quirks | Value | Description |
| AvoidRunTimeDefrag | YES | |
| DevirtualiseMmio | YES | |
| DisableSingleUser | ||
| DisableVariableWrite | ||
| DiscardHibernateMap | ||
| EnableSafeModeSlide | YES | |
| EnableWriteUnprotector | NO | |
| ForceExitBootServices | ||
| ProtectMemoryRegions | ||
| ProvideCustomSlide | ||
| SetupVirtualMap | NO | |
| SignalAppleOS | ||
| ProtectSecureBoot | ||
| ProtectUefiServices | ||
| RebuildAppleMemoryMap | YES | |
| SyncRuntimePermissions | YES | |
| ProvideMaxSlide | 0 | |
| DummyPowerManagement | ||
| FuzzyMatch | YES | |
| KernelArch | ||
| KernelCache | ||
| AppleCpuPmCfgLock | YES | |
| AppleXcpmCfgLock | YES | |
| AppleXcpmExtraMsrs | ||
| AppleXcpmForceBoost | ||
| DisableIoMapper | YES | |
| ExternalDiskIcons | ||
| LapicKernelPanic | NO | Only required for HP Motherboards |
| PowerTimeoutKernelPanic | YES | |
| ThirdPartDrives | ||
| XhciPortLimit | YES | This quirk is similar to 15 port limit patch. It’s advised to map your USB ports at the time of postinstallation. |
| IncreasePciBarSize | ||
| DisableRtcChecksum | ||
| DisableLinkeditJettison | YES | |
| ExtendBTFeatureFlags | ||
| LegacyCommpage |
Last edited: Oct 28, 2020
Similar threads
-
This site uses cookies to help personalise content, tailor your experience and to keep you logged in if you register.
By continuing to use this site, you are consenting to our use of cookies.
The config.plist resides at /Volumes/EFI/EFI/CLOVER/config.plist and is one of the tougher files to work with for those new to the Hackintosh world. We’ll go into some of the basics of the structure here, then break out into different sections for different hardware config setup.
The config.plist is an XML property list. XML is a markup language that shares a lot of similarities with HTML. This means you’ve got a few different data types available to you, and most of the structure revolves around keeping track of opening and closing tags.
When Clover explores a config.plist it expects to have certain parts in certain spots. The order and scope of your config are very important as putting information in the wrong spot can effectively hide it from Clover. You can view the general layout that Clover expects on the
Clover Wiki
.
There are a few major data types we’ll run into when working with the config. I’ll outline the most common here. Note — I’m only using the opening tags here, when actually working with the following types we’ll need to make sure we clean up after ourselves and close our tags.
<string>This is a string</string>
Strings are just text. Not terribly crazy — you will see them used a lot for comments and other such things.
These are just whole numbers. Again, nothing too wild here.
<data>RXh0ZXJuYWw=</data>
While this looks similar to the strings above, it’s actually the base64 representation of some data. Wtf does that mean? You can read up on it
here
, but in summation — it’s a slick way to save binary data in a text format without it getting lost when copied, moved, etc. What’s even more crazy is that you can take the above base64 data and convert it to ASCII via the following in Terminal.app:
echo RXh0ZXJuYWw= | python -m base64 -d && echo
This will output External on the next line. We use the && echo to output a newline after our text is spit out — this makes it easier to read.
You can also convert from ASCII to base64 (handy for working with ACPI renames — more about that later) with the following in Terminal.app:
echo -n External | base64
This will spit out RXh0ZXJuYWw= which is exactly what we’d expect.
Note — Many plist editors (Clover Configurator, Xcode, etc) will display data as hexadecimal instead of base64, so make sure you pay attention to which you’re using.
These are boolean values. You can think of them as on/off values. Unlike the other types listed here, these are both an opening and closing tag at once so they don’t require a matching tag.
This is an unordered list of items. If we wanted to gather up a collection of names, we could store them as <string> values in our <array> like the above example. They are accessed by index (which is just the number they’re at in the list).
This denotes a dictionary. These, like arrays are great for storing extra collections of data, but instead of being index based, they utilize key/value organization. As you can see from the above example, we are able to store specific data about Bob through the use of these key/value pairs. All the keys are just text (like our strings).
Let’s go over some before/after examples with some pretend config.plist data to hopefully remove some of the mystery that happens in this wizard’s closet.
In this first example, we’re just going to change a boolean value from true to false, or vise versa. I’ll use the Disabled value inside a KextsToPatch entry to make this actually a real-world example. First, I’ll give us the KextsToPatch entry we’ll be working with:
<string>External icons patch</string>
<key>InfoPlistPatch</key>
<string>AppleAHCIPort</string>
Whew, that might look like a lot up front, but we’ll break things down. Firstly, I’ll go over what the different keys mean:
-
Comment— this is just a comment to describe what the patch is doing. -
Disabled— this is a bit counter-intuitive, but it’s a boolean value that determines whether or not this patch is disabled. If set to<true/>, the patch will be disabled, and Clover will ignore it. If set to<false/>the patch is not disabled, and it will be applied. -
InfoPlistPatch— this is a boolean value that tells Clover if we’re patching the Info.plist of the kext instead of the binary. -
Name— this is the actual kext we intend to patch. -
Find— this is the base64 data we want to look for in the binary to patch. -
Replace— this is what we will be replacing theFinddata with (if we find it).
Alright, now I’ll explain what this patch is actually for. Via the information in this patch, Clover will look for the AppleAHCIPort kext and search for RXh0ZXJuYWw= (which becomes External when we decode the data) and replace it with SW50ZXJuYWw= (which becomes Internal when we decode it). The end result is that drives that are hot-pluggable (and normally considered external drives) will be displayed as internal drives and not have the orange icon on the desktop. This patching happens on the fly, and is non-destructive — meaning that the AppleAHCIPort kext remains untouched on the system.
So — I guess at this point, I should explain how we would change a boolean value to disable this patch. I mentioned before how the Disabled key works — wo we’ll change the <false/> on the next line to <true/> which sets this patch to disabled like so:
<string>External icons patch</string>
<key>InfoPlistPatch</key>
<string>AppleAHCIPort</string>
Adding a New Dict to an Array
Adding a New Dict to an Array
This is one that I see quite often that can be a bit overwhelming for new folks. If you are told to add a new patch to config.plist -> ACPI -> DSDT -> Patches, we’d first pop open our config.plist and see what we’re working with.
We’ll assume for this example that the config looks like so:
<?xml version=»1.0″ encoding=»UTF-8″?>
<!DOCTYPE plist PUBLIC «-//Apple//DTD PLIST 1.0//EN» «http://www.apple.com/DTDs/PropertyList-1.0.dtd»>
<string>change OSID to XSID (to avoid match against _OSI XOSI patch)</string>
<string>change _OSI to XOSI</string>
As we look down the config, starting at the top, we can follow that path I outlined before. We see ACPI, and under that DSDT. Then underneath DSDT is Fixes and in-line with that is Patches. We’re not concerned with the Fixes section currently, so we’ll just ignore that and focus on the Patches.
Firstly, I’ll point out that under the <key>Patches</key> is an opening array tag (<array>) — and then we have 2 dictionaries — each with similar keys to what we worked with in the prior example (Comment, Disabled, Find, Replace). After the dictionaries, we see the closing array tag (</array>). Our goal is to add a new dictionary in between the <array> and </array> tags while also avoiding slicing up the other existing dictionaries. The data that we’ll be adding looks like so:
<string>change SAT0 to SATA</string>
Like I mentioned prior, arrays are unordered — that means it doesn’t matter whether we put our new dictionary before the existing 2, after them, or in between them. I’m going to add it to the end though — just above that last </array> tag like so:
<?xml version=»1.0″ encoding=»UTF-8″?>
<!DOCTYPE plist PUBLIC «-//Apple//DTD PLIST 1.0//EN» «http://www.apple.com/DTDs/PropertyList-1.0.dtd»>
<string>change OSID to XSID (to avoid match against _OSI XOSI patch)</string>
<string>change _OSI to XOSI</string>
<string>change SAT0 to SATA</string>
I’ll try to keep my ears open for more plist editing examples that people have issues with, and add them as needed.