В обязанности системного администратора помимо всего прочего входит и добавление нового пользователя, а также назначение ему определенных прав. Рассмотрим как это сделать в операционных системах семейства Microsoft Windows Server. Данный способ универсален для большинства существующих версий данной ОС. Возможны некоторые фразеологические отличия.
В меню Пуск, выбираем Администрирование (“Средства администрирования” в Windows Server 2016).

В новом окне двойным кликом мыши открываем “Управление компьютером”.

В левой части открывшегося окна раскрываем ветку “Локальные пользователи и группы” и открываем папку Пользователи. В основной части окна, кликаем правой кнопкой мыши по свободному месту и в контекстном меню выбираем “Новый пользователь”.

В новом окне вводим логин пользователя, пароль и подтверждение пароля. Для полноты понимания какому пользователю принадлежит учетная запись, а также чтобы у коллег не возникало вопросов рекомендуется заполнять поля “Полное имя” и “Описание”.
Для повышения безопасности рекомендуется установить галку “Требовать смены пароля при следующем входе в систему” только в том случае, если вы используете один и тот же пароль для всех создаваемых учетных записей.
Отключение учетной записи допустимо, например, если пользователь только заступает в должность.
Кликаем по кнопке Создать.

Учетная запись создана. Перейдем к ее настройке. Для этого все в том же окне “Управление компьютером” кликаем по учетной записи правой кнопкой мыши. В контекстном меню выбираем Свойства.

Настройки учетной записи пользователя, для удобства, представлены на нескольких вкладках.

Общие — управляет базовыми параметрами учетной записи.
Членство в группах — позволяет задать пользователю членство в группах.
Профиль — на этой вкладке определяется расположение пользовательского домашнего каталога, путь к профилю пользователя, а также сценарий для входа.
Среда — дает возможность назначить запуск определенной программы при входе в систему, а также разрешает подключение жестких дисков, принтеров и выбор принтера по умолчанию при входе.
Сеансы — позволяет накладывать ограничения на общую длительность сеанса, на время бездействия и многое другое.
Профиль служб удаленных рабочих столов — задает профиль пользователя, который будет загружен при входе на сервер средствами удаленного рабочего стола.
Входящие звонки — определяет параметры сетевых соединений, а также их права.
Рассмотрим делегирование прав пользователю на доступ к удаленному рабочему столу.
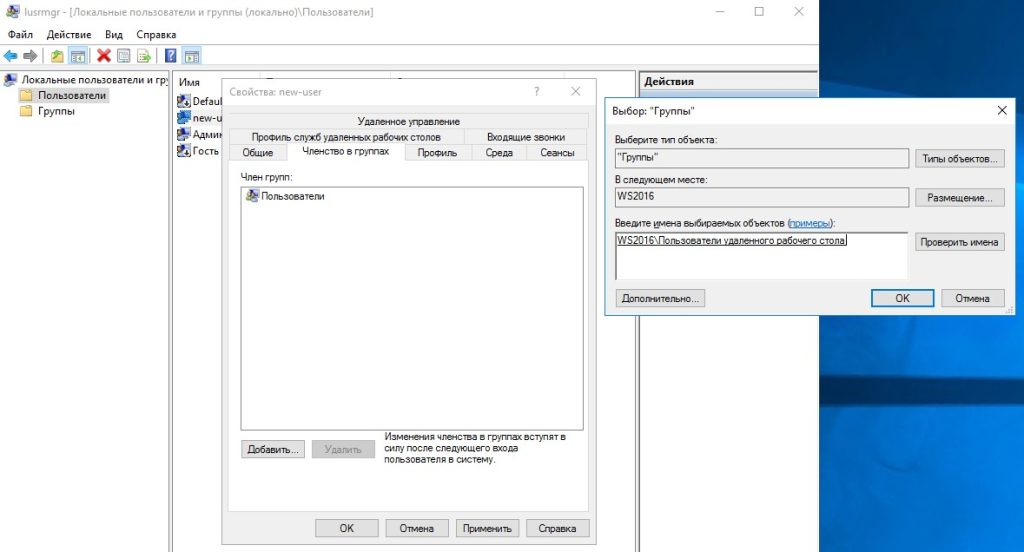
Выбираем вкладку Членство в группах и кликаем по кнопке Добавить.

В открывшемся окне кликаем по кнопке Дополнительно. Затем в новом окне кликаем по кнопке Поиск. Внизу окна отобразятся все доступные группы. Выбираем Пользователи удаленного рабочего стола двойным кликом или одиночным с последующим нажатием на кнопку ОК.

Окно Выбор: “Группы” изменит внешний вид. Нажимаем кнопку ОК.

Теперь под учетными данными этого пользователя можно подключиться к серверу.

Аverage rating : 4.3
Оценок: 3
191028
Санкт-Петербург
Литейный пр., д. 26, Лит. А
+7 (812) 403-06-99
![]()
700
300
ООО «ИТГЛОБАЛКОМ ЛАБС»
191028
Санкт-Петербург
Литейный пр., д. 26, Лит. А
+7 (812) 403-06-99
![]()
700
300
ООО «ИТГЛОБАЛКОМ ЛАБС»
![]()
700
300
После установки Windows Server на VDS вам доступна только одна учётная запись — Administrator. Однако во многих случаях сервер нужен для работы нескольких человек — причём одновременной. В таких случаях в систему необходимо добавлять дополнительных пользователей — при условии, что у вас уже настроен терминальный сервер и подключено требуемое количество RDP-лицензий.
- Добавление учётной записи в Windows Server 2016
- Добавление учётной записи в Windows Server 2019
- Зачем нужны RDP-лицензии и где их взять
Для начала подключитесь к вашему серверу по RDP под пользователем Administrator. Если сервер только приобретён, для удобства работы можно сразу включить русский язык в настройках:
- Как добавить русский язык в Windows Server 2016
- Как добавить русский язык в Windows Server 2019
Добавление учётной записи в Windows Server 2016
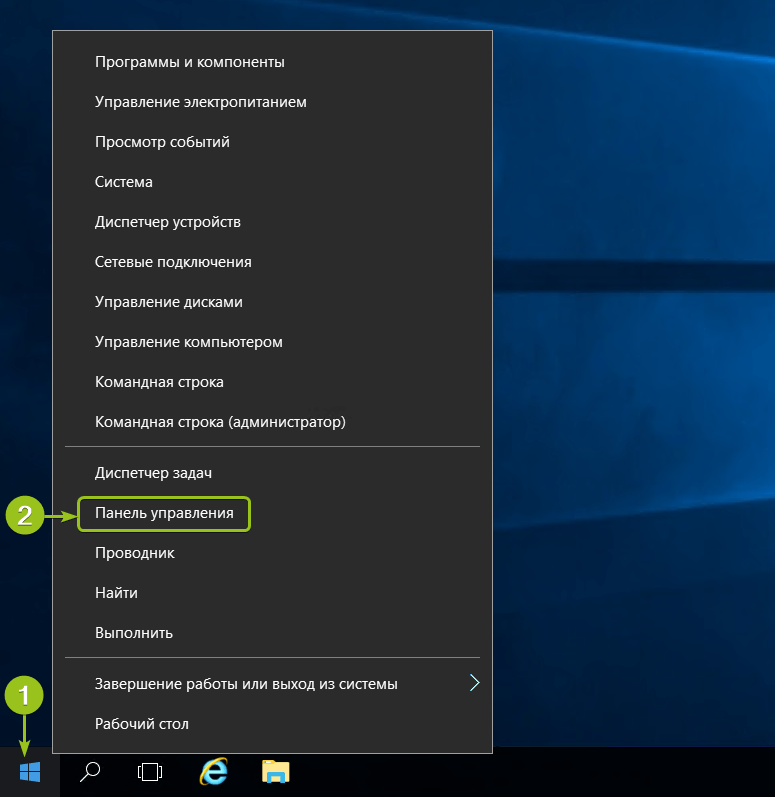
В Windows Server 2016 в панель управления можно перейти из контекстного меню при клике правой кнопкой мыши по меню «Пуск»:
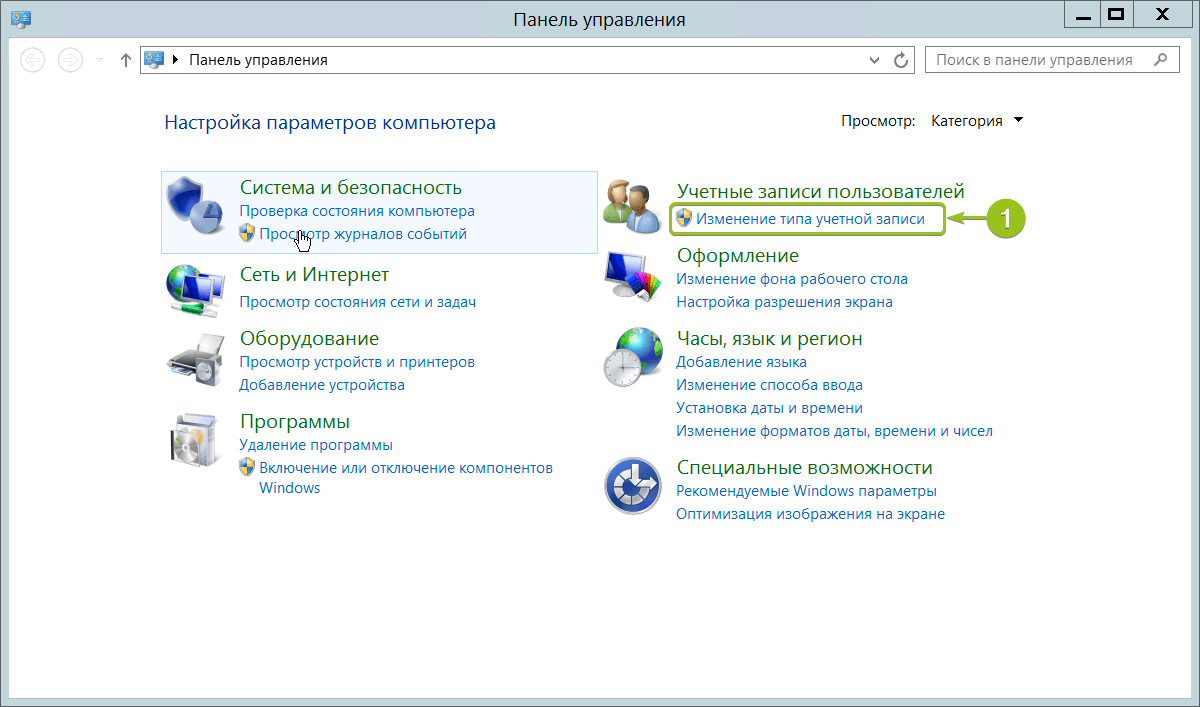
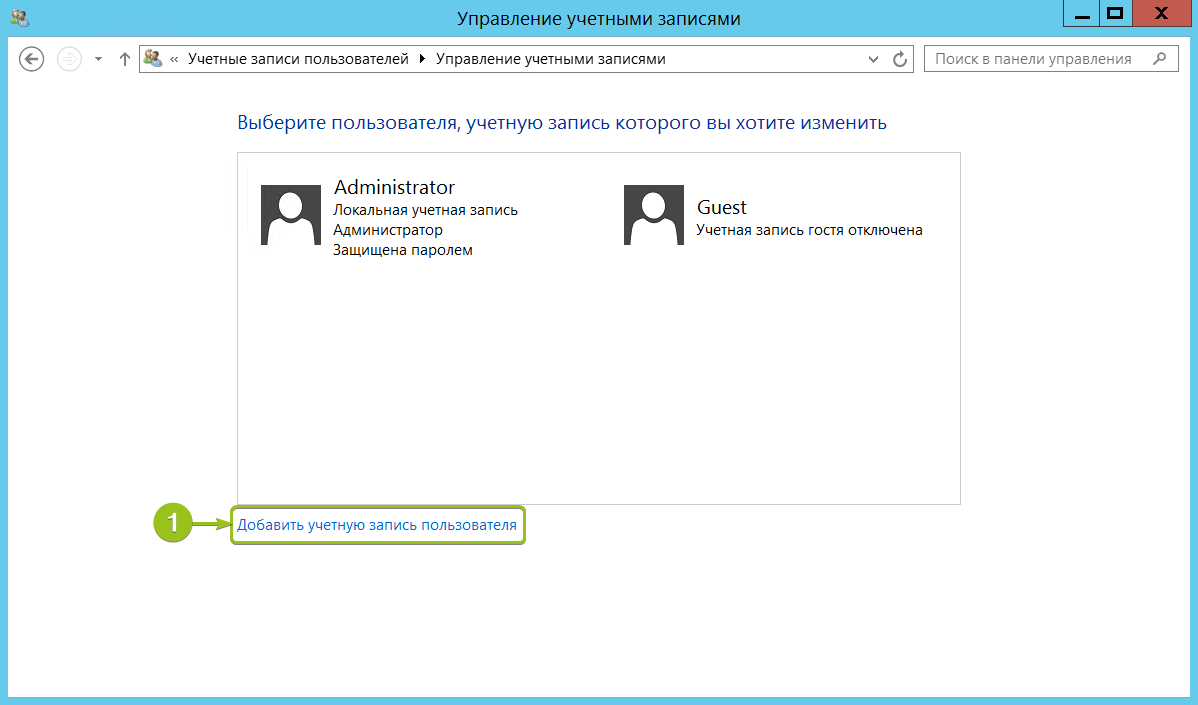
В панели управления в разделе «Учётные записи пользователей» нажмите «Изменение типа учётной записи». Откроется список пользователей вашего сервера. Здесь выберите опцию «Добавить учётную запись пользователя»:
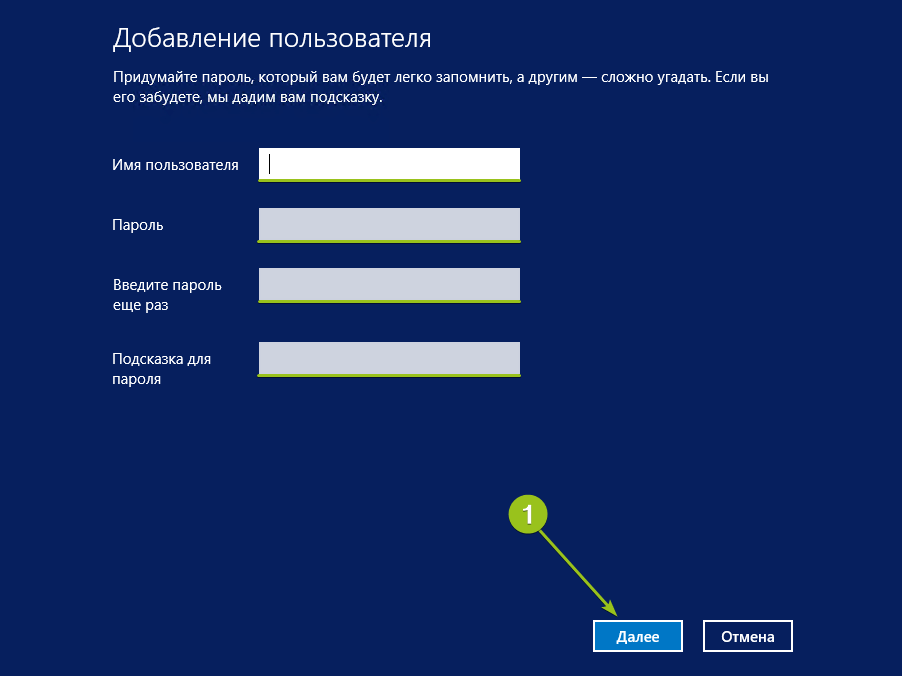
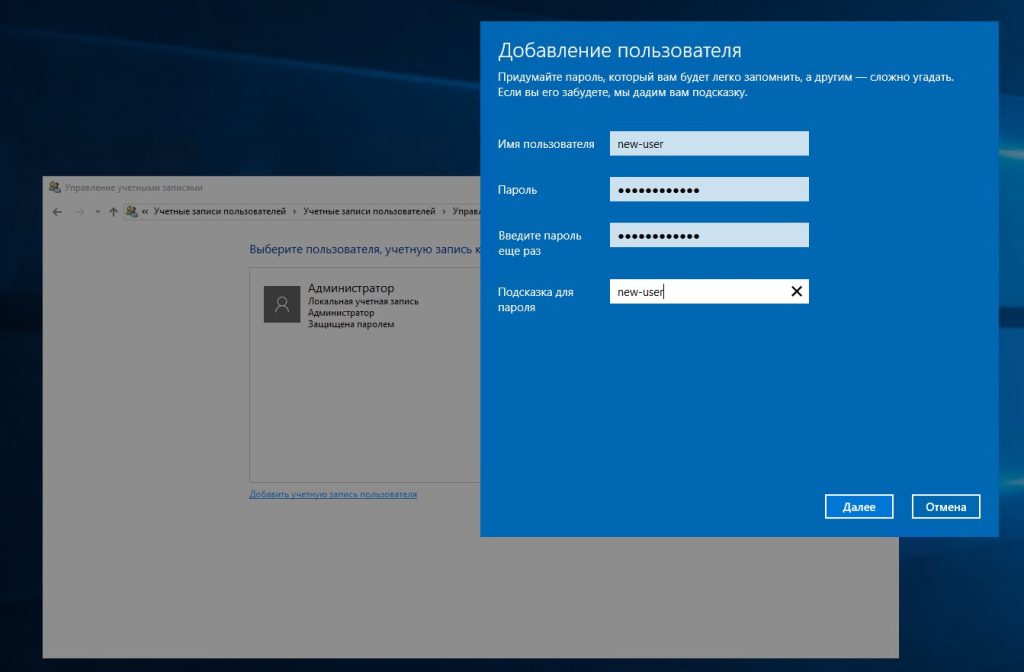
Запустится мастер создания пользователей. Введите логин, пароль, подтверждение пароля, подсказку и нажмите «Далее».
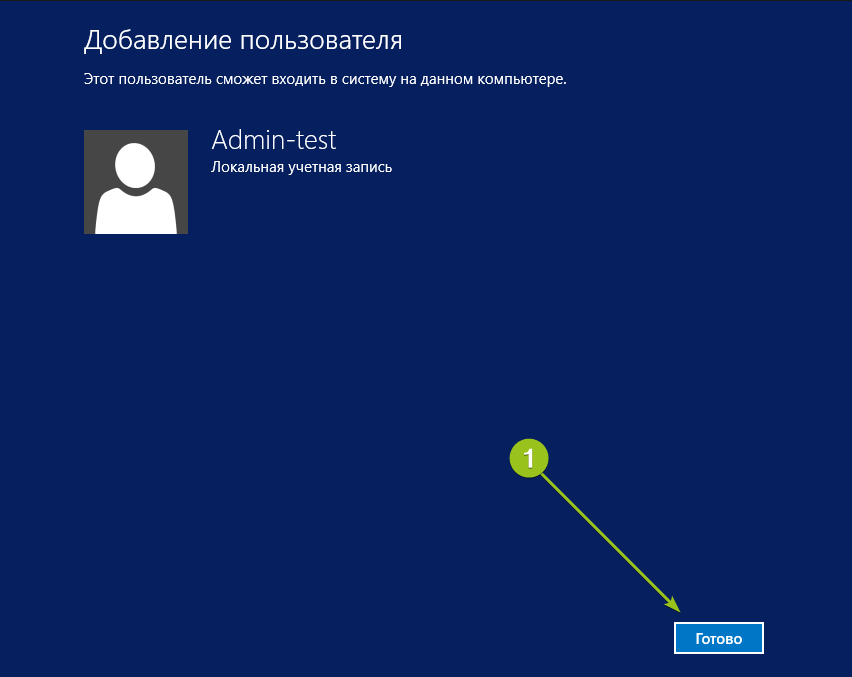
Система добавит новую учётную запись и отобразит её данные — имя и уровень прав. Для завершения настройки нажмите «Готово»:
После этого в списке пользователей появится новая учётная запись.

При необходимости вы можете изменить тип созданного пользователя — дать ему права администратора. Для этого кликните на карточку учётной записи — откроется окно настройки:
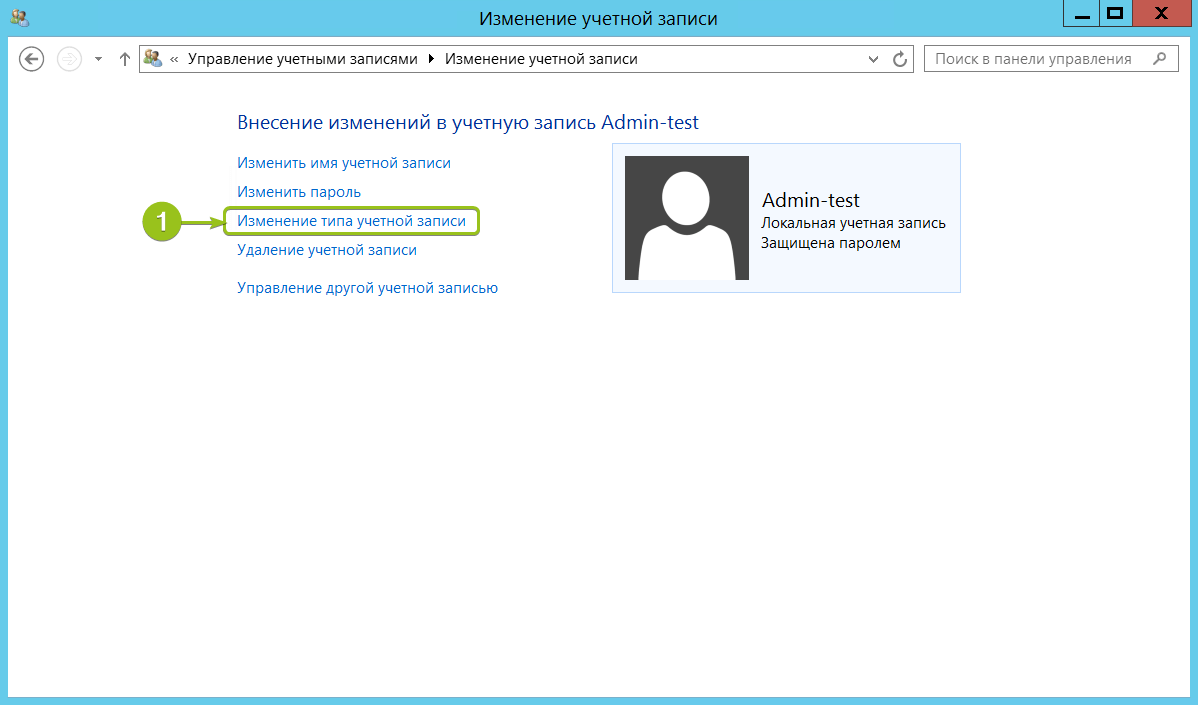
В меню слева выберите «Изменение типа учётной записи» — система предложит настроить уровень доступа:
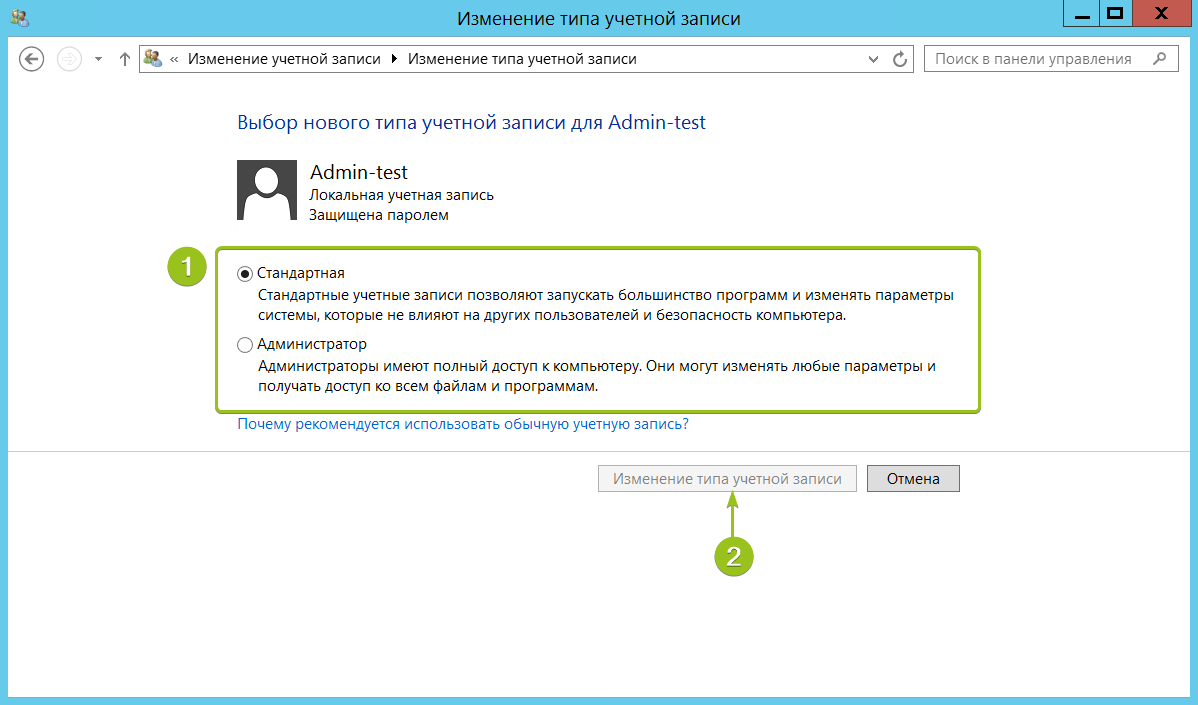
Укажите требуемый уровень прав и нажмите «Изменение типа учётной записи» для вступления настроек в силу.
На этом процесс создания пользователя на Windows Server 2016 завершён. Чтобы новый пользователь мог подключиться к серверу по RDP, ему потребуются следующие данные:
- IP-адрес вашего сервера / домен;
- логин пользователя;
- пароль пользователя.
Добавление учётной записи в Windows Server 2019
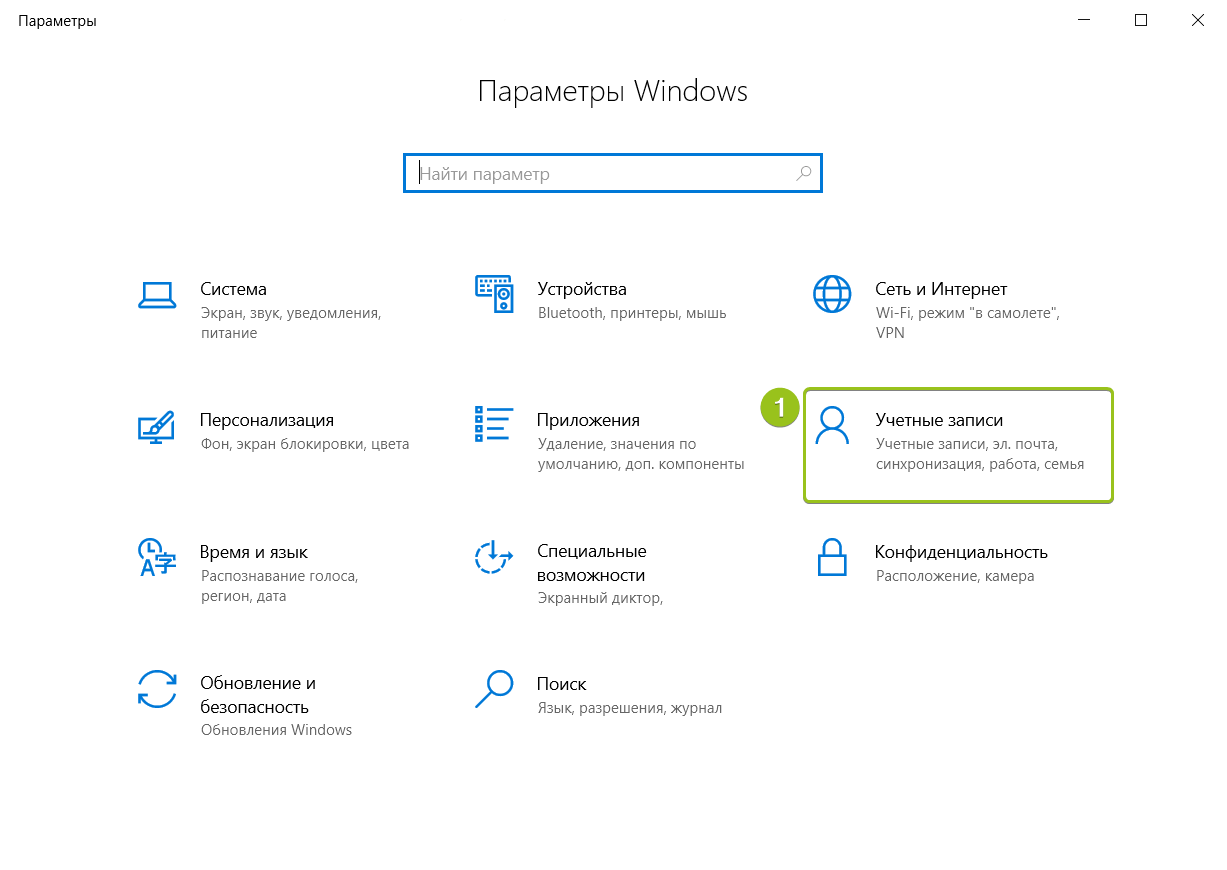
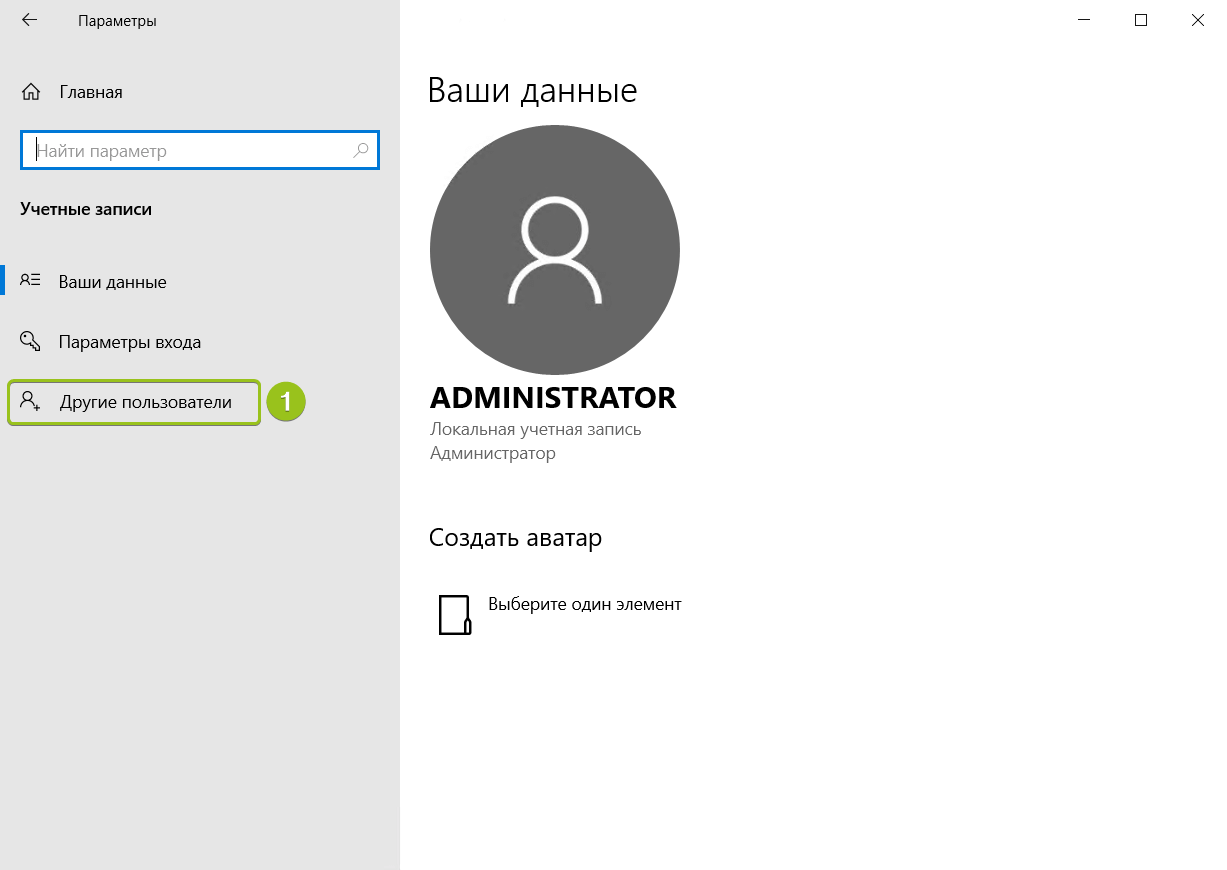
Алгоритм создания пользователей на Windows Server 2019 немного отличается. После подключения к серверу откройте меню «Пуск» и перейдите в раздел «Параметры».

В панели управления выберите раздел «Учётные записи».
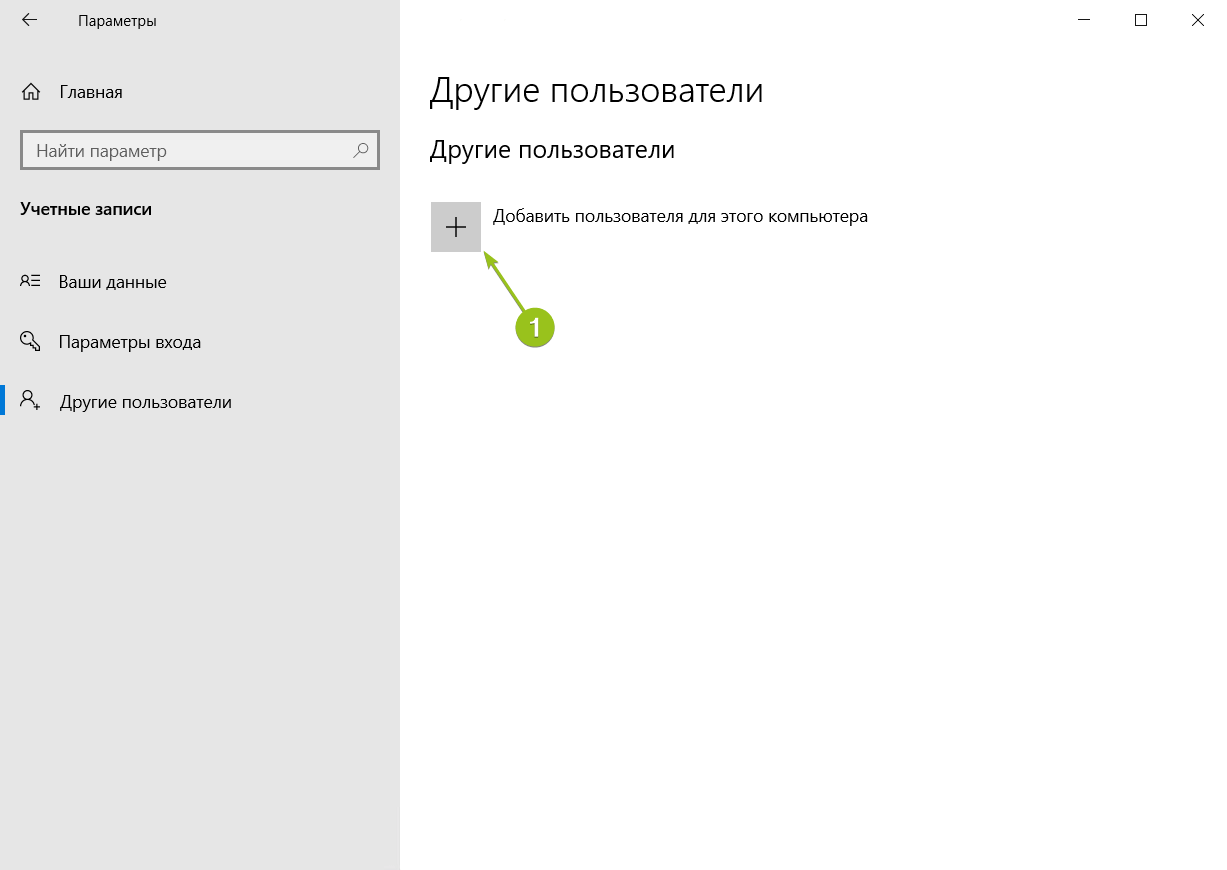
Система перенаправит вас на страницу с данными текущего пользователя. В меню слева перейдите в раздел «Другие пользователи» и нажмите «Добавить пользователя для этого компьютера»
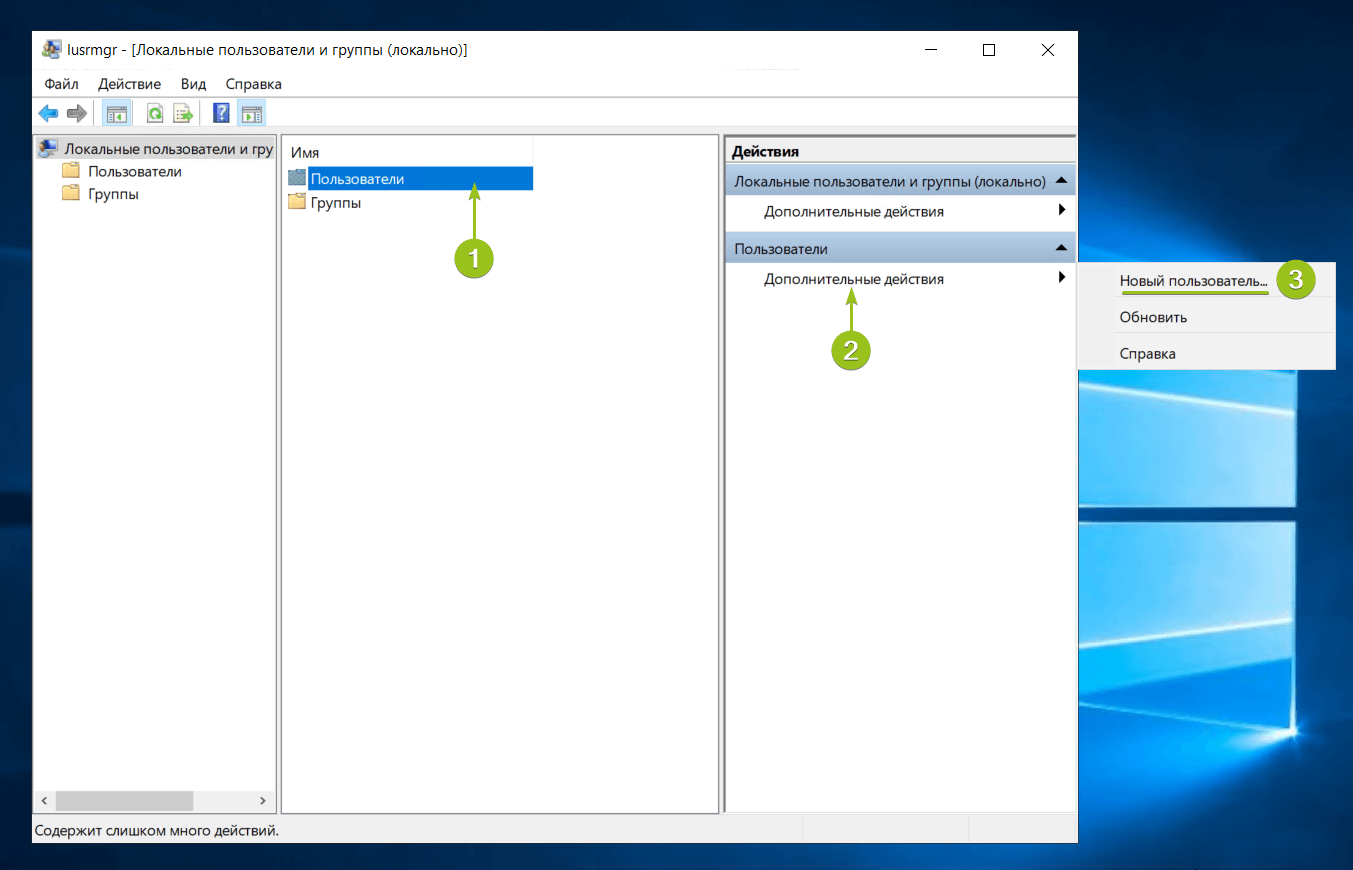
Запустится оснастка настройки локальных пользователей и групп. Выберите раздел «Пользователи» и в блоке «Действия» в соответствующем подразделе справа перейдите в меню «Дополнительные действия» — «Новый пользователь...»:
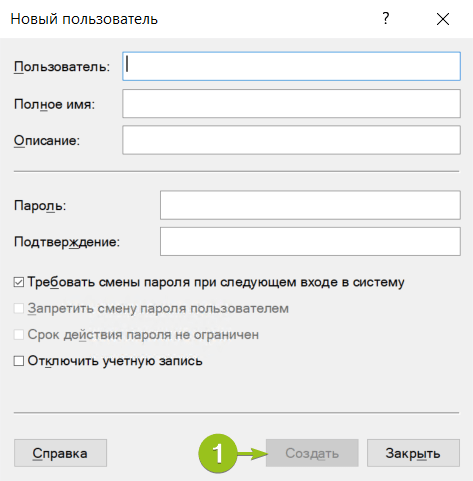
Система предложит ввести данные нового пользователя: логин, имя для отображения в системе, описание и пароль с подтверждением. После заполнения данных нажмите «Создать». Поля в форме сбросятся к пустому состоянию — при отсутствии ошибок это означает, что новый пользователь успешно добавлен.
После добавления нужного количества пользователей нажмите «Закрыть» — вы вернётесь к списку пользователей, где появятся созданные учётные записи.

По умолчанию новые учётные записи создаются со стандартным уровнем прав. Если вы хотите предоставить новому пользователю права администратора, вернитесь в Параметры — Учётные записи — Другие пользователи. Выберите созданного пользователя и нажмите «Изменить тип учётной записи».
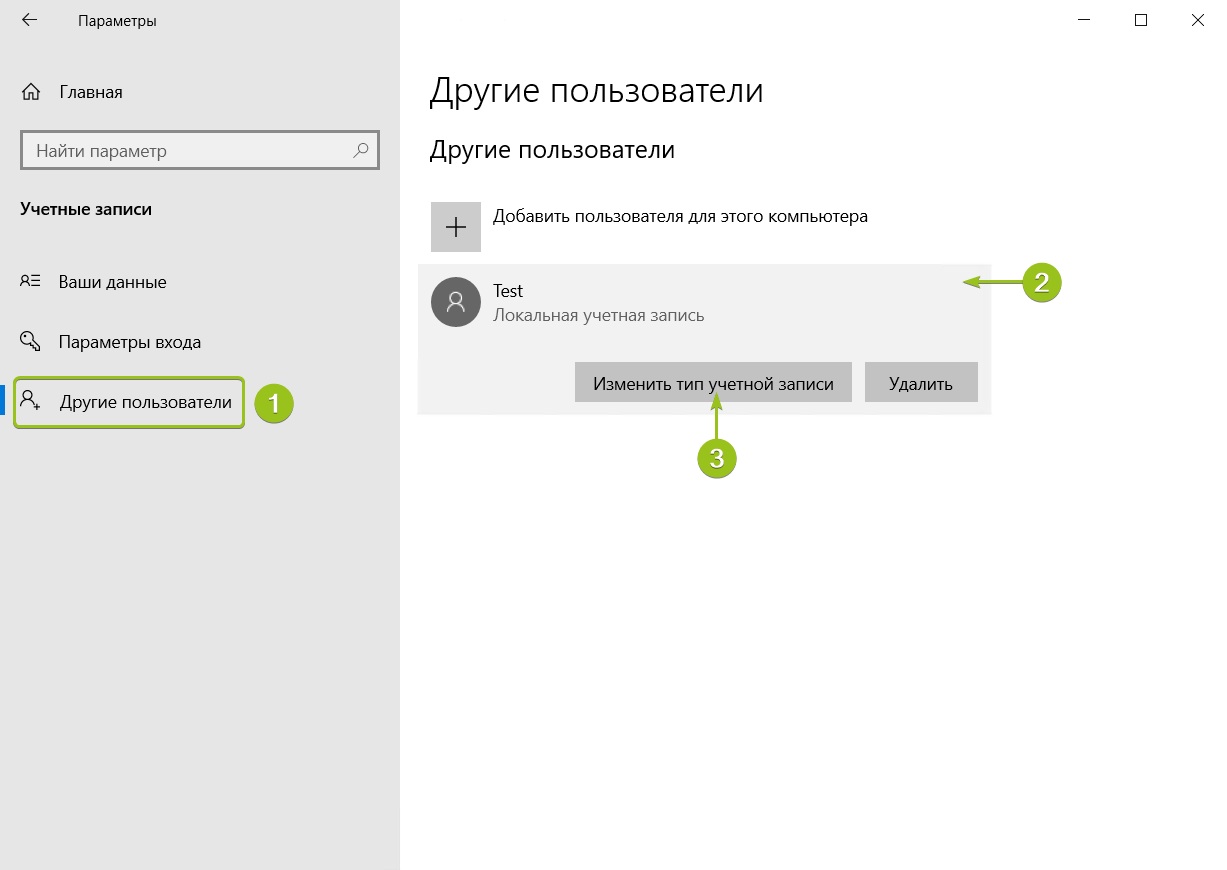
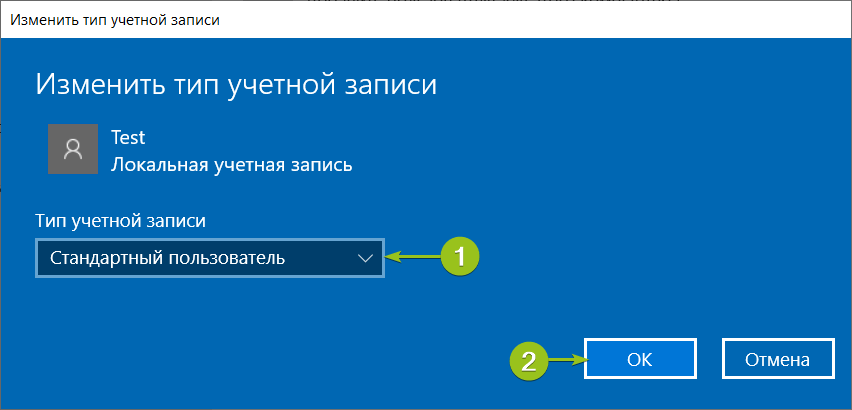
В окне настройки выберите в списке «Тип учётной записи» уровень прав и нажмите «ОК».
На этом процесс добавления пользователя завершён. Чтобы новый пользователь мог подключиться к серверу по RDP, ему потребуются следующие данные:
- IP-адрес вашего сервера / домен;
- логин пользователя;
- пароль пользователя.
Зачем нужны RDP-лицензии и где их взять
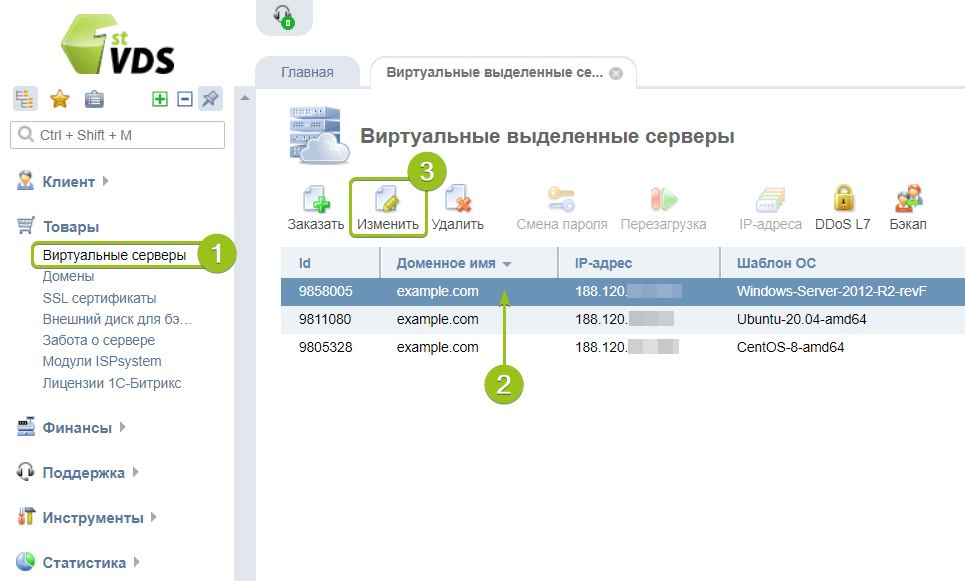
По умолчанию в Windows Server одновременно могут работать только два пользователя уровня Administrator. Для совместной работы большего числа пользователей к серверу нужно подключить RDP-лицензии — по одной на каждого дополнительного пользователя. Их можно приобрести в Личном кабинете: для этого откройте раздел Товары — Виртуальные серверы, выберите ваш сервер в списке, сверху «Изменить».
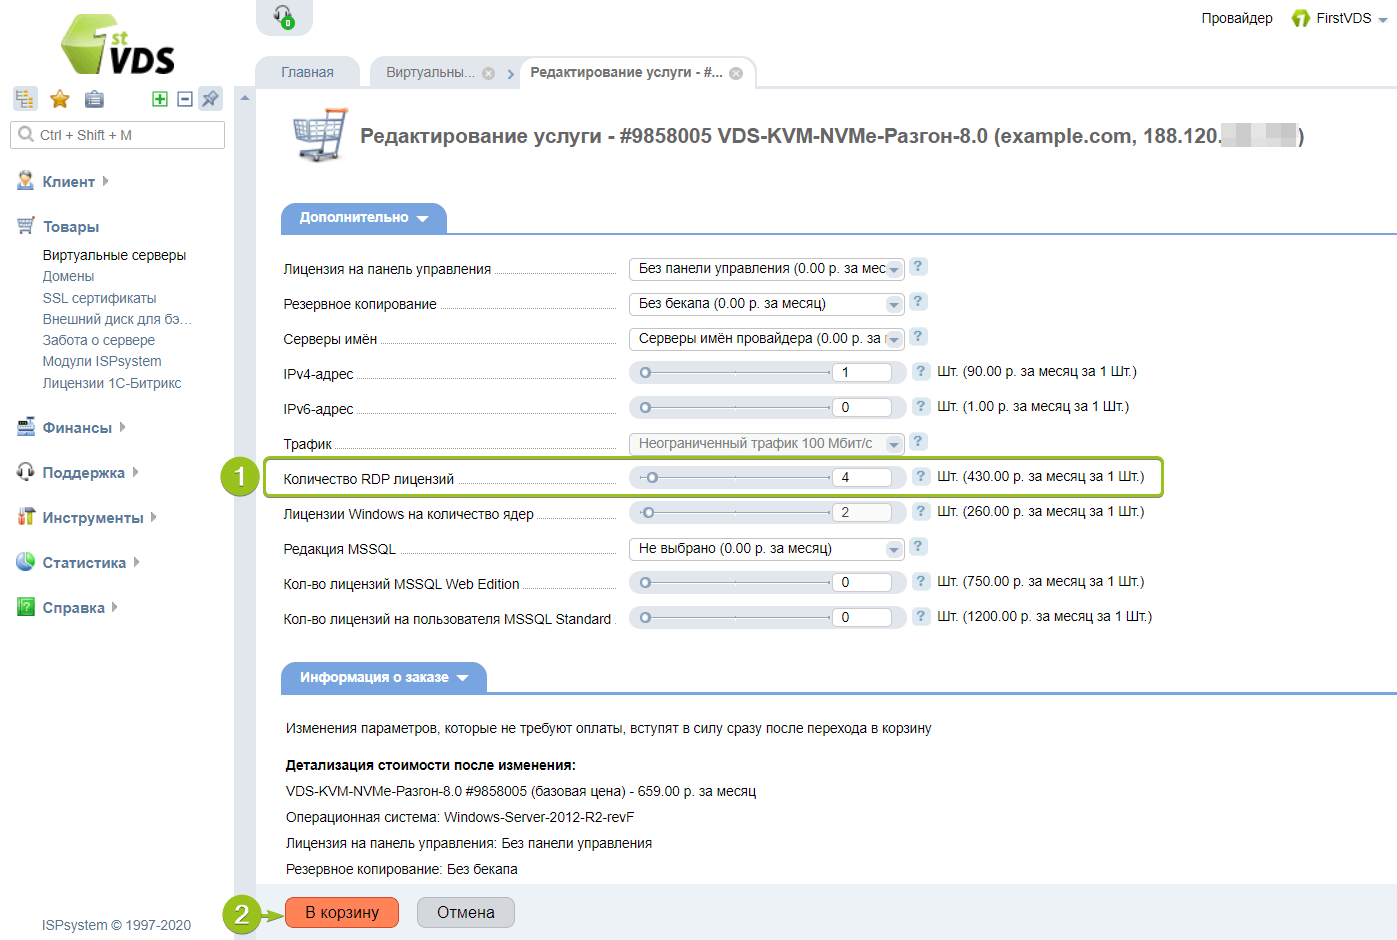
В списке настроек услуги в блоке «Дополнительно» измените значение поля «Количество RDP-лицензий» и нажмите «В корзину». Стоимость одной RDP-лицензии составляет 430 ₽ в месяц. После активации лицензия включается в стоимость сервера и автоматически продлевается вместе с ним.
После оплаты в течение получаса к серверу подключится наш системный администратор для активации лицензий и настройки терминального сервера.
Этот материал был полезен?
После того, как установлена роль Доменные службы Active Directory, пришло врем создать пользователя в домене в Windows Server 2016. Начиная с версии Windows Server 2008 появилась возможность восстанавливать из корзины обьекты Active Directory, в том числе пользователей домена. Если в Windows Server 2008 было возможно восстанавливать объекты из корзины из Power Shell, то начиная с версии Windows Server 2012 появилась возможнсоть работать с графическим интерфейсом.
Создание учётной записи в Windows server 2016.
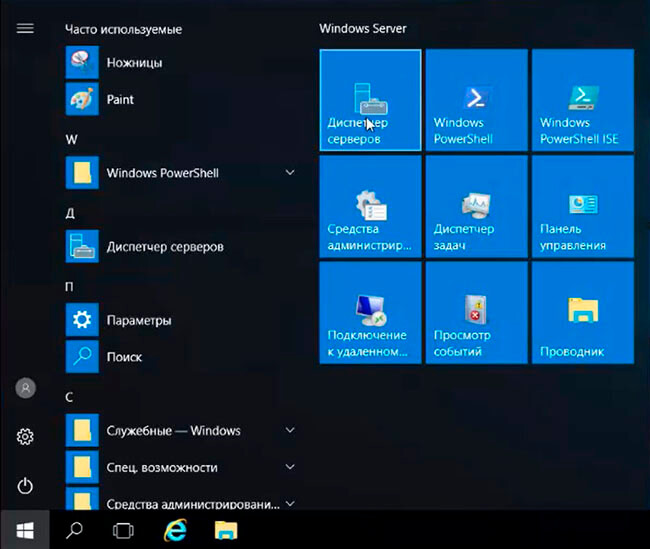
1. Нажимаем Пуск, далее выбираем Диспетчер серверов.
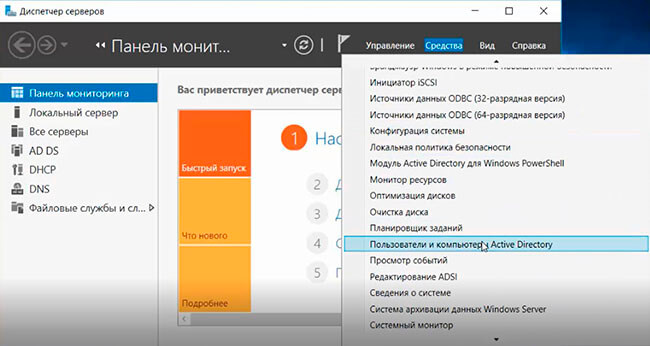
2. В «Диспетчер серверов» выбираем «Средства», затем «Пользователи и компьютеры Active Directory».
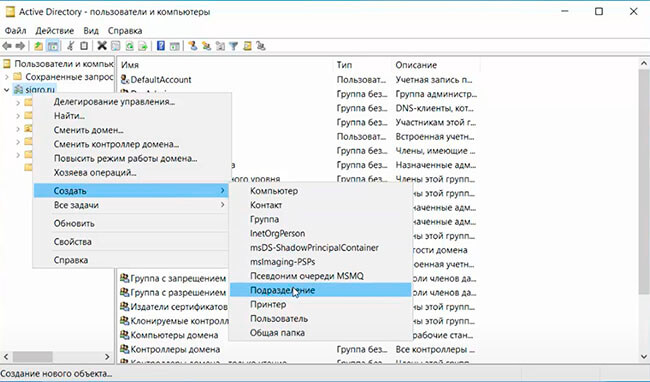
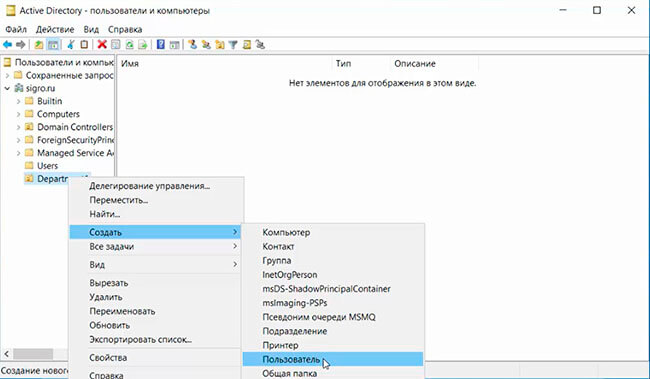
3. В окне «Active Directory» выбираем домен, правой клавишей мыши — «Создать», далее «Подразделение».
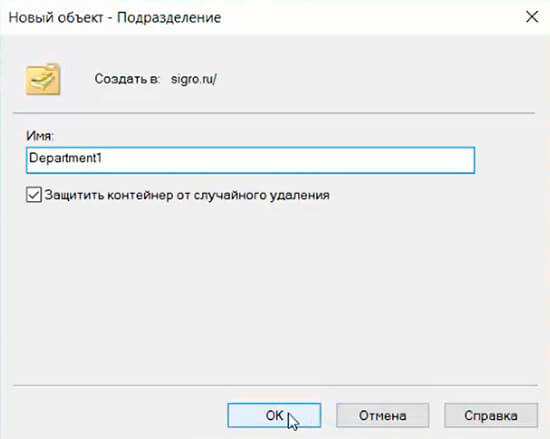
4. Создаём новое подразделение в домене. Для защиты контейнера отслучайного удаления не снимаем чекбокс. Нажимаем «ОК».
5. В новом подразделении заведём пользователя домена. Для этого правой клавишей мыши на подразделение — «Создать» — «Пользователь».
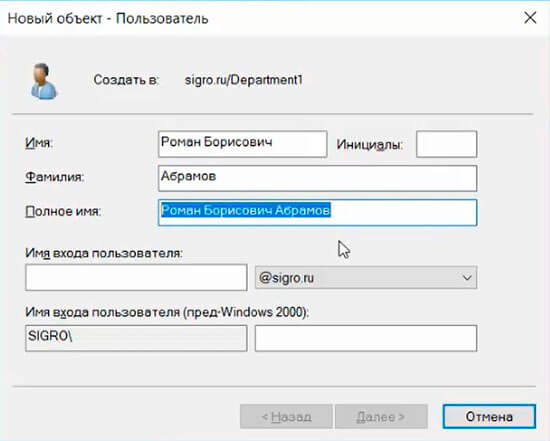
6. При создании пользователя в графе «Полное Имя» пользователь отображается в виде Имя-Отчество-Фамилие. Для удобства изменим отображение на более привычный вид Фамилие-Имя-Отчество.
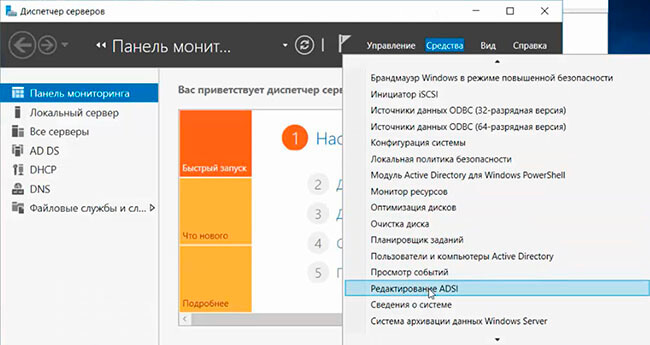
7. Для этого в «Диспетчер серверов» выбираем «Средства», далее «Редактирование ADSI».
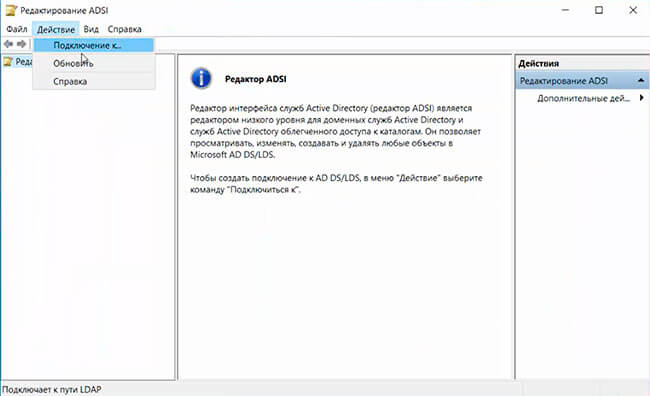
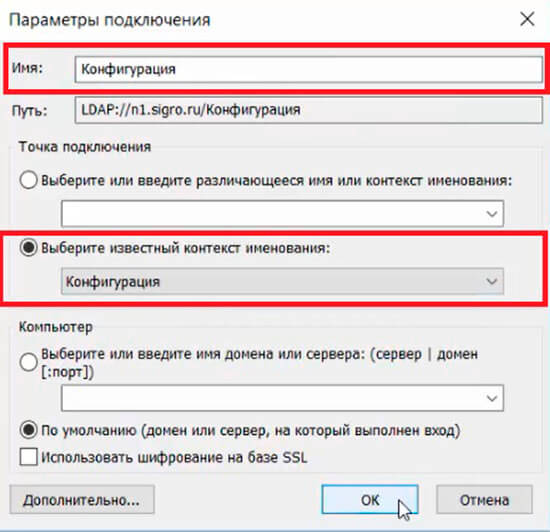
8. В новом окне нажимаем «Действие» — «Подключение к…».
9. В поле «Известный контекст именования:» выбираем «Конфигурация», нажимаем «ОК».
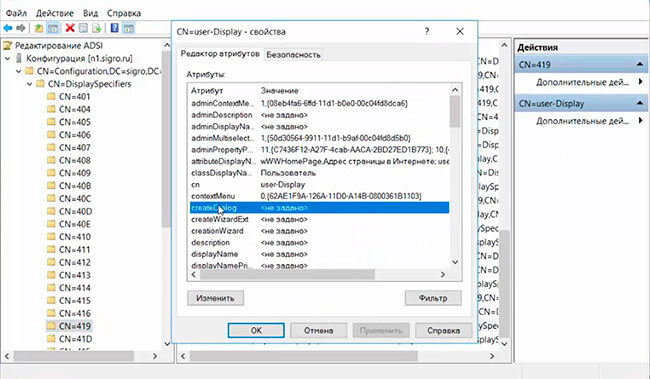
10. Открываем «Конфигурация [домен]» — «CN=DisplaySpecifiers» — «CN=419». Далее «CN=user-Display» — «createDialog».
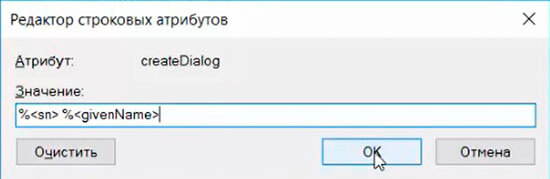
11. В редакторе строковых атрибутов устанавливаем значение: %<sn> %<givenName>. Не забываем пробел в устанавливаемом значении и нажимаем «ОК».
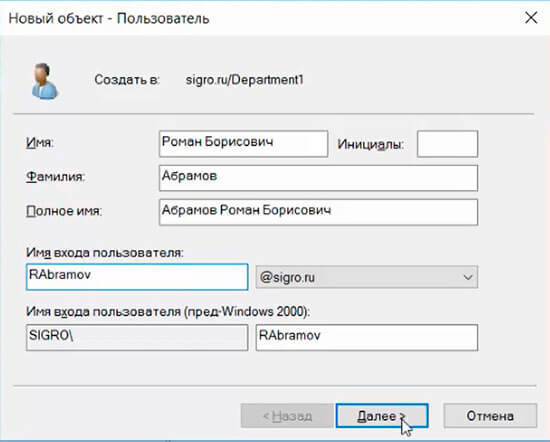
12. Теперь при заполнении полей создания пользователя графа «Полное имя» будет отображаться в виде Фамилияе-Имя-Отчество. Заполняем все графы в окне «Новый объект — Пользователь» и нажимаем «Далее».
13. В следующем окне вводим пароль и подтверждение пароля для пользователя и нажимаем «Далее».
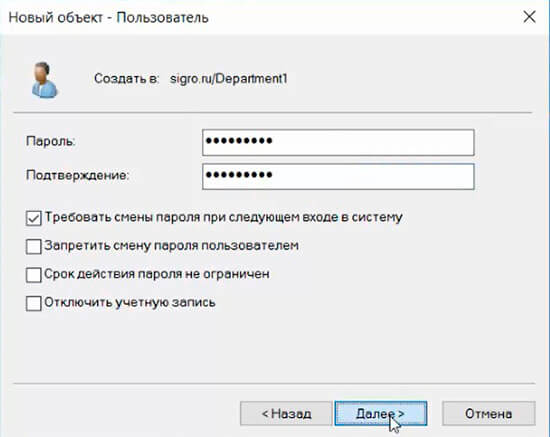
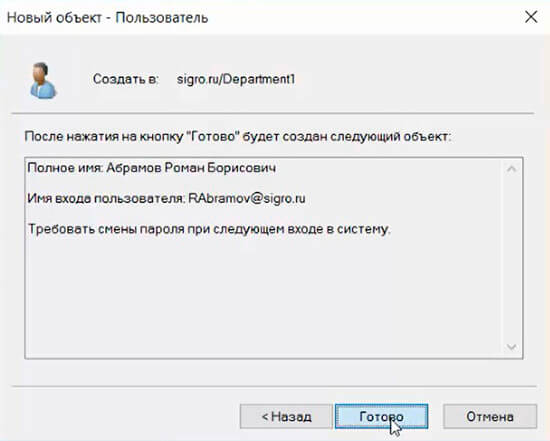
14. Проверяем параметры создания нового пользователя, затем «Готово».
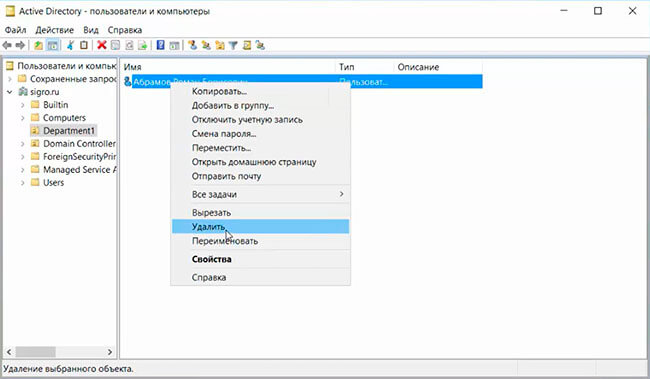
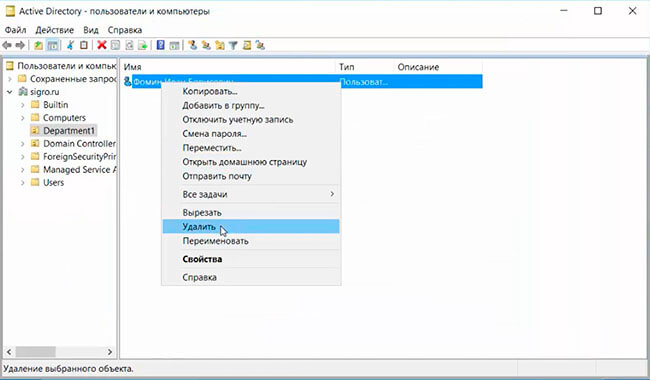
15. Удалить пользователя в домене очень просто. Выбираем пользователя, правой клавишей мыши на обьекте, далее «Удалить».
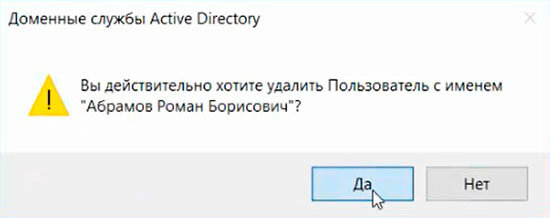
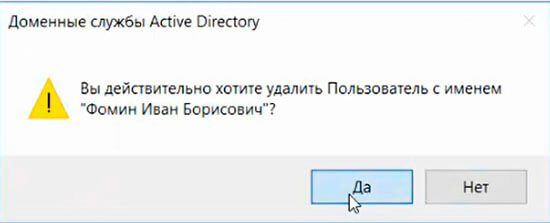
16. Появится предупреждение «Вы действительно ходите удалить Пользователь …». При выборе «Да» пользователь будет удален из Active Directory.
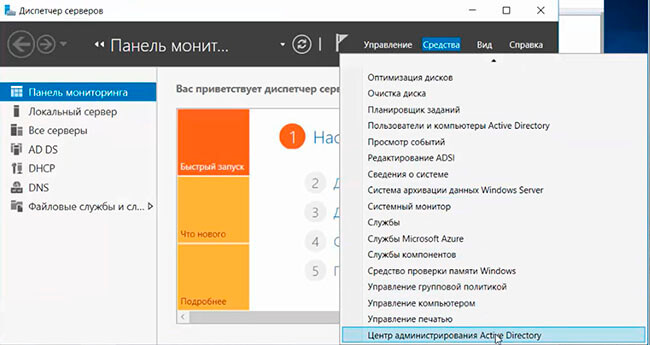
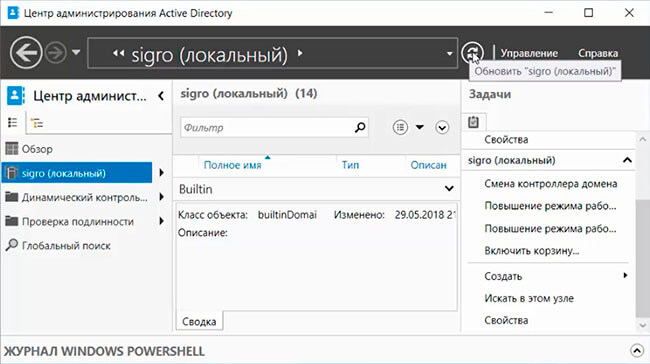
17. Для восстановления объектов Active Directory, в том числе пользователей», необходимо включить корзину. По умолчанию корзина выключена. В «Диспетчере серверов» выбираем «Средства», далее «Центр администрирования Active Directory».
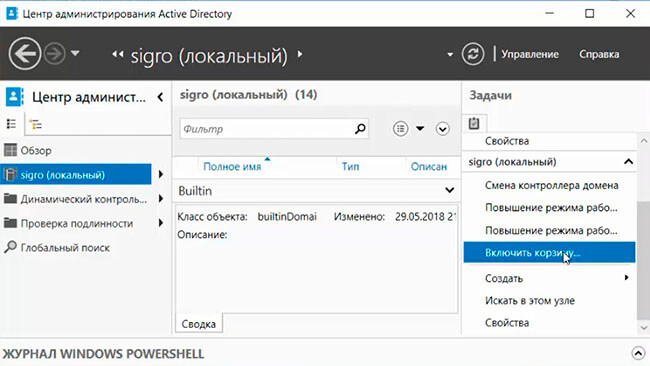
18. В новом окне выбираем наш домен, затем в правой части выбираем «Включить корзину…».
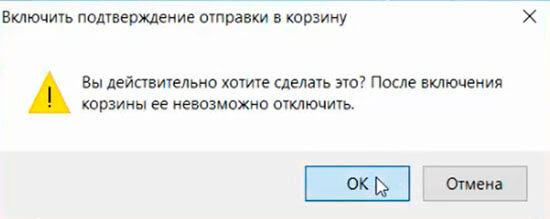
19. Появится подтверждение включения корзины в Active Directory. Нажимаем «ОК».
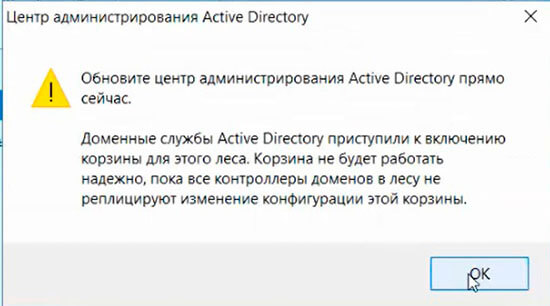
20. Для актуализации состояния корзины в домене необходимо обновить центр администрирования Active Directory. Нажимаем «ОК».
21. Обновляем состояния центра администрирования.
22. Для проверки работоспособности корзины удаляем пользователя в домене.
23. Отвечаем «Да» на появление запроса на подтверждение удаления пользователя.
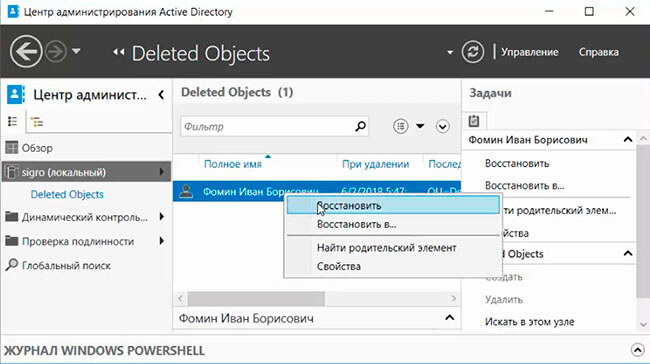
24. Переходим в Центр администрирования Active Directory. Выбираем наш домен. Справа появится удаленный объект. Нажимаем правой клавишей мыши на удаленного пользователя, далее «Восстановить». Удаленный пользователь будет восстановлен в Active Directory.
Посмотреть, что и как делать, можно здесь:
Читайте также:
- Установка DNS и Active Directory — Windows Server 2016
- Установка и настройка DHCP — Windows Server 2016
- Второй контроллер домена — Windows Server 2016
- Ввод компьютера в домен — Windows Server 2016
- Переименование учётной записи администратора домена — Windows Server 2016
- Windows server 2019 — установка и настройка Active Directory, DNS, DHCP
Источник: https://1cloud.ru/help/windows/kak-sozdat-polzovatelya-v-windows-server-2016
Чтобы изменить имя пользователя «администратор» и одновременно переименовать папку пользователя «администратор» нужно переименовать учетную запись и удалить запись пользователя в “HKEY_LOCAL_MACHINESOFTWAREMicrosoftWindows NTCurrentVersionProfileList. После перезагрузить сервер. После перезагрузки создастся каталог с новым именем пользователя, старый каталог со старым именем пользователя можно будет удалить.
Для очистки всех настроек системы и востановления до заводских настроек, нужно использувать утилиту Sysprep.exe
Для того, чтобы еще один пользователь мог подключиться к виртуальному серверу с операционной системой Windows Server 2016, необходимо его создать и выдать права на удаленное подключение к серверу.
Создание пользователя: СПОСОБ 1
Создание пользователя: СПОСОБ 1
Для создания пользователя в Windows откройте Панель управления сервером и выберете вкладку User Accounts.

Далее снова перейдите во вкладку User Accounts.

Далее выберете Manage other account.

В нижней части экрана выберете Add a user account.

a
В открывшемся окне введите имя и пароль, соответствующий правилам безопасности. Мастер настройки сообщит, если пароль не достаточно надежный. В поле Password hint введите подсказку на случай, если вы забудете пароль.


В итоге вы увидите нового пользователя Windows Server 2016.

Создание пользователя: СПОСОБ 2
Создание пользователя: СПОСОБ 2
Запустите консоль управления Windows, для этого в поиске найдите команду mmc. Или с помощью комбинаций клавиш Win+R перейдите к поиску и введите mmc.

Далее следует добавить оснастку, для этого откройте закладку File -> Add/Remove Snap-in.

Найдите нужную нам оснастку Local Users and Groups и кликните кнопку Add, затем OK.

На этом шаге выберете Local computer и нажмите Finish.

Раскройте иерархию оснастки и в разделе Users с помощью правой кнопки мыши создайте нового пользователя Windows (New User).

В поле User name введите системное имя, в поле Full name — полное имя, поле Description заполните описанием при необходимости. Введите и подтвердите пароль. Отметьте галочками необходимые опции, например срок действия пароля.

В итоге вы увидите нового пользователя.

Разрешение на удаленное подключение: СПОСОБ 1
Разрешение на удаленное подключение: СПОСОБ 1
Снова откройте консоль управления Microsoft, для этого с помощью комбинаций клавиш Win+R перейдите к поиску и введите mmc.
Далее следует добавить оснастку Local Users and Groups, для этого откройте закладку File -> Add/Remove Snap-in.
Найдите нужного пользователя и правой кнопкой мыши откройте свойства. Перейдите во вкладку Member Of и нажмите Add.

В открывшемся окне откройте расширенные возможности с помощью кнопки Advanced.

Для поиска нужной группы кликните Find Now и выберете группу с именем Remote Desktop Users. Кликните OK.

Отобразится полное название группы, нажмите OK.

Сохраните изменения с помощью кнопок Apply -> OK.
Разрешение на удаленное подключение: СПОСОБ 2
Разрешение на удаленное подключение: СПОСОБ 2
Для того, чтобы новый пользователь Windows Server мог подключиться к виртуальному серверу, необходимо добавить его в список пользователей, которым разрешено удаленное подключение.
Откройте Панель управления компьютером, перейдите в System and Security -> System и нажмите Change settings. В открывшемся окне перейдите во вкладку Remote и нажмите кнопку Select Users.


Далее нажмите кнопку Add, чтобы добавить нового пользователя.

В новом окне введите имя созданного пользователя, например “test”, и нажмите Check Names. Появится полное системное имя. Нажмите OK.

В списке появится новый пользователь. Сохраните изменения, нажав OK.

Теперь вы можете подключиться к виртуальному серверу от имени нового пользователя.
Подключение к виртуальному серверу
Подключение к виртуальному серверу
О том как подключиться к виртуальному серверу написано в нашей
инструкции
. При подключении необходимо выбрать Другую учетную запись (Use a different account).

Введите имя и пароль созданного пользователя Windows и подключитесь к виртуальному серверу.

Для совместной работы на виртуальном сервере лучше всего создать нового пользователя и предоставить ему доступ к системе. Рассмотрим несколько способов создания нового пользователя на базе ОС Windows Server 2016:
1) lusrmgr.msc
- Нажмите команды: Пуск –> Параметры –> Учетные записи –> Другие люди –> Добавить пользователя для этого компьютера.
ИЛИ
- Нажмите: Пуск –>введите команду: lusrmgr.msc и нажмите Enter.
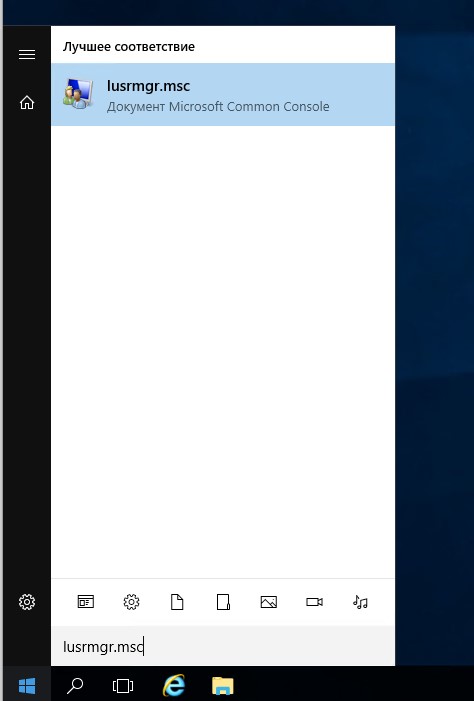
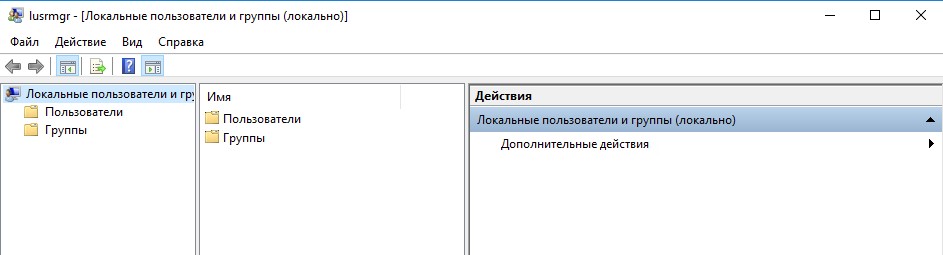
Откроется панель управления локальными пользователями и группами.
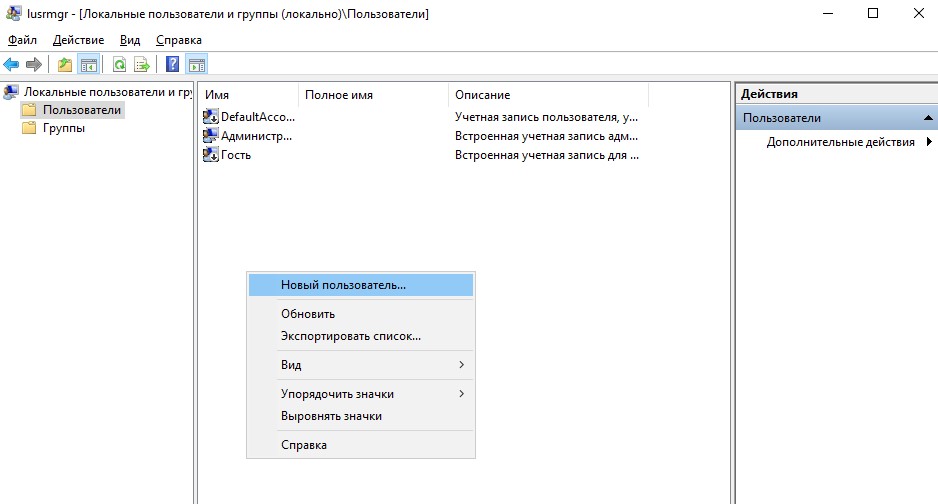
- Выбираем папку «Пользователи» нажимаем правой кнопкой мыши и в выпадающем списке выбираем «Новый пользователь».
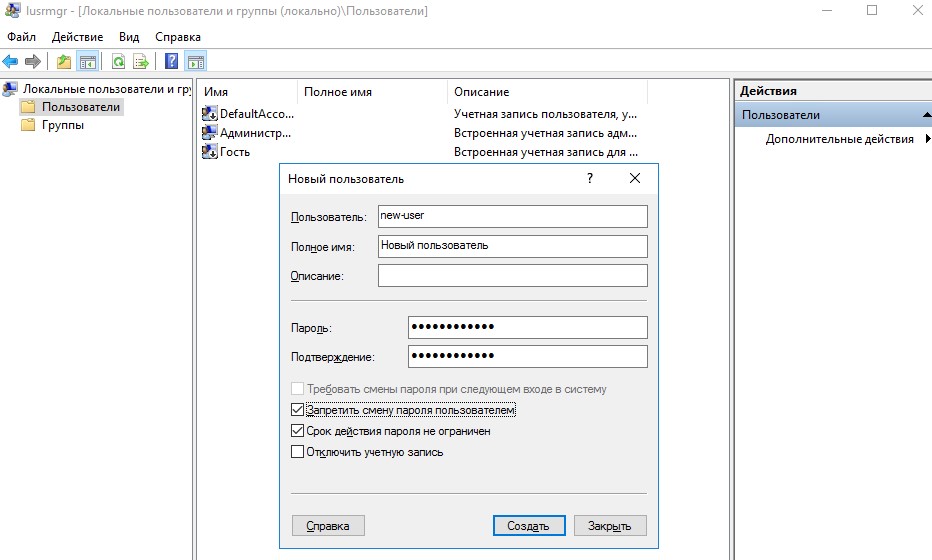
- Введите имя нового пользователя, описание и пароль.
Пароль лучше всего сгенерировать, можно воспользоваться следующим ресурсом: https://mclouds.ru/pass/
Во избежание проблем с доступностью учетной записи можете поставить галочку «Срок действия учетной записи не ограничен» и «Запретить смену пароля пользователем», чтобы знать наверняка, что пользователь не снизит уровень защищенности системы простым паролем.
- Нажмите «Создать».
Чтобы пользователь смог подключаться к серверу, используя удаленный рабочий стол, необходимо в свойствах пользователя добавить его в группу «Пользователи удаленного рабочего стола»:
- нажмите: Пользователь –> Свойства –> Членство в группах –> Пользователи удаленного рабочего стола.
При необходимости, добавьте пользователя и в другие группы, список которых вы сможете найти в папке «Группы».
- Нажмите «ОК» и «Применить».
После этого вы сможете подключаться к серверу с помощью нового пользователя.
2) Панель управления
Второй способ создания нового пользователя.
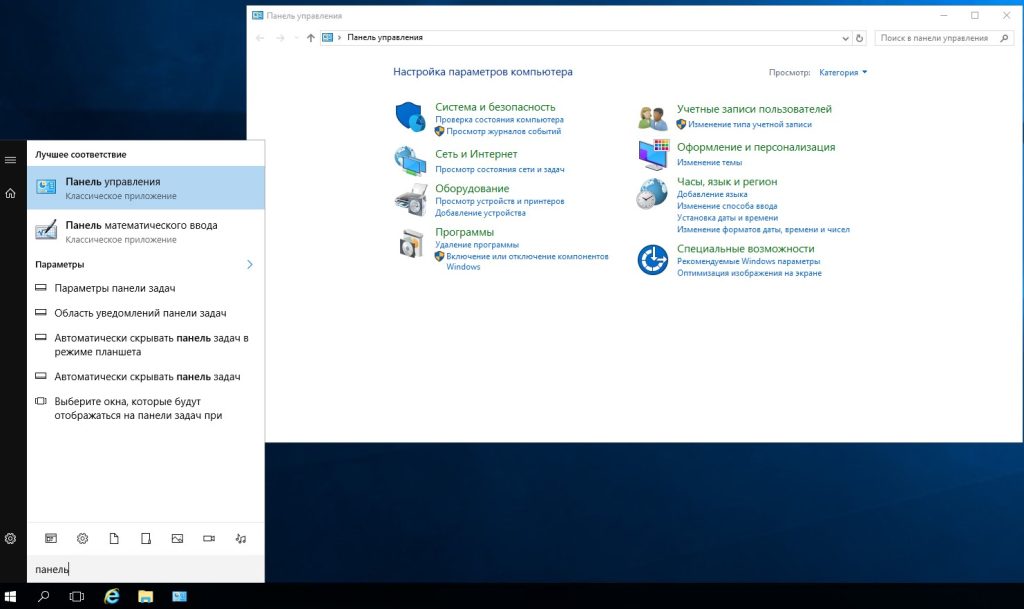
- Нажмите меню «Пуск» и введите «Панель управления».
- Пройдите по пути: Панель управления –> Учетные записи пользователей –> Учетные записи пользователей –> Управление учетными записями –> Добавить учетную запись пользователя.
- В открывшемся окне укажите все необходимые данные.
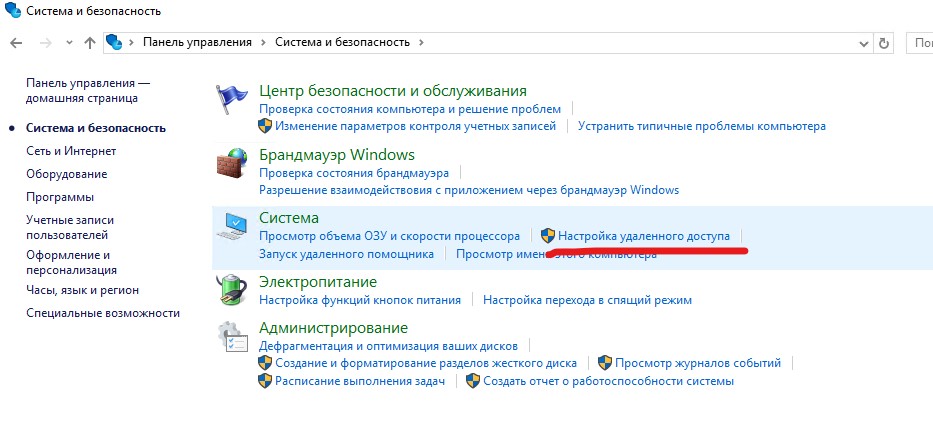
Чтобы пользователь смог подключаться к серверу, используя удаленный рабочий стол, необходимо в панели управления выбрать раздел «Система и безопасность», а в ней выбрать ссылку «Настройка удаленного доступа».
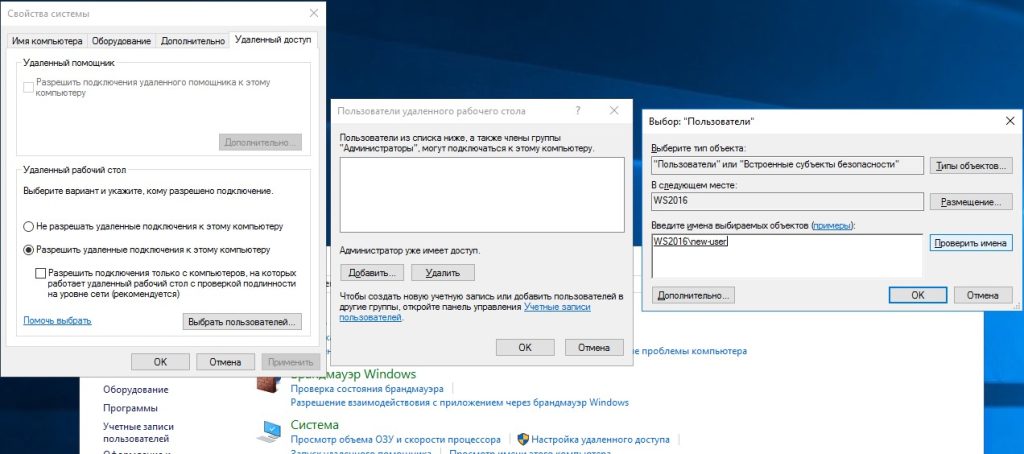
- Нажмите: Свойства системы –> Удаленный доступ –> Удаленный рабочий стол –> Разрешить удаленные подключения к этому компьютеру –> Выбрать пользователей –> Добавить –> Указать необходимого пользователя.
- Закрыть все окна клавишей «ОК».
Готово! После этого вы сможете подключаться к серверу с помощью нового пользователя.
Создание собственной учетной записи для каждого пользователя важный атрибут безопасности сервера. Рассмотрим как добавить пользователя в Windows 2016.
Способ 1. Традиционный
Открываем Пуск → Панель управления.

В открывшемся окне кликаем по “Учетные записи пользователей”.

В обновленном окне еще раз кликаем по “Учетные записи пользователей”.

Особенность операционной системы такова, что откроются параметры текущей учетной записи, а нам нужно создать новую. Кликаем по надписи “Управление другой учетной записью”.

В нижней части обновленного окна кликаем по “Добавить учетную запись пользователя”.

В новом окне “Добавление пользователя” следует заполнить все поля:
- имя пользователя;
- пароль;
- подтверждение пароля;
- подсказка к паролю.

Если пароль не соответствует критериям безопасности, программа об этом уведомит.
В обновившемся окне кликаем по кнопке “Готово”.
Окно добавления пользователя закроется и в окне “Управление учетными записями” появится возможность выбора учетной записи для изменения параметров.

Способ 2. Через консоль управления компьютером.
Сочетанием клавиш “Windows + R” вызываем системное окно “Выполнить”. В его единственное поле впишем команду mmc.

Откроется пустая консоль оснасток. Для того чтобы появилась возможность создать пользователя, необходимо добавить необходимую оснастку в консоль. Для этого открываем Файл → Добавить или удалить оснастку…

В открывшемся окне “Добавление и удаление оснасток”, в левой его части, находим “Локальные пользователи и группы”. Теперь кликаем по кнопке “Добавить”. “Локальные пользователи и группы” переместится в секцию “Выбранные оснастки”.

Сразу после действия выше, откроется окно “Выбор целевого компьютера”. Выбираем параметр “Локальный компьютер (на котором запущено окно этой программы консоли)”, обычно этот параметр установлен по умолчанию. Кликаем по кнопке “Готово”.

Окно закроется. В оставшемся окне кликаем по кнопке “OK”.

Окно “Добавления и удаления оснасток” закроется. Останется только окно Консоль 1. В левой части окна развернем деров “Локальные пользователи и группы”, затем кликнем по папке “Пользователи”. В основной части окна, кликаем правой кнопкой мыши и в контекстном меню выбираем “Новый пользователь”.

В открывшемся окне “Новый пользователь” важными для заполнения являются поля:
- Пользователь;
- Полное имя;
- Пароль;
- Подтверждение пароля.
Рекомендуем понятно заполнить поле “Описание”.
Важно обратить внимание на параметр “Требовать смены пароля при следующем входе в систему”. Галка устанавливается по умолчанию. Таким образом, когда администратор передает пароль пользователю, при первом входе, операционная система потребует от пользователя указать новый пароль для входа в систему.
Кликаем по кнопке “Создать”.

Результат будет примерно таким.

Разрешаем удаленное подключение.
Изначально планировалось чтобы созданный пользователь имел возможность подключения к удаленному рабочему столу на этом сервере. Предоставим эту возможность.
Способ 1. Через консоль сервера.
Из способа выше, все в том же окне “Консоль 1”, кликаем по созданному пользователю правой кнопкой мыши. В открывшемся контекстном меню выбираем пункт “Свойства”.

Открываем вкладку “Членство в группах” и кликаем по кнопке “Добавить”.

В окне выбора группы кликаем по кнопке “Дополнительно”.

В правой части обновленного окна кликаем по кнопке “Поиск”. В поле “Результаты поиска” следует выбрать “Пользователи удаленного рабочего стола” двойным кликом.

В окне выбора групп кликаем по кнопке “OK”.

В окне свойств учетной записи появится соответствующее членство в группах. Закрываем окно кликом по кнопке “OK”

Способ 2.
Рассмотрим альтернативный способ предоставления возможности доступа к удаленному рабочему столу. Открываем меню Пуск и выбираем Панель управления.

В открывшемся окне, кликаем по “Система и безопасность”.

В обновленном окне кликаем по “Система”.

В левой части нового окна кликаем по “Настройка удаленного доступа”.

В открывшемся окне “Свойства системы” переходим на вкладку “Удаленный доступ” и кликаем по кнопке “Выбрать пользователей”.

В открывшемся окне кликаем по кнопке “Добавить”

В окне выбора пользователей кликаем по кнопке “Дополнительно..”
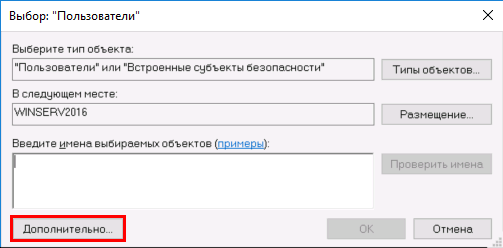
В обновленном окне кликаем по кнопке “Поиск”, а в нижней части окна, где результаты поиска, находим нужного нам пользователя. Выбираем его двойным кликом мыши.

В окно выбора пользователя добавится строка с логином и на каком сервере находится пользователь. Если все правильно — кликаем по кнопке “OK”.

В окне “Пользователи удаленного рабочего стола” проверяем пользователей и по окончании кликаем по кнопке “OK”.

Теперь можно пробовать подключаться.
Запустить “Подключение к удаленному рабочему столу” возможно через меню Пуск → Стандартные — Windows → Подключение к удаленному рабочему столу. Возможно, данная программа будет находиться на “плитке” справа.

Откроется окно программы. В нем необходимо ввести IP-адрес удаленной машины или ее доменное имя. И кликаем по кнопке “Подключить”.

Удаленный компьютер запросит имя пользователя и пароль, вводим их и кликаем по кнопке “OK”.

220140
Минск
ул. Домбровская, д. 9
+375 (173) 88-72-49
![]()
700
300
ООО «ИТГЛОБАЛКОМ БЕЛ»
220140
Минск
ул. Домбровская, д. 9
+375 (173) 88-72-49
![]()
700
300
ООО «ИТГЛОБАЛКОМ БЕЛ»
Но когда на сервере необходимо работать нескольким пользователям, и одновременно, тогда необходимо добавить дополнительного пользователя, или пользователей. Так же, в данном случае, необходимо учесть, что бы на сервере был установлен терминальный сервер, и необходимое количество лицензий для RDP соединения. Как установить и настроить сервер терминалов, Вы можете увидеть в этой статье.
Для того что бы добавить второго пользователя, подключитесь к серверу со своими учетными данными Administrator. Потом перейдите в Computer Management. Это можно сделать, кликнув правой мышкой по меню Start, и в контекстном меню выбрать Computer Management.

Или нажмите комбинацию Win+R и в окне Run введите команду compmgmt.msc и нажмите OK.

Теперь в окне Computer Management переходим в Local Users and Groups => Users и в верхнем Action меню выбираем New User.

В открывшемся окне New User необходимо прописать имя пользователя, в графе User Name которое Вы будете использовать для входа на сервер. В пункте Full Name можно прописать полное имя, которое будет видно на экране приветствия. В поле Description можно ничего не писать.
В поле Password и подтверждение пароля, введите пароль который будете использовать для данного пользователя.

Чекбокс User must change password at next logon можете снять, если не нужно будет изменять пароль при первом подключении пользователя.
Чекбокс User cannot change password оставляем, что бы пользователь не смог изменять пароль.
Чекбокс Password never expires оставляем так же если нет необходимости в смене пароля. Account is disabled включает/отключает возможность подключения/входа пользователя на сервер. Снимаем галочку.
Чтобы создать пользователя, нажимаем Create.

Теперь для созданного пользователя, необходимо предоставить необходимые права, на подключение к серверу. Чтобы это сделать, нужно кликнуть правой кнопкой мыши и выбрать пункт Properties.

Чтобы созданному пользователю разрешить доступ по RDP к данному серверу, на вкладке Remote control необходимо установить соответствующие разрешения, как показано на иллюстрации ниже.

Но для того чтобы пользователю дать права Администратора, его необходимо добавить в соответствующую группу. На вкладке Member of
нажимаем Add… и в окне выбора группы выбираем Advanced… затем кнопку Find Now в окне подбора групп. Выбираем группу Administrators и нажимаем Ок.

Теперь, таким же образом, Вы можете создавать нужное количество пользователей на своем сервере.
Те же действия, только через Power Shell
Создадим пользователя User2, с описанием Manager и паролем QWErty1! (Не создавайте такие легкие пароли!!!)
$PASSWORD= ConvertTo-SecureString –AsPlainText -Force -String QWErty1!; New-LocalUser -Name "User2" -Description "Manager" -Password $PASSWORDСоответственно, вместо User2 используйте имя своего пользователя, и пароль не меньше 12 символов.
Теперь добавим данного пользователя в нужную нам группу.
Add-LocalGroupMember -Group "Remote Desktop Users" -Member "User2"В группу Remote Desktop Users
Чтобы добавить в группу Administrators используем следующую команду:
Add-LocalGroupMember -Group "Administrators" -Member "User2"| title | description | ms.date | ms.topic | ms.assetid | author | ms.author | manager |
|---|---|---|---|---|---|---|---|
|
Manage User Accounts in Windows Server Essentials |
Learn about the Users page of the Windows Server Essentials Dashboard and how it centralizes information and tasks that help you manage the user accounts. |
10/03/2016 |
article |
0d115697-532b-48c2-a659-9f889e235326 |
nnamuhcs |
wscontent |
mtillman |
Manage User Accounts in Windows Server Essentials
Applies To: Windows Server 2016 Essentials, Windows Server 2012 R2 Essentials, Windows Server 2012 Essentials
The Users page of the Windows Server Essentials Dashboard centralizes information and tasks that help you manage the user accounts on your small business network. For an overview of the Users Dashboard, see Dashboard Overview.
Managing user accounts
The following topics provide information about how to use the Windows Server Essentials Dashboard to manage the user accounts on the server:
-
Add a user account
-
Remove a user account
-
View user accounts
-
Change the display name for the user account
-
Activate a user account
-
Deactivate a user account
-
Understand user accounts
-
Manage user accounts using the Dashboard
Add a user account
When you add a user account, the assigned user can log on to the network, and you can give the user permission to access network resources such as shared folders and the Remote Web Access site. Windows Server Essentials includes the Add a User Account Wizard that helps you:
-
Provide a name and password for the user account.
-
Define the account as either an administrator or as a standard user.
-
Select which shared folders the user account can access.
-
Specify if the user account has remote access to the network.
-
Select email options if applicable.
-
Assign a Microsoft Online Services account (referred to as a Microsoft 365 account in Windows Server Essentials) if applicable.
-
Assign user groups ( Windows Server Essentials only).
[!NOTE]
- Non-ASCII characters are not supported in Microsoft Azure Active Directory (Azure AD). Do not use any non-ASCII characters in your password, if your server is integrated with Azure AD.
- The email options are only available if you install an add-in that provides email service.
To add a user account
-
Open the Windows Server Essentials Dashboard.
-
On the navigation bar, click Users.
-
In the Users Tasks pane, click Add a user account. The Add a User Account Wizard appears.
-
Follow the instructions to complete the wizard.
Remove a user account
When you choose to remove a user account from the server, a wizard deletes the selected account. Because of this, you can no longer use the account to log on to the network or to access any of the network resources. As an option, you can also delete the files for the user account at the same time that you remove the account. If you do not want to permanently remove the user account, you can deactivate the user account instead to suspend access to network resources.
[!IMPORTANT]
If a user account has a Microsoft online account assigned, when you remove the user account, the online account also is removed from Microsoft Online Services, and the user’s data, including email, is subject to data retention policies in Microsoft Online Services. If you want to retain user data for the online account, deactivate the user account instead of removing it. For more information, see Manage Online Accounts for Users.
To remove a user account
-
Open the Windows Server Essentials Dashboard.
-
On the navigation bar, click Users.
-
In the list of user accounts, select the user account that you want to remove.
-
In the <User Account> Tasks pane, click Remove the user account. The Delete a User Account Wizard appears.
-
On the Do you want to keep the files? page of the wizard, you can choose to delete the user’s files, including File History backups and the redirected folder for the user account. To keep the user’s files, leave the check box empty. After making your selection, click Next.
-
Click Delete account.
[!NOTE]
After you remove a user account, the account no longer appears in the list of user accounts. If you chose to delete the files, the server permanently deletes the user’s folder from the Users server folder and from the File History Backups server folder.If you have an integrated email provider, the email account assigned to the user account will also be removed.
View user accounts
The Users section of the Windows Server Essentials Dashboard displays a list of network user accounts. The list also provides additional information about each account.
To view a list of user accounts
-
Open the Windows Server Essentials Dashboard.
-
On the main navigation bar, click Users.
-
The Dashboard displays a current list of user accounts.
To view or change properties for a user account
-
In the list of user accounts, select the account for which you want to view or change properties.
-
In the <User Account> Tasks pane, click View the account properties. The Properties page for the user account appears.
-
Click a tab to display the properties for that account feature.
-
To save any changes that you make to the user account properties, click Apply.
Change the display name for the user account
The display name is the name that appears in the Name column on the Users page of the Dashboard. Changing the display name does not change the logon or sign-in name for a user account.
To change the display name for a user account
-
Open the Windows Server Essentials Dashboard.
-
On the navigation bar, click Users.
-
In the list of user accounts, select the user account that you want to change.
-
In the <User Account> Tasks pane, click View the account properties. The Properties page for the user account appears.
-
On the General tab, type a new First name and Last name for the user account, and then click OK.
The new display name appears in the list of user accounts.
Activate a user account
When you activate a user account, the assigned user can log on to the network and access network resources to which the account has permission, such as shared folders and the Remote Web Access site.
[!NOTE]
You can only activate a user account that is deactivated. You cannot activate a user account after you remove it from the server.
To activate a user account
-
Open the Windows Server Essentials Dashboard.
-
On the navigation bar, click Users.
-
In the list view, select the user account that you want to activate.
-
In the <User Account> Tasks pane, click Activate the user account.
-
In the confirmation window, click Yes to confirm your action.
[!NOTE]
After you activate a user account, the status for the account displays Active. The user account regains the same access rights that were assigned prior to account deactivation.If you have an integrated email provider, the email account assigned to the user account will also be activated.
Deactivate a user account
When you deactivate a user account, account access to the server is temporarily suspended. Because of this, the assigned user cannot use the account to access network resources such as shared folders or the Remote Web Access site until you activate the account.
If the user account has a Microsoft online account assigned, the online account is also deactivated. The user cannot use resources in Microsoft 365 and other online services that you subscribe to, but the user’s data, including email, is retained in Microsoft Online Services.
[!NOTE]
You can only deactivate a user account that is currently active.
To deactivate a user account
-
Open the Windows Server Essentials Dashboard.
-
On the navigation bar, click Users.
-
In the list view, select the user account that you want to deactivate.
-
In the <User Account> Tasks pane, click Deactivate the user account.
-
In the confirmation window, click Yes to confirm your action.
[!NOTE]
After you deactivate a user account, the status for the account displays Inactive.If you have an integrated email provider, the email account assigned to the user account will also be deactivated.
Understand user accounts
A user account provides important information to Windows Server Essentials, which enables individuals to access information that is stored on the server, and makes it possible for individual users to create and manage their files and settings. Users can log on to any computer on the network if they have a Windows Server Essentials user account and they have permissions to access a computer. Users access their user accounts with their user name and password.
There are two main types of user accounts. Each type gives users a different level of control over the computer:
-
Standard accounts are for everyday computing. The standard account helps protect your network by preventing users from making changes that affect other users, such as deleting files or changing network settings.
-
Administrator accounts provide the most control over a computer network. You should assign the administrator account type only when necessary.
Manage user accounts using the Dashboard
Windows Server Essentials makes it possible to perform common administrative tasks by using the Windows Server Essentials Dashboard. By default, the Users page of the Dashboard includes two tabs: Users and Users Groups.
[!NOTE]
- If you integrate your server that is running Windows Server Essentials with Microsoft 365, a new tab called Distribution Groups is also added within the Users page of the Dashboard.
- In Windows Server Essentials, the Users page of the Dashboard includes only a single tab — Users.
The Users tab includes the following:
-
A list of user accounts, which displays:
-
The name of the user.
-
The Logon name for the user account.
-
Whether the user account has Anywhere Access permission. Anywhere Access permission for a user account is either Allowed or Not allowed.
-
Whether the File History for this user account is managed by the server running Windows Server Essentials. The File History status for a user account is either Managed or Not managed.
-
The level of access that is assigned to the user account. You can assign either Standard user access or Administrator access for a user account.
-
The user account status. A user account can be Active, Inactive, or Incomplete.
-
In Windows Server Essentials, if the server is integrated with Microsoft 365 or Windows Intune, the Microsoft online account is displayed.
-
In Windows Server Essentials, if the server is integrated with Microsoft 365, the status of the account (known in Windows Server Essentials as the Microsoft online account) for the user account is displayed.
-
-
A details pane with additional information about a selected user account.
-
A tasks pane that includes:
-
A set of user account administrative tasks such as viewing and removing user accounts, and changing passwords.
-
Tasks that allow you to globally set or change settings for all user accounts in the network.
The following table describes the various user account tasks that are available from the Users tab. Some of the tasks are user account-specific, and they are only visible when you select a user account in the list.
-
[!NOTE]
If you integrate Microsoft 365 with Windows Server Essentials, additional tasks will become available. For more information, see Manage Online Accounts for Users.
User account tasks in the Dashboard
| Task name | Description |
|---|---|
| View the account properties | Enables you to view and change the properties of the selected user account, and to specify folder access permissions for the account. |
| Deactivate the user account | A user account that is deactivated cannot log on to the network or access network resources such as shared folders or printers. |
| Activate the user account | A user account that is activated can log on to the network and can access network resources as defined by the account permissions. |
| Remove the user account | Enables you to remove the selected user account. |
| Change the user account password | Enables you to reset the network password for the selected user account. |
| Add a user account | Starts the Add a User Account Wizard, which enables you to create a single new user account that has either standard user access or administrator access. |
| Assign a Microsoft online account | Adds a Microsoft online account to the local network user account that is selected.
This task is displayed when your server is integrated with Microsoft online services, such as Microsoft 365. |
| Add Microsoft online accounts | Adds Microsoft online accounts and associates them to local network user accounts.
This task is displayed when your server is integrated with Microsoft online services, such as Microsoft 365. |
| Set the password policy | Enables you to change the values of the password polices for your network. |
| Import Microsoft online accounts | Performs a bulk import of accounts from Microsoft online services into the local network.
This task is displayed when your server is integrated with Microsoft online services, such as Microsoft 365. |
| Refresh | Refreshes the Users tab.
This task is applicable to Windows Server Essentials. |
| Change File History settings | Enables you to change File History settings, such as backup frequency, or backup duration.
This task is applicable to Windows Server Essentials. |
| Export all remote connections | Creates a .CSV-format file of all remote connections to the server that have occurred over the past 30 days. |
Managing passwords and access
The following topics provide information about how to use the Windows Server Essentials Dashboard to manage user account passwords and user access to the shared folders on the server:
-
Change or reset the password for a user account
-
What you should know about password policies
-
Change the password policy
-
Level of access to shared folders
-
Retain and manage access to files for removed user accounts
-
Synchronize the DSRM password with the network administrator password
-
Give user accounts remote desktop permission
-
Enable users to access resources on the server
-
Change remote access permissions for a user account
-
Change virtual private network permissions for a user account
-
Change access to internal shared folders for a user account
-
Allow user accounts to establish a remote desktop session to their computer
Change or reset the password for a user account
To change or reset a user account password, follow these steps.
To reset the password for a user account
-
Open the Windows Server Essentials Dashboard.
-
On the navigation bar, click Users.
-
In the list of user accounts, select the user account that you want to reset.
-
In the <User Account> Tasks pane, click Change the user account password. The Change User Account Password Wizard appears.
-
Type a new password for the user account, and then type the password again to confirm it.
-
Click Change password.
-
Provide the new password to the user.
[!IMPORTANT]
- You may not be able to change your password if the password policy for your account has been set to Passwords never expire.
- Non-ASCII characters are not supported in Azure AD. Therefore, if your server is integrated with Azure AD, do not use any non-ASCII characters in your password.
- If a Microsoft online account (known in Windows Server Essentials as a Microsoft 365 account) is assigned to the user, the password is synchronized with the online account password. The user will use the new password to sign in on the server or sign in to Microsoft 365. For more information, see Manage Online Accounts for Users.
- You may not be able to change your password if the password policy for your account has been set to Passwords never expire.
What you should know about password policies
The password policy is a set of rules that define how users create and use passwords. The policy helps to prevent unauthorized access to user data and other information that is stored on the server. The password policy is applied to all user accounts that access the network.
The Windows Server Essentials password policy consists of three primary elements as follows:
-
Password length. The longer a password is, the more secure it is. Blank passwords are not secure.
-
Password complexity. Complex passwords contain a mixture of uppercase and lowercase letters (a-z, A-Z), base numbers (0-9), and non-alphabetic symbols (such as; !,@,#,_,-). Complex passwords are much less susceptible to unauthorized access. Passwords that contain user names, birthdates, or other personal information do not provide adequate security.
-
Password age. Windows Server Essentials requires that users change their password at least once every 180 days. As an option, you can choose to have passwords never expire.
To make it easier to implement a password policy on your computer network, Windows Server Essentials provides a simple tool that allows you to set or change the password policy to any of the following four pre-defined policy profiles:
-
Weak. Users can specify any password that is not blank.
-
Medium. These passwords must contain at least 5 characters. A complex password is not required.
-
Medium Strong. These passwords must contain at least 5 characters, and must include letters, numbers, and symbols.
-
Strong. These passwords must contain at least 7 characters, and must include letters, numbers, and symbols. These passwords are more secure, but may be more difficult for users to remember.
[!NOTE]
Passwords cannot contain the user name or email address.If you integrate with Microsoft 365, the integration enforces the Strong password policy, and updates the policy to include the following requirements:
- Passwords must contain 8 �16 characters.
- Passwords cannot contain a space or the Microsoft 365 email name.
By default, server installation sets the default password policy to the Strong option.
- Passwords must contain 8 �16 characters.
Change the password policy
Use the following procedure to set or change the password policy to any of four pre-defined policy profiles.
To change the password policy
-
Open the Windows Server Essentials Dashboard, and then click Users.
-
In the Users Tasks pane, click Set the password policy.
-
On the Change the Password Policy screen, set the level of password strength by moving the slider.
Microsoft recommends that you set the password strength to Strong.
[!NOTE]
As an option, you can also select Passwords never expire. This setting is less secure, and so it is not recommended. -
Click Change policy.
Level of access to shared folders
As a best practice, you should assign the most restrictive permissions available that still allow users to perform required tasks.
You have three access settings available for the shared folders on the server:
-
Read/Write. Choose this setting if you want to allow the user account permission to create, change, and delete any files in the shared folder.
-
Read only. Choose this setting if you want to allow the user account permission to only read the files in the shared folder. User accounts with read-only access cannot create, change, or delete any files in the shared folder.
-
No access. Choose this setting if you do not want the user account to access any files in the shared folder.
Retain and manage access to files for removed user accounts
The network administrator can remove a user account and choose to keep the user’s files for future use. In this scenario, the removed user account can no longer be used to sign in to the network; however, the files for this user will be saved in a shared folder, which can be shared with another user.
[!IMPORTANT]
Be aware that if you remove a user account that has a Microsoft online account assigned, the online account is also removed, and the user data, including email, is subject to data retention policies in Microsoft Online Services. To retain the user data for the online account, deactivate the user account instead of removing it. For more information, see Manage Online Accounts for Users.
To remove a user account but retain access to the user’s files
-
Open the Windows Server Essentials Dashboard.
-
On the navigation bar, click Users.
-
In the list of user accounts, select the user account that you want to remove.
-
In the <User Account> Tasks pane, click Remove the user account. The Delete a User Account Wizard appears.
-
On the Do you want to keep the files? page, make sure that the Delete the files including File History backups and redirected folder for this user account check box is clear, and then click Next.
A confirmation page appears warning you that are deleting the account but keeping the files.
-
Click Delete account to remove the user account.
After the user account is removed, the administrator can give another user account access to the shared folder.
To give a user account permission to access a shared folder
-
Open the Windows Server Essentials Dashboard.
-
On the navigation bar, click Storage, and then click the Server Folders tab.
-
In the list of folders, select the Users folder.
-
In the Users Tasks pane, click Open the folder. Windows Explorer opens and displays the contents of the Users folder.
-
Right-click the folder for the user account that you want to share, and then click Properties.
-
In <User Account> Properties, click the Sharing tab, and then click Share.
-
In the File Sharing window, type or select the user account name with whom you want to share the folder, and then click Add.
-
Choose the Permission Level that you want the user account to have, and then click Share.
Synchronize the DSRM password with the network administrator password
Directory Services Restore Mode (DSRM) is a special boot mode for repairing or recovering Active Directory. The operating system uses DSRM to log on to the computer if Active Directory fails or needs to be restored. If your network administrator password and the DSRM password are different, DSRM will not load.
During a clean, first-time installation of Windows Server Essentials, the program sets the DSRM password to the network administrator account password that you specify during setup or in the migration answer file. When you change your network administrator password (as recommended typically every 60 days for increased server security), the password change is not forwarded to DSRM. This results in a password mismatch. If this occurs, you can use the following solutions to manually or automatically synchronize your network administrator’s password with the DSRM password.
To manually synchronize the DSRM password to a network administrator account
-
At a command prompt, run
ntdsutil.exeto open the ntdsutil tool. -
To reset the DSRM password, type set dsrm password.
-
To synchronize the DSRM password on a domain controller with the current network administrator’s account, type:
sync from domain account <current_network_administrator_account>, and then press Enter.
Because you will periodically change the password for the network administrator account, to ensure that the DSRM password is always the same as the current password of the network administrator, we recommend that you create a schedule task to automatically synchronize the DSRM password to the network administrator password daily.
To automatically synchronize the DSRM password to a network administrator account
-
From the server, open Administrative Tools, and then double-click Task Scheduler.
-
In the Task Scheduler Actions pane, click Create Task.
-
In the Name text box, type a name for the task such as AutoSync DSRM Password, and then select the Run with highest privileges option.
-
Define when the task should run:
-
In the Create Task dialog box, click the Triggers tab, and then click New.
-
In the New Trigger dialog box, select your recurrence option, specify the recurrence interval, and choose a start time.
[!NOTE]
As a best practice, you should set the task to run daily during non-business hours. -
Click OK to save your changes and return to the Create Task dialog box.
-
-
Define the task actions:
-
Click the Actions tab, and then click New. The New Action dialog box appears.
-
In the Action list, click Start a program, and then browse to C:WINDOWSSYSTEM32ntdsutil.exe.
-
In the Add arguments(optional) text box, type the following (you must include the quotation marks): set dsrm password sync from domain account SBS_network_administrator_account q q where SBS_network_administrator_account is the current network administrator’s account name.
-
-
Click OK twice to save the task and close the Create Task dialog box. The new task appears in the Active Tasks section of Task Schedule.
Give user accounts remote desktop permission
In the default installation of Windows Server Essentials, network users do not have permission to establish a remote connection to computers or other resources on the network.
Before network users can establish a remote connection to network resources, you must first set up Anywhere Access. After you set up Anywhere Access, users can access files, applications, and computers in your office network from a device in any location with an Internet connection.
The Set up Anywhere Access Wizard allows you to enable two methods of remote access:
-
Virtual private network (VPN)
-
Remote Web Access
When you run the wizard, you can also choose to allow Anywhere Access for all current and newly added user accounts.
To set up Anywhere Access, open the Dashboard Home page, click SETUP, and then click Set up Anywhere Access.
For more information about Anywhere Access, see Manage Anywhere Access.
Enable users to access resources on the server
This section applies to a server running Windows Server Essentials or Windows Server Essentials, or to a server running Windows Server 2012 R2 Standard or Windows Server 2012 R2 Datacenter with the Windows Server Essentials Experience role installed.
If you want users to use remote access, and/or have individual user accounts, after you finish connecting a computer to the server, you can create new network user accounts for the users of the networked computer on the server by using the Dashboard. For more information about creating a user account, see Add a user account. After creating the user accounts, you must provide the network user name and password information to the users of the client computer so that they can access resources on the server by using the Launchpad.
For each user account that you create you can set access for the following through the user account properties:
-
Shared folders. By default, network administrators have Read/Write permission to all the shared folders, and standard user accounts have Read-only permissions to the Company folder. If media streaming is enabled, you can assign folder access permissions for individual standard user accounts for the following shared folders: Music, Pictures, Recorded TV, and Videos. You can set permissions for user accounts to access shared folders on the Shared folders tab of the user account properties.
-
Anywhere Access. By default, network administrators can use either VPN or Remote Web Access to access server resources. For standard user accounts, you must set user account permissions on the Anywhere Access tab.
-
Computer access. By default, network administrators can access all the computers in the network. However, for standard user accounts you can set individual user account permissions for accessing computers on the network on the Computer access tab of the user account properties.
To edit user account properties in Windows Server Essentials 2012 R2
-
Open the Windows Server Essentials Dashboard.
-
On the navigation bar, click USERS.
-
In the list of user accounts, select the user account that you want to edit.
-
In the <User Account> Tasks pane, click View the account properties.
-
In the <User Account> Properties, do the following:
-
On the Shared folders tab, set the appropriate folder permissions for each shared folder as needed.
-
On the Anywhere Access tab:
-
To allow a user to connect to the server by using VPN, select the Allow Virtual Private Network (VPN) check box.
-
To allow a user to connect to the server by using Remote Web Access, select the Allow Remote Web Access and access to web services applications check box.
-
-
On the Computer access tab, select the network computers that you would like the user to have access to.
-
To edit user account properties in Windows Server Essentials 2012
-
Open the Windows Server Essentials Dashboard.
-
On the navigation bar, click USERS.
-
In the list of user accounts, select the user account that you want to edit.
-
In the <User Account> Tasks pane, click Properties.
-
In the <User Account> Properties, do the following:
-
On the General tab, select User can view network health alerts if the user account needs to access network health reports.
-
On the Shared folders tab, set the appropriate folder permissions for each shared folder as needed.
-
On the Anywhere Access tab:
-
To allow a user to connect to the server by using VPN, select the Allow Virtual Private Network (VPN) check box.
-
To allow a user to connect to the server by using Remote Web Access, select the Allow Remote Web Access and access to web services applications check box.
-
-
On the Computer access tab, select the network computers that you would like the user to have access to.
-
Change remote access permissions for a user account
A user can access resources located on the server from a remote location by using a virtual private network (VPN), Remote Web Access, or other web services applications. By default, remote access permissions are turned on for network users when you configure Anywhere Access in Windows Server Essentials by using the Dashboard.
To change remote access permissions for a user account
-
Open the Windows Server Essentials Dashboard.
-
On the navigation bar, click Users.
-
In the list of user accounts, select the user account that you want to change.
-
In the <User Account> Tasks pane, click View the account properties. The Properties page for the user account appears.
-
On the Anywhere Access tab, do the following:
-
Select the Allow Virtual Private Network (VPN) check box to allow a user to connect to the server by using VPN.
-
Select the Allow Remote Web Access and access to web services applications check box to allow a user to connect to the server by using Remote Web Access.
-
-
Click Apply, and then click OK.
Change virtual private network permissions for a user account
You can use a virtual private network (VPN) to connect to Windows Server Essentials and access all your resources that are stored on the server. This is especially useful if you have a client computer that is set up with network accounts that can be used to connect to a hosted Windows Server Essentials server through a VPN connection. All the newly created user accounts on the hosted Windows Server Essentials server must use VPN to log on to the client computer for the first time.
To change VPN permissions for network users
-
Open the Windows Server Essentials Dashboard.
-
On the navigation bar, click USERS.
-
In the list of user accounts, select the user account to which you want to grant permissions to access the desktop remotely.
-
In the <User Account> Tasks pane, click Properties.
-
In the <User Account> Properties, click the Anywhere Access tab.
-
On the Anywhere Access tab, to allow a user to connect to the server by using VPN, select the Allow Virtual Private Network (VPN) check box.
-
Click Apply, and then click OK.
Change access to internal shared folders for a user account
You can manage access to any shared folders on the server by using the tasks on the Server Folders tab of the Dashboard. By default, the following server folders are created when you install Windows Server Essentials:
-
Client Computer Backups. Used to store client computer backups created by Windows Server backup. This server folder is not shared.
-
Company. Used to store and access documents related to your organization by network users.
-
File History Backups. By default, Windows Server Essentials stores file backups created by using File History. This server folder is not shared.
-
Folder Redirection. Used to store and access folders that are set up for folder redirection by network users. This server folder is not shared.
-
Music. Used to store and access music files by network users. This folder is created when you turn on media sharing.
-
Pictures. Used to store and access pictures by network users. This folder is created when you turn on media sharing.
-
Recorded TV. Used to store and access recorded TV programs by network users. This folder is created when you turn on media sharing.
-
Videos. Used to store and access videos by network users. This folder is created when you turn on media sharing.
-
Users. Used to store and access files by network users. A user-specific folder is automatically generated in the Users server folder for every network user account that you create.
To change access to a shared folder for a user account
-
Open the Windows Server Essentials Dashboard.
-
Click STORAGE, and then click Server Folders.
-
Navigate to and select the server folder for which you want to modify permissions.
-
In the task pane, click View the folder properties.
-
In <FolderName> Properties, click Sharing, and select the appropriate user access level for the listed user accounts, and then click Apply.
[!NOTE]
You cannot modify the sharing permissions for File History Backups, Folder Redirection, and Users server folders. Hence, the folder properties of these server folders do not include a Sharing tab.
Allow user accounts to establish a remote desktop session to their computer
This section applies to a server running Windows Server Essentials or Windows Server Essentials, or to a server running Windows Server 2012 R2 Standard or Windows Server 2012 R2 Datacenter with the Windows Server Essentials Experience role installed.
The network administrator can grant permissions to network users that allow them to access their network computers from a remote location.
To enable users to access their network computers from a remote location
-
Open the Windows Server Essentials Dashboard.
-
On the navigation bar, click USERS.
-
In the list of user accounts, select the user account that you want to grant permissions for accessing the desktop remotely.
-
In the <User Account> Tasks pane, click Properties.
-
In the <User Account> Properties, click the Computer Access tab.
-
Select the computers that you want this user account to be able to access remotely, and then click OK.
Additional References
-
Manage Online Accounts for Users
-
Get Connected
-
Use Windows Server Essentials
-
Manage Windows Server Essentials