There are lots of tools for creating RAM drives. None of them seem to work for windows 2008 R2. Does anyone know if this is possible and if so how. Does anyone know of a tool that does work?
I’ve tried the gavotte ram disk. It doesn’t work. When i try to install it it just sais «Failed». I don’t see log files anywhere. I’ve tried a couple of other ones (forgot the names) to no avail.
Any ideas?
Thanks
![]()
Ben Pilbrow
12k5 gold badges36 silver badges57 bronze badges
asked Dec 2, 2010 at 21:52
![]()
We’ve got an old version of the StarWind iSCSI Target software that works in 2008 R2 and can create RAM disks. It’s not free, and it comes with an iSCSI wrapper, but it still works.
answered Dec 2, 2010 at 22:19
![]()
Mark HendersonMark Henderson
68.4k31 gold badges176 silver badges256 bronze badges
Как создать RAM диск в оперативной памяти средствами Windows Server
RAM диск – это виртуальный диск, созданный в свободной области оперативной памяти, который воспринимается операционной системой как отдельный физический диск. За счет, того, что RAM диск хранится в быстрой оперативной памяти, все операции чтения/записи с такого диска выполняются почти мгновенно, даже быстрее, чем при использовании SSD накопителя (у самых производительных SSD скорость передачи данных сейчас составляет около 560МБ/с, в то время как у памяти DDR4 — 12000-25000МБ/с).
Использование RAM диска целесообразно в системах с избытком оперативной памяти. На таком RAM диске можно размещать кэш и временные файлы приложений/системы, временные базы SQL, тем самым можно добиться существенного увеличения производительности приложений.
В операционной системе Windows отсутствуют встроенные средства создания RAM-дисков, поэтому в этих целях приходится использовать сторонние программы (AMD RAMDisk, ImDisk, PassMark OSFMount, StarWind RAM Disk и т.д.).
Однако в Windows Server вы можете создать RAM диск и без использования сторонних программ. Для этого можно воспользоваться драйвером iSCSI.
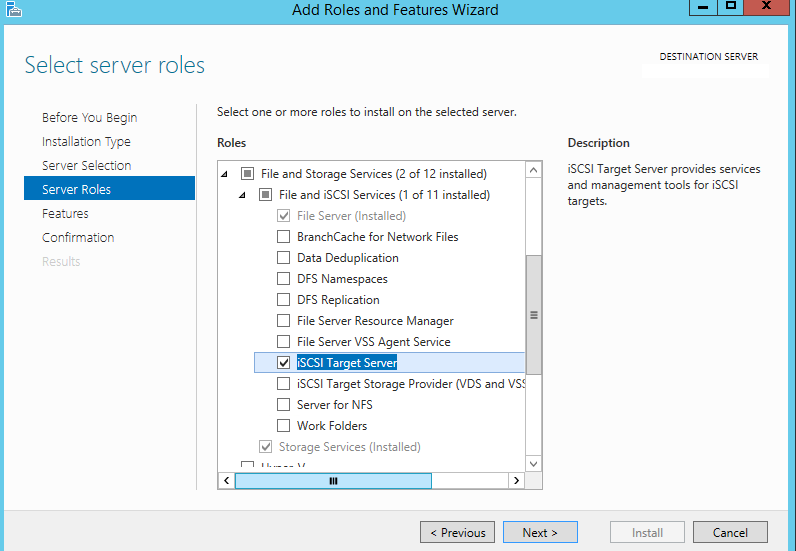
В первую очередь на сервере нужно установить компонент iSCSI Target Server (входит в состав роли File and Storage Services).
Если у вас включен файервол Windows, необходимо разрешить трафик для службы iSCSI Service.
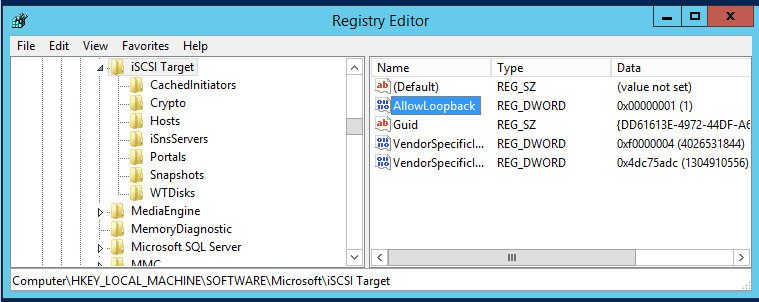
Чтобы разрешить трафик на loopback интерфейс для iSCSI, нужно в ветке реестра HKLMSoftwareMicrosoftiSCSI Target изменить значение DWORD параметра AllowLoopBack на 1. Можно изменить ключ реестра из PowerShell одной командой:
Set-ItemProperty -Path ‘HKLM:SOFTWAREMicrosoftiSCSI Target’ -Name AllowLoopBack -Value 1
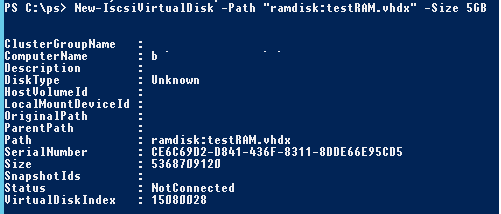
Теперь откройте консоль PowerShell и создайте виртуальный RAM диск размером 5 Гб командой:
New-IscsiVirtualDisk -Path «ramdisk:testRAM.vhdx» -Size 5GB
Теперь нужно создать iSCSI таргет:
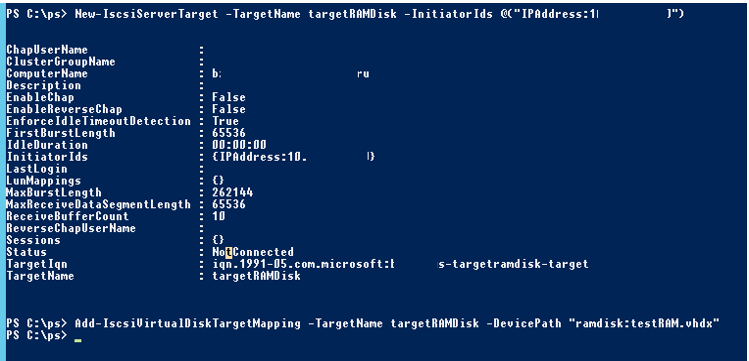
New-IscsiServerTarget -TargetName targetRAMDisk -InitiatorIds @(«IPAddress:10.1.1.200»)
Подключим RAM диск в созданный iSCSI таргет
Add-IscsiVirtualDiskTargetMapping -TargetName targetRAMDisk -DevicePath «ramdisk:testRAM.vhdx»

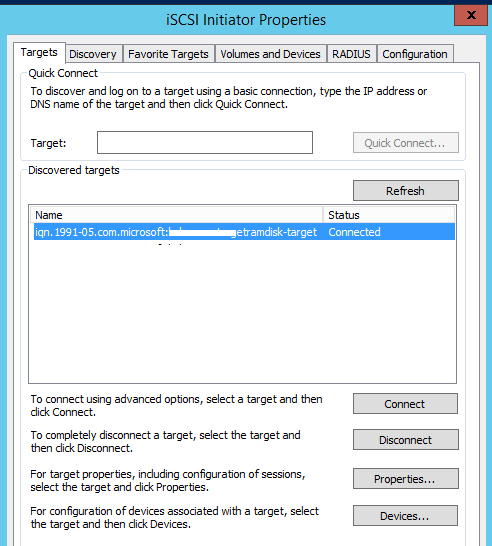
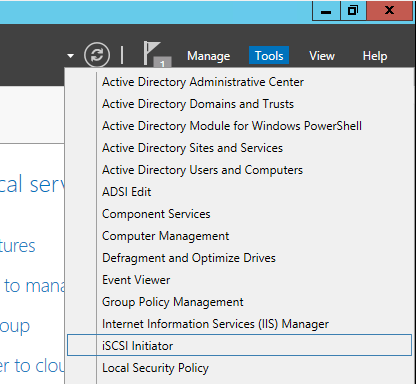
Теперь нужно запустить консоль iSCSI Initiator через Server Manager

На вкладке Targets укажите IP адрес вашего сервера, нажмите Quick Connect и подключите ваш iSCSI таргет.
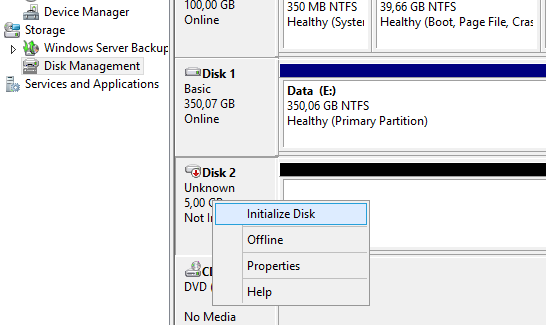
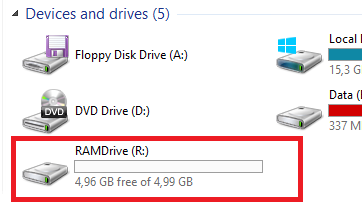
Теперь откройте консоль управления дисками и проверьте, что у вас появился новый диск размером 5 Гб. Это и есть тот самый RAM диск. Инициализируйте, разметьте и отформатируйте данный диск. Назначьте ему букву диска.
Теперь вы можете перенести необходимые файлы на RAM диск и перенастроить ПО на использование данного диска.

После перезагрузки сервера RAM диск удаляется (вместе со всем содержимым) и его нужно пересоздавать заново.
В некоторых сторонних программах для создания RAM дисков есть возможность сохранения данных RAM диска в файл на жестком диске. После перезагрузки системы данные извлекаются и помещаются на RAM диск.
Источник
How to Create a RAM Disk on Windows Server?
A RAM disk is a virtual disk created in a free area of the memory (RAM) that it sees by the OS as a separate physical disk. Due to the RAM disk being stored in the fast RAM, all read/write operations on this disk are performed almost instantaneously, even faster than when using an SSD (the data transfer speed of the most productive SSDs is about 560 MB/s, while DDR4 memory – 12,000-25,000 MB/s.)
It is recommended to use a RAM disk in systems with an excess of free memory. You can use the RAM disk to place the cache or temporary files of apps/system, temporary SQL databases. Thus you can achieve a significant increase in the applications and databases performance.
In Windows OS, there are no integrated tools to create RAM disks, so you have to use third-party software to do it (AMD RAMDisk, ImDisk, PassMark OSFMount, StarWind RAM Disk, etc.).
However, you can create a RAM disk in Windows Server without using any third-party apps. To do it, you can use the iSCSI driver.
First, install the iSCSI Target Server component (it is the part of the File and Storage Services role).

If you have Windows Firewall enabled, you must allow iSCSI Service traffic.
To allow traffic to the loopback interface for iSCSI, change the value of the DWORD parameter AllowLoopBack to 1 in the HKLMSoftwareMicrosoftiSCSI Target registry key. You can change the registry parameter from PowerShell using a single command:
Set-ItemProperty -Path ‘HKLM:SOFTWAREMicrosoftiSCSI Target’ -Name AllowLoopBack -Value 1

Now open the PowerShell console and create a 5 GB virtual RAM disk using this command:
New-IscsiVirtualDisk -Path «ramdisk:testRAM.vhdx» -Size 5GB

Now you need to create an iSCSI target pointing to the IP address of your server (not localhost!):
New-IscsiServerTarget -TargetName targetRAMDisk -InitiatorIds @(«IPAddress:10.1.1.200»)
Connect the RAM disk to the created iSCSI target:
Add-IscsiVirtualDiskTargetMapping -TargetName targetRAMDisk -DevicePath «ramdisk:testRAM.vhdx»
Run the iSCSI Initiator management console through Server Manager.
Specify the IP address of your server in the Targets tab and click Quick Connect to add your iSCSI target.

You can connect the iSCSI Target with the command:
Open the Disk Management console and make sure that the new 5 GB disk appeared there. This is the RAM disk we created. Initialize the disk, create a partition and format it. Assign a disk letter to it.
Get-Disk | Where partitionstyle -eq ‘raw’ | Initialize-Disk -PartitionStyle MBR -PassThru | New-Partition -AssignDriveLetter -UseMaximumSize | Format-Volume -FileSystem NTFS -NewFileSystemLabel «disk2» -Confirm:$false

Now you can move app files to the RAM disk and reconfigure your software to use it.
After rebooting the server, the RAM disk is removed with all its contents and you will have to re-create it again.
To remove your RAM disk, use the following commands:
Remove-IscsiVirtualDiskTargetMapping -TargetName targetRAMDisk -DevicePath «ramdisk:testRAM.vhdx»
Remove-IscsiServerTarget -TargetName targetRAMDisk
Remove-IscsiVirtualDisk -Path «ramdisk:testRAM.vhdx»
How to Add, Edit, Deploy and Import Registry Keys through GPO?
How to Deploy SSL Certificate on a Computers Using GPO?
Manage Groups in Azure AD and Microsoft 365.
Invoke-WebRequest: Perform HTTP Requests, Download Files, Parse Web.
Configuring Port Forwarding in Windows
Get-ADComputer: Find Computer Properties in Active Directory with.
Running PowerShell Startup (Logon) Scripts Using GPO
Great tutorial. I was able to create my ram disk.
“After rebooting the server, the RAM disk is removed with all its contents and you will have to re-create it again.”
Is there a way to make the RAM disk perpetual on a Windows Server?
I have an automatic service that starts automatically and I need to make sure that the drive is mounted at system boot up so that the service can make use of the disk.
Adrian, maybe running the power shell script at startup and setting the app service with automatic delayed start.
very slow for me on vm: C: FC SSD, M: ramdisk
C:chudytest1>winsat disk -drive m
Windows System Assessment Tool
> Running: Feature Enumeration ”
> Run Time 00:00:00.00
> Running: Storage Assessment ‘-drive m -ran -read’
> Run Time 00:00:00.38
> Running: Storage Assessment ‘-drive m -seq -read’
> Run Time 00:00:01.44
> Running: Storage Assessment ‘-drive m -seq -write’
> Run Time 00:00:02.55
> Running: Storage Assessment ‘-drive m -flush -seq’
> Run Time 00:00:00.44
> Running: Storage Assessment ‘-drive m -flush -ran’
> Run Time 00:00:00.47
> Disk Random 16.0 Read 110.98 MB/s 7.2
> Disk Sequential 64.0 Read 273.13 MB/s 7.6
> Disk Sequential 64.0 Write 546.02 MB/s 8.1
> Average Read Time with Sequential Writes 0.082 ms 8.8
> Latency: 95th Percentile 0.141 ms 8.9
> Latency: Maximum 0.865 ms 8.9
> Average Read Time with Random Writes 0.090 ms 8.9
> Total Run Time 00:00:05.36
C:chudytest1>winsat disk -drive c
Windows System Assessment Tool
> Running: Feature Enumeration ”
> Run Time 00:00:00.00
> Running: Storage Assessment ‘-drive c -ran -read’
> Run Time 00:00:00.23
> Running: Storage Assessment ‘-drive c -seq -read’
> Run Time 00:00:02.61
> Running: Storage Assessment ‘-drive c -seq -write’
> Run Time 00:00:01.84
> Running: Storage Assessment ‘-drive c -flush -seq’
> Run Time 00:00:01.55
> Running: Storage Assessment ‘-drive c -flush -ran’
> Run Time 00:00:01.67
> Disk Random 16.0 Read 188.32 MB/s 7.7
> Disk Sequential 64.0 Read 3377.72 MB/s 9.3
> Disk Sequential 64.0 Write 754.20 MB/s 8.3
> Average Read Time with Sequential Writes 0.558 ms 7.9
> Latency: 95th Percentile 1.368 ms 8.1
> Latency: Maximum 7.964 ms 8.2
> Average Read Time with Random Writes 0.580 ms 8.6
> Total Run Time 00:00:08.03
Источник
How to Create a RAM Disk on Windows Server?
A RAM disk is a virtual disk created in a free area of the memory (RAM) that it sees by the OS as a separate physical disk. Due to the RAM disk being stored in the fast RAM, all read/write operations on this disk are performed almost instantaneously, even faster than when using an SSD (the data transfer speed of the most productive SSDs is about 560 MB/s, while DDR4 memory – 12,000-25,000 MB/s.)
It is recommended to use a RAM disk in systems with an excess of free memory. You can use the RAM disk to place the cache or temporary files of apps/system, temporary SQL databases. Thus you can achieve a significant increase in the applications and databases performance.
In Windows OS, there are no integrated tools to create RAM disks, so you have to use third-party software to do it (AMD RAMDisk, ImDisk, PassMark OSFMount, StarWind RAM Disk, etc.).
However, you can create a RAM disk in Windows Server without using any third-party apps. To do it, you can use the iSCSI driver.
First, install the iSCSI Target Server component (it is the part of the File and Storage Services role).
If you have Windows Firewall enabled, you must allow iSCSI Service traffic.
To allow traffic to the loopback interface for iSCSI, change the value of the DWORD parameter AllowLoopBack to 1 in the HKLMSoftwareMicrosoftiSCSI Target registry key. You can change the registry parameter from PowerShell using a single command:
Set-ItemProperty -Path ‘HKLM:SOFTWAREMicrosoftiSCSI Target’ -Name AllowLoopBack -Value 1
Now open the PowerShell console and create a 5 GB virtual RAM disk using this command:
New-IscsiVirtualDisk -Path «ramdisk:testRAM.vhdx» -Size 5GB
Now you need to create an iSCSI target pointing to the IP address of your server (not localhost!):
New-IscsiServerTarget -TargetName targetRAMDisk -InitiatorIds @(«IPAddress:10.1.1.200»)
Connect the RAM disk to the created iSCSI target:
Add-IscsiVirtualDiskTargetMapping -TargetName targetRAMDisk -DevicePath «ramdisk:testRAM.vhdx»
Run the iSCSI Initiator management console through Server Manager.
Specify the IP address of your server in the Targets tab and click Quick Connect to add your iSCSI target.
You can connect the iSCSI Target with the command:
Open the Disk Management console and make sure that the new 5 GB disk appeared there. This is the RAM disk we created. Initialize the disk, create a partition and format it. Assign a disk letter to it.
Get-Disk | Where partitionstyle -eq ‘raw’ | Initialize-Disk -PartitionStyle MBR -PassThru | New-Partition -AssignDriveLetter -UseMaximumSize | Format-Volume -FileSystem NTFS -NewFileSystemLabel «disk2» -Confirm:$false
Now you can move app files to the RAM disk and reconfigure your software to use it.
After rebooting the server, the RAM disk is removed with all its contents and you will have to re-create it again.
To remove your RAM disk, use the following commands:
Remove-IscsiVirtualDiskTargetMapping -TargetName targetRAMDisk -DevicePath «ramdisk:testRAM.vhdx»
Remove-IscsiServerTarget -TargetName targetRAMDisk
Remove-IscsiVirtualDisk -Path «ramdisk:testRAM.vhdx»
How to Add, Edit, Deploy and Import Registry Keys through GPO?
How to Deploy SSL Certificate on a Computers Using GPO?
Manage Groups in Azure AD and Microsoft 365.
Invoke-WebRequest: Perform HTTP Requests, Download Files, Parse Web.
Configuring Port Forwarding in Windows
Get-ADComputer: Find Computer Properties in Active Directory with.
Running PowerShell Startup (Logon) Scripts Using GPO
Great tutorial. I was able to create my ram disk.
“After rebooting the server, the RAM disk is removed with all its contents and you will have to re-create it again.”
Is there a way to make the RAM disk perpetual on a Windows Server?
I have an automatic service that starts automatically and I need to make sure that the drive is mounted at system boot up so that the service can make use of the disk.
Adrian, maybe running the power shell script at startup and setting the app service with automatic delayed start.
very slow for me on vm: C: FC SSD, M: ramdisk
C:chudytest1>winsat disk -drive m
Windows System Assessment Tool
> Running: Feature Enumeration ”
> Run Time 00:00:00.00
> Running: Storage Assessment ‘-drive m -ran -read’
> Run Time 00:00:00.38
> Running: Storage Assessment ‘-drive m -seq -read’
> Run Time 00:00:01.44
> Running: Storage Assessment ‘-drive m -seq -write’
> Run Time 00:00:02.55
> Running: Storage Assessment ‘-drive m -flush -seq’
> Run Time 00:00:00.44
> Running: Storage Assessment ‘-drive m -flush -ran’
> Run Time 00:00:00.47
> Disk Random 16.0 Read 110.98 MB/s 7.2
> Disk Sequential 64.0 Read 273.13 MB/s 7.6
> Disk Sequential 64.0 Write 546.02 MB/s 8.1
> Average Read Time with Sequential Writes 0.082 ms 8.8
> Latency: 95th Percentile 0.141 ms 8.9
> Latency: Maximum 0.865 ms 8.9
> Average Read Time with Random Writes 0.090 ms 8.9
> Total Run Time 00:00:05.36
C:chudytest1>winsat disk -drive c
Windows System Assessment Tool
> Running: Feature Enumeration ”
> Run Time 00:00:00.00
> Running: Storage Assessment ‘-drive c -ran -read’
> Run Time 00:00:00.23
> Running: Storage Assessment ‘-drive c -seq -read’
> Run Time 00:00:02.61
> Running: Storage Assessment ‘-drive c -seq -write’
> Run Time 00:00:01.84
> Running: Storage Assessment ‘-drive c -flush -seq’
> Run Time 00:00:01.55
> Running: Storage Assessment ‘-drive c -flush -ran’
> Run Time 00:00:01.67
> Disk Random 16.0 Read 188.32 MB/s 7.7
> Disk Sequential 64.0 Read 3377.72 MB/s 9.3
> Disk Sequential 64.0 Write 754.20 MB/s 8.3
> Average Read Time with Sequential Writes 0.558 ms 7.9
> Latency: 95th Percentile 1.368 ms 8.1
> Latency: Maximum 7.964 ms 8.2
> Average Read Time with Random Writes 0.580 ms 8.6
> Total Run Time 00:00:08.03
Источник
Ramdisk как установить windows server 2008

Драйвер программы эмулирует в системе виртуальный диск (раздел), физически хранящийся в оперативной памяти.
http://ru.wikipedia.org/wiki/RAM_drive
Среди множества аналогичных продуктов хочу выделить Qsoft RAMDisk «Enterprise». Русскоязычная версия распространяется бесплатно, программа обладает достаточной функциональностью и стабильностью. Последняя из доступных . Проверена на Windows 7, 8, 10
AMD Radeon RAMDisk | Primo Ramdisk | ImDisk
Предлагаю здесь делиться опытом по использованию RAM-дисков, тонкостям настройки, примерами использования и т.д.
Сообщение отредактировал velikashkin — 29.03.18, 12:00
Насколько я понимаю этот рам диск только для временных файлов в т.ч. для файла подкачки и т.д. Сделаю я на рам файл подкачки 6 гигов и что это мне даст ощутимый прирост?Он ещё каждый раз при старте системы стирается.CUDA вроде и на этой матери работает нормально,тут скорее вопрос поддерживает ли программа куду.Адоб поддерживает.

Сообщение отредактировал Shoore — 19.03.12, 01:02
funky88, во всех приложения, активно работающих с диском, производительность увеличивается на порядок. Как с этим обстоят дела в Премьере не в курсе. Можно помониторить дисковую активность.
Кстати, проверить — дело пяти минут. В шапке программа, перезагрузка не требуется. Просто пренеси на РАМ что-либо, куда производится частая запись, а на его месте сделай символьную (?) ссылку.
cmd > mklink /j «старое_расположение_папки» «новое_расположение_папки» > enter
Только не забудь при удалении рамдиска вернуть папку на место. Дисковую активность удобно мониторить этим
Сообщение отредактировал Shoore — 25.03.12, 12:42
Я использую SuperSpeed RamDisk Plus 11.5.390.x86
Размер поставил 755 МБ. Перенёс на него:
Cache IE9
Mozilla (Portable) полностью
Skype (Portable) полностью
Второй Skype с другим профилем (Portable) полностью
uTorrent 2.2 (Portable) полностью
Журналы (Logs) Windows:
Application
Security
Setup
System
Свободны ещё 305 Мб.
Единственное неудобство — планшет долго на мой взгляд выключается, включается ненамного медленнее.
На планшете стоит 4 ГБ ОП, сборка WINDOWS 7 Ultimate x86 for MSI WindPad 110W (prepared by xalex & zhuk.m)
Сообщение отредактировал zhuk.m — 19.03.12, 21:51
Видимо, на запись драйв совсем медленный.
У меня и то и другое сопоставимо, но само время увеличилось в разы.
Добавлено 19.03.2012, 21:50:
Туда, кстати, относительно немного пишется. Гораздо больше в %user%AppData и ProgramData
Добавлено 19.03.2012, 21:54:
А сами программы нет смысла там держать полностью, у них постоянные обращения идут к Профилям. Utorret вообще любой портируется переносом файлов из C:UsersuserAppDataRoaminguTorrent в папку с экзешником.
Сообщение отредактировал Shoore — 19.03.12, 22:10

Это потеря всех основных преимуществ SSD. Смысл его тогда использовать? По статистике, ещё ни один SSD не вышел из строя по причине износа.
Вот интересный ресурс SSD Write Endurance 25nm Vs 34nm
Сообщение отредактировал Shoore — 20.03.12, 00:06

И не забудьте настроить сохранение образа, иначе потеряется всё, что там.
Ну или резервируйте инфу на время экспериментов.
Да, и подкачку включите. 8ГБ не тот объём, что бы можно было без неё обходится. Прецедентов масса.
Сообщение отредактировал Shoore — 22.03.12, 00:01

Сообщение отредактировал 404 not found — 20.03.12, 12:44
Зависит от задач  Если не класть туда системные темпы, хватит и одного-полутора ГБ.

Пока всё нормально.
Сообщение отредактировал Shoore — 20.03.12, 00:42
еще раз извиняюсь за назойливость. но впечатление, что мануал писали таджики, а переводили китайцы.
Вот на скрине:
1. это место зарезервировано под оперативу?
2. это размер, который можно использовать под RAM диск, остальное под файловую систему
так я понимаю?
а что такое 3?
спасибо

Посмотрите мой скрин выше с Монитором ресурсов. Это какое-то оборудование (часто видеокарта) железно резервирует себе часть оперативной памяти.
в общем остановился на гиге рамдиска. перенес профиль, кеш огнелиса, темп пользователя (общий боюсь не влезет, если придется что-нибудь глобальное распаковывать, или обновы какие мелкософт гигансткие выпустит), туда же всунул uTorrent Portable. Все, будем посмотреть. Сейчас наибольшую активность проявляет MES, но боюсь я с ним ничего не сделаю.

з.ы. подкачку включил, но сделал всего 2 гига, хватит ей.
Сообщение отредактировал 404 not found — 20.03.12, 19:00
Да у него активность полгига в сутки. Не страшно. Дело не столько избавится от активности, сколько повысить быстродействие.
uTorrent вообще убрать на HDD, там ему самое место.
У меня подкачка 500МБ-4ГБ пока что не вышла за рамки 500.
Файл уберите, ссылку можно. Но не нужно. Гугл у всех есть.
Сообщение отредактировал Shoore — 20.03.12, 19:09
Odysseus,
нет, это не файл подкачки, это как бы «виртуальный» диск (сорри за сочиненный на ходу термин), скорость чтения и записи у которого в разы больше, чем с жесткого диска, и равна скорости твоей оперативы.
Смысл как раз и в браузере, скорости распаковки архивов, установки игр (ну с этим на 6-8 гигах особо не разгонишся). Чего я сделал, см. выше. Откусить 1-1.5 гига от оперативы ничего страшного ( у вас часто она бывает заполнена до 80%?)
Как-то так
Сообщение отредактировал 404 not found — 20.03.12, 19:57
Источник
Как создать RAM-диск и перенести кэш 1С
В статье разберём по шагам, как создаётся RAM-диск в ОС Windows. Тестовая система — Windows Server 2008 R2. ПО для создания RAM-диска — Dataram RAMDisk. Перенос кэша 1С используем в качестве примера.
На момент написания статьи официальный релиз программы на сайте разработчика — версия 4.4.0.RC36 . Объём RAM-диска до 1 Гб — ограничение бесплатной версии. Но, в ранней версии 4.4.0.RC19 — допускается создавать диск объёмом до 4 Гб.
Установка и настройка RAM-диска
Для установки приложения требуется наличие в системе клиентского профиля .NET Framework 4.0 или выше.
- Загружаем с официального сайта файл- инсталлятор и запускаем Dataram_RAMDisk_4_4_0_RC36.msi.
- Принимаем лицензионное соглашение и нажимаем на «Install». После установки программа запустится автоматически запуск установки Dataram RAMDisk.
- Настройки программы на вкладке «Setting» , больше параметров в «View — Advanced» .
Настройки — смотрим вкладку «Settings» сверху вниз:
1. Варианты «When I click start,» ( «когда я нажму «Создать»):
- Create a new FAT disk (создать новый диск с файловой системой FAT).
- Create a new unformatted disk (создать новый диск без форматирования).
- Load a saved image (загрузить сохранённый образ диска) — рекомендуется.
2. Поле «From» : путь к файлу-образу RAMDisk.img.
3. Поле «Using» : количество мегабайт памяти для RAM-диска.
4. Указываем метку диска через выбор «Label it» , не указывать — «Leave it unlabeled».
5. Создать временный каталог Temp — «create», не создавать — «do not create» .
6. Рекомендуем также выбрать режим сохранения данных при выключении ПК — «save them on shutdown» . При следующем включении содержимое RAM-диска будет восстановлено с образа RAMDisk.img.
Выбрав настройки, нажмите «Start RAMDisk» и подтвердите установку устройства.
После чего в системе появляется RAM-диск и становится доступным для обзора.
Источник
Создание RAM диска на Windows встроенными средствами
Создадим RAM диск на Windows Server 2012 R2. Выделим из оперативки 32 Гб в отдельный диск R. Используем для этого средства Windows через драйвер iSCSI.
Для создания RAM диска нам понадобится оперативка. Вставляем в сервер память или выделяем её виртуальной машине:
Итак, 32 Гб оперативки добавили.
Добавляем серверу роль iSCSI Target Server:
Настраиваем Windows Firewall. Выполняем:
Запускается оснастка Windows Firewall. Нажимаем Allow an app or feature through Windows Firewall:
Выбираем iSCSI Service и ставим галки на Domain, Private, Public:
В настройках реестра убеждаемся в наличие значения:
HKLMSoftwareMicrosoftiSCSI Target
Value Name: AllowLoopBack
Type: REG_DWORD
Value: 1
Запускаем Powershell и создаём виртуальный диск как Ramdisk:
New-IscsiVirtualDisk -Path «ramdisk:tempdbRAM.vhdx» -Size 32GB
Создаём target iSCSI:
New-IscsiServerTarget -TargetName targetRAM -InitiatorIds @(«IPAddress:10.10.30.10»)
Я сначала пробовал на 127.0.0.1, но что-то не срослось. Пришлось использовать локальный IP адрес, на нём всё завелось.
Мапим Ramdisk на target iSCSI:
Add-IscsiVirtualDiskTargetMapping -TargetName targetRAM -DevicePath «ramdisk:tempdbRAM.vhdx»
Запускаем консоль Server Manager и кликаем Tools > iSCSI Initiator:
Просят запустить iSCSI сервис, соглашаемся:
Запускается настройка iSCSI Initiator Properties:
Указываем в Target адрес, у меня в коде выше был 10.10.30.10, кликаем Quick Connect.
Login Succeeded. Всё в порядке. В оснастке Disk Management можно увидеть новый диск:
Настроил его как R.
Тестируем с помощью ATTO Disk Benchmark.
И видим засаду — скорось чтения/записи очень мала, по сравнению с RAM диском от WinRamTech Ramdisk Enterprise:
У технологии есть свои плюсы и минусы. Не требуется сторонний софт, можно презентовать диск другому серверу. Но низкая скорость портит всё удовольствие. Возможно, есть способы ускорить, я вникать не стал.
Как всё это разобрать
Удаляем диск, потом:
Remove-IscsiVirtualDiskTargetMapping -TargetName targetRAM -DevicePath «ramdisk:tempdbRAM.vhdx»
Remove-IscsiServerTarget -TargetName targetRAM
Remove-IscsiVirtualDisk -Path «ramdisk:tempdbRAM.vhdx»
Если вам понравилась статья, то ставьте 👍🏻 каналу.
Пишите комментарии, задавайте вопросы, подписывайтесь.
Источник
A RAM disk is a virtual disk created in a free area of the memory (RAM) that it sees by the OS as a separate physical disk. Due to the RAM disk being stored in the fast RAM, all read/write operations on this disk are performed almost instantaneously, even faster than when using an SSD (the data transfer speed of the most productive SSDs is about 560 MB/s, while DDR4 memory – 12,000-25,000 MB/s.)
It is recommended to use a RAM disk in systems with an excess of free memory. You can use the RAM disk to place the cache or temporary files of apps/system, temporary SQL databases. Thus you can achieve a significant increase in the applications and databases performance.
In Windows OS, there are no integrated tools to create RAM disks, so you have to use third-party software to do it (AMD RAMDisk, ImDisk, PassMark OSFMount, StarWind RAM Disk, etc.).
However, you can create a RAM disk in Windows Server without using any third-party apps. To do it, you can use the iSCSI driver.
First, install the iSCSI Target Server component (it is the part of the File and Storage Services role).

If you have Windows Firewall enabled, you must allow iSCSI Service traffic.
To allow traffic to the loopback interface for iSCSI, change the value of the DWORD parameter AllowLoopBack to 1 in the HKLMSoftwareMicrosoftiSCSI Target registry key. You can change the registry parameter from PowerShell using a single command:
Set-ItemProperty -Path 'HKLM:SOFTWAREMicrosoftiSCSI Target' -Name AllowLoopBack -Value 1

Now open the PowerShell console and create a 5 GB virtual RAM disk using this command:
New-IscsiVirtualDisk -Path "ramdisk:testRAM.vhdx" -Size 5GB

Now you need to create an iSCSI target pointing to the IP address of your server (not localhost!):
New-IscsiServerTarget -TargetName targetRAMDisk -InitiatorIds @("IPAddress:10.1.1.200")
Connect the RAM disk to the created iSCSI target:
Add-IscsiVirtualDiskTargetMapping -TargetName targetRAMDisk -DevicePath "ramdisk:testRAM.vhdx"

Run the iSCSI Initiator management console through Server Manager.

Specify the IP address of your server in the Targets tab and click Quick Connect to add your iSCSI target.

You can connect the iSCSI Target with the command:
Get-IscsiTarget | Connect-IscsiTarget
Open the Disk Management console and make sure that the new 5 GB disk appeared there. This is the RAM disk we created. Initialize the disk, create a partition and format it. Assign a disk letter to it.
You can initialize a RAM disk and assign it a drive letter using the PowerShell cmdlets from the built-in disk and partition management module Storage with a following one-liner:
Get-Disk | Where partitionstyle -eq 'raw' | Initialize-Disk -PartitionStyle MBR -PassThru | New-Partition -AssignDriveLetter -UseMaximumSize | Format-Volume -FileSystem NTFS -NewFileSystemLabel "disk2" -Confirm:$false

Now you can move app files to the RAM disk and reconfigure your software to use it.

After rebooting the server, the RAM disk is removed with all its contents and you will have to re-create it again.
Some third-party programs that create RAM disks allow saving RAM disk data as a file on your hard drive. When the system is restarted, the data are extracted and moved to the RAM disk.
To remove your RAM disk, use the following commands:
Remove-IscsiVirtualDiskTargetMapping -TargetName targetRAMDisk -DevicePath "ramdisk:testRAM.vhdx"

Remove-IscsiServerTarget -TargetName targetRAMDisk

Remove-IscsiVirtualDisk -Path "ramdisk:testRAM.vhdx"