Мало кто из обычных пользователей ПК знает о наличии скрытых разделов на системном диске, которые могут занимать достаточно много дискового пространства, вплоть до 15 ГБ. Но большинству известно, что при появлении проблем с работоспособностью операционной системы имеется возможность её восстановления. Именно для этих целей в Windows имеется соответствующий раздел, содержащий файлы, требуемые для выполнения подобной процедуры. Сегодня мы рассмотрим, что это за раздел, насколько он нужен и как его удалить или создать – необходимость в этих операциях может возникнуть в отношении любого из этих вариантов.

Для чего нужен раздел восстановления
В «десятке» объём этого раздела, находящегося на системном диске, составляет порядка 500 МБ. Он находится в каталоге Recovery, а сам образ восстановления – это файл с именем Winre.wim, расположенный в одном из подкаталогов. Из соображений безопасности раздел имеет статус скрытого, чтобы его случайно не удалили. Кроме раздела восстановления, на системном диске имеется ещё 2 скрытых раздела, занимающих ещё порядка 250 МБ.
Каталог Recovery предназначен для тех случаев, когда операционная система работает со сбоями или вообще не загружается, а у пользователя отсутствует возможность использования установочного диска/флешки. Это самый простой и быстрый способ решить возникшие проблемы.
Но если установочный носитель имеется, то вопрос «Зачем нужен раздел восстановления?» уже не может трактоваться однозначно, особенно если имеется потребность освободить занимаемое им пространство. Другими словами, его можно безболезненно удалить или просто скрыть, но в любом случае нужно понимать, что подобные действия вы будете осуществлять на свой страх и риск.
Как скрыть раздел восстановления
Как мы уже знаем, по умолчанию каталог Recovery является скрытым. В некоторых случаях это правило может быть нарушено, чаще всего – при переносе операционной системы на другой диск или после очередного обновления Windows 10. В подобных случаях в проводнике может появиться новый диск, именуемый «Восстановление» (иногда – без имени, просто «Локальный диск»). Ориентиром должен служить его размер, около 580 МБ. Если у вас системный диск только один, то раздел восстановления удалять не нужно, но скрыть от посторонних глаз – настоятельно рекомендуется.
Пошаговый алгоритм:
ВНИМАНИЕ. Если в результате переноса ОС каталог Recovery оказался не на системном диске, его можно смело удалить, поскольку он является всего лишь дублем настоящего скрытого раздела.
Удаление раздела восстановления Windows 10/8/7
Самый «правильный», эффективный, но требующий особенной внимательности метод – это использование командной строки, которую нужно запускать с правами администратора.


Но перед тем как удалить раздел восстановления на жёстком диске, нужно позаботиться о создании диска восстановления на внешнем носителе, флешке или DVD-диске. Это можно сделать встроенными средствами Windows, например, через «Панель управления», используя инструмент «Восстановление» и вкладку «Создать диск восстановления» (Create a recovery drive).


Теперь у вас будет возможность решать проблемы с функционированием Windows, используя этот носитель, предварительно изменив порядок загрузки в BIOS.


А теперь рассмотрим, как убрать раздел восстановления через командную строку, для чего в консоли поиска набираем cmd, щёлкаем ПКМ по строке с результатом поиска и выбираем запуск от имени администратора. Набираем последовательность команд, каждая из которых завершается нажатием Enter:
- diskpart
- list disk
- select disk 0 (выбираем системный диск)
- list partition
- select partition Х (здесь Х – номер раздела восстановления размером около 580 МБ);
- del partition override

Если удаление производится с целью освобождения занимаемого пространства, проще всего это сделать с помощью утилиты AOMEI, а сам процесс будет описан ниже.
В Windows 10/8 этот процесс выполняется намного проще. Когда мы кликаем по вкладке «Создать диск восстановления», необходимо поставить галочку в нижней части окна, чтобы загрузить на флешку и системные файлы, но в этом случае объём носителя должен быть большим (не менее 64 ГБ), а время, необходимое для создания диска, существенно увеличится.
Зато в конце утилита автоматически предложит удалить раздел восстановления и сама освободит занимаемое им пространство.
Присоединение освободившегося места к диску С
Напомним, эту процедуру необходимо выполнять, если у вас Windows 7 или вы не проставили галочку напротив параметра «Back up system files…».

Скачиваем утилиту AOMEI Partition Assistant с официального сайта, запускаем. В главном окне выбираем диск, к которому нужно присоединить освободившееся место.


В левом меню («Операции над разделом») выбираем пункт «Изменение раздела». Откроется новое окно, в котором ставим галочку напротив строки «I need to move this partition» («Мне нужно переместить этот раздел») и перетаскиваем ползунок право до упора. При этом параметр «Unallocated space before» («Незанятое место перед») должен обнулиться.


Осталось дважды подтвердить перемещение раздела восстановления, после чего появится новое окно. Кликаем по кнопке «Перейти», подтверждаем и ожидаем окончания процесса.
Как создать раздел восстановления
Удаление каталога Recovery по ряду причин нежелательно. Главным образом потому что диск восстановления – это не слишком надёжный носитель. Современные ПК выпускают без оптического дисковода. Это означает, что в качестве такого накопителя будет использоваться флешка, содержимое которой можно случайно удалить. В этом случае проблемы с работоспособностью Windows удастся решить только с применением дистрибутива операционной системы, на котором тоже содержится каталог Recovery.

Если вас не устраивает такой сценарий, а раздел восстановления на системном диске оказался удалённым, это поправимо.
И снова проще всего это сделать с помощью ПО от стороннего производителя, например, утилиты AOMEI OneKey Recovery (ссылка на страничку скачивания с официального сайта — https://www.aomeitech.com/onekey-recovery.html).


СОВЕТ. Желательно создание раздела восстановления Windows производить на чистой ОС с установленными драйверами и программами. В противном случае в раздел восстановления попадёт весь тот «мусор», который накопился в Windows на данный момент, что нехорошо само по себе и к тому же увеличит объём раздела.


Сама процедура весьма проста: запускаем утилиту, жмём кнопку «Создать раздел восстановления». Отметим, что диск должен иметь как минимум столько же свободного места, сколько на данный момент занято системой. Утилита приступит к формированию резервной копии системы и по окончании процесса пометит раздел как скрытый.


В результате в меню загрузки Windows вы увидите новый пункт — AOMEI OneKey Recovery, который и нужно использовать, если возникнут проблемы в работе операционной системы.
Теперь вы знаете, как создать или удалить раздел восстановления на диске в Windows 10. А если вы уже проводили данные операции на своём компьютере, то просим поделиться своим опытом в комментариях.
What is recovery partition? Can I delete recovery partition and how do I delete? And if I want to recreate, how to do that? Now reading this post to find all answers towards these questions put forwarded by MiniTool.
About Windows Recovery Partition
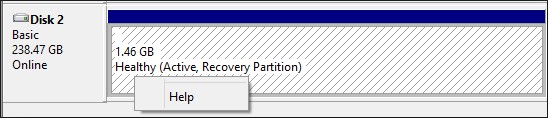
If you buy a computer with Windows 10 or Windows 8 preinstalled, you will find that there is a recovery partition in Disk Management, with no drive letter and no executable functions except Help (see the image attached below).
Well, what is recovery partition? To put it simple, a recovery partition is a portion of your disk drive that is set aside by the manufacturer to hold an image of your system before it was shipped from the factory. Recovery partition contains the files of system backup image and files that guide system restoration.
In a word, recovery partition is a function of one key computer recovery when the system runs into an error.
How to Create Windows 10 Recovery Partition?
Although a recovery partition takes up a couple of GBs of disk space, you can save a lot of time finding a way to quickly restore your PC to factory conditions when your PC runs abnormally. Thanks to the huge disk space of today’s hard drives, the disk space taken by recovery partition is only a drop in the bucket.
Besides, when you have a recovery partition at hand, you don’t need to worry about where you should keep a recovery drive or recovery disc and make an effort to keep it well. Thus, Windows 10 create recovery partition is also a frequently asked issue.
However, unlike creating a normal partition, creating a recovery partition is not easy. Usually, when you buy a brand-new computer that has been pre-installed with Windows 10, you can find that recovery partition in Disk Management; but if you reinstall Windows 10, it is likely that no recovery partition can be found.
Luckily, our previous post How to Create Recovery Partition Windows 10 shows step-by-step guidance, you can follow the instruction and try creating a recovery drive by yourself.
Can I Delete Recovery Partition Windows 10?
You may ask: can I delete recovery partition Windows 10? The answer is positive: you can delete recovery partition without affecting the performance of Windows 10, provided that you have made a backup or you are not planning to do factory reset when Windows runs into an error.
However, please note that you cannot delete recovery partition in Disk Management utility, only a Help option can be found there.
Well, how to delete recovery partition Windows 10 to release available space?
Luckily, we have MiniTool Partition Wizard, which can easily and safely remove recovery partition Windows 10/8/7. Here, we recommend using MiniTool Partition Wizard Free edition which is qualified to do this job, you only need to click several buttons to finish.
Recommended: curious about some strange partitions on your drive? Read this post to make them clear.
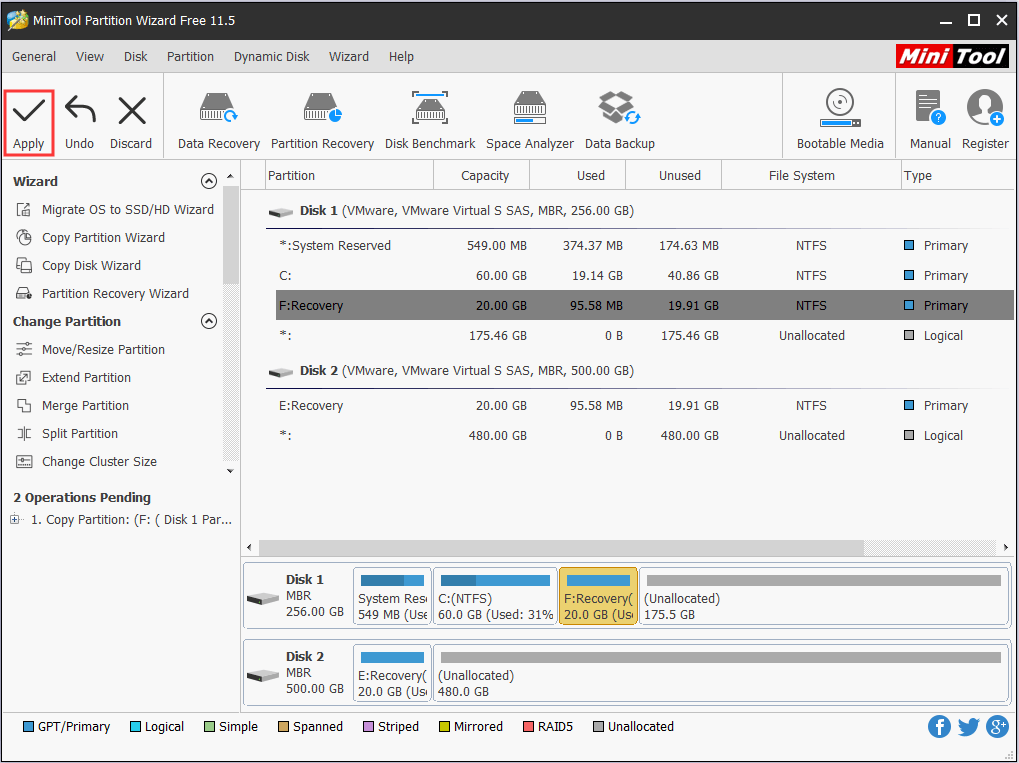
Way 1: Delete Recovery Partition using Partition Wizard
Let’s see how MiniTool Partition Wizard works on deleting recovery partition Windows 10:
Step 1. Download MiniTool Partition Wizard Free Edition. Install it on computer and run it.
Free Download
Step 2. Right click on the recovery partition you want to delete and select «Delete Partition».
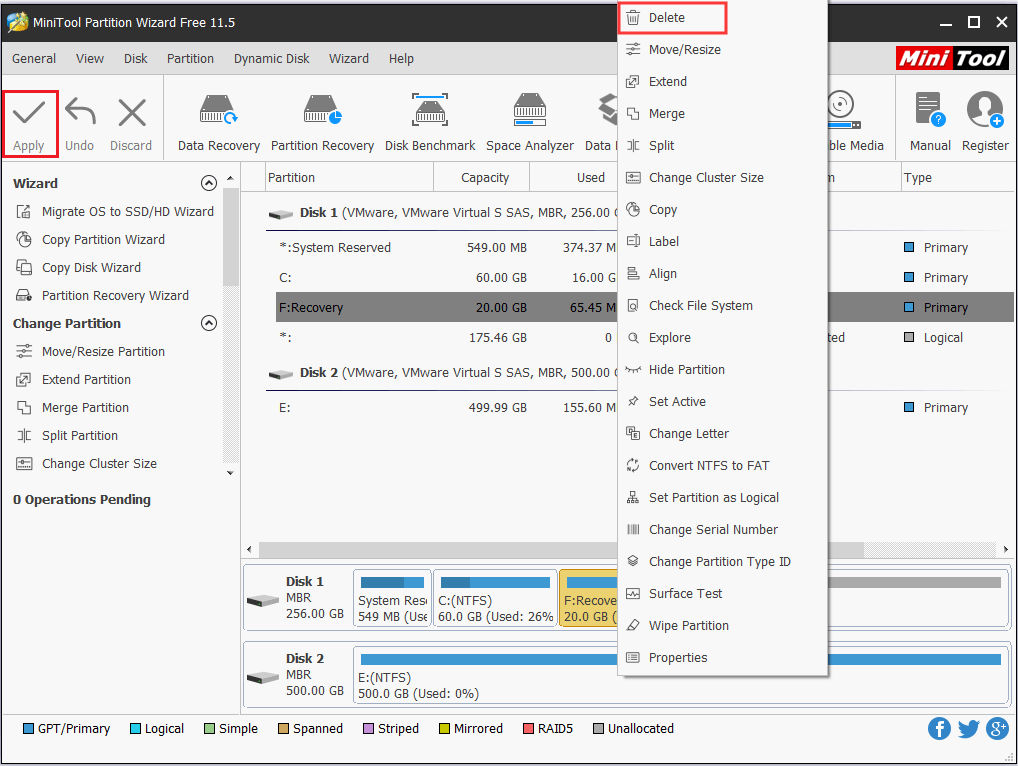
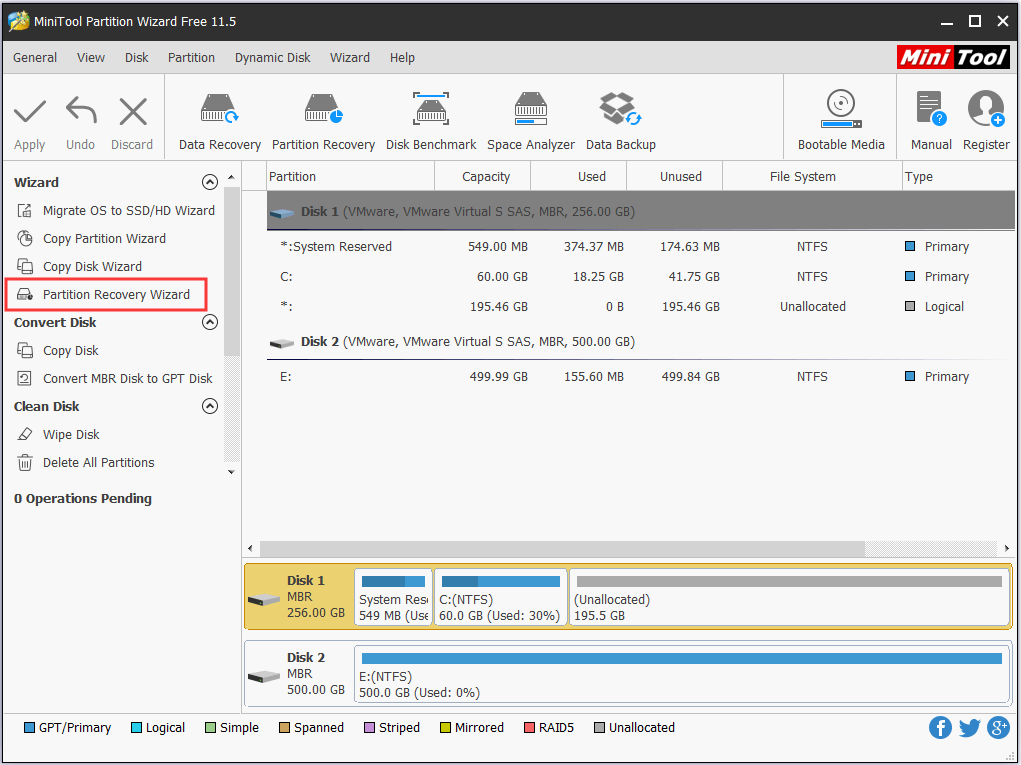
Step 3. The recovery partition will be displayed as unallocated space for your preview. Now click «Apply» to make the operation into effect.
Within a few seconds, you will have Windows 10 recovery partition deleted. Then you can use MiniTool Partition Wizard to add this unallocated space to any partition so as to extend partition or you may just create new partition on this location.
Way 2: Delete Recovery Partition using Diskpart
In fact, Windows also provides you a way to delete recovery partition, that is to use Diskpart.exe to delete partitions from Diskpart command prompt. Please follow these steps to remove Windows 10 recovery partition.
Let’s see how to delete recovery partition Windows 10 using Diskpart.
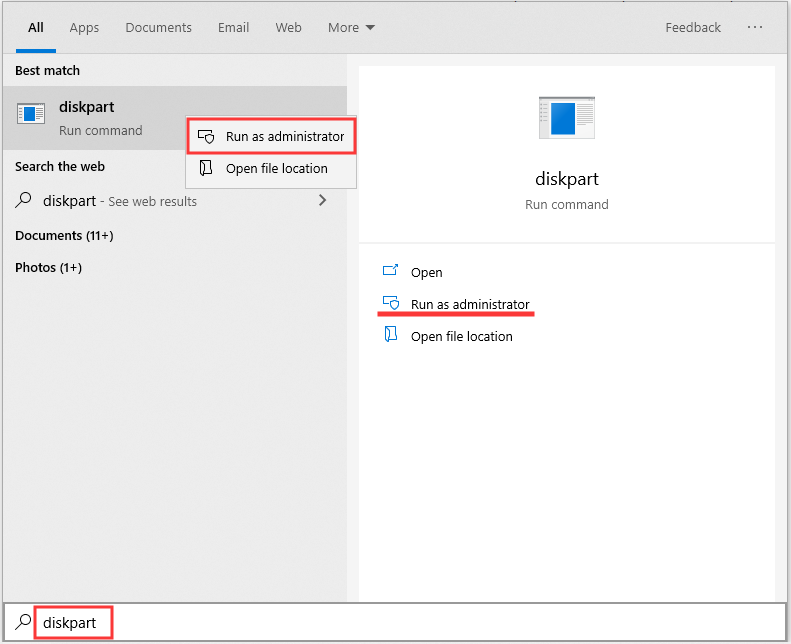
Step 1. Navigate to Windows 10 Start menu, type «diskpart» in the search box, and then Windows 10 will show you the best match. Right-click on «diskpart» and select «Run as administrator», then confirm that you want to allow this app to make changes to your computer.
Step 2. At Diskpart window, type the following commands in order. Please end each command with the Enter key:
- Type «list disk» to display all your disks. Please pay attention to the disk number that contains the recovery partition.
- Type «select disk n» where «n» should be replaced with the correct disk number.
- Type «list partition» to list all the partitions on the selected disk. By viewing the partition label and other partition information, you will know which one is the recovery partition to be deleted.
- Type «select partition n» where «n» should be replaced with the partition number of the recovery partition.
- Type «delete partition» to delete the recovery partition.
- Type «exit» to quit.
Kindly reminder:
Sometimes, you may fail to delete recovery partition and an error message which reads «cannot delete a protected partition without the force protected parameter set» appears:

This error message is likely to appear on GPT disk. If the recovery partition you intend to delete is marked as protected partition by Windows, then deletion is prevented. At this time, you can type «gpt attributes=0x8000000000000000» and then repeat «delete partition» to solve this issue.
If you are familiar with Diskpart, you can continue creating a new partition on the released unallocated space before you exit. Or you can use this unallocated space to enlarge partition. But probably you will encounter «Virtual Disk Service error» during the process. Here I suggest using MiniTool Partition Wizard Free Edition to save time, which can break some limitations in Diskpart.
So the bottom line here is: both MiniTool Partition Wizard and Diskpart are useful to delete recovery partition Windows 10. But in my opinion, the former one is easier to operate, and the latter is likely to lead to errors.
Although Diskpart is able to delete recovery partition, without a clear interface to display the details, there are chances that you may delete a wrong partition and the operations are irreversible. For those who are unfamiliar with Diskpart, obviously this is not a good choice.
«MiniTool Partition Wizard Free Edition is able to delete Windows 10 recovery partition. Use this freeware to help you delete recovery partition, then the released unallocated space can be used to extend other partition.»Click to Tweet
After knowing how to delete recovery partition using two methods, you might be interested in whether it is possible to restore deleted Windows recovery partition. See the following part to get specific tutorial.
Restore Windows Recovery Partition
Sometimes, you may regret of deleting recovery partition, for you may need it to restore Windows to factory settings someday. Is it possible to restore recovery partition Windows 10? Yes, and MiniTool Partition Wizard is always the best solution.
MiniTool Partition Wizard provides a powerful feature called «Partition Recovery» to guide users through the process of recovering lost partitions due to wrong deletion or wrong diskpart clean. Let’s see how to retrieve Windows 10 recovery partition in detail:
Note: Only when you have not made any change to the unallocated space that is released by recovery partition, you can use MiniTool Partition Wizard to help you do the recovery. Free Edition helps to scan for lost partition while only paid editions can be used to execute the final partition recovery.
Free DownloadBuy Now
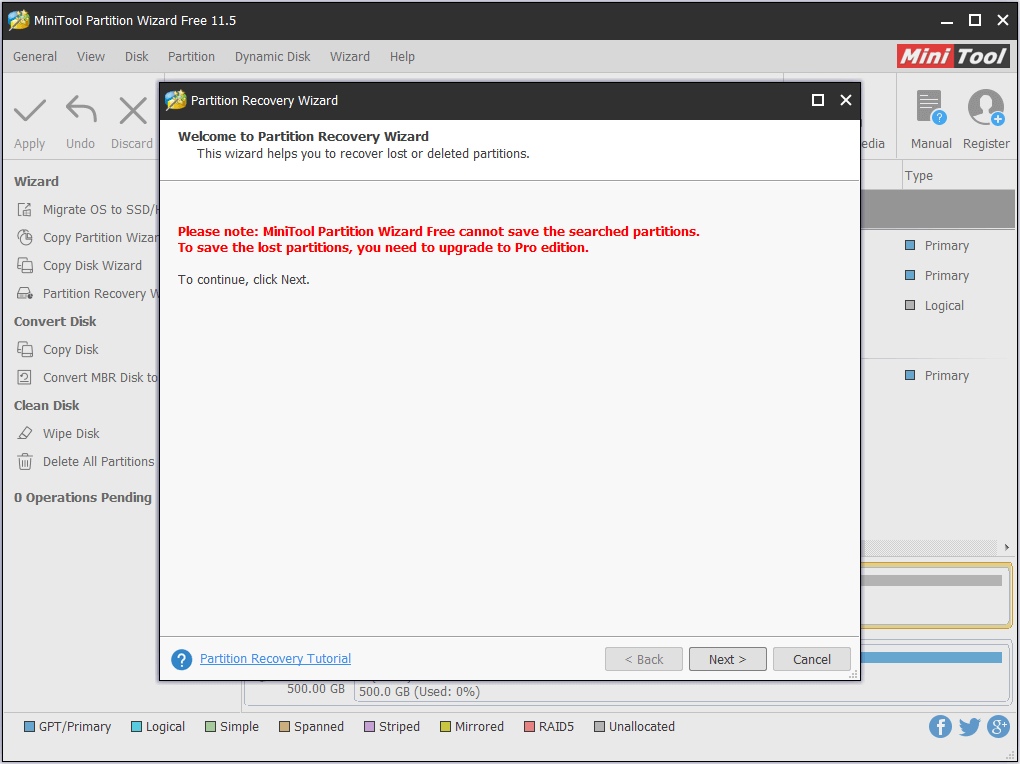
Step 1. Run Partition Wizard Free Edition to the main interface. Then right click on the disk that used to contain the recovery partition and choose «Partition Recovery Wizard» from the option box.
Step 2. If you are using the Free Edition, you will see notice saying Free Edition is only capable of scanning for lost partitions. To recover, you need to upgrade software to Pro Edition. If you are already running the Pro Edition, the red notice will not show up. Now to continue, click «Next«.
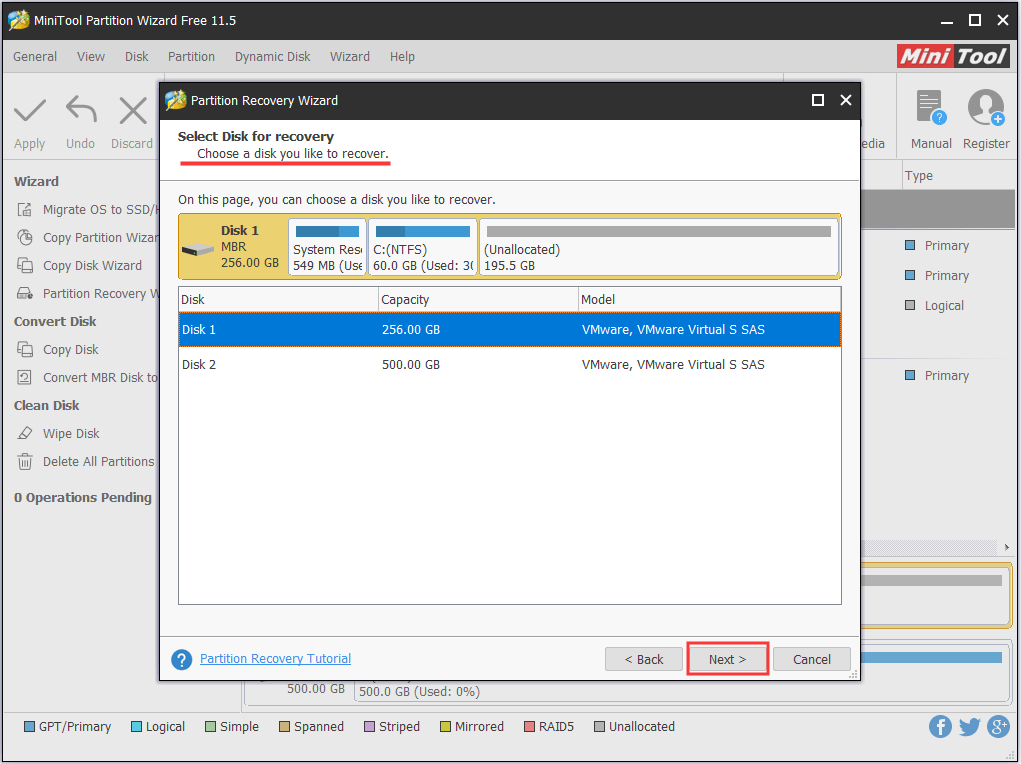
Step 3. Now choose a disk you want to recover partitions from.
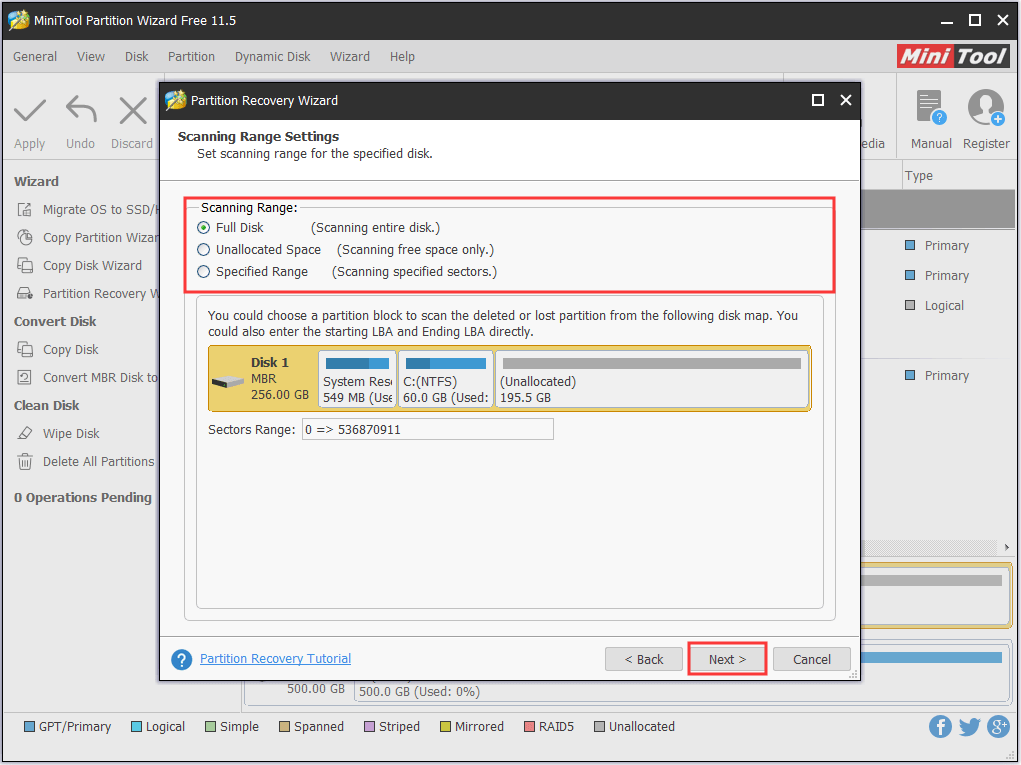
Step 4. Then set a scanning range to search for the deleted recovery partition. It is recommended to choose Full Disk or Unallocated Space here for they are easy for users to carry out. Then click «Next» to go on.
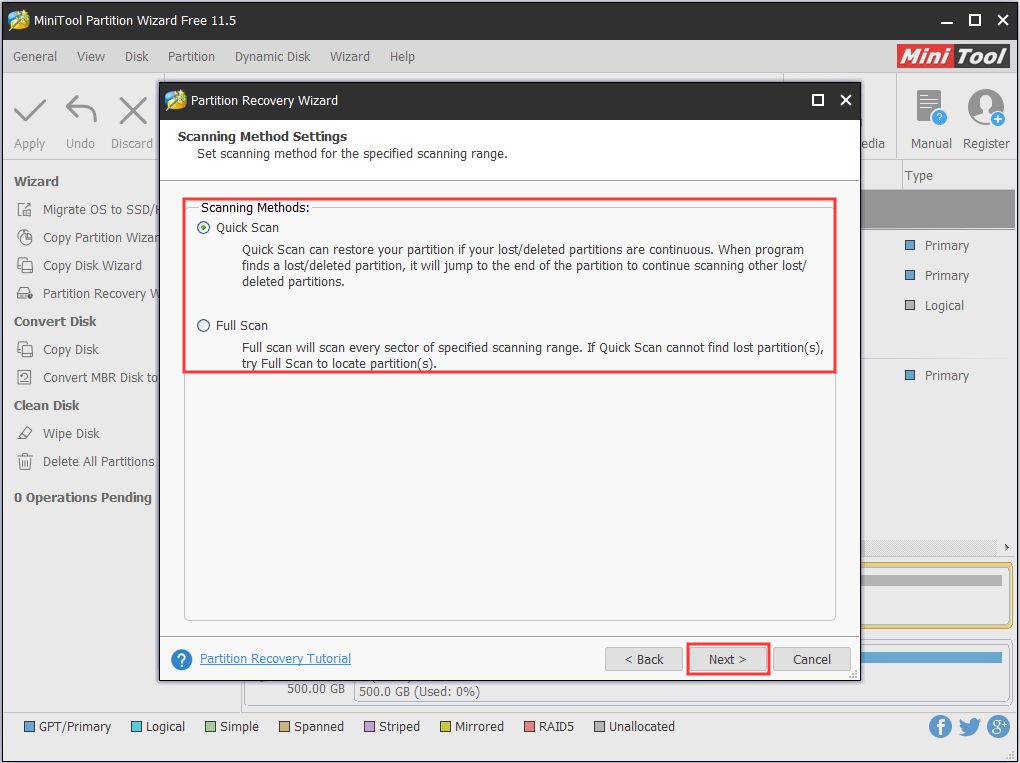
Step 5. In the next page choose a scanning method. Do you want a Quick Scan or would you prefer a Full Scan? I suggest using Quick Scan which saves a lot time first to take your chance. Click «Next» and continue.
Step 6. Here comes to the scanning result page. Now you need to tick ALL partitions you need to do the recovery. Look! The recovery partition is successfully found by Partition Wizard. So here I just tick this partition along with the rest important ones. Then click «Finish» to go back to the main interface.
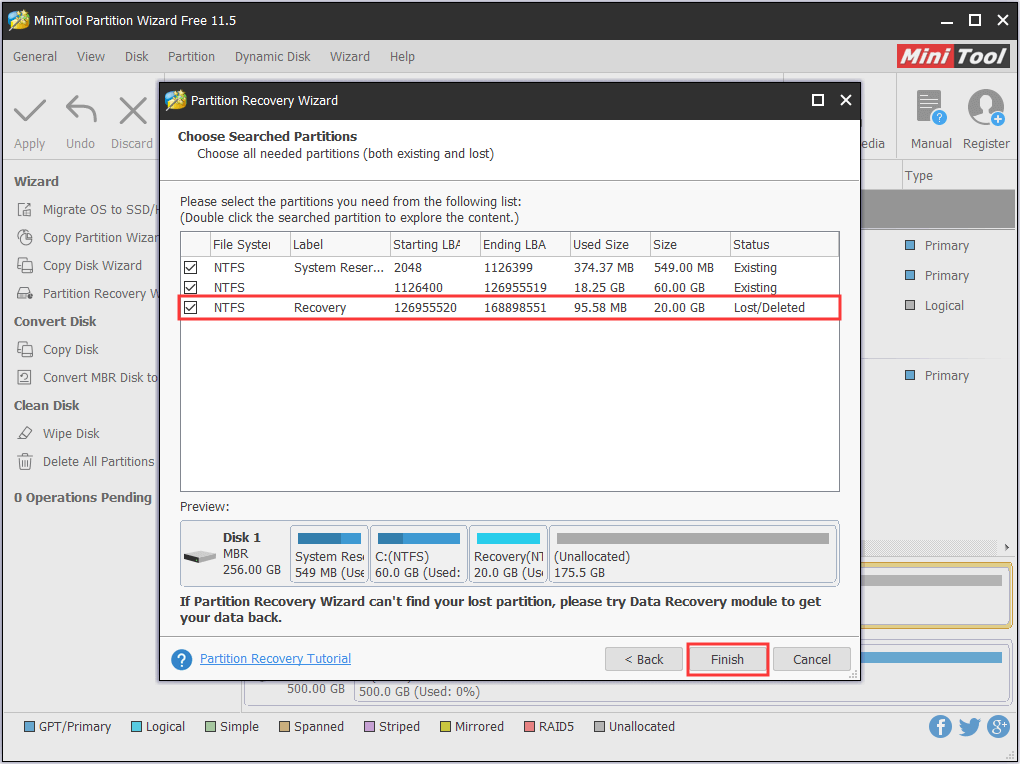
Step 7. Finally, hit the «Apply» button to start the recovery process (only the paid editions allow you to do so).
Free DownloadBuy Now
Related Article: HP Recovery Drive Full Windows 10/8/7? Here’re Full Solutions!?
Back up Recovery Partition Windows 10
Some users are quite indecisive on whether they need to delete the recovery partition or not. If they keep the recovery partition there, it seems that they will never have the chance to make use of it, and the disk space it occupies is wasted; if they just choose to delete it, they feel someday they need this partition to do Windows reset. In such case, it is wise to back up the recovery partition to another location before deleting recovery partition.
Well, how to back up recovery partition Windows 10?
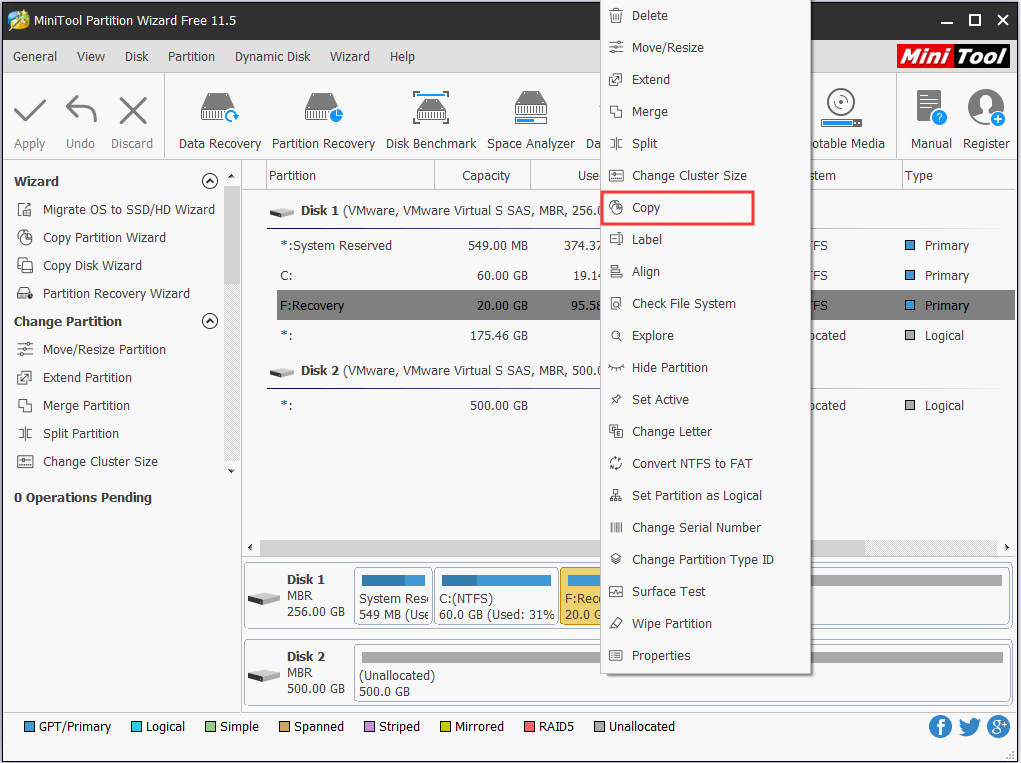
MiniTool Partition Wizard offers an easy way to do partition backup. As long as you employ the «Copy Partition» feature, you can finish backing up recovery partition Windows 10 easily and quickly.
Step 1. On the main interface of MiniTool Partition Wizard, select the recovery partition to choose «Copy» from the Partition group.
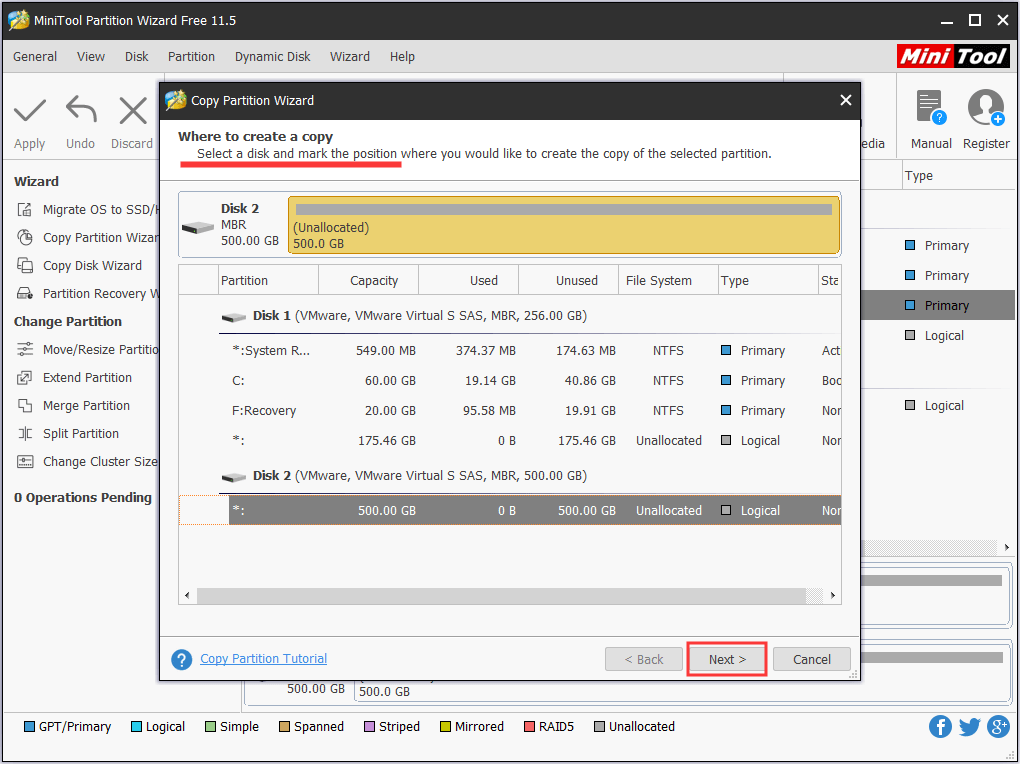
Step 2. In the pop-up mini window, select unallocated space on another disk to hold the copy of the recovery partition. Then click «Next» to continue.
Step 3. Here you can edit the size of the new partition which will hold the copy of the recovery partition. Then click «Finish» to go back to the main interface.
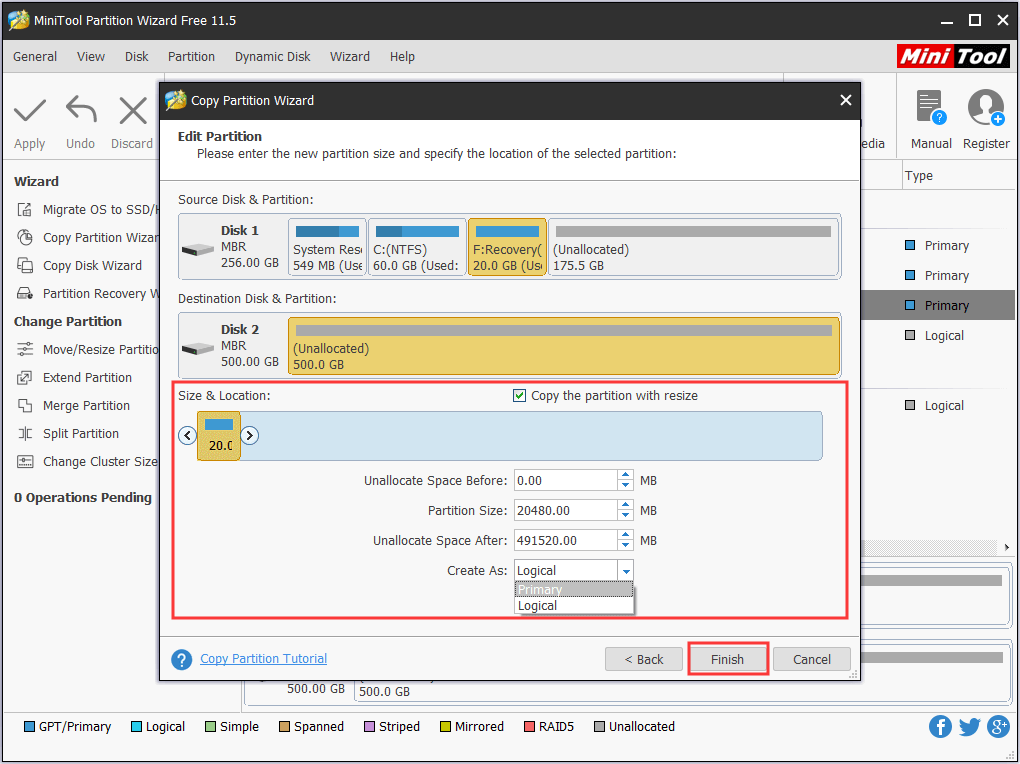
Step 4. Finally, click «Apply» to start the backup process.
Related Article: How to Clone Recovery Partition to External HDD?
Reading here, you can see MiniTool Partition Wizard is really of great help to deal with issues related to recovery partition. In fact, there are more features MiniTool Partition Wizard can offer, such as merge recovery Partition Windows 10 (paid edition), move recovery partition Windows 10, explore the content of recovery partition, and so on. Now grasp this freeware to help manage you recovery partition Windows 10.
«MiniTool Partition Wizard offers many features towards recovery partition management, such as explorer recovery partition, back up recovery partition, etc. So I recommend it to all you guys to save time and effort.»Click to Tweet
Restore Windows from Recovery Partition
If your computer isn’t running the way it should and keeps sending out error messages, or you just want to make a reset to its default state, then Windows 10 recovery partition plays an rather important role. How to factory reset a Windows 10 laptop? Well, the process of restoring windows 10 from recovery partition is rather easy. Just follow these steps:
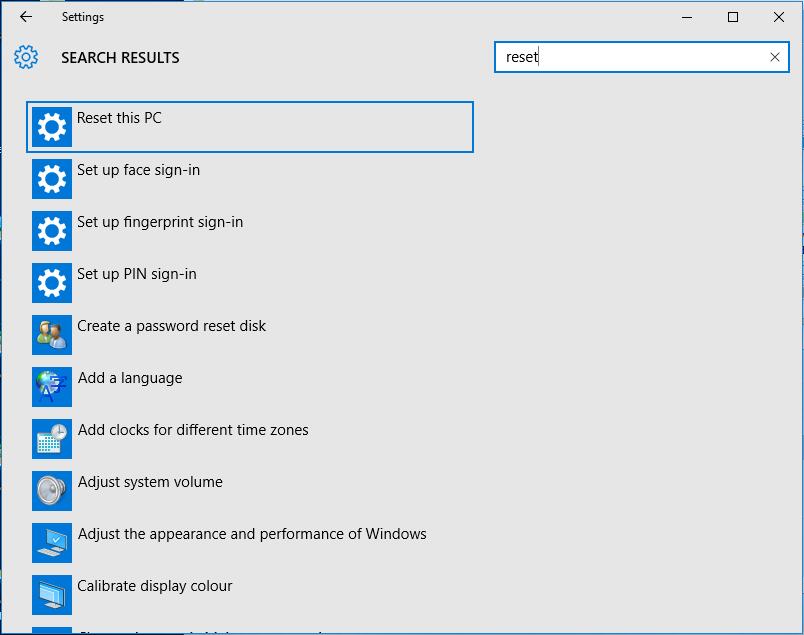
Step 1. Navigate to Windows 10 Start menu to choose «Settings». Then in the pop-up new window, input «reset» to select «Reset this PC».
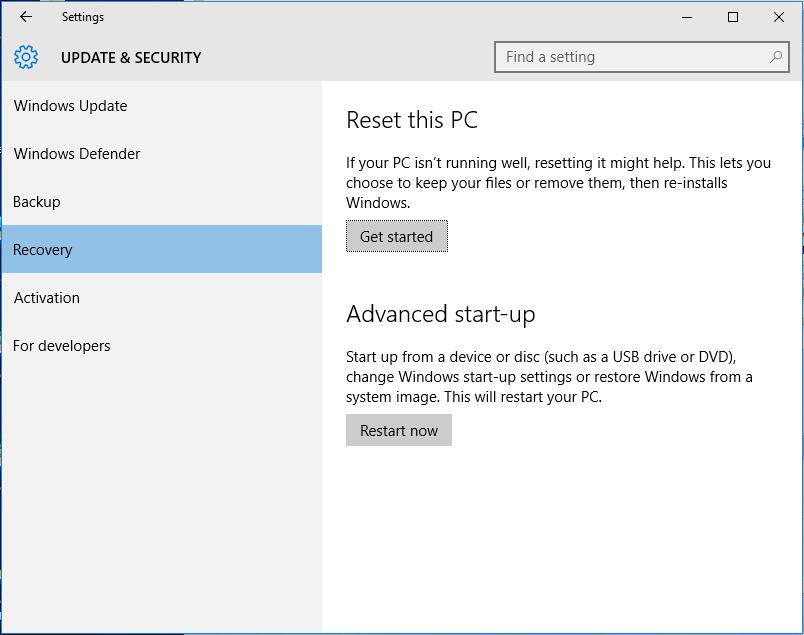
Step 2. Under UPDATE & SECURITY -> Recovery, click «Get Started».
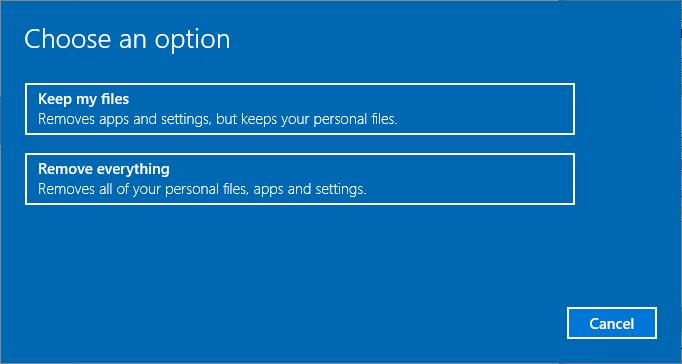
Step 3. Here you can choose how to carry out the recovery: to keep your files or to remove everything. Depending on your own needs, you should make your own decision. Then the reset process begins.
This is the end of how to restore Windows 10 from recovery partition. Rather easy right? But for Windows 8 and Windows 7, things are more complicated. You can refer to How to Factory Reset a Laptop — Windows 7 & 8 to get the detailed steps.
Summary
In this post, I mainly talk about what is recovery partition, how to create recovery partition, can a recovery partition be removed and how to delete it, how to back up recovery partition, etc. Hope these information are helpful. In addition, I strongly recommend using MiniTool Partition Wizard Free Edition to help you since it is free, reliable and easy to use.
If you have any question towards using this freeware, you can email us via [email protected] or leave us comment below. Thanks in advance!
What is recovery partition? Can I delete recovery partition and how do I delete? And if I want to recreate, how to do that? Now reading this post to find all answers towards these questions put forwarded by MiniTool.
About Windows Recovery Partition
If you buy a computer with Windows 10 or Windows 8 preinstalled, you will find that there is a recovery partition in Disk Management, with no drive letter and no executable functions except Help (see the image attached below).
Well, what is recovery partition? To put it simple, a recovery partition is a portion of your disk drive that is set aside by the manufacturer to hold an image of your system before it was shipped from the factory. Recovery partition contains the files of system backup image and files that guide system restoration.
In a word, recovery partition is a function of one key computer recovery when the system runs into an error.
How to Create Windows 10 Recovery Partition?
Although a recovery partition takes up a couple of GBs of disk space, you can save a lot of time finding a way to quickly restore your PC to factory conditions when your PC runs abnormally. Thanks to the huge disk space of today’s hard drives, the disk space taken by recovery partition is only a drop in the bucket.
Besides, when you have a recovery partition at hand, you don’t need to worry about where you should keep a recovery drive or recovery disc and make an effort to keep it well. Thus, Windows 10 create recovery partition is also a frequently asked issue.
However, unlike creating a normal partition, creating a recovery partition is not easy. Usually, when you buy a brand-new computer that has been pre-installed with Windows 10, you can find that recovery partition in Disk Management; but if you reinstall Windows 10, it is likely that no recovery partition can be found.
Luckily, our previous post How to Create Recovery Partition Windows 10 shows step-by-step guidance, you can follow the instruction and try creating a recovery drive by yourself.
Can I Delete Recovery Partition Windows 10?
You may ask: can I delete recovery partition Windows 10? The answer is positive: you can delete recovery partition without affecting the performance of Windows 10, provided that you have made a backup or you are not planning to do factory reset when Windows runs into an error.
However, please note that you cannot delete recovery partition in Disk Management utility, only a Help option can be found there.
Well, how to delete recovery partition Windows 10 to release available space?
Luckily, we have MiniTool Partition Wizard, which can easily and safely remove recovery partition Windows 10/8/7. Here, we recommend using MiniTool Partition Wizard Free edition which is qualified to do this job, you only need to click several buttons to finish.
Recommended: curious about some strange partitions on your drive? Read this post to make them clear.
Way 1: Delete Recovery Partition using Partition Wizard
Let’s see how MiniTool Partition Wizard works on deleting recovery partition Windows 10:
Step 1. Download MiniTool Partition Wizard Free Edition. Install it on computer and run it.
Free Download
Step 2. Right click on the recovery partition you want to delete and select «Delete Partition».
Step 3. The recovery partition will be displayed as unallocated space for your preview. Now click «Apply» to make the operation into effect.
Within a few seconds, you will have Windows 10 recovery partition deleted. Then you can use MiniTool Partition Wizard to add this unallocated space to any partition so as to extend partition or you may just create new partition on this location.
Way 2: Delete Recovery Partition using Diskpart
In fact, Windows also provides you a way to delete recovery partition, that is to use Diskpart.exe to delete partitions from Diskpart command prompt. Please follow these steps to remove Windows 10 recovery partition.
Let’s see how to delete recovery partition Windows 10 using Diskpart.
Step 1. Navigate to Windows 10 Start menu, type «diskpart» in the search box, and then Windows 10 will show you the best match. Right-click on «diskpart» and select «Run as administrator», then confirm that you want to allow this app to make changes to your computer.
Step 2. At Diskpart window, type the following commands in order. Please end each command with the Enter key:
- Type «list disk» to display all your disks. Please pay attention to the disk number that contains the recovery partition.
- Type «select disk n» where «n» should be replaced with the correct disk number.
- Type «list partition» to list all the partitions on the selected disk. By viewing the partition label and other partition information, you will know which one is the recovery partition to be deleted.
- Type «select partition n» where «n» should be replaced with the partition number of the recovery partition.
- Type «delete partition» to delete the recovery partition.
- Type «exit» to quit.
Kindly reminder:
Sometimes, you may fail to delete recovery partition and an error message which reads «cannot delete a protected partition without the force protected parameter set» appears:
This error message is likely to appear on GPT disk. If the recovery partition you intend to delete is marked as protected partition by Windows, then deletion is prevented. At this time, you can type «gpt attributes=0x8000000000000000» and then repeat «delete partition» to solve this issue.
If you are familiar with Diskpart, you can continue creating a new partition on the released unallocated space before you exit. Or you can use this unallocated space to enlarge partition. But probably you will encounter «Virtual Disk Service error» during the process. Here I suggest using MiniTool Partition Wizard Free Edition to save time, which can break some limitations in Diskpart.
So the bottom line here is: both MiniTool Partition Wizard and Diskpart are useful to delete recovery partition Windows 10. But in my opinion, the former one is easier to operate, and the latter is likely to lead to errors.
Although Diskpart is able to delete recovery partition, without a clear interface to display the details, there are chances that you may delete a wrong partition and the operations are irreversible. For those who are unfamiliar with Diskpart, obviously this is not a good choice.
«MiniTool Partition Wizard Free Edition is able to delete Windows 10 recovery partition. Use this freeware to help you delete recovery partition, then the released unallocated space can be used to extend other partition.»Click to Tweet
After knowing how to delete recovery partition using two methods, you might be interested in whether it is possible to restore deleted Windows recovery partition. See the following part to get specific tutorial.
Restore Windows Recovery Partition
Sometimes, you may regret of deleting recovery partition, for you may need it to restore Windows to factory settings someday. Is it possible to restore recovery partition Windows 10? Yes, and MiniTool Partition Wizard is always the best solution.
MiniTool Partition Wizard provides a powerful feature called «Partition Recovery» to guide users through the process of recovering lost partitions due to wrong deletion or wrong diskpart clean. Let’s see how to retrieve Windows 10 recovery partition in detail:
Note: Only when you have not made any change to the unallocated space that is released by recovery partition, you can use MiniTool Partition Wizard to help you do the recovery. Free Edition helps to scan for lost partition while only paid editions can be used to execute the final partition recovery.
Free DownloadBuy Now
Step 1. Run Partition Wizard Free Edition to the main interface. Then right click on the disk that used to contain the recovery partition and choose «Partition Recovery Wizard» from the option box.
Step 2. If you are using the Free Edition, you will see notice saying Free Edition is only capable of scanning for lost partitions. To recover, you need to upgrade software to Pro Edition. If you are already running the Pro Edition, the red notice will not show up. Now to continue, click «Next«.
Step 3. Now choose a disk you want to recover partitions from.
Step 4. Then set a scanning range to search for the deleted recovery partition. It is recommended to choose Full Disk or Unallocated Space here for they are easy for users to carry out. Then click «Next» to go on.
Step 5. In the next page choose a scanning method. Do you want a Quick Scan or would you prefer a Full Scan? I suggest using Quick Scan which saves a lot time first to take your chance. Click «Next» and continue.
Step 6. Here comes to the scanning result page. Now you need to tick ALL partitions you need to do the recovery. Look! The recovery partition is successfully found by Partition Wizard. So here I just tick this partition along with the rest important ones. Then click «Finish» to go back to the main interface.
Step 7. Finally, hit the «Apply» button to start the recovery process (only the paid editions allow you to do so).
Free DownloadBuy Now
Related Article: HP Recovery Drive Full Windows 10/8/7? Here’re Full Solutions!?
Back up Recovery Partition Windows 10
Some users are quite indecisive on whether they need to delete the recovery partition or not. If they keep the recovery partition there, it seems that they will never have the chance to make use of it, and the disk space it occupies is wasted; if they just choose to delete it, they feel someday they need this partition to do Windows reset. In such case, it is wise to back up the recovery partition to another location before deleting recovery partition.
Well, how to back up recovery partition Windows 10?
MiniTool Partition Wizard offers an easy way to do partition backup. As long as you employ the «Copy Partition» feature, you can finish backing up recovery partition Windows 10 easily and quickly.
Step 1. On the main interface of MiniTool Partition Wizard, select the recovery partition to choose «Copy» from the Partition group.
Step 2. In the pop-up mini window, select unallocated space on another disk to hold the copy of the recovery partition. Then click «Next» to continue.
Step 3. Here you can edit the size of the new partition which will hold the copy of the recovery partition. Then click «Finish» to go back to the main interface.
Step 4. Finally, click «Apply» to start the backup process.
Related Article: How to Clone Recovery Partition to External HDD?
Reading here, you can see MiniTool Partition Wizard is really of great help to deal with issues related to recovery partition. In fact, there are more features MiniTool Partition Wizard can offer, such as merge recovery Partition Windows 10 (paid edition), move recovery partition Windows 10, explore the content of recovery partition, and so on. Now grasp this freeware to help manage you recovery partition Windows 10.
«MiniTool Partition Wizard offers many features towards recovery partition management, such as explorer recovery partition, back up recovery partition, etc. So I recommend it to all you guys to save time and effort.»Click to Tweet
Restore Windows from Recovery Partition
If your computer isn’t running the way it should and keeps sending out error messages, or you just want to make a reset to its default state, then Windows 10 recovery partition plays an rather important role. How to factory reset a Windows 10 laptop? Well, the process of restoring windows 10 from recovery partition is rather easy. Just follow these steps:
Step 1. Navigate to Windows 10 Start menu to choose «Settings». Then in the pop-up new window, input «reset» to select «Reset this PC».
Step 2. Under UPDATE & SECURITY -> Recovery, click «Get Started».
Step 3. Here you can choose how to carry out the recovery: to keep your files or to remove everything. Depending on your own needs, you should make your own decision. Then the reset process begins.
This is the end of how to restore Windows 10 from recovery partition. Rather easy right? But for Windows 8 and Windows 7, things are more complicated. You can refer to How to Factory Reset a Laptop — Windows 7 & 8 to get the detailed steps.
Summary
In this post, I mainly talk about what is recovery partition, how to create recovery partition, can a recovery partition be removed and how to delete it, how to back up recovery partition, etc. Hope these information are helpful. In addition, I strongly recommend using MiniTool Partition Wizard Free Edition to help you since it is free, reliable and easy to use.
If you have any question towards using this freeware, you can email us via [email protected] or leave us comment below. Thanks in advance!
Здравствуйте админ! У меня новый ноутбук с Windows 8.1, без скрытого раздела с заводскими настройками, я удалил данный раздел уже давно, но потом пожалел. Есть желание самостоятельно создать такой раздел с резервным эталонным образом Windows 8.1, чтобы при необходимости откатываться к этому образу, содержащему весь необходимый мне софт. Вопрос! Скажите, как, используя встроенные в Windows 8.1 средства, создать резервный образ Win 8.1 со всеми установленными программами и привязать его к системной среде восстановления, чтобы я мог откатываться этому образу при помощи одной кнопки — Push-Button Reset Overview?
Как создать собственный раздел с заводскими настройками или как, используя встроенные в Windows 8.1 средства, создать резервный образ Windows 8.1 на ноутбуке и привязать его к системной среде восстановления
Автор Владимир!
Привет друзья! Сегодня очень занимательная статья для компьютерных энтузиастов, в ней я расскажу Вам об одном неизвестном секрете восстановления Windows 8.1.
Создать эталонный образ Windows 8.1, содержащий все нужные вам программы, можно не только на новом ноутбуке, но и на обычном компьютере. Установите на свой ноутбук Windows 8.1, затем инсталлируйте в систему все необходимые программы, далее создайте образ винды (способом, который покажу вам я), после этого привяжите его к системной среде восстановления и откатывайтесь к этому образу при тяжёлом системном сбое, откатиться можно когда система ещё худо-бедно функционирует и загружается, а также в случае, когда Windows совсем не загружается. Подробности далее в статье.
Многие читатели могут задать вопрос: «Что такое сброс винды одной кнопкой — Push-Button Reset Overview?»
Все мы знаем, что в Windows 8.1, при возникновении системных проблем (устранение которых невозможно), есть способ возврата компьютера в исходное состояние — Push-Button Reset Overview, т.е. сброс винды одной кнопкой, понадобится установочный дистрибутив с Windows 8.1, в двух словах напомню вам, как это делается. Вставляем в дисковод установочный диск с Windows 8.1, далее идём в
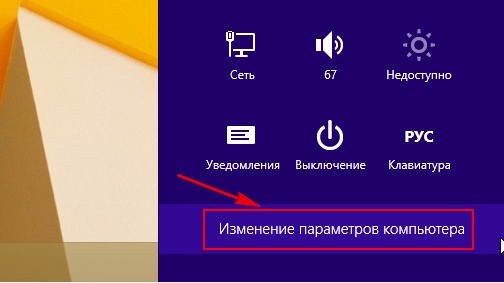
Параметры

Изменение параметров компьютера
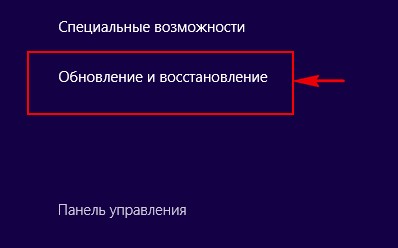
Обновление и восстановление
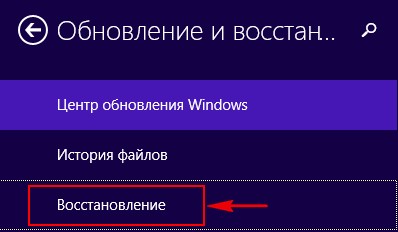
Восстановление
Удаление всех данных и переустановка Windows
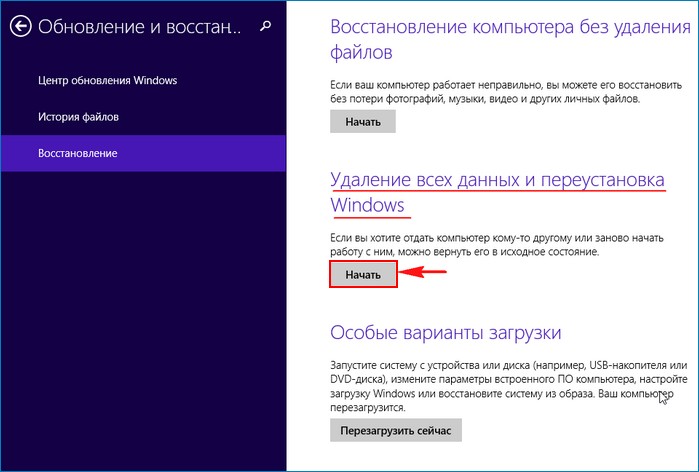
Возврат компьютера в исходное состояние
Далее
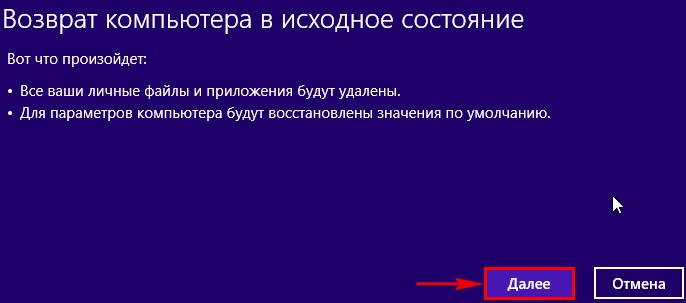
После этого происходит сброс Windows к изначальному состоянию, в результате пользователь теряет все установленные программы и настройки, а также личные данные на диске (C:), но зато операционная система приобретает первозданный вид. Напомню, что для восстановления, Windows 8.1 берёт резервные файлы из установочного дистрибутива, который у вас должен быть вставлен в дисковод.
Опытные пользователи заметят, что можно воспользоваться встроенной в систему утилитой recimg и функцией Refresh Your PC в Win 8.1 и заранее создать образ восстановления, и при необходимости откатиться к нему, в этом случае какая-то часть пользовательских данных останется цела! Замечу, что и в этом случае всё равно теряется большинство пользовательских настроек и все установленные приложения.
Для сохранения всех установленных в операционную систему программ предлагаю создать полный файл-образ Windows 8.1 в формате WIM и расположить его на специально созданном нами разделе жёсткого диска. Далее нужно привязать образ WIM к среде восстановления Windows 8.1, то есть, при возврате компьютера в исходное состояние — Push-Button Reset Overview (сброс одной кнопкой), операционная система Win 8.1 будет использовать для восстановления не файлы дистрибутива Windows 8.1, а созданный нами файл-образ Windows 8.1! В этом случае все ваши установленные на диске C: программы останутся в целости и сохранности. При необходимости со временем вы можете обновить файл-образа install.wim.
Итак, поехали. Имеем новый ноутбук с БИОСом UEFI и установленной на нём Windows 8.1.
В операционную систему установлены нужные нам программы.
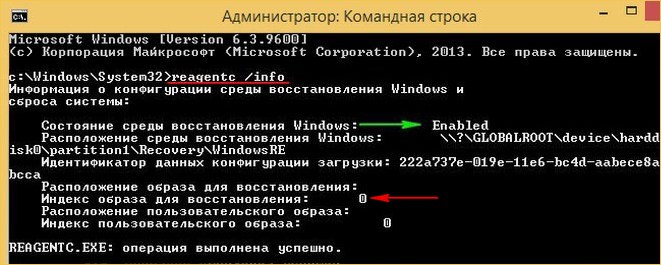
В первую очередь проверяем включена ли у нас среда восстановления.
Откроем командную строку от имени администратора и введем команду:
reagentc /info (программа REAgentC.exe используется для настройки образа загрузки среды восстановления Windows и образа для восстановления сброс одной кнопкой, а также для администрирования параметров восстановления и настроек. В нашем случае программа REAgentC показывает, что среда восстановления включена и как положено, находится на первом скрытом разделе (Исправен. Раздел восстановления, объём 300 Мб), но образ для восстановления и его местонахождение не указано, а это значит, для восстановления при помощи одной кнопки — Push-Button Reset Overview будет использоваться DVD-диск Windows 8.1).
Примечание: если в вашем случае среда восстановления будет выключена — Disabled, то идите в самый конец статьи и читайте необходимую информацию).
В нашем случае всё нормально.
Состояние среды восстановления Windows: Enabled
Расположение среды восстановления Windows: \?GLOBALROOTdevicehardd
isk0partition1RecoveryWindowsRE
Идентификатор данных конфигурации загрузки: 222a737e-019e-11e6-bc4d-aabece8a
bcca
Расположение образа для восстановления:
Индекс образа для восстановления: 0
Расположение пользовательского образа:
Индекс пользовательского образа: 0
Управление дисками.
Скрытый раздел с заводскими настройками мы удалили и теперь создадим его заново.
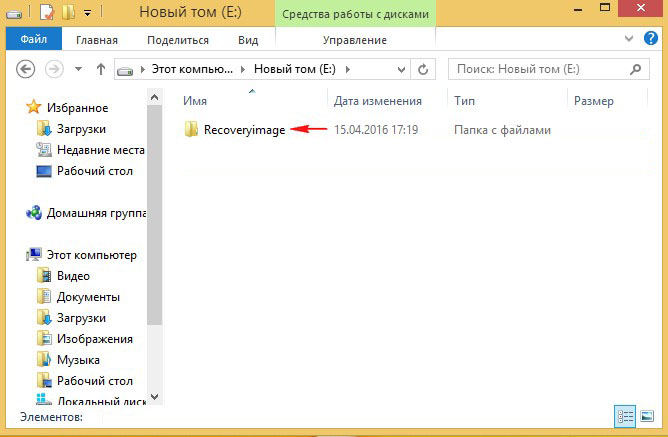
Создаём обычный раздел в конце жёсткого диска, мне будет достаточно размера 20 Гб, буква диска (E:).

Заходим на диск (E:) и создаём на нём папку: Recoveryimage
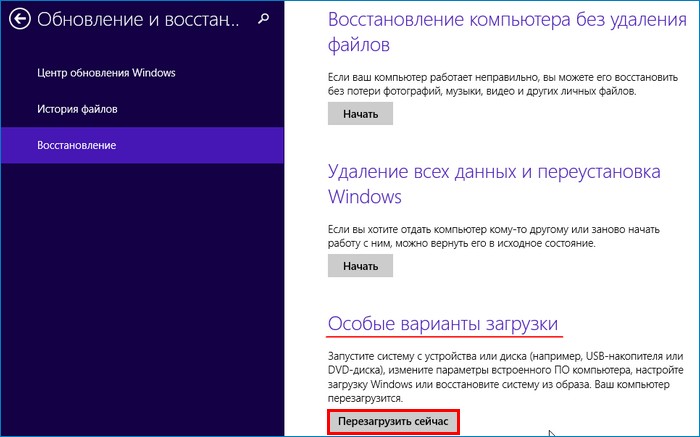
После этого загружаемся в Особые варианты загрузки.
Параметры
Изменение параметров компьютера
Обновление и восстановление
Восстановление
Особые варианты загрузки
Перезагрузить сейчас
Диагностика

Дополнительные параметры
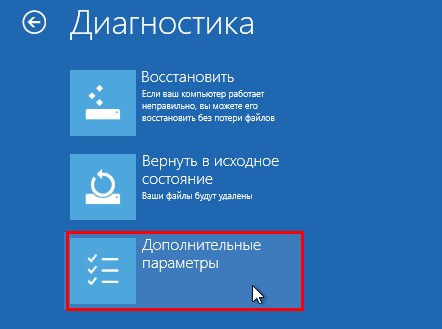
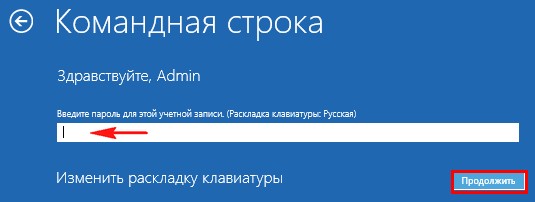
Командная строка

Выбираем нашу учётную запись

Если есть пароль, то вводим его и жмём Продолжить.
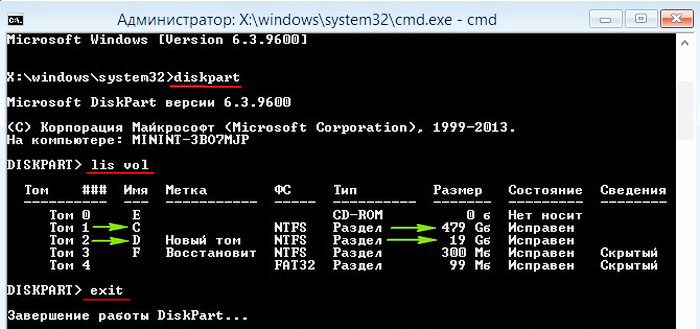
Открывается окно командной строки.
Вводим команды:
diskpart
lis vol (определяемся с буквами дисков, видим, что операционная система установлена на диске C:, а созданный нами раздел восстановления имеет букву D: вместо E:)
exit (выходим из diskpart),
вводим команду:
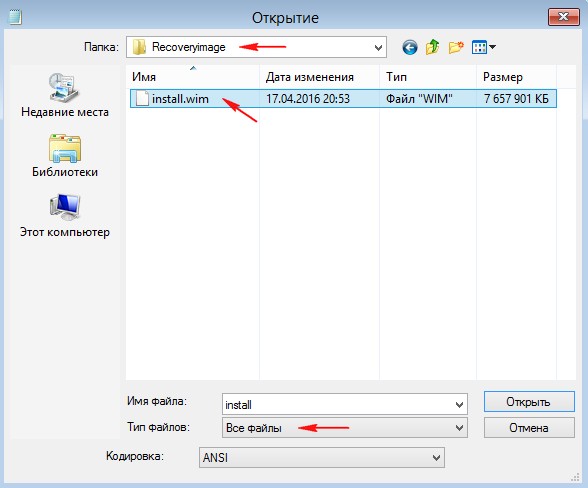
Dism /Capture-Image /ImageFile:D:recoveryimageinstall.wim /CaptureDir:C: /Name:"Windows"где,
install.wim: — это название WIM-образа диска (C:) с Windows 8.1.
D:recoveryimage — место сохранения WIM-образа.
C: — раздел с установленной Windows 8.1.
Прогресс операции 100%. Образ системы создан.
Вводим ещё команды:
cd /d C:windowssystem32 (данной командой мы входим в каталог C:windowssystem32)
reagentc /info (среда восстановления включена, но образ и его местонахождение не указано)
reagentc /setosimage /path D:Recoveryimage /index 1 /target C:windows (данная команда привязывает созданный нами образ восстановления install.wim, находящийся на диске D: в папке recoveryimage к системной среде восстановления (RE), теперь для восстановления при помощи одной кнопки — Push-Button Reset Overview будет использоваться именно этот файл-образ install.wim.
Задан каталог: \?GLOBALROOTdeviceharddisk0partition5recoveryimage
REAGENTC.EXE: операция выполнена успешно.
Всё это можно проверить опять же командой reagentc /info
reagent /info
Информация о конфигурации среды восстановления Windows и сброса системы:
Состояние среды восстановления Windows: Enabled
Расположение среды восстановления Windows: \?GLOBALROOTdeviceharddisk0partition1RecoveryWindowsRE
Идентификатор данных конфигурации загрузки: 222a737e-019e-11e6-bc4d-aabece8abcca
Расположение образа для восстановления: \?GLOBALROOTdeviceharddisk0partition5recoveryimage
Индекс образа для восстановления: 1
Расположение пользовательского образа:
Индекс пользовательского образа: 0
REAGENTC.EXE: операция выполнена успешно.

Возврат компьютера в исходное состояние
Друзья, теперь для возврата компьютера в исходное состояние — Push-Button Reset Overview (сброс винды одной кнопкой), вам не понадобится установочный дистрибутив с Windows 8.1, так как мы с вами перепрограммировали среду восстановления и теперь для возврата компьютера в исходное состояние будет использоваться созданный нами файл- образ восстановления install.wim, находящийся на диске D: в папке recoveryimage.
Параметры
Изменение параметров компьютера
Обновление и восстановление
Восстановление
Удаление всех данных и переустановка Windows
Возврат компьютера в исходное состояние
Далее
После этого происходит откат Windows 8.1 к тому состоянию, которое было в операционной системе на момент создания вами файл-образа install.wim, то есть DVD-диск с Win 8.1 уже не нужен и все ваши установленные на диске C: программы останутся в целости и сохранности. При необходимости со временем вы можете обновить файл-образа install.wim.