Unturned – популярная игра среди любителей survival horror. Это простая песочница с открытым миром и зомби, основная ставка в которой делается на выживание, из-за чего даже графика оказалась максимально упрощённой, в стиле Minecraft.
Кооперироваться с друзьями гораздо удобнее и веселее, если играть на собственной площадке. Создать сервер в Unturned не так сложно, как может показаться, и доступно это как для Windows, так и для Linux, в чём убедят инструкции ниже.
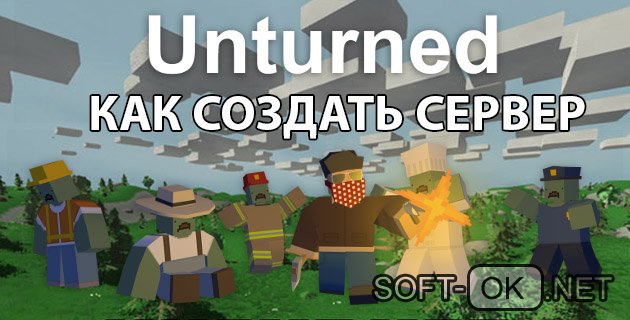
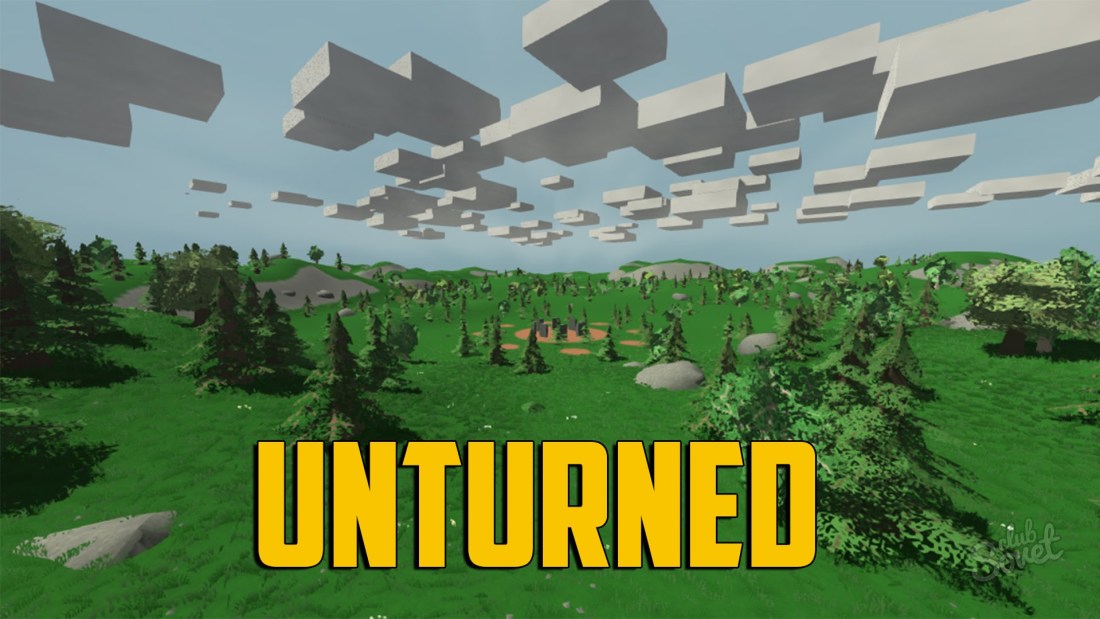
Рисунок 1. Руководство по созданию и настройке сервера игры Unturned
Содержание:
- Инструкция как создать сервер в unturned в Windows
- Инструкция по созданию сервера в Linux
- Правила работы с сервером
- Возможные трудности
Инструкция как создать сервер в unturned в Windows
Сделать площадку в Windows для Унтурнед – дело нескольких минут. Достаточно следовать алгоритму:
- Перейти в библиотеку Steam.
- Отыскать там Unturned и нажать на него правой кнопкой мыши.
- Выбрать «Свойства» из предложенного меню.
- Перейти в Локальные файлы.
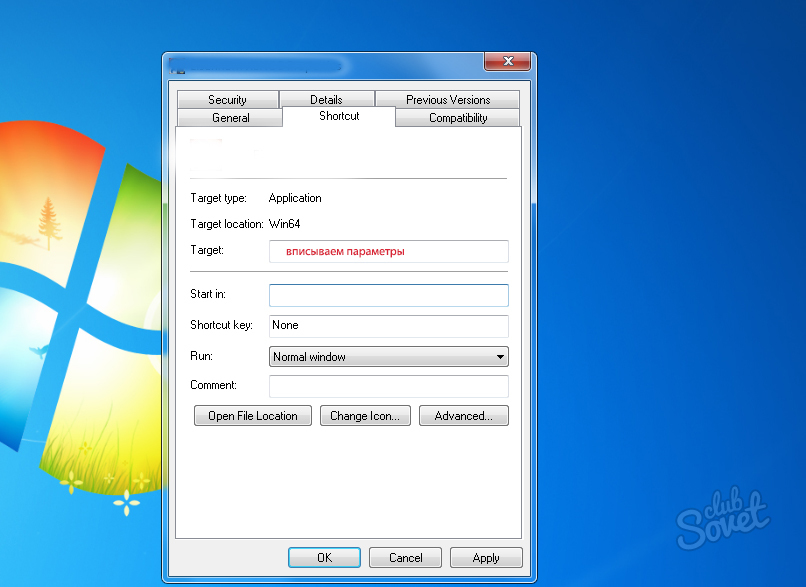
- Найти .exe файл и создать его ярлык на рабочем столе.
- Открыть «Свойства» ярлыка.
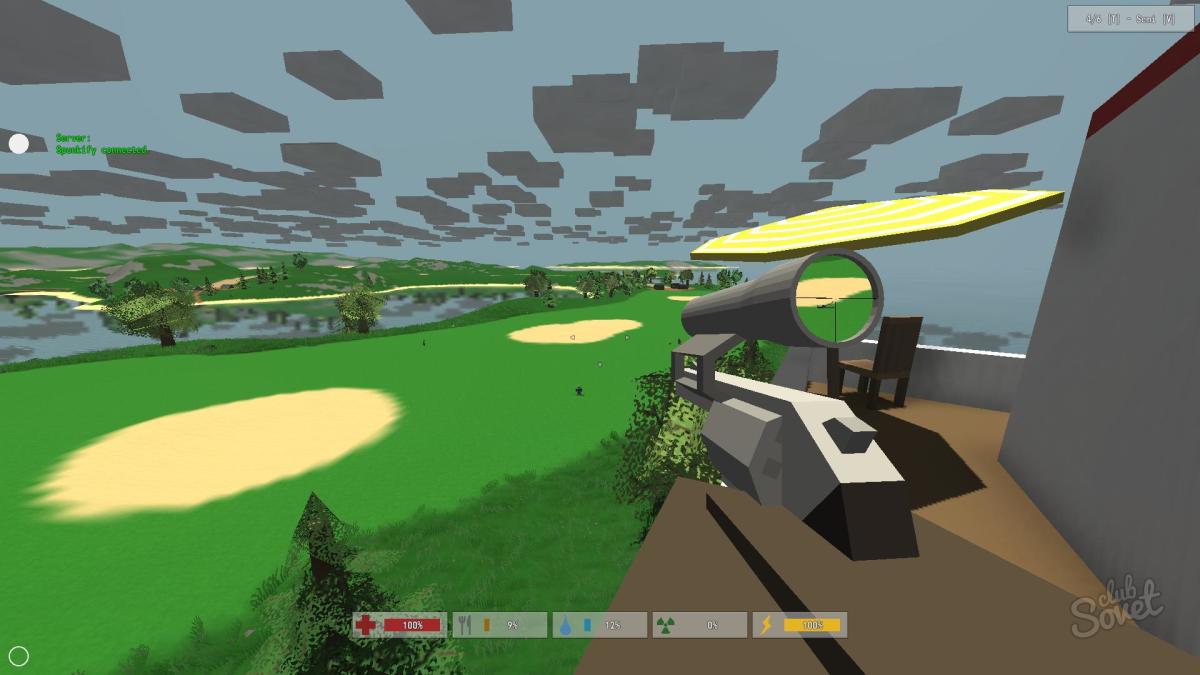
- Там, в строке «Объект» через пробел в самый конец необходимо внести -nographics -batchmode +secureserver/Nelson. Здесь, secureserver заменяется на lanserver, если сервер должен быть локальным. «Nelson» — это имя, оно может быть любым (Рисунок 2).
- После сохранения изменений запустить игру через этот ярлык.
- В открывшемся окне с абракадаброй ввести Shutdown и нажать Enter.
После можно заняться конфигурацией. Нужно выйти из игры и вернуться в локальные файлы, потому что теперь там есть папка «Servers». В ней же будет другая папка, с заданным именем площадки.
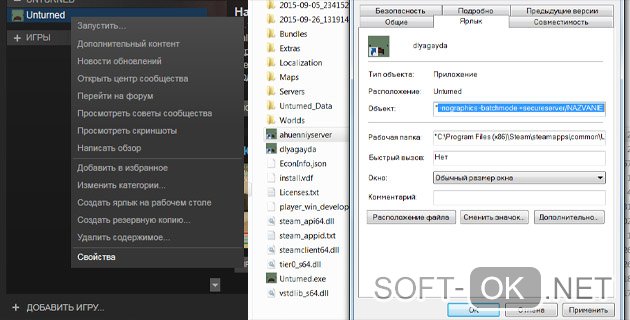
Рисунок 2. Руководство по созданию сервера
А в ней — снова папка «Server» с четырьмя файлами, про белый и чёрный листы, список администраторов и список команд — Commands.dat, который и нужен сейчас. Он открывается в текстовом редакторе, для чего обычно используется блокнот, и туда вписываются команды, выполняемые программой при запуске — все их можно найти, введя Help:
- Name — задать серверу имя, если не нравится предыдущее.
- Port — установить порт.
- Password — создать пароль.
- Maxplayers — сколько слотов доступно максимально. Важно учитывать, что чем их больше, тем сильнее будет нагрузка на систему. Так что желательно, чтобы их количество не превышало 24.
- Map — выбирается карта, где и будет запускаться площадка.
- Mode — сложность. В Unturned 4 уровня — лёгкий, средний, хардкор и золотой.
- Admins — будет отображаться список админов на загрузке.
- Permits — показывает вайтлист.
- Timeout — верхняя граница пинга. Создателем игры рекомендуется 400-600.
- Bindip — команда привязывает внешний статический IP к серверу.
- Perspective — вид. Он может быть от третьего или первого лица.
- Owner — владелец по SteamID и т. д.
Когда с заполнением файла будет окончено, необходимо сохранить его и снова запустить игру. Площадка должна открыться с обозначенными характеристиками. Он находится и в серверах Steam через:
- Localhost.
- Внешний IP при его установке.
- 127.0.0.1.
Подключиться к игре доступно отсюда же. Так же мозможно использовать приложение FileZilla для работы с передачей файлов.
Инструкция по созданию сервера в Linux
Создать площадку для Unturned на Linux немного сложнее, чем на Windows. Для этого понадобятся:
- VPS или сервер с 2 гигами оперативки минимум и двуяхдерным процессором.
- Понимание Unix, хотя бы базовое.
- Права администратора или доступ sudo.
После этого можно приступать к установке сервера. Для начала нужно добавить через sudo компоненты:
- Интерактивный просмоторщик процессов.
- Библиотеки архитектуры.
- Mono runtime.
- Объекты библиотеки Unity 3D.
Когда компоненты добавлены, можно переходить к следующему шагу – созданию аккаунта в Steam. Здесь для создания своей игровой площадки он нужен отдельный. После, всё также через sudo, можно создавать нового пользователя и папки steamcmd и unturned.
Примечание: Скачивается установщик SteamCMD Linux в архиве, который нужно распаковать в папку steamcmd. Запуск steamcmd.sh нужно разрешить, зайти под логином и паролем от новой учётной записи Steam. Остаётся только указать директорию для установки, установить туда Rocket for Unturned (linux).
Это должен быть домашний каталог, куда и распаковываются файлы. RocketLauncher нужно перенести в папку Unturned, а все .dll файлы в unturned/Unturned_Headless_Data/Managed. Последним шагом будет копирование start.sh и update.sh в домашний каталог.
Чтобы запустить сервер, нужно ввести в /home/steam команду ./start.sh <instance>, где <instance> можно заменить на любой параметр, к примеру, -pvp, -bambi (минимальная сложность), -arena (одна из доступных карт), -lanserver (сервер создается без античита)и т.д. Название сервера в servers Steam потом можно изменить.
Правила работы с сервером
После всех манипуляций, для созданной площадки нужно открыть порты, чтобы на него могли попасть игроки. Делается это просто:
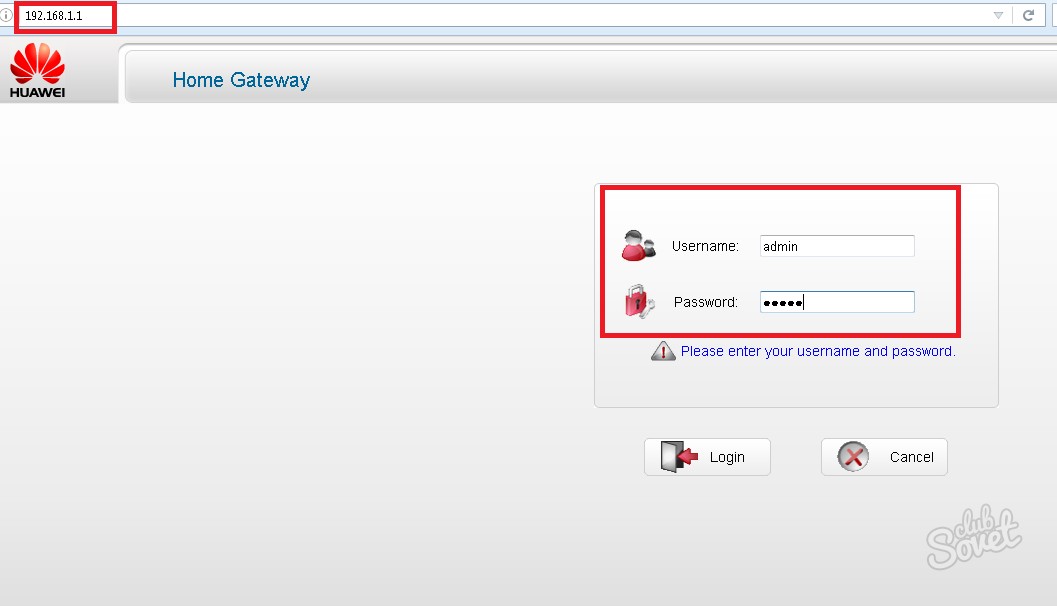
- Скачать программу Portforward Network Utilities (Рисунок 3).
- Установить её на компьютер.
- Запустить программу и перейти в Status.
- Там в браузерную строку вписать Router IP Adress.
- В логин и пароль вносится одно и то же значение – admin.
- В открывшемся окне нужно найти «Переадресацию», а там – «Порты».
В новой вкладке, которая откроется, можно будет создать порт.
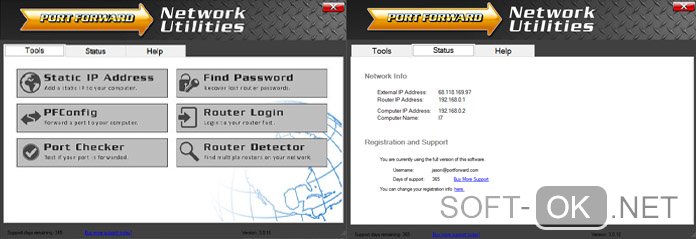
Рисунок 3. Интерфейс приложения Portforward Network Utilities
Возможные трудности
Несмотря на то, что описанные выше инструкции чаще срабатывают, чем нет, существует вероятность того, что что-то пойдёт не так. В этом случае рекомендуется не заниматься поисками причины в файлах, а попробовать другие возможности, потому что иногда исправить проблемы или невозможно, или слишком сложно.
К примеру, при выключенном компьютере сервер не будет работать, если он не будет куплен или арендован для Windows или Linux VPS.
Также иногда площадка не срабатывает, потому, что её останавливает Брандмауэр. Тогда у него необходимо добавить порты в исключения.
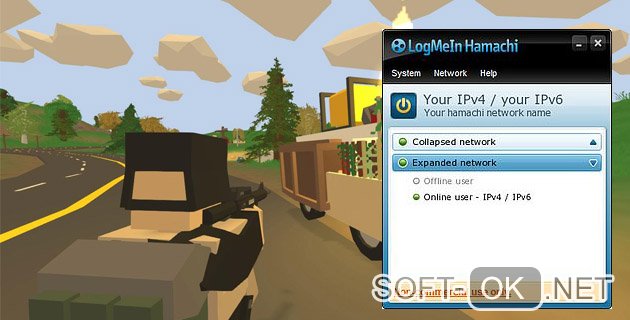
Рисунок 4. Использование сторонних приложений для создания сервера
И если ничего не помогает, а сервер не работает даже после проверок и починок, пригодится Hamachi — ПО, с помощью которого можно создать защищённую сеть компьютеров через интернет, как если бы они физически соединялись друг с другом (Рисунок 4). Здесь, после создания сети, всем игрокам передаётся порт и IPV4, чтобы у них был доступ.
Но в большинстве случаев, способы настройки и создания сервера Steam для Unturned, описанные в этой статье, срабатывают без дополнительной помощи.
Первым делом, ознакомься с общими требованиями для создания публичного сервера любой игры. А теперь приступим.
Нам понадобится:
0. Steam. Он в первую очередь нам нужен для того, чтобы получать обновления игры, ну и играть самому.
Если его у вас нет – ставим Steam, регистрируемся и устанавливаем игру Unturned.
1. Если вы не хотите ставить моды (kits, home, tp, kill и т.д.), то пропускайте этот шаг. Но если вы желаете поставить моды, то перейдите к папке с игрой:
Примеры пути к библиотеке Steam и папке с игрой.
C:Program Files (x86)Steamsteamapps
H:GamesSteamLibrarysteamappscommon
Сделайте дубликат папки с игрой в этот же или в другой каталог.
H:GamesSteamLibrarysteamappscommonUnturned
H:GamesSteamLibrarysteamappscommonUnturned Server
Теперь мы работает только с копией игры.
2. Заходим в “Unturned Server” (или, если вы не выполняли шаг выше, в каталог с игрой) и делаем ярлык файла “Unturned.exe” на рабочий стол. Открываем свойства только что созданного ярлыка и дописываем в поле “Объект” следующее:
-nographics -batchmode +secureserver/NewServer
чтобы получилось (это лишь пример, так у меня):
H:GamesSteamLibrarysteamappscommonUnturned ServerUnturned.exe -nographics -batchmode +secureserver/NewServer
,где NewServer – это имя каталога вашего сервера.
Запустите ярлык и после того, как в появившемся окне всё успокоится можете смело его закрыть.
Далее нам нужно зайти в папку “Server” в папке с вашей игрой:
H:GamesSteamLibrarysteamappscommonUnturned ServerServers
Ищем там каталог с названием вашего сервера. Заходим в папку “Server”:
H:GamesSteamLibrarysteamappscommonUnturned ServerServersNewServerServer
Тут хранятся параметры нашего сервера.
Adminlist.dat
Blacklist.dat
Whitelist.dat
Эти файлы нельзя редактировать вручную. Они редактируются командами сервера (admin, unadmin и т.д.). Нам нужен файл:
Commands.dat
Открываем его через блокнот (ИМХО рекомендую Notepad++). Редактируем исходя из своих соображений. Ниже приведён список команд:
| Bind | Bind [IP] | IP-адрес сервера. Не обязательно. |
| Chatrate | Chatrate [Number] | Время между сообщениями игрока в чат. Антиспам. (сек) |
| Cheats | Cheats [Enable | Disable] | Разрешены ли читы на сервере |
| Cycle | Cycle [Number] | Дневной цикл в игре (сек) |
| Decay | Decay [Barricade Duration]/[Structure Duration] | Время остуствия игрока/группы на сервера, после которого будут удалены его/их строения и пострйки. По умолчанию 604,800 секунд (7 дней.) |
| Filter | Filter | Enables the old name filter |
| Gold | Gold | Сервер только для Gold-аккаунтов |
| Hide_Admins | Hide_Admins | Админы будут отображаться как обычные игроки |
| Loadout | Loadout [SkillsetID]/[ItemID]/[ItemID]/… | Вещи, которые будут даны игроку после спавна. SkillsetID – ID специализации игрока (0-10). Далее через /ID вещей |
| Log | Log [Chat]/[Join/Leave]/[Death] | Лог в игровой чат /присоединился/Отключился/Умер. Параметры: Y/N. log Y/Y/N |
| Map | Map [Level] | Имя карты на сервере |
| MaxPlayers | MaxPlayers [Number] | Максимальное кол-во игроков. (макс. 24) |
| Mode | Mode [Easy | Normal | Hard] | Сложность |
| Name | Name [Text] | Имя сервера в списке серверов |
| Owner | Owner [SteamID] | Владелец сервера |
| Password | Password [Text] | Пароль для входа |
| Perspective | Perspective [First | Third | Both] | Доступные виды в игре |
| Port | Port [Number] | Основной порт сервера |
| PvE | PvE | Режим PvE |
| Sync | Sync [Key] | Синхронизация игроков с другими серверами |
| Timeout | Timeout [Number] | Парог пинга игрока, после котороего его выкинет с сервера |
| Votify | Votify [Vote Allowed Y|N]/[Pass Cooldown]/[Fail Cooldown]/[Vote Duration]/[Vote Percentage]/[Required Players] | Разрешить и настроит голосование на сервере. votify Y/5/60/15/0.75/3 |
| Welcome | Welcome [Text]/[R]/[G]/[B] | Текст приветствия |
А вот пример содержимого конфигурационного файла сервера.
Maxplayers 24
port 27015
name HemulGM.RU [PVE, KITS, HOME] [Россия]
map PEI
PVE
Cheats
Perspective Both
loadout 0/406/405/426/85/276
loadout 1/233/234/241/1032/276
loadout 2/223/224/225/276/1195/1196
loadout 3/1172/1171/1044/121
loadout 4/242/243/244/1031/343/343/336/336
loadout 5/509/510/511/503/505/505
loadout 6/670/550/193/141
loadout 7/232/240/2/138/418
loadout 8/230/239/231/93/78
loadout 9/1157/1156/192
loadout 10/311/312/15/388
cycle 3000
owner 76561198151655003
votify Y/5/60/15/0.75/3
welcome Welcome!_PvE._Kit_start,_kit_help,_home.
3. Если вы не намерены ставить моды – можно уже запустить сервер и смело играть. Тем, кто хочет ставить моды – читать дальше.
4. Заходим на сайт Rocket и качаем последнюю сборку. Содержимое скаченного архива копируем с заменой фалов в каталог с игрой:
H:GamesSteamLibrarysteamappscommonUnturned Server
5. Скачать моды и плагины во можете здесь. Моды устанавливаются непосредственно в каталог с вашим сервером:
H:GamesSteamLibrarysteamappscommonUnturned ServerServersNewServerRocketPlugins
Далее вам остается его лишь настроить.
Вот и всё. Вы создали сервер игры Unturned и сделали возможность ставить плагины. Поздравляю!
Практически с самого момента релиза разработчики предлагали пользователям уникальную возможность – создать свой собственный сервер Unturned, чтобы играть с друзьями. О том, как это сделать, мы поговорим ниже.
1
Особенности сервера в Unturned
Несмотря на достаточное количество багов и финальный результат, далекий от совершенства, личный сервер Unturned предлагает пользователям массу преимуществ. Так, к примеру, администратор сервера может подключать свои карты, причем большего масштаба, чем обычные. Серверное приложение полностью реализовано в виде консоли, благодаря чему владельцу не потребуются дополнительные мощности для обработки графической составляющей. Дальнейшие настройки и манипуляции будут подразумевать использование только лицензионного ПО. В обратном случае сервер может не заработать, или игроки столкнутся с рядом ошибок.
2
Создаем сервер Unturned с нуля
- В отличие от предыдущих версий, сервер Unturned 3.0 начинается с настройки ярлыка. Для этого заходим в папку с игрой, находим файл unturned.exe, кликаем по нему правой кнопкой и выбираем пункт создания ярлыка.
- После снова жмем правой кнопкой по новому ярлыку и заходим в “Свойства”, вкладку “Ярлык”.
- В поле, под названием “Объект”, нужно прописать параметры, с которыми ярлык будет открываться. Для нашего сервера это -batchmode -nographics и его название через /.
- Среди дополнительных параметров вы можете выбрать: “+lanserver” – незащищенная от читов версия, “+secureserver” – с применением античита.
- Чтобы было удобнее, не забудьте переименовать ярлык, запускающий сервер, а не клиент игры. После первого запуска должна появиться консоль, на этом создание сервера завершено, далее потребуется его настроить.
3
Настраиваем сервер Unturned
В данном разделе также не придется прилагать много усилий. В папке с игрой заходим в Servers → “название сервера”→ Server и открываем для редактирования файл Commands.dat. В нем заполняем каждую строку, как показано в примере, внося собственные показатели, если это нужно. Выглядеть файл будет так (на прикрепленном изображении вы сможете увидеть пояснения к каждому пункту):
- Name
- Port
- MaxPlayers
- Map
- Mode
- PvE
- Perspective
- Owner
- cycle
- loadout

4
Открываем порты
Чтобы к вашему личному серверу могли присоединиться друзья, вы должны сообщить им внешний IP и адрес порта. Если сторонние игроки приконнектиться не могут, следует проверить, открыты ли порты (а лучше – сделать это перед финальным запуском сервера).
- Для этого качаем Portforward Network Utilities с официального сайта, устанавливаем, открываем и заходим во вкладку “Статус”, смотрим IP, который принадлежит вашему роутеру и переносим его в адресную строку браузера.
- Должен открыться интерфейс с запросом логина и пароля, по умолчанию они соответствуют значениям adminadmin. Так как веб-интерфейсы роутеров различных моделей могут отличаться, ищем вкладку, с названием “Порты”, “Переадресация” или подобные. Вписываем порт и проверяем соответствие IP адреса.
Если игроки все еще не могут подключиться к серверу, отключите брандмауэр Windows. Альтернативный способ – играть через программу Hamachi.
Создание сервера
Одним из основных достоинств новой версии Unturned (3.0) — стала возможность создания собственного выделенного сервера. На данный момент эта функция далека от идеала: поддержка относительно небольшого количества пользователей, не очень удобная система создания и настройки, сравнительно небольшая функциональность.
Однако, даже в таком состоянии, имеется ряд положительных моментов :
Во-первых, появилась возможность подключения собственной карты с большими масштабами.
Во-вторых, сам сервер представляет из себя консольное приложение, что позволяет не тратить системные ресурсы на вывод графической информации.
Создание сервера (Только лицензионные версии)
- Создаем ярлык Unturned.exe
- Заходим в свойства ярлыка и в строке «объект» в конце строки прописываем -nographics -batchmode +secureserver/Имя_Сервера
- Запускаем сервер.
Открывается окно консоли. Пока в указанной при создании сервера папке нет никаких файлов. Чтобы это исправить:
- Вводим Shutdown
Shutdown
После этого сервер закрывается, сохраняя процесс и создавая недостающие файлы.
- Переходим в /Servers/<ИМЯ_ПАПКИ_УКАЗАННОЙ_ПРИ_СОЗДАНИИ_СЕРВЕРА>/Server
- Открываем файл Commands.dat с помощью текстового редактора.
Этот файл — список команд, выполняемых при загрузке сервера. Вот список часто используемых команд:
- Help — вывод списка всех команд
- Shutdown — безопасное прекращение работы
- Maxplayers — максимальное кол-во игроков (от 1 до 24)
- Name — имя сервера
- Password — пароль сервера
- Port — порт сервера
Пример:
Maxplayers 20
Примечание:
Предлагаю взяться за перевод статьи на англо-язычной вики.
И делать данную статью на ее основе.

22.09.2015
Просмотры: 419
![]() Memory Lane
Memory Lane
Большим преимуществом перед предыдущей версией для Unturned (3.0.0.1) является возможность реализации любым желающим рабочего игрового сервера. В этой статье мы как раз и поговорим о том, как сделать сервер в Unturned 3.0.
К сожалению, пока эта опция не слишком совершенна:
- позволяет одновременно подключаться небольшому количеству игроков;
- довольно трудоемкий процесс создания и настройки сервера;
- недостаточно высокий функциональный потенциал.
Тем не менее, использование данной опции имеет также и ряд существенных преимуществ:
- игра с проверенными людьми, друзьями, единомышленниками;
- собственные настройки, включая крупномасштабную карту;
- консольное приложение, которым является сервер, дает возможность экономить внутрисистемные ресурсы.
Существует довольно много способов и специализированных программ, помогающих сделать свой игровой сервер, ниже будут описан наиболее оптимальный путь, который поможет даже не слишком опытному пользователю ПК реализовать идею создания собственного игрового пространства.
Первый этап — создание сервера
- Для начала следует сделать резервную копию папки с игрой в любое удобное место на ПК, чтобы вернуть игровые файлы в случае сбоя.
- Далее необходимо зайти в изначальную папку Unturned, найти в ней загрузчик «Unturned.exe» и кликом правой кнопки мыши отправить его на рабочий стол (создать ярлык).
- Кликнув на созданном ярлыке правой кнопкой, зайти в «Свойства».
- В строчке «Объект», где указан адрес приложения, на которое ссылается ярлык, сделать соответствующую приписку (см. ниже). В итоге строка адреса должна выглядеть так (квадратные скобки прописывать не нужно):«C:Program Files (x86)SteamsteamappscommonUnturnedUnturned.exe»[пробел]-nographics[пробел]-batchmode[пробел]+secureserver/[!название сервера!]
- Сохранив изменения, следует запустить сервер при помощи созданного ярлыка. На экране должно появиться черное окно без текста. Чтобы закрыть его, требуется прописать в командной строке «Shutdown», без кавычек. Окно закроется, а система произведет запись и создание необходимых файлов.
Вот и все, как видите – сделать свой сервер в Unturned 3.0 – совсем несложно. Теперь необходимо его настроить.
Второй этап — настройка сервера
Приступаем к настройке конфигурации сервера. Для этого в папке игры нужно найти файл /Servers/[!название сервера!]/Server/Commands.dat и открыть его при помощи программы «Блокнот».
Серверные команды для Unturned
В этом файле прописываются ключевые команды, которые выполняются при загрузке сервера. Список основных базовых команд:
Не обязательно использовать все команды. Прописать в файле нужно только те строки, которые необходимы.
Чтобы зайти на сервер, необходимо через Steam нажать – «Играть» — «Подключение», а в поле IP ввести «localhost». После нажатия на «Подключиться» будет выполнен вход на созданный сервер.
Друзья могут зайти на сделанный сервер в Unturned 3.0 тем же путем, за исключением того, что в поле IP они должны ввести «localhost», а номер внешнего IP вашего ПК. Эту информацию можно узнать у провайдера или на специальном проверочном ресурсе.
Если подключиться не удается, можно попробовать установить инструмент Steam под названием Steam VR или обратиться к провайдеру за соответствующей помощью!
Комментарии VK-комментарии
A Dedicated Server is a method of hosting an Unturned server that does not require the host to be an active player in the game. The host can choose to play on the server, or just leave it running in the background while others play on it. Unlike a Local Server, port forwarding is required. Servers are hosted with the Unturned Dedicated Server app.
A Dedicated Server also allows for vastly increased versatility in configuration of the server. Many server options become available through the Commands.dat, Config.json, server console, and other configuration files.
Windows Setup:
Shortcut Method (pre-3.20.12.2 only)
The deprecated shortcut method for creating servers only works for versions of the game prior to 3.20.12.2, which had been released on October 14, 2020. Newer versions of the game should only be hosted through the Unturned Dedicated Server app.
How to Host a Dedicated server on Unturned Version 3.0 Above
- Right-click the «Unturned.exe», hover the mouse over «Send To», and click on «Desktop (create shortcut)».
- Right-click on the shortcut and select «Properties». The «Target:» field should contain the path to Unturned.exe and should look something like this:
-
"C:Program Files (x86)SteamsteamappscommonUnturnedUnturned.exe"
-
- Now, at the end of the string of text, insert this string of text:
-
-nographics -batchmode +secureserver/...
-
- … is whatever you want to name your server.
An example of a finished «Target» field:
"C:Program Files (x86)SteamsteamappscommonUnturnedUnturned.exe" -nographics -batchmode +secureserver/My server
- 4. Finally, run the server. A black console screen should appear.
- 5. Optional: You can easily update an existing Unturned server by using the following method:
The following text string will create a shortcut that will automatically update your server. This example assumes that you installed your server through SteamCMD, which does not update Unturned automatically.
"C:SteamCMDsteamcmd.exe" +login Username Password +app_update 304930 +exit
Classic Setup:
Unturned — how to create a dedicated server! (and how to join it)
- From the Steam window, right-click the Unturned game in your Library and select «Properties».
- Click in the «Local Files» tab.
- Click «Browse Local Files…».
- In the explorer window, right-click the «Unturned.exe», hover the mouse over «Send To», and click on «Desktop (create shortcut)».
- Right-click on the newly created shortcut and select «Properties». The «Target:» field should contain the path to Unturned.exe and should look something like this:
-
"C:Program Files (x86)SteamsteamappscommonUnturnedUnturned.exe"
-
- In order for the server to run, you need to add add options to the end of the field. For example, if you wanted the server to be PvE, you would add the -pve option to the end of the field. A complete list of options is found at the bottom of the page.
- An example of a finished «Target» field:
-
"C:Program Files (x86)SteamsteamappscommonUnturnedUnturned.exe" -port:25444 -players:20 -nographics -pei -gold -nosync -pve -sv
-
To finish, simply apply changes to the shortcut and double-click it to run it. The game should run and then immediately go to a gray screen. This screen means the server is running fine. If your screen doesn’t go gray and the server does not work, make sure you put the -sv option at the end of your options, otherwise the server may not work.
MacOS Setup:
- From the Steam window, right-click the Unturned game in your Library and select «Properties».
- Click in the «Local Files» tab.
- Click «Browse Local Files…».
- Optional: Go back to Common, duplicate the Unturned folder, paste it in Common and name it Unturned Server)
- In the Finder window right click on Unturned
- Select Show Package Contents
- Select Contents
- Select MacOS
- Open up terminal
- Then drag the Unturned executable into the terminal window (this will paste the path of the application)
- Press space, then add in your parameters (this is the same as step 3 of Windows 3.0.0 setup, except that the program will be referred to as Unturned.app instead of Unturned.exe)
- Then press enter to execute the command.
With Unturned 3.0, the procedure is exactly the same, but after the parameters, you need to add: +secureserver/servername
Replace «secureserver» with «lanserver» if you want a LAN server instead. Replace «servername» with what you want to name your server.
Now, if you want to double-click to start the server, in TextEdit (Located in Applications), paste the same command you just ran (hopefully testing it first), then save it as «StartServer.command». Make sure it doesn’t add .txt or .rtf to it.
Linux Setup:
New Guide
Install Unturned.
Go to the install folder and right click and press open in terminal.
press the following
-
./Unturned.XX -nographics -pei -normal -nosync -pve -players:16 -sv
Replace XX with the name of the architecture (x86 if you have a 32 bit computer, x86_64 if 64 bit)
example:
-
./Unturned.x86_64 -nographics -pei -normal -nosync -pve -players:16 -sv
Headless Guide
Note: This is mainly for computers without a GUI (graphical user interface), or if you only have access to the terminal/command line. If you use a VPS with only SSH/PuTTY access, go right ahead! If you are using a GUI, the above option might be better for you, however you might have some slight memory benefits using this method.
Install your OS of choice, whether it be Ubuntu Server/Debian or Fedora Server/RHEL/CentOS. After that, update your OS and your repositories. You know you are in the shell when you see a $ or an # at the end of the line.
To update in Fedora, use
sudo dnf update
while on Ubuntu, use
sudo apt-get update && sudo apt-get upgrade && sudo dpkg --add-architecture i386
The «Add Architecture» is only needed once; to update your system, only the other two is required afterwards.
If on Fedora, you do not have access to dnf, try using yum instead.
Now for installing the libraries. On Fedora, run
sudo dnf install glibc-devel.i686 mono-devel gcc libgcc libstdc++.i686 libgcc.i686 ncurses-libs.i686 zlib-devel.i686 libXcursor.i686 libXrandr.i686 screen
Hint: Adding -y to the command (sudo dnf -y …) will automatically say yes to every prompt. Use it here to avoid having to type yes to every statement, you should only use this if ypou are sure your machine is configured correctly, as you may want to see dependencies for every package, and their size.
If you have an Nvidia GPU, also use
sudo dnf install xorg-x11-drv-nvidia-libs.i686
If you only have an Intel Graphic Chipset, or you don’t know what graphics you have, use
sudo dnf install mesa-libGL.i686 mesa-dri-drivers.i686
For Ubuntu, type each individual line, then hit return. You should have typed in four statements.
sudo apt-get install screen htop unzip wget

sudo apt-get install build-essential gcc-multilib libstdc++6:i386 libgcc1:i386 libncurses5:i386 rpm zlib1g:i386

sudo apt-get install libmono2.0-cil mono-runtime

sudo apt-get install libc6:i386 libgl1-mesa-glx:i386 libXrandr2:i386 libXcursor1:i386
If your Fedora/Redhat server throws an architecture error, try adding —setopt=protected_multilib=false to resolve the issue temporarily.
At this time, you will need a steam account. To avoid conflict, create a new dummy Steam account with Unturned added to its library.
There are a lot of things to say here, but I recommend creating a new user similar to the instructions in the old guide. Look at the «Running the Server» part, and ONLY do the first step (two commands).
Most of these steps are going to be the same for Ubuntu/Fedora/Debian/RHEL/CentOS, unless said.
First, let’s create some folders and download SteamCMD.
mkdir ~/unturnedserver && cd ~/unturnedserver
mkdir steamcmd && mkdir unturned && cd steamcmd
wget https://steamcdn-a.akamaihd.net/client/installer/steamcmd_linux.tar.gz
tar xvf steamcmd_linux.tar.gz && rm -rf steamcmd_linux.tar.gz
We need the RocketLauncher to start the server, so we will download it.
chmod +x steamcmd.sh && cd ..
wget https://ci.rocketmod.net/job/Rocket.Unturned/lastSuccessfulBuild/artifact/Rocket.Unturned/bin/Release/Rocket.zip
unzip Rocket.zip && rm -rf Rocket.zip
mv Scripts/Linux/RocketLauncher.exe unturned/
mv Scripts/Linux/*.sh .
If you want RocketMod on your server as well:
mv Modules/Rocket.Unturned/ unturned/Modules/ # DO NOT USE FOR VANILLA
You may now remove any excess files, other than start.sh, update.sh, unturned/, steamcmd/, or Steam/.
Now, using an editor of choice (Vi or Nano), open update.sh.
nano update.sh
Here is where your Steam account that you created earlier is used. Put the username and password in there. If you want to keep your password private, keep the password string blank.
Now you’re done!
./update.sh # For updating server and downloading files
./start.sh # For running the server
File installation
A short-term testing method is to use WinSCP or a similar SFTP software to transfer the entire Unturned folder over to the Linux server. The folder is likely located in C:Program Files (x86)SteamSteamAppscommon. The problem with this option is that you must update the server files with WinSCP every time an update is released.
A better option is to use SteamCMD, which is a light-weight Linux Steam client that downloads and updates the required Unturned files.
- Download steamcmd to the server
-
wget http://media.steampowered.com/installer/steamcmd.zip
-
- Unzip it:
-
unzip steamcmd.zip
-
- Start SteamCMD:
-
wine steamcmd.exe
-
- Login to a Steam account:
-
login username password
-
- Define an installation directory:
-
force_install_dir Z:/home/your/unix/folder
-
- Download the game to the dedicated server. «app_update 304930» also updates the files of the force_install_dir you pointed at.
-
app_update 304930
-
Running the server
- Starting from root, add a user:
-
adduser unt
-
adduser unt sudo
-
- Log in using the new user:
-
su unt
-
- Install wine and xinit:
-
sudo apt-get install wine xinit
-
- Configure X to allow Anybody to start it:
-
sudo dpkg-reconfigure x11-common
-
- Start X (headless style):
-
tmux
-
startx
-
- Move to a different shell in tmux:
-
[CTRL]+[B], [C]
-
- Tell WINE to use the headless X session:
-
export DISPLAY=:0.0
-
- Start the Unturned server:
-
wine Unturned.exe -nographics -pei -normal -nosync -pve -players:16 -sv
-
Configuring your Server:
Setup Commands
Note: You may have to open the .dat files in a text editor.
Type shutdown in the console. Go back to the Unturned directory. Now click on Servers, then you should see a folder, with the name of your server. Click on that folder. Click on the sub-folder Server. There should be 4 .dat documents, labeled Adminlist, Blacklist, Commands, and Whitelist.
Use the Commands file if you want to run list of commands that will run each time the server starts. Use a separate line for each command.
The Setup Commands are as follows:
- Bind — Binds your internal IP to the socket. (Internal IP is the network adapter IP of the adapter you use)
- Chatrate — Assigns the minimum amount of time between chat messages in order to prevent spam.
- Cycle — Assigns the day/night cycle in seconds.
- Decay — Assigns the amount of time a player, or their group members, can be offline before their structures can be removed by anyone. Default is 604800. (7 days)
- Filter — Enables the old name filter.
- Loadout — Assigns what all players spawn with. The first number value in the loadout is the Skillset ID. (Example: Loadout 255/15/15/81/81/18/20/20/121 — Gives all skillsets 2 Medkits, 2 MREs, a Timberwolf, 2 Timberwolf Magazines, and a Military Knife.)
- Log — Enables/Disables [chat]/[join&leave]/[death]/[anticheat] messages. (Y = Yes, N = No) (i.e. Log Y/Y/Y/Y)
- Map — Sets the map that will be used for the server. If you want to use a workshop map, the workshop map folder must be placed in the Workshop folder of the server, otherwise it will fail to load the map.
- MaxPlayers — Sets the max amount of players the server will allow.
- Mode — Sets the difficulty mode. (Easy, Normal, Hard)
- Name — Sets the server’s name. (i.e. Nelson’s Server)
- Owner — Sets the server’s owner, which gives them administrator commands and fully sets up the server. (Requires your Steam 64 ID.)
- Password — Sets a password to the server to keep out unwanted guests, making the server more private.
- Perspective — Assigns the perspective views. (First, Third, Vehicle, Both.) First allows only first-person, third allows only third-person, Vehicle allows third-person only when the player is in a vehicle, and both allows changing between first and third-person views freely.
- Port — Sets the server’s port. The default port is 27015. This command does not need to be used if the server is hosted under the default port range.
- PvE — Sets the server to only allow Players VS Environment combat.
- Sync — Syncs player data between servers using the same key.
- Timeout — Sets the max Ping for players before they time out. (400~600 is recommended)
- Welcome — Sets the welcome message. (i.e. Welcome Welcome to Nelson’s Server!)
Command Line Options
These parameters are used in launching the server from a command line interface. The order of inputted commands do not matter.
- Map:
- -arena
- -pei
- Gamemode:
- -bambi
- -normal
- -hardcore
- -gold
- Sync Setting:
- -sync
- -nosync
- PVP/PVE Setting:
- -pvp
- -pve
- Misc:
- -pass:[PASSWORD]
- -port:[PORT NUMBER]
- -players:[PLAYER MAX]
- -nographics (This command is needed to not see the welcome screen. Instead you see a black screen with no GUI.)
- -sv (needs to be at the end of the parameters)
- -batchmode (prevents the game from launching a GUI, and makes it run as a background process. Greatly reduces CPU usage)
Config.json file
- Main article: Gameplay Config
The Config.json file offers a lot of control over the actual server gameplay. It is located in:
{UNTURNED}Servers(Server name)config.json
It can be edited in the same manner as the commands.dat file. It is in JavaScript Object Notation format, meaning that it is a simple list that connects one string to a variable. In more simple terms, you should only edit text that is within «quotation marks» and after a : colon. Any value that is before the colon is specific to the game and it WILL break your server if you change it.
- Browser
- Icon — the file path to the server’s icon to be shown on the Server page
- Thumbnail — Similar to the Icon, but to be shown when you select the server
- Desc_Hint — Text to be shown when you hover over the server in the server list
- Desc_Full — The full description of the server
- Desc_Server_List —
- Server
- VAC_Secure — Should the server require Valve (Through steam) Anti-Cheat? (true/false)
- BattlEye_Secure — Should the server require BattlEye Anti-Cheat to be running? (true/false)
Connecting:
You should now be able to connect to your own server by running the game through Steam. To do this, click «Play», and then «Connect», and in the IP field, type «localhost», then click «Connect» to join your own server.
If you fail to connect to your own server, try installing SteamVR (found under tools in Steam).
Note: Other players will not use «localhost», only you will. Other players will use your EXTERNAL IP to connect to your server. Find your external IP by visiting a site such as WhatIsMyIP.
Firewall
If you have correctly set up your server and can’t even connect to it, you might want to check if your firewall is blocking the port.
On Windows, it shouldn’t be that hard; open Control Panel, Security, and click «Allow a Program». Here, you can choose the Unturned application, and voila!
For MacOS, open System Preferences. Go to Security and Privacy, Firewall, then unlock the settings via the padlock at the bottom left of the window. Next, go to Firewall Options, scroll down the list, click on Unturned, and on the right of it, make sure it says «Allow incoming connections». If not, click on it, and choose that option. Close the window, making sure to apply settings, padlock the settings, and you’re done!
For Fedora/CentOS/RHEL:
sudo firewall-cmd --zone=public --add-port=27015-27017/tcp --permanent
sudo firewall-cmd --zone=public --add-port=27015-27017/udp --permanent
For Ubuntu/Debian:
sudo ufw enable
sudo ufw allow 27015:27017/tcp
sudo ufw allow 27015:27017/udp
For both, if you selected a different port via the start command or Commands.dat, change the first number to the port you selected, and the second port two ports ahead (ex. 27040-27042).
Port Forwarding:
NOTE: Port Forwarding has to be done carefully. Nobody will be able to connect to your server if you do this incorrectly.
In order for anyone to access the server you’ve set up, you need to go into your router’s settings and open the server’s set ports.
You will need the following information which can be retrieved from your router (usually a sticker on the side):
- Your default gateway address
- Your gateway username (NOT your network name/SSID)
- Your gateway password (NOT your network password)
- Your local IP address
To find your local IP address, follow these steps (Windows):
- Open the Command Prompt (Type «cmd» into the search bar).
- Type «ipconfig» and press Enter.
- Find the heading that says «Wireless LAN Adapter Wi-Fi» or «Ethernet Adapter Ethernet.»
- Under that heading, find the line that says «IPv4 Address.»
- Write down the number on that line and label it «Local IP.»
Follow the steps below (these might not be the exact field names, you will have to look for something similar in context):
- Open any internet browser, and type your default gateway into the address bar, then hit enter.
- Find a section for Port Forwarding.
- Click the option that allows you to add a new port, or rule.
- Under a «Service name» or «Rule name,» type a name that will identify it as port forwards for Unturned.
- For the «Protocol,» choose «UDP».
- Under «External Starting Port», type the number you wrote down earlier, labeled «Server Port».
- Under «External Ending Port», type your External Starting Port number, plus 2. With the default port, this would be 27017.
- The external and internal ports should match.
- Under the «Internal IP Address» box, type the number you wrote down earlier, labeled «Local IP».
- Save and apply changes afterwards.
Below is an example of a completed port forwarding rule.
| Field Name | Field Value |
|---|---|
| Rule | Unturned |
| Protocol | UDP |
| External Starting Port | 27015 |
| External Ending Port | 27017 |
| Internal Starting Port | 27015 |
| Internal Ending Port | 27017 |
| Internal IP Address Box | 192.168.1.150 |
If you are unable to locate these things, try checking https://portforward.com/router.htm to see specific instructions for your router.
Alternatively, you can put your hosting system into the DMZ. This opens all ports and is an option if for some reason normal port-forwarding fails. Putting your system into the DMZ opens up numerous security vulnerabilities and should only be used as a last resort!
- Follow the steps above until you reach your router page (from the default gateway)
- Find a section for DMZ (Demilitarized Zone)
- Input your computer’s internal IP Address
Optional Server Improvements
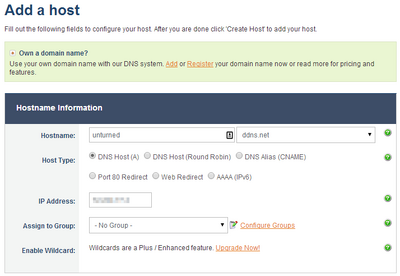
- (Free) Turn your IP address into a DNS:
- Utilizing a website such as http://www.noip.com/ will allow you to create an easy-to-remember text-based IP address, such as «myserver.zapto.net». Players will use this name to connect to your server instead of the numbered alternative, such as «74.12.127.76».
- Register for a new account (free)
- After signing in, select «Add a Host»
- Most of the fields are already done for you. You only need to give the host a name in the «Hostname» field, such as «unturned», «myserver», etc. You also have the option of choosing the domain name from the drop-down menu immediately to the right of the hostname. In the example to the right, my hostname will become «unturned.ddns.net».
- Once you click «Add Host», your IP address now matches the Hostname. Players can now use your hostname to connect to your server instead of your numbered IP address.
- Optional but recommended: Download the No-IP client in the sidebar menu on the left (download link here ). The client will run in your taskbar and automatically update your hostname to match your IP address if it changes in the future. If you skip this step, you will need to change your IP address manually with «Manage Hosts» on the noip.com website.
- Utilizing a website such as http://www.noip.com/ will allow you to create an easy-to-remember text-based IP address, such as «myserver.zapto.net». Players will use this name to connect to your server instead of the numbered alternative, such as «74.12.127.76».
- (Free) IP to DNS via Duckdns (extra option for DNS):
- The steps are listed on https://duckdns.org and are similar to steps for no-ip. It’s just another option that exists to achieve the same goal. They have a clear FAQ and Install guide for people new to it.
A Dedicated Server is a method of hosting an Unturned server that does not require the host to be an active player in the game. The host can choose to play on the server, or just leave it running in the background while others play on it. Unlike a Local Server, port forwarding is required. Servers are hosted with the Unturned Dedicated Server app.
A Dedicated Server also allows for vastly increased versatility in configuration of the server. Many server options become available through the Commands.dat, Config.json, server console, and other configuration files.
Windows Setup:
Shortcut Method (pre-3.20.12.2 only)
The deprecated shortcut method for creating servers only works for versions of the game prior to 3.20.12.2, which had been released on October 14, 2020. Newer versions of the game should only be hosted through the Unturned Dedicated Server app.
How to Host a Dedicated server on Unturned Version 3.0 Above
- Right-click the «Unturned.exe», hover the mouse over «Send To», and click on «Desktop (create shortcut)».
- Right-click on the shortcut and select «Properties». The «Target:» field should contain the path to Unturned.exe and should look something like this:
-
"C:Program Files (x86)SteamsteamappscommonUnturnedUnturned.exe"
-
- Now, at the end of the string of text, insert this string of text:
-
-nographics -batchmode +secureserver/...
-
- … is whatever you want to name your server.
An example of a finished «Target» field:
"C:Program Files (x86)SteamsteamappscommonUnturnedUnturned.exe" -nographics -batchmode +secureserver/My server
- 4. Finally, run the server. A black console screen should appear.
- 5. Optional: You can easily update an existing Unturned server by using the following method:
The following text string will create a shortcut that will automatically update your server. This example assumes that you installed your server through SteamCMD, which does not update Unturned automatically.
"C:SteamCMDsteamcmd.exe" +login Username Password +app_update 304930 +exit
Classic Setup:
Unturned — how to create a dedicated server! (and how to join it)
- From the Steam window, right-click the Unturned game in your Library and select «Properties».
- Click in the «Local Files» tab.
- Click «Browse Local Files…».
- In the explorer window, right-click the «Unturned.exe», hover the mouse over «Send To», and click on «Desktop (create shortcut)».
- Right-click on the newly created shortcut and select «Properties». The «Target:» field should contain the path to Unturned.exe and should look something like this:
-
"C:Program Files (x86)SteamsteamappscommonUnturnedUnturned.exe"
-
- In order for the server to run, you need to add add options to the end of the field. For example, if you wanted the server to be PvE, you would add the -pve option to the end of the field. A complete list of options is found at the bottom of the page.
- An example of a finished «Target» field:
-
"C:Program Files (x86)SteamsteamappscommonUnturnedUnturned.exe" -port:25444 -players:20 -nographics -pei -gold -nosync -pve -sv
-
To finish, simply apply changes to the shortcut and double-click it to run it. The game should run and then immediately go to a gray screen. This screen means the server is running fine. If your screen doesn’t go gray and the server does not work, make sure you put the -sv option at the end of your options, otherwise the server may not work.
MacOS Setup:
- From the Steam window, right-click the Unturned game in your Library and select «Properties».
- Click in the «Local Files» tab.
- Click «Browse Local Files…».
- Optional: Go back to Common, duplicate the Unturned folder, paste it in Common and name it Unturned Server)
- In the Finder window right click on Unturned
- Select Show Package Contents
- Select Contents
- Select MacOS
- Open up terminal
- Then drag the Unturned executable into the terminal window (this will paste the path of the application)
- Press space, then add in your parameters (this is the same as step 3 of Windows 3.0.0 setup, except that the program will be referred to as Unturned.app instead of Unturned.exe)
- Then press enter to execute the command.
With Unturned 3.0, the procedure is exactly the same, but after the parameters, you need to add: +secureserver/servername
Replace «secureserver» with «lanserver» if you want a LAN server instead. Replace «servername» with what you want to name your server.
Now, if you want to double-click to start the server, in TextEdit (Located in Applications), paste the same command you just ran (hopefully testing it first), then save it as «StartServer.command». Make sure it doesn’t add .txt or .rtf to it.
Linux Setup:
New Guide
Install Unturned.
Go to the install folder and right click and press open in terminal.
press the following
-
./Unturned.XX -nographics -pei -normal -nosync -pve -players:16 -sv
Replace XX with the name of the architecture (x86 if you have a 32 bit computer, x86_64 if 64 bit)
example:
-
./Unturned.x86_64 -nographics -pei -normal -nosync -pve -players:16 -sv
Headless Guide
Note: This is mainly for computers without a GUI (graphical user interface), or if you only have access to the terminal/command line. If you use a VPS with only SSH/PuTTY access, go right ahead! If you are using a GUI, the above option might be better for you, however you might have some slight memory benefits using this method.
Install your OS of choice, whether it be Ubuntu Server/Debian or Fedora Server/RHEL/CentOS. After that, update your OS and your repositories. You know you are in the shell when you see a $ or an # at the end of the line.
To update in Fedora, use
sudo dnf update
while on Ubuntu, use
sudo apt-get update && sudo apt-get upgrade && sudo dpkg --add-architecture i386
The «Add Architecture» is only needed once; to update your system, only the other two is required afterwards.
If on Fedora, you do not have access to dnf, try using yum instead.
Now for installing the libraries. On Fedora, run
sudo dnf install glibc-devel.i686 mono-devel gcc libgcc libstdc++.i686 libgcc.i686 ncurses-libs.i686 zlib-devel.i686 libXcursor.i686 libXrandr.i686 screen
Hint: Adding -y to the command (sudo dnf -y …) will automatically say yes to every prompt. Use it here to avoid having to type yes to every statement, you should only use this if ypou are sure your machine is configured correctly, as you may want to see dependencies for every package, and their size.
If you have an Nvidia GPU, also use
sudo dnf install xorg-x11-drv-nvidia-libs.i686
If you only have an Intel Graphic Chipset, or you don’t know what graphics you have, use
sudo dnf install mesa-libGL.i686 mesa-dri-drivers.i686
For Ubuntu, type each individual line, then hit return. You should have typed in four statements.
sudo apt-get install screen htop unzip wget

sudo apt-get install build-essential gcc-multilib libstdc++6:i386 libgcc1:i386 libncurses5:i386 rpm zlib1g:i386

sudo apt-get install libmono2.0-cil mono-runtime

sudo apt-get install libc6:i386 libgl1-mesa-glx:i386 libXrandr2:i386 libXcursor1:i386
If your Fedora/Redhat server throws an architecture error, try adding —setopt=protected_multilib=false to resolve the issue temporarily.
At this time, you will need a steam account. To avoid conflict, create a new dummy Steam account with Unturned added to its library.
There are a lot of things to say here, but I recommend creating a new user similar to the instructions in the old guide. Look at the «Running the Server» part, and ONLY do the first step (two commands).
Most of these steps are going to be the same for Ubuntu/Fedora/Debian/RHEL/CentOS, unless said.
First, let’s create some folders and download SteamCMD.
mkdir ~/unturnedserver && cd ~/unturnedserver
mkdir steamcmd && mkdir unturned && cd steamcmd
wget https://steamcdn-a.akamaihd.net/client/installer/steamcmd_linux.tar.gz
tar xvf steamcmd_linux.tar.gz && rm -rf steamcmd_linux.tar.gz
We need the RocketLauncher to start the server, so we will download it.
chmod +x steamcmd.sh && cd ..
wget https://ci.rocketmod.net/job/Rocket.Unturned/lastSuccessfulBuild/artifact/Rocket.Unturned/bin/Release/Rocket.zip
unzip Rocket.zip && rm -rf Rocket.zip
mv Scripts/Linux/RocketLauncher.exe unturned/
mv Scripts/Linux/*.sh .
If you want RocketMod on your server as well:
mv Modules/Rocket.Unturned/ unturned/Modules/ # DO NOT USE FOR VANILLA
You may now remove any excess files, other than start.sh, update.sh, unturned/, steamcmd/, or Steam/.
Now, using an editor of choice (Vi or Nano), open update.sh.
nano update.sh
Here is where your Steam account that you created earlier is used. Put the username and password in there. If you want to keep your password private, keep the password string blank.
Now you’re done!
./update.sh # For updating server and downloading files
./start.sh # For running the server
File installation
A short-term testing method is to use WinSCP or a similar SFTP software to transfer the entire Unturned folder over to the Linux server. The folder is likely located in C:Program Files (x86)SteamSteamAppscommon. The problem with this option is that you must update the server files with WinSCP every time an update is released.
A better option is to use SteamCMD, which is a light-weight Linux Steam client that downloads and updates the required Unturned files.
- Download steamcmd to the server
-
wget http://media.steampowered.com/installer/steamcmd.zip
-
- Unzip it:
-
unzip steamcmd.zip
-
- Start SteamCMD:
-
wine steamcmd.exe
-
- Login to a Steam account:
-
login username password
-
- Define an installation directory:
-
force_install_dir Z:/home/your/unix/folder
-
- Download the game to the dedicated server. «app_update 304930» also updates the files of the force_install_dir you pointed at.
-
app_update 304930
-
Running the server
- Starting from root, add a user:
-
adduser unt
-
adduser unt sudo
-
- Log in using the new user:
-
su unt
-
- Install wine and xinit:
-
sudo apt-get install wine xinit
-
- Configure X to allow Anybody to start it:
-
sudo dpkg-reconfigure x11-common
-
- Start X (headless style):
-
tmux
-
startx
-
- Move to a different shell in tmux:
-
[CTRL]+[B], [C]
-
- Tell WINE to use the headless X session:
-
export DISPLAY=:0.0
-
- Start the Unturned server:
-
wine Unturned.exe -nographics -pei -normal -nosync -pve -players:16 -sv
-
Configuring your Server:
Setup Commands
Note: You may have to open the .dat files in a text editor.
Type shutdown in the console. Go back to the Unturned directory. Now click on Servers, then you should see a folder, with the name of your server. Click on that folder. Click on the sub-folder Server. There should be 4 .dat documents, labeled Adminlist, Blacklist, Commands, and Whitelist.
Use the Commands file if you want to run list of commands that will run each time the server starts. Use a separate line for each command.
The Setup Commands are as follows:
- Bind — Binds your internal IP to the socket. (Internal IP is the network adapter IP of the adapter you use)
- Chatrate — Assigns the minimum amount of time between chat messages in order to prevent spam.
- Cycle — Assigns the day/night cycle in seconds.
- Decay — Assigns the amount of time a player, or their group members, can be offline before their structures can be removed by anyone. Default is 604800. (7 days)
- Filter — Enables the old name filter.
- Loadout — Assigns what all players spawn with. The first number value in the loadout is the Skillset ID. (Example: Loadout 255/15/15/81/81/18/20/20/121 — Gives all skillsets 2 Medkits, 2 MREs, a Timberwolf, 2 Timberwolf Magazines, and a Military Knife.)
- Log — Enables/Disables [chat]/[join&leave]/[death]/[anticheat] messages. (Y = Yes, N = No) (i.e. Log Y/Y/Y/Y)
- Map — Sets the map that will be used for the server. If you want to use a workshop map, the workshop map folder must be placed in the Workshop folder of the server, otherwise it will fail to load the map.
- MaxPlayers — Sets the max amount of players the server will allow.
- Mode — Sets the difficulty mode. (Easy, Normal, Hard)
- Name — Sets the server’s name. (i.e. Nelson’s Server)
- Owner — Sets the server’s owner, which gives them administrator commands and fully sets up the server. (Requires your Steam 64 ID.)
- Password — Sets a password to the server to keep out unwanted guests, making the server more private.
- Perspective — Assigns the perspective views. (First, Third, Vehicle, Both.) First allows only first-person, third allows only third-person, Vehicle allows third-person only when the player is in a vehicle, and both allows changing between first and third-person views freely.
- Port — Sets the server’s port. The default port is 27015. This command does not need to be used if the server is hosted under the default port range.
- PvE — Sets the server to only allow Players VS Environment combat.
- Sync — Syncs player data between servers using the same key.
- Timeout — Sets the max Ping for players before they time out. (400~600 is recommended)
- Welcome — Sets the welcome message. (i.e. Welcome Welcome to Nelson’s Server!)
Command Line Options
These parameters are used in launching the server from a command line interface. The order of inputted commands do not matter.
- Map:
- -arena
- -pei
- Gamemode:
- -bambi
- -normal
- -hardcore
- -gold
- Sync Setting:
- -sync
- -nosync
- PVP/PVE Setting:
- -pvp
- -pve
- Misc:
- -pass:[PASSWORD]
- -port:[PORT NUMBER]
- -players:[PLAYER MAX]
- -nographics (This command is needed to not see the welcome screen. Instead you see a black screen with no GUI.)
- -sv (needs to be at the end of the parameters)
- -batchmode (prevents the game from launching a GUI, and makes it run as a background process. Greatly reduces CPU usage)
Config.json file
- Main article: Gameplay Config
The Config.json file offers a lot of control over the actual server gameplay. It is located in:
{UNTURNED}Servers(Server name)config.json
It can be edited in the same manner as the commands.dat file. It is in JavaScript Object Notation format, meaning that it is a simple list that connects one string to a variable. In more simple terms, you should only edit text that is within «quotation marks» and after a : colon. Any value that is before the colon is specific to the game and it WILL break your server if you change it.
- Browser
- Icon — the file path to the server’s icon to be shown on the Server page
- Thumbnail — Similar to the Icon, but to be shown when you select the server
- Desc_Hint — Text to be shown when you hover over the server in the server list
- Desc_Full — The full description of the server
- Desc_Server_List —
- Server
- VAC_Secure — Should the server require Valve (Through steam) Anti-Cheat? (true/false)
- BattlEye_Secure — Should the server require BattlEye Anti-Cheat to be running? (true/false)
Connecting:
You should now be able to connect to your own server by running the game through Steam. To do this, click «Play», and then «Connect», and in the IP field, type «localhost», then click «Connect» to join your own server.
If you fail to connect to your own server, try installing SteamVR (found under tools in Steam).
Note: Other players will not use «localhost», only you will. Other players will use your EXTERNAL IP to connect to your server. Find your external IP by visiting a site such as WhatIsMyIP.
Firewall
If you have correctly set up your server and can’t even connect to it, you might want to check if your firewall is blocking the port.
On Windows, it shouldn’t be that hard; open Control Panel, Security, and click «Allow a Program». Here, you can choose the Unturned application, and voila!
For MacOS, open System Preferences. Go to Security and Privacy, Firewall, then unlock the settings via the padlock at the bottom left of the window. Next, go to Firewall Options, scroll down the list, click on Unturned, and on the right of it, make sure it says «Allow incoming connections». If not, click on it, and choose that option. Close the window, making sure to apply settings, padlock the settings, and you’re done!
For Fedora/CentOS/RHEL:
sudo firewall-cmd --zone=public --add-port=27015-27017/tcp --permanent
sudo firewall-cmd --zone=public --add-port=27015-27017/udp --permanent
For Ubuntu/Debian:
sudo ufw enable
sudo ufw allow 27015:27017/tcp
sudo ufw allow 27015:27017/udp
For both, if you selected a different port via the start command or Commands.dat, change the first number to the port you selected, and the second port two ports ahead (ex. 27040-27042).
Port Forwarding:
NOTE: Port Forwarding has to be done carefully. Nobody will be able to connect to your server if you do this incorrectly.
In order for anyone to access the server you’ve set up, you need to go into your router’s settings and open the server’s set ports.
You will need the following information which can be retrieved from your router (usually a sticker on the side):
- Your default gateway address
- Your gateway username (NOT your network name/SSID)
- Your gateway password (NOT your network password)
- Your local IP address
To find your local IP address, follow these steps (Windows):
- Open the Command Prompt (Type «cmd» into the search bar).
- Type «ipconfig» and press Enter.
- Find the heading that says «Wireless LAN Adapter Wi-Fi» or «Ethernet Adapter Ethernet.»
- Under that heading, find the line that says «IPv4 Address.»
- Write down the number on that line and label it «Local IP.»
Follow the steps below (these might not be the exact field names, you will have to look for something similar in context):
- Open any internet browser, and type your default gateway into the address bar, then hit enter.
- Find a section for Port Forwarding.
- Click the option that allows you to add a new port, or rule.
- Under a «Service name» or «Rule name,» type a name that will identify it as port forwards for Unturned.
- For the «Protocol,» choose «UDP».
- Under «External Starting Port», type the number you wrote down earlier, labeled «Server Port».
- Under «External Ending Port», type your External Starting Port number, plus 2. With the default port, this would be 27017.
- The external and internal ports should match.
- Under the «Internal IP Address» box, type the number you wrote down earlier, labeled «Local IP».
- Save and apply changes afterwards.
Below is an example of a completed port forwarding rule.
| Field Name | Field Value |
|---|---|
| Rule | Unturned |
| Protocol | UDP |
| External Starting Port | 27015 |
| External Ending Port | 27017 |
| Internal Starting Port | 27015 |
| Internal Ending Port | 27017 |
| Internal IP Address Box | 192.168.1.150 |
If you are unable to locate these things, try checking https://portforward.com/router.htm to see specific instructions for your router.
Alternatively, you can put your hosting system into the DMZ. This opens all ports and is an option if for some reason normal port-forwarding fails. Putting your system into the DMZ opens up numerous security vulnerabilities and should only be used as a last resort!
- Follow the steps above until you reach your router page (from the default gateway)
- Find a section for DMZ (Demilitarized Zone)
- Input your computer’s internal IP Address
Optional Server Improvements
- (Free) Turn your IP address into a DNS:
- Utilizing a website such as http://www.noip.com/ will allow you to create an easy-to-remember text-based IP address, such as «myserver.zapto.net». Players will use this name to connect to your server instead of the numbered alternative, such as «74.12.127.76».
- Register for a new account (free)
- After signing in, select «Add a Host»
- Most of the fields are already done for you. You only need to give the host a name in the «Hostname» field, such as «unturned», «myserver», etc. You also have the option of choosing the domain name from the drop-down menu immediately to the right of the hostname. In the example to the right, my hostname will become «unturned.ddns.net».
- Once you click «Add Host», your IP address now matches the Hostname. Players can now use your hostname to connect to your server instead of your numbered IP address.
- Optional but recommended: Download the No-IP client in the sidebar menu on the left (download link here ). The client will run in your taskbar and automatically update your hostname to match your IP address if it changes in the future. If you skip this step, you will need to change your IP address manually with «Manage Hosts» on the noip.com website.
- Utilizing a website such as http://www.noip.com/ will allow you to create an easy-to-remember text-based IP address, such as «myserver.zapto.net». Players will use this name to connect to your server instead of the numbered alternative, such as «74.12.127.76».
- (Free) IP to DNS via Duckdns (extra option for DNS):
- The steps are listed on https://duckdns.org and are similar to steps for no-ip. It’s just another option that exists to achieve the same goal. They have a clear FAQ and Install guide for people new to it.