
Создал группу в telegram «Хакинтош на русском», где стараюсь в силу своих возможностей помогать новичкам в установке Хакинтошей на ПК и столкнулся с тем, что люди желающие установить себе впервые Mac OS, не знают как записать образ на флеш накопитель из под различных систем и с помощью различных приложений. Решил устранить эту брешь и написать мануал на эту тему.
Все описанные мной действия носят лишь ознакомительный характер, редакция сайта категорически против установки не лицензионного программного обеспечения. Так же предупреждаю, что администрация сайта не несет ответственность за порчу вашего оборудования, если таковая произошла. Если вы, как пользователь, не в состоянии распаковать файлы на флешку, не знаете элементарных различий файловых систем и не знаете для чего вам нужна операционная система Mac OS, то рекомендую дальше не читать, дабы не тратить своё время.
Прошу обратить внимание, что для создания загрузочной флешки вам потребуется USB флеш накопитель объёмом 8 и более гигабайт.
1. Создание загрузочной флешки Mac OS в Windows с помощью BDU
Первый способ создания загрузочной флешки, я считаю самым правильным и не требовательным к квалификации пользователя. Для этого нам потребуется скачать с официального сайта Boot Disk Utility, распаковать файлы из архива на ваш компьютер. Выглядят файлы примерно так:

- Запускаем утилиту
- Destination disk → выбираем нашу флешку
- Format disk
Теперь ждем. Флешка отформатируется в Apple HFS и разобьется на два раздела, на один из которых будет установлен загрузчик (CLOVER), а второй останется чистым для того, чтобы туда можно было развернуть установщик. На появляющиеся окна Windows с предложением форматировать диск отказываемся.
Предполагается, что у вас уже есть образ системы которую вы желаете установить, если же нет, то может скачать с торрент трекера nnm нужную вам версию ОС.
- Извлекаем из архива HFS Partition File (HFS+), файл с расширением .hfs.
- В окне утилиты BDU «Destination disk» выбираем Part 2 нашей разбитой флешки.
- Нажимаем «Restore partiton».
- Ищем и выбираем наш *.hfs-файл. Обратите внимание, что он должен быть не больше PART 2 раздела.
Если всё прошло хорошо, то после окончания распаковки вы становитесь обладателем флешки с установленным загрузчиком CLOVER и установщиком Mac OS X.
2. Создание загрузочной флешки Mac OS в Windows с помощью BDU
Скачиваем образ High Sierra например тут или Sierra тут
- Монтируем образ ISO
- Используем флешку минимум 8 или больше.
- Вставить в флешку юсб, вызвать diskpart, написать
list diskопределить номер флешки
вводим
sel disk Xгде X номер флешки
далее вводим
cleanи по завершению
exit


- Устанавливаем R-Drive (в раздаче).
- Разворачиваем образ rdr на флешку выбрав «Восстановить из образа»


3. Создание загрузочной флешки Mac OS в Windows с помощью Transmac
Устанаваливаем триальную версию трансмак с официального сайта, запускаем его от имени администратора, форматируем нашу флешку

потом восстанавливаем из имеемого образа

4. Создание загрузочной флешки Mac OS в Mac OS
Если у вас есть компьютер под управлением Mac OS или же виртуальная машина с этой операционной системой, то процесс создания загрузочной флешки будет кардинально отличаться от приведённого выше. Данное руководство написано для обладателей современных материнских плат использующих UEFI загрузчик.
Скачиваем необходимый образ из Appstore (Mojave, High Sierra, Sierra, El Capitan)
- Подключаем ваш флеш накопитель объёмом 8 и более гигабайт
- Открываем дисковую утилиту
- Выбираем в левой колонке ваш флеш накопитель и нажимаем «Стереть»
- Выбираем следующие настройки:
- Имя: tehnojam
- Формат: Mac OS Extended (журналируемый)
- Схема: GUID Partition Map
- Нажимаем «Стереть»

Крайне важно выбрать GUID Partition Map, так как только при такой разметке создается скрытый раздел EFI, на который мы установим загрузчик CLOVER.
Запишем файлы установщика на нашу флешку
- Открываем Terminal в spotlight или launchpad
- Копируем следующий код в зависимости от того какую систему вы планируете установить:
Для установки Mac OS Mojave:
sudo /Applications/Install macOS Mojave.app/Contents/Resources/createinstallmedia --volume /Volumes/tehnojam --nointeractionДля установки High Sierra:
sudo /Applications/Install macOS High Sierra.app/Contents/Resources/createinstallmedia --applicationpath /Applications/Install macOS High Sierra.app --volume /Volumes/tehnojam/Для установки Sierra:
sudo /Applications/Install macOS Sierra.app/Contents/Resources/createinstallmedia --applicationpath /Applications/Install macOS Sierra.app --volume /Volumes/tehnojam/Для установки El Capitan:
sudo /Applications/Install OS X El Capitan.app/Contents/Resources/createinstallmedia --applicationpath /Applications/Install OS X El Capitan.app --volume /Volumes/tehnojam/- Вставляем в Terminal
- Жмём Enter
- Вводим пароль(символы пароля отображаться не будут)Нажимаем Y когда предложит стереть и снова жмём Enter
Не извлекайте устройство USB до окончания процесса записи.

После окончания записи, у нас есть два варианта действий:
- Использовать эту флешку для установки на настоящик от Apple.
- Установить на неё Clover, отредактировать его config.plist под свои нужды и использовать флешку для установки на PC.
Те у кого такая же материнская плата на чипсете B250, как у меня могут взять мой кловер для Mojave в этой статье после чего выполнить в терминале
diskutil listувидите что-то вроде этого

находим внешнее физическое устройство (external, physical), это и есть наша флешка, находим в ней раздел EFI, на моём скриншоте это раздел disk4s1, и монтируем его командой:
diskutil mount disk4s1в Finder и на рабочем столе у вас появится пустой диск EFI, закидываем в него папку EFI из прикреплённого архива. Проходим в /EFI/CLOVER правим config.plist под свои нужды в зависимости от семейства вашего процессора.
Теперь у вас более менее готовый загрузочный диск и остальная
установка будет зависеть только от ваших знаний и умений или же везения.

Гик, хакинтошник, линуксоид, считаю себя flutter разработчиком. Завёл канал, в котором изначально хотел показывать как я с нуля и до бесконечности погрузился в дорвей тематику, а в итоге просто рассказываю о себе, своих успехах и неудачах в сайтах, приложениях, офлайн проектах. Добро пожаловать в https://www.youtube.com/channel/UCbrTUrElICx4pewX0NbolmQ
58 096

В этой подробной инструкции мы расскажем вам как создать загрузочную USB-флешку с macOS Sierra (10.12) на компьютере с Windows 10. Данная процедура понадобится для создания хакинтоша (установка macOS на PC). Аналогичным образом Вы сможете создать загрузочную флешку с более ранними версиями OS X на компьютере с Windows 10, 8 и ниже. Если вам нужно создать загрузочную флешку с macOS для iMac, MacBook или других компьютеров Apple, то прочитать об этом Вы можете в нашей статье тут.
Обычно, для создания загрузочных флешек на баз macOS используется утилита UniBeast, но главная проблема заключается в том, что она доступна только для компьютеров Mac. Наш же способ подразумевает, что вы PC-пользователь и ни Mac, ни MacBook, и далее по списку, в вашем распоряжении нет.
Что понадобится для создания загрузочной USB-флешки с macOS Sierra из-под Windows 10?
Для начала, убедитесь в том, что у вас есть всё необходимое:
- USB-накопитель с минимальным объёмом в 8 ГБ;
- PC на базе Windows (используемое в инструкции программное обеспечение тестировалось на Windows 7, 8 и 10 редакции);
- загруженный образ macOS Sierra (или более старшей версии). Скачать его можно с любого файлообменника или трекера (наверняка для создания хакинтоша вам понадобится определённая версия). В качестве примера, мы оставим ссылку на скачивание последней версии macOS Sierra на момент публикации этого материала (скачать из облачного хранилища Google Drive);
- утилита Win32 Disk Imager;
- конфигурационный файл драйвера (config.plist) графического процессора (скачать из облачного хранилища Google Drive). Обратите внимание на то, что там есть не все десктопные и ноутбучные версии файлов. Скачайте файл для своей видеокарты.
- утилита Boot Disk Utility;
Шаг 1 Разархивируйте скачанный образ macOS Sierra при помощи любой общеизвестной утилиты вроде 7-Zip, Winrar и подобных

Шаг 2 Установите утилиту Win32 Disk Imager (жмите Next, I accept the agreement, Next, Next, Next, Next, Install)
Шаг 3 Подключите к PC флешку которую Вы будете использовать в качестве загрузочной
Внимание! Все данные на подключенном USB-накопителе будут стёрты! Обязательно сделайте резервную копию всей важной информации с подключенной флешки!
Шаг 4 Запустите Win32 Disk Imager с правами администратора. Для этого щёлкните правой кнопкой мыши по иконке программы и выберите Запустить от имени администратора. Если не выполнить этого действия, Вы получите системную ошибку
Шаг 5 В запущенной программе Win32 Disk Imager укажите путь к скачанному образу macOS Sierra (поле «Image File»). Обратите внимание на то, что в окне с проводником в правом нижнем углу в качестве используемого формата данных будут указаны образы IMG, а наш загруженный образ macOS Sierra в формате RAW. Для того чтобы его найти, необходимо в окне проводника выбрать тип файла «.» и тогда у вас будут отображаться все файлы
Шаг 6 Укажите путь к подключенному USB-накопителю (поле «Device»)
Шаг 7 Нажмите кнопку Write и подтвердите намерения нажатием Yes в диалоговом окне (сотрутся все данные на флешке) для начала записи образа на USB-флешку и дождитесь окончания процесса (в среднем, процедура занимает около 10-15 минут)
Шаг 8 После успешного окончания процедуры записи образа, Вы получите соответствующее уведомление «Write Successful». Нажмите кнопку ОК и закройте окно программы
Редактирование файла Config.plist
После успешного создания загрузочной флешки останется заменить конфигурационный файл «Config.plist» на тот, который соответствует вашему графическому процессору.
Шаг 1 Разархивируйте скачанный файл «Config package»
Шаг 2 Перейдите в папку «Desktops» или «Notebooks» в зависимости от того, на настольный компьютер или ноутбук Вы собираетесь ставить хакинтош
Шаг 3 Отыщите «Config.plist» для своего графического процессора на базе Intel, AMD или NVIDIA. Обратите внимание на то, что если Вы не найдёте точную версию своей видеокарты, то можете спокойно выбирать ближайшую
Например, на нашем ноутбуке Acer Aspire 7745G стоит мобильная видеокарта ATI Mobility Radeon HD5850. Прохожу в папку «Notebooks» и копирую файл «Config.plist» из папки «HD5500». Если вас терзают сомнения, то можете отыскать этот файл в сети.
Шаг 4 Откройте созданный загрузочный USB-накопитель и перейдите в папку EVI → CLOVER
Шаг 5 Замените лежащий в корне файл «Config.plist» на тот, который Вы отыскали в «Config package» («Заменить файл в папке назначения»)
Готово! Теперь Вы можете приступать к установке macOS на компьютер или на ноутбук под управлением ОС Windows.
Обратите внимание на то, что размер отформатированной под загрузочную macOS Sierra флешки стал равен всего 200 МБ. Беспокоится не стоит. Необходимый раздел с образом попросту скрыт (его размер составляет чуть больше 6 ГБ)
Для того чтобы вернуть флешку к исходному виду необходимо воспользоваться сторонними программами вроде Acronis Disk Direct Suite.
Создание загрузочной флешки macOS c помощью Boot Disk Utility
Понравилась статья? Поделитесь ею со своими друзьями, а также подписывайтесь на наши страницы в соц.сетях: Facebook, Google+, Twitter и Вконтакте
Когда компьютер Mac внезапно перестал запускаться, а резервной копии macOS под рукой нет, поможет чистая переустановка системы.
Если рядом есть другой Mac, то проблем с созданием загрузочной флешки не возникнет. Сейчас расскажем, как выкрутиться из ситуации с Windows-ПК.
? Спасибо re:Store за полезную информацию. ?
Как создать загрузочную флешку в Windows
1. Для создания флешки скачиваем приложение TransMac.
Утилита распространяете на сайте разработчика по цене $59. К счастью, есть бесплатный 15-дневный триал.
2. Теперь потребуется найти образ для установки macOS.
Официального способа скачать операционную систему из Windows нет. Придется либо искать друга с компьютером Mac, либо пользоваться известными всем сайтами.
Обратите внимание, что для работы утилиты TransMac нужен образ macOS в формате *.dmg
Если удастся найти друга с яблочным компьютером и скачать macOS из Mac App Store, будет проще у него же и сделать нагрузочную флешку по инструкции.
![]()
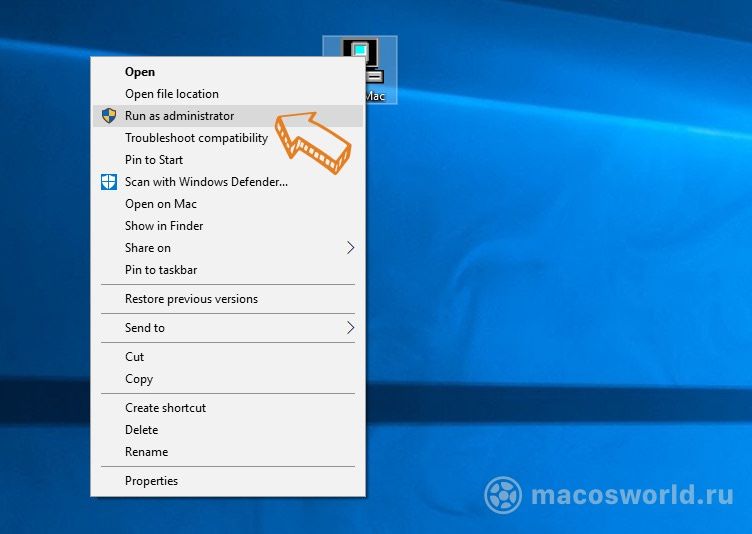
3. Когда образ скачан, а утилита установлена, запускаем TransMac от имени Администратора и соглашаемся на триальный период использования программы.
4. Подключаем к компьютеру флешку (понадобится накопитель емкостью 8ГБ и более)
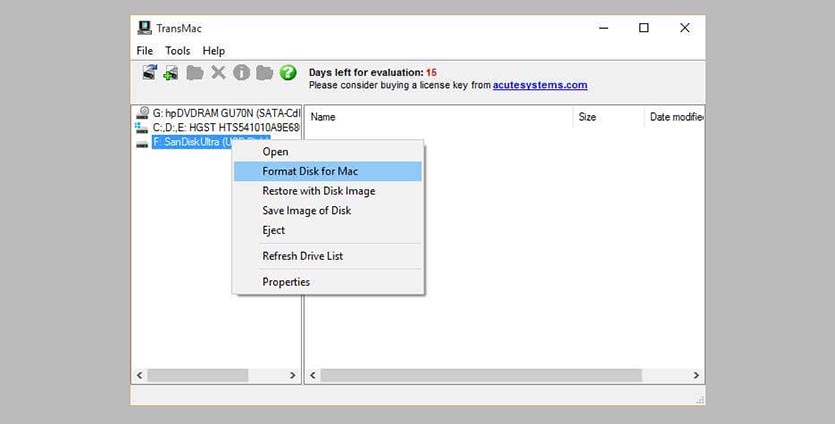
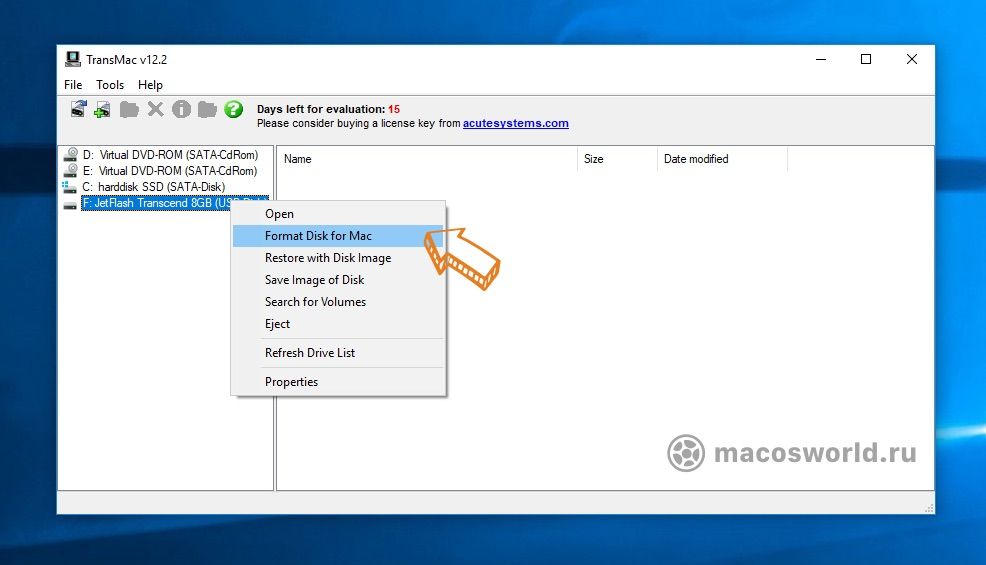
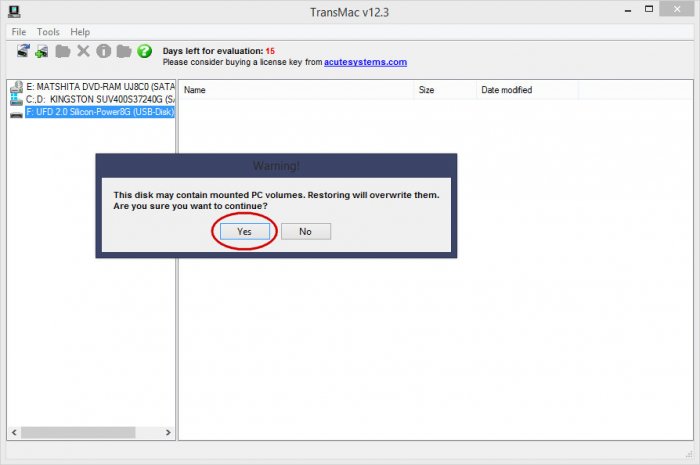
5. В боковом меню находим подключенный накопитель и через контекстное меню форматируем командой Format Disk for Mac.
Внимание! Данный процесс является необратимым, все данные с флешки будут удалены.
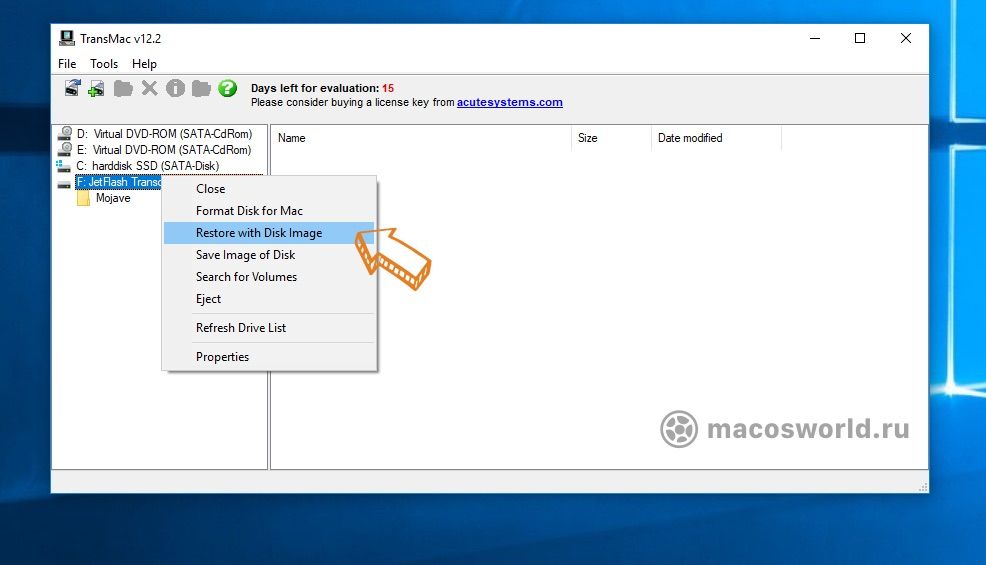
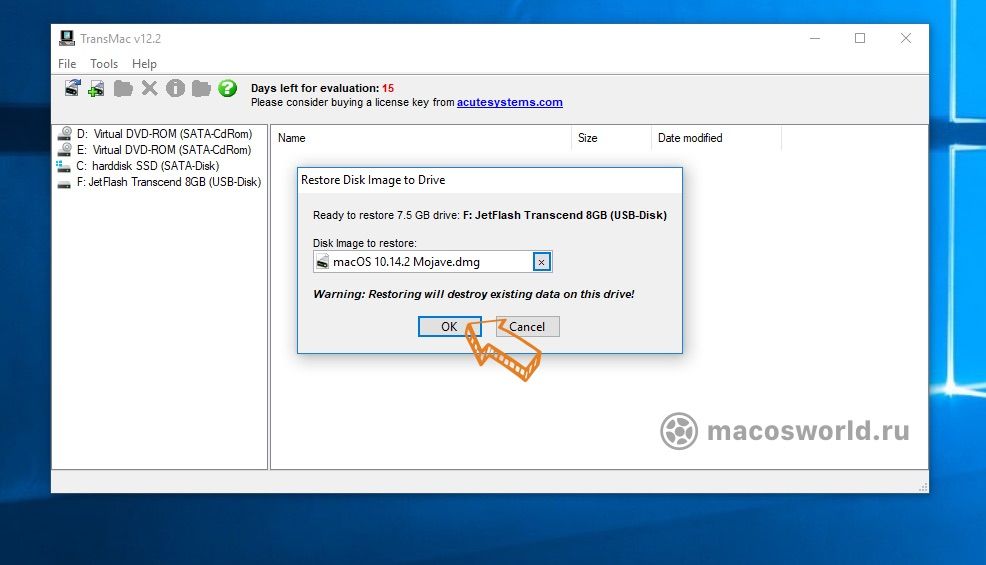
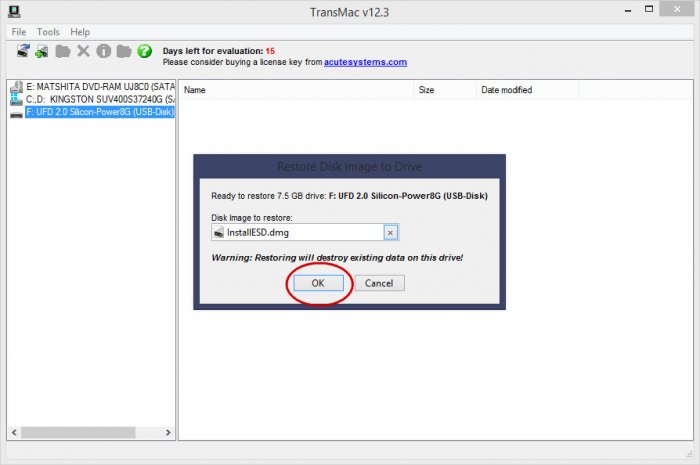
6. После окончания форматирования снова вызываем контекстное меню диска и выбираем пункт Restore with Disk Image.
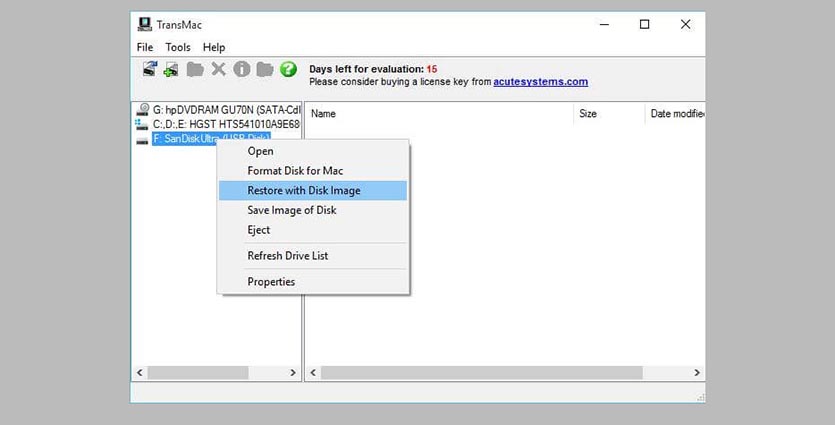
7. В открывшемся окне проводника указываем скачанный образ для установки macOS.
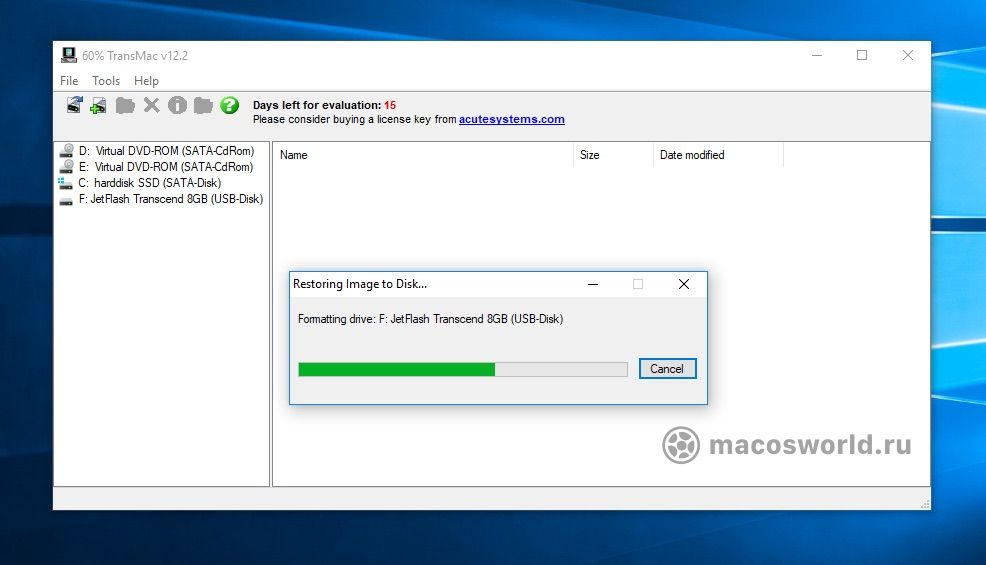
8. Подтверждаем запись образа на флешку и ждем 20-30 минут, пока процесс не завершится.
Все! Флешка для установки macOS готова.
Как запустить Mac с флешки
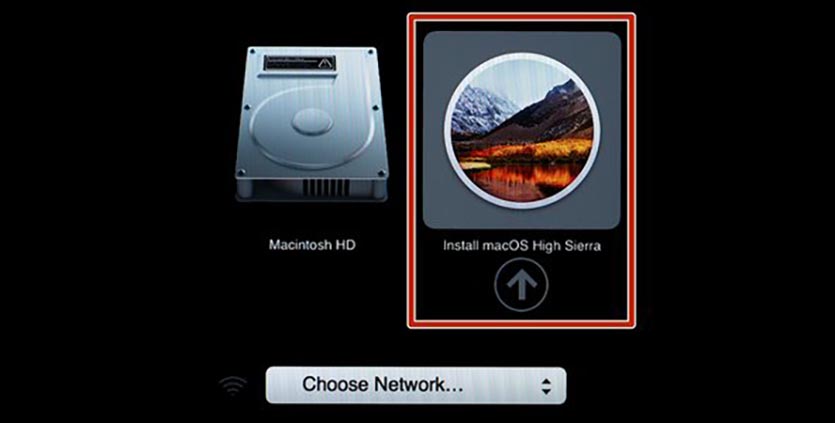
Подключаем наш накопитель к компьютеру Mac и включаем его с зажатой клавишей Alt (Option).
Обратите внимание, что для загрузки со внешних накопителей на Mac с чипом T2 нужно произвести некоторые манипуляции.
В меню выбора диска указываем флешку и производим установку macOS.
Следуйте подсказкам мастера установки и через несколько минут получите работоспособный Mac.

 (68 голосов, общий рейтинг: 4.59 из 5)
🤓 Хочешь больше? Подпишись на наш Telegram.
![]()
iPhones.ru
Это может пригодиться каждому, когда нет второго Mac под рукой.
- macOS,
- restore,
- windows,
- инструкции,
- фишки
![]()
Артём Суровцев
@artyomsurovtsev
Люблю технологии и все, что с ними связано. Верю, что величайшие открытия человечества еще впереди!
Загрузочная флешка с macOS Catalina пригодится, когда нужно поставить систему с нуля, либо обновить сразу несколько машин. Сейчас я расскажу, как создать такую флешку в самой macOS и в Windows. Инструкция подходит для High Sierra, Mojave и Catalina.

23 окт. 2019 г.
• 3 min read
Как создать загрузочную флешку в macOS
Нам понадобится любой USB-накопитель от 8 Гб и бесплатная утилита Disk Creator. Флешку также можно создать консольными командами через терминал, но я не вижу смысла мучаться.
🧰 Скачать Disk Creator, 2.2 МБ
Шаг 1. Загрузите macOS Catalina
Если сейчас у вас установлена macOS High Sierra или более поздняя версия macOS, то вы можете загрузить macOS Catalina из Mac App Store, после чего в папке Приложения macOS появится новая иконка .

Шаг 2. Запустите Disk Creator
Если вы заранее загрузили установщик macOS Catalina, то утилита Disk Creator автоматически найдет его и отобразит в интерфейсе. Останется только выбрать флешку, на которую вы хотите развернуть образ:
Шаг 3. Создайте загрузочный диск
Нажмите Create Installer и подождите пока Disk Creator создал загрузочную флешку с Catalina. На быстром накопителе процесс занимает 3–4 минуты.
👨💻 Читайте также: что стоит на моем Mac в 2019 году
Как загрузится с флешки и начать установку
Вставьте загрузочную флешку в Mac и включите его удерживая клавишу Option. Компьютер начнет загружаться в флешки. Если вы собираетесь устанавливать систему на Хакинтош, то выберете флешку в качестве «загрузочной» в BIOS.
🤦♂️Если загрузка с флешки не происходит, стоит попробовать пересоздать её еще раз или попробовать другой накопитель. Я сам не раз сталкивался с ситуациями, когда с определенными плешками установщик просто не хотел грузиться.
И обязательно почитайте мои 5 советов по переустановке macOS с нуля. В этой статье я рассказал, как ничего не забыть и потратить на переустановку системы минимум времени.
Как создать загрузочную флешку macOS в Windows
При создании флешки в Windows понадобится утилита TransMac. Она платная, но после установки есть двухнедельный пробный период. Чего нам более чем достаточно.
🧰 Скачать TransMac, 2.1 МБ
Шаг 1. Загрузите macOS Mojave
Увы, но официального способа сказать macOS из под Windows нет. Вам придется скачать его при помощи iMac или MacBook. Либо же найти установщик на торрентах.

Шаг 2. Запустите TransMac в режиме администратора
Нажмите правой кнопкой на иконке TransMac и выберете соответствующий пункт в меню.
Шаг 3. Отформатируйте флешку
- Правый клик на названии флешки;
- Format Disk for Mac.
Шаг 4. Выберете dmg-файл с образом macOS
- Правый клик на названии флешки;
- Restore with Disk Image;
- Укажите путь к установочному файлу macOS;
- Дождитесь завершения создания загрузочной флешки.
Как загрузится с флешки и начать установку
Вставьте загрузочную флешку в Mac и включите его удерживая клавишу Option. Так вы сможете начать установку. Если вы собираетесь устанавливать систему на Хакинтош, то выберете флешку в качестве «загрузочной» в BIOS.
И обязательно почитайте мои 5 советов по переустановке macOS с нуля. В этой статье я рассказал, как ничего не забыть и потратить на переустановку системы минимум времени.
Мы шаг за шагом рассказываем вам, о том как установить на ваш еще пока Windows компьютер, ОС macOS. Сегодня же статья будет о создание загрузочной флешки macOS через Boot Disk Utility (BDU) в Windows.
Ранее мы рассказывали что необходимо, чтобы установить хакинтош:
- Выбор железа для Хакинтош
- Скачивание образа macOS
- Настройка BIOS / UEFI
- Значение аргументов (ключей) загрузки
- Создание загрузочной флешки
- С помощью терминала
- В Windows с помощью (BDU) Boot Disk Utility <
- С помощью UniBeast в macOS
- Скачать kext для Хакинтош
- Куда и как установить Kext для Хакинтош?
- Какие драйверы устанавливать в drivers64UEFI
- Создание config.plist для установки Хакинтош
- Установка Хакинтош
- Установить загрузчик Clover на системный диск
- Установка драйвера Nvidia Web Driver
- Как завести звук на Хакинтош?
- Как завести USB?
- Изменить таймер запуска Хакинтош
- Включить ускорение Intel Quick Sync Video на Хакинтош
- Как перенести файлы с Mac в Windows
- Не удается установить программы, срабатывает защита
- Настройка Windows клавиатуры в Mac
- USB Bluetooth адаптер «отваливается»
- Сбивается время в Windows
Вы еще ходите по различным сайтам с вопросом «Как записать образ mac os на флешку из под windows?» Тогда вы обратились по адресу!
Одним из немаловажных подготовительных шагов в установке macOS на ПК — это создание загрузочной флешки Хакинтош, если у вас под рукой нет ни одного MacBook или iMac, то придется записывать установщик в Windows.
Самой популярной утилитой для записи установщика macOS на флешку является утилита Boot Disk Utility или BDU (БДУ). Есть конечно и другие утилиты, но о них мы поговорим позже. Давайте подробно рассмотрим процесс создание загрузочной флешки Хакинтош с помощью BDU.
Для начала необходимо скачать данную утилиту Boot Disk Utility:
- официальный сайт (очень много рекламы)
- зеркало сайта Android +1
- форум applelife

- Теперь распакуйте архив с программой BDU в любую папку.
- Вставьте USB флешку в компьютер объемом не менее 8 GB, на которую будет записан установщик.
- Теперь вам необходимо скачать установочный образ macOS, мы уже предлагали вам свой вариант, но будет нужна небольшая доработка для BDU (читайте далее в статье), либо же скачать HFS-образ с торрента.

- Когда HFS образ macOS загружен на компьютер можно приступать к записи. Запустите BDU ( флешка в компьютере), кликаем по необходимой флешки, чтобы выбрать и после форматируем ее «Format Disk».

- Нажимаем «ОК».

- На появляющиеся окна Windows с предложением форматировать диск отказываемся.

- После чего на флешке будет создано два раздела.
- Первый раздел будет с загрузчиком с Clover, а второй пока что пустой, на него и будет записываться образ macOS.

- Выбирай 2 раздел и кликаем по кнопке «Restore Partiton»


- Откроется окно проводника, выбираем скачанный ранее HFS образ macOS Подтверждаем что мы действительно хотим записать образ на данную флешку.

- Ожидаем пока образ для будущего Хакинтош запишется на флеш накопитель. Вам удалось создание загрузочной флешки mac os из под windows!
У вас еще остались дополнительные вопросы? Задавайте их в комментариях, рассказывайте о том, что у вас получилось или наоборот!
Вот и все! Оставайтесь вместе с сайтом Android +1, дальше будет еще интересней! Больше статей и инструкций читайте в разделе Статьи и Хаки Android.
Каждый уважающий себя пользователь должен иметь под рукой как минимум диск с операционной системой, дабы загрузить с него компьютер и выполнить восстановление, если тот по какой-то причине не смог загрузиться самостоятельно. Касается это не только Windows, но и Mac OS. Правда, создавать такой образ нужно заранее, чтобы затем внезапно не оказаться обезоруженным. В ОС от Apple для этих целей можно воспользоваться такими программами как MacDaddy Install Disk Crеаtor и DiskMaker X, но что, если беда случилась, а вы так и не позаботились загодя создать загрузочный носитель с «яблочной» системой?
Неприятно, но не катастрофично, потому что создать его вы можете на другом маке, а если он недоступен, вполне сгодится ПК под управлением Windows, нужно только установить на него программу TransMac. Это простое приложение предназначается для просмотра содержимого оптических и жестких дисков, флеш-накопителей и томов Apple File System, а также файлов dmg, dmgpart, sparsebundle и sparseimage. Программа поддерживает работу с файловыми системами HFS, HFS+, создание, редактирование и разделение образов DMG, их запись на оптические и флеш-накопители.
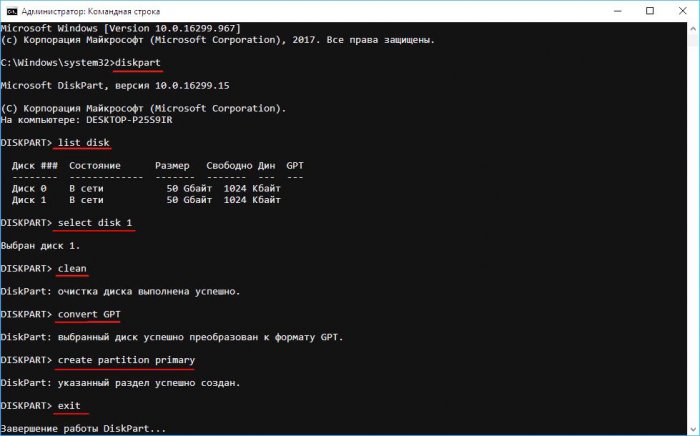
Для создания загрузочной флешки Mac OS вам понадобится установочный образ DMG с операционной системой от Apple, флеш-накопитель объёмом 16 Гб и установленная на компьютер с Windows программа TransMac. Перед тем как приступать к записи, флешку необходимо соответствующим образом подготовить, создав на ней раздел GPT. Для этого откройте от имени администратора командную строку и выполните в ней следующие команды:

Первой командой запускается утилита Diskpart, второй и третьей командами выводится список подключенных к компьютеру носителей и выбирается номер нужного диска, в данном случае флешки, четвертая и пятая команды очищают и преобразовывают диск в GPT, шестая команда создаёт на нём первичный раздел. Наконец, команда exit завершает работу утилиты Diskpart.
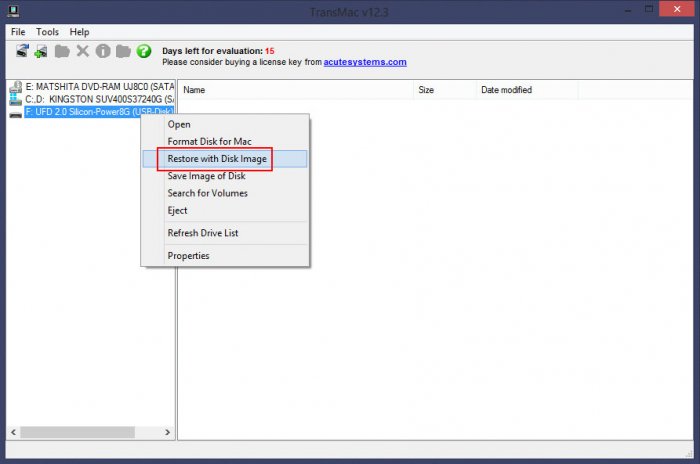
Подготовив носитель, запустите программу TransMac от имени администратора, слева на панели кликните по подключённой флешке ПКМ и выберите в меню опцию «Restore with Disk Image».
Подтвердите действие в открывшемся диалоговом окошке, затем в новом диалоговом окне
укажите путь к образу DMG и нажмите ОК.
Начнётся процедура копирования файлов загрузочного образа на флешку. Она может занять достаточно длительное время, час или даже более, так что наберитесь терпения. По завершении процедуры вы станете обладателем загрузочной флешки, с помощью которой сможете попасть в среду восстановления операционных систем от Apple.
Статьи по этой теме:
1. Как установить Mac OS на Windows
2. Windows или Mac — какая из операционных систем лучше
A Hackintosh is a non-Mac computer system, made with PC parts, that runs the macOS operating system. In this tutorial, you will learn how to create a Hackintosh.
You will learn how to install macOS Big Sur (or any other version of macOS) using OpenCore.
The main benefit of a Hackintosh compared to an official Macintosh computer, is that it is WAY cheaper. I created a Hackintosh computer that matches the Mac Pro specs for about 1/3rd the price of a Mac Pro. Some people have been able to create a Hackintosh for under $100.
This tutorial will focus mainly on how to install macOS on your hardware. I also created a video version that shows how to build a complete machine and then install macOS on it.
The video shows how to use a computer with macOS to create a macOS installer for your Hackintosh. In this written tutorial, you will learn how to create the macOS installer using macOS or Windows.
You can watch the video here:
It is not illegal to create a Hackintosh for personal use but it does go against Apple’s End User License Agreement. So don’t plan on taking this into an Apple store for repair. And in many places it is illegal to sell a Hackintosh.
The Hardware
Many computer parts work for Hackintoshes. But some do not. Check this website to see what hardware is compatible with a Hackintosh.
In the video above I demonstrate step-by-step how to build a computer that will work as a Hackintosh. In the video description is a list of the specific parts I used.
If you want to be safe, you can use exact parts I used in my build but it is possible to install macOS on a wide variety of hardware.
Downloading MacOS and Creating a Bootable USB Installer
For this step, you will need a USB drive that is at least 16GB. The process is different depending on if you are setting up the bootable USB installer using macOS or Windows. The process is much simpler to do on macOS, but it still possible on Windows.
If you can, find a Mac machine to use to create the bootable USB installer. But I’ll cover the steps for macOS and Windows.
Using MacOS to Create the MacOS Installer
There are a few programs you’ll need during this process so start by downloading them. Here are links for what you will need followed by the download instructions.
- ProperTree — Click the «Code» button, then «Download Zip»
- MountEFI — Click the «Code» button, then «Download Zip»
- OC_GEN-X — Download the zip file for the most recent release.
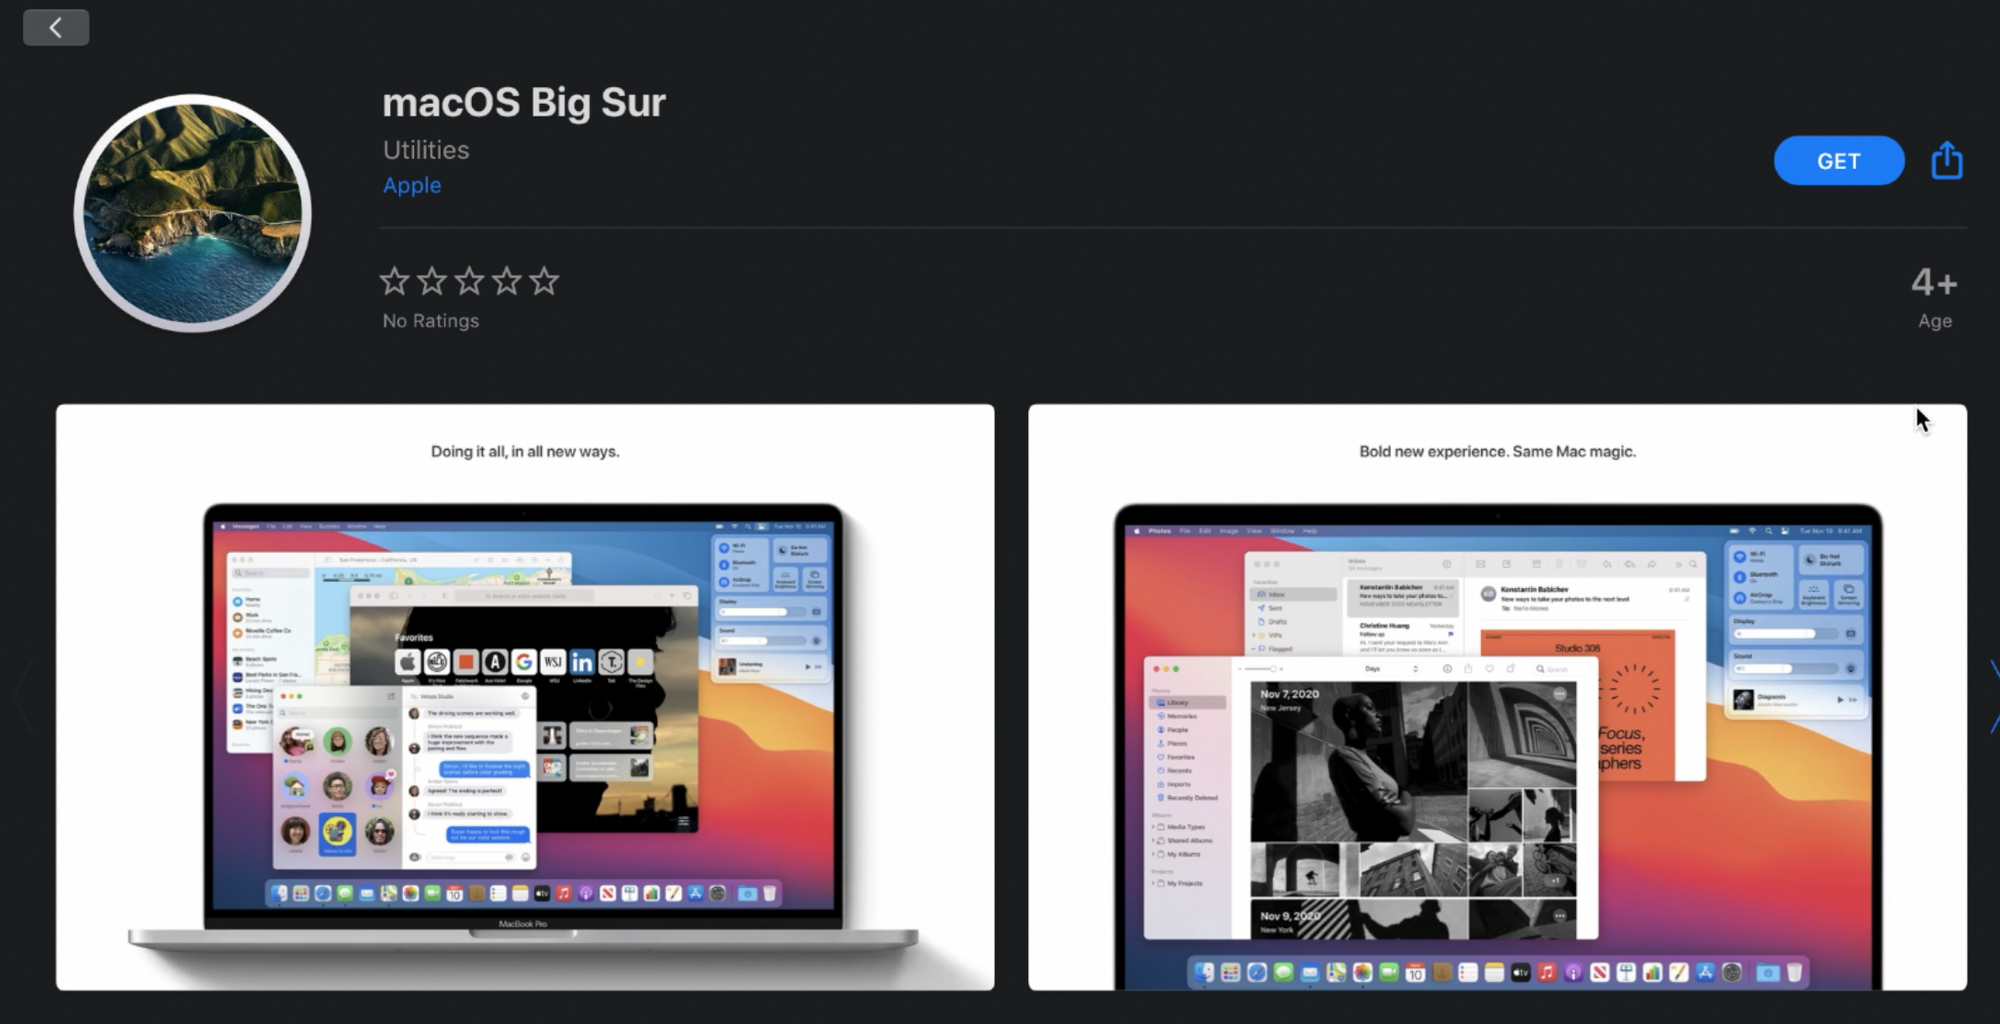
Open up the App store on macOS. Search for «Big Sur». Click «Get», and then «Download».
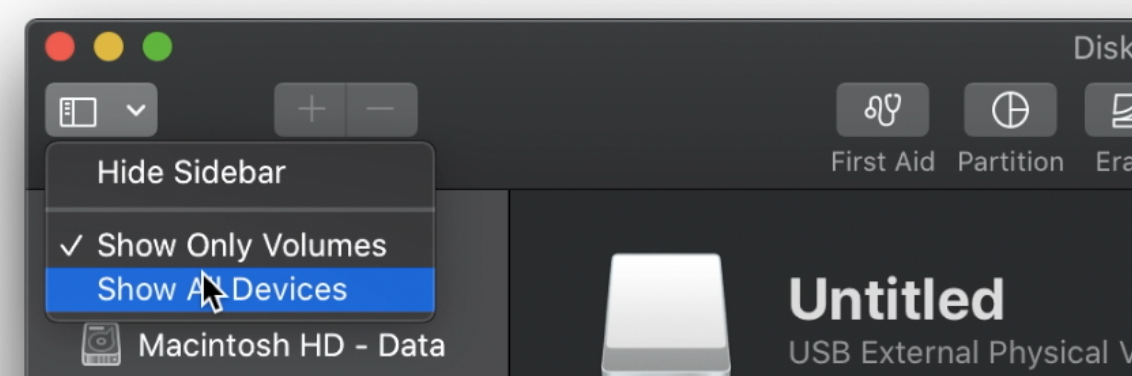
Format your USB drive using Disk Utility. To get into Disk Utility, just click the magnifying glass and type «Disk Utility.
Once Disk Utility is open, make sure that the view is set to show all devices.
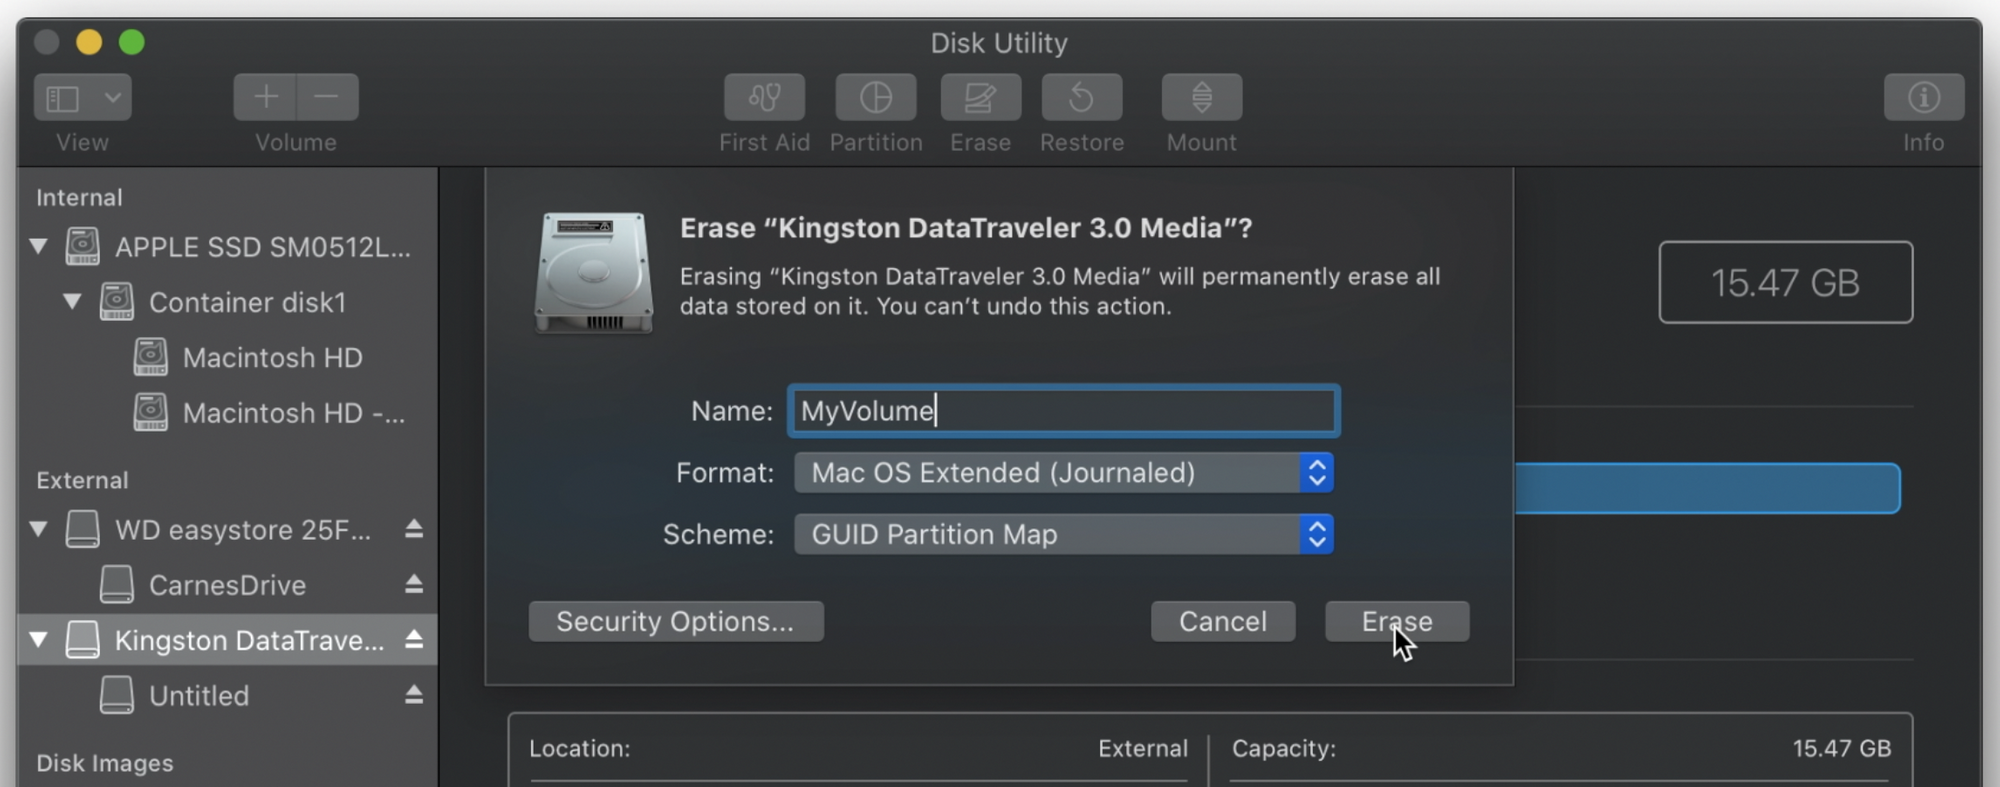
Click the USB drive, then click «Erase» in the top menu.
Name the drive «MyVolume». Make sure the format is Mac OS Extended (Journaled) and that the scheme is GUID Partition Map. Then click the «Erase» button.
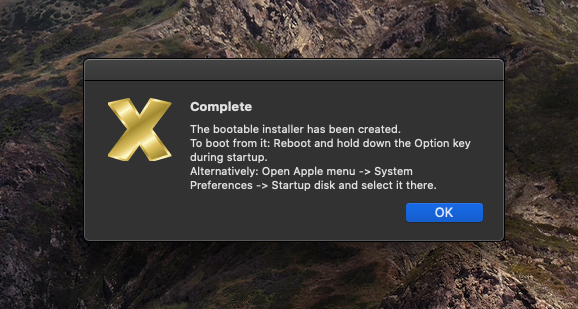
After the USB drive is prepared, open the Terminal in MacOS. You will use a command in the terminal to make the USB drive into a bootable installer for macOS.
If you are installing macOS Big Sur, type the following command:
sudo /Applications/Install macOS Big Sur.app/Contents/Resources/createinstallmedia --volume /Volumes/MyVolume
If you are installing a different version of macOS, you can find the command for the version you are installing here.
You’ll have to wait a bit for this to install. After this is done, open the OC_Gen-X program you downloaded earlier.
To open the program, you will have to right-click the icon, select «open», then select «open» again.
This is a software wizard that helps us easily prepare what we need to install MacOS on our particular hardware setup. It will go out and get everything we need except the SSDTs and put them in a folder for you.
You can also do this is a more manual method by following the OpenCore Install Guide. But this program simplifies things for us quite a bit and it is not available for Windows.
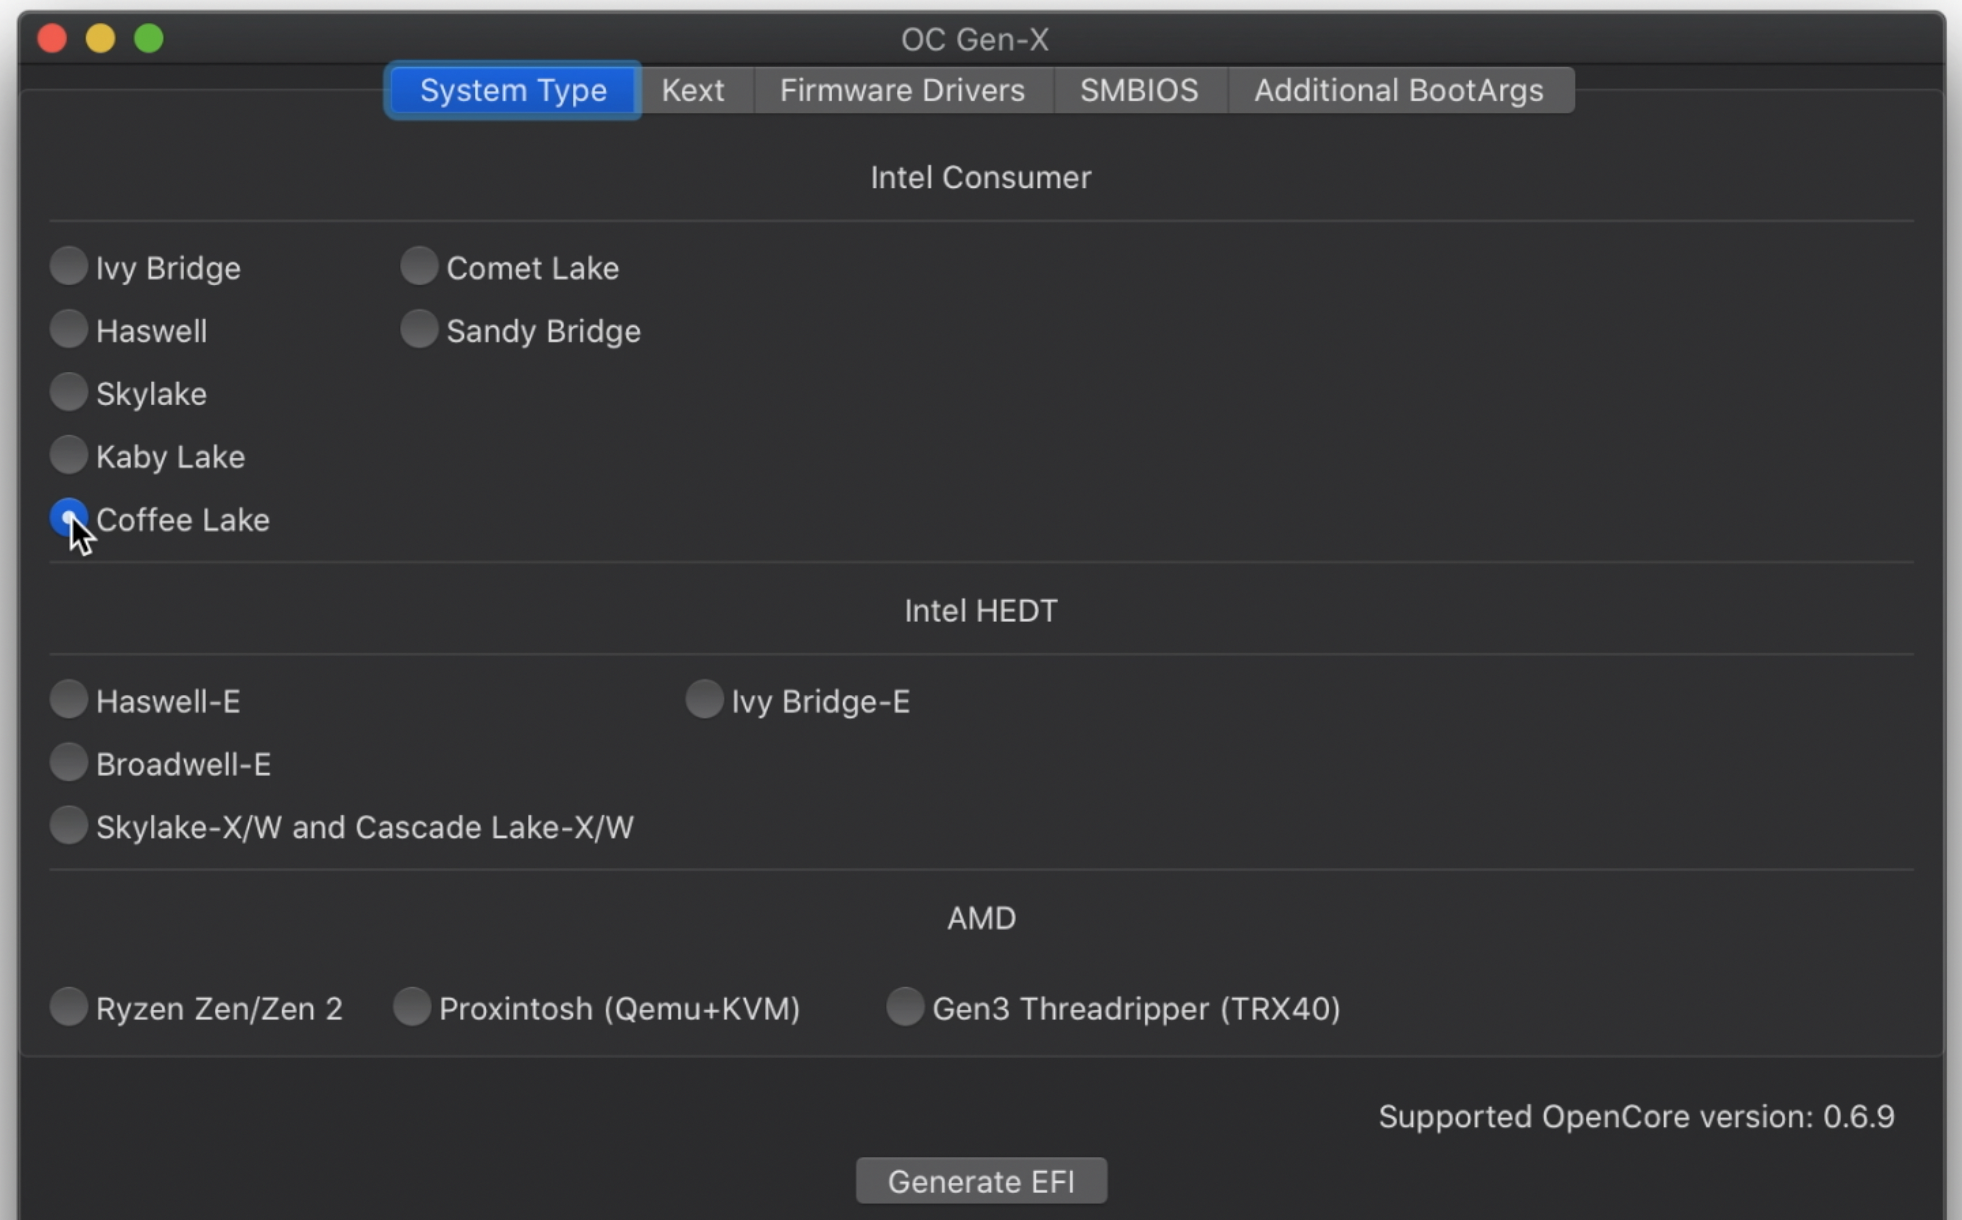
On this first screen under «System Type» choose the type of processor you have. Look in your processor’s documentation to determine the name of the microarchitecture it uses. Getting this right is very important.
The type of processor I used is «Coffee Lake».
For most of the tabs in this program you can keep the default settings.
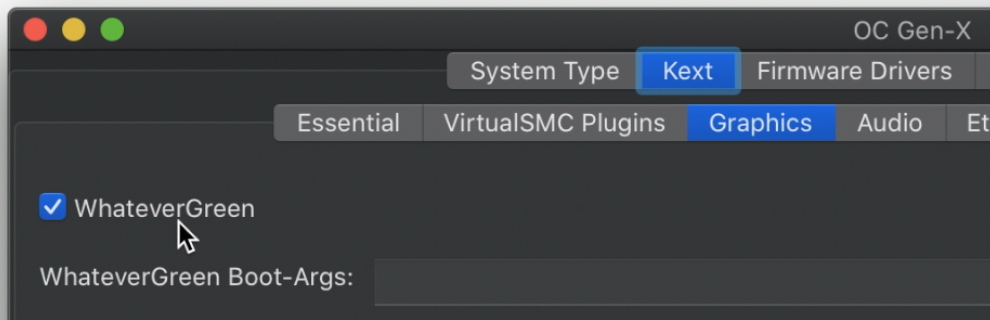
Under «Graphics» select «WhateverGreen» and under «Audio» select «AppleALC». Under «Ethernet» select «IntelMausi». These are very commonly used options but there is a small chance your settings will be different depending on your hardware and specific use case.
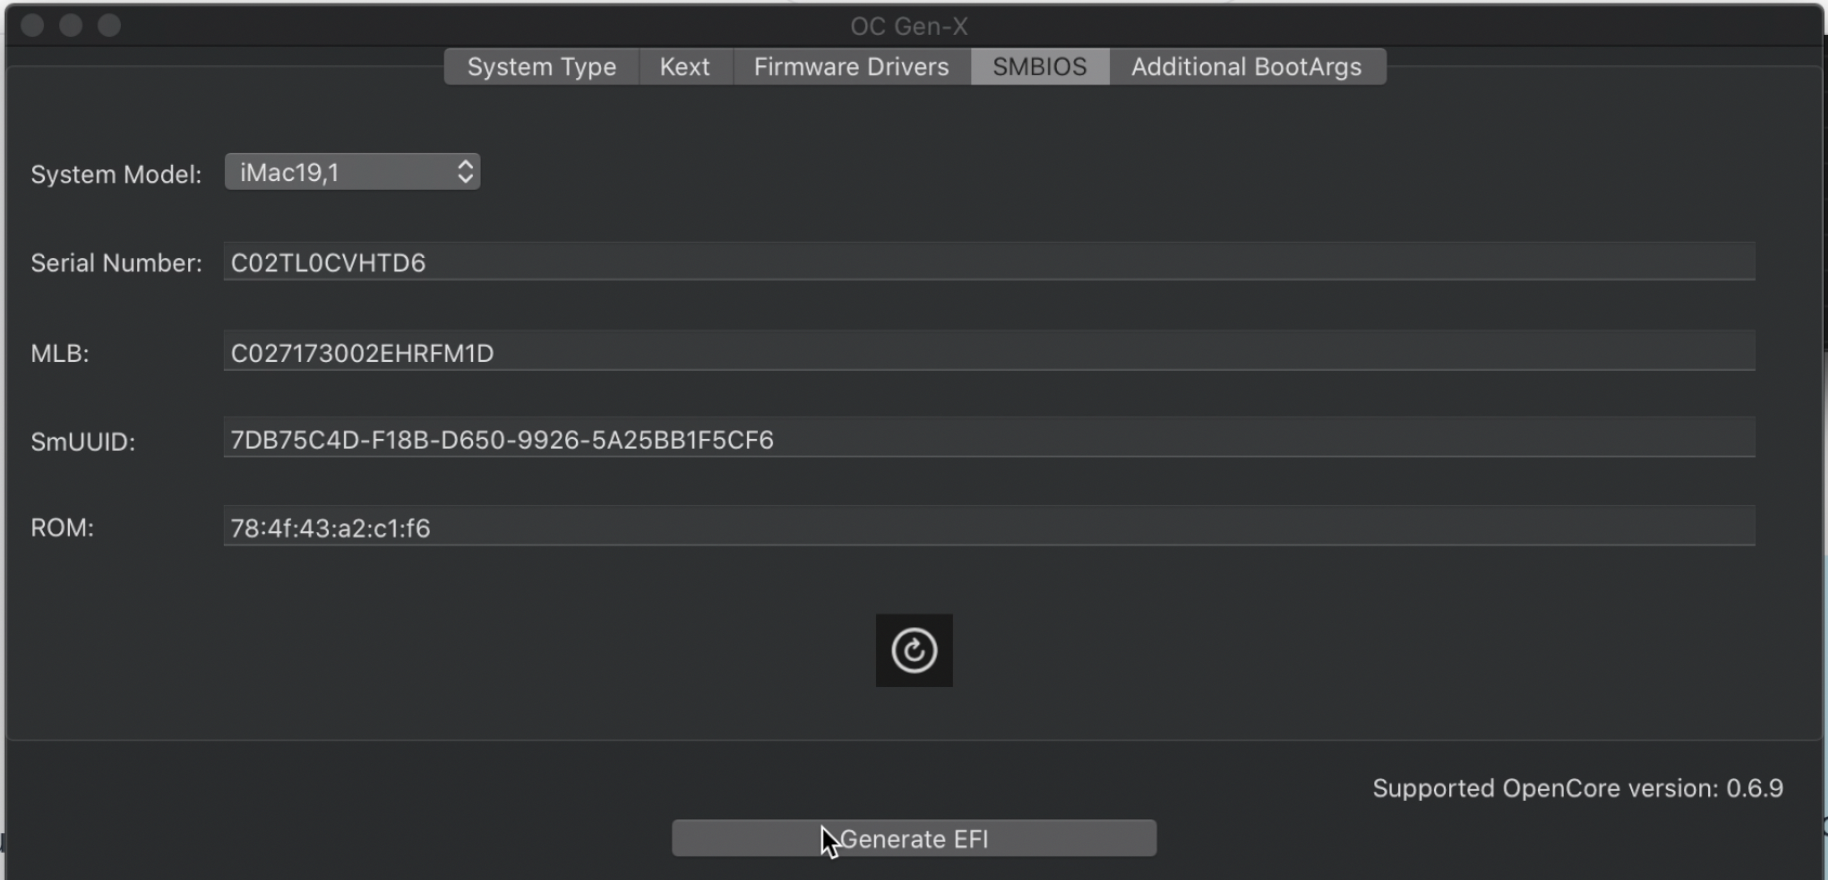
The SMBIOS is important and you will have to specify the correct System Model on that tab. For my setup I used «iMac19,1» but it could be different for you if you are using a different processor of a different operating system version.
To figure out what System Model to use, go to the Open Core Install Guide.
Select the section on the left side for your processor type (in my case it is «Coffee Lake»). Then find the heading «PlatformInfo». Scroll down a bit and you will see a table with the SMBIOS to use.
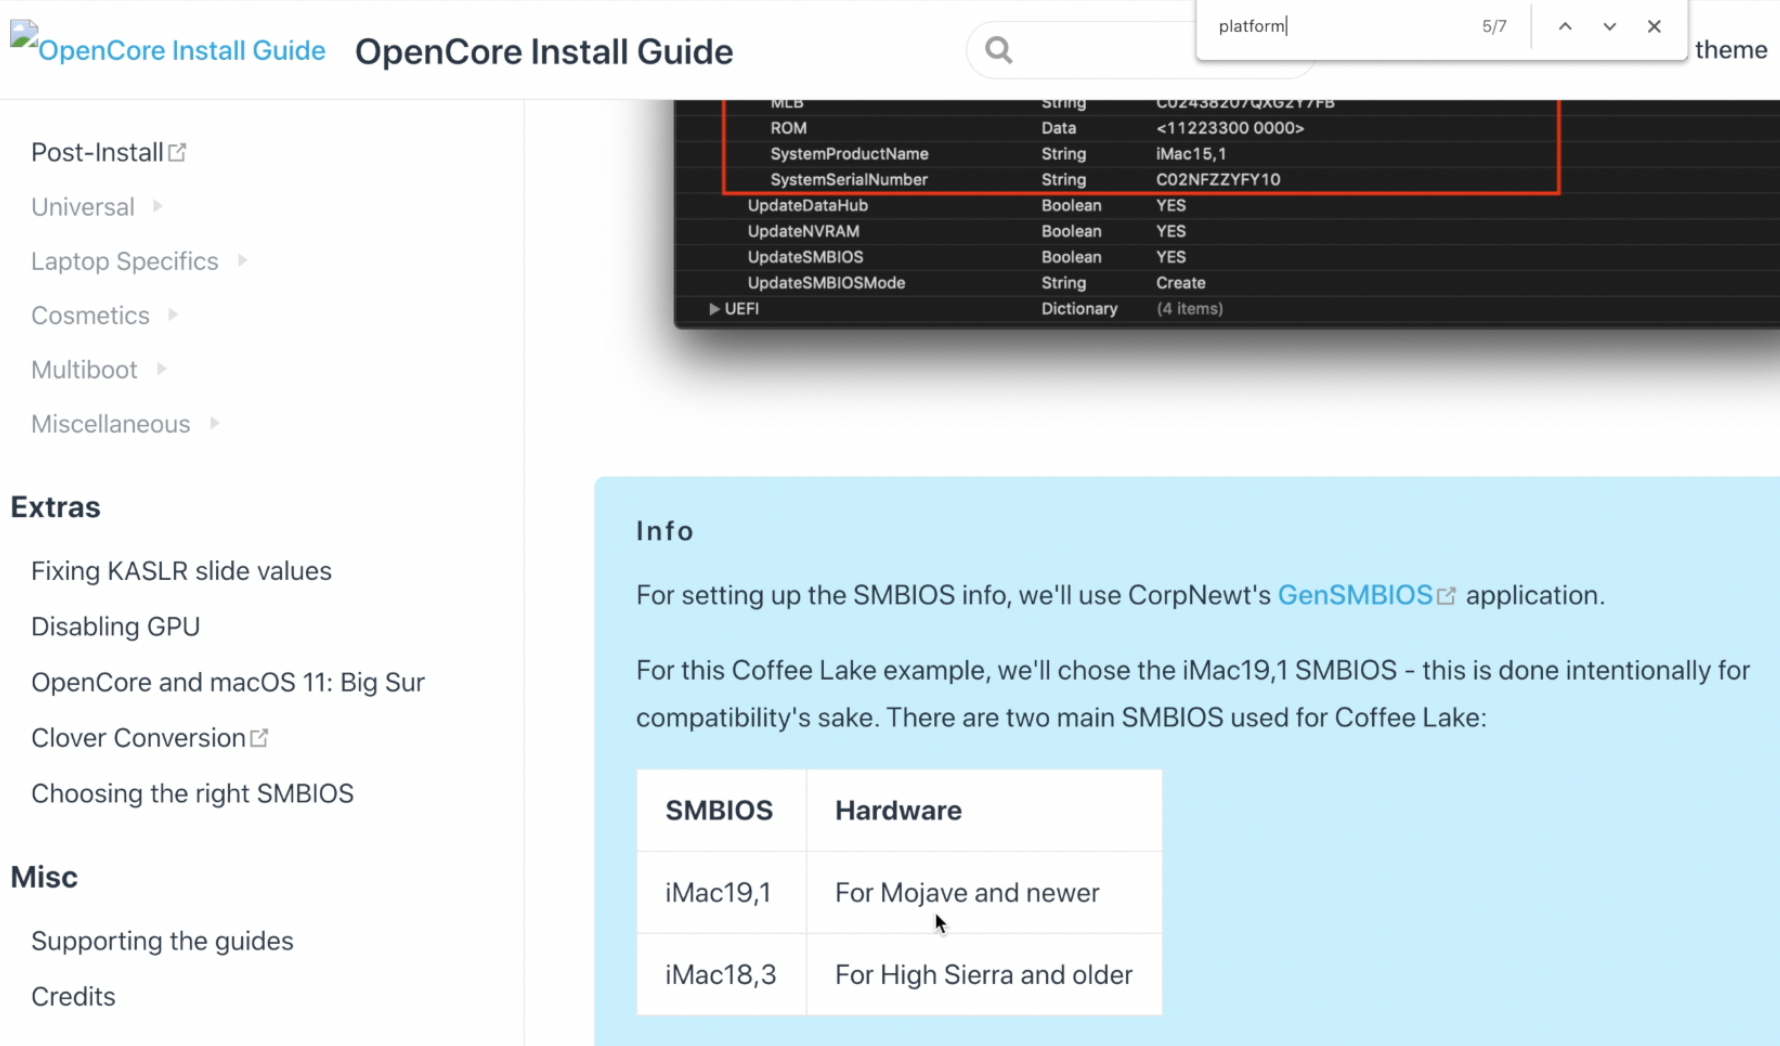
After selecting the appropriate System Model, click the «Generate EFI» button at the bottom.
An EFI folder has now been created on your desktop. We will now make some modifications to the contents.
You’ll need to get the SSDT files. This is different depending on your processor.
You can find the list of the exact SSDT’s you need at this link. Just select your processor type and download each of the required SSDTs.
Here are the links for the SSDTs needed for my Coffee Lake system.
- SSDT-PLUG-DRTNIA
- SSDT-EC-USBX-DESKTOP
- SSDT-AWAC
- SSDT-PMC
Once all of those files are downloaded, move them into your EFI folder. They should be moved to this subfolder: EFI/ACPI/OC
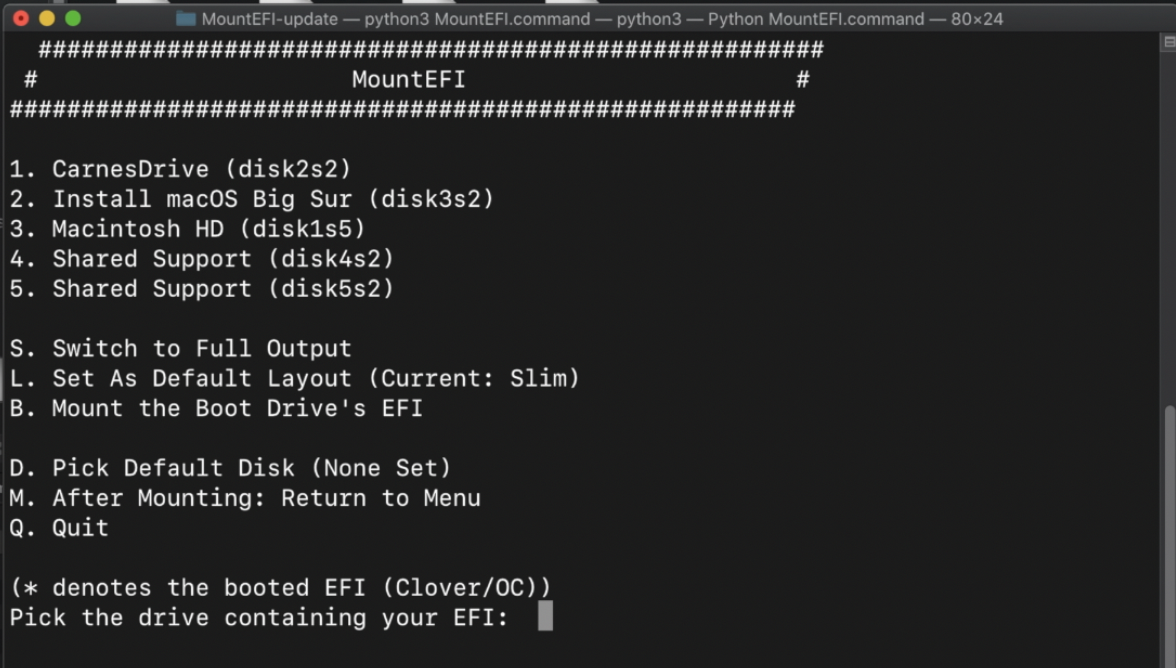
Now you will will use the MountEFI program downloaded earlier to mount the hidden EFI partition on the USB drive.
Right-click on MountEFI.command and click «open», then «open» again.
Select your USB drive. It should have a name like «Install macOS Big Sur» since we made it into a bootable installer for MacOS. In the screenshot below, it is option 2.
You now have a mounted EFI partition and an EFI folder from OC Gen-X. Drag the EFI folder into the EFI partition.
Open ProperTree.command which you downloaded earlier. Like before you can open it by right-clicking and selecting «open».
Once ProperTree is running, go to «File -> Open». Select the EFI partition, then the «OC» folder, then open the «config.plist» file.
The first thing we need to do is to inject all of the files in the EFI folder into the «config.plist» file.
So go to «File», then select «OC Snapshot». Make sure you’re on the EFI partition. Go to the «EFI» folder, then the «OC» folder. And click the «Choose» button.
A dialog box could pop up here about what version to use. If this happens, click «Yes».
Now go back to «File», then select «OC Clean Snapshot» and select «Choose».
The OC Gen-X program helped simplify all the required setup. At this point you should verify that everything is setup correctly according the the official install guide.
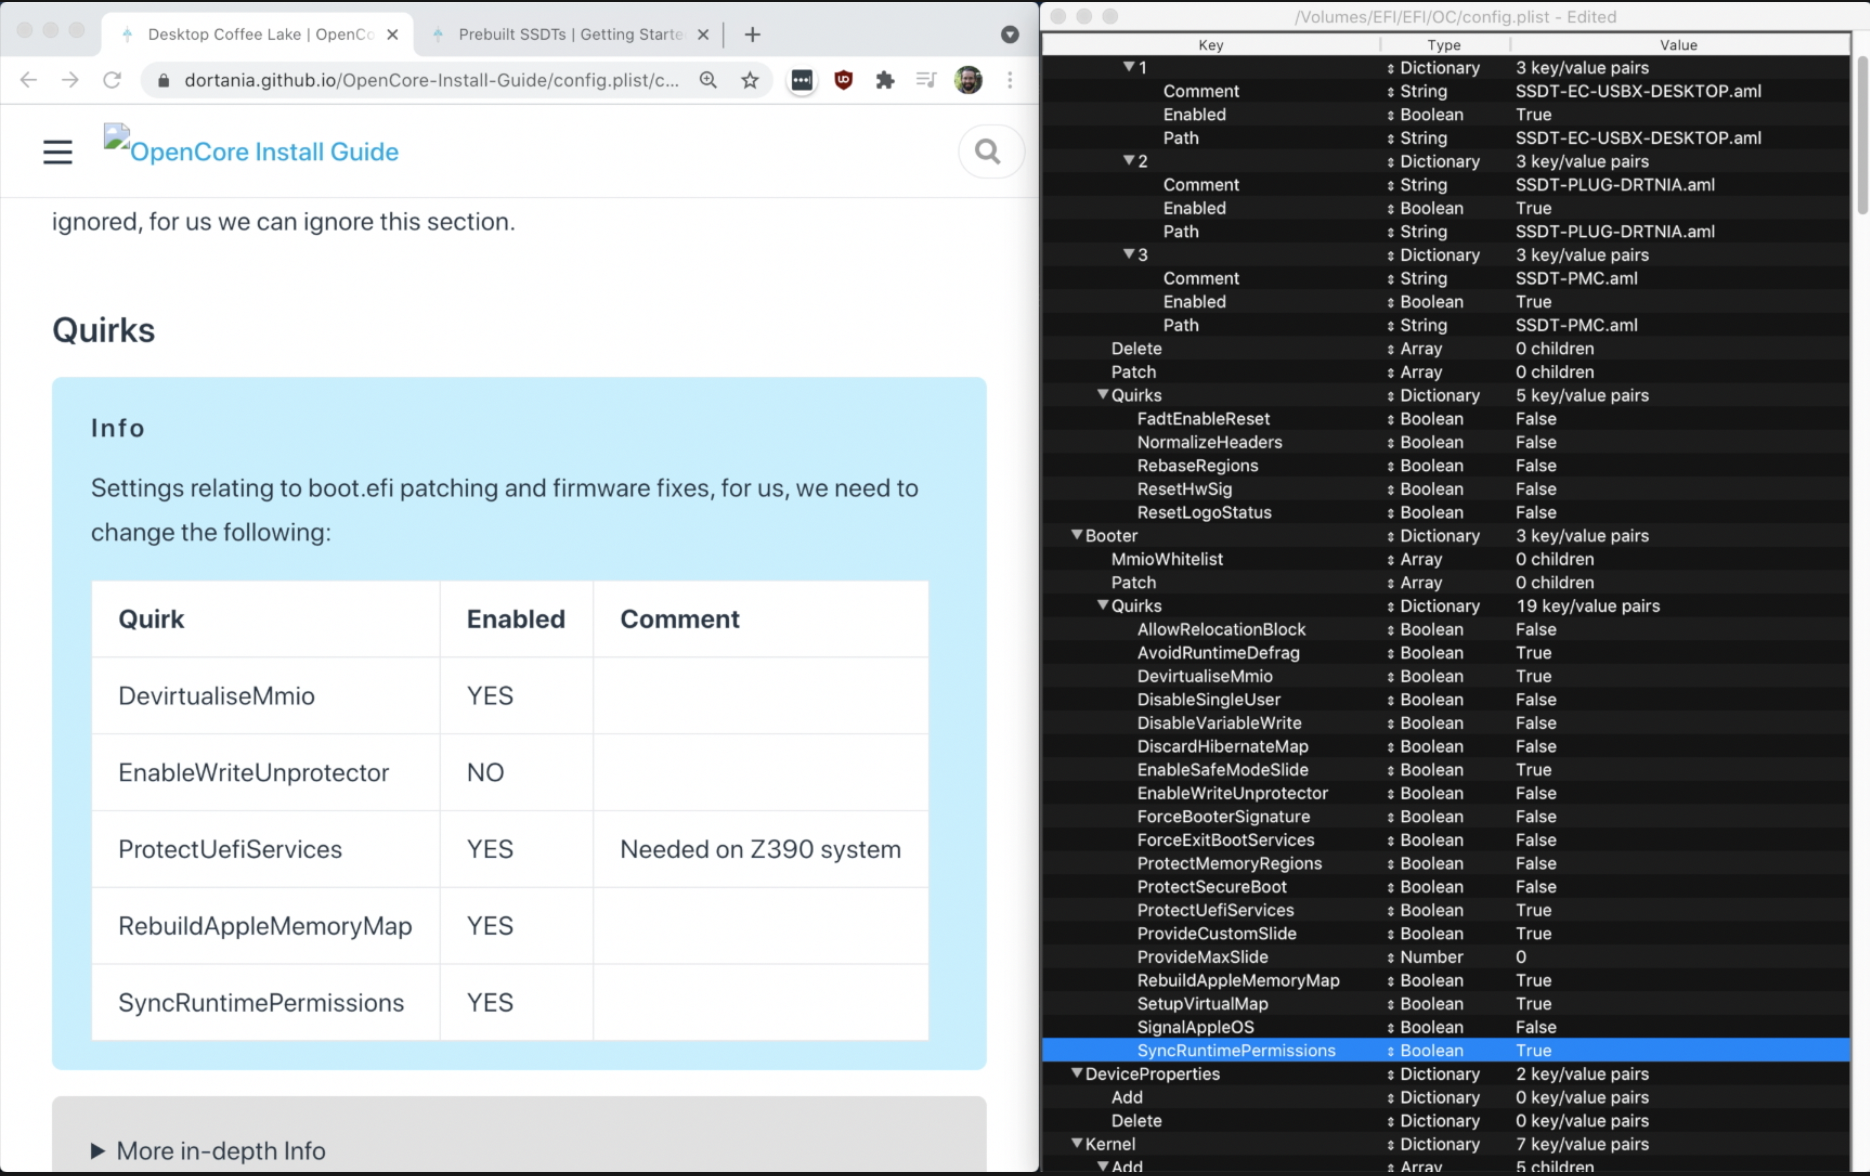
Here is the guide for Coffee Lake. If you are using a different type of processor, just select your type in the left menu.
You can verify the quirks are set correctly in the config.plist file. They should all be correct.
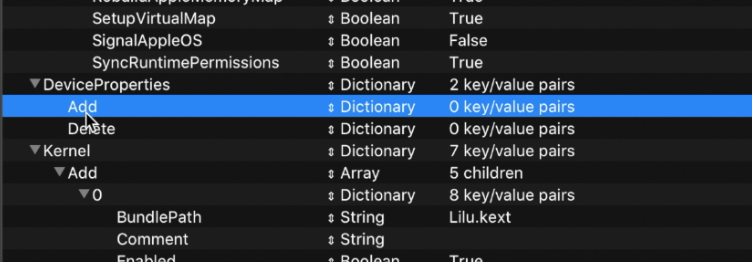
You need to do additional setup in the config.plist file to make sure the onboard graphics work. Find the «DeviceProperties» section, and then copy the following characters to add.
PciRoot(0x0)/Pci(0x2,0x0)
Note that this if you processor is not Coffee Lake, the exact thing you need to add under «DeviceProperties» could be different. Search for «Device Properties» in the OpenCore guide for your processor type to confirm what to add under «DeviceProperties» in the config.plist file.
Under «DeviceProperties», click on «Add». Then right click and choose «New child under ‘Add’ (+)».
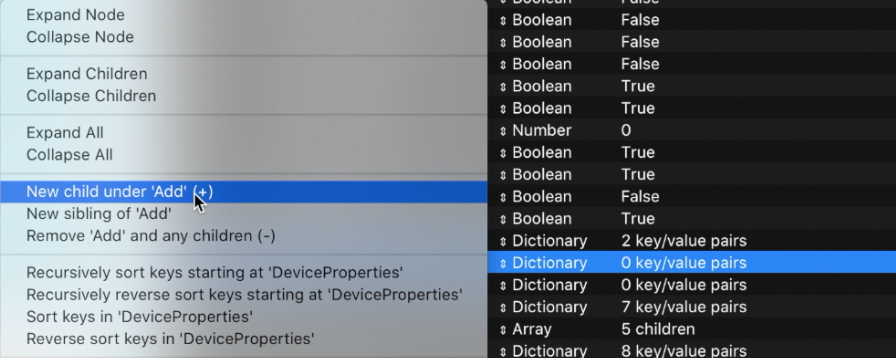
Double-click where it says «New String» and just paste the text into the field and hit enter. Then select in the next column where it says «String» and make sure that it is set to «Dictionary».
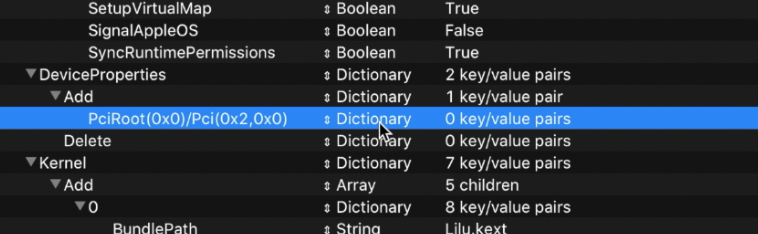
Next, we need to add more children under it and it should eventually look like this:
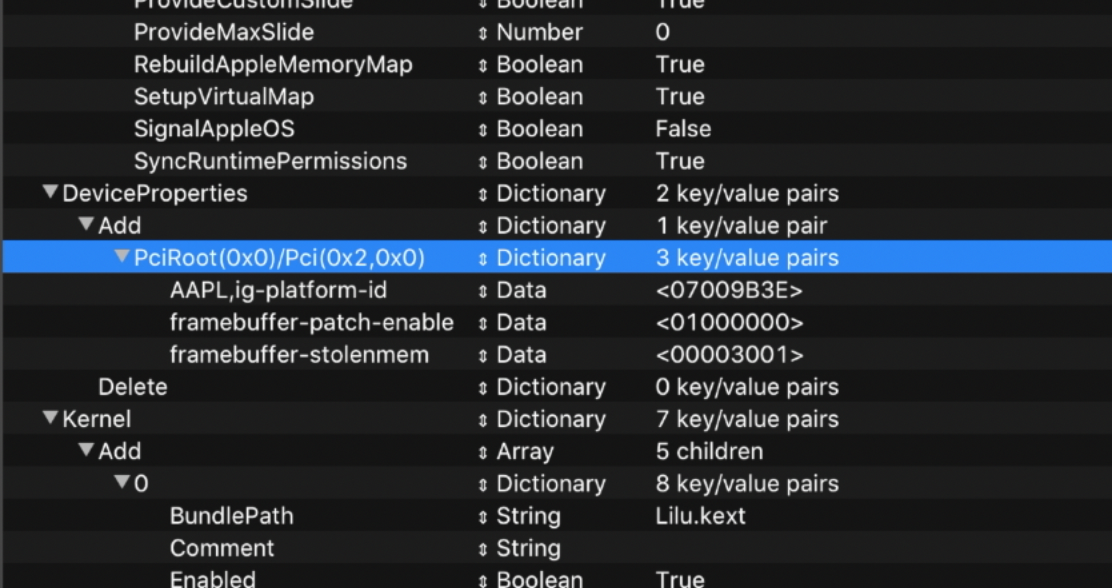
Below is the text from the image above that you need to add (if you system is Cofee Lake).
| Name | Type | Value |
|---|---|---|
| AAPL,ig-platform-id | Data | 07009B3E |
| framebuffer-patch-enable | Data | 01000000 |
| framebuffer-stolenmem | Data | 00003001 |
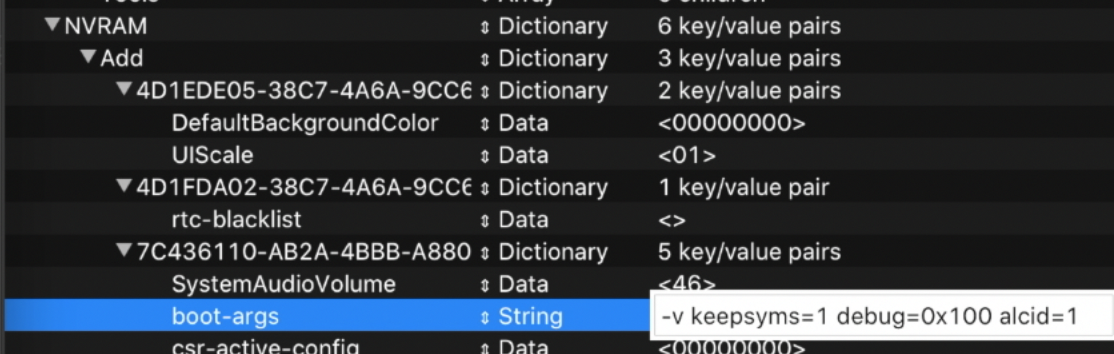
Now in the config.plist file, find the NVRAM section.
Update the «boot-args» so the text is «-v keepsyms=1 debug=0x100 alcid=1».
Now we’ll change the language to English. So next to where it says «prev-lang:kbd», change «data» to «String» and set the value to «en-US:0» and hit enter.

If you want a different language just go to this link to find what language code to use.
The config.plist file is now done. So go to «file», then «save». You are now completely done setting up the bootable drive. So just eject the drive, and then you can plug it in to your Hackintosh.
Skip the next Windows section and go to the heading «BIOS Setup».
Using Windows to create the macOS Installer
The first step to creating a macOS installer on Windows is to download OpenCore. Make sure to download the zip file for the most recent release.
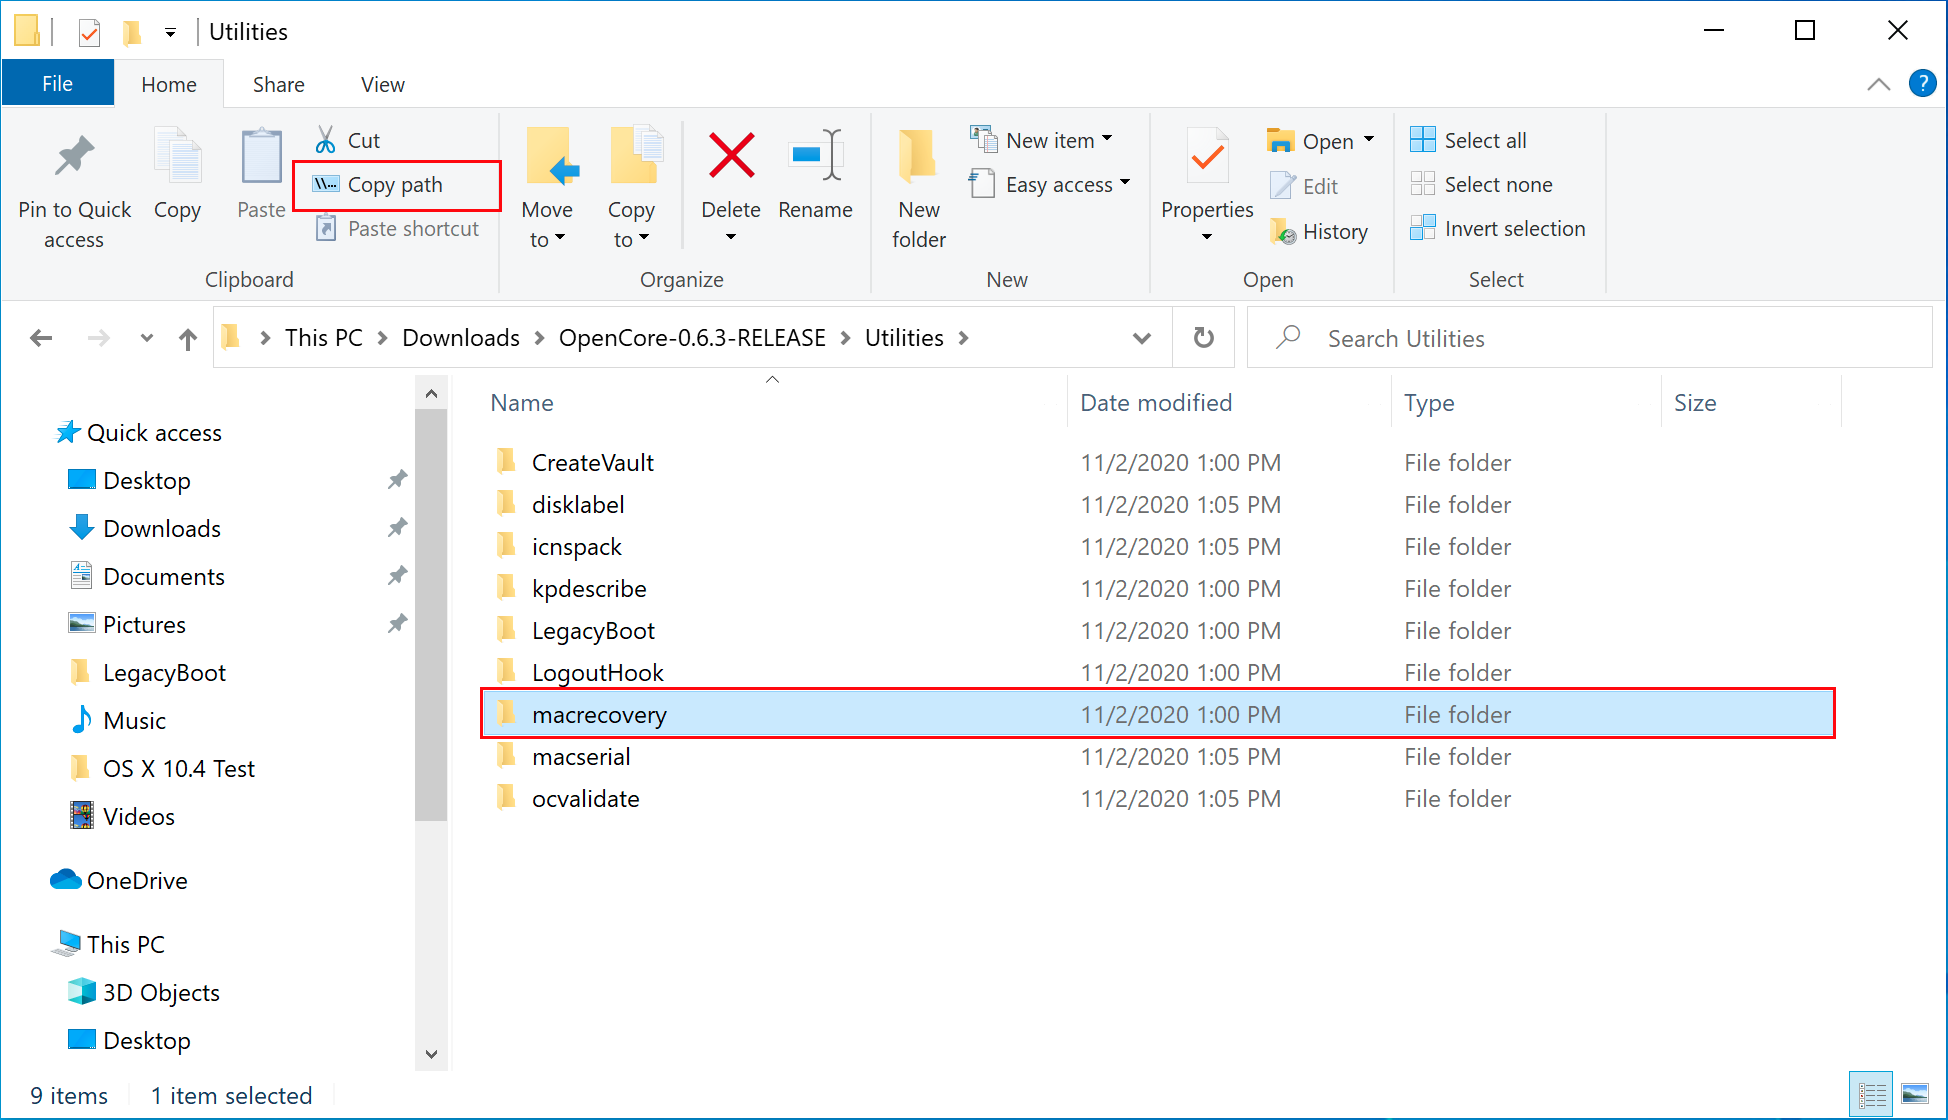
Unzip OpenCore and then go to /Utilities/macrecovery/. Next copy the folder path for the macrecovery folder:
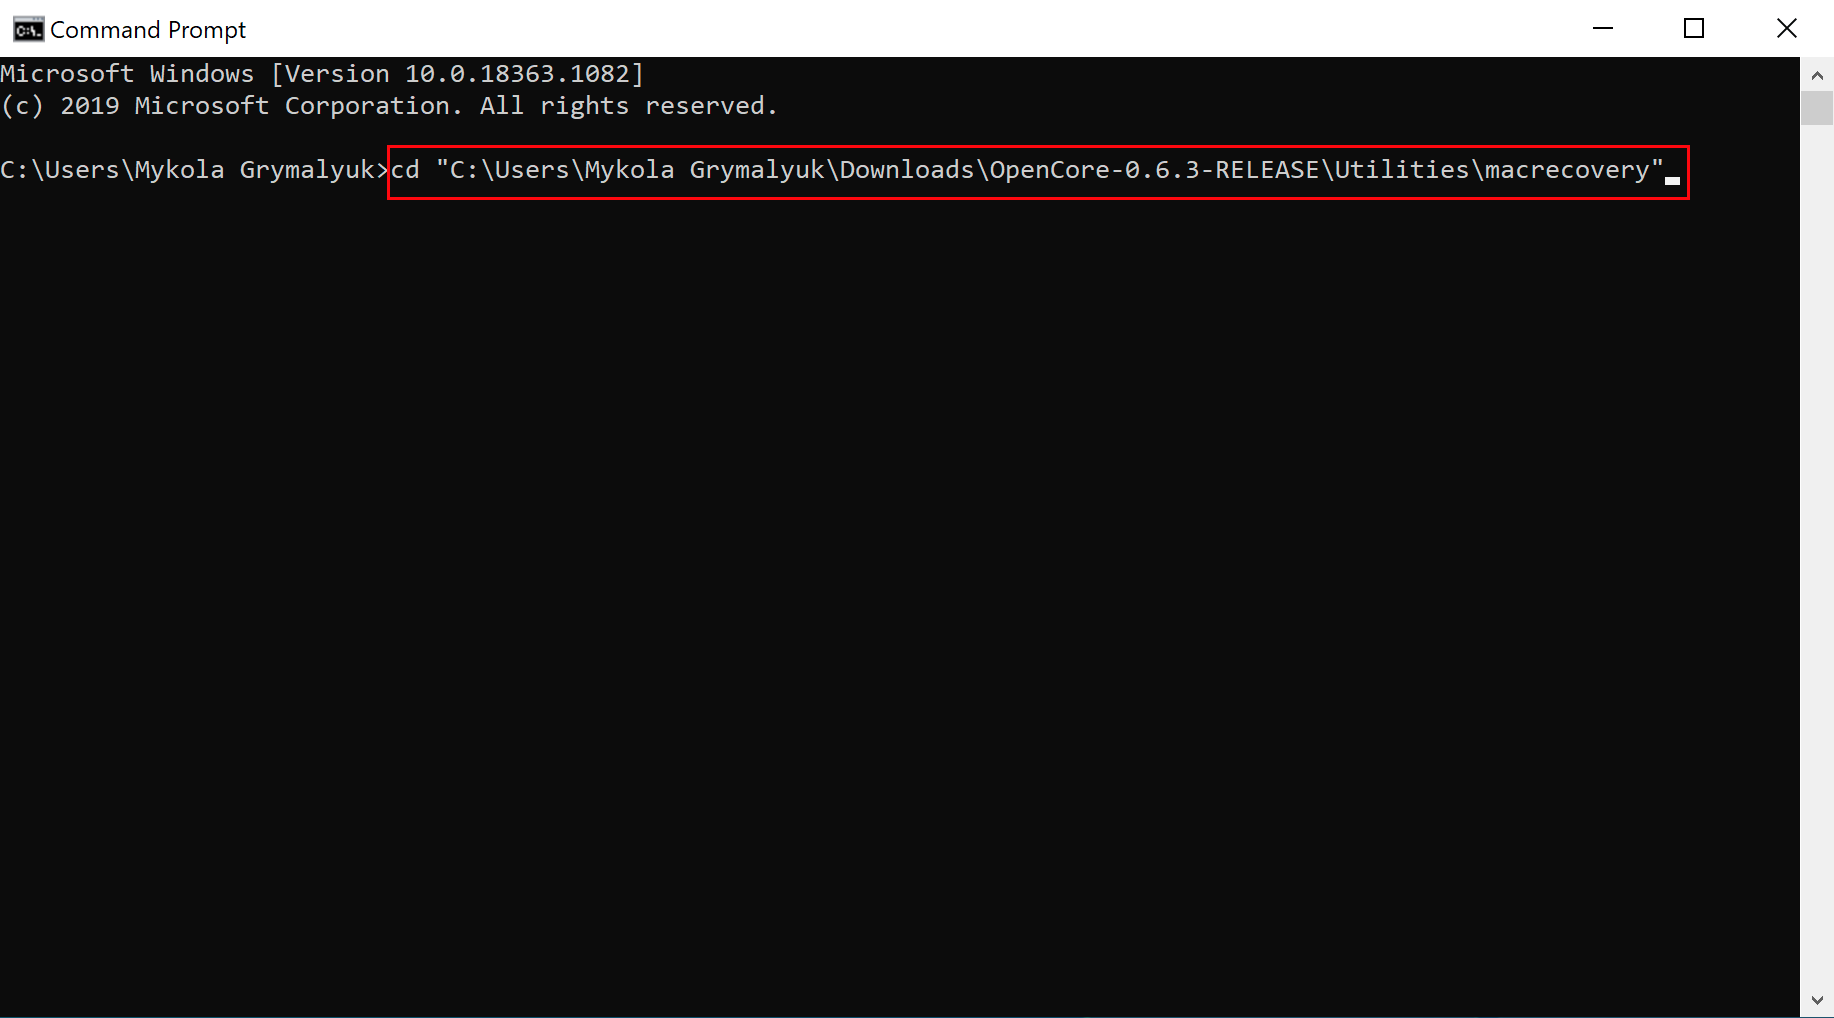
Open a Command Prompt and change directories into the macrecovery folder that you just copied using the command cd [PASTE_FOLDER_NAME].
It should look something like this:
Now in the Command Prompt, run one of the following commands depending on what version of macOS you want. If you don’t already have Python, you will have to install it first.
# Mojave(10.14)
python macrecovery.py -b Mac-7BA5B2DFE22DDD8C -m 00000000000KXPG00 download
# Catalina(10.15)
python macrecovery.py -b Mac-00BE6ED71E35EB86 -m 00000000000000000 download
# Big Sur(11)
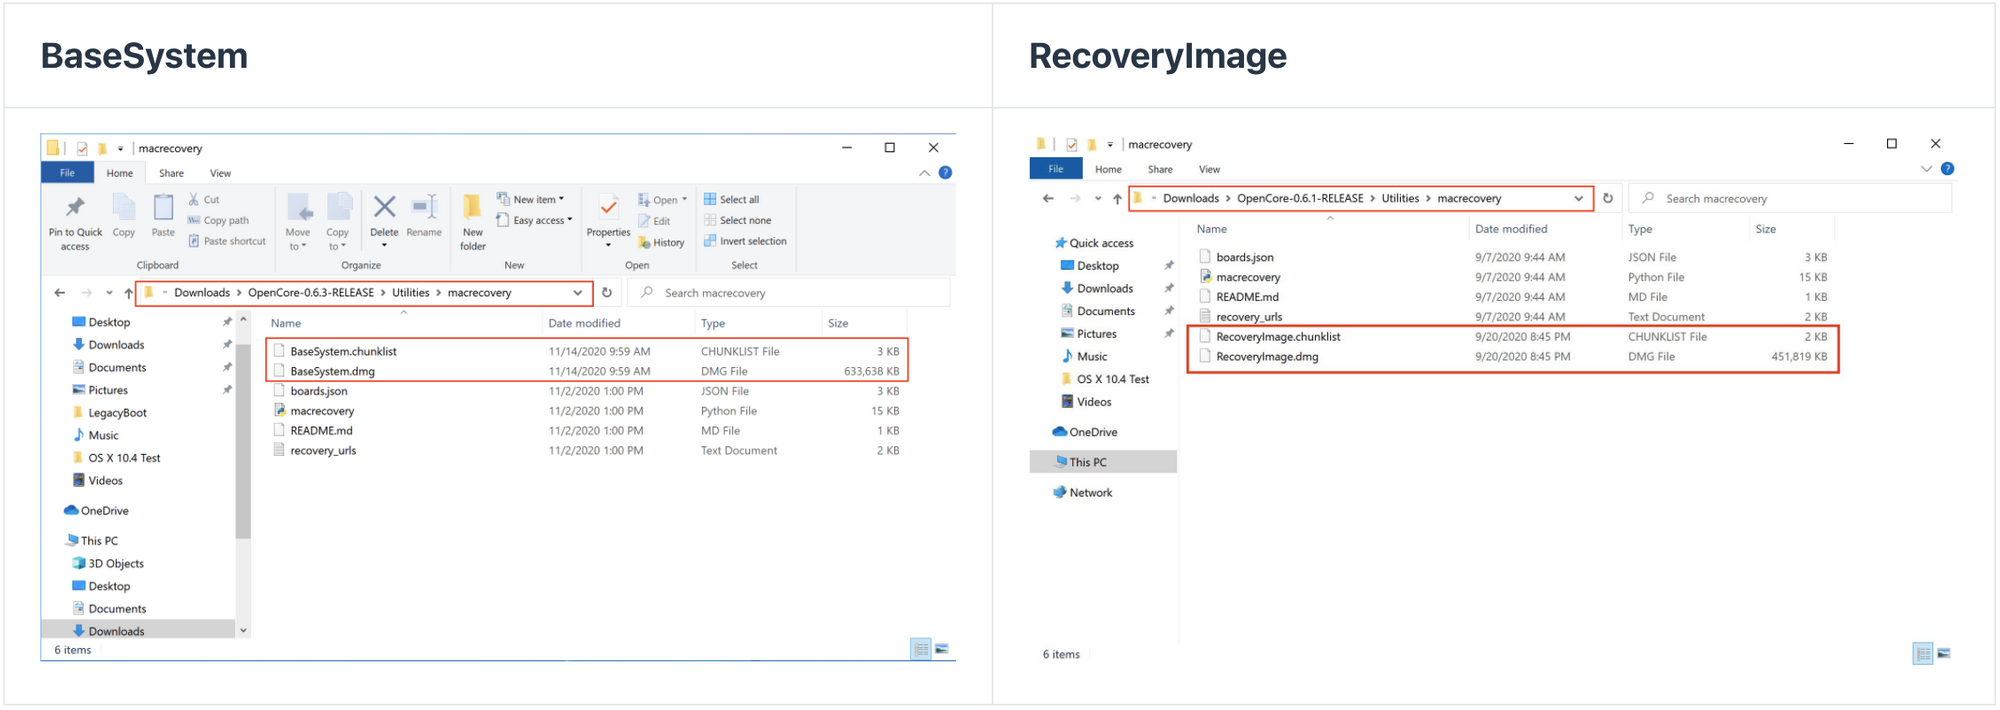
python macrecovery.py -b Mac-E43C1C25D4880AD6 -m 00000000000000000 downloadThis will take some time, however once you’re finished you should get either BaseSystem or RecoveryImage files:
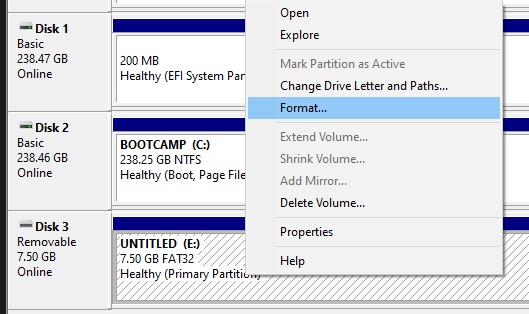
Now open up Disk Management and format the USB drive as FAT32. Follow these steps from the OpenCore Docs:
- Right click the Start Button on your task bar and select Disk Management.
- You should see all of your partitions and disks. On the bottom half, you’ll see your devices. Find your USB.
- You’ll want to format the USB to have a FAT32 partition.
- If you have multiple partitions on the USB, right click each partition and click Delete Volume for your USB.
- Right click the unallocated space and create a new simple volume. Make sure it is FAT32 and at least a gigabyte or two big. Name it «EFI».
- Otherwise, right click the partition on the USB and click Format and set it to FAT32.
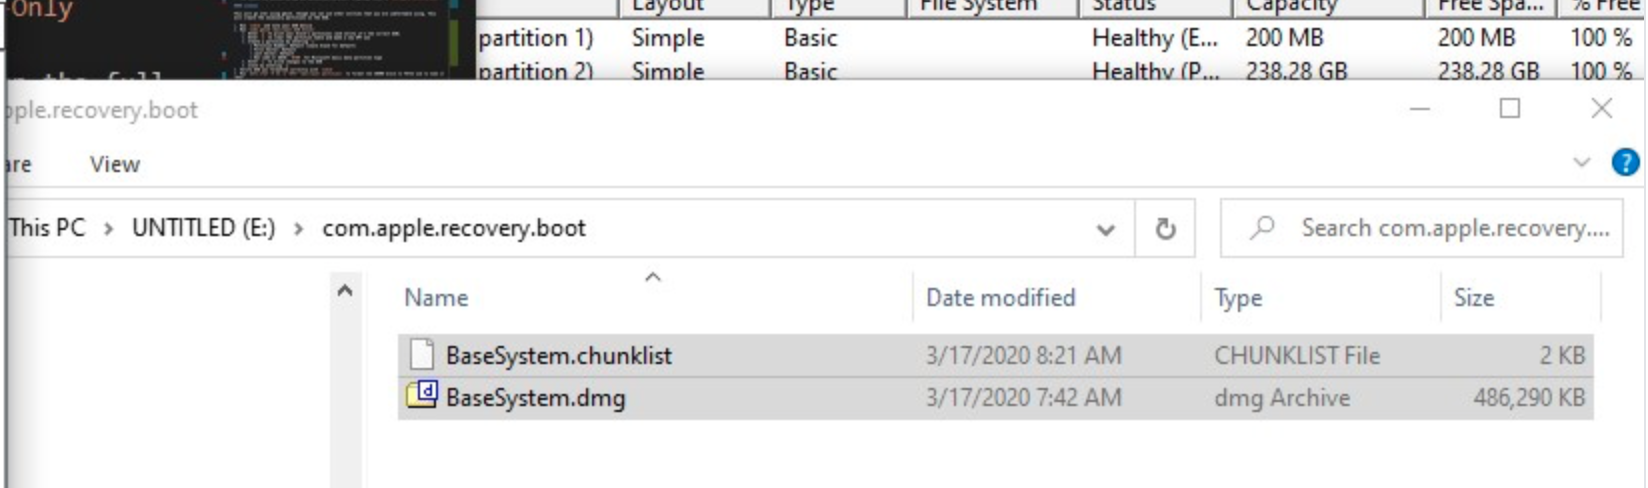
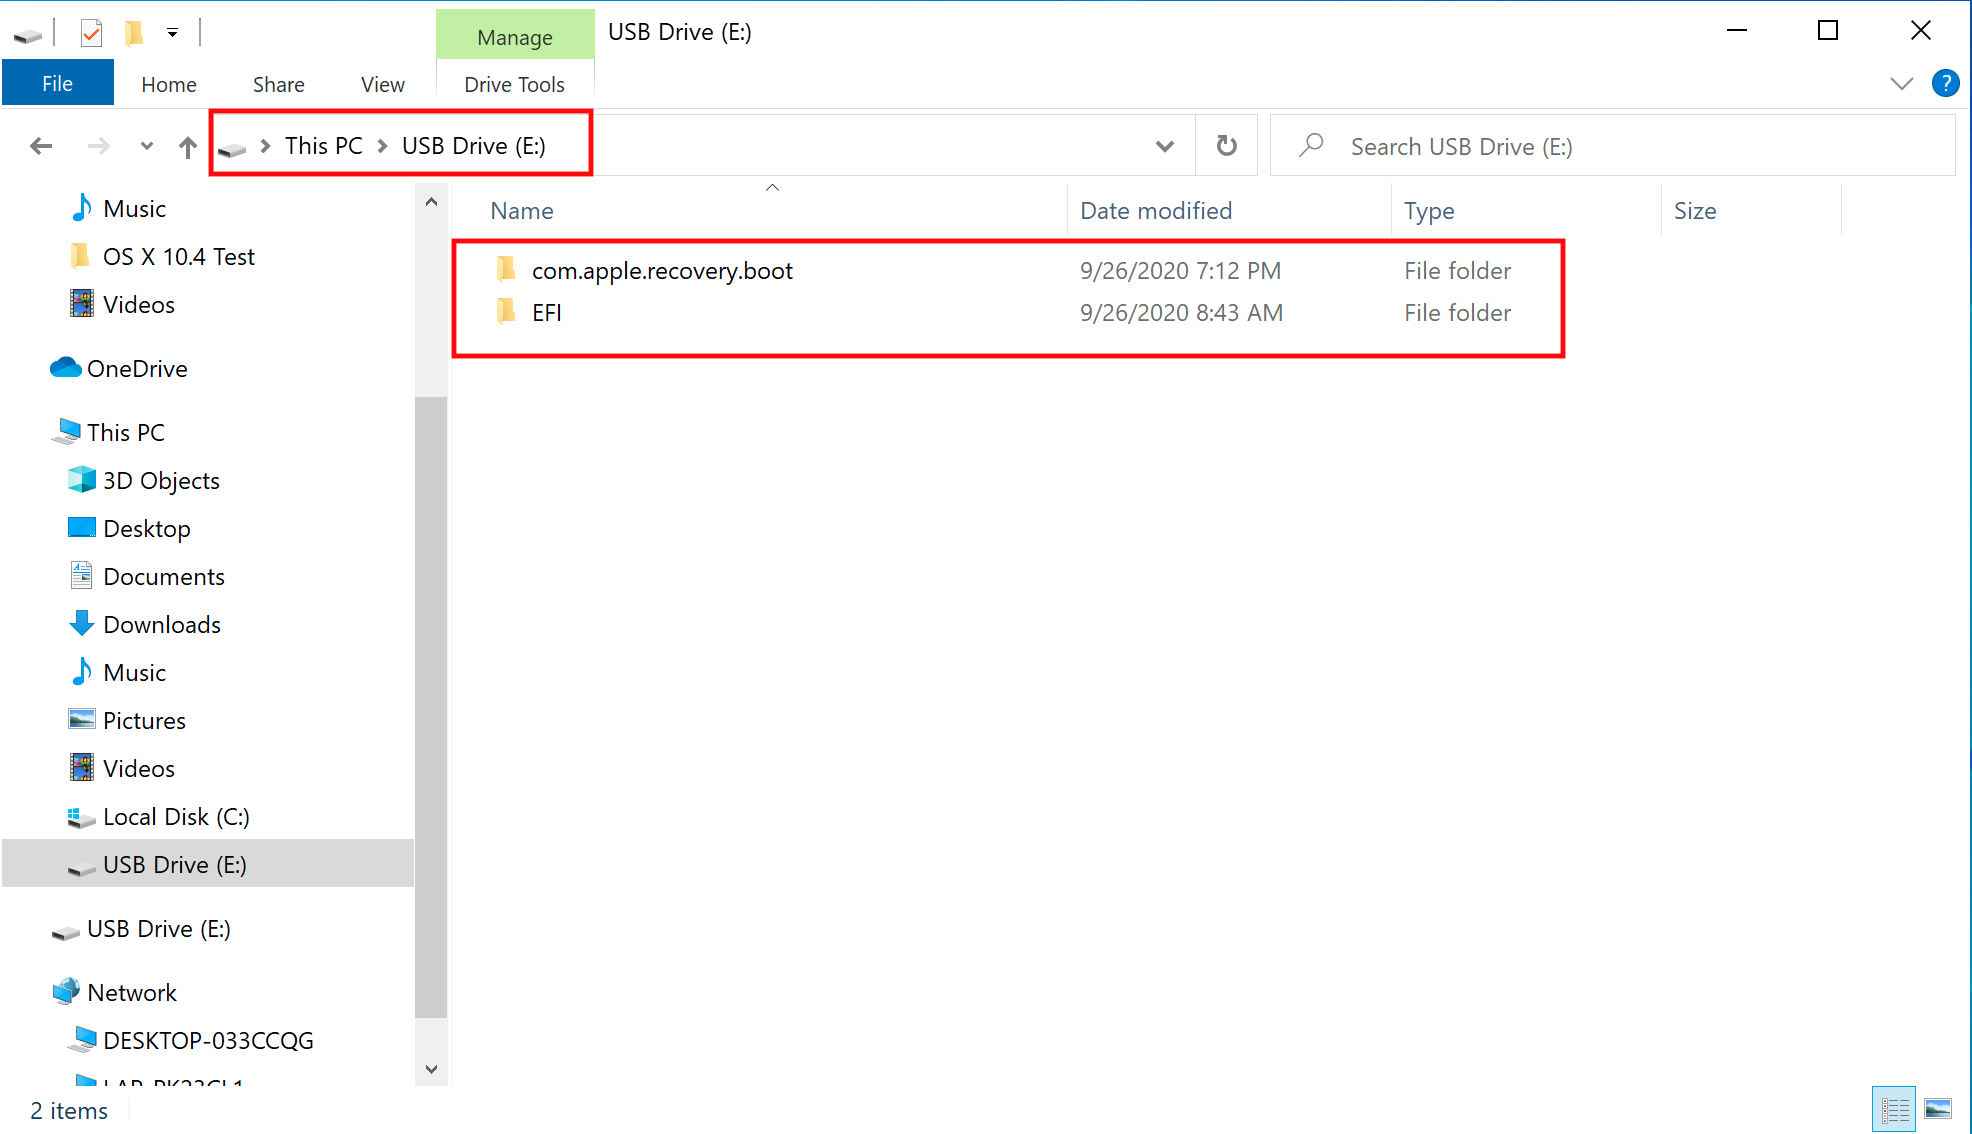
Next, go to the root of this USB drive and create a folder called com.apple.recovery.boot. Then move the downloaded BaseSystem or RecoveryImage files. Please ensure you copy over both the .dmg and .chunklist files to this folder:
Now grab OpenCorePkg you downloaded earlier and open it:
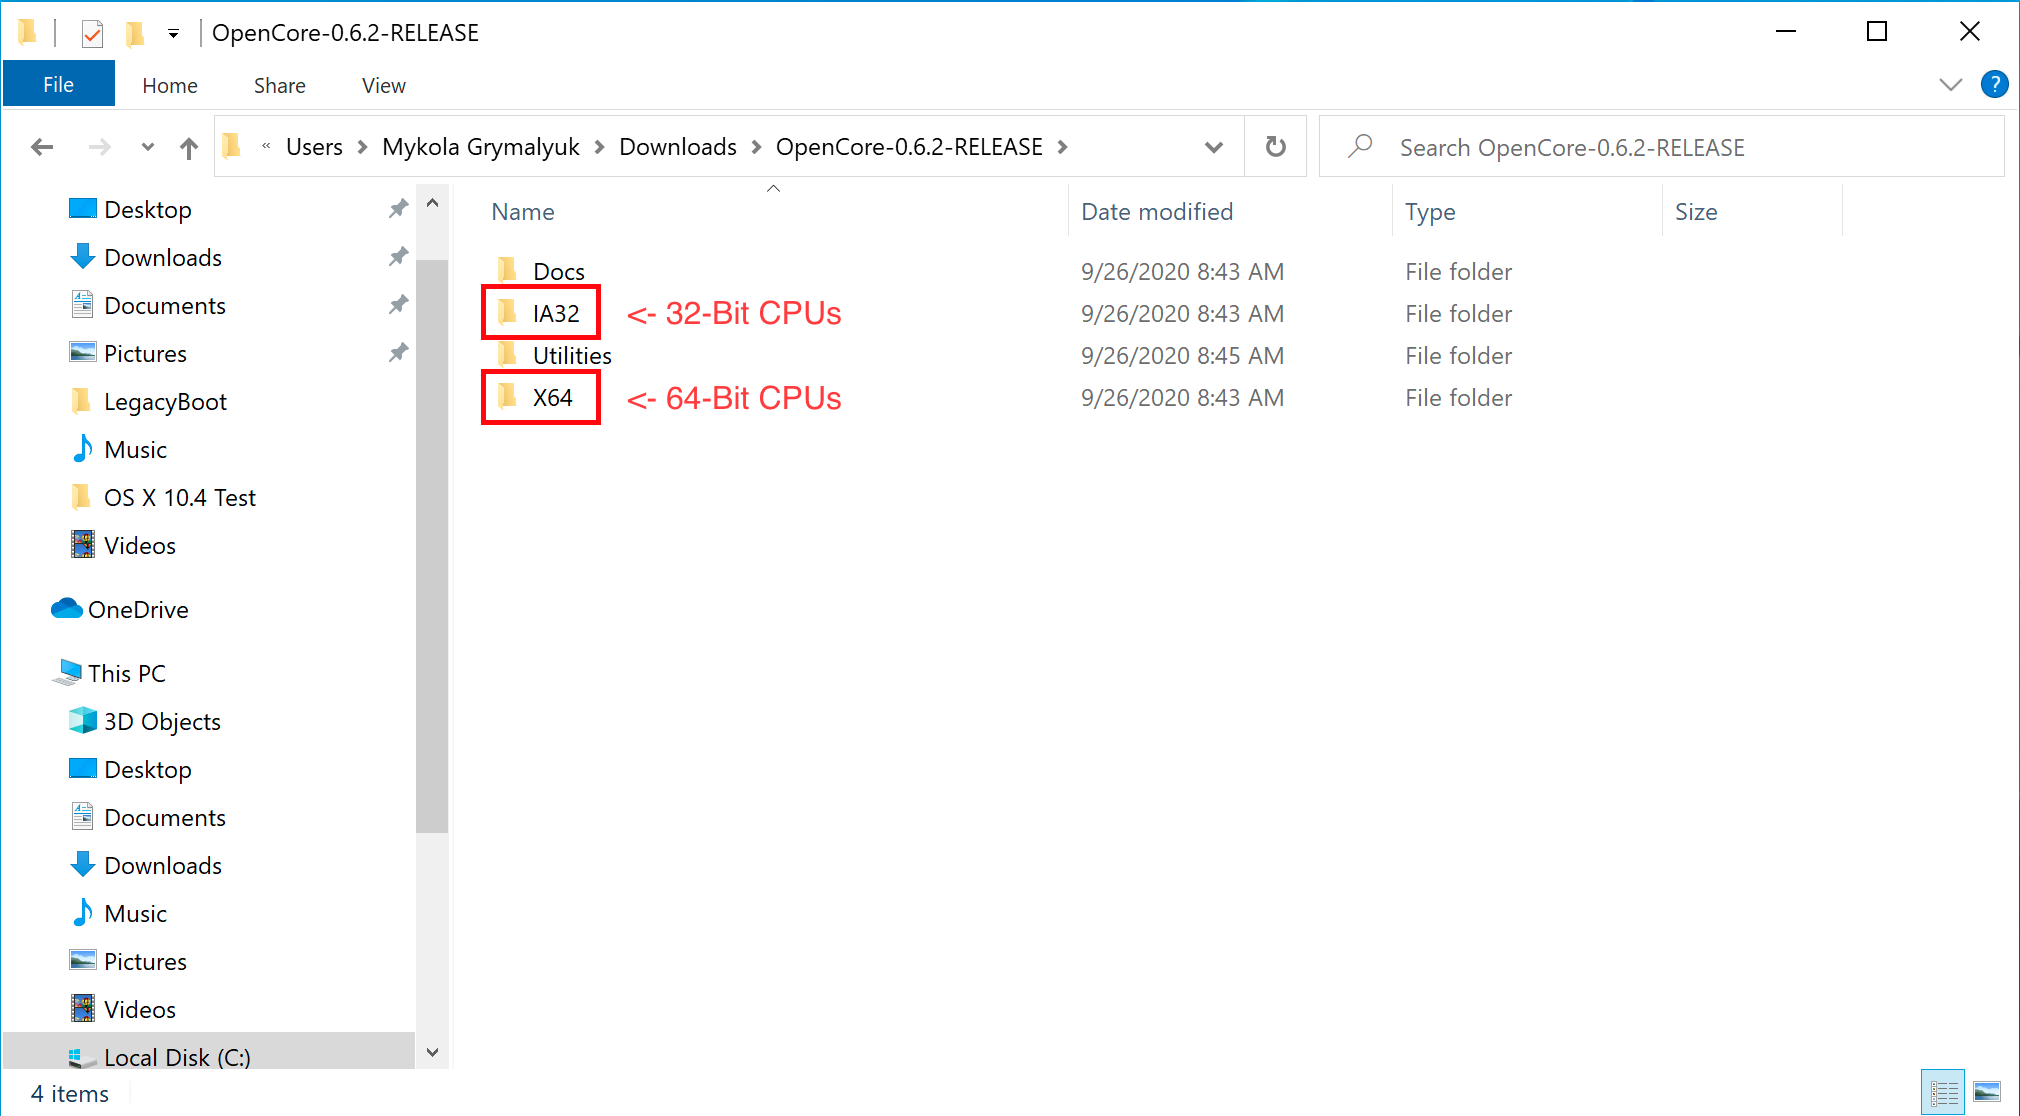
Here we see both IA32(32 Bit CPUs) and X64(64 Bit CPUs) folders, choose the one that’s most appropriate to your hardware and open it. Next grab the EFI folder inside and place this on the root of the USB drive along side com.apple.recovery.boot. Once done it should look like this:
At this point you will have to continue setting up your EFI folder. Because of the complexity of this step and all the different possible options depending on your setup, you should follow along with the official documentation for the next few steps.
Here are the links to the instructions for the next steps when using Windows to create the bootable USB installer. Note that the screenshots in the documentation show a mac but the steps apply to Windows as well. For setup using a mac, you don’t have to go through these steps because there is a wizard that does all of them automatically.
Adding The Base OpenCore Files
Gathering Files
Getting started with ACPI
BIOS Setup
I’ll show you how I setup my BIOS for my Hackintosh. The BIOS software is specific to my motherboard and yours may look a little different. If yours looks different, do you best to find equivalent setting in you software, if yours looks different. Note that BIOS setting are easy to experiment with and you don’t have to have all the same settings as me to get everything working.
Boot the computer up and then hit the «Delete» key to get into the BIOS.
Most setting can be left as the default. Here are the settings that should be updated:
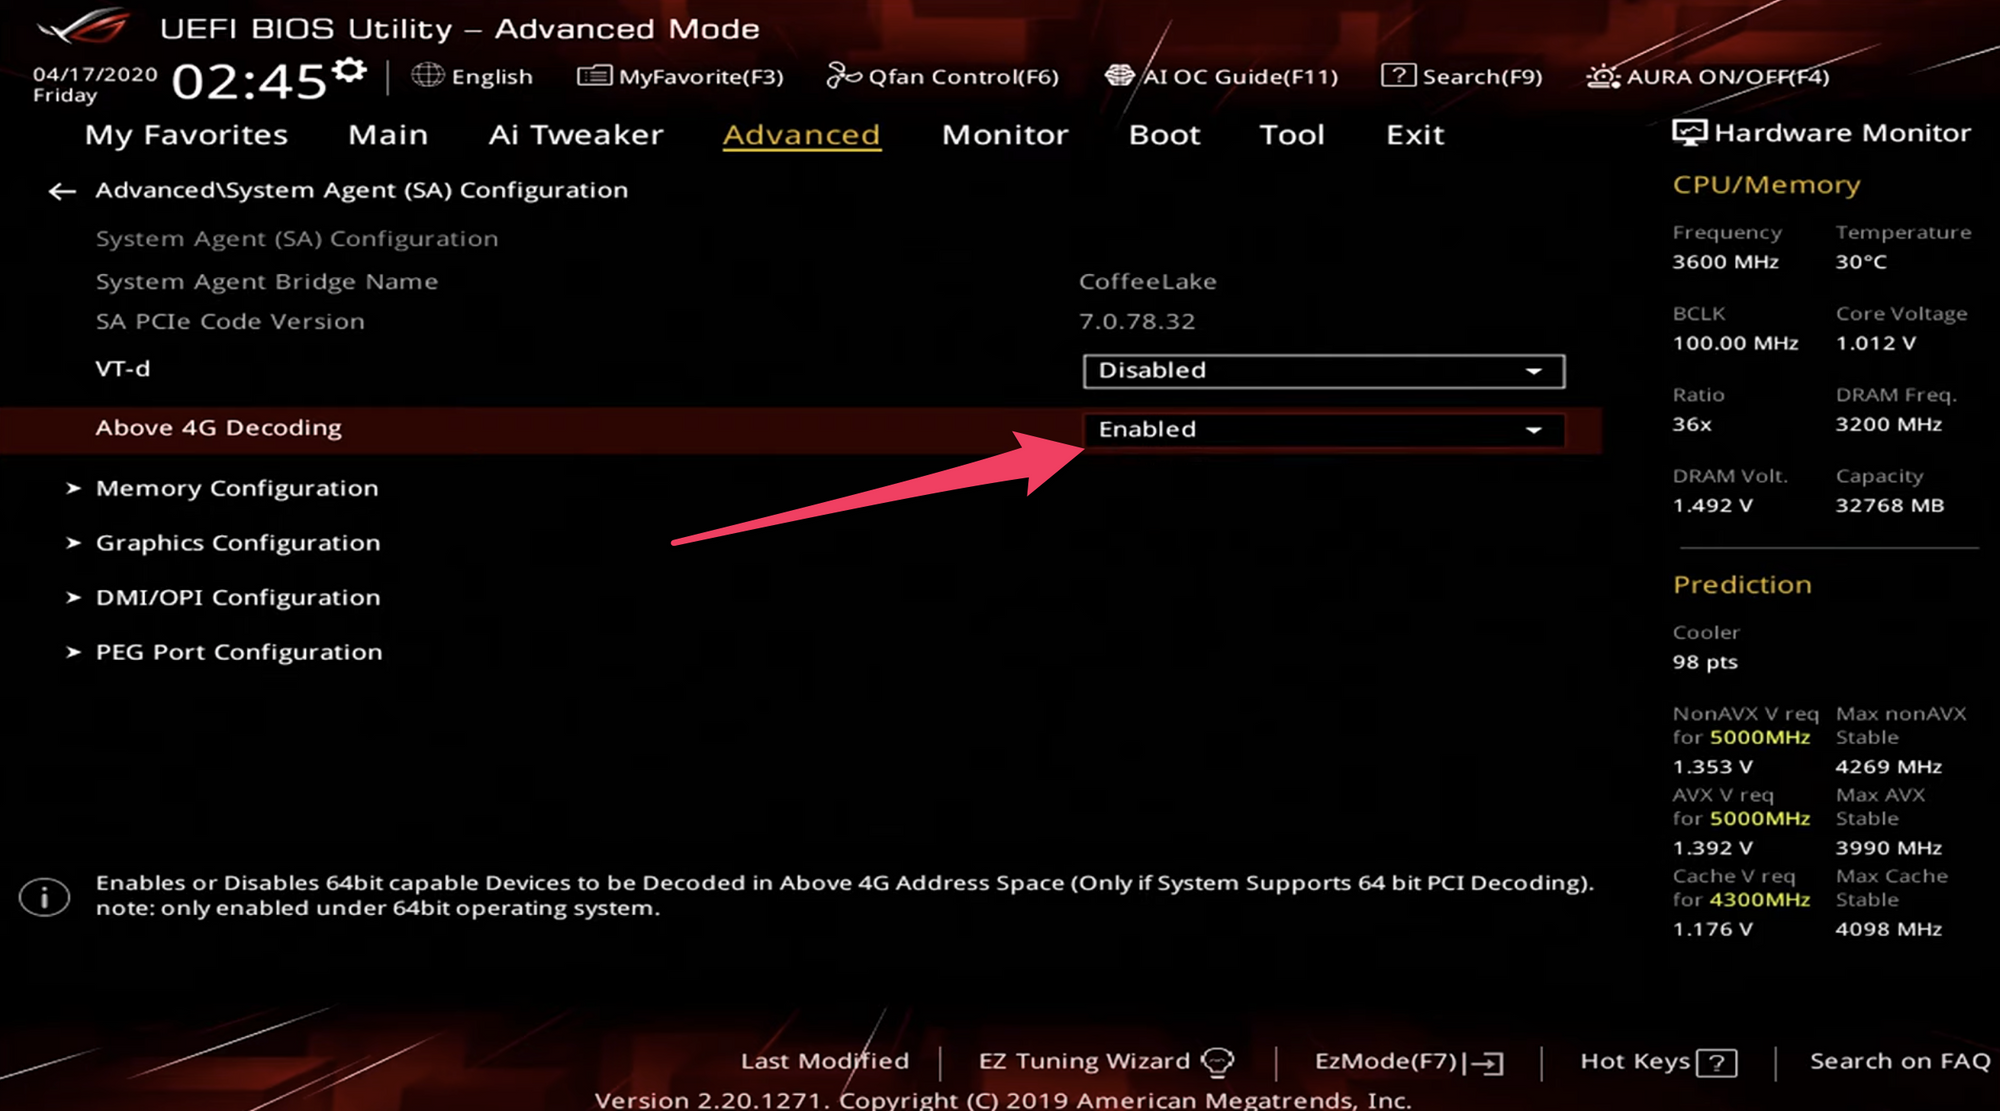
Under Advanced, «Above 4G Decoding» should be Enabled.
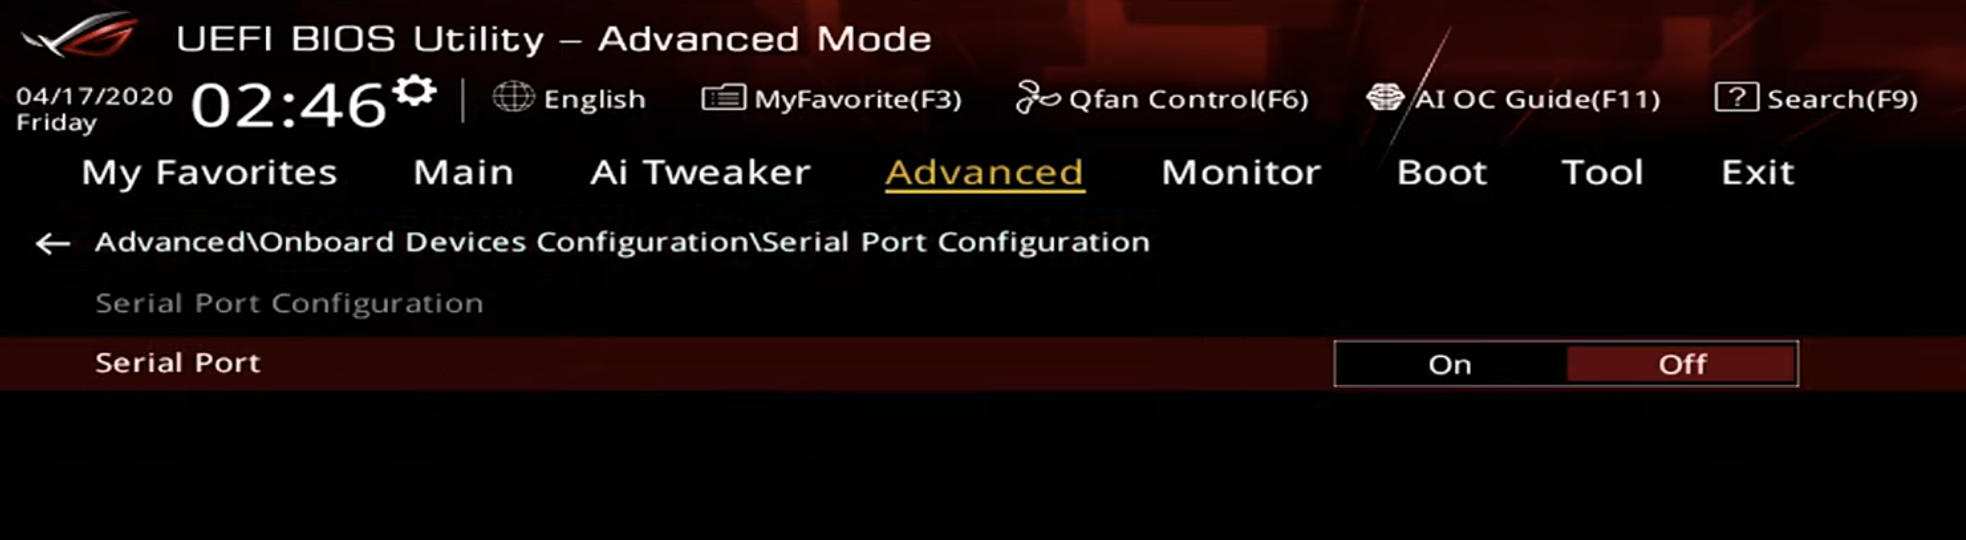
Under Advanced, and then under Serial Port Configuration, turn «Serial Port» to Off.
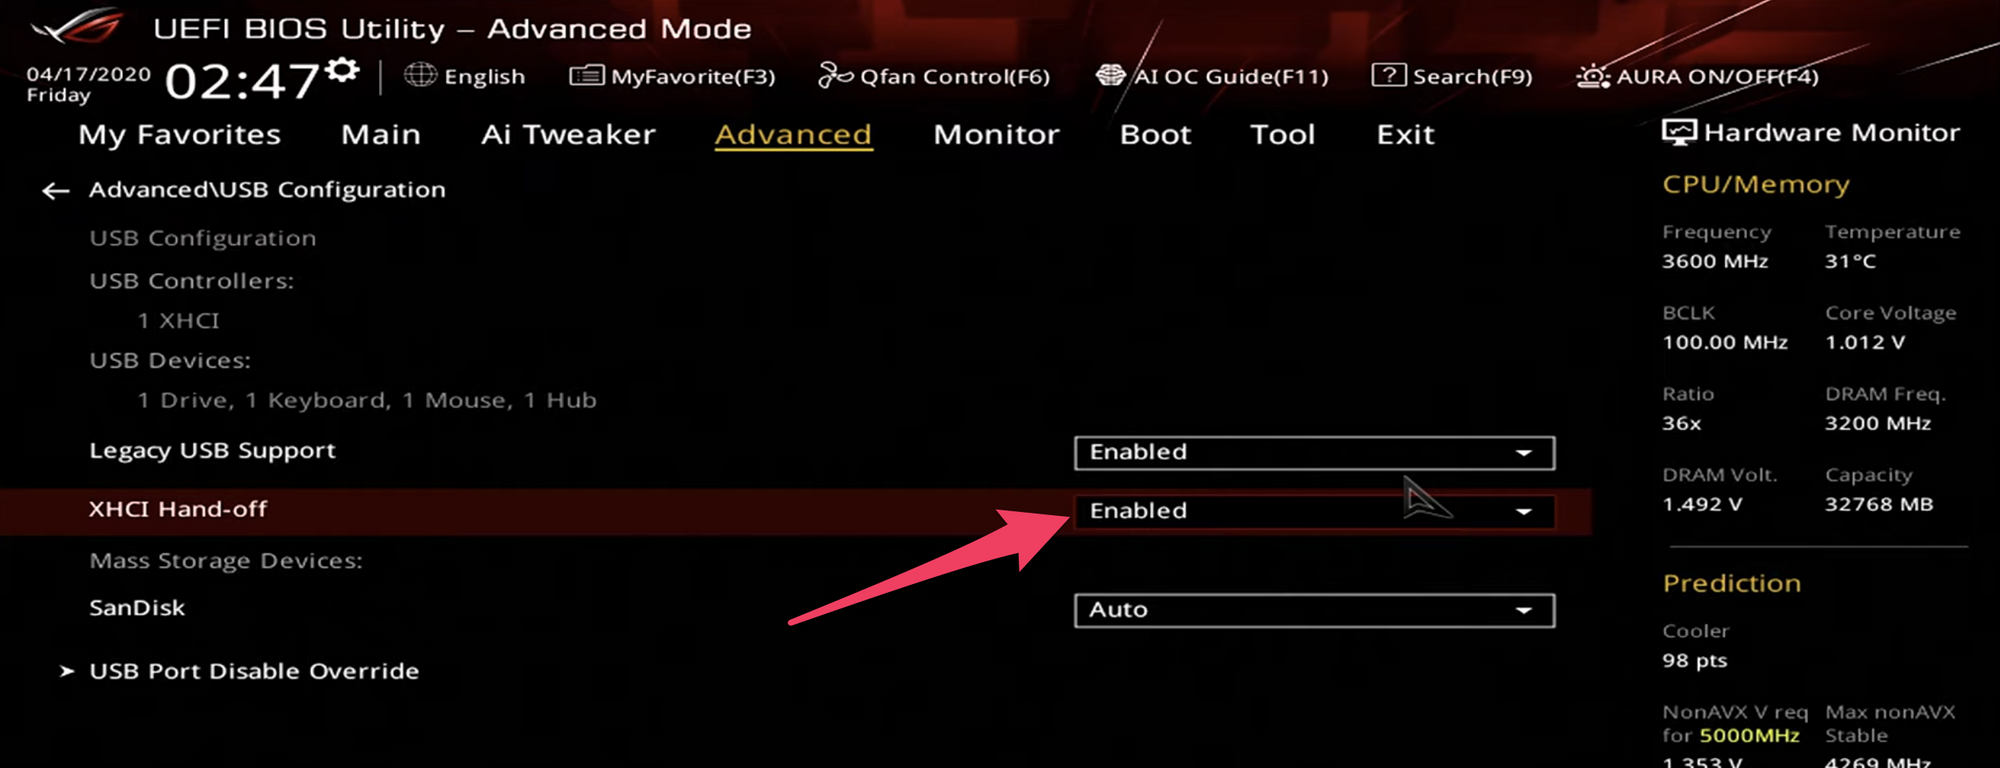
Under Advanced, and then under USB Configuration, set «XHCI Hand-off» to Enabled.

Under Boot, and then under Boot Configuration, set «Fast Boot» to Disabled

Under Boot, and then under Secure Boot, set «OS Type» to Windows UEFI mode.
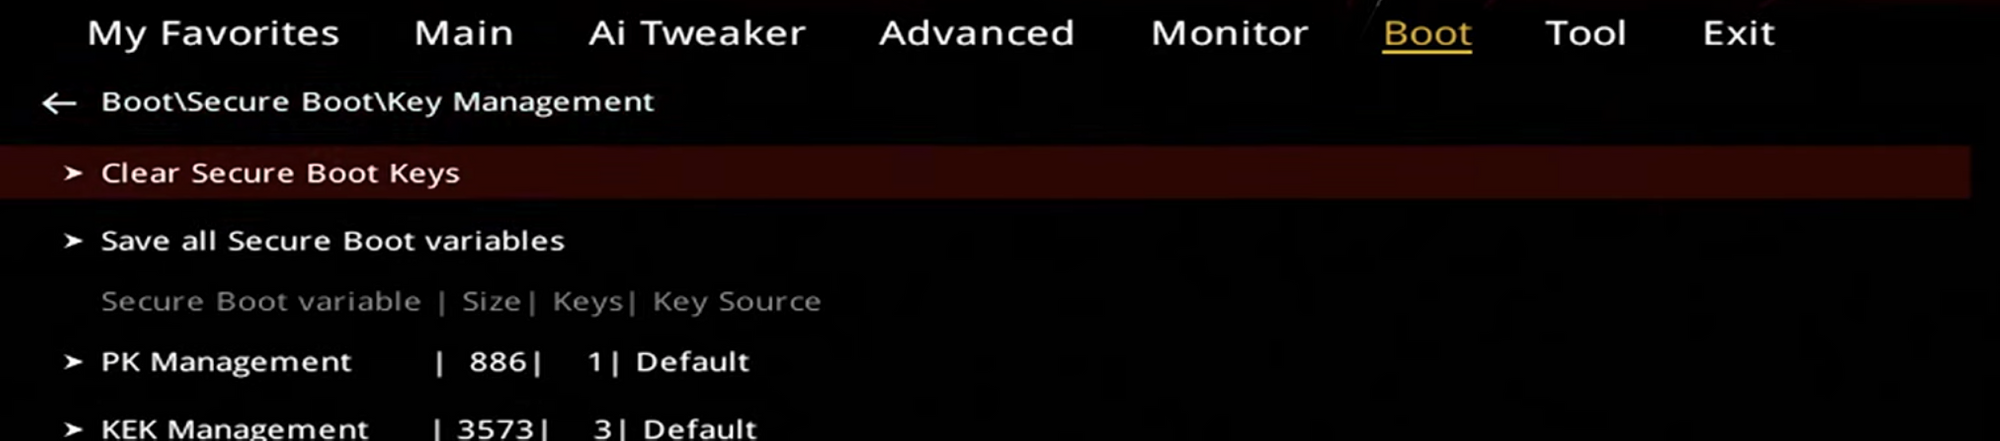
The final thing you need to do is to go under Boot > Secure Boot > Key Management. Then select «Clear Secure Boot Keys».
Now go to Exit and select «Save Changes & Reset».
MacOS Setup
After the computer restarts, hit F12 to get into the boot menu. Choose «Install MacOS Big Sur (External).
The next few screenshots are a little blurry since I was videotaping my monitor and did not focus correctly. Sorry about that.
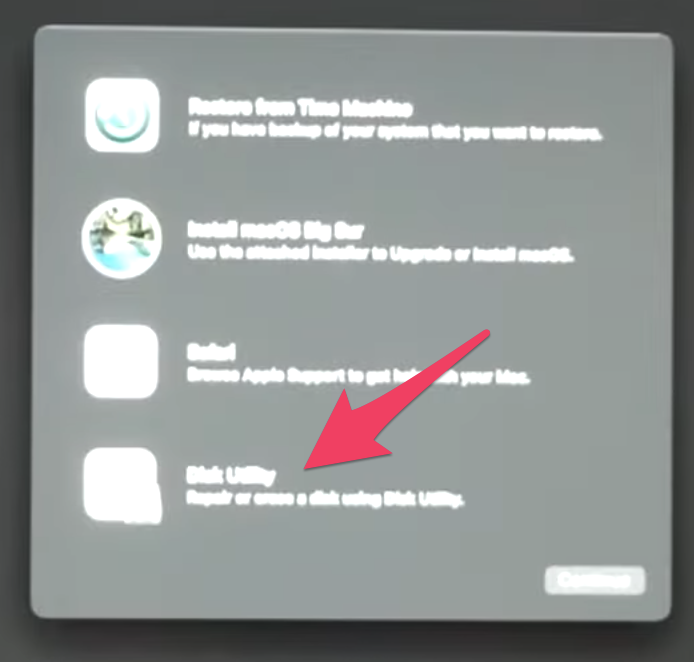
After it loads, the macOS Utilities screen should appear. Select «Disk Utility».
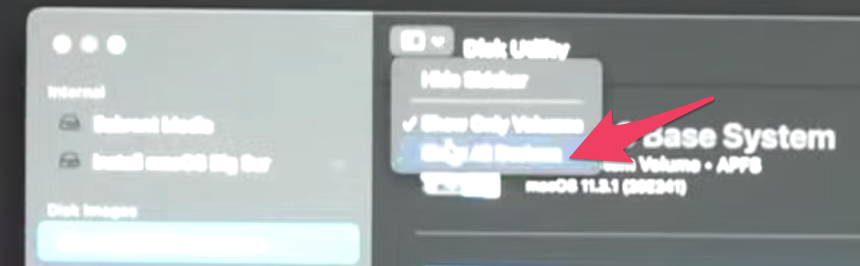
Click the dropdown menu toward the top and click «Show All Devices». Then select your hard drive and click «Erase» at the top.
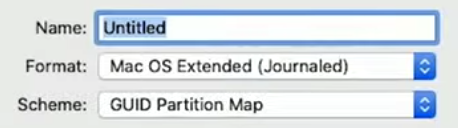
You can name the drive anything you like. For Format, make sure to choose «Mac OS Extended (Journaled) and for Scheme choose «GUID Partition Map»
After the drive is erased, close Disk Utility and select «Install MacOS Big Sur». You will have to choose the hard drive you just formatted. And then you will have to wait as macOS is installed.
The computer should restart back into the boot menu. Select «MacOS Installer».
At this point you will set up the computer just like you would a brand new Mac computer. After the setup, macOS Big Sur will load.
There is one more thing left to do. You have to copy the EFI folder from the hidden EFI partition on the USB stick to the EFI partition on the hard drive you installed macOS on.
On the new Hackintosh, go to the web browser and download MountEFI. This is the same program you used before, if you created the installer on a mac. After clicking the link, click the «Code» button, then «Download ZIP».
Go to the downloads folder and and right click on MountEFI.command and open it.
Use the program to mount the EFI partitions from both the hard drive on your Hackintosh and the USB drive called «Install MacOS Big Sur». First select one, then the other.
After both partitions are mounted, you will need to copy the EFI folder from the USB EFI partition over to the hard drive EFI partition.

At this point you can restart the computer and take out the USB drive. The Hackintosh is complete!
Learn to code for free. freeCodeCamp’s open source curriculum has helped more than 40,000 people get jobs as developers. Get started
A Hackintosh is a non-Mac computer system, made with PC parts, that runs the macOS operating system. In this tutorial, you will learn how to create a Hackintosh.
You will learn how to install macOS Big Sur (or any other version of macOS) using OpenCore.
The main benefit of a Hackintosh compared to an official Macintosh computer, is that it is WAY cheaper. I created a Hackintosh computer that matches the Mac Pro specs for about 1/3rd the price of a Mac Pro. Some people have been able to create a Hackintosh for under $100.
This tutorial will focus mainly on how to install macOS on your hardware. I also created a video version that shows how to build a complete machine and then install macOS on it.
The video shows how to use a computer with macOS to create a macOS installer for your Hackintosh. In this written tutorial, you will learn how to create the macOS installer using macOS or Windows.
You can watch the video here:
It is not illegal to create a Hackintosh for personal use but it does go against Apple’s End User License Agreement. So don’t plan on taking this into an Apple store for repair. And in many places it is illegal to sell a Hackintosh.
The Hardware
Many computer parts work for Hackintoshes. But some do not. Check this website to see what hardware is compatible with a Hackintosh.
In the video above I demonstrate step-by-step how to build a computer that will work as a Hackintosh. In the video description is a list of the specific parts I used.
If you want to be safe, you can use exact parts I used in my build but it is possible to install macOS on a wide variety of hardware.
Downloading MacOS and Creating a Bootable USB Installer
For this step, you will need a USB drive that is at least 16GB. The process is different depending on if you are setting up the bootable USB installer using macOS or Windows. The process is much simpler to do on macOS, but it still possible on Windows.
If you can, find a Mac machine to use to create the bootable USB installer. But I’ll cover the steps for macOS and Windows.
Using MacOS to Create the MacOS Installer
There are a few programs you’ll need during this process so start by downloading them. Here are links for what you will need followed by the download instructions.
- ProperTree — Click the «Code» button, then «Download Zip»
- MountEFI — Click the «Code» button, then «Download Zip»
- OC_GEN-X — Download the zip file for the most recent release.
Open up the App store on macOS. Search for «Big Sur». Click «Get», and then «Download».
Format your USB drive using Disk Utility. To get into Disk Utility, just click the magnifying glass and type «Disk Utility.
Once Disk Utility is open, make sure that the view is set to show all devices.
Click the USB drive, then click «Erase» in the top menu.
Name the drive «MyVolume». Make sure the format is Mac OS Extended (Journaled) and that the scheme is GUID Partition Map. Then click the «Erase» button.
After the USB drive is prepared, open the Terminal in MacOS. You will use a command in the terminal to make the USB drive into a bootable installer for macOS.
If you are installing macOS Big Sur, type the following command:
sudo /Applications/Install macOS Big Sur.app/Contents/Resources/createinstallmedia --volume /Volumes/MyVolume
If you are installing a different version of macOS, you can find the command for the version you are installing here.
You’ll have to wait a bit for this to install. After this is done, open the OC_Gen-X program you downloaded earlier.
To open the program, you will have to right-click the icon, select «open», then select «open» again.
This is a software wizard that helps us easily prepare what we need to install MacOS on our particular hardware setup. It will go out and get everything we need except the SSDTs and put them in a folder for you.
You can also do this is a more manual method by following the OpenCore Install Guide. But this program simplifies things for us quite a bit and it is not available for Windows.
On this first screen under «System Type» choose the type of processor you have. Look in your processor’s documentation to determine the name of the microarchitecture it uses. Getting this right is very important.
The type of processor I used is «Coffee Lake».
For most of the tabs in this program you can keep the default settings.
Under «Graphics» select «WhateverGreen» and under «Audio» select «AppleALC». Under «Ethernet» select «IntelMausi». These are very commonly used options but there is a small chance your settings will be different depending on your hardware and specific use case.
The SMBIOS is important and you will have to specify the correct System Model on that tab. For my setup I used «iMac19,1» but it could be different for you if you are using a different processor of a different operating system version.
To figure out what System Model to use, go to the Open Core Install Guide.
Select the section on the left side for your processor type (in my case it is «Coffee Lake»). Then find the heading «PlatformInfo». Scroll down a bit and you will see a table with the SMBIOS to use.
After selecting the appropriate System Model, click the «Generate EFI» button at the bottom.
An EFI folder has now been created on your desktop. We will now make some modifications to the contents.
You’ll need to get the SSDT files. This is different depending on your processor.
You can find the list of the exact SSDT’s you need at this link. Just select your processor type and download each of the required SSDTs.
Here are the links for the SSDTs needed for my Coffee Lake system.
- SSDT-PLUG-DRTNIA
- SSDT-EC-USBX-DESKTOP
- SSDT-AWAC
- SSDT-PMC
Once all of those files are downloaded, move them into your EFI folder. They should be moved to this subfolder: EFI/ACPI/OC
Now you will will use the MountEFI program downloaded earlier to mount the hidden EFI partition on the USB drive.
Right-click on MountEFI.command and click «open», then «open» again.
Select your USB drive. It should have a name like «Install macOS Big Sur» since we made it into a bootable installer for MacOS. In the screenshot below, it is option 2.
You now have a mounted EFI partition and an EFI folder from OC Gen-X. Drag the EFI folder into the EFI partition.
Open ProperTree.command which you downloaded earlier. Like before you can open it by right-clicking and selecting «open».
Once ProperTree is running, go to «File -> Open». Select the EFI partition, then the «OC» folder, then open the «config.plist» file.
The first thing we need to do is to inject all of the files in the EFI folder into the «config.plist» file.
So go to «File», then select «OC Snapshot». Make sure you’re on the EFI partition. Go to the «EFI» folder, then the «OC» folder. And click the «Choose» button.
A dialog box could pop up here about what version to use. If this happens, click «Yes».
Now go back to «File», then select «OC Clean Snapshot» and select «Choose».
The OC Gen-X program helped simplify all the required setup. At this point you should verify that everything is setup correctly according the the official install guide.
Here is the guide for Coffee Lake. If you are using a different type of processor, just select your type in the left menu.
You can verify the quirks are set correctly in the config.plist file. They should all be correct.
You need to do additional setup in the config.plist file to make sure the onboard graphics work. Find the «DeviceProperties» section, and then copy the following characters to add.
PciRoot(0x0)/Pci(0x2,0x0)
Note that this if you processor is not Coffee Lake, the exact thing you need to add under «DeviceProperties» could be different. Search for «Device Properties» in the OpenCore guide for your processor type to confirm what to add under «DeviceProperties» in the config.plist file.
Under «DeviceProperties», click on «Add». Then right click and choose «New child under ‘Add’ (+)».
Double-click where it says «New String» and just paste the text into the field and hit enter. Then select in the next column where it says «String» and make sure that it is set to «Dictionary».
Next, we need to add more children under it and it should eventually look like this:
Below is the text from the image above that you need to add (if you system is Cofee Lake).
| Name | Type | Value |
|---|---|---|
| AAPL,ig-platform-id | Data | 07009B3E |
| framebuffer-patch-enable | Data | 01000000 |
| framebuffer-stolenmem | Data | 00003001 |
Now in the config.plist file, find the NVRAM section.
Update the «boot-args» so the text is «-v keepsyms=1 debug=0x100 alcid=1».
Now we’ll change the language to English. So next to where it says «prev-lang:kbd», change «data» to «String» and set the value to «en-US:0» and hit enter.
If you want a different language just go to this link to find what language code to use.
The config.plist file is now done. So go to «file», then «save». You are now completely done setting up the bootable drive. So just eject the drive, and then you can plug it in to your Hackintosh.
Skip the next Windows section and go to the heading «BIOS Setup».
Using Windows to create the macOS Installer
The first step to creating a macOS installer on Windows is to download OpenCore. Make sure to download the zip file for the most recent release.
Unzip OpenCore and then go to /Utilities/macrecovery/. Next copy the folder path for the macrecovery folder:
Open a Command Prompt and change directories into the macrecovery folder that you just copied using the command cd [PASTE_FOLDER_NAME].
It should look something like this:
Now in the Command Prompt, run one of the following commands depending on what version of macOS you want. If you don’t already have Python, you will have to install it first.
# Mojave(10.14)
python macrecovery.py -b Mac-7BA5B2DFE22DDD8C -m 00000000000KXPG00 download

# Catalina(10.15)
python macrecovery.py -b Mac-00BE6ED71E35EB86 -m 00000000000000000 download

# Big Sur(11)
python macrecovery.py -b Mac-E43C1C25D4880AD6 -m 00000000000000000 download
This will take some time, however once you’re finished you should get either BaseSystem or RecoveryImage files:
Now open up Disk Management and format the USB drive as FAT32. Follow these steps from the OpenCore Docs:
- Right click the Start Button on your task bar and select Disk Management.
- You should see all of your partitions and disks. On the bottom half, you’ll see your devices. Find your USB.
- You’ll want to format the USB to have a FAT32 partition.
- If you have multiple partitions on the USB, right click each partition and click Delete Volume for your USB.
- Right click the unallocated space and create a new simple volume. Make sure it is FAT32 and at least a gigabyte or two big. Name it «EFI».
- Otherwise, right click the partition on the USB and click Format and set it to FAT32.
Next, go to the root of this USB drive and create a folder called com.apple.recovery.boot. Then move the downloaded BaseSystem or RecoveryImage files. Please ensure you copy over both the .dmg and .chunklist files to this folder:
Now grab OpenCorePkg you downloaded earlier and open it:
Here we see both IA32(32 Bit CPUs) and X64(64 Bit CPUs) folders, choose the one that’s most appropriate to your hardware and open it. Next grab the EFI folder inside and place this on the root of the USB drive along side com.apple.recovery.boot. Once done it should look like this:
At this point you will have to continue setting up your EFI folder. Because of the complexity of this step and all the different possible options depending on your setup, you should follow along with the official documentation for the next few steps.
Here are the links to the instructions for the next steps when using Windows to create the bootable USB installer. Note that the screenshots in the documentation show a mac but the steps apply to Windows as well. For setup using a mac, you don’t have to go through these steps because there is a wizard that does all of them automatically.
Adding The Base OpenCore Files
Gathering Files
Getting started with ACPI
BIOS Setup
I’ll show you how I setup my BIOS for my Hackintosh. The BIOS software is specific to my motherboard and yours may look a little different. If yours looks different, do you best to find equivalent setting in you software, if yours looks different. Note that BIOS setting are easy to experiment with and you don’t have to have all the same settings as me to get everything working.
Boot the computer up and then hit the «Delete» key to get into the BIOS.
Most setting can be left as the default. Here are the settings that should be updated:
Under Advanced, «Above 4G Decoding» should be Enabled.
Under Advanced, and then under Serial Port Configuration, turn «Serial Port» to Off.
Under Advanced, and then under USB Configuration, set «XHCI Hand-off» to Enabled.
Under Boot, and then under Boot Configuration, set «Fast Boot» to Disabled
Under Boot, and then under Secure Boot, set «OS Type» to Windows UEFI mode.
The final thing you need to do is to go under Boot > Secure Boot > Key Management. Then select «Clear Secure Boot Keys».
Now go to Exit and select «Save Changes & Reset».
MacOS Setup
After the computer restarts, hit F12 to get into the boot menu. Choose «Install MacOS Big Sur (External).
The next few screenshots are a little blurry since I was videotaping my monitor and did not focus correctly. Sorry about that.
After it loads, the macOS Utilities screen should appear. Select «Disk Utility».
Click the dropdown menu toward the top and click «Show All Devices». Then select your hard drive and click «Erase» at the top.
You can name the drive anything you like. For Format, make sure to choose «Mac OS Extended (Journaled) and for Scheme choose «GUID Partition Map»
After the drive is erased, close Disk Utility and select «Install MacOS Big Sur». You will have to choose the hard drive you just formatted. And then you will have to wait as macOS is installed.
The computer should restart back into the boot menu. Select «MacOS Installer».
At this point you will set up the computer just like you would a brand new Mac computer. After the setup, macOS Big Sur will load.
There is one more thing left to do. You have to copy the EFI folder from the hidden EFI partition on the USB stick to the EFI partition on the hard drive you installed macOS on.
On the new Hackintosh, go to the web browser and download MountEFI. This is the same program you used before, if you created the installer on a mac. After clicking the link, click the «Code» button, then «Download ZIP».
Go to the downloads folder and and right click on MountEFI.command and open it.
Use the program to mount the EFI partitions from both the hard drive on your Hackintosh and the USB drive called «Install MacOS Big Sur». First select one, then the other.
After both partitions are mounted, you will need to copy the EFI folder from the USB EFI partition over to the hard drive EFI partition.
At this point you can restart the computer and take out the USB drive. The Hackintosh is complete!
Learn to code for free. freeCodeCamp’s open source curriculum has helped more than 40,000 people get jobs as developers. Get started