![]()
Download Article
![]()
Download Article
This wikiHow teaches you how to test your PHP scripts for errors and functionality. The most practical way to do this is by running your PHP scripts in your computer’s web browser via XAMPP, but you can also use a free online service called «Online PHP Functions» to look for errors in your PHP code.
-

1
Make sure you have XAMPP installed. XAMPP is one of the most popular PHP-testing environments for both Windows and Mac computers.
- You can download and install XAMPP for free.
-
2
Close XAMPP if it’s running. This will allow you to update the «htdocs» folder without interfering with existing processes.
- Skip this step on a Mac.
Advertisement
-
3
Place your PHP files in the «htdocs» folder. Depending on your operating system, do one of the following:
-
Windows — Open «This PC», double-click your hard drive’s name, double-click the «xampp» folder, double-click the «htdocs» folder, and move any necessary PHP files into the folder.
- Mac — Click the Volumes tab in the XAMPP control panel, click Mount, click Explorer, double-click the «htdocs» folder, and move any necessary PHP files into the folder.
-
Windows — Open «This PC», double-click your hard drive’s name, double-click the «xampp» folder, double-click the «htdocs» folder, and move any necessary PHP files into the folder.
-
4
Open XAMPP. Click or double-click the XAMPP app icon, which resembles a white «X» on an orange background.
-
5
Start Apache. Click Start to the right of the «Apache» heading to start your Apache web server. You should see the indicator to the right of «Apache» turn green. If you encounter an error and Apache doesn’t start, do the following:[1]
- Click Config next to the «Apache» heading, then click Apache (httpd.conf) in the resulting menu.
- Find the «Listen 80» line and replace «80» with «8080».
- Find the «Server name localhost: 80» line and replace «80» with «8080».
- Press Ctrl+S (Windows) or ⌘ Command+S (Mac) to save your changes, then close the file.
- Click Config next to the «Apache» heading, then click Apache (httpd.conf) in the resulting menu.
-
6
Note Apache’s second port. This is the port to the right of the first port number.
- If you edited the «httpd.conf» file, the second port should be «8080».
-
7
Open a web browser. You can use any web browser (e.g., Chrome) to test your PHP scripts.
-
8
Click the address bar. It’s at the top of the browser.
- If there’s any text in the address bar, delete it before proceeding.
-
9
Enter the address of the PHP script you want to check. Type in localhost: and your Apache server’s second port number (e.g., 8080), then type a slash (/) and enter the name of the PHP document you want to test (e.g., index.php).
- For example, to test a script called «LandingPage» on port 80, you would type in localhost:80/landingpage.php here.
- Make sure you include «.php» at the end of the address.
-
10
Press ↵ Enter. Doing so will load your PHP script in your browser. If the script is working, you should see the page load without any problems.
- If your script has errors, they will manifest in a number of different visual ways. Look for elements of your page that failed to load correctly to discern errors.


Advertisement
-
1
Open your PHP document. You’ll use your computer’s PHP-editing software (e.g., Notepad++ on Windows or BBEdit on Mac) to do so:
- Right-click the PHP document (or, on a Mac, click the document and then click File).
- Select Open With.
- Click your PHP-editing program’s name.
- Right-click the PHP document (or, on a Mac, click the document and then click File).
-
2
Select your document’s contents. Click once anywhere in the document, then press Ctrl+A (Windows) or ⌘ Command+A (Mac) to select the entire document.
-
3
Copy the contents. Press either Ctrl+C (Windows) or ⌘ Command+C (Mac) to do so.
-
4
-
5
Paste in your copied code. Select the code in the «Your script» window, then press either Ctrl+V (Windows) or ⌘ Command+V (Mac) to replace it with your copied code.
-
6
Select a PHP version. Click the «Run on PHP version» drop-down box below the «Your script» window, then click your PHP version number in the drop-down menu.
- As of October 2018, the most recent version of PHP that is supported by Online PHP Functions is version 7.2.4.
-
7
Click Execute code. It’s below the «Run on PHP version» drop-down box. Doing so runs your PHP code and displays the results in the «Result» text box below the Execute code button.
-
8
Review any errors. In the «Result» text box, you should see your code’s appearance. If there are any errors in the code, they will appear in between «<br >» tags.
- Each error will be reported as belonging to a specific line (e.g., «on line 2»). You can view each line’s number by looking on the left side of the «Your script» window.
- Errors will also appear as red-and-white «X» icons to the left of the pertinent lines in the «Your code» text box.


Advertisement
Ask a Question
200 characters left
Include your email address to get a message when this question is answered.
Submit
Advertisement
Thanks for submitting a tip for review!
References
About This Article
Thanks to all authors for creating a page that has been read 15,320 times.
Is this article up to date?
![]()
Download Article
![]()
Download Article
This wikiHow teaches you how to test your PHP scripts for errors and functionality. The most practical way to do this is by running your PHP scripts in your computer’s web browser via XAMPP, but you can also use a free online service called «Online PHP Functions» to look for errors in your PHP code.
-
1
Make sure you have XAMPP installed. XAMPP is one of the most popular PHP-testing environments for both Windows and Mac computers.
- You can download and install XAMPP for free.
-
2
Close XAMPP if it’s running. This will allow you to update the «htdocs» folder without interfering with existing processes.
- Skip this step on a Mac.
Advertisement
-
3
Place your PHP files in the «htdocs» folder. Depending on your operating system, do one of the following:
-
Windows — Open «This PC», double-click your hard drive’s name, double-click the «xampp» folder, double-click the «htdocs» folder, and move any necessary PHP files into the folder.
- Mac — Click the Volumes tab in the XAMPP control panel, click Mount, click Explorer, double-click the «htdocs» folder, and move any necessary PHP files into the folder.
-
Windows — Open «This PC», double-click your hard drive’s name, double-click the «xampp» folder, double-click the «htdocs» folder, and move any necessary PHP files into the folder.
-
4
Open XAMPP. Click or double-click the XAMPP app icon, which resembles a white «X» on an orange background.
-
5
Start Apache. Click Start to the right of the «Apache» heading to start your Apache web server. You should see the indicator to the right of «Apache» turn green. If you encounter an error and Apache doesn’t start, do the following:[1]
- Click Config next to the «Apache» heading, then click Apache (httpd.conf) in the resulting menu.
- Find the «Listen 80» line and replace «80» with «8080».
- Find the «Server name localhost: 80» line and replace «80» with «8080».
- Press Ctrl+S (Windows) or ⌘ Command+S (Mac) to save your changes, then close the file.
- Click Config next to the «Apache» heading, then click Apache (httpd.conf) in the resulting menu.
-
6
Note Apache’s second port. This is the port to the right of the first port number.
- If you edited the «httpd.conf» file, the second port should be «8080».
-
7
Open a web browser. You can use any web browser (e.g., Chrome) to test your PHP scripts.
-
8
Click the address bar. It’s at the top of the browser.
- If there’s any text in the address bar, delete it before proceeding.
-
9
Enter the address of the PHP script you want to check. Type in localhost: and your Apache server’s second port number (e.g., 8080), then type a slash (/) and enter the name of the PHP document you want to test (e.g., index.php).
- For example, to test a script called «LandingPage» on port 80, you would type in localhost:80/landingpage.php here.
- Make sure you include «.php» at the end of the address.
-
10
Press ↵ Enter. Doing so will load your PHP script in your browser. If the script is working, you should see the page load without any problems.
- If your script has errors, they will manifest in a number of different visual ways. Look for elements of your page that failed to load correctly to discern errors.
Advertisement
-
1
Open your PHP document. You’ll use your computer’s PHP-editing software (e.g., Notepad++ on Windows or BBEdit on Mac) to do so:
- Right-click the PHP document (or, on a Mac, click the document and then click File).
- Select Open With.
- Click your PHP-editing program’s name.
- Right-click the PHP document (or, on a Mac, click the document and then click File).
-
2
Select your document’s contents. Click once anywhere in the document, then press Ctrl+A (Windows) or ⌘ Command+A (Mac) to select the entire document.
-
3
Copy the contents. Press either Ctrl+C (Windows) or ⌘ Command+C (Mac) to do so.
-
4
-
5
Paste in your copied code. Select the code in the «Your script» window, then press either Ctrl+V (Windows) or ⌘ Command+V (Mac) to replace it with your copied code.
-
6
Select a PHP version. Click the «Run on PHP version» drop-down box below the «Your script» window, then click your PHP version number in the drop-down menu.
- As of October 2018, the most recent version of PHP that is supported by Online PHP Functions is version 7.2.4.
-
7
Click Execute code. It’s below the «Run on PHP version» drop-down box. Doing so runs your PHP code and displays the results in the «Result» text box below the Execute code button.
-
8
Review any errors. In the «Result» text box, you should see your code’s appearance. If there are any errors in the code, they will appear in between «<br >» tags.
- Each error will be reported as belonging to a specific line (e.g., «on line 2»). You can view each line’s number by looking on the left side of the «Your script» window.
- Errors will also appear as red-and-white «X» icons to the left of the pertinent lines in the «Your code» text box.
Advertisement
Ask a Question
200 characters left
Include your email address to get a message when this question is answered.
Submit
Advertisement
Thanks for submitting a tip for review!
References
About This Article
Thanks to all authors for creating a page that has been read 15,320 times.
Is this article up to date?
Table of Contents
Для запуска тестов используя фреймворк PhpUnit нам нужен сам PHP, если его нет, то установим.
Если у вас есть PHP в составе OpenServer, WAMP или другой сборки. Пропускайте шаг с установкой
Установка PHP 7.x
Скачивание
Переходим на сайт и скачиваем последнюю версию 7.x
Нам нужна именно версию ThreadSafe, скачиваем архив zip.
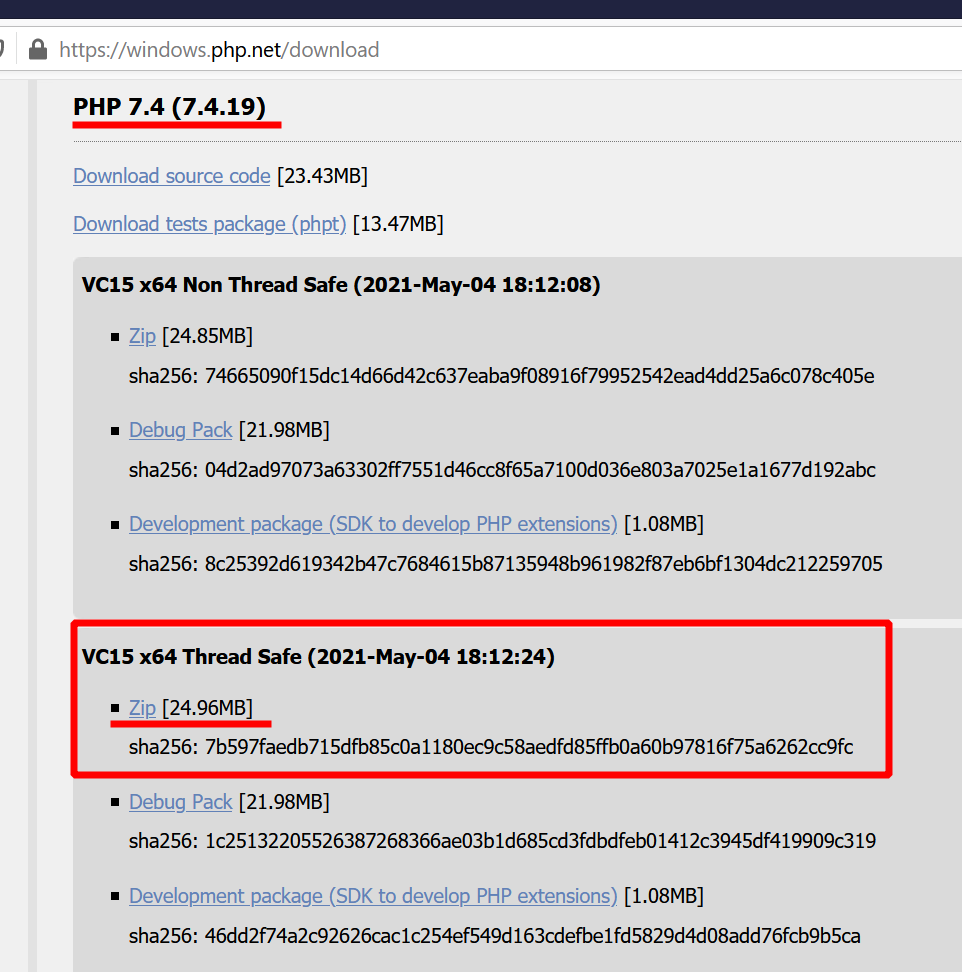
Создайте папку, буду использовать C:/php, и в нее распакуйте содержимое архива.
Можно уже сейчас проверить работу php кода, создайте в любом месте файл test.php с таким содержимым:
<?php
echo "php работает!";
?>
Запускаем передавая путь до файла c кодом интерпретатору C:/php/php.exe:

Мы теперь можем запускать PHP код, уже хорошо!
Настройка PATH
Чтобы каждый раз не писать полный путь до испольняемого файла, добавить в переменную PATH путь, и тогда будет использовать только короткую запись php .test.php для запуска файлов.
- 💡 рекомендуется сделать бекап ваших настроек, делается командой:
echo $env:path > backup_path.txt
если что пойдет не так — сможете восстановить данные из файла.
Запускайте Powershell (Администратор) и командой добавляем новый путь в PATH для текущего пользователя:
setx path "$env:path;C:php"

Закройте Powershell и откройте заново, чтобы новые PATH использовался в новой сессии.
Проверяем, что путь на месте:

и теперь запускаем скрипт так:

Успех!
Установка PhpUnit
Скачиваем phar архив https://phar.phpunit.de/phpunit.phar
копируйте в папку с php, в нашем случае это C:php и создайте phpunit.bat в этой же директории:
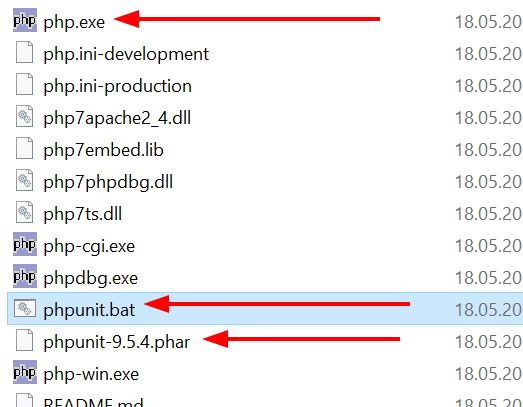
содержимое файла
@php "%~dp0phpunit-9.5.4.phar" %*
- 💡 Укажите точное название файла, который скоприровали, чтобы версии совпадали.
Проверяем:

Это явный признак успешной установки! 👍
Запуск тестов
Для запуска тестов из консоли, выполните команду
Пример запуска тестов:
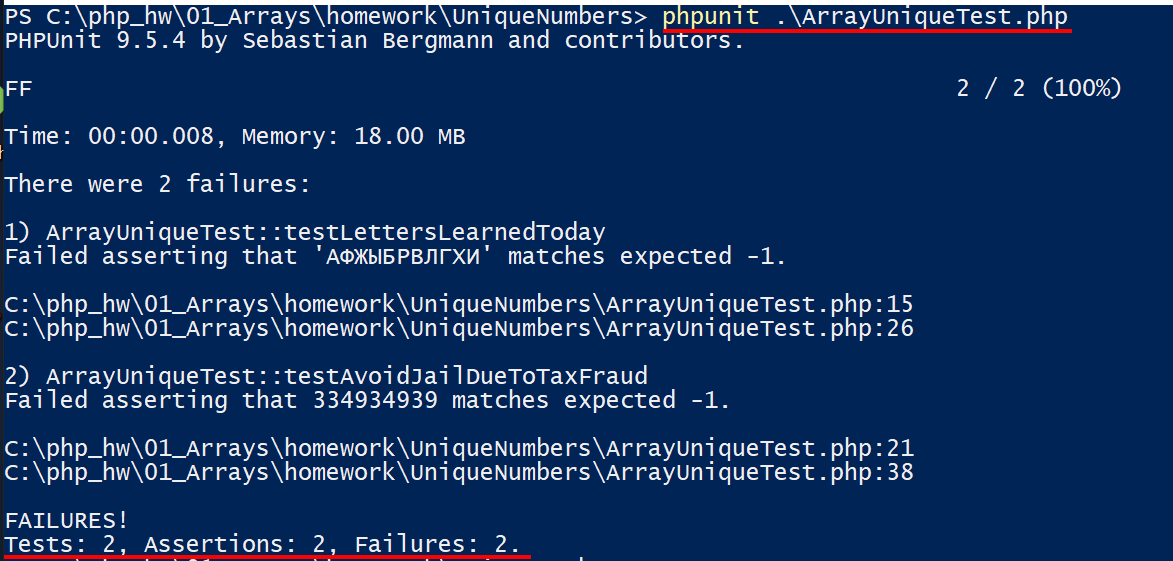
Судя по скриншоту, тесты испольняются, теперь их предстоить только удовлетворить. А это уже другая история 🙂
Полезные ссылки
- PhpUnit Manual
Время прочтения
4 мин
Просмотры 165K

Всем привет!
Пора перейти от слов к действиям и познакомиться с Visual Studio Code поближе. В этом посте представлена поэтапная настройка VS Code для разработки на PHP.
Если кратко, то мы поговорим о том как:
- Скачать и установить Visual Studio Code.
- Настройть статистический анализ кода на PHP в параметрах пользователя.
- Скачать и установить расширение PHP Debug с портала Visual Studio Marketplace.
- Настройть расширение PHP Debug для использования XDebug.
Скачайте и установите Visual Studio Code
Visual Studio Code — бесплатный кроссплатформенный, легковесный редактор кода от Microsoft. Пока он будет загружаться (в нем всего 42 мегабайта), рассмотрим подробнее каждое из этих свойств:
- Бесплатный: да, VS Code полностью бесплатен, никаких приписок мелким шрифтом.
- Кроссплатформенный: доступны версии VS Code для Windows, Linux и OS X.
- Легковесный: VS Code, в отличие от Visual Studio, — не полнофункциональная среда IDE, а редактор кода. Он поддерживает ряд мощных функций, характерных для IDE, например, IntelliSense, отладку и интеграцию с системой управления исходным кодом Git.
Кроме того, VS Code — это проект с открытым исходным кодом. Вы можете принять участие в разработке или отправлять сообщения о проблемах через репозиторий на GitHub.
После загрузки установите редактор на своем компьютере. Подробные инструкции по установке доступны здесь. Теперь можно открыть окно командной строки, запустить Visual Studio Code и начать редактировать файлы в папке.

Если вы откроете файл с расширением .php, Code поймет, что это файл на языке PHP. Тип файла можно изменить и вручную: щелкните кнопку Language Mode в правом нижнем углу окна редактора или последовательно нажмите клавиши Ctrl+K и M.

Встроенные функции работы с PHP
VS Code поддерживает множество языков, в том числе PHP. На портале Visual Studio Marketplace доступны расширения VS Code, обеспечивающие поддержку дополнительных языков. Для PHP работает подсветка синтаксиса, определение парных скобок и фрагменты кода.
Когда вы начнете набирать код в файле PHP, то заметите автоматическое срабатывание цветового выделения синтаксиса, определения парных скобок и функции IntelliSense.

Настройка статического анализа PHP
По умолчанию VS Code будет проводить статический анализ кода на PHP в ходе проверки при сохранении файла. Для этого используется исполняемый файл php. Если вы работаете с VS Code впервые, то получите сообщение об ошибке, в котором сказано, что исполняемый PHP файл не обнаружен.

Необходимо указать путь к исполняемому файлу PHP на вашем компьютере. Для этого следует изменить файл настроек (в VS Code существуют различные уровни файлов настроек, подробнее см. в документации). В нашем примере мы настроим параметры PHP глобально для пользователя.
Откройте пользовательские настройки с помощью панели команд: нажмите F1, введите «user» и нажмите Enter.

Откроется два документа JSON. В документе слева содержатся настройки по умолчанию, в документе справа — пользовательские настройки. В пользовательских настройках можно переопределить настройки по умолчанию. Чтобы включить статический анализ кода PHP, необходимо изменить значения трех параметров.

Чтобы настроить путь к исполняемому файлу PHP, укажите его в файле пользовательских настроек:

После этого функция проверки будет включена для всех файлов PHP. Некорректный код PHP будет подчеркнут красным (в примере ниже пропущена точка с запятой).

Настройка отладки
Расширение PHP Debug (спасибо Феликсу Беккеру!) добавляет в VS Code поддержку отладчика XDebug. Установите расширение через панель команд VS Code: нажмите F1, введите «install ext», нажмите Enter, введите «PHP Debug» и вновь нажмите Enter. После установки расширения может потребоваться перезапуск VS Code.

Обратите внимание: это расширение использует отладчик XDebug. Поэтому для его работы необходимо установить XDebug. Скачать XDebug можно здесь (для Windows выбирайте 32-разрядную non-thread-safe версию).
Затем внесите в файл php.ini следующие настройки. Я установил XDebug в подкаталог ext установочной папки PHP. Если вы выбрали для XDebug другой каталог установки, убедитесь, что параметр zend_extension содержит правильное значение.

Убедитесь, что корневой раздел веб-сервера соответствует вашему проекту. Тогда при каждом запросе файла PHP XDebug будет предпринимать попытку подключения к порту 9000 для отладки.
Чтобы начать отладку, откройте вкладку Debugging в VS Code.

Щелкните значок шестеренки, чтобы сформировать файл launch.json, который позволит VS Code начать сеанс отладки XDebug.

Чтобы начать отладку, нажмите F5 или щелкните зеленую стрелку на вкладке Debugging. Чтобы задать точку останова в исходном коде, выберите строку и нажмите F9.

Теперь, когда вы откроете определенную веб-страницу, VS Code остановит выполнение исходного кода в заданной точке. В области слева отобразится информация о переменных, стеке вызовов и т. п.

Заключение
Visual Studio Code обладает отличной встроенной поддержкой PHP, а расширение PHP Debug добавляет возможность отладки кода на PHP. Все эти инструменты являются бесплатными и кроссплатформенными.
На портале Visual Studio Marketplace доступны и другие расширения для работы с PHP.
Полезные ссылки
- Visual Studio 2015: бесплатные предложения для разработчиков
- Дополнительные и бесплатные инструменты и службы в программе Visual Studio Dev Essentials
- Лабораторные работы по разработке, тестированию и управлению жизненым циклом ПО для Visual Studio 2015
PHP is a server-side scripting language and, at the time of writing, the world’s most used web computer language. Additionally, some of the most popular web-suites like the WordPress and Joomla content management software, have been written in PHP.
The language was created by Rasmus Lerdorf in 1995 for his personal web site and, probably for this reason, was called originally Personal Home Page. PHP soon became popular and other developers started chipping in. Its name was later changed to a recursive acronym, PHP: HyperText Preprocessor.
Sponsored Links
We believe PHP is a simple language to learn. A few months of dedicated practice and you would be able to create fairly decent applications for web sites. The strong point of PHP is that it can easily connect to databases such as MySQL that help you to develop dynamic pages.
In this article, we would be providing detailed instructions on how to install PHP on a Windows 10 computer. This way you can set up a local web development environment and avoid the expenses of an actual web host.
But PHP doesn’t run on its own. It needs a web server such as Apache. So before you start on this guide, make sure you have installed Apache on your Windows 10 computer – click on that link to check out that guide.
Once the Apache web server is set up and configured on Windows 10, come back to this page and set up PHP. The process is quite easy!
If you have Apache running, dig right in.
- Launch a web browser and go to PHP.net. Click the “Downloads” tab on the page – its at the top [Slide 1].
- The current stable release is PHP 7.1.0 and this is what we would be installing on the Windows 10 computer. Click the “Windows downloads” link [Slide 2].
- Choose the VC14 x64 Thread Safe zip file on the next page [Slide 3].
- The file will be downloaded to the default downloads folder. Move to the folder when the download completes, right-click on the file and select the “Extract All…” option [Slide 4].
- This opens a pop-up with the default directory to which the archive would be unzipped to. We like to keep things simple on our computer and would recommend you do the same. Thus, we recommend installing PHP in its own directory on the C: drive.
Replace the default directory to C:PHP and hit the Extract button [Slide 5].
Files from the PHP zip archive would begin to get extracted to the specified folder [Slide 6]. - The next step is to configure PHP on the Windows 10 computer.
Move to the folder to which the PHP files were extracted and locate the ini files; there would be two of them – php.ini-development and php.ini-production [Slide 7]. - Right-click on php.ini-development, select “Copy” option from the menu to create a duplicate of the file [Slide 8]. This way, if we mess up, we’ve at least preserved a copy of the original. Right-click on a black area and select the “Paste” option to get a copy of the file [Slide 9].
- Rename this copy to simply php.ini. Since we are changing the file extension, the system would throw up a warning asking for a confirmation [Slide 10]. Click the Yes button. FYI, once the file name is modified, the file icon would also change.
- Right-click on the php.ini file and select “Open with” -> “Notepad” option [Slide 11].
- We now get to see what the php.ini file looks like – it’s essentially plain text. For PHP to run on our Windows 10 computer without any issues, we need to make a few modifications.
- Using the “Find” feature (keyboard shortcut Ctrl + F) hunt for extension_dir = . You should come to a line similar to what is shown in Slide 13.
We need to change this to:extension_dir = "c:PHPext"
Thus, remove the prefix semicolon and set the directory path to c:PHPext. FYI, this points to the ext folder inside the directory in which we installed PHP – c:PHP.
Refer Slide 14 in case of any doubt. - Employ the “Find” feature once again to locate the “Windows Extensions” section in the php.ini file. You’ll find a list of extensions that should be loaded by PHP for it to work with other applications such as MySQL database [Slide 15].
- Remove the semicolon before the GD library and MySQL extensions. The two lines should look like ones below (refer Slide 15 again):
extension=php_gd2.dll
...
extension=php_mysqli.dll
You can remove the semicolon (or uncomment) other lines to enable those extensions to load.
- FYI, the default upload file size of this PHP installation is 2MB. If you feel that you may need to increase this value, hunt for “upload_max_filesize = ” line and change it as per requirements.
- Save the php.ini file [Slide 16] and close the Notepad app.
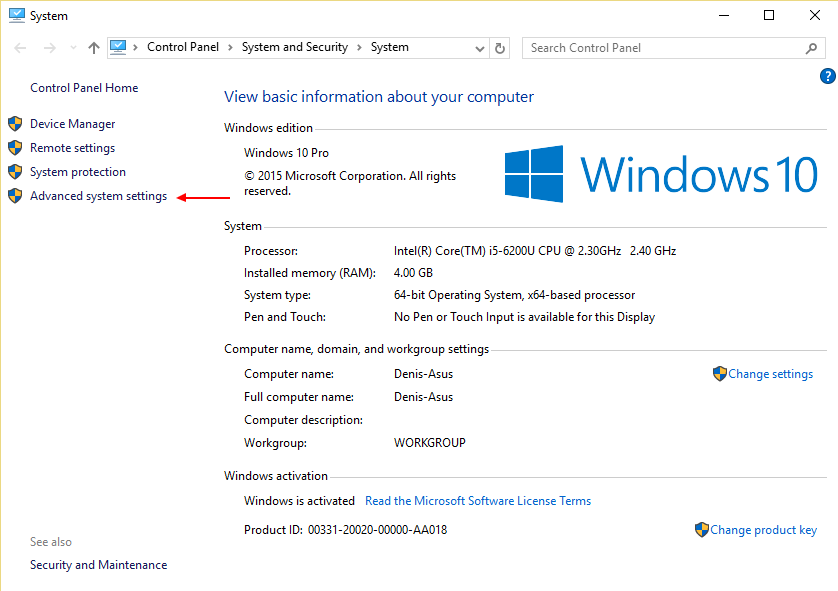
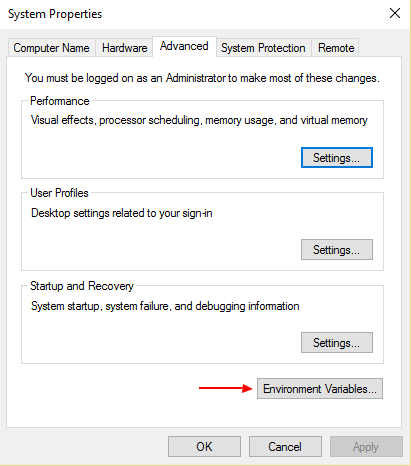
- We now need to set the environment variable for PHP. Open the Control Panel. Go to System and Security [Slide 17] -> System [Slide 18] -> Advanced system settings [Slide 19].
- Click the Environment Variables button [Slide 20].
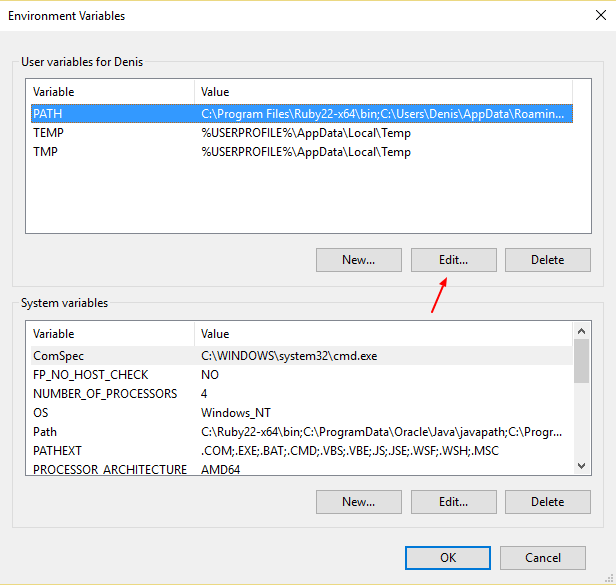
- Select “Path” from the “System variables” section and click the Edit button [Slide 21].
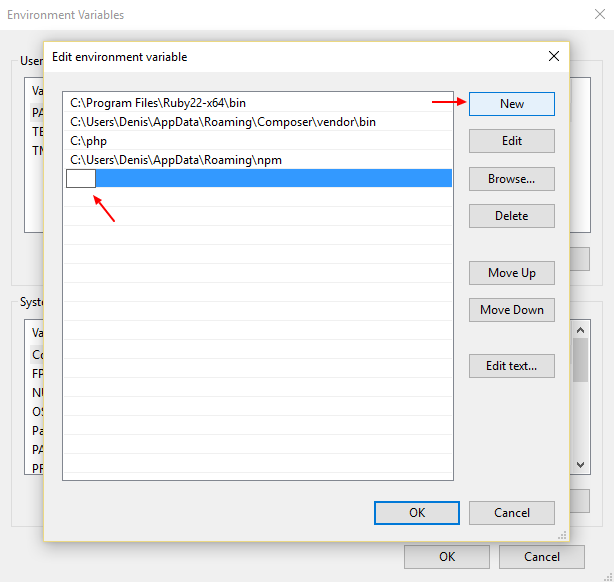
- A pop-up window will appear [Slide 22]. Click the New button and add c:PHP as the new variable as shown in Slide 23.
- Click OK button [Slide 24] on this pop-up and all the others to close everything.
- As mentioned before, for PHP to work we need a web server like Apache. Assuming you had set up and configured Apache on your Windows 10 computer, open the server’s configuration file httpd.conf in Notepad. It should be residing in c:/Apache24/conf folder if you’ve used our instructions.
- Move to the DirectoryIndex line and add index.php with a preceding space character. The lines should look like:
<IfModule dir_module>
	DirectoryIndex index.html index.php
</IfModule>
Refer Slide 25 in case of doubt.
- Move to the very end of the httpd.conf file and add the following three lines:
LoadModule php7_module "c:/PHP/php7apache2_4.dll"
AddHandler application/x-httpd-php .php
PHPIniDir "c:/PHP"
I’ve marked these lines in blue in Slide 26.
- Save the file.
- Since we have changed the PATH variable a restart of the computer is typically required.
Testing the PHP installation on your Windows 10 computer
Go to the document root folder. It should be c:/websites if you’ve followed our guide on installing Apache on Windows 10.
Launch the Notepad application and put in the following three lines:
<?php
phpinfo();
?>
Save this file as phpinfo.php.
Make sure the extension is .php and not .txt or .html.
Launch your chosen web browser and type in localhost/phpinfo.php in the address bar.
You should get a page similar to Slide 27.
Hurray! Your PHP installation was successful.
Here is a “Hackerman meme” for you!
We’re sure you’ll be pleased and pumped up after installing PHP. Why don’t you start on our guide on how to install MySQL which will complete the local web development environment on your Windows 10 computer.
Перейти к содержимому
Язык программирования PHP без труда устанавливается на Windows. Для этого создатели PHP подготовили специальную Windows-версию языка, которую можно скачать с сайта PHP.
Для среды разработки я использую PHP 7, с тем расчётом, чтобы мой код был готов к тому моменту, как PHP 7 можно будет установить на боевой сервер. Для того, чтобы установить PHP 7 в операционной системе Windows понадобится программа Visual C++ Redistributable for Visual Studio 2015, которую можно скачать с официального сайта Майкрософта. Установка этой программы не содержит никаких трудностей, нужно просто нажимать кнопку «Далее».
После установки Visual C++ Redistributable скачиваем архив PHP 7 для Windows (VC14 Non Thread Safe x64 или x86 в зависимости от разрядности системы) c официального сайта PHP. В архиве нет инсталлятора, его просто нужно распаковать в папку где-нибудь на диске. В пути к этой папке не должно быть пробелов и русских букв, у меня это просто C:PHP.
После распаковки нужно добавить PHP в системный PATH для того, чтобы можно было запускать PHP из любого каталога:
- нажимаем win+x и переходим в настройки System;
- переходим в Advanced system settings;

- выбираем Environment Variables;

- выбираем переменну PATH и нажимаем кнопку Edit;

- нажимаем кнопку New и вводим адрес каталога с распакованным PHP, например C:PHP;

- нажимаем кнопку Ok.
Теперь нужно настроить PHP для работы:
- переименовываем файл
php.ini-productionвphp.ini; - раскоментируем (убираем знак
;) перед строчками:extension=php_curl.dll;extension=php_gd2.dll;extension=php_mbstring.dll;extension=php_openssl.dll;extension=php_pdo_mysql.dll;extension=php_pdo_sqlite.dll;extension=php_sqlite3.dll.
Всё, PHP 7 установлен в системе и готов к использованию.
This section contains notes and hints specific to getting PHP running
from the command line for Windows.
Note:
You should read the manual
installation steps first!
Getting PHP to run from the command line can be performed without making
any changes to Windows.
C:phpphp.exe -f "C:PHP Scriptsscript.php" -- -arg1 -arg2 -arg3
But there are some easy steps that can be followed to make this simpler.
Some of these steps should already have been taken, but are repeated here
to be able to provide a complete step-by-step sequence.
-
Append the location of the PHP executable (php.exe,
php-win.exe or php-cli.exe
depending upon your PHP version and display preferences) to the
PATH environment variable. Read more about how to
add your PHP directory to PATH in the corresponding FAQ entry. -
Append the
.PHPextension to the
PATHEXT environment variable. This can be done
at the same time as amending the PATH environment
variable. Follow the same steps as described in the FAQ but amend the
PATHEXT environment variable rather than the
PATH environment variable.Note:
The position in which you place the
.PHPwill
determine which script or program is executed when there are matching
filenames. For example, placing.PHPbefore
.BATwill cause your script to run, rather than
the batch file, if there is a batch file with the same name. -
Associate the
.PHPextension with a file type. This
is done by running the following command: -
Associate the
phpfilefile type with the appropriate
PHP executable. This is done by running the following command:ftype phpfile="C:phpphp.exe" -f "%1" -- %~2
Note:
Both PATH and PATHEXT are important
pre-existing system variables in Windows,
and care should be taken to not overwrite either variable,
only to add to them.
Following these steps will allow PHP scripts to be run from any directory
without the need to type the PHP executable or the .PHP
extension and all parameters will be supplied to the script for processing.
The example below details some of the registry changes that can be made manually.
Example #1 Registry changes
Windows Registry Editor Version 5.00

[HKEY_LOCAL_MACHINESOFTWAREClasses.php]
@="phpfile"
"Content Type"="application/php"

[HKEY_LOCAL_MACHINESOFTWAREClassesphpfile]
@="PHP Script"
"EditFlags"=dword:00000000
"BrowserFlags"=dword:00000008
"AlwaysShowExt"=""

[HKEY_LOCAL_MACHINESOFTWAREClassesphpfileDefaultIcon]
@="C:\php\php-win.exe,0"

[HKEY_LOCAL_MACHINESOFTWAREClassesphpfileshell]
@="Open"

[HKEY_LOCAL_MACHINESOFTWAREClassesphpfileshellOpen]
@="&Open"

[HKEY_LOCAL_MACHINESOFTWAREClassesphpfileshellOpencommand]
@=""C:\php\php.exe" -f "%1" -- %~2"
With these changes the same command can be written as:
"C:PHP Scriptsscript" -arg1 -arg2 -arg3
or, if your "C:PHP Scripts" path is in the
PATH environment variable:
Note:
There is a small problem if you intend to use this technique and use your
PHP scripts as a command line filter, like the example below:dir | "C:PHP Scriptsscript" -arg1 -arg2 -arg3or
dir | script -arg1 -arg2 -arg3You may find that the script simply hangs and nothing is output.
To get this operational, you need to make another registry change.Windows Registry Editor Version 5.00 [HKEY_LOCAL_MACHINESOFTWAREMicrosoftWindowsCurrentVersionpoliciesExplorer] "InheritConsoleHandles"=dword:00000001Further information regarding this issue can be found in this » Microsoft
Knowledgebase Article : 321788.
As of Windows 10, this setting seems to be reversed, making the default install of
Windows 10 support inherited console handles automatically. This »
Microsoft forum post provides the explanation.
vechenjivot at gmail dot com 
7 years ago
On Windows 10, the above registry entries didn't work for me. In order for them to work, you need to write to
HKEY_CURRENT_USERSOFTWAREMicrosoftWindowsCurrentVersionExplorerFileExts.phpUserChoice
for which you don't have access, even if you run regedit as admin (probably because of the Hash key).
The solution is actually much easier - right-click a PHP file in Explorer and associate it to always open with php.exe.
And then you need to modify the PATH variable:
setx PATH "%PATH%;c:pathtophp" /M
if you want to execute files with commands like
php file.php
elhadjouattara at gmail dot thrcom 
7 years ago
On Windows 8, with php 5.6.8 win32 VC11 in command line, need to indicate path with / rather than backslash
Hence C:UserstoshibaDocumentsphptest.php shall be C:/Users/toshiba/Documents/php/test.php
pimroes at gmail dot com 
12 years ago
Make sure your run CMD.exe as an administrator, otherwise you'll get an "access denied" when you run the commands.
rudigerw at hotmail dot com 
7 years ago
On Windows 10 starting php by only typing the script name in an elevated command prompt pops up a dialog to choose an app.
It turns out Windows does that when the program associated with phpfiles through ftype cannot be executed. In this case this happens because it is trying to run php.exe in non-admin mode, even when launched from an elevated command prompt. To fix this, locate your php.exe, right-click, "Properties",  "Compatibility", under Settings check "Run this program as an administrator; then also click "Change settings for all users".
Для получения качественного кода, мы должны выполнять тестирование во время его написания (если не использовать TDD). Однако, трудно сделать выбор среди такого широкого круга PHP инструментов тестирования.
Эта статья посвящена самым широко распространенным инструментам тестирования. В ней собрана обновленная информация по состоянию QA инструментов в 2017 году.

PHPUnit
PHPUnit — это фреймворк PHP для тестирования. Он был разработан Себастьяном Бергманом (Sebastian Bergmann) в 2004 и является одним из многих доступных средств тестирования моделей РНР в процессе разработки. Сейчас доступна 6 версия фреймворка, требующая PHP 7.
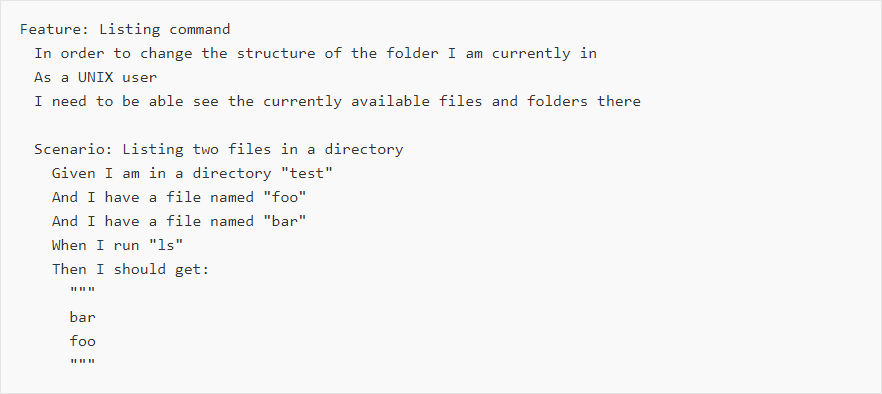
Cucumber
Cucumber — это фреймворк для создания тестирования по спецификациям. Он известен своими описательными сгенерированными текстами, которые очень удобно и просто читать. Официальной реализацией PHP для Cucumber является Behat.

Ниже приведен пример из документации, который хорошо отображает выразительность фреймворка.
Atoum

Atoum – еще один фреймворк для тестирования PHP. Это автономный пакет, который можно установить через GitHub, Composer или исполняемый файл PHAR.
Тесты Atoum очень читабельны, имеют выраженные имена методов и взаимосвязи.

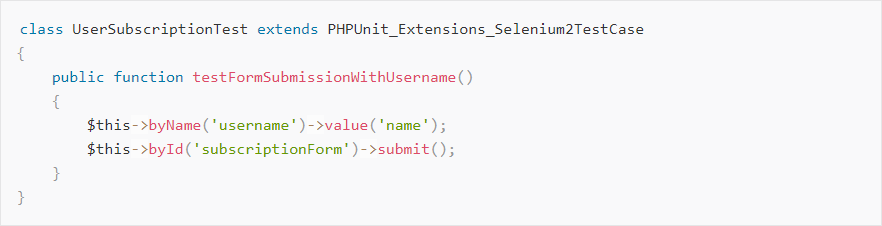
Selenium
Selenium — это инструмент для автоматического браузерного тестирования (интегрированное и приемочное тестирование). Он преобразует тесты в команды API браузера и утверждает ожидаемые результаты. Selenium поддерживает большинство доступных браузеров.
Мы можем использовать Selenium с PHPUnit, используя расширение.

Вот простой пример:
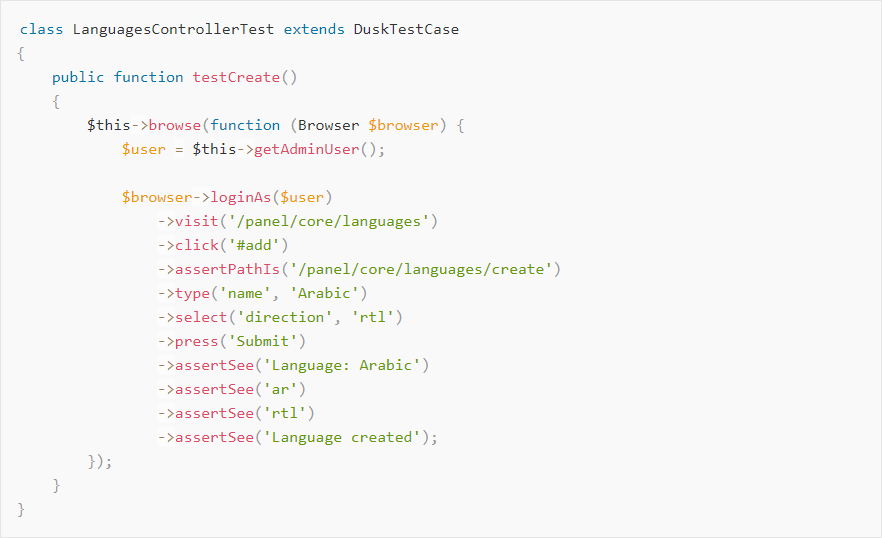
Dusk

Dusk из Laravel – еще один инструмент автоматизации браузера. Он может использоваться автономно (с chromedriver) или с Selenium. Он имеет простой в использовании API и охватывает все возможности тестирования, такие как ожидание элементов, загрузка файлов, управление мышью и т.д. Вот простой пример:
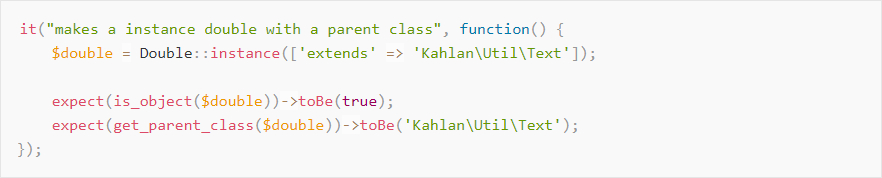
Kahlan

Kahlan – это полнофункциональная среда тестирования Unit & BDD, которая использует описательный синтаксис.

Из приведенного выше синтаксиса видно, что он похож на тесты Behat. Kahlan поддерживает Stub-инг и Mock-инг (stubbing and mocking out of the box) без зависимостей, покрытия кода, отчетности и т.д.
Видео курсы по схожей тематике:
php_testability
Последний пакет, о котором мы упомянем здесь – PHP Testability. Это инструмент статического анализа, который рассказывает о проблемах с тестируемостью в вашей программе и генерирует подробный отчет.
Пакет в настоящее время не имеет помеченного релиза, на который можно полагаться, но вы можете безопасно использовать его в разработке. Вы можете установить его через Composer:

Затем запустить его следующим образом:

Сервисы непрерывной интеграции (CI)
Важная часть в предоставлении кода при работе с командами – это возможность автоматически проверять код до его объединения с официальным репозиторием проекта. Большинство доступных сервисов/инструментов CI предоставляют возможность тестировать код на разных платформах и конфигурациях, чтобы убедиться, что ваш код безопасен для слияния.
Существует множество сервисов, которые предлагают доступные цены, но вы также можете использовать инструменты с открытым исходным кодом:
• PHPCI: (с открытым исходным кодом)
• TravisCI: (бесплатно для проектов с открытым исходным кодом)
• SemaphoreCI: (бесплатно для проектов с открытым исходным кодом)
Бесплатные вебинары по схожей тематике:
• Jenkins
Заключение
Принять культуру тестирования кода сложно, но она понемногу развивается с практикой. Если вы заботитесь о своем коде, вы должны его протестировать! Перечисленные в этой статье инструменты и ресурсы помогут вам разобраться и начать работу.
Оригинальная статья на английском языке
This tutorial provides all the steps required to install PHP 8 on Windows 10. The steps should be similar on the other versions of Windows.
In some cases, we need to develop or test our application against a specific version of PHP or to install it separately. In such cases, we can download it from the official site instead of using a bundled package in the form of XAMPP or WAMP. Once installed, we can configure the latest PHP to work with the web servers including Apache and NGINX.
Notes: You may also be interested in our debugging tutorials to debug PHP. These include How To Install NetBeans on Windows, How To Install NetBeans On Ubuntu, How To Debug PHP In NetBeans On Windows, How To Debug PHP Web Apps In NetBeans On Windows, How To Remote Debug PHP Web Apps In NetBeans On Windows, How To Install Eclipse for PHP on Windows, and How To Debug PHP In Eclipse On Windows.
Step 1 — Download PHP 8 for Windows
Go to the official download link and download the required version of PHP 8 for Windows. The distributions are provided as tar and windows binaries. While writing this tutorial, PHP 8.0.3 is the most recent one, hence we will discuss the installation steps specific to PHP 8.0.3. Click the Windows Download Link and it will open the page having Binaries and Sources packaged for Windows.

Fig 1

Fig 2
We can see that PHP is available either as Thread Safe and Non Thread Safe. In simple terms, we can use Thread Safe PHP if we are using mod_php as worker MPM in Apache which spans multiple threads concurrently to process the requests and Non Thread Safe can be used for CGI. The Thread Safe version is required for web servers running in a multithreaded context.
The download page also provided binaries for both 32-bit and 64-bit Operating Systems. We will download the Zip Thread Safe version for 64-bit Operating System having the title as — VC15 x64 Thread Safe. As a regular user, we do not need the Debug Pack which is required for PHP developers.
Step 2 — Extract the Zip
Extract the downloaded zip at a specific location. It will look similar to the one having the PHP executable file as shown in Fig 3.

Fig 3
Step 3 — Verify Installation
Open the command prompt and type php —version to check the available version. It will look similar to Fig 4 in case existing PHP versions are available.

Fig 4
It will show the error ‘php’ is not recognized as an internal or external command, operable program or batch file., in case PHP is not installed on the system.
We need to configure the environment variable to access PHP from the command line. You can follow the below-mentioned steps to do so.
Right Click -> My Computer(This PC) -> Properties -> Scroll Down -> Advanced System Settings
The above steps will open the Windows Settings Panel as shown in Fig 5.

Fig 5
Now click the Environment Variables Button, select Path under either User variables or System Variables based on your preference, and click the Edit Button. We need to add/update the path of the installed PHP to the system Path.
Click the New/Edit Button and add/update the path to the PHP bin which is E:toolsphpphp-7.3.1 in my case. Press the OK Button 3 times to close all the windows. This sets the PHP 8 on system environment variables to access the same from the console.
Now again open the console and test the PHP version as shown in Fig 6.

Fig 6
These are the basic steps required to install PHP 8 on Windows 10.
Step 4 — Getting Started With PHP Development
In this step, we will write a simple program and print Hello World on the console using the PHP executable configured by us in the previous step. Open your favorite editor and write the program as shown below.
<?php
// Print Hello World !!
echo "Hello World !!n";
Now save the file as index.php and execute it using the command as shown below.
E:programsphp>php index.php
Hello World !!
In this way, we can execute the PHP program on the console. Though PHP is meant for web development, we can also use it for console-based development. The latest PHP supports the modern programming concepts i.e. OOPS and it also supports strict typing.
Step 5 — Configure With Apache
You might have installed the Apache Web Server either independently or installed it as part of the bundled packages including WAMP, XAMPP, etc. In this step, we will simply configure the Apache Web Server to use the PHP installed by us in the previous steps.
Copy the file php.ini-development available at the path where we have extracted PHP and save it as php.ini at the same location.
Open the httpd.conf file of your Apache Web Server installation and search for the line having LoadModule php7_module or LoadModule php_module. Now comment on the line and add the path to your PHP as shown below.
#LoadModule php7_module "${INSTALL_DIR}/bin/php/php7.4.9/php7apache2_4.dll"
LoadModule php_module "e:/tools/php/php-8.0.3/php8apache2_4.dll"
PHPIniDir "e:/tools/php/php-8.0.3"
You might not find the php7_module or php_module in case the Apache HTTP Server is installed without using any bundled software. If Apache 2 is installed directly as shown in How To Install Apache 2 On Windows, you just need to add the module to the httpd.conf as highlighted below.
....
....
#LoadModule watchdog_module modules/mod_watchdog.so
#LoadModule xml2enc_module modules/mod_xml2enc.soLoadModule php_module "e:/tools/php/php-8.0.3/php8apache2_4.dll"
AddType application/x-httpd-php .php
PHPIniDir "e:/tools/php/php-8.0.3"<IfModule unixd_module>
#
# If you wish httpd to run as a different user or group, you must run
# httpd as root initially and it will switch.
....
........
....
#
# DirectoryIndex: sets the file that Apache will serve if a directory
# is requested.
#
<IfModule dir_module>
    DirectoryIndex index.php index.html
</IfModule>....
....
Save the file and restart the webserver. Now create a file test.php at your webroot of the Apache server as shown below.
<?php
echo phpinfo();
Save the file, open your browser, and open the link — http://localhost/test.php. It should show the PHP settings as shown in Fig 7.

Fig 7
You can also enable the PHP extensions required for your project. The most important one is the pdo_mysql. I have updated the php.ini file and enabled it as shown below.
....
;extension=openssl
;extension=pdo_firebird
extension=pdo_mysql
;extension=pdo_oci
;extension=pdo_odbc
....
You must also enable to extensions directory by updating the php.ini file as shown below.
; Directory in which the loadable extensions (modules) reside.
; http://php.net/extension-dir
;extension_dir = "./"
; On windows:
;extension_dir = "ext"
extension_dir = "E:toolsphpphp-8.0.3ext"
Below mentioned is the output of phpinfo() before and after enabling the PDO extension.

Fig 8

Fig 9
We have successfully configured the latest PHP installed by us to work with the Apache Web Server.
Step 6 — WampServer & XAMPP
The relevant tutorials to configure or install WampServer and XAMPP include How To Install WampServer on Windows, How To Install XAMPP On Windows, How To Update PHP Version In XAMPP On Windows.
Summary
In this tutorial, we have installed the latest PHP on Windows i.e. PHP 8 on Windows 10, and also configured the system path to use it from the console. We have also executed our first program in PHP to print Hello World on the console. In the last section, we have configured the PHP installation to work with the Apache Web Server and saw how to enable PHP extensions using the PDO extension example.