 Сравнительно часто в списке раскладок клавиатуры пользователи обнаруживают лишнюю: например, британскую английскую. Происходит это обычно из-за того, что она была добавлена при установке системы без учета того, что английская (США) устанавливается по умолчанию, но возможны и другие причины.
В этой пошаговой инструкции подробно о способах удалить лишнюю раскладку клавиатуры в Windows 11 и Windows 10 — в Параметрах или PowerShell.
Удаление раскладки клавиатуры в Параметрах
Интерфейс параметров Windows 11 и Windows 10 отличается, но действия для удаления ненужных раскладок и сопутствующие нюансы одинаковы.
Достаточно выполнить следующие шаги:
- В Windows 11 нажмите по индикатору языка в области уведомлений и выберите «Дополнительные настройки клавиатуры», либо перейдите в Параметры — Время и язык — Язык и регион.

- В Windows 10 нажмите по значку языка и откройте пункт «Настройки языка», либо перейдите в Параметры — Время и язык — Язык.
- В Windows 11 справа от языка, который нужно удалить, нажмите по трем точкам и выберите пункт «Удалить». Если пункт не активен, сначала переместите язык вниз (первый по счету язык удалить нельзя).

- В Windows 10 нажмите по языку, который нужно удалить в списке «Предпочитаемые языки» и нажмите соответствующую кнопку. Если кнопка не активна, переместите язык вниз с помощью кнопки со стрелкой: первый по счету язык удалить нельзя.


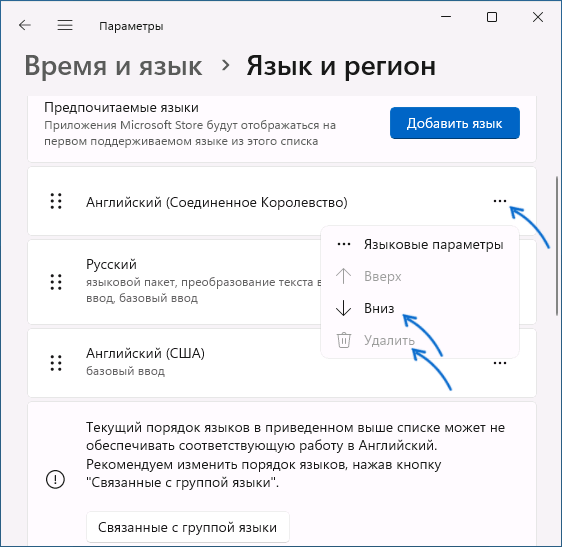

В результате выбранный язык ввода (раскладка клавиатуры) будет удален.
Удаление языка ввода в PowerShell
Если при удалении раскладки клавиатуры возникли какие-либо проблемы или доступ к Параметрам Windows ограничен, можно использовать удаление с помощью Windows PowerShell (или Терминала Windows):
- Запустите Терминал Windows или Windows PowerShell от имени администратора. Сделать это можно, открыв контекстное меню кнопки «Пуск», нажав по ней правой кнопкой мыши.
- Введите команду
Get-WinUserLanguageList
и нажмите Enter. Это выведет список установленных языков. Обратите внимание на значение LanguageTag языка и раскладки, которую нужно удалить.

- В моем случае нужно удалить Английскую (Великобритания), это en-GB, именно этот идентификатор языка я буду использовать во второй команде, вам его потребуется изменить на свой. Команды для удаления языка:
$1 = Get-WinUserLanguageList
$1.RemoveAll( { $args[0].LanguageTag -clike 'en-GB' } )
Set-WinUserLanguageList $1 -Force


Если всё прошло успешно, язык будет удален из списка доступных для ввода с клавиатуры в Windows.
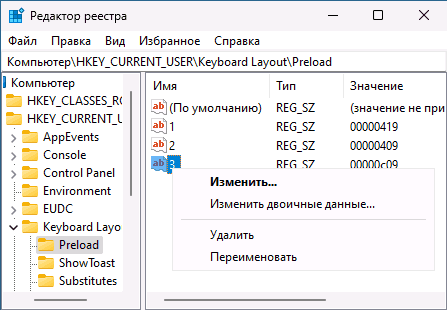
Удаление раскладки в редакторе реестра
Ещё один метод — использование редактора реестра для удаления языка ввода:
- Нажмите правой кнопкой мыши по кнопке «Пуск», выберите пункт «Выполнить», введите regedit в диалоговое окно «Выполнить» и нажмите Enter.
- В редакторе реестра перейдите в раздел HKEY_CURRENT_USERKeyboard LayoutPreload
- В этом разделе в правой панели реестра вы увидите несколько пунктов: они представляют собой языки ввода, причем расположены в том же порядке, что и в «Параметрах» Windows. Нажмите правой кнопкой мыши по ненужному языку, выберите пункт «Удалить».

- Закройте редактор реестра, выйдите и снова зайдите в систему, либо перезагрузите компьютер: лишняя раскладка должна исчезнуть.
Известна проблема, когда языков раскладки отображается больше, чем языков в Параметрах, PowerShell или реестре, то есть лишний язык нигде кроме выбора языка ввода не виден.
Одно из возможных решений: установить этот лишний язык в Параметрах языка (как в первом способе, но именно добавить его), а уже после добавления — удалить этот язык, используя любой из описанных подходов.
If you see a keyboard or input method that you aren’t expecting in the input switcher or in your preferred languages list, here are some ways to fix it.
Remove the language from Settings
Here’s the first thing to try:
-
Select Start > Settings > Time & language > Language & region .
-
Find the language you don’t want on your PC, then select More > Remove.
If the unwanted keyboard or input method is still there, you can remove the individual keyboard from Settings. Here’s how:
-
Select Start > Settings > Time & language > Language & region .
-
Find the language you don’t want on your PC, then select More > Language options > Remove.
Unwanted language or keyboard is still in the input switcher
If the unwanted language or keyboard is still in the input switcher, but not in the language list, try this:
-
Select Start > Settings > Time & language > Language & region .
-
Select Add a language, add the unwanted language or keyboard, then select Next > Install.
-
After the language or keyboard is installed, select More > Language options > Remove.
Note: The last keyboard for a language and the default input method can’t be removed. The default input method is based on the order of the language list in Settings.
Default input method doesn’t show the language you chose
If the default input method doesn’t have the language you chose, try this:
-
Select Start > Settings > Time & language > Typing > Advanced keyboard settings.
-
In Override for default input method, select your preferred language.
Related
Manage the input and display language settings in Windows
Need more help?
Раскладки клавиатуры — отличный способ ввода на компьютер нескольких языков без необходимости в специальном оборудовании. Однако несколько пользователей сообщили, что не могут удалить раскладку клавиатуры в Windows 11.
Хотя это не представляет серьезной проблемы, всегда есть вероятность ошибочно выбрать неправильную раскладку клавиатуры.
Также многие пользователи предпочитают лаконичный ПК без лишних настроек или приложений, которые могут помешать прогрессу и, соответственно, необходимости удалять дополнительные раскладки клавиатуры.
Итак, если вы пытаетесь, но не можете удалить раскладку клавиатуры в Windows 11, вот самые эффективные решения проблемы.
Что делать, если я не могу удалить раскладку клавиатуры в Windows 11?
1. Используйте настройки
- Нажмите Windows+ I, чтобы запустить приложение «Настройки», и выберите «Время и язык» на вкладках в области навигации слева.

- Нажмите «Язык и регион» справа.

- Теперь щелкните многоточие рядом с языком, на котором отображается раскладка, которую вы хотите удалить, и выберите «Параметры языка».

- Нажмите кнопку «Добавить клавиатуру» рядом с «Установленные клавиатуры».

- Выберите тот самый макет из списка, который у вас возникли проблемы с удалением.

- После этого закройте приложение «Настройки» и перезагрузите компьютер.
- Теперь снова перейдите в «Параметры языка».
- Щелкните многоточие рядом с макетом, который вы пытались удалить, и выберите «Удалить» во всплывающем меню.

- Снова перезагрузите компьютер, чтобы изменения вступили в силу.
Как только компьютер включится, макет будет удален. Этот метод очень эффективен, если вы не можете удалить раскладку клавиатуры в Windows 11 на Dell, Lenovo или HP.
Идея здесь состоит в том, чтобы добавить макет, который продолжает появляться, а затем вручную удалить его. Аналогичные проблемы возникали и в предыдущей итерации, то есть в Windows 10. Если этот метод не работает, перейдите к следующему.
2. Используйте Windows PowerShell
- Нажмите Windows+ S, чтобы запустить меню поиска, введите «Терминал» в текстовое поле вверху, щелкните правой кнопкой мыши соответствующий результат поиска и выберите «Запуск от имени администратора» в контекстном меню.

- Нажмите «Да» в появившемся окне UAC (Контроль учетных записей).

- Теперь вставьте следующую команду и нажмите Enter, чтобы вывести список всех раскладок клавиатуры, добавленных в систему:
Get-WinUserLanguageList

- Запишите значение, указанное рядом с LanguageTag для макета, который вы хотите удалить.

- Затем выполните следующие четыре команды по одной, заменив <LanguageTag> во второй команде на ту, которую вы отметили ранее:
$LangList = Get-WinUserLanguageList$MarkedLang = $LangList | where LanguageTag -eq <LanguageTag>$LangList.Remove($MarkedLang)Set-WinUserLanguageList $LangList -Force - Например, если вы хотите удалить макет с LanguageTag как en-IN, четыре команды станут следующими:
$LangList = Get-WinUserLanguageList$MarkedLang = $LangList | where LanguageTag -eq en-IN$LangList.Remove($MarkedLang)Set-WinUserLanguageList $LangList -Force

- После этого перезагрузите компьютер, чтобы изменения вступили в силу.
Для тех из вас, кто предпочитает запускать приложения командной строки, этот метод должен помочь, если вы не можете удалить раскладку клавиатуры в Windows 11.
3. Изменить реестр
- Нажмите Windows+ R, чтобы открыть диалоговое окно «Выполнить команду», введите regedit в текстовое поле и либо нажмите «ОК», либо нажмите Enter, чтобы запустить редактор реестра.

- Нажмите «Да» в появившемся окне UAC.

- Теперь вставьте следующий путь в адресную строку вверху и нажмите Enter. Кроме того, вы можете перейти к нему, используя панель слева.
ComputerHKEY_USERS.DEFAULTKeyboard LayoutPreload

- Теперь вы найдете список записей справа, каждая из которых обозначает определенную раскладку клавиатуры, добавленную на ПК. Посетите официальный веб-сайт Microsoft для идентификатора клавиатуры, чтобы узнать, какой из них вы хотите удалить.
- Как только вы сможете определить макет, который нужно удалить, щелкните его правой кнопкой мыши и выберите «Удалить» в контекстном меню.

- Нажмите «Да» в появившемся окне подтверждения.

- Перезагрузите компьютер, чтобы изменения вступили в силу.
Вот и все! Теперь вы успешно удалили раскладку клавиатуры с помощью реестра в Windows 11. Процесс довольно прост, но обязательно правильно определите раскладку клавиатуры и не вносите никаких других изменений в реестр, кроме перечисленных здесь.
Как изменить раскладку клавиатуры в Windows 11?
Изменить раскладку клавиатуры довольно просто в Windows 11 и даже в предыдущих версиях ОС. Чтобы изменить раскладку клавиатуры для того же языка, нажмите Ctrl+ Shift а затем нажмите Shift клавишу, чтобы выбрать другую.

Если вы хотите выбрать другой язык, нажмите Windows+ Space Bar а затем нажмите Space Bar, чтобы просмотреть перечисленные записи и выбрать один.
Это все, что касается концепции, а также наиболее эффективные решения, если вы не можете удалить раскладку клавиатуры в Windows 11. Кроме того, эти методы также помогут удалить раскладку клавиатуры в Windows 10.
Если у вас есть какие-либо другие вопросы или вы знаете метод, который не указан здесь, оставьте комментарий в разделе ниже.
В Windows 11 вы можете добавить раскладку клавиатуры с другим языком. Причём вы можете добавить любое количество языков.
Смотрите также:
- Как поменять язык Windows 11 без переустановки ОС
- Как изменить сочетание клавиш для смены раскладки клавиатуры в Windows 11
- Как установить, с какой клавиатурой загружается компьютер
Откройте приложение «Параметры», это можно сделать нажав Win+i.
Перейдите на вкладку «Время и язык».

В новом окне перейдите в «Язык и регион».

Нажмите кнопку «Добавить язык».

Введите название языка и выберите его из предложенных вариантов.

Нажмите кнопку «Далее».

Если вы не хотите менять язык Windows, то вам достаточно скачать «Базовый ввод», который устанавливается по умолчанию и его установку нельзя отменить. При этом вы можете отменить скачивание «Языковой пакет» и «Преобразование текста в речь».

Когда будете готовы, нажмите кнопку «Установить».

Дождитесь завершения установки.
Сразу после этого вы можете воспользоваться новым языком ввода.

Как удалить раскладку клавиатуры в Windows 11
Откройте приложение «Параметры», это можно сделать нажав Win+i.
Перейдите на вкладку «Время и язык».
В новом окне перейдите в «Язык и регион».
Нажмите кнопку из трёх точек напротив языка, чью раскладку клавиатуры вы хотите удалить. В открывшемся контекстном меню нажмите «Удалить».

Всё готово — раскладка клавиатуры удалена!
Связанные статьи:
- Как установить, с какой клавиатурой загружается компьютер (100%)
- Как изменить сочетание клавиш для смены раскладки клавиатуры в Windows 11 (93.8%)
- Как изменить сочетание клавиш для смены раскладки клавиатуры (82.5%)
- Как поменять язык Windows 11 без переустановки ОС (67.5%)
- Как настроить вывод звука отдельно для каждого приложения в Windows 10 (61.3%)
- Стоит ли покупать дискретную звуковую карту для компьютера? (RANDOM — 50%)
One of the under-reported problems is where Windows 11/10 keeps adding keyboard layouts without permission. As you add new languages, it starts appearing in the language bar and cannot be removed from the Keyboard Layout at all. One of the people reported that it also included English US – Greek (220) Latin Keyboard and English UK, despite having English US already.
The problem that arises because of this is that it makes switching really hard when somebody is just using two languages. Also, it keeps switching layout as you type. Punctuation changes at any time and you will need to switch the keyboard layout back to what I chose and correct the mistake.
Read: How to change Windows Keyboard Layout.
Here are the methods that you can use to fix this problem in Windows 11 or Windows 10:
- Turn off the Automatic Keyboard layout change option.
- Add and then remove the automatic keyboard layout.
- Override Microsoft automatic language settings via PowerShell.
- Fix the problem using the Registry Editor.
1] Turn off the Automatic Keyboard layout change option

You can try disabling the Automatic Keyboard layout change option to fix the problem. This setting can be tweaked by going to the Advanced Keyboard Settings. Here are the steps to do so:
- First of all, open the Windows 11 Settings app and navigate to Time & language tab.
- Now, click on the Typing option from the right pane.
- Next, tap on the Advanced keyboard settings option.
- Inside the Advanced keyboard settings page, uncheck the Let me use a different input method for each app window option.
- Check if this fixes up the issue for you.
In case it doesn’t fix the problem for you, move on to the next potential fix.
2] Add and then remove the automatic keyboard layout
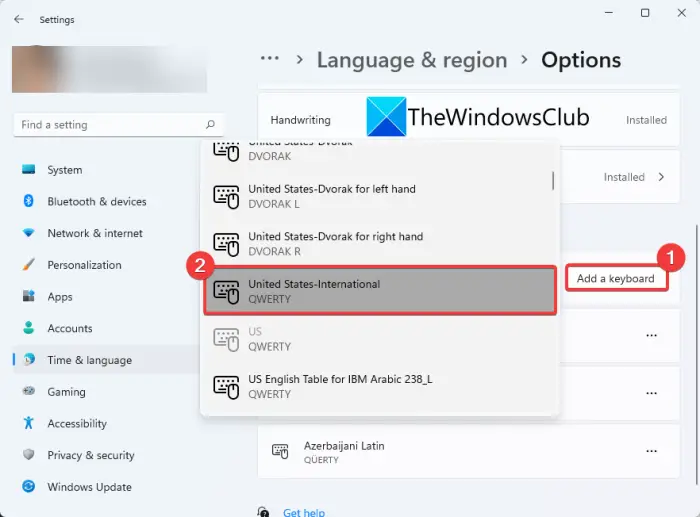
The first method that you can try is to add the automatically added keyboard layout and then remove it again. It is kind of a workaround and might fix the problem for you. To do that in Windows 11, you can follow the below steps:
Firstly, open the Settings app and go to the Time & language tab. Now, from the right panel, tap on the Language & region option.
Next, click on the three-dot menu for a language under the Language section. After that, press Language options and then select the Add a keyboard button.
Then, choose the automatically added layout to add that keyboard layout. You will see the keyboard layouts under the Keyboards section.
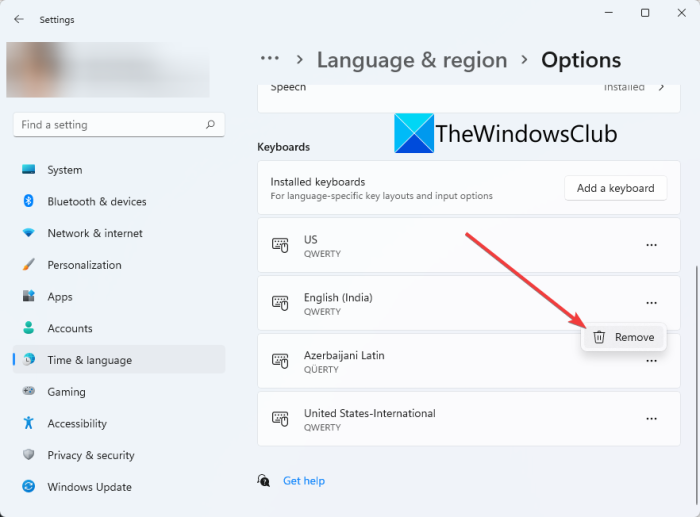
Finally, click on the three-dot menu present next to the previously added keyboard and choose Remove.
If the keyboard layout appears again, you will have to repeat the above process again.
Windows 10: The OS may randomly add that English US layout, and as someone who uses two layouts, it makes quick switching harder (you need one more keypress, and if you need to switch a lot in a short time, it becomes frustrating.)

- From Language preferences, select the English language.
- Click Options.
- Click “Add a Keyboard” and select that automatically added layout.
- After adding it, click on it and click Remove.
Note that may randomly reappear again, and you will have to repeat the step again.
3] Override Microsoft automatic language settings via PowerShell
If you use PowerShell, you can use it to override Microsoft`s default and weird language settings then it does not jump around anymore. You need to find InputTip and Culture settings for your desired settings of course. They can be found online in Microsoft IT Pros documentation.
Set-WinCultureFromLanguageListOptOut -OptOut 1
Set-WinUILanguageOverride -Language en-US
Set-WinDefaultInputMethodOverride -InputTip "0426:00040426"
Set-Culture lv-LV
Keep this PowerShell script handy, and execute it whenever you see the layout appear again. If this is happening in your company or a large number of computers, you can use run this script when somebody logs in to the computer.
4] Fix the problem using the Registry Editor
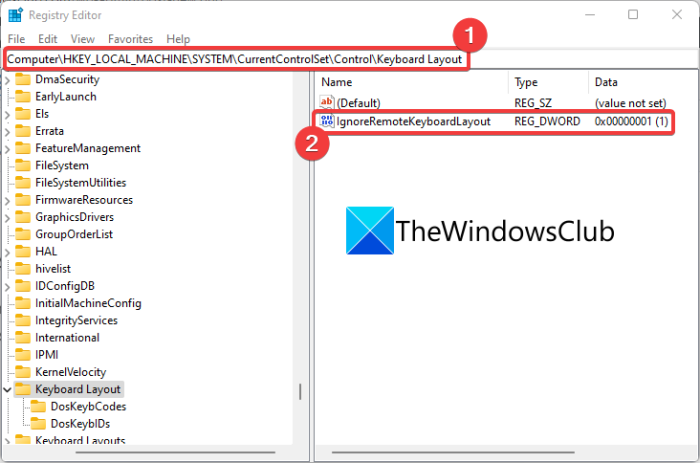
You can try a Registry hack to fix this problem. You will need to create a new DWORD to get rid of this issue. Here is the step by step procedure to resolve the issue using Registry Editor:
Firstly, press the Windows + R hotkey to evoke the Run dialog box and enter regedit in it to open up the Registry Editor app.
Now, navigate to the following key in Registry Editor:
HKEY_LOCAL_MACHINESYSTEMCurrentControlSetControlKeyboard Layout
Next, right-click on the right-pan and select the DWORD (32-bit) Value option from the context menu.
After that, name the newly created DWORD as IgnoreRemoteKeyboardLayout.
Then, double-click on the above DWORD and set its value to 1.
Finally, close the Registry Editor app and then reboot your PC.
Hopefully, this will fix up the issue for you.
How do I turn off Keyboard Layout Synchronization?
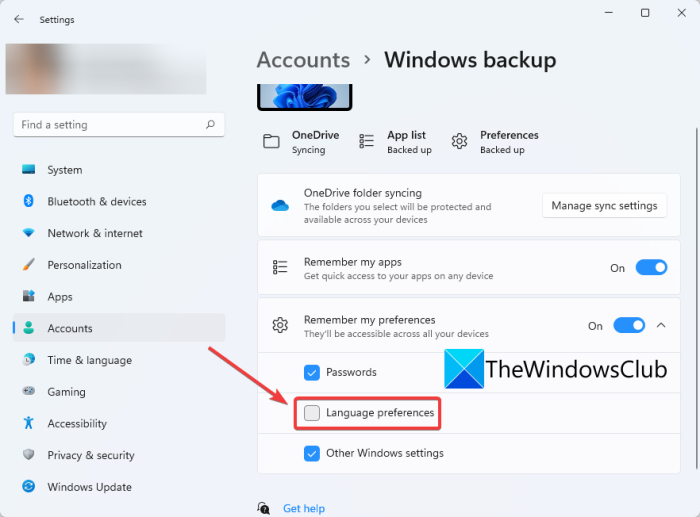
To turn off keyboard layout synchronization in Windows 11, you can follow the below steps:
- Open Settings and go to the Accounts tab.
- Go to the Windows backup section.
- Open the Remember my preferences drop-down.
- Uncheck the Language preferences option.
Are you facing similar problems? Do your keyboard jumps to a different language as you type? Let us know if this solution fixed your problem.
This post will help you if you are unable to remove a Language from Windows.
One of the under-reported problems is where Windows 11/10 keeps adding keyboard layouts without permission. As you add new languages, it starts appearing in the language bar and cannot be removed from the Keyboard Layout at all. One of the people reported that it also included English US – Greek (220) Latin Keyboard and English UK, despite having English US already.
The problem that arises because of this is that it makes switching really hard when somebody is just using two languages. Also, it keeps switching layout as you type. Punctuation changes at any time and you will need to switch the keyboard layout back to what I chose and correct the mistake.
Read: How to change Windows Keyboard Layout.
Here are the methods that you can use to fix this problem in Windows 11 or Windows 10:
- Turn off the Automatic Keyboard layout change option.
- Add and then remove the automatic keyboard layout.
- Override Microsoft automatic language settings via PowerShell.
- Fix the problem using the Registry Editor.
1] Turn off the Automatic Keyboard layout change option
You can try disabling the Automatic Keyboard layout change option to fix the problem. This setting can be tweaked by going to the Advanced Keyboard Settings. Here are the steps to do so:
- First of all, open the Windows 11 Settings app and navigate to Time & language tab.
- Now, click on the Typing option from the right pane.
- Next, tap on the Advanced keyboard settings option.
- Inside the Advanced keyboard settings page, uncheck the Let me use a different input method for each app window option.
- Check if this fixes up the issue for you.
In case it doesn’t fix the problem for you, move on to the next potential fix.
2] Add and then remove the automatic keyboard layout
The first method that you can try is to add the automatically added keyboard layout and then remove it again. It is kind of a workaround and might fix the problem for you. To do that in Windows 11, you can follow the below steps:
Firstly, open the Settings app and go to the Time & language tab. Now, from the right panel, tap on the Language & region option.
Next, click on the three-dot menu for a language under the Language section. After that, press Language options and then select the Add a keyboard button.
Then, choose the automatically added layout to add that keyboard layout. You will see the keyboard layouts under the Keyboards section.
Finally, click on the three-dot menu present next to the previously added keyboard and choose Remove.
If the keyboard layout appears again, you will have to repeat the above process again.
Windows 10: The OS may randomly add that English US layout, and as someone who uses two layouts, it makes quick switching harder (you need one more keypress, and if you need to switch a lot in a short time, it becomes frustrating.)
- From Language preferences, select the English language.
- Click Options.
- Click “Add a Keyboard” and select that automatically added layout.
- After adding it, click on it and click Remove.
Note that may randomly reappear again, and you will have to repeat the step again.
3] Override Microsoft automatic language settings via PowerShell
If you use PowerShell, you can use it to override Microsoft`s default and weird language settings then it does not jump around anymore. You need to find InputTip and Culture settings for your desired settings of course. They can be found online in Microsoft IT Pros documentation.
Set-WinCultureFromLanguageListOptOut -OptOut 1
Set-WinUILanguageOverride -Language en-US
Set-WinDefaultInputMethodOverride -InputTip "0426:00040426"
Set-Culture lv-LV
Keep this PowerShell script handy, and execute it whenever you see the layout appear again. If this is happening in your company or a large number of computers, you can use run this script when somebody logs in to the computer.
4] Fix the problem using the Registry Editor
You can try a Registry hack to fix this problem. You will need to create a new DWORD to get rid of this issue. Here is the step by step procedure to resolve the issue using Registry Editor:
Firstly, press the Windows + R hotkey to evoke the Run dialog box and enter regedit in it to open up the Registry Editor app.
Now, navigate to the following key in Registry Editor:
HKEY_LOCAL_MACHINESYSTEMCurrentControlSetControlKeyboard Layout
Next, right-click on the right-pan and select the DWORD (32-bit) Value option from the context menu.
After that, name the newly created DWORD as IgnoreRemoteKeyboardLayout.
Then, double-click on the above DWORD and set its value to 1.
Finally, close the Registry Editor app and then reboot your PC.
Hopefully, this will fix up the issue for you.
How do I turn off Keyboard Layout Synchronization?
To turn off keyboard layout synchronization in Windows 11, you can follow the below steps:
- Open Settings and go to the Accounts tab.
- Go to the Windows backup section.
- Open the Remember my preferences drop-down.
- Uncheck the Language preferences option.
Are you facing similar problems? Do your keyboard jumps to a different language as you type? Let us know if this solution fixed your problem.
This post will help you if you are unable to remove a Language from Windows.