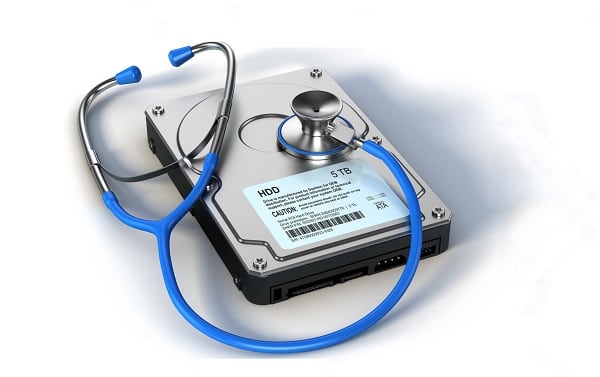
При запуске компьютера, в процессе загрузки, пользователи всегда сталкиваются с разным проверками. Многие из них скрыты от человеческого глаза, но всегда выполняются. В отличие от scanning and repairing drive, которая часто пугают обычного пользователя. Иногда в процессе выполнения компьютер зависает, и чтобы не отправляться сразу в ремонтную мастерскую нужно понять, насколько данная проблема серьезная и как с ней бороться.
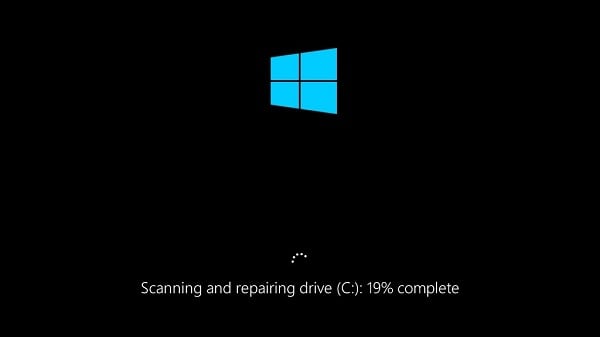
В переводе, эта фраза звучит как сканирование и ремонт/исправление диска. Значит, что в тот момент, когда scanning and repairing drive (D:): % complete (имя диска может отличаться) отображается на экране монитора, компьютер проверяет жесткий диск.
Конечно, автоматическое сканирование происходит при каждом запуске системы, но подобные надписи не высвечиваются. Но стоит обратить внимание и на вторую часть фразы — «ремонт». Устройство обнаружило серьезные ошибки и пытается справится с ними. Обычно это происходит при экстренном выключение ПК, т.е. в обход стандартного завершения работы.
Многих пользователей настораживает, что надпись зависает на определенном проценте. Перезагрузка компьютера не дает результатов, после нее ничего не меняется. Нет необходимости паниковать. Сканирование может занимать до 24 часов. При этом, оно все время выполняется, а не зависает. Но, если все-таки процесс завис, можно воспользоваться нашими рекомендациями для устранения неисправности.
Чтобы наверняка в этом убиться, можно посмотреть на системный блок. Чаще всего там есть лампочка, которая отвечает за использование диска. Если эта лампочка в процессе горит практически не переставая, значит система проверяет диск.
Как отключить scanning and repairing drive
Если не хочется видеть надпись scanning and repairing drive при запуске системы Windows 7, 8, 10, эту проверку можно отключить. Но с этим нужно быть аккуратным. Дело в том, что сканирование не выполняется просто так. Оно свидетельствует о наличии серьезных проблем с жестким диском устройства, с точки зрения системы. И иногда такая проверка действительно помогает справиться с некоторыми неисправностями и даже восстановить запуск Windows.
Отключить scanning and repairing drive можно несколькими способами. Нужный выбирают в зависимости от того, получилось ли зайти в операционную систему.
Общие рекомендации
Повредится диск мог как самостоятельно, так и под воздействием программных факторов. Например, вредоносное ПО или недавно установленная программа в некоторых случаях отрицательно скажется на работоспособности жесткого диска. Тогда, нужно попробовать просканировать компьютер на вирусы и удалить то, что было установлено в последнее время.
Диск можно подключить к другому устройству и выполнить полную проверку. В этом помогут сторонние утилиты, например, Виктория. Диск сканируется, и проблема устраняется. Если надпись возникает из-за изношенности жесткого диска, его лучше заменить на новый в ближайшее время. Затянув с этим, можно потерять все данные на нем. В любом случае, лучше обратиться в сервисный центр за квалифицированной помощью.
Правка реестра
Другим способом избавления от этой ошибки, будет отключение функции сканирование при загрузке вообще через реестр. Последовательность действий будет следующей:
- В поиске вводится команда regedit.

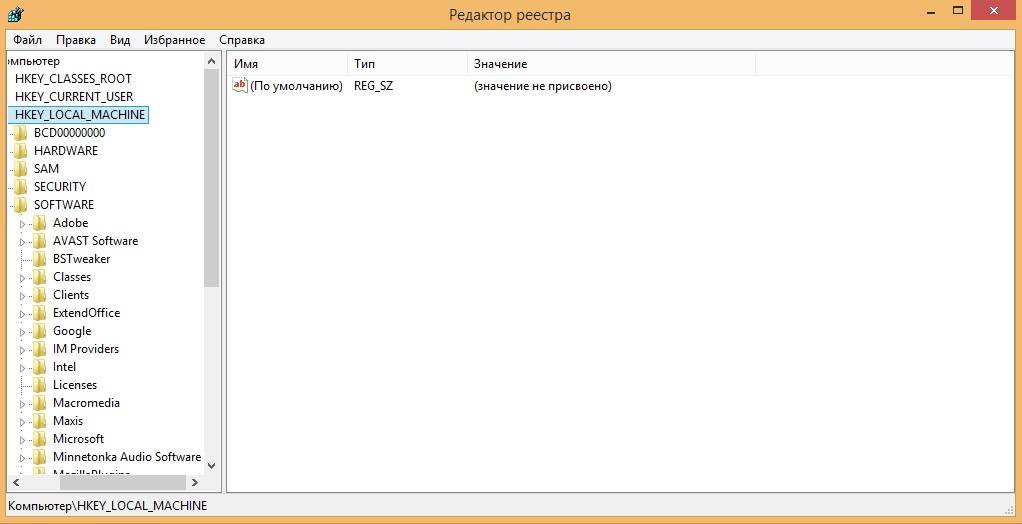
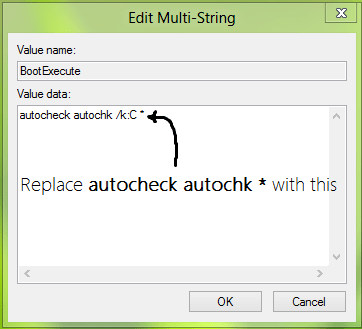
- В открытом окне, нужно перейти по адресу: HKEY_LOCAL_MACHINESYSTEMCurrentControlSetControlSession Manager.

- Значение параметра BootExecute изменить на: autocheck autochk /k:C *, где C имя нужного диска. Если проверку нужно отключить для нескольких дисков, то перечисляем их, например: autocheck autochk /k:C /k:D *.


После этого при включении не будет проверки и исправления жесткого диска и надпись scanning and repairing drive перестанет появляться.
This page includes six solutions to help you get rid of Windows 10 stuck at scanning and repairing drive error. Refer to the manual tutorial and check out how to remove scanning and repairing drive stuck on your own:
| Workable Solutions | Step-by-step Troubleshooting |
|---|---|
| Fix 1. Check Disk Connection | Remove the computer case > Check the cable and port to ensure the disk is correctly connected…Full steps |
| Fix 2. Let Scanning Process Finish | If the drive is in a bad condition, the scanning process may take longer and you need to wait for it to finish…Full steps |
| Fix 3. Stop Scanning Process | Shutdown PC by pressing the power button > Restart PC > Enter «Repairing Automatic Repair»…Full steps |
| More Fixes | Press the power button to shutdown PC > Restart PC and hold the power button for 10 seconds …Full steps |
Windows 10 Stuck at Scanning and Repairing Drive
«My Lenovo running Windows 10 is stuck on boot and shows a message ‘Scanning and repairing drive (C:): 11% complete’. It has been hanging there for about half a day now! How can I exit out of scanning and repairing drive?»
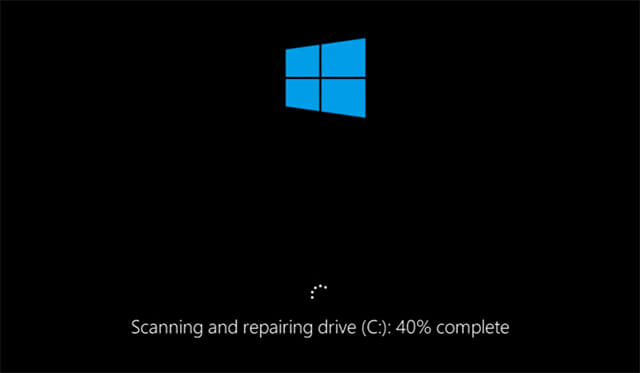
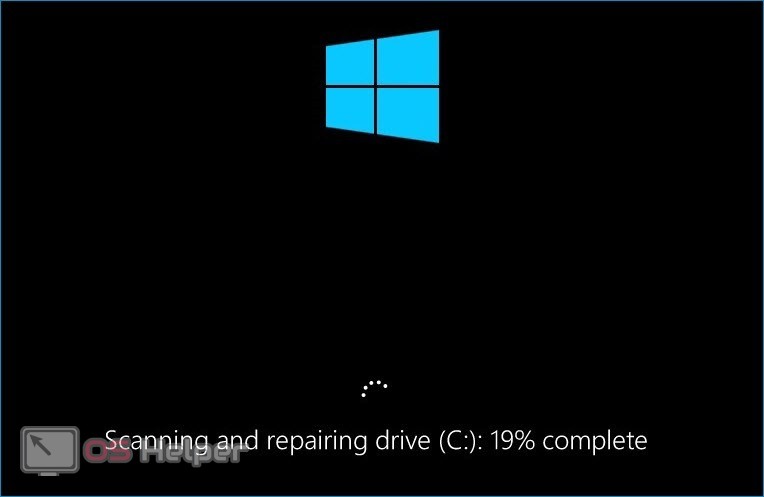
Getting stuck at scanning and repairing drive is one of the biggest headaches for Windows 10 computer users. It happens when CHKDSK’s scanning and repairing hard drive seems to never finish, halting at a certain percentage value and not advancing. Generally, you might see Windows 10 get stuck at scanning and repairing the drive C: or D:. The scan will often partially complete, but then get stuck on a particular percent.
![]()

Scanning and repairing drive is a disk checking process in Windows Automatic Repair (the same as Startup Repair). When there is a boot issue on the computer, Automatic Repair will start automatically and you will see the computer screen showing Preparing Automatic Repair, Diagnosing your PC, and then Scanning and repairing drive C, D… You may also initiate the Startup Repair by yourself from the Advanced Options in the Windows Recovery Environment (WinRE). If the «Scanning and repairing drive» process gets stuck, it suggests that there is trouble reading the drive, which might result from disk connection issues or disk errors like bad sectors and file system errors.
6 Fixes for Scanning and Repairing Drive C/D Stuck at 0%, 10%, 11%…100%
This guide offers six proven methods to fix the scanning and repairing drive stuck issue and enable you to boot the computer again.
Fix 1. Check the Disk Connection
Have you moved around the PC recently or done something familiar that is likely to displace the computer disks? If you have, the cause of the «Scanning and repairing drive» stuck might be the connection issues between the disk and the computer. If possible, recheck the cable and port to ensure the disks have been connected to the PC correctly.
Fix 2. Wait for the Scanning and Repairing Process to Finish
How long should scanning and repairing drive take? That depends. If there is a minor issue on the drive, that process won’t take long. However, if the drive is in a bad condition, it may take hours for the «Scanning and repairing drive» process to complete. There are tested and proven cases that indicate being patient and waiting is a workable solution.
Fix 3. Stop Windows from Scanning and Repairing the Drive
As you may know, you can disable the automatic disk checking process in the Automatic Repair. During Windows startup, you will have the chance to bypass «Scanning and repairing drive» by pressing any key. Here are the detailed steps.
Step 1. Since you are now being stuck at «Scanning and repairing drive», you need to press the power button to shut down the computer.
Step 2. Start the computer and you will see the «Preparing Automatic Repair» screen and then «Diagnosing your PC».
Step 3. Before the disk checking starts, you need to press any key, e.g. the spacebar, continuously, and then you will get the chance to disable the disk checking. (You can also press «Ctrl + C» to have a try.)
Fix 4. Disable Automatic Repair
Automatic Repair doesn’t always work. It is known to cause troubles like Windows stuck at «Preparing Automatic Repair», Automatic Repair loop, and the one in the discussion, «Scanning and repairing drive» stuck. Therefore, you can disable Automatic Repair to avoid these problems. To get it done, you will need to enter the Windows Recovery Environment or the Windows installation media. Given that most users don’t have the Windows installation media available, here I’d like to show you how to get things done in WinRE.
Step 1. Hold down the power button for 10s to shut down the computer.
Step 2. Press the power button to start the computer. Once you see the first sign of Windows has started, e.g. the logo of the manufacturer, hold down the power button for 10s again to turn off the device.
Step 3. Press the power button to start the computer. Once Windows restarts, hold down the power button for 10s to turn off the computer.
Step 4. Press the power button to start the computer and don’t interrupt it this time. Then you will see your computer in WinRE.
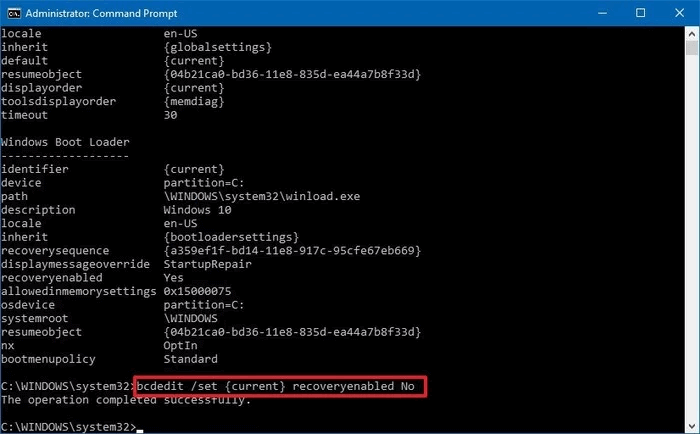
Step 5. On the «Choose an option» screen, choose «Troubleshoot» > «Advanced options» > «Command Prompt».
Step 6. Enter bcdedit and remember the values of «identifier» and «recoveryenabled» under Windows Boot Loader, Generally, it’s «{current}» and «Yes».
Step 7. To disable Automatic Repair, enter bcdedit /set {current} recoveryenabled no. («{current}» indicates the current OS and change the value to «no» will abort Automatic Repair.)
Step 8. Restart the computer.
Fix 5. Enter Safe Mode and Run CHKDSK
Since the cause of «Scanning and repairing drive» stuck is highly likely to be disk errors like bad sectors and file system errors, you can choose to enter Safe Mode and run CHKDSK to fix the errors. Safe Mode starts the computer with minimal required services and drivers and thus is a diagnostic mode in which you can perform fixes.
Step 1. Hold down the power button for 10s to shut down the computer.
Step 2. Press the power button to start the computer. Once you see the first sign of Windows has started, e.g. the logo of the manufacturer, hold down the power button for 10s again to turn off the device.
Step 3. Press the power button to start the computer. Once Windows restarts, hold down the power button for 10s to turn off the computer.
Step 4. Press the power button to start the computer and don’t interrupt it this time. Then you will see your computer in WinRE.
Step 5. On the «Choose an option» screen, choose «Troubleshoot» > «Advanced options» > «Startup Settings» > «Restart».
Step 6. After the restart, you will see a list of options as shown in the image below. Select «5» or press «F5» to enable Safe Mode with Networking.
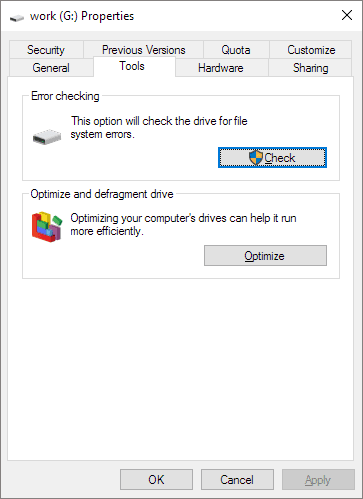
Step 7. Open «This PC», right-click the drive that Windows is stuck at scanning and repairing, then choose «Properties».
Step 8. Go to the «Tools» tab and choose «Check». (This works the same as running CHKDSK in Command Prompt.)
Fix 6. Recover Data
In most cases, one of the solutions above will fix the «Scanning and repairing drive C, D…» stuck issue in Windows 10. But there may be exceptions that the C drive (the system drive) is severely damaged and you can’t boot into Windows even after you try all the fixes. In such a situation, you will need bootable data recovery software like EaseUS Data Recovery Wizard with Bootable Media to rescue all the files from the non-working PC and then reinstall Windows.
To create a bootable USB or CD/DVD:
Note: To guarantee a high data recovery chance, install EaseUS data recovery software on another disk instead of the original disk where you lost files.
Step 1. Launch EaseUS Data Recovery Wizard on your Windows 11, Windows 10, Windows 8, or Windows 7 computer. Select the disk partition or storage location where you lost data and click «Scan».

Step 2. This recovery software will start scanning the disk to find all lost and deleted files. When the scan process completes, click «Filter» > «Type» to specify lost file types.

Step 3. Preview and restore lost Windows files. You can double-click to preview the scanned files. Then, select the target data and click the «Recover» button to save them to another safe spot in the PC or an external storage device.

Step 4. Reinstall Windows.
Whenever you encounter a boot issue, you can apply the bootable data recovery software to perform data recovery. However, reinstalling Windows is the last resort to solve the scanning and repairing drive stuck. You can also send the PC for manual repair if possible.
Extra Tip: How to Enable Disk Checking or Automatic Repair
You may want to enable disk checking or Automatic Repair when the computer can boot properly considering the feature might help to solve some boot related issues.
To enable disk checking:
Step 1. Press «Windows + R» and enter regedit.
Step 2. Click «Yes» to allow the app to make changes.
Step 3. Go to HKEY_LOCAL_MACHINESYSTEMCurrentControlSetControlSession Manager.
Step 4. Find and double-click «BootExecute».
Step 5. Change the value from autocheck autochk * to autocheck autochk * /rDosDeviceC: to enable disk checking.
To enable Automatic Repair:
If you have followed fix 4 to disable the feature, it’ll be easy for you to enable it again.
Step 1. Type cmd in the search bar, right-click «Command Prompt» and choose «Run as administrator».
Step 2. Enter bcdedit and remember the values of «identifier» and «recoveryenabled» under Windows Boot Loader, Generally, it’s «{current}» and «No».
Step 3. Enter bcdedit /set {current} recoveryenabled yes to turn on Automatic Repair in Windows.
The Bottom Line
«Scanning and repairing drive C» stuck always suggests disk issues. The solutions are clear: either fix the disk errors or let Windows skip them. Specify your situation and carry out the solution best suited to your needs. Hope one of the methods above could be useful to remove the «Scanning and repairing drive» stuck issue.
Next are some other questions related to scanning and repairing drive stuck. Check the answers if you’re interested.
1. How long should scanning and repairing drive take?
If your computer is in the process of scanning and repairing a hard drive, that process will take in excess of 2 hours depending on the size of your drive and errors found. It typically stops updating around 10 or 11% and suddenly jumps to 100 when done.
2. Can I stop scanning and repairing the drive?
You can disable the automatic disk checking process in Automatic Repair.
Step 1. Press the power button to shut down the computer.
Step 2. Start the computer and you will see the «Preparing Automatic Repair» screen and then «Diagnosing your PC».
Step 3. Before the disk checking starts, you need to press any key to disable the disk checking.
3. What does scanning and repairing drive mean?
Scanning and repairing drive is a disk checking process in Windows Automatic Repair. When there is a boot issue on the computer, Automatic Repair will start automatically and you will see the computer screen showing Preparing Automatic Repair, Diagnosing your PC, and then Scanning and repairing drive C, D…
This page includes six solutions to help you get rid of Windows 10 stuck at scanning and repairing drive error. Refer to the manual tutorial and check out how to remove scanning and repairing drive stuck on your own:
| Workable Solutions | Step-by-step Troubleshooting |
|---|---|
| Fix 1. Check Disk Connection | Remove the computer case > Check the cable and port to ensure the disk is correctly connected…Full steps |
| Fix 2. Let Scanning Process Finish | If the drive is in a bad condition, the scanning process may take longer and you need to wait for it to finish…Full steps |
| Fix 3. Stop Scanning Process | Shutdown PC by pressing the power button > Restart PC > Enter «Repairing Automatic Repair»…Full steps |
| More Fixes | Press the power button to shutdown PC > Restart PC and hold the power button for 10 seconds …Full steps |
Windows 10 Stuck at Scanning and Repairing Drive
«My Lenovo running Windows 10 is stuck on boot and shows a message ‘Scanning and repairing drive (C:): 11% complete’. It has been hanging there for about half a day now! How can I exit out of scanning and repairing drive?»
Getting stuck at scanning and repairing drive is one of the biggest headaches for Windows 10 computer users. It happens when CHKDSK’s scanning and repairing hard drive seems to never finish, halting at a certain percentage value and not advancing. Generally, you might see Windows 10 get stuck at scanning and repairing the drive C: or D:. The scan will often partially complete, but then get stuck on a particular percent.
![]()
Scanning and repairing drive is a disk checking process in Windows Automatic Repair (the same as Startup Repair). When there is a boot issue on the computer, Automatic Repair will start automatically and you will see the computer screen showing Preparing Automatic Repair, Diagnosing your PC, and then Scanning and repairing drive C, D… You may also initiate the Startup Repair by yourself from the Advanced Options in the Windows Recovery Environment (WinRE). If the «Scanning and repairing drive» process gets stuck, it suggests that there is trouble reading the drive, which might result from disk connection issues or disk errors like bad sectors and file system errors.
6 Fixes for Scanning and Repairing Drive C/D Stuck at 0%, 10%, 11%…100%
This guide offers six proven methods to fix the scanning and repairing drive stuck issue and enable you to boot the computer again.
Fix 1. Check the Disk Connection
Have you moved around the PC recently or done something familiar that is likely to displace the computer disks? If you have, the cause of the «Scanning and repairing drive» stuck might be the connection issues between the disk and the computer. If possible, recheck the cable and port to ensure the disks have been connected to the PC correctly.
Fix 2. Wait for the Scanning and Repairing Process to Finish
How long should scanning and repairing drive take? That depends. If there is a minor issue on the drive, that process won’t take long. However, if the drive is in a bad condition, it may take hours for the «Scanning and repairing drive» process to complete. There are tested and proven cases that indicate being patient and waiting is a workable solution.
Fix 3. Stop Windows from Scanning and Repairing the Drive
As you may know, you can disable the automatic disk checking process in the Automatic Repair. During Windows startup, you will have the chance to bypass «Scanning and repairing drive» by pressing any key. Here are the detailed steps.
Step 1. Since you are now being stuck at «Scanning and repairing drive», you need to press the power button to shut down the computer.
Step 2. Start the computer and you will see the «Preparing Automatic Repair» screen and then «Diagnosing your PC».
Step 3. Before the disk checking starts, you need to press any key, e.g. the spacebar, continuously, and then you will get the chance to disable the disk checking. (You can also press «Ctrl + C» to have a try.)
Fix 4. Disable Automatic Repair
Automatic Repair doesn’t always work. It is known to cause troubles like Windows stuck at «Preparing Automatic Repair», Automatic Repair loop, and the one in the discussion, «Scanning and repairing drive» stuck. Therefore, you can disable Automatic Repair to avoid these problems. To get it done, you will need to enter the Windows Recovery Environment or the Windows installation media. Given that most users don’t have the Windows installation media available, here I’d like to show you how to get things done in WinRE.
Step 1. Hold down the power button for 10s to shut down the computer.
Step 2. Press the power button to start the computer. Once you see the first sign of Windows has started, e.g. the logo of the manufacturer, hold down the power button for 10s again to turn off the device.
Step 3. Press the power button to start the computer. Once Windows restarts, hold down the power button for 10s to turn off the computer.
Step 4. Press the power button to start the computer and don’t interrupt it this time. Then you will see your computer in WinRE.
Step 5. On the «Choose an option» screen, choose «Troubleshoot» > «Advanced options» > «Command Prompt».
Step 6. Enter bcdedit and remember the values of «identifier» and «recoveryenabled» under Windows Boot Loader, Generally, it’s «{current}» and «Yes».
Step 7. To disable Automatic Repair, enter bcdedit /set {current} recoveryenabled no. («{current}» indicates the current OS and change the value to «no» will abort Automatic Repair.)
Step 8. Restart the computer.
Fix 5. Enter Safe Mode and Run CHKDSK
Since the cause of «Scanning and repairing drive» stuck is highly likely to be disk errors like bad sectors and file system errors, you can choose to enter Safe Mode and run CHKDSK to fix the errors. Safe Mode starts the computer with minimal required services and drivers and thus is a diagnostic mode in which you can perform fixes.
Step 1. Hold down the power button for 10s to shut down the computer.
Step 2. Press the power button to start the computer. Once you see the first sign of Windows has started, e.g. the logo of the manufacturer, hold down the power button for 10s again to turn off the device.
Step 3. Press the power button to start the computer. Once Windows restarts, hold down the power button for 10s to turn off the computer.
Step 4. Press the power button to start the computer and don’t interrupt it this time. Then you will see your computer in WinRE.
Step 5. On the «Choose an option» screen, choose «Troubleshoot» > «Advanced options» > «Startup Settings» > «Restart».
Step 6. After the restart, you will see a list of options as shown in the image below. Select «5» or press «F5» to enable Safe Mode with Networking.
Step 7. Open «This PC», right-click the drive that Windows is stuck at scanning and repairing, then choose «Properties».
Step 8. Go to the «Tools» tab and choose «Check». (This works the same as running CHKDSK in Command Prompt.)
Fix 6. Recover Data
In most cases, one of the solutions above will fix the «Scanning and repairing drive C, D…» stuck issue in Windows 10. But there may be exceptions that the C drive (the system drive) is severely damaged and you can’t boot into Windows even after you try all the fixes. In such a situation, you will need bootable data recovery software like EaseUS Data Recovery Wizard with Bootable Media to rescue all the files from the non-working PC and then reinstall Windows.
To create a bootable USB or CD/DVD:
Note: To guarantee a high data recovery chance, install EaseUS data recovery software on another disk instead of the original disk where you lost files.
Step 1. Launch EaseUS Data Recovery Wizard on your Windows 11, Windows 10, Windows 8, or Windows 7 computer. Select the disk partition or storage location where you lost data and click «Scan».
Step 2. This recovery software will start scanning the disk to find all lost and deleted files. When the scan process completes, click «Filter» > «Type» to specify lost file types.
Step 3. Preview and restore lost Windows files. You can double-click to preview the scanned files. Then, select the target data and click the «Recover» button to save them to another safe spot in the PC or an external storage device.
Step 4. Reinstall Windows.
Whenever you encounter a boot issue, you can apply the bootable data recovery software to perform data recovery. However, reinstalling Windows is the last resort to solve the scanning and repairing drive stuck. You can also send the PC for manual repair if possible.
Extra Tip: How to Enable Disk Checking or Automatic Repair
You may want to enable disk checking or Automatic Repair when the computer can boot properly considering the feature might help to solve some boot related issues.
To enable disk checking:
Step 1. Press «Windows + R» and enter regedit.
Step 2. Click «Yes» to allow the app to make changes.
Step 3. Go to HKEY_LOCAL_MACHINESYSTEMCurrentControlSetControlSession Manager.
Step 4. Find and double-click «BootExecute».
Step 5. Change the value from autocheck autochk * to autocheck autochk * /rDosDeviceC: to enable disk checking.
To enable Automatic Repair:
If you have followed fix 4 to disable the feature, it’ll be easy for you to enable it again.
Step 1. Type cmd in the search bar, right-click «Command Prompt» and choose «Run as administrator».
Step 2. Enter bcdedit and remember the values of «identifier» and «recoveryenabled» under Windows Boot Loader, Generally, it’s «{current}» and «No».
Step 3. Enter bcdedit /set {current} recoveryenabled yes to turn on Automatic Repair in Windows.
The Bottom Line
«Scanning and repairing drive C» stuck always suggests disk issues. The solutions are clear: either fix the disk errors or let Windows skip them. Specify your situation and carry out the solution best suited to your needs. Hope one of the methods above could be useful to remove the «Scanning and repairing drive» stuck issue.
Next are some other questions related to scanning and repairing drive stuck. Check the answers if you’re interested.
1. How long should scanning and repairing drive take?
If your computer is in the process of scanning and repairing a hard drive, that process will take in excess of 2 hours depending on the size of your drive and errors found. It typically stops updating around 10 or 11% and suddenly jumps to 100 when done.
2. Can I stop scanning and repairing the drive?
You can disable the automatic disk checking process in Automatic Repair.
Step 1. Press the power button to shut down the computer.
Step 2. Start the computer and you will see the «Preparing Automatic Repair» screen and then «Diagnosing your PC».
Step 3. Before the disk checking starts, you need to press any key to disable the disk checking.
3. What does scanning and repairing drive mean?
Scanning and repairing drive is a disk checking process in Windows Automatic Repair. When there is a boot issue on the computer, Automatic Repair will start automatically and you will see the computer screen showing Preparing Automatic Repair, Diagnosing your PC, and then Scanning and repairing drive C, D…
На чтение 4 мин Просмотров 6.4к. Опубликовано 16.08.2019
![]() Любой пользователь Windows 10 однажды может столкнуться с тем, что при запуске системы начинается долгая процедура «Scanning and repairing drive». Зачастую сбой возникает совсем не по вине самой системы – текст уведомления указывает на то, что были обнаружены некоторые проблемы, связанные с жёстким диском. Чаще всего уведомление о проведении сканирования не позволяет войти в систему – это может продолжаться часами. В этой статье мы подробно расскажем о «Scanning and repairing drive (C:)» — что это такое и как от него избавиться.
Любой пользователь Windows 10 однажды может столкнуться с тем, что при запуске системы начинается долгая процедура «Scanning and repairing drive». Зачастую сбой возникает совсем не по вине самой системы – текст уведомления указывает на то, что были обнаружены некоторые проблемы, связанные с жёстким диском. Чаще всего уведомление о проведении сканирования не позволяет войти в систему – это может продолжаться часами. В этой статье мы подробно расскажем о «Scanning and repairing drive (C:)» — что это такое и как от него избавиться.
Содержание
- Причина возникновения ошибки
- Решаем проблему
- Выполняем проверку вручную
- Отключаем проверку
- Видеоинструкция
- Заключение
Причина возникновения ошибки
Подобный сбой может быть вызван следующими факторами:
- Возникла ошибка, из-за которой операционная система зависает и пытается самостоятельно выйти из ситуации путём использования стандартных инструментов.
- На винчестер попало вирусное ПО, которое мешает нормальному запуску и функционированию ОС.
- Жёсткий диск переполнен битыми секторами или попросту физически изношен – HDD не вечны, их износ неизбежен.
Мнение эксперта
Дарья Ступникова
Специалист по WEB-программированию и компьютерным системам. Редактор PHP/HTML/CSS сайта os-helper.ru.
Спросить у Дарьи
В переводе на русский «Scanning and repairing drive» означает «Сканирование и исправление диска» — система пытается самостоятельно исправить ошибки, мешающие её запуску.
Решаем проблему
Есть два метода избавления от продолжительного сканирования при старте системы, и оба они заключаются лишь в отключении этого самого сканирования. Поскольку ошибка вызвана неисправностью жёсткого диска, устройство всё же придётся просканировать самостоятельно или отдать в сервисный центр.
Выполняем проверку вручную
Чтобы быстро получить доступ к системе, минуя долгую процедуру диагностики диска, можно попробовать следующий вариант действий:
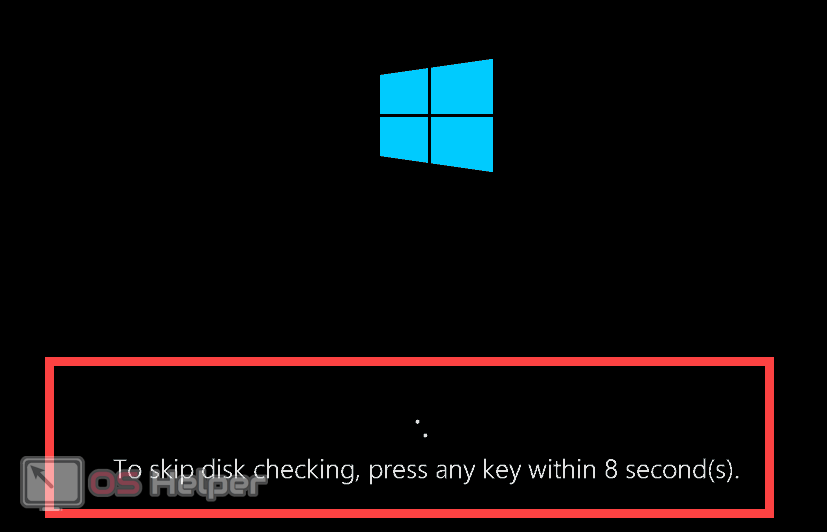
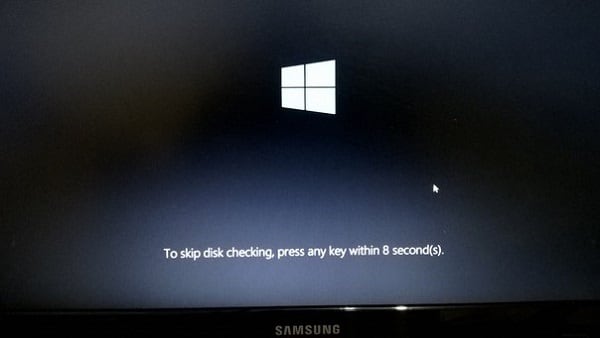
- Принудительно перезагрузить ПК и успеть нажать [knopka]F8[/knopka]+[knopka]Del[/knopka] в момент, когда сообщение о необходимости выполнения сканирования только появилось.
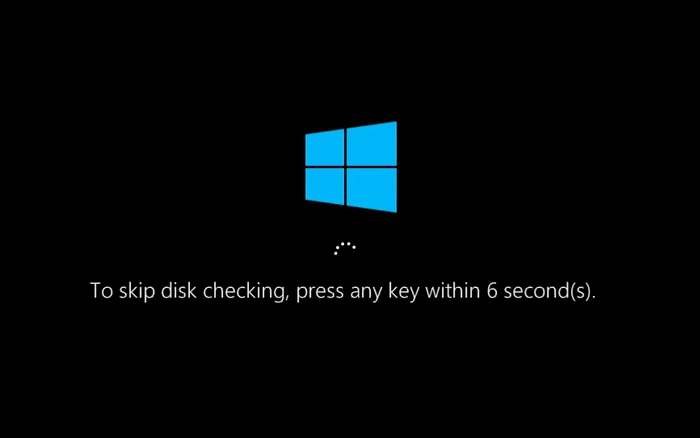
- Если всё получится, на экране появится сообщение «To skip disk checking press any key within … seconds», которое позволяет пропустить проверку в течение указанного количества секунд.
- Нажать на любую клавишу – вход в систему будет выполнен автоматически.
После того, как ОС будет успешно запущена, нужно выполнить полное сканирование диска имеющимся антивирусом, чтобы убедиться, что ошибка не вызвана вирусной активностью.
Доступ к системе получен, вирусы обнаружены и удалены (или не обнаружены). Теперь нужно запустить сканирование диска на предмет наличия ошибок:
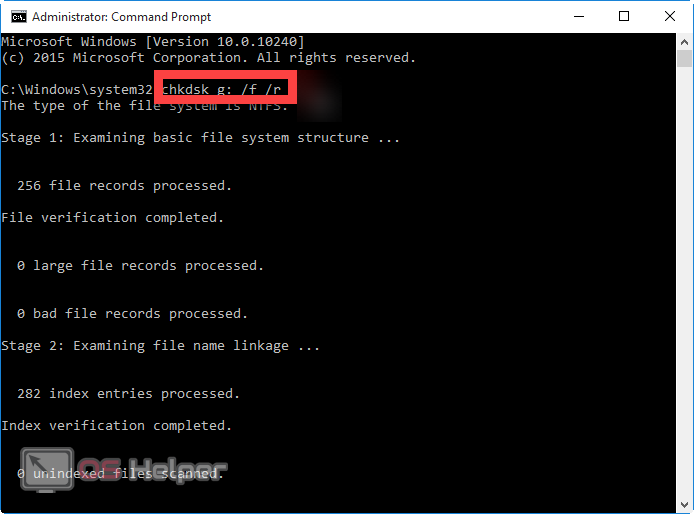
- Делаем правый клик на «Пуске», запускаем командную строку с правами администратора.
- Вставляем команду «chkdsk X: /f /r». Вместо «X» вставьте букву, соответствующую обозначению проблемного диска (она отображается в окне проверки при запуске ОС).
- Нажимаем на [knopka]Enter[/knopka], дожидаемся окончания процедуры, перезагружаем ПК.
Если причина скрывалась не в вирусах, и ручная диагностика к результату не привела, то после следующей перезагрузки система вновь попытается запустить сканирование. Чтобы не ловить момент с нажатием клавиши каждый раз, можно полностью отключить утилиту, ответственную за проведение сканирования – об этом далее.
Отключаем проверку
Если предложенные выше действия не помогли, значит устройство придётся отдавать в ремонт. Возможно, никаких внешних признаков износа нет, и система работает нормально. В такой ситуации можно просто отключить функцию сканирования и продолжить пользоваться ОС.
Отключение выполняется через редактор реестра:
- Прожимаем сочетание клавиш [knopka]Win[/knopka]+ [knopka]R[/knopka], вводим и выполняем команду «regedit».
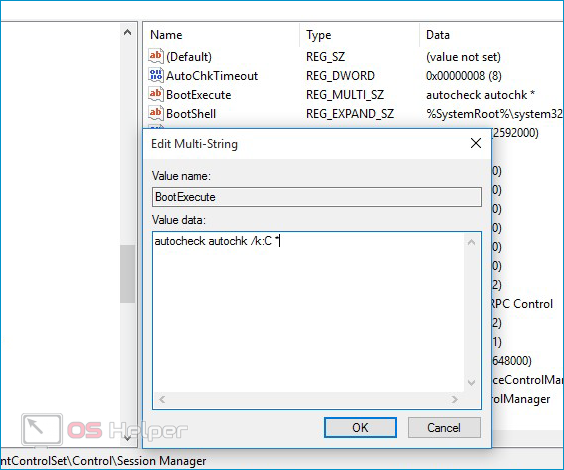
- Переходим по такому пути: HKEY_LOCAL_MACHINE > SYSTEM > CurrentControlSet > Control > Session Manager.
- Дважды кликаем по параметру «BootExecute», меняем значение на «autocheck autochk /k:Y *», где вместо «Y» вставляем букву «неисправного» диска. Если хотите выключить проверку сразу для нескольких дисков, добавьте их следом – например, «autocheck autochk /k:Y /k:X /k:Z *».
При следующем запуске системы утилита для диагностики запущена не будет. Тем не менее, проблема остаётся не решённой – с диском что-то не так, а значит ему нужна расширенная диагностика.
Видеоинструкция
Прикрепляем короткое видео, где наглядно продемонстрированы действия по активации запрета на проведение сканирования жёсткого диска.
Заключение
Надеемся, что вы смогли справиться с решением проблемы и получить доступ к операционной системе. Если неисправность носит физический характер, HDD придётся либо заменить, либо отремонтировать (что не всегда возможно).
Некоторые из пользователей Windows 10 могут столкнуться с невозможностью загрузки их операционной системы и сообщением. После этого длительное время может ничего не происходить, указанная надпись может висеть без каких-либо изменений, а перезагрузка системы возвращает её ровно в аналогичное состояние. В этом материале я расскажу, как исправить Scanning and repairing drive на Windows 10, поясню суть данного сообщения, а также перечислю те шаги, которые нужно предпринять для исправления ситуации.
- Что такое Scanning and repairing drive?
- Как исправить ошибку на Windows 10
- Ещё один способ — отключаем проверку CHKDSK
- Заключение
Что такое Scanning and repairing drive?
Чтобы понять что это Scanning and repairing drive необходимо прежде всего обратиться к переводу данного сообщения. Как видим, тут идёт речь о «сканировании и исправлении жёсткого диска» (или какого-либо его подразделов), на котором система обнаружила ошибки. Последние возникают по различным причинам – от постепенного «осыпания» жёсткого диска вследствие физического износа до банального сбоя и вредоносного действия некоторых программ (в том числе и вирусных).
Потому система в начале загрузки запускает инструментарий проверки жёсткого диска на ошибки, что может занять значительное время, при этом пользователь может предполагать что система попросту зависла, хотя это совсем не так.
Как исправить ошибку на Windows 10
Итак, как же устранить Scanning and repairing drive? Необходимо выполнить следующее:
- Подождите некоторое время. Процесс восстановления проблемного диска может занять срок до 24 часов, потому не стоит паниковать и думать, что если процесс висит часами на показателе 10%, то ваш ПК не функционирует. Данный процесс устроен таким образом, что повисев 6 часов на одном показателе, система может буквально за пару минут дойти до 100% значения, потому просто наберитесь терпения и подождите некоторое время (до 24 часов), дав системе выполнить свою работу;
- Для входа в систему быстро кликните на клавиши F8 и Delete, ваша цель – это появление фразы «To skip disk checking press any key within (цифра) seconds», а затем жмите на любую клавишу (например, Enter). Таким образом вы сможете избежать проверки диска и зайти в свою систему (при этом проверка может вновь появится при следующей перезагрузке системы, потому лучше выполнить исправление диска.)

Для этого в командной строке, запущенной от имени администратора, выполните команду:
chkdsk С: /f /r (если проблемный диск – С). Дождитесь окончания процесса проверки и перезагрузите ваш компьютер, система должна загрузится без проблем;
- Подключите ваш проблемный диск к другому компьютеру и проведите там его полную проверку используя системные утилиты (жмём правую клавишу мыши на проблемном диске, выбираем «Свойства», закладка «Сервис», там выбираем «Выполнить проверку, ставим галочки на обоих пунктах и кликаем на «Запуск»);
- Если вам удалось зайти в систему, проверьте ваш диск на наличие вирусных программ (подойдут такие инструменты как Dr. Web Cureit!, Kaspersky Removal Tool, Malware Anti-Malware и ряд других);

- Обратитесь в сервисный центр. Если все вышеперечисленные советы вам не помогли, возможно ваш жёсткий диск имеет серьёзные проблемы с функционалом. Обратитесь в надёжный сервисный центр для аппаратной диагностики и выявления неисправностей.

Ещё один способ — отключаем проверку CHKDSK
Вариантом того, как пофиксить Scanning and repairing drive, является отключение проверки CHKDSK при старте системы. Если вам удалось зайти в операционную систему, тогда выполните следующее:
- Зайдите в реестр системы (нажмите на кнопку «Пуск», в строке поиска наберите regedit и нажмите на ввод);
- Перейдите по пути HKEY_LOCAL_MACHINESYSTEMCurrentControlSetControlSession Manager и установите значение параметра BootExecute на «autocheck autochk /k:C /k:D *» (без кавычек), не забыв подтвердить изменения;
- Теперь утилита CHKDSK не будет проверять на ошибки диски С и D при запуске системы (если у вас только диск C, то параметр должен быть «autocheck autochk /k:C *»).
Если же зайти в систему не получается, используйте диск с инсталляцией ОС Windows при запуске системы. Алгоритм таков:
- Вставьте диск в DVD (можно использовать и загрузочный флеш-накопитель с инсталляционной версией ОС Windows 10);
- Перезагрузите компьютер;
- Зайдите в БИОС и установите там загрузку с DVD (или флешки);
- Загрузитесь с нашего диска, в появившемся меню установки выберите «Восстановление системы», затем переходим на «Диагностика» — «Дополнительные параметры» — «Командная строка»;
- Жмём там regedit, открывается реестр среды установки;
- Жмём на HKEY_LOCAL_MACHINE, затем идём вверх и нажимаем на «Файл» — «Загрузить куст»;
- В открывшемся жёстком диске заходим в директорию Windows и переходим там в директорию System32config. Выбираем файл SYSTEM, жмём на «Открыть», в появившейся табличке «Имя раздела» вводим любое имя (например, name);
- Кликаем на ControlSet001, затем на Control, ищем подраздел Session Manager, в котором находим параметр BootExecute и там прописываем значение «autocheck autochk /k:C /k:D *» (без кавычек);
- Нажимаем «Ок», выделяем имя созданного нами подраздела, нажимаем «Файл», а затем «Выгрузить куст» и подтверждаем, нажав на «Да»;
- Перезагружаем наш компьютер, выполненное может эффективно помочь в проблеме.
Как это выглядит визуально можно посмотреть на видео:
Заключение
Выше я ответил на вопрос что делать с Scanning and repairing drive на Windows 10, описал причины появлений данного сообщения, а также пояснил, как исправить данную дисфункцию. В большинстве случаем инициаторами появления указанного сообщения являются какие-либо неисправности на жёстком диске, а для избавления от последних необходимо проработать жёсткий диск утилитой CHKDSK или вообще отключить проверку дисков при запуске системы. При этом обращаю внимание, что активизация CHKDKS не происходит просто так, потому рекомендую дать утилите отработать своё и провести полную проверку вашего винчестера, это может обеспечить стабильную и надёжную работу вашей системы в будущем.
Что делать при ошбки Scanning and repairing drive в Windows 10
Сегодня мы поговорим о болячках новой Windows 10. Хотя, что значит болячках. По сути, если вы сталкивались хоть раз с сообщением об ошибке Scanning and repairing drive, то скорее всего болячки у вашего винчестера. Дело в том, что любой винчестер — это железяка которая может пострадать не только физически, но и программно. Таким образом, необходимо периодически производить лечение винчестера, чтобы избавлять его от программных болячек. Говорить о том, что винчестер нельзя бить ногами, думаю будет излишнем.
Выглядит эта проблема следующим образом. Вы включаете компьютер и на определенном этапе загрузки Windows 10 он выдает вам сообщение, что мол, Scanning and repairing drive. Если перевести, то смысл примерно следующий: сканирование проблемных секторов вашего жесткого диска. Операционная система производит сканировоание вашего жесткого диска на разного рода неполадки. Дело в том, что иногда система может остановиться на определенном процентном значении и повиснуть. На самом деле система наткнулась на проблемный сектор и пытает с ним справиться, однако это не так просто и ей приходится долгое время возиться с этим сектором. после система также внезапно, может быстро, в считанные секунды с, например 19% дойти до 99%. Думаю, смысл вам понятен: если система как-бы зависла, то не спешите выключать компьютер, подождите несколько часов, быть может все наладится.
.jpg)
Другими словами, у вас проблема с винчестером, в результате либо программных сбоев, либо физического износа. Но что делать?
Давайте разберемся в проблеме и попробуем понять, как от нее избавиться.
Наилучшим способом избавления от проблемы, является проверка винчестера. Лучше всего снимите жесткий диск, подключите его в качестве второстепенного к другому компьютеру и просканируйте на наличие бэдов. Есть множество программных комплексов для проведения такого рода проверки. Вы можете воспользоваться встроенной утилитой в саму операционную систему Windows, либо скачать что-то более серьезное.
Вы также можете оставить включенным на сообщении Scanning and repairing drive компьютер и дождаться завершения сканирования. Это может длиться вплоть до 24 часов, поэтому запаситесь терпением.
Есть еще один интересный способ. Для того чтобы войти в систему, быстро нажмите клавиши F8 и Delete. Необходимо, чтобы появилось сообщение To skip disk checking press any key within (цифра) seconds. Далее нажмите Enter. Однако, имейте в виду, что в при следующей загрузки компьютера, сканирование может вновь появится. Таким образом вы проблему не решаете, а всего-либо откладываете.
Войдя в систему вы можете запустить проверку диска C, предварительно выставив галочку о проверке секторов винчестера. Таким образом, операционная система будет проверять жесткий диск не олько на предмет программных ошибок, но и на наличие/отсутствие ошибок секторов и пытаться от них избавиться.
Как бы там ни было, мы рекомендуем вам, позаботиться о замене жесткого диска заранее. Купите новый жесткий диск и перенесите на него всю важную для вас информацию. Либо воспользуйтесь любыми доступными сменными носителями для создания бэкапа нужной вам информации. Вы также можете прибегнуть к облачному хранилищу, для того, чтобы смерть вашего винчестера не застала вас врасплох.
Сегодня мы рассмотрели проблему с появлением ошибки Scanning and repairing drive, а также узнали причину появления данной ошибки и способы ее устранения. Если статья была вам полезна, мы очень рады! Не забывайте периодически посещать наш сайт, ведь мы публикуем новые статьи каждый день. Это отличный способ узнавать что-то новое и учиться понимать ваш компьютер.
Disable or Stop Auto CHKDSK During Windows Startup
One of Windows annoying so called “features” is the Windows disk checker (Chkdsk) being automatically executed whenever you don’t shut down your computer properly. The blue colored screen appears on Windows XP or black colored screen for Windows Vista and 7 during boot that says:
Checking file system on C:
The type of the file system is NTFS.
One of your disks needs to be checked for consistency. You may cancel the disk check, but it is strongly recommended that you continue.
To skip disk checking, press any key within 10 seconds(s).
Simply pressing any key would stop Check disk from running but when you restart your computer, you’ll get this prompt again because Windows still thinks the drive needs scanning and will keep reminding you until it is checked. Sometimes, even after letting Check disk scan the drive that it wants to, the checking process would still automatically run at next boot and it wants to check the drives again.

What we have found out is that when Windows detects there has been an improper shutdown or a drive such as a USB flash drive has been ejected before the system has finished with it, a secret value is stored on the drive to let Windows know about the issue and force a Check disk request. This value is known as a “Dirty bit” and is a single hex value (2 values for Windows  that Windows looks at on boot for system drives or when the the external device is inserted.
One easy way to determine if a drive letter is marked as dirty and will require auto chkkdsk on boot is to run the command fsutil dirty query C: in Command Prompt. If the fsutil tool reports that the drive letter is not dirty, the disk checking process will not want to run for that drive. However, when a drive letter is being marked as dirty, we discovered the location of the hex values on the drive that are being modified and resetting the dirty bit hex value to default will magically stop the auto disk check on boot.

While resetting the dirty bit manually would be the best solution for many situations, it is more difficult to do on system drives such as C because they will be locked and not allow editing from within Windows to change the bit value. Another option for these drives is to simply instruct Windows not to bother checking whether they have been marked as dirty on boot, so you’ll never get a request to auto check them again. Here’s how to disable or stop Check disk from scanning your drives in Windows boot for Windows XP, Vista, 7 and Windows 8.
There are people who suggest editing the registry to do this which works if done properly, but the recommended and safer way to disable auto Check disk from starting up is using the /x switch via the chkntfs command in Command Prompt. This switch will exclude a drive from the default boot time check. To get to the Command Prompt, go to:
Start -> Run (or Win key+R) -> type cmd and press enter
If you have drive C: as the drive you want exclude, then the command to disable chkdsk from scanning the C: drive would be:

If you have a second drive to exclude, C: and D: for example, you can disable Check disk with the command below. Simply add all the drives you want to exclude in this way, separating them with a space.

Sometimes users don’t like editing the registry or using the command prompt, which is why for your convenience, we have created a simple batch file to run the command for you. Download and run the .bat file, then enter the drive letter(s) to exclude from autocheck when prompted, the rest is automatic. Make sure to right click and “Run as Administrator”.

There are some experts who believe that it’s better not to disable Check disk from scanning your hard drive. But sometimes it makes sense if you don’t want it to scan your hard drive because if it finds anything bad, damaged files will be changed to File00001.CHK. When that happens, you will have to use data recovery software or some third party tools to recognize and recover the CHK files.
There are other important functions the Windows chkntfs command performs you should know about, which are discussed in more detail on page 2.
Каждый раз, выпуская очередную операционную систему, представители Майкрософт заявляют о том, что с разнообразными ошибками и проблемами человек будет сталкиваться все реже и реже. И вот очередной юзер переходит на Windows 10, какое-то время пользуется, потом как-то включает свой комп и видит на экране надпись — Scanning and repairing drive.
Проблема в том, что такое состояние иногда наблюдается очень долго – проходят часы, а доступа в систему как не было, так и нет. Естественно, возникает вопрос – как исправить ситуацию? Именно об этом мы и поговорим в этой статье.
Что означает данная надпись на экране монитора?
Итак, чтобы разобраться в первопричинах возникновения такой ошибки, следует изначально понять, что же обозначает сообщение, возникшее на экране.
Scanning and repairing drive — перевод на русский: «сканирование и исправление жесткого диска».

Как отмечают специалисты, подобное может возникнуть в следующих ситуациях:
- Произошел как-то сбой, который приводит к тому, что зависает Windows 10 и система пытается самостоятельно решить проблему за счет встроенных инструментов;
- На винчестере начали действовать какие-то вредоносные программы, мешающие нормальной загрузке и функционированию операционки;
- Жесткий диск находится в крайне плохом состоянии – он сыпется и скоро вообще может прекратить функционировать.
Итак, что делать? Прежде всего, не начинать паниковать раньше времени – дайте системе шанс самостоятельно решить возникшую проблему. Да, иногда подобная проверка может длиться часами, но, если процент проверки периодически меняется на большее число, значит, Windows 10 занимается именно тем, чем нужно.
Если первопричина незначительная, то достаточно подождать завершения процедуры и перезапустить еще раз ПК, чтобы убедиться — Scanning and repairing drive больше не возникает.
К сожалению, но это не всегда так. Иногда при такой проверке ОС «виснет». Или перепроверка начинается с каждой новой перезагрузкой. Как быть?
В любом случае потребуется доступ к системе. Проверку можно пропустить, если операционка в этот момент виснет:
- На начальном этапе появления надписи успеть задействовать комбинацию кнопок «F8» и «Del»;
- На экране появится новое сообщение «To skip disk checking press any key within (цифра) seconds», предлагающее пропустить проверку в ближайшие несколько секунд;
- Достаточно нажать на любую кнопку, чтобы пропустить процедуру и зайти в ОС.
 seconds")
Что дальше? Рекомендуется сразу же активировать один из хороших, качественных антивирусников, чтобы удостовериться в отсутствии каких-либо заражений. Для этой цели можно применить следующие варианты: Dr. Web Cureit!, Kaspersky Removal Tool, Malware Anti-Malware или другое, схожее по функционалу программное обеспечение.
Естественно, потребуется перезагрузка по завершению сканирования, чтобы убедиться в наличии или отсутствии результата.
Если его нет, то предлагается следующее решение:
- Активировать работу командной строки. Для этого достаточно открыть меню Винды, начать на клавиатуре набирать название данного функционала, перейти по предложенной ссылке;
- Вбить «chkdsk X: /f /r». Без кавычек. «X» в данном случае тот диск, с которым возникла проблема (об этом указывается на экране ошибки при загрузке системы);
- Нажать на Enter. Подождать результатов. Перезапуститься.

Еще один метод предусматривает наличие возможности переставить винчестер на другое компьютерное оборудование – дома, у друзей, родственников, на работе:
- Подключить жесткий диск в качестве дополнительного;
- Выполнить вход в операционку с основного накопителя;
- Открываем проводник, используя ПКМ, кликаем на иконке проблемного тома;
- Активируется дополнительное меню, где необходимо будет перейти в «Свойства»;
- Открыть вкладку «Сервис». Обнаружить в ней предложение, позволяющее выполнить проверку;
- Перед непосредственным запуском необходимо обязательно поставить рядом две галочки;
- Кликнуть на кнопочку «Запустить» и ожидать результата.
Конечно же, по окончанию осуществить очередной перезапуск Виндовс, чтобы убедиться — Scanning and repairing drive complete.
Методы, подсказанные одним из пользователей
Один из интернет-пользователей предложил собственные решения подобной проблемы. Каждый из них, в определенных ситуациях дает необходимый результат.
Использование PowerShell
Программу следует запускать только с правами администратора, иначе ничего не получится. Что дальше:
- После открытия рабочего окна, найти строку, предназначенную для ввода команд;
- Вбить в нее «Repair-Volume –DriveLetter». Тоже без кавычек и через пробел – букву диска, который следует проверить;
- Кликнув на «Enter», подтвердить запуск процедуры;
- Потребуется немного подождать, пока программа будет пытаться решить проблему;
- В конце, для выхода, вбить в строку слово «Exit» и подтвердить «Enter-ом».

Использование загрузочной флешки
Как отмечает предложивший это решение пользователь, данный метод помогает в самых тяжелых случаях. Естественно, проверялся именно на десятой версии операционки от Microsoft:
- Изначально потребуется создать загрузочную флешку. Или аналогичный диск, если человек предпочитает использовать именно такой накопитель;
- Инициировать перезапуск компа и вход в BIOS (кнопкой DEL);
- Выставить приоритет загрузки с DVD-ROM или флеш-накопителя;
- Сохранить настройки и выйти из БИОСа;
- Начать загрузку с выбранного носителя. Это приведет к тому, что откроется окно установки Винды;
- В первом окошке следует нажать на «Далее»;
- Активируется еще один экран, где потребуется выбрать вариант, предлагающий пройти процедуру восстановления системы. Воспользоваться им;
- Дальше – «поиск и устранение неисправностей», где появится возможность воспользоваться строкой для ввода команд;
- В ней нужно вбить chkdsk Х: /F /R. Понятно, что «Х» — буква проблемного диска;
- Подтвердить команду «Ентером».
Процедура достаточно долгая. Поэтому придется набраться терпения. После ее завершения нужно будет еще раз перезапустить компьютер, не забыть зайти в БИОС и вернуть приоритетность загрузки в изначальное состояние. Чаще всего этот метод хорошо срабатывает.
Деактивация автоматической проверки в Windows 10
Сразу хочется отметить, что этот способ совершенно не решает проблему, а только скрывает ее. Зачем же он нужен, — могут спросить некоторые. Например, в ситуации, когда гарантированно известно, что причиной ошибки является плохое состояние жесткого диска. Да, через какое-то время он перестанет работать. Но, возможно, владельцу обязательно нужно еще получить доступ к ОС и файлам, которые хранятся на накопителе. И очень не хочется, чтобы проверка включалась при каждой новой загрузки операционной системы.
Деактивация производится таким образом:
- Изначально потребуется зайти в Windows. Выше уже описано, как обойти обязательную проверку;
- После входа, нажать на «Пуск» и вбить regedit. Перейти по предложенному пути;
- Откроется окошко реестра, где потребуется пройти следующий путь: HKEY_LOCAL_MACHINESYSTEMCurrentControlSetControlSession Manager;
- В правой части экранчика найти параметр, имеющий название «BootExecute»;
- В поле «Значение» вводим «autocheck autochk /k:C /k:D *» (если на винчестере используются тома «С» и «D»);
- Кликнуть на «ОК».

Если все сделано правильно, то после следующей попытки входа в систему процедура обязательного сканирования и исправления активироваться не будет.
Еще один способ позволяет получить этот же результат, если в операционку зайти вообще невозможно. Но для этого изначально потребуется иметь загрузочную флешку или компакт-диск:
- Совершить вход с загрузочного накопителя (изменив приоритетность в БИОСе, как это описано выше);
- Дойти до экрана «восстановление системы». Из него перейти в «Диагностику», затем – в «доп.параметры»;
- Дальше появится возможность воспользоваться строкой для ввода команд;
- Набрать «regedit», в списке кликнуть на «HKEY_LOCAL_MACHINE»;
- Перейти наверх нового перечня, выбрать «Файл», затем – «Загрузить куст»;
- Через папку, в которую установлена Виндовс, перейти в System32config;
- В разделе требуется обнаружить файл, помеченный как «System»;
- Выбрать именно его и воспользоваться предложением «Открыть»;
- Активируется табличка «Имя раздела». Вписать в него любое слово на английском языке, естественно;
- Совершить новое путешествие: ControlSet001 – Control — Session Manager. В конце пути будет нужный нам параметр «BootExecute»;
- Для него прописывается все тоже значение: autocheck autochk /k:C /k:D *;
- Совершить вход в только что созданный раздел. В нем выбрать «Файл», затем 2Выгрузить куст» и завершить все подтверждением этого приказа.
Можно выходить из утилиты, возвращать приоритет запуска с винчестера и оценивать полученный результат.
Отзывы
Некоторые юзеры уже сталкивались с подобной проблемой. Их отзывы позволяют понять, какой именно вариант позволил избавиться от этой неприятности:
- Борис. Я столкнулся с такой ситуацией только один раз. Неожиданно выключили свет в доме. А свой бесперебойник я отдал как раз в ремонт. В итоге, комп отключился. При включении началось это сканирование. Продолжалось минут сорок. Думал, если честно, что что-то серьезное. Оказалось, что Десятка все сама исправила и больше подобное сообщение не возникало.
- Владислав. Перепробовал все предложенные варианты. К сожалению, при каждом новом входе все повторяется. Друг посоветовал установить ПО для проверки состояния жесткого диска. Поставил. Оно обнаружило, что моему винту скоро придет полный конец. Пришлось покупать новый. Переустановил на него Винду. Проблема исчезла.
- Григорий. Меня подобная ситуация раздражает. Люблю включить комп и пойти делать себе кофе. А тут проверка. И если ее не успеть выключить, то продолжаться она будет крайне долго. А работать-то надо! В итоге, помог мне вариант с загрузочным диском. После запущенной таким образом процедуры исправления ошибка больше не появлялась.
- Дмитрий. На моем ноуте такое сканирование происходило катастрофически медленно. Специально поставил на ночь с вечера. Часам к четырем утра набрала сто процентов. К счастью, моего терпения хватило, чтобы дождаться, а не форматировать винт и устанавливать систему заново. Так как после завершения процедуры ситуация больше не повторялась.
- Егор. У меня ПК слабенький, поэтому антивирусники в режиме реального времени я не использую. Вот и занес какую-то заразу, которая и стала причиной возникновения этой неприятности. Не дождался завершения диагностики – очень долго. Просто перезапустил еще раз и успел выключить ее. Затем активировал антивирусную программу. Хорошенько все проверил. Нашел заражение и избавился от них. Проблема оказалась решенной.
Судя по отзывам пользователей, наибольшее неудобство доставляет время проведения этой автоматической процедуры. И не всегда ее достаточно, чтобы устранить первопричину. Тем не менее, если неприятность проявилась не из-за плохого состояния жесткого диска, большинство людей способны справиться с ней самостоятельно и без каких-либо дополнительных финансовых вложений.
Part 2: How Do I Fix Scanning and Repairing Drive Stuck in Windows 10?
Fix 1: Check the Drive Status
If there are issues with the drive, Windows will identify it and permit you to sweep and fix it by looking at the drive status.
Step 1: From Control Panel, go to Security and Maintenance.
Step 2: Click Maintenance, and under Drive status, you might see issues recorded here and a link to fix them.

Fix 2: Use Windows Error Checking Tool
Step 1: Go to the File Explorer and explore Devices and Drives.
Step 2: Right-click the drive that Windows is scanning and repairing and click Properties.
Step 3: Open the Tools tab and snap the Check button under Error-checking.
Step 4: Windows will observe errors and then click Repair Drive to fix them.
Step 5: If no mistakes are found, the following screen prompts. Click Scan drive to fix it.
Step 6 : Reboot your PC and verify whether the scan and repair drive stuck issue is settled.
Fix 3: Wait for the Completion of Scanning and Repairing
What amount of time should scanning and repairing the drive require? That depends. Assuming there is a minor issue on the drive that cycle won’t take long. Nonetheless, it might need hours for the «Scanning and repairing drive» to finish if the drive is in poor condition.
Fix 4: Disable Automatic Repair
Step 1: Press the power button to turn on the PC and when you see the Windows logo, hold down the power button again to switch off the PC. Repeat it twice.
Step 2: Turn your PC on, and don’t interfere with it this time. Then, at that point, you will see your PC in WinRE.
Step 3: Go to Troubleshoot > Advanced options from the «Choose an option» screen.
Step 4: Open the Command Prompt and enter “bcdedit” and remember the values of «identifier» and «recoveryenabled.» Generally, it’s «{current}» and «Yes.»
Step 5: Disable Automatic Repair by entering bcdedit/set {current} recoveryenabled no.
Step 6 : Restart your PC.
Fix 5: Disable Fast Startup Feature
Step 1: Right-click the Start button and go to Search.
Step 2: Click on “Power Options” once you have opened Control Panel.
Step 3: Click on the option “Choose what the power buttons do.”
Step 4: Click «Change settings that are currently unavailable.»
Step 5: Untick the Turn on quick startup (suggested) option and save changes.
Fix 6: Disable Check Disk on Booting
Step 1: Boot your PC in Safe Mode and type “regedit” the Run dialog box.
Step 2: Go to the Session Manager and click BootExecute.
Step 3: Then, at that point, in the spring-up window, change the Value data to autocheckautochk/k:C * and tap OK.
Step 4: Restart your PC to check whether it tackled the Windows 10 scanning and repairing drive stuck at 100 issues.
Fix 7: Run SFC Utility
Step 1: Open command prompt as admin.
Step 2: Run “sfc/scannow” to check and get back the corrupted system files.
Step 3: Sfc utility will examine your framework for such files, and if found, it will restore them from the %WinDir%System32dllcache folder.
Fix 8: Enter Safe Mode and Run CHKDSK
Step 1: Press the power button to turn on the PC and when you see the Windows logo, hold down the power button again to switch off the PC. Repeat it twice.
Step 2: Turn your PC on, and don’t interfere with it this time. Then, at that point, you will see your PC in WinRE.
Step 3: Go to Troubleshoot > Advanced options from the «Choose an option» screen.
Step 4: Click Startup Settings, then tap Restart and press F5
Step 5: Open This PC, right-click the drive that scanning and repairing drive stuck at 0, then, at that point, pick «Properties >Tools> Check.
Fix 9: Run System Restore
Step 1: Press and hold the Power button to constrain the PC to close down multiple times, and you will enter Windows Recovery Environment.
Step 2: Next, go to Troubleshoot > Advanced options.
Step 3: From there, click “System Restore” and tap “Next” to pick a system restore point.
Step 4: Click “Finish” to proceed.
Fix 10: Reinstall System
Step 1: Go to Settings > Update and Security and click on Recovery.
Step 2: A message, inquiring you to whether switch applications to Windows Security will show up. Click “Yes.”
Step 3: The Fresh Start option will appear.
Step 4: Tap on the Get Started button and then the «Next» button.
Step 5: That will delete all the applications that are not associated with Windows 10.
Step 6: Click “Next” to download the most recent version of Windows 10. Install the Windows, and your scanning and repairing drive stuck at 10 percent issue will resolve.
Bonus: Boot and Recover Data from Computer Stuck in Scanning and Repairing
Hopefully, the above methods will help you fix the scanning and repairing stuck issue. However, there may be instances where the C drive (the system disk) is significantly damaged and you are unable to boot into Windows despite attempting all of the repairs. You’ll need bootable data recovery software like Tenorshare 4DDiG data recovery with bootable media to recover all of the files from the non-working PC.
Some highlights of the 4DDiG data recovery include:
- Boot and recover data from crached computer
- Compatible with over 1000 file types and file systems, including photos, video, documents, audios and others.
- Support to extract data from flash drives, hard drives, memory cards, digital cameras, and camcorders, among other storage devices.
- Recover any lost or deleted data from Windows/Mac
- Our data recovery success rates are among the best in the industry, with data recovered from a variety of data loss circumstances.
To recover unbootable laptop with 4DDiG, prepare yourself with the following stuffs before data recovery from crash computer: another working computer, a blank USB drive of more than 1.5G or CD/DVD.
- Connect USB drive and Select
- Create a Bootable Drive
- Boot Crashed Computer and Recover Data
Launch 4DDiG software on your computer and get your USB flash drive well connected. Choose Recover from Crash Computer from the home interface and then click on Scan to proceed.
Choose an external USB/DVD drive to create a bootable drive then click on Create. After a while, the bootable drive will be created successfully and then you can turn to your crashed computer to start data recovery.
Insert the USB flash drive or CD/DVD drive into the crashed computer then restart your device. Afterwards, you would see the computer brand logo on the screen, then press the corresponding key until you get into your device’s BIOS settings.After you enter the BIOS, switch to the boot tab using the arrow keys and select boot device. Then your crashed system will start loading files and please wait patiently for the configuration. Now 4DDiG will be launched automatically and you can select a location to start recovering data.
FAQs about Scanning and Repairing
1. How long should scanning and repairing the drive take?
Assuming your PC is currently scanning and repairing drive how long, that interaction will take more than 2 hours, relying upon the size of your drive and problems found. It commonly quits refreshing around 10 or 11% and out of nowhere leaps to 100 when done.
2. How do I bypass scanning and repairing drive C?
To bypass scanning and repairing of drive C, boot your computer in safe mode and run the system file checker utility as mentioned above. That will help complete the system scanning and repairing.
3. How do I disable scanning and repairing drive C every time Windows 10 starts?
To disable scanning and repairing drive C, you can employ one of the following techniques:
- Run a CHKDSK scan in Safe Mode
- Use Windows Error-checking tool
- Open Safe Mode and run the Repair-Volume-DriveLetter command
- Check the drive status
Summary
Scanning and repairing drive stuck consistently recommends problems with your disk. The arrangements are visible: either fix the errors or let Windows skip them. Determine your issue and select the most suitable fix from above. We hope that one of the strategies above could be valuable to eliminate the error from your device. By the way, try Tenorshare 4DDiG to boot and recover data before fixing the issue.