Alex Moon
10.12.2022
Нажимай сначала шифт, а потом альт, у меня так не появляется
Ответить
Развернуть ветку
kyokwadesu
10.12.2022
Автор
Мешает внутри игры, лочит часть управления порой — не вариант
Ответить
Развернуть ветку
Alex G
10.12.2022
я тоже привык переключать таким образом, что альт отпускается позже шифта и раньше никаких проблем не было. теперь, чтоб эта дрянь не появлялась, надо зажать шифт, нажать и отпустить альт и только потом отпускать шифт. какой дебил это придумал…
Ответить
Развернуть ветку
Максим Соколовский
11.12.2022
У меня была такая проблема, тк я приседаю на альт, в апексе особенно это мешало, поменял смену раскладки на ё
Ответить
Развернуть ветку
да, но
10.12.2022
Афигеть. Еще одна вещь в венде, о которой не задумывался, но она там есть.
Ответить
Развернуть ветку
Alex G
11.12.2022
о, спасибо, всё теперь как надо, python уже стоял =)
Ответить
Развернуть ветку
Igor Bukalov
11.12.2022
«В результате патча всплывающий индикатор смены языка будет появляться только при нажатии клавиш Win + Пробел.»
А вот сейчас обидно было.
Специально переучил себя на Win+Пробел, потому что на работе мак, и там Alt+Shift без бубна не делается. Подумал, что лучше перепривыкну, чтобы одинаково было.
Но всплывающее окно в винде очень раздражает до сих пор.
Установил обратно Punto Switcher, иногда неудобно, но пусть он мне раскладки меняет, чем вот это всё :-/
Ответить
Развернуть ветку
Somepony
10.12.2022
У меня оно появляется только если я после переключения языка специально не буду отпускать Alt. А так его нет.
Ответить
Развернуть ветку
Alex G
10.12.2022
раньше такого не было, а штука реально мешает.
Ответить
Развернуть ветку
Котьмак из школы кота
10.12.2022
Я тыщу лет уже жмякаю альт, затем шифт, затем отпускаю альт, затем шифт, и не имею таких проблем
Ответить
Развернуть ветку
Alex G
10.12.2022
кто как привык, я всю жизнь наоборот делаю.
Ответить
Развернуть ветку
Котьмак из школы кота
10.12.2022
Вот потому и имеешь проблемы; я ж не просто так привык, а как раз потому, что другие алгоритмы в тех или иных ситуациях приводили к затупам
Ответить
Развернуть ветку
fesskerl
10.12.2022
How do I get rid of floating language bar?
Here’s how:
Select Start > Settings > Time & language > Language & region .
Find the language you don’t want on your PC, then select More > Language options > Remove.
Ответить
Развернуть ветку
Guns Lingerovich
10.12.2022
Хорошее решение проблемы. Нет дополнительного языка раскладки клавиатуры — нет проблемы.
Ответить
Развернуть ветку
RayzeA
10.12.2022
Сначала тоже не нравилось, мешало и всякое вот это вот
А потом привык и даже как то удобно стало, особенно в играх, чтоб в чат не писать t,fybye
за доли секунды успеваешь заметить какой язык там выбран и норм
Ответить
Развернуть ветку
kyokwadesu
10.12.2022
Автор
Не мой случай, расходники в виде хила в Apex на альте xd
Ответить
Развернуть ветку
RayzeA
10.12.2022
ну..у меня всякие скилы там и расходники на доп кнопках мышки (их 12 можно все уместить да)
Ответить
Развернуть ветку
kyokwadesu
10.12.2022
Автор
Superlight — для облегчения убраны лишние кнопки, а имеющиеся 2 уже заняты
Ответить
Развернуть ветку
kyokwadesu
10.12.2022
Автор
alt+shift
шиндовс+пробел
Жес а чё так тоже можно
Ответить
Развернуть ветку
Педагогический историк
10.12.2022
Комментарий недоступен
Ответить
Развернуть ветку
kyokwadesu
10.12.2022
Автор
ЗАЧЕМ ТОГДА НА ALT SHIFT БЫЛО ЭТО ЕЩЁ ДОБАВЛЯТЬ
Ответить
Развернуть ветку
Гимнокалициум
10.12.2022
альт-шитф было всегда. Это вин+пробел добавили в 10ой винде на манер макос.
Ответить
Развернуть ветку
TopoR
10.12.2022
Более того, можно повесить даже макросы на разные сочетания, если больше двух раскладок.
Увы, только macOS нативно умеет переключаться между двумя последними, а не крутить по всему списку (но за нативный Linux не скажу).
Ответить
Развернуть ветку
kyokwadesu
10.12.2022
Автор
Видимо самым простым способом будет просто разбиндить сам ALT в игре ЪУЪ
Ответить
Развернуть ветку
Колоссальный кубок
10.12.2022
ты на шиндовс+пробел переключаешь?
А как отключить это в данном случае?
Ответить
Развернуть ветку
pew
10.12.2022
Если это win 11, то помогла обнова винды.
Ответить
Развернуть ветку
kyokwadesu
10.12.2022
Автор
Да, жаль, что полностью отключает переключение в таком случае
Ответить
Развернуть ветку
Andrew Khz
10.12.2022
в 10ке можно библу от старой версии подкинуть, тогда появлятся не будет
Ответить
Развернуть ветку
Читать все 43 комментария
Перейти к контенту
Надоело постоянно появление меню переключения языка когда ты используешь сочетания клавиш для переключения раскладки Windows 11? Оно надоело всем, кроме разработчиков MicroSoft.
Данная статья подходит для всех брендов, выпускающих ноутбуки на Windows 11/10: ASUS, Acer, Lenovo, HP, Dell, MSI, Toshiba, Samsung и прочие. Мы не несем ответственности за ваши действия.
Внимание! Вы можете задать свой вопрос специалисту в конце статьи.

Знаешь в чем прикол? Это меню никак не отключить. Оно появилось еще в Windows 10 и успешно перекочевало в Windows 11.
Но!!! Можно сделать так, чтобы это окно меню не появлялось.
Суть такая: переключение обычно идет при помощи комбинации клавиш SHIFT + ALT или SHIFT + CTRL. Так вот, если заставить себя переключать чуть по другому, то такое меню показываться не будет.
Надо чтобы нажатие клавиши SHIFT было первым и последним. Т.е. при комбинации с ALT или CTRL первым зажимаем SHIFT, потом нажали вторую кнопку и отпустили ее. А только потом отпускаем SHIFT.
 Нужна помощь?
Не знаешь как решить проблему в работе своего гаджета и нужен совет специалиста? На вопросы отвечает Алексей, мастер по ремонту смартфонов и планшетов в сервисном центре.Напиши мне »
Немного тренировок и всё войдет в привычку.

АвторМастер Николай
Инженер по ремонту мобильной и компьютерной техники в специализированном сервисном центре, г. Москва. Непрерывный опыт работы с 2010 года.
Есть вопросы? Задавайте в комментариях к статье. Отвечать стараюсь максимально быстро вам на указанную почту. Каждый случай индивидуален и поэтому очень важно, чтобы вы максимально расписали свою проблему и какая у вас модель устройства.
One of the under-reported problems is where Windows 11/10 keeps adding keyboard layouts without permission. As you add new languages, it starts appearing in the language bar and cannot be removed from the Keyboard Layout at all. One of the people reported that it also included English US – Greek (220) Latin Keyboard and English UK, despite having English US already.
The problem that arises because of this is that it makes switching really hard when somebody is just using two languages. Also, it keeps switching layout as you type. Punctuation changes at any time and you will need to switch the keyboard layout back to what I chose and correct the mistake.
Read: How to change Windows Keyboard Layout.
Here are the methods that you can use to fix this problem in Windows 11 or Windows 10:
- Turn off the Automatic Keyboard layout change option.
- Add and then remove the automatic keyboard layout.
- Override Microsoft automatic language settings via PowerShell.
- Fix the problem using the Registry Editor.
1] Turn off the Automatic Keyboard layout change option

You can try disabling the Automatic Keyboard layout change option to fix the problem. This setting can be tweaked by going to the Advanced Keyboard Settings. Here are the steps to do so:
- First of all, open the Windows 11 Settings app and navigate to Time & language tab.
- Now, click on the Typing option from the right pane.
- Next, tap on the Advanced keyboard settings option.
- Inside the Advanced keyboard settings page, uncheck the Let me use a different input method for each app window option.
- Check if this fixes up the issue for you.
In case it doesn’t fix the problem for you, move on to the next potential fix.
2] Add and then remove the automatic keyboard layout
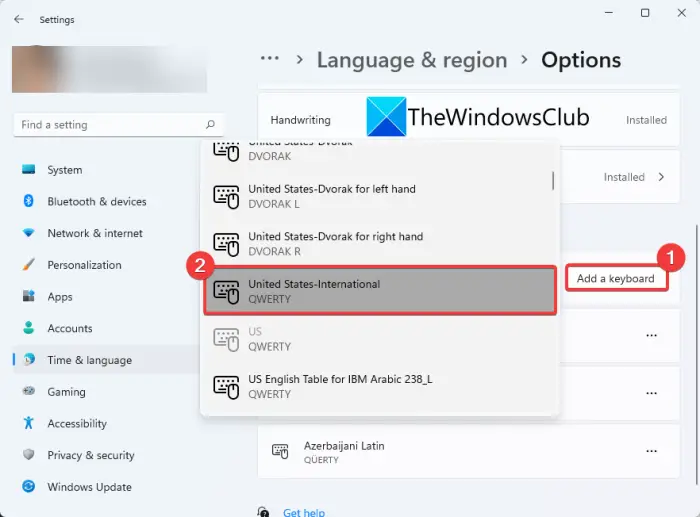
The first method that you can try is to add the automatically added keyboard layout and then remove it again. It is kind of a workaround and might fix the problem for you. To do that in Windows 11, you can follow the below steps:
Firstly, open the Settings app and go to the Time & language tab. Now, from the right panel, tap on the Language & region option.
Next, click on the three-dot menu for a language under the Language section. After that, press Language options and then select the Add a keyboard button.
Then, choose the automatically added layout to add that keyboard layout. You will see the keyboard layouts under the Keyboards section.
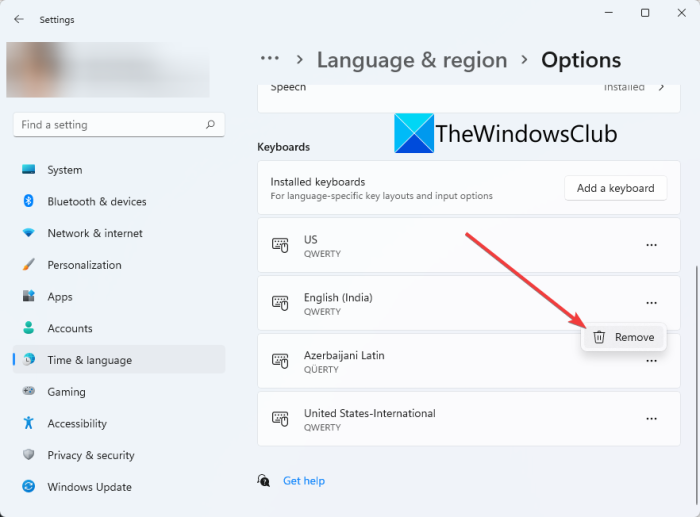
Finally, click on the three-dot menu present next to the previously added keyboard and choose Remove.
If the keyboard layout appears again, you will have to repeat the above process again.
Windows 10: The OS may randomly add that English US layout, and as someone who uses two layouts, it makes quick switching harder (you need one more keypress, and if you need to switch a lot in a short time, it becomes frustrating.)

- From Language preferences, select the English language.
- Click Options.
- Click “Add a Keyboard” and select that automatically added layout.
- After adding it, click on it and click Remove.
Note that may randomly reappear again, and you will have to repeat the step again.
3] Override Microsoft automatic language settings via PowerShell
If you use PowerShell, you can use it to override Microsoft`s default and weird language settings then it does not jump around anymore. You need to find InputTip and Culture settings for your desired settings of course. They can be found online in Microsoft IT Pros documentation.
Set-WinCultureFromLanguageListOptOut -OptOut 1
Set-WinUILanguageOverride -Language en-US
Set-WinDefaultInputMethodOverride -InputTip "0426:00040426"
Set-Culture lv-LV
Keep this PowerShell script handy, and execute it whenever you see the layout appear again. If this is happening in your company or a large number of computers, you can use run this script when somebody logs in to the computer.
4] Fix the problem using the Registry Editor
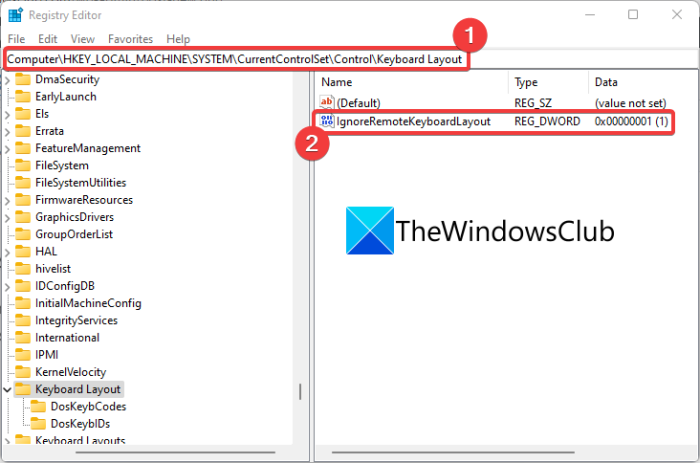
You can try a Registry hack to fix this problem. You will need to create a new DWORD to get rid of this issue. Here is the step by step procedure to resolve the issue using Registry Editor:
Firstly, press the Windows + R hotkey to evoke the Run dialog box and enter regedit in it to open up the Registry Editor app.
Now, navigate to the following key in Registry Editor:
HKEY_LOCAL_MACHINESYSTEMCurrentControlSetControlKeyboard Layout
Next, right-click on the right-pan and select the DWORD (32-bit) Value option from the context menu.
After that, name the newly created DWORD as IgnoreRemoteKeyboardLayout.
Then, double-click on the above DWORD and set its value to 1.
Finally, close the Registry Editor app and then reboot your PC.
Hopefully, this will fix up the issue for you.
How do I turn off Keyboard Layout Synchronization?
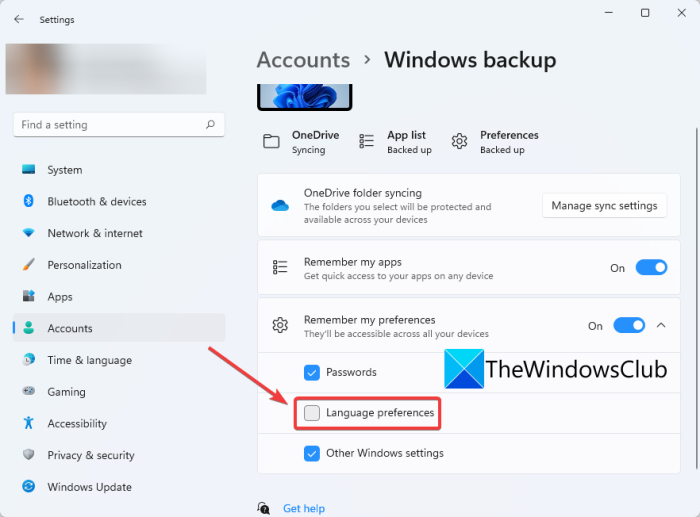
To turn off keyboard layout synchronization in Windows 11, you can follow the below steps:
- Open Settings and go to the Accounts tab.
- Go to the Windows backup section.
- Open the Remember my preferences drop-down.
- Uncheck the Language preferences option.
Are you facing similar problems? Do your keyboard jumps to a different language as you type? Let us know if this solution fixed your problem.
This post will help you if you are unable to remove a Language from Windows.
One of the under-reported problems is where Windows 11/10 keeps adding keyboard layouts without permission. As you add new languages, it starts appearing in the language bar and cannot be removed from the Keyboard Layout at all. One of the people reported that it also included English US – Greek (220) Latin Keyboard and English UK, despite having English US already.
The problem that arises because of this is that it makes switching really hard when somebody is just using two languages. Also, it keeps switching layout as you type. Punctuation changes at any time and you will need to switch the keyboard layout back to what I chose and correct the mistake.
Read: How to change Windows Keyboard Layout.
Here are the methods that you can use to fix this problem in Windows 11 or Windows 10:
- Turn off the Automatic Keyboard layout change option.
- Add and then remove the automatic keyboard layout.
- Override Microsoft automatic language settings via PowerShell.
- Fix the problem using the Registry Editor.
1] Turn off the Automatic Keyboard layout change option
You can try disabling the Automatic Keyboard layout change option to fix the problem. This setting can be tweaked by going to the Advanced Keyboard Settings. Here are the steps to do so:
- First of all, open the Windows 11 Settings app and navigate to Time & language tab.
- Now, click on the Typing option from the right pane.
- Next, tap on the Advanced keyboard settings option.
- Inside the Advanced keyboard settings page, uncheck the Let me use a different input method for each app window option.
- Check if this fixes up the issue for you.
In case it doesn’t fix the problem for you, move on to the next potential fix.
2] Add and then remove the automatic keyboard layout
The first method that you can try is to add the automatically added keyboard layout and then remove it again. It is kind of a workaround and might fix the problem for you. To do that in Windows 11, you can follow the below steps:
Firstly, open the Settings app and go to the Time & language tab. Now, from the right panel, tap on the Language & region option.
Next, click on the three-dot menu for a language under the Language section. After that, press Language options and then select the Add a keyboard button.
Then, choose the automatically added layout to add that keyboard layout. You will see the keyboard layouts under the Keyboards section.
Finally, click on the three-dot menu present next to the previously added keyboard and choose Remove.
If the keyboard layout appears again, you will have to repeat the above process again.
Windows 10: The OS may randomly add that English US layout, and as someone who uses two layouts, it makes quick switching harder (you need one more keypress, and if you need to switch a lot in a short time, it becomes frustrating.)
- From Language preferences, select the English language.
- Click Options.
- Click “Add a Keyboard” and select that automatically added layout.
- After adding it, click on it and click Remove.
Note that may randomly reappear again, and you will have to repeat the step again.
3] Override Microsoft automatic language settings via PowerShell
If you use PowerShell, you can use it to override Microsoft`s default and weird language settings then it does not jump around anymore. You need to find InputTip and Culture settings for your desired settings of course. They can be found online in Microsoft IT Pros documentation.
Set-WinCultureFromLanguageListOptOut -OptOut 1
Set-WinUILanguageOverride -Language en-US
Set-WinDefaultInputMethodOverride -InputTip "0426:00040426"
Set-Culture lv-LV
Keep this PowerShell script handy, and execute it whenever you see the layout appear again. If this is happening in your company or a large number of computers, you can use run this script when somebody logs in to the computer.
4] Fix the problem using the Registry Editor
You can try a Registry hack to fix this problem. You will need to create a new DWORD to get rid of this issue. Here is the step by step procedure to resolve the issue using Registry Editor:
Firstly, press the Windows + R hotkey to evoke the Run dialog box and enter regedit in it to open up the Registry Editor app.
Now, navigate to the following key in Registry Editor:
HKEY_LOCAL_MACHINESYSTEMCurrentControlSetControlKeyboard Layout
Next, right-click on the right-pan and select the DWORD (32-bit) Value option from the context menu.
After that, name the newly created DWORD as IgnoreRemoteKeyboardLayout.
Then, double-click on the above DWORD and set its value to 1.
Finally, close the Registry Editor app and then reboot your PC.
Hopefully, this will fix up the issue for you.
How do I turn off Keyboard Layout Synchronization?
To turn off keyboard layout synchronization in Windows 11, you can follow the below steps:
- Open Settings and go to the Accounts tab.
- Go to the Windows backup section.
- Open the Remember my preferences drop-down.
- Uncheck the Language preferences option.
Are you facing similar problems? Do your keyboard jumps to a different language as you type? Let us know if this solution fixed your problem.
This post will help you if you are unable to remove a Language from Windows.
В этом руководстве мы покажем вам, как запретить Windows 11 автоматически добавлять раскладку клавиатуры. На этот раз Windows добавила довольно много новых функций в свою последнюю сборку ОС. Но в то же время он также перенес некоторые странности поведения своего предшественника. Одним из них является случайное добавление новой раскладки клавиатуры, когда она будет сочтена подходящей. У многих меню раскладки клавиатуры уже заполнено 6-7 языками и регионами, хотя явно не добавили ни одного.

Так в чем причина этой проблемы? Ну, обычно это происходит, когда комбинация языка/клавиатуры не родная. Например, если вы добавили британский язык отображения, но с французской раскладкой клавиатуры, вероятность возникновения этой проблемы высока. С учетом сказанного, существует несколько обходных путей, которые, как известно, не позволяют Windows 11 автоматически добавлять раскладку клавиатуры. И это руководство познакомит вас именно с этим. Следуйте вместе.
Обратите внимание, что универсального решения как такового не существует. Вам нужно будет попробовать каждый из нижеперечисленных обходных путей, а затем проверить, какой из них принесет вам успех. Итак, имея это в виду, давайте начнем.
ИСПРАВЛЕНИЕ 1. Настройте экран приветствия и настройку новой учетной записи пользователя.
- Используйте сочетания клавиш Windows + I, чтобы открыть меню настроек,
- Затем выберите «Время и язык» в меню слева и перейдите в раздел «Ввод».
- После этого перейдите в раздел «Язык и регион».
- Затем щелкните значок с тремя точками рядом с языком, который вы хотите удалить, и выберите «Удалить».
- После этого запустите Панель управления из меню «Пуск», измените ее «Просмотр по типу» на «Большие значки» и перейдите в «Регионы».
- После этого перейдите на вкладку «Администрирование» и нажмите кнопку «Копировать настройки».
- Убедитесь, что текущий пользователь/экран приветствия и новая учетная запись пользователя отображают только языки по вашему выбору. Если это не так, измените его в разделе «Язык и регион», как описано выше.
- Если все в порядке, отметьте следующие две опции: «Экран приветствия» и «Системная учетная запись» и «Новые учетные записи пользователей».
- Наконец, нажмите «ОК», чтобы сохранить изменения, а затем проверьте, удалось ли остановить автоматическое добавление раскладки клавиатуры в Windows 11.
ИСПРАВЛЕНИЕ 2: изменение значения языкового реестра
- Используйте ярлык Windows + R, чтобы открыть «Выполнить». Затем введите приведенную ниже команду и нажмите Enter, чтобы открыть редактор реестраregedit.
- Теперь скопируйте и вставьте указанное ниже местоположение в адресную строку и нажмите Enter: ComputerHKEY_LOCAL_MACHINESYSTEMCurrentControlSetControlKeyboard Layouts.
- Теперь вы увидите список папок с числовыми значениями. На самом деле это названия языков. Чтобы узнать их настоящие имена, проверьте этот список от майкрософт и обратитесь к числовому значению после двоеточия (:) для языка, который вы хотите удалить из меню раскладки клавиатуры.
- Например, если вы хотите удалить английский язык (США), значение будет (0409:00000409). И значение после двоеточия 00000409.
- Теперь проверьте то же значение в редакторе реестра, щелкните его правой кнопкой мыши и выберите «Переименовать».
- Затем добавьте -NO в конец его имени и сохраните его. Windows больше не сможет идентифицировать этот язык и, следовательно, не будет отображать его в раскладке клавиатуры.
- В результате теперь это должно помешать Windows 11 автоматически добавлять раскладку клавиатуры, и, следовательно, проблема устранена.
ИСПРАВЛЕНИЕ 3. Добавьте реестр IgnoreRemoteKeyboardLayout.
- Перейдите в меню «Пуск» и запустите редактор реестра.
- Затем скопируйте и вставьте указанное ниже местоположение в его адресную строку и нажмите Enter:ComputerHKEY_LOCAL_MACHINESYSTEMCurrentControlSetControlKeyboard Layout.
- Теперь щелкните правой кнопкой мыши пустое место с правой стороны и выберите «Создать» > «Значение DWORD (32-разрядное)».
- Назовите его IgnoreRemoteKeyboardLayout и дважды щелкните, чтобы открыть его. Затем введите 1 в поле «Значение» и нажмите «ОК», чтобы сохранить его.
- Наконец, перезагрузите компьютер и проверьте, может ли он помешать Windows 11 автоматически добавлять раскладку клавиатуры.
ИСПРАВЛЕНИЕ 4. Удаление реестра предварительной загрузки
- Запустите редактор реестра и перейдите в следующую папку: ComputerHKEY_USERS.DEFAULTKeyboard LayoutPreload.
- Теперь давайте сначала сделаем резервную копию этой папки предварительной загрузки. Поэтому щелкните его правой кнопкой мыши, выберите «Экспорт» и выберите нужное место для его сохранения.
- После этого щелкните правой кнопкой мыши Preloader и выберите «Удалить». Затем нажмите YES в диалоговом окне подтверждения.
- Наконец, перезагрузите компьютер и проверьте, удается ли ему запретить Windows 11 автоматически добавлять раскладку клавиатуры.
Если в какой-то момент времени вы захотите восстановить резервную копию, нажмите «Файл» > «Импорт» и выберите файл «Предварительная загрузка». Для местоположения это будет КомпьютерHKEY_USERS.DEFAULTРаскладка клавиатуры
ИСПРАВЛЕНИЕ 5: переопределить параметры автоматического языка Microsoft
Перейдите в меню «Пуск» и запустите PowerShell от имени администратора. Затем скопируйте и вставьте приведенную ниже команду (по одной за раз) и нажмите Enter. Обратите внимание, что это временный обходной путь, и вам придется выполнять эту команду каждый раз, когда возникает проблема. Именно из-за этого временного характера мы решили перечислить его в конце этого руководства.
Set-WinCultureFromLanguageListOptOut -OptOut 1 Set-WinUILanguageOverride -Language en-US Set-WinDefaultInputMethodOverride -InputTip «0426:00040426» Set-Culture lv-LV
Итак, на этом мы завершаем руководство о том, как вы можете запретить Windows 11 автоматически добавлять раскладку клавиатуры. мы перечислили пять различных методов для одного и того же. Дайте нам знать в разделе комментариев, какой из них принес вам успех. Кроме того, все ваши вопросы приветствуются в комментариях ниже.
В Windows 10, начиная с релиза 1903, появилась новая «фича» — в момент смены языка ввода, справа на экране всплывает окно переключения раскладки клавиатуры. Лично я заметил это после перехода на версию 1909, но судя по безответным сообщениям и мольбам в интернете, уведомление о смене языка всплывало на рабочем столе и в более ранних версиях.
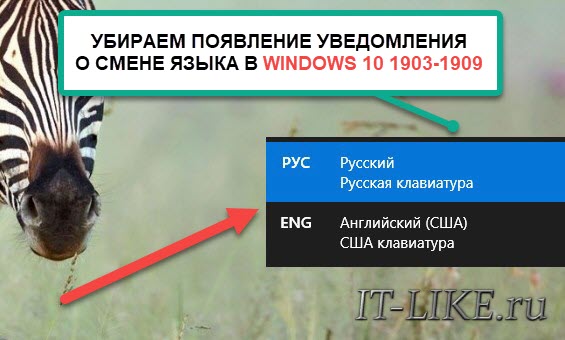
Я просто был в шоке, когда узнал, что эту функцию невозможно отключить в настройках Windows! Разработчики посчитали это новой «фишкой» интерфейса Windows 10 без возможности отключения. У меня просто встала работа, не могу печатать текст, когда это окошко постоянно моргает перед глазами. Как вариант, можно нажимать первой клавишу «Shift», а затем «Alt» или «Ctrl», смотря как у вас настроены кнопки для смены языка. Но, когда привыкаешь к «Ctrl+Shift», то это всё равно неудобство. Замена языковой панели на Punto Switcher не решает проблему.
Есть и хорошая новость: убрать уведомление можно, и это совсем просто. Скачайте архив со скриптом, который заменяет системную библиотеку на пропатченную версию.
Скачать InputSwitch
Скрипт написал не я, видео с инструкцией по скрипту «Input Switch» от разработчика будет в конце статьи. Всё что вам нужно знать: это не замануха и не вирус, программа реально работает.
- Вот что нужно сделать:
- Распакуйте архив любым удобным способом;
- Запустите файл «KILLTHISDIALOGBOX.bat». Для успешного выполнения скрипта, в систему нужно войти с правами Администратора.
- Перед вами на несколько секунд появится чёрное окно с выполняемыми командами. Нажмите любую кнопку, чтобы окно закрылось, уведомление о смене языка больше появляться не будет;
- Рекомендуется перезагрузить Windows, если окошко переключения раскладки всё ещё появляется.
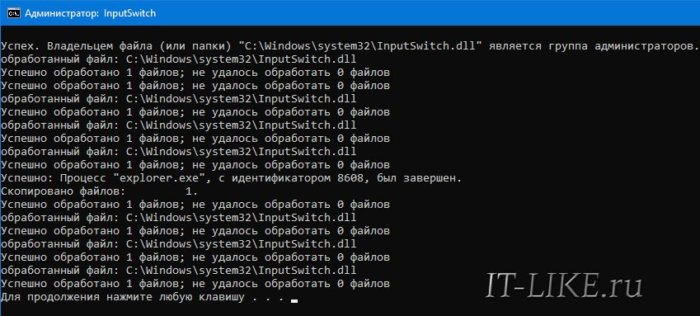
Чтобы откатить всё как было, просто запустите батник «RETURNTHISDIALOGBOX.bat», и диалог переключения раскладки клавиатуры вернётся, как было раньше. Видео:
- ВКонтакте
Download PC Repair Tool to quickly find & fix Windows errors automatically
When you select more than one language as the input language, the Language bar will be displayed either on the taskbar or desktop in Windows. If you wish to turn on or turn off the Input Indicator or Language Bar in Windows 11/10, then this post will show you how to do it. The post has been edited to mention the procedure for Windows 11/10 in the first half and then talks about Windows 8.1 in the latter half.
How to disable Language Bar or Input Indicator in Windows 11
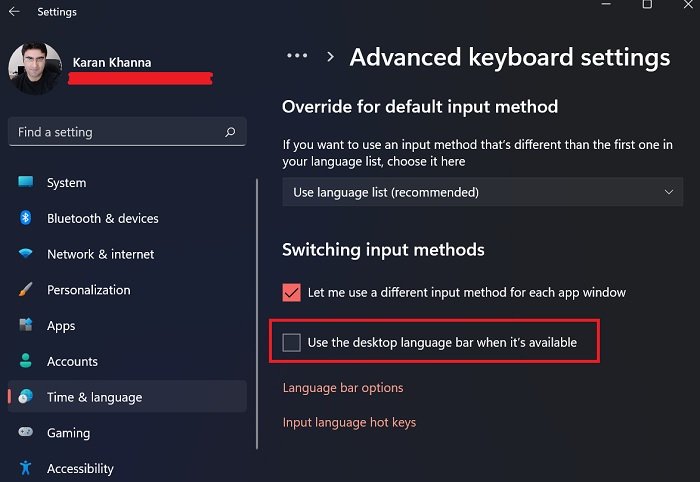
Adding more input languages in Windows 11 automatically invokes the language bar on the system. If you wish to turn Off the Language Bar in Windows 11, then the procedure is as follows:
- Right-click on the Start button and select Settings.
- Go to the Time & language tab on the list on the left-hand side.
- In the right pane, select Typing.
- Scroll down and click on Advanced Keyboard settings.
- In the Advanced Keyboard settings window, uncheck the box associated with Use the desktop language bar when it’s available.
- Reboot your system.
Language Bar & Input Indicator settings in Windows 10
In recent versions of Windows 10, to Turn Off Language Bar or Input Indicator, you need to do this.

- Open Settings
- Select Devices > Typing
- Scroll down till you see More keyboard settings
- Click on Advanced keyboard settings to open the panel
- Here you will see the setting Use the desktop language bar when it’s available.
Clicking on language bar options will open the following window-
Make the choices as per your requirements.
To hide the ENG from the Taskbar, you can turn off the Input Indicator from Settings > Personalization > Taskbar > Notification area > Turn System icons on or off.

Do note that closing the Language bar will not uninstall or remove any languages from your Windows PC, it is only this option to easily switch between input methods, that is hidden or removed.
How to hide the Language Bar?
If you do not want to turn OFF the Language Bar but merely hide it or sideline it, then the procedure is as follows:
- Right-click on the Start button and select Settings.
- Go to the Time & language tab on the list on the left-hand side.
- In the right pane, select Typing.
- Scroll down and click on Advanced Keyboard settings.
- Click on the option for Language bar options.
- In the Language bar tab, you will find options to make it Hidden, Floating on Desktop, Transparent when inactive, etc.
Why is the option for the language bar under the Typing section instead of the Languages section?
Microsoft made significant changes to menus in Settings for the convenience and accessibility of Windows users. Since the option for the Language bar had to be clubbed with other similar options, it was placed in the Typing section and not otherwise.
In earlier versions of Windows 10 and in Windows 8.1 you had to do this:
From the WinX Menu, open Control Panel and click on the Language applet. Here it is assumed that you have more than one language as the input language. In my image, you will see English and Hindi.
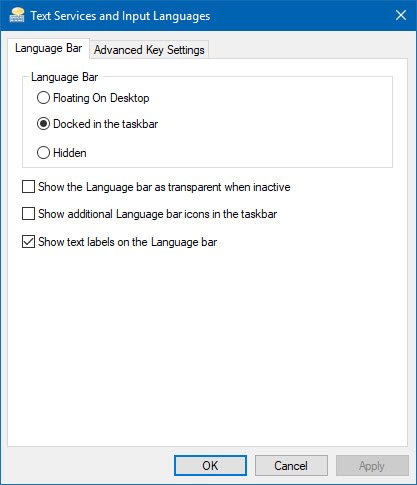
Click on Advanced settings, that you can see in the left panel. The following will open. Under Switching inputs method, select Use the desktop language bar when it‘s available.
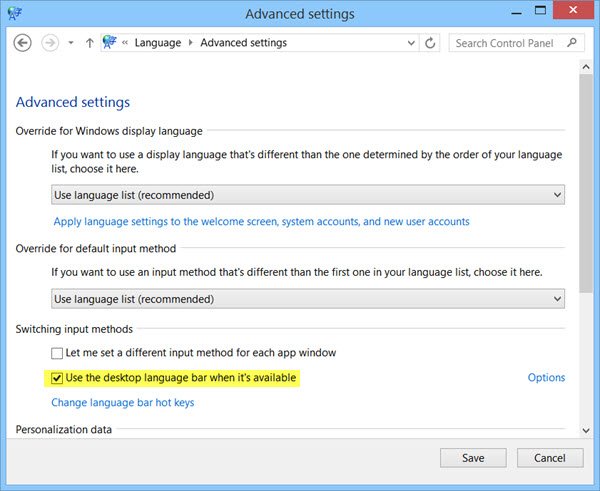
Once you have done this, click on the Options link in the same line. The Text Services and Input Languages settings box will open. Under the Language Bar tab, you will see the following three options for the Language Bar.
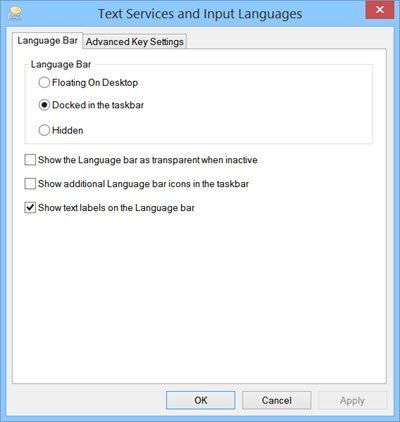
By default, the Language Bar appears as follows in the Taskbar.
When you select Floating on Desktop, you will see the following bar, which you can drag and place anywhere on your Windows desktop, according to your convenience.

If you select Docked in the Taskbar and also check the Show additional Language Bar icons in the taskbar, you will see it appear as follows:
![]()
When you select Hidden, the Language Bar will be hidden. To remove or turn off, simply uncheck the Use the desktop language bar when it‘s available setting.
There is another way to hide the ENG from taskbar
You may also right-click Taskbar > Properties > Taskbar and Navigation Properties > Taskbar tab. Click the Notification Area – Customize button.
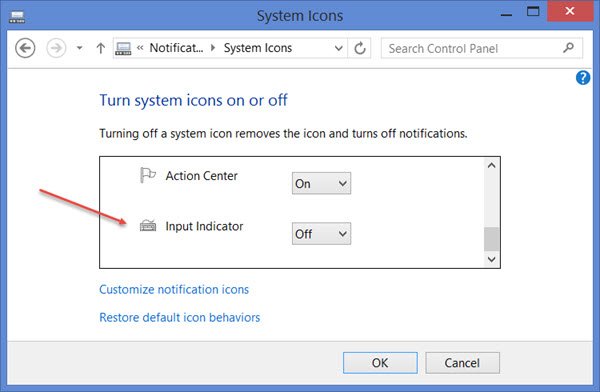
Next, in the new window which opens, click Turn system icons on or off. Now select the option Off for Input Indicator from the drop-down menu. Click OK and Exit.
Go here to troubleshoot if your Language Bar is missing.

Anand Khanse is the Admin of TheWindowsClub.com, a 10-year Microsoft MVP (2006-16) & a Windows Insider MVP (2016-2022). Please read the entire post & the comments first, create a System Restore Point before making any changes to your system & be careful about any 3rd-party offers while installing freeware.