The Ultimate Guide to Uninstalling or Disabling Hyper-V in Windows 10
Hyper-V is the first type hypervisor that can be installed on Windows to run virtual machines. Recently we have explained how to install Hyper-V on Windows 10 and Windows Server 2019. But what if you no longer need Hyper-V on your machine? Hyper-V also causes issues if you want to run other second-type hypervisor such as VMware Workstation or VirtualBox on the same Windows machine. This blog post explains how to uninstall Hyper-V in Windows by using the graphical user interface or the command line interface.
How to Uninstall Hyper-V in Control Panel of Windows 10
Using the Control Panel to uninstall Hyper-V is the most convenient method and is preferred by most Windows 10 users. As a result, the Hyper-V feature is uninstalled completely. Let me explain the workflow step by step.
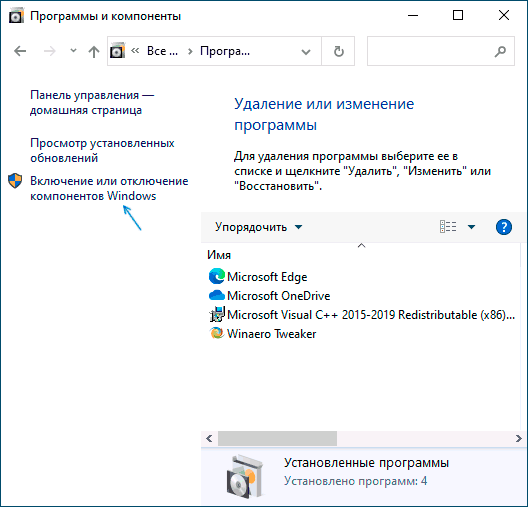
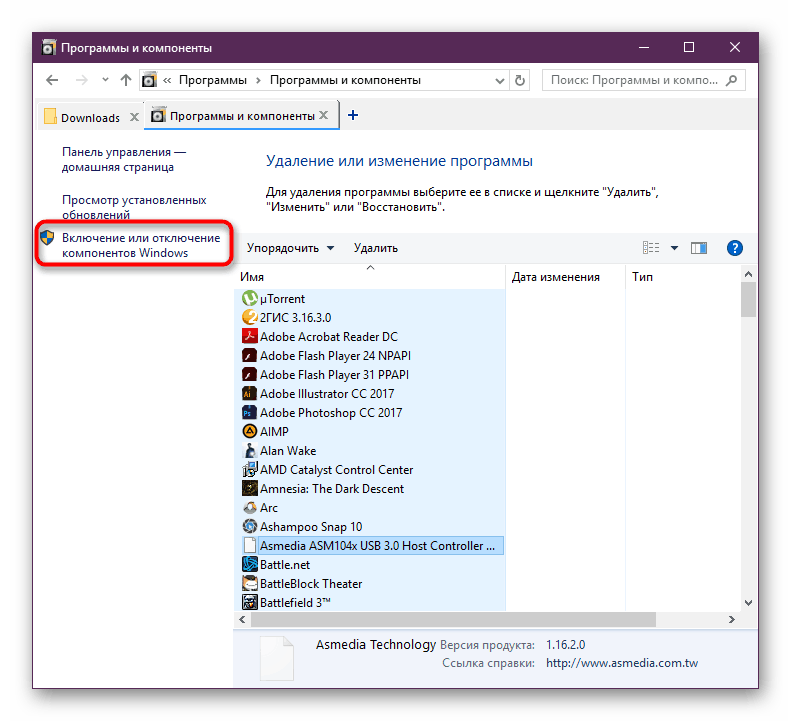
Click Start, type Control Panel, and open Control Panel. There are two alternative methods to open Control Panel. Press the Win+X combination on your keyboard, and, in the menu that opens, click Control Panel. Press Win+R. In the Run field, type appwiz.cpl and press Enter.
Click Turn Windows features on or off in the Control Panel window.
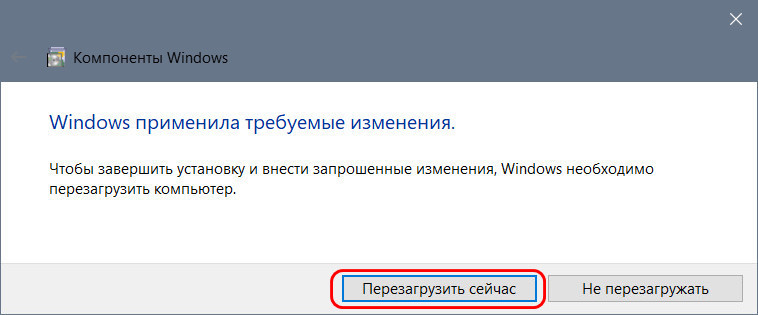
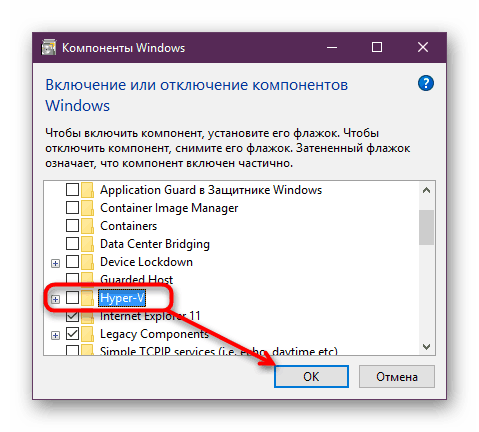
In the Windows Features window that opens, deselect the Hyper-V checkbox. Make sure that checkboxes in Hyper-V subfolders are deselected. Hit OK to save settings and start the Hyper-V uninstallation process.

Hit Restart now to restart your computer to finish the process and uninstall Hyper-V.

How to Uninstall Hyper-V in the Command Prompt of Windows 10
You can uninstall Hyper-V in the command line interface (CLI). At the end of this workflow you get the same result as for the method explained in the previous section when using the graphical user interface (GUI). Check the Hyper-V installation status in the command line before you start to uninstall Hyper-V and after you uninstall Hyper-V to make sure that this hypervisor is removed from your Windows system.
Open the command line (CMD) as administrator. Open the Windows Start menu, type cmd, right click the cmd entry, and click Run as administrator.
Run systeminfo to check whether Hyper-V is installed.
If Hyper-V is not installed, you can see in the Hyper-V requirements section the names of technologies required to install Hyper-V and the status of their availability on the machine.
If Hyper-V is installed, you should see the following message in the Hyper-V Requirements line:
A hypervisor has been detected. Features required for Hyper-V will not be displayed.

As an alternative, you can run msinfo32.exe to check whether Hyper-V is uninstalled in the GUI. The needed information is located in the System Summary section in the bottom of the item list.

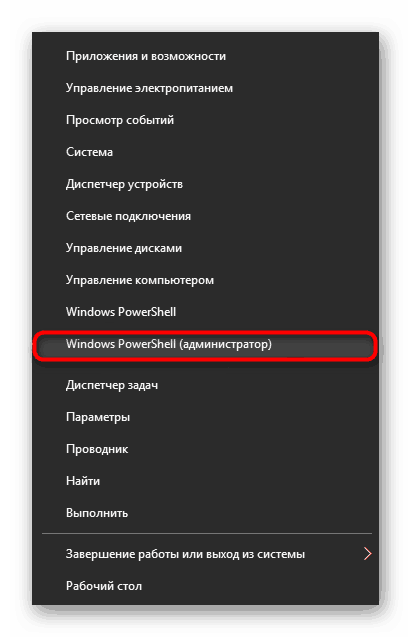
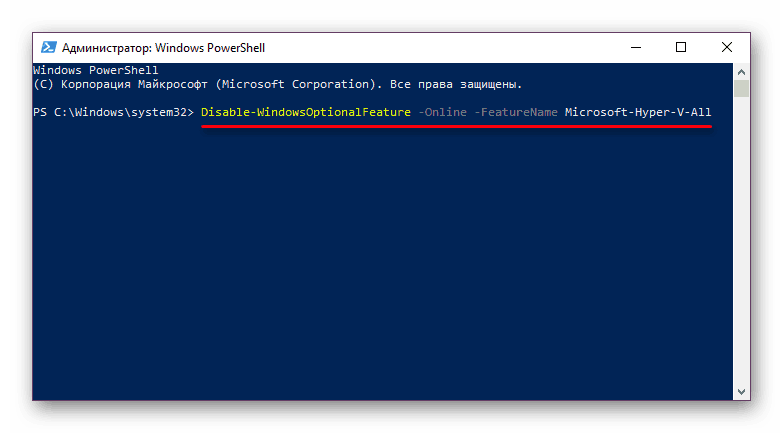
Now it is time to uninstall Hyper-V in Windows 10 by using the command line. You should open PowerShell with administrative privileges (type PowerShell in the Start menu, right click PowerShell and click Run as administrator just as you do to run CMD). Run the following command to remove the Hyper-V feature from Windows 10:
Disable-WindowsOptionalFeature -Online -FeatureName Microsoft-Hyper-V-All

Do you want to restart the computer to complete this operation now?
Type Y and hit Enter.
Restart is required after executing this command. You can type N (No) and restart Windows manually.
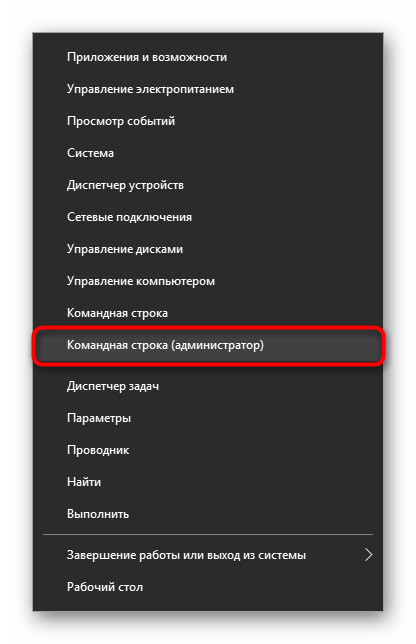
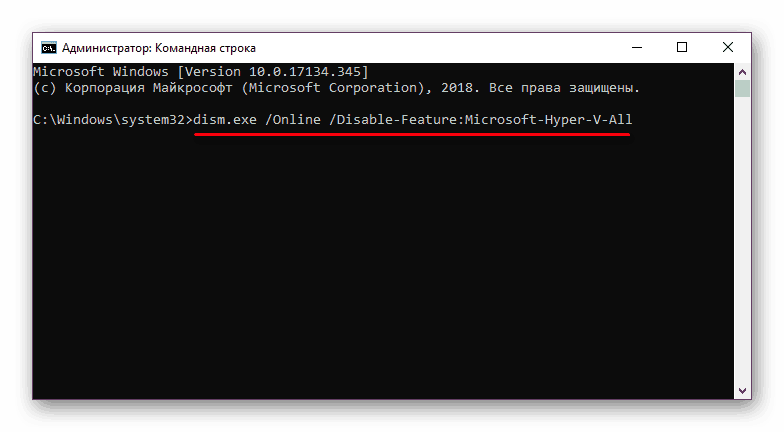
Removing Hyper-V with DISM
DISM (Deployment Image Servicing and Management) is a tool for working with Windows images (.wim files) and install/uninstall Windows drivers, features, and packages.
Open PowerShell with administrative privileges, and run this command to disable Hyper-V:
DISM /Online /Disable-Feature:Microsoft-Hyper-V

You may need to disable Secure Boot in UEFI/BIOS settings of a computer to finish the uninstallation process and uninstall Hyper-V. The sequence to disable Secure Boot depends on your hardware vendor and differs for different motherboard vendors and models.
You can change Hyper-V startup options when Windows boots without uninstalling Hyper-V completely. In this case, Hyper-V is installed but inactivated. Hyper-V is not booted before Windows boots if you disable Hyper-V by using the command line bcdedit tool. Bcdedit is the command line tool to manage Boot Configuration Data or BCD. BCD store is used to describe boot parameters for applications, add boot menu entries, etc. If you use BCD to disable Hyper-V, the Hyper-V feature is disabled but not uninstalled completely from Windows. As you remember, Hyper-V is the first-type hypervisor that boots before Windows boots. The idea of using this method is to disable Hyper-V in boot configuration.
Run the command prompt (CMD) as administrator and run the following command to disable Hyper-V by using bcdedit:
bcdedit /set hypervisorlaunchtype off

Note: If you need to enable Hyper-V again, run bcdedit /set hypervisorlaunchtype on
For more convenience, you can create two boot entries for your Windows machine. One boot entry is used to boot an operating system with Hyper-V, and another one is used to boot an OS without Hyper-V.
Run the following command to copy the default boot configuration to the new entry. “Hyper-V disable” is the name of the new boot entry in my case.
bcdedit /copy {default} /d «Hyper-V disable»
The following output message is displayed:
«The entry was successfully copied to {xxxxxxxx-xxxx-xxxx-xxxx-xxxxxxxxxxxx}.»
Run the command to edit Hyper-V boot options for the new boot entry you have created. Copy the value in brackets {} from the above output message and paste to this command:
bcdedit /set {xxxxxxxx-xxxx-xxxx-xxxx-xxxxxxxxxxxx} hypervisorlaunchtype off

You should see the message: The operation completed successfully.
Edit the name of the default boot entry with Hyper-V to “Windows 10 Hyper-V” for more convenience:
bcdedit /set {default} description «Windows 10 Hyper-V»
Restart your computer.
Now you have two boot menu entries. Select “Hyper-V disable” to boot Windows without Hyper-V or select “Windows 10 Hyper-V” to boot Windows with Hyper-V.

How to Uninstall Hyper-V on Windows Server 2016
The process of removing Hyper-V in Windows Server 2016 is slightly different compared to Windows 10. In this section, I explain how to uninstall Hyper-V in Windows Server 2016. If you use Windows Server 2019, the workflow to uninstall Hyper-V on Windows Server 2019 is identical.
Using the GUI
If your Windows Server is installed with the graphic experience and has a graphical user interface (GUI), then the easiest way to uninstall Hyper-V is using Server Manager and the Remove Roles and Features wizard.
Open Server Manager (Start > Server Manager). Click Manage > Remove Roles and Features.

The Remove Roles and Features wizard opens.
Before You Begin. There is nothing to configure at this step, but you can select the Skip this page by default to avoid displaying this page in the future. Click Next to continue.
Server Selection. Select a server from the server pool and select your server in the list. The server name is Hyper-V-Repl.test.net in my case. Hit Next at each step of the wizard to continue.

Server Roles. Deselect the Hyper-V checkbox in the list of roles to uninstall Hyper-V.

The popup window opens. Check the features that you are about to remove. Select Remove management tools (if applicable) to remove Hyper-V Manager Windows tools. Click Remove Features.

Features. There is no need to remove custom features when you uninstall Hyper-V. Leave features configuration as is.

Confirmation. Check all items that are going to be removed. Select the checkbox if you want your server to restart automatically when the Hyper-V role is removed. Otherwise, you need to restart Windows manually for changes to take effect and finish Hyper-V uninstallation. Click Remove to finish and uninstall Hyper-V.

Using PowerShell
The PowerShell command to uninstall Hyper-V in Windows Server 2016 and 2019 is not the same as in Windows 10.
Open PowerShell as administrator.
Run the following command to uninstall Hyper-V on Windows Server 2016:
Remove-WindowsFeature -Name Hyper-V

Restart the server to finish the removal process.
Issues that Can Occur
Sometimes issues may occur when you try to uninstall Hyper-V in Windows 10 and Windows Server 2016 or 2019. Let me explain some common issues and offer recommendations to help fix these issues.
Case 1
If you see a message that Windows cannot uninstall Hyper-V components, try to check system files and their storage. Different error codes are displayed, for example, 0x800F0831, 0x80073701, etc. Use command line tools to fix this issue. Open the command line (CMD) with administrative privileges and run the following commands.
Dism /Online /Cleanup-Image /RestoreHealth
Dism.exe /online /Cleanup-Image /StartComponentCleanup
sfc /scannow
Disable-WindowsOptionalFeature -Online -FeatureName Microsoft-Hyper-V-All
After executing these commands, logs are written to CBS.log and dism.log. Logs are useful for troubleshooting.
Case 2
Hyper-V is not uninstalled because a virtual network adapter or a virtual switch created by Hyper-V is present in a host Windows system. Remove virtual Hyper-V network adapters, and try to uninstall Hyper-V again. Here are some posts about Hyper-V network adapters and virtual switches from our blog.
Case 3
You disable Hyper-V but after reboot, Hyper-V is enabled again. A possible cause may be that a group policy is set to enable Hyper-V automatically on login after each boot. A system administrator should edit group policy configuration to fix this issue. Remember, that Device Guard and Credential Guard are features using Hyper-V to work in Windows. Check Computer Configuration -> Administrative Templates -> System -> Device Guard in the group policy editor to make sure that there are no settings to force run Device Guard on a Windows machine.
Conclusion
This blog post has explained how to uninstall Hyper-V in Windows 10 and Windows Server 2016. “How to uninstall Hyper-V in Windows?” is a popular question among users. Hyper-V can be uninstalled with a graphical user interface or a command line interface in Windows 10 and Windows Server 2016/2019. The workflow is different for Windows 10 and Windows Server operating systems. If you have uninstalled Hyper-V, you can use another hypervisor to run virtual machines. Read the blog post about Hyper-V vs VMware and Hyper-V vs VirtualBox comparison to make the right choice.
Remember to back up your virtual machines to protect your data. NAKIVO Backup & Replication is a product that supports backup of VMware VMs and Hyper-V VMs. Download the Free Edition of NAKIVO Backup & Replication from the official website and try the product to protect your virtual machines.
Join
- Learn
- Virtualization
- Server Virtualization
- Microsoft Hyper-V


to enable IT peers to see that you are a professional.
Last Updated:
Jan 26, 2023
4 Minute Read
-
Spice
-
Reply (0)
-
Subscribe
-
Share
Opens a new window
-
Facebook
Opens a new window -
Twitter
Opens a new window -
Reddit
Opens a new window -
LinkedIn
Opens a new window
-

to enable IT peers to see that you are a professional.
What’s this?
Microsoft Office 365
- Microsoft Office 365 |
- Data Backup |
- Microsoft Teams |
- Microsoft Exchange |
- VMware
Sign Up

- Remove From My Forums
-
Question
-
Hi,
I’ve tried to uninstall Hyper-V role using both GUI and Powershell method but I can’t remove that. When the server restart I get the following error in Server Manager:

Any help would be appreciated.
Thanks
-
Edited by
Amirhossein Karimpour
Wednesday, March 20, 2019 8:24 AM
-
Edited by
All replies
-
Hi,
You can try uninstalling Hyper-V via an administrative PowerShell:
Remove-WindowsFeature Hyper-V
Best regards,
Leon
Blog:
https://thesystemcenterblog.com
LinkedIn: -
Thanks Leon, I try this command but right now the error was solved but still the Hyper-V role hasn’t been uninstalled.
-
Hi ,
Did you mean when you remove the Hyper-V feature successfully and then restart , the Hyper-V role still be checked here?
Best Regards,
Candy
Please remember to mark the replies as an answers if they help.
If you have feedback for TechNet Subscriber Support, contact
tnmff@microsoft.com -
Did you reboot afterwards?
You can also try these:
Disable-WindowsOptionalFeature -Online -FeatureName Microsoft-Hyper-V-All
or
dism.exe /Online /Disable-Feature:Microsoft-Hyper-V-All
Blog:
https://thesystemcenterblog.com
LinkedIn: -
When I try the second command I got the below error:
Deployment Image Servicing and Management tool
Version: 10.0.14393.0

Image Version: 10.0.14393.0


Error: 87

The all option is not recognized in this context.
For more information, refer to the help.

The DISM log file can be found at C:WindowsLogsDISMdism.log
-
Yes, I did, But the Hyper-V role still exist!
Note: /All parameter doesn’t work.
-
Edited by
Amirhossein Karimpour
Wednesday, March 20, 2019 11:47 AM
-
Edited by
-
Excuse me Leon, Where does should I check that event log?
-
What OS version are you using?
Microsoft Certified Professional
[If a post helps to resolve your issue, please click the
«Mark as Answer» of that post or click
«Vote as helpful» button of that post. By marking a post as Answered or Helpful, you help others find the answer faster. ] -
Hi,
Please check the logs in
Start — Run — Type ‘Eventvwr’ (without quotes) Enter
Eventviewer —> Windows Logs —> Setup, System
Eventviewer —> Applications & services —> Microsoft —> Windows —> Hyper-V-VMMS, Hyper-V
Regards,
Bala -
-
-
Edited by
Matej Klemencic
Wednesday, March 20, 2019 1:03 PM
-
Edited by
-
I run this machine in the test environment. In the VMware Workstation. Therefore, This feature is enabled in the virtual machine.
-
Edited by
Amirhossein Karimpour
Wednesday, March 20, 2019 1:08 PM
-
Edited by
-
Hi,
All the drivers are updated?
Please check the problems in any hardware
Hyper-V VMMS service is running?
Regards,
Bala -
All the drivers are updated?
I’m in the test environment.
Please check the problems in any hardware
I’m in the test environment.
Hyper-V VMMS service is running?
Yes
-
Edited by
Amirhossein Karimpour
Wednesday, March 20, 2019 1:12 PM
-
Edited by
-
I run this machine in the test environment. In the VMware Workstation. Therefore, This feature is enabled in the virtual machine.
Don’t quite understand your environment. So the server from which you are trying to remove Hyper-V is a VM on top of VMware?
Microsoft Certified Professional
[If a post helps to resolve your issue, please click the
«Mark as Answer» of that post or click
«Vote as helpful» button of that post. By marking a post as Answered or Helpful, you help others find the answer faster. ] -
Yes, I’m running this server on the VMware Workstation as a VM.
-
Edited by
Amirhossein Karimpour
Wednesday, March 20, 2019 2:33 PM
-
Edited by
-
That is important info, because you should not mix VMware and Hyper-V virtualization — it’s not supported.
Microsoft Certified Professional
[If a post helps to resolve your issue, please click the
«Mark as Answer» of that post or click
«Vote as helpful» button of that post. By marking a post as Answered or Helpful, you help others find the answer faster. ] -
Mixing two virtualization platforms (VMware and Hyper-V) is not supported as Matej mentioned, it can cause various issues and unexpected behavior.
Blog:
https://thesystemcenterblog.com
LinkedIn: -
But I got the answer in Windows Server 2012, I mean, I can’t remove the Hyper-V role in Windows Server 2016
-
The same applies for windows server 2012 and 2016.
Microsoft Certified Professional
[If a post helps to resolve your issue, please click the
«Mark as Answer» of that post or click
«Vote as helpful» button of that post. By marking a post as Answered or Helpful, you help others find the answer faster. ] -
Hi ,
Just want to confirm the current situations.
Please feel free to let us know if you need further assistance.
Best Regards,
Candy
Please remember to mark the replies as an answers if they help.
If you have feedback for TechNet Subscriber Support, contact
tnmff@microsoft.com
- Remove From My Forums
-
Question
-
Hi,
I’ve tried to uninstall Hyper-V role using both GUI and Powershell method but I can’t remove that. When the server restart I get the following error in Server Manager:
Any help would be appreciated.
Thanks
-
Edited by
Amirhossein Karimpour
Wednesday, March 20, 2019 8:24 AM
-
Edited by
All replies
-
Hi,
You can try uninstalling Hyper-V via an administrative PowerShell:
Remove-WindowsFeature Hyper-V
Best regards,
Leon
Blog:
https://thesystemcenterblog.com
LinkedIn: -
Thanks Leon, I try this command but right now the error was solved but still the Hyper-V role hasn’t been uninstalled.
-
Hi ,
Did you mean when you remove the Hyper-V feature successfully and then restart , the Hyper-V role still be checked here?
Best Regards,
Candy
Please remember to mark the replies as an answers if they help.
If you have feedback for TechNet Subscriber Support, contact
tnmff@microsoft.com -
Did you reboot afterwards?
You can also try these:
Disable-WindowsOptionalFeature -Online -FeatureName Microsoft-Hyper-V-All
or
dism.exe /Online /Disable-Feature:Microsoft-Hyper-V-All
Blog:
https://thesystemcenterblog.com
LinkedIn: -
When I try the second command I got the below error:
Deployment Image Servicing and Management tool
Version: 10.0.14393.0

Image Version: 10.0.14393.0


Error: 87

The all option is not recognized in this context.
For more information, refer to the help.

The DISM log file can be found at C:WindowsLogsDISMdism.log
-
Yes, I did, But the Hyper-V role still exist!
Note: /All parameter doesn’t work.
-
Edited by
Amirhossein Karimpour
Wednesday, March 20, 2019 11:47 AM
-
Edited by
-
Excuse me Leon, Where does should I check that event log?
-
What OS version are you using?
Microsoft Certified Professional
[If a post helps to resolve your issue, please click the
«Mark as Answer» of that post or click
«Vote as helpful» button of that post. By marking a post as Answered or Helpful, you help others find the answer faster. ] -
Hi,
Please check the logs in
Start — Run — Type ‘Eventvwr’ (without quotes) Enter
Eventviewer —> Windows Logs —> Setup, System
Eventviewer —> Applications & services —> Microsoft —> Windows —> Hyper-V-VMMS, Hyper-V
Regards,
Bala -
-
-
Edited by
Matej Klemencic
Wednesday, March 20, 2019 1:03 PM
-
Edited by
-
I run this machine in the test environment. In the VMware Workstation. Therefore, This feature is enabled in the virtual machine.
-
Edited by
Amirhossein Karimpour
Wednesday, March 20, 2019 1:08 PM
-
Edited by
-
Hi,
All the drivers are updated?
Please check the problems in any hardware
Hyper-V VMMS service is running?
Regards,
Bala -
All the drivers are updated?
I’m in the test environment.
Please check the problems in any hardware
I’m in the test environment.
Hyper-V VMMS service is running?
Yes
-
Edited by
Amirhossein Karimpour
Wednesday, March 20, 2019 1:12 PM
-
Edited by
-
I run this machine in the test environment. In the VMware Workstation. Therefore, This feature is enabled in the virtual machine.
Don’t quite understand your environment. So the server from which you are trying to remove Hyper-V is a VM on top of VMware?
Microsoft Certified Professional
[If a post helps to resolve your issue, please click the
«Mark as Answer» of that post or click
«Vote as helpful» button of that post. By marking a post as Answered or Helpful, you help others find the answer faster. ] -
Yes, I’m running this server on the VMware Workstation as a VM.
-
Edited by
Amirhossein Karimpour
Wednesday, March 20, 2019 2:33 PM
-
Edited by
-
That is important info, because you should not mix VMware and Hyper-V virtualization — it’s not supported.
Microsoft Certified Professional
[If a post helps to resolve your issue, please click the
«Mark as Answer» of that post or click
«Vote as helpful» button of that post. By marking a post as Answered or Helpful, you help others find the answer faster. ] -
Mixing two virtualization platforms (VMware and Hyper-V) is not supported as Matej mentioned, it can cause various issues and unexpected behavior.
Blog:
https://thesystemcenterblog.com
LinkedIn: -
But I got the answer in Windows Server 2012, I mean, I can’t remove the Hyper-V role in Windows Server 2016
-
The same applies for windows server 2012 and 2016.
Microsoft Certified Professional
[If a post helps to resolve your issue, please click the
«Mark as Answer» of that post or click
«Vote as helpful» button of that post. By marking a post as Answered or Helpful, you help others find the answer faster. ] -
Hi ,
Just want to confirm the current situations.
Please feel free to let us know if you need further assistance.
Best Regards,
Candy
Please remember to mark the replies as an answers if they help.
If you have feedback for TechNet Subscriber Support, contact
tnmff@microsoft.com

Как удалить Hyper-V? Этот гипервизор встроен в серверные и некоторые клиентские системы Windows, является штатным их функционалом, поэтому в прямом контексте удалить его невозможно. Его можно только отключить. При отключении Hyper-V из операционной системы убираются все его виртуальные сетевые карты, гипервизор не загружается вместе с ядром Windows, и тогда в системе можно работать с другими, сторонними гипервизорами.
Давайте рассмотрим, как удалить Hyper-V из клиентских Windows 8.1 и 10.
Hyper-V удаляется способом, обратным тому, каким он активировался в Windows 8.1 или 10.
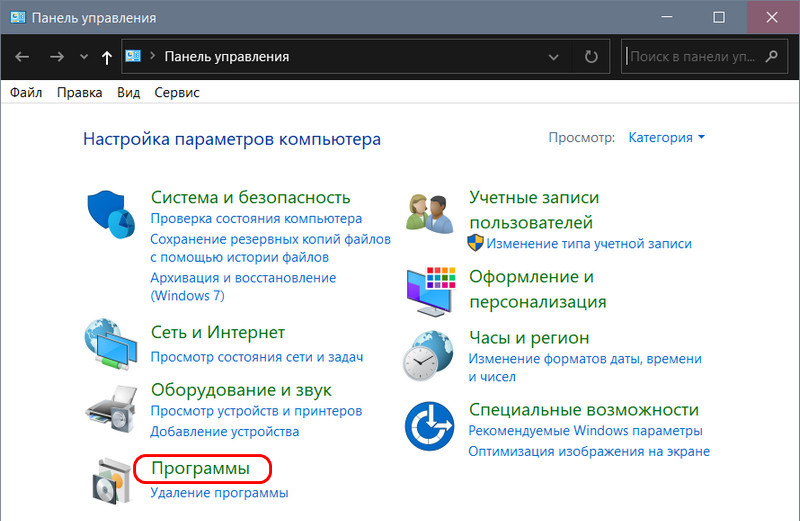
Идём в панель управления системы.
Заходим в раздел «Программы».
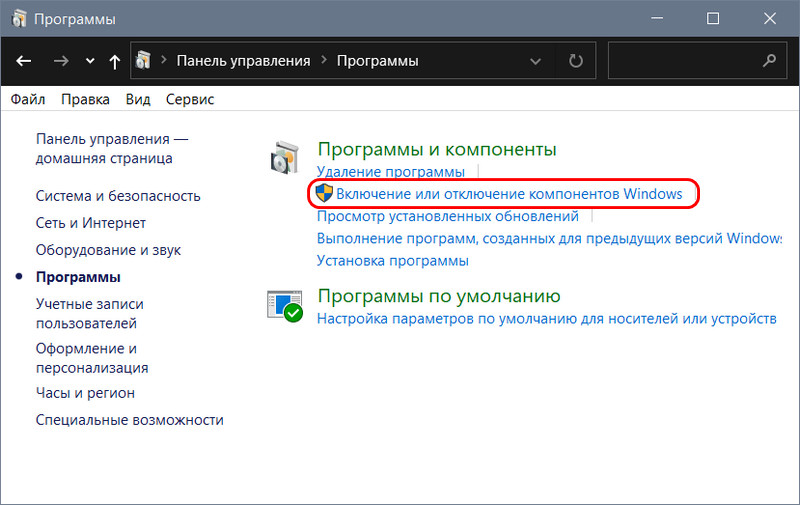
Запускаем включение и отключение системных компонентов.
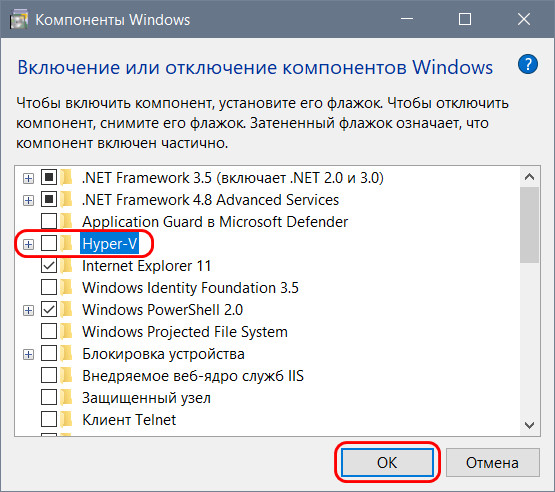
В их перечне снимаем галочку с Hyper-V.
Жмём «Ок».
Ожидаем, пока Windows применит изменения.
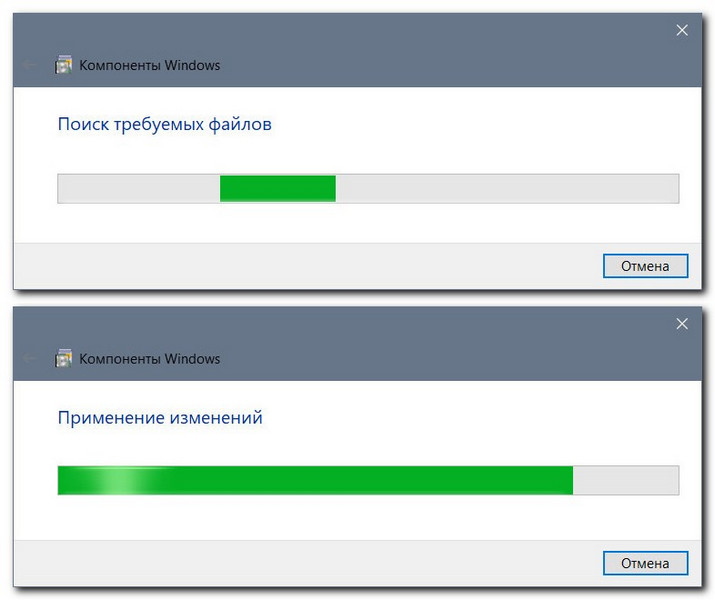
И перезагружаем компьютер.
Далее нам останется только решить судьбу файлов виртуальных машин.
Их можно оставить, если в будущем планируется возврат к работе с Hyper-V. Можно удалить, если никаких планов с этим гипервизором более не связано. А можно удалить всё, кроме файлов жёстких VHD-дисков машин Hyper-V. Этот формат поддерживают другие программы-гипервизоры, в частности, VMware и VirtualBox, и на базе таких виртуальных дисков в этих программах можно создать виртуальные машины.
Оцените Статью:
 (1 оценок, среднее: 5,00 из 5)
![]() Загрузка…
Загрузка…
 Компоненты Hyper-V в Windows 10 позволяют создавать виртуальные машины встроенными средствами системы (подробнее: Виртуальные машины Hyper-V в Windows 10), а также служит для работы таких компонентов как Песочница Windows 10. Однако в некоторых случаях включенные компоненты Hyper-V могут мешать: например, для запуска виртуальных машин VirtualBox или эмуляторов Android.
В этой инструкции подробно о том, как отключить Hyper-V в Windows 10 двумя способами: первый предполагает отключение соответствующих компонентов системы, второй — отключение гипервизора без удаления самих компонентов Hyper-V.
- Отключение Hyper-V путем удаления в компонентах
- Как отключить Hyper-V без удаления
- Видео инструкция
- Дополнительные способы удалить Hyper-V
Отключение Hyper-V в компонентах Windows 10
Первый способ отключить Hyper-V предполагает использование соответствующего раздела «Программы и компоненты» в панели управления, шаги будут следующими:
- Откройте Панель управления, для этого можно использовать поиск в панели задач, либо нажать Win+R на клавиатуре, ввести control и нажать Enter.
- В панели управления перейдите в раздел «Программы и компоненты» или «Удаление программы».
- Слева нажмите по пункту «Включение или отключение компонентов Windows».

- Снимите отметку с пункта «Hyper-V» и примените настройки.

- При появлении запроса на перезагрузку, перезагрузите Windows 10 для вступления изменений в силу.

Обычно указанных действий достаточно, чтобы устранить проблемы, которые иногда могут быть вызваны наличием Hyper-V в системе.
Если указанные шаги не помогли, попробуйте там же в компонентах отключить пункт «Песочница Windows» и также перезагрузить компьютер при необходимости.
Как отключить Hyper-V без удаления компонентов
Предыдущий метод отключения Hyper-V предполагает удаление соответствующих компонентов из системы, однако можно обойтись и без этого:
- Запустите командную строку от имени Администратора, для этого можно использовать поиск в панели задач, а потом выбрать пункт «Запуск от имени администратора». Другие способы запуска командной строки от имени администратора.
- Введите команду
bcdedit /set hypervisorlaunchtype off
и нажмите Enter.
- Перезагрузите компьютер.
После перезагрузки Hyper-V (гипервизор) будет выключен и не будет влиять на запуск каких-либо других виртуальных машин, при этом сам компонент останется включенным.
Чтобы снова включить Hyper-V, используйте ту же команду, но измените off на auto и перезагрузите компьютер. Также есть возможность создания меню загрузки для выбора режима, в котором будет запускаться система — с включенным или отключенным Hyper-V, об этом в инструкции Как запускать виртуальные машины Hyper-V и VirtualBox на одном компьютере.

Видео
Дополнительные способы удалить Hyper-V
Помимо описанных способов, вы можете удалить компоненты Hyper-V в PowerShell с помощью команды
Disable-WindowsOptionalFeature -Online -FeatureName Microsoft-Hyper-V-Hypervisor
Или, при использовании командной строки, с помощью команды:
DISM /Online /Disable-Feature:Microsoft-Hyper-V
Надеюсь, материал помог разобраться. Если же остаются вопросы — задавайте в комментариях. Также помните, что для работы виртуальных машин и эмуляторов следует включить аппаратную виртуализацию.
Hyper-V — встроенная система виртуализации, которая доступна во всех редакциях Windows 10, кроме Home. Иногда от её использования приходится отказываться — в первую очередь, из-за конфликтов со сторонними виртуальными машинами. Рассмотрим доступные способы отключения Hyper-V.
Hyper-V — элемент системы, поэтому им можно управлять через инструмент «Компоненты Windows».
- Открываем «Панель управления» и переходим в раздел «Удаление программ».
- Кликаем по ссылке «Включение или отключение компонентов» в меню слева.

Переходим к управлению системными компонентами
- В списке находим Hyper-V.
- Убираем отметку, чтобы деактивировать приложение.
- Нажимаем «ОК» для сохранения конфигурации.

Снимая отметку, мы отключаем системный компонент
Параметры применяются сразу, перезагрузка не требуется, но можно на всякий случай её выполнить.
Использование консоли
Отключить Hyper-V можно также через PowerShell и командную строку. Команды отличаются, но результат их выполнения одинаковый — встроенная виртуальная машина будет деактивирована.
Сначала посмотрим, как это работает в PowerShell:
- Запускаем PowerShell с правами администратора.

В последних версиях Windows консоль PowerShell вытесняет командую строку
- Выполняем команду Disable-WindowsOptionalFeature -Online -FeatureName Microsoft-Hyper-V-All.
- Ждём завершения процесса деактивации.
- После получения сообщения о статусе выполнения закрываем окно консоли.

Деактивируем Hyper-V через консоль PowerShell
То же самое можно сделать через командную строку, используя хранилище системных компонентов DISM.
- Запускаем командную строку от имени администратора.

В предыдущих сборках командная строка всё ещё остаётся основной консолью
- В открывшемся окне выполняем следующую команду dism.exe /Online /Disable-Feature:Microsoft-Hyper-V-All
- Ждём завершения процедуры и появления сообщения о том, что функция отключена.

Отключаем Hyper-V в командной строке
При использовании консоли также не требуется перезагрузка, конфигурация сразу вступает в силу.
Hyper-V не отключается
Если при попытке деактивации Hyper-V появляется уведомление о том, что системе не удалось завершить компоненты, то следует выполнить проверку системных файлов и их хранилища. Для этого мы будем использовать командную строку.
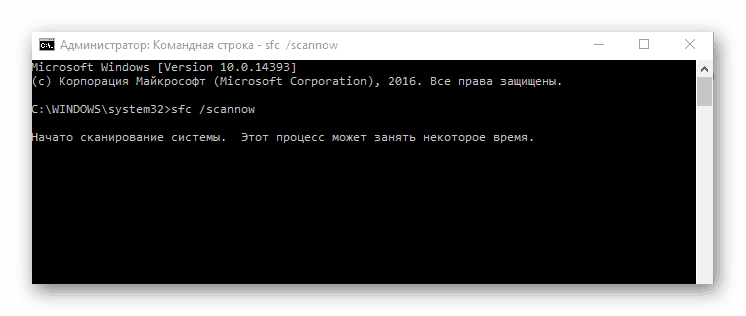
- Запускаем командную строку с правами администратора.
- Выполняем команду sfc /scannow.
- Дожидаемся завершения диагностики.

Проверяем системные файлы
Если проверка с помощью SFC не обнаружила причину неполадки, то пробуем вторую команду.
- Запускаем командную строку с правами администратора.
- Выполняем команду DISM /Online /Cleanup-Image /RestoreHealth.
- Дожидаемся завершения диагностики.

Проверяем хранилище системных файлов
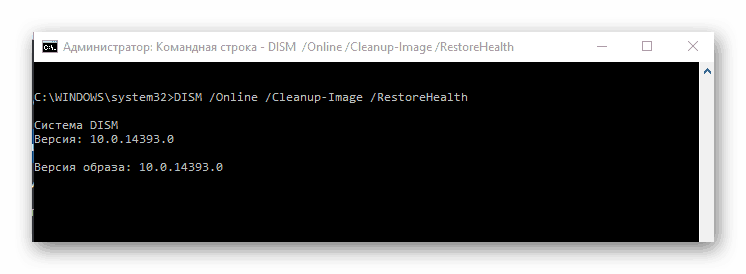
При выполнении команды система находит и устраняет сбои в системных файлах и хранилище. Даже если исправить ошибки не удаётся, информация о них записывается в логи CBS.log. и dism.log, которые создаются автоматически. В этих файлах вы можете посмотреть описание проблемы, после чего найти конкретные решения.
![]() Загрузка …
Загрузка …
Post Views: 16 289
В данной статье показаны действия, с помощью которых можно удалить виртуальную машину Hyper-V в Windows 10.
Платформа Hyper-V позволяет запускать виртуализированные компьютерные системы поверх физического хоста. Эти виртуализированные системы (гостевые системы) могут использоваться и управляться так же, как если бы они были физическими компьютерными системами, однако они существуют в виртуализированной и изолированной среде.
При необходимости можно удалить виртуальную машину Hyper-V, при этом виртуальная машина удаляется только из диспетчера Hyper-V.
При удалении виртуальной машины Hyper-V удаляется файл конфигурации виртуальной машины, но не удаляются виртуальные жесткие диски (.VHDX-файлы).
Если виртуальная машина имеет какие-либо контрольные точки (snapshots), они удаляются и объединяются в файлы виртуального жесткого диска после удаления виртуальной машины.
Как удалить виртуальную машину Hyper-V в «Диспетчере Hyper-V»
Чтобы удалить виртуальную машину, откройте Диспетчер Hyper-V (virtmgmt.msc).
В списке установленных виртуальных машин выберите виртуальную машину Hyper-V которую вы хотите удалить (в данном примере, Windows 7 Ultimate) и выполните одно из следующих действий:
•Нажмите правой кнопкой мыши на выбранной виртуальной машине и в появившемся контекстном меню выберите пункт Удалить…
•В правом нижнем углу в панели действий выберите пункт Удалить…
•Нажмите на клавиатуре клавишу Del.
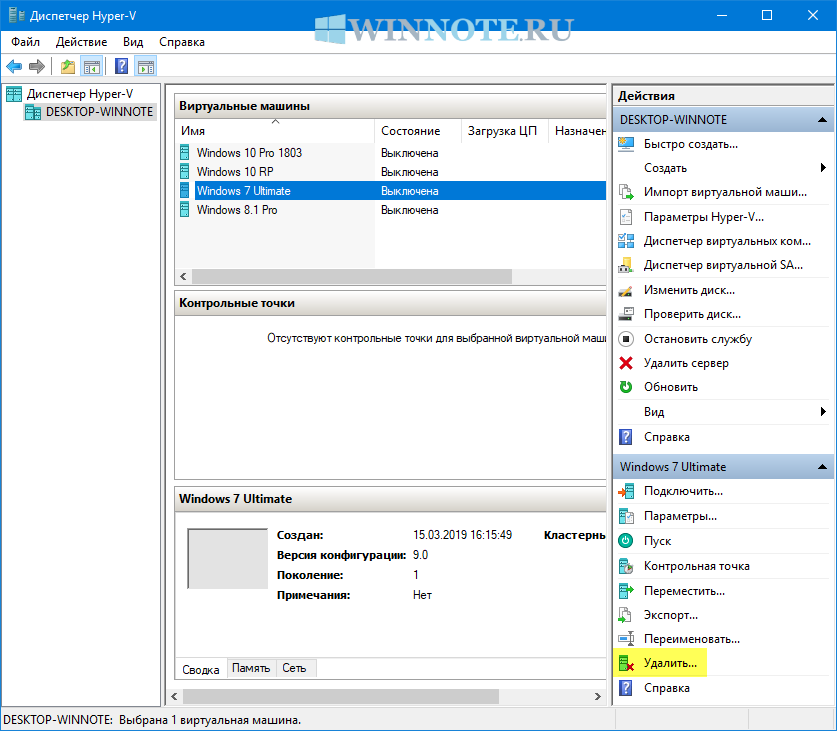
При появлении запроса на удаление виртуальной машины, нажмите кнопку Удалить.

Как удалить виртуальную машину Hyper-V в Windows PowerShell
Также можно удалить виртуальную машину используя консоль Windows PowerShell.
Прежде чем удалить виртуальную машину, сначала выведем список имеющихся виртуальных машин, для этого откройте консоль Windows PowerShell от имени администратора и выполните команду:
Get-VM
Запомните имя виртуальной машины которую необходимо удалить (в данном примере удалим виртуальную машину с именем Windows 7 Ultimate).

Чтобы удалить виртуальную машину, выполните команду следующего вида:
Remove-VM «Имя_Виртуальной_машины» -Force
Замените Имя_Виртуальной_машины в команде выше фактическим именем виртуальной машины которую вы хотите удалить (в данном примере Windows 7 Ultimate).
В данном примере команда выглядит следующим образом:
Remove-VM «Windows 7 Ultimate» -Force
