Вернуться к результатам поиска
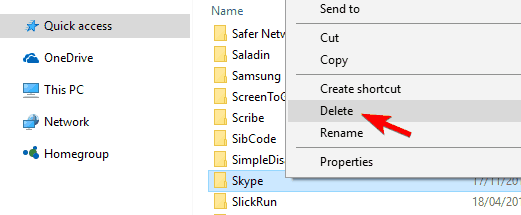
Если у вас возникли технические проблемы с Skype, иногда может помочь Skype и ее переустановка.
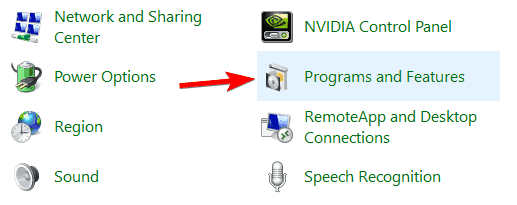
Версия для рабочего стола Windows
- Сначала вам потребуется выйти из Skype. Если вы Skype на панели задач, щелкните его правой кнопкой мыши и выберите Выход. Если на панели задач нет Skype, щелкните его правой кнопкой мыши (или нажмите CTRL+ALT+DELETE) и выберите Диспетчер задач ,а затем Skype и нажмите кнопку Окончание задачи.
- Одновременно нажмите Windows клавиши R и
 R на клавиатуре.
 - В appwiz.cpl в диалоговом окке Выполнить выберите ОК.
- Найдите Skype в списке, щелкните его правой кнопкой мыши и выберите удалить или удалить. (Если вы не можете найти Skype установленных программах, следуйте указаниям здесь.
- Скачайте и установите последнюю версию Skype.
 R на клавиатуре.
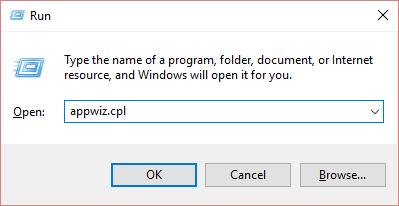
Mac
- Сначала вам потребуется выйти из Skype, щелкнув Skype ивыбрав Выход Skype.
- Откройте папку Приложения и перетащите копию Skype в корзину.
- Откройте Finder и найдите «Skype» с помощью функции поиска в Mac OS X. Переместите все результаты, возвращенные в корзину.
- Щелкните кнопку корзины, нажав клавишу CONTROL, и выберите очистить корзину.
- Перезагрузите компьютер.
- Скачайте и установите последнюю версию Skype.
машинный перевод
ВНИМАНИЕ! Эта статья переведена с помощью средств машинного (автоматического) перевода, а не человеком. Дополнительные сведения см в следующей статье. В Skype машинный перевод используется для предоставления статей службы поддержки и справки на дополнительных языках. При этом автоматически переведенные статьи могут содержать ошибки, а также синтаксические и грамматические неточности, аналогичные тем, которые допускают носители других языков. Skype не несет ответственности за неточности, ошибки и ущерб, вызванные некачественным переводом или его использованием клиентами.
См. исходный текст на английском языке: FA10634
Дополнительные ресурсы
После чистой установки системы пользователям предлагается использовать предустановленное доверенное приложение Скайп с Магазина Windows 10. Если же доверенное приложение сравнивать с классическим решением, то сразу становится понятно что его ещё нужно дорабатывать. Сейчас же большинство пользователей предпочитают избавиться от предустановленной версии приложения и установить альтернативу.
Эта статья расскажет, как полностью удалить Скайп с компьютера под управлением Windows 10. Рассмотрим, как удалить не только встроенный Скайп для бизнеса, но и даже классическую версию программы. Возможно, можно будет обойтись без его полного удаления и достаточно будет убрать Скайп из автозагрузки Windows 10.
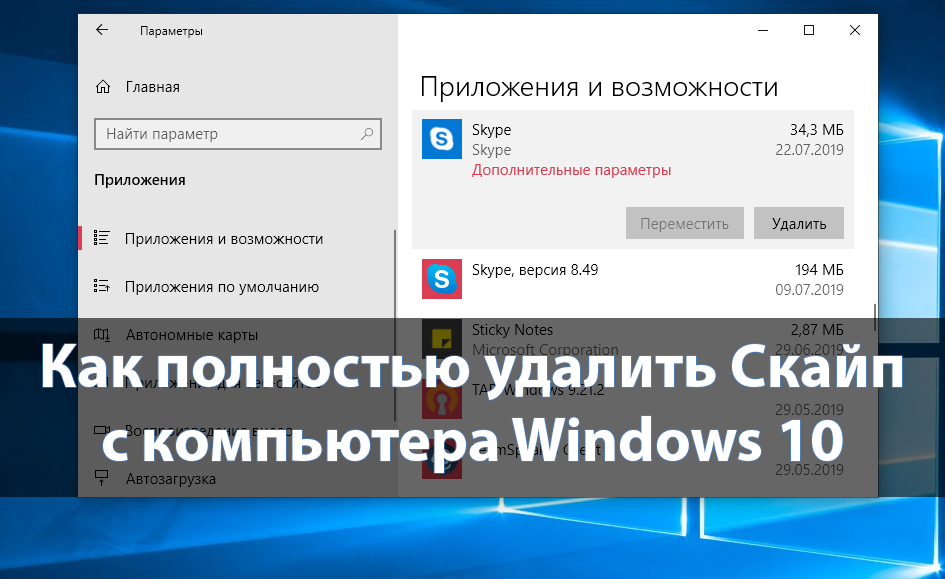
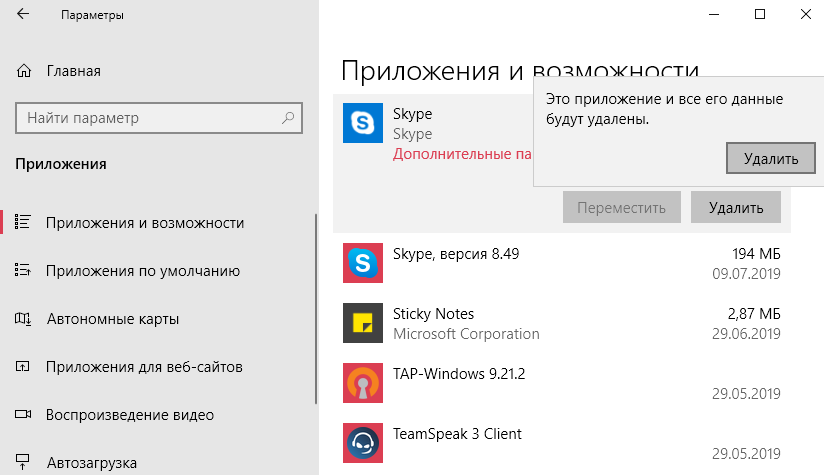
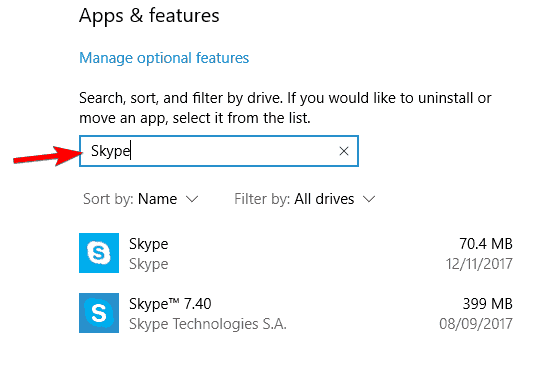
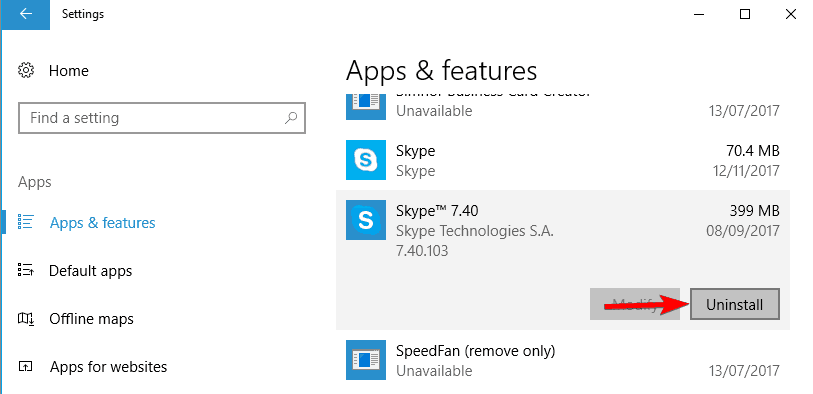
- Перейдите в раздел Параметры > Приложения > Приложения и возможности.
- В списке всех установленных приложений найдите Skype и нажмите Удалить.

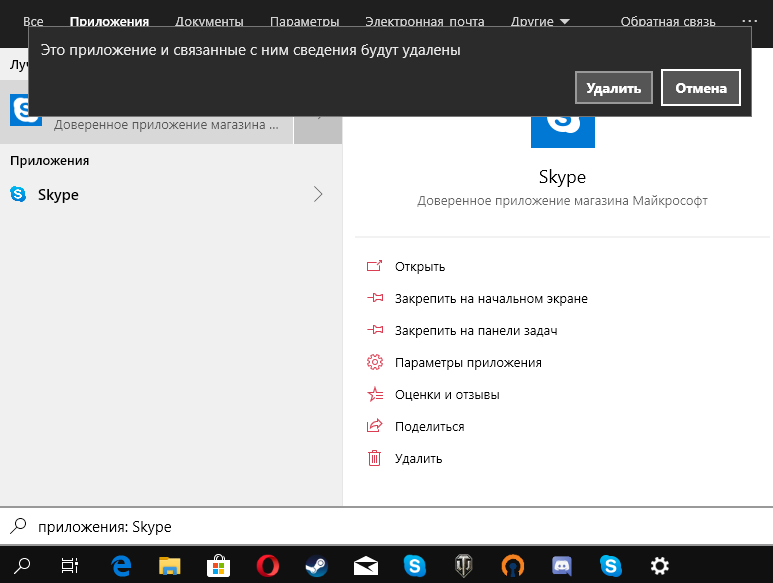
Если же в обновлённом поиске найти доверенное приложение Skype, тогда прямо оттуда можно выполнить его удаление. Достаточно в окне Win+Q начать вводить название Skype. После чего уже в контекстном меню или правой части поискового окна нажмите кнопку Удалить. После подтверждения это приложение и связанные с ним сведения будут удалены.
В принципе также подходят ранее рассмотренные способы удаления стандартных приложений Windows 10. Более сложный способ удаления предустановленных приложений заключается в использовании обновлённой оболочки Windows PowerShell. Все доверенные приложения, установленные с магазина можно удалять именно таким способом.
- В контекстном меню пуск выберите Windows PowerShell (администратор), в котором выполните команду: Get-AppxPackage | Select Name, PackageFullName.
- Выполните команду: Get-AppxPackage PackageFullName | Remove-AppxPackage, вместо PackageFullName используйте полное имя приложения Skype.
(Именно в моём случае нужно будет выполнить следующую команду: Get-AppxPackage Microsoft.SkypeApp_14.48.51.0_x64__kzf8qxf38zg5c | Remove-AppxPackage). В зависимости от версии предустановленного приложения Скайп (которое автоматически обновляется) полное имя может отличаться.
Как полностью удалить Скайп с компьютера
Если же нужно удалить классическую версию приложения, тогда можно воспользоваться способами полного удаления программ с компьютера Windows 10. Достаточно в разделе Приложения и возможности найти уже ненужное приложение и нажать кнопку Удалить. В случае классического приложения будет запущен деинсталятор программы, шагам которого нужно будет следовать.
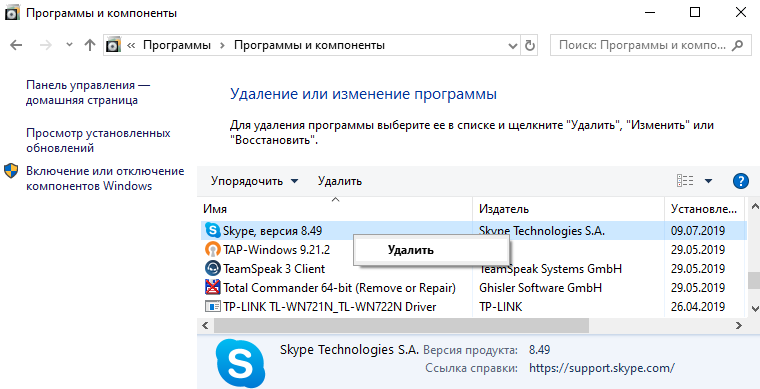
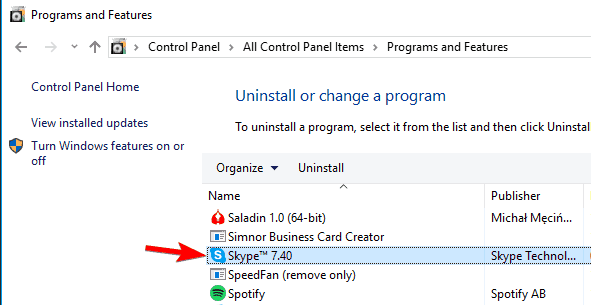
Даже в последней версии операционной системы на сегодняшний день можно воспользоваться стандартной панелью управления. Найдите Панель управления в обновлённом поиске, и перейдите в раздел Программы > Программы и компоненты. В списке установленных приложений найдите Skype, и нажмите кнопку Удалить.
Использую и всем рекомендую многофункциональную программу CCleaner. Дополнительно смотрите: Как пользоваться CCleaner для Windows 10. Помимо возможности правильного и полного удаления установленных программ, программа позволяет также выполнить очистку реестра, системного диска от временных файлов, настроить автозагрузку и даже обновить установленные программы сторонних разработчиков.
В крайнем случае опытные пользователи могут самостоятельно открыть расположение установленного приложений и выполнить удаление его файлов. Не стану рассказывать где располагаются данные доверенных приложений с магазина в целях безопасности. Лучше всего используйте выше предложенные способы полного удаления доверенного и классического приложений Скайп с Вашего компьютера.
Заключение
Если же Вы всё же решились избавиться от предустановленного приложения Скайп достаточно воспользоваться одним из наших способов. Процесс удаления программы Скайп занимает несколько секунд. При необходимости можно будет выполнить повторную загрузку и установку приложения с официального сайта или Магазина Windows 10.

 (3 оценок, среднее: 4,67 из 5)

Администратор и основатель проекта Windd.ru. Интересуюсь всеми новыми технологиями. Знаю толк в правильной сборке ПК. Участник программы предварительной оценки Windows Insider Preview. Могу с лёгкостью подобрать комплектующие с учётом соотношения цены — качества. Мой Компьютер: AMD Ryzen 5 3600 | MSI B450 Gaming Plus MAX | ASUS STRIX RX580 8GB GAMING | V-COLOR 16GB Skywalker PRISM RGB (2х8GB).
Skype является внутренним средством коммуникации Microsoft, которое используется для голосовых вызовов, видеозвонков, обмена сообщениями, обмена экранами и во многих других местах. В то время как это все еще находится в Предприятии, где продукты Microsoft имеют значительное присутствие, это не популярно среди потребителей. Если вы вообще не используете приложение Skype, то в этом посте мы узнаем, как удалить приложение Skype. Мы можем сделать это через меню «Пуск», «Настройки», используя команду PowerShell или бесплатную программу удаления приложений для удаления приложений.
Вы можете удалить или удалить приложение Skype, используя следующие методы:
- Удалить из меню Пуск
- Удалить через настройки
- Использовать команду PowerShell
- Удалить из панели управления
- Использовать сторонние бесплатные программы.
Скайп поставляется в двух версиях. Один, который приходит из Microsoft Store, а второй, EXE, который можно установить, загрузив его с официального сайта.
1] Удалить приложение Skype из меню «Пуск»
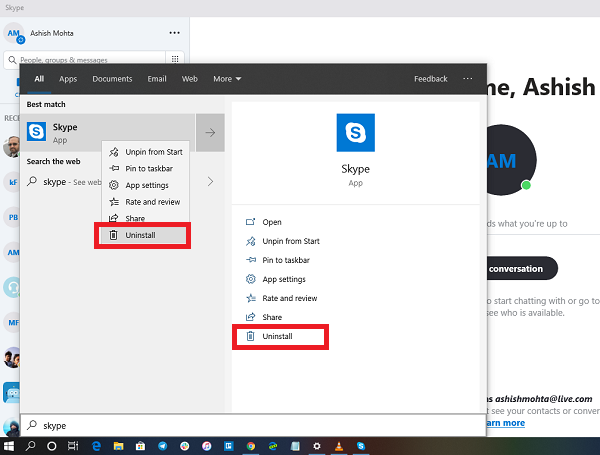
Самый простой способ удалить приложения — щелкнуть правой кнопкой мыши. Есть два способа, один из которых является новым с недавним обновлением функций Windows.
- Нажмите на кнопку «Пуск» и введите Skype
- Когда приложение Skype появится в списке, щелкните его правой кнопкой мыши.
- Нажмите на вариант удаления.
В правой части списка есть еще одна опция удаления, которая также показывает некоторые быстрые действия для приложения.
2] Удалить приложение Skype и Календарь через Настройки
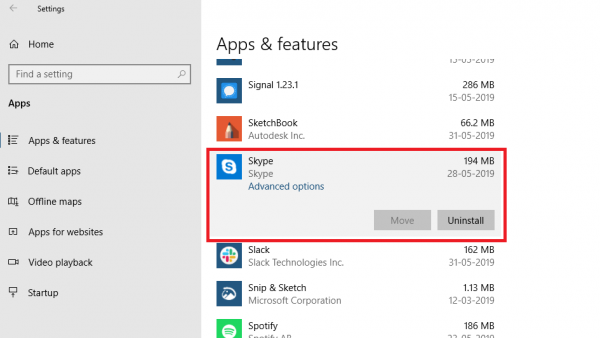
Первый способ работает нормально, но вы также можете удалить через настройки
- Нажмите Пуск Меню> Настройки> Система> Приложения и компоненты.
- Подождите, пока список приложений не будет заполнен.
- Нажмите на приложение Skype.
- Откроется меню для перемещения и удаления.
- Нажмите на кнопку Удалить, чтобы удалить приложение Skype из Windows.
3] Используйте команду PowerShell, чтобы удалить приложение Skype
Если вы опытный пользователь, этот метод работает как шарм.
Откройте PowerShell с правами администратора и выполните команду Удалить пакет приложения для Skype:
Get-AppxPackage Microsoft.SkypeApp | Remove-AppxPackage
По завершении выполнения приложение Skype будет удалено.
4] Удалить из панели управления
Skype также можно установить, загрузив его прямо с официальной веб-страницы. Это версия EXE для Skype, которая отличается от версии Store. Если вы установили эту версию, вам нужно использовать программу «Установка и удаление», чтобы удалить Skype из Windows 10.
- В командной строке введите
appwiz.cplи нажмите ОК. - Найдите Skype в списке, щелкните его правой кнопкой мыши и выберите «Удалить».
- Следуйте указаниям мастера, чтобы полностью удалить Skype из Windows.
5] Используйте сторонние бесплатные программы
Вы также можете использовать CCleaner, Store Applications Manager, 10AppsManager или AppBuster для удаления нежелательных приложений в Windows 10.
Таким образом, вы можете легко удалить приложение Skype, используя любой из методов. Используйте PowerShell с осторожностью и используйте конкретную команду. Меню настроек полезно, когда вам нужно удалить несколько приложений, иначе отличный щелчок правой кнопкой мыши по методу меню «Пуск» работает отлично.
![]()
Здравствуйте. В комплекте с операционной системой Виндовс 10 идут стандартные утилиты от компании Майкрософт. К таким приложениям относятся: погода, календарь и почта, различные карты. И не все эти программы можно легко удалить с вашего устройства. Приложение Skype — не стало исключением, так как оно устанавливается вместе с ОС и не всегда легко деинсталлируется. Поэтому, прочитав данный материал вы узнаете ответ на вопрос: «Как удалить встроенный Скайп в Windows 10».
Кроме того, вы так же узнаете, как скачать скайп, как правильно его установить и где находятся все необходимые настройки программы.
Что такое Скайп и какие возможности он даёт?
Это бесплатная утилита, которая позволяет каждому пользователю, скачавшему её, общаться через интернет со своими друзьями, коллегами и родственниками с любого уголка нашей планеты. Для того, чтобы программа полноценно работала, нужно её установить, при этом настроив некоторые параметры.
Благодаря этому, Вы легко сможете:
- Вести индивидуальную и бесплатную переписку с дорогими для вас людьми;
- При наличии таких устройств как микрофон или веб — камера, вы сможете не только разговаривать, но и видеть собеседника и проводить различные видеоконференции;
- Звонить к собеседнику на его мобильный телефон или отправлять смс-сообщения.
Как выполнить установку?
- Скачайте её официальную версию с интернет — магазина компании.
Рекомендую производить загрузку Skype только с проверенных источников в интернете. Ведь некоторые пиратские версии могут не обновляться или не корректно работать.
- Двойным нажатием левой кнопкой мыши открываем установщик.
- Соглашаемся с пользовательским соглашением, выбираем язык, указываем папку для установки и нажимаем «Установить».
- Перезагружаем систему.
- Ждём завершения установки и заходим в программу через ярлык на вашем рабочем столе.
- В открывшимся окне «Настройки Skype», настраиваем параметры чувствительности микрофона, оптимизируем изображение web — камеры, проделываем дополнительные действия по настройке и нажимаем «Продолжить».
- Устанавливаем желаемое изображение аватара (не обязательный пункт).
- Жмём «Продолжить» или «Отложить».
- В самом последнем пункте жмём на «Использовать скайп».
- Водим логин и пароль, или регистрируемся в системе.
Разработчики программы выложили в интернет версии как для 32, так и для 64 — битных операционных систем, поэтому никаких проблем при установке у вас не должно возникнуть. Для тех, у кого они появились, в сети интернет существует масса обучающих видео по этому поводу.
Автор рекомендует:
- Как в Windows 10 посмотреть пароль Wi Fi
- Отключаем автоматический перезапуск Windows 10
- Как сбросить Windows 10 к заводским настройкам без потери данных
- Как восстановить системный реестр Windows 10
- Решаем проблемы с открытием фото в Windows 10
Как удалить Скайп?
Для того, чтобы полностью убрать данное стандартное приложение, нужно придерживаться таких основных пунктов:
- Запустить компьютер;
- Открыть меню «Пуск», в нём найти «Windows PowerShell» (можно через поисковую строку) и запустить его от имени администратора:

- В появившейся консоли без ошибок введите:
Get-AppxPackage Microsoft.SkypeApp
Можно просто скопировать отсюда и вставить с помощью щелчка правой кнопкой мыши.

Для экспорта полного списка всех установленных приложений в один отдельный файл, используйте команду:
Get-AppxPackage >C:appDetails.txt
После выполнения данной операции файл с расширением «txt» будет успешно сохранён в корне системного диска устройства. Это поможет сэкономить время и осуществить выбор нужного приложения для удаления.
- Система проведёт несколько операций, в следствии чего на экране появится несколько строк с данными. Найдите ту, которая имеет название «PackageFullName».
- Скопируйте информацию из этой строки и вставьте после команды (через пробел):
Remove-AppxPackage –package

- Теперь нажмите клавишу Enter и дождитесь полного завершения работы процесса.
Эти все действия помогут не только убрать из панели задач Скайп, но и навсегда почистить его следы в ОС компьютера или ноутбука.
Полезная информация
Существует так же несколько интересных команд, которые позволят либо удалить приложения для всех учётных записей, либо произвести деинсталляцию приложений из текущего аккаунта. Для этого введите:
Get-AppxPackage -AllUsers | Remove-AppxPackage
или
Get-AppxPackage -User | Remove-AppxPackage
При вводе данных фраз не забудьте сменить слово «User» на имя учётной записи вашего ПК.
Подробнее об удалении всех встроенных приложений «десятки» я рассказывал в этой статье. Рекомендую прочитать.
Очень не хочу прощаться, но на этом моменте хотел бы завершить сегодняшнюю статью. Не забываем подписываться на обновления моего блога и рассказывать о выходе нового материала друзьям в социальных сетях.
С уважением, Виктор!
by Milan Stanojevic
Milan has been enthusiastic about technology ever since his childhood days, and this led him to take interest in all PC-related technologies. He’s a PC enthusiast and he… read more
Updated on February 11, 2022
- Skype is one of the world’s most used chat tools on the market, being popular among home users and enterprises alike.
- If for some reason you would like to uninstall Skype from your PC, simply follow the steps listed below.
- To read more about this amazing tool, visit our dedicated Skype page.
- If you need more PC-related tutorials and guidance, you can find them on our How-To page.

As you know, there are two versions of Skype you can run on Windows 10. One is the dedicated app that you can download and install from the Microsoft Store, and the other is the desktop app for Windows 10 that can be downloaded from the Skype website.
While some users don’t like the Skype app at all and want to install the desktop version, others will want to have it the other way around.
If you have installed Skype and you now want to remove it, check out this small guide where I will show you how to uninstall Skype on Windows 10, for the two versions that are available.
Skype is a great application, but many users experienced various issues with it. Speaking of issues, these are the most common problems that users have with Skype:
- Can’t uninstall Skype Windows 10 – Many users reported that they are unable to uninstall Skype on their PC. This can be a big problem, but in this article, we’ll show you several methods you can use to remove Skype.
- The older version of Skype cannot be removed – Many users reported that an older version of Skype can’t be removed. This can be an annoying problem, but you should be able to fix it using one of our solutions.
- Uninstall Skype error 1603, 2503, 2738 – Several users reported various errors while trying to remove Skype. These errors can interfere with the uninstall process and prevent you from removing Skype.
- Uninstall Skype toolbar error 2738 – Sometimes certain errors can appear while trying to remove Skype toolbar. However, the problem should disappear after you remove Skype.
- Skype uninstall hangs – Many users reported that Skype uninstall hangs on their PC. If you have the same problem, simply restart the uninstall process and check if that helps.
How can I uninstall Skype on Windows 10?
1. Use PowerShell
If you want to uninstall Skype, you might be able to do that by using PowerShell. Keep in mind that this method can only remove the Universal version of Skype and not the desktop application.
If you want to remove the desktop version of Skype, be sure to try a different solution. To remove Skype with PowerShell, you need to do the following:
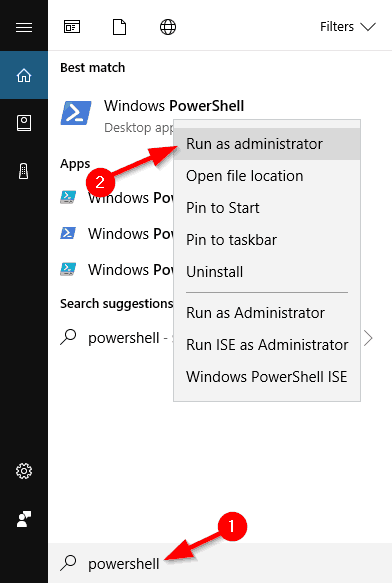
- Press Windows Key + S, enter powershell and right-click PowerShell from the list of results.
- Choose Run as administrator from the menu.

- When Powershell starts, enter Get-AppxPackage *Microsoft.SkypeApp* | Remove-AppxPackage and press Enter to run it.

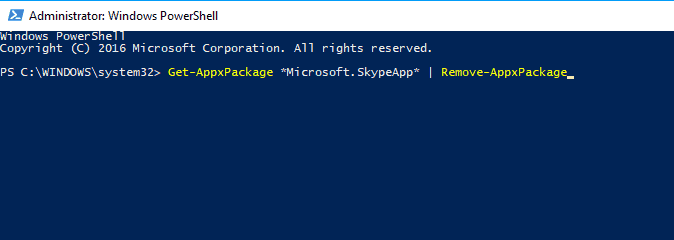
After running this command, the Universal version of Skype should be deleted from your PC.
If PowerShell doesn’t work, another alternative to force-remove Skype is to use a dedicated uninstaller that will not only remove the base program, but also the related files, folders, and residual data.
Uninstaller software are utilities that can do all the above and more. They don’t only handle software such as Skype, it can also deal with tougher programs as well, such as pre-installed Windows 10 programs (bloatware), Store apps, browser extensions, etc.
These tools can even remove malicious apps that you won’t be able to uninstall using the Add or remove programs Utility.
2. Right-click Skype icon and choose Uninstall from the menu
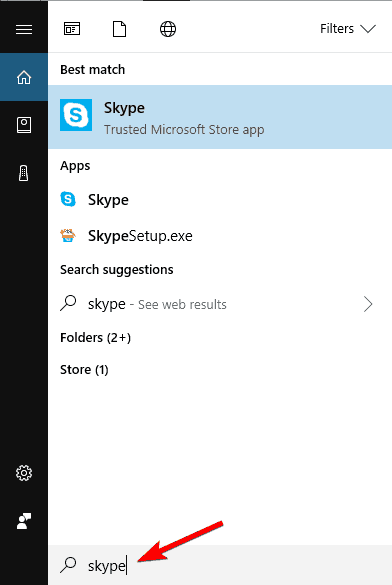
- Press Windows Key + S and enter skype. If you have Skype pinned to your Start Menu, you just have to open the Start Menu to find it.

- Locate Skype, right click it and choose Uninstall from the menu.


If you try to uninstall the desktop version of Skype, you’ll open Programs and Features window. From there you’ll need to find Skype from the list of apps and double click it to remove it.
For detailed instructions on how to do that, be sure to check Solution 3 for detailed instructions.
If you have installed the Skype app and didn’t like the way it looks or works, uninstalling it is very simple.
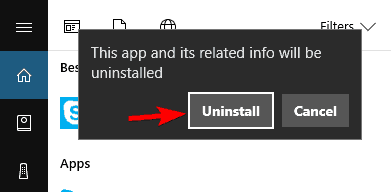
If you’re trying to remove Universal version of Skype, the process is more straightforward. Instead of opening Programs and Features window, you’ll get a dialog box asking you to confirm whether you want to uninstall Skype.
Now you just have to click the Uninstall button and you’ll remove the Universal version of Skype.
Note: Also, for users that have upgraded to Windows 10, they can find the Skype app in the All Apps screen.
Most users don’t know what to do when the Windows key stops working. Check out this guide and be a step ahead.
3. Use the Settings app
If you want to uninstall Skype, the best course of action would be to use the Settings app. To uninstall Skype using the Settings app, you just need to do the following:
- Open the Settings app. You can do that by pressing Windows Key + I shortcut.
- When Settings app opens, go to the Apps section.


- List of applications will now appear. Select Skype from the list. Now click the Uninstall button. Click Uninstall button again.
 Note: You can locate Skype quickly simply by entering Skype in the search field above.
 - Follow the instructions on the screen to remove Skype.

 Note: You can locate Skype quickly simply by entering Skype in the search field above.
Some PC issues are hard to tackle, especially when it comes to corrupted repositories or missing Windows files. If you are having troubles fixing an error, your system may be partially broken.
We recommend installing Restoro, a tool that will scan your machine and identify what the fault is.
Click here to download and start repairing.
We also have to mention that there’s an instant way to open the Apps section. To do that, just follow these steps:
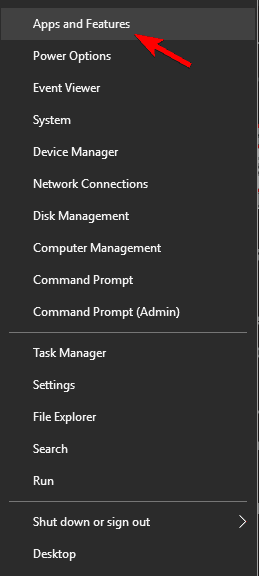
- Press Windows Key + X to open Win + X menu. You can also open this menu by right clicking your Start Button.
- Now select Apps and Features from the menu.

After doing that, you should see the list of all installed applications on your PC.
If you have both desktop and Universal version installed, you can remove them both using the Settings app.
As you can see, this method is simple and straightforward and it’s perfect since it can remove both desktop and Universal version of Skype from your PC.
4. Use Programs and Features
Another way to remove Skype is to use Programs and Features applet. This method was used in previous versions of Windows, but you can still use it on Windows 10. To access Programs and Features, you just need to follow these steps:
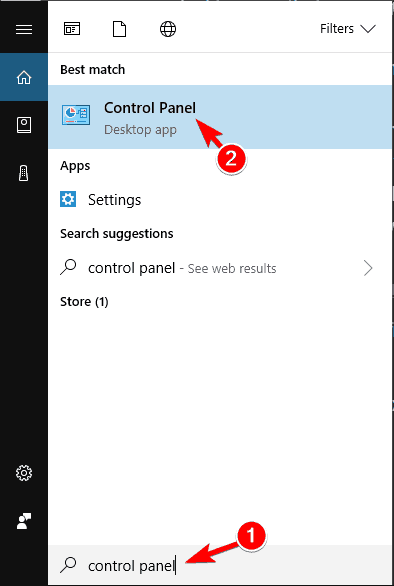
- Press Windows Key + S and enter control panel in the Search bar. Select Control Panel from the list of results.

- When the Control Panel opens, navigate to Programs and Features section.

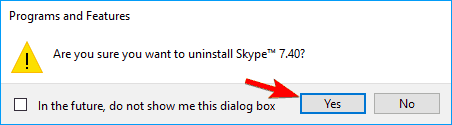
- Now you should see the list of all installed desktop applications. Locate Skype and double click it.

- A confirmation dialog will now appear. Click on Yes to proceed.
- Follow the instructions on the screen to uninstall Skype.
This method is effective just like the first one, but in order to use it, you need to start the Control Panel first. As a result, you need to perform a few extra steps in order to open Programs and Features applet.
Keep in mind that this method only allows you to remove desktop apps. Therefore, if you have the Universal version of Skype installed, you won’t be able to uninstall it using this method.
In fact, you won’t be able to see the Universal version of Skype on the list. If you want to remove Universal version of Skype, you’ll have to use Settings app or any other method to remove it.
If you want more info on how to uninstall programs and apps from Control Panel on Windows 10, check out this detailed guide.
5. Completely remove Skype from your PC
If you want to completely remove Skype from your PC, it’s not enough just to uninstall Skype. Even after you uninstall the application using one of the aforementioned methods, you’ll still have some leftover Skype files on your PC and in your registry.
To completely remove all files associated with the desktop version of Skype, you need to do the following:
- Follow the steps from Solution 3 to uninstall the desktop version of Skype.
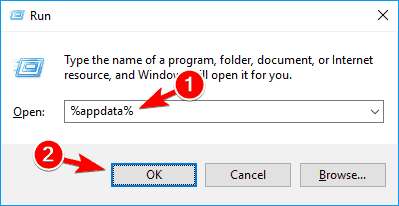
- Now press Windows Key + R and enter %appdata%. Press Enter or click OK.

- Now locate Skype directory, right click it and choose Delete. Keep in mind that removing this directory will remove all your chat logs and received files.
 If you want to back up your chat logs, you need to open the Skype directory and find the directory named after your Skype username. Now just copy that file to a safe location. After doing that, you can delete the Skype directory and your chat history will remain intact.
 If you want to back up your chat logs, you need to open the Skype directory and find the directory named after your Skype username. Now just copy that file to a safe location. After doing that, you can delete the Skype directory and your chat history will remain intact.
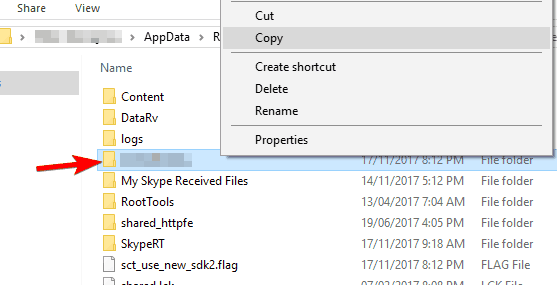
Now you need to delete all remaining files from the Skype directory. To do that, just follow these steps:
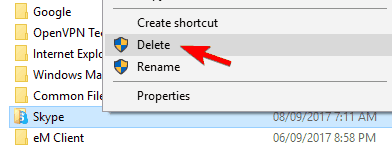
- Go to C:Program Files (x86) directory.
- Locate Skype directory on the list, right click it and choose Delete from the menu.

The last step requires you to delete all Skype registry entries from your PC. This is probably the most advanced part of the solution, so follow the instructions carefully. To remove Skype registry entries, do the following:
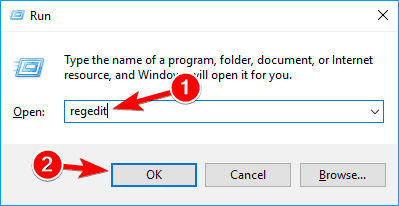
- Press Windows Key + R and enter regedit. Press Enter or click OK.
- Note: Modifying the registry can cause certain issues with your PC if you don’t do it properly, therefore it’s recommended to export your registry before making any changes. To do that, just click on File > Export in Registry Editor.
 Set Export range as All, enter the desired name, choose a safe location and then click on Save button.
 In case anything goes wrong after modifying your registry, you can always run the file that you just created in order to restore the registry to the original state.
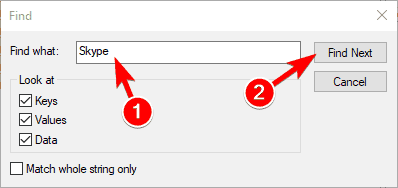
 - Press Ctrl + F in Registry Editor or go to Edit > Find.

- Enter Skype in the input field and click on Find Next.

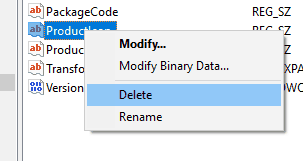
- Now you need to delete every entry that mentions Skype. To do that, simply select that entry, right click it and choose Delete. When the confirmation message appears, click on Yes.

- Now repeat Steps 2 and 3 to find another entry associated with Skype. Delete this entry and repeat these steps until all Skype entries are removed from your registry. Keep in mind that you might have over 50 Skype entries in your registry, so this process can take a while.
 Set Export range as All, enter the desired name, choose a safe location and then click on Save button.
 In case anything goes wrong after modifying your registry, you can always run the file that you just created in order to restore the registry to the original state.
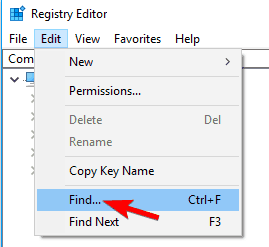
If you can’t edit your Windows 10’s registry, read this handy guide and find the quickest solutions to the issue.
If any problems occur after removing these entries, you can easily restore them by running the file you created in Step 2. This is an advanced solution, but if you want to completely remove Skype, this might be the right way to do it.
If you want a software solution that will clean your registry automatically, check out this complete list with the best registry cleaners available right now.
Skype is a great application, but if you have problems with it and you want to remove it, feel free to try one of our solutions.
If you have any other questions or suggestions, feel free to leave them in the comments section below.
![]()
Newsletter
by Milan Stanojevic
Milan has been enthusiastic about technology ever since his childhood days, and this led him to take interest in all PC-related technologies. He’s a PC enthusiast and he… read more
Updated on February 11, 2022
- Skype is one of the world’s most used chat tools on the market, being popular among home users and enterprises alike.
- If for some reason you would like to uninstall Skype from your PC, simply follow the steps listed below.
- To read more about this amazing tool, visit our dedicated Skype page.
- If you need more PC-related tutorials and guidance, you can find them on our How-To page.
As you know, there are two versions of Skype you can run on Windows 10. One is the dedicated app that you can download and install from the Microsoft Store, and the other is the desktop app for Windows 10 that can be downloaded from the Skype website.
While some users don’t like the Skype app at all and want to install the desktop version, others will want to have it the other way around.
If you have installed Skype and you now want to remove it, check out this small guide where I will show you how to uninstall Skype on Windows 10, for the two versions that are available.
Skype is a great application, but many users experienced various issues with it. Speaking of issues, these are the most common problems that users have with Skype:
- Can’t uninstall Skype Windows 10 – Many users reported that they are unable to uninstall Skype on their PC. This can be a big problem, but in this article, we’ll show you several methods you can use to remove Skype.
- The older version of Skype cannot be removed – Many users reported that an older version of Skype can’t be removed. This can be an annoying problem, but you should be able to fix it using one of our solutions.
- Uninstall Skype error 1603, 2503, 2738 – Several users reported various errors while trying to remove Skype. These errors can interfere with the uninstall process and prevent you from removing Skype.
- Uninstall Skype toolbar error 2738 – Sometimes certain errors can appear while trying to remove Skype toolbar. However, the problem should disappear after you remove Skype.
- Skype uninstall hangs – Many users reported that Skype uninstall hangs on their PC. If you have the same problem, simply restart the uninstall process and check if that helps.
How can I uninstall Skype on Windows 10?
1. Use PowerShell
If you want to uninstall Skype, you might be able to do that by using PowerShell. Keep in mind that this method can only remove the Universal version of Skype and not the desktop application.
If you want to remove the desktop version of Skype, be sure to try a different solution. To remove Skype with PowerShell, you need to do the following:
- Press Windows Key + S, enter powershell and right-click PowerShell from the list of results.
- Choose Run as administrator from the menu.
- When Powershell starts, enter Get-AppxPackage *Microsoft.SkypeApp* | Remove-AppxPackage and press Enter to run it.
After running this command, the Universal version of Skype should be deleted from your PC.
If PowerShell doesn’t work, another alternative to force-remove Skype is to use a dedicated uninstaller that will not only remove the base program, but also the related files, folders, and residual data.
Uninstaller software are utilities that can do all the above and more. They don’t only handle software such as Skype, it can also deal with tougher programs as well, such as pre-installed Windows 10 programs (bloatware), Store apps, browser extensions, etc.
These tools can even remove malicious apps that you won’t be able to uninstall using the Add or remove programs Utility.
2. Right-click Skype icon and choose Uninstall from the menu
- Press Windows Key + S and enter skype. If you have Skype pinned to your Start Menu, you just have to open the Start Menu to find it.
- Locate Skype, right click it and choose Uninstall from the menu.
If you try to uninstall the desktop version of Skype, you’ll open Programs and Features window. From there you’ll need to find Skype from the list of apps and double click it to remove it.
For detailed instructions on how to do that, be sure to check Solution 3 for detailed instructions.
If you have installed the Skype app and didn’t like the way it looks or works, uninstalling it is very simple.
If you’re trying to remove Universal version of Skype, the process is more straightforward. Instead of opening Programs and Features window, you’ll get a dialog box asking you to confirm whether you want to uninstall Skype.
Now you just have to click the Uninstall button and you’ll remove the Universal version of Skype.
Note: Also, for users that have upgraded to Windows 10, they can find the Skype app in the All Apps screen.
Most users don’t know what to do when the Windows key stops working. Check out this guide and be a step ahead.
3. Use the Settings app
If you want to uninstall Skype, the best course of action would be to use the Settings app. To uninstall Skype using the Settings app, you just need to do the following:
- Open the Settings app. You can do that by pressing Windows Key + I shortcut.
- When Settings app opens, go to the Apps section.
- List of applications will now appear. Select Skype from the list. Now click the Uninstall button. Click Uninstall button again.Note: You can locate Skype quickly simply by entering Skype in the search field above.
- Follow the instructions on the screen to remove Skype.
Some PC issues are hard to tackle, especially when it comes to corrupted repositories or missing Windows files. If you are having troubles fixing an error, your system may be partially broken.
We recommend installing Restoro, a tool that will scan your machine and identify what the fault is.
Click here to download and start repairing.
We also have to mention that there’s an instant way to open the Apps section. To do that, just follow these steps:
- Press Windows Key + X to open Win + X menu. You can also open this menu by right clicking your Start Button.
- Now select Apps and Features from the menu.
After doing that, you should see the list of all installed applications on your PC.
If you have both desktop and Universal version installed, you can remove them both using the Settings app.
As you can see, this method is simple and straightforward and it’s perfect since it can remove both desktop and Universal version of Skype from your PC.
4. Use Programs and Features
Another way to remove Skype is to use Programs and Features applet. This method was used in previous versions of Windows, but you can still use it on Windows 10. To access Programs and Features, you just need to follow these steps:
- Press Windows Key + S and enter control panel in the Search bar. Select Control Panel from the list of results.
- When the Control Panel opens, navigate to Programs and Features section.
- Now you should see the list of all installed desktop applications. Locate Skype and double click it.
- A confirmation dialog will now appear. Click on Yes to proceed.
- Follow the instructions on the screen to uninstall Skype.
This method is effective just like the first one, but in order to use it, you need to start the Control Panel first. As a result, you need to perform a few extra steps in order to open Programs and Features applet.
Keep in mind that this method only allows you to remove desktop apps. Therefore, if you have the Universal version of Skype installed, you won’t be able to uninstall it using this method.
In fact, you won’t be able to see the Universal version of Skype on the list. If you want to remove Universal version of Skype, you’ll have to use Settings app or any other method to remove it.
If you want more info on how to uninstall programs and apps from Control Panel on Windows 10, check out this detailed guide.
5. Completely remove Skype from your PC
If you want to completely remove Skype from your PC, it’s not enough just to uninstall Skype. Even after you uninstall the application using one of the aforementioned methods, you’ll still have some leftover Skype files on your PC and in your registry.
To completely remove all files associated with the desktop version of Skype, you need to do the following:
- Follow the steps from Solution 3 to uninstall the desktop version of Skype.
- Now press Windows Key + R and enter %appdata%. Press Enter or click OK.
- Now locate Skype directory, right click it and choose Delete. Keep in mind that removing this directory will remove all your chat logs and received files.If you want to back up your chat logs, you need to open the Skype directory and find the directory named after your Skype username. Now just copy that file to a safe location. After doing that, you can delete the Skype directory and your chat history will remain intact.
Now you need to delete all remaining files from the Skype directory. To do that, just follow these steps:
- Go to C:Program Files (x86) directory.
- Locate Skype directory on the list, right click it and choose Delete from the menu.
The last step requires you to delete all Skype registry entries from your PC. This is probably the most advanced part of the solution, so follow the instructions carefully. To remove Skype registry entries, do the following:
- Press Windows Key + R and enter regedit. Press Enter or click OK.
- Note: Modifying the registry can cause certain issues with your PC if you don’t do it properly, therefore it’s recommended to export your registry before making any changes. To do that, just click on File > Export in Registry Editor.Set Export range as All, enter the desired name, choose a safe location and then click on Save button.In case anything goes wrong after modifying your registry, you can always run the file that you just created in order to restore the registry to the original state.
- Press Ctrl + F in Registry Editor or go to Edit > Find.
- Enter Skype in the input field and click on Find Next.
- Now you need to delete every entry that mentions Skype. To do that, simply select that entry, right click it and choose Delete. When the confirmation message appears, click on Yes.
- Now repeat Steps 2 and 3 to find another entry associated with Skype. Delete this entry and repeat these steps until all Skype entries are removed from your registry. Keep in mind that you might have over 50 Skype entries in your registry, so this process can take a while.
If you can’t edit your Windows 10’s registry, read this handy guide and find the quickest solutions to the issue.
If any problems occur after removing these entries, you can easily restore them by running the file you created in Step 2. This is an advanced solution, but if you want to completely remove Skype, this might be the right way to do it.
If you want a software solution that will clean your registry automatically, check out this complete list with the best registry cleaners available right now.
Skype is a great application, but if you have problems with it and you want to remove it, feel free to try one of our solutions.
If you have any other questions or suggestions, feel free to leave them in the comments section below.
![]()
Newsletter
Поговорим о том, как полностью удалить Скайп с компьютера Windows 10. Мы решили подробнее остановиться на этой ОС, так как на данный момент она является одной из самых популярных платформ.
Если тебе интересно как удалить Скайп на других устройствах, мы подготовили отдельную статью.
На Windows 10
Рассмотрим, как удалить встроенный Скайп в Windows 10. Процесс имеет свои особенности, так как на десятой Виндовс, Скайп- интегрированная в операционную систему программа. Итак, удалить Скайп с Виндовс 10 можно следующим образом:
- Найди в меню «Пуск» Windows PowerShell

- Нажми на него правой кнопкой мыши и запусти от имени администратора
- Появится консоль, в которой нужно ввести следующую строку: Get-AppxPackage Microsoft.SkypeApp
- Эта команда запустит ряд операций, и в результате на экране ты увидишь несколько строк с данными. Тебе понадобится та, в которой прописано: PackageFullName»
- Из этой строки нужно скопировать информацию
- Теперь прописывай такую команду: Remove-AppxPackage –package
- А после нее, через пробел, ранее скопированную информацию
- Жми Enter и дожидайся, пока процесс будет завершен полностью

91.4%
пользователей считают эту статью полезной.

Skype является встроенным средством коммуникации в операционной системе Windows 10, которое используется для голосовых вызовов, видеозвонков и обмена сообщениями.
Но если вы вообще не используете приложение Skype, то наше руководство, поможет удалить данное приложение. Это можно сделать через «Поиск», используя «Параметры», «Панель управления» или бесплатную программу удаления.
Как удалить приложение Skype в Windows 10
Skype поставляется в двух версиях. Одна, устанавливается из Microsoft Store, вторая имеет обычное расширение «.exe» и загружается с официального сайта разработчика.
Удаление Skype через «Поиск»
Это самый простой способ — введите в поле поиска «Skype» и нажмите «Удалить«.

Используйте параметры Windows
Нажмите сочетание клавиш Windows + I и перейти в раздел «Приложения«.

Прокручивайте в низ пока не найдете Skype, нажмите по нему и произведите удаление.

С помощью панели управления
Если установлена стандартная версия, используйте поиск, чтобы открыть «Панель управления«, перейдите в «Удаление программы«.

И просто удалите Skype.

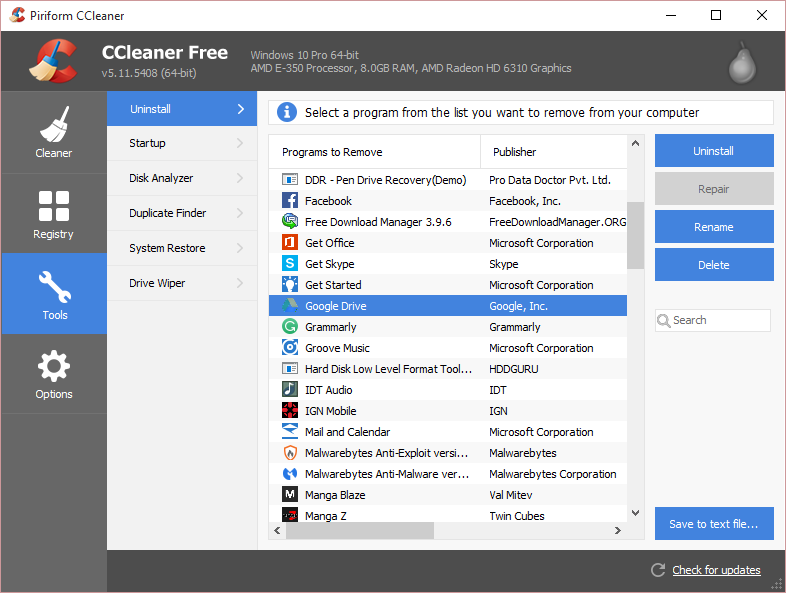
Использование программы CCleaner
Инструмент CCleaner помогает в очистке системы и удалении ненужных приложений.
Скачайте
, установите и запустите его. Перейдите в Инструменты > Удаление программ, выделите Skype и нажмите кнопку «Деинсталляция«.

Таким образом, вы можете легко удалить приложение Skype, используя любой из представленных методов.
Как удалить Skype в windows 10? В составе ОС Windows 10 присутствуют различные приложения от Maicrosoft. Имеется в виду погоду, почту, календарь, WordPad, разнообразные карты. Программа Скайп также встроена в систему Windows 10 и из-за этого её не просто удалить. Но, многим людям по тем или иным причинам необходимо удалить данную утилиту (например, из-за сбоя данная система повредилась). Давайте рассмотрим, как удалить системный Скайп?
Также, из статьи вы узнаете, как его потом можно вернуть на место, то есть установить и узнаете, где в данной утилите содержатся нужные параметры данное программы.

«>
Что такое Skype и для чего он нужен?
Это системное приложение даёт возможность любому человеку, который пользуется ею, начать общение не только со своими родственниками, друзьями, но и с любым человеком из любой страны Земли. Если у вас Windows 10, то она уже находится в вашей системе. Если на компьютере установлена другая система, скайп придётся установить.
Установив Skype, перед вами откроются следующие возможности:
- Можно переписываться на различные темы с родными и близкими людьми;
- Если же у вас есть такой прибор, как микрофон с web-камерой, появляется возможность не только вести переписку, но и онлайн вести разговор с собеседником, при этом вы ещё собеседника видите;
- Также, Skype даёт возможность делать звонки на сотовые телефоны или производить отправку SMS сообщений.
Это всё конечно здорово, но может так случиться, что в данном приложении произойдёт системный сбой или ошибка. В этом случае Скайп желательно удалить, а потом установить заново.
Как удалить скайп в Windows 10?
Итак, давайте рассмотрим инструкцию, которая позволит нам провести удаление данного системного приложения:
- Нам необходимо кликнуть по кнопочке «Пуск», и активировать команду «Windows PowerShell» как администратор;
- Далее, в консоль необходимо вписать следующее сочетание: Get-AppxPackage Microsoft.SkypeApp.
- ОС начнёт проводить нужные действия, мы же будем копировать данные, находящиеся рядом с фразой: PackageFullName

- Далее, нам нужно в одной строке вписать: Remove-AppxPackage –package, а после этого, необходимо вставить часть текста, который мы скопировали на прошлом шаге;
- Наш скайп удалён, можно наслаждаться проделанными действиями.


Как установить Skype на компьютер?
- Загружать скайп рекомендуется только с официального сайта, нажав на синюю кнопочку и выбрав свою систему, иначе вы можете скачать пиратскую версию, которая будет плохо функционировать, или принесёт с собой вирус;
- Затем, нам нужно открыть установщика, согласиться с соглашением, выбрать язык, указав папочку, в которую будем устанавливать нашу утилиту;
- После этого, необходимо кликнуть по кнопочке «Установить»;
- Затем, нужно перезагрузить ОС;
- После того, как у нас завершилась установка, нужно войти в приложение по ярлыку на дисплее;
- В том окошке, которое открылось, необходимо выбрать настройки;
- В новом окошке необходимо проверить на чувствительность микрофон, и оптимизировать картинку веб-камеры;
- Если вы не установили свой аватар, его нужно установить (не каждый человек ответить на вызов незнакомого человека без аватара);
- Затем, нужно нажать «Продолжить»;
- После данных манипуляций, необходимо нажать на «Использовать скайп»;
- После этого, нам нужно ввести логин с паролем. Если вы ещё не зарегистрировались в системе, нужно зарегистрироваться.

Вам не помешает это знать
Кроме тех команд, которые приводились, есть ещё другие, позволяющие или деинсталлировать скайп для каждой учётной записи, или просто удалить программу из вашего профиля. Чтобы это сделать, нужно ввести следующие команды:
Get-AppxPackage -AllUsers | Remove-AppxPackage
Есть и другая команда
Get-AppxPackage -User | Remove-AppxPackage
Важно: когда вы будете вводить данные фразы, не забываем поменять «User» на логин из вашего профиля в компании Microsoft.
Вывод: вы теперь сами увидели, что удалить skype в windows 10 довольно просто. Для этого, нужно всего-то чуть-чуть постараться. Успехов!