Содержание:
Здравствуйте админ! На моём ноутбуке не загружается Windows 10. Статью на вашем сайте о восстановлении загрузчика читал, но она к сожалению мне не помогла, хотя испробовал все приведённые в ней способы. В комментариях к статье один пользователь посоветовал мне создать загрузчик Windows 10 заново, но подробностей не привёл. Скажите, как это можно сделать?
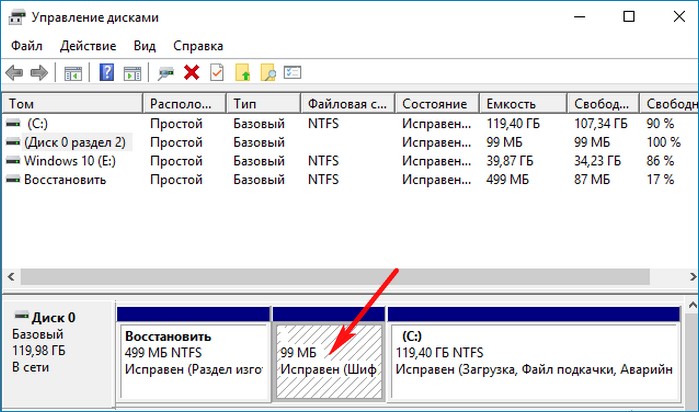
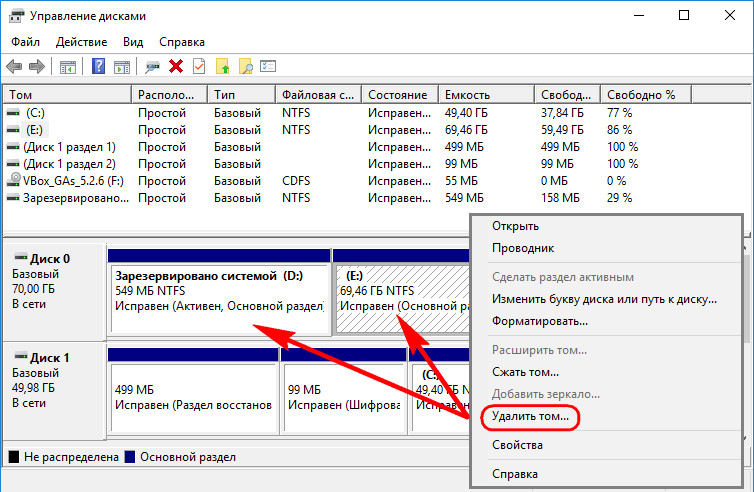
Привет друзья! Если ваша Windows 10 не загружается из-за проблем с файлами, ответственными за загрузку операционной системы, располагающимися на скрытом шифрованном (EFI) системном разделе FAT32 (размер 99 Мб), то можно удалить этот раздел и затем создать заново. В результате файлы загрузчика обновятся и вполне возможно такое решение приведёт к успешной загрузке Windows. Здесь не лишним будет заметить, что за загрузку Windows отвечают файлы конфигурации хранилища загрузки (BCD) в папке Boot и менеджер загрузки системы (файл bootmgr).
Шифрованный (EFI) системный раздел FAT32, размер 99 Мб, можно увидеть в «Управлении дисками» вашего компьютера. Нам также придётся удалить первый раздел со средой восстановления (499 Мб), так как после пересоздания загрузчика она перестанет функционировать (среду восстановления можно будет позже создать заново).
Ещё мы создадим заново не отображаемый в Управлении дисками служебный раздел MSR, обязателен для разметки GPT в системах UEFI (размер 16 Мб).
Итак, перед работой ещё раз уточним, какие именно разделы мы будем удалять и затем создавать заново:
1. Раздел (499 Мб) содержащий среду восстановления Windows 10 (от данного раздела можно избавиться и пользоваться при необходимости средой восстановления, находящейся на загрузочном носителе с Win 10).
2. Раздел (99 Мб), шифрованный (EFI) системный раздел, содержащий все файлы загрузчика Windows 10.
3. Служебный раздел MSR (Microsoft System Reserved) 16 Мб, обязательный для разметки дисков GPT.
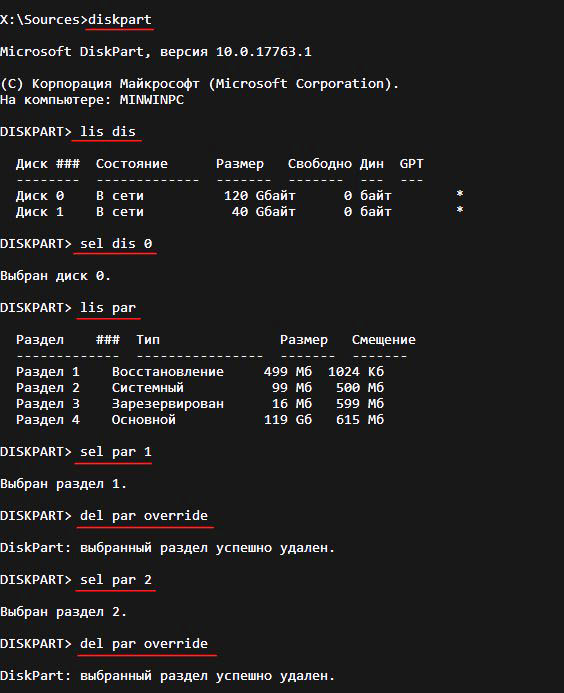
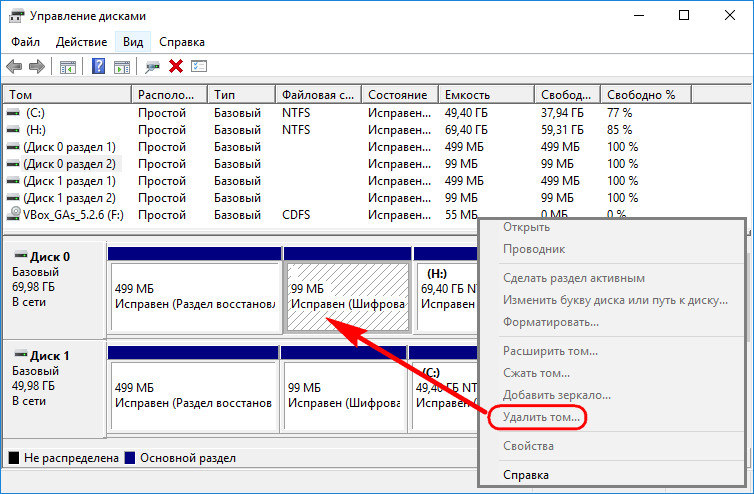
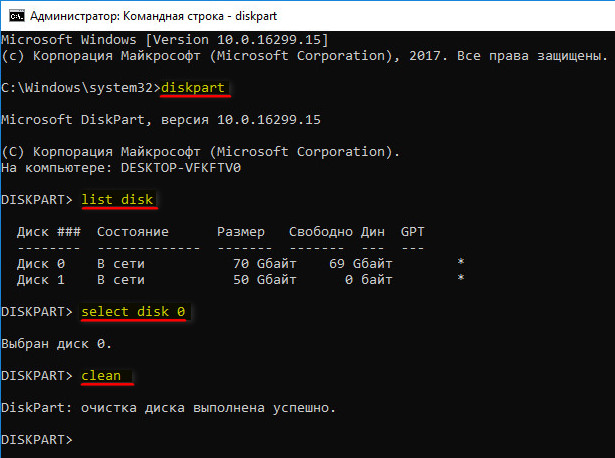
Загружаем ноутбук с загрузочной флешки с Windows 10 и в начальном окне установки системы жмём клавиатурное сочетание Shift + F10,
открывается окно командной строки, вводим команды:
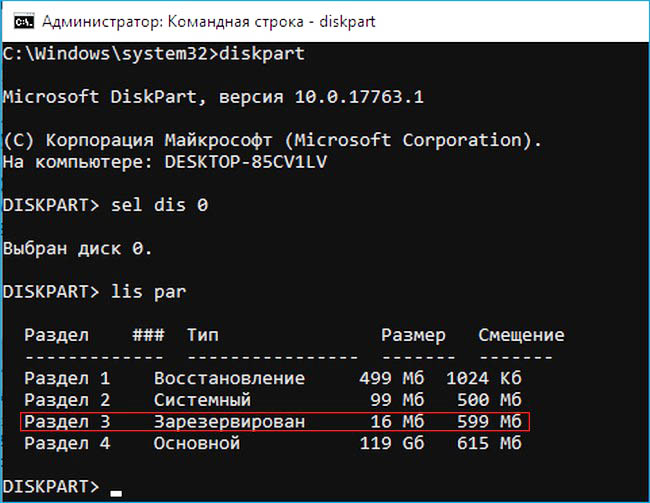
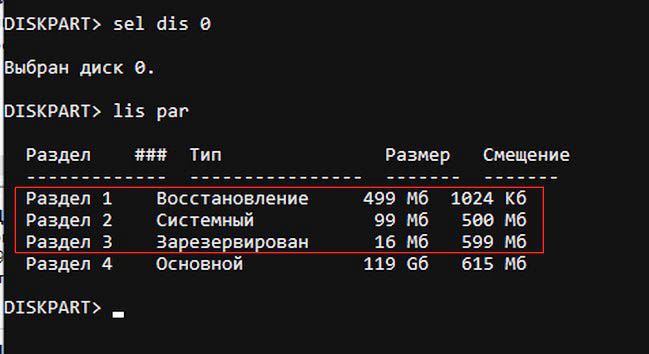
diskpart
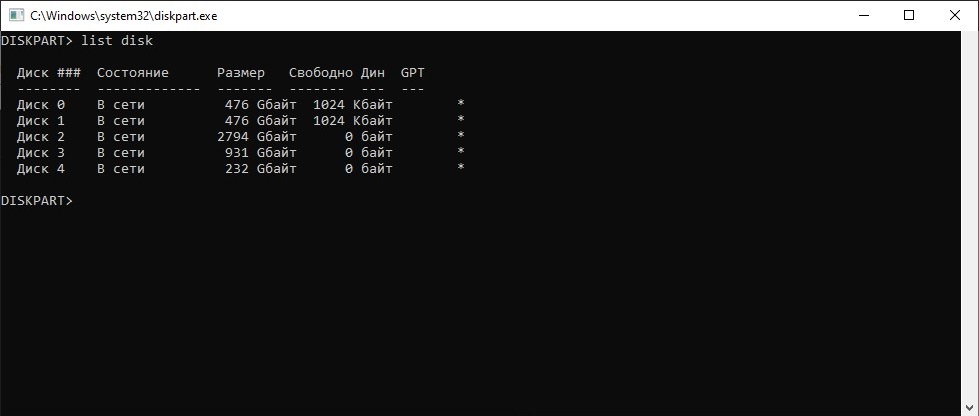
lis dis (выводит список физических дисков).
sel dis 0 (выбираем жёсткий диск ноутбука 120 Гб).
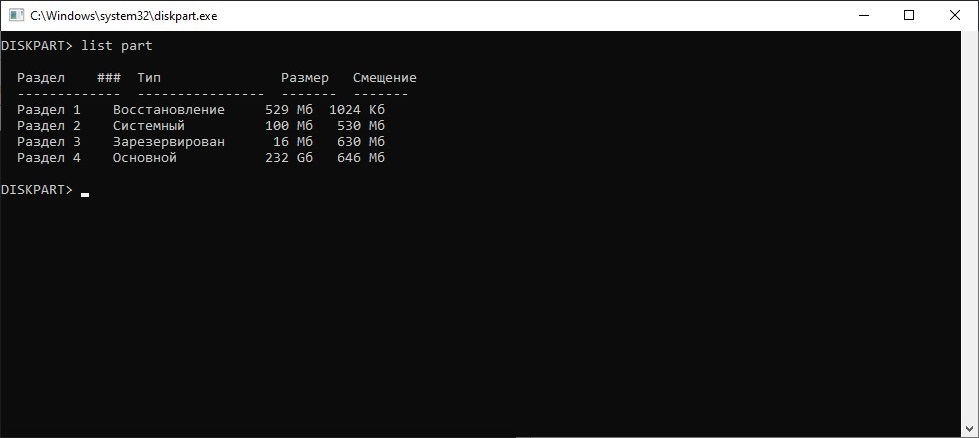
lis par (показ всех разделов выбранного диска, первые три раздела будем удалять).
sel par 1 (выбираем первый раздел
del par override (удаляем раздел, для удаления раздела ESP и MSR или раздела OEM-изготовителя ноутбука, необходимо указать параметр override)
sel par 2
del par override
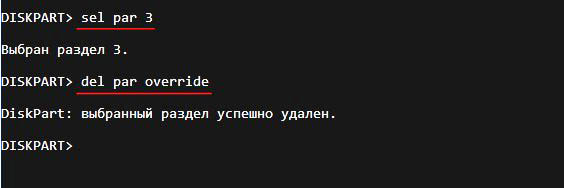
sel par 3
del par override
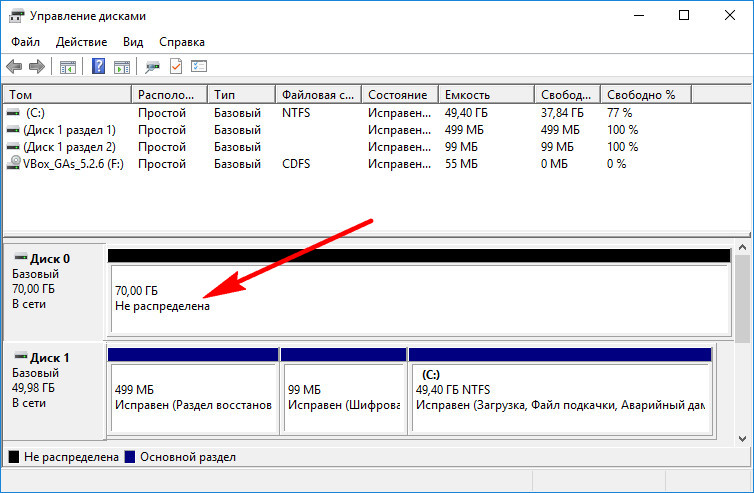
Всё, все три скрытых раздела мы удалили.
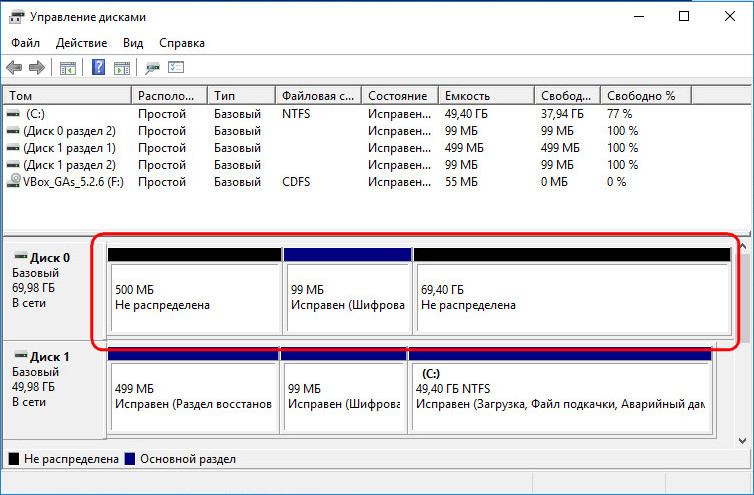
Вводим команды:
diskpart
lis dis (выводим список дисков).
sel dis 0 (выбираем жёсткий диск ноутбука).
create par efi size=99 (создаём шифрованный (EFI) системный раздел 99 Мб).
format fs=fat32 (форматируем его в файловую систему FAT32).
creat par msr size=16 (создаём раздел MSR 16 Мб)
lis vol (выводятся все разделы жёсткого диска).
exit (выходим из diskpart)
Создаём загрузчик командой
bcdboot C:Windows, так как буква диска операционной системы в среде восстановления (C:).
Файлы загрузки успешно созданы.
Перезагружаемся и Windows 10 должна загрузиться.

Рекомендуем другие статьи по данной теме
Заметили ошибку
Выделите и нажмите Ctrl+Enter
Раздел EFI -обязательный для GPT разметки на системах с UEFI. Стандартный размер раздела EFI равен 100MB, но на дисках расширенного формата 4K Native (секторы 4KB) он увеличен до 260MB.
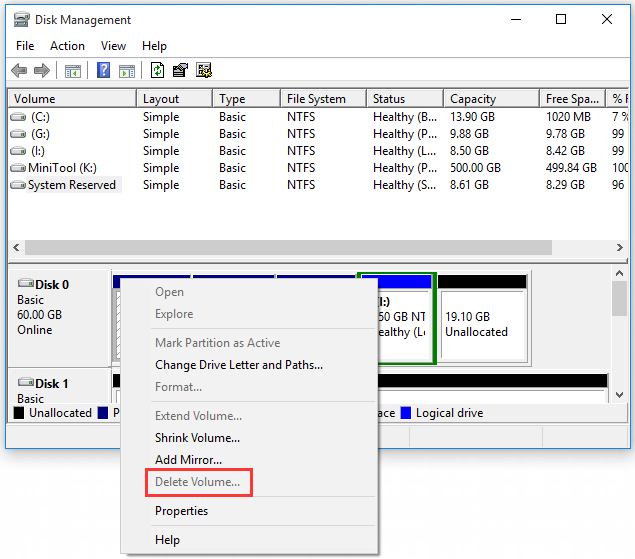
Стандартной утилитой «Управление дисками» в Windows не удастся удалить шифрованные EFI тома.
Но в операционной системе есть консольная утилита Diskpart.
Запускаем коммандную строку (cmd) от имени администатора и выполняем команду diskpart
Удалить шифрованный EFI
Команды diskpart для удаления разделов:

list disk – смотрим список дисков
select disk 1 – выбираем диск 1
clean – удаление всех разделов или томов на диске
list partition – проверка, что все разделы удалены
Создать новый раздел
Команды diskpart для создания нового раздела:
list disk (смотрим список дисков)
select disk 1 (выбираем диск 1)
create partition primary size=n (n - размер раздела в мегабайтай)
assign letter=H (добавляем метку к диску)
format fs=ntfs quick (быстрое форматирование в формат NTFS)

У блога появился хостинг, его любезно предоставила компания Облакотека. Облакотека — облачные сервисы для создания и управления виртуальной ИТ-инфраструктурой.
Если вам понравился мой блог и вы хотели бы видеть на нем еще больше полезных статей, большая просьба поддержать этот ресурс.
Если вы размещаете материалы этого сайта в своем блоге, соц. сетях, и т.д., убедительная просьба публиковать обратную ссылку на оригинал
Many users want to delete EFI partition and reformat the drive, but there is no option to remove the partition. At this time, how to delete EFI partition smoothly? If you are searching for the guide, this post of MiniTool can help you remove EFI partition easily.
When deleting the EFI system, drive C, and OEM in Disk Management, lots of users may find the Delete Volume feature is grayed out. Why can’t delete EFI partition in DM? Are there any alternatives for the EFI system partition delete? Let’s start exploring these questions now.
I have a 2nd drive which has an EFI System Partition of 750MB and an unused partition of 118GB. I want to remove the EFI System Partition and reformat the entire drive. But when I click around there is no option to remove the EFI. Is there a way?https://superuser.com/questions/1507763/remove-efi-system-partition
About EFI System Partition
The EFI system partition (ESP) is formatted with a file system after you successfully install Windows OS or Mac OS X on a GPT disk. Usually, you can see the EFI partition in Disk Management. Lots of important files including operating systems, driver files, and system utility programs are stored in the partition.
To protect these important files, the EFI partition is not assigned with a drive letter by Windows and cannot be seen in File Explorer. It is protected and locked by the Windows system partition to avoid any accidental deletion. Without the EFI system partition, your system won’t be able to boot.
Why the EFI System Partition Cannot Be Deleted
The EFI system partition is a protective partition. That’s why you can’t delete EFI partition using Windows built-in tool — Disk Management. It is risky to remove EFI partition because the system will be unbootable after that.
Sometimes, however, some users want to remove EFI partition because it takes up some space. Also, some other people want to delete EFI system partition on the second hard drive and reformat it. No matter what situations you are in, you can follow the 2 methods below to delete EFI partition Windows 10 smoothly.
What You Need to Do Before Deleting EFI Partition
Prior to deleting EFI system partition, bear in mind the following tips and tricks to avoid any unexpected loss. If you have more than one disk, make sure that you select the right disk number that you want to remove the partition from.
To know the disk numbers, you can right-click the Start button and select Disk Management from the elevated menu. And then remember the disk number that you’re ready to delete EFI partition in.
Tip: If your computer is not Windows 10 version, you can press Win + R keys to call out the Run dialog box. Then type diskmgmt.msc in the box and hit Enter. This method can open Disk Management on any version of Windows.
Here are some important tips for you before deleting EFI partition.
- Don’t do anything to the EFI system partition if you want to keep the Windows OS running smoothly.
- .In order to avoid any unnecessary data loss, it is highly recommended that you back up the important files from the EFI partition to an external storage device in advance.
- If you just want to deal with the full hard disk drive, you can check what files are taking up some much space on the drive and then choose a suitable way to free up disk.
- If there are 2 Windows systems on your computer and just want to remove EFI partition, you can free up disk and keep one OS, and then follow the methods below.
- If you want to delete the delete EFI system partition and install a new Windows operating system, you can reinstall OS directly, which will delete ESP automatically.
Have you confirmed to delete the EFI system partition? If so, you can start the following 2 methods.
How to Delete EFI Partition in Windows 10
Here are 2 major ways to remove EFI partition in Windows 10/8/7. You can use Windows built-in tool — Diskpart. Alternatively, you can use a professional disk management tool – MiniTool Partition Wizard.
Method 1. Use Diskpart
Diskpart is a Windows built-in partitioning tool that uses various command lines to manage your storage devices. Here are detailed steps to delete EFI system partition with Diskpart.
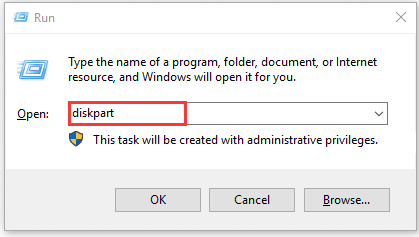
Step 1. Open Diskpart.exe on your computer.
- Press Win + R keys to open the Run dialog box.
- Type diskpart in the Run box and click on the OK button to open the Command Prompt window.
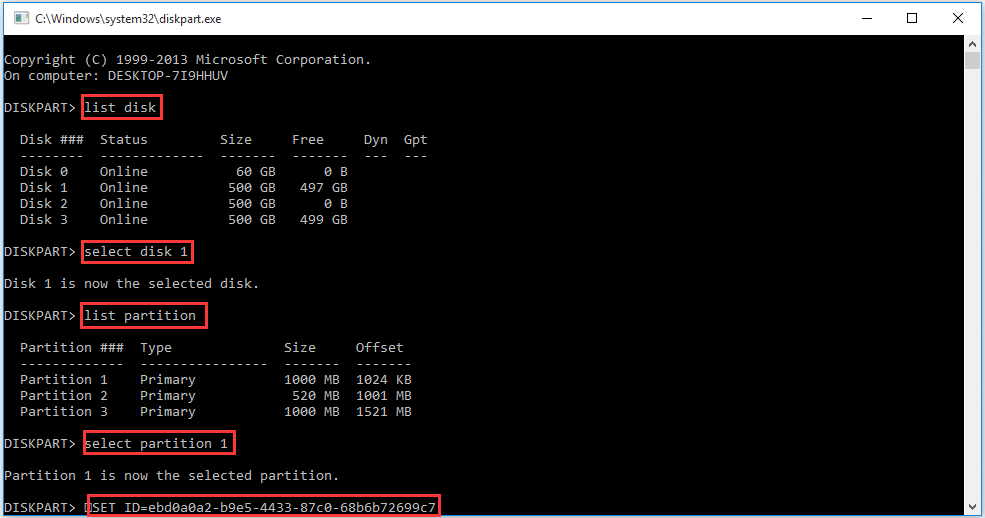
Step 2. Change the EFI system partition ID and set it as a basic data partition. To do so, type the following command and hit Enter key after typing each command.
- list disk (it will show all the disks on your P)
- select disk * (replace * with the disk number that you want to remove EFI partition from.)
- list partitions (it will show the EFI system partition and other partitions on the selected disk.)
- select partition 1 (here 1 refers to the volume number of EFI partition.)
- SET ID=ebd0a0a2-b9e5-4433-87c0-68b6b72699c7 (it can set the type field to be a basic data partition.)
The EFI system partition should become a basic data partition that you can delete smoothly. Now, continue the steps below to remove EFI partition on the hard disk drive.
Step 3. Delete the EFI system partition with the following command lines.
- list partition
- select partition 1
- delete partition override (it can delete the EFI partition that you just changed to data partition.)
Step 4. Exit the deleting process. If you receive the message that states “DiskPart successfully deleted the selected partition”, type exit and hit Enter to close the Command Prompt window.
Diskpart can help you remove EFI system partition in Windows 10/8/7. In many cases, however, Diskpart is not always the most effective utility to manage your storage devices. Lots of users encounter a variety of error messages when using Diskpart such as failed to clear disk attributes, Diskpart has encountered an error, and so forth. Is there any better way to delete EFI partition? Please keep reading the following method.
Method 2. Use MiniTool Partition Wizard
A professional partition manager – MiniTool Partition Wizard is capable of deleting a specified partition include EFI, OEM, C drive, and recovery partition.
It is a reliable partition management tool that spares no effort to provide effective solutions to various problems. This software can help you resize partition, convert FAT to NTFS without data loss, wipe hard drive and reinstall Windows, convert MBR to GPT disk, etc.
Besides, MiniTool also helps users fix lots of issues when playing games or using hardware devices such as PS4 randomly turns off, Minecraft not using GPU, League of Legends critical error, Steam not recognizing installed games, and so on.
Now, let’s see how to delete EFI partition using MiniTool Partition Wizard Pro Ultimate Edition. Click the button below to download this software and install it on your PC.
Note: To help you delete EFI partition smoothly, you need to create a bootable media drive. So, you should prepare a USB drive or a CD/DVD disc.
Buy Now
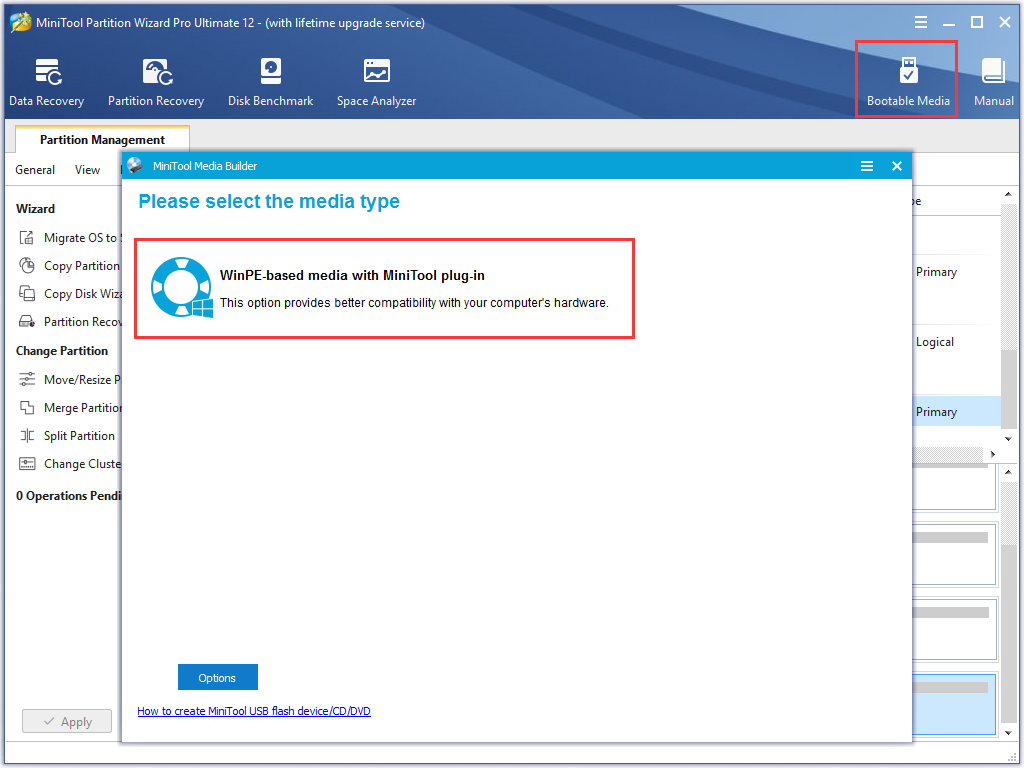
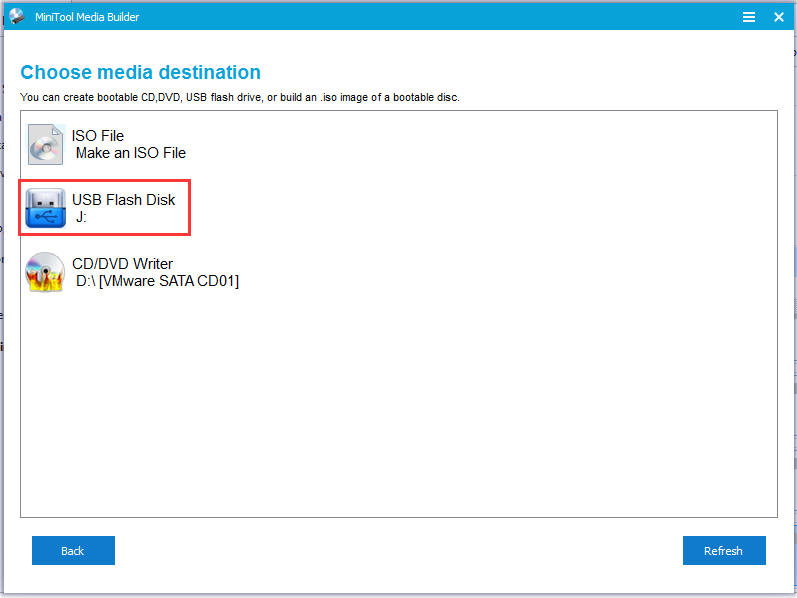
Step 1. Create a bootable USB flash drive.
- Plug the USB flash drive on your computer and launch this software to get its main interface.
- Click on the Bootable Media on the toolbar.
- Click on the WinPE-based media with MiniTool plug-in option.
- Select the USB flash disk to burn the iso into the USB drive directly.
- Wait for the creating process of MiniTool bootable USB flash drive to complete. Click on Finish after the iso is burned successfully.
Step 2. Use the bootable USB flash drive to boot your computer. You can refer to this post to boot your computer.
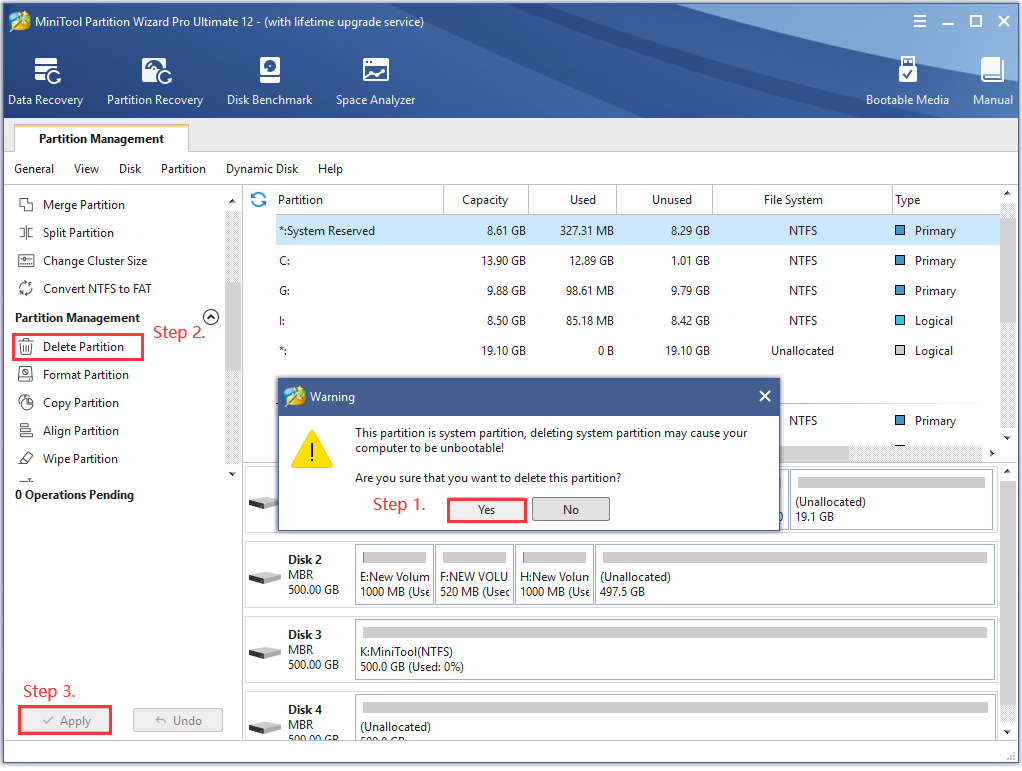
Step 3. Delete the EFI system partition.
- In the main interface, select the EFI partition that you want to delete and click on the Delete Partition feature from the left pane.
- Click on the Yes button to confirm the operation. Since EFI partition is a system partition, you will receive a warning message that reminds you deleting the partition may cause your computer to be unbootable.
- Now, click on the Apply button to execute the pending changes.
- Restart your computer to make it take into effect.
How to delete EFI partition Windows 10? Now, I believe that you already have known the 2 accessible methods.
Many users want to reformat their hard drive after deleting the EFI partition. For this, MiniTool Partition Wizard can help you reformat hard drive easily. You can follow this quick guide.
Free Download Buy Now
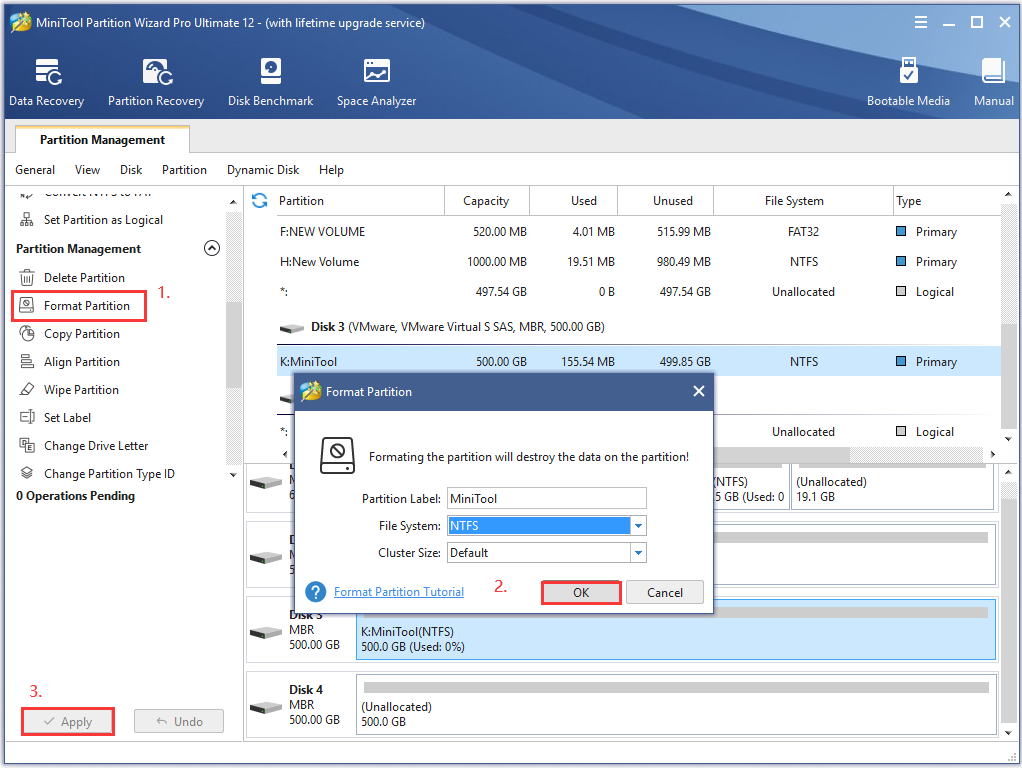
Step 1. Select the hard drive that you’re ready to reformat and click on the Format Partition feature from the left pane.
Step 2. Select a File System from the drop-down menu and click on the OK button to confirm
Step 3. Click on the Apply button to execute the pending changes.
I want to delete the EFI partition on my hard drive and reformat it. But when I right-click the partition in Disk Management, the Delete Volume feature is grayed out. How to delete EFI partition in Windows 10? Probably you also need this post. Click to Tweet
What’s Your Opinion
In this post, we mainly talk about how to delete EFI partition in Windows 10. Since the EFI system partition is a protective one that stores many important files, you cannot delete it in Disk Management directly. Fortunately, the Diskpart and MiniTool Partition Wizard can help you delete EFI partition.
If you have any questions about this software, you can send us an e-mail via [email protected]. We also appreciate any ideas about this topic in the comment area.
Delete EFI Partition FAQ
Can I delete EFI partition in Windows 10?
You cannot delete EFI partition directly. This is because it is a protective system partition that stores the boot files. Deleting EFI partition will cause your computer to be unbootable. If you want to delete EFI partition, you can use convert it to a basic data partition and delete it by using Diskpart. Alternatively, you can use a professional utility.
How to delete all partitions on a hard drive?
For this, you can use Windows built-in tool Diskpart. Here’s how to do that:
- Type diskpart in the search box and select Diskpart app from the elevated menu.
- Type the following commands and hit Enter after each one.
- list disk
- select disk * (* represent the disk number that you want to delete all partition on the disk)
- clean
How big is an EFI system partition?
This question depends on the specific operation systems. Usually, 100MB is the minimum partition size for EFI partition. To avoid some potential problems, it is recommended to set the EFI partition between 100MB to 500MB.
How to boot my computer from EFI?
In order to boot from EFI menu, you need to create a bootable USB media.
- Prepare a USB drive and format it to FAT32.
- Open the USB drive and create a directory /efi/boot in the drive.
- Copy the efi file to the directory that’s created above.
- Rename the shell.efi file to efi.
- Restart your computer and enter the UEFI menu, and then select the Boot from USB.
Many users want to delete EFI partition and reformat the drive, but there is no option to remove the partition. At this time, how to delete EFI partition smoothly? If you are searching for the guide, this post of MiniTool can help you remove EFI partition easily.
When deleting the EFI system, drive C, and OEM in Disk Management, lots of users may find the Delete Volume feature is grayed out. Why can’t delete EFI partition in DM? Are there any alternatives for the EFI system partition delete? Let’s start exploring these questions now.
I have a 2nd drive which has an EFI System Partition of 750MB and an unused partition of 118GB. I want to remove the EFI System Partition and reformat the entire drive. But when I click around there is no option to remove the EFI. Is there a way?https://superuser.com/questions/1507763/remove-efi-system-partition
About EFI System Partition
The EFI system partition (ESP) is formatted with a file system after you successfully install Windows OS or Mac OS X on a GPT disk. Usually, you can see the EFI partition in Disk Management. Lots of important files including operating systems, driver files, and system utility programs are stored in the partition.
To protect these important files, the EFI partition is not assigned with a drive letter by Windows and cannot be seen in File Explorer. It is protected and locked by the Windows system partition to avoid any accidental deletion. Without the EFI system partition, your system won’t be able to boot.
Why the EFI System Partition Cannot Be Deleted
The EFI system partition is a protective partition. That’s why you can’t delete EFI partition using Windows built-in tool — Disk Management. It is risky to remove EFI partition because the system will be unbootable after that.
Sometimes, however, some users want to remove EFI partition because it takes up some space. Also, some other people want to delete EFI system partition on the second hard drive and reformat it. No matter what situations you are in, you can follow the 2 methods below to delete EFI partition Windows 10 smoothly.
What You Need to Do Before Deleting EFI Partition
Prior to deleting EFI system partition, bear in mind the following tips and tricks to avoid any unexpected loss. If you have more than one disk, make sure that you select the right disk number that you want to remove the partition from.
To know the disk numbers, you can right-click the Start button and select Disk Management from the elevated menu. And then remember the disk number that you’re ready to delete EFI partition in.
Tip: If your computer is not Windows 10 version, you can press Win + R keys to call out the Run dialog box. Then type diskmgmt.msc in the box and hit Enter. This method can open Disk Management on any version of Windows.
Here are some important tips for you before deleting EFI partition.
- Don’t do anything to the EFI system partition if you want to keep the Windows OS running smoothly.
- .In order to avoid any unnecessary data loss, it is highly recommended that you back up the important files from the EFI partition to an external storage device in advance.
- If you just want to deal with the full hard disk drive, you can check what files are taking up some much space on the drive and then choose a suitable way to free up disk.
- If there are 2 Windows systems on your computer and just want to remove EFI partition, you can free up disk and keep one OS, and then follow the methods below.
- If you want to delete the delete EFI system partition and install a new Windows operating system, you can reinstall OS directly, which will delete ESP automatically.
Have you confirmed to delete the EFI system partition? If so, you can start the following 2 methods.
How to Delete EFI Partition in Windows 10
Here are 2 major ways to remove EFI partition in Windows 10/8/7. You can use Windows built-in tool — Diskpart. Alternatively, you can use a professional disk management tool – MiniTool Partition Wizard.
Method 1. Use Diskpart
Diskpart is a Windows built-in partitioning tool that uses various command lines to manage your storage devices. Here are detailed steps to delete EFI system partition with Diskpart.
Step 1. Open Diskpart.exe on your computer.
- Press Win + R keys to open the Run dialog box.
- Type diskpart in the Run box and click on the OK button to open the Command Prompt window.
Step 2. Change the EFI system partition ID and set it as a basic data partition. To do so, type the following command and hit Enter key after typing each command.
- list disk (it will show all the disks on your P)
- select disk * (replace * with the disk number that you want to remove EFI partition from.)
- list partitions (it will show the EFI system partition and other partitions on the selected disk.)
- select partition 1 (here 1 refers to the volume number of EFI partition.)
- SET ID=ebd0a0a2-b9e5-4433-87c0-68b6b72699c7 (it can set the type field to be a basic data partition.)
The EFI system partition should become a basic data partition that you can delete smoothly. Now, continue the steps below to remove EFI partition on the hard disk drive.
Step 3. Delete the EFI system partition with the following command lines.
- list partition
- select partition 1
- delete partition override (it can delete the EFI partition that you just changed to data partition.)
Step 4. Exit the deleting process. If you receive the message that states “DiskPart successfully deleted the selected partition”, type exit and hit Enter to close the Command Prompt window.
Diskpart can help you remove EFI system partition in Windows 10/8/7. In many cases, however, Diskpart is not always the most effective utility to manage your storage devices. Lots of users encounter a variety of error messages when using Diskpart such as failed to clear disk attributes, Diskpart has encountered an error, and so forth. Is there any better way to delete EFI partition? Please keep reading the following method.
Method 2. Use MiniTool Partition Wizard
A professional partition manager – MiniTool Partition Wizard is capable of deleting a specified partition include EFI, OEM, C drive, and recovery partition.
It is a reliable partition management tool that spares no effort to provide effective solutions to various problems. This software can help you resize partition, convert FAT to NTFS without data loss, wipe hard drive and reinstall Windows, convert MBR to GPT disk, etc.
Besides, MiniTool also helps users fix lots of issues when playing games or using hardware devices such as PS4 randomly turns off, Minecraft not using GPU, League of Legends critical error, Steam not recognizing installed games, and so on.
Now, let’s see how to delete EFI partition using MiniTool Partition Wizard Pro Ultimate Edition. Click the button below to download this software and install it on your PC.
Note: To help you delete EFI partition smoothly, you need to create a bootable media drive. So, you should prepare a USB drive or a CD/DVD disc.
Buy Now
Step 1. Create a bootable USB flash drive.
- Plug the USB flash drive on your computer and launch this software to get its main interface.
- Click on the Bootable Media on the toolbar.
- Click on the WinPE-based media with MiniTool plug-in option.
- Select the USB flash disk to burn the iso into the USB drive directly.
- Wait for the creating process of MiniTool bootable USB flash drive to complete. Click on Finish after the iso is burned successfully.
Step 2. Use the bootable USB flash drive to boot your computer. You can refer to this post to boot your computer.
Step 3. Delete the EFI system partition.
- In the main interface, select the EFI partition that you want to delete and click on the Delete Partition feature from the left pane.
- Click on the Yes button to confirm the operation. Since EFI partition is a system partition, you will receive a warning message that reminds you deleting the partition may cause your computer to be unbootable.
- Now, click on the Apply button to execute the pending changes.
- Restart your computer to make it take into effect.
How to delete EFI partition Windows 10? Now, I believe that you already have known the 2 accessible methods.
Many users want to reformat their hard drive after deleting the EFI partition. For this, MiniTool Partition Wizard can help you reformat hard drive easily. You can follow this quick guide.
Free Download Buy Now
Step 1. Select the hard drive that you’re ready to reformat and click on the Format Partition feature from the left pane.
Step 2. Select a File System from the drop-down menu and click on the OK button to confirm
Step 3. Click on the Apply button to execute the pending changes.
I want to delete the EFI partition on my hard drive and reformat it. But when I right-click the partition in Disk Management, the Delete Volume feature is grayed out. How to delete EFI partition in Windows 10? Probably you also need this post. Click to Tweet
What’s Your Opinion
In this post, we mainly talk about how to delete EFI partition in Windows 10. Since the EFI system partition is a protective one that stores many important files, you cannot delete it in Disk Management directly. Fortunately, the Diskpart and MiniTool Partition Wizard can help you delete EFI partition.
If you have any questions about this software, you can send us an e-mail via [email protected]. We also appreciate any ideas about this topic in the comment area.
Delete EFI Partition FAQ
Can I delete EFI partition in Windows 10?
You cannot delete EFI partition directly. This is because it is a protective system partition that stores the boot files. Deleting EFI partition will cause your computer to be unbootable. If you want to delete EFI partition, you can use convert it to a basic data partition and delete it by using Diskpart. Alternatively, you can use a professional utility.
How to delete all partitions on a hard drive?
For this, you can use Windows built-in tool Diskpart. Here’s how to do that:
- Type diskpart in the search box and select Diskpart app from the elevated menu.
- Type the following commands and hit Enter after each one.
- list disk
- select disk * (* represent the disk number that you want to delete all partition on the disk)
- clean
How big is an EFI system partition?
This question depends on the specific operation systems. Usually, 100MB is the minimum partition size for EFI partition. To avoid some potential problems, it is recommended to set the EFI partition between 100MB to 500MB.
How to boot my computer from EFI?
In order to boot from EFI menu, you need to create a bootable USB media.
- Prepare a USB drive and format it to FAT32.
- Open the USB drive and create a directory /efi/boot in the drive.
- Copy the efi file to the directory that’s created above.
- Rename the shell.efi file to efi.
- Restart your computer and enter the UEFI menu, and then select the Boot from USB.
Если мы захотим избавиться от текущей структуры жёсткого диска – убрать все разделы на нём и вернуть ему исходное нераспределённое пространство, в среде активной Windows с использованием её штатных средств сможем сделать это при соблюдении двух условий. Во-первых, в качестве оперируемого диска — того, на котором хотим убрать все разделы, естественно, не должно выступать хранилище текущей ОС.
Под хранилищем понимаются либо все разделы системы, либо как минимум один из них, например, загрузочный. Во-вторых, на таком оперируемом диске не должно существовать защищённых от удаления разделов. Если ранее оперируемый диск имел стиль разметки MBR, с помощью утилиты diskmgmt.msc в составе Windows мы без проблем удалим все пользовательские и системные разделы.
И превратим дисковое пространство в нераспределённое, на базе которого сможем создать новую структуру разделов под другие задачи.
А вот пространство GPT-дисков, на которых ранее была установлена Windows, таким образом мы полностью не сможем очистить. Для скрытого системного EFI-раздела не будут доступны ни функция удаления, ни любые иные возможности.
Даже если избавиться от всех остальных разделов, EFI-раздел останется.
Подобно последнему, на носителях OEM-устройств могут также существовать неудаляемые служебные Recovery-разделы, необходимые для отката Windows до заводских настроек.
Как очистить жёсткий диск с защищёнными разделами от структуры — удалить все разделы, убрать стиль разметки, чтобы он стал таким, как до инициализации? Рассмотрим несколько вариантов, как это можно осуществить.
1. Командная строка
Проводить очистку носителей данных от их структуры умеет штатный Windows-инструмент – командная строка. Важный нюанс: запущена она должна быть от имени администратора.
В её окне вводим последовательно:
diskpart
list disk
Увидим перечень всех носителей компьютера. В этом перечне нужно узнать, под каким порядковым номером значится оперируемый диск. И здесь ориентироваться нужно на его объём. В нашем тестовом случае это Диск 0.
От порядкового номера будет зависеть следующая команда:
select disk 0
Здесь вместо нуля каждый должен подставить свой порядковый номер.
Последний шаг – ввод команды для очистки носителя от структуры:
clean
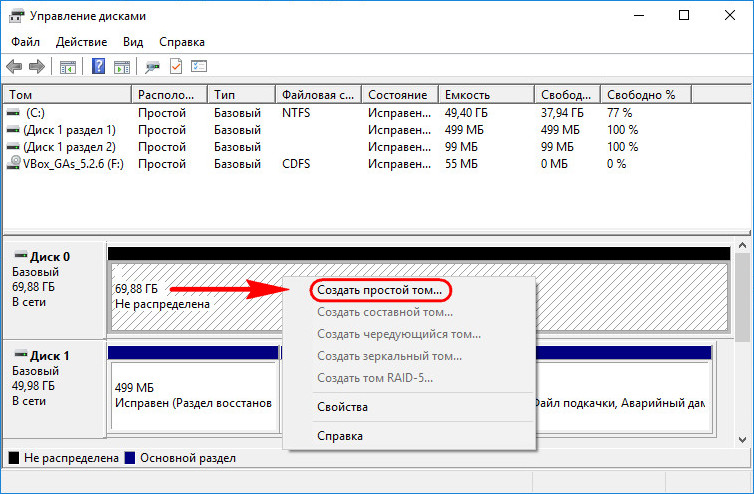
Всё – диск очищен от разделов и инициализации. После этого можем снова обратиться к утилите diskmgmt.msc, чтобы сформировать структуру по новой.
Осуществляем инициализацию.
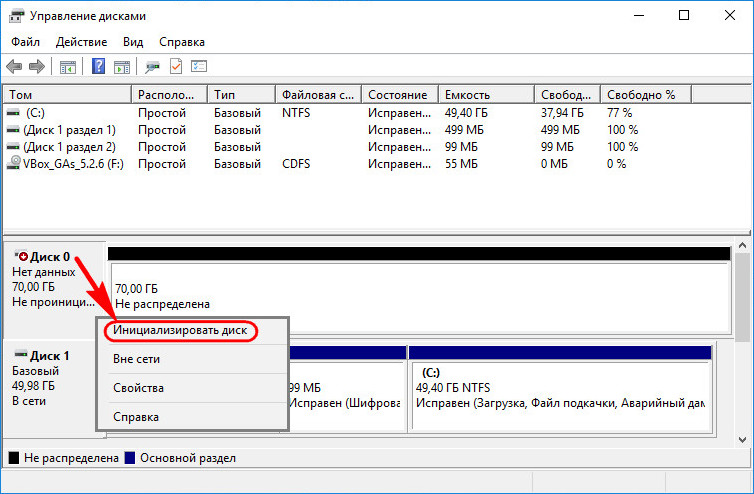
Выбираем GPT— или MBR-стиль разметки.

И далее уже можем формировать новую структуру.
2. Процесс установки Windows
Удалять скрытые разделы диска умеет процесс установки Windows. Если к компьютеру подключён установочный носитель системы, можно загрузиться с него и на этапе выбора места её установки убрать разделы. А затем прекратить установку и перезагрузить компьютер.
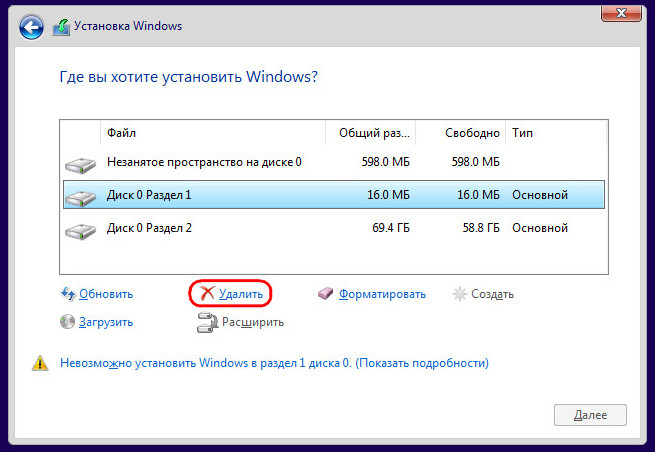
Правда, этот вариант подойдёт только для пользователей, которые хорошо знают оперируемый диск. Поскольку установочный процесс отображает дисковое пространство в виде перечня разделов, высока вероятность ошибочно повредить структуру неоперируемого носителя.
***
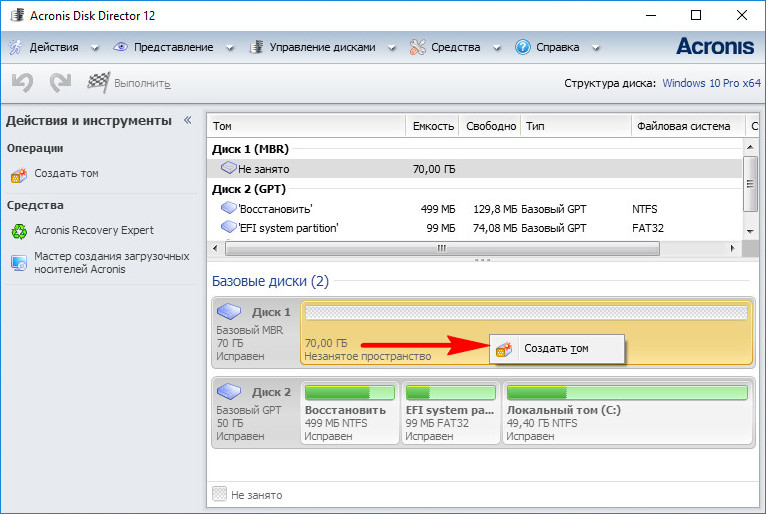
Хейтеры командной строки могут прибегнуть к стороннему софту для работы с дисковым пространством типа Acronis Disk Director 12. Это более функциональный, более юзабильный и даже в каком-то смысле более безопасный способ проведения операций с разметкой носителей данных.
3. Acronis Disk Director 12
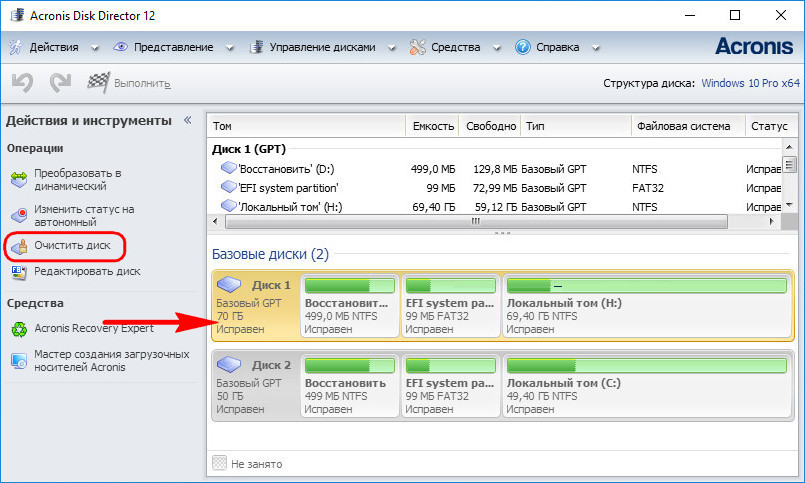
И менеджер работы с дисками от компании Acronis, и его аналоги примечательны чёткой и понятной подачей структуры дисков. Более того, подобного рода программы в составе LiveDisk – это единственный способ решить поставленную в статье задачу, если оперируемый носитель является единственным таковым в составе компьютера. Чтобы с помощью Acronis Disk Director 12 избавиться от структуры диска, выбираем его, например, в визуальном представлении.
И задействуем функцию «Очистить диск».
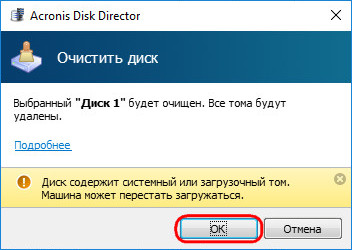
Acronis нас предупреждает, что на очищаемом носителе есть загрузочные разделы. И таким образом защищает нас от необдуманных решений. Дело в том, что у двух Windows, установленных на разных дисках, могут быть как свои загрузчики, так и один общий. Важно проверить этот момент: у оставляемой Windows должны быть свои разделы загрузки:
• Либо «Зарезервировано системой» (MBR);
• Либо «Восстановить» и «EFI» (GPT).
Проверяем, если всё в порядке, жмём «Ок».
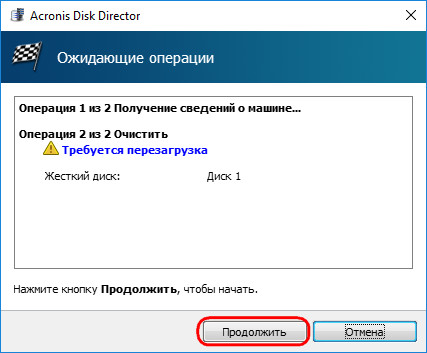
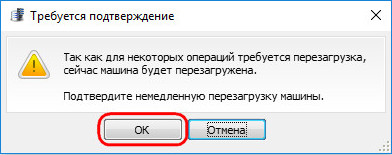
Применяем запланированное.
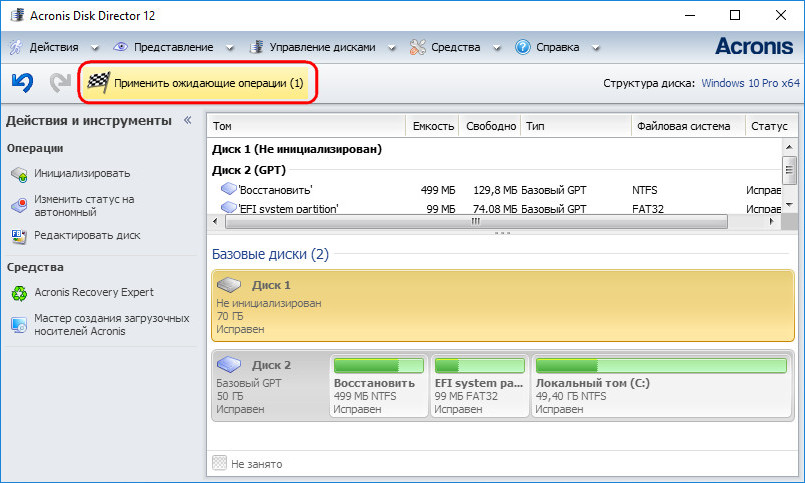
Если работаем не с LiveDisk, а внутри Windows, потребуется перезагрузка.
Как только Acronis завершит свою работу, и компьютер перезапустится, можем приступать к формированию новой структуры оперируемого диска.
Инициализируем его.
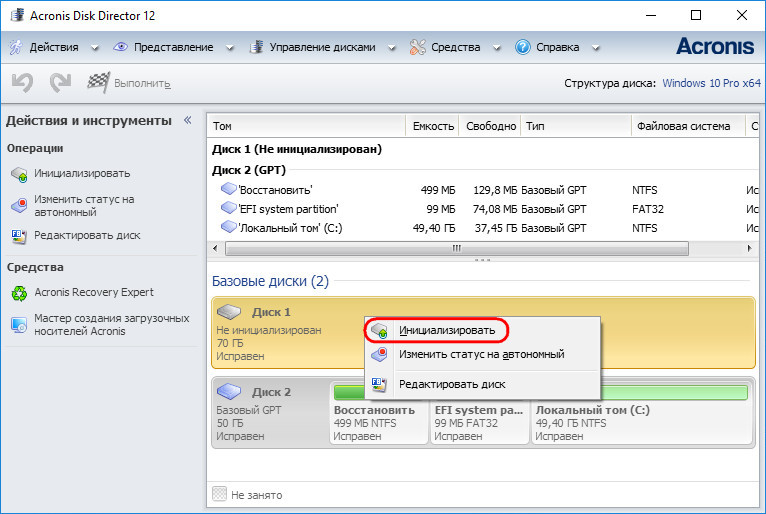
Выбираем стиль разметки.

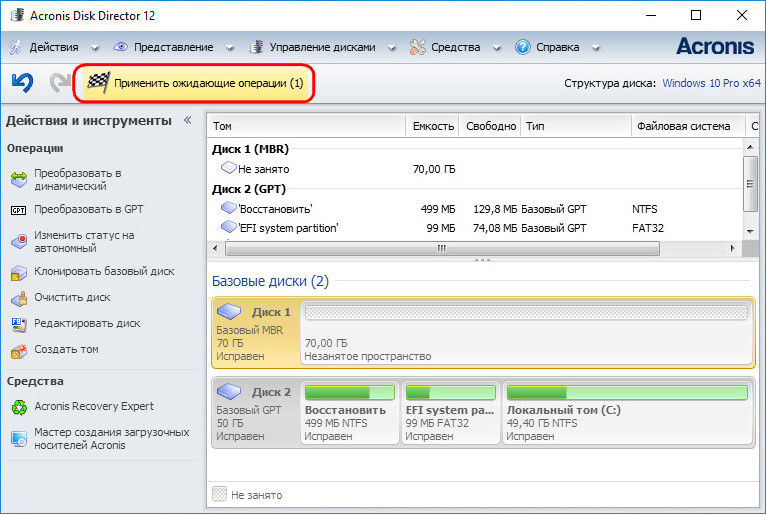
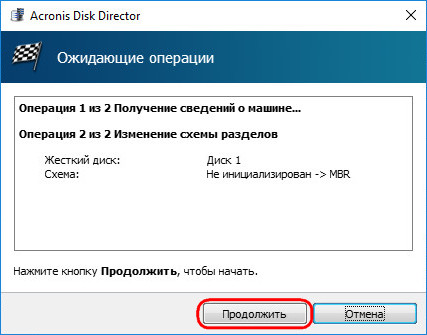
Применяем.
Формируем разделы под новые цели применения.
![]() Загрузка…
Загрузка…

Внутренний накопитель компьютера, а также хранилище USB-флешки, нередко подразделяется на несколько томов. Пожалуй, каждый пользователь знает о делении на диски «C» и «D», но вместе с тем существует раздел EFI, который отвечает за соединение ОС и программных компонентов ПК. При необходимости от него можно избавиться, но далеко не все понимают, как удалить шифрованный том EFI на операционной системе Windows 10.
Зачем удалять шифрованный EFI раздел с USB флешки
Во-первых, важно отметить, что нельзя удалять том UFI на SSD или HDD своего компьютера, так как это нарушит его работу. Поэтому в данном материале мы говорим о системном разделе для флешки, удаление которого как раз-таки не влечет за собой критических последствий.

Зачем вообще удалять EFI? Для ответа на этот вопрос нужно предварительно объяснить, как он появляется на самом обыкновенном USB-накопителе. Возникает системный раздел только в том случае, когда пользователь превращает переносной накопитель в загрузочную флешку для установки Windows на компьютер. В этом случае накопителю требуется тот самый том, который используется для связи ОС с программными компонентами ПК.
В таком режиме владельцу накопителя недоступны многие функции, а для превращения загрузочной флешки в обычную приходится использовать сторонний софт, так как в стандартной утилите «Управления дисками» раздел EFI не отображается. Поэтому удаление тома становится самым простым способом изменения формата использования USB-накопителя. Пользователю не нужно прибегать к помощи стороннего софта, и операция выполняется стандартными средствами системы.

Удаление шифрованного EFI
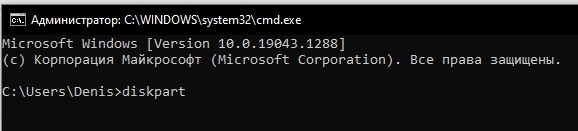
Прежде чем рассказать о процессе удаления, вновь заметим, что операцию нельзя выполнить через системный компонент «Управление дисками». EFI здесь скрыт. При этом есть другие стандартные средства, которые помогают при выполнении операции. В частности, за помощью можно обратиться к командной строке:
- Откройте окно «Выполнить» комбинацией клавиш «Win» + «R».
- В появившемся окне пропишите «diskpart» и нажмите на кнопку «ОК». Так мы сразу же откроем средство удаления разделов через КС.
- Через окно командной строки обработайте команду «list disk» для показа всех доступных дисков.

- Далее введите запрос формата «select disk X», где вместо «X» будет указываться номер, под которым определяется флешка.
- Обработайте команду «clean» для подтверждения удаления.
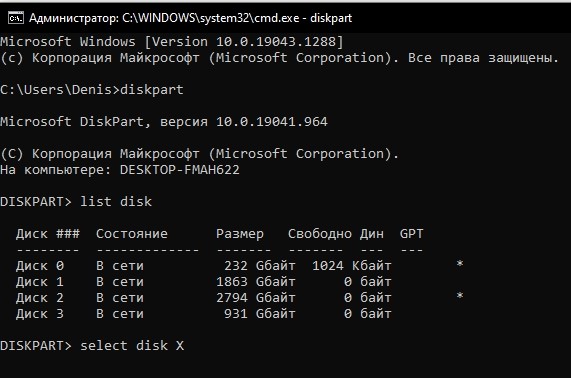
На заметку. В командной строке ввод каждого запроса должен сопровождаться нажатием на клавишу «Enter». В противном случае команда не будет выполнить.
Для проверки того, что операция выполнена успешно, вы можете использовать запрос «list partition». Если в списке нет удаленного раздела – поздравляем, вам удалось избавиться от тома EFI. Если же все осталось на своих местах, предлагаем повторить операцию.
Создание нового раздела
При необходимости вы можете создать новый раздел EFI. Операция выполняется путем превращения USB-накопителя в загрузочную флешку или специальными командами, доступными через консоль «diskpart»:
- Выполните шаги 1-4 из предыдущей инструкции.
- Введите команду «create partition primary size=X», указав вместо «X» размер тома.
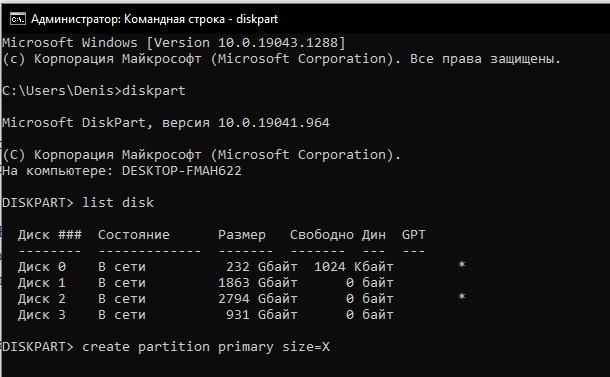
- Обработайте запрос «assign letter=X», где вместо «X» указывается предполагаемая буква раздела.
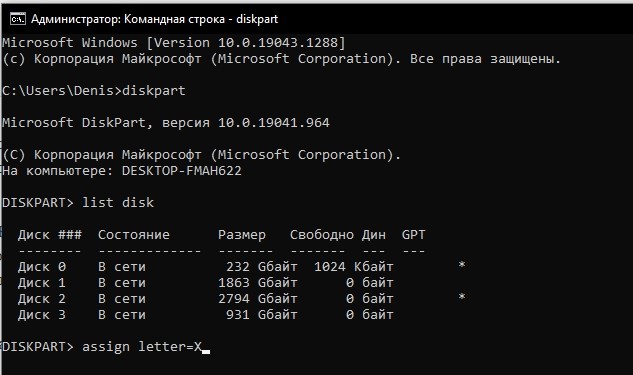
Наконец, через все тот же инструмент вы можете быстро привести флешку к наиболее распространенному формату NTFS. Для этого потребуется обработать запрос «format fs=ntfs quick».
Столкнулись с проблемой, что невозможно удалить EFI раздел с жёсткого диска в Windows? Не волнуйтесь данную проблему можно решить довольно быстро!
Если у вас стоял Хакинтош, либо была установлена ОС Windows на другом диске, либо флешке, то на нем наверняка существует EFI «защищенный раздел GPT», который к сожалению нельзя удалить из графического интерфейса! Устанавливать стороннюю программу? Как вариант, но можно обойтись и стандартными средствами! В этом нам поможет утилита DiskPart!
Удалить «защищенный раздел GPT» в Windows
- Запустите “Управление дисками”
- Нажмите одновременно на клавиатуре “Win” + “R”, а потом в окне “Выполнить” ввести команду “diskmgmt.msc“

- Нажмите одновременно на клавиатуре “Win” + “R”, а потом в окне “Выполнить” ввести команду “diskmgmt.msc“
- Либо правой кнопкой мыши по меню пуск и выбрать “Управление дисками”

- Определяем диск на котором установлен находиться EFI раздел:

- Теперь запустите командную строку и введите команду
diskpart - Просматриваем подключенный диск:
lis disk - Выбираем диск на котором необходимо удалить efi раздел или «защищенный раздел GPT» “
sel disk X” (вместо X, номер диска) - Просматриваем разделы
lis part - Выбираем раздел который необходимо удалить, вводим команду “
sel part X” (вместо X, ваше значение) - Удаляем раздел
del part override


EFI, «защищенный раздел GPT» будет удален!
У вас еще остались вопросы? Пишите их в комментариях, рассказывайте, что у вас получилось или наоборот!
Вот и все! Больше полезных статей и инструкций читайте в разделе Статьи и Хаки Windows. Оставайтесь вместе с сайтом Android +1, дальше будет еще интересней!
Windows, Windows 10, Windows 7, Windows 8, Windows Server, Windows Vista, Windows XP
- 27.04.2020
- 20 209
- 15
- 09.06.2020
- 105
- 99
- 6

- Содержание статьи
- Удаление EFI раздела
- Комментарии к статье ( 15 шт )
- Добавить комментарий
При подключении жесткого диска (твердотельного накопителя, флешки или другого накопителя информации), который использовался для работы операционной системы, можно столкнуться с тем, что там есть раздел EFI. Просто удалить его через управление дисками не получится, но это не значит, что это невозможно. Сделать это можно через утилиту командной строки diskpart, которая идет в комплекте с операционными системами Windows.
Удаление EFI раздела
Попытки удалить данный раздел с Вашего системного диска приведут к выходу из строя операционной системы!
- Сперва нужно запустить программу управления дисками, выполнив следующую команду в Командной строке, меню Пуск или Выполнить:
diskpart - Запустится отдельное окно командной строки с программой diskpart.

- В нем вводим команду для показа всех известных системе жестких дисков:
list disk
- Выбираем нужный диск:
select disk [НОМЕР ДИСКА]где [НОМЕР ДИСКА] — номер жесткого диска, на котором находится EFI раздел, который вы хотите удалить (тот, который показала команда
list disk). - Теперь необходимо отобразить все разделы на данном диске. Делается это следующей командой:
list part
- Ориентируясь по полученному списку разделов, выбираем нужный раздел EFI:
select part [НОМЕР РАЗДЕЛА]где [НОМЕР РАЗДЕЛА] — EFI раздел, который сейчас будет удален.
- Теперь осталось дело за малым — удалить раздел EFI. Делается это одной простой командой:
del part override - После выполнения данной команды, раздел EFI будет удален, теперь можно спокойно закрыть окно программы.