Содержание
- How To Perform A Clean Uninstall Of Waves Plugins
- Preparation
- Uninstall Waves License Center
- Uninstall Waves Central
- The Post Uninstall Clean-up
- The new install
- Удаление Office с компьютера
- Удаление Office для вашего типа установки
- Удаление Office из раздела параметров Windows 10
- Удаление Office вручную с помощью Windows PowerShell
- Переустановка Office
- Удаление Visual Studio
- Удаление установщика Visual Studio
- Удаление установщика Visual Studio
- Удаление всех файлов
- Техническая поддержка
How To Perform A Clean Uninstall Of Waves Plugins
Waves have recently revamped their licensing application again and moved from the «Waves Licence Center» (WLC) to a new «Waves Central» system.
This means if you have been a previous waves plug-in user with WLC you’ll need to uninstall your current WLC setup in order to use the new Waves Central.
For some this has proven a little difficult or troublesome to totally clean out the old components and has caused issues with plugins showing up in Pro Tools after installing Waves Central.
So we decided to put together this little guide to help you make sure any leftovers from WLC don’t cause problems for you running Waves Central.
Preparation
Uninstall Waves License Center

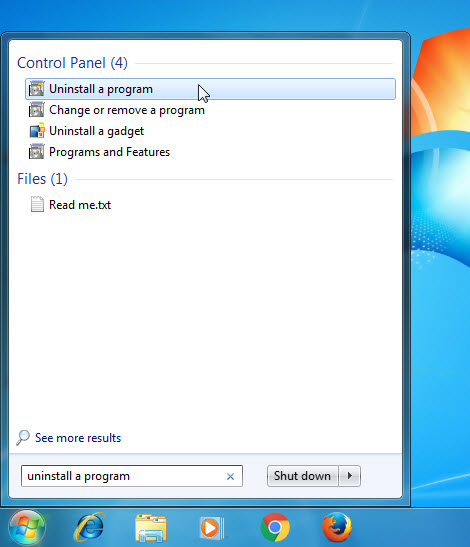
First go to Windows control panel/programs and features (on your keyboard press the Windows key and type «Programs and Features» without the quotation marks) and from the list of Installed Programs
this «should» uninstall all Waves plugins from your system, and then move down to the «Post Uninstall clean-up» below.
Uninstall Waves Central
If you have already moved passed this stage and have installed Waves Central but are experiencing problems follow on with these instructions below to start again and clean up that problematic install.
Launch Waves Central, 
Click the «Install» tab and select «Uninstall»

Select the tick box in the middle column labelled «All Waves Plugins V9» and click Uninstall in the bottom right corner.
This «should» remove all of the Waves Plugins on your system but we’ll check that in a moment.

You can then go to Windows control panel/programs and features (on your keyboard press the Windows key and type «Programs and Features» without the quotation marks) and from the list of Installed Programs.
The Post Uninstall Clean-up
Ok now we are in the position to go and clean out those possible left over files that may cause us problems later on,
Navigate to your Windows «Control Panel» (press the Windows Key on your Keyboard and type Control Panel and left mouse click it from the search results that appear).

Double click folder options,

click the «View» tab from the top and under «Hidden Files and Folders» select «Show hidden files,folders and drives».
Click ok and exit Control Panel.
Next we want to navigate to the following folder locations and delete the folders.
C:Program Files (x86)Waves
C:UsersYOURUSERNAMEAppData RoamingWaves Audio
C:UsersYOURUSERNAMEAppDataLocalWaves Audio
And lastly you can delete the contents of the C:ProgramDataWaves Audio folder except the Licenses folder ( you need to keep this ).
And then making sure no waveshell files are presnt in:
C:Program FilesCommon FilesAvidAudioPlug-Ins
C:Program FilesCommon FilesSteinbergVST2
C:Program FilesCommon FilesVST3
C:Program Files (x86)Common FilesSteinbergVST2
C:Program Files (x86)Common FilesVST3
C:Program Files (x86)VSTPlugIns
C:Program FilesVSTPlugIns
C:Program Files (x86)SteinbergVSTPlugins
C:Program FilesSteinbergVSTPlugins
C:Program Files (x86)Common FilesDigidesignDAEPlug-Ins
C:Program Files (x86)Common FilesWPAPI

Then just to make double sure you have caught everything in Windows explorer navigate to your C: system drive and in the top right corner of the Windows perform a search for «Waveshell» and delete anything that comes up.
And restart your computer.
The new install
Go to Waves.com and download the latest Waves Central installer to your desktop, Right click it and select «Run as Administrator» when it has installed launch Waves Central and follow the Waves «Easy Install and Activate» guide here
If you still experience technical difficulties contact Waves tech support at 865-909-9200 or message them directly here: http://www.waves.com/contact-support
Источник
Удаление Office с компьютера
Ниже приведены пошаговые инструкции по удалению продуктов Office с ПК (ноутбука, настольного компьютера или трансформера 2-в-1). Если вы хотите удалить Office с компьютера Mac, см. статью Удаление Office для Mac.
Совет: При удалении Office с компьютера удаляются только приложения Office, при этом файлы, документы и книги, созданные с помощью этих приложений, остаются.
Удаление Office для вашего типа установки
Действия по удалению Office зависят от вашего типа установки. Наиболее распространенные типы установки: по технологии «нажми и работай» и с помощью установщика Microsoft Windows (MSI). Другой тип — это установка Office из приложения Microsoft Store.
Выберите ниже вкладку Технология «нажми и работай» или MSI или Microsoft Store и следуйте инструкциям по удалению для вашего типа установки.
Не знаете, какой у вас тип установки?
Откройте приложение Office, чтобы проверить тип установки
Примечание: Если не удается открыть приложение для проверки типа установки, сначала попробуйте выполнить действия по удалению распространенного типа установки «нажми и работай» или MSI.
Создайте или откройте существующий файл и выберите Файл > Учетная запись (этот элемент также может называться Учетная запись Office).
В разделе сведений о продукте найдите кнопку О программе и проверьте наличие следующих элементов:
Технология «нажми и работай»

Для установок по технологии «нажми и работай» указана версия и номер сборки, а также фраза нажми и работай.
Следуйте приведенным ниже инструкциям для технологии «нажми и работай» или MSI.

Установки MSI не содержат версии и номера сборки.
Следуйте приведенным ниже инструкциям для технологии «нажми и работай» или MSI.

Для установок из Microsoft Store указана версия и номер сборки, а также фраза Microsoft Store.
Если вы используете этот тип установки, выберите вкладку Microsoft Store.
Если вы использовали установку типа «нажми и работай» или MSI, удалите Office через панель управления или скачайте средство поддержки удаления.
Откройте панель управления.
Совет: Если вы устанавливали приложения Office как часть набора, например Office для дома и учебы или Microsoft 365, найдите имя этого набора. Чтобы найти отдельное приложение, выполните поиск по его имени, например Project или Visio.
В большинстве случаев нельзя удалить отдельное приложение, если оно включено в набор приложений Office. Приложения можно удалять по отдельности, только если они были приобретены не в наборе.
Способ открытия панели управления зависит от версии Windows.
В поле поиска на панели задач введите панель управления, а затем выберите Панель управления.
Выберите раздел Программы, а затем — Программы и компоненты, щелкните правой кнопкой мыши нужный продукт Microsoft Office и выберите команду Удалить.
Щелкните правой кнопкой мыши кнопку Пуск  (в левом нижнем углу) и выберите команду Панель управления.
Выберите пункт Программы и компоненты, щелкните правой кнопкой мыши нужный продукт Office и выберите команду Удалить.
Нажмите кнопку Пуск и выберите Панель управления.
В категории Программы выберите пункт Программы и компоненты.
Щелкните правой кнопкой мыши приложение Office, которое нужно удалить, и выберите команду Удалить.
Следуйте указаниям, чтобы завершить удаление.
Примечание: Если Office не указан в панели управления, возможно, вы использовали установку из Microsoft Store. Вместо этого выберите вкладку Microsoft Store выше и следуйте указанным в ней инструкциям по удалению.
Выберите версию Office, которую вы хотите переустановить, и выполните указанные ниже действия.
Выберите кнопку ниже для скачивания средства поддержки удаления Office.

Выполните действия, чтобы открыть загрузку в зависимости от браузера. Когда вам будет предложено в окне установки приложения, выберите Установить, а затем Я соглашаюсь для соглашения об использовании служб Майкрософт.
Совет: Скачивание и установка средства может занять несколько минут. По завершении установки откроется окно удаления продуктов Office.
В левом нижнем углу щелкните правой кнопкой мыши SetupProd_OffScrub.exe и выберите пункт Открыть.

Microsoft Edge (старый)
В нижней части окна браузера нажмите кнопку Выполнить, чтобы запустить файл SetupProd_OffScrub.exe.

Во всплывающем окне нажмите Сохранить файл, а затем в правом верхнем углу окна браузера выберите стрелку скачивания > SetupProd_OffScrub.exe.

В окне «Удалить продукты Office» выберите версию Office, которую нужно удалить, а затем выберите Далее.
Следуйте указаниям и при появлении запроса перезагрузите компьютер.
После перезагрузки компьютера средство удаления автоматически откроется для завершения последнего этапа процесса удаления. Следуйте остальным указаниям.
Если вы хотите переустановить Office, выберите и выполните инструкцию для нужной версии. Закройте средство удаления.
Совет: Если средство удаления Office не полностью удаляет Office с компьютера, можно попытаться удалить Office вручную.
Удаление Office из раздела параметров Windows 10
Выберите Пуск  > Параметры
  > Приложения.
В разделе Приложения и компоненты выберите версию Office, которую нужно удалить.
Примечание: Если вы установили Officeпакет, например Office для дома и учебы, или у вас есть подписка Office, выполните поиск по имени пакета. Если вы купили отдельное Office приложение, например Word, или Visio, найдите имя приложения.
Нажмите кнопку Удалить.
Совет: Если не удается удалить установку Microsoft Store с помощью раздела Параметры в Windows 10, попробуйте удалить Office вручную с помощью Windows PowerShell, следуя инструкциям ниже.
Удаление Office вручную с помощью Windows PowerShell
Щелкните правой кнопкой мыши кнопку Пуск и выберите Windows PowerShell(администратор).
В окне Windows PowerShell введите следующее:
Нажмите клавишу ВВОД.
Это займет несколько минут. После завершения появится новая командная строка.
Проверьте удаление Office
В окне Windows PowerShell введите следующее:
Нажмите клавишу ВВОД.
Если отображается только командная строка без дополнительных сведений, то Office успешно удален и окно Windows PowerShell можно закрыть.
Переустановка Office
Примечание: Если не знаете, какая у вас операционная версия, см. статью Какая у меня версия операционной системы Windows?.
Источник
Удаление Visual Studio
На этой странице приведены пошаговые инструкции по удалению Visual Studio, интегрированного набора средств для эффективной работы разработчиков.
Этот раздел относится к Visual Studio в Windows. Для Visual Studio для Mac см. раздел Удаление Visual Studio для Mac.
Если у вас возникли проблемы с экземпляром Visual Studio, воспользуйтесь средством восстановления. Дополнительные сведения см. в статье Восстановление Visual Studio.
Если вам требуется изменить расположение каких-либо файлов Visual Studio, это можно сделать, не удаляя текущий экземпляр. Дополнительные сведения см. в статье Выбор расположения установки в Visual Studio.
Найдите установщик Visual Studio на своем компьютере.
Например, на компьютере с юбилейным обновлением или более поздней версией Windows 10 нажмите кнопку Пуск и прокрутите список до буквы V, где расположен пункт Visual Studio Installer.

На некоторых компьютерах установщик Visual Studio может быть указан под буквой «M» — для Microsoft Visual Studio.
Кроме того, Visual Studio Installer можно найти в следующем расположении: C:Program Files (x86)Microsoft Visual StudioInstallervs_installer.exe
В установщике найдите установленный у вас выпуск Visual Studio. Затем выберите Дополнительно и Удалить.

Нажмите кнопку ОК, чтобы подтвердить действие.
Если в будущем вы захотите снова установить Visual Studio 2017, запустите Visual Studio Installer и выберите Установить на экране выбора.
Удаление установщика Visual Studio
Чтобы полностью удалить все установки Visual Studio 2017 и Visual Studio Installer с компьютера, удалите их в окне «Программы и компоненты».
Найдите Visual Studio Installer на своем компьютере.
В меню «Пуск» Windows можно выполнить поиск по слову «установщик».

Кроме того, Visual Studio Installer можно найти в следующем расположении:
C:Program Files (x86)Microsoft Visual StudioInstallervs_installer.exe
Для продолжения работы может потребоваться обновление самого установщика. Если это так, следуйте инструкциям на экране.
В установщике найдите установленный у вас выпуск Visual Studio. Затем выберите Дополнительно и Удалить.

Нажмите кнопку ОК, чтобы подтвердить действие.

Если в будущем вы передумаете и захотите снова установить Visual Studio 2019 или 2022, снова запустите Visual Studio Installer, выберите вкладку Доступно, выберите выпуск Visual Studio, который вы хотите установить, а затем нажмите Установка.
Удаление установщика Visual Studio
Удалить все установки Visual Studio 2019, Visual Studio 2022 и Visual Studio Installer с компьютера можно в окне «Программы и компоненты».
Удаление всех файлов
Если произошла неустранимая ошибка и вы не можете удалить Visual Studio с помощью предыдущих инструкций, есть вариант, который можно использовать в качестве последнего средства. Дополнительные сведения о том, как полностью удалить все файлы установки Visual Studio и информацию о продукте, см. в этой статье.
Техническая поддержка
Иногда возникают проблемы. Если установить Visual Studio не удается, воспользуйтесь пошаговыми указаниями в статье Устранение неполадок при установке и обновлении Visual Studio.
Также доступен чат по вопросам установки, предназначенный для оказания помощи при проблемах с установкой (только на английском языке).
Ниже приведены несколько дополнительных вариантов:
Источник
ENDS TOMORROW
Limited Time Only: Top 20 Grammy Plugins – $29.99 each Limited Time: Top 20 Grammy Plugins | Shop Now
3758b9b5-045c-4b7d-b020-80f9b068d990
07:10 AM EST
Log in to see your personal recommendations
6
2
2023
20
53
41
216fc7db-aaa0-467c-b9a9-e7fa0e42a28a
30
80
1
grid-view
False
False
False
40
900
PRODUCTION
voTekqO2wEJBRRQbsEWTHeJEaV5FbTWvet3JZATG
b705eb6e-5be8-46d1-a9e3-8fbf47be7a04
False
False
False
False
false
https://img.wavescdn.com
href src content data-original
True
d2ntW2B8vSS_JJsTlb_VTw
6LeG-IcUAAAAAIb42eguHdUztlZNcrLPhuk81WSM
6LftoDMUAAAAAC9QpaYXNehGHSu__XxRJyFAIgkJ
6LeIxAcTAAAAAJcZVRqyHh71UMIEGNQ_MXjiZKhI
30
#000000
#fff
#fff
#000
#e8e8e8
Last updated on: 6/21/2022 11:59:28 AM
Follow these instructions to uninstall Waves plugins and applications using Waves Central or uninstall unused individual plugins manually.
Note that Waves Central allows you to uninstall Waves plugins by version only. For instance, you can only uninstall all your Waves V14 plugins at once — or all your Waves V11 plugins at once and so on.
Individual plugins must be removed manually, as described below.
Waves applications (such as SuperRack or eMotion LV1) and Waves SoundGrid I/O drivers can only be uninstalled together as one.
Uninstall via Waves Central:
- Quit all audio apps.
- Launch the Waves Central application:
- Windows: via the desktop shortcut or Start Menu > All Programs > Waves Central.
- Mac: Applications > Waves Central.
- Log into Waves Central using your Waves account information.
- Go to the Settings tab.
- Under Maintenance, select the products/version you wish to uninstall in the dropdown menu, and click Uninstall.
Uninstall unused individual plugins manually:
- Quit all audio apps.
- Navigate to the relevant plugin version folder:
- Windows: C:Program Files (x86)WavesPlug-Ins V14 (or whichever version is installed on your device).
- Mac: Macintosh HD > Applications > Waves > Plug-Ins V14 (or whichever version is installed on your device).
- The plugin file you wish to remove will be named after the plugin, in this format: [PluginName].bundle. For example, the plugin file for Reel ADT will be named Reel ADT.bundle.
- Delete the plugin file/s you wish to remove (or move to a backup folder).
- Clear Waves preferences:
Windows:- Click the Windows key + ‘R’ and enter %appdata%, click Enter.
- Delete the Waves folder inside the ‘Roaming’ folder that appears.
Mac: Delete the «Waves Preferences» folder located at HD > Users > Current user > Library > Preferences (this folder is accessed by going to the Go menu and holding down the Altoption key. This will reveal the Library option).
Please note: Manually removing a plugin will not be reflected in Waves Central’s ‘Install Status’ for that plugin. For correct reflection of the installed plugins in Waves Central, uninstall the entire version and re-install just the plugins that you need.
Was this article helpful?
Thanks for your feedback!
https://register.waves.com
2023-02-01 04:59 AM EST
[{«slot»:»6″,»codeName»:»ProductPageAlsoBought5050″, «testType»:»0″, «variations»: «off:50, waves:50», «isActive»: «True»,»masterSlotID»:»0″},{«slot»:»7″,»codeName»:»ListRecs9901″, «testType»:»0″, «variations»: «wavesrecs:99 , waves:1», «isActive»: «True»,»masterSlotID»:»0″},{«slot»:»8″,»codeName»:»ListRecommendedBadge», «testType»:»0″, «variations»: «yes:50, no:50», «isActive»: «False»,»masterSlotID»:»0″},{«slot»:»9″,»codeName»:»CartPopupFree9811″, «testType»:»0″, «variations»: «yes:1, no:98, strip:1», «isActive»: «False»,»masterSlotID»:»0″},{«slot»:»10″,»codeName»:»CartSkipStepYesRemove», «testType»:»0″, «variations»: «yes:50,yes-remove:50», «isActive»: «True»,»masterSlotID»:»0″},{«slot»:»21″,»codeName»:»ListGrid», «testType»:»0″, «variations»: «list:50, grid:50», «isActive»: «True»,»masterSlotID»:»0″},{«slot»:»22″,»codeName»:»ProductPageSelectedVideo», «testType»:»0″, «variations»: «one:50, two:50», «isActive»: «True»,»masterSlotID»:»0″},{«slot»:»23″,»codeName»:»PersonalDealsOnlyWaves», «testType»:»0″, «variations»: «on:0, off:100», «isActive»: «True»,»masterSlotID»:»0″},{«slot»:»24″,»codeName»:»NeoWizeMaster», «testType»:»0″, «variations»: «on:95, off:5», «isActive»: «True»,»masterSlotID»:»0″},{«slot»:»25″,»codeName»:»HomepageAB2″, «testType»:»0″, «variations»: «top10show:90, top10hide:10», «isActive»: «False»,»masterSlotID»:»0″},{«slot»:»26″,»codeName»:»BFPostFree22″, «testType»:»0″, «variations»: «on:1, off:99», «isActive»: «False»,»masterSlotID»:»0″},{«slot»:»27″,»codeName»:»CartPopupFreePluginNYS», «testType»:»0″, «variations»: «on:50, off:50», «isActive»: «False»,»masterSlotID»:»0″},{«slot»:»28″,»codeName»:»CouponAutoApply1″, «testType»:»1″, «variations»: «yes:50, no:50», «isActive»: «True»,»masterSlotID»:»0″},{«slot»:»29″,»codeName»:»WUPMultiYearClose», «testType»:»0″, «variations»: «on:1, off:99», «isActive»: «True»,»masterSlotID»:»0″},{«slot»:»30″,»codeName»:»CartFreePluginConfirmation», «testType»:»0″, «variations»: «on:50, off:50», «isActive»: «False»,»masterSlotID»:»0″},{«slot»:»31″,»codeName»:»CartFreePluginConfirmationMultiTier9010″, «testType»:»0″, «variations»: «on:90, off:10», «isActive»: «False»,»masterSlotID»:»0″},{«slot»:»38″,»codeName»:»UndoInCart», «testType»:»0″, «variations»: «on:50, off:50», «isActive»: «False»,»masterSlotID»:»0″},{«slot»:»39″,»codeName»:»AddToCartFlow9901″, «testType»:»0″, «variations»: «popup:99, page:1», «isActive»: «True»,»masterSlotID»:»0″},{«slot»:»40″,»codeName»:»TopMenuSpecials», «testType»:»0″, «variations»: «middle:50,right:50», «isActive»: «False»,»masterSlotID»:»0″} ]
[ { «ItemID» : 7, «BannerImage» : «/1lib/images/banners/my-offers/grammys-40pc-feb23-2023-1.jpg», «BannerTitle» : «Top 20 Plugins Powering 2023 Grammy winners – $29.99 each», «BannerURL» : «/top-20-grammy-plugins», «GAValue» : «grammys-40pc-feb23» }, { «ItemID» : 3, «BannerImage» : «/1lib/images/banners/my-offers/grammys-40pc-feb23-2.jpg», «BannerTitle» : «40% Off All Plugins & Bundles – Use code CREATE40», «BannerURL» : «/specials», «GAValue» : «grammys-40pc-feb23» }, { «ItemID» : 2, «BannerImage» : «/1lib/images/banners/my-offers/grammys-40pc-feb23-3.jpg», «BannerTitle» : «Spend $50 get 1 free plugin; Spend $90 get 2 free plugins; Spend $120 get 3 free plugins», «BannerURL» : «/free-plugins-40-percent-off-february-2023», «GAValue» : «grammys-40pc-feb23» }, { «ItemID» : 12, «BannerImage» : «/1lib/images/banners/my-offers/grammys-40pc-feb23-4.jpg», «BannerTitle» : «40% Off when you upgrade to a bigger bundle», «BannerURL» : «/account/upgrades», «GAValue» : «grammys-40pc-feb23» }, { «ItemID» : 11, «BannerImage» : «/1lib/images/banners/my-offers/v14-july22-1.jpg», «BannerTitle» : «Waves V14: The New Version of Waves Plugins is Here», «BannerURL» : «/v14», «GAValue» : «v14-jul22» }, { «ItemID» : 10, «BannerImage» : «/1lib/images/banners/my-offers/v14-july22-2.jpg», «BannerTitle» : «Upgrade Your Way to V14: Get the latest plugin versions when you», «BannerURL» : «/account/upgrades», «GAValue» : «v14-jul22» }, { «ItemID» : 9, «BannerImage» : «/1lib/images/banners/my-offers/40pc-clarity-6.jpg», «BannerTitle» : «Are you an influencer? We want YOU – Find out more», «BannerURL» : «/influencer-form», «GAValue» : «influencer-signup» } ]
Содержание
- How To Perform A Clean Uninstall Of Waves Plugins
- Preparation
- Uninstall Waves License Center
- Uninstall Waves Central
- The Post Uninstall Clean-up
- The new install
- Waves Общие элементы управления всех плагинов
- Содержание
- Панель инструментов WaveSystem [ править ]
- Работа с пресетами [ править ]
- Типы пресетов [ править ]
- Загрузка пресетов и установочных файлов [ править ]
- Сохранение пресетов и установочных файлов [ править ]
- Удаление пресетов [ править ]
- Сравнение и копирование A/B [ править ]
- Элементы управления интерфейс [ править ]
- Переключатели [ править ]
- Окна с числовыми значениями [ править ]
- Ползунки [ править ]
- Всплывающие окна [ править ]
- Выбор нескольких параметров [ править ]
- Функции перемещения [ править ]
- Настройки Waves (только в Pro Tools) [ править ]
- Удаление Visual Studio
- Удаление установщика Visual Studio
- Удаление установщика Visual Studio
- Удаление всех файлов
- Техническая поддержка
- Как полностью удалить waves с компьютера
- Как навсегда отключить «волны» MaxxAudio Pro » / MaxxSense
- 2 ответов
How To Perform A Clean Uninstall Of Waves Plugins
Waves have recently revamped their licensing application again and moved from the «Waves Licence Center» (WLC) to a new «Waves Central» system.
This means if you have been a previous waves plug-in user with WLC you’ll need to uninstall your current WLC setup in order to use the new Waves Central.
For some this has proven a little difficult or troublesome to totally clean out the old components and has caused issues with plugins showing up in Pro Tools after installing Waves Central.
So we decided to put together this little guide to help you make sure any leftovers from WLC don’t cause problems for you running Waves Central.
Preparation
Uninstall Waves License Center
First go to Windows control panel/programs and features (on your keyboard press the Windows key and type «Programs and Features» without the quotation marks) and from the list of Installed Programs
this «should» uninstall all Waves plugins from your system, and then move down to the «Post Uninstall clean-up» below.
Uninstall Waves Central
If you have already moved passed this stage and have installed Waves Central but are experiencing problems follow on with these instructions below to start again and clean up that problematic install.
Launch Waves Central,
Click the «Install» tab and select «Uninstall»
Select the tick box in the middle column labelled «All Waves Plugins V9» and click Uninstall in the bottom right corner.
This «should» remove all of the Waves Plugins on your system but we’ll check that in a moment.
You can then go to Windows control panel/programs and features (on your keyboard press the Windows key and type «Programs and Features» without the quotation marks) and from the list of Installed Programs.
The Post Uninstall Clean-up
Ok now we are in the position to go and clean out those possible left over files that may cause us problems later on,
Navigate to your Windows «Control Panel» (press the Windows Key on your Keyboard and type Control Panel and left mouse click it from the search results that appear).
Double click folder options,
click the «View» tab from the top and under «Hidden Files and Folders» select «Show hidden files,folders and drives».
Click ok and exit Control Panel.
Next we want to navigate to the following folder locations and delete the folders.
C:Program Files (x86)Waves
C:UsersYOURUSERNAMEAppData RoamingWaves Audio
C:UsersYOURUSERNAMEAppDataLocalWaves Audio
And lastly you can delete the contents of the C:ProgramDataWaves Audio folder except the Licenses folder ( you need to keep this ).
And then making sure no waveshell files are presnt in:
C:Program FilesCommon FilesAvidAudioPlug-Ins
C:Program FilesCommon FilesSteinbergVST2
C:Program FilesCommon FilesVST3
C:Program Files (x86)Common FilesSteinbergVST2
C:Program Files (x86)Common FilesVST3
C:Program Files (x86)VSTPlugIns
C:Program FilesVSTPlugIns
C:Program Files (x86)SteinbergVSTPlugins
C:Program FilesSteinbergVSTPlugins
C:Program Files (x86)Common FilesDigidesignDAEPlug-Ins
C:Program Files (x86)Common FilesWPAPI
Then just to make double sure you have caught everything in Windows explorer navigate to your C: system drive and in the top right corner of the Windows perform a search for «Waveshell» and delete anything that comes up.
And restart your computer.
The new install
Go to Waves.com and download the latest Waves Central installer to your desktop, Right click it and select «Run as Administrator» when it has installed launch Waves Central and follow the Waves «Easy Install and Activate» guide here
If you still experience technical difficulties contact Waves tech support at 865-909-9200 or message them directly here: http://www.waves.com/contact-support
Источник
Waves Общие элементы управления всех плагинов
Данная статья является частью цикла статей «Waves»
Содержание
Панель инструментов WaveSystem [ править ]
Все плагины Waves оснащены панелью инструментов WaveSystem, которая принимает большинство административных функций с которыми вы столкнётесь при работе с программным обеспечением Waves. Особенности панели инструментов WaveSystem одинаковые практически во всех плагинах Waves, так что знакомство с её возможностями будет полезным не зависимо от того, какие плагины вы используете.

Работа с пресетами [ править ]
Типы пресетов [ править ]
Заводские пресеты. Это постоянные пресеты находящиеся в меню Load. Заводские пресеты не могут быть изменены или удалены. При необходимости, различные компоненты плагинов могут иметь различные заводских пресетов.
Пользовательских пресеты. Ваши любимые настройки плагина можно сохранить в качестве пресетов находящихся в меню Load, в разделе User Presets (пользовательские пресеты). Пользовательские пресеты могут быть перезаписаны и удалены.
Установочные файлы. Могут содержать более одного пресета. Например, один файл может содержать все пресеты для одной сессии. Когда вы открываете установочный файл, все его настройки становятся частью вашего всплывающего меню Load для получения быстрого доступа. Это может быть особенно полезно при использовании нескольких экземпляров плагина в одной сессии. Сохранения настройки плагина вы создаёте один установочный файл, он может быть быстро доступен для каждого экземпляра этого плагина.
Загрузка пресетов и установочных файлов [ править ]
Нажмите на кнопку Load, чтобы увидеть всплывающее меню загрузки. Меню разделено на четыре части. Если какой либо раздел не доступен в настоящее время, он не будет отображаться во всплывающем меню Load.
Сохранение пресетов и установочных файлов [ править ]
Нажмите на кнопку Save, чтобы увидеть всплывающее меню сохранения. Если опция в настоящее время не доступна она будет окрашена в серый цвет и неактивной.
Удаление пресетов [ править ]
Вы можете удалять пользовательские пресеты и пресеты в установочных файлах. Заводские пресеты и установочные файлы библиотеки не могут быть удалены или перезаписаны.
Сравнение и копирование A/B [ править ]
Кнопки Setup A/Setup B могут быть нажаты, чтобы сравнить две различные настройки плагина. Если вы загрузите пресет в Setup B, это не повлияет на пресет загруженный в Setup A, и наоборот.
Если вы хотите изменить настройки параметров немного, то вы можете скопировать их в Setup B, нажав на кнопку A→B, затем изменить настройки и сравнить с оригинальным Setup A.
Название текущей установки будет показано в строке заголовка (на платформах, которые поддерживают эту строку), и будет переключаться когда вы будете переходить от Setup A в Setup B.
 Когда вы внесёте в пресет изменения в его названии будет добавлена звездочка.
Элементы управления интерфейс [ править ]
Параметры плагина могут находиться в одном из трех состояний:
Переключатели [ править ]
Переключатели отображают переключаемые состояния параметра и позволяют переключаться между двумя или большим количеством состояний. Нажмите один раз, чтобы изменить состояние параметра. Некоторые переключатели имею текстовый дисплей, который обновляется текущими настройками и другими действиями (обход, солирование, или мониторинг), когда параметр является активным.
Некоторые плагины имеют связывающие кнопки которые связывают несколько переключателей, позволяя одновременно изменять значения связанных с этой кнопкой параметров, сохраняя при этом смещение между значениями этих параметров.
Окна с числовыми значениями [ править ]
Окно с числовым значением отображает значение своего параметра и позволяет изменять его с помощью нажатия и перетаскивания мышью, или управлять напрямую с помощью клавиатуры.
Некоторые плагины имеют связывающие кнопки которые связывают несколько окон, позволяя одновременно изменять значения связанных с этой кнопкой окон, сохраняя при этом смещение между значениями этих параметров.
Ползунки [ править ]
Нажмите кнопку мыши и перетащите ползунок или прокрутить колесо мыши наведя на ползунок или в любом месте на дорожке ползунка. Над дорожкой ползунка отобразится настраиваемое числовое значение.
Всплывающие окна [ править ]
При перемещении параметра появятся всплывающее окно отображающее его значение.
Выбор нескольких параметров [ править ]
Одна из наиболее мощных функций WaveSystem это возможность выбора и настройки нескольких элементов управления одновременно. С помощью мыши, нажмите в пустом месте окна плагина и начните выделять рамкой нужную группу параметров и графических элементов управления, при перетаскивании образуется прямоугольник, который включает в себя элементы управления для настройки. Кроме того вы можете нажать и удерживать клавишу Shift, при щелчке мышью по любым параметрам которые вы хотите выделить или добавить к уже выделенным. Этот метод полезен, когда вы хотите выбрать два или более параметров, которые расположены не рядом.
Функции перемещения [ править ]
Клавиша Tab перемещает ваш выбор к следующему элементу управления, сочетание клавиш Shift+Tab, перемещает в обратном направлении.
Кроме того, Mac имеет комбинацию Option+Tab перемещая «вниз» и Shift+Option+Tab для перемещения «вверх», где это возможно.
Если у вас есть несколько выбранных параметров, клавиша Tab перемещает вас только через выбранные элементы управления.
Нажатие клавиши Esc или Enter вернет «фокус» в DAW приложение.
При запуске Pro Tools, удерживайте клавишу Shift, чтобы просмотреть окно настроек Waves. Доступны следующие опции:
Источник
Удаление Visual Studio
На этой странице приведены пошаговые инструкции по удалению Visual Studio, интегрированного набора средств для эффективной работы разработчиков.
Этот раздел относится к Visual Studio в Windows. Для Visual Studio для Mac см. раздел Удаление Visual Studio для Mac.
Если у вас возникли проблемы с экземпляром Visual Studio, воспользуйтесь средством восстановления. Дополнительные сведения см. в статье Восстановление Visual Studio.
Если вам требуется изменить расположение каких-либо файлов Visual Studio, это можно сделать, не удаляя текущий экземпляр. Дополнительные сведения см. в статье Выбор расположения установки в Visual Studio.
Найдите установщик Visual Studio на своем компьютере.
Например, на компьютере с юбилейным обновлением или более поздней версией Windows 10 нажмите кнопку Пуск и прокрутите список до буквы V, где расположен пункт Visual Studio Installer.
На некоторых компьютерах установщик Visual Studio может быть указан под буквой «M» — для Microsoft Visual Studio.
Кроме того, Visual Studio Installer можно найти в следующем расположении: C:Program Files (x86)Microsoft Visual StudioInstallervs_installer.exe
В установщике найдите установленный у вас выпуск Visual Studio. Затем выберите Дополнительно и Удалить.
Нажмите кнопку ОК, чтобы подтвердить действие.
Если в будущем вы захотите снова установить Visual Studio 2017, запустите Visual Studio Installer и выберите Установить на экране выбора.
Удаление установщика Visual Studio
Чтобы полностью удалить все установки Visual Studio 2017 и Visual Studio Installer с компьютера, удалите их в окне «Программы и компоненты».
Найдите Visual Studio Installer на своем компьютере.
В меню «Пуск» Windows можно выполнить поиск по слову «установщик».
Кроме того, Visual Studio Installer можно найти в следующем расположении:
C:Program Files (x86)Microsoft Visual StudioInstallervs_installer.exe
Для продолжения работы может потребоваться обновление самого установщика. Если это так, следуйте инструкциям на экране.
В установщике найдите установленный у вас выпуск Visual Studio. Затем выберите Дополнительно и Удалить.
Нажмите кнопку ОК, чтобы подтвердить действие.
Если в будущем вы передумаете и захотите снова установить Visual Studio 2019 или 2022, снова запустите Visual Studio Installer, выберите вкладку Доступно, выберите выпуск Visual Studio, который вы хотите установить, а затем нажмите Установка.
Удаление установщика Visual Studio
Удалить все установки Visual Studio 2019, Visual Studio 2022 и Visual Studio Installer с компьютера можно в окне «Программы и компоненты».
Удаление всех файлов
Если произошла неустранимая ошибка и вы не можете удалить Visual Studio с помощью предыдущих инструкций, есть вариант, который можно использовать в качестве последнего средства. Дополнительные сведения о том, как полностью удалить все файлы установки Visual Studio и информацию о продукте, см. в этой статье.
Техническая поддержка
Иногда возникают проблемы. Если установить Visual Studio не удается, воспользуйтесь пошаговыми указаниями в статье Устранение неполадок при установке и обновлении Visual Studio.
Также доступен чат по вопросам установки, предназначенный для оказания помощи при проблемах с установкой (только на английском языке).
Ниже приведены несколько дополнительных вариантов:
Источник
Как полностью удалить waves с компьютера

Компания Waves существует на рынке около 25 лет (первопроходец Q10 вышел в свет в 1992г). За это время она выпустила огромное число плагинов и, вроде как, не собирается останавливаться.
При установке полного пакета в DAW отображается длинный список плагинов, а что каждый из них делает, не всегда интуитивно понятно из названия.
Например, есть чистые сокращения вроде IR1, J37, MV2, NS1, W43; есть более приземленные названия, однако не несут особой смысловой нагрузки: Saphira, Enigma, Vitamin, Renaissance Axx, MondoMod; есть эмуляции винтажных вещей, и их названия перекликаются с оригиналами, однако человеку, хотя бы косвенно не знакомому с этими аппаратами, сложно определить работу плагина по названию: CLA-76, PuigTech 670, API-2500, dbx-160, ну и есть более простые-понятные названия, которые (хотя бы частично) отражают суть: H-EQ, RDeEsser, S1 Imager, SSLComp, MaxxBass.
Естественно, что после установки пакета, необходимо открыть/пробежаться по плагинам, разобраться что к чему и постараться это запомнить, чтобы во время работы быстро находить нужное. Кстати, назначение некоторых плагинов не ясно даже и после запуска (не говоря уж о правильном использовании), поэтому приходится обращаться к мануалу.

Road Plates – ревербератор, эмуляция четырех Plate из Abbey Road

Далее 6 плагинов-мультиэффектов для различных групп инструментов и 3 эмуляции компрессоров. Созданы в коллаборации с саунд-инженером Chris Lord-Alge.
CLA Bass, CLA Drums, CLA Effects, CLA Guitar, CLA Unplugged, CLA Vocals
DPR-402 – компрессор, лимитер, де-эссер, эмуляция BSS DPR-402
DTS Neural DownMix, Mono2Stereo, UpMix – переводят сигнал из одного формата в другой (моно, стерео, surround)

Далее 5 плагинов-мультиэффектов для различных групп инструментов. Созданы в коллаборации с саунд-инженером Eddie Kramer.
EKramer BA, EKramer DR, EKramer FX, EKramer GT, EKramer VC
_____________
EMO-Generator – производит тест-тоны: розовый/белый шум, синус (20-21 кГц)
EMO-Q4 – четырехполосный параметрический EQ
GW MixCentric – обработка мастер-шины; эквализация, компрессия и гармонические искажения одной ручкой
GW PianoCentric – быстрое «улучшение» звука фортепиано
GW VoiceCentric – вокальный процессор с компрессией, задержкой, даблером, реверберацией
Далее 6 плагинов-мультиэффектов для различных групп инструментов. Созданы в коллаборации с саунд-инженером Jack Joseph Puig
JJP-Bass, JJP-Cymb-Perc, JJP-Drums, JJP-Guitars, JJP-Strings-Keys, JJP-Vocals
_____________

Далее 6 плагинов-эффектов от продюсера Manny Marroquin

Далее 7 плагинов-мультиэффектов для различных групп инструментов от продюсера Tony Maserati
Далее 7 эквалайзеров серии Q. Цифра в название соответствует количеству полос

Reel ADT Live- версия с низкой задержкой
Sub Align – контроль над сабвуферами и громкоговорителями
Источник
Как навсегда отключить «волны» MaxxAudio Pro » / MaxxSense
Как навсегда отключить «Waves’ MaxxAudio Pro » / MaxxSense?
потому что, если вы закроете его (Dell Audio в этом случае, но это может быть то же самое со всеми Realtek оборудованных рабочих станций) и снова открыть его из системного трея снова он будет включен снова. Кроме того, если вы перезагрузите компьютер, он будет включен снова или если вы подключите наушники или что-то. Это рабочая станция Windows 10.
2 ответов
мой (плохой) обходной путь, чтобы оставить его включенным, но отключить все отдельные компоненты внутри пресета под названием «Off»:

Это не предустановка по умолчанию, просто соответствовать настройкам у меня есть выше, а затем нажмите на значок диска / сохранить. он предложит вам назвать новый предустановку. Я не мог найти способ, чтобы навсегда отключить его.
просто удалите Waves MaxxAudio Pro.
меню Пуск > волны MaxxAudio Pro в > правый клик > удалить. Работать на меня.
или, вы могли бы изменить аудио драйвер из Realtek в Microsoft, который также работал для меня, но это кажется немного тяжеловато:
менеджер устройств > Звуковые, видео и игровые устройства > Realtek аудио > Обновить драйвер > обзор поиск драйверов на этом компьютере > выбрать из списка доступных драйверы на моем компьютере > снимите флажок Показать совместимое оборудование > производитель > Microsoft > версия аудиоустройства высокой четкости <последние>> OK
Источник
Are you in need of uninstalling Waves to fix some problems? Are you looking for an effective solution to completely uninstall it and thoroughly delete all of its files out of your PC? No worry! This page provides detailed instructions on how to completely uninstall Waves .
Possible problems when you uninstall Waves
* Waves is not listed in Programs and Features.
* You do not have sufficient access to uninstall Waves .
* A file required for this uninstallation to complete could not be run.
* An error has occurred. Not all of the files were successfully uninstalled.
* Another process that is using the file stops Waves being uninstalled.
* Files and folders of Waves can be found in the hard disk after the uninstallation.
Waves cannot be uninstalled due to many other problems. An incomplete uninstallation of Waves may also cause many problems. So, it’s really important to completely uninstall Waves and remove all of its files.
How to Uninstall Waves Completley?
Method 1: Uninstall Waves via Programs and Features.
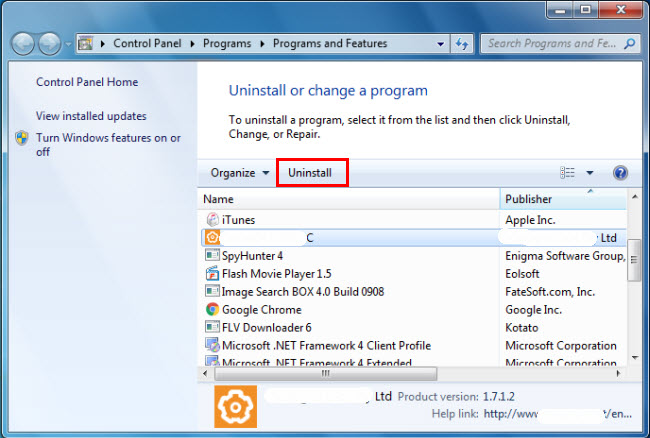
When a new piece of program is installed on your system, that program is added to the list in Programs and Features. When you want to uninstall the program, you can go to the Programs and Features to uninstall it. So when you want to uninstall Waves , the first solution is to uninstall it via Programs and Features.
Steps:
a. Open Programs and Features.
Windows Vista and Windows 7
Click Start, type uninstall a program in the Search programs and files box and then click the result.
Windows 8, Windows 8.1 and Windows 10
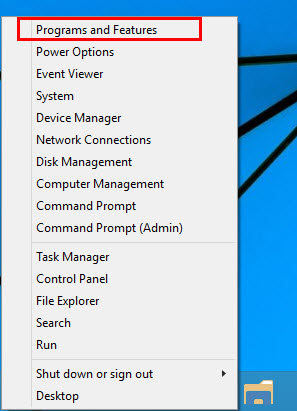
Open WinX menu by holding Windows and X keys together, and then click Programs and Features.
b. Look for Waves in the list, click on it and then click Uninstall to initiate the uninstallation.
Method 2: Uninstall Waves with its uninstaller.exe.
Most of computer programs have an executable file named uninst000.exe or uninstall.exe or something along these lines. You can find this files in the installation folder of Waves .
Steps:
a. Go to the installation folder of Waves .
b. Find uninstall.exe or unins000.exe.
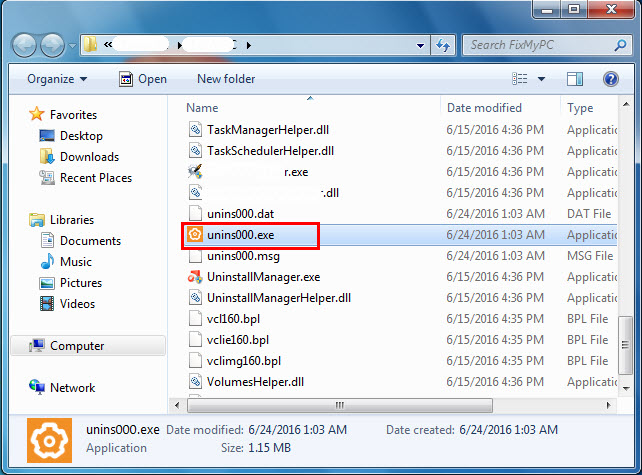
c. Double click on its uninstaller and follow the wizard to uninstall Waves .
Method 3: Uninstall Waves via System Restore.
System Restore is a utility which comes with Windows operating systems and helps computer users restore the system to a previous state and remove programs interfering with the operation of the computer. If you have created a system restore point prior to installing a program, then you can use System Restore to restore your system and completely eradicate the unwanted programs like Waves . You should backup your personal files and data before doing a System Restore.
Steps:
a. Close all files and programs that are open.
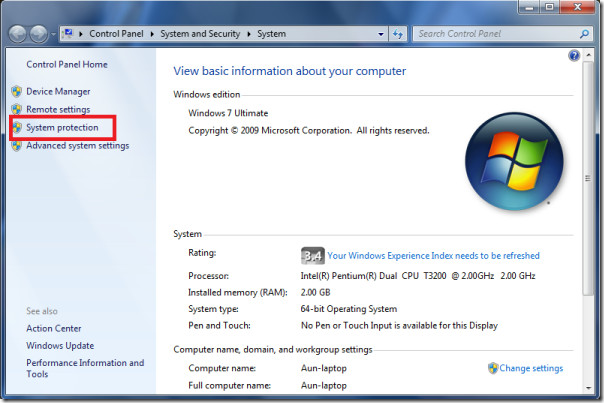
b. On the desktop, right click Computer and select Properties. The system window will display.
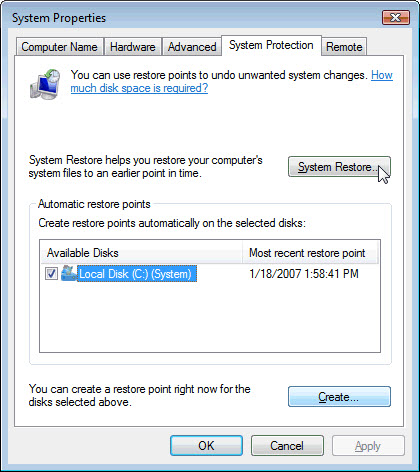
c. On the left side of the System window, click System protection. The System Properties window will display.
d. Click System Restore and the System Restore window will display.
e. Select Choose a different restore point and click Next.
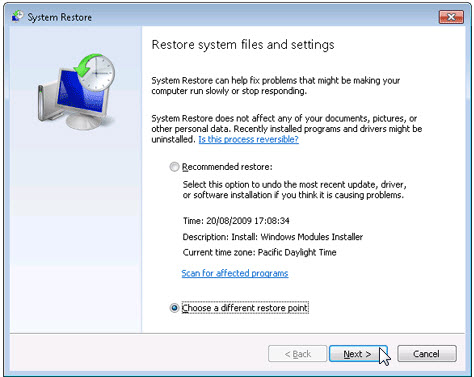
f. Select a date and time from the list and then click Next. You should know that all programs and drivers installed after the selected date and time may not work properly and may need to be re-installed.
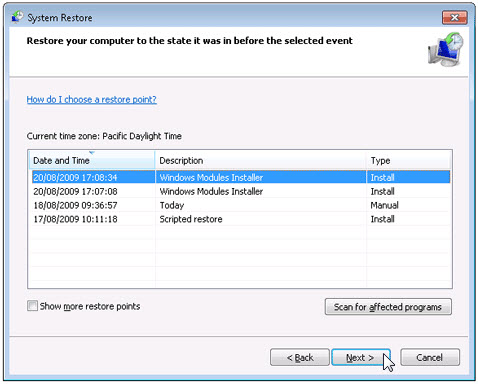
g. Click Finish when the «Confirm your restore point» window appears.
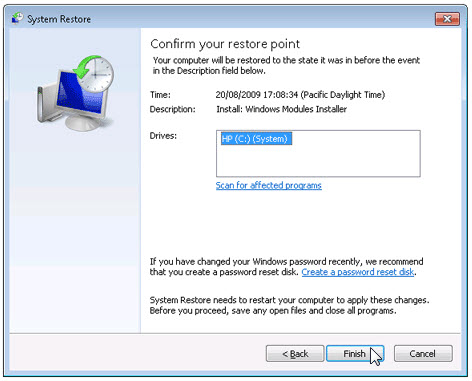
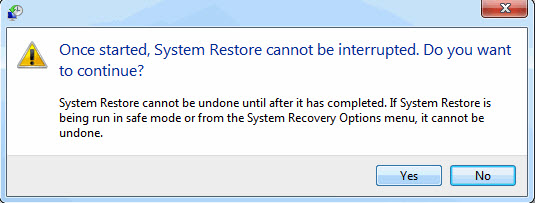
h. Click Yes to confirm again.
Method 4: Uninstall Waves with Antivirus.
Nowadays, computer malware appear like common computer applications but they are much more difficult to remove from the computer. Such malware get into the computer with the help of Trojans and spyware. Other computer malware like adware programs or potentially unwanted programs are also very difficult to remove. They usually get installed on your system by bundling with freeware software like video recording, games or PDF convertors. They can easily bypass the detection of the antivirus programs on your system. If you cannot remove Waves like other programs, then it’s worth checking whether it’s a malware or not. Click and download this malware detect tool for a free scan.
Method 5: Reinstall Waves to Uninstall.
When the file required to uninstall Waves is corrupted or missing, it will not be able to uninstall the program. In such circumstance, reinstalling Waves may do the trick. Run the installer either in the original disk or the download file to reinstall the program again. Sometimes, the installer may allow you to repair or uninstall the program as well.
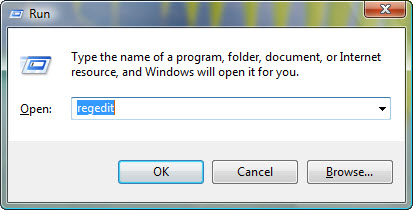
Method 6: Use the Uninstall Command Displayed in the Registry.
When a program is installed on the computer, Windows will save its settings and information in the registry, including the uninstall command to uninstall the program. You can try this method to uninstall Waves . Please carefully edit the registry, because any mistake there may make your system crash.
Steps:
a. Hold Windows and R keys to open the Run command, type in regedit in the box and click OK.
b. Navigate the following registry key and find the one of Waves :
HKEY_LOCAL_MACHINESOFTWAREMicrosoftWindowsCurrentVersionUninstall
c. Double click on the UninstallString value, and copy its Value Data.
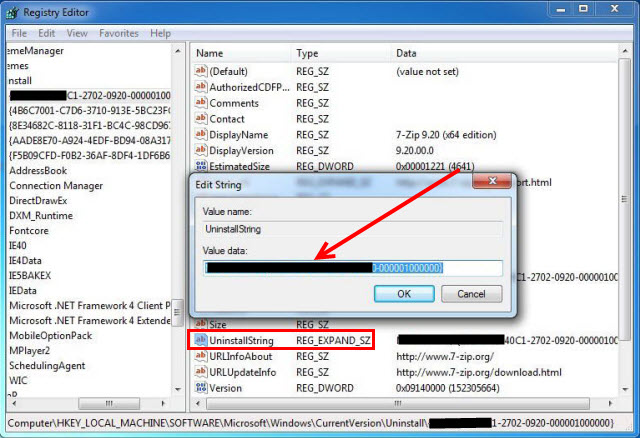
d. Hold Windows and R keys to open the Run command, paste the Value Data in the box and click OK.
e. Follow the wizard to uninstall Waves .
Method 7: Uninstall Waves with Third-party Uninstaller.
The manual uninstallation of Waves requires computer know-how and patience to accomplish. And no one can promise the manual uninstallation will completely uninstall Waves and remove all of its files. And an incomplete uninstallation will many useless and invalid items in the registry and affect your computer performance in a bad way. Too many useless files also occupy the free space of your hard disk and slow down your PC speed. So, it’s recommended that you uninstall Waves with a trusted third-party uninstaller which can scan your system, identify all files of Waves and completely remove them. Download this powerful third-party uninstaller below.
Waves have recently revamped their licensing application again and moved from the «Waves Licence Center» (WLC) to a new «Waves Central» system.
This means if you have been a previous waves plug-in user with WLC you’ll need to uninstall your current WLC setup in order to use the new Waves Central.
For some this has proven a little difficult or troublesome to totally clean out the old components and has caused issues with plugins showing up in Pro Tools after installing Waves Central.
So we decided to put together this little guide to help you make sure any leftovers from WLC don’t cause problems for you running Waves Central.
Preparation
Uninstall Waves License Center

First go to Windows control panel/programs and features (on your keyboard press the Windows key and type «Programs and Features» without the quotation marks) and from the list of Installed Programs
this «should» uninstall all Waves plugins from your system, and then move down to the «Post Uninstall clean-up» below.
Uninstall Waves Central
If you have already moved passed this stage and have installed Waves Central but are experiencing problems follow on with these instructions below to start again and clean up that problematic install.
Launch Waves Central,

Click the «Install» tab and select «Uninstall»

Select the tick box in the middle column labelled «All Waves Plugins V9» and click Uninstall in the bottom right corner.
This «should» remove all of the Waves Plugins on your system but we’ll check that in a moment.

You can then go to Windows control panel/programs and features (on your keyboard press the Windows key and type «Programs and Features» without the quotation marks) and from the list of Installed Programs.
The Post Uninstall Clean-up
Ok now we are in the position to go and clean out those possible left over files that may cause us problems later on,
The first thing to do is make sure you are able to see some hidden files that we’ll need to be cleaning out — primarily what is referred to the «Waves Cache»
This is a database record of the waves plugins that have previously been scanned on the launch of Pro Tools rather like the Pro Tools plugin databases that can be trashed to fix problems.
Navigate to your Windows «Control Panel» (press the Windows Key on your Keyboard and type Control Panel and left mouse click it from the search results that appear).

Double click folder options,

click the «View» tab from the top and under «Hidden Files and Folders» select «Show hidden files,folders and drives».
Click ok and exit Control Panel.
Next we want to navigate to the following folder locations and delete the folders.
C:Program Files (x86)Waves
C:UsersYOURUSERNAMEAppDataRoamingWaves Audio
C:UsersYOURUSERNAMEAppDataLocalWaves Audio
And lastly you can delete the contents of the C:ProgramDataWaves Audio folder except the Licenses folder (you need to keep this).
And then making sure no waveshell files are presnt in:
C:Program FilesCommon FilesAvidAudioPlug-Ins
C:Program FilesCommon FilesSteinbergVST2
C:Program FilesCommon FilesVST3
C:Program Files (x86)Common FilesSteinbergVST2
C:Program Files (x86)Common FilesVST3
C:Program Files (x86)VSTPlugIns
C:Program FilesVSTPlugIns
C:Program Files (x86)SteinbergVSTPlugins
C:Program FilesSteinbergVSTPlugins
C:Program Files (x86)Common FilesDigidesignDAEPlug-Ins
C:Program Files (x86)Common FilesWPAPI

Then just to make double sure you have caught everything in Windows explorer navigate to your C: system drive and in the top right corner of the Windows perform a search for «Waveshell» and delete anything that comes up.
And restart your computer.
The new install
Go to Waves.com and download the latest Waves Central installer to your desktop, Right click it and select «Run as Administrator» when it has installed launch Waves Central and follow the Waves «Easy Install and Activate» guide here
If you still experience technical difficulties contact Waves tech support at 865-909-9200 or message them directly here: http://www.waves.com/contact-support
I hope that helps please leave a comment in the discussion section at the bottom and consider signing up to our blog post mailing list using the form below to be notified by email when we post more content, Thanks !
[wysija_form id=»1″]
-

flguy
Ultrasonic- Joined:
- Jan 22, 2019
- Messages:
- 154
- Likes Received:
- 34
My v9 plugins are glitching out so I want to update to the new V10 that was dropped today. V9 plugins don’t show up at all in Waves Central for some reason. Do I have to manually delete all the folders? I’m not sure where to start.
-
Best Answer
First, I will save the instruments libraries. Then, I will use Revo Ununistaller Pro and proceed to uninstall WAVES. Perform an advance scan. When finishedI will use Regscan to sear for WAVES and delete all those registry entries. When finished I will use Ultrasearch to make sure everything that had anything to do with WAVES is gone.
If you dont feel comfortable with all of the above make sure you delete these folders:
C:Program Files (x86)Waves
C:UsersYOURUSERNAMEAppDataRoamingWaves Audio
C:UsersYOURUSERNAMEAppDataLocalWaves Audio
C:Program FilesCommon FilesAvidAudioPlug-Ins
C:Program FilesCommon FilesSteinbergVST2
C:Program FilesCommon FilesVST3
C:Program Files (x86)Common FilesSteinbergVST2
C:Program Files (x86)Common FilesVST3
C:Program Files (x86)VSTPlugIns
C:Program FilesVSTPlugIns
C:Program Files (x86)SteinbergVSTPlugins
C:Program FilesSteinbergVSTPlugins
C:Program Files (x86)Common FilesDigidesignDAEPlug-Ins
C:Program Files (x86)Common FilesWPAPII did not include the C: Program DataWAVES Audio because you could have your instrument libraries in there (I keep mine on separate hard drive)
Best way is to follow my first set of instructions. It will delete every registry entrie (junk) and allow you to perform a true clean install.
Last edited: Aug 30, 2019 -
flguy
Ultrasonic- Joined:
- Jan 22, 2019
- Messages:
- 154
- Likes Received:
- 34
Right on I will do that!
-
 Like x 1
- List
-
If you need help and want to make sure you do it right send me a PM or email.
-
Like x 3
- List
-
-
flguy
Ultrasonic- Joined:
- Jan 22, 2019
- Messages:
- 154
- Likes Received:
- 34
Everything worked perfect! I appreciate it!
-
Like x 3
- List
-
You are welcome! Out of curiosity, did you use te first or the second set of instructions?
-
Like x 1
- List
-
-
flguy
Ultrasonic- Joined:
- Jan 22, 2019
- Messages:
- 154
- Likes Received:
- 34
I used the first set of instructions.
-
Like x 2
- List
-
That is the optimunway to do it. BTW, you can use the same method if you want to reinstall any VST that is giving you problems. It is as close to a clean install as you can get in Windows.
-
belinea2010
Kapellmeister- Joined:
- Feb 23, 2017
- Messages:
- 215
- Likes Received:
- 68
Hi The Pirate
Found this thread as I want to do the same, uninstall Waves 9 and install a newer version. I want to use your excellent tutorial above and I have been able to find Revo on the sister site and Ultrasearch free from the authors www but if I search for Regscan I get lots of different results. As doing anything in the registry needs to be done right can you kindly point me in the right direction for the Regscan you use?
-
https://www.nirsoft.net/utils/regscanner.html
Make sure that when you run the scan you enter the following:
Find string: Waves
Exact match and Case Sensitive
Look for: Values>Data>Keys>Search for Unicode string in binary values
Run scan on all base keys
Delete all the results.As far as Waves is concerned, you don’t run the risk of deleting anything that you are not supposed to.
-
ADiSH
Ultrasonic- Joined:
- Jan 25, 2019
- Messages:
- 99
- Likes Received:
- 37
-
It does part of the job, but not a complete job.
-
flguy
Ultrasonic- Joined:
- Jan 22, 2019
- Messages:
- 154
- Likes Received:
- 34
Yes, there were tons of related files found with Ultrasearch after the uninstall.
-
Like x 1
- List
-
belinea2010
Kapellmeister- Joined:
- Feb 23, 2017
- Messages:
- 215
- Likes Received:
- 68
Pirate — you are a total star — followed your instructions and it worked perfectly. Thank you.
-
Like x 2
- List
-
U-Kadian
Kapellmeister- Joined:
- Jul 28, 2015
- Messages:
- 147
- Likes Received:
- 67
I use Revo — then repeat cpl times cus sometimes it misses things 1st time around.. so I always and only use Revo but I repeat it max 3 times to clear registry, ect.
-
Again, REVO does not find and delete every entry. You may think that you run it 3 times and everything is gone. Next time use Revo 3 or 20 times and then do a registry scan with Regscanner. You are going to be surprised. BTW, I use REVO all the time and and even released it next door. I told the OP to uninstall it with REVO but I know REVO’s limitations. When I want a true complete uninstall, Regscanner is my best friend.
-
Like x 1
- List
-
-
U-Kadian
Kapellmeister- Joined:
- Jul 28, 2015
- Messages:
- 147
- Likes Received:
- 67
-
ADiSH
Ultrasonic- Joined:
- Jan 25, 2019
- Messages:
- 99
- Likes Received:
- 37
did you try a more aggressive search option in revo? (theres 3 options)
-
Bro, did you try what I told the OP and @U-Kadian ? That is a better question. Nevertheless, I will answer your question. I operate REVO in «Advanced» mode at all times. I don’t bother with its «Safe» or «Moderate» modes.
BTW, with REVO the best results are achieved when you use REVO Uninstaller PRO with the Real Time Installation option
https://www.revouninstaller.com/products/revo-uninstaller-pro/
-
ADiSH
Ultrasonic- Joined:
- Jan 25, 2019
- Messages:
- 99
- Likes Received:
- 37
I never said i had problem uninstalling anything


