This tutorial will cover step by step instructions to install Anaconda on Windows. You will also learn how to update, write your first program and uninstall Anaconda. This is going to be awesome learning, in case you are a developer or exploring Anaconda and Python.
Let’s deep dive in with these topics —
Table of Contents
- 1 What is Anaconda
- 2 System requirement to Install Anaconda on Windows
- 3 Download Anaconda Python 3
- 4 How to install Anaconda on Windows 10 (with Python)
- 5 How to run Anaconda in Windows using CLI and GUI
- 6 How to update Anaconda in Windows 10
- 7 How to Uninstall Anaconda on Windows 10
- 8 Video
- 9 Conclusion
What is Anaconda
Anaconda {a.ka. Anaconda Python} is a Python and R programming language distribution for scientific computing. All predictive analytics, data science, machine learning and big data falls under scientific computing.
It’s helps to simplify package management and deployment. Anaconda is available for all platforms like Windows, macOS and Linux.
There are two version available to install Anaconda in Windows —
- Anaconda distribution or Individual edition, which are open source and free
- Anaconda Team Edition and Anaconda Enterprise Edition are paid
In this tutorial, I will cover the Anaconda individual edition. It comes with more than 250 packages automatically installed and over 7500 packages available in the PyPI repository.
Conda is an open-source, language-agnostic and cross-platform package manager. It helps to manage and deploy packages using the command line while Anaconda navigator is a GUI alternative to Conda.
System requirement to Install Anaconda on Windows
- Internet connection
- Windows 10 machine
- Approx. 2.7GB free disks pace.
** You don’t need python to be pre-installed because Python 3.8 automatically get install with Anaconda3.
Download Anaconda Python 3
Follow these steps to download Anaconda3 for Windows 10.
Step1.1- Visit Anaconda installers section on Anaconda.com
- Visit https://www.anaconda.com/products/individual > Scroll down on the page to the Anaconda installers section
- Select your Operating system
Step1.2- Download Installer «Anaconda» for Windows 10 ( 64-bit)
- Click on 64-bit Graphical installer (457 MB) to download Anaconda. If your system supports 32 bit only, then go for a 32-bit Graphical installer (403 MB) Anaconda download.
- Default Python 3.8 comes with it as a bundle. Later in this post, I will let you know, how to get the latest Python version 3.9 using Anaconda.

Alternatively, Just Click on below mentioned «Download buttons» to avoid all hassles.
Depending upon your internet speed, within couple of minutes, you will get «Anaconda3-2020.11-Windows-x86_64.exe» in your Download folder.

If you are in search of Old or Archive version of Anaconda installer for Windows 10, Then visit «https://repo.anaconda.com/archive/».
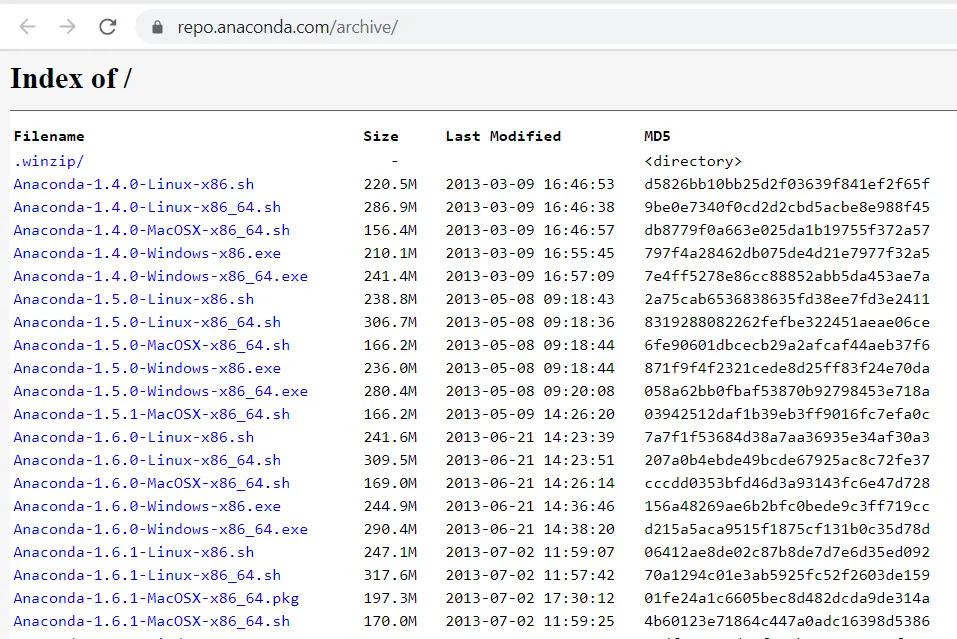
Step1.3- Verify MD5 Checksum Keys for Anaconda installer
You need to perform this step to make sure you have a legitimate copy of Anaconda.
- Visit «https://repo.anaconda.com/archive/» and search for your Anaconda installer.exe, which you just downloaded.
- Look for the MD5 checksum Key written in the 4th column against your exe file.
For example, I will show MD5 Key for «Anaconda3-2020.11-Windows-x86_64.exe» in the image for reference.

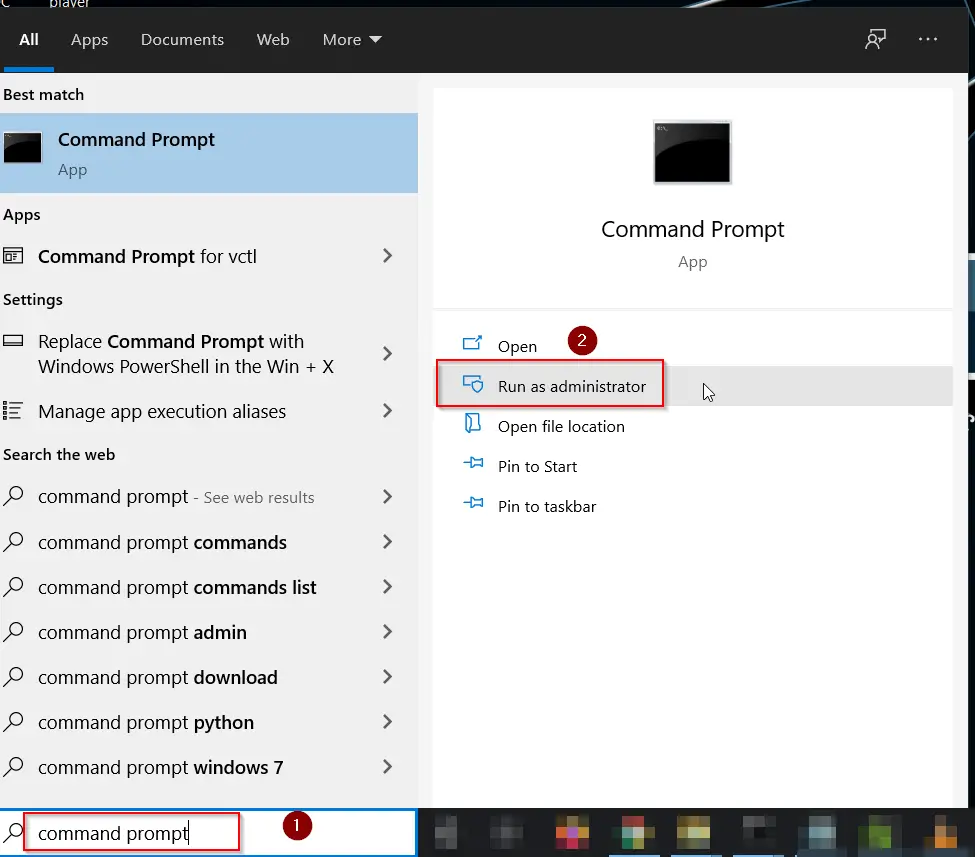
- Now Type «Command prompt» in Windows search bar and open it as administrator.
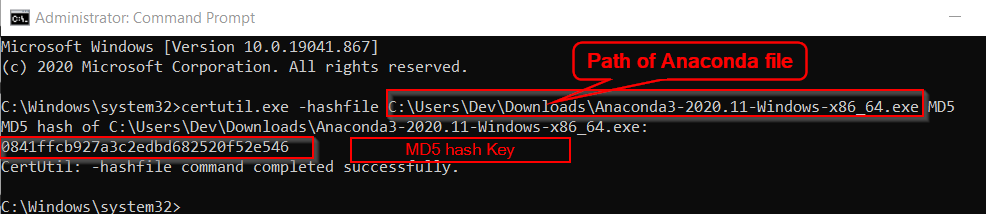
- Run the Certutil.exe command and provide the full path to your download file.
- Add MD5 in the last of your command. You will get a series of number.
- Match it with the key you got in Step1.3 from the Anaconda website. If all matches, you are good to proceed further.
C:Windowssystem32>certutil.exe -hashfile "path to your anaconda file" MD5
For example, I have added «C:UsersDevDownloadsAnaconda3-2020.11-Windows-x86_64.exe» as the file path in the command.
Then I got 0841ffcb927a3c2edbd682520f52e546 MD5 Key. And If you will look closely, it matches with the key we noted in Step1.3.
> certutil.exe -hashfile "C:UsersDevDownloadsAnaconda3-2020.11-Windows-x86_64.exe" MD5

#Output#
MD5 hash of C:UsersDevDownloadsAnaconda3-2020.11-Windows-x86_64.exe:
0841ffcb927a3c2edbd682520f52e546
CertUtil: -hashfile command completed successfully.
Now we know, that our Anaconda installer file is a genuine copy. Let’s go ahead with the installation steps.
Installing Anaconda on Windows 10 is pretty straightforward. You just need to decide on few options carefully.
Let’s deep dive into Anaconda installation steps —
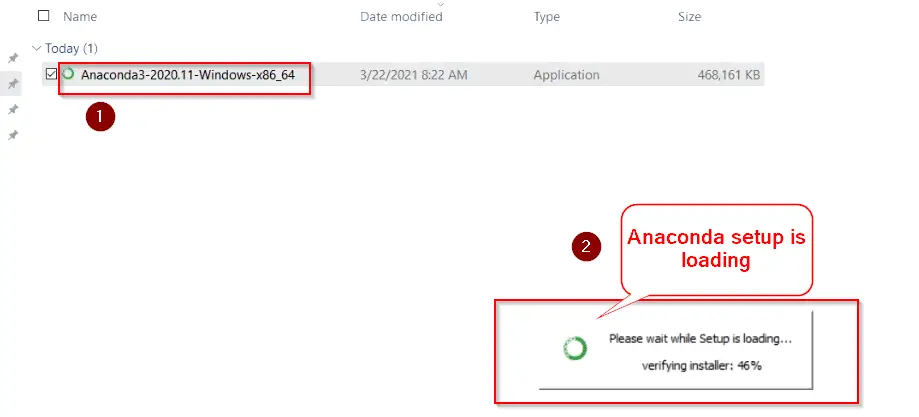
Step2.1- Run Anaconda3 (Python) installer
- Go to your «Download» directory, where the Anaconda installer exists.
- <Double click> on the Anaconda installer file to run the setup.
Step2.2- click Next on «Anaconda Welcome Screen»
Click Next on the «Welcome to Anaconda3 2020.11 (64-bit) setup» screen.
Make sure you have close all other applications before starting this setup. Because it may avoid updating important relevant system files. A system reboot will become mandatory in that case.

Step2.3- Accept End User License Agreement (EULA)
Select «I Agree» on End user license agreement page.

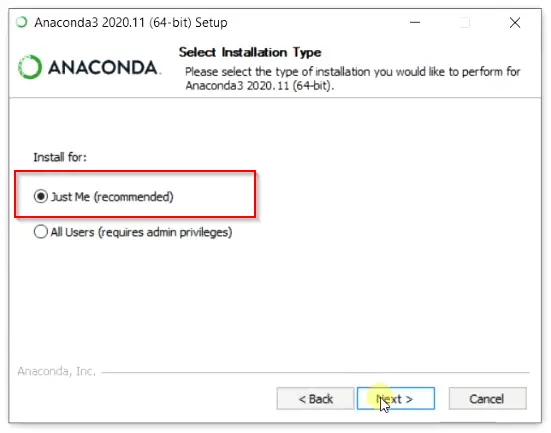
Step2.4- Select Anaconda installation type
On this screen you will get two options —
- Just me — It’s the recommended option. If you will select this option, you can install Anaconda on Windows without admin rights. But if your system is used by more than one user or developer. He or She will not be able to access it. I will go with the «Just me» option.
- All users — If you have a system, where more than one user will use Anaconda to develop scientific programs. You should select this option. Although you will require Admin rights on this system.
Also take a look on couple of extra steps, if you want to install Anaconda on Windows for multiple users.
Click Next —
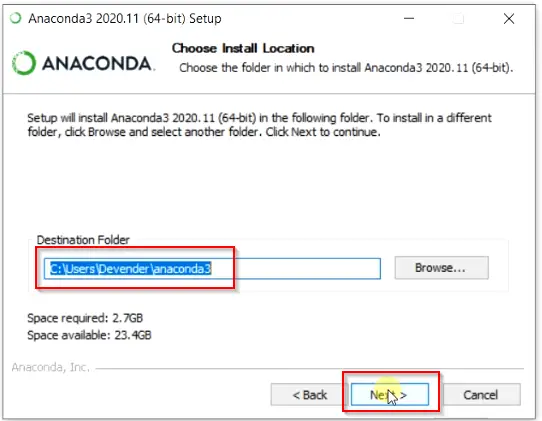
Step2.5- Choose Anaconda install location
Select Destination folder, where you want to install Anaconda on Windows 10 system. By default, Anaconda3 will get install in the «Users home directory«. For example, it is in C:usersDevenderanaconda3 in my case.
If you want to select different folder, then click Browse and choose your preferred folder.
I will go with default installation folder.
Hit Next, once you are ready.
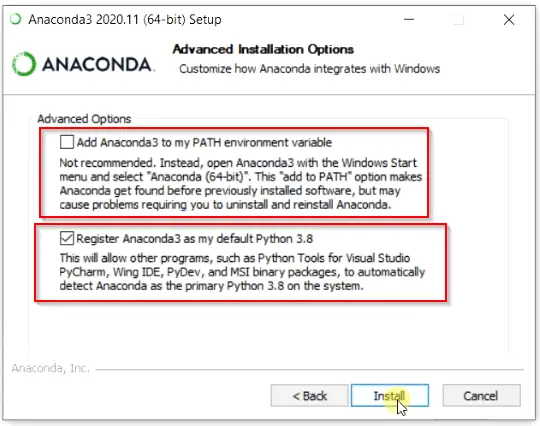
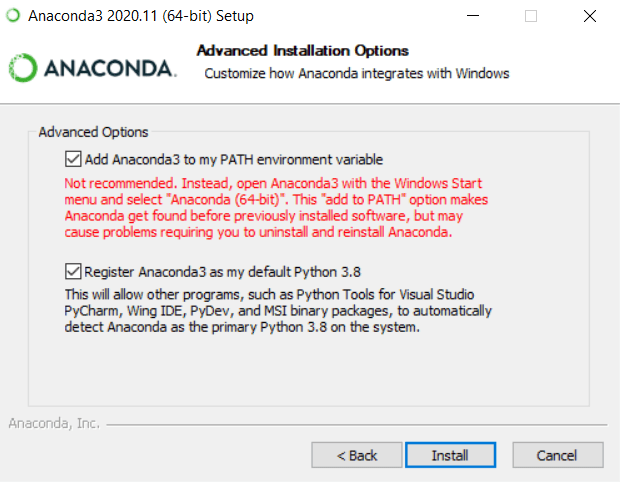
Step2.6- Choose Advance installation options
You have flexibility to customize your Anaconda integration with Windows. There are two options available —
a. Add Anaconda3 to my PATH variable — I will not recommend you to select this option. Because setting up the Anaconda PATH variable can mess up with your previously installed software. Alternatively, you can open Anaconda Shell or Navigator using the Windows start menu. Let’s don’t tick this check box.
b. Register Anaconda3 as my default Python 3.8 — You can go with this option because it helps other software to detect Python 3.8 as primary. If you don’t want to set Python 3.8 as default, in case you are using some other python version. You can uncheck this option also.
I don’t have any other software or Python installed. So I will leave «Register Anaconda3 as my default Python 3.8» selected.
Click on «Install» button to move further.
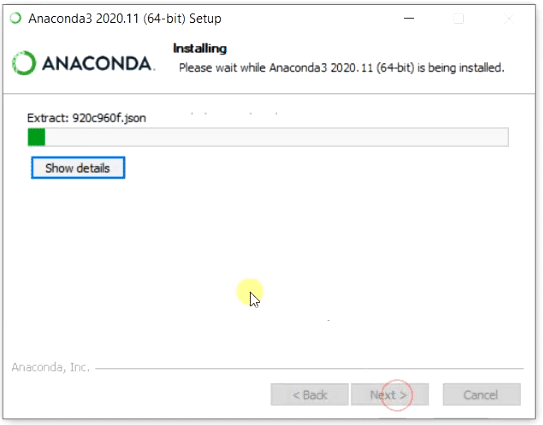
Step2.7- Let Anaconda installation complete
Now you can relax and get a cup of coffee. This setup will take few mins to install Anaconda on Windows 10.
You can tap on «Show details» to check the details of actions happening during installation.
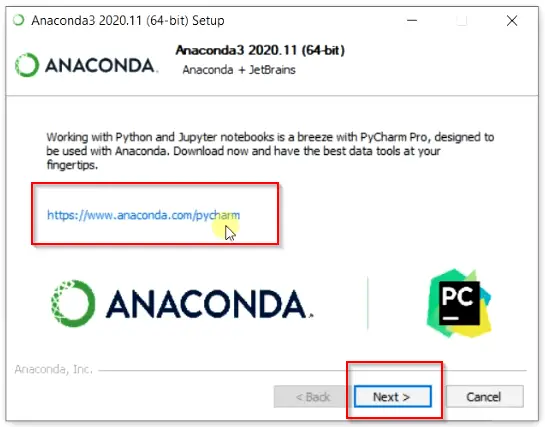
Step2.8- Install PyCharm Pro with Anaconda (Optional)
On this screen, Anaconda setup suggests you installing the PyCharm Pro editor. Actually, PyCharm is an IDE (integrated development environment) designed especially for Python programming by Jet Brains.
Let’s talk about PyCharm later in some other tutorial.
Click Next —
Step2.9- Finish Anaconda Installation Wizard
As soon as you will Finish completing the Anaconda3 setup. You will be redirected to the «Anaconda tutorial and the «Getting started» website of Anaconda.
Uncheck these two options on final screen to avoid redirection to Anaconda website for tutorial.
- Anaconda Individual Edition Tutorial
- Getting Started with Anaconda
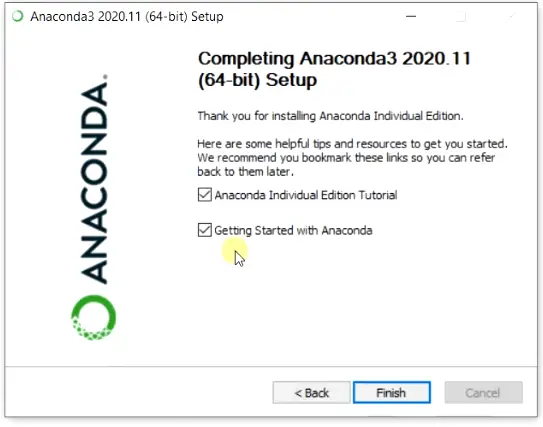
Congrats!! you are done with latest Anaconda installation in Windows.
How to run Anaconda in Windows using CLI and GUI
When you install Anaconda on Windows, you get a lot of bundled scientific packages with it like Spyder, Python and Jupyter notebook.
There are two methods to run Anaconda in Windows. If you are a CLI (Command Line Interface) fan, you can use Conda to run on the prompt.
In the case of GUI (Graphical User Interface), an Anaconda navigator can be used to manage packages, environment and launch applications.
I will show you both methods (Conda and Navigator) to create your first program. Just follow along :—
Step3.1 (CLI Method) — Create and Activate Anaconda environment
Let’s create our first test environment and run our first program in Python3.
Step3.1 (CLI Method) — Create and Activate Anaconda environment
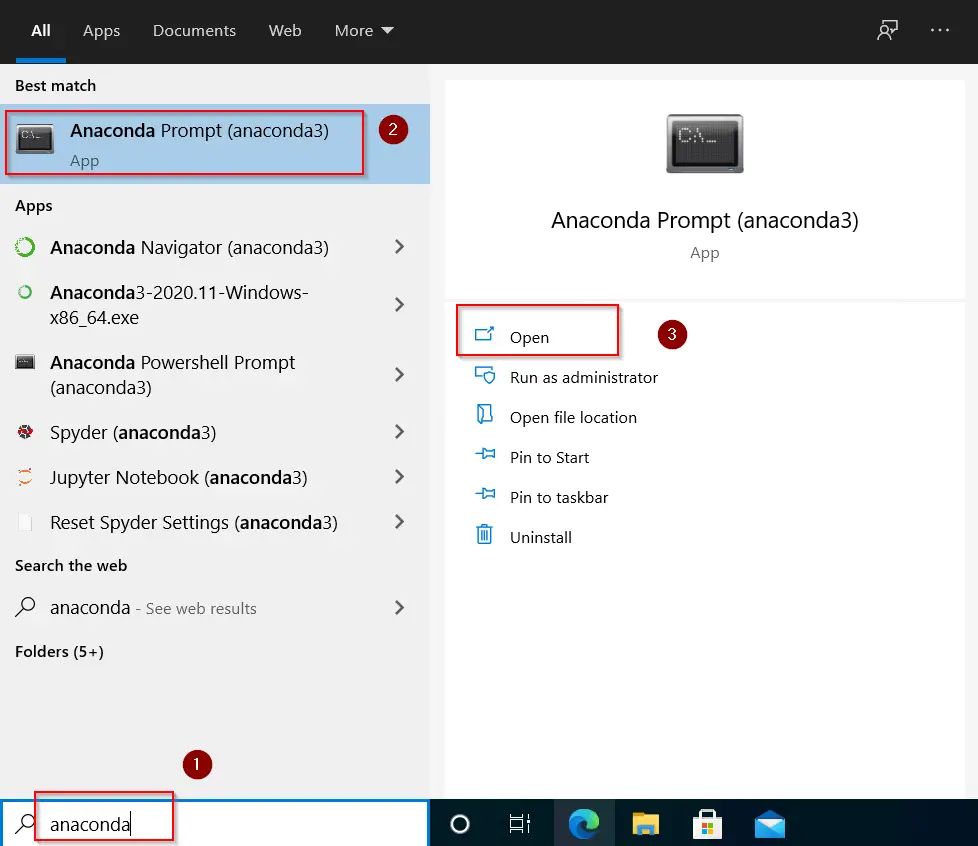
To create your first environment, you need to launch Anaconda3 prompt application.
- Type «Anaconda» in Windows search bar > Select Anaconda prompt application > Click Open
Step3.1.2 — Activate conda environment
By-default, you will get base(root) environment in Anaconda shell prompt.
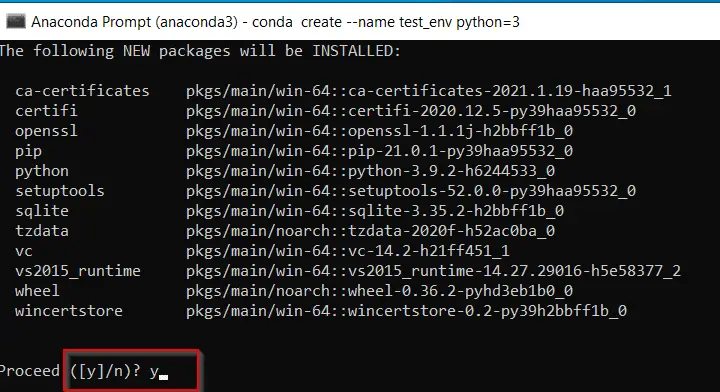
Run the «conda create» command to set up our first test environment (test_env) with Python3. It will also install the latest Python 3.9 and Pip 21.0 packages.
(base) C:UsersDevender>conda create --name test_env python=3
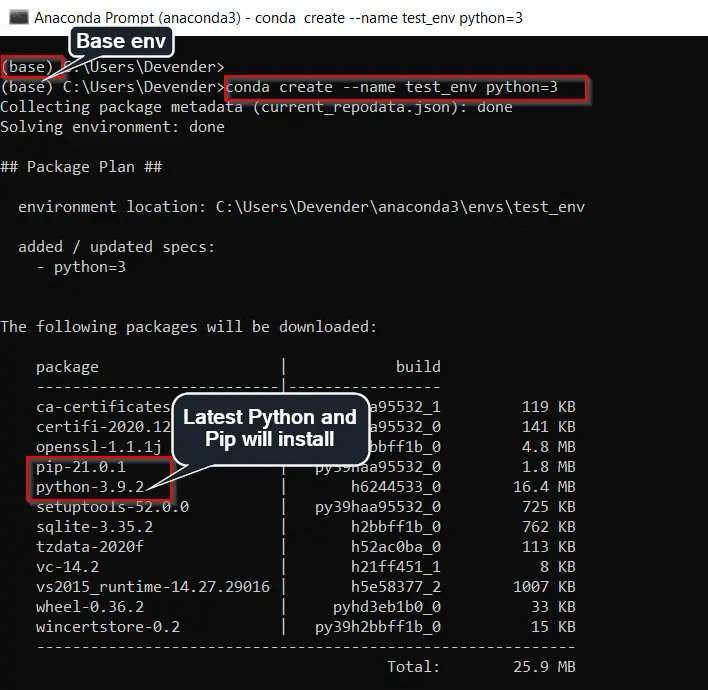
Please make a note, every environment is individual in Anaconda. You need to install required packages for each environment individually.
Press «y» to install packages.
Anaconda will download, extract and install packages required. Once done, you can activate your environment with Conda activate command.
For example, test_env is the name of our newly create environment. So I will run this command —
(base) C:UsersDevender>conda activate test_env
It will switch from base(root) environment to «test_env» environment as shown in image.

** Please make a note running conda activate command without an environment name argument, drops you in the base environment. So make sure you give your environment name.
Step3.1.3 — Run your first python program
Now run Python and Type print(«your first program«) and check the output.
(test_env) C:UsersDevender>python
You will get «>>>» prompt. Type print(«Hello Anaconda! World») from your keyboard and press Enter.
# Type your first program code"
>>> print("Hello Anaconda! World")
Output should be «Hello Anaconda! World» as shown in image.
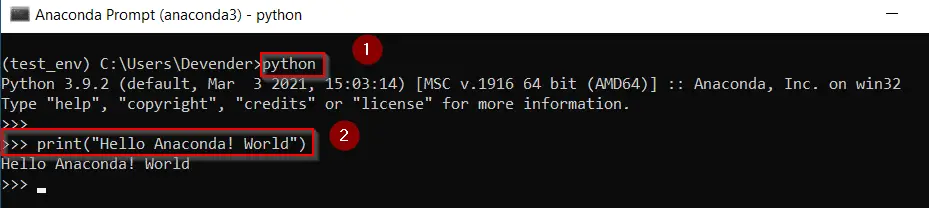
Type exit() to come out from Python prompt.
Hurray!! You have run your first python program in Anaconda successfully.
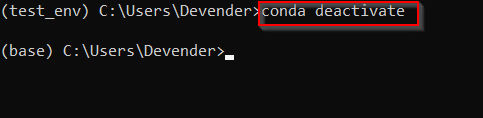
Step3.1.4 — Deactivate Conda environment
If you want to exit or want to deactivate any environment. You just need to run conda deactivate command.
For example, If I will run conda deactivate command inside my test_env environment. It will drop me to the default base environment as shown in the image.
(test_env) C:UsersDevender>conda deactivate
Step3.2 (GUI Method)- How to start Anaconda navigator and Launch Jupyter
Just to make things interesting, I will show you how to Launch the Anaconda navigator. Also, how to install and launch Jupyter notebook using Anaconda in your newly created test environment.
So follow these easy steps —
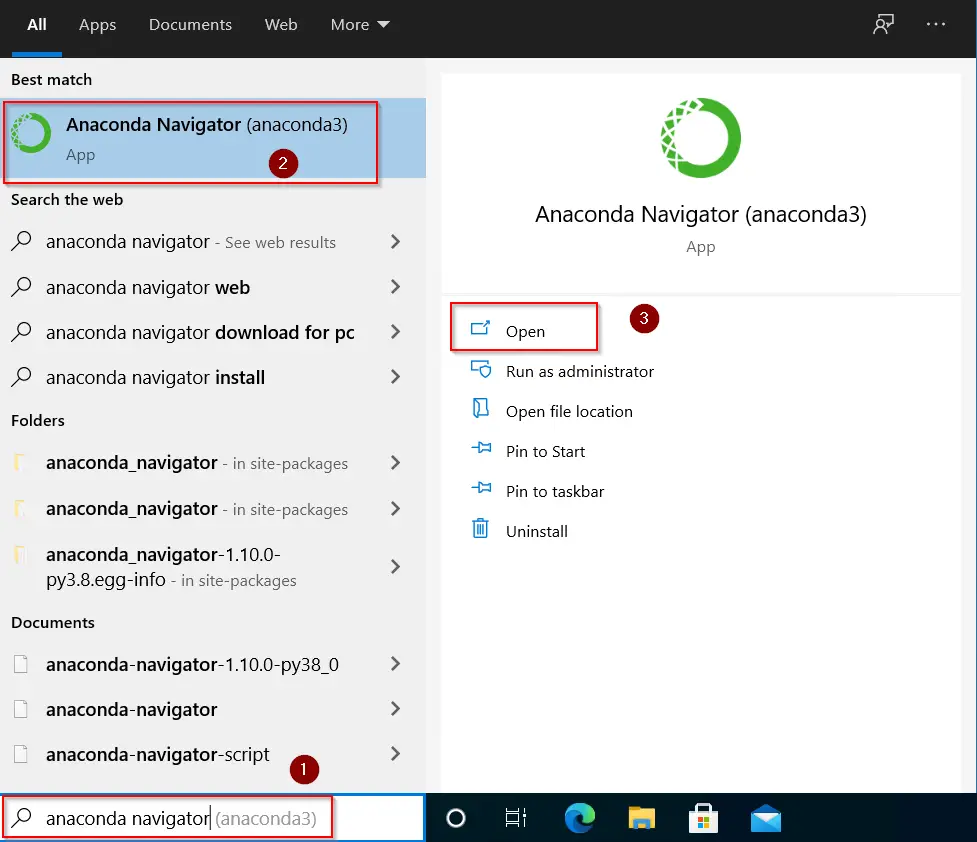
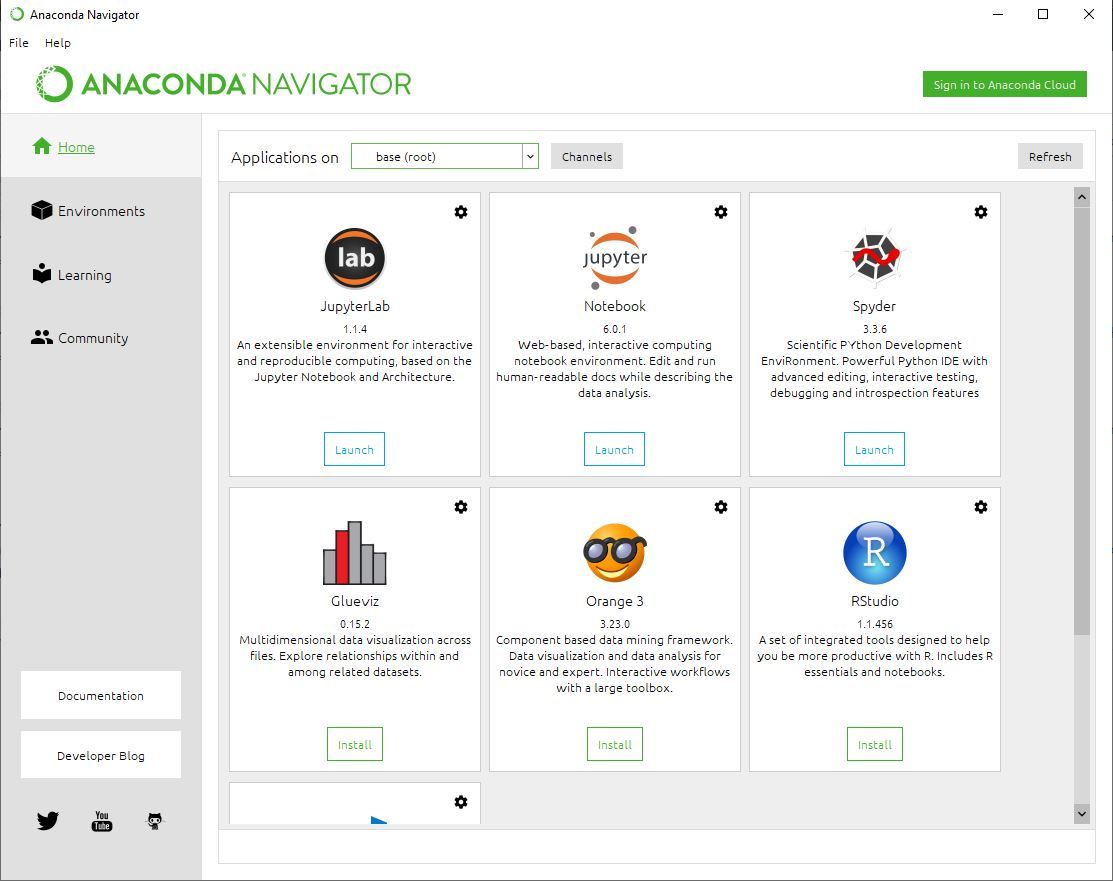
Step3.2.1 — Launch Anaconda Navigator in Windows 10
- Type «Anaconda Navigator» in Windows search bar > Select Anaconda Navigator > click Open.
Step3.2.2 — Select your test environment (test_env) and install Jupyter notebook
Jupyter notebook is a web based tool to interactively develop and present data science projects.
You can launch Jupyter notebook from <start menu> or search bar also. But It will get launch from base(root) environment by-default.
Here I will show, how you can install and launch Jupyter notebook in your custom environment. For example, test_env in my case.
- Select your environment from drop down > click on the «install» button in Jupyter Notebook application.
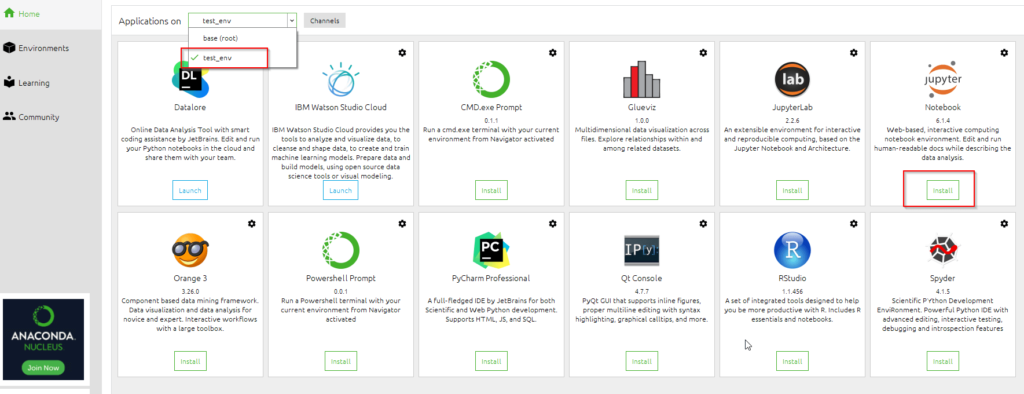
- Please wait and let Jupyter notebook installation complete. You can monitor the progress in Navigator task bar.

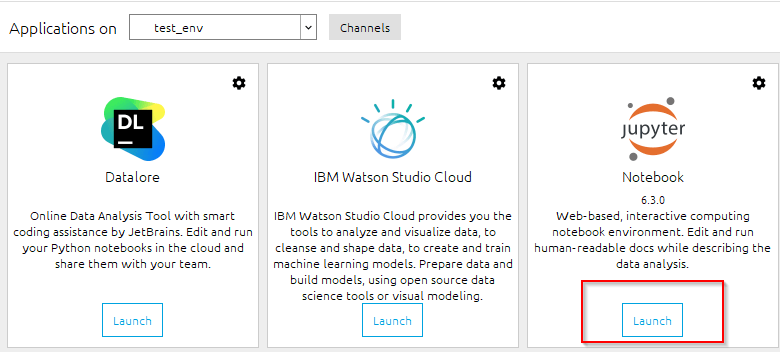
Step3.2.3 — Launch Jupyter Notebook in Anaconda navigator
Click on Launch button of Jupyter notebook.
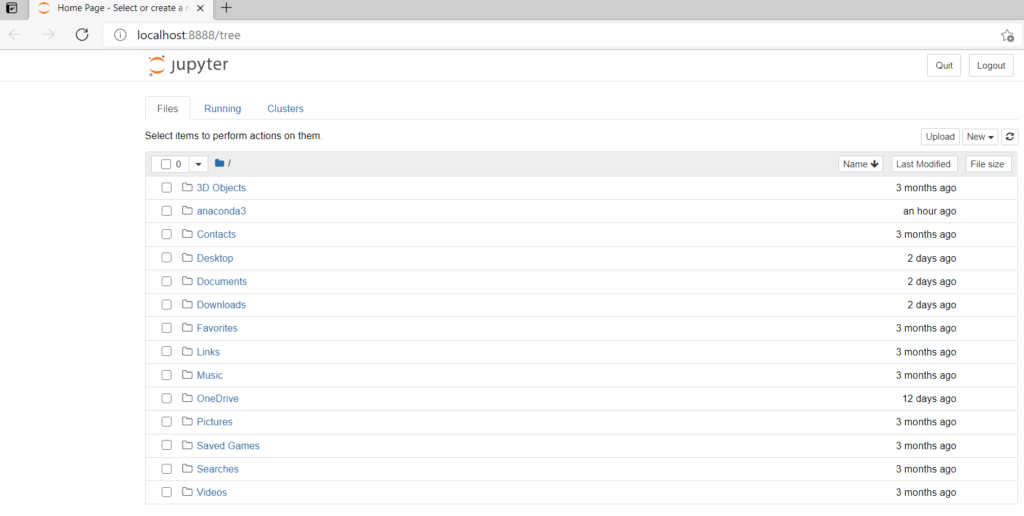
You will see a Jupyter home page in your default web browser. The default URL path of Jupyter notebook will be http://localhost:8888/tree.
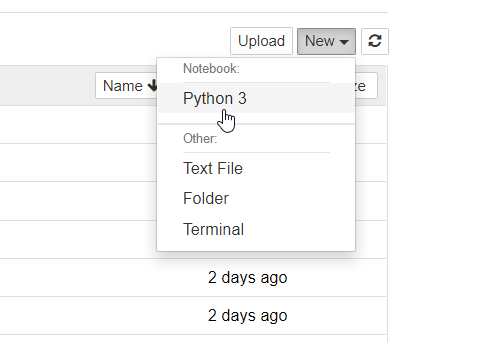
Step3.2.4 — Create your first Jupyter Notebook with Python3
Select New > Python3 notebook.
Step3.2.5 — Run first python program using Jupyter command cell
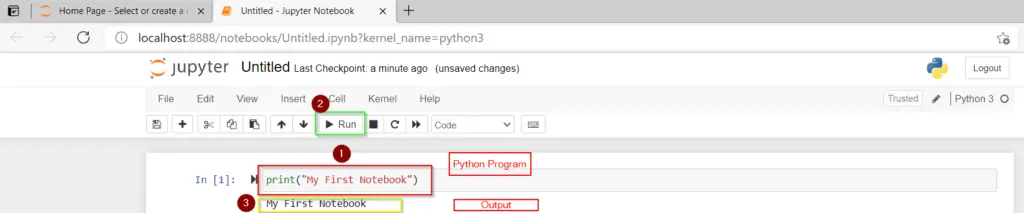
To run your first sample python program in Jupyter notebook. Follow these 3 steps —
- Type «print(«My First Notebook») in Jupyter command cell
- Click on Run button as shown in image
- You will see output as «My First Notebook«.
You can also save this file. Go to File > save as > provide the file name (path) and you are done. This was just the basic, For more details, checkout Jupyter documentation.
Enjoy! Anaconda and Jupyter in your development journey.
How to update Anaconda in Windows 10
You can update Anaconda in Windows 10 by 3 simple steps —
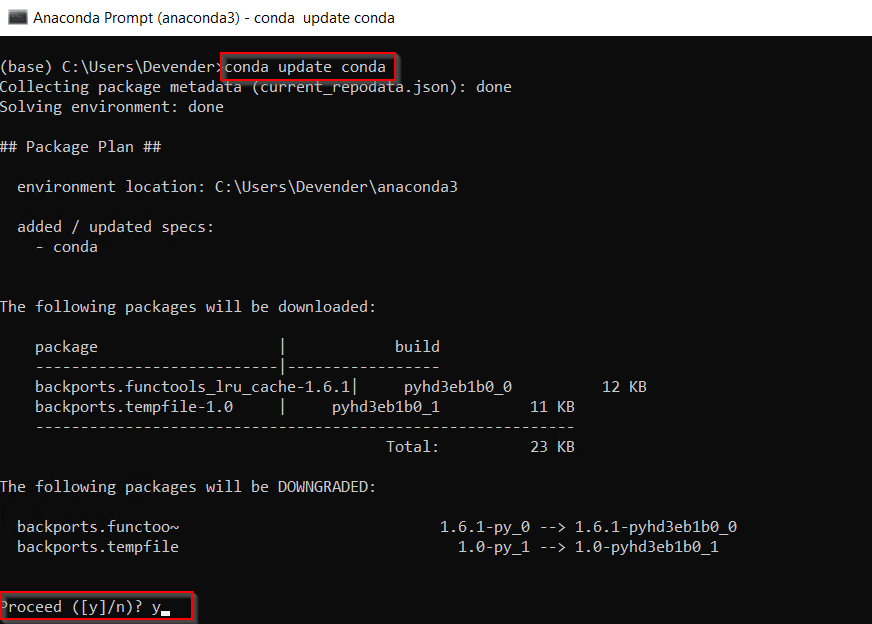
Step4.1- Update conda utility
First you need to update conda utility before upgrading Anaconda package in windows 10. To achieve this-
- Type «Anaconda» in Windows search bar > Select Anaconda prompt application > Click Open
- Run conda update command.
(base) C:UsersDevender>conda update conda
Press «y» to proceed
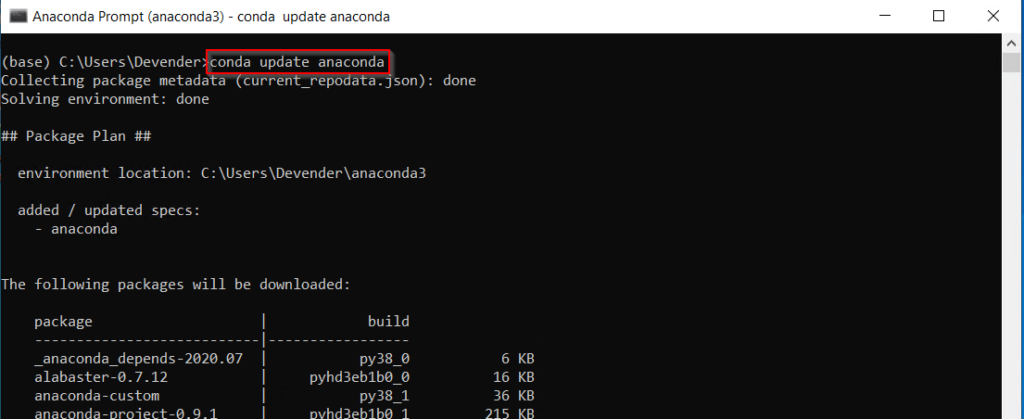
Step4.2- Update Anaconda package
Run this command to update Anaconda packages to latest version —
(base) C:UsersDevender>conda update anaconda
Press «y» to install packages.
To update Anaconda to specific version, Run below mentioned command —
> conda update anaconda=VersionNumber
For example, to upgrade it to Anaconda 2020.11 version, type
> conda update anaconda=2020.11
How to Uninstall Anaconda on Windows 10
Till this point, We know how to install Anaconda on Windows 10 and how to update it to latest version.
Now I will show you how to remove Anaconda from Windows10 completely. Follow along with these simple steps —
Step5.1- Go to Add remove programs
**** First of all take backup of all your projects, you created using Anaconda to be on safer side.
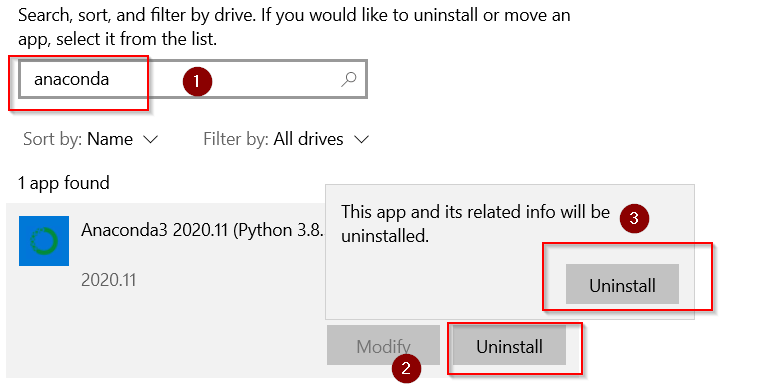
Then type «Add remove programs» in Windows search bar and click Open.

Step5.2- Uninstall Anaconda and Python completely
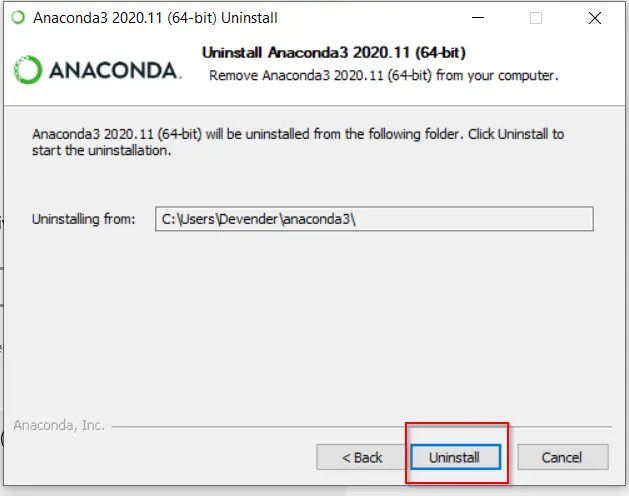
- In the «Apps and feature» window. Search for the «Anaconda» program > click Uninstall > then Uninstall again.
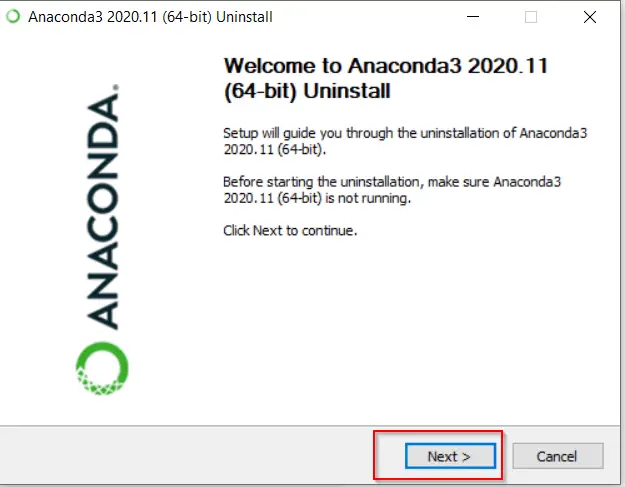
- Press Next on Anaconda welcome screen
- Click «Uninstall«.
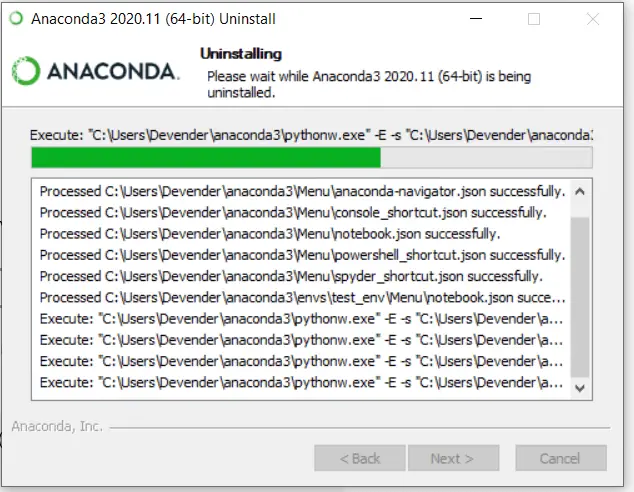
It will take a couple of minutes to uninstall anaconda and python 3.8.5 from your windows system.
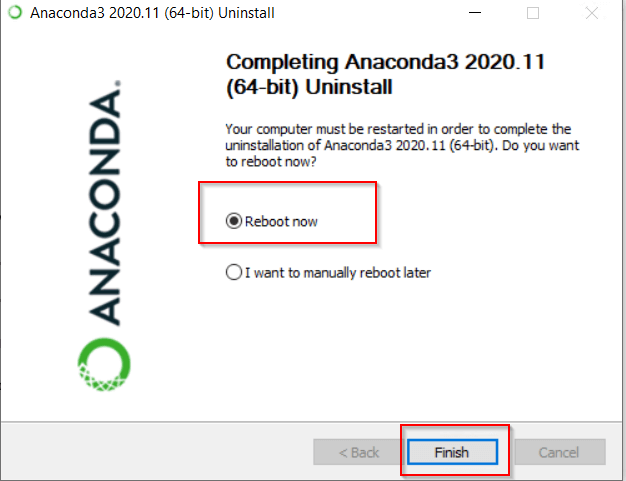
Click Next and then select Reboot Now or «I want to manually reboot later» as per your preference.
I will select reboot now and then Finish to complete uninstallation of Anaconda.
Important Tip
In a few rare cases, you may find the Anaconda3 folder, where you installed Anaconda. For example, in my case, it will reside in «C:usersDevenderanaconda3«. You can manually delete it if you find it after uninstallation of Anaconda.
You must be a happy soul now!!
Video
Check out this informative video on «How to Install Anaconda on Windows 10«. In case, you don’t like reading text or something is not clear in text instructions.
Conclusion
If you follow each and every instruction of this tutorial, You can install Anaconda on Windows 10 very easily. Even if you are a novice in the development world.
I wish you all the good luck for your future learnings. You can also download Anaconda cheat sheet to keep it handy.
Let me know, in case you have any feedback or suggestions for me.
- Скачайте установщик Anaconda.
- РЕКОМЕНДУЕТСЯ: проверить целостность данных с SHA-256.
- Кликните два раза по файлу с установочной программой.
Чтобы избежать ошибок доступа, не запускайте установку из папки «Избанное».
Если при установке появляются проблемы, попробуйте временно отключить антивирусное ПО, а затем снова включить его после установки. Если Anaconda была установлена для всех пользователей, нужно удалить ее и переустановить для одного пользователя.
- Нажмите «Далее» (Next)
- Прочитайте лицензионное соглашение и нажмите «Согласен» (I agree).
- Выберите «Только я» (Just Me), если вы не устанавливаете программу для всех пользователей (в Windows для этого нужны привилегии Администратора) и нажмите «Далее» (Next).
- Выберите папку установки Anaconda и нажмите «Далее» (Next). Смотрите FAQ
Устанавливайте Anaconda в папку, имя которой не содержит пробелов и символов unicode (например, кириллицу)
Не устанавливайте с правами Администратора, если такие не запрашивались

- Выберите, нужно ли добавлять Anaconda в переменную окружения PATH. Рекомендуется не делать этого, потому что это может повлиять на работу других программ. Вместо этого запускайте программу из Anaconda Navigator или Anaconda Prompt из меню «Пуск».
- Выберите, стоит ли регистрировать Anaconda как Python-решение по умолчанию. Если не планируется устанавливать и запускать несколько версий Anaconda или несколько версий Python, лучше оставить все по умолчанию с отмеченным флажком.
- Нажмите кнопку «Установить» (Install). Нажав на «Посмотреть детали» (Show Details), можно увидеть, какие пакеты Anaconda установит.
- Нажмите кнопку «Далее» (Next).
- По желанию: для установки PyCharm для Anaconda перейдите по ссылке https://www.anaconda.com/pycarm/
Для установки Anaconda без PyCharm просто нажмите кнопку «Далее» (Next) - После установки вы увидите диалоговое окно «Спасибо за установку Anaconda»:
- Если хочется почитать больше об Anaconda Cloud и о том, как начать работать с Anaconda, отметьте флажками пункты «Learn more about Anaconda Cloud» и «Learn how to get started with Anaconda». Нажмите кнопку «Завершить» (Finish).


Обучение с трудоустройством
Improve Article
Save Article
Improve Article
Save Article
Anaconda is an open-source software that contains Jupyter, spyder, etc that are used for large data processing, data analytics, heavy scientific computing. Anaconda works for R and python programming language. Spyder(sub-application of Anaconda) is used for python. Opencv for python will work in spyder. Package versions are managed by the package management system called conda.
To begin working with Anaconda, one must get it installed first. Follow the below instructions to Download and install Anaconda on your system:
Download and install Anaconda:
Head over to anaconda.com and install the latest version of Anaconda. Make sure to download the “Python 3.7 Version” for the appropriate architecture.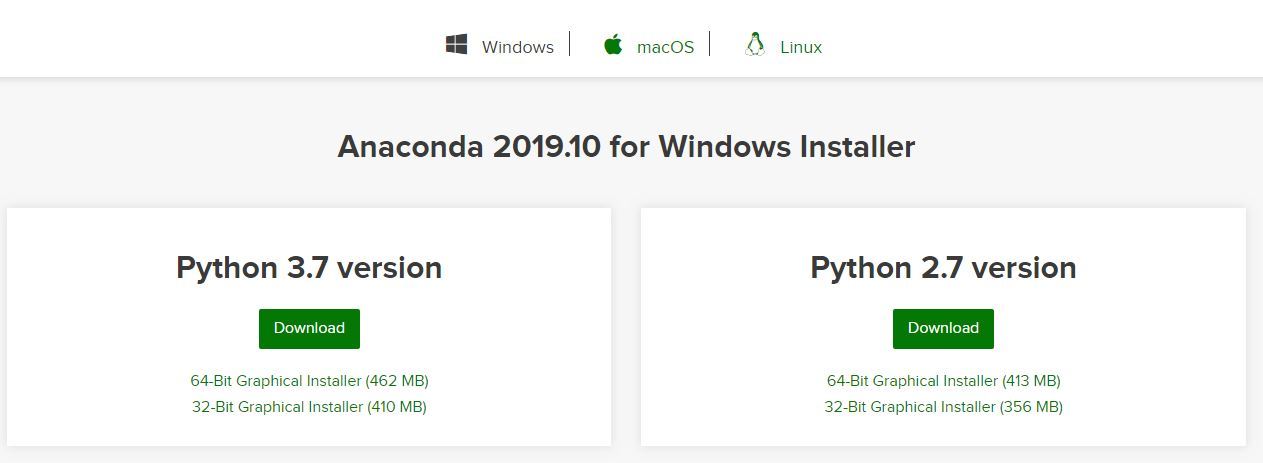
Begin with the installation process:
Working with Anaconda:
Once the installation process is done, Anaconda can be used to perform multiple operations. To begin using Anaconda, search for Anaconda Navigator from the Start Menu in Windows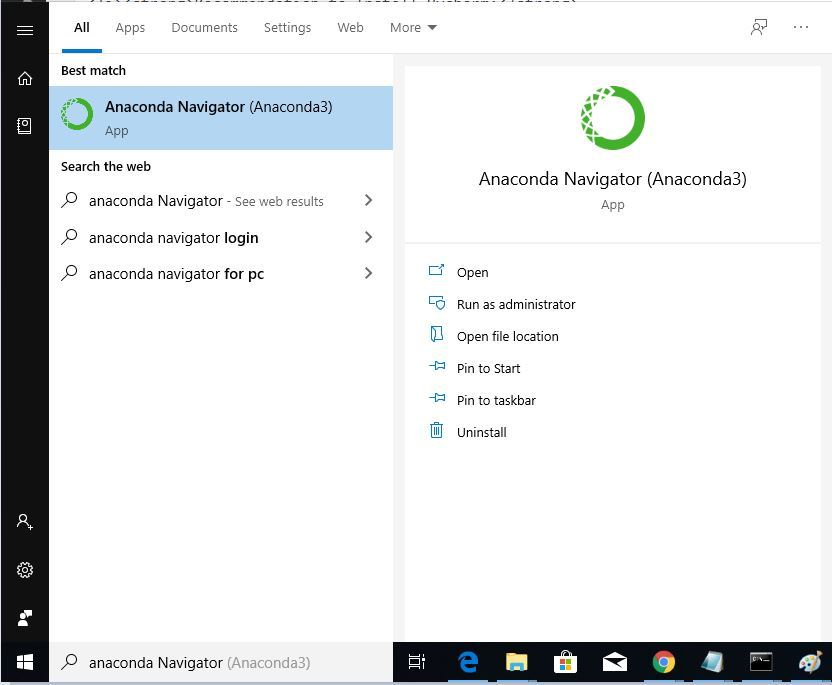
Improve Article
Save Article
Improve Article
Save Article
Anaconda is an open-source software that contains Jupyter, spyder, etc that are used for large data processing, data analytics, heavy scientific computing. Anaconda works for R and python programming language. Spyder(sub-application of Anaconda) is used for python. Opencv for python will work in spyder. Package versions are managed by the package management system called conda.
To begin working with Anaconda, one must get it installed first. Follow the below instructions to Download and install Anaconda on your system:
Download and install Anaconda:
Head over to anaconda.com and install the latest version of Anaconda. Make sure to download the “Python 3.7 Version” for the appropriate architecture.
Begin with the installation process:
Working with Anaconda:
Once the installation process is done, Anaconda can be used to perform multiple operations. To begin using Anaconda, search for Anaconda Navigator from the Start Menu in Windows
Перевод
Ссылка на автора
Когда мы начнем работать над машинным обучением и углубленным изучением ИИ, нам, по сути, придется установить несколько пакетов. Это на самом деле иногда проблематично для большинства из нас. Чтобы сделать это проще, Anaconda приходит в качестве менеджера пакетов, который будет управлять установкой и развертыванием наших новых пакетов.
Сначала перейдите по следующей ссылке: https://www.anaconda.com/distribution/ и страница появится так.

Прокрутите страницу вниз и выберите окна.

Загрузите версию Python 3.7 (рекомендуется), поскольку версия Python 2 больше не будет поддерживаться сообществом в конце 2019 года. В зависимости от вашей компьютерной системы, выберите 32-разрядный или 64-разрядный установщик для загрузки файла .exe.

После загрузки файла запустите файл. Файл откроется, нажмитеследующий

И нажмитеЯ согласенк лицензии.

выберитеПросто яи нажмитеследующий

Выберите место установки, нажавОбзор илиоставьте все как есть (местоположение по умолчанию) и продолжайте нажиматьследующий,

Здесь настоятельно рекомендуется выбрать второйЗарегистрировать Anaconda в качестве моего Python по умолчанию 3.7И нажмитеустанавливать

После завершения установки откройтеАнаконда Подскажитеиз панели меню Пуск Windows.

Anaconda Prompt — это оболочка, похожая на Windows Command Prompt (Windows Terminal) на основе дистрибутива Anaconda. Чтобы проверить, успешно ли мы установили Anaconda, введитепитонКоманда в оболочке.
> python
и вывод будет выброшен с версией Python, и символ будет изменен на с>в>>>показывая это как интерпретатор Python.

Чтобы выйти из интерпретатора Python, введите команду выхода, как показано ниже.
>>> exit()
Что если мы хотим получить доступ к Anaconda из командной строки Windows? Следуйте этому, если вы хотите сделать это. Сначала из подсказки Anaconda введите эту команду, чтобы проверить местоположение Anaconda.
> where conda

НажмитеWindows Key + Rчтобы открыть окно Run. Типsysdm.cplв коробкеи нажмитеХОРОШО .

Свойства системыокно появится. Затем перейдите кпродвинутыйвкладку и нажмите наПеременные среды

ВПеременные средыокно, выберитеПутьи нажмитередактироватьредактировать путь.

ВнутриИзменить переменную средыокно, нажмитеновыйдобавить пути.

Добавьте эти три местоположения в это. Введите свое имя пользователя вместо* UserName *.Здесь я использую последнюю версию AnacondaAnaconda3и если вы склонны использовать более старые версии, также измените номера версий.
C:Users*UserName*Anaconda3ScriptsC:Users*UserName*Anaconda3C:Usersbestc*UserName*Librarybin
После того, как все вышеперечисленные действия будут выполнены, откройте командную строку Windows из поля «Выполнить», введяCMDи ударилХОРОШО.

В командной строке введите команду
> conda
и увидим несколько строк появилось. Это означает, что мы можем успешно выполнять команды Anaconda прямо из нашего любимого терминала Windows.

И последнее, но не менее важное, чтобы проверить версию conda. Введите эту команду ниже.
> conda — - version

Ссылки:
Установка Anaconda в Windows
Для решения проблем я рекомендую установить и использовать дистрибутив Anaconda Python. Этот раздел подробно описывает…
problemsolvingwithpython.com
Anaconda Python / R Distribution — Скачать бесплатно
Anaconda Distribution с открытым исходным кодом — это самый простой способ выполнить науку данных Python / R и машинное обучение на…
www.anaconda.com
Исправлено: «conda» не распознается как внутренняя или внешняя команда, работающая программа или командный файл…
Некоторые пользователи сталкиваются с тем, что «conda не распознается как внутренняя или внешняя команда, работающая программа или…
appuals.com

![]()
This post provides you a thorough description of how to install both the anaconda and python versions on your Windows computer, and how to access them individually.
✏ Introduction.
If you’re reading this post, then you’re either an ML enthusiast or an enthusiast like me to try various python distributions 😅.
As a python developer, there will be situations where one needs to work with more than one distributions of python. And it’s known fact that accessing different distributions of python is a bit tricky and can be a hectic job for beginners. Well, after reading this post, hope you’ll get a clear picture how to use both with ease.
📃 Requirements
- A Windows 10 operating machine.
- Python (any version).
- Anaconda Distribution Package.
That’s it.
In this scenario, I’ll be using latest version of Python 3.9.1, however you’re free to use any version of python.
Install Anaconda Distribution
Download the latest version of Anaconda Distribution here
-
Run the installer.

-
Make sure you have checked out Add Anaconda3 to my PATH environment variable. This provides the flexibility to access the distribution of anaconda python anywhere from the PC.
-
Click on Install. Hang on some time, the installation will take a while depending on your system performance.
-
Once installed, do a quick run of Anaconda Navigator and ensure it’s running fine.

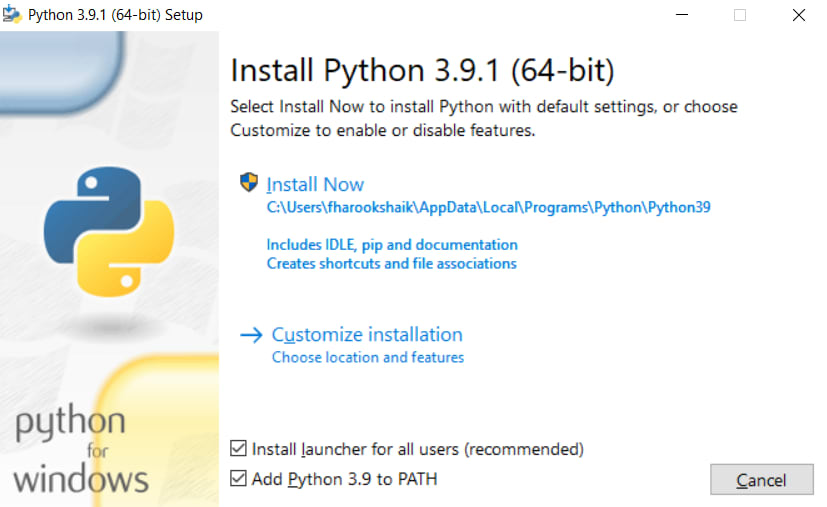
🐍 Install Python
Download the appropriate version python exe installer from here
- Run the installer.
-
Make sure that you have checked out ADD Python to PATH.
-
Click on Customize installation and make few clicks on Next till you’ve got this page.
-
Choose a custom location other than the default. In this case I’ve choose
D:Python39. -
Click on Install and hang on for few moments until it get installed.

🤔 How to Access Anaconda & Python from cmd?
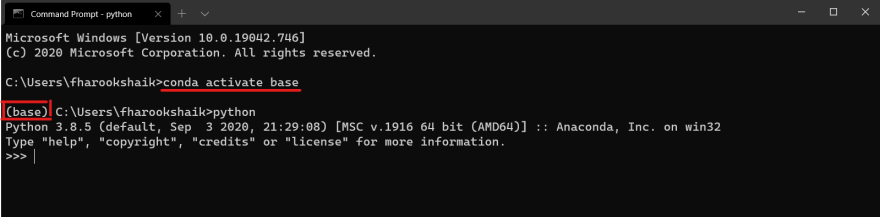
Accessing Anaconda from cmd:
It’s actually simple to access / activate anaconda distribution.
- Open
command promptand use the following command to activate conda base environment.
conda activate base
Enter fullscreen mode
Exit fullscreen mode
-
Type
pythonand you’ll be welcomed with python from anaconda environment.
-
The
(base)before the path indicates that conda environment is active. -
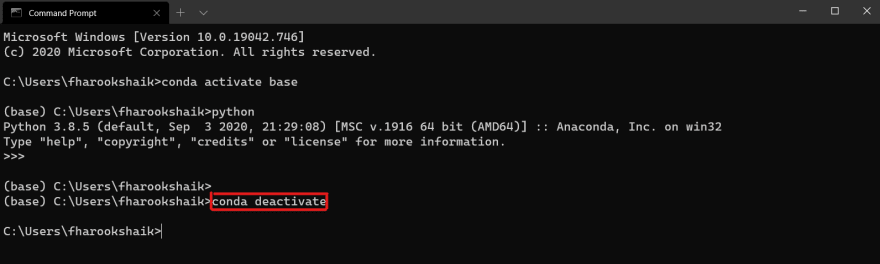
To deactivate conda environment, use the following command
conda deactivate
Enter fullscreen mode
Exit fullscreen mode
Well, with that you’ve learned how to access/activate conda environment using cmd, let’s look into accessing python environment using cmd.
Note: Every anaconda distribution comes with base environment. Any additional virtual environments created inside anaconda can be activated using the
conda activate <envname>
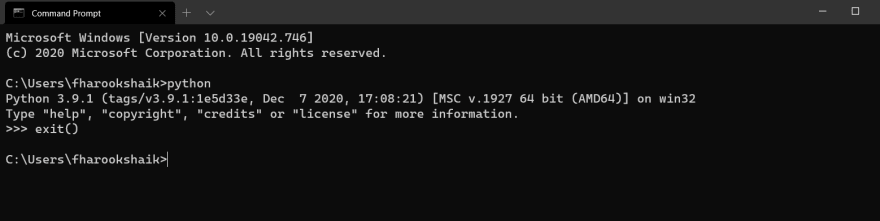
Accessing Python from cmd:
A simple thing to remember here, just make sure that you’re not in conda environment in order to access Native Python distribution.
- Just type
pythonorpyto open the python interpreter.
📥 Install packages differently
With both the distributions installed, you have control on installing packages separately for each distribution.
- To install any package/dependency in conda environment, use the following command
conda install <packageName>
Enter fullscreen mode
Exit fullscreen mode
- To install any package/dependency in native python, use the following command
pip install <packageName>
Enter fullscreen mode
Exit fullscreen mode
That’s it! ✌
See you in next post!👋
Feel free to comment down any type of doubts/issues you’ve encountered. Would ❤️ to help.
Find this insightful🤔 Give a ❤️ & share the knowledge with your friends.