NetBeans IDE is a Free open-Source, Cross-plate form Integrated Development Environment (IDE) with built-in support for the JAVA Programming Language. It can run any machine which consists of the Java Virtual Machine (JVM). It consists of many features for application development as follows:
- Drag & Drop Graphical User Interface (GUI) Creation.
- Excellent editing (advanced source code editor)
- Web-service
- Excellent debugging
- Wizards, code generation and management tools, and many more.
Steps of Installation of NetBeans on Windows
1. You need to have a setup file of the NetBeans JAVA into your setup.
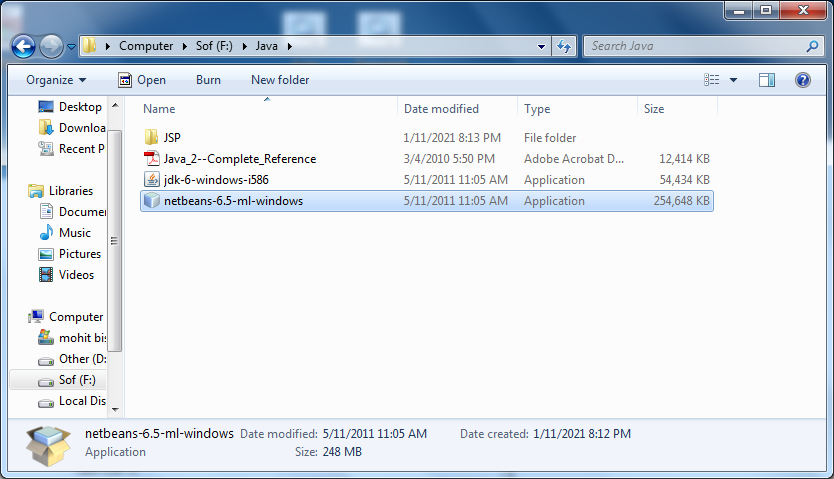
2. If you didn’t have the setup you can download from the following link: https://netbeans.org/images_www/v6/download/community/8.2
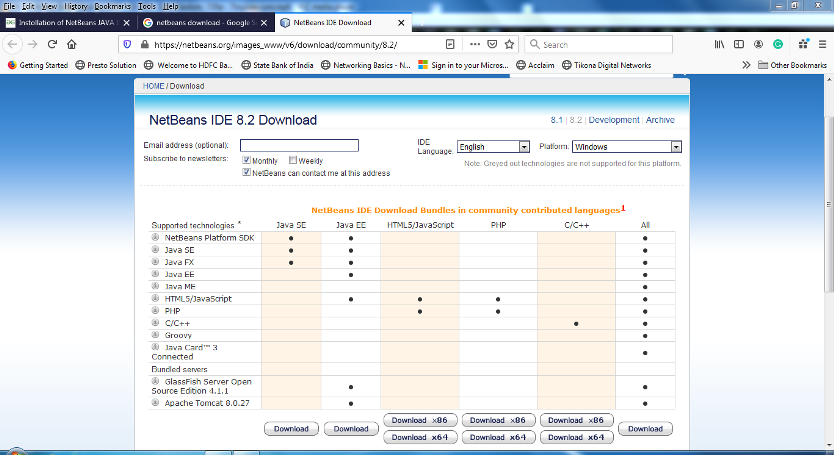
3. You can download any type of setup as per your requirements from the above mention web page.
4. Right-click on the setup or you can Double-Click on the setup by using the mouse.
5. Click on the next option
6. Check on the “Private networks, such as my home and work network”.

7. Click on the Allow access button.
8. Check on the “I accept” option and click on the “Next” button.

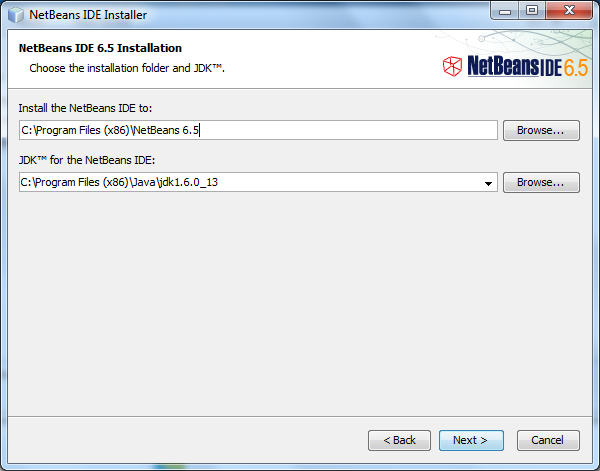
9. Select the path where you want to install the software and press the “Next” button.
10. Set the Password, User Name & Ports for the Network Connectivity, or we can use this UserName and the Password for the Connecting the Front-End to the Back-End.

11. Click on the “Next” button.
12. Click on the “Install” button.
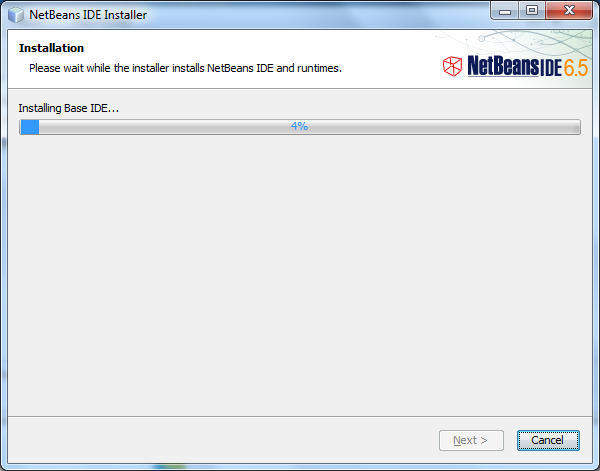
13. Wait for the while till the time the setup is properly Installed into the Computer
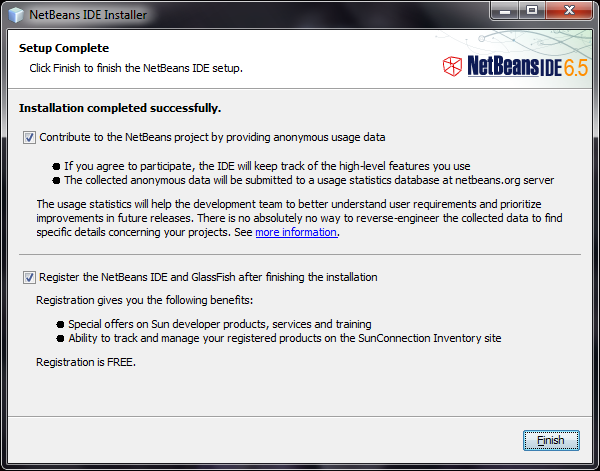
14. After complication of the setup you can click on the “Finish” button or you can also register the Software, for Further Assistance because it is a Free Software.
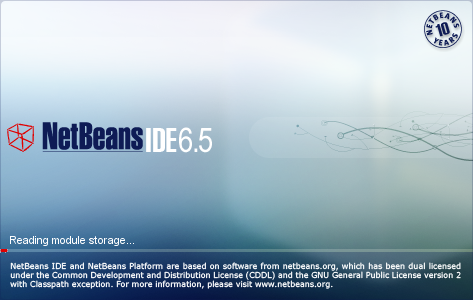
15. Now you can start the NetBeans for further use
NetBeans IDE is a Free open-Source, Cross-plate form Integrated Development Environment (IDE) with built-in support for the JAVA Programming Language. It can run any machine which consists of the Java Virtual Machine (JVM). It consists of many features for application development as follows:
- Drag & Drop Graphical User Interface (GUI) Creation.
- Excellent editing (advanced source code editor)
- Web-service
- Excellent debugging
- Wizards, code generation and management tools, and many more.
Steps of Installation of NetBeans on Windows
1. You need to have a setup file of the NetBeans JAVA into your setup.
2. If you didn’t have the setup you can download from the following link: https://netbeans.org/images_www/v6/download/community/8.2
3. You can download any type of setup as per your requirements from the above mention web page.
4. Right-click on the setup or you can Double-Click on the setup by using the mouse.
5. Click on the next option
6. Check on the “Private networks, such as my home and work network”.
7. Click on the Allow access button.
8. Check on the “I accept” option and click on the “Next” button.
9. Select the path where you want to install the software and press the “Next” button.
10. Set the Password, User Name & Ports for the Network Connectivity, or we can use this UserName and the Password for the Connecting the Front-End to the Back-End.
11. Click on the “Next” button.
12. Click on the “Install” button.
13. Wait for the while till the time the setup is properly Installed into the Computer
14. After complication of the setup you can click on the “Finish” button or you can also register the Software, for Further Assistance because it is a Free Software.
15. Now you can start the NetBeans for further use
Posted at 21:03h
in NetBeans
2 Comments
NetBeans is a free and open source Integrated Development Environment (IDE) and is governed by the Apache Software Foundation. Develop desktop, mobile, and web applications with Java, JavaScript, HTML5, PHP, C/C++, etc easily with NetBeans. Here, we will be installing NetBeans IDE.
In this tutorial, we will learn how to install NetBeans IDE on Windows 10. Java installation is also necessary since NetBeans is a Java-based IDE, therefore we will also see JAVA JDK 13 installation while installing NetBeans IDE with text as well as video tutorial below:
Following steps we will follow to install NetBeans IDE on Windows 10:
- Download and Install Java
- Download NetBeans
- Installing NetBeans IDE
- Set NetBeans and Java path
- Launch NetBeans after installation
- Check the Video Tutorial also
Let’s begin with the installation:
Step 1: Download and Install Java
We will see how to install Java JDK on Windows 10 OS. With that, to avoid any hassles in future, we will also let you know how to verify the installation.
Let us now Download Java JDK
To download Java, go to Oracle’s official website and type “JAVA JDK ” in the search box as in the below screenshot:
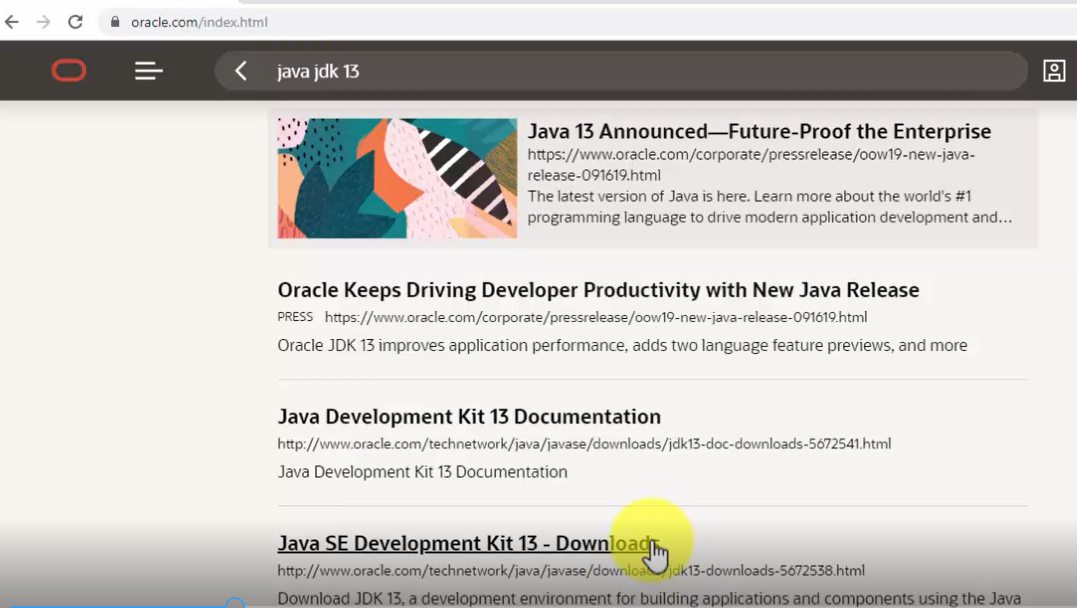
Now, click “Java SE Development Kit 13 – Downloads” and you will reach the Downloads section:

Go to bottom of the same page, click “Accept” there itself:
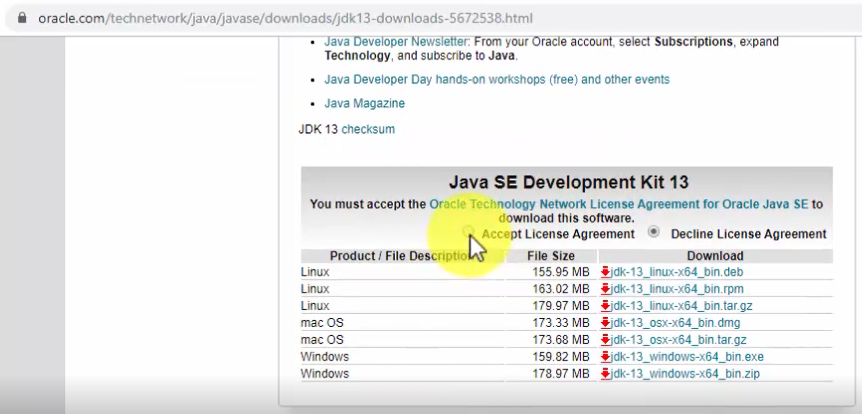
Since, we are on a Windows 10 system, therefore, we now have two options. From that, we will go with the installer exe 64-bit file i.e. jdk-13_windows-x64_bin.exe:
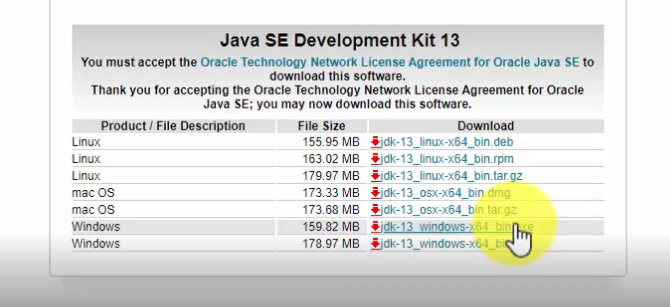
Note: Java JDK 13 will get installed only on a 64-bit Windows 10 system
As you can see on the bottom-left of the web browser, the download begins. Just wait for few minutes till the download finishes:
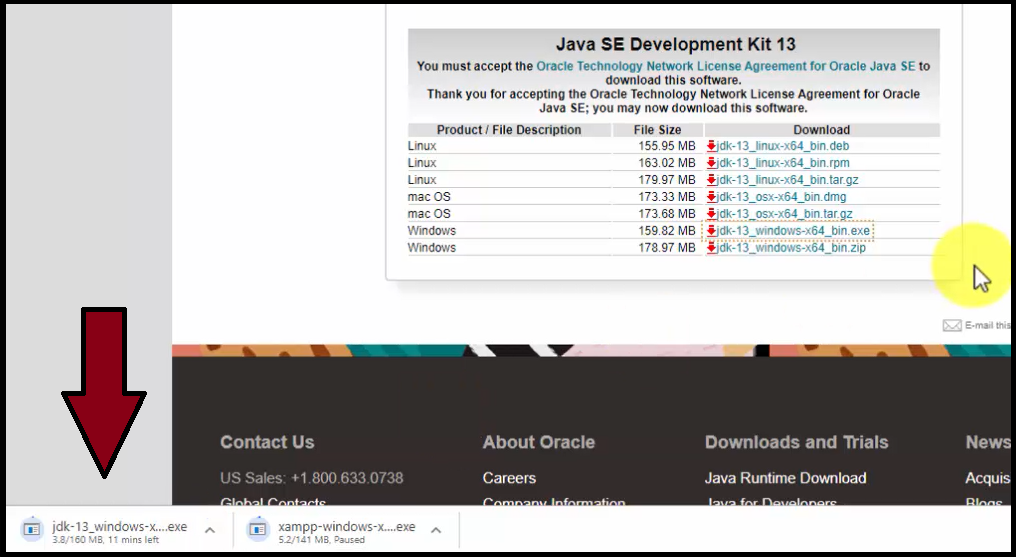
The downloaded jdk exe file will get saved in the “Downloads” folder:
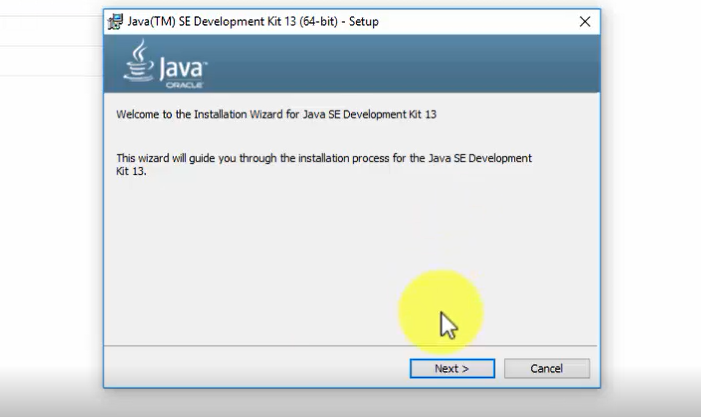
Now, go to “Downloads” folder on your Windows 10 system and double click on the “jdk-13_windows-x64_bin.exe” file:
Double click on the exe file and the installation begins:
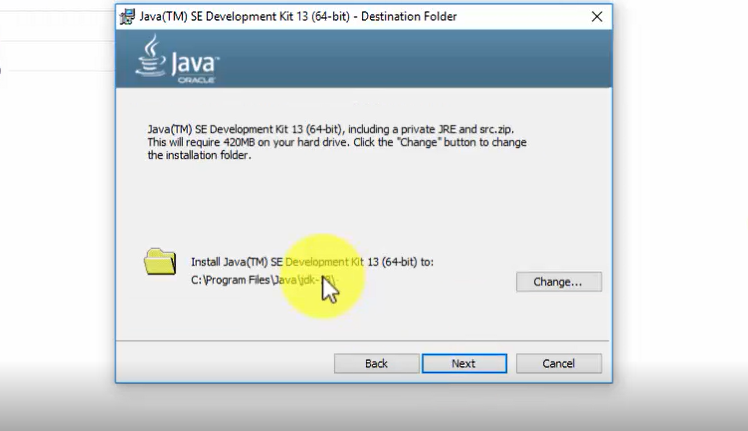
Click on “Next” above and set the path wherein the Java 13 will get installed. You can also keep it the default:
Click on “Next” above and the installation continues for some minutes.
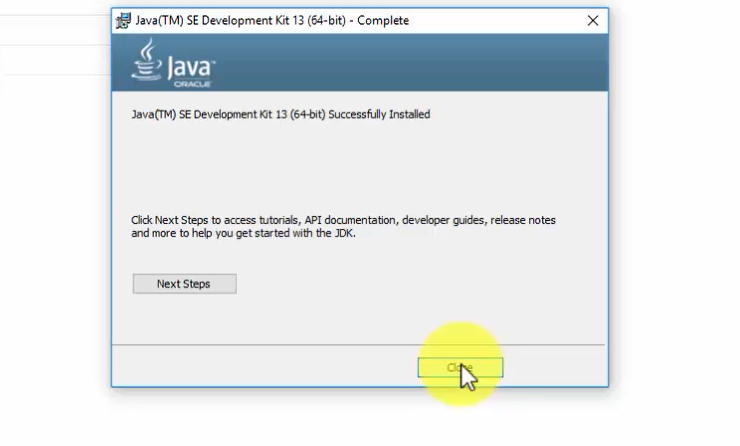
The installation finishes as in the following screenshot. Click on “Close“:
Now, let us set the JDK path.
Now, we will see how to set Java JDK Path (Environment Variable).
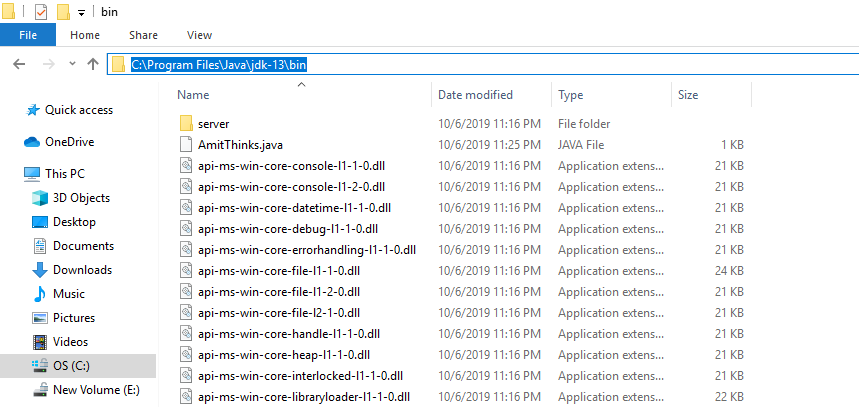
At first, copy the path wherein you installed the Java JDK. Let us copy it first. Remember, we need to copy the bin path i.e. the following on our system:
|
C:Program FilesJavajdk—13bin |
Here’s the screenshot of the “bin” path, wherein we installed Java 13:
To set JDK Path, the easiest way is to type “Environment Variables” on Start. On typing, the following would be visible:
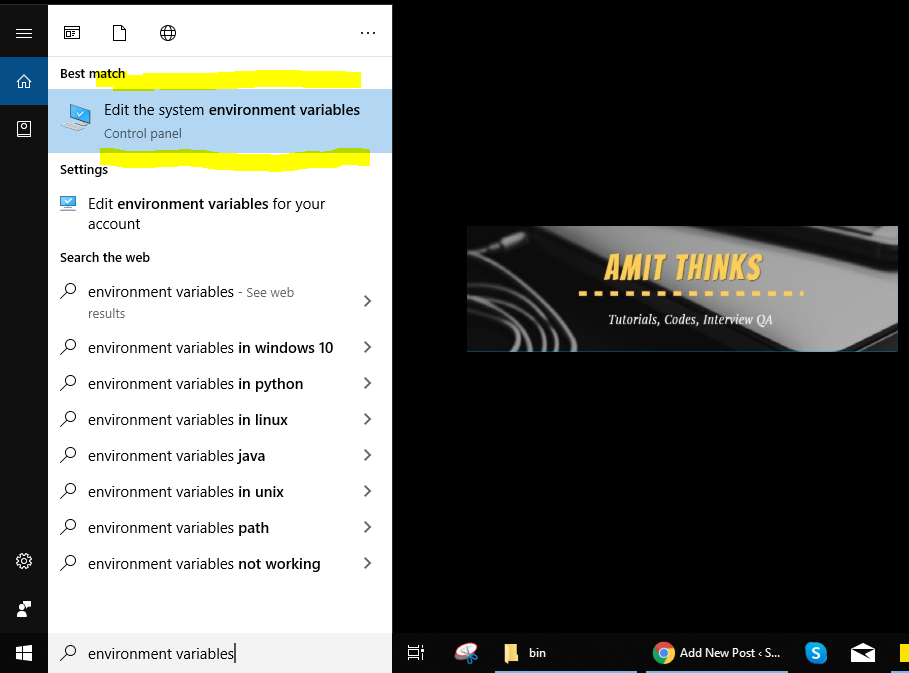
Now, click on “Edit Environment Variables” and a new dialog box would be visible:
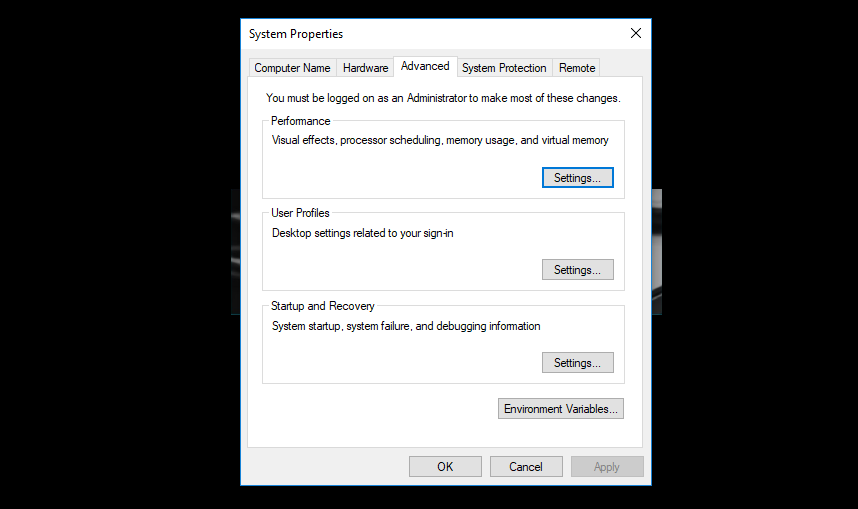
Now, click “Environment Variable” and a new dialog box will open. Go to “System Variables” section and double click “Path” as in the below screenshot:
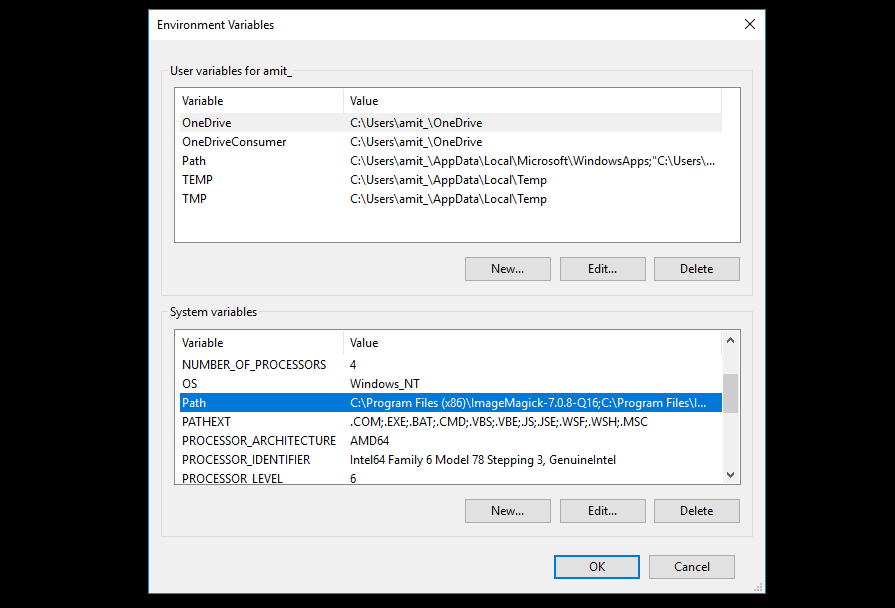
On clicking “Path“, a new dialog box will open. From there, click “New” and add the Java JDK path “C:Program FilesJavajdk-13bin” as displayed in the below screenshot:
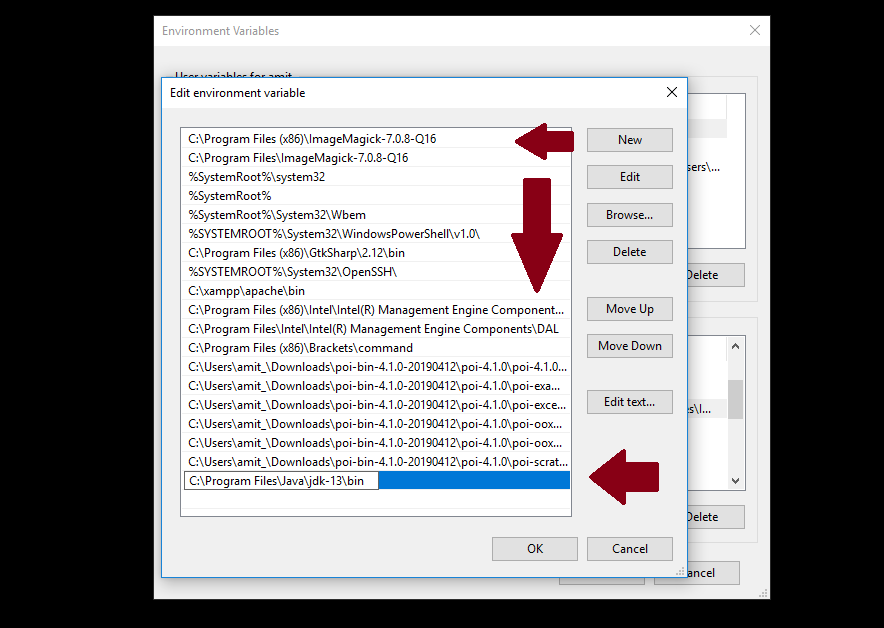
Above, press Ok for all the dialog boxes i.e. 3 times. This ends the installation and the procedure to set path for JDK. Now, we will verify the JDK installation.
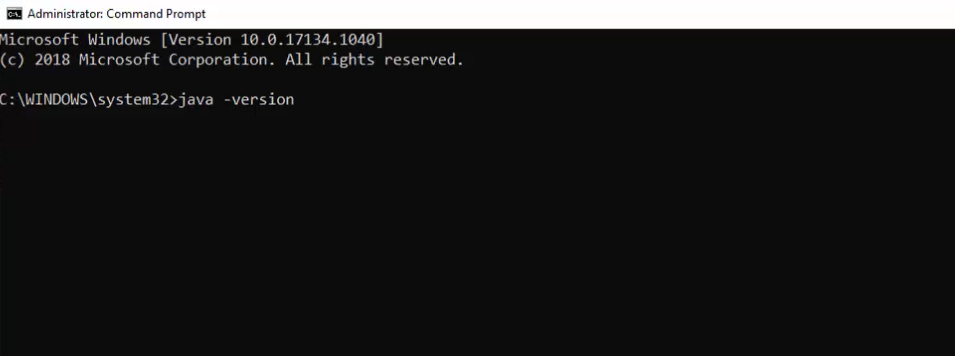
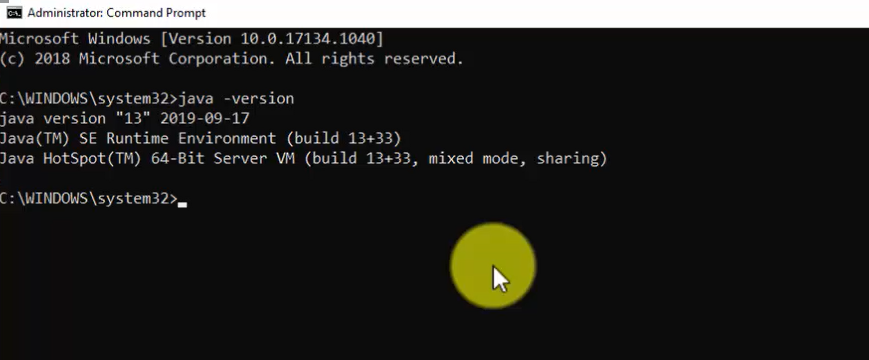
Now, we will verify Java JDK 13 Installation.
We saw how to install Java JDK 13 above. We installed on Windows 10 OS. Now, we can easily verify whether the installation was successfully or not using the following command:
Let us implement the above command on command prompt (cmd) and verify Java installation:
Therefore, the installation verification is now complete and successful since now we can see the version in the command prompt:
If you’d like to watching a video for installing Java 13 on Windows 10:
Step 2: Download NetBeans IDE
We installed Java above for NetBeans. Now, to install NetBeans IDE on Windows 10, at first we will download NetBeans IDE.
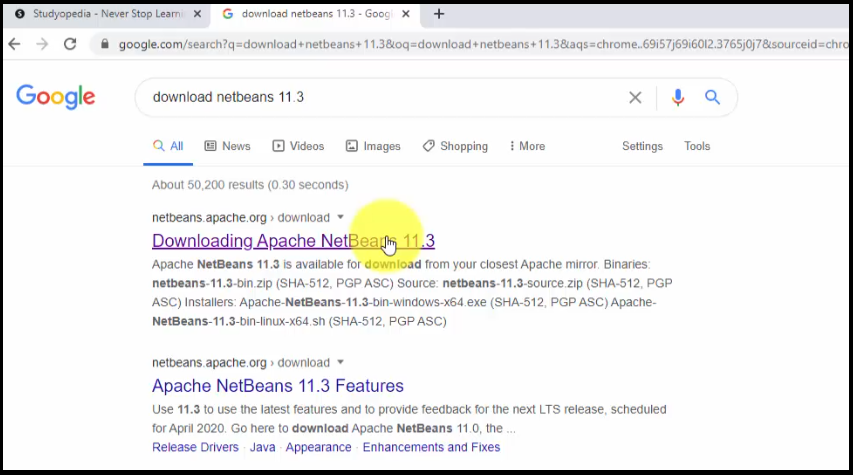
Go to Google and type Download NetBeans IDE 11.3. On typing, the official website of NetBeans i.e. “netbeans.apache.org” would be visible on the top of search results. Click on the website to download NetBeans as in the below screenshot:
Now, the official website will open. Click on the Windows exe file i.e. “Apache-NetBeans-11.3-bin-windows-x64” file since we have to install NetBeans IDE on Windows 10:
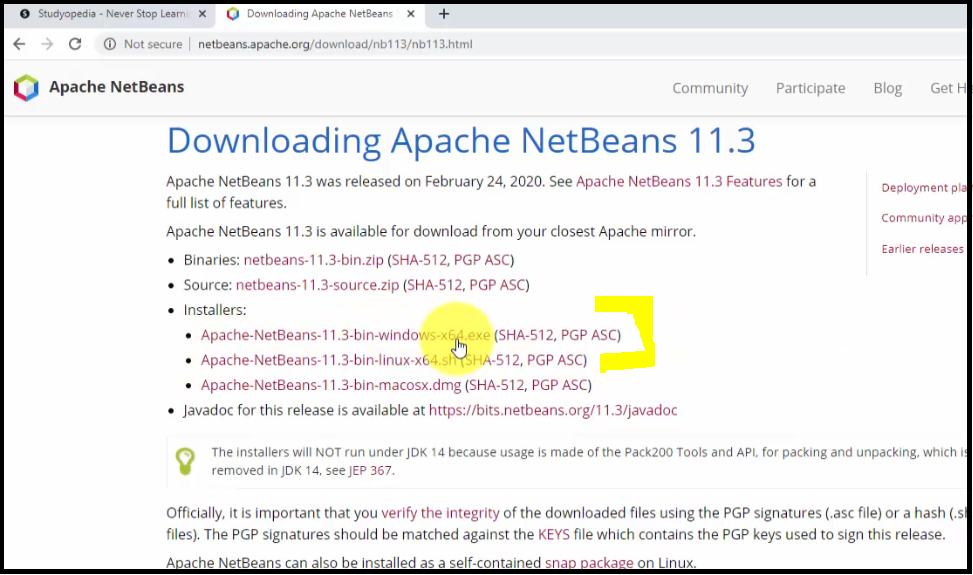
Now, you will be redirected to mirror sites. Click on any of them to download NetBeans IDE. We click the first one and the Download started as in the below screenshot. The Download status would be visible on the bottom left of Chrome web browser. When the download ends, right click to reach the folder where it installed. We have set the default for Google Chrome downloads to the “Downloads” folder:

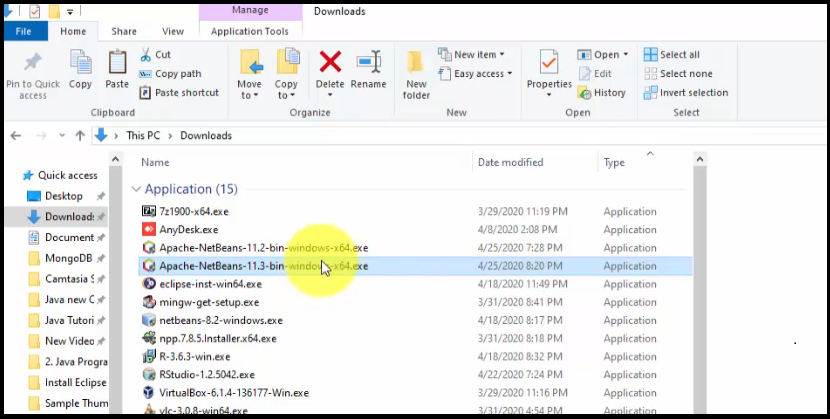
NetBeans installed successfully under “Downloads” folder through Google Chrome as in the below screenshot. Locate the exe file of NetBeans: “Apache-NetBeans-11.3-bin-windows-x64” file:
Now, let us move to Step 3 and begin installing NetBeans.
Step 3: Installing NetBeans IDE
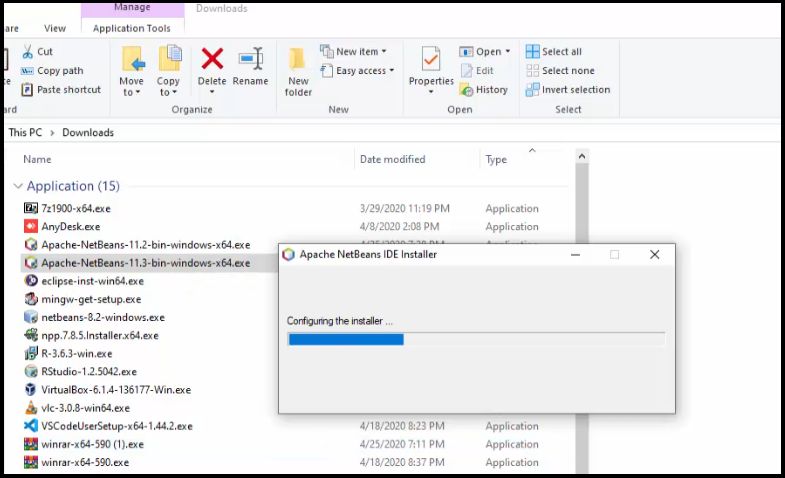
Now, we will be installing NetBeans IDE. Double click the exe file we downloaded in Step2 and the installation begins as in the below screenshot:
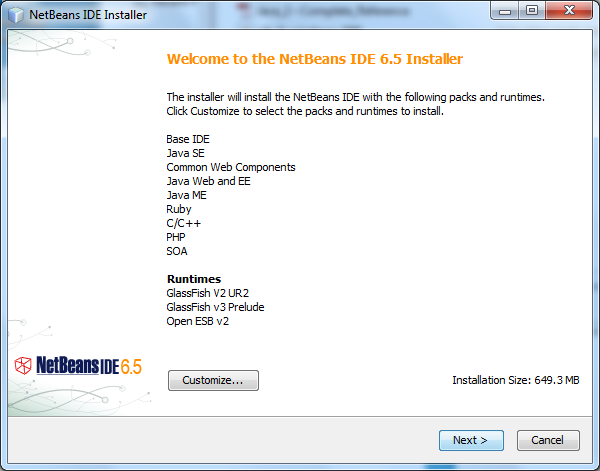
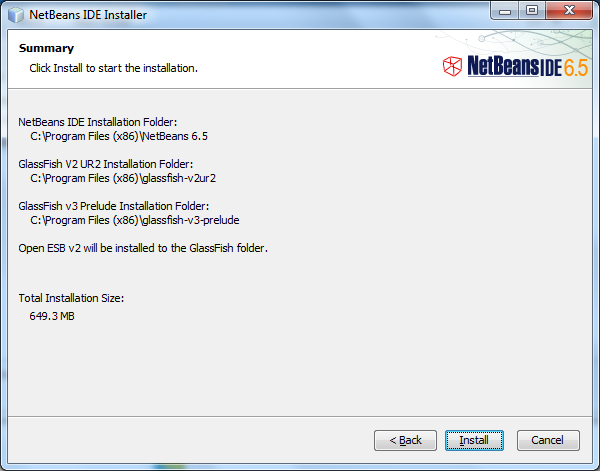
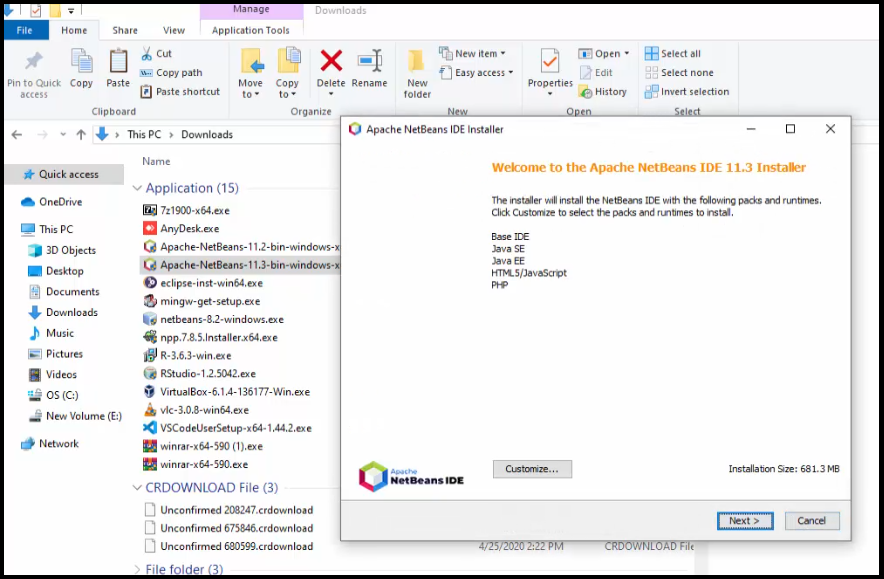
Now, you will reach the following installation dialog box (NetBeans Installer) showing what all will get installed with the installer size.
Note: You may get NetBeans installation error here. Do not worry, check our tutorial to fix NetBeans installation error.
Click “Next” to proceed:
Now, let us move to Step 4 and set the path.
Step 4: Set NetBeans and Java path
Now, set the path for NetBeans i.e. where you want to install it. We will keep the default i.e. under Program Files we will set the NetBeans path. Following is the path:
|
C:Program FilesNetBeans—11.3 |
Here, you can also see we need to set the path for JAVA JDK installation. This is the reason why we need to install Java before installing NetBeans IDE. Set the same path we saw under step 1 above while Installing Java i.e. he following Java path:
|
C:Program FilesJavajdk—13 |
Screenshot shows the same paths:

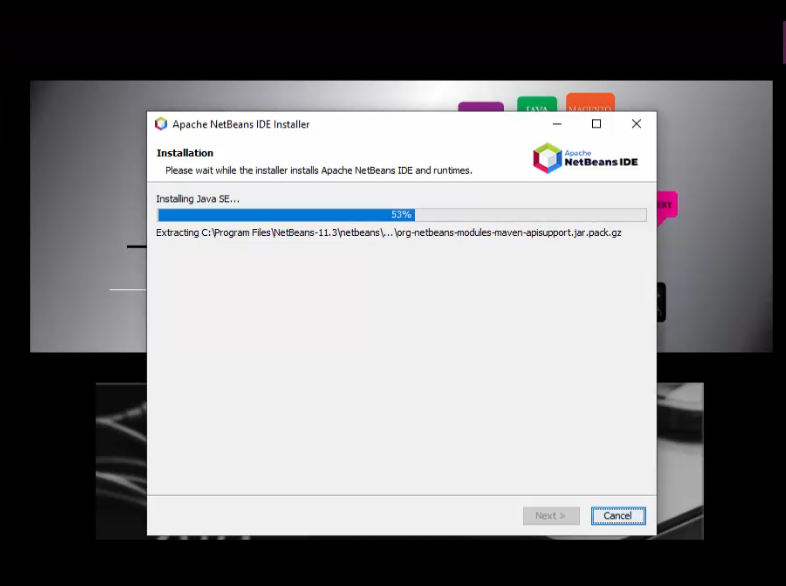
After, that click “Next” and the installation continues. Now, the summary of installer is visible. Click on “Install” as in the below screenshot:

Now, installation continues. This is the final step:
Installation completed successfully and Desktop Shortcut created as in the below screenshot:
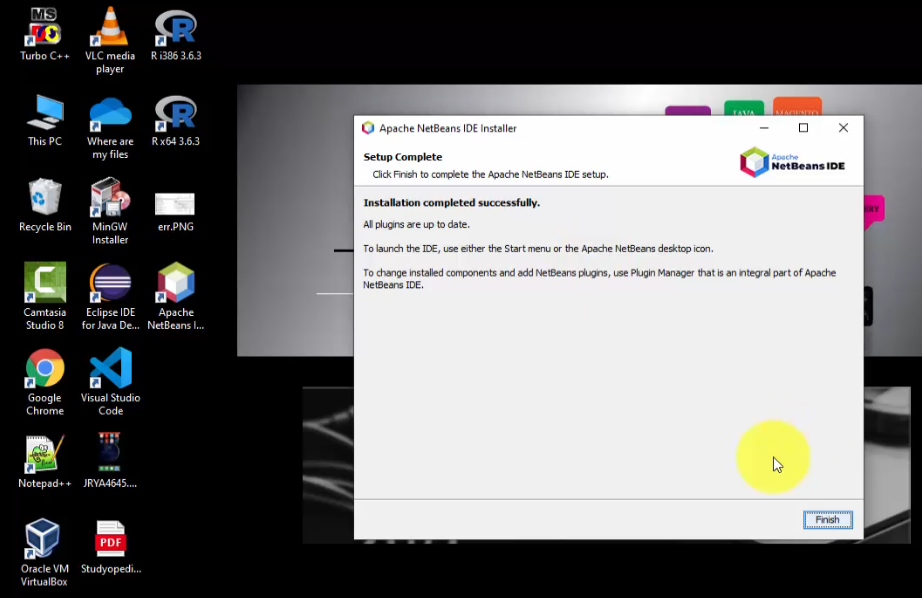
Click “Finish” above to close the dialog box.
Step 5: Launch NetBeans after installation
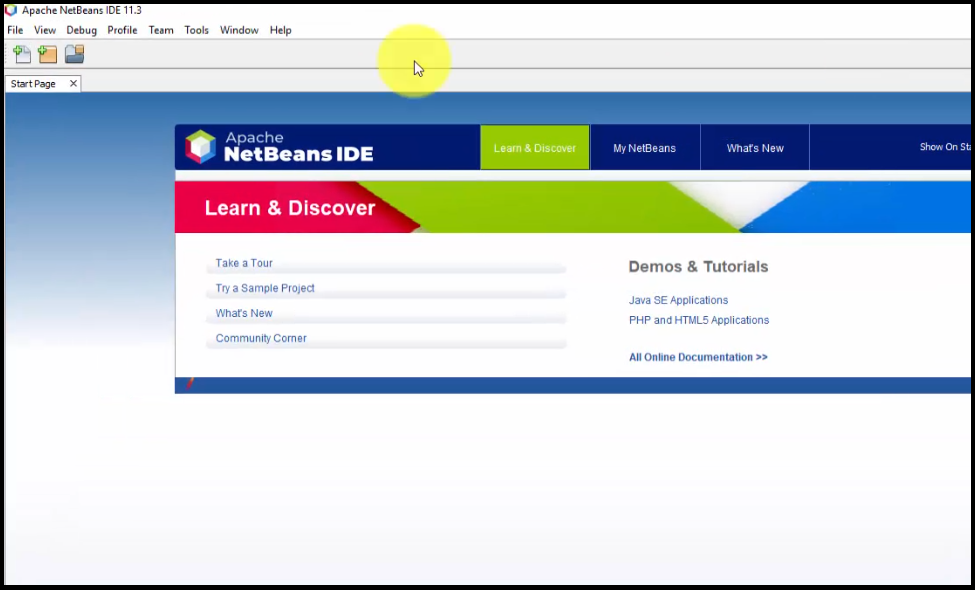
After that, click the “Desktop Shortcut” to launch NetBeans as in the below screenshot:

NetBeans opened successfully for the first time after installation as in the below screenshot:
In this article, we saw how to install NetBeans on Windows 10 after installing Java. While installing, we also set the Java path.
Video Tutorial to Install NetBeans on Windows 10
Following is the video tutorial displaying how to install NetBeans IDE on Windows 10. Covers the steps shown in the above text tutorial:
If you liked the NetBeans tutorial, spread the word and share the link and our website Studyopedia with others.
Support us: DONATE
Read More:
-
- Install Java 14 on Windows 1o
- Install Python 3.8.2 on Windows 10
- Run your first PHP program on XAMPP Server
- Install WordPress on localhost in Windows 10
- Install Drupal on localhost in Windows 10
- Install Joomla on localhost in Windows 10
- Install Python on Windows 10
- Install jQuery on localhost in Windows 10
- Install Eclipse on Windows 10
java:installing_openjdk_and_netbeans_on_windows
Table of Contents
Installing OpenJDK and Apache NetBeans on Windows 10
The following has been vetted for AdoptOpenJDK’s OpenJDK 11 (LTS) and Apache NetBeans version 12 (LTS).
Introduction
This guide takes you through the process of installing OpenJDK and Apache NetBeans for Java development on Windows 10. To install OpenJDK, we will be using resources created by the AdoptOpenJDK project. AdoptOpenJDK greatly simplifies the process of installing OpenJDK for the typical user.
Be sure to install things in the order listed.
Install OpenJDK
-
Go to the AdoptOpenJDK homepage and select the Version you want to install. I recommend you get the newest LTS release, which at this time is OpenJDK 11. Also select the JVM you want. I use the HotSpot JVM. I have no experience with OpenJ9.
-
Click the Latest release button and save the installer someplace on your computer.
-
Start the installer, accept the licenses, and make sure the installation options are set as given below:
-
Add to PATH: ON
-
Associate .jar: ON
-
Set JAVA_HOME variable: ON (the default if OFF)
-
JavaSoft (Oracle) registry keys: OFF
-
-
Install the package.
Installation verification
If you wish, you can verify that the installation was successful by doing the following:
-
Open a command line prompt 1) and enter
java -version. You should see something along the lines of:
openjdk version “11.<version>” 2020-04-14
OpenJDK Runtime Environment AdoptOpenJDK (build 11.<version>)
OpenJDK 64-Bit Server VM AdoptOpenJDK (build 11.<version>, mixed mode) -
In the same window, enter
javac -version(note the ‘c’ at the end of the command). You should see something along the lines of:
javac 11.<version>
If you know how to check the system PATH and environment variables, you can additionally do the following:
-
Verify that
C:Program FilesAdoptOpenJDKjdk-<version>-hotspotbin
is on the system PATH in front of any Oracle Java entries. -
Verify that the system JAVA_HOME variable is set to
C:Program FilesAdoptOpenJDKjdk-<version>-hotspotbin
Install Cygwin
If you want a functioning terminal in NetBeans (and you almost certainly do), you will need to install a basic Cygwin environment. Download setup-x86_64.exe from https://cygwin.com/install.html, start the installer and walk through the wizard as follows:
-
Install from Internet.
-
Install into the default location (C:cygwin64) for All Users.
-
Set the Local Package Directory to something that makes sense (consider a system-wide location, e.g.,
C:cygwin64-local-packages). -
Set the Internet connection to “Use System Proxy Settings” (unless you have reason to use something else).
-
Select a download mirror that’s close to you.
-
Don’t select any packages to install, just hit Next. (We only need the base installation.)
-
Review and confirm.
-
Select “Add icon to start menu”. You probably don’t want a desktop icon.
Install Apache NetBeans
-
On the resulting page, under Installers, click on
Apache-NetBeans-<version>-bin-windows-x64.exe
On the following page, select a mirror from which to download. Save the installer to your computer. -
Run the installer and walk through the steps of the wizard:
-
The installer gives you the option to customize the features you want. If you are short on storage space and will only be doing Java development outside an enterprise environment, the only options you will need are Base IDE, Java SE, and HTML5/JavaScript.
-
Accept the license.
-
Verify that the “JDK for Apache NetBeans IDE” is set to
C:Program FilesAdoptOpenJDKjdk-<version>-hotspot -
Allow the installer to check for updates.
-
Finish
-
First time run
The first time you create a Java project, you will probably be prompted to add nb-javac Java editing support library and JavaFX Implementation for Windows. Enable both checkmarks and click Download and Activate …, accept the licenses and install.
· Last modified: 2020/08/25 02:02 by
mithat
— Advertisement —
Hi! Today we’re going to talk a little about Netbeans. This is an integrated development environment that allows programming in various languages. Also, it contains many features, for different types of applications. Consequently, it is oriented to facilitate the programming, testing, and debugging of the applications that are developed. It also incorporates its own editor. It is an open-source project designed mainly for Java. However, it has plugins to extend its operation. Additionally, it is a free product with no usage restrictions. Well, in this post we’ll see how to install NetBeans on Windows 10.
Prerequisites
To be able to run this program you need to have JDK installed on your system. To know how to install and configure it, check our post.
How to download NetBeans for Windows 10
As mentioned, this program is free. So just go to the project download page and select the executable file. At the time of writing, the most recent version is Netbeans 12.0. After downloading the file, just run it as another installable for Windows. At the beginning of the process, it is possible to customize the installation. That is, it is possible to select the elements to be installed. However, this time we will install all the available components.

Next you can set the automatic update of the plugins while they are installed.

Then, the installation process will begin. Please wait a few moments while the process is completed.


Launching the first project with NetBeans.
After the installation is completed, we are ready to use the environment for the first time. With this in mind, just look for the program in the start menu.

Then, the program will start loading the modules. After a few seconds, you will see the interface of the IDE. Now, it’s time to start the first project. With this in mind, please click on New Project.

A window with the available options for the new project will be displayed immediately. As you can see, they are very varied. For the purposes of this example, we will use Java with Ant. Specifically, we will create a Java Application. Also, the Java logo is colorless because the plugin is not yet available. So in order to enable it, please click Next.

It is then convenient to download some additional modules. This time, please check the JavaFX box. Finally, click on Download and Activate.

After accepting the license terms, please click on Install to begin the installation of the plugin.

Please wait a few moments while the plugin is downloaded and installed


Now it’s time to name the new project. You can choose the one you want. Please remember to check the Create main class option. Additionally, you can customize the location of the project and its folder.

The main page of the IDE will be displayed below. Please add the following test line:
System.out.println("Welcome to osradar")Then click on the Play icon to start compiling the project. If everything goes well, you will see the successful building in the output.

Conclusion
At the end of the day, we have seen how to install NetBeans on Windows 10. These make the work easier and expand the scope of application. All right, I hope you enjoyed the tutorial. I’ll say goodbye for now!