Introduction
Apache Spark is an open-source framework that processes large volumes of stream data from multiple sources. Spark is used in distributed computing with machine learning applications, data analytics, and graph-parallel processing.
This guide will show you how to install Apache Spark on Windows 10 and test the installation.

Prerequisites
- A system running Windows 10
- A user account with administrator privileges (required to install software, modify file permissions, and modify system PATH)
- Command Prompt or Powershell
- A tool to extract .tar files, such as 7-Zip
Installing Apache Spark on Windows 10 may seem complicated to novice users, but this simple tutorial will have you up and running. If you already have Java 8 and Python 3 installed, you can skip the first two steps.
Step 1: Install Java 8
Apache Spark requires Java 8. You can check to see if Java is installed using the command prompt.
Open the command line by clicking Start > type cmd > click Command Prompt.
Type the following command in the command prompt:
java -versionIf Java is installed, it will respond with the following output:
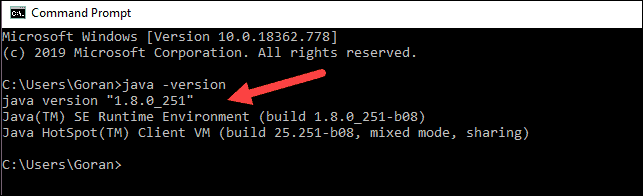
Your version may be different. The second digit is the Java version – in this case, Java 8.
If you don’t have Java installed:
1. Open a browser window, and navigate to https://java.com/en/download/.
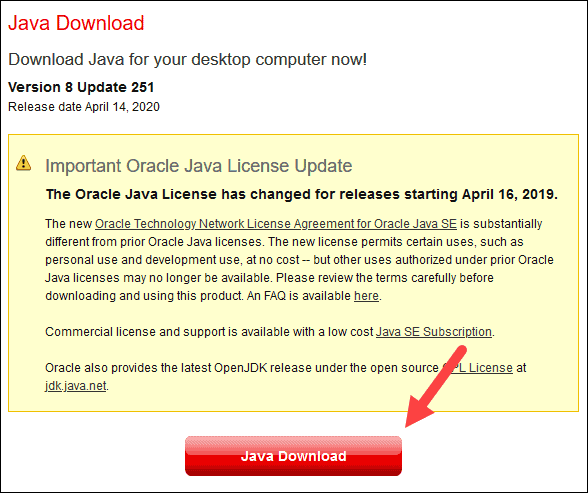
2. Click the Java Download button and save the file to a location of your choice.
3. Once the download finishes double-click the file to install Java.
Note: At the time this article was written, the latest Java version is 1.8.0_251. Installing a later version will still work. This process only needs the Java Runtime Environment (JRE) – the full Development Kit (JDK) is not required. The download link to JDK is https://www.oracle.com/java/technologies/javase-downloads.html.
Step 2: Install Python
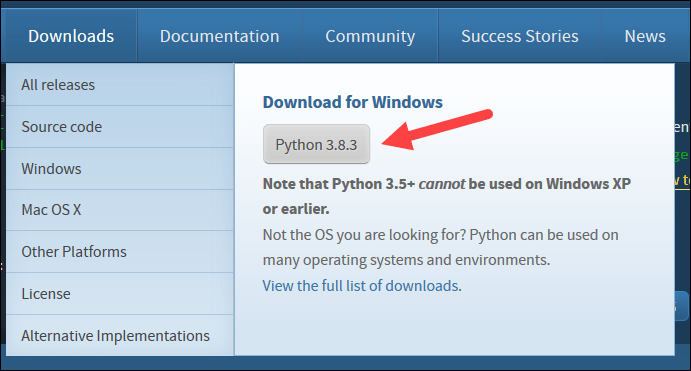
1. To install the Python package manager, navigate to https://www.python.org/ in your web browser.
2. Mouse over the Download menu option and click Python 3.8.3. 3.8.3 is the latest version at the time of writing the article.
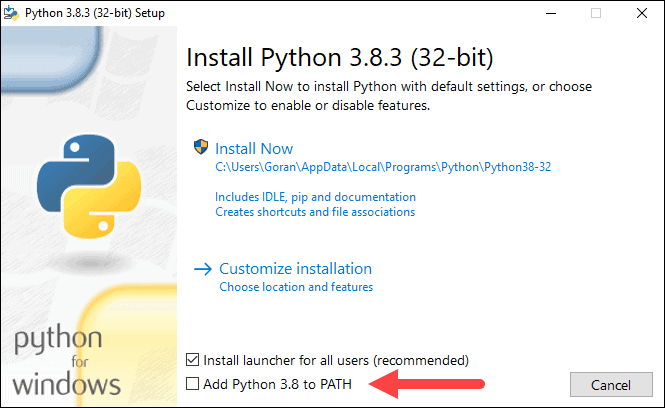
3. Once the download finishes, run the file.
4. Near the bottom of the first setup dialog box, check off Add Python 3.8 to PATH. Leave the other box checked.
5. Next, click Customize installation.
6. You can leave all boxes checked at this step, or you can uncheck the options you do not want.
7. Click Next.
8. Select the box Install for all users and leave other boxes as they are.
9. Under Customize install location, click Browse and navigate to the C drive. Add a new folder and name it Python.
10. Select that folder and click OK.

11. Click Install, and let the installation complete.
12. When the installation completes, click the Disable path length limit option at the bottom and then click Close.
13. If you have a command prompt open, restart it. Verify the installation by checking the version of Python:
python --versionThe output should print Python 3.8.3.
Note: For detailed instructions on how to install Python 3 on Windows or how to troubleshoot potential issues, refer to our Install Python 3 on Windows guide.
Step 3: Download Apache Spark
1. Open a browser and navigate to https://spark.apache.org/downloads.html.
2. Under the Download Apache Spark heading, there are two drop-down menus. Use the current non-preview version.
- In our case, in Choose a Spark release drop-down menu select 2.4.5 (Feb 05 2020).
- In the second drop-down Choose a package type, leave the selection Pre-built for Apache Hadoop 2.7.
3. Click the spark-2.4.5-bin-hadoop2.7.tgz link.
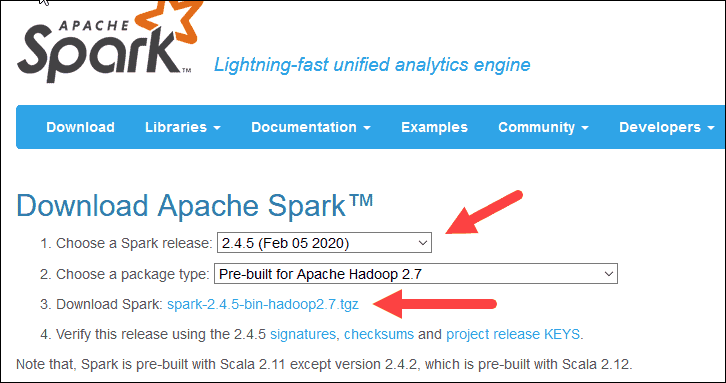
4. A page with a list of mirrors loads where you can see different servers to download from. Pick any from the list and save the file to your Downloads folder.
Step 4: Verify Spark Software File
1. Verify the integrity of your download by checking the checksum of the file. This ensures you are working with unaltered, uncorrupted software.
2. Navigate back to the Spark Download page and open the Checksum link, preferably in a new tab.
3. Next, open a command line and enter the following command:
certutil -hashfile c:usersusernameDownloadsspark-2.4.5-bin-hadoop2.7.tgz SHA5124. Change the username to your username. The system displays a long alphanumeric code, along with the message Certutil: -hashfile completed successfully.
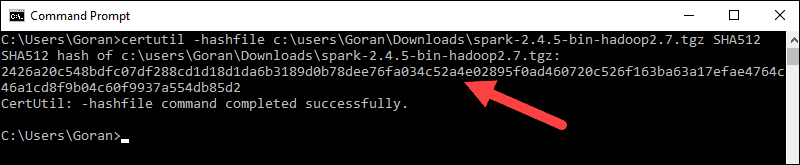
5. Compare the code to the one you opened in a new browser tab. If they match, your download file is uncorrupted.
Step 5: Install Apache Spark
Installing Apache Spark involves extracting the downloaded file to the desired location.
1. Create a new folder named Spark in the root of your C: drive. From a command line, enter the following:
cd

mkdir Spark
2. In Explorer, locate the Spark file you downloaded.
3. Right-click the file and extract it to C:Spark using the tool you have on your system (e.g., 7-Zip).
4. Now, your C:Spark folder has a new folder spark-2.4.5-bin-hadoop2.7 with the necessary files inside.
Step 6: Add winutils.exe File
Download the winutils.exe file for the underlying Hadoop version for the Spark installation you downloaded.
1. Navigate to this URL https://github.com/cdarlint/winutils and inside the bin folder, locate winutils.exe, and click it.
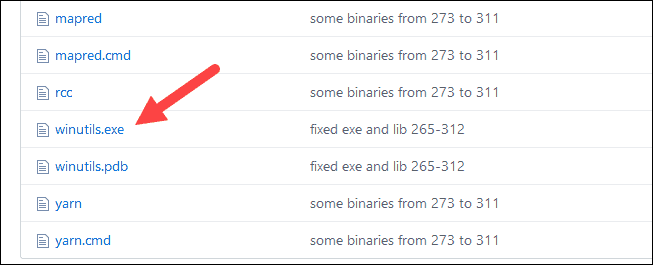
2. Find the Download button on the right side to download the file.
3. Now, create new folders Hadoop and bin on C: using Windows Explorer or the Command Prompt.
4. Copy the winutils.exe file from the Downloads folder to C:hadoopbin.
Step 7: Configure Environment Variables
Configuring environment variables in Windows adds the Spark and Hadoop locations to your system PATH. It allows you to run the Spark shell directly from a command prompt window.
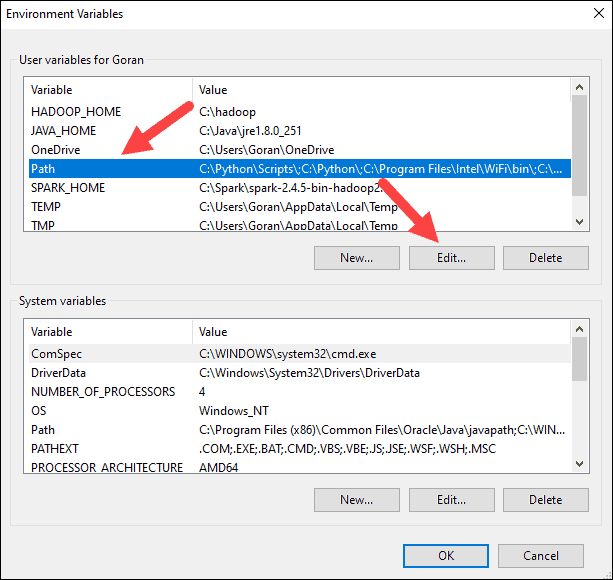
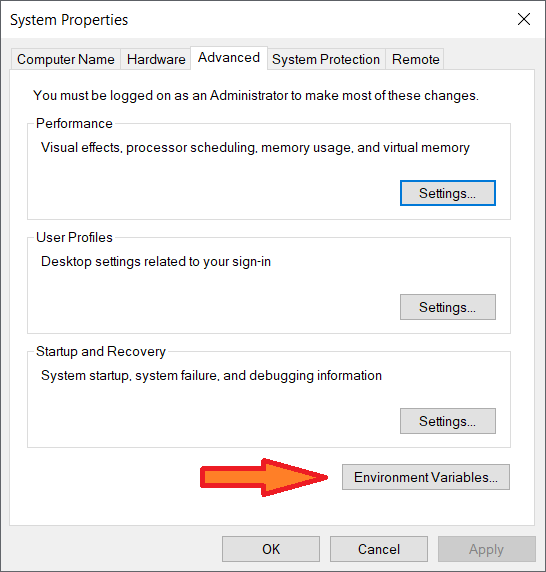
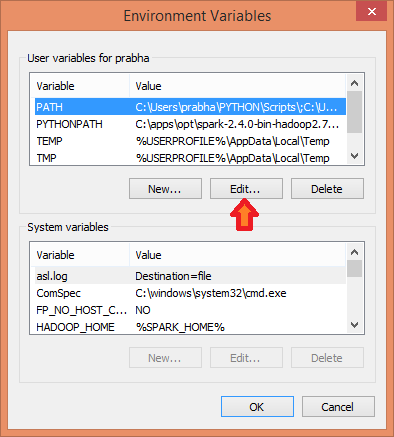
1. Click Start and type environment.
2. Select the result labeled Edit the system environment variables.
3. A System Properties dialog box appears. In the lower-right corner, click Environment Variables and then click New in the next window.

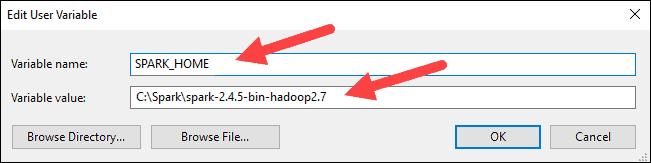
4. For Variable Name type SPARK_HOME.
5. For Variable Value type C:Sparkspark-2.4.5-bin-hadoop2.7 and click OK. If you changed the folder path, use that one instead.
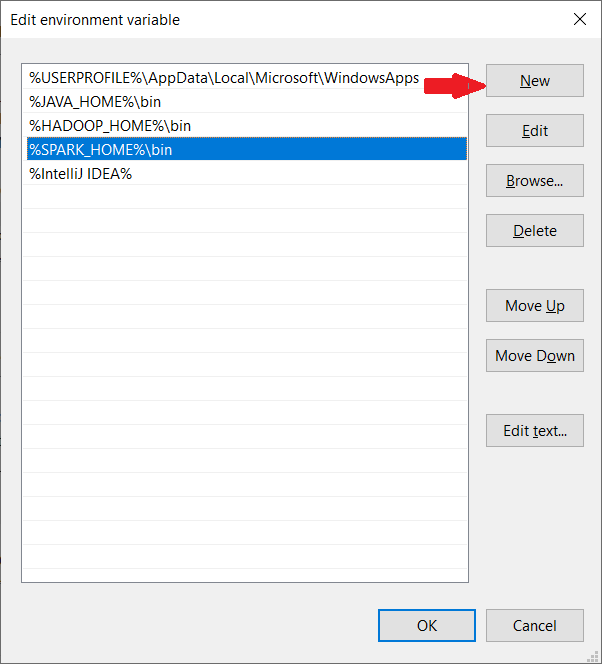
6. In the top box, click the Path entry, then click Edit. Be careful with editing the system path. Avoid deleting any entries already on the list.
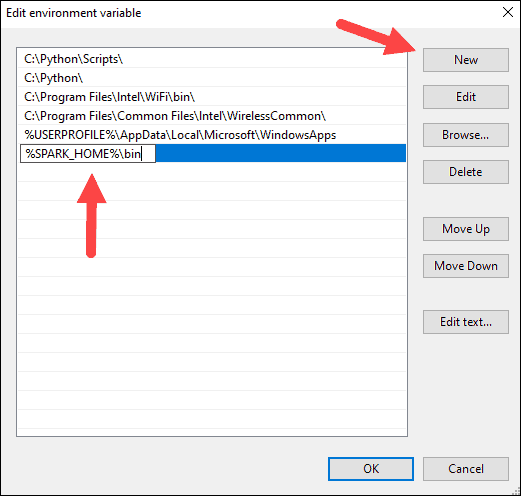
7. You should see a box with entries on the left. On the right, click New.
8. The system highlights a new line. Enter the path to the Spark folder C:Sparkspark-2.4.5-bin-hadoop2.7bin. We recommend using %SPARK_HOME%bin to avoid possible issues with the path.
9. Repeat this process for Hadoop and Java.
- For Hadoop, the variable name is HADOOP_HOME and for the value use the path of the folder you created earlier: C:hadoop. Add C:hadoopbin to the Path variable field, but we recommend using %HADOOP_HOME%bin.
- For Java, the variable name is JAVA_HOME and for the value use the path to your Java JDK directory (in our case it’s C:Program FilesJavajdk1.8.0_251).
10. Click OK to close all open windows.
Note: Star by restarting the Command Prompt to apply changes. If that doesn’t work, you will need to reboot the system.
Step 8: Launch Spark
1. Open a new command-prompt window using the right-click and Run as administrator:
2. To start Spark, enter:
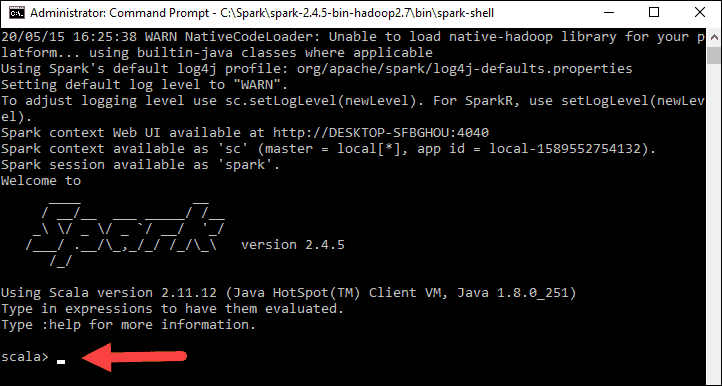
C:Sparkspark-2.4.5-bin-hadoop2.7binspark-shellIf you set the environment path correctly, you can type spark-shell to launch Spark.
3. The system should display several lines indicating the status of the application. You may get a Java pop-up. Select Allow access to continue.
Finally, the Spark logo appears, and the prompt displays the Scala shell.
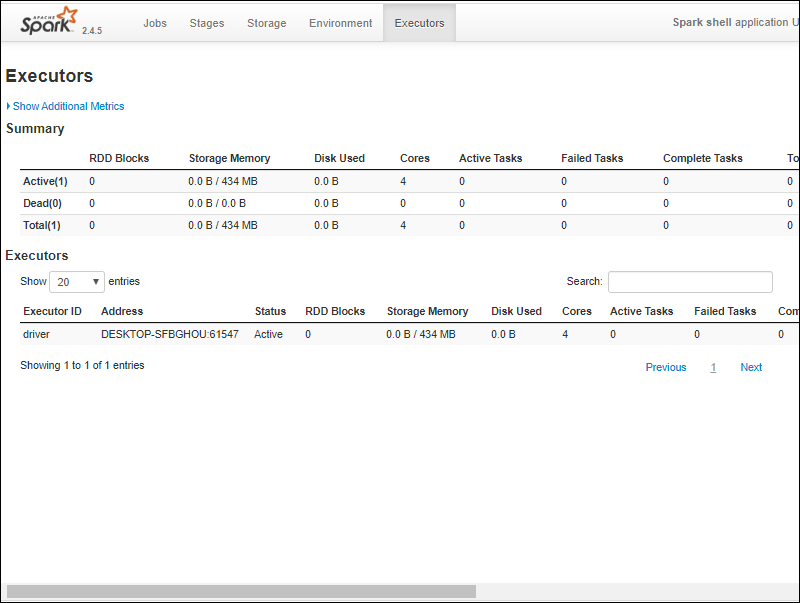
4., Open a web browser and navigate to http://localhost:4040/.
5. You can replace localhost with the name of your system.
6. You should see an Apache Spark shell Web UI. The example below shows the Executors page.
7. To exit Spark and close the Scala shell, press ctrl-d in the command-prompt window.
Note: If you installed Python, you can run Spark using Python with this command:
pysparkExit using quit().
Test Spark
In this example, we will launch the Spark shell and use Scala to read the contents of a file. You can use an existing file, such as the README file in the Spark directory, or you can create your own. We created pnaptest with some text.
1. Open a command-prompt window and navigate to the folder with the file you want to use and launch the Spark shell.
2. First, state a variable to use in the Spark context with the name of the file. Remember to add the file extension if there is any.
val x =sc.textFile("pnaptest")3. The output shows an RDD is created. Then, we can view the file contents by using this command to call an action:
x.take(11).foreach(println)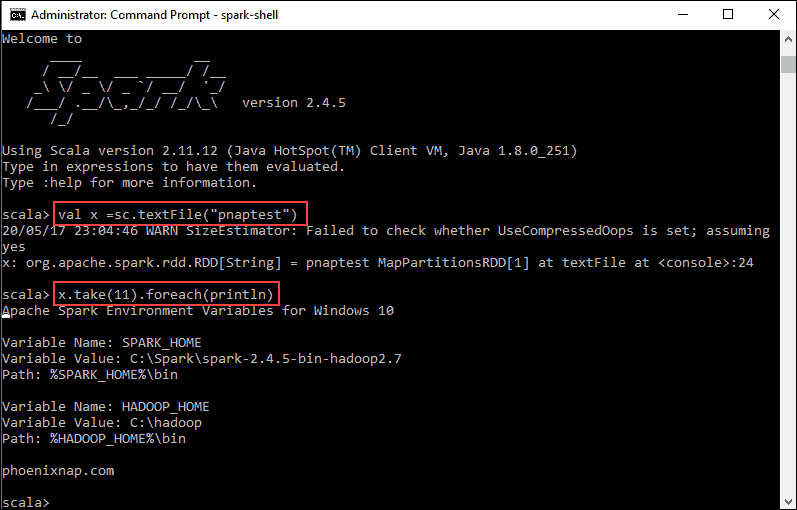
This command instructs Spark to print 11 lines from the file you specified. To perform an action on this file (value x), add another value y, and do a map transformation.
4. For example, you can print the characters in reverse with this command:
val y = x.map(_.reverse)5. The system creates a child RDD in relation to the first one. Then, specify how many lines you want to print from the value y:
y.take(11).foreach(println)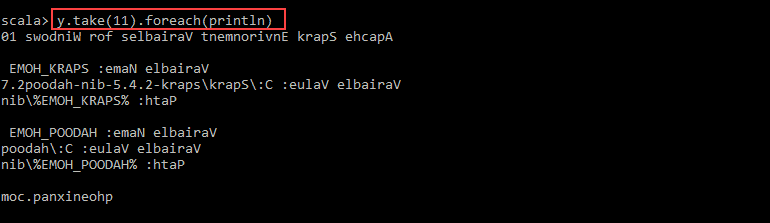
The output prints 11 lines of the pnaptest file in the reverse order.
When done, exit the shell using ctrl-d.
Conclusion
You should now have a working installation of Apache Spark on Windows 10 with all dependencies installed. Get started running an instance of Spark in your Windows environment.
Our suggestion is to also learn more about what Spark DataFrame is, the features, and how to use Spark DataFrame when collecting data.
В моей последней статье я рассмотрел, как настроить и использовать Hadoop в Windows. Теперь эта статья посвящена настройке локальной среды разработки для Apache Spark в ОС Windows.
Apache Spark — самая популярная технология кластерных вычислений, предназначенная для быстрых и надежных вычислений. Он обеспечивает неявный параллелизм данных и отказоустойчивость по умолчанию. Он легко интегрируется с HIVE и HDFS и обеспечивает беспроблемный опыт параллельной обработки данных. Вы можете прочитать больше о Spark на https://spark.apache.org .
По умолчанию проекты Spark SQL не работают в ОС Windows и требуют, чтобы мы сначала выполнили некоторые основные настройки; это все, что мы собираемся обсудить в этой статье, поскольку я не нашел это хорошо задокументированным в Интернете или в книгах.
Эта статья также может быть использована для настройки среды разработки Spark на Mac или Linux. Просто убедитесь, что вы загрузите правильную версию ОС с сайта Spark.
В конце этой статьи вы сможете создавать / запускать свои проекты Spark SQL и spark-shell в ОС Windows.
Я разделил эту статью на три части. Вы можете использовать любой из трех режимов в зависимости от конкретного варианта использования.
Многие из вас, возможно, пытались запустить spark в Windows, и могли столкнуться со следующей ошибкой при запуске проекта:
16/04/02 19:59:31 WARN NativeCodeLoader: Unable to load native-hadoop library for
 your platform... using builtin-java classes where applicable
16/04/02 19:59:31 ERROR Shell: Failed to locate the winutils binary in the hadoop
binary path java.io.IOException: Could not locate executable nullbinwinutils.exe
in the Hadoop binaries.
Это связано с тем, что в вашей системе нет встроенных двоичных файлов Hadoop для ОС Windows.
Приведенная ниже ошибка также связана с двоичными файлами Native Hadoop для ОС Windows.
16/04/03 19:59:10 ERROR util.Shell: Failed to locate the winutils binary in the
 hadoop binary path java.io.IOException: Could not locate executable
C:hadoopbinwinutils.exe in the Hadoop binaries.
Решение то же самое. Нам нужно установить HADOOP_HOMEс родными двоичными файлами Windows.
Итак, просто следуйте этой статье, и в конце этого урока вы сможете избавиться от всех этих ошибок.
Для 32-битных (x86) ОС вам нужно установить только., А для 64-битных (x64) -. и б.
В этом руководстве предполагается, что двоичные файлы Spark и Hadoop разархивированы на диске C: . Однако вы можете разархивировать их в любом месте вашей системы.
Прежде чем мы продолжим, давайте удостоверимся, что ваши настройки Java выполнены правильно, а переменные среды обновлены в установочном каталоге Java.
Чтобы подтвердить, что Java установлена на вашем компьютере, просто откройте cmd и введите java –version. Вы должны увидеть версию Java, установленную в вашей системе.
Если вы получили сообщение об ошибке, например «java» не распознается как внутренняя или внешняя команда, работающая программа или пакетный файл », выполните следующие действия. В противном случае пропустите это.
Если ваша командная строка выглядит примерно так, как на картинке выше, вы готовы. В противном случае вам нужно проверить, совпадает ли ваша установочная версия с архитектурой вашей ОС (x86, x64). Путь переменных среды также может быть неправильным.
In this article, I will explain step-by-step how to do Apache Spark Installation on windows os 7, 10, and the latest version and also explain how to start a history server and monitor your jobs using Web UI.
Related:
- Spark Install Latest Version on Mac
- PySpark Install on Windows
Install Java 8 or Later
To install Apache Spark on windows, you would need Java 8 or the latest version hence download the Java version from Oracle and install it on your system. If you wanted OpenJDK you can download it from here.
After download, double click on the downloaded .exe (jdk-8u201-windows-x64.exe) file in order to install it on your windows system. Choose any custom directory or keep the default location.
Note: This article explains Installing Apache Spark on Java 8, same steps will also work for Java 11 and 13 versions.
Apache Spark comes in a compressed tar/zip files hence installation on windows is not much of a deal as you just need to download and untar the file. Download Apache spark by accessing the Spark Download page and select the link from “Download Spark (point 3 from below screenshot)”.
If you wanted to use a different version of Spark & Hadoop, select the one you wanted from the drop-down; the link on point 3 changes to the selected version and provides you with an updated link to download.

After download, untar the binary using 7zip or any zip utility to extract the zip file and copy the extracted directory spark-3.0.0-bin-hadoop2.7 to c:appsoptspark-3.0.0-bin-hadoop2.7
Spark Environment Variables
Post Java and Apache Spark installation on windows, set JAVA_HOME, SPARK_HOME, HADOOP_HOME and PATH environment variables. If you know how to set the environment variable on windows, add the following.
JAVA_HOME = C:Program FilesJavajdk1.8.0_201
PATH = %PATH%;%JAVA_HOME%

SPARK_HOME  = C:appsoptspark-3.0.0-bin-hadoop2.7
HADOOP_HOME = C:appsoptspark-3.0.0-bin-hadoop2.7
PATH=%PATH%;%SPARK_HOME%
Follow the below steps if you are not aware of how to add or edit environment variables on windows.
- Open System Environment Variables window and select Environment Variables.
2. On the following Environment variable screen, add SPARK_HOME, HADOOP_HOME, JAVA_HOME by selecting the New option.
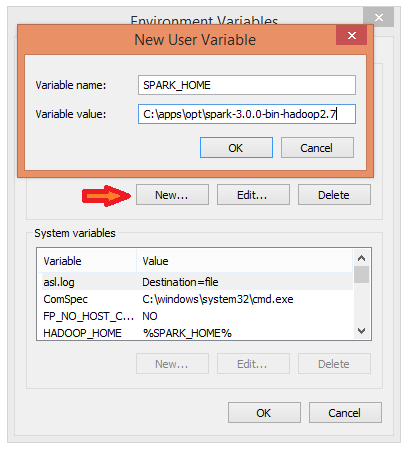
3. This opens up the New User Variables window where you can enter the variable name and value.
4. Now Edit the PATH variable
5. Add Spark, Java, and Hadoop bin location by selecting New option.
Spark with winutils.exe on Windows
Many beginners think Apache Spark needs a Hadoop cluster installed to run but that’s not true, Spark can run on AWS by using S3, Azure by using blob storage without Hadoop and HDFSe.t.c.
To run Apache Spark on windows, you need winutils.exe as it uses POSIX like file access operations in windows using windows API.
winutils.exe enables Spark to use Windows-specific services including running shell commands on a windows environment.
Download winutils.exe for Hadoop 2.7 and copy it to %SPARK_HOME%bin folder. Winutils are different for each Hadoop version hence download the right version based on your Spark vs Hadoop distribution from https://github.com/steveloughran/winutils
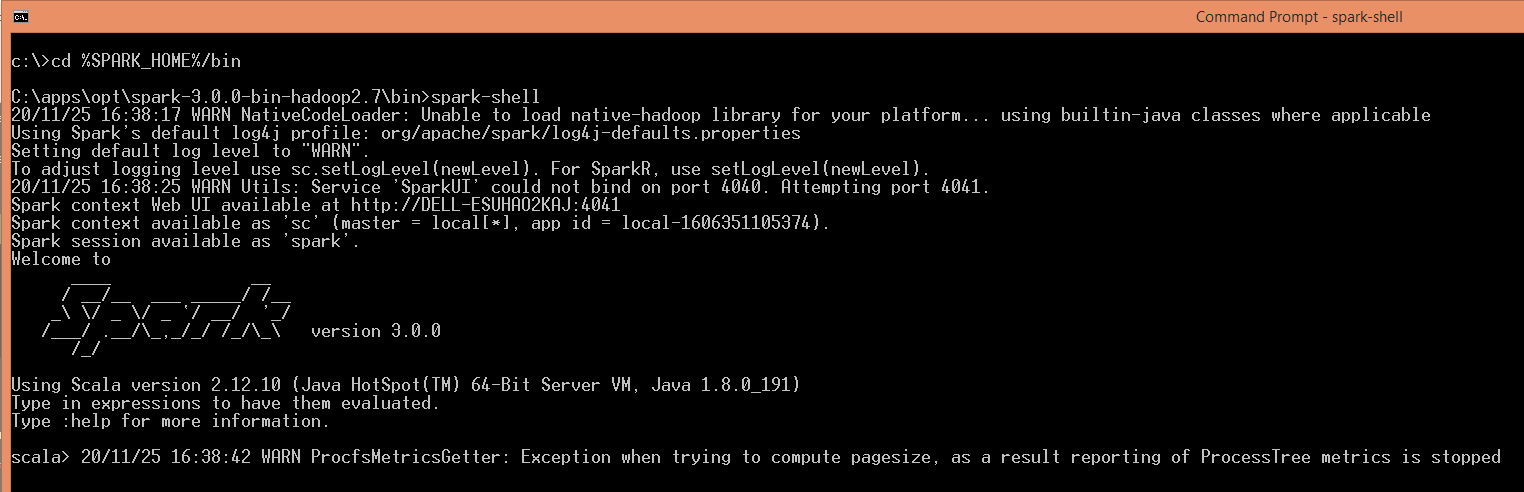
Apache Spark shell
spark-shell is a CLI utility that comes with Apache Spark distribution, open command prompt, go to cd %SPARK_HOME%/bin and type spark-shell command to run Apache Spark shell. You should see something like below (ignore the error you see at the end). Sometimes it may take a minute or two for your Spark instance to initialize to get to the below screen.
Spark-shell also creates a Spark context web UI and by default, it can access from http://localhost:4041.
On spark-shell command line, you can run any Spark statements like creating an RDD, getting Spark version e.t.c
scala> spark.version
res2: String = 3.0.0

scala> val rdd = sc.parallelize(Array(1,2,3,4,5,6,7,8,9,10))
rdd: org.apache.spark.rdd.RDD[Int] = ParallelCollectionRDD[0] at parallelize at console:24

scala>
This completes the installation of Apache Spark on Windows 7, 10, and any latest.
Where to go Next?
You can continue following the below document to see how you can debug the logs using Spark Web UI and enable the Spark history server or follow the links as next steps
- Spark RDD Tutorial
- Spark Hello World Example in IntelliJ IDEA
Web UI on Windows
Apache Spark provides a suite of Web UIs (Jobs, Stages, Tasks, Storage, Environment, Executors, and SQL) to monitor the status of your Spark application, resource consumption of Spark cluster, and Spark configurations. On Spark Web UI, you can see how the operations are executed.

History Server
History server keeps a log of all Spark applications you submit by spark-submit, spark-shell. You can enable Spark to collect the logs by adding the below configs to spark-defaults.conf file, conf file is located at %SPARK_HOME%/conf directory.
spark.eventLog.enabled true
spark.history.fs.logDirectory file:///c:/logs/path
After setting the above properties, start the history server by starting the below command.
$SPARK_HOME/bin/spark-class.cmd org.apache.spark.deploy.history.HistoryServer
By default History server listens at 18080 port and you can access it from browser using http://localhost:18080/

By clicking on each App ID, you will get the details of the application in Spark web UI.
Conclusion
In summary, you have learned how to install Apache Spark on windows and run sample statements in spark-shell, and learned how to start spark web-UI and history server.
If you have any issues, setting up, please message me in the comments section, I will try to respond with the solution.
Happy Learning !!
Related Articles
- Apache Spark Installation on Linux
- What is Apache Spark Driver?
- Apache Spark 3.x Install on Mac
- Install Apache Spark Latest Version on Mac
- How to Check Spark Version
- What does setMaster(local[*]) mean in Spark
- Spark Start History Server
- Spark with Scala setup on IntelliJ
Spark 3.0.0 was release on 18th June 2020 with many new features. The highlights of features include adaptive query execution, dynamic partition pruning, ANSI SQL compliance, significant improvements in pandas APIs, new UI for structured streaming, up to 40x speedups for calling R user-defined functions, accelerator-aware scheduler and SQL reference documentation.
This article summarizes the steps to install Spark 3.0 on your Windows 10 environment.
Tools and Environment
- GIT Bash
- Command Prompt
- Windows 10
- Python
- Java JDK
Install Git Bash
Download the latest Git Bash tool from this page: https://git-scm.com/downloads.
Run the installation wizard to complete the installation.
Install Java JDK
Spark 3.0 runs on Java 8/11. You can install Java JDK 8 based on the following section.
Step 4 — (Optional) Java JDK installation
If Java 8/11 is available in your system, you don’t need install it again.
Install Python
Python is required for using PySpark. Follow these steps to install Python.
1) Download and install python from this web page: https://www.python.org/downloads/.
2) Verify installation by running the following command in Command Prompt or PowerShell:
python --version
The output looks like the following:

If python command cannot be directly invoked, please check PATH environment variable to make sure Python installation path is added:
For example, in my environment Python is installed at the following location:
Thus path C:UsersRaymondAppDataLocalProgramsPythonPython38-32 is added to PATH variable.
Hadoop installation (optional)
To work with Hadoop, you can configure a Hadoop single node cluster following this article:
Install Hadoop 3.3.0 on Windows 10 Step by Step Guide
Download binary package
Go to the following site:
https://spark.apache.org/downloads.html
Select the package type accordingly. I already have Hadoop 3.3.0 installed in my system, thus I selected the following:
You can choose the package with pre-built for Hadoop 3.2 or later.
Save the latest binary to your local drive. In my case, I am saving the file to folder: F:big-data. If you are saving the file into a different location, remember to change the path in the following steps accordingly.
Unpack binary package
Open Git Bash, and change directory (cd) to the folder where you save the binary package and then unzip using the following commands:
$ mkdir spark-3.0.0
$ tar -C spark-3.0.0 -xvzf spark-3.0.0-bin-without-hadoop.tgz --strip 1
The first command creates a sub folder named spark-3.0.0; the second command unzip the downloaded package to that folder.
warning Your file name might be different from spark-3.0.0-bin-without-hadoop.tgz if you chose a package with pre-built Hadoop libs.
Spark 3.0 files are now extracted to F:big-dataspark-3.0.0.
Setup environment variables
1) Setup JAVA_HOME variable.
Setup environment variable JAVA_HOME if it is not done yet. The variable value points to your Java JDK location.
2) Setup SPARK_HOME variable.
Setup SPARK_HOME environment variable with value of your spark installation directory.
3) Update PATH variable.
Added ‘%SPARK_HOME%bin’ to your PATH environment variable.
4) Configure Spark variable SPARK_DIST_CLASSPATH.
This is only required if you configure Spark with an existing Hadoop. If your package type already includes pre-built Hadoop libraries, you don’t need to do this.
Run the following command in Command Prompt to find out existing Hadoop classpath:
F:big-data>hadoop classpath
F:big-datahadoop-3.3.0etchadoop;F:big-datahadoop-3.3.0sharehadoopcommon;F:big-datahadoop-3.3.0sharehadoopcommonlib*;F:big-datahadoop-3.3.0sharehadoopcommon*;F:big-datahadoop-3.3.0sharehadoophdfs;F:big-datahadoop-3.3.0sharehadoophdfslib*;F:big-datahadoop-3.3.0sharehadoophdfs*;F:big-datahadoop-3.3.0sharehadoopyarn;F:big-datahadoop-3.3.0sharehadoopyarnlib*;F:big-datahadoop-3.3.0sharehadoopyarn*;F:big-datahadoop-3.3.0sharehadoopmapreduce*
Setup an environment variable SPARK_DIST_CLASSPATH accordingly using the output:
Config Spark default variables
Run the following command to create a default configuration file:
cp %SPARK_HOME%/conf/spark-defaults.conf.template %SPARK_HOME%/conf/spark-defaults.conf
Open spark-defaults.conf file and add the following entries:
spark.driver.host localhost
Now Spark is available to use.
Verify the installation
Let’s run some verification to ensure the installation is completed without errors.
Verify spark-shell command
Run the following command in Command Prompt to verify the installation.
spark-shell
The screen should be similar to the following screenshot:
You can use Scala in this interactive window.
Run examples
Execute the following command in Command Prompt to run one example provided as part of Spark installation (class SparkPi with param 10).
https://spark.apache.org/docs/latest/
%SPARK_HOME%binrun-example.cmd SparkPi 10
The output looks like the following:
PySpark interactive window
Run the following command to try PySpark:
pyspark
Python in my environment is 3.8.2.
Try Spark SQL
Spark SQL interactive window can be run through this command:
spark-sql
As I have not configured Hive in my system, thus there will be error when I run the above command.
Spark context UI
When a Spark session is running, you can view the details through UI portal. As printed out in the interactive session window, Spark context Web UI available at http://localhost:4040. The URL is based on the Spark default configurations. The port number can change if the default port is used.
The following is a screenshot of the UI:
References
Spark developer tools
Refer to the following page if you are interested in any Spark developer tools.
https://spark.apache.org/developer-tools.html
Spark 3.0.0 overview
Refer to the official documentation about Spark 3.0.0 overview: http://spark.apache.org/docs/3.0.0/.
Spark 3.0.0 release notes
https://spark.apache.org/releases/spark-release-3-0-0.html
check Congratulations! You have successfully configured Spark in your Windows environment. Have fun with Spark 3.0.0.
Apache Spark is a fast and general-purpose cluster computing system. It provides high-level APIs in Java, Scala, Python, and R and an optimized engine that supports general execution graphs. It also supports a rich set of higher-level tools, including Spark SQL for SQL and structured data processing, MLlib for machine learning, GraphX for graph processing, and Spark Streaming.
In this document, we will cover the installation procedure of Apache Spark on the Windows 10 operating system.

Prerequisites
This guide assumes that you are using Windows 10 and the user has admin permissions.
System requirements:
- Windows 10 OS
- At least 4 GB RAM
- Free space of at least 20 GB
Installation Procedure
Step 1: Go to Apache Spark’s official download page and choose the latest release. For the package type, choose ‘Pre-built for Apache Hadoop’.
The page will look like the one below.

Step 2: Once the download is completed, unzip the file, unzip the file using WinZip or WinRAR, or 7-ZIP.
Step 3: Create a folder called Spark under your user Directory like below and copy and paste the content from the unzipped file.
C:Users<USER>Spark
It looks like the below after copy-pasting into the Spark directory.

Step 4: Go to the conf folder and open the log file called log4j.properties. template. Change INFO to WARN (It can be an ERROR to reduce the log). This and the next steps are optional.

Remove. template so that Spark can read the file.
Before removing. template all files look like below.

After removing. template extension, files will look like below

Step 5: Now, we need to configure the path.
Go to Control Panel -> System and Security -> System -> Advanced Settings -> Environment Variables
Add below new user variable (or System variable) (To add a new user variable, click on the New button under User variable for <USER>)

Click OK.
Add %SPARK_HOME%bin to the path variable.

Click OK.
Step 6: Spark needs a piece of Hadoop to run. For Hadoop 2.7, you need to install winutils.exe.
You can find winutils.exe on this page. You can download it for your ease.
Step 7: Create a folder called winutils in C drive and create a folder called bin inside. Then, move the downloaded winutils file to the bin folder.
C:winutilsbin

Add the user (or system) variable %HADOOP_HOME% like SPARK_HOME.


Click OK.
Step 8: To install Apache Spark, Java should be installed on your computer. If you don’t have java installed on your system. Please follow the below process
Java Installation Steps
1. Go to the official Java site mentioned below the page.
Accept Licence Agreement for Java SE Development Kit 8u201
2. Download jdk-8u201-windows-x64.exe file
3. Double Click on the Downloaded .exe file, and you will see the window is shown below.

4. Click Next.
5. Then below window will be displayed.

6. Click Next.
7. Below window will be displayed after some process.

8. Click Close.
Test Java Installation
Open Command Line and type java -version, then it should display the installed version of Java

You should also check JAVA_HOME and the path of %JAVA_HOME%bin included in user variables (or system variables)
1. In the end, the environment variables have 3 new paths (if you need to add a Java path, otherwise SPARK_HOME and HADOOP_HOME).


2. Create c:tmphive directory. This step is not necessary for later versions of Spark. When you first start Spark, it creates the folder by itself. However, it is the best practice to create a folder.
C:tmphive
Test Installation
Open the command line and type spark-shell, and you will get the result below.

We have completed the spark installation on the Windows system. Let’s create RDD and Data frame
We create one RDD and Data frame; then we will end up.
1. We can create RDD in 3 ways; we will use one way to create RDD.
Define any list, then parallelize it. It will create RDD. Below is the code, and copy and paste it one by one on the command line.
val list = Array(1,2,3,4,5)
val rdd = sc.parallelize(list)
The above will create RDD.
2. Now, we will create a Data frame from RDD. Follow the below steps to create Dataframe.
import spark.implicits._
val df = rdd.toDF("id")
The above code will create Dataframe with id as a column.
To display the data in Dataframe, use the below command.
Df.show()
It will display the below output.

How to uninstall Spark from Windows 10 System
Please follow the below steps to uninstall spark on Windows 10.
- Remove the below System/User variables from the system.
- SPARK_HOME
- HADOOP_HOME
To remove System/User variables, please follow the below steps:
Go to Control Panel -> System and Security -> System -> Advanced Settings -> Environment Variables, then find SPARK_HOME and HADOOP_HOME then, select them, and press the DELETE button.
Find Path variable Edit -> Select %SPARK_HOME%bin -> Press DELETE Button
Select % HADOOP_HOME%bin -> Press DELETE Button -> OK Button
Open Command Prompt, type spark-shell, then enter, and now we get an error. Now we can confirm that Spark is successfully uninstalled from the System.
Перевод
Ссылка на автора

Последние несколько месяцев я работал над проектом Data Science, который обрабатывает огромный набор данных, и стало необходимым использовать распределенную среду, предоставляемую Apache PySpark.
Я много боролся при установке PySpark на Windows 10. Поэтому я решил написать этот блог, чтобы помочь любому легко установить и использовать Apache PySpark на компьютере с Windows 10.
1. Шаг 1
PySpark требует Java версии 7 или новее и Python версии 2.6 или новее. Давайте сначала проверим, установлены ли они, или установим их и убедимся, что PySpark может работать с этими двумя компонентами.
Установка Java
Проверьте, установлена ли на вашем компьютере Java версии 7 или новее. Для этого выполните следующую команду в командной строке.

Если Java установлена и настроена для работы из командной строки, выполнение вышеуказанной команды должно вывести информацию о версии Java на консоль. Иначе, если вы получите сообщение, подобное:
«Java» не распознается как внутренняя или внешняя команда, работающая программа или пакетный файл.
тогда вы должны установить Java.
а) Для этого скачайте Java из Скачать бесплатное программное обеспечение Java
б) Получить Windows x64 (например, jre-8u92-windows-x64.exe), если вы не используете 32-разрядную версию Windows, в этом случае вам нужно получитьWindows x86 Offlineверсия.
в) Запустите установщик.
d) После завершения установки закройте текущую командную строку, если она уже была открыта, снова откройте ее и проверьте, можете ли вы успешно запуститьJava — версиякоманда.
2. Шаг 2
питон
Python используется многими другими программными инструментами. Поэтому вполне возможно, что требуемая версия (в нашем случае версия 2.6 или более поздняя) уже доступна на вашем компьютере. Чтобы проверить, доступен ли Python и найти его версию, откройте командную строку и введите командуPython — версия
Если Python установлен и настроен для работы из командной строки, при выполнении вышеуказанной команды информация о версии Python должна выводиться на консоль. Например, я получил следующий вывод на моем ноутбуке:
C: Users uug20> python —version
Python 3.7.3
Вместо этого, если вы получите сообщение, как
«Python» не распознается как внутренняя или внешняя команда, работающая программа или пакетный файл ».
Это означает, что вам нужно установить Python. Для этого
а) Перейти к питону скачать стр.
б) НажмитеПоследний выпуск Python 2ссылка.
c) Загрузите установочный файл MSI для Windows x86–64. Если вы используете 32-разрядную версию Windows, загрузите установочный файл MSI для Windows x86.
г) Когда вы запускаете установщик, наНастроить Pythonраздел, убедитесь, что опцияДобавить python.exe в путьвыбран. Если этот параметр не выбран, некоторые утилиты PySpark, такие как pyspark и spark-submit, могут не работать.
e) После завершения установки закройте командную строку, если она уже была открыта, снова откройте ее и проверьте, можете ли вы успешно запуститьPython — версиякоманда.
3. Шаг 3
Установка Apache Spark
а) Перейти к искре скачать стр.
б) Выберите последнюю стабильную версию Spark.
с)Выберите тип упаковки: sвыберите версию, предварительно созданную для последней версии Hadoop, такую какПредварительно построен для Hadoop 2.6,
г)Выберите тип загрузки:ВыбратьПрямое скачивание,
д) Нажмите на ссылку рядом сСкачать Sparkзагрузить заархивированный tar-файл, заканчивающийся расширением .tgz, такой как spark-1.6.2-bin-hadoop2.6.tgz.
f) Для установки Apache Spark вам не нужно запускать какой-либо установщик. Извлеките файлы из загруженного tar-файла в любую папку по вашему выбору, используя 7Zip инструмент / другие инструменты для разархивирования.
Убедитесь, что путь к папке и имя папки, содержащей файлы Spark, не содержат пробелов.
Я создал папку с именем spark на моем диске D и распаковал заархивированный tar-файл в папку с именем spark-2.4.3-bin-hadoop2.7. Таким образом, все файлы Spark находятся в папке с именем D: spark spark-2.4.3-bin-hadoop2.7. Давайте назовем эту папку SPARK_HOME в этом посте.
Чтобы проверить успешность установки, откройте командную строку, перейдите в каталог SPARK_HOME и введите bin pyspark. Это должно запустить оболочку PySpark, которую можно использовать для интерактивной работы со Spark.
Последнее сообщение содержит подсказку о том, как работать со Spark в оболочке PySpark с использованием имен sc или sqlContext. Например, при вводе sc.version в оболочке должна появиться версия Spark. Вы можете выйти из оболочки PySpark так же, как вы выходите из любой оболочки Python — набрав exit ().
Оболочка PySpark выводит несколько сообщений при выходе. Поэтому вам нужно нажать Enter, чтобы вернуться в командную строку.
4. Шаг 4
Настройка установки Spark
Первоначально, когда вы запускаете оболочку PySpark, она выдает много сообщений типа INFO, ERROR и WARN. Давайте посмотрим, как удалить эти сообщения.
Установка Spark в Windows по умолчанию не включает утилиту winutils.exe, которая используется Spark. Если вы не укажете своей установке Spark, где искать winutils.exe, вы увидите сообщения об ошибках при запуске оболочки PySpark, такие как
«ОШИБКА Shell: не удалось найти двоичный файл winutils в двоичном пути hadoop java.io.IOException: не удалось найти исполняемый файл null bin winutils.exe в двоичных файлах Hadoop».
Это сообщение об ошибке не препятствует запуску оболочки PySpark. Однако если вы попытаетесь запустить автономный скрипт Python с помощью утилиты bin spark-submit, вы получите ошибку. Например, попробуйте запустить скрипт wordcount.py из папки примеров в командной строке, когда вы находитесь в каталоге SPARK_HOME.
«Bin spark-submit examples src main python wordcount.py README.md»
Установка winutils
Давайте загрузим winutils.exe и сконфигурируем нашу установку Spark, чтобы найти winutils.exe.
a) Создайте папку hadoop bin внутри папки SPARK_HOME.
б) Скачать winutils.exe для версии hadoop, для которой была создана ваша установка Spark. В моем случае версия hadoop была 2.6.0. Так что я загруженное winutils.exe для hadoop 2.6.0 и скопировал его в папку hadoop bin в папке SPARK_HOME.
c) Создайте системную переменную среды в Windows с именем SPARK_HOME, которая указывает путь к папке SPARK_HOME.
d) Создайте в Windows другую переменную системной среды с именем HADOOP_HOME, которая указывает на папку hadoop внутри папки SPARK_HOME.
Поскольку папка hadoop находится внутри папки SPARK_HOME, лучше создать переменную среды HADOOP_HOME, используя значение% SPARK_HOME% hadoop. Таким образом, вам не нужно менять HADOOP_HOME, если SPARK_HOME обновлен.
Если вы теперь запустите сценарий bin pyspark из командной строки Windows, сообщения об ошибках, связанные с winutils.exe, должны исчезнуть.
5. Шаг 5
Настройка уровня журнала для Spark
Каждый раз при запуске или выходе из оболочки PySpark или при запуске утилиты spark-submit остается много дополнительных сообщений INFO. Итак, давайте внесем еще одно изменение в нашу установку Spark, чтобы в консоль записывались только предупреждения и сообщения об ошибках. Для этого:
a) Скопируйте файл log4j.properties.template в папку SPARK_HOME conf как файл log4j.properties в папке SPARK_HOME conf.
b) Установите для свойства log4j.rootCategory значение WARN, console.
c) Сохраните файл log4j.properties.
Теперь любые информационные сообщения не будут записываться на консоль.
Резюме
Чтобы работать с PySpark, запустите командную строку и перейдите в каталог SPARK_HOME.
а) Чтобы запустить оболочку PySpark, запустите утилиту bin pyspark. Когда вы окажетесь в оболочке PySpark, используйте имена sc и sqlContext и введите exit (), чтобы вернуться в командную строку.
б) Чтобы запустить автономный скрипт Python, запустите утилиту bin spark-submit и укажите путь к вашему скрипту Python, а также любые аргументы, которые нужны вашему скрипту Python, в командной строке. Например, чтобы запустить скрипт wordcount.py из каталога examples в папке SPARK_HOME, вы можете выполнить следующую команду:
«bin spark-submit examples src main python wordcount.py README.md«
6. Шаг 6
Важно: я столкнулся с проблемой при установке
После завершения процедуры установки на моем компьютере с Windows 10 я получал следующее сообщение об ошибке.
Файл «C: Users uug20 Anaconda3 lib site-packages zmq backend cython __ init__.py», строка 6, вот . import (константы, ошибка, сообщение, контекст, ImportError: сбой загрузки DLL: указанный модуль не найден.
Решение:
Я просто разобрался, как это исправить!
В моем случае я не знал, что мне нужно добавить ТРИ пути, связанные с миникондами, в переменную окружения PATH.
C: Users uug20 Anaconda3
C: Users uug20 Anaconda3 Scripts
C: Users uug20 Anaconda3 Library bin
После этого я не получил никаких сообщений об ошибках, и pyspark начал работать правильно и открыл записную книжку Jupyter после ввода pyspark в командной строке.
Надеюсь, это работает и для вас!
Introduction
This post is to help people to install and run Apache Spark in a computer with window 10 (it may also help for prior versions of Windows or even Linux and Mac OS systems), and want to try out and learn how to interact with the engine without spend too many resources. If you really want to build a serious prototype, I strongly recommend to install one of the virtual machines I mentioned in this post a couple of years ago: Hadoop self-learning with pre-configured Virtual Machines or to spend some money in a Hadoop distribution on the cloud. The new version of these VMs come with Spark ready to use.
A few words about Apache Spark
Apache Spark is making a lot of noise in the IT world as a general engine for large-scale data processing, able to run programs up to 100x faster than Hadoop MapReduce, thanks to its in-memory computing capabilities. It is possible to write Spark applications using Java, Python, Scala and R, and it comes with built-in libraries to work with structure data (Spark SQL), graph computation (GraphX), machine learning (MLlib) and streaming (Spark Streaming).
Spark runs on Hadoop, Mesos, in the cloud or as standalone. The latest is the case of this post. We are going to install Spark 1.6.0 as standalone in a computer with a 32-bit Windows 10 installation (my very old laptop). Let’s get started.
Install or update Java
For any application that uses the Java Virtual Machine is always recommended to install the appropriate java version. In this case I just updated my java version as follows:
Start –> All apps –> Java –> Check For Updates

Update Java
In the same way you can verify your java version. This is the version I used:

Java Version
Download Scala
Download from here. Then execute the installer.
I just downloaded the binaries for my system:

Scala Download
Download Spark
Select any of the prebuilt version from here
As we are not going to use Hadoop it make no difference the version you choose. I downloaded the following one:

Spark Download
Feel free also to download the source code and make your own build if you feel comfortable with it.
Extract the files to any location in your drive with enough permissions for your user.
Download winutils.exe
This was the critical point for me, because I downloaded one version and did not work until I realized that there are 64-bits and 32-bits versions of this file. Here you can find them accordingly:
32-bit winutils.exe
64-bit winutils.exe
In order to make my trip still longer, I had to install Git to be able to download the 32-bits winutils.exe. If you know another link where we can found this file you can share it with us.
Git client download (I hope you don’t get stuck in this step)
Extract the folder containing the file winutils.exe to any location of your preference.
Environment Variables Configuration
This is also crucial in order to run some commands without problems using the command prompt.
- _JAVA_OPTION: I set this variable to the value showed in the figure below. I was getting Java Heap Memory problems with the default values and this fixed this problem.
- HADOOP_HOME: even when Spark can run without Hadoop, the version I downloaded is prebuilt for Hadoop 2.6 and looks in the code for it. To fix this inconvenient I set this variable to the folder containing the winutils.exe file
- JAVA_HOME: usually you already set this variable when you install java but it is better to verify that exist and is correct.
- SCALA_HOME: the bin folder of the Scala location. If you use the standard location from the installer should be the path in the figure below.
- SPARK_HOME: the bin folder path of where you uncompressed Spark

Environment Variables 1/2
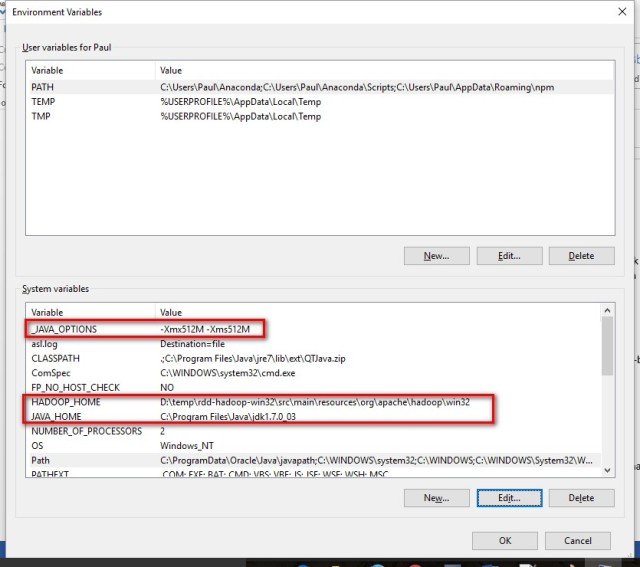
Environment Variables 2/2
Permissions for the folder tmp/hive
I struggled a little bit with this issue. After I set everything I tried to run the spark-shell from the command line and I was getting an error, which was hard to debug. The shell tries to find the folder tmp/hive and was not able to set the SQL Context.
I look at my C drive and I found that the C:tmphive folder was created. If not you can created by yourself and set the 777 permissions for it. In theory you can do it with the advanced sharing options of the sharing tab in the properties of the folder, but I did it in this way from the command line using winutils:
Open a command prompt as administrator and type:

Set 777 permissions for tmp/hive
Please be aware that you need to adjust the path of the winutils.exe above if you saved it to another location.
We are finally done and could start the spark-shell which is an interactive way to analyze data using Scala or Python. In this way we are going also to test our Spark installation.
Using the Scala Shell to run our first example
In the same command prompt go to the Spark folder and type the following command to run the Scala shell:

Start the Spark Scala Shell
After some executions line you should be able to see a similar screen:

Shell started
You are going to receive several warnings and information in the shell because we have not set different configuration options. By now just ignore them.
Let’s run our first program with the shell, I took the example from the Spark Programming Guide. The first command creates a resilient data set (RDD) from a text file included in the Spark’s root folder. After the RDD is created, the second command just counts the number of items inside:

Running a Spark Example
And that’s it. Hope you can follow my explanation and be able to run this simple example. I wish you a lot of fun with Apache Spark.
References
Why does starting spark-shell fail with NullPointerException on Windows?
Apache Spark checkpoint issue on windows
Configure Standalone Spark on Windows 10

About Paul Hernandez
I’m an Electronic Engineer and Computer Science professional, specialized in Data Analysis and Business Intelligence Solutions. Also a father, swimmer and music lover.