Introduction
Apache Tomcat is an open-source web server and servlet container for Java code. Tomcat executes programs written in the Java programming language, and it implements many Java EE specifications, including Jakarta Servlet, Jakarta Server Pages, and others.
In this tutorial, you will learn to install the Apache Tomcat server on Windows.
Prerequisites:
- Java JRE installed and configured
- Administrator privileges
In this section, we will cover two ways of installing the Tomcat web server:
- Via Windows Service Installer.
- From a zip archive.
Follow the steps below to download and install Tomcat.
Step 1: Download Tomcat for Windows
To download the Tomcat installation file, follow the steps below:
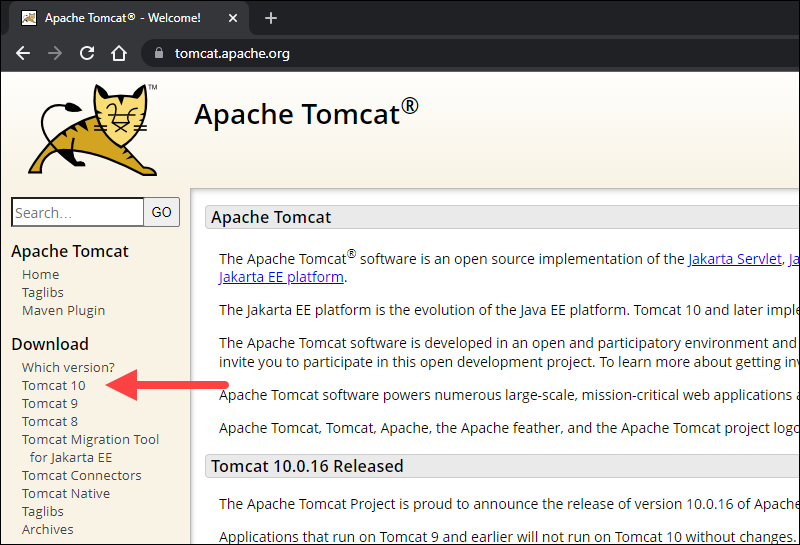
1. Browse to the official Apache Tomcat website. Locate the Download section and click the latest Tomcat version available. At the time of writing this article, the latest Tomcat version was version 10.
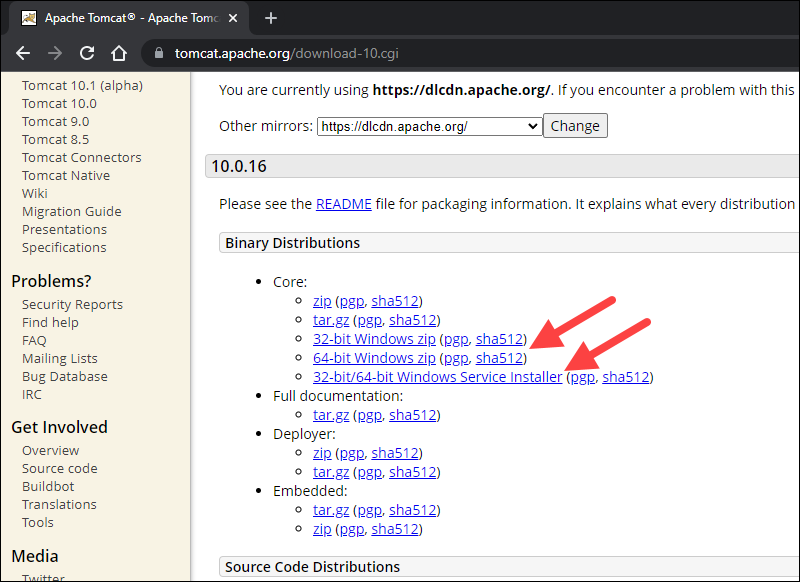
2. On the Download page, scroll down and locate the Binary Distributions area.
In the Core list, depending on the installation type you prefer, click the download link for the Windows Service Installer or the 32bit/64bit Windows zip file.
Step 2: Install Tomcat
Install Tomcat via the Windows Service Installer for an automated and wizard-guided experience. The service installer installs the Tomcat service and runs it automatically when the system boots.
For a portable experience, install Tomcat using the zip file and avoid installing the service. Easily uninstall Tomcat when it is no longer needed by deleting the Tomcat directory, or move it around when necessary.
Note: Take a look at our list of 13 best Java IDEs, which help write, debug, and test Java code.
Method 1: Install Tomcat Using the Windows Service Installer
Follow the steps below to install Tomcat using the Windows Service Installer.
1. Open the downloaded Windows Service Installer file to start the installation process.
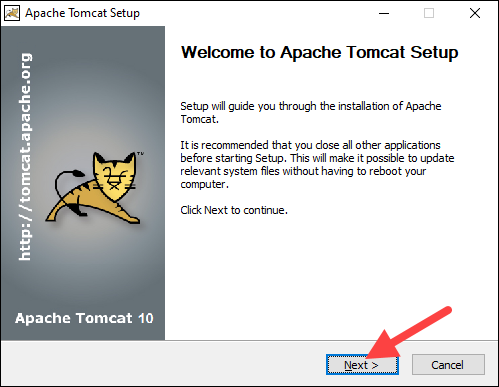
2. In the Tomcat Setup welcome screen, click Next to proceed.
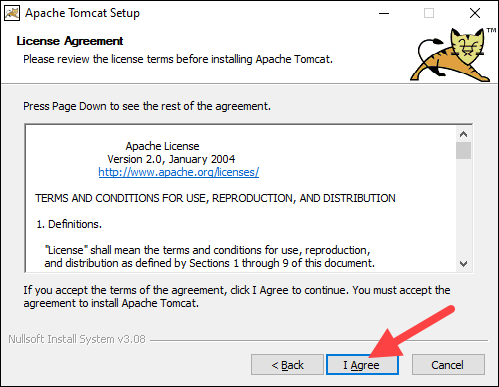
3. Read the License Agreement and if you agree to the terms, click I Agree to proceed to the next step.
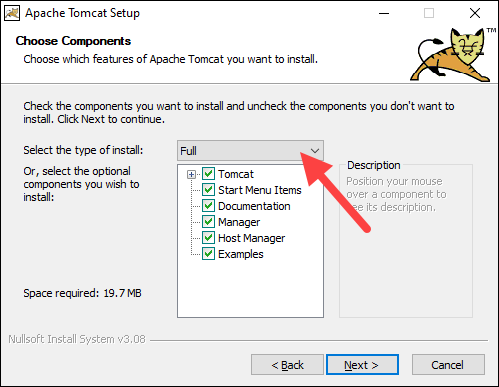
4. In the Tomcat component selection screen, choose Full in the dropdown menu to ensure the wizard installs the Tomcat Host Manager and Servlet and JSP examples web applications. Alternatively, keep the default Normal installation type and click Next.
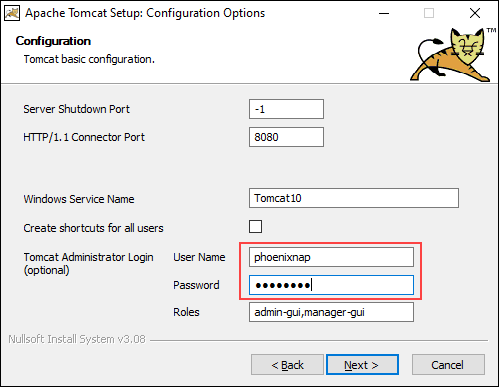
5. The next step configures the Tomcat server. For instance, enter the Administrator login credentials or choose a different connection port. When finished, click Next to proceed to the next step.
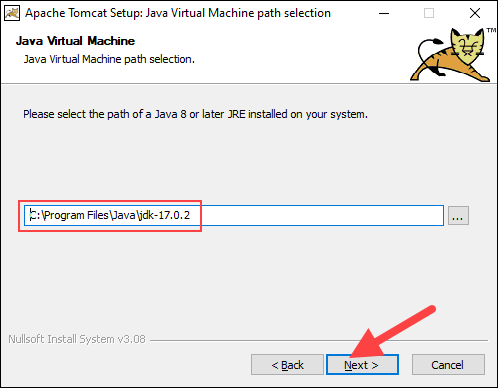
6. The next step requires you to enter the full path to the JRE directory on your system. The wizard auto-completes this if you have previously set up the Java environment variables. Click Next to proceed to the next step.
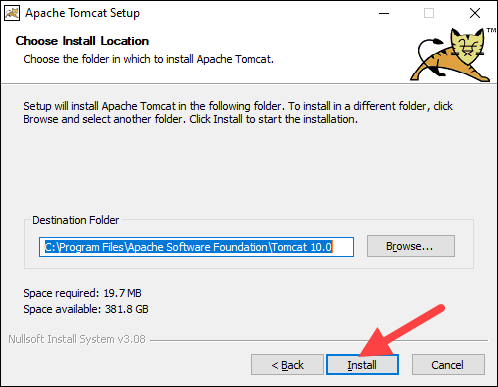
7. Choose the Tomcat server install location or keep the default one and click Install.
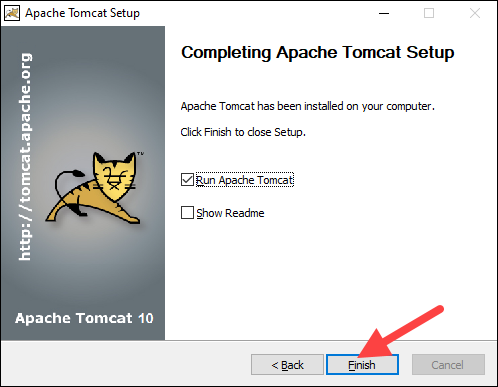
8. Check the Run Apache Tomcat box to start the service after the installation finishes. Optionally, check the Show Readme box to see the Readme file. To complete the installation, click Finish.
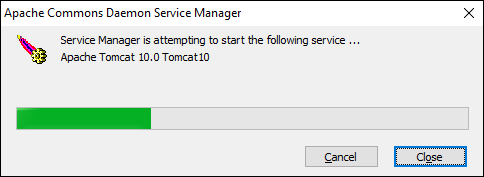
9. A popup window appears that starts the Tomcat service. After the process completes, the window closes automatically. The Apache Tomcat web server is now successfully installed .
Method 2: Install Tomcat Using the zip Archive
Follow the steps below to set up the Tomcat server using the zip archive.
1. After downloading the 32bit/64bit Windows zip file, depending on your Windows version, unzip the downloaded file. Right-click the file and select Extract all…
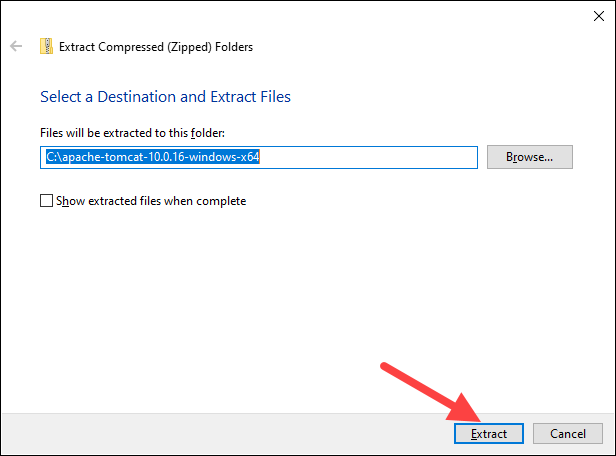
2. Choose where to extract the archive contents. For easier navigation, we recommend extracting it to the hard drive’s root. Optionally, give the directory a shorter name to facilitate server configuration later. Click Extract to start the process.
3. Navigate to the conf sub-directory within the extracted directory and locate the server.xml file.
Important: Back up the .xml files before making any changes.
4. The default connection port is 8080. To choose a different port, edit the server.xml file with a text editor, such as Notepad++, and locate the following lines:
<Connector port="8080" protocol="HTTP/1.1"
           connectionTimeout="20000"
           redirectPort="8443" />
Change the connector port number to any number between 1024 and 65535.
5. To enable directory browsing, locate the web.xml file in the conf directory and edit the file with a text editor. Directory browsing helps when testing the system, and sometimes it may be the solution for a 403 forbidden error.
Locate the following lines and change the listings value from false to true:
<servlet>
  <servlet-name>default</servlet-name>
  <servlet-class>org.apache.catalina.servlets.DefaultServlet</servlet-class>
  <init-param>
    <param-name>debug</param-name>
    <param-value>0</param-value>
  </init-param>
  <init-param>
    <param-name>listings</param-name>
    <param-value>false</param-value>
  </init-param>
  <load-on-startup>1</load-on-startup>
</servlet>
6. Implement an auto-reload feature by editing the context.xml file. Above all, auto-reload is useful in development to prevent restarting the server manually each time a change is made.
Using a text editor, open the context.xml file. Locate the following line and change the value from false to true in each instance:
<Context reloadable="false" crossContext="false" parallelAnnotationScanning="false">
   ......
   ......
</Context>
7. After making the changes, start the server. Press the Windows key and type cmd. Press Enter to open a Command Prompt window.
8. Move to the bin directory of your Tomcat server and run:
startup
8. Add an exception for Tomcat in the firewall:
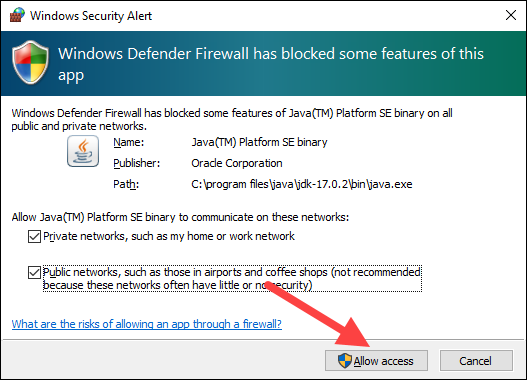
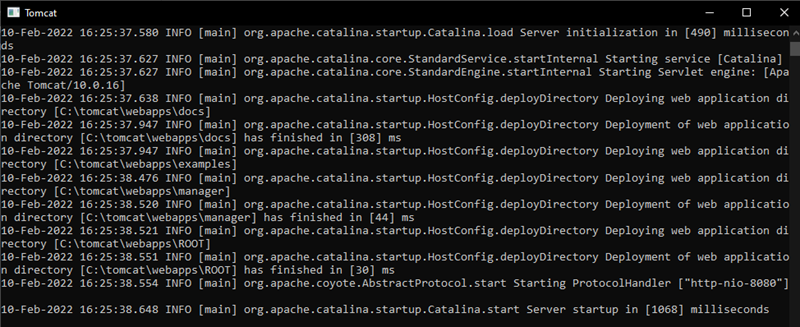
9. A new Tomcat console window appears. This console receives error messages and system.out.println() messages issued by the Java servlets.
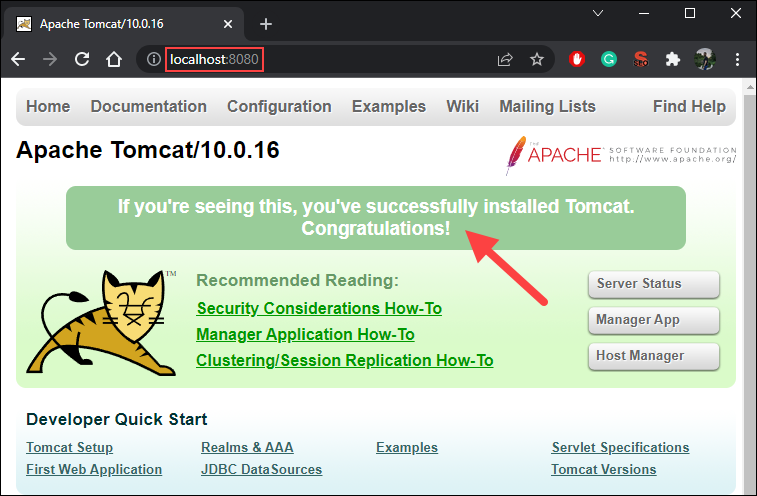
10. Access the server using a browser as an HTTP client. Browse to http://localhost:8080 and access the Tomcat welcome page to ensure the server works.
In addition, use the Developer Quick Start links to see more information about the server and start using and configuring the server.
11. Shut down the Tomcat server by pressing Ctrl+C on the Tomcat console.
Step 3: Check if Apache Tomcat Service Is Running
Installing Tomcat using the Windows Service Installer installs Tomcat as a Windows service that automatically runs on boot. Follow the steps below to ensure that Tomcat is started as a Windows service.
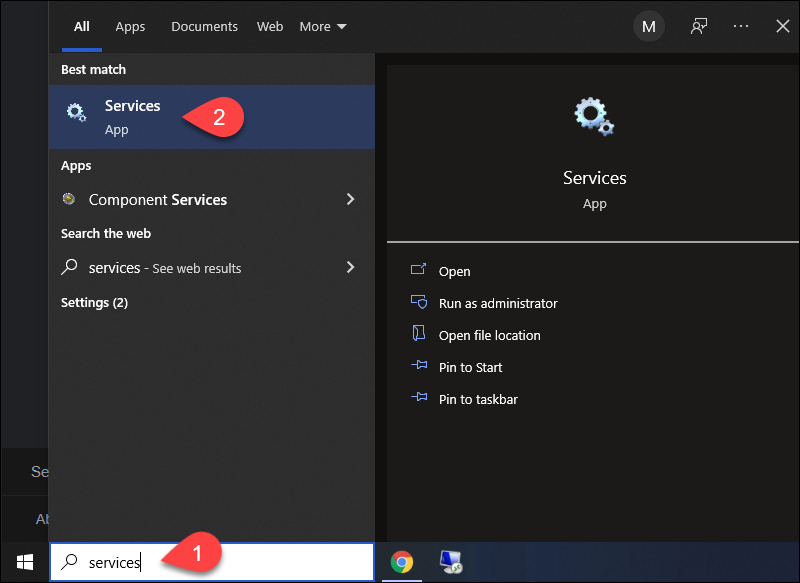
1. Open the Start menu and search for Services.
2. Select the Services result.
3. In the Services window, locate the Apache Tomcat service. The Status column indicates whether the service is running or not. Start or Stop the service using the buttons in the toolbar or by pressing Stop or Restart on the left side of the service list.
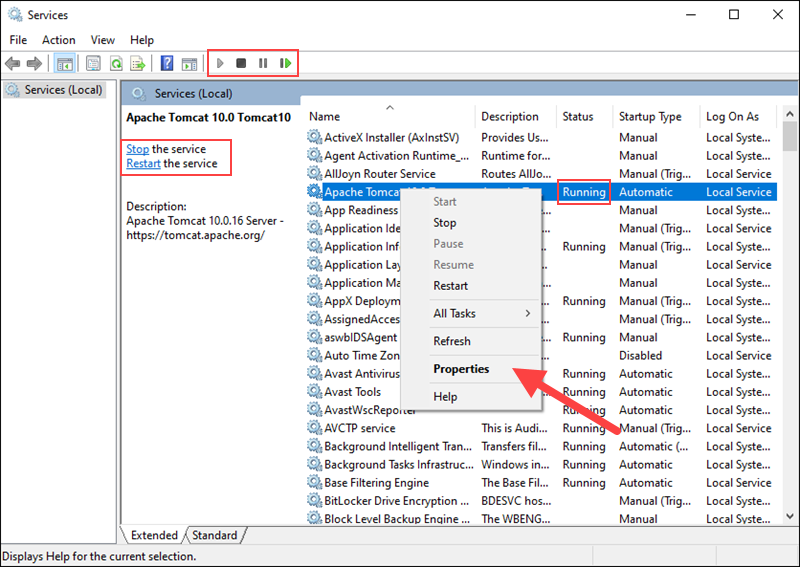
Configure the service startup by right-clicking the Tomcat service and selecting Properties.
4. In the Properties window, under the Startup type dropdown menu, select how to run the Tomcat service:
- Automatic (Delayed Start). Starts the service shortly after boot. A delayed start improves server boot performance and has security benefits.
- Automatic. Automatically starts the service on boot.
- Manual. The service starts only when Windows or another service needs it or if invoked.
- Disabled. Disables the service startup, even if you try to start it.
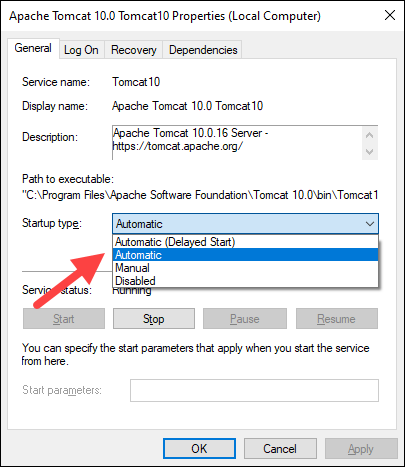
Click OK to confirm the changes.
Note: If you are looking for a different operating system, our Knowledge Base also has a tutorial on how to install Tomcat on Ubuntu.
Conclusion
This guide showed how to install the Apache Tomcat web server on Windows. While Tomcat doesn’t provide all the features of Java EE, many applications require only the features that Tomcat provides. Therefore, heavier tools aren’t always necessary.
Learn more about servers in our tutorial on big data servers, or learn what a database server is.
Download Article
Download Article
This wikiHow teaches you how to install the Apache Tomcat web server environment on your computer, using a Windows PC. Tomcat allows you to run Java code with several specifications in an HTTP web server environment. You will first have to install and configure Java Development Kit (JDK) on your computer to install Tomcat.
-
1
Open the Oracle website. Type or paste https://www.oracle.com into the address bar, and press ↵ Enter or ⏎ Return on your keyboard.
- You will have to download, install, and configure JDK (Java Development Kit) in order to install and run Tomcat.
-
2
Click the Downloads button next to «Top Actions.« This button looks like a white, downward arrow in a blue circle on a quick menu bar. You can find it below the main showcase box on the welcome page.
Advertisement
-
3
Scroll down and click Java SE in the Java section. You can find all the Java Standard Edition downloads here, including JDK, JRE, and Server JRE versions.
-
4
Click the DOWNLOAD button below «JDK» or «Oracle JDK.« This is a blue button on the right-hand side. It will open the available download versions.
- The newest release version will show up at the top of the «Java SE Downloads» page.
-
5
Select Accept License Agreement at the top of the download links. All the download versions are listed at the bottom of the page. You can find the license agreement option at the top of this list.
- You’ll have to accept the license agreement here in order to download a file.
-
6
Click the blue download link next to your Windows version. This will download the installer file to your default Downloads folder.
- Some of the latest Oracle JDK versions only have 64-bit (x64) support for Windows.
- If you’re using Windows in 32-bit version (x86), you may have to check several JDK/Oracle JDK versions on the Java SE page, and find one that’s compatible with your system.
-
7
Launch the JDK installer file on your computer. Find the installer file you just downloaded in your Downloads folder, and double-click on it to run the installer.
-
8
Click Next in the installer window. This will take you to the installation preferences on the next step.
- Make sure to note down the folder directory of the installation location here. You can find it near the bottom-left corner.
- The installation location is usually «C:Program FilesJavajdk1.8.*» with the latest version and release number.
-
9
Click Next. This will start your installation, and install Java Development Kit (JDK) on your computer.
- If you’re prompted during the install, click Next to confirm the installation location.
-
10
Click the Close button. At the end of your installation, click this button to close the installer window.
-
11
Open the Java installation location on your computer. Double-click This PC on your desktop or Start menu, and find the Java folder in your Program Files.
- If you install JDK to a different location, make sure to open the same location as your install location from the installation wizard.
-
12
Open the jdk folder in your files. You will usually have two folders named jdk and jre in your Java folder. Double-click the JDK folder to open it.
-
13
Copy the folder directory for the JDK folder. Select the directory from the address bar at the top of the File Explorer window, right-click on it, and select Copy on the menu.
-
14
Right-click This PC on your desktop. The «This PC» icon looks like a desktop computer. This will open your right-click options on a drop-down menu.
-
15
Click Properties on the right-click menu. This will open your system information in a new window.
-
16
Click Advanced system settings on the left-menu. This is a blue link on the left-hand side of the System window. It will open a new dialogue box titled «System Properties.»
-
17
Click the Advanced tab. You can change your performance, user profile, and other advanced settings here.
-
18
Click the Environment Variables button. This button is near the bottom-right corner of the dialogue box. It will open a new window.
-
19
Click the New button under the «System variables» section. This section is the second box at the bottom of the Environment Variables window. You can create a new system variable here.
-
20
Type JAVA_HOME into the «Variable name» field. This will be the name of your new system variable.
-
21
Paste the copied folder directory into the «Variable value» field. Right-click the bottom field, and select paste to paste the copied folder directory.
-
22
Click OK. This will add your new system variable.
-
23
Select Path in the «System variables» section. Scroll down the variable list in the bottom box, and click Path to select it.
-
24
Click the Edit button. This will allow you to edit the contents of the Path variable in a new dialogue box.
-
25
Click New in the new dialogue box. It’s in the upper-right corner of the window. This will add a new entry at the bottom of the list.
-
26
Type %JAVA_HOME%bin into the new entry field. This will be added to the Path variable in your system.
-
27
Click OK. This will save the new contents of the Path variable.
-
28
Click OK in the Environment Variables window. This will save your new environment variables.
-
29
Click OK in the System Properties window. This will save and apply all your new settings.
- You are now ready to download and install the Tomcat files on your computer.
Advertisement
-
1
Open the Tomcat website in your internet browser. Type or paste http://tomcat.apache.org into your browser’s address bar, and press ↵ Enter or ⏎ Return on your keyboard.
-
2
Click Tomcat 9 on the left sidebar. You can find this option under the «Downloads» heading on a navigation menu on the left-hand side.
-
3
Download 32-bit/64-bit Windows Service Installer under «Core.« You can find this option in the «Binary Distributions» section at the bottom.
- If you’re prompted, select a saving location for the installer file.
-
4
Launch the installer file on your computer. Find the installer in your Downloads folder, and double-click on it to start the installation wizard.
-
5
Click Next on the welcome page. This will open the License Agreement on a new page.
-
6
Click the I Agree button. It’s on the bottom-right corner of the installer window. This will let you choose the components you want to install on the next page.
-
7
Select Full as your install type. Click the drop-down next to «Select the type of install,» and select Full here to install all the Tomcat components, including documentation and app shortcuts.
- Optionally, you can click and uncheck the components you don’t want to install on the list here.
-
8
Click Next. This will confirm your selection, and take you to the configuration page.
-
9
Click Next on the configuration page. Unless you’re customizing your ports, click Next here to proceed.
- Optionally, you can set an admin user name and password for your Tomcat service at the bottom here.
- You will have to specify the Java SE location on your computer on the next page.
-
10
Click the three-dot button next to the text field. When you’re prompted to specify the location of your JRE (Java Runtime Environment), click this button to select your file location.
-
11
Select the jre folder in your Java folder. You can usually find your Java folder in Program Files under This PC.
-
12
Click OK. This will confirm your selection, and copy the folder directory to the text field in the installer.
-
13
Click Next in the installer. You can select the install location on the final page in the next step.
-
14
Click the Install button. This will start your installation. You can track the install on a green progress bar here.
- Optionally, you can click Browse before beginning installation, and set a custom location for your Tomcat install.
-
15
Click Finish on the last page. When your Tomcat setup is finished, click this button to close the installer.
-
16
Press the ⊞ Win+R Windows and «R» keys on your keyboard. Make sure to press both buttons at the same time. This will open the «Run» window.
-
17
Type services.msc in the Run window. You can check all your running and paused system services here.
-
18
Right-click Apache Tomcat on the list. This will open your right-click options on a drop-down.
-
19
Select Properties on the right-click menu. This will open a new dialogue box.
-
20
Click the Start button under «Service status.« This will take a few seconds, and start the Tomcat service on your computer.
Advertisement
Ask a Question
200 characters left
Include your email address to get a message when this question is answered.
Submit
Advertisement
Thanks for submitting a tip for review!
About This Article
Article SummaryX
1. Install and configure Java JDK.
2. Download the Tomcat 9 installer from https://tomcat.apache.org/download-90.cgi.
3. Launch the installer.
4. Click Next, and then I Agree.
5. Select the Full install, and click Next twice.
6. Click the three-dot button to specify JRE location.
7. Select your jre folder, and click OK.
8. Click Next, and then Install.
9. Click Finish.
Did this summary help you?
Thanks to all authors for creating a page that has been read 30,740 times.
Is this article up to date?
Download Article
Download Article
This wikiHow teaches you how to install the Apache Tomcat web server environment on your computer, using a Windows PC. Tomcat allows you to run Java code with several specifications in an HTTP web server environment. You will first have to install and configure Java Development Kit (JDK) on your computer to install Tomcat.
-
1
Open the Oracle website. Type or paste https://www.oracle.com into the address bar, and press ↵ Enter or ⏎ Return on your keyboard.
- You will have to download, install, and configure JDK (Java Development Kit) in order to install and run Tomcat.
-
2
Click the Downloads button next to «Top Actions.« This button looks like a white, downward arrow in a blue circle on a quick menu bar. You can find it below the main showcase box on the welcome page.
Advertisement
-
3
Scroll down and click Java SE in the Java section. You can find all the Java Standard Edition downloads here, including JDK, JRE, and Server JRE versions.
-
4
Click the DOWNLOAD button below «JDK» or «Oracle JDK.« This is a blue button on the right-hand side. It will open the available download versions.
- The newest release version will show up at the top of the «Java SE Downloads» page.
-
5
Select Accept License Agreement at the top of the download links. All the download versions are listed at the bottom of the page. You can find the license agreement option at the top of this list.
- You’ll have to accept the license agreement here in order to download a file.
-
6
Click the blue download link next to your Windows version. This will download the installer file to your default Downloads folder.
- Some of the latest Oracle JDK versions only have 64-bit (x64) support for Windows.
- If you’re using Windows in 32-bit version (x86), you may have to check several JDK/Oracle JDK versions on the Java SE page, and find one that’s compatible with your system.
-
7
Launch the JDK installer file on your computer. Find the installer file you just downloaded in your Downloads folder, and double-click on it to run the installer.
-
8
Click Next in the installer window. This will take you to the installation preferences on the next step.
- Make sure to note down the folder directory of the installation location here. You can find it near the bottom-left corner.
- The installation location is usually «C:Program FilesJavajdk1.8.*» with the latest version and release number.
-
9
Click Next. This will start your installation, and install Java Development Kit (JDK) on your computer.
- If you’re prompted during the install, click Next to confirm the installation location.
-
10
Click the Close button. At the end of your installation, click this button to close the installer window.
-
11
Open the Java installation location on your computer. Double-click This PC on your desktop or Start menu, and find the Java folder in your Program Files.
- If you install JDK to a different location, make sure to open the same location as your install location from the installation wizard.
-
12
Open the jdk folder in your files. You will usually have two folders named jdk and jre in your Java folder. Double-click the JDK folder to open it.
-
13
Copy the folder directory for the JDK folder. Select the directory from the address bar at the top of the File Explorer window, right-click on it, and select Copy on the menu.
-
14
Right-click This PC on your desktop. The «This PC» icon looks like a desktop computer. This will open your right-click options on a drop-down menu.
-
15
Click Properties on the right-click menu. This will open your system information in a new window.
-
16
Click Advanced system settings on the left-menu. This is a blue link on the left-hand side of the System window. It will open a new dialogue box titled «System Properties.»
-
17
Click the Advanced tab. You can change your performance, user profile, and other advanced settings here.
-
18
Click the Environment Variables button. This button is near the bottom-right corner of the dialogue box. It will open a new window.
-
19
Click the New button under the «System variables» section. This section is the second box at the bottom of the Environment Variables window. You can create a new system variable here.
-
20
Type JAVA_HOME into the «Variable name» field. This will be the name of your new system variable.
-
21
Paste the copied folder directory into the «Variable value» field. Right-click the bottom field, and select paste to paste the copied folder directory.
-
22
Click OK. This will add your new system variable.
-
23
Select Path in the «System variables» section. Scroll down the variable list in the bottom box, and click Path to select it.
-
24
Click the Edit button. This will allow you to edit the contents of the Path variable in a new dialogue box.
-
25
Click New in the new dialogue box. It’s in the upper-right corner of the window. This will add a new entry at the bottom of the list.
-
26
Type %JAVA_HOME%bin into the new entry field. This will be added to the Path variable in your system.
-
27
Click OK. This will save the new contents of the Path variable.
-
28
Click OK in the Environment Variables window. This will save your new environment variables.
-
29
Click OK in the System Properties window. This will save and apply all your new settings.
- You are now ready to download and install the Tomcat files on your computer.
Advertisement
-
1
Open the Tomcat website in your internet browser. Type or paste http://tomcat.apache.org into your browser’s address bar, and press ↵ Enter or ⏎ Return on your keyboard.
-
2
Click Tomcat 9 on the left sidebar. You can find this option under the «Downloads» heading on a navigation menu on the left-hand side.
-
3
Download 32-bit/64-bit Windows Service Installer under «Core.« You can find this option in the «Binary Distributions» section at the bottom.
- If you’re prompted, select a saving location for the installer file.
-
4
Launch the installer file on your computer. Find the installer in your Downloads folder, and double-click on it to start the installation wizard.
-
5
Click Next on the welcome page. This will open the License Agreement on a new page.
-
6
Click the I Agree button. It’s on the bottom-right corner of the installer window. This will let you choose the components you want to install on the next page.
-
7
Select Full as your install type. Click the drop-down next to «Select the type of install,» and select Full here to install all the Tomcat components, including documentation and app shortcuts.
- Optionally, you can click and uncheck the components you don’t want to install on the list here.
-
8
Click Next. This will confirm your selection, and take you to the configuration page.
-
9
Click Next on the configuration page. Unless you’re customizing your ports, click Next here to proceed.
- Optionally, you can set an admin user name and password for your Tomcat service at the bottom here.
- You will have to specify the Java SE location on your computer on the next page.
-
10
Click the three-dot button next to the text field. When you’re prompted to specify the location of your JRE (Java Runtime Environment), click this button to select your file location.
-
11
Select the jre folder in your Java folder. You can usually find your Java folder in Program Files under This PC.
-
12
Click OK. This will confirm your selection, and copy the folder directory to the text field in the installer.
-
13
Click Next in the installer. You can select the install location on the final page in the next step.
-
14
Click the Install button. This will start your installation. You can track the install on a green progress bar here.
- Optionally, you can click Browse before beginning installation, and set a custom location for your Tomcat install.
-
15
Click Finish on the last page. When your Tomcat setup is finished, click this button to close the installer.
-
16
Press the ⊞ Win+R Windows and «R» keys on your keyboard. Make sure to press both buttons at the same time. This will open the «Run» window.
-
17
Type services.msc in the Run window. You can check all your running and paused system services here.
-
18
Right-click Apache Tomcat on the list. This will open your right-click options on a drop-down.
-
19
Select Properties on the right-click menu. This will open a new dialogue box.
-
20
Click the Start button under «Service status.« This will take a few seconds, and start the Tomcat service on your computer.
Advertisement
Ask a Question
200 characters left
Include your email address to get a message when this question is answered.
Submit
Advertisement
Thanks for submitting a tip for review!
About This Article
Article SummaryX
1. Install and configure Java JDK.
2. Download the Tomcat 9 installer from https://tomcat.apache.org/download-90.cgi.
3. Launch the installer.
4. Click Next, and then I Agree.
5. Select the Full install, and click Next twice.
6. Click the three-dot button to specify JRE location.
7. Select your jre folder, and click OK.
8. Click Next, and then Install.
9. Click Finish.
Did this summary help you?
Thanks to all authors for creating a page that has been read 30,740 times.
Is this article up to date?
In this article, I will show you how to install tomcat 9 on windows 10 correctly.
1. Prerequisites.
- The tomcat 9 supports JDK version 8 and later. So you need to install JDK 8 or higher version to run tomcat 9.
- You can open a dos window and run the command java -version to check the current installed JDK version.
> java -version
java version "1.8.0_131"
Java(TM) SE Runtime Environment (build 1.8.0_131-b11)
Java HotSpot(TM) 64-Bit Server VM (build 25.131-b11, mixed mode)
- If your JDK version is less than 8.0, you can click here to download JDK 8 according to your operating system.
2. Install Tomcat And Start It From Command-Line.
- Many web application developers like to run Tomcat from command-line, in most cases, they just run it from eclipse they used. Following are the steps to achieve this.
- Click here to go to the Tomcat 9.0 download page.
- You can find the download link on the above page Binary Distributions/Core area.
- Because I want to demo how to start Tomcat from the command line, so I download the Tomcat zip file, this is a cross-platform version.
- Unzip the zip file into a local folder like D:WorkToolapache-tomcat-9.0.45.
- Edit the confweb.xml file under your installation directory. It is D:WorkToolapache-tomcat-9.0.45confweb.xml in my Windows 10.
- Search text org.apache.jasper.servlet.JspServlet in web.xml file and add the 2 initial parameters ( compilerSourceVM, compilerTargetVM ) in it like below.
<servlet> <servlet-name>jsp</servlet-name> <servlet-class>org.apache.jasper.servlet.JspServlet</servlet-class> <init-param> <param-name>fork</param-name> <param-value>false</param-value> </init-param> <init-param> <param-name>xpoweredBy</param-name> <param-value>false</param-value> </init-param> <init-param> <param-name>compilerSourceVM</param-name> <param-value>1.8</param-value> </init-param> <init-param> <param-name>compilerTargetVM</param-name> <param-value>1.8</param-value> </init-param> <load-on-startup>3</load-on-startup> </servlet> - Now the Tomcat will compile JSP files with language features provided by Java SE 8 after adding the above 2 servlets init parameters.
- Before you can start it up, you need to set JAVA_HOME system environment variable’s value to the JDK 8 ‘s home you just installed. You can read the article How To Set Java Environment Variable JAVA_HOME, CLASSPATH, PATH to learn more.
- If you do not set the JAVA_HOME environment variable, when you start Tomcat it will display an error message like below.
D:WorkToolapache-tomcat-9.0.45bin> .startup.bat
Neither the JAVA_HOME nor the JRE_HOME environment variable is defined
At least one of these environment variable is needed to run this program
- After setting JAVA_HOME environment variable, you need to restart your dos window or shell window to make the settings take effect.
- Then you can start up Tomcat by run the command startup.bat ( Windows ) or startup.sh ( Linux ) command in Tomcat bin folder.
cd D:WorkToolapache-tomcat-9.0.45bin
> startup.bat
- Then Java console window popup and displaying the log information generated by the Tomcat process.
- When you see a message like Server startup in 1000 ms in the java console, that means it has been started successfully and is ready to process the client request.
- Open a web browser and browse URL http://localhost:8080/, then you will see the Apache Tomcat home page.
3. Install Tomcat As Windows Service.
Install and run Tomcat as windows service is commonly used in production and quality assurance environment.
3.1 Advantages of install tomcat as a windows service.
- Tomcat server startup do not need active administrator login.
- Tomcat server startup automatically when your server restart. This is very useful because in many cases you may need to restart your windows server. With this feature, you do not need to log in to your windows to start it again after os restart. Because as a windows service it will start automatically when os started.
- It is more secure when running a Tomcat server under a specific system account than an administrator account.
3.2 Steps to install tomcat as a windows service.
- Download the Tomcat windows installer file, the file name is 32-bit/64-bit Windows Service Installer.
- Click the installer to install Tomcat use default settings step by step.
- When you click the Finish button on the last screen. It will popup a progress bar to tell you that it just installing the Tomcat server as a windows service.
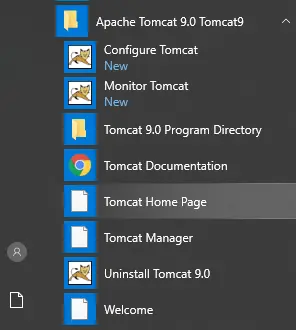
- After installation, click the Windows start menu, you can see the Apache Tomcat 9.0 Tomcat9 menu folder.
- When you click the Configure Tomcat sub-menu for the first time, it will prompt a dialog window with the error message The item referred to by this shortcut cannot be accessed. You may not have the appropriate permissions.
- To fix the above error, you can click the Tomcat 9.0 Program Directory sub-menu and it will popup an alert dialog with the message You don’t currently have permission to access this folder. Click Continue to permanently get access to this folder. Then you can click the Continue button and it will open the tomcat install folder.
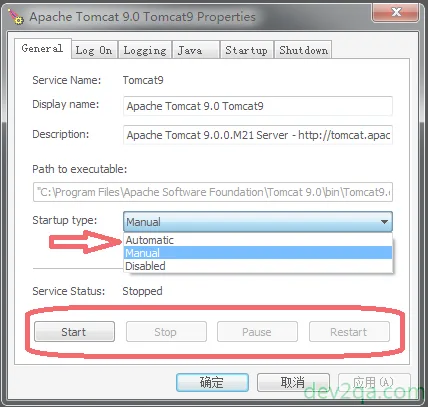
- Now click the Configure Tomcat sub-menu again will open the Apache Tomcat 9.0 Tomcat9 Properties dialog window.
- In the above Apache Tomcat 9.0 Tomcat9 Properties dialog window, you can configure to start the tomcat manually or automatically when windows startup. You can also stop, pause, restart it by clicking different buttons.
4. Different between Tomcat9.exe and Tomcat9w.exe.
- There are two wrapper programs in the Apache Tomcat bin directory, one is Tomcat9.exe the other is Tomcat9w.exe.
- Tomcat9.exe is the wrapper program that makes it run as a windows service in the background. We can see this from the above Apache Tomcat 9.0 Tomcat9 Properties dialog window Path to executable text box.
- .You can run it with a lot of input parameters. You can find all the parameters description and how to use them by click here.
- Tomcat9w.exe is the wrapper program that will pop up the Apache Tomcat 9.0 Tomcat9 Properties configure panel. You can do a lot of configuration in that panel.
- You can leave comments in this article. Our expert will respond to you asap.
5. Question & Answer.
5.1 Can not start tomcat service as windows service.
- I can run the Tomcat portable version ( the zip file version ) from command line successfully, for example, run the command startup.bat to start tomcat. Now I want to install Tomcat as a Windows service, then I open a dos window as windows administrator and run the command tomcat_home/bin/service.bat install, and its success. I can see the Tomcat Service in Windows Services list. But when I click the Start button in Windows Service to start it, it prompts the below error messge. Windows could not start the Apache Tomcat 9 on Local Computer. For more information, review the System Event Log. And I find the below error message in the Windows system event log. Apache Tomcat 9 service terminated with the following service-specific error: The operation completed successfully. How to fix this error.
Apache Tomcat is a web server, or application server. Tomcat is java web servlet container and web server from the Apache software foundation. It can be used as standalone or it can be used behind traditional web servers such as Apache httpd. In the following steps i will show you how to install tomcat in windows 7 or windows 10 or 8.
Install Apache Tomcat on Windows 10
Download Apache Tomcat
download Apache tomcat 9 from here http://mirrors.estointernet.in/apache/tomcat/tomcat-9/v9.0.16/bin/apache-tomcat-9.0.16-windows-x64.zip
or
https://tomcat.apache.org/download-90.cgi
download apcahe tomcat 8 from here http://mirrors.estointernet.in/apache/tomcat/tomcat-8/v8.5.37/bin/apache-tomcat-8.5.37-windows-x64.zip
or
https://tomcat.apache.org/download-80.cgi
download apcahe tomcat 7 from here http://mirrors.estointernet.in/apache/tomcat/tomcat-7/v7.0.92/bin/apache-tomcat-7.0.92-windows-x64.zip
or
https://tomcat.apache.org/download-70.cgi
By using above links download tomcat version 9 or 8 or 7 which you want in a zip format.
Extract Apache Tomcat
extract the zip file which you downloaded.
Install Apache Tomcat on Windows 10 7
Setup Java
To run tomcat you need java in your system. if you have java installed in your system you have to set path varibles. if you have not installed yet you can refer here.
- How To install java in windows 7 8 10
Set java path variables
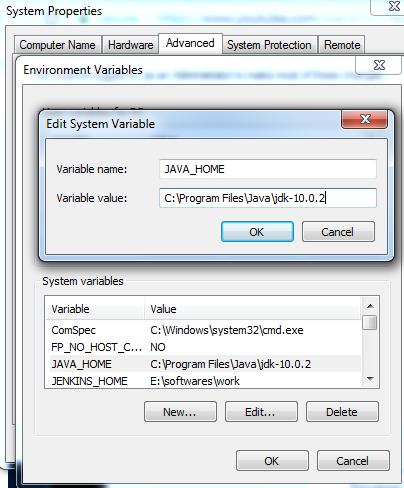
Right Click on computer and click on properties. Click on advanced system settings it will open environment variables window.Click on environment variables you can see system variables. click on new.
Right Click on computer==>properties==> advanced system settings==>environment variables==>new(system varibles)
Add new variable by clicking on new
Adding PATH Variable:
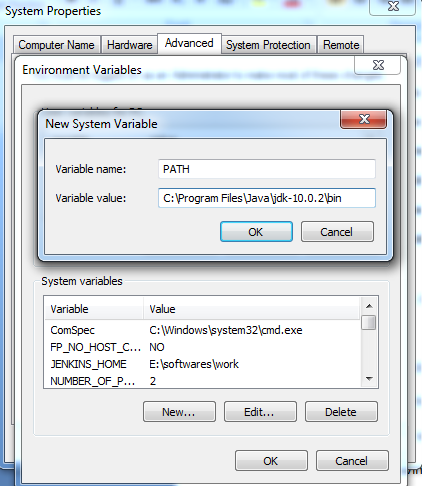
Variable value C:Program FilesJavajdk-10.0.2bin
if you have already installed java in your system you can find this value c:programfilesjava. here we have to enter path value up to your jdk version bin folder.
Adding JAVA_HOME variable
Variable name is JAVA_HOME
Variable value is C:Program FilesJavajdk-10.0.2
you can find this value c:programfilesjava. here we have to enter path value up to your jdk version.
Run Tomcat How To Install Tomcat on Windows 10
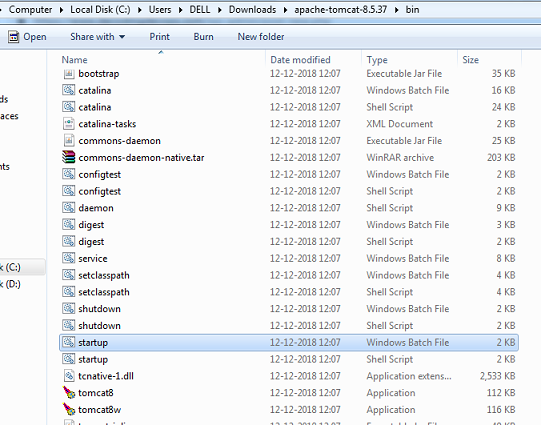
we have successfully configured java in your system now go to the folder of tomcat which you extracted. and go to the bin folder, here you can see startup windows batch file double click on that. and run this. that’s it tomcat will start in few seconds.
you can now open the browser and type http://localhost:8080
it will show the tomcat server.
- how to install tomcat
- install apache tomcat
- how to install tomcat 9 on windows 10
- apache tomcat 10 download
- install apache tomcat on windows 7
- how to install apache tomcat on windows 10
- apache tomcat download for windows 10
- apache tomcat 7.0.47 download
- apache tomcat 9 download
— Advertisement —
Hi. How are you? Let’s see how to install Apache Tomcat on Windows 10/ Server. It works as a servlet container developed under the Jakarta project at the Apache Software Foundation. In addition, it is written in Java, for that reason it works in any operating system that has the Java virtual machine. It can also be used with XAMPP. Besides, Tomcat can function as a Web server on its own with support for servlets and JSP. Despite being surpassed in popularity by NGINX and Apache Web Server, it is still an interesting option to try. That’s why I show you how to install Apache Tomcat on Windows 10/Server.
Prerequisites. Install Java Development Kit JDK.
As we have mentioned, Tomcat is a software developed in Java. For that reason, it is mandatory to download and install JDK in order to run it. With that in mind please go to the download page. You need to have an Oracle account, but don’t worry it’s a fast and free process.
Once you have downloaded the installer, please double click on it to start the process.
Adding environment variables.
To ensure the proper functioning of the server, it is necessary to add Java to the Windows environment variables. If you don’t know how to do this, please check out our article on Wget in Windows 10. First, create a variable with the name JAVA_HOME and use the address where JDK was installed: C:Program FilesJavajdk1.8.0_231
Then create another environment variable with the name JAVA_JRE. In this case, use the following address: C:Program FilesJavajre1.8.0_231
Installing Apache Tomcat
Once JDK is installed and configured, it is time to install Tomcat. With that intention go to the program page and download the latest Windows Service installer. At the time of publication of this article, the version is 9.0.27.
After downloading the installer, proceed to run it. Press Next to continue.
Then choose the components to install. You can select the ones you want, but I recommend that you do a full installation.
In the next window, you will see the configuration options. You can leave almost everything by default. Just keep in mind that the ports must be free. In addition, add a username and password.
Now select the path where JDK is installed.
Now set the installation path for Apache Tomcat.
Once all the configurations have been completed, the installation process will begin.
Finally, the wizard will have finished its work, and we will have Tomcat installed in the system.
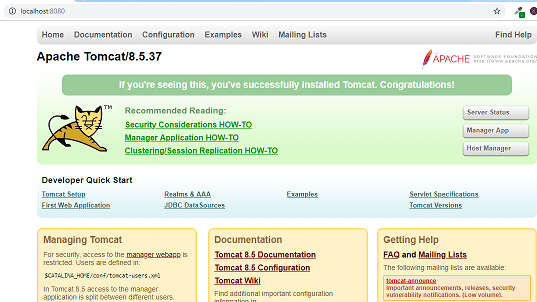
Now, to test that the server is properly installed and running, please open a web browser. Then go to this address: http://localhost:8080/ If you’ve done everything right, the page should look like this:
Conclusion.
Ultimately we have seen how to install Tomcat on Windows 10/Server. The procedure with the installer is very intuitive and easy to use. In addition, the wizard installs Tomcat as a Windows service. So no additional configuration is required. You only need to have installed and preconfigured Java Development Kit. This is all for now, see you soon.
Tomcat is a Web Server that can run Java Web Applications like Java Servlets, Java Server Pages (JSP), Java Expression Language and Java Websocket. Tomcat is a powerful production-ready server that is used by many small, medium and big companies. Students studying Java Servlets and JSP technologies want to practice programs and projects on their home laptops, desktops and even their college computers. So they want to install Tomcat Server on Windows 10 and other older Windows operating systems.
Install Tomcat Server On Windows 10, 8 and 7
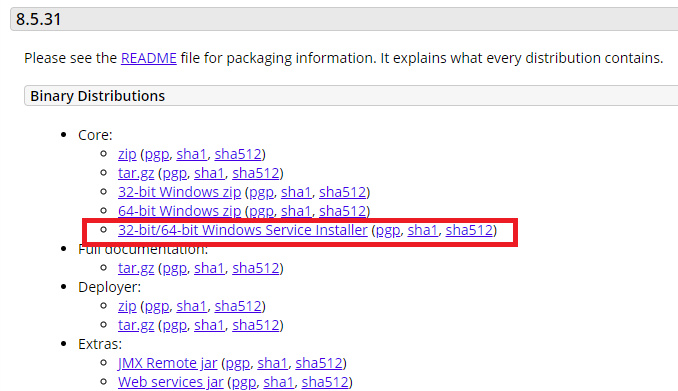
You can download Tomcat from Apache Tomcat 8 , Tomcat 9 and Tomcat 10 website pages. Go for Binary Installable versions like 32-bit/64-bit Windows Service Installer (pgp, sha1, sha512).
Always install Tomcat directly on C Drive instead of Program Files or any other inner folders. If you use Tomcat Windows Installer instead of ZIP version, Tomcat background process will be started automatically.
You need to setup JAVA_HOME or JRE_HOME and CATALINA_HOME so that you can do some maintenance operations on the Tomcat server like Starting and Stopping the Server. If you change any deployed files, you may need to restart the server.
Follow the Java Environment Setup in Windows Tutorial to setup JAVA variables globally.
Setup JAVA_HOME variable path as C:Program FilesJavajdk1.8.0_131 in my case.
Or setup JRE_HOME variable path as C:Program FilesJavajre1.8.0_131 in my case.
Setup CATALINA_HOME variable path as C:Tomcat8 which is my Tomcat installation path.
This is how we did install Tomcat Server on Windows 10, Windows 8 and Windows 7 operating systems.
Start and Stop Tomcat Server on Windows 10, 8 and 7
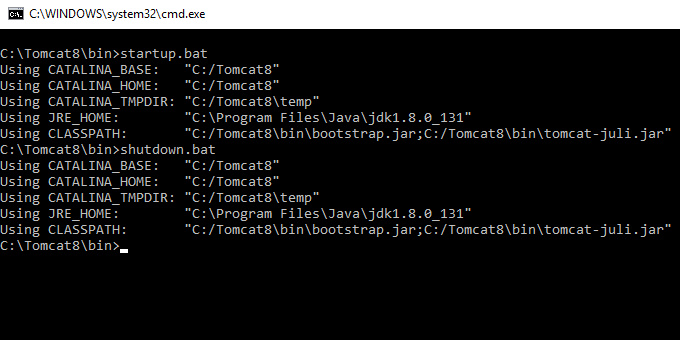
After successful installation, go to BIN folder directly under Tomcat folder. You will find two batch files with names startup.bat and shutdown.bat. You can create shortcuts of these batch files on the desktop or inside Startup Menu for easily starting and stopping Tomcat server whenever required.
Simply use Command Prompt to start and stop Tomcat server in other way.
C:Tomcat8bin>startup.bat
C:Tomcat8bin>shutdown.bat
Testing Tomcat Installation
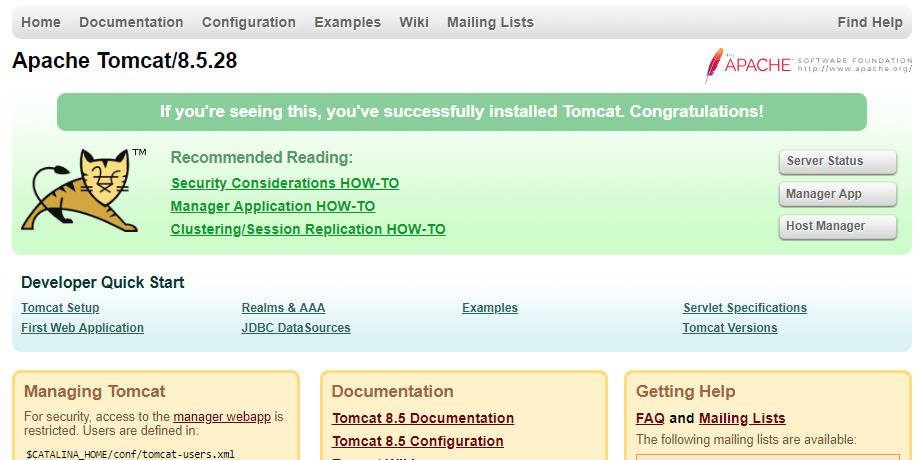
Open any web browser like Internet Explorer or Google Chrome. Go to ‘http://localhost:8080‘. You should see the below page. It means you successfully installed Tomcat Server. You should start the server before opening the webpage.
Configure Users on Tomcat Server
By default, Tomcat does not use User Password. It does not even prompt to configure users and roles.
Go to Tomcat/conf/tomcat-users.xml
Add Usernames, Passwords and Roles required. Without configuring these Usernames, You will be able to access Server Status, Manager App and Host Manager options on the Tomcat Home Page.
<role rolename=»manager-gui»/>
<user username=»admin» password=»admin» roles=»manager-gui»/>
<role rolename=»admin-gui»/>
<user username=»tomcat» password=»tomcat» roles=»admin-gui»/>
Examples of Servlets and JSP on Tomcat Server
You can find good quality examples of Servlets and JSP on Tomcat Server at http://localhost:8080/examples/.
Yes. It is this easy to install Tomcat Server on Windows 10 and other older Windows operating systems.
You can also read our good stuff articles / exams


