
Перевод файла с репозитория blynk-server
Автор перевода: Титенко Максим
-
Facebook
-
Twitter
-
GitHub
Blynk Local Server
Платформа с приложением для iOS и Android для управления Arduino, ESP8266, Raspberry Pi и других плат микроконтроллеров через Интернет.
Что такое Blynk?
Blynk — это платформа с приложениями iOS и Android для управления Arduino, ESP8266, Raspberry Pi и подобных плат микроконтроллеров через Интернет.
Вы можете легко создавать графические интерфейсы для всех своих проектов, просто перетаскивая виджеты. Если вам нужна дополнительная информация, перейдите по следующим ссылкам:
- Blynk сайт
- Blynk документация
- Blynk сообщество
- Blynk Examples generator
- App Store
- Google Play
- Blynk library
- Kickstarter


Содержание
- Скачать
- Требования
- Быстрая настройка локального сервера
- Установка локального сервера на Raspberry Pi
- Настройка авто перезагрузки сервера на системах Unix(Linux)
- Настройка авто перезагрузки сервера на Windows
- Инструкция по обновлению для Unix (Linux) Систем
- Инструкция по обновлению для Windows
- Подключения Blynk к локальному серверу
- Расширенная настройка локального сервера
- Панель администратора
- HTTP/S RESTful API
- Включение почты на локальном сервервере
- Включение SMS на локальном сервере
- Включение хранилища необработанных данных
- Автоматическое шифрование данных
- Руководство шифрования SSL/TLS сертефикатов
- Создание собственных сертификатов SSL
- Установка java для Ubuntu
- Как работает Blynk?
- Blynk протоколы
НАЧНЕМ
Blynk сервер
Сервер Blynk — это Java сервер с открытым исходным кодом Netty, отвечающий за пересылку
данных между мобильным приложением Blynk и различными микроконтроллерами и SBC (например, Arduino, Raspberry Pi и т. д.).
Скачать последнею версию сервера здесь.

Требования
- Требуется Java 8/9 (OpenJDK, Oracle)
- Любая операционная система, которая имеет поддержку java
- Не менее 30 МБ ОЗУ (оперативной памяти) — (может быть меньше при настройке)
- Открытые порты 9443 (для приложения), 8442 (для аппаратного обеспечения без ssl), 8441 (для аппаратного обеспечения с ssl)
Инструкция установки Java на Ubuntu.
Для Windows загрузите Java здесь и установите.
Быстрая настройка локального сервера
- Убедитесь, что вы используете Java 9
java -version
Output: java version «9»
- Запустите сервер по умолчанию «аппаратный порт 8442» и по умолчанию «порт приложения 9443» (порт SSL)
java -jar server-0.31.0.jar -dataFolder /path
Вот и всё!
ПРИМЕЧАНИЕ: / path должен быть реальным существующим путем в папку, где вы хотите хранить все свои данные.
- В конечном результате вы увидите такое сообщение:
Blynk Server successfully started.
All server output is stored in current folder in ‘logs/blynk.log’ file.
Включение почты на локальном сервере
-
Чтобы включить уведомления по почте на локальном сервере, вам необходимо предоставить свои собственные учетные данные. Создайте файл
mail.propertiesв той же папке, гдеserver.jar. -
Свойства почты:
mail.smtp.auth=true
mail.smtp.starttls.enable=true
mail.smtp.host=smtp.gmail.com
mail.smtp.port=587
mail.smtp.username=YOUR_EMAIL_HERE
mail.smtp.password=YOUR_EMAIL_PASS_HERE
Пример настройки почты здесь.
ПРЕДУПРЕЖДЕНИЕ: разрешены только учетные записи gmail.
ПРИМЕЧАНИЕ. Вам нужно настроить Gmail для работы с ненадежными приложениями.
Нажмите здесь, а затем нажмите «Ненадежные приложения заблокированы ».
Быстрая настройка локального сервера на Raspberry Pi
- Подключить Raspberry Pi через ssh;
- Установить java 8:
sudo apt-get install oracle-java8-jdk
- Убедитесь, что вы используете именно Java 8
java -version
Output: java version «1.8»
- Загрузите Blynk сервер Jar файл (или вручную скопируйте его в Raspberry Pi через команду ssh и scp):
wget «https://github.com/blynkkk/blynk-server/releases/download/v0.31.0/server-0.31.0-java8.jar»
- Запустите сервер по умолчанию «аппаратный порт 8442» и по умолчанию «порт приложения 9443» (порт SSL)
java -jar server-0.31.0-java8.jar -dataFolder /home/pi/Blynk
Вот и всё!
- В конечном результате вы увидите следующее сообщение:
Blynk Server successfully started.
All server output is stored in current folder in ‘logs/blynk.log’ file.
Включение автоматического перезапуска сервера в UNIX-системах
- Чтобы включить автоматический перезапуск сервера, найдите файл /etc/rc.local и добавьте:
java -jar /home/pi/server-0.31.0.jar -dataFolder /home/pi/Blynk &
- Или если описанный выше подход не работает, выполните:
crontab -e
- добавьте следующую строку:
@reboot java -jar /home/pi/server-0.31.0.jar -dataFolder /home/pi/Blynk &
Сохранить и выйти.
Включение автоматического перезапуска сервера в Windows
- Создать .bat файл:
start-blynk.bat
- Вставьте в файл одну строку:
java -jar server-0.31.0.jar -dataFolder /home/pi/Blynk
- Добавить файл bat в папку автозагрузки Windows
Вы также можете использовать этот скрипт для запуска сервера.
Инструкция по обновлению для unix — систем
ВАЖНО
Сервер должен всегда обновляться до того, как вы обновите приложение Blynk. Чтобы обновить сервер до более новой версии, вам нужно будет убить старый процесс и запустить новый.
- Найти идентификатор процесса сервера Blynk
ps -aux | grep java
- Вы должны увидеть что-то подобное:
username 10539 1.0 12.1 3325808 428948 pts/76 Sl Jan22 9:11 java -jar server-0.31.0.jar
- Убить старый процесс
kill 10539
10539 — идентификатор процесса сервера blynk из вывода команды выше.
- Запустить новый сервер как обычно
После этого вы можете обновить приложение Blynk. Понижение версии сервера не поддерживается.
ВНИМАНИЕ!
Не переустанавливайте сервер на более низкие версии. Вы можете потерять все свои данные.
Инструкцию по обновлению для Windows
-
Открыть диспетчер задач;
-
Найти Java-процесс;
-
Остановить процесс;
-
Запустить новый сервер как обычно
Изменения в приложение и эскизе
- Укажите настраиваемый путь к серверу в приложении


-
Изменить тип вашего проводного подключения к интернету с
на
Blynk.begin(auth, "your_host");или на
Blynk.begin(auth, IPAddress(xxx,xxx,xxx,xxx)); -
Измените ваше WiFi подключения с
Blynk.begin(auth, SSID, pass));на
Blynk.begin(auth, SSID, pass, "your_host");или на
Blynk.begin(auth, SSID, pass, IPAddress(XXX,XXX,XXX,XXX)); -
Изменить ваш Raspberry Pi Javascript c
var blynk = new Blynk.Blynk(AUTH, options = {connector : new Blynk.TcpClient()});на
var blynk = new Blynk.Blynk(AUTH, options= {addr:"xxx.xxx.xxx.xxx"}); -
или в случае USB при запуске blynk-ser.sh предоставить опцию «-s» с адресом вашего локального сервера
./blynk-ser.sh -s you_host_or_IP
ВАЖНО
Блинк постоянно развивается. Мобильные приложения и сервер часто обновляются. Чтобы избежать проблем во время обновлений, отключите автоматическое обновление для приложения Blynk или одновременно обновите локальный сервер и приложение blynk, чтобы избежать возможных проблем с миграцией.
ВАЖНО
Локальный сервер Blynk отличается от сервера Blynk Cloud. Они не связаны вообще. Вы должны создать новую учетную запись при использовании локального сервера Blynk.
Расширенная настройка локального сервера
Для большей гибкости вы можете расширить сервер с большим количеством опций, создав файл server.properties в той же папке, что иserver.jar.
Пример можно найти здесь.
Вы также можете указать любой путь к файлу server.properties через аргумент командной строки -serverConfig. Вы можете
делать то же самое с mail.properties через -mailConfig и sms.properties через -smsConfig.
Например:
java -jar server-0.31.0.jar -dataFolder /home/pi/Blynk -serverConfig /home/pi/someFolder/server.properties
Доступные параметры сервера:
- Приложение Blynk, https, websockets, порт администратора
https.port=9443
- Аппаратный простой порт tcp/ip
hardware.default.port=8442
- Аппаратный порт ssl/tls (для аппаратного обеспечения, поддерживающего сокеты SSL/TLS)
hardware.ssl.port=8441
-
Для простоты Blynk уже предоставляет серверную банку со встроенными сертификатами SSL, поэтому у вас есть рабочий сервер из коробки через SSL / TLS-сокеты. Но поскольку сертификат и его частный ключ находятся на публике, это совершенно небезопасно. Поэтому, чтобы исправить это, вам нужно предоставить свои собственные сертификаты. И измените ниже свойства с указанием пути к вашему сертификату. и закрытый ключ, и это пароль. Узнайте, как создавать самозаверяющие сертификаты [здесь](# generate-ssl-certificate)
-
Указывает на cert и ключ, который помещается в ту же папку, что и jar.
server.ssl.cert=./server_embedded.crt
server.ssl.key=./server_embedded.pem
server.ssl.key.pass=pupkin123
- Порт Http и веб-сокетов
http.port=8080
- Папка профилей пользователей. Папка, в которой будут сохраняться все профили пользователей. По умолчанию используется System.getProperty («java.io.tmpdir») / blynk. Будет создано, если не существует
data.folder=/tmp/blynk
- Папка для всех журналов приложений. Будет создана, если оно не существует. «.» Это директория, из которого вы запускаете скрипт.
logs.folder=./logs
- Уровень отладки журнала. Возможные значения: trace | debug | info | error. Определяет, насколько точным будет запись. Слева направо -> максимальная регистрация до минимума
log.level=trace
- Максимально допустимое количество панелей пользователей.
user.dashboard.max.limit=100
- 100-кратное ограничение скорости на пользователя. Вы также можете расширить этот предел на странице hardware side.
user.message.quota.limit=100
- этот параметр определяет, как часто вы можете отправлять почту / твит / push или любое другое уведомление. Указано в секундах
notifications.frequency.user.quota.limit=60
- Максимально разрешенный размер профиля пользователя. В Кб.
user.profile.max.size=128
- Количество строк для хранения в терминальном виджете (данные истории терминала)
terminal.strings.pool.size=25
- Максимально допустимое количество очереди уведомлений. Очередь, ответственная за обработку электронной почты, нажатие, отправка твитов. Из-за проблемы с производительностью — эта очередь обрабатывается в отдельном потоке, это требуется из-за блокировки характера всех вышеперечисленных операций. Обычно ограничение не должно быть достигнуто
notifications.queue.limit=5000
- Количество потоков для выполнения операций блокировки — push, twits, emails, db query. Рекомендуется удерживать это значение до минимума, если вам не нужно выполнять много операций блокировки.
blocking.processor.thread.pool.limit=6
- Период для очистки всей пользовательской БД на диск. В миллисекундах
profile.save.worker.period=60000
- Указывает максимальный период времени, когда аппаратный сокет может быть бездействующим. После чего сокет будет закрыт из-за неактивности. Через несколько секунд. Оставьте его пустым для тайм-аута бесконечности
hard.socket.idle.timeout=15
- В основном требуется настройка локальных серверов в случае, если пользователь хочет записывать необработанные данные в формате CSV. Дополнительную информацию см. В разделе raw data.
enable.raw.data.store=true
- Адрес для открытия страницы администрирования. Необходимо начинать с «/». Для «/ admin» URL-адрес будет выглядеть так: «https://127.0.0.1:9443/admin».
admin.rootPath=/admin
- Список IP-адресов администратора, разделенных запятыми. Разрешить доступ к пользовательскому интерфейсу администратора только для этих IP-адресов. Вы можете установить его для 0.0.0.0/0, чтобы разрешить доступ для всех. Вы можете использовать нотацию CIDR. Например, 192.168.0.53/24.
allowed.administrator.ips=0.0.0.0/0
- Имя и пароль администратора по умолчанию. Будет создан при запуске начального сервера
admin.email=admin@blynk.cc
admin.pass=admin
- Хост для перенаправления пароля и генерации сертификата. По умолчанию текущий IP-адрес сервера взят из сетевого интерфейса «eth». Может быть заменено более дружественным именем хоста. Рекомендуется переопределить это свойство с помощью IP-адреса вашего сервера, чтобы избежать возможных проблем с решением узла.
server.host=blynk-cloud.com
- Электронная почта, используемая для регистрации сертификата, может быть опущена, если вы уже указали ее в mail.properties.
contact.email=pupkin@gmail.com
- Список пользователей с запятыми, которым разрешено создавать учетные записи. Оставьте его пустым, если не требуется никаких ограничений.
allowed.users.list=allowed1@gmail.com,allowed2@gmail.com
Панель администратора
Сервер Blynk предоставляет панель администрирования, где вы можете контролировать свой сервер. Она доступна по этому URL-адресу:
https://your_ip:9443/admin

ПРЕДУПРЕЖДЕНИЕ
Пожалуйста, измените пароль администратора и его имя сразу после входа на страницу администратора. ЭТО МЕРЫ БЕЗОПАСНОСТИ.
ПРЕДУПРЕЖДЕНИЕ
По умолчанию параметр allowed.administrator.ips разрешает доступ для всех. Другими словами,
доступной с любого другого компьютера. Ограничьте доступ к нему через свойство allowed.administrator.ips.
Отключение chrome https warning на localhost
- Вставить в адресную строку chrome
chrome://flags/#allow-insecure-localhost
- Вы должны увидеть выделенный текст, говорящий: «Разрешить недопустимые сертификаты для ресурсов, загруженных с localhost». Нажмите «Включить»
HTTP / S RESTful
Blynk HTTP / S RESTful API позволяет легко считывать и записывать значения в / из Pins в приложениях и оборудовании Blynk.
Описание API Http можно найти здесь.
Включение смс на локальном сервере
Чтобы включить уведомления SMS на локальном сервере, вам необходимо предоставить учетные данные для шлюза SMS (в настоящее время сервер Blynk
поддерживает только 1 провайдера — Nexmo. Вам нужно создать файл sms.properties
в той же папке, где находится server.jar.
nexmo.api.key=
nexmo.api.secret=
И заполните вышеуказанные свойства учетными данными, которые вы получите от Nexmo. (Учетная запись -> Настройки -> Настройки API).
Вы также можете отправлять SMS по электронной почте, если ваш оператор сотовой сети поддерживает это. См. Обсуждение для более подробной информации.
Включение хранилища необработанных данных
По умолчанию необработанное хранилище данных отключено (поскольку он много занимает место на диске).
Когда вы включаете его, каждая команда Blynk.virtualWrite будет сохранена в DB.
Вам необходимо будет установить PostgreSQL Database (** минимальная требуемая версия — 9.5 **), чтобы включить эту функцию:
1. Включение необработанных данных на сервере
Включить необработанные данные в server.properties:
enable.db=true
enable.raw.db.data.store=true
2. Установите PostgreSQL. Вариант A
sudo sh -c ‘echo «deb http://apt.postgresql.org/pub/repos/apt/ lsb_release -cs-pgdg main» >> /etc/apt/sources.list.d/pgdg.list’
wget -q https://www.postgresql.org/media/keys/ACCC4CF8.asc -O — | sudo apt-key add —
sudo apt-get update
sudo apt-get install postgresql postgresql-contrib
2. Установите PostgreSQL. Вариант Б
sudo apt-get update
apt-get —no-install-recommends install postgresql-9.6 postgresql-contrib-9.6
3. Скачать Blynk DB скрипт
wget https://raw.githubusercontent.com/blynkkk/blynk-server/master/server/core/src/main/resources/create_schema.sql
4. Переместите файл create_schema.sql в папку temp (чтобы избежать проблем с разрешением)
mv create_schema.sql /tmp
Результат:
/tmp/create_schema.sql
Скопируйте его в буфер обмена с консоли.
5. Подключитесь к PostgreSQL
sudo su — postgres
psql
6. Создать Blynk DB, проверить пользователя и таблицы
i /tmp/create_schema.sql
/ tmp / create_schema.sql — путь от шага 4.
Вы должны увидеть следующий вывод:
postgres=# i /tmp/create_schema.sql
CREATE DATABASE
You are now connected to database «blynk» as user «postgres».
CREATE TABLE
CREATE TABLE
CREATE TABLE
CREATE TABLE
CREATE TABLE
CREATE TABLE
CREATE TABLE
CREATE TABLE
CREATE TABLE
CREATE TABLE
CREATE TABLE
CREATE ROLE
GRANT
GRANT
Выход
q
Теперь запустите свой сервер, и вы увидите следующий текст в файле postgres.log:
2017-03-02 16:17:18.367 — DB url : jdbc:postgresql://localhost:5432/blynk?tcpKeepAlive=true&socketTimeout=150
2017-03-02 16:17:18.367 — DB user : test
2017-03-02 16:17:18.367 — Connecting to DB…
2017-03-02 16:17:18.455 — Connected to database successfully.
ПРЕДУПРЕЖДЕНИЕ:
Исходные данные могут очень быстро сократить пространство на диске!
Формат данных CSV
Формат данных:
значение, метка времени, DeviceId
Например:
10,1438022081332,0
Где 10 — значение булавки.
1438022081332 — разница, измеренная в миллисекундах, между текущим временем и полночью, 1 января 1970 г. UTC.
Чтобы отобразить дату / время в excel, вы можете использовать формулу:
= ((Column / (60 * 60 * 24) / 1000 + 25569))
0 — идентификатор устройства
Автоматическое создание шифрования сертификатов
У последнего сервера Blynk есть супер классная функция — автоматическая генерация сертификатов Encrypt.
Однако он имеет несколько требований:
- Добавить свойство
server.hostв файлserver.properties.
Например :
server.host = myhost.com
IP не поддерживается, это ограничение Let’s Encrypt. Также имейте в виду, что myhost.com
должны быть разрешены публичными DNS-серверами.
- Добавить свойство
contact.emailвserver.properties. Например :
contact.email=test@gmail.com
- Вам нужно запустить сервер на порту 80 (требуется root или права администратора) или
сделать [переадресацию портов](# port-forwarding-for-https-api) на порт HTTP Blynk по умолчанию — 8080.
Это оно! Запускать сервер как обычный, а сертификаты будут генерироваться автоматически.
Руководство шифровки сертификатов SSL / TLS
- Сначала установите certbot на свой сервер (машина, на которой вы собираетесь запускать сервер Blynk)
wget https://dl.eff.org/certbot-auto
chmod a + x certbot-auto
- Генерирование и проверка сертификатов (ваш сервер должен быть подключен к Интернету и иметь открытые порты 80/443)
./certbot-auto certonly —agree-tos —email YOUR_EMAIL —standalone -d YOUR_HOST
Например
./certbot-auto certonly —agree-tos —email pupkin@blynk.cc —standalone -d blynk.cc
- Затем добавьте файл
server.properties(в папку с server.jar)
server.ssl.cert = / и т.д. / letsencrypt / живой / YOUR_HOST / fullchain.pem
server.ssl.key = / и т.д. / letsencrypt / живой / YOUR_HOST / privkey.pem
server.ssl.key.pass =
Создание собственных сертификатов SSL
- Создать самозаверяющий сертификат и ключ
openssl req -x509 -nodes -days 1825 -newkey rsa: 2048 -keyout server.key -out server.crt
- Преобразование server.key в файл закрытого ключа PKCS # 8 в формате PEM
openssl pkcs8 -topk8 -inform PEM -outform PEM -in server.key -out server.pem
Если вы подключаете аппаратное обеспечение с помощью USB-скрипта, вы должны указать опцию ‘-s’, указывающую на «общее имя» (имя хоста), вы указанных во время создания сертификата.
В качестве вывода вы получите файлы server.crt и server.pem, которые необходимо предоставить для свойств server.ssl.
Установить java для Ubuntu
sudo apt-add-repository ppa:webupd8team/java
sudo apt-get update
sudo apt-get install oracle-java9-installer
или
sudo apt-get install oracle-java8-installer
в случае, если в вашей системе еще нет Java 9.
Перенаправление портов для API HTTP / S
sudo iptables -t nat -A PREROUTING -p tcp —dport 80 -j REDIRECT — to-port 8080
sudo iptables -t nat -A PREROUTING -p tcp —dport 443 -j REDIRECT — to-port 9443
Включение генерации QR на сервере
sudo apt-get install libxrender1
За маршрутизатором wifi
Если вы хотите запустить сервер Blynk за WiFi-маршрутизатором и хотите, чтобы он был доступен из Интернета, вам необходимо добавить правило переадресации портов на вашем маршрутизаторе. Это необходимо для перенаправления всех запросов, которые поступают на маршрутизатор в локальной сети на сервер Blynk.
Как построить
Blynk имеет кучу интеграционных тестов, требующих DB, поэтому вам нужно пропустить тесты во время сборки.
mvn clean install -Dmaven.test.skip = true
Как работает Блинк?
Когда аппаратное обеспечение подключается к облаку Blynk, оно открывает либо соединение ssl / tls keep-alive на порту 8441, либо в режиме keep-alive plain
tcp / ip на порту 8442. Приложение Blynk открывает взаимное соединение ssl / tls с Blynk Cloud на порту 443 (9443 для локальных серверов).
Blynk Cloud отвечает за пересылку сообщений между оборудованием и приложением. В обоих приложениях (приложениях и оборудовании) Blynk использует
собственный двоичный протокол, описанный ниже.
Протокол Блинк
Blynk передает двоичные сообщения со следующей структурой:
| Команда | Идентификатор сообщения | Длина / Статус | Тело |
|---|---|---|---|
| 1 байт | 2 байта | 2 байта | Переменная |
Идентификатор сообщения и длина big endian.
Тело имеет формат, специфичный для команд.
Определения команд и состояний: BlynkProtocolDefs.h
Типичная библиотека Blynk знает, как отправить (S) / процесс (P):
S BLYNK_CMD_LOGIN + токен аутентификации
SP BLYNK_CMD_PING
SP BLYNK_CMD_RESPONSE
SP BLYNK_CMD_BRIDGE
SP BLYNK_CMD_HARDWARE
S BLYNK_CMD_TWEET
S BLYNK_CMD_EMAIL
S BLYNK_CMD_PUSH_NOTIFICATION
Лицензирование
Лицензия GNU GPL
Introduction:
Blynk Legacy is a very powerful Internet of Things(IoT ) software solution which allows you to design your own IoT APP without Android and iOS APP programming knowledge.
Following tutorial will guide to install Blynk legacy server in your local Windows, Mac computer or Linux like Raspberry Pi.
Picture 1.1 shows how Blynk systems works:
Picture 1.1
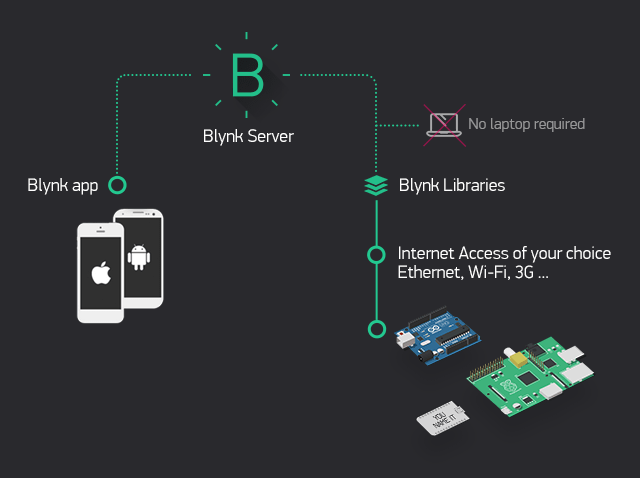
From Above picture, you can see Blynk software consists three parts:
- Blynk Legacy APP which is installed in your Cell phone or tablet
- Blynk Legacy Server
- Blynk Library which is installed in IoT terminal device such as Arduino, Raspberry Pi etc.
In this Lesson, we will teach students how to install Blynk Legacy local Server and setup APP and Arduino sketch code to make them working in Blynk Local Server.
Install Server on local PC
You can install local Blynk server on any computer which has Java 11 (or higher version). Java environment is a basic module which comes with those popular OS such as Windows, MacOS and Linux. So if your computer is not too old, you no need install any Java software to run Blynk server.
In this tutorial, we will teach how to install local Blynk server on Windows, MacOS and Raspbian(Raspberry Pi OS). If you use other OS, the installation is similar, just make sure you have Java 11 and JDK 8+ installed in your OS.
Install Blynk local server on Windows
1)Download Blynk local server from https://osoyoo.com/driver/blynk/blynk-server.jar
2)In Windows search bar , type cmd to open command windows
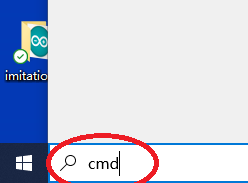
3)After open the command window, go to the fold where blynk-server.jar file is saved. Test your java environment by typing following command in cmd terminal:
java -version
You should see something as following
java version "1.8.0_202"
If you can’t see java version, it means your haven’t installed Java properly, please read this article to install Java
4)Go to your download folder, replace the bold font path with your folder path
cd C:UsersAdminyour download folder
Then run following command to start the local Blynk server:
java -jar ./blynk-server.jar -dataFolder ./Blynk
you will see following result:

Now your local Blynk server has been successfully installed and running in your Windows.
Install Blynk local server on Apple Macbook Computer
1)Download Blynk local server from https://osoyoo.com/driver/blynk/blynk-server.jar
2)Open MacBook terminal window,
Go to your download folder, Run following command to start the local Blynk server:
java -jar ./blynk-server.jar -dataFolder ./Blynk
you will see following result:

Install Blynk local server on Raspberry Pi or similar Linux computer
1)Open your Pi shell terminal or use SSH to connect Raspberry Pi remote terminal
2)Download Blynk local server by following command
wget http://osoyoo.com/driver/blynk/blynk-server.jar
2)Go to your download folder, Run following command to start the local Blynk server:
java -jar ./blynk-server.jar -dataFolder ./Blynk
The java server will start in one or two minutes, then you will see following result:

If you want the Raspberry Pi to start Blynk Server automatically when starting your Pi, you can run following command:
crontab -e
Then you can add following in the bottom crontab file
@reboot java -jar /home/pi/blynk-server.jar -dataFolder /home/pi/Blynk
After that, use Ctrl-X to save and exit the file and reboot your computer. Your Blynk server will automatically start every time.
You can visit the admin page of Blynk Server url:
https://your_RaspberryPi_ip_address:9443/admin
Cell Phone APP download and configure:
Prerequisite:
You have successfully installed Blynk server in your local computer. Next step is to install Blynk Legacy APP in your cell phone.
Before install and setup your Blynk APP, you need to know your local server’s LAN IP address first, if you don’t know how to do it, read following article:
How to know my computer’s local IP address
Now let’s start to install and setup Blynk Legacy APP
1)In Google Play or iOS APP store, search Blynk Legacy and install the APP.
2) Open Blynk App, click Login , you will see following UI:
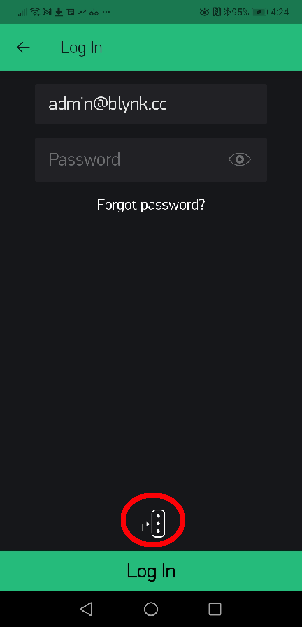
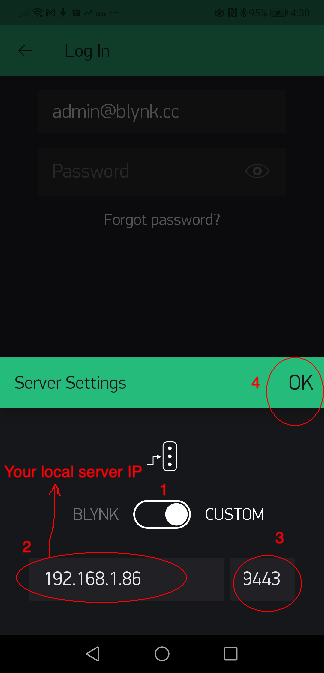
3)Click the three dot icon in above UI to set local server IP and port.
Do following settings:
- Switch server from BLYNK to CUSTOMS
- Set your local blynk server IP
- Set port to 9443
- click OK
See following picture:
After you have set up the local server IP and port, you can use following steps to connect APP to local Blynk server:
- Set Email field to [email protected]
- Set password field to admin
- Click Login
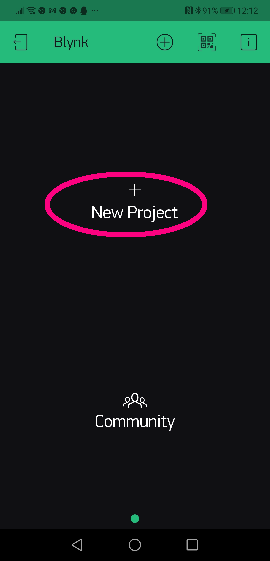
If your Local Blynk is not running properly or IP address setting is wrong, APP will show Can’t connect to Server, Try later…If server running and IP setting are all ok, you will a New Project UI as following:
Congratulations! You have successfully installed local Blynk Server and connected your APP to the server.
Suppose you are using Arduino as terminal device, you click +New Project to add an Arduino project:
You can name your Project Lesson1 and select Arduino UNO (or Arduino MEGA if you are using MEGA2560),
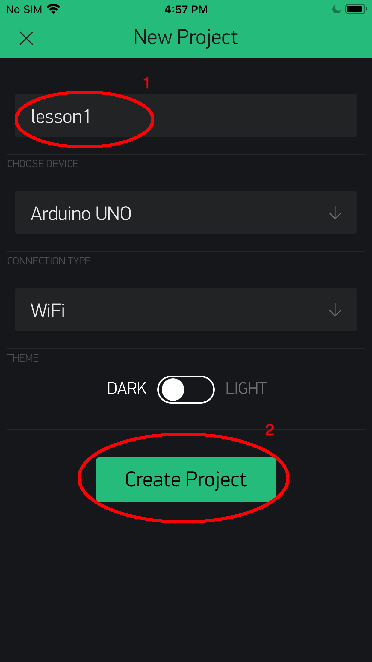
In above UI, Click Create Project, you will see a blank project named lesson1 as following picture, In future, you can click (+) sign to add control Widget to create your APP UI
![]()
Get Auth Token
Blynk Auth token is the password to let your Arduino board to exchange project data with local Blynk server. You need to set this token in your Arduino code file in future. Token is associated with a project, so you must create a project in APP before getting a Token.
You have two methods to get Blynk Token:
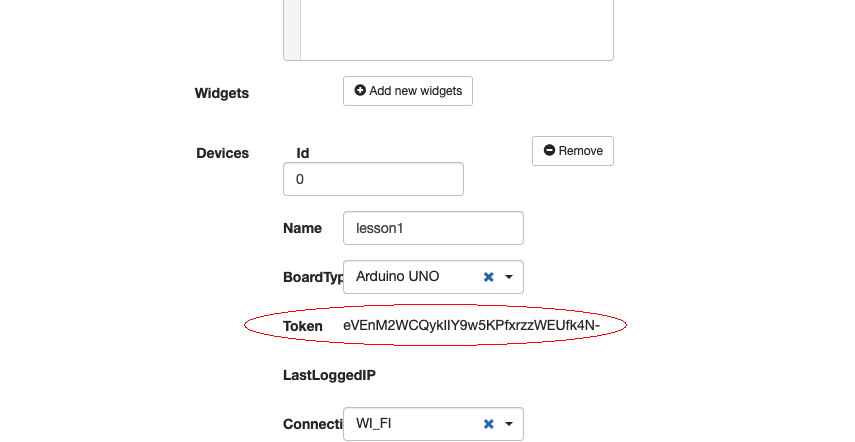
Method 1) In your folder where you download and save blynk-server.jar file, you will see a sub-folder called blynk, enter that folder, you will find a file [email protected] , please use a text editor to open this file:

After open the the file, you will see following content:
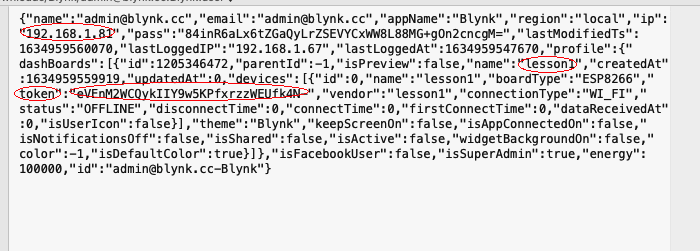
In above picture, you can see that, on the right of the word “token“, there is a long string
eVEnM2WCQykIIY9w5KPfxrzzWEUfk4N–
This is the token of the lesson 1 project , copy this token to a file , and you will use it in your Arduino or Raspberry Pi client software code.
Method 2) Get token from local blynk control panel:
Please open your browser and visit following url:
https://your_server_ip:9443/admin
your_server_ip is the IP address of your local Blynk server.
Above https:// url default certificate is self-signed. It will therefore be considered unreliable. You will have to accept the alert message displayed by your internet browser. If you are using Google Chrome browser, You will see following alert:
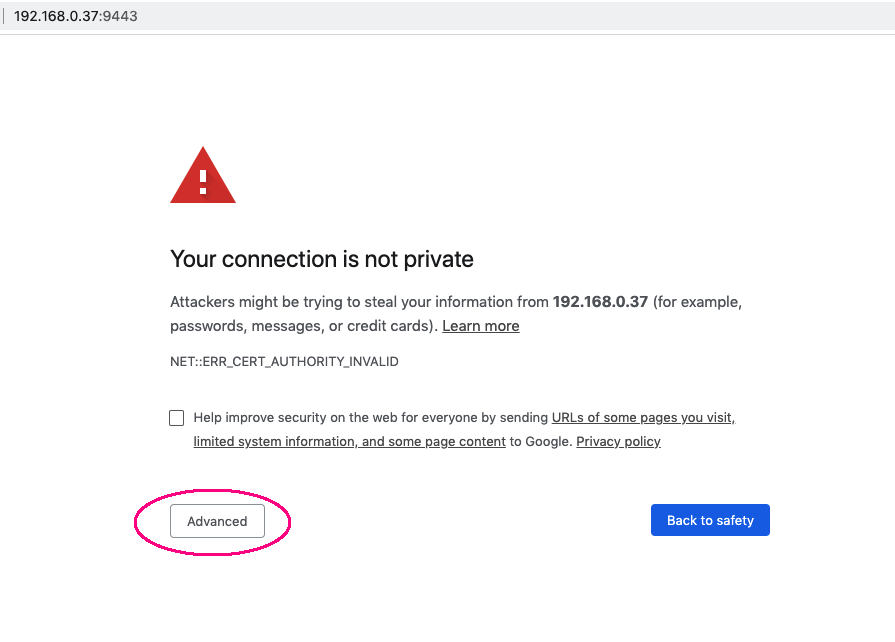
Click Advanced, then select proceed to the unsafe IP as following:

You will go to Server login page, please use user name [email protected] and password admin to login to control panel.
then please click Users->[email protected]:
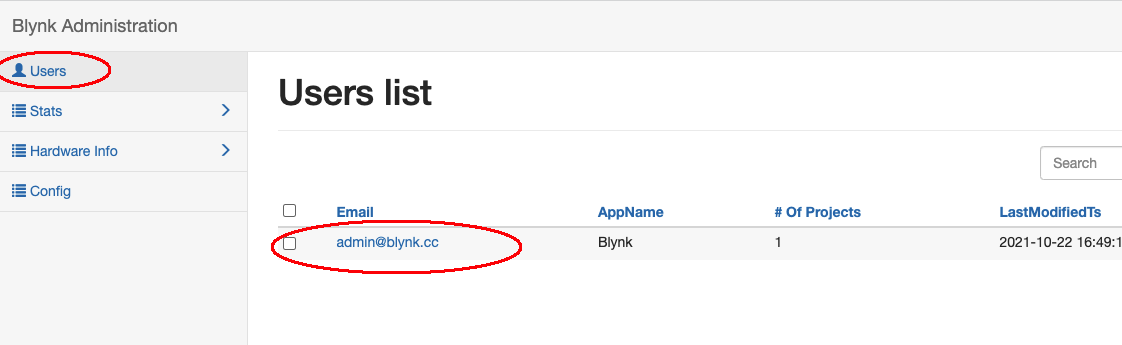
Click [email protected], then you will find the Token which was just assigned for your project:
- blynk
- blynk server
- blynk server raspberry pi
- blynk server raspberry pi3
- raspberry pi server blynk
- server
- блинк
- блинк сервер
Страница 1 из 9
-
Blynk Server (сервер умного дома блинк ) С доступом из любой точки мира!!
Дело было вечером делать было нечего. И тут на глаза попалась мне давно лежащая без дела Rspberry Pi3. А дальше все как в тумане, ничего не помню! Очнулся я дня через три с сервером Блинк (Blynk_Server) на Pi3 и простеньким проектом на ESP8266.
Для того что бы создать сервер на одноплатном компьютере типа Raspberry Pi и ему подобных нам понадобится:
1.Одноплатный компьютер (Raspberry Pi, Orange Pi, Banana Pi И.т.д)
2.Установить программное обеспечение на одноплатный ПК.
3.Инструкция по установке Амперка_Wiki http://wiki.amperka.ru/rpi:installation
4.Для работы сервера Блинк (Blynk) на понадобиться установить из репозитория linux
Java8 ( sudo apt-get install oracle-java8-jdk ) .
5. Создать дерикторию Blynk ( mkdir /home/pi/Blynk )
6. Перейти в директорию Blynk ( cd Blynk )
7.И из директории /Blynl установить последньую актувальную версяю сервера Blynk https://github.com/blynkkk/blynk-server/releases[!] Создатели Blynk удалили репозиторий, но остались ответвления. Вот одно из них, сделанное администратором их сообщества.
8. На 23 мая 2018 актуальна версия Blynk server V 0.36.4( wget «https://github.com/blynkkk/blynk-server/releases/download/v0.36.4/server-0.36.4-java8.jar» ).
9.Запустить сервер блинк (Blynk) ( java -jar server-0.36.4-java8.jar -dataFolder /home/pi/Blynk ).
10.Если все сделано правильно то следующее сообщениеBlynk Server 0.36.5-SNAPSHOT successfully started.
All server output is stored in folder ‘/home/pi/Blynk/logs’ file.
Your Admin login email is admin@blynk.cc
Your Admin password is admin11.Отключаем сервер Сtrl+C
12.Далее нам нужно настроить автозапуск сервера Blynk, открыть файл rc.local ( sudo nano /etc/rc.local ). И записать в него путь к серверу ( java -jar /home/pi/Blynk/server-0.36.4-java8.jar -dataFolder /home/pi/Blynk & ) 13.Вводим команду ( crontab –e )
14.Записываем в открывшийся файл ( @reboot java -jar /home/pi/Blynk/server-0.36.4-java8.jar -dataFolder /home/pi/Blynk & )
15.Перезагружаем одноплатник ( sudo reboot ).
16.Берем мобильный или планшет на IOS или Android и скачиваем приложение Blynk
17.Запускаем приложение Blynk. Выбираем пункт:Login ( email is admin@blynk.cc and password is admin )
18.В нижней части экрана по центру пиктограмма с тремя точками и стрелкой нажимаем ее и вводим (IP-адрес вашего однолетника (server) и порт 9443)
19.Так же работоспособность сервера Blynk можно проверить через броузер
https://ip-адрес одоплатника :9443/adminПример(https://192.168.1.22:9443/admin)—email: admin@blynk.ccand password: admin .
20. На это первая часть закончена!!!!!!!Global_Server_Blynk Доступ из любой точки мира INTERNET !!!
1.Установка сертификатов безопасности ( openssl req -x509 -nodes -days 1825 -newkey rsa:2048 -keyout server.key -out server.crt )
1.2 Заполнить форму: Country Name (2 letter code) [AU]:……………………………………………
State or Province Name (full name) [Some-State]:………………………..
Locality Name (eg, city) []:………………………………………………………
Organization Name (eg, company) [Internet Widgits Pty Ltd]:…………..
Organizational Unit Name (eg, section) []:………………………………………….
Common Name (e.g. server FQDN or YOUR name) []:………………………..
Email Address []:………………………………………………………………………………
2. ( openssl pkcs8 -topk8 -inform PEM -outform PEM -in server.key -out server.pem )2.1 Создать пароль……………………………
2.2 Открыть файл (он пустой) ( sudo nano server.properties )
2.3 Содержимое файла берм по ссылке https://raw.githubusercontent.com/b…ver/core/src/main/resources/server.properties
2.4 В файле заменить строки server.ssl.cert=./server.crt
server.ssl.key=./server.pem
server.ssl.key.pass=PASSWORD_USED_IN_STEP_2.1
2.5 Открыть файл (он пустой) ( sudo nano mail.properties )
2.6 Содержимое файла берм по ссылке https://raw.githubusercontent.com/b…ions/email/src/main/resources/mail.properties
3. Обновить файлы для автозагрузки ( sudo nano /etc/rc.local )
3.1 ( java -jar /home/pi/Blynk/server-0.36.4-java8.jar -dataFolder /home/pi/Blynk -serverConfig /home/pi/Blynk/server.properties -mailConfig /home/pi/Blynk/mail.properties & )
3.2 ( crontab –e )
3.3 ( java -jar /home/pi/Blynk/server-0.36.4-java8.jar -dataFolder /home/pi/Blynk -serverConfig /home/pi/Blynk/server.properties -mailConfig /home/pi/Blynk/mail.properties )
Далее я воспользовался сервисом www.noip.com.
Зарегестрировался на сервисе, создал Hostname: name.ddns.net.Следующим шагом установить NO-IP на одноплатный компьютер. Открываем терминал и устанавливаем
1. mkdir /home/pi/noip
2. cd /home/pi/noip
3. wget http://www.no-ip.com/client/linux/noip-duc-linux.tar.gz
4. tar vzxf noip-duc-linux.tar.gz
5. cd noip-2.1.9-1
6. sudo make
7. sudo make install На этом этапе нужно ввести LOGIN и PASSWORD от учетной записи на сайте NOIP.COM
8. sudo /usr/local/bin/noip2
9. sudo noip2 –S
Далее нужно настроить проброс портов на вашем роутере порты 9443 и 8000. Тут все зависит от вашего роутера.
В моем случае это TP-LINKВложения:
Последнее редактирование модератором: 6 авг 2021
-
Добрый день… а есть ли возможность установить сервер blynk на приставке с андроидом…4 гига оперативы 16 гиг для программ можно в личку serg3262@mail.ru
-
А можно регулировать количество энергии для поддержки количества виджетов? Интересует получение дополнительной энергии, что бы не разбирать старый проект.
-
Здравствуйте. Не совсем понятны последние шаги: после регистрации в сервисе No-IP.com и установки софта на raspberry какие еще действия необходимо произвести для подключения по Blynk извне? Выданный сервисом IP-адрес Blynk не видит.
-
Наверное надо ip искать в своей локальной сети , например приложением fing.
-
Преимущество собственного сервера в том, что у вас будет целых 100,000$ энергии вместо жалких 2000$.
-
Сколько поставишь, столько и будет Ставил 1000000.
-
Инструкция конечно не идеальная, по типу «каши из топора». Однако очень поспособствовала созданию своего Blynk сервера. Пока правда не получается зайти на него извне. Но продолжаю работать над этой пролемой.
-
Да, «доступ из любой точки мира» — это круто!
Никогда не видел этого чуда в силу скромности — не бываю в любых точках мира, но посоветую разобраться с тем, что есть доступный извне IP и какой порт к вашему чудесному серверу надо пробросить через роутер.
Если вы все это знаете и совет лишний… Значит этот блинк не крут.
-
На всех белых IP не хватит. Переход на IPv6 пока не ожидается. Так что не_облачные решения для доступа из вне сразу в топку. Это исключительно моё ИМХО.
-
Достаточно серых. Можно немного заплатить.ИМХО вещь офигенная, но я захожу в сеть на даче через роутер keenetic, что находится за файрволом провайдера. Это как — облачное решение, или нет?
-
у моего провайдера нет такой услуги. Только белый IP.А мне откуда знать?
-
Да ладно, это из первой десятки двухтысячных пост?
-
что-то у меня со второй частью (доступ извне) нелады. А именно я не уверен в правильности установки мной ssl. Как проверить установку ssl на малине?
-
Может попробовать что-то вроде:
openssl —help
#or
openssl -hМои браузеры проваливают тест на IPv6.
-
Так а на роутере IPv6 Поднят?
-
А првайдер его дает?
Я решил жизненно важную задачу «доступа из любой точки мира!!!! к вытяжке туалета» через поднятие VPN на роутере дома. Там пасется дачный роутер, смартфон(ы), etc.
Два mqtt брокера дома и на даче в режиме моста обмениваются сообщениями через туннель. Обе сети в принципе связаны друг с другом (доступ к сетевым дискам, воспроизведение медиа). Рекомендую.
VPN на домашнем роутере избавляет от всех ssl проблем.Последнее редактирование: 13 янв 2021
-
Поддержу, у меня два кинетика ultra и runner 4g, поднял vpn, с телефона тоже без проблем захожу если в vpn войти.
И потом нафига нужен блинк, я так и не понял его прелести. Связка node red, mosquitto отлично работает. И бесплатно и никаких заморочек с лишним софтом. -
Блинк, ESPHome, Tasmota — ардуино конструкторы в мире IoT. Инструментарий крутых перцев: «доступ из любой точки мира!!!».
-
И мелким шрифтом между строк — «где есть доступ в интернет».
")


Страница 1 из 9
What is Blynk?
Blynk is a platform with iOS and Android apps to control Arduino, ESP8266, Raspberry Pi and the likes over the Internet.
You can easily build graphic interfaces for all your projects by simply dragging and dropping widgets.
If you need more information, please follow these links:
- Blynk site
- Blynk docs
- Blynk community
- Blynk Examples generator
- App Store
- Google Play
- Blynk library
- Kickstarter


Content
- Download
- Requirements
- Quick Local Server setup
- Enabling mail on Local server
- Quick local server setup on Raspberry PI
- Docker container setup
- Enabling server auto restart on unix-like systems
- Enabling server auto restart on Windows
- Update instruction for unix-like systems
- Update instruction for Windows
- App and sketch changes for Local Server
- Advanced local server setup
- Administration UI
- HTTP/S RESTful API
- Enabling sms on local server
- Enabling raw data storage
- Automatic Let’s Encrypt Certificates
- Manual Let’s Encrypt SSL/TLS Certificates
- Generate own SSL certificates
- Install java for Ubuntu
- How Blynk Works?
- Blynk Protocol
GETTING STARTED
Blynk Server is an Open-Source Netty based Java server, responsible for forwarding
messages between Blynk mobile application and various microcontroller boards and SBCs (i.e. Arduino, Raspberry Pi. etc).
Download latest server build here.


Requirements
- Java 8/11 required (OpenJDK, Oracle)
- Any OS that can run java
- At least 30 MB of RAM (could be less with tuning)
- Open ports 9443 (for app and hardware with ssl), 8080 (for hardware without ssl)
Ubuntu java installation instruction.
For Windows download Java here and install.
Quick local server setup
-
Make sure you are using Java 11
java -version Output: java version "11" -
Run the server on default ‘hardware port 8080’ and default ‘application port 9443’ (SSL port)
java -jar server-0.41.16.jar -dataFolder /path
That’s it!
NOTE: /path should be real existing path to folder where you want to store all your data.
-
As an output you should see something like that:
  Blynk Server successfully started.
  All server output is stored in current folder in 'logs/blynk.log' file.
Enabling mail on Local server
To enable mail notifications on Local server you need to provide your own mail credentials. Create file mail.properties within same folder where server.jar is.
Mail properties:
    mail.smtp.auth=true
    mail.smtp.starttls.enable=true
    mail.smtp.host=smtp.gmail.com
    mail.smtp.port=587
    mail.smtp.username=YOUR_EMAIL_HERE
    mail.smtp.password=YOUR_EMAIL_PASS_HERE
Find example here.
WARNING : only gmail accounts are allowed.
NOTE : you’ll need to setup Gmail to allow less secured applications.
Go here and then click «Allow less secure apps».
Quick local server setup on Raspberry PI
-
Login to Raspberry Pi via ssh;
-
Install java 8:
sudo apt install openjdk-8-jdk openjdk-8-jre -
Make sure you are using Java 8
java -version Output: java version "1.8" -
Download Blynk server jar file (or manually copy it to Raspberry Pi via ssh and scp command):
wget "https://github.com/blynkkk/blynk-server/releases/download/v0.41.16/server-0.41.16-java8.jar" -
Run the server on default ‘hardware port 8080’ and default ‘application port 9443’ (SSL port)
java -jar server-0.41.16-java8.jar -dataFolder /home/pi/Blynk
That’s it!
-
As output you will see something like that:
  Blynk Server successfully started.
  All server output is stored in current folder in 'logs/blynk.log' file.
Docker container setup
Quick Launch
-
Install Docker
-
Run Docker container
docker run -p 8080:8080 -p 9443:9443 mpherg/blynk-server
Quick Launch on Raspberry Pi
-
Install Docker
-
Run Docker container
docker run -p 8080:8080 -p 9443:9443 linuxkonsult/rasbian-blynk
Full customisation
- Check README in docker folder
Enabling server auto restart on unix-like systems
-
To enable server auto restart find /etc/rc.local file and add:
java -jar /home/pi/server-0.41.16-java8.jar -dataFolder /home/pi/Blynk & -
Or if the approach above doesn’t work, execute
crontab -e
add the following line
@reboot java -jar /home/pi/server-0.41.16-java8.jar -dataFolder /home/pi/Blynk &
save and exit.
Enabling server auto restart on Windows
-
Create bat file:
start-blynk.bat -
Put in it one line:
java -jar server-0.41.16.jar -dataFolder /home/pi/Blynk -
Put bat file to windows startup folder
You can also use this script to run server.
Update instruction for unix-like systems
IMPORTANT
Server should be always updated before you update Blynk App. To update your server to a newer version you would need to kill old process and start a new one.
-
Find process id of Blynk server
ps -aux | grep java -
You should see something like that
username 10539 1.0 12.1 3325808 428948 pts/76 Sl Jan22 9:11 java -jar server-0.41.16.jar -
Kill the old process
kill 10539
10539 — blynk server process id from command output above.
- Start new server as usual
After this steps you can update Blynk app. Server version downgrade is not supported.
WARNING!
Please do not revert your server to lower versions. You may loose all of your data.
Update instruction for Windows
-
Open Task Manager;
-
Find Java process;
-
Stop process;
-
Start new server as usual
App and sketch changes
- Specify custom server path in your application


-
Change your ethernet sketch from
Blynk.begin(auth);to
Blynk.begin(auth, "your_host", 8080);or to
Blynk.begin(auth, IPAddress(xxx,xxx,xxx,xxx), 8080); -
Change your WIFI sketch from
Blynk.begin(auth, SSID, pass));to
Blynk.begin(auth, SSID, pass, "your_host", 8080);or to
Blynk.begin(auth, SSID, pass, IPAddress(XXX,XXX,XXX,XXX), 8080); -
Change your rasp PI javascript from
var blynk = new Blynk.Blynk(AUTH, options = {connector : new Blynk.TcpClient()});to
var blynk = new Blynk.Blynk(AUTH, options= {addr:"xxx.xxx.xxx.xxx", port:8080}); -
or in case of USB when running blynk-ser.sh provide ‘-s’ option with address of your local server
./blynk-ser.sh -s you_host_or_IP
IMPORTANT
Blynk is being constantly developed. Mobile apps and server are updated often. To avoid problems during updates either turn off auto-update for Blynk app, or update both local server and blynk app at same time to avoid possible migration issues.
IMPORTANT
Blynk local server is different from Blynk Cloud server. They are not related at all. You have to create new account when using Blynk local server.
Advanced local server setup
For more flexibility you can extend server with more options by creating server.properties file in same folder as server.jar.
Example could be found here.
You could also specify any path to server.properties file via command line argument -serverConfig. You can
do the same with mail.properties via -mailConfig and sms.properties via -smsConfig.
For example:
java -jar server-0.41.16-java8.jar -dataFolder /home/pi/Blynk -serverConfig /home/pi/someFolder/server.properties
Available server options:
-
Blynk app, https, web sockets, admin port
https.port=9443 -
Http, hardware and web sockets port
http.port=8080 -
For simplicity Blynk already provides server jar with built in SSL certificates, so you have working server out of the box via SSL/TLS sockets. But as certificate and it’s private key are in public this is totally not secure. So in order to fix that you need to provide your own certificates. And change below properties with path to your cert. and private key and it’s password. See how to generate self-signed certificates here
  #points to cert and key that placed in same folder as running jar.

  server.ssl.cert=./server_embedded.crt
  server.ssl.key=./server_embedded.pem
  server.ssl.key.pass=pupkin123
Note: if you use Let’s Encrypt certificates you’ll have to add #define BLYNK_SSL_USE_LETSENCRYPT before #include <BlynkSimpleEsp8266_SSL.h> in the Arduino Sketch for your hardware.
-
User profiles folder. Folder in which all users profiles will be stored. By default System.getProperty(«java.io.tmpdir»)/blynk used. Will be created if not exists
data.folder=/tmp/blynk -
Folder for all application logs. Will be created if it doesn’t exist. «.» is dir from which you are running script.
logs.folder=./logs -
Log debug level. Possible values: trace|debug|info|error. Defines how precise logging will be. From left to right -> maximum logging to minimum
log.level=trace -
Maximum allowed number of user dashboards.
user.dashboard.max.limit=100 -
100 Req/sec rate limit per user. You also may want to extend this limit on hardware side.
user.message.quota.limit=100 -
this setting defines how often you can send mail/tweet/push or any other notification. Specified in seconds
notifications.frequency.user.quota.limit=60 -
Maximum allowed user profile size. In Kb’s.
user.profile.max.size=128 -
Number of strings to store in terminal widget (terminal history data)
terminal.strings.pool.size=25 -
Maximum allowed number of notification queue. Queue responsible for processing email, pushes, twits sending. Because of performance issue — those queue is processed in separate thread, this is required due to blocking nature of all above operations. Usually limit shouldn’t be reached
notifications.queue.limit=5000 -
Number of threads for performing blocking operations — push, twits, emails, db queries. Recommended to hold this value low unless you have to perform a lot of blocking operations.
blocking.processor.thread.pool.limit=6 -
Period for flushing all user DB to disk. In millis
profile.save.worker.period=60000 -
Specifies maximum period of time when hardware socket could be idle. After which socket will be closed due to non activity. In seconds. Leave it empty for infinity timeout
hard.socket.idle.timeout=15 -
Mostly required for local servers setup in case user want to log raw data in CSV format. See [raw data] (#raw-data-storage) section for more info.
enable.raw.data.store=true -
Url for opening admin page. Must start from «/». For «/admin» url path will look like that «https://127.0.0.1:9443/admin».
admin.rootPath=/admin -
Comma separated list of administrator IPs. Allow access to admin UI only for those IPs. You may set it for 0.0.0.0/0 to allow access for all. You may use CIDR notation. For instance, 192.168.0.53/24.
allowed.administrator.ips=0.0.0.0/0 -
Default admin name and password. Will be created on initial server start
[email protected] admin.pass=admin -
Host for reset password redirect and certificate generation. By default current server IP is taken from «eth» network interface. Could be replaced with more friendly hostname. It is recommended to override this property with your server IP to avoid possible problems of host resolving.
server.host=blynk-cloud.com -
Email used for certificate registration, could be omitted in case you already specified it in mail.properties.
[email protected]
Administration UI
Blynk server provides administration panel where you can monitor your server. It is accessible at this URL:
https://your_ip:9443/admin

WARNING
Please change default admin password and name right after login to admin page. THIS IS SECURITY MEASURE.
WARNING
Default allowed.administrator.ips setting allows access for everyone. In other words,
administration page available from any other computer. Please restrict access to it via property allowed.administrator.ips.
Turn off chrome https warning on localhost
-
Paste in chrome
chrome://flags/#allow-insecure-localhost -
You should see highlighted text saying: «Allow invalid certificates for resources loaded from localhost». Click enable.
HTTP/S RESTful
Blynk HTTP/S RESTful API allows to easily read and write values to/from Pins in Blynk apps and Hardware.
Http API description could be found here.
Enabling sms on local server
To enable SMS notifications on Local Server you need to provide credentials for SMS gateway (currently Blynk server
supports only 1 provider — Nexmo. You need to create file sms.properties
within same folder where server.jar is.
    nexmo.api.key=
    nexmo.api.secret=
And fill in the above properties with the credentials you’ll get from Nexmo. (Account -> Settings -> API settings).
You can also send SMS over email if your cell provider supports that. See discussion for more details.
Enabling raw data storage
By default raw data storage is disabled (as it consumes disk space a lot).
When you enable it, every Blynk.virtualWrite command will be saved to DB.
You will need to install PostgreSQL Database (minimum required version is 9.5) to enable this functionality:
1. Enabling raw data on server
Enable raw data in server.properties :
    enable.db=true
    enable.raw.db.data.store=true
2. Install PostgreSQL. Option A
    sudo sh -c 'echo "deb http://apt.postgresql.org/pub/repos/apt/ `lsb_release -cs`-pgdg main" >> /etc/apt/sources.list.d/pgdg.list'
    wget -q https://www.postgresql.org/media/keys/ACCC4CF8.asc -O - | sudo apt-key add -

    sudo apt-get update
    sudo apt-get install postgresql postgresql-contrib
2. Install PostgreSQL. Option B
    sudo apt-get update
    apt-get --no-install-recommends install postgresql-9.6 postgresql-contrib-9.6
3. Download Blynk DB script
    wget https://raw.githubusercontent.com/blynkkk/blynk-server/master/server/core/src/main/resources/create_schema.sql
    wget https://raw.githubusercontent.com/blynkkk/blynk-server/master/server/core/src/main/resources/reporting_schema.sql
4. Move create_schema.sql and reporting_schema.sql to temp folder (to avoid permission problems)
    mv create_schema.sql /tmp
    mv reporting_schema.sql /tmp
Result:
    /tmp/create_schema.sql
    /tmp/reporting_schema.sql
Copy it to clipboard from your console.
5. Connect to PostgreSQL
    sudo su - postgres
    psql
6. Create Blynk DB and Reporting DB, test user and tables
    i /tmp/create_schema.sql
    i /tmp/reporting_schema.sql
/tmp/create_schema.sql — is path from step 4.
You should see next output:
    postgres=# i /tmp/create_schema.sql
    CREATE DATABASE
    You are now connected to database "blynk" as user "postgres".
    CREATE TABLE
    CREATE TABLE
    CREATE TABLE
    CREATE TABLE
    CREATE TABLE
    CREATE TABLE
    CREATE TABLE
    CREATE TABLE
    CREATE TABLE
    CREATE TABLE
    CREATE TABLE
    CREATE ROLE
    GRANT
    GRANT
Quit
q
Now start your server and you should see next text in postgres.log file :
    2017-03-02 16:17:18.367 - DB url : jdbc:postgresql://localhost:5432/blynk?tcpKeepAlive=true&socketTimeout=150
    2017-03-02 16:17:18.367 - DB user : test
    2017-03-02 16:17:18.367 - Connecting to DB...
    2017-03-02 16:17:18.455 - Connected to database successfully.
WARNING:
Raw data may consume your disk space very quickly!
CSV data format
Data format is:
value,timestamp,deviceId
For example:
10,1438022081332,0
Where 10 — value of pin.
1438022081332 — the difference, measured in milliseconds, between the current time and midnight, January 1, 1970 UTC.
To display the date/time in excel you may use formula:
=((COLUMN/(60*60*24)/1000+25569))
0 — device id
Automatic Let’s Encrypt certificates generation
Latest Blynk server has super cool feature — automatic Let’s Encrypt certificates generation.
However, it has few requirements:
-
Add
server.hostproperty inserver.propertiesfile.
For example :server.host=myhost.com
IP is not supported, this is the limitation of Let’s Encrypt. Also have in mind that myhost.com
should be resolved by public DNS severs.
-
Add
contact.emailproperty inserver.properties. For example :[email protected] -
You need to start server on port 80 (requires root or admin rights) or
make port forwarding to default Blynk HTTP port — 8080.
That’s it! Run server as regular and certificates will be generated automatically.

Manual Let’s Encrypt SSL/TLS Certificates
-
First install certbot on your server (machine where you going to run Blynk Server)
wget https://dl.eff.org/certbot-auto chmod a+x certbot-auto -
Generate and verify certificates (your server should be connected to internet and have open 80/443 ports)
./certbot-auto certonly --agree-tos --email YOUR_EMAIL --standalone -d YOUR_HOST
For example
./certbot-auto certonly --agree-tos --email [email protected] --standalone -d blynk.cc
-
Then add to your
server.propertiesfile (in folder with server.jar)server.ssl.cert=/etc/letsencrypt/live/YOUR_HOST/fullchain.pem server.ssl.key=/etc/letsencrypt/live/YOUR_HOST/privkey.pem server.ssl.key.pass=
Generate own SSL certificates
-
Generate self-signed certificate and key
openssl req -x509 -nodes -days 1825 -newkey rsa:2048 -keyout server.key -out server.crt -
Convert server.key to PKCS#8 private key file in PEM format
openssl pkcs8 -topk8 -v1 PBE-SHA1-2DES -in server.key -out server.enc.key
If you connect hardware with USB script you have to provide an option ‘-s’ pointing to «common name» (hostname) you did specified during certificate generation.
As an output you’ll retrieve server.crt and server.pem files that you need to provide for server.ssl properties.
Install java for Ubuntu
    sudo add-apt-repository ppa:openjdk-r/ppa
    && sudo apt-get update -q
    && sudo apt install -y openjdk-11-jdk
or if above doesn’t work:
    sudo apt-add-repository ppa:webupd8team/java
    sudo apt-get update
    sudo apt-get install oracle-java8-installer
Port forwarding for HTTP/S API
    sudo iptables -t nat -A PREROUTING -p tcp --dport 80 -j REDIRECT --to-port 8080
    sudo iptables -t nat -A PREROUTING -p tcp --dport 443 -j REDIRECT --to-port 9443
Enabling QR generation on server
sudo apt-get install libxrender1
Behind wifi router
If you want to run Blynk server behind WiFi-router and want it to be accessible from the Internet, you have to add port-forwarding rule on your router. This is required in order to forward all of the requests that come to the router within the local network to Blynk server.
How to build
Blynk has a bunch of integration tests that require DB, so you have to skip tests during build.
mvn clean install -Dmaven.test.skip=true
How Blynk Works?
When hardware connects to Blynk cloud it opens either keep-alive ssl/tls connection on port 443 (9443 for local servers) or keep-alive plain
tcp/ip connection on port 8080. Blynk app opens mutual ssl/tls connection to Blynk Cloud on port 443 (9443 for local servers).
Blynk Cloud is responsible for forwarding messages between hardware and app. In both (app and hardware) connections Blynk uses
own binary protocol described below.
Blynk protocol
Hardware side protocol
Blynk transfers binary messages between the server and the hardware with the following structure:
| Command | Message Id | Length/Status | Body |
|---|---|---|---|
| 1 byte | 2 bytes | 2 bytes | Variable |
Command and Status definitions: BlynkProtocolDefs.h
Mobile app side protocol
Blynk transfers binary messages between the server and mobile app with the following structure:
| Command | Message Id | Length/Status | Body |
|---|---|---|---|
| 1 byte | 2 bytes | 4 bytes | Variable |
Websockets web side protocol
Blynk transfers binary messages between the server and websockets (for web) with the following structure:
| Websocket header | Command | Message Id | Body |
|---|---|---|---|
| 1 byte | 2 bytes | Variable |
When command code == 0, than message structure is next:
| Websocket header | Command | Message Id | Response code |
|---|---|---|---|
| 1 byte | 2 bytes | 4 bytes |
Possible response codes.
Possible command codes
Message Id and Length are big endian.
Body has a command-specific format.
Licensing
GNU GPL license
Open Source Agenda is not affiliated with «Blynk Server» Project. README Source: blynkkk/blynk-server
Introduction: How to Create a Blynk Local Server
Blynk is a software/app allows a user to control arduino devices from a smartphone or tablet. This can be done by using the company’s Blynk server or the user can host their own Blynk server. This Instructable shows you as to how the user can create their local Blynk Server.
The Files required for the process can be downloaded from the links below.
Blynk Server File: http://www.mediafire.com/download/8pyk6eg0gp5q6l2…
JavaJDK 8.77
32Bit: http://www.mediafire.com/download/72y69zvenhc10my…
64Bit: http://www.mediafire.com/download/72y69zvenhc10my…
Server Properties File: http://www.mediafire.com/download/1uxkg9jkwwmxcb3…
Mail Properties FIle: http://www.mediafire.com/download/1uxkg9jkwwmxcb3…
OpenSSL Installation Files
32Bit: http://www.mediafire.com/download/ae66hxukjp4fvax…
64Bit: http://www.mediafire.com/download/ae66hxukjp4fvax…
SSL Commands File: http://www.mediafire.com/download/ae66hxukjp4fvax…
Blynk Aurdino Library Files: http://www.mediafire.com/download/saccgzz86yeaqvf…
Step 1: The Actual Process
The actual process of creating a Blynk server has been clearly demonstrated in the video.
Be the First to Share
Recommendations
32 Comments
unable to write ‘random state’
I’m getting this error after running this statement : openssl x509 -req -days 1500 -in server_embedded.csr -signkey server_embedded.key -out server_embedded.crt

Hello,
These are the errors I get after I have done the certificates and restarted the server.
Do you have any idea of what I should do next?
I followed your video exactly so far. Running Win7
Thank you

same problem , finding solution , plzz reply if u finf the sol
Please fill you Encryption password in file «server.properties»
server.host=
server.ssl.cert=./server_embedded.crt
server.ssl.key=./server_embedded.pem
server.ssl.key.pass=Fill you Encrytion Password heare <<====
#Blynk server allows to use 2 hosts for same IP, below properties for second host
server2.host=
server2.ssl.cert=./server_embedded.crt
server2.ssl.key=./server_embedded.pem
server2.ssl.key.pass=Fill you Encrytion Password here<<====
client.ssl.cert=
client.ssl.key=


thanks a lot man , i did solve it before , but thanks 💚
i just copied the .key file (rsa private key ) to.
the .pem file
so the rsa private key of .pem file matched with the rsa private key of .key file
n that’s it , it worked ,
idk but the rsa private key of both the files previously was different ,
now its the same n working
Hi,
Thank you very much.
hi…
i try to setup a blynk server, and following your instruction in the video but i stuck at the command prompt: wait too long but nothing happen.. can you help me?

press control+c
I’m trying to being nice and to help you
i see no problem in your picture
your blynk server just started successfully as i see in your picture
if you see
Blynk server successfully started.
it means that tells you have a working local blynk server to confirm that, open up your browser and nether visit localhost:9443/admin, 127.0.0.1:9443/admin, your ip address:9443/admin, or your public ip address:9443/admin
if your browser cannot connect and you tryed localhost:9443/admin, 127.0.0.1:9443/admin, your ip address:9443/admin, and/or your public ip address:9443/admin
this means you had a real problem.
you can view the log which appears on cmd
for example, it should be
All server output is stored in folder ‘C:pathtopath..logs’ file.
in your picture
All server output is stored in folder ‘D:Blynk Server..logs’ file.
you can contact me with email «shehabtweel@gmail.com»
For further help.
— Shehab Ali Tweel
after getting the certificates , i run the server to check , i get error

i did all the 4 commands given to create certificates , now when i check my server.properties file , it is same as before , it has not changed ,
plzzzzzzz helppppppp
The server file is a zip file????
Do i unzip, if so where to???
Hello,
I am getting the same error:
Error Message: ‘openss1 is not recognised as an internal or external command, operable program or batch file’.
I have tried entering it manually nothing helped.
Well at the place of openssl … you have to put actually the path to your openssl folder that you have downloaded. Your actual command should look like
`C:OpenSSL-Win64binopenssl.exe genrsa -out server_embedded.key 2048`
It works

sir , recently i started a new iot project which uses NodeMcu and blynk app. in blynk app i require more widgets and so more energy. hence i searched in web and found your video. i just followed your steps. and took 5 days to host it successfully. NOw the blynk app connects to my local server and i can access free energy. But now the problem is , the Nodemcu is not coming online in my blynk app. in app it shows «device is not online yet». but it will be connect to mobile wifi. and even i can acces my admin account also. so i request you to give me solution. as soon as possible . looking forward for your answer. thank you
hi, I have made it. but just wonder why there are many warnings??
warnings:
1. an illegal reflective access operation has occurred.
2. illegal reflective access by io.netty.util.internal.platformdependent0 (-folder path-/server-0.15.2.jar) to field java.nio.buffer.address
3. please consider reporting this to the maintainers of io.netty.util.internal.platformdependent0
4. use —illegal-access=warn to enable warnings of further illegal reflective access operations
5. all illegal access operations will be denied in a future release.
question: 1. does the connected device is connecting to the local machine hotspot or both were connecting to a local network or both?

first you must see your Raspberry pi IP and put it in your scetch.. after that you must make a port to your router (8443) i your android blynk use this port.. (in the mail.properties text file you must put your email and pass).In the blynk app put the switch in private server and IP (raspberry pi IP) and port 8443..If anyone have some problem P.M me
where’s the video?
in step 1
on the internet everybody shows how to connect the application to the server but nobody explains how to connect hardware to the local server how would you prevent your arduino getting connected to bylnk.cc servers instead of your local blynk server

D_Jackas
Всем привет. Имею у себя Home-сервер и на нем висит сервер не мало известного Blynk’a. Т.к. присутствует возможность, могу поделиться с сообществом. Ибо для пары девайсов жирновато будет, да и наличие халявной энергии не помешает.


Можно пользоваться. По сути делюсь из-за того, что опять-же жирно для нескольких девайсов и могу поделиться т.к. не жадный, да и вам не придется арендовать белый IP у провайдера.
Немного информации о сервере:
| Адрес сервера | trsh.su |
| Порт сервера | 9443 |
| Порт для подключения (в скетче) | 8080 |
| Кол-во энергии по умолчанию | 1 |
| Почта сервера | trshfiles@gmail.com |
| Возможность генерации QR | + |
| Текущая версия сервера | 0.41.15 |
| Статус сервера | Online |
Q: Зачем тебе оно?
A: Просто. Нечего делать
Q: Можно пополнять энергию? И сколько будет стоить?
A: Да можно. Бесплатно. Просто напиши мне.
Q: Обновляешь ли сервер?
A: По мере выхода обновлений
Q: Будешь ли смотреть за моим проектами?
A: Оно мне надо? За своими стараюсь не забывать смотреть.
Q: А если отключишь сервер?
A: Отключится только если по тех. причинам и то буду стараться оповещать заранее.
Q: Забьешь на проект?
A: Только если не будет актуальным. А мне он нужен постоянно.
P.S. Если есть вопросы или пожелания, пишите. Данный «сервер» отдам полностью под комьюнити если будет интересно.
. ВНИМАНИЕ.
На данный момент по умолчанию выдаётся 1 единица энергии! Сделано это для фильтрации от ботов (такие имеются ). Чтобы получить энергию (БЕСПЛАТНО), пишите мне в ЛС.
Источник
Локальный сервер blynk на windows
Blynk is a platform with iOS and Android apps to control Arduino, ESP8266, Raspberry Pi and the likes over the Internet.
You can easily build graphic interfaces for all your projects by simply dragging and dropping widgets. If you need more information, please follow these links:


Blynk Server is an Open-Source Netty based Java server, responsible for forwarding messages between Blynk mobile application and various microcontroller boards and SBCs (i.e. Arduino, Raspberry Pi. etc).
Download latest server build here.


For Windows download Java here and install.
Quick local server setup
Make sure you are using Java 11
Run the server on default ‘hardware port 8080’ and default ‘application port 9443’ (SSL port)
NOTE: /path should be real existing path to folder where you want to store all your data.
As an output you should see something like that:
Enabling mail on Local server
To enable mail notifications on Local server you need to provide your own mail credentials. Create file mail.properties within same folder where server.jar is. Mail properties:
WARNING : only gmail accounts are allowed.
NOTE : you’ll need to setup Gmail to allow less secured applications. Go here and then click «Allow less secure apps».
Quick local server setup on Raspberry PI
Login to Raspberry Pi via ssh;
Make sure you are using Java 8
Download Blynk server jar file (or manually copy it to Raspberry Pi via ssh and scp command):
Run the server on default ‘hardware port 8080’ and default ‘application port 9443’ (SSL port)
As output you will see something like that:
Docker container setup
Run Docker container
Quick Launch on Raspberry Pi
Run Docker container
Enabling server auto restart on unix-like systems
To enable server auto restart find /etc/rc.local file and add:
Or if the approach above doesn’t work, execute
add the following line
Enabling server auto restart on Windows
Put in it one line:
Put bat file to windows startup folder
You can also use this script to run server.
Update instruction for unix-like systems
IMPORTANT Server should be always updated before you update Blynk App. To update your server to a newer version you would need to kill old process and start a new one.
Find process id of Blynk server
You should see something like that
Kill the old process
After this steps you can update Blynk app. Server version downgrade is not supported.
WARNING! Please do not revert your server to lower versions. You may loose all of your data.
Update instruction for Windows
App and sketch changes


Change your ethernet sketch from
Change your WIFI sketch from
Change your rasp PI javascript from
or in case of USB when running blynk-ser.sh provide ‘-s’ option with address of your local server
IMPORTANT Blynk is being constantly developed. Mobile apps and server are updated often. To avoid problems during updates either turn off auto-update for Blynk app, or update both local server and blynk app at same time to avoid possible migration issues.
IMPORTANT Blynk local server is different from Blynk Cloud server. They are not related at all. You have to create new account when using Blynk local server.
Advanced local server setup
Available server options:
Blynk app, https, web sockets, admin port
Http, hardware and web sockets port
For simplicity Blynk already provides server jar with built in SSL certificates, so you have working server out of the box via SSL/TLS sockets. But as certificate and it’s private key are in public this is totally not secure. So in order to fix that you need to provide your own certificates. And change below properties with path to your cert. and private key and it’s password. See how to generate self-signed certificates here
Note: if you use Let’s Encrypt certificates you’ll have to add #define BLYNK_SSL_USE_LETSENCRYPT before #include in the Arduino Sketch for your hardware.
User profiles folder. Folder in which all users profiles will be stored. By default System.getProperty(«java.io.tmpdir»)/blynk used. Will be created if not exists
Folder for all application logs. Will be created if it doesn’t exist. «.» is dir from which you are running script.
Maximum allowed number of user dashboards.
100 Req/sec rate limit per user. You also may want to extend this limit on hardware side.
this setting defines how often you can send mail/tweet/push or any other notification. Specified in seconds
Maximum allowed user profile size. In Kb’s.
Number of strings to store in terminal widget (terminal history data)
Period for flushing all user DB to disk. In millis
Specifies maximum period of time when hardware socket could be idle. After which socket will be closed due to non activity. In seconds. Leave it empty for infinity timeout
Mostly required for local servers setup in case user want to log raw data in CSV format. See [raw data] (#raw-data-storage) section for more info.
Url for opening admin page. Must start from «/». For «/admin» url path will look like that «https://127.0.0.1:9443/admin».
Comma separated list of administrator IPs. Allow access to admin UI only for those IPs. You may set it for 0.0.0.0/0 to allow access for all. You may use CIDR notation. For instance, 192.168.0.53/24.
Default admin name and password. Will be created on initial server start
Host for reset password redirect and certificate generation. By default current server IP is taken from «eth» network interface. Could be replaced with more friendly hostname. It is recommended to override this property with your server IP to avoid possible problems of host resolving.
Email used for certificate registration, could be omitted in case you already specified it in mail.properties.
Blynk server provides administration panel where you can monitor your server. It is accessible at this URL:

WARNING Please change default admin password and name right after login to admin page. THIS IS SECURITY MEASURE.
Turn off chrome https warning on localhost
You should see highlighted text saying: «Allow invalid certificates for resources loaded from localhost». Click enable.
Blynk HTTP/S RESTful API allows to easily read and write values to/from Pins in Blynk apps and Hardware. Http API description could be found here.
Enabling sms on local server
Enabling raw data storage
By default raw data storage is disabled (as it consumes disk space a lot). When you enable it, every Blynk.virtualWrite command will be saved to DB. You will need to install PostgreSQL Database (minimum required version is 9.5) to enable this functionality:
1. Enabling raw data on server
Enable raw data in server.properties :
2. Install PostgreSQL. Option A
2. Install PostgreSQL. Option B
3. Download Blynk DB script
4. Move create_schema.sql and reporting_schema.sql to temp folder (to avoid permission problems)
Copy it to clipboard from your console.
5. Connect to PostgreSQL
6. Create Blynk DB and Reporting DB, test user and tables
You should see next output:
Now start your server and you should see next text in postgres.log file :
WARNING: Raw data may consume your disk space very quickly!
Automatic Let’s Encrypt certificates generation
Add server.host property in server.properties file. For example :
IP is not supported, this is the limitation of Let’s Encrypt. Also have in mind that myhost.com should be resolved by public DNS severs.
That’s it! Run server as regular and certificates will be generated automatically.
Manual Let’s Encrypt SSL/TLS Certificates
First install certbot on your server (machine where you going to run Blynk Server)
Generate and verify certificates (your server should be connected to internet and have open 80/443 ports)
Then add to your server.properties file (in folder with server.jar)
Generate own SSL certificates
Generate self-signed certificate and key
Convert server.key to PKCS#8 private key file in PEM format
If you connect hardware with USB script you have to provide an option ‘-s’ pointing to «common name» (hostname) you did specified during certificate generation.
As an output you’ll retrieve server.crt and server.pem files that you need to provide for server.ssl properties.
Install java for Ubuntu
or if above doesn’t work:
Port forwarding for HTTP/S API
Enabling QR generation on server
Behind wifi router
If you want to run Blynk server behind WiFi-router and want it to be accessible from the Internet, you have to add port-forwarding rule on your router. This is required in order to forward all of the requests that come to the router within the local network to Blynk server.
Blynk has a bunch of integration tests that require DB, so you have to skip tests during build.
When hardware connects to Blynk cloud it opens either keep-alive ssl/tls connection on port 443 (9443 for local servers) or keep-alive plain tcp/ip connection on port 8080. Blynk app opens mutual ssl/tls connection to Blynk Cloud on port 443 (9443 for local servers). Blynk Cloud is responsible for forwarding messages between hardware and app. In both (app and hardware) connections Blynk uses own binary protocol described below.
Hardware side protocol
Blynk transfers binary messages between the server and the hardware with the following structure:
| Command | Message Id | Length/Status | Body |
|---|---|---|---|
| 1 byte | 2 bytes | 2 bytes | Variable |
Command and Status definitions: BlynkProtocolDefs.h
Mobile app side protocol
Blynk transfers binary messages between the server and mobile app with the following structure:
| Command | Message Id | Length/Status | Body |
|---|---|---|---|
| 1 byte | 2 bytes | 4 bytes | Variable |
Websockets web side protocol
Blynk transfers binary messages between the server and websockets (for web) with the following structure:
| Websocket header | Command | Message Id | Body |
|---|---|---|---|
| 1 byte | 2 bytes | Variable |
When command code == 0, than message structure is next:
| Websocket header | Command | Message Id | Response code |
|---|---|---|---|
| 1 byte | 2 bytes | 4 bytes |
Message Id and Length are big endian. Body has a command-specific format.
Источник
How to install a local Blynk Legacy Server in your PC and get a Local Blynk Token
Blynk Legacy is a very powerful Internet of Things(IoT ) software solution which allows you to design your own IoT APP without Android and iOS APP programming knowledge.
Following tutorial will guide to install Blynk legacy server in your local Windows, Mac computer or Linux like Raspberry Pi.
Picture 1.1 shows how Blynk systems works:
Picture 1.1
From Above picture, you can see Blynk software consists three parts:
In this Lesson, we will teach students how to install Blynk Legacy local Server and setup APP and Arduino sketch code to make them working in Blynk Local Server.
Install Server on local PC
You can install local Blynk server on any computer which has Java 11 (or higher version). Java environment is a basic module which comes with those popular OS such as Windows, MacOS and Linux. So if your computer is not too old, you no need install any Java software to run Blynk server.
In this tutorial, we will teach how to install local Blynk server on Windows, MacOS and Raspbian(Raspberry Pi OS). If you use other OS, the installation is similar, just make sure you have Java 11 and JDK 8+ installed in your OS.
Install Blynk local server on Windows
3)After open the command window, go to the fold where blynk-server.jar file is saved. Test your java environment by typing following command in cmd terminal:
You should see something as following
If you can’t see java version, it means your haven’t installed Java properly, please read this article to install Java
4)Go to your download folder, replace the bold font path with your folder path
Then run following command to start the local Blynk server:
you will see following result:
Now your local Blynk server has been successfully installed and running in your Windows.
Install Blynk local server on Apple Macbook Computer
1)Download Blynk local server from https://osoyoo.com/driver/blynk/blynk-server.jar
2)Open MacBook terminal window,
Go to your download folder, Run following command to start the local Blynk server:
you will see following result:
Install Blynk local server on Raspberry Pi or similar Linux computer
1)Open your Pi shell terminal or use SSH to connect Raspberry Pi remote terminal
2)Download Blynk local server by following command
2)Go to your download folder, Run following command to start the local Blynk server:
The java server will start in one or two minutes, then you will see following result:
After that, use Ctrl-X to save and exit the file and reboot your computer. Your Blynk server will automatically start every time.
You can visit the admin page of Blynk Server url:
Cell Phone APP download and configure:
Prerequisite:
You have successfully installed Blynk server in your local computer. Next step is to install Blynk Legacy APP in your cell phone.
Before install and setup your Blynk APP, you need to know your local server’s LAN IP address first, if you don’t know how to do it, read following article:
3)Click the three dot icon in above UI to set local server IP and port.
Do following settings:
See following picture:
After you have set up the local server IP and port, you can use following steps to connect APP to local Blynk server:
If your Local Blynk is not running properly or IP address setting is wrong, APP will show Can’t connect to Server, Try later…If server running and IP setting are all ok, you will a New Project UI as following:
Congratulations! You have successfully installed local Blynk Server and connected your APP to the server.
Suppose you are using Arduino as terminal device, you click +New Project to add an Arduino project:
You can name your Project Lesson1 and select Arduino UNO (or Arduino MEGA if you are using MEGA2560),
In above UI, Click Create Project, you will see a blank project named lesson1 as following picture, In future, you can click (+) sign to add control Widget to create your APP UI

Get Auth Token
Blynk Auth token is the password to let your Arduino board to exchange project data with local Blynk server. You need to set this token in your Arduino code file in future. Token is associated with a project, so you must create a project in APP before getting a Token.
You have two methods to get Blynk Token:
After open the the file, you will see following content:
In above picture, you can see that, on the right of the word “token“, there is a long string
eVEnM2WCQykIIY9w5KPfxrzzWEUfk4N–
Method 2) Get token from local blynk control panel:
Please open your browser and visit following url:
https://your_server_ip:9443/admin
your_server_ip is the IP address of your local Blynk server.
Above https:// url default certificate is self-signed. It will therefore be considered unreliable. You will have to accept the alert message displayed by your internet browser. If you are using Google Chrome browser, You will see following alert:
Click Advanced, then select proceed to the unsafe IP as following:
You will go to Server login page, please use user name [email protected] and password admin to login to control panel.
then please click Users->[email protected]:
Click [email protected], then you will find the Token which was just assigned for your project:
Источник
Локальный сервер blynk на windows
Перевод файла с репозитория blynk-server
Автор перевода: Титенко Максим
Blynk Local Server
Платформа с приложением для iOS и Android для управления Arduino, ESP8266, Raspberry Pi и других плат микроконтроллеров через Интернет.
Скачать последнею версию сервера здесь.

Для Windows загрузите Java здесь и установите.
Быстрая настройка локального сервера
Вот и всё!
ПРИМЕЧАНИЕ: / path должен быть реальным существующим путем в папку, где вы хотите хранить все свои данные.
Blynk Server successfully started. All server output is stored in current folder in ‘logs/blynk.log’ file.
Включение почты на локальном сервере
mail.smtp.auth=true mail.smtp.starttls.enable=true mail.smtp.host=smtp.gmail.com mail.smtp.port=587 mail.smtp.username=YOUR_EMAIL_HERE mail.smtp.password=YOUR_EMAIL_PASS_HERE
Пример настройки почты здесь.
ПРЕДУПРЕЖДЕНИЕ: разрешены только учетные записи gmail.
ПРИМЕЧАНИЕ. Вам нужно настроить Gmail для работы с ненадежными приложениями. Нажмите здесь, а затем нажмите «Ненадежные приложения заблокированы ».
Быстрая настройка локального сервера на Raspberry Pi
sudo apt-get install oracle-java8-jdk
Вот и всё!
Blynk Server successfully started. All server output is stored in current folder in ‘logs/blynk.log’ file.
Включение автоматического перезапуска сервера в UNIX-системах
Сохранить и выйти.
Включение автоматического перезапуска сервера в Windows
Вы также можете использовать этот скрипт для запуска сервера.
После этого вы можете обновить приложение Blynk. Понижение версии сервера не поддерживается.
ВНИМАНИЕ! Не переустанавливайте сервер на более низкие версии. Вы можете потерять все свои данные.
Инструкцию по обновлению для Windows
Открыть диспетчер задач;
Запустить новый сервер как обычно
Изменения в приложение и эскизе
Изменить тип вашего проводного подключения к интернету с
Измените ваше WiFi подключения с
Изменить ваш Raspberry Pi Javascript c
или в случае USB при запуске blynk-ser.sh предоставить опцию «-s» с адресом вашего локального сервера
ВАЖНО Блинк постоянно развивается. Мобильные приложения и сервер часто обновляются. Чтобы избежать проблем во время обновлений, отключите автоматическое обновление для приложения Blynk или одновременно обновите локальный сервер и приложение blynk, чтобы избежать возможных проблем с миграцией.
ВАЖНО Локальный сервер Blynk отличается от сервера Blynk Cloud. Они не связаны вообще. Вы должны создать новую учетную запись при использовании локального сервера Blynk.
Расширенная настройка локального сервера
Доступные параметры сервера:
Для простоты Blynk уже предоставляет серверную банку со встроенными сертификатами SSL, поэтому у вас есть рабочий сервер из коробки через SSL / TLS-сокеты. Но поскольку сертификат и его частный ключ находятся на публике, это совершенно небезопасно. Поэтому, чтобы исправить это, вам нужно предоставить свои собственные сертификаты. И измените ниже свойства с указанием пути к вашему сертификату. и закрытый ключ, и это пароль. Узнайте, как создавать самозаверяющие сертификаты [здесь](# generate-ssl-certificate)
Указывает на cert и ключ, который помещается в ту же папку, что и jar.
server.ssl.cert=./server_embedded.crt server.ssl.key=./server_embedded.pem server.ssl.key.pass=pupkin123
Сервер Blynk предоставляет панель администрирования, где вы можете контролировать свой сервер. Она доступна по этому URL-адресу:
ПРЕДУПРЕЖДЕНИЕ Пожалуйста, измените пароль администратора и его имя сразу после входа на страницу администратора. ЭТО МЕРЫ БЕЗОПАСНОСТИ.
Отключение chrome https warning на localhost
Blynk HTTP / S RESTful API позволяет легко считывать и записывать значения в / из Pins в приложениях и оборудовании Blynk. Описание API Http можно найти здесь.
Включение смс на локальном сервере
Включение хранилища необработанных данных
1. Включение необработанных данных на сервере
Включить необработанные данные в server.properties :
2. Установите PostgreSQL. Вариант A
sudo apt-get update sudo apt-get install postgresql postgresql-contrib
2. Установите PostgreSQL. Вариант Б
3. Скачать Blynk DB скрипт
4. Переместите файл create_schema.sql в папку temp (чтобы избежать проблем с разрешением)
mv create_schema.sql /tmp
Скопируйте его в буфер обмена с консоли.
5. Подключитесь к PostgreSQL
6. Создать Blynk DB, проверить пользователя и таблицы
Вы должны увидеть следующий вывод:
postgres=# i /tmp/create_schema.sql CREATE DATABASE You are now connected to database «blynk» as user «postgres». CREATE TABLE CREATE TABLE CREATE TABLE CREATE TABLE CREATE TABLE CREATE TABLE CREATE TABLE CREATE TABLE CREATE TABLE CREATE TABLE CREATE TABLE CREATE ROLE GRANT GRANT
Теперь запустите свой сервер, и вы увидите следующий текст в файле postgres.log :
ПРЕДУПРЕЖДЕНИЕ: Исходные данные могут очень быстро сократить пространство на диске!
значение, метка времени, DeviceId
= ((Column / (60 * 60 * 24) / 1000 + 25569))
Автоматическое создание шифрования сертификатов
IP не поддерживается, это ограничение Let’s Encrypt. Также имейте в виду, что myhost.com должны быть разрешены публичными DNS-серверами.
Это оно! Запускать сервер как обычный, а сертификаты будут генерироваться автоматически.
Руководство шифровки сертификатов SSL / TLS
server.ssl.cert = / и т.д. / letsencrypt / живой / YOUR_HOST / fullchain.pem server.ssl.key = / и т.д. / letsencrypt / живой / YOUR_HOST / privkey.pem server.ssl.key.pass =
Создание собственных сертификатов SSL
Если вы подключаете аппаратное обеспечение с помощью USB-скрипта, вы должны указать опцию ‘-s’, указывающую на «общее имя» (имя хоста), вы указанных во время создания сертификата.
В качестве вывода вы получите файлы server.crt и server.pem, которые необходимо предоставить для свойств server.ssl.
Установить java для Ubuntu
sudo apt-add-repository ppa:webupd8team/java sudo apt-get update sudo apt-get install oracle-java9-installer
sudo apt-get install oracle-java8-installer
в случае, если в вашей системе еще нет Java 9.
Перенаправление портов для API HTTP / S
Включение генерации QR на сервере
sudo apt-get install libxrender1
За маршрутизатором wifi
Если вы хотите запустить сервер Blynk за WiFi-маршрутизатором и хотите, чтобы он был доступен из Интернета, вам необходимо добавить правило переадресации портов на вашем маршрутизаторе. Это необходимо для перенаправления всех запросов, которые поступают на маршрутизатор в локальной сети на сервер Blynk.
Blynk имеет кучу интеграционных тестов, требующих DB, поэтому вам нужно пропустить тесты во время сборки.
Как работает Блинк?
Когда аппаратное обеспечение подключается к облаку Blynk, оно открывает либо соединение ssl / tls keep-alive на порту 8441, либо в режиме keep-alive plain tcp / ip на порту 8442. Приложение Blynk открывает взаимное соединение ssl / tls с Blynk Cloud на порту 443 (9443 для локальных серверов). Blynk Cloud отвечает за пересылку сообщений между оборудованием и приложением. В обоих приложениях (приложениях и оборудовании) Blynk использует собственный двоичный протокол, описанный ниже.
Blynk передает двоичные сообщения со следующей структурой:
| Команда | Идентификатор сообщения | Длина / Статус | Тело |
|---|---|---|---|
| 1 байт | 2 байта | 2 байта | Переменная |
Идентификатор сообщения и длина big endian. Тело имеет формат, специфичный для команд.
Определения команд и состояний: BlynkProtocolDefs.h
Типичная библиотека Blynk знает, как отправить (S) / процесс (P):
S BLYNK_CMD_LOGIN + токен аутентификации SP BLYNK_CMD_PING SP BLYNK_CMD_RESPONSE SP BLYNK_CMD_BRIDGE SP BLYNK_CMD_HARDWARE S BLYNK_CMD_TWEET S BLYNK_CMD_EMAIL S BLYNK_CMD_PUSH_NOTIFICATION
About
Платформа с приложением для iOS и Android для управления Arduino, ESP8266, Raspberry Pi и других плат микроконтроллеров через Интернет.
Источник