Опубликовано: 10 мар 2019
Данная статья возникла, как результат желания протестировать функционал ClickHouse на простом привычном окружении. Поскольку я в основном использую Windows 10, в которой имеется возможность подключить компонент Windows Subsystem for Linux, эта операционная система и была выбрана для развертывания ClickHouse. Фактически все описанное здесь было выполнено на самом простом домашнем ноутбуке.
Поскольку я не являюсь экспертом Linux, я искал такой вариант развертывания, который можно было бы осуществить просто следуя небольшому набору команд. Пришлось протестировать несколько вариантов, и так как в некоторых случаях возникали ошибки, с которыми не очень хотелось разбираться, я выбрал тот дистрибутив, в котором все прошло наиболее гладко. Таким дистрибутивом оказалась Ubuntu 16.04, пакет которой для WSL можно скачать на странице Manually download Windows Subsystem for Linux.
Установка Ubuntu
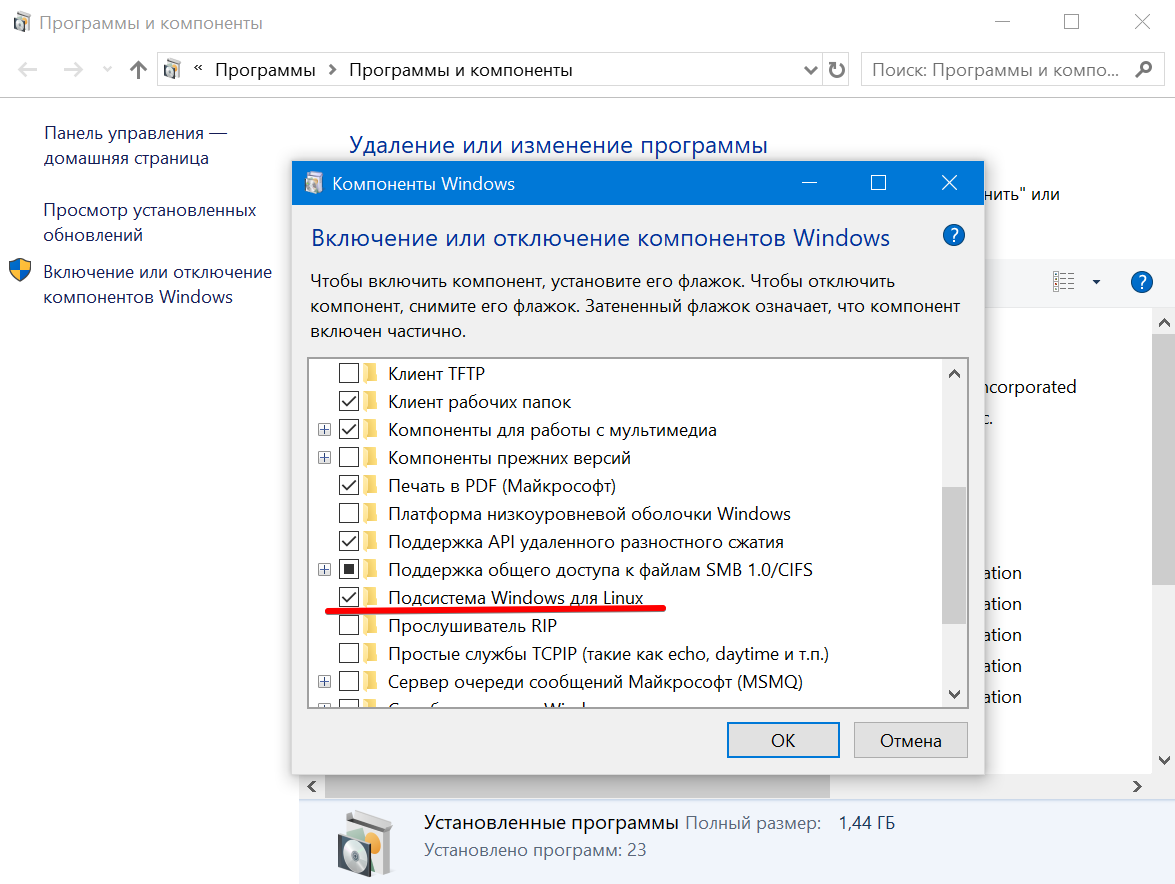
Прежде чем устанавливать Ubuntu нужно активировать компонент Windows Subsystem for Linux в Windows 10. Для этого, нажав клавиши Win + R нужно запустить команду appwiz.cpl, затем в открывшемся окне перейти на вкладку «Включение и отключение компонентов Windows» и поставить галочку на против нужного компонента:
Развертывание ClickHouse
После установки Ubuntu на наш ноутбук с Windows 10 можно приступить к установке ClickHause. Cледуя шагам, предложенным в инструкции от Яндекса, выполним ряд соответствующих команд в терминале Ubuntu:
1. Добавляем репозиторий яндекса в список репозиториев
sudo sh -c "echo deb http://repo.yandex.ru/clickhouse/deb/stable/ main/ >> /etc/apt/sources.list"
2. Добавляем ключ авторизации пакета
sudo apt-key adv --keyserver keyserver.ubuntu.com --recv E0C56BD4
3. Устанавливаем пакет ClickHouse, состоящий из сервера и клиента
sudo apt-get update
sudo apt-get install clickhouse-client clickhouse-server
4. Поскольку мы разворачиваем ClickHouse на локальной машине, мы можем дать ему расширенные права доступа к соответсвующим директориям, что упростит процесс установки.
sudo chmod 777 /var/lib/clickhouse/
sudo chmod 777 /var/log/clickhouse-server/

sudo chown -R clickhouse:clickhouse /var/log/clickhouse-server/
sudo chown -R clickhouse:clickhouse /var/lib/clickhouse
5. По ходу установки выяснилось, что дополнительно нужно сконфигурировать в развернутой Ubuntu региональную временную зону
sudo dpkg-reconfigure tzdata
6. Теперь мы можем проверить готов ли к работе развернутый clickhouse-server, запустив его в режиме логирования в окно терминала:
clickhouse-server --config-file=/etc/clickhouse-server/config.xml
На экране появится много информационных сообщений, из которых нам по сути важно только поддтверждение запуска сервера и слушания приложением портов localhost:
Application: Listening http://127.0.0.1:8123
Ubuntu напрямую коммуницирует с localhost в Windows, что естественно очень удобно, и что позволяет работать с ClickHouse непосредственно из браузера в Windows, в том числе в Jupyter Notebook.
7. Если все установилось, запускаем сервер и клиент ClickHouse:
sudo service clickhouse-server start --config-file=/etc/clickhouse-server/config.xml
clickhouse-client
Увидев приглашение от clickhouse-client, вы можете отправить тестовый запрос:
ClickHouse client version 0.0.18749.
Connecting to localhost:9000.
Connected to ClickHouse server version 0.0.18749.

:) SELECT 1

┌─1─┐
│ 1 │
└───┘

1 rows in set. Elapsed: 0.003 sec.
Параметр config-file в большинстве случаев можно опустить. Эти две команды и будут в дальнейшем использоваться для запуска ClickHouse:
sudo service clickhouse-server start
clickhouse-client
Доступ по API к отчетам Яндекс Метрики и к Logs API
Чтобы иметь возможность обращаться по API к данным отчетов метрики и к данным хитов в Logs API нужно выполнить несколько несложных действий, следуя инструкциям от Яндекса:
- API отчетов v1 — Введение
- Logs API — Введение
По сути все сводится к регистрации условного приложения и получения для него токена для авторизации в вышеперечисленных API. Наиболее простой способ для начала работы — это получить отладочный токен, который действует достаточно долго, затем его можно будет обновить.
Работа с ClickHouse и Logs API в Jupyter Notebook
Благодаря сообществу пользователей ClickHouse появились ряд визуальных интерфейсов и библиотек, упрощающих взаимодействие с инструментом. Данная же статья будет следовать примерам, которые демонстрировали сами специалисты Яндекса на проводимых ими лекциях и вебинарах.
Открываем Jupyter Notebook и первым делом загружаем ряд необходимых пакетов:
In [1]:
import requests
import sys
from datetime import date
from datetime import timedelta
import urllib
Мы можем сохранить выданный нашему приложению авторизационный токен в файл и прочитать его с помощью команды:
In [2]:
with open('token.txt') as f:
    TOKEN = f.read().strip()
В качетсве димонстрации вот пример обращения к API отчетов метрики, где мы берем некоторые данные за вчерашний день:
In [3]:
header = {'Authorization': 'OAuth '+TOKEN}
ids = 11113333
payload = {
    'metrics': 'ym:s:pageviews, ym:s:users',
    'date1': (date.today() - timedelta(days=1)).isoformat(),
    'date2': (date.today() - timedelta(days=1)).isoformat(),
    'ids': ids,
    'accuracy': 'full',
    'pretty': True,
}
r = requests.get('https://api-metrika.yandex.ru/stat/v1/data', params=payload, headers=header).content
In [4]:
import json
print (json.dumps(json.loads(r)['data'], indent = 2))
[
  {
    "metrics": [
      112770.0,
      15020.0
    ],
    "dimensions": []
  }
]
При обращение же к Logs API вначале нам нужно проверить возможность формирования данных. Зададим параметры: мы обращаемся к хитам, а не к визитам и берем данные за вчерашний день. Отправим соответствующий запрос:
In [5]:
API_HOST = 'https://api-metrika.yandex.ru'
COUNTER_ID = 11113333
START_DATE = (date.today() - timedelta(days=1)).isoformat()
END_DATE = (date.today() - timedelta(days=1)).isoformat()
SOURCE = 'hits'
API_FIELDS = ('ym:pv:date', 'ym:pv:dateTime', 'ym:pv:URL', 'ym:pv:deviceCategory',
         'ym:pv:operatingSystemRoot', 'ym:pv:clientID', 'ym:pv:browser', 'ym:pv:lastTrafficSource')
In [6]:
url_params = urllib.urlencode(
    [
        ('date1', START_DATE),
        ('date2', END_DATE),
        ('source', SOURCE),
        ('fields', ','.join(API_FIELDS))
    ]
)
In [7]:
url = 'https://api-metrika.yandex.ru/management/v1/counter/11113333/logrequests/evaluate?'
    .format(host=API_HOST, counter_id=COUNTER_ID) + url_params
r = requests.get(url, headers={'Authorization': 'OAuth '+TOKEN})
r.status_code
Код 200 означает, что запрос отправлен успешно. А вот ответ о возможности получить данные:
In [8]:
json.loads(r.text)['log_request_evaluation']
Out[8]:
{u'max_possible_day_quantity': 340, u'possible': True}
Как видно, в случае данного сайта есть возможность получить одним запросом данные за 341 день. Теперь отправим запрос непосредственно на получение данных:
In [9]:
url_params = urllib.urlencode(
    [
        ('date1', START_DATE),
        ('date2', END_DATE),
        ('source', SOURCE),
        ('fields', ','.join(sorted(API_FIELDS, key=lambda s: s.lower())))
    ]
)
url = '{host}/management/v1/counter/{counter_id}/logrequests?'
    .format(host=API_HOST,
            counter_id=COUNTER_ID)
      + url_params
r = requests.post(url, headers={'Authorization': 'OAuth '+TOKEN})
In [11]:
print (json.dumps(json.loads(r.text)['log_request'], indent = 2))
{
  "date1": "2019-03-09",
  "status": "created",
  "date2": "2019-03-09",
  "counter_id": 11113333,
  "fields": [
    "ym:pv:browser",
    "ym:pv:clientID",
    "ym:pv:date",
    "ym:pv:dateTime",
    "ym:pv:deviceCategory",
    "ym:pv:lastTrafficSource",
    "ym:pv:operatingSystemRoot",
    "ym:pv:URL"
  ],
  "source": "hits",
  "request_id": 2782240
}
Поскольку данные могут формироваться некоторое время из этих данных нам потребуется request_id для проверки готовности ответа.
In [12]:
request_id = json.loads(r.text)['log_request']['request_id']
Задаем параметры и проверяем готовность ответа:
In [13]:
url = '{host}/management/v1/counter/{counter_id}/logrequest/{request_id}'
            .format(request_id=request_id,
                    counter_id=COUNTER_ID,
                    host=API_HOST)
r = requests.get(url, params="", headers=header)
In [15]:
print (json.dumps(json.loads(r.text)['log_request'], indent = 4))
{
    "date1": "2019-03-09",
    "status": "processed",
    "date2": "2019-03-09",
    "counter_id": 11113333,
    "fields": [
        "ym:pv:browser",
        "ym:pv:clientID",
        "ym:pv:date",
        "ym:pv:dateTime",
        "ym:pv:deviceCategory",
        "ym:pv:lastTrafficSource",
        "ym:pv:operatingSystemRoot",
        "ym:pv:URL"
    ],
    "source": "hits",
    "parts": [
        {
            "part_number": 0,
            "size": 25338635
        }
    ],
    "request_id": 2782240,
    "size": 25338635
}
Если видим статус "created" — ждем, если статус "processed", это означает, что данные готовы, и что ответ будет состоять из какого-то количества частей.
In [16]:
parts = json.loads(r.text)['log_request']['parts']
print(parts)
[{u'part_number': 0, u'size': 25338635}]
Получаем ответ и помещаем его в Pandas DataFrame
In [17]:
import io
import StringIO
import pandas as pd
In [18]:
tmp_dfs = []
for part_num in map(lambda x: x['part_number'], parts):
    url = '{host}/management/v1/counter/{counter_id}/logrequest/{request_id}/part/{part}/download'
            .format(
                host=API_HOST,
                counter_id=COUNTER_ID,
                request_id=request_id,
                part=part_num
            )
    r = requests.get(url, headers=header)
    if r.status_code == 200:
        tmp_df = pd.read_csv(io.StringIO(r.text), sep = 't')
        tmp_dfs.append(tmp_df)
    else:
        raise ValueError(r.text)
df = pd.concat(tmp_dfs)
Мы можем сохранить полученные данные в csv файл, если в дальнейшем они нам могут понадобится
In [20]:
df.to_csv('site_data.csv', sep = 't', index = False, encoding='utf-8', line_terminator='n')
Один из параметров, которые нужны для взаимодействия с ClickHouse через браузер это хост:
In [21]:
HOST = 'http://localhost:8123'
Так, к примеру, если вы зайдете на http://localhost:9000 то можно прочесть:
Port 9000 is for clickhouse-client program.

You must use port 8123 for HTTP.
Определим функции для работы с ClickHouse из нашего Jupyter Notebook. Функции повторяют примеры, размещенные на вебинарах Яндекса1:
In [22]:
def get_clickhouse_data(query, host = HOST, connection_timeout = 1500):
    r = requests.post(host, params = {'query': query}, timeout = connection_timeout)
    if r.status_code == 200:
        return r.text
    else:
        raise ValueError(r.text)
def get_clickhouse_df(query, host = HOST, connection_timeout = 1500):
    data = get_clickhouse_data(query, host, connection_timeout)
    df = pd.read_csv(StringIO.StringIO(data), sep = 't')
    return df
def upload(table, content, host=HOST):
#   content = content.encode('utf-8')
    query_dict = {
             'query': 'INSERT INTO ' + table + ' FORMAT TabSeparatedWithNames '
        }
    r = requests.post(host, data=content, params=query_dict)
    result = r.text
    if r.status_code == 200:
        return result
    else:
        raise ValueError(r.text)
С чегобы начать? Давайте, например, посмотрим что за базы данных в ClickHouse есть в текущеий момент:
In [23]:
q = '''
    SHOW DATABASES
'''
get_clickhouse_df(q)
Out[23]:
| datasets | |
|---|---|
| 0 | default |
| 1 | funnels |
| 2 | system |
Поскольку я уже немного поработал с данными, мы видим три базы данных, одна из которых системная. Создадим таблицу в базе funnels, в которую поместим данные из Logs API:
In [24]:
q = 'drop table if exists funnels.visits'
get_clickhouse_data(q)
q = '''
create table funnels.visits (
    browser String,
    clientID UInt64,
    date Date,
    dateTime DateTime,
    deviceCategory String,
    trafficSource String,
    system String,
    URL String
) ENGINE = MergeTree(date, intHash32(clientID), (date, intHash32(clientID)), 8192)
'''
get_clickhouse_data(q)
Для демонстрации возможности прочтем полученные данные из созданного нами на предыдущих шагах csv файла
In [25]:
df = pd.read_csv('site_data.csv', sep='t',encoding='utf-8')
Загружаем данные в нашу таблицу:
In [27]:
# %%time
upload(
    'funnels.visits',
    df.to_csv(index = False, sep = 't', encoding='utf-8',line_terminator='n'))
Квест пройден, а вот и приз — посмотрим, к примеру, сколько пользователей было вчера на основном разделе нашего сайта:
In [28]:
q = '''
SELECT
    uniq(clientID) as users
FROM funnels.visits
WHERE date = yesterday()
      AND match(URL,'^https://yoursite.ru/main')
FORMAT TabSeparatedWithNames
'''
get_clickhouse_df(q)
| sidebar_label | keywords | slug | ||||
|---|---|---|---|---|---|---|
|
Install |
|
/en/install |
Installing ClickHouse
You have three options for getting up and running with ClickHouse:
- ClickHouse Cloud: The official ClickHouse as a service, — built by, maintained and supported by the creators of ClickHouse
- Self-managed ClickHouse: ClickHouse can run on any Linux, FreeBSD, or macOS with x86-64, ARM, or PowerPC64LE CPU architecture
- Docker Image: Read the guide with the official image in Docker Hub
ClickHouse Cloud
The quickest and easiest way to get up and running with ClickHouse is to create a new service in ClickHouse Cloud:

Once your Cloud service is provisioned, you will be able to connect to it and start inserting data.
Self-Managed Install
- The simplest way to download ClickHouse locally is to run the following command. If your operating system is supported, an appropriate ClickHouse binary will be downloaded and made runnable:
curl https://clickhouse.com/ | sh
- Run the
installcommand, which defines a collection of useful symlinks along with the files and folders used by ClickHouse — all of which you can see in the output of the install script:
sudo ./clickhouse install
- At the end of the install script, you are prompted for a password for the
defaultuser. Feel free to enter a password, or you can optionally leave it blank:
Creating log directory /var/log/clickhouse-server.
Creating data directory /var/lib/clickhouse.
Creating pid directory /var/run/clickhouse-server.
 chown -R clickhouse:clickhouse '/var/log/clickhouse-server'
 chown -R clickhouse:clickhouse '/var/run/clickhouse-server'
 chown  clickhouse:clickhouse '/var/lib/clickhouse'
Enter password for default user:
You should see the following output:
 ClickHouse has been successfully installed.

 Start clickhouse-server with:
  sudo clickhouse start

 Start clickhouse-client with:
  clickhouse-client
- Run the following command to start the ClickHouse server:
:::tip
The Quick Start walks through the steps to download and run ClickHouse, connect to it, and insert data.
:::
Available Installation Options {#available-installation-options}
From DEB Packages {#install-from-deb-packages}
It is recommended to use official pre-compiled deb packages for Debian or Ubuntu. Run these commands to install packages:
sudo apt-get install -y apt-transport-https ca-certificates dirmngr
sudo apt-key adv --keyserver hkp://keyserver.ubuntu.com:80 --recv 8919F6BD2B48D754

echo "deb https://packages.clickhouse.com/deb stable main" | sudo tee
    /etc/apt/sources.list.d/clickhouse.list
sudo apt-get update

sudo apt-get install -y clickhouse-server clickhouse-client

sudo service clickhouse-server start
clickhouse-client # or "clickhouse-client --password" if you've set up a password.
Deprecated Method for installing deb-packages
sudo apt-get install apt-transport-https ca-certificates dirmngr
sudo apt-key adv --keyserver hkp://keyserver.ubuntu.com:80 --recv E0C56BD4

echo "deb https://repo.clickhouse.com/deb/stable/ main/" | sudo tee
    /etc/apt/sources.list.d/clickhouse.list
sudo apt-get update

sudo apt-get install -y clickhouse-server clickhouse-client

sudo service clickhouse-server start
clickhouse-client # or "clickhouse-client --password" if you set up a password.
Migration Method for installing the deb-packages
sudo apt-key del E0C56BD4
sudo apt-key adv --keyserver hkp://keyserver.ubuntu.com:80 --recv 8919F6BD2B48D754
echo "deb https://packages.clickhouse.com/deb stable main" | sudo tee
    /etc/apt/sources.list.d/clickhouse.list
sudo apt-get update

sudo apt-get install -y clickhouse-server clickhouse-client

sudo service clickhouse-server start
clickhouse-client # or "clickhouse-client --password" if you set up a password.
You can replace stable with lts to use different release kinds based on your needs.
You can also download and install packages manually from here.
Packages {#packages}
clickhouse-common-static— Installs ClickHouse compiled binary files.clickhouse-server— Creates a symbolic link forclickhouse-serverand installs the default server configuration.clickhouse-client— Creates a symbolic link forclickhouse-clientand other client-related tools. and installs client configuration files.clickhouse-common-static-dbg— Installs ClickHouse compiled binary files with debug info.
:::info
If you need to install specific version of ClickHouse you have to install all packages with the same version:
sudo apt-get install clickhouse-server=21.8.5.7 clickhouse-client=21.8.5.7 clickhouse-common-static=21.8.5.7
:::
From RPM Packages {#from-rpm-packages}
It is recommended to use official pre-compiled rpm packages for CentOS, RedHat, and all other rpm-based Linux distributions.
First, you need to add the official repository:
sudo yum install -y yum-utils
sudo yum-config-manager --add-repo https://packages.clickhouse.com/rpm/clickhouse.repo
sudo yum install -y clickhouse-server clickhouse-client

sudo /etc/init.d/clickhouse-server start
clickhouse-client # or "clickhouse-client --password" if you set up a password.
Deprecated Method for installing rpm-packages
sudo yum install yum-utils
sudo rpm --import https://repo.clickhouse.com/CLICKHOUSE-KEY.GPG
sudo yum-config-manager --add-repo https://repo.clickhouse.com/rpm/clickhouse.repo
sudo yum install clickhouse-server clickhouse-client

sudo /etc/init.d/clickhouse-server start
clickhouse-client # or "clickhouse-client --password" if you set up a password.
You can replace stable with lts to use different release kinds based on your needs.
Then run these commands to install packages:
sudo yum install clickhouse-server clickhouse-client
You can also download and install packages manually from here.
From Tgz Archives {#from-tgz-archives}
It is recommended to use official pre-compiled tgz archives for all Linux distributions, where installation of deb or rpm packages is not possible.
The required version can be downloaded with curl or wget from repository https://packages.clickhouse.com/tgz/.
After that downloaded archives should be unpacked and installed with installation scripts. Example for the latest stable version:
LATEST_VERSION=$(curl -s https://packages.clickhouse.com/tgz/stable/ |
    grep -Eo '[0-9]+.[0-9]+.[0-9]+.[0-9]+' | sort -V -r | head -n 1)
export LATEST_VERSION

case $(uname -m) in
  x86_64) ARCH=amd64 ;;
  aarch64) ARCH=arm64 ;;
  *) echo "Unknown architecture $(uname -m)"; exit 1 ;;
esac

for PKG in clickhouse-common-static clickhouse-common-static-dbg clickhouse-server clickhouse-client
do
  curl -fO "https://packages.clickhouse.com/tgz/stable/$PKG-$LATEST_VERSION-${ARCH}.tgz"
    || curl -fO "https://packages.clickhouse.com/tgz/stable/$PKG-$LATEST_VERSION.tgz"
done

tar -xzvf "clickhouse-common-static-$LATEST_VERSION-${ARCH}.tgz"
  || tar -xzvf "clickhouse-common-static-$LATEST_VERSION.tgz"
sudo "clickhouse-common-static-$LATEST_VERSION/install/doinst.sh"

tar -xzvf "clickhouse-common-static-dbg-$LATEST_VERSION-${ARCH}.tgz"
  || tar -xzvf "clickhouse-common-static-dbg-$LATEST_VERSION.tgz"
sudo "clickhouse-common-static-dbg-$LATEST_VERSION/install/doinst.sh"

tar -xzvf "clickhouse-server-$LATEST_VERSION-${ARCH}.tgz"
  || tar -xzvf "clickhouse-server-$LATEST_VERSION.tgz"
sudo "clickhouse-server-$LATEST_VERSION/install/doinst.sh" configure
sudo /etc/init.d/clickhouse-server start

tar -xzvf "clickhouse-client-$LATEST_VERSION-${ARCH}.tgz"
  || tar -xzvf "clickhouse-client-$LATEST_VERSION.tgz"
sudo "clickhouse-client-$LATEST_VERSION/install/doinst.sh"
Deprecated Method for installing tgz archives
export LATEST_VERSION=$(curl -s https://repo.clickhouse.com/tgz/stable/ |
    grep -Eo '[0-9]+.[0-9]+.[0-9]+.[0-9]+' | sort -V -r | head -n 1)
curl -O https://repo.clickhouse.com/tgz/stable/clickhouse-common-static-$LATEST_VERSION.tgz
curl -O https://repo.clickhouse.com/tgz/stable/clickhouse-common-static-dbg-$LATEST_VERSION.tgz
curl -O https://repo.clickhouse.com/tgz/stable/clickhouse-server-$LATEST_VERSION.tgz
curl -O https://repo.clickhouse.com/tgz/stable/clickhouse-client-$LATEST_VERSION.tgz

tar -xzvf clickhouse-common-static-$LATEST_VERSION.tgz
sudo clickhouse-common-static-$LATEST_VERSION/install/doinst.sh

tar -xzvf clickhouse-common-static-dbg-$LATEST_VERSION.tgz
sudo clickhouse-common-static-dbg-$LATEST_VERSION/install/doinst.sh

tar -xzvf clickhouse-server-$LATEST_VERSION.tgz
sudo clickhouse-server-$LATEST_VERSION/install/doinst.sh
sudo /etc/init.d/clickhouse-server start

tar -xzvf clickhouse-client-$LATEST_VERSION.tgz
sudo clickhouse-client-$LATEST_VERSION/install/doinst.sh
For production environments, it’s recommended to use the latest stable-version. You can find its number on GitHub page https://github.com/ClickHouse/ClickHouse/tags with postfix -stable.
From Docker Image {#from-docker-image}
To run ClickHouse inside Docker follow the guide on Docker Hub. Those images use official deb packages inside.
From Sources {#from-sources}
To manually compile ClickHouse, follow the instructions for Linux or macOS.
You can compile packages and install them or use programs without installing packages.
  Client: <build_directory>/programs/clickhouse-client
  Server: <build_directory>/programs/clickhouse-server
You’ll need to create data and metadata folders manually and chown them for the desired user. Their paths can be changed in server config (src/programs/server/config.xml), by default they are:
  /var/lib/clickhouse/data/default/
  /var/lib/clickhouse/metadata/default/
On Gentoo, you can just use emerge clickhouse to install ClickHouse from sources.
From CI checks pre-built binaries
ClickHouse binaries are built for each commit.
Launch {#launch}
To start the server as a daemon, run:
There are also other ways to run ClickHouse:
$ sudo service clickhouse-server start
If you do not have service command, run as
$ sudo /etc/init.d/clickhouse-server start
If you have systemctl command, run as
$ sudo systemctl start clickhouse-server.service
See the logs in the /var/log/clickhouse-server/ directory.
If the server does not start, check the configurations in the file /etc/clickhouse-server/config.xml.
You can also manually launch the server from the console:
$ clickhouse-server --config-file=/etc/clickhouse-server/config.xml
In this case, the log will be printed to the console, which is convenient during development.
If the configuration file is in the current directory, you do not need to specify the --config-file parameter. By default, it uses ./config.xml.
ClickHouse supports access restriction settings. They are located in the users.xml file (next to config.xml).
By default, access is allowed from anywhere for the default user, without a password. See user/default/networks.
For more information, see the section “Configuration Files”.
After launching server, you can use the command-line client to connect to it:
By default, it connects to localhost:9000 on behalf of the user default without a password. It can also be used to connect to a remote server using --host argument.
The terminal must use UTF-8 encoding.
For more information, see the section “Command-line client”.
Example:
$ ./clickhouse-client
ClickHouse client version 0.0.18749.
Connecting to localhost:9000.
Connected to ClickHouse server version 0.0.18749.

:) SELECT 1

SELECT 1

┌─1─┐
│ 1 │
└───┘

1 rows in set. Elapsed: 0.003 sec.

:)
Congratulations, the system works!
To continue experimenting, you can download one of the test data sets or go through tutorial.
Recommendations for Self-Managed ClickHouse
ClickHouse can run on any Linux, FreeBSD, or macOS with x86-64, ARM, or PowerPC64LE CPU architecture.
ClickHouse uses all hardware resources available to process data.
ClickHouse tends to work more efficiently with a large number of cores at a lower clock rate than with fewer cores at a higher clock rate.
We recommend using a minimum of 4GB of RAM to perform non-trivial queries. The ClickHouse server can run with a much smaller amount of RAM, but queries will then frequently abort.
The required volume of RAM generally depends on:
- The complexity of queries.
- The amount of data that is processed in queries.
To calculate the required volume of RAM, you may estimate the size of temporary data for GROUP BY, DISTINCT, JOIN and other operations you use.
To reduce memory consumption, ClickHouse can swap temporary data to external storage. See GROUP BY in External Memory for details.
We recommend to disable the operating system’s swap file in production environments.
The ClickHouse binary requires at least 2.5 GB of disk space for installation.
The volume of storage required for your data may be calculated separately based on
-
an estimation of the data volume.
You can take a sample of the data and get the average size of a row from it. Then multiply the value by the number of rows you plan to store.
-
The data compression coefficient.
To estimate the data compression coefficient, load a sample of your data into ClickHouse, and compare the actual size of the data with the size of the table stored. For example, clickstream data is usually compressed by 6-10 times.
To calculate the final volume of data to be stored, apply the compression coefficient to the estimated data volume. If you plan to store data in several replicas, then multiply the estimated volume by the number of replicas.
For distributed ClickHouse deployments (clustering), we recommend at least 10G class network connectivity.
Network bandwidth is critical for processing distributed queries with a large amount of intermediate data. Besides, network speed affects replication processes.
This article is»[Hard Data Learning Data] From Zero to Big Data Experts (Comprehensive Upgraded Edition)»Clickhouse: Partial complement.
Zero REVIEW
- With the development of Internet technology, huge amounts of data has become an important source of corporate decision analysis, ClickHouse hasBig DataAnd low-cost entry-learning (support SQL) advantages, it opened the first post built environment. We are hoping to reduce the barriers to entry ClickHouse.
A tool and environment
- Windows10 Professional Edition (64-bit): Windows Other versions may have other problems, it is recommended to use the environment.
- Docker Desktop: docker can run a product in the Windows environment.
- DBeaver: Support ClickHousedatabaseIt is a database management tool.
Two Windows configuration
1, Enable Virtualization
- Open Task Manager (CTRL + ALT + DELETE) -> select Properties -> CPU -> virtualization confirm is enabled.
2, enable the Hyper-v
- Control panel (Win + R -> Input Control -> Enter) -> program -> Windows enable or disable the function -> Check Hyper-v
Three Docker related
1. Download
- https://www.docker.com/products/docker-desktop
2, installation
- Installation is very simple, not repeat them. After a successful installation view windows task bar will appear docker’s classic logo, small whales.
3, check the version
- Open Windows console (Win + R -> Input cmd -> Enter) -> Input
docker --version
Fourth, the configuration
1 docker desktop wsl2 modify the default storage location subsystem
https://zhuanlan.zhihu.com/p/339377526
After installation WSL2, can in general options docker windows version settings, select Use the WSL2 based engine, WSL2 enabled. At this point, modify Docker desktop methods and modify the previous section WSL same way as other subsystems, but, in Windows, dockers program is divided into the following two subsystems of wsl2:
- docker-desktop
- docker-desktop-data (images will be placed here)
Modify the following steps:
// Exit Docker
 / / Export Docker subsystem
wsl --export docker-desktop D:docker-desktopdocker-desktop.tar
wsl --export docker-desktop-data D:docker-desktopdocker-desktop-data.tar
 // Log out existing Docker subsystem
wsl --unregister docker-desktop
wsl --unregister docker-desktop-data
 // Import the Docker subsystem using the new location
wsl --import docker-desktop D:docker-desktopdistro D:docker-desktopdocker-desktop.tar --version 2
wsl --import docker-desktop-data D:docker-desktopdata D:docker-desktopdocker-desktop-data.tar --version 2
 / / Restart Dockers
Configuration Mirror Docker domestic accelerate the download: the left menu Docker Engine -> right input box -> Apply & Restart
{
  "registry-mirrors": [
    "https://registry.docker-cn.com",
    "http://hub-mirror.c.163.com",
    "https://docker.mirrors.ustc.edu.cn"
  ],
  "insecure-registries": [],
  "debug": false,
  "experimental": false,
  "features": {
    "buildkit": true
  }
}
Five related ClickHouse
1, pull mirroring
- Open Windows console (Win + R -> Input cmd -> Enter) -> Input
docker pull yandex/clickhouse-server
docker pull yandex/clickhouse-client
- tips: If no country can not download mirror
2, the temporary containers run temp-clickhouse-server
- Windows console command to continue
docker run --rm -d --name=temp-clickhouse-server yandex/clickhouse-server
3, config configuration and mapping users to configure Windows hard disk directory
- (1) D created in the root directory D: / clickhouse / conf folder
- (2) Windows console command to continue
docker cp temp-clickhouse-server:/etc/clickhouse-server/config.xml D:/clickhouse/conf/config.xml
docker cp temp-clickhouse-server:/etc/clickhouse-server/users.xml D:/clickhouse/conf/users.xml
- tips: If no Dcoker mount the file directory permissions error.
- (3) to view the file case
4. Create an account
- (1) into the temporary container temp-clickhouse-server, Windows console command to continue
docker exec -it temp-clickhouse-server /bin/bash
- (2) Run the vessel, the SHA256 account generated, for example, account number: zhai Password: zhai
PASSWORD=$(base64 < /dev/urandom | head -c8); echo "zhai"; echo -n "zhai" | sha256sum | tr -d '-
- Results of the
- (3) modify D: /clickhouse/conf/users.xml file
<users>
    <zhai>
        <password_sha256_hex>3b75903cd12c5e8ad59f73feb4baa526ed3fe234f2d77d421d7b9d73fefb3f61</password_sha256_hex>
           <networks incl="networks" replace="replace">
           <ip>::/0</ip>
        </networks>
        <profile>zhai</profile>
        <quota>zhai</quota>
    </zhai>
</users>
5, modify the host monitor
- Modify D: /clickhouse/conf/config.xml file
<listen_host>0.0.0.0</listen_host>
- tips: generally IPV4, IPV6 changed if ::
6, destruction temporary container
- Run Windows Console
docker stop temp-clickhouse-server
7, run ClickHouse service
- (1) Create a directory: D: / clickhouse / data and D: / clickhouse / log
- (2) Windows console execute the command, port mapping 8123,9000,9009, data, configuration, log mapped to the Windows hard disk
docker run -d --name=single-clickhouse-server -p 8123:8123 -p 9000:9000 -p 9009:9009 --ulimit nofile=262144:262144 --volume D:/clickhouse/data:/var/lib/clickhouse:rw --volume D:/clickhouse/conf:/etc/clickhouse-server:rw --volume D:/clickhouse/log:/var/log/clickhouse-server:rw yandex/clickhouse-server
8, installation

Six CLICKHOUSE_CLIENT (docker mounted clickhouse-client)
1 pulling yandex / clickhouse-client docker mirroring
docker pull yandex/clickhouse-client
2 Start clickhouse-client
docker run --name liucf-clickhouse-client -it --rm --link single-clickhouse-server:clickhouse-server-alias docker.io/yandex/clickhouse-client --host 192.168.12.14 --port 9000 --user zhai --password zhaiVisible successful start can use
Because the client after each use need not have been resident here so use —rm parameters will directly delete the container after use exit command to exit liucf-clickhouse-client container, re-created next time you start it
Note: This uses docker —link command, allowing a container and another container easily connect together, the parameters part of single-clickhouse-server said to be connected is really the name of the vessel, clickhouse-server-alias is to be connected alias container. 192.168.12.14 host IP
related question:

Resolve error
More reported, guessing may be the WSL2 version we used, you need to update our own manual, we will open it according to the prompt to download the latest version of the WSL2 installation after the prompt.
Статьи Справочник
- Предисловие
- Введение
- 2. Подготовка
-
- 1. Установите Linux
-
- 1. Откройте режим разработчика Windows
- 2. Установите подсистемы Windows, подходящие для Linux
- 3. Установите Ubuntu
- 4. Установите разрешение администратора
-
- Вопрос 1: SU: Решение об отказе от аутентификации
- В -третьих, установить Clickhouse
-
- 1. Получите файл установки
- 2. Выполните установку
- 3. Запустите сервис Clickhouse
-
- Первый может запустить следующую команду, чтобы запустить службу в фоновом режиме:
- Во -вторых, вы также можете запустить сервис непосредственно в консоли:
-
- Вопрос 1: ошибка часового пояса
- Вопрос 2: Запустите ошибку
- Вопрос 3: Подключение к отказанному подключению к ошибке сервера: Коннектику
- Вопрос 4: Не могу
- 4. Служба запуска/остановки/перезагрузки
- 5. Подключите сервер Clickhouse
- 6. Используйте инструмент базы данных, чтобы подключить к Clickhouse
- Подвести итог
-
- Справочный пост в блоге
Предисловие
Недавно прослушивание моих соседей по комнате сказала, что их компания использовала базу данных Clichous В целом очень подробно, как правило, гладко. Обычно это гладко. Странно, что я не наступил на яму во время процесса установки. Этот блог записывает весь процесс установки, с некоторыми шагами и решениями.
Совет: Ниже приведен текст этой статьи, можно использовать следующие случаи для справки
Введение
Clickhouse — это онлайн -анализ (OLAP)База данных столбцовСистема управления (СУБД).
: Vertica 、 Paraccel (актианская матрица , Amazon Redshift) 、 Sybase IQ 、 Exasol 、 Infobright 、 Infinidb 、 Monetdb (Vectorwise , Actian Vector) 、 uciddb 、 、 、 、 、。 kd kd kd kd kd kd kd kd kd kd kd kd kd kd kd kd kd kd k ka+
Clickhouse является наиболее часто используемым в базе данных столбцов и является реальным СУБД. В Интернете есть много очень подробных статей в блоге. Конкретное обучение не является основным содержанием этого блога.
Прикрепите официальный документ Clickhouse:Официальная документация Clickhouse
2. Подготовка
1. Установите Linux
Прежде всего, в настоящее время Clickhouse поддерживает установку в операционных системах, таких как Linux, Mac OS X, и не поддерживает непосредственно установленную на платформе Windows. Таким образом, вам нужно понять соответствующие знания и опыт Linux.
Вы можете установить виртуальную машину, установив Linux, а затем установите систему дистрибуции Linux, такую как Linux, такой как OS Cent или Ubuntu. Тем не менее, установка является более хлопотной, вам нужно установить виртуальную машину и загрузить системное зеркало. Здесь рекомендуется использовать встроенную подсистему Linux от Windows 10. Этот метод также обменивается студентами в Интернете, который действительно прост в использовании. Конкретный метод установки заключается в следующем:
1. Откройте режим разработчика Windows
Откройте «Настройка» -> «Обновление и безопасность» -> «Параметры разработчика, выберите« Режим разработчика ».

Здесь будет установлена опция разработчика, где будет установлен опция разработчика, и это будет несколько минут.
2. Установите подсистемы Windows, подходящие для Linux
Откройте панель управления, выберите «Программа», нажмите «Включить или закрыть функцию Windows» и проверить «подсистемы Windows, подходящие для Linux». Пакет программ будет установлен здесь, просто подождите несколько минут,Перезагрузить систему после установки。

3. Установите Ubuntu
Откройте магазин Microsoft, найдите Ubuntu, выберите недавнюю систему и нажмите, чтобы получить его автоматически.

После установки запустите Ubuntu, будет проведен короткий процесс инициализации, а затем введите и оставьте имя пользователя и пароль, как показано на рисунке ниже, установка успешна.

4. Установите разрешение администратора
Использование системы Linux часто нужно работать с администраторами. Так что установите его здесь, чтобы избежать неприятностей позже. Поскольку я не знаю о Ubuntu, я наступил здесь на яму.
Вопрос 1: SU: Решение об отказе от аутентификации
Причина в том, что Ubuntu не разрешается войти в систему с root по умолчанию, поэтому начальная корневая учетная запись не может быть использована. Вам необходимо использовать разрешения SUDO для изменения пароля корневого уровня в обычной учетной записи.

Решение просто: просто установите пароль root. Обратите внимание, что это sudo вместо Su. Это решено!
Обратитесь к оригинальному блогу:SU: Решение об отказе от подлинности
Если вы готовы на ранней стадии, вы можете ввести установку Clickhouse.
В -третьих, установить Clickhouse
Первоначально установка Clickhouse была управляется ссылкой на этот пост в блоге:Установка и доступ к Clickhouse под UbuntuТем не менее, процесс установки не так гладкий, как Bo Wen, и процесс установки не очень подробный. Следующее будет сочетаться с Bo Wen и вашей собственной фактической операцией для выполнения подробного развертывания установки.
1. Получите файл установки
Вот установка пакета установки вручную на официальном веб -сайте. Вы можете попробовать его самостоятельно, потянув его. Операция здесь не повторяется, а версия установки такая же, как в приведенном выше посте в блоге.
Официальный адрес:ссылка на скачивание
Загрузите три установки пакета:
clickhouse-common-static_20.9.2.20_amd64
clickhouse-server_20.9.2.20_all
clickhouse-client_20.9.2.20_all
Поиск непосредственно в списке загрузки для поиска.

2. Выполните установку
После загрузки скопируйте три файла, загруженные в файл TMP, а затем перейдите в эту папку через команду CD. Команда LS проверяет, существует ли система Ubuntu в системе Ubuntu. Поскольку я наступил на яму, было предложено, чтобы файл не существовал, когда команда была выполнена, поэтому мне пришлось переехать в другие места.

Затем установите по очереди, выполните команду:
sudo dpkg -i clickhouse-common-static_20.9.2.20_amd64.deb
sudo dpkg -i clickhouse-server_20.9.2.20_all.deb
sudo dpkg -i clickhouse-client_20.9.2.20_all.deb

Как показано на рисунке, он был успешно установлен. Следует отметить, что при установке Clickhouse-Server запрашивается пароль ввода. 123456 Я вошел здесь (Очень важно), Кажется возможным, если вы не введете пароль напрямую.

И я увидел установленного клика в папке и т. Д.

3. Запустите сервис Clickhouse
Можно сказать, что можно сказать, что здесь на полпути. Здесь вы можете начать сервис Clickhouse. Однако при запуске службы будет сообщена ошибка, и решение этой идеи состоит в том, чтобы изменить содержание файла конфигурации. Здесь мы начнем службу напрямую и посмотрим, какие ошибки будут сообщены. ((Сконцентрируйся)
Есть два способа начать службу:
Первый может запустить следующую команду, чтобы запустить службу в фоновом режиме:
sudo service clickhouse-server start
Вы можете просмотреть журнал в/var/log/clickhouse-server/directory.
Если служба не запускается, проверьте файл конфигурации/etc/clickhouse- Server/config.xml.
Во -вторых, вы также можете запустить сервис непосредственно в консоли:
clickhouse-server --config-file=/etc/clickhouse-server/config.xml
В этом случае журнал будет напечатан на консоли, которая очень удобна в процессе разработки.
Если файл конфигурации находится в текущем каталоге, вы не можете указать параметр –config-file. Он использует ‘./config.xml’ по умолчанию.
Давайте сначала выполним этоsudo service clickhouse-server startПосмотрите, что вы будете запрашивать (возможно, это может быть успешным, вот яма, с которой вы столкнулись).
Вопрос 1: ошибка часового пояса

Обратите внимание на красную линию — это сообщение об ошибке, что означает, что нельзя определить, что часовой пояс операционной системы этой машины необходимо установить вручную.
sudo vim /etc/clickhouse-server/config.xml
Найдите часовой застрой и измените следующее:
<timezone>Asia/Shanghai</timezone>

Этот часовой пояс по умолчанию, что этот код по умолчанию, поэтому постарайтесь добавить его заранее.
Вопрос 2: Запустите ошибку
Параметры начала: sudo clickhouse-server-config-file =/etc/clickhouse-server/config.xml
2020.08.20 18:49:28.189321 [ 29338 ] {} <Error> Application: DB::Exception: Effective user of the process (root) does not match the owner of the data (clickhouse). Run under 'sudo -u clickhouse'
Подсказка уже ясна, запустите в рамках «Sudo -u Clickhouse».
После изменения начального параметра: sudo -u Clickhouse Clickhouse-server-config-file =/etc/clickhouse-server/config.xml
Вопрос 3: Подключение к отказанному подключению к ошибке сервера: Коннектику
Настройте внешний доступ сети (удаленный доступ).
В config.xml открыта часть красной коробки.

Вопрос 4: не может включать узлы Crickhouse_Remote_servers
При запуске может быть предложено, что она аналогична ошибке, которая не может быть введена щелчком щелчка щелчка щелчка щелчка щелчка. Это может быть связано с тем, что нет файла metrika.xml, который заставляет узел введения сообщать об ошибке. Поскольку это одноразовая версия, вы можете временно удалить узел на рисунке ниже (рекомендуется сделать резервную копию исходного файла перед изменением файла конфигурации).ПРИМЕЧАНИЕ. Ctrl+/Annotation нельзя оставить напрямую, потому что в узле есть комментарии, которые сообщат об ошибке.

4. Служба запуска/остановки/перезагрузки
sudo service clickhouse-server start #запускать
sudo service clickhouse-server stop #остановка
sudo service clickhouse-server restart #Restart Service, на самом деле, просто запустите сначала, затем запустите
5. Подключите сервер Clickhouse
Экскурация заказа:
clickhouse-client
Примечание. Если будет установлен пароль, будет такая подсказка

Поэтому используйте следующие полные команды (учетная запись по умолчанию, используемая сейчас):
clickhouse-client --port 9000 --host 127.0.0.1 --password 123456 --multiline

Это успешно.
6. Используйте инструмент базы данных, чтобы подключить к Clickhouse
Если вы разрабатываете Java, вы можете подключиться к встроенному инструменту Clickhouse с идеей, и операция очень проста.

Порт здесь — 8123 по умолчанию, а порт HTTP, подключающий Clickhouse 8123.

После установки плагина -IN вы можете использовать его в идее.

Подвести итог
После написания этого было в основном закончилось. Впервые было установлено много ям, и было много странных проблем. Вторая установка была очень плавной. Это всего лишь одноразовое развертывание, но в реальной работе и производстве важным является кластер, и будет продолжать изучать развертывание кластера в будущем.
Справочный пост в блоге
Вот несколько сообщений в блоге для справки, и есть метод развертывания кластера, который можно упомянуть:
1. Установка Clickhouse Cluster
2. Серия Clickhouse: введение и установка
3. Clickhouse Series 2: Clickhouse встретил отчет об ошибках и решение
4. Установка и доступ к Clickhouse в Clickhouse
5. Clickhouse Basic Operation One User Power Management
The premise
With the development of current services, the amount of data in several business systems began to expand dramatically. Before, I used relational database MySQL to conduct a data warehouse modeling, and found that after the amount of data came up, a large number of JOIN operations were still a little unbearable after improving the configuration of cloud MySQL. In addition, I developed a label service based on relational database design. Daily full label data (unavoidable Cartesian product) single table exceeds 5000W. At present, the user ID-based segmentation with multi-process processing method has temporarily delayed the deterioration of performance, but considering the near future, we still need to build a small data platform. The system of Hadoop is too large, with too many components and high learning costs of hardware and software, which cannot be mastered overnight by all members of a small team. With all these factors in mind, ClickHouse is a dark technology that needs to be invoked to see if it can get out of the way.

Software version
ClickHouse is not covered here, but is fully documented at https://clickhouse.tech. In Windows10, you can install Docker directly and run ClickHouse images directly using hyper-V features. The software required for setting up the development environment is listed below:
| software | version | note |
|---|---|---|
Windows |
10 |
Make sure you use itWindows10And turn it onHyper-VIn order to useDocker |
Docker Desktop |
any | DockertheWindowsThe desktop version |
ClickHouse Server |
X 20.3. |
Direct pulllatestThe mirror image of |
ClickHouse Client |
X 20.3. |
Direct pulllatestThe mirror image of |
Cmder |
The latest version | Optional, used to replace the unusable console that comes with it |
In Windows10, you can enable the Hyper-V feature by running the following command: Control Panel — Programs — Enable or Disable Windows Features — Hyper-V

Then the Docker official site https://www.docker.com/get-started child pages can find Docker Desktop download entry:

After installation, Docker Desktop will automatically start with the system, and the software interface is as follows:

Install and use ClickHouse
Note that you need to have a preliminary understanding of ClickHouse’s core directory before starting the container installation.
Mirror pull and core directory
Download the images of ClickHouse Server and ClickHouse Client:
docker pull yandex/clickhouse-server
docker pull yandex/clickhouse-client
Copy the code
After downloading, the following prompt will be displayed:

Check this out with Docker Images:
λ  docker images
REPOSITORY                 TAG                 IMAGE ID            CREATED             SIZE
yandex/clickhouse-server   latest              c85f84ea6550        10 days ago         515MB
yandex/clickhouse-client   latest              f94470cc9cd9        10 days ago         488MB
Copy the code
Both images are actually wrapped in a tiny Ubuntu system, so the container can be used as if it were a Linux system. The core directory portion of ClickHouse Server in the container is as follows:
/etc/clickhouse-serverThis is:ClickHouse ServerDefault configuration file directory, including global configurationconfig.xmlAnd user configurationusers.xmlAnd so on./var/lib/clickhouseThis is:ClickHouse ServerDefault data storage directory./var/log/clickhouse-serverThis is:ClickHouse ServerDefault log output directory.
In order to facilitate configuration management, data viewing and log searching, the above three directories can be directly mapped to the specific directory of the host computer. The author has done the following mapping in this development machine:
| Docker container directory | Host directory |
|---|---|
/etc/clickhouse-server |
E:/Docker/images/clickhouse-server/single/conf |
/var/lib/clickhouse |
E:/Docker/images/clickhouse-server/single/data |
/var/log/clickhouse-server |
E:/Docker/images/clickhouse-server/single/log |
A few points to note before starting ClickHouse Server:
ClickHouse ServerThe service itself depends on three ports, whose default value is9000(TCPProtocol),8123(HTTPAgreement) and9009(Cluster data replication), the mapping to the host should be one-to-one, so you need to ensure that the three ports on the host are not occupied and can be usedDockerThe parameters of the-pSpecifies the port mapping between the container and the host.ClickHouse ServerThe number of file handles in the container system needs to be modifiedulimit nofile, you can useDockerparameter--ulimit nofile=262144:262144Specifies the number of file handles.- There’s a technique that you can use. Use
Dockerthe--rmParameter to create a temporary container, obtained first/etc/clickhouse-serverDirectory configuration file, passDocker cp container directory Host directoryCommand to copy the container configuration file to the host directory. After the container is stopped, it will be deleted directly, so that the host configuration file template can be retained.
Temporary container copy configuration
Docker run —rm -d —name=temp-clickhouse-server Yandex /clickhouse-server After success, copy the container’s config. XML and users. XML files to the host using the following command:
docker cp temp-clickhouse-server:/etc/clickhouse-server/config.xml E:/Docker/images/clickhouse-server/single/conf/config.xmldocker cp temp-clickhouse-server:/etc/clickhouse-server/users.xml E:/Docker/images/clickhouse-server/single/conf/users.xml
After these two commands are executed, you can see that config.xml and users.xml have been generated in the host’s disk directory. Then you need to do a few configurations:
- create
defaultPassword of the account. - Create a new one
rootAccount. - Open client listening
Host, avoid later useJDBCClient orClickHouse ClientCannot connect whenClickHouse Server.
Docker exec-it temp-clickhouse-server /bin/bash:
PASSWORD=$(base64 /dev/urandom | head -c8); echo "default"; echo -n "default" | sha256sum | tr -d '-'PASSWORD=$(base64 /dev/urandom | head -c8); echo "root"; echo -n "root" | sha256sum | tr -d '-'
[email protected]:/# PASSWORD=$(base64  /dev/urandom | head -c8); echo "default"; echo -n "default" | sha256sum | tr -d '-'
default
37a8eec1ce19687d132fe29051dca629d164e2c4958ba141d5f4133a33f0688f
[email protected]:/# PASSWORD=$(base64  /dev/urandom | head -c8); echo "root"; echo -n "root" | sha256sum | tr -d '-'
root
4813494d137e1631bba301d5acab6e7bb7aa74ce1185d456565ef51d737677b2
Copy the code
This gives you the SHA256 digest of the passwords for the default:default and root:root accounts. Modify the users.xml file on the host:

Then modify the config.xml file on the host:

Finally, the temporary container is stopped and destroyed with the Docker Stop temp-clickhouse-server.
Run the ClickHouse service
Then create and run an instance of the ClickHouse Server container using the following command (make sure config.xml and users.xml already exist) :
Name and container name: docker run -d --name=single-clickhouse-server Port mapping: -p 8123:8123 -p 9000:9000 -p 9009:9009 Number of file handles: - the ulimit nofiles = 262144-262144 data directory mapping: - v E: / Docker/images/clickhouse - server/use/data: / var/lib/clickhouse: rw configuration directory mapping: - v E: / Docker/images/clickhouse - server/use/conf: / etc/clickhouse - server: rw log directory mapping: - v E: / Docker/images/clickhouse - server/use/log: / var/log/clickhouse - server: rw mirror: another dual/clickhouse - serverCopy the codeDocker run -d —name=single-clickhouse-server -p 8123:8123 -p 9000:9000 -p 9009:9009 —ulimit nofile=262144:262144 -v E:/Docker/images/clickhouse-server/single/data:/var/lib/clickhouse:rw -v E:/Docker/images/clickhouse-server/single/conf:/etc/clickhouse-server:rw -v E: / Docker/images/clickhouse — server/use/log: / var/log/clickhouse — server: rw another dual/clickhouse — server.
After executing the command above, the Docker Desktop will have several pop-ups confirming whether to share the host directory. Simply press the Share it button.

Finally, the native command line Client, ClickHouse Client, is used to connect. Use the docker run-it —rm —link single-clickhouse-server:clickhouse-server yandex/ clickhouse-client-uroot —password command Root — host clickhouse — server:
λ docker run-it --rm --link single-clickhouse-server:clickhouse-server yandex/ clickhouse-client-uroot --password root -- Host Clickhouse-server Clickhouse Client Version 20.10.3.30 (Official build). Connecting to Clickhouse-server :9000 AS Connected to ClickHouse server version 20.10.3 revision 54441.f5abc88ff7e4 :) select 1; SELECT 1 ┌ ─ ─ 1 ┐ │ │ 1 └ ─ ─ ─ ┘ 1 rows in the set. The Elapsed: 0.004 SEC.Copy the codeThe next time your computer restarts the ClickHouse Server container and the container does not start, simply use the command docker (re)start single-clickhouse-server to pull up the container instance.
Connect to the ClickHouse service using JDBC
ClickHouse currently has three JDBC drivers:
clickhouse-jdbc(Official) : The address ishttps://github.com/ClickHouse/clickhouse-jdbc, the current version is based onApache Http ClientThe implementation.ClickHouse-Native-JDBC(Third party) : The address ishttps://github.com/housepower/ClickHouse-Native-JDBCBased on theSocketThe implementation.clickhouse4j(Third party) : The address ishttps://github.com/blynkkk/clickhouse4jLighter than the official driver.
To be honest, it is a little embarrassing that the official driver package does not connect with TCP private protocol stack, but uses HTTP protocol for interaction. I do not know how much performance will be reduced, but based on the thinking of «official is better», I still choose the official driver package for Demo demonstration. Introducing clickHouse-JDBC dependencies:
dependency
    groupIdru.yandex.clickhouse/groupId
    artifactIdclickhouse-jdbc/artifactId
    version0.2.4/version
/dependency
Copy the code
Write a test class:
public class ClickHouseTest {

    @Test
    public void testCh(a) throws Exception {
        ClickHouseProperties props = new ClickHouseProperties();
        props.setUser("root");
        props.setPassword("root");
The result is as follows:
Table default.t_test already exists # Default Table in the database :[t_test] Query result,id:1,name:throwable query result, ID :2,name:dogeCopy the codesummary
After the ClickHouse development environment is set up, you will learn the basic syntax of ClickHouse, the features and usage scenarios of the various engines, and clustering (sharding and multiple copies).
References:
https://clickhouse.tech
remind
After a direct power outage, I found that the ClickHouse service in Docker was successfully restarted, but the error log output File not found, causing all clients to fail to connect to the service. The initial judgment is that metadata and actual stored data caused by the «power failure» caused by inconsistency. So proposal in a development environment to turn it off before you enter the container calls the service clickhouse — stop server, and then in the host machine call docker stop container name | containers ID stop to shut down, Otherwise, you need to recursively delete all the files in the Store directory in the data directory to restart ClickHouse Server and use it properly (this is a very rude method and has a high chance of directly causing data loss, so be careful).
(C-2-D E-A-20201108)
Personal blog
- Throwable’s Blog
Getting Started
System Requirements
ClickHouse can run on any Linux, FreeBSD or Mac OS X with x86_64 CPU architecture.
Though pre-built binaries are typically compiled to leverage SSE 4.2 instruction set, so unless otherwise stated usage of CPU that supports it becomes an additional system requirement. Here’s the command to check if current CPU has support for SSE 4.2:
$ grep -q sse4_2 /proc/cpuinfo && echo "SSE 4.2 supported" || echo "SSE 4.2 not supported"
Installation
From DEB Packages
Yandex ClickHouse team recommends using official pre-compiled deb packages for Debian or Ubuntu.
To install official packages add the Yandex repository in /etc/apt/sources.list or in a separate /etc/apt/sources.list.d/clickhouse.list file:
deb http://repo.yandex.ru/clickhouse/deb/stable/ main/
If you want to use the most recent version, replace stable with testing (this is not recommended for production environments).
Then run these commands to actually install packages:
sudo apt-get install dirmngr    # optional
sudo apt-key adv --keyserver keyserver.ubuntu.com --recv E0C56BD4    # optional
sudo apt-get update
sudo apt-get install clickhouse-client clickhouse-server
You can also download and install packages manually from here: https://repo.yandex.ru/clickhouse/deb/stable/main/.
From RPM Packages
Yandex does not run ClickHouse on rpm based Linux distributions and rpm packages are not as thoroughly tested. So use them at your own risk, but there are many other companies that do successfully run them in production without any major issues.
For CentOS, RHEL or Fedora there are the following options:
- Packages from https://repo.yandex.ru/clickhouse/rpm/stable/x86_64/ are generated from official
debpackages by Yandex and have byte-identical binaries. - Packages from https://github.com/Altinity/clickhouse-rpm-install are built by independent company Altinity, but are used widely without any complaints.
- Or you can use Docker (see below).
From Docker Image
To run ClickHouse inside Docker follow the guide on Docker Hub. Those images use official deb packages inside.
From Sources
To manually compile ClickHouse, follow the instructions for Linux or Mac OS X.
You can compile packages and install them or use programs without installing packages. Also by building manually you can disable SSE 4.2 requirement or build for AArch64 CPUs.
Client: dbms/programs/clickhouse-client
Server: dbms/programs/clickhouse-server
You’ll need to create a data and metadata folders and chown them for the desired user. Their paths can be changed in server config (src/dbms/programs/server/config.xml), by default they are:
/opt/clickhouse/data/default/
/opt/clickhouse/metadata/default/
On Gentoo you can just use emerge clickhouse to install ClickHouse from sources.
Launch
To start the server as a daemon, run:
$ sudo service clickhouse-server start
See the logs in the /var/log/clickhouse-server/ directory.
If the server doesn’t start, check the configurations in the file /etc/clickhouse-server/config.xml.
You can also manually launch the server from the console:
$ clickhouse-server --config-file=/etc/clickhouse-server/config.xml
In this case, the log will be printed to the console, which is convenient during development.
If the configuration file is in the current directory, you don’t need to specify the --config-file parameter. By default, it uses ./config.xml.
ClickHouse supports access restriction settings. They are located in the users.xml file (next to config.xml).
By default, access is allowed from anywhere for the default user, without a password. See user/default/networks.
For more information, see the section «Configuration Files».
After launching server, you can use the command-line client to connect to it:
By default it connects to localhost:9000 on behalf of the user default without a password. It can also be used to connect to a remote server using --host argument.
The terminal must use UTF-8 encoding.
For more information, see the section «Command-line client».
Example:
$ ./clickhouse-client
ClickHouse client version 0.0.18749.
Connecting to localhost:9000.
Connected to ClickHouse server version 0.0.18749.

:) SELECT 1

SELECT 1

┌─1─┐
│ 1 │
└───┘

1 rows in set. Elapsed: 0.003 sec.

:)
Congratulations, the system works!
To continue experimenting, you can download one of test data sets or go through tutorial.
Original article
Installing and configuring the ClickHouse ODBC Driver for Windows
The ClickHouse ODBC Driver for Microsoft Windows allows users to connect different applications to a ClickHouse database. There are two versions available: 64-Bit and 32-Bit based on which version of Windows is being used, and the requirements of the applications connecting to ClickHouse.
Prerequisites
- The ClickHouse ODBC Driver relies on the Microsoft Visual C++ Redistributable for Visual Studio 2019. This is included with the ClickHouse ODBC Installer for Windows.
- A local Administrator account is required to install the ClickHouse ODBC driver on Windows 10.
Installation Steps
To install the ClickHouse ODBC Driver for Microsoft Windows:
-
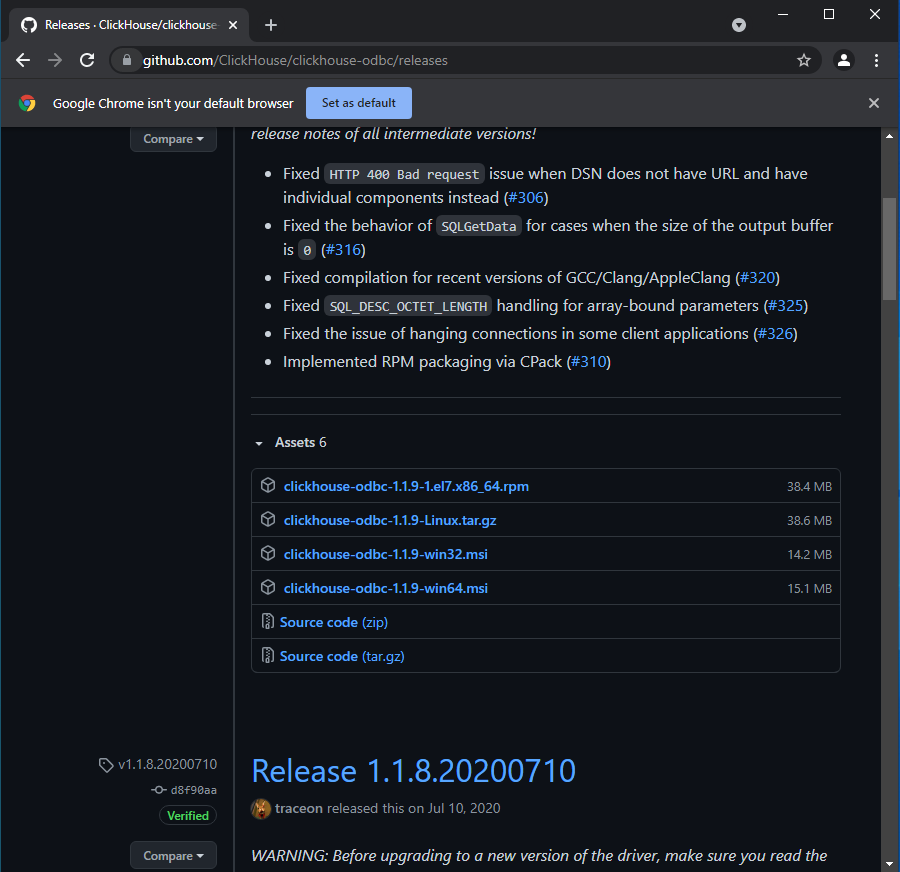
With a browser, navigate to the clickhouse-odbc releases page.
-
Select the most recent release and select one of the following ClickHouse ODBC installer for Windows, replacing
{version}with the version that will be downloaded:
- For 32-bit versions of Windows:
clickhouse-odbc-{version}-win32.msi - For 64-bit versions of Windows:
clickhouse-odbc-{version}-win64.msi
- For 32-bit versions of Windows:
-
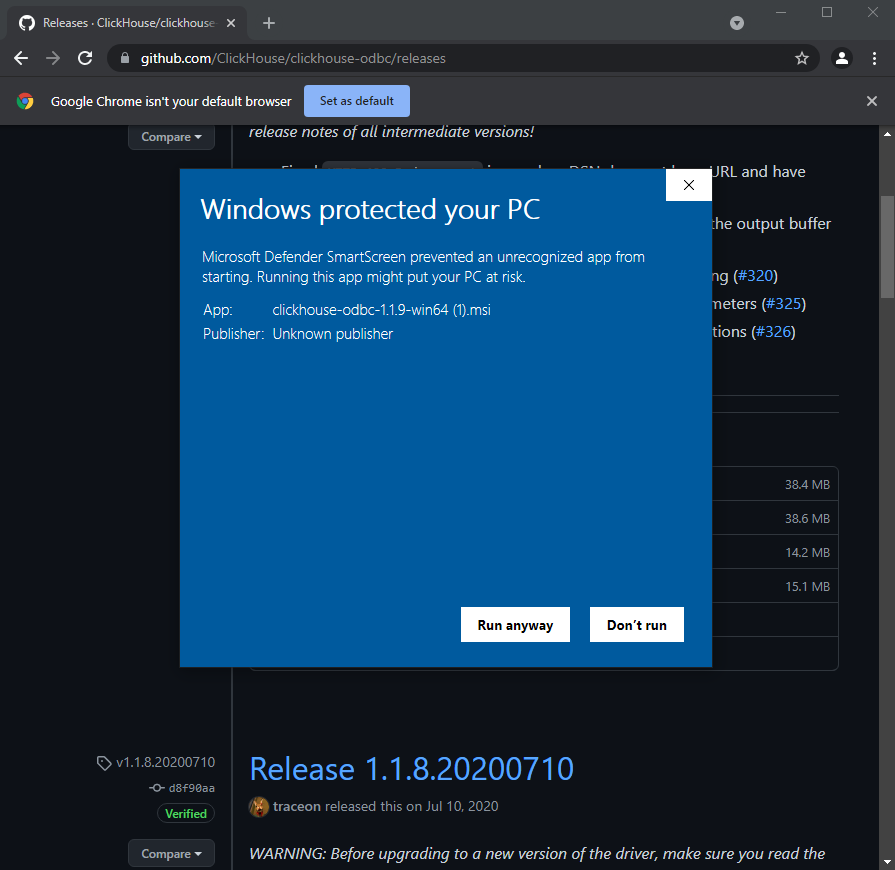
Launch the downloaded ClickHouse ODBC installer.
- Note: There may be a warning from Microsoft Windows Defender that the installer is an unrecognized application. If this occurs, select More Info, then select Run Anyway.
-
Follow the ODBC installation process as detailed by the application. The default installation are typically sufficient, but refer to the clickhouse-odbc guide for full details.
-
Once finished, the ClickHouse ODBC Driver will be installed.
Verifying the ClickHouse ODBC Driver Installation
To verify the ClickHouse ODBC Driver has been installed:
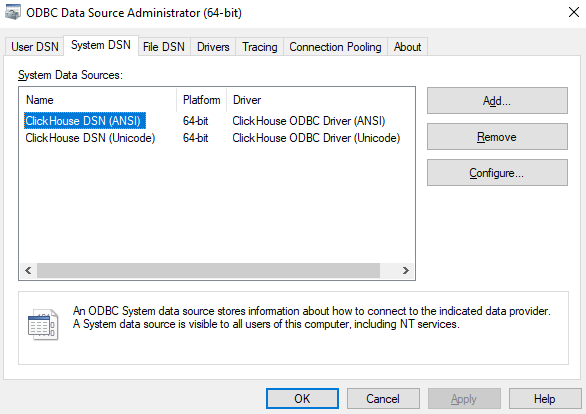
-
Launch the Windows 10 application ODBC Data Source Administrator — there are two versions: 32 bit and 64 bit. Select the version that matches your operating system.
-
Select the System DSN tab. Under a standard ClickHouse ODBC installation, both the ClickHouse DSN (ANSI) and the ClickHouse DSN (Unicode) will be available.
Example Connecting to ClickHouse with ODBC
Once the ClickHouse ODBC driver has been installed, connections can be made to specific ClickHouse servers via the Data Source Name(DSN). Two connection types are recommended:
- User DSN: These are ODBC connections that are available for the Windows 10 user.
- System DSN: These are ODBC connections available to all users of the Windows 10 operating system.
The following example demonstrates how to create a User DSN connection to a ClickHouse server.
-
Launch the Windows 10 application ODBC Data Source Administrator — there are two versions: 32 bit and 64 bit. Select the version that matches your operating system and the applications that will be connecting to ClickHouse.
- For example: If running the 64 bit version of Windows 10, but the application is 32 bit, then select the 32 bit version of the ODBC driver.
-
Select the User DSN tab.
-
Select Add.
-
Select ClickHouse ODBC Driver (Unicode), then select Finish.
-
There are two methods of setting up the DSN connection: URL or Host Name. To set up the connection via URL:
-
Name: The name you set for your connection.
-
Description (Optional): A short description of the ODBC connection.
-
URL: The URL for the ClickHouse server. This will be the HTTP or HTTPS connection based on the ClickHouse HTTP Interface.
- This will be in the format:
{connection type}//{url}:{port}For example:
https://github.demo.trial.altinity.cloud:8443
-
-
To set up the connection via Host Name, provide the following:
- Host: The hostname or IP address of the ClickHouse server.
- Port: The port to be used. This will be either the HTTP port, default
8123, or the HTTPS port default8443. - Database (Optional): The name of the database on the ClickHouse server.
- SSLMode (Optional)
- Set to require if SSL will be used and fail if it can not be verified.
- Set to allow if SSL will be used with self-signed certificates.
- User (Optional): Set to provide a specific username when connecting, leave blank to be prompted.
- Password (Optional): Set to provide a specific password when connecting, leave blank to be prompted.
- Timeout (Optional): Set a timeout period before giving up on the connection.

Test Connection
One method of testing the connection to ClickHouse through the ODBC driver is with Powershell. This script will make an ODBC connection to the specified database, then show all tables available to the authenticating ClickHouse user.
- Launch Powershell.
- If using the 64 bit version of the ClickHouse ODBC Driver, then select
Windows Powershell ISE. - If using the 32 bit version of the ClickHouse ODBC Driver, select
Windows Powershell ISE (x86).
- If using the 64 bit version of the ClickHouse ODBC Driver, then select
- Paste the following script, replacing the following:
- DSN: The DSN of your ClickHouse ODBC Connection.
- Uid: The ClickHouse user being used.
- Pwd: The password of the ClickHouse user being used.
- Run the script.
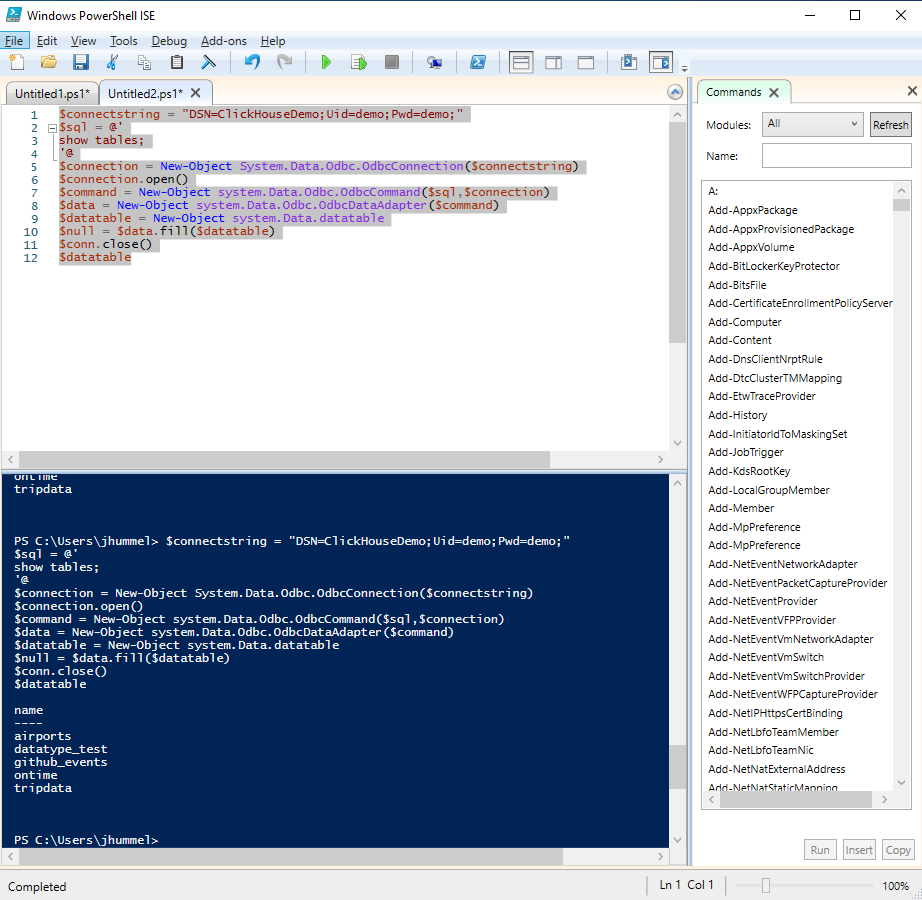
$connectstring = "DSN=ClickHouseDemo;Uid=demo;Pwd=demo;"
$sql = @'
show tables;
'@
$connection = New-Object System.Data.Odbc.OdbcConnection($connectstring)
$connection.open()
$command = New-Object system.Data.Odbc.OdbcCommand($sql,$connection)
$data = New-Object system.Data.Odbc.OdbcDataAdapter($command)
$datatable = New-Object system.Data.datatable
$null = $data.fill($datatable)
$conn.close()
$datatable
Feedback
Was this page helpful?
Glad to hear it!
Sorry to hear that. We’ll track this issue and see how we can improve.
Last modified 2021.06.25: Release notes and other updates.