Cmder

![]()
Cmder is a software package created out of pure frustration over absence of usable console emulator on Windows. It is based on ConEmu with major config overhaul, comes with a Monokai color scheme, amazing clink (further enhanced by clink-completions) and a custom prompt layout.
Why use it
The main advantage of Cmder is portability. It is designed to be totally self-contained with no external dependencies, which makes it great for USB Sticks or cloud storage. So you can carry your console, aliases and binaries (like wget, curl and git) with you anywhere.
The Cmder’s user interface is also designed to be more eye pleasing, and you can compare the main differences between Cmder and ConEmu here.
Installation
Single User Portable Config
- Download the latest release
- Extract the archive. Note: This path should not be
C:Program Filesor anywhere else that would require Administrator access for modifying configuration files - (optional) Place your own executable files into the
%cmder_root%binfolder to be injected into your PATH. - Run
Cmder.exe
Shared Cmder install with Non-Portable Individual User Config
- Download the latest release
- Extract the archive to a shared location.
- (optional) Place your own executable files and custom app folders into the
%cmder_root%bin. See: bin/README.md- This folder to be injected into your PATH by default.
- See
/max_depth [1-5]in ‘Command Line Arguments forinit.bat‘ table to add subdirectories recursively.
- (optional) Place your own custom app folders into the
%cmder_root%opt. See: opt/README.md- This folder will NOT be injected into your PATH so you have total control of what gets added.
- Run
Cmder.exewith/Ccommand line argument. Example:cmder.exe /C %userprofile%cmder_config-
This will create the following directory structure if it is missing.
c:users[username]cmder_config
├───bin
├───config
│   └───profile.d
└───opt
-
- (optional) Place your own executable files and custom app folders into
%userprofile%cmder_configbin.- This folder to be injected into your PATH by default.
- See
/max_depth [1-5]in ‘Command Line Arguments forinit.bat‘ table to add subdirectories recursively.
- (optional) Place your own custom app folders into the
%user_profile%cmder_configopt.- This folder will NOT be injected into your PATH so you have total control of what gets added.
- Both the shared install and the individual user config locations can contain a full set of init and profile.d scripts enabling shared config with user overrides. See below.
Cmder.exe Command Line Arguments
| Argument | Description |
|---|---|
/C [user_root_path] |
Individual user Cmder root folder. Example: %userprofile%cmder_config |
/M |
Use conemu-%computername%.xml for ConEmu settings storage instead of user_conemu.xml |
/REGISTER [ALL, USER] |
Register a Windows Shell Menu shortcut. |
/UNREGISTER [ALL, USER] |
Un-register a Windows Shell Menu shortcut. |
/SINGLE |
Start Cmder in single mode. |
/START [start_path] |
Folder path to start in. |
/TASK [task_name] |
Task to start after launch. |
/X [ConEmu extras pars] |
Forwards parameters to ConEmu |
Context Menu Integration
So you’ve experimented with Cmder a little and want to give it a shot in a more permanent home;
Shortcut to open Cmder in a chosen folder
- Open a terminal as an Administrator
- Navigate to the directory you have placed Cmder
- Execute
.cmder.exe /REGISTER ALL
If you get an «Access Denied» message, make sure you are executing the command in an Administrator prompt.
In a file explorer window right click in or on a directory to see «Cmder Here» in the context menu.
Keyboard shortcuts
Tab manipulation
- Ctrl + T : New tab dialog (maybe you want to open cmd as admin?)
- Ctrl + W : Close tab
- Ctrl + D : Close tab (if pressed on empty command)
- Shift + Alt + #Number : Fast new tab: 1 — CMD, 2 — PowerShell
- Ctrl + Tab : Switch to next tab
- Ctrl + Shift + Tab : Switch to previous tab
- Ctrl + #Number : Switch to tab #Number
- Alt + Enter: Fullscreen
Shell
- Ctrl + Alt + U : Traverse up in directory structure (lovely feature!)
- End, Home, Ctrl : Traversing text with as usual on Windows
- Ctrl + R : History search
- Shift + Mouse : Select and copy text from buffer
(Some shortcuts are not yet documented, though they exist — please document them here)
Features
Access to multiple shells in one window using tabs
You can open multiple tabs each containing one of the following shells:
| Task | Shell | Description |
|---|---|---|
| Cmder | cmd.exe |
Windows cmd.exe shell enhanced with Git, Git aware prompt, Clink (GNU Readline), and Aliases. |
| Cmder as Admin | cmd.exe |
Administrative Windows cmd.exe Cmder shell. |
| PowerShell | powershell.exe |
Windows PowerShell enhanced with Git and Git aware prompt . |
| PowerShell as Admin | powershell.exe |
Administrative Windows powershell.exe Cmder shell. |
| Bash | bash.exe |
Unix/Linux like bash shell running on Windows. |
| Bash as Admin | bash.exe |
Administrative Unix/Linux like bash shell running on Windows. |
| Mintty | bash.exe |
Unix/Linux like bash shell running on Windows. See below for Mintty configuration differences |
| Mintty as Admin | bash.exe |
Administrative Unix/Linux like bash shell running on Windows. See below for Mintty configuration differences |
Cmder, PowerShell, and Bash tabs all run on top of the Windows Console API and work as you might expect in Cmder with access to use ConEmu’s color schemes, key bindings and other settings defined in the ConEmu Settings dialog.
⚠ Note: Only the full edition of Cmder comes with a pre-installed bash, using a vendored git-for-windows installation. The pre-configured Bash tabs may not work on Cmder mini edition without additional configuration.
You may however, choose to use an external installation of bash, such as Microsoft’s Subsystem for Linux (called WSL) or the Cygwin project which provides POSIX support on windows.
⚠ Note: Mintty tabs use a program called ‘mintty’ as the terminal emulator that is not based on the Windows Console API, rather it’s rendered graphically by ConEmu. Mintty differs from the other tabs in that it supports xterm/xterm-256color TERM types, and does not work with ConEmu settings like color schemes and key bindings. As such, some differences in functionality are to be expected, such as Cmder not being able to apply a system-wide configuration to it.
As a result mintty specific config is done via the [%USERPROFILE%|$HOME]/.minttyrc file. You may read more about Mintty and its config file here.
An example of setting Cmder portable terminal colors for mintty:
From a bash/mintty shell:
cd $CMDER_ROOT/vendor
git clone https://github.com/karlin/mintty-colors-solarized.git
cd mintty-colors-solarized/
echo source $CMDER_ROOT/vendor/mintty-colors-solarized/mintty-solarized-dark.sh>>$CMDER_ROOT/config/user_profile.sh
You may find some Monokai color schemes for mintty to match Cmder here.
Changing Cmder Default cmd.exe Prompt Config File
The default Cmder shell cmd::Cmder prompt is customized using Clink and is configured by editing a config file that exists in one of two locations:
- Single User Portable Config
%CMDER_ROOT%configcmder_prompt_config.lua - Shared Cmder install with Non-Portable Individual User Config
%CMDER_USER_CONFIG%cmder_prompt_config.lua
If your Cmder setup does not have this file create it from %CMDER_ROOT%vendorcmder_prompt_config.lua.default
Customizations include:
- Colors.
- Single/Multi-line.
- Full path/Folder only.
[user]@[host]to the beginning of the prompt.~for home directory.λsymbol
Documentation is in the file for each setting.
Changing Cmder Default cmd.exe Shell Startup Behaviour Using Task Arguments
- Press Win + Alt + T
- Click either:
1. {cmd::Cmder as Admin}2. {cmd::Cmder}
- Add command line arguments where specified below:
Note: Pay attention to the quotes!
cmd /s /k ""%ConEmuDir%..init.bat" [ADD ARGS HERE]"
Command Line Arguments for init.bat
| Argument | Description | Default |
|---|---|---|
/c [user cmder root] |
Enables user bin and config folders for ‘Cmder as admin’ sessions due to non-shared environment. | not set |
/d |
Enables debug output. | not set |
/f |
Enables Cmder Fast Init Mode. This disables some features, see pull request #1492 for more details. | not set |
/t |
Enables Cmder Timed Init Mode. This displays the time taken run init scripts | not set |
/git_install_root [file path] |
User specified Git installation root path. | %CMDER_ROOT%vendorGit-for-Windows |
/home [home folder] |
User specified folder path to set %HOME% environment variable. |
%userprofile% |
/max_depth [1-5] |
Define max recurse depth when adding to the path for %cmder_root%bin and %cmder_user_bin% |
1 |
/nix_tools [0-2] |
Define how *nix tools are added to the path. Prefer Windows Tools: 1, Prefer *nix Tools: 2, No /usr/bin in %PATH%: 0 |
1 |
/svn_ssh [path to ssh.exe] |
Define %SVN_SSH% so we can use git svn with ssh svn repositories. |
%GIT_INSTALL_ROOT%binssh.exe |
/user_aliases [file path] |
File path pointing to user aliases. | %CMDER_ROOT%configuser_aliases.cmd |
/v |
Enables verbose output. | not set |
| (custom arguments) | User defined arguments processed by cexec. Type cexec /? for more usage. |
not set |
Cmder Shell User Config
Single user portable configuration is possible using the Cmder specific shell config files. Edit the below files to add your own configuration:
| Shell | Cmder Portable User Config |
|---|---|
| Cmder | %CMDER_ROOT%configuser_profile.cmd |
| PowerShell | $ENV:CMDER_ROOTconfiguser_profile.ps1 |
| Bash/Mintty | $CMDER_ROOT/config/user_profile.sh |
Note: Bash and Mintty sessions will also source the $HOME/.bashrc file if it exists after it sources $CMDER_ROOT/config/user_profile.sh.
You can write *.cmd|*.bat, *.ps1, and *.sh scripts and just drop them in the %CMDER_ROOT%configprofile.d folder to add startup config to Cmder.
| Shell | Cmder Profile.d Scripts |
|---|---|
| Cmder | %CMDER_ROOT%configprofile.d*.bat and *.cmd |
| PowerShell | $ENV:CMDER_ROOTconfigprofile.d*.ps1 |
| Bash/Mintty | $CMDER_ROOT/config/profile.d/*.sh |
Git Status Opt-Out
To disable Cmder prompt git status globally add the following to ~/.gitconfig or locally for a single repo [repo]/.git/config and start a new session.
Note: This configuration is not portable
[cmder]
  status = false      # Opt out of Git status for 'ALL' Cmder supported shells.
  cmdstatus = false   # Opt out of Git status for 'Cmd.exe' shells.
  psstatus = false    # Opt out of Git status for 'Powershell.exe and 'Pwsh.exe' shells.
  shstatus = false    # Opt out of Git status for 'bash.exe' shells.
Aliases
Cmder(Cmd.exe) Aliases
You can define simple aliases for cmd.exe sessions with a command like alias name=command. Cmd.exe aliases support optional parameters through the $1-9 or the $* special characters so the alias vi=vim.exe $* typed as vi [filename] will open [filename] in vim.exe.
Cmd.exe aliases can also be more complex. See: DOSKEY.EXE documentation for additional details on complex aliases/macros for cmd.exe
Aliases defined using the alias.bat command will automatically be saved in the %CMDER_ROOT%configuser_aliases.cmd file
To make an alias and/or any other profile settings permanent add it to one of the following:
Note: These are loaded in this order by $CMDER_ROOT/vendor/init.bat. Anything stored in %CMDER_ROOT% will be a portable setting and will follow Cmder to another machine.
%CMDER_ROOT%configprofile.d*.cmdand*.bat%CMDER_ROOT%configuser_aliases.cmd%CMDER_ROOT%configuser_profile.cmd
Bash.exe|Mintty.exe Aliases
Bash shells support simple and complex aliases with optional parameters natively so they work a little different. Typing alias name=command will create an alias only for the current running session.
To make an alias and/or any other profile settings permanent add it to one of the following:
Note: These are loaded in this order by $CMDER_ROOT/vendor/git-for-windows/etc/profile.d/cmder.sh. Anything stored in $CMDER_ROOT will be a portable setting and will follow Cmder to another machine.
$CMDER_ROOT/config/profile.d/*.sh$CMDER_ROOT/config/user_profile.sh$HOME/.bashrc
If you add bash aliases to $CMDER_ROOT/config/user_profile.sh they will be portable and follow your Cmder folder if you copy it to another machine. $HOME/.bashrc defined aliases are not portable.
PowerShell.exe Aliases
PowerShell has native simple alias support, for example [new-alias | set-alias] alias command, so complex aliases with optional parameters are not supported in PowerShell sessions. Type get-help [new-alias|set-alias] -full for help on PowerShell aliases.
To make an alias and/or any other profile settings permanent add it to one of the following:
Note: These are loaded in this order by $ENV:CMDER_ROOTvendoruser_profile.ps1. Anything stored in $ENV:CMDER_ROOT will be a portable setting and will follow Cmder to another machine.
$ENV:CMDER_ROOTconfigprofile.d*.ps1$ENV:CMDER_ROOTconfiguser_profile.ps1
SSH Agent
To start the vendored SSH agent simply call start-ssh-agent, which is in the vendor/git-for-windows/cmd folder.
If you want to run SSH agent on startup, include the line @call "%GIT_INSTALL_ROOT%/cmd/start-ssh-agent.cmd" in %CMDER_ROOT%/config/user_profile.cmd (usually just uncomment it).
Vendored Git
Cmder is by default shipped with a vendored Git installation. On each instance of launching Cmder, an attempt is made to locate any other user provided Git binaries. Upon finding a git.exe binary, Cmder further compares its version against the vendored one by executing it. The vendored git.exe binary is only used when it is more recent than the user-installed one.
You may use your favorite version of Git by including its path in the %PATH% environment variable. Moreover, the Mini edition of Cmder (found on the downloads page) excludes any vendored Git binaries.
Using external Cygwin/Babun, MSys2, WSL, or Git for Windows SDK with Cmder.
You may run bash (the default shell used on Linux, macOS and GNU/Hurd) externally on Cmder, using the following instructions:
- Setup a new task by pressing Win +Alt + T.
- Click the
+button to add a task. - Name the new task in the top text box.
- Provide task parameters, this is optional.
- Add
cmd /c "[path_to_external_env]binbash --login -i" -new_consoleto theCommandstext box.
Recommended Optional Steps:
Copy the vendor/cmder_exinit file to the Cygwin/Babun, MSys2, or Git for Windows SDK environments /etc/profile.d/ folder to use portable settings in the $CMDER_ROOT/config folder.
Note: MinGW could work if the init scripts include profile.d but this has not been tested.
The destination file extension depends on the shell you use in that environment. For example:
- bash — Copy to
/etc/profile.d/cmder_exinit.sh - zsh — Copy to
/etc/profile.d/cmder_exinit.zsh
Uncomment and edit the line below in the script to use Cmder config even when launched from outside Cmder.
# CMDER_ROOT=${USERPROFILE}/cmder # This is not required if launched from Cmder.
Customizing user sessions using init.bat custom arguments.
You can pass custom arguments to init.bat and use cexec.cmd in your user_profile.cmd to evaluate these
arguments then execute commands based on a particular flag being detected or not.
init.bat creates two shortcuts for using cexec.cmd in your profile scripts.
%ccall% — Evaluates flags, runs commands if found, and returns to the calling script and continues.
ccall=call C:Usersusercmderdevvendorbincexec.cmd
Example: %ccall% /startnotepad start notepad.exe
%cexec% — Evaluates flags, runs commands if found, and does not return to the calling script.
cexec=C:Usersusercmderdevvendorbincexec.cmd
Example: %cexec% /startnotepad start notepad.exe
It is useful when you have multiple tasks to execute cmder and need it to initialize
the session differently depending on the task chosen.
To conditionally start notepad.exe when you start a specific cmder task:
-
Press win+alt+t
-
Click
+to add a new task. -
Add the below to the
Commandsblock:cmd.exe /k ""%ConEmuDir%..init.bat" /startnotepad"
-
Add the below to your
%cmder_root%configuser_profile.cmd%ccall% "/startNotepad" "start" "notepad.exe"`
To see detailed usage of cexec, type cexec /? in Cmder.
Integrating Cmder with Windows Terminal, VS Code, and your favorite IDEs
Cmder by default comes with a vendored ConEmu installation as the underlying terminal emulator, as stated here.
However, Cmder can in fact run in a variety of other terminal emulators, and even integrated IDEs. Assuming you have the latest version of Cmder, follow the following instructions to get Cmder working with your own terminal emulator.
For instructions on how to integrate Cmder with your IDE, please read our Wiki section.
Upgrading
The process of upgrading Cmder depends on the version/build you are currently running.
If you have a [cmder_root]/config/user[-|_]conemu.xml, you are running a newer version of Cmder, follow the below process:
-
Exit all Cmder sessions and relaunch
[cmder_root]/cmder.exe, this backs up your existing[cmder_root]/vendor/conemu-maximus5/conemu.xmlto[cmder_root]/config/user[-|_]conemu.xml.- The
[cmder_root]/config/user[-|_]conemu.xmlcontains any custom settings you have made using the ‘Setup Tasks’ settings dialog.
- The
-
Exit all Cmder sessions and backup any files you have manually edited under
[cmder_root]/vendor.- Editing files under
[cmder_root]/vendoris not recommended since you will need to re-apply these changes after any upgrade. All user customizations should go in[cmder_root]/configfolder.
- Editing files under
-
Delete the
[cmder_root]/vendorfolder. -
Extract the new
cmder.ziporcmder_mini.zipinto[cmder_root]/overwriting all files when prompted.
If you do not have a [cmder_root]/config/user[-|_]conemu.xml, you are running an older version of cmder, follow the below process:
-
Exit all Cmder sessions and backup
[cmder_root]/vendor/conemu-maximus5/conemu.xmlto[cmder_root]/config/user[-|_]conemu.xml. -
Backup any files you have manually edited under
[cmder_root]/vendor.- Editing files under
[cmder_root]/vendoris not recommended since you will need to re-apply these changes after any upgrade. All user customizations should go in[cmder_root]/configfolder.
- Editing files under
-
Delete the
[cmder_root]/vendorfolder. -
Extract the new
cmder.ziporcmder_mini.zipinto[cmder_root]/overwriting all files when prompted.
Current development builds
You can download builds of the current development branch by going to AppVeyor via the following link:
The latest download builds by GitHub Actions can be downloaded from the link below:
![]()
License
All software included is bundled with own license
The MIT License (MIT)
Copyright (c) 2016 Samuel Vasko
Permission is hereby granted, free of charge, to any person obtaining a copy
of this software and associated documentation files (the «Software»), to deal
in the Software without restriction, including without limitation the rights
to use, copy, modify, merge, publish, distribute, sublicense, and/or sell
copies of the Software, and to permit persons to whom the Software is
furnished to do so, subject to the following conditions:
The above copyright notice and this permission notice shall be included in
all copies or substantial portions of the Software.
THE SOFTWARE IS PROVIDED «AS IS», WITHOUT WARRANTY OF ANY KIND, EXPRESS OR
IMPLIED, INCLUDING BUT NOT LIMITED TO THE WARRANTIES OF MERCHANTABILITY,
FITNESS FOR A PARTICULAR PURPOSE AND NONINFRINGEMENT. IN NO EVENT SHALL THE
AUTHORS OR COPYRIGHT HOLDERS BE LIABLE FOR ANY CLAIM, DAMAGES OR OTHER
LIABILITY, WHETHER IN AN ACTION OF CONTRACT, TORT OR OTHERWISE, ARISING FROM,
OUT OF OR IN CONNECTION WITH THE SOFTWARE OR THE USE OR OTHER DEALINGS IN
THE SOFTWARE.
Cmder
![]()
Cmder is a software package created out of pure frustration over absence of usable console emulator on Windows. It is based on ConEmu with major config overhaul, comes with a Monokai color scheme, amazing clink (further enhanced by clink-completions) and a custom prompt layout.
Why use it
The main advantage of Cmder is portability. It is designed to be totally self-contained with no external dependencies, which makes it great for USB Sticks or cloud storage. So you can carry your console, aliases and binaries (like wget, curl and git) with you anywhere.
The Cmder’s user interface is also designed to be more eye pleasing, and you can compare the main differences between Cmder and ConEmu here.
Installation
Single User Portable Config
- Download the latest release
- Extract the archive. Note: This path should not be
C:Program Filesor anywhere else that would require Administrator access for modifying configuration files - (optional) Place your own executable files into the
%cmder_root%binfolder to be injected into your PATH. - Run
Cmder.exe
Shared Cmder install with Non-Portable Individual User Config
- Download the latest release
- Extract the archive to a shared location.
- (optional) Place your own executable files and custom app folders into the
%cmder_root%bin. See: bin/README.md- This folder to be injected into your PATH by default.
- See
/max_depth [1-5]in ‘Command Line Arguments forinit.bat‘ table to add subdirectories recursively.
- (optional) Place your own custom app folders into the
%cmder_root%opt. See: opt/README.md- This folder will NOT be injected into your PATH so you have total control of what gets added.
- Run
Cmder.exewith/Ccommand line argument. Example:cmder.exe /C %userprofile%cmder_config-
This will create the following directory structure if it is missing.
c:users[username]cmder_config
├───bin
├───config
│   └───profile.d
└───opt
-
- (optional) Place your own executable files and custom app folders into
%userprofile%cmder_configbin.- This folder to be injected into your PATH by default.
- See
/max_depth [1-5]in ‘Command Line Arguments forinit.bat‘ table to add subdirectories recursively.
- (optional) Place your own custom app folders into the
%user_profile%cmder_configopt.- This folder will NOT be injected into your PATH so you have total control of what gets added.
- Both the shared install and the individual user config locations can contain a full set of init and profile.d scripts enabling shared config with user overrides. See below.
Cmder.exe Command Line Arguments
| Argument | Description |
|---|---|
/C [user_root_path] |
Individual user Cmder root folder. Example: %userprofile%cmder_config |
/M |
Use conemu-%computername%.xml for ConEmu settings storage instead of user_conemu.xml |
/REGISTER [ALL, USER] |
Register a Windows Shell Menu shortcut. |
/UNREGISTER [ALL, USER] |
Un-register a Windows Shell Menu shortcut. |
/SINGLE |
Start Cmder in single mode. |
/START [start_path] |
Folder path to start in. |
/TASK [task_name] |
Task to start after launch. |
/X [ConEmu extras pars] |
Forwards parameters to ConEmu |
Context Menu Integration
So you’ve experimented with Cmder a little and want to give it a shot in a more permanent home;
Shortcut to open Cmder in a chosen folder
- Open a terminal as an Administrator
- Navigate to the directory you have placed Cmder
- Execute
.cmder.exe /REGISTER ALL
If you get an «Access Denied» message, make sure you are executing the command in an Administrator prompt.
In a file explorer window right click in or on a directory to see «Cmder Here» in the context menu.
Keyboard shortcuts
Tab manipulation
- Ctrl + T : New tab dialog (maybe you want to open cmd as admin?)
- Ctrl + W : Close tab
- Ctrl + D : Close tab (if pressed on empty command)
- Shift + Alt + #Number : Fast new tab: 1 — CMD, 2 — PowerShell
- Ctrl + Tab : Switch to next tab
- Ctrl + Shift + Tab : Switch to previous tab
- Ctrl + #Number : Switch to tab #Number
- Alt + Enter: Fullscreen
Shell
- Ctrl + Alt + U : Traverse up in directory structure (lovely feature!)
- End, Home, Ctrl : Traversing text with as usual on Windows
- Ctrl + R : History search
- Shift + Mouse : Select and copy text from buffer
(Some shortcuts are not yet documented, though they exist — please document them here)
Features
Access to multiple shells in one window using tabs
You can open multiple tabs each containing one of the following shells:
| Task | Shell | Description |
|---|---|---|
| Cmder | cmd.exe |
Windows cmd.exe shell enhanced with Git, Git aware prompt, Clink (GNU Readline), and Aliases. |
| Cmder as Admin | cmd.exe |
Administrative Windows cmd.exe Cmder shell. |
| PowerShell | powershell.exe |
Windows PowerShell enhanced with Git and Git aware prompt . |
| PowerShell as Admin | powershell.exe |
Administrative Windows powershell.exe Cmder shell. |
| Bash | bash.exe |
Unix/Linux like bash shell running on Windows. |
| Bash as Admin | bash.exe |
Administrative Unix/Linux like bash shell running on Windows. |
| Mintty | bash.exe |
Unix/Linux like bash shell running on Windows. See below for Mintty configuration differences |
| Mintty as Admin | bash.exe |
Administrative Unix/Linux like bash shell running on Windows. See below for Mintty configuration differences |
Cmder, PowerShell, and Bash tabs all run on top of the Windows Console API and work as you might expect in Cmder with access to use ConEmu’s color schemes, key bindings and other settings defined in the ConEmu Settings dialog.
⚠ Note: Only the full edition of Cmder comes with a pre-installed bash, using a vendored git-for-windows installation. The pre-configured Bash tabs may not work on Cmder mini edition without additional configuration.
You may however, choose to use an external installation of bash, such as Microsoft’s Subsystem for Linux (called WSL) or the Cygwin project which provides POSIX support on windows.
⚠ Note: Mintty tabs use a program called ‘mintty’ as the terminal emulator that is not based on the Windows Console API, rather it’s rendered graphically by ConEmu. Mintty differs from the other tabs in that it supports xterm/xterm-256color TERM types, and does not work with ConEmu settings like color schemes and key bindings. As such, some differences in functionality are to be expected, such as Cmder not being able to apply a system-wide configuration to it.
As a result mintty specific config is done via the [%USERPROFILE%|$HOME]/.minttyrc file. You may read more about Mintty and its config file here.
An example of setting Cmder portable terminal colors for mintty:
From a bash/mintty shell:
cd $CMDER_ROOT/vendor
git clone https://github.com/karlin/mintty-colors-solarized.git
cd mintty-colors-solarized/
echo source $CMDER_ROOT/vendor/mintty-colors-solarized/mintty-solarized-dark.sh>>$CMDER_ROOT/config/user_profile.sh
You may find some Monokai color schemes for mintty to match Cmder here.
Changing Cmder Default cmd.exe Prompt Config File
The default Cmder shell cmd::Cmder prompt is customized using Clink and is configured by editing a config file that exists in one of two locations:
- Single User Portable Config
%CMDER_ROOT%configcmder_prompt_config.lua - Shared Cmder install with Non-Portable Individual User Config
%CMDER_USER_CONFIG%cmder_prompt_config.lua
If your Cmder setup does not have this file create it from %CMDER_ROOT%vendorcmder_prompt_config.lua.default
Customizations include:
- Colors.
- Single/Multi-line.
- Full path/Folder only.
[user]@[host]to the beginning of the prompt.~for home directory.λsymbol
Documentation is in the file for each setting.
Changing Cmder Default cmd.exe Shell Startup Behaviour Using Task Arguments
- Press Win + Alt + T
- Click either:
1. {cmd::Cmder as Admin}2. {cmd::Cmder}
- Add command line arguments where specified below:
Note: Pay attention to the quotes!
cmd /s /k ""%ConEmuDir%..init.bat" [ADD ARGS HERE]"
Command Line Arguments for init.bat
| Argument | Description | Default |
|---|---|---|
/c [user cmder root] |
Enables user bin and config folders for ‘Cmder as admin’ sessions due to non-shared environment. | not set |
/d |
Enables debug output. | not set |
/f |
Enables Cmder Fast Init Mode. This disables some features, see pull request #1492 for more details. | not set |
/t |
Enables Cmder Timed Init Mode. This displays the time taken run init scripts | not set |
/git_install_root [file path] |
User specified Git installation root path. | %CMDER_ROOT%vendorGit-for-Windows |
/home [home folder] |
User specified folder path to set %HOME% environment variable. |
%userprofile% |
/max_depth [1-5] |
Define max recurse depth when adding to the path for %cmder_root%bin and %cmder_user_bin% |
1 |
/nix_tools [0-2] |
Define how *nix tools are added to the path. Prefer Windows Tools: 1, Prefer *nix Tools: 2, No /usr/bin in %PATH%: 0 |
1 |
/svn_ssh [path to ssh.exe] |
Define %SVN_SSH% so we can use git svn with ssh svn repositories. |
%GIT_INSTALL_ROOT%binssh.exe |
/user_aliases [file path] |
File path pointing to user aliases. | %CMDER_ROOT%configuser_aliases.cmd |
/v |
Enables verbose output. | not set |
| (custom arguments) | User defined arguments processed by cexec. Type cexec /? for more usage. |
not set |
Cmder Shell User Config
Single user portable configuration is possible using the Cmder specific shell config files. Edit the below files to add your own configuration:
| Shell | Cmder Portable User Config |
|---|---|
| Cmder | %CMDER_ROOT%configuser_profile.cmd |
| PowerShell | $ENV:CMDER_ROOTconfiguser_profile.ps1 |
| Bash/Mintty | $CMDER_ROOT/config/user_profile.sh |
Note: Bash and Mintty sessions will also source the $HOME/.bashrc file if it exists after it sources $CMDER_ROOT/config/user_profile.sh.
You can write *.cmd|*.bat, *.ps1, and *.sh scripts and just drop them in the %CMDER_ROOT%configprofile.d folder to add startup config to Cmder.
| Shell | Cmder Profile.d Scripts |
|---|---|
| Cmder | %CMDER_ROOT%configprofile.d*.bat and *.cmd |
| PowerShell | $ENV:CMDER_ROOTconfigprofile.d*.ps1 |
| Bash/Mintty | $CMDER_ROOT/config/profile.d/*.sh |
Git Status Opt-Out
To disable Cmder prompt git status globally add the following to ~/.gitconfig or locally for a single repo [repo]/.git/config and start a new session.
Note: This configuration is not portable
[cmder]
  status = false      # Opt out of Git status for 'ALL' Cmder supported shells.
  cmdstatus = false   # Opt out of Git status for 'Cmd.exe' shells.
  psstatus = false    # Opt out of Git status for 'Powershell.exe and 'Pwsh.exe' shells.
  shstatus = false    # Opt out of Git status for 'bash.exe' shells.
Aliases
Cmder(Cmd.exe) Aliases
You can define simple aliases for cmd.exe sessions with a command like alias name=command. Cmd.exe aliases support optional parameters through the $1-9 or the $* special characters so the alias vi=vim.exe $* typed as vi [filename] will open [filename] in vim.exe.
Cmd.exe aliases can also be more complex. See: DOSKEY.EXE documentation for additional details on complex aliases/macros for cmd.exe
Aliases defined using the alias.bat command will automatically be saved in the %CMDER_ROOT%configuser_aliases.cmd file
To make an alias and/or any other profile settings permanent add it to one of the following:
Note: These are loaded in this order by $CMDER_ROOT/vendor/init.bat. Anything stored in %CMDER_ROOT% will be a portable setting and will follow Cmder to another machine.
%CMDER_ROOT%configprofile.d*.cmdand*.bat%CMDER_ROOT%configuser_aliases.cmd%CMDER_ROOT%configuser_profile.cmd
Bash.exe|Mintty.exe Aliases
Bash shells support simple and complex aliases with optional parameters natively so they work a little different. Typing alias name=command will create an alias only for the current running session.
To make an alias and/or any other profile settings permanent add it to one of the following:
Note: These are loaded in this order by $CMDER_ROOT/vendor/git-for-windows/etc/profile.d/cmder.sh. Anything stored in $CMDER_ROOT will be a portable setting and will follow Cmder to another machine.
$CMDER_ROOT/config/profile.d/*.sh$CMDER_ROOT/config/user_profile.sh$HOME/.bashrc
If you add bash aliases to $CMDER_ROOT/config/user_profile.sh they will be portable and follow your Cmder folder if you copy it to another machine. $HOME/.bashrc defined aliases are not portable.
PowerShell.exe Aliases
PowerShell has native simple alias support, for example [new-alias | set-alias] alias command, so complex aliases with optional parameters are not supported in PowerShell sessions. Type get-help [new-alias|set-alias] -full for help on PowerShell aliases.
To make an alias and/or any other profile settings permanent add it to one of the following:
Note: These are loaded in this order by $ENV:CMDER_ROOTvendoruser_profile.ps1. Anything stored in $ENV:CMDER_ROOT will be a portable setting and will follow Cmder to another machine.
$ENV:CMDER_ROOTconfigprofile.d*.ps1$ENV:CMDER_ROOTconfiguser_profile.ps1
SSH Agent
To start the vendored SSH agent simply call start-ssh-agent, which is in the vendor/git-for-windows/cmd folder.
If you want to run SSH agent on startup, include the line @call "%GIT_INSTALL_ROOT%/cmd/start-ssh-agent.cmd" in %CMDER_ROOT%/config/user_profile.cmd (usually just uncomment it).
Vendored Git
Cmder is by default shipped with a vendored Git installation. On each instance of launching Cmder, an attempt is made to locate any other user provided Git binaries. Upon finding a git.exe binary, Cmder further compares its version against the vendored one by executing it. The vendored git.exe binary is only used when it is more recent than the user-installed one.
You may use your favorite version of Git by including its path in the %PATH% environment variable. Moreover, the Mini edition of Cmder (found on the downloads page) excludes any vendored Git binaries.
Using external Cygwin/Babun, MSys2, WSL, or Git for Windows SDK with Cmder.
You may run bash (the default shell used on Linux, macOS and GNU/Hurd) externally on Cmder, using the following instructions:
- Setup a new task by pressing Win +Alt + T.
- Click the
+button to add a task. - Name the new task in the top text box.
- Provide task parameters, this is optional.
- Add
cmd /c "[path_to_external_env]binbash --login -i" -new_consoleto theCommandstext box.
Recommended Optional Steps:
Copy the vendor/cmder_exinit file to the Cygwin/Babun, MSys2, or Git for Windows SDK environments /etc/profile.d/ folder to use portable settings in the $CMDER_ROOT/config folder.
Note: MinGW could work if the init scripts include profile.d but this has not been tested.
The destination file extension depends on the shell you use in that environment. For example:
- bash — Copy to
/etc/profile.d/cmder_exinit.sh - zsh — Copy to
/etc/profile.d/cmder_exinit.zsh
Uncomment and edit the line below in the script to use Cmder config even when launched from outside Cmder.
# CMDER_ROOT=${USERPROFILE}/cmder # This is not required if launched from Cmder.
Customizing user sessions using init.bat custom arguments.
You can pass custom arguments to init.bat and use cexec.cmd in your user_profile.cmd to evaluate these
arguments then execute commands based on a particular flag being detected or not.
init.bat creates two shortcuts for using cexec.cmd in your profile scripts.
%ccall% — Evaluates flags, runs commands if found, and returns to the calling script and continues.
ccall=call C:Usersusercmderdevvendorbincexec.cmd
Example: %ccall% /startnotepad start notepad.exe
%cexec% — Evaluates flags, runs commands if found, and does not return to the calling script.
cexec=C:Usersusercmderdevvendorbincexec.cmd
Example: %cexec% /startnotepad start notepad.exe
It is useful when you have multiple tasks to execute cmder and need it to initialize
the session differently depending on the task chosen.
To conditionally start notepad.exe when you start a specific cmder task:
-
Press win+alt+t
-
Click
+to add a new task. -
Add the below to the
Commandsblock:cmd.exe /k ""%ConEmuDir%..init.bat" /startnotepad"
-
Add the below to your
%cmder_root%configuser_profile.cmd%ccall% "/startNotepad" "start" "notepad.exe"`
To see detailed usage of cexec, type cexec /? in Cmder.
Integrating Cmder with Windows Terminal, VS Code, and your favorite IDEs
Cmder by default comes with a vendored ConEmu installation as the underlying terminal emulator, as stated here.
However, Cmder can in fact run in a variety of other terminal emulators, and even integrated IDEs. Assuming you have the latest version of Cmder, follow the following instructions to get Cmder working with your own terminal emulator.
For instructions on how to integrate Cmder with your IDE, please read our Wiki section.
Upgrading
The process of upgrading Cmder depends on the version/build you are currently running.
If you have a [cmder_root]/config/user[-|_]conemu.xml, you are running a newer version of Cmder, follow the below process:
-
Exit all Cmder sessions and relaunch
[cmder_root]/cmder.exe, this backs up your existing[cmder_root]/vendor/conemu-maximus5/conemu.xmlto[cmder_root]/config/user[-|_]conemu.xml.- The
[cmder_root]/config/user[-|_]conemu.xmlcontains any custom settings you have made using the ‘Setup Tasks’ settings dialog.
- The
-
Exit all Cmder sessions and backup any files you have manually edited under
[cmder_root]/vendor.- Editing files under
[cmder_root]/vendoris not recommended since you will need to re-apply these changes after any upgrade. All user customizations should go in[cmder_root]/configfolder.
- Editing files under
-
Delete the
[cmder_root]/vendorfolder. -
Extract the new
cmder.ziporcmder_mini.zipinto[cmder_root]/overwriting all files when prompted.
If you do not have a [cmder_root]/config/user[-|_]conemu.xml, you are running an older version of cmder, follow the below process:
-
Exit all Cmder sessions and backup
[cmder_root]/vendor/conemu-maximus5/conemu.xmlto[cmder_root]/config/user[-|_]conemu.xml. -
Backup any files you have manually edited under
[cmder_root]/vendor.- Editing files under
[cmder_root]/vendoris not recommended since you will need to re-apply these changes after any upgrade. All user customizations should go in[cmder_root]/configfolder.
- Editing files under
-
Delete the
[cmder_root]/vendorfolder. -
Extract the new
cmder.ziporcmder_mini.zipinto[cmder_root]/overwriting all files when prompted.
Current development builds
You can download builds of the current development branch by going to AppVeyor via the following link:
The latest download builds by GitHub Actions can be downloaded from the link below:
![]()
License
All software included is bundled with own license
The MIT License (MIT)
Copyright (c) 2016 Samuel Vasko
Permission is hereby granted, free of charge, to any person obtaining a copy
of this software and associated documentation files (the «Software»), to deal
in the Software without restriction, including without limitation the rights
to use, copy, modify, merge, publish, distribute, sublicense, and/or sell
copies of the Software, and to permit persons to whom the Software is
furnished to do so, subject to the following conditions:
The above copyright notice and this permission notice shall be included in
all copies or substantial portions of the Software.
THE SOFTWARE IS PROVIDED «AS IS», WITHOUT WARRANTY OF ANY KIND, EXPRESS OR
IMPLIED, INCLUDING BUT NOT LIMITED TO THE WARRANTIES OF MERCHANTABILITY,
FITNESS FOR A PARTICULAR PURPOSE AND NONINFRINGEMENT. IN NO EVENT SHALL THE
AUTHORS OR COPYRIGHT HOLDERS BE LIABLE FOR ANY CLAIM, DAMAGES OR OTHER
LIABILITY, WHETHER IN AN ACTION OF CONTRACT, TORT OR OTHERWISE, ARISING FROM,
OUT OF OR IN CONNECTION WITH THE SOFTWARE OR THE USE OR OTHER DEALINGS IN
THE SOFTWARE.
Предполагается, что вы уже справились с установкой Cmder, поэтому я буду рассказывать исключительно про настройку. Действие происходит под Windows 10.0, версия ConEmu, которая пришла в поставке Cmder, 160710. Поднимается занавес.
При первом запуске вижу консоль с приглашением, кажется это cmd:
Первый запуск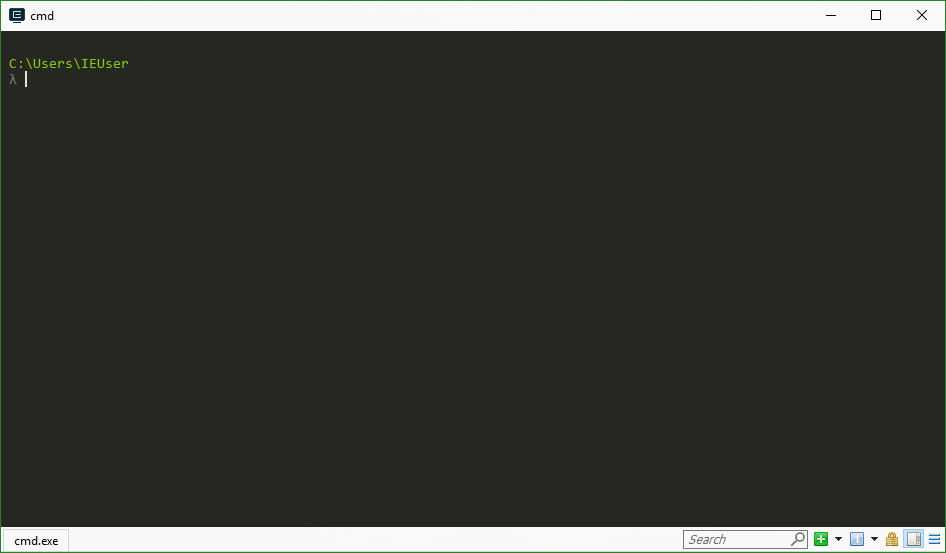
Я в качестве шелла хочу использовать bash, поэтому расскажу про него. Аналогичным образом можно настроить другой шелл.
Резервная копия настроек
Перед тем, как проводить эксперименты, забекаплю настройки, чтобы в случае чего откатиться. Окно настроек открывается по Win+Alt+P. В самом верху есть поле Storage, в котором указан файл с настройками. Рядом с ним кнопка Export:
Настройки можно экспортировать в файл и импортировать из файла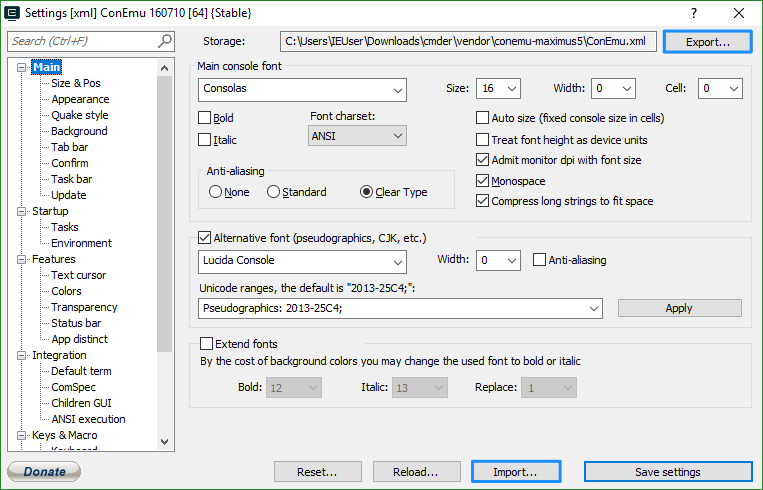
Жму эту кнопку «Export», он предлагает сохранить файл. Я сохраняю на рабочий стол и называю conemu1.xml. Если я вдруг что-то сломаю в настройках, я смогу нажать Import внизу и восстановить настройки из этого файла.
А ещё так можно перенести настройки с одного компьютера на другой. Или поделиться с друзьями.
Вкладки при запуске
Для начала сделаю, чтобы при запуске Cmder открывался Bash. Открываю настройки, там секцию «Startup» и выбираю Startup options → Specified named task → {bash::bash}. Можно выбрать Auto save/restore opened tabs, чтобы при открытии Cmder восстанавливались вкладки с прошлого раза. Но я люблю начинать с чистого листа:
Запускать при старте таску {bash::bash}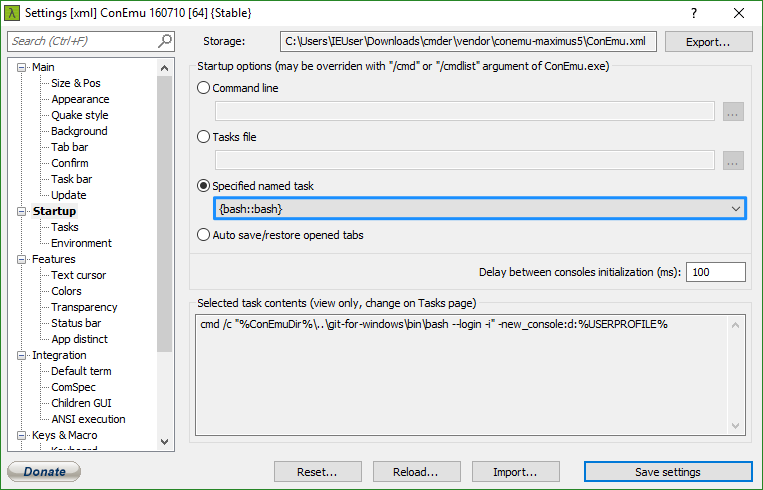
Перезапускаю Cmder и проверяю, что запустился bash. Ввожу команду echo $SHELL, она отвечает /usr/bin/bash, значит точно баш:
Узнаю текущий шелл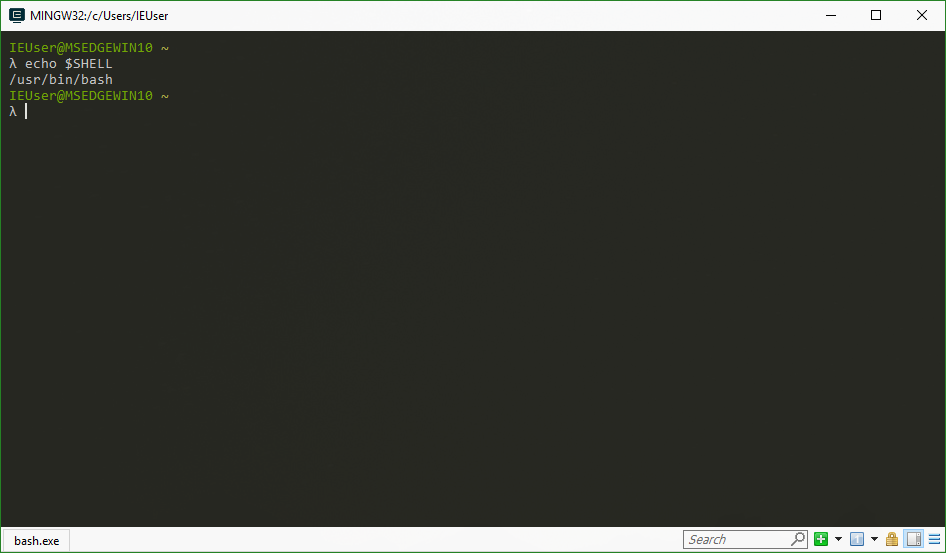
Папка при запуске
Такая шляпа, что Cmder открывается в домашней папке пользователя: C:UsersПользователь. А у меня весь код лежит на рабочем столе в папке Projects. Сделаю, чтобы консоль при запуске открывалась там. Startup → Tasks, выбираю {bash::bash}. Последний параметр запуска -new_console:d:%USERPROFILE%, здесь %USERPROFILE% это домашняя папка текущего пользователя. А мне нужна папка с проектами, дописываю %USERPROFILE%/Desktop/Projects:
Bash будет запускаться в папке Desktop/Projects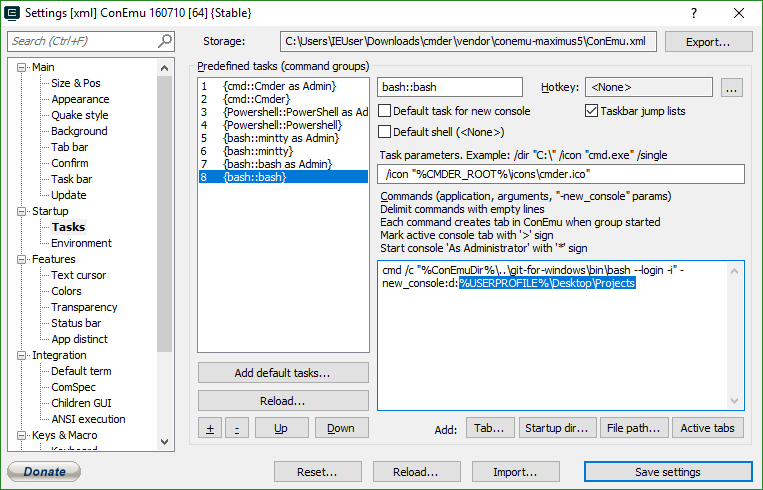
Если вам нужна папка не в домашней директории, то у вас получится что-то вроде -new_console:d:D:/Projects.
Новая вкладка
Нажимаю Ctrl+T, чтобы открыть новую вкладку. Открывается окно с вопросом, какой именно шел запустить, от администратора или нет, и прочие скучные вопросы:
Дурацкие вопросы при открытии вкладки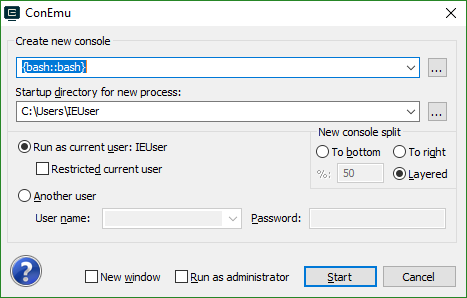
Жизнь слишком коротка, чтобы на них отвечать. Хочу, чтобы по Ctrl+T открывалась вкладка bash без всяких вопросов. И ещё чтобы в новой вкладке открывалась та же папка, что в текущей вкладке. Сначала поручу башу отдавать информацию о папке терминалу, по умолчанию он этого не делает. Для этого открываю вкладку с {bash::bash}, и в ней выполняю команду
echo "PROMPT_COMMAND='ConEmuC -StoreCWD'" >> ~/.bashrc
Эта команда добавит строку в .bashrc — файл настроек баша. Если файла ещё нет, он появится. Проверяю:
Настройки в .bashrc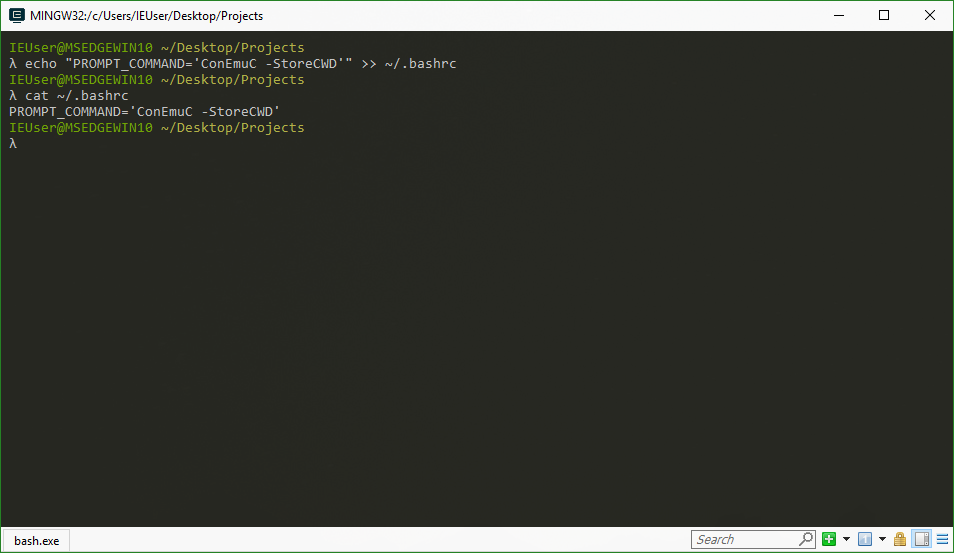
Теперь в настройках Startup → Tasks создам новую задачу. Назову её {bash::cwd}, потому что она запускает bash в текущей папке — current working directory. Поле «Task parameters» скопирую из задачи {bash::bash}, команду тоже копирую из этой задачи, но меняю в последнем параметре папку на %CD%:
cmd /c "%ConEmuDir%..git-for-windowsbinbash --login -i" -new_console:d:%CD%
В поле Hotkey жму на многоточие и выбираю Ctrl+T:
Задача {bash::cwd} будет запускаться в текущей папке
Проверяю — не работает. Открывается дурацкое окно с вопросами. Иду в настройках в «Keys & Macro» и вижу, что на Ctrl+T всё ещё висит «открыть окно с вопросами», выбираю его и добавляю к хоткеям шифт, чтобы окно висело на Ctrl+Shift+T:
Добавляю шифт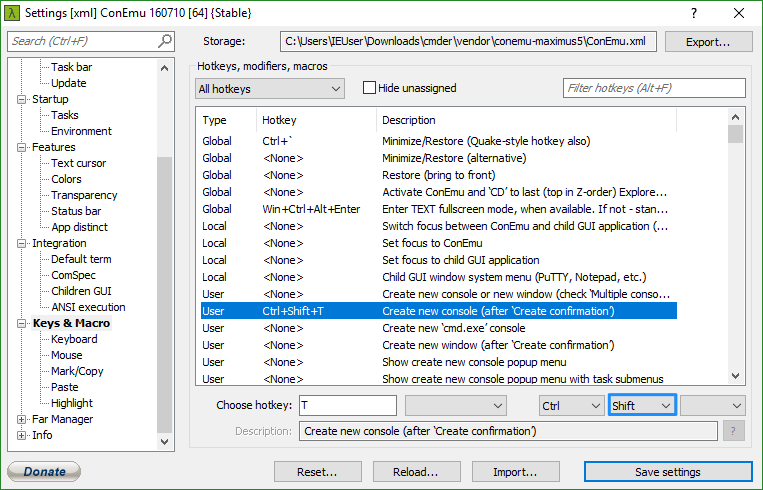
Сохраняю и проверяю. По Ctrl+T открывается вкладка с bash в текущей папке без вопросов, по Ctrl+Shift+T открывается окно с вопросом, какую вкладку открыть. Отлично.
Запуск из папки
Когда я смотрю в проводнике какую-то папку, иногда хочу запустить терминал прямо в ней. Иду в настройки → Integrations. Там две группы полей: «ConEmu Here» и «ConEmu Inside». Первый добавляет в контекстное меню пункт, по которому можно открыть окно ConEmu, а второй добавляет пункт, по которому можно открыть ConEmu прямо во вкладке проводника. Мне нужен первый вариант — открыть ConEmu. Прописываю команду:
{bash::cwd} -cur_console:n
Заодно переименовываю ConEmu Here в Terminal (мне так больше нравится):
Добавляю в меню проводника пункт Terminal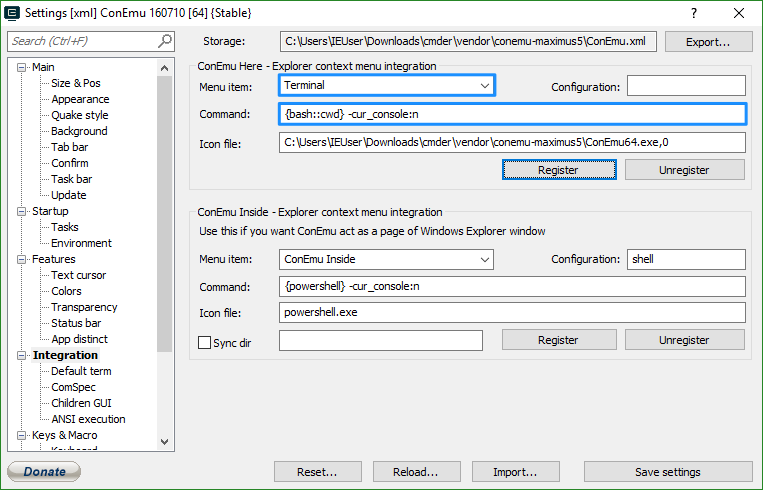
И нажимаю кнопку «Register». Если не нажать, настройки не применятся. Закрываю настройки, закрываю терминал, захожу в папку, проверяю. Пункт в меню появился:
Теперь из любой папки можно консоль открыть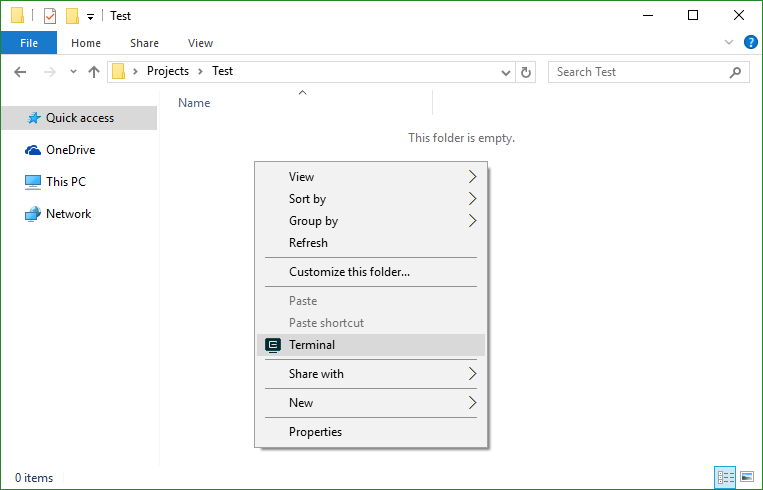
Жму на него, открывается консоль в этой папке. Круто. Даже с рабочего стола запускается! Кстати, с таской {bash::bash} не заработало. Видимо потому, что в ней уже прописана папка.
Деление экрана
Я люблю открывать две-три консоли одновременно. В одной вкладке запущен дев-сервер, во второй ввожу всякие команды, например манипулирую гитом:
В одной вкладке висит вечный сервер, в другой пишу команды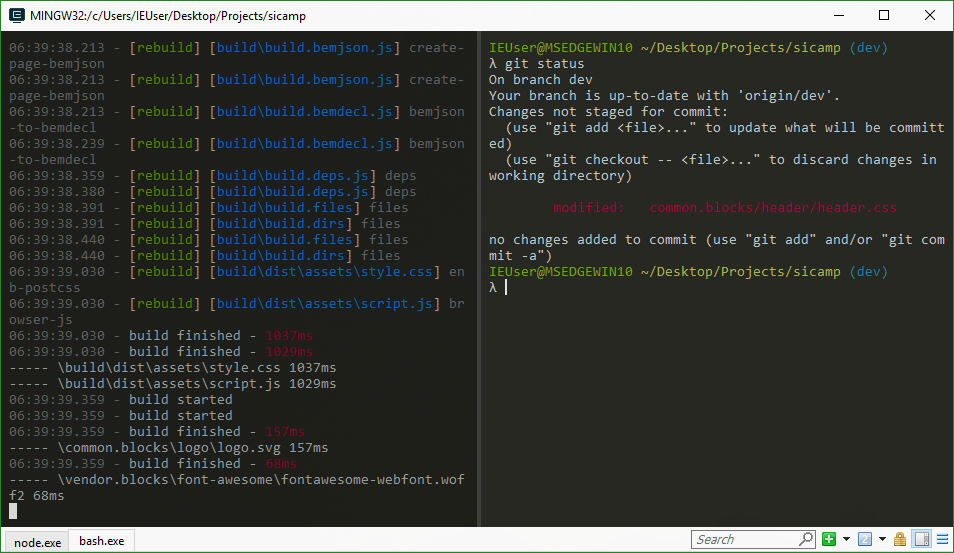
Экран можно сплитить, если открыть окошко с вопросами про новую вкладку (Ctrl+Shift+T, как я настроил) и выбрать New console split → To bottom или To right:
New console split → To right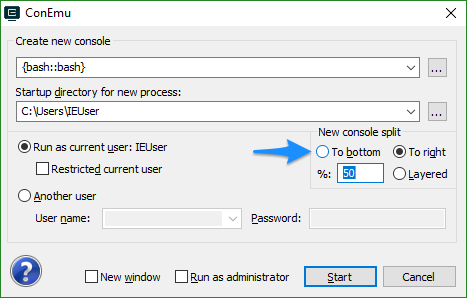
Тыкать кнопки долго, нужны хоткеи, которые делят экран без вопросов, запуская bash в текущей папке. В меню «Keys & Macro» я нашёл какие-то на первый взгляд нужные команды «Split: Duplicate active ‘shell’ split to bottom» и to right, но у меня с ними не сохранялась папка после cd, а без этого неудобно.
В меню «Keys & Macro» есть свободные слоты «Macro N», куда можно вписать свои команды и хоткеи. У меня первыми свободными слотами были 12 и 13. В первый я добавил команду:
Shell("new_console:s50H", "", "{bash::cwd}")
s50H — это значит поделить (split) экран на 50% по горизонтали (Horizontal). Добавил хоткей Ctrl+S (от слова Split). В следующий слот добавил деление по вертикали (V):
Shell("new_console:s50V", "", "{bash::cwd}")
Получилось так:
Сплит экрана с bash в текущей папке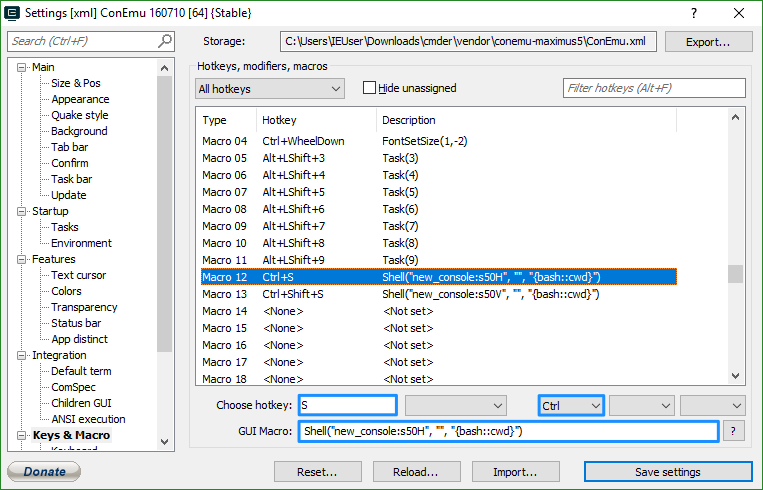
Проверяю, как работает. Закрываю cmder и снова открываю. Он открывается в Desktop/Projects (левая панель). Я перехожу в папку sicamp и жму Ctrl+S, экран делится по вертикали (правая верхняя панель). Теперь в этой панели захожу в папку Desktop/Projects/Test и жму Ctrl+Shift+S, панель делится пополам и открывается правая нижняя:
Смотрю, как делится окно
Теперь наконец можно пользоваться.
Вот хоткеи для вкладок пачкой:
- Новая вкладка
Ctrl+T - новая вкладка с настройкой
Ctrl+Shift+T - открыть панель справа
Ctrl+S - открыть панель снизу
Ctrl+Shift+S - закрыть вкладку
Ctrl+W.
Terminal profiles are platform-specific shell configurations comprised of an executable path, arguments, and other customizations. By default several profiles are automatically detected which can be customized or added to.
Example profile:
{
  "terminal.integrated.profiles.windows": {
    "Custom Init": {
      "path": "pwsh.exe",
      "args": [
         "-noexit",
         "-file",
         "${env:APPDATA}\PowerShell\custom-init.ps1"
      ]
    }
  },
  "terminal.integrated.defaultProfile.windows": "Custom Init"
}
You can use variables in terminal profiles as shown in the example above with the APPDATA environment variable. There is a list of available variables in the Variables Reference topic.
Configure your default profile by running the Terminal: Select Default Profile command, which is also accessible via the new terminal dropdown.

The default terminal profile shell defaults to $SHELL on Linux and macOS and PowerShell on Windows. VS Code will automatically detect most standard shells that can then be configured as the default.
Configuring profiles
To create a new profile, run the Terminal: Select Default Profile command and activate the configure button on the right side of the shell to base it on. This will add a new entry to your settings that can be tweaked manually in your settings.json file.
Profiles can be created using either a path or a source, as well as a set of optional arguments. A source is available only on Windows and can be used to let VS Code detect the install of either PowerShell or Git Bash. Alternatively, a path pointing directly to the shell executable can be used. Here are some example profile configurations:
{
  "terminal.integrated.profiles.windows": {
    "PowerShell -NoProfile": {
      "source": "PowerShell",
      "args": ["-NoProfile"]
    }
  },
  "terminal.integrated.profiles.linux": {
    "zsh (login)": {
      "path": "zsh",
      "args": ["-l"]
    }
  }
}
Other arguments supported in profiles include:
overrideName: A boolean indicating whether or not to replace the dynamic terminal title that detects what program is running with the static profile name.env: A map defining environment variables and their values, set the variable tonullto delete it from the environment. This can be configured for all profiles using theterminal.integrated.env.<platform>setting.icon: An icon ID to use for the profile.color: A theme color ID to style the icon.
Tip: Path, args, and env all support resolving variables
The default profile can be defined manually with the terminal.integrated.defaultProfile.* settings. This should be set to the name of an existing profile:
{
  "terminal.integrated.profiles.windows": {
    "my-pwsh": {
      "source": "PowerShell",
      "args": ["-NoProfile"]
    }
  },
  "terminal.integrated.defaultProfile.windows": "my-pwsh"
}
Tip: The integrated terminal shell is running with the permissions of VS Code. If you need to run a shell command with elevated (administrator) or different permissions, use platform utilities such as
runas.exewithin a terminal.
Removing built-in profiles
To remove a built-in profile and prevent it from showing up in the new terminal dropdown, set the name of the profile to null. For example, to remove the Git Bash profile on Windows, use this setting:
{
  "terminal.integrated.profiles.windows": {
    "Git Bash": null
  }
}
Configuring the task/debug profile
By default, the task/debug features will use the default profile. This may not be ideal if your default has a heavy PowerShell startup script or a non-POSIX compliant shell for example. To configure a profile to be used only in the debug/tasks features, use the terminal.integrated.automationProfile.<platform> setting:
{
  "terminal.integrated.defaultProfile.osx": "fish",
  // Use a fully POSIX-compatible shell and avoid running a complex ~/.config/fish/config.fish
  // for tasks and debug
  "terminal.integrated.automationProfile.osx": {
    "path": "/bin/sh"
  }
}
Unsafe profile detection
Certain shells are installed in unsafe paths by default, like a path that could be written to by another user on a Windows environment. VS Code will still detect these but not expose them as a proper profile until they have been explicitly configured via the Terminal: Select Default Profile command. When configuring an unsafe profile, there will be a warning before it’s added:

Cmder
Cmder itself is a terminal, but you can use the Cmder shell in VS Code with the following profile:
{
  "terminal.integrated.profiles.windows": {
    "cmder": {
      "path": "C:\WINDOWS\System32\cmd.exe",
      "args": ["/K", "C:\cmder\vendor\bin\vscode_init.cmd"]
    }
  },
  "terminal.integrated.defaultProfile.windows": "cmder"
}
This profile should be picked up automatically when the CMDER_ROOT environment variable is set. It will also be detected as an unsafe profile if installed at C:cmder. You may refer to Cmder’s wiki for more information.
Cygwin
Cygwin itself is a terminal, but you can use the Cygwin shell in VS Code with the following profile:
{
  "terminal.integrated.profiles.windows": {
    "Cygwin": {
      "path": "C:\cygwin64\bin\bash.exe",
      "args": ["--login"]
    }
  },
  "terminal.integrated.defaultProfile.windows": "Cygwin"
}
This profile should be detected automatically as an unsafe profile when installed at the default paths C:cygwin or C:cygwin64.
Git Bash
A limitation of Git Bash when VS Code uses bash.exe (the shell) as opposed to git-bash.exe (the terminal) is that history will not be retained across shell sessions. You can work around this by adding the following to your ~/.bashrc or ~/.bash_profile files:
export PROMPT_COMMAND='history -a'
This will cause the shell to call history -a whenever the prompt is printed which flushes the session’s current session commands to the backing history file.
MSYS2
MSYS2’s bash shell can be configured with the following profile:
{
  "terminal.integrated.profiles.windows": {
    "bash (MSYS2)": {
      "path": "C:\msys64\usr\bin\bash.exe",
      "args": ["--login", "-i"]
    }
  }
}
This profile should be detected automatically as an unsafe profile when installed at the default path C:\msys64.
Windows PowerShell
When PowerShell 6+ is installed, Windows PowerShell is not included in the profiles list by default. To add Windows PowerShell as a profile, choose the Select Default Profile option in the new terminal dropdown and select the Windows PowerShell item. This will configure the profile and set it as your default.
WSL
When running VS Code on your local machine, Windows Subsystem for Linux shells should be automatically detected. Depending on your setup, this may be a nuisance if you have a lot of distros installed. For finer control over the WSL profiles the automatic detection can be disabled with the terminal.integrated.useWslProfiles setting, then here’s an example of how to manually configure a WSL shell:
{
  "terminal.integrated.profiles.windows": {
    "Debian (WSL)": {
      "path": "C:\WINDOWS\System32\wsl.exe",
      "args": [
        "-d",
        "Debian"
      ]
    }
  }
}
Common questions
Why are there duplicate paths in the terminal’s $PATH environment variable and/or why are they reversed on macOS?
This can happen on macOS because of how the terminal launches using VS Code’s environment. When VS Code launches for the first time, to source your «development environment,» it launches your configured shell as a login shell, which runs your ~/.profile/~/.bash_profile/~/.zprofile scripts. Now when the terminal launches, it also runs as a login shell, which will put the standard paths to the front (for example, /usr/local/bin:/usr/bin:/bin:/usr/sbin:/sbin) and reinitialize your shell environment.
To get a better understanding, you can simulate what is happening by launching an inner login shell within your operating system’s built-in terminal:
# Add /test to the beginning of $PATH
export PATH=/test:$PATH
# Echo $PATH, /test should be at the beginning
echo $PATH
# Run bash as a login shell
bash -l
# Echo $PATH, the values should be jumbled
echo $PATH
Unfortunately, unlike in Linux, standalone macOS terminals all run as login shells by default, since macOS does not run a login shell when the user logs into the system. This encourages «bad behavior,» like initializing aliases in your profile script when they should live in your rc script as that runs on non-login shells.
There are two direct fixes for this. The first is to set "terminal.integrated.inheritEnv": false, which will strip most environment variables from the terminal’s environment, except for some important ones (like HOME, SHELL, TMPDIR, etc.).
The other fix is to no longer run a login shell in the terminal by creating a terminal profile and setting its args to []. If you go with this fix, you will want to make sure any aliases in your profile scripts are moved over to your ~/.bashrc/~/.zshrc file since aliases only apply to the shell they’re set in.
2/2/2023
Введение
cmderЭто усовершенствованный инструмент командной строки, который не только может использовать все команды под окнами, но также может использовать команды Linux и команды оболочки.
скачать
Официальный адрес сайта:http://cmder.net/

1. Зачем переходить на cmder
Когда я работаю над проектом, иногда, когда я хочу скопировать код на консоль,cmdИногда копирование и вставка очень хлопотны.CmderТогда нет, аCmderВы можете разделить экран, чтобы открыть несколько окон, вы можете установить цвет окна, размер шрифта и многие сочетания клавиш, аналогичные операциям в Google Chrome, и многие другие функции.
2. Официальный адрес загрузки сайта:
http://cmder.net/
О загрузке
После входа на официальный сайт появляютсямини версияс участиемполная версия, Рекомендуется полная версия, полная версия имеет больше функций и может использоватьсяgit, Скачав распакованный пакет файлов, вы можете им пользоваться.


При загрузке будет две версии, мини и полная; разница только в том, есть ли встроенный инструмент msysgit, который является стандартным оборудованием Git для Windows; полностью установленная версия cmder поставляется с msysgit, сжатым пакетом 23M, В дополнение к этой команде самого git, в ней можно использовать множество команд linux; например, grep, curl (без wget); например, vim, grep, tar, unzip, ssh, ls, bash, perl, это еще более болезненно для бросающего кодера .
установка
Просто разархивируйте его прямо в каталог, щелкните Cmder.exe, чтобы запустить его.
Настроить переменные среды
Добавить в системные переменные
- имя переменной:CMDER_HOME
- Значение переменной: абсолютный путь установки

Наконец, добавьте его в путьКурсивный текст
%CMDER_HOME%

Добавить cmder в контекстное меню
После настройки переменных среды вПрава администратораВведите в терминал следующую инструкцию.
Win8 или Win10 могут напрямую выиграть + x и нажать клавишу для входа.
Cmder.exe /REGISTER ALLДисплей интерфейса cmder
Запустите интерфейс Cmder следующим образом: я, конечно, установил цвет фона, прозрачность, стиль шрифта, скрыл панель вкладок, увеличил нижнюю строку состояния и функцию разделения экрана.

Дисплей интерфейса cmder
Три, некоторые конфигурации о cmder
1. Настройте переменные среды:
Настройте переменные среды в свойствах системы, установитеCmder.exeДобавьте путь к файлу вPathв


2. Настройте быстрый запуск правой кнопкой мыши:
Открыть как администраторcmd, Выполните следующую команду, после этого щелкните правой кнопкой мыши в любом месте, чтобы использовать cmder
// Устанавливаем правую кнопку мыши в любом месте, чтобы запустить Cmder
Cmder.exe /REGISTER ALL

Правая кнопка мыши для запуска Cmder
3. Настройки эффектов интерфейса.
Первое использованиеwindows+alt+pВойдите в настройки интерфейса
настройка цвета фона

Настройки шрифта

Прозрачность фона

Скрыть панель вкладок

Показать нижнюю строку состояния

Установить командную строку Cmder по умолчанию"λ"Чтобы“$”,
вcmdervendorсреднийclink.luaВнесите следующие изменения и замените «λ» на «$».

Четыре, некоторые часто используемые сочетания клавиш для Cmder
1, Cmder часто используемые сочетания клавиш
 Вкладка автоматического завершения пути
 Ctrl + T Создать новую вкладку
 Ctrl + W закрыть вкладку
 Ctrl + Tab переключение вкладки
 Alt + F4 закрыть все вкладки
 Alt + Shift + 1 открыть cmd.exe
 Alt + Shift + 2 открыть powershell.exe
 Alt + Shift + 3 открыть powershell.exe (права системного администратора)
 Ctrl + 1 быстро перейти на первую вкладку
 Ctrl + n быстро перейти на n-ю вкладку (значение n не имеет верхнего предела)
 Alt + Enter перейти в полноэкранный режим
 Ctr + r исторический поиск команд
 Win + Alt + P открыть окно параметров инструмента

 2, Вы можете искать любые ключевые слова, которые появляются на экране в окне.
 3. Добавьте кнопку вкладки.
 4. Переключите кнопку вкладки.
 5. Заблокируйте окно, чтобы в него больше нельзя было войти.
 6. Независимо от того, следует ли переключать окно для обеспечения функции прокрутки, вы можете запросить ранее отображаемый контент при запуске.
 7. Щелкните левой кнопкой мыши, чтобы открыть системное меню, и правой кнопкой мыши, чтобы открыть окно параметров инструмента. Win + Alt + P: открыть окно параметров инструмента.
5. О китайских искаженных иероглифах:
Добавьте следующие 4 строки команд в конец файла cmder / config / aliases. Если вы по-прежнему не можете обратиться к предыдущим настройкам шрифта, снимите флажок Моноширинный в настройках шрифта, упомянутых ранее. Другое дело — выработать хорошие навыки программирования: лучше не использовать китайский язык в имени файла.
l=ls --show-control-chars
la=ls -aF --show-control-chars
ll=ls -alF --show-control-chars
ls=ls --show-control-chars -F Microsoft
Windows открывает все инструменты командной строки в старой среде консоли Windows. Однако вы можете сделать Терминал Windows своим приложением Терминала по умолчанию при каждом запуске командной строки или PowerShell.
Когда вы открываете командную строку или PowerShell в Windows 10, каждый сеанс начинается в отдельном окне. К сожалению, это означает, что вам придется переключаться между несколькими открытыми окнами на рабочем столе.
Приложение Windows Terminal по умолчанию открывается в виде вкладок, чтобы помочь вам управлять несколькими окнами командной строки. Кроме того, вы также можете запускать PowerShell и CMD на отдельных вкладках.
Переключение на приложение Windows Terminal дает вам доступ к другим функциям, таким как темы, поддержка эмодзи, несколько сеансов, разделенные панели, рендеринг с помощью графического процессора и многие другие настройки.
Такие функции не попадают в консоль Windows. Вот почему переключение приложения Терминал по умолчанию на Терминал Windows — хорошая идея.
Кроме того, Windows 11 использует приложение Windows Terminal в качестве среды командной строки по умолчанию для открытия CMD, PowerShell и подсистемы Windows для Linux (WSL). Пока Windows 11 не начнет развертываться в конце 2021 года, вы можете начать использовать Терминал Windows по умолчанию в Windows 10 прямо сейчас.
Как сделать Windows Terminal вашим терминальным приложением по умолчанию
Прежде чем начать, вам необходимо скачать и установить Приложение Windows Terminal если у вас его нет на вашем компьютере.
Запустите приложение Windows Terminal, выберите меню со стрелкой вниз и нажмите «Настройки». Или вы можете нажать Ctrl +, (запятая), чтобы напрямую открыть «Настройки».
В открывшемся окне настроек вы увидите, что для параметра «Терминальное приложение по умолчанию» установлено значение «Хост консоли Windows (ConHost.exe)». Это означает, что Windows использует устаревшее терминальное приложение ConHost.exe для CMD или PowerShell.
Щелкните раскрывающееся меню «Терминальное приложение по умолчанию» и выберите из списка Терминал Windows.
По умолчанию приложение Windows Terminal использует профиль Windows PowerShell при запуске приложения.
Однако вы можете переключить его на запуск другого профиля оболочки. Для этого щелкните раскрывающийся список «Профиль по умолчанию», чтобы выбрать командную строку, PowerShell, Windows PowerShell или Azure Cloud Shell.
Нажмите кнопку «Сохранить», чтобы применить внесенные вами изменения.
Вот и все. После этого, когда вы открываете командную строку или PowerShell, Windows запускает приложение Windows Terminal, и вы также можете настроить его внешний вид.
Существует три способа заменить Терминал на Командную Строку в Windows 11 и поставить его в качестве консоли приложение. Консоль по умолчанию — это процесс, в котором открываются при запуске программы для командной строки, такие как diskpart или sfc.
Консоль по умолчанию также отвечает за запуск интерпретаторов PowerShell, командной строки и WSL. Они выполняются внутри процесса консоли, который обрабатывает их вывод и предоставляет им определенные системные ресурсы.
Windows 11 позволяет вам установить Терминал Windows или классическую консоль (conhost) в качестве программного обеспечения консоли по умолчанию. Со второй вы уже наверняка знакомы, так как она доступна в Windows десятилетиями.
Приложение «Терминал Windows» — это новое современное приложение, которое значительно расширяет возможности окна командной строки. Он поддерживает вкладки, отрисовку текста с графическим ускорением, профили, настраиваемый внешний вид и горячие клавиши, а также многое другое.
С Терминалом Windows вы сможете запустить PowerShell, WSL и командную строку одновременно в одном окне, но в разных вкладках, поскольку каждый из инструментов будет иметь свой собственный профиль.
С conhost в качестве консоли PowerShell, WSL и командная строка будут работать в своих собственных окнах и будут ограничены классическим набором функций.
Существует три способа изменить консоль по умолчанию в Windows 11. Вы можете установить предпочтительное приложение, выполняющее роль командной строки, с помощью Параметров Windows, непосредственно из настроек терминала Windows, а также в свойствах окна классической командной строки. Давайте рассмотрим эти методы.
Как заменить Терминал Windows на Командную Строку в Параметрах
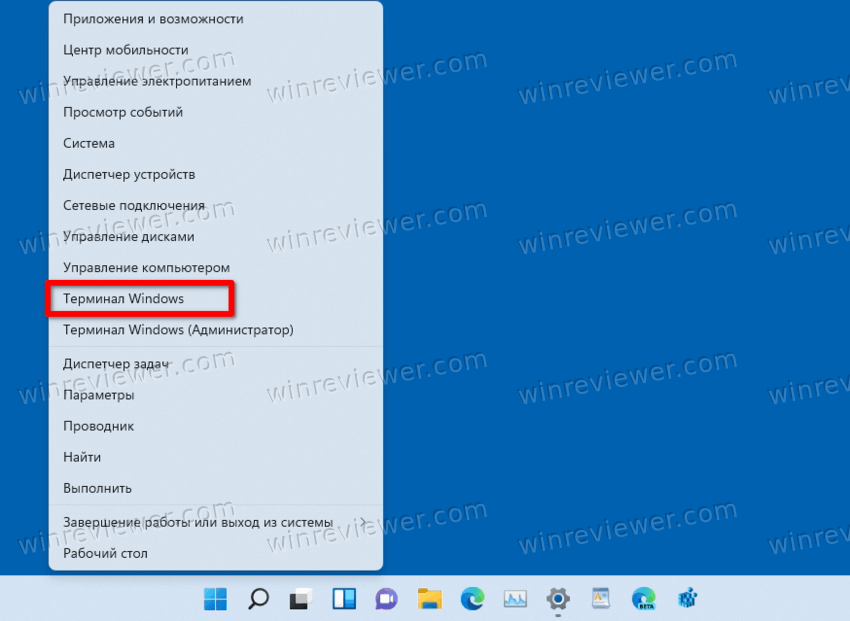
- Щелкните правой кнопкой мыши кнопку «Пуск» и выберите в меню «Параметры».

- Слева выберите Конфиденциальность и безопасность. Справа нажмите Для разработчиков.

- На следующей странице выберите Узел консоли Windows, чтобы использовать классическую Командную строку по умолчанию, в раскрывающемся меню Терминал.
- Соответственно, опция Терминал Windows сделает приложение консолью по умолчанию.
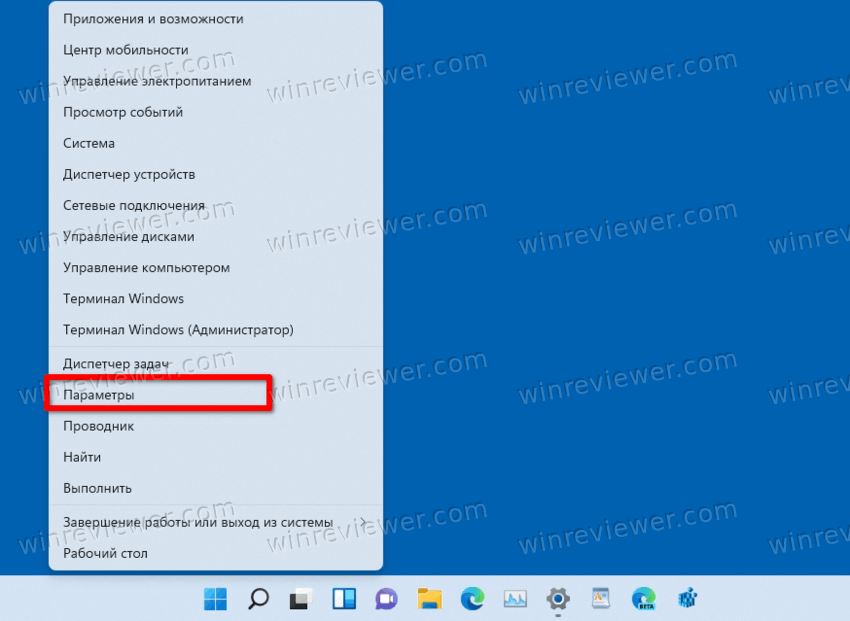
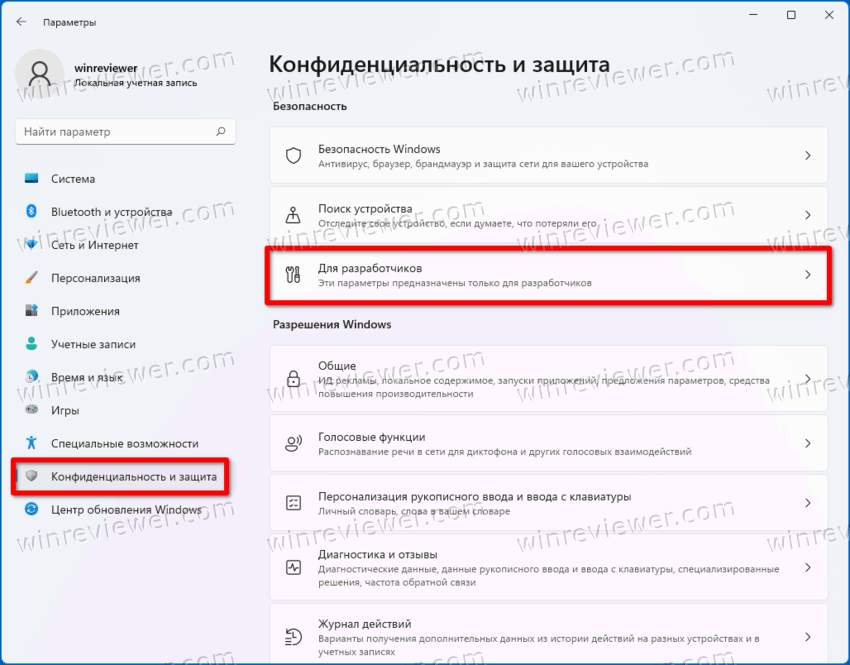
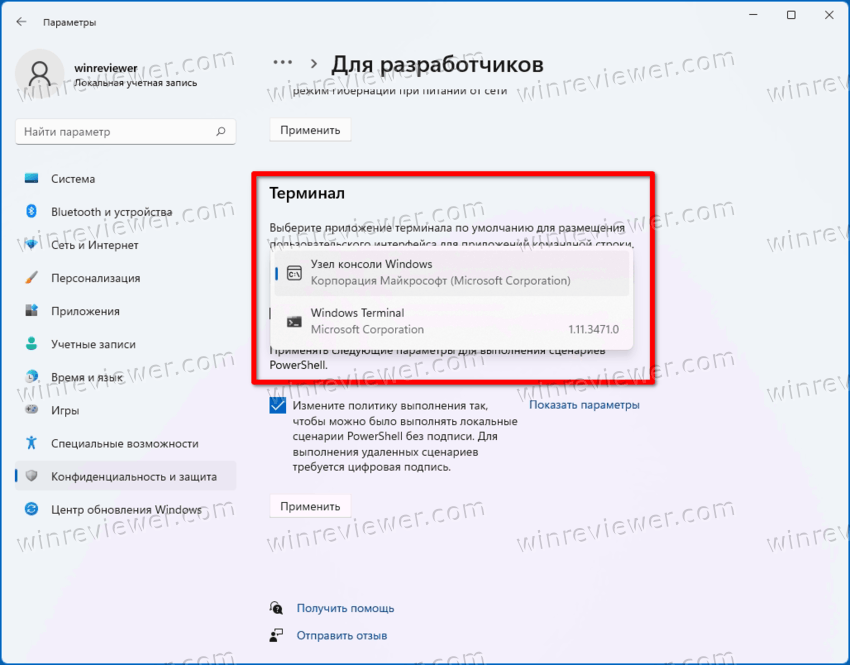
Готово!
Помимо приложения «Параметры системы», вы можете указать предпочитаемое консольное приложение прямо в настройках Терминала Windows. Он имеет очень тесную интеграцию с ОС, например он доступен в контекстном меню проводника.
Изменить консоль по умолчанию в Windows 11 в настройках терминала Windows
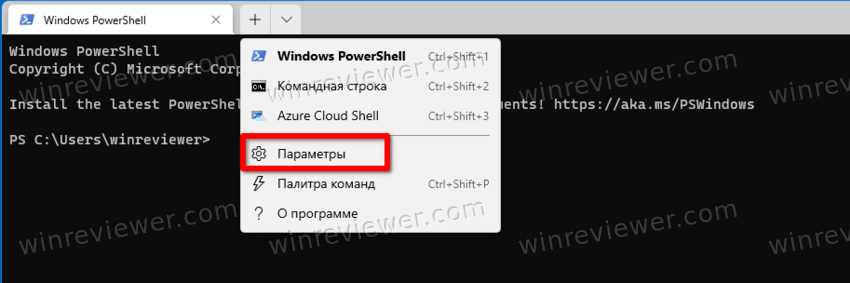
- Нажмите Win + X и выберите Терминал Windows из меню.
- В Терминале Windows нажмите кнопку со стрелкой вниз и выберите «Параметры».

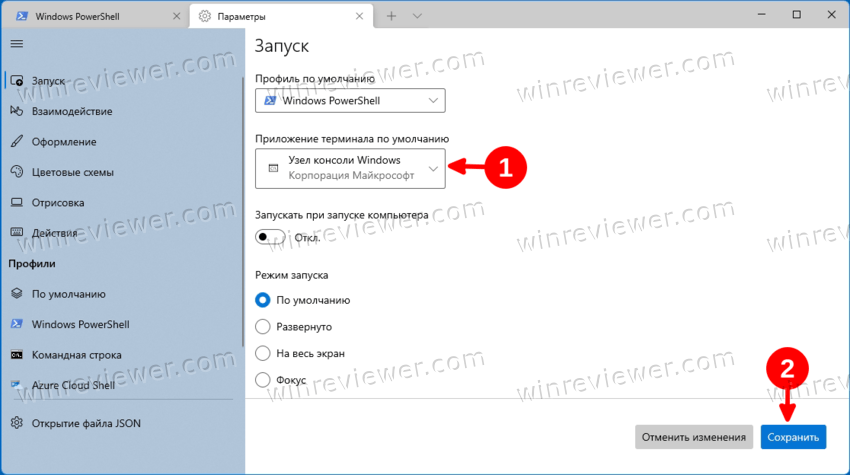
- В левой панели настроек выберите Запуск.
- Справа выберите Терминал Windows или Узел консоли Windows в раскрывающемся меню Терминальное приложение по умолчанию.

- Нажмите кнопку «Сохранить», чтобы применить изменения.
Готово!
Наконец, вы можете изменить предпочтительное приложение терминала прямо в параметрах командной строки. Имейте в виду, что этот метод работает только в том случае, если текущее приложение терминала настроено на Хост консоли Windows, а не на Windows Terminal. Сделайте следующее.
Как изменить приложение терминала по умолчанию в свойствах командной строки
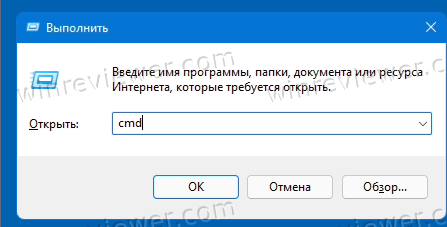
- Нажмите Win + R и введите
cmd.exeв поле «Выполнить», чтобы открыть новую командную строку.
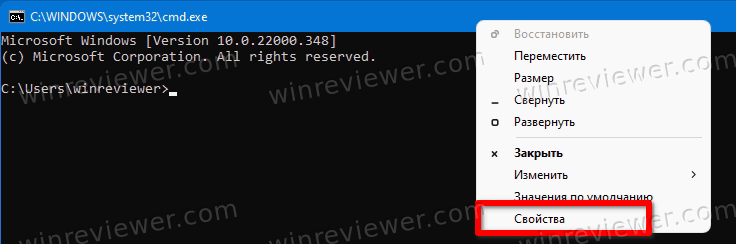
- Щелкните правой кнопкой мыши строку заголовка и выберите в меню «Свойства».

- Перейдите на вкладку «Терминал» в диалоговом окне «Свойства».
- В разделе «Терминальное приложение по умолчанию» выберите либо Узел консоли Windows, либо Терминал Windows.

- Щелкните ОК, чтобы сохранить изменения.

Готово!
Опять же, вы не сможете открыть свойства командной строки, если вы уже установили в качестве консоли по умолчанию терминал Windows. В этом случае вы должны использовать любой из методов, рассмотренных выше, чтобы переключить его обратно на Windows Console Host.
На этом всё.
Источник: Winaero
💡Узнавайте о новых статьях быстрее. Подпишитесь на наши каналы в Telegram и Twitter.
Судя по тому, что вы читаете этот текст, вы дочитали эту статью до конца. Если она вам понравилась, поделитесь, пожалуйста, с помощью кнопок ниже. Спасибо за вашу поддержку!