DBeaver is a multiplatform application. It has versions for Windows, macOS, and Linux users. To start working with DBeaver you need to download and install it, and today we will go through these steps with you.

How can I get the app?
You can easily download the commercial versions of DBeaver from our official website DBeaver.com. To do this, go to Products -> Download and select an edition. We have three commercial products: Lite, Enterprise, and Ultimate. For your convenience, we have prepared a comparison table, where you can choose the most suitable product in terms of the number of features.
All previous DBeaver versions are available in the archive. You can also download the early access version with the most recent fixes, enhancements, and features. It is less tested, so use it at your own risk.
We suggest taking advantage of the free 14 days trial period if you have not purchased a license yet.
You can get it in the “Try for free” section.
When you open the download page, your operating system will be recognized automatically and you will see a button to get a compatible version. If you want to get a different installer, select one of the options from the list.
The installation process depends on your operating system.
Move on to the installation
WINDOWSRun installer executable. When the installation wizard opens, follow the instructions and choose the options you need. In the dialog box, you can select whether to install DBeaver for all users or for the current user. You also have the option to change the destination folder from default to custom.
| macOS | Drag and drop DBeaver into your Application folder. On reinstall do the same. |
|---|---|
| Linux Debian package | Run sudo dpkg -i dbeaver-.deb. Then execute the package. |
| Linux RPM package | Run sudo rpm -ivh dbeaver-.rpm, and then execute the package. Note: to upgrade use “-Uvh” parameter. |
You can easily change a DBeaver file’s location in any operating system using the app.
Just go to File -> Switch Workspace and set a new path.
When you launch the application, the system will suggest that you generate a trial version of the product or import your license key into DBeaver. You can copy it from your profile on our website. More information about importing a license can be found on our Wiki page.
If you need to update DBeaver, you do not have to uninstall the previous version. Just close the running application and follow the same steps as during the first installation.
You can install all DBeaver Editions on one computer and it will not cause any problems.
But we advise you not to open more than one of our apps at the same time.
What about DBeaver CE?
To download our open-source product DBeaver Community go to dbeaver.io and click the “Download” button on the main page. You will be redirected to a page where you can select the version compatible with your operating system. You will receive the latest edition of the product with the updates listed below. On the download page, you can also find the archives of previous DBeaver Community releases to download an earlier version.
The installation process for the DBeaver Community is the same as for the commercial products.
That’s all. Now you can start using DBeaver for your projects. We hope you will enjoy it!
How to: Как установить DBeaver на Windows
Introduction
В данной инструкции информация по скачиванию и установке DBeaver.
DBeaver — это клиент SQL и средство администрирования базы данных. Он предоставляет редактор, поддерживающий компиляцию кода и подсветку синтаксиса, архитектуру плагинов (основанную на архитектуре плагинов Eclipse), которая позволяет модифицировать поведение большой части приложения для обеспечения специальных функций базы данных, которые не зависят от самой базы данных. Приложение, написанно на Java и основанно на платформе Eclipse.
Requirements
Операционная система: Windows, Mac, Linux
Лицензия: Apache, бесплатное программное обеспечение с открытым исходным кодом.
Windows
Installation
Перейти по ссылке
https://dbeaver.io/files/dbeaver-ce-latest-x86_64-setup.exe
- Запустить исполняемый файл.
- Нажать Далее->Принимаю->Далее->
- Добавить галочку Associate .SQL files, Нажать Далее
- Выбрать директорию установки и нажать Далее->Установить
- Добавить галочку Create Desktop Shortcut ->Готово
Launch
- После запуска отменить создание новой Базы Данных
- Выбрать тип нового соединения PostgreSQL, Нажать Далее
- В поле аутентификация ввести пароль суперпользователя Базы данных, Нажать Готово
Mac OS X
Installation
Перейти по ссылке
https://dbeaver.io/files/dbeaver-ce-latest-installer.pkg
- Запустить исполняемый файл.
- Нажать Продолжить->Принять условия лицензионного соглашения->Установить->Ввести пароль учетной записи Mac OS
Launch
- После запуска отменить создание новой Базы Данных
- Выбрать тип нового соединения PostgreSQL Нажать Далее
- В поле аутентификация ввести пароль суперпользователя Базы данных Нажать Готово
Dear SAPLearners, in this blog post we will show the steps to install DBeaver Community Edition which is a free and open-source universal database tool.
DBeaver Introduction
DBeaver is a free and open-source universal database tool for developers, database administrators, analysts, and all people who need to work with databases.
It supports all popular databases like MySQL, PostgreSQL, SQLite, DB2. You can find more information from here. The good part is that it also supports SAP HANA and will explore more of its features in the next tutorials.

DBeaver Community Edition installation guide for windows
1. Download the community edition from here.
Please select the relevant edition based on the operating system on which you are working. Here, I download the latest version 7.3.1
2. Installation wizard

A setup installer wizard will open like below, it is recommended to close all other applications before starting setup.
3. Accept the License Agreement.

Click on I Agree to accept the license agreement.
4. Choose Users

Choose for which users to install DBeaver Community.
5. Choose Components

Choose which features of DBeaver Community you want to install.
6. Installation Location

Choose the folder in which to install DBeaver Community. I leave it to the default location, but you can change the installation folder as per your choice.
7. Start Menu Folder

Choose a Start Menu folder for the DBeaver community for shortcuts.
8. Complete the DBeaver Community Setup

Click on Finish to complete the setup
9. Launch the DBeaver

Open the DBeaver tool from the shortcut icon from the desktop or search for DBeaver in the search menu.
Conclusion
Congrats!! you have successfully learned the steps to install DBeaver Community Edition. This is just an introductory blog post and setup guide, we will be writing more tutorials on connecting DBeaver to SAP HANA Cloud.
Please feel free to comment and let us know your feedback. Subscribe for more updates
If you liked it ❤️, please share it! Thanks! 🙏
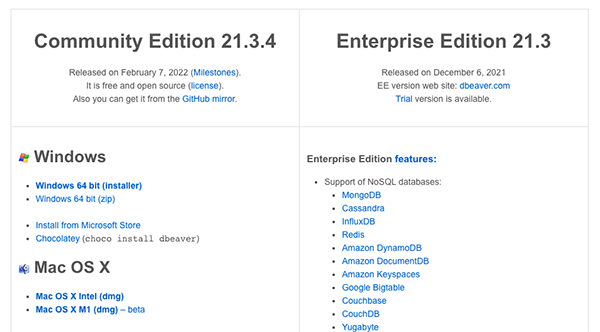
DBeaver Community 22.3.4Released on February 6th 2023 (Milestones). |
DBeaver PRO 22.3Released on December 12th, 2022 |
|
Enterprise Edition features:
|
| Usually we release a new Minor Community Edition version once per two weeks. Major version is released quarterly (every 3 months). Information about previous releases you can find here. |
 Windows
 Mac OS X
 Linux
Linux Eclipse Plugin
Tested and verified for MS Windows, Linux and Mac OS X.
Install:
Windows installer – run installer executable. It will automatically upgrade version (if needed).
MacOS DMG – just run it and drag-n-drop DBeaver into Applications.
Debian package – run sudo dpkg -i dbeaver-<version>.deb. Then execute “dbeaver &”.
RPM package – run sudo rpm -ivh dbeaver-<version>.rpm. Then execute “dbeaver &”. Note: to upgrade use “-Uvh” parameter.
ZIP archive – extract archive and run “dbeaver” executable. Do not extract archive over previous version (remove previous version before install).
Upgrade – don’t be afraid to remove previous DBeaver version – your settings won’t be lost. All settings are kept in the separate folder (DBeaverData in user home)
Java notes:
DBeaver requires Java 11 or higher. Since version 7.3.1 all distributions include OpenJDK 11 bundle.
If you want to use you own locally installed Java you may delete folder “jre” in the DBeaver installation folder.
Debian repository:
sudo  wget -O /usr/share/keyrings/dbeaver.gpg.key https://dbeaver.io/debs/dbeaver.gpg.key
echo "deb [signed-by=/usr/share/keyrings/dbeaver.gpg.key] https://dbeaver.io/debs/dbeaver-ce /" | sudo tee /etc/apt/sources.list.d/dbeaver.list
sudo apt-get update && sudo apt-get install dbeaver-ce
Ubuntu PPA:
You can use PPA repository to easily install/upgrade DBeaver on Debian Linuxes. Mostly it is the same as regular Debian repo but it is hosted on Launchpad.
sudo add-apt-repository ppa:serge-rider/dbeaver-ce
sudo apt-get update
sudo apt-get install dbeaver-ce
Early Access:
You may get latest build (EA version) of DBeaver. Usually it contains all major bug fixes found in current stable version. Just choose the archive corresponding to your OS and hardware from the following folder: EA version downloads.
Source code:
Please, star the repository!
Archive:
All recent DBeaver versions are available in the archive.
CloudBeaver
DBeaver is desktop application.
If you are looking for a web-based database management system – please check another of our products: CloudBeaver.
It is also open-source and free.
![]()
Free universal database tool and SQL client
View the Project on GitHub dbeaver/dbeaver


![]()
![]()
DBeaver
Free multi-platform database tool for developers, SQL programmers, database administrators and analysts.
Supports any database which has JDBC driver (which basically means — ANY database). EE version also supports non-JDBC datasources (MongoDB, Cassandra, Couchbase, Redis, BigTable, DynamoDB, etc).
- Has a lot of features including metadata editor, SQL editor, rich data editor, ERD, data export/import/migration, SQL execution plans, etc.
- Based on Eclipse platform.
- Uses plugins architecture and provides additional functionality for the following databases: MySQL/MariaDB, PostgreSQL, Greenplum, Oracle, DB2 LUW, Exasol, SQL Server, Sybase/SAP ASE, SQLite, Firebird, H2, HSQLDB, Derby, Teradata, Vertica, Netezza, Informix, etc.
Download
You can download prebuilt binaries from official website or directly from GitHub releases.
You can also download Early Access version. We publish it 1-2 times per week.
Running
Just run an installer (or unzip an archive) and run dbeaver.
Note: DBeaver needs Java to run. Open JDK 11 is included in all DBeaver distributions. (since version 7.3.1).
You can change default JDK version by replacing directory jre in dbeaver installation folder.
Documentation
- WIKI
- Issue tracker
Building
Prerequisites:
- Java (JDK) 11 or later (AdoptOpenJDK 11 is our default Java at the moment).
- Apache Maven 3.6+
- Internet access
- Git client
Build
git clone https://github.com/dbeaver/dbeaver.git dbeaver
cd dbeaver
mvn package
Binaries are in product/standalone/target/products
Notes
- For bug reports and feature requests — please create a ticket.
- If you have any questions, ideas, etc — please start a discussion.
- Pull requests are welcome.
- Visit https://dbeaver.io or https://dbeaver.com for more information.
- Follow us on Twitter: https://twitter.com/dbeaver_news/
- Thanks for using DBeaver! Star if you like it.
Contribution: help the Beaver!
Hooray, we have reached 17k of stars on GitHub and continue to grow!
That’s really cool, we are glad that you like DBeaver.
- We are actively looking for new source code contributors. We have added labels “Good first issue” and “Help wanted” to some tickets. If you want to be a part of our development team just be brave and take a ticket.
- You can buy DBeaver EE version. It includes all features of CE + NoSQL databases support + EE extensions + official online support. Also, licensed users have priorities in bug fixes and new features development.
Thank you!
- DBeaver Team (contributors)
![]()
DBeaver is a desktop client.
If you are looking for a web-based database management tool — check our new product: CloudBeaver.
It is based on DBeaver platform and thus supports any database and most of DBeaver features.
We are going to see how to download, install and use DBeaver by making our very first query call in this tutorial. So stick around till the end for you might actually learn something.

So the first question that must come to your mind would be, du-uh – What is DBeaver after all? Let’s get it out of the way first.
What is DBeaver?
DBeaver is one of the most popular universal database tools used by database administrators all across the globe.
If you wish to learn database, this is a must have tool for everyone, since it works with all the popular DBMSs that you know about like MySQL, PostgreSQL, SQLite, MariaDB, Oracle, SQL Server, DB2, Sybase, Teradata, Firebird, Microsoft Access, Derby, etc.
Let’s move on to learn how to download and install DBeaver.
Here’s a step by step tutorial that will teach you how:
Steps to Download DBeaver
Step 1: Navigate to the following website:
https://dbeaver.io/download/
Step 2: Based on your operating system, click on the respective installer and download the setup. Mine is Windows, so I am gonna go ahead and click on it.

Step 3: Once you click on it, the downloading will begin.
Steps to Install DBeaver
Step 4: Once the file gets downloaded, just click it open.

Step 5: The first dialog will ask you to select language. Doesn’t have Dothraki, what a bummer!

Step 6: The next dialog box would be a welcome to DBeaver Community Setup screen. You know, kind of things that you already know. Just click on Next.

Step 7: License Agreement calls for a reading. Click on Next.

Step 8: Next dialog box inquires about the users who are going to use this software. If you don’t have a problem with sharing, you can leave things as is. Click on Next.

Step 9: If you want to Associate all your .SQL files to this tool, you can check that. Then click on Next.

Step 10: Leaving the install location as is. Clicking on Next.

Step 11: You can leave things as they are. Click on Install.

With that the installation will begin.

Step 12: Once the installation finishes, click on Next button which will get highlighted.

Step 13: If you want a desktop shortcut, fine! Check the Create Desktop Shortcut checkbox and then click on Finish.
Opening and Using DBeaver
Let’s move on to the interesting part.
Step 14: Go to your desktop and open DBeaver by double clicking the Dbeaver icon.

Step 15: The first thing that might show up would be the “selection of database”. You have to select your database out of countless databases. Since I am going to be using PostgreSQL, I am going to just go ahead and select that, and then click on Next.

Step 16: If you are in a working environment it is advisable you ask for the host url and port from them. Also, you need user credentials to log into their database.
Once you have entered all this info, you can click on Test Connection…to check if the connection has been established.

Any missing driver files can be downloaded in the next dialog box.
Step 17: Just check the force download/ overwrite file and click on Download.

If no errors remain, your connection will get established, and a green tick mark will be visible on your project.

That’s it. You are all set.
How to Create a Query in DBWeaver
Let’s see it in action! You might have got an option to create a sample database, something that will help you get acquainted how things work in DBWeaver. It is recommended you go for it.
The following processes should be done when a database project has begun to show on the Database navigator on left side of your screen.
Step 18: Right click on your database and select SQL Editor. Alternatively, you can press F3 button too.

Doing so will open the SQL Editor on DBWeaver. It must look something like this:

As you can see in the navigator, we have Album is a table. We will try to pass our first query in the SQL Editor.
Step 19: Type the following:
select * from Table

As you type you would notice that DBeaver automatically starts suggesting things. That’s the Intellisense technology that IDEs and applications all across the globe nowadays have started incorporating just like we had seen for Eclipse.
Step 20: Once typed, in order to run the query all you have to do is right click on your query and look for the option of Execute > Execute SQL Statement.

Even better, the shortcut to execute a query is Ctrl + Enter. Simply press that, and you will see the result in the bottom pane.

As you can see the query we created brings back the content from entire table. Cool, huh!
Let’s quickly bring just one record by using the following query:
select * from Album WHERE Title is "Big Ones"
where Big Ones is just a random title that I saw in the table that was retrieved.
Press Ctrl + Enter on the line and let that execution happen.

Cool! Right?
If you like our tutorial on How to Download and Install DBeaver, give us a shout out in the comments section.

Scottshak
Poet. Author. Blogger. Screenwriter. Director. Editor. Software Engineer.
Author of «Songs of a Ruin» and proud owner of four websites and two production houses. Also, one of the geekiest Test Automation Engineers based in Ahmedabad.
Обзор очень полезного инструмента для работы с различными базами данных — MySQL, PostgreSQL, Firebird, SQLite, ODBC, Oracle и другими. DBeaver — это свободный кроссплатформенный менеджер баз данных для Linux, Windows и MacOS. О DBeaver кратко: много возможностей, небольшой вес, портабельность, свободное ПО.
Содержание:
- Предисловие
- Особенности DBeaver
- Установка
- Использование программы
- Как изменить язык интерфейса программы
- Заключение
Предисловие
При работе под Linux рано или поздно у разработчика или администратора возникнет необходимость в использовании удобного и мультифункционального менеджера баз данных. Это должен быть многофункциональный и и удобный программный продукт, по возможности портабельный и желательно кроссплатформенный, принадлежать к категории свободного ПО — Open Source.

После недолгих поисков и перебрав несколько вариантов решил остановиться на DBeaver (Database Beaver, Бобер — повелитель Баз Данных). Такой себе универсальный зверек, который проникнет в любую структуру в базе данных и покажет вам что внутри, поможет навести порядок, внести изменения и предоставит прочие полезности и удобства…
Особенности DBeaver
![]()
![]()
Из основных особенностей программы можно выделить:
- Удобный структурированный интерфейс, основан на OpenSource фреймворке c большой подборкой мощных плагинов;
- Небольшой вес — 50Мб;
- Свободное программное обеспечение;
- Мультиплатформенность (работает под Linux, MacOS, Windows, Solaris, AIX, HPUX);
- Поддержка большого количества разных Баз Данных;
- Умеет делать туннелирование через SSH (встроенный функционал, очень удобно);
Список поддерживаемых баз данных:
- MySQL;
- Oracle;
- PostgreSQL;
- IBM DB2;
- Microsoft SQL Server;
- Sybase;
- ODBC;
- Java DB (Derby);
- Firebird (Interbase);
- HSQLDB;
- SQLite;
- Mimer;
- H2;
- IBM Informix;
- SAP MAX DB;
- Cache;
- Ingres;
- Linter;
- Teradata;
- Vertica;
- MongoDB;
- Cassandra;
- Любой JDBC совместимый источник.
Небольшой список того что умеет DBeaver:
- Обзор и правка метаданных: таблички, колонки, ключи, индексы;
- Выполнение SQL запросов и скриптов;
- Подсветка синтаксиса для SQL (специфичная для разных типов БД);
- Функция авто-дополнения в SQL редакторе;
- Просмотр и редактирование данных в таблицах;
- Поддержка BLOB/CLOB (просмотр и редактирование);
- Экспорт данных (таблици, результаты запросов);
- Менеджмент транзакций;
- Поиск объектов в базе данных (таблици, колонки, процедуры и т.п.);
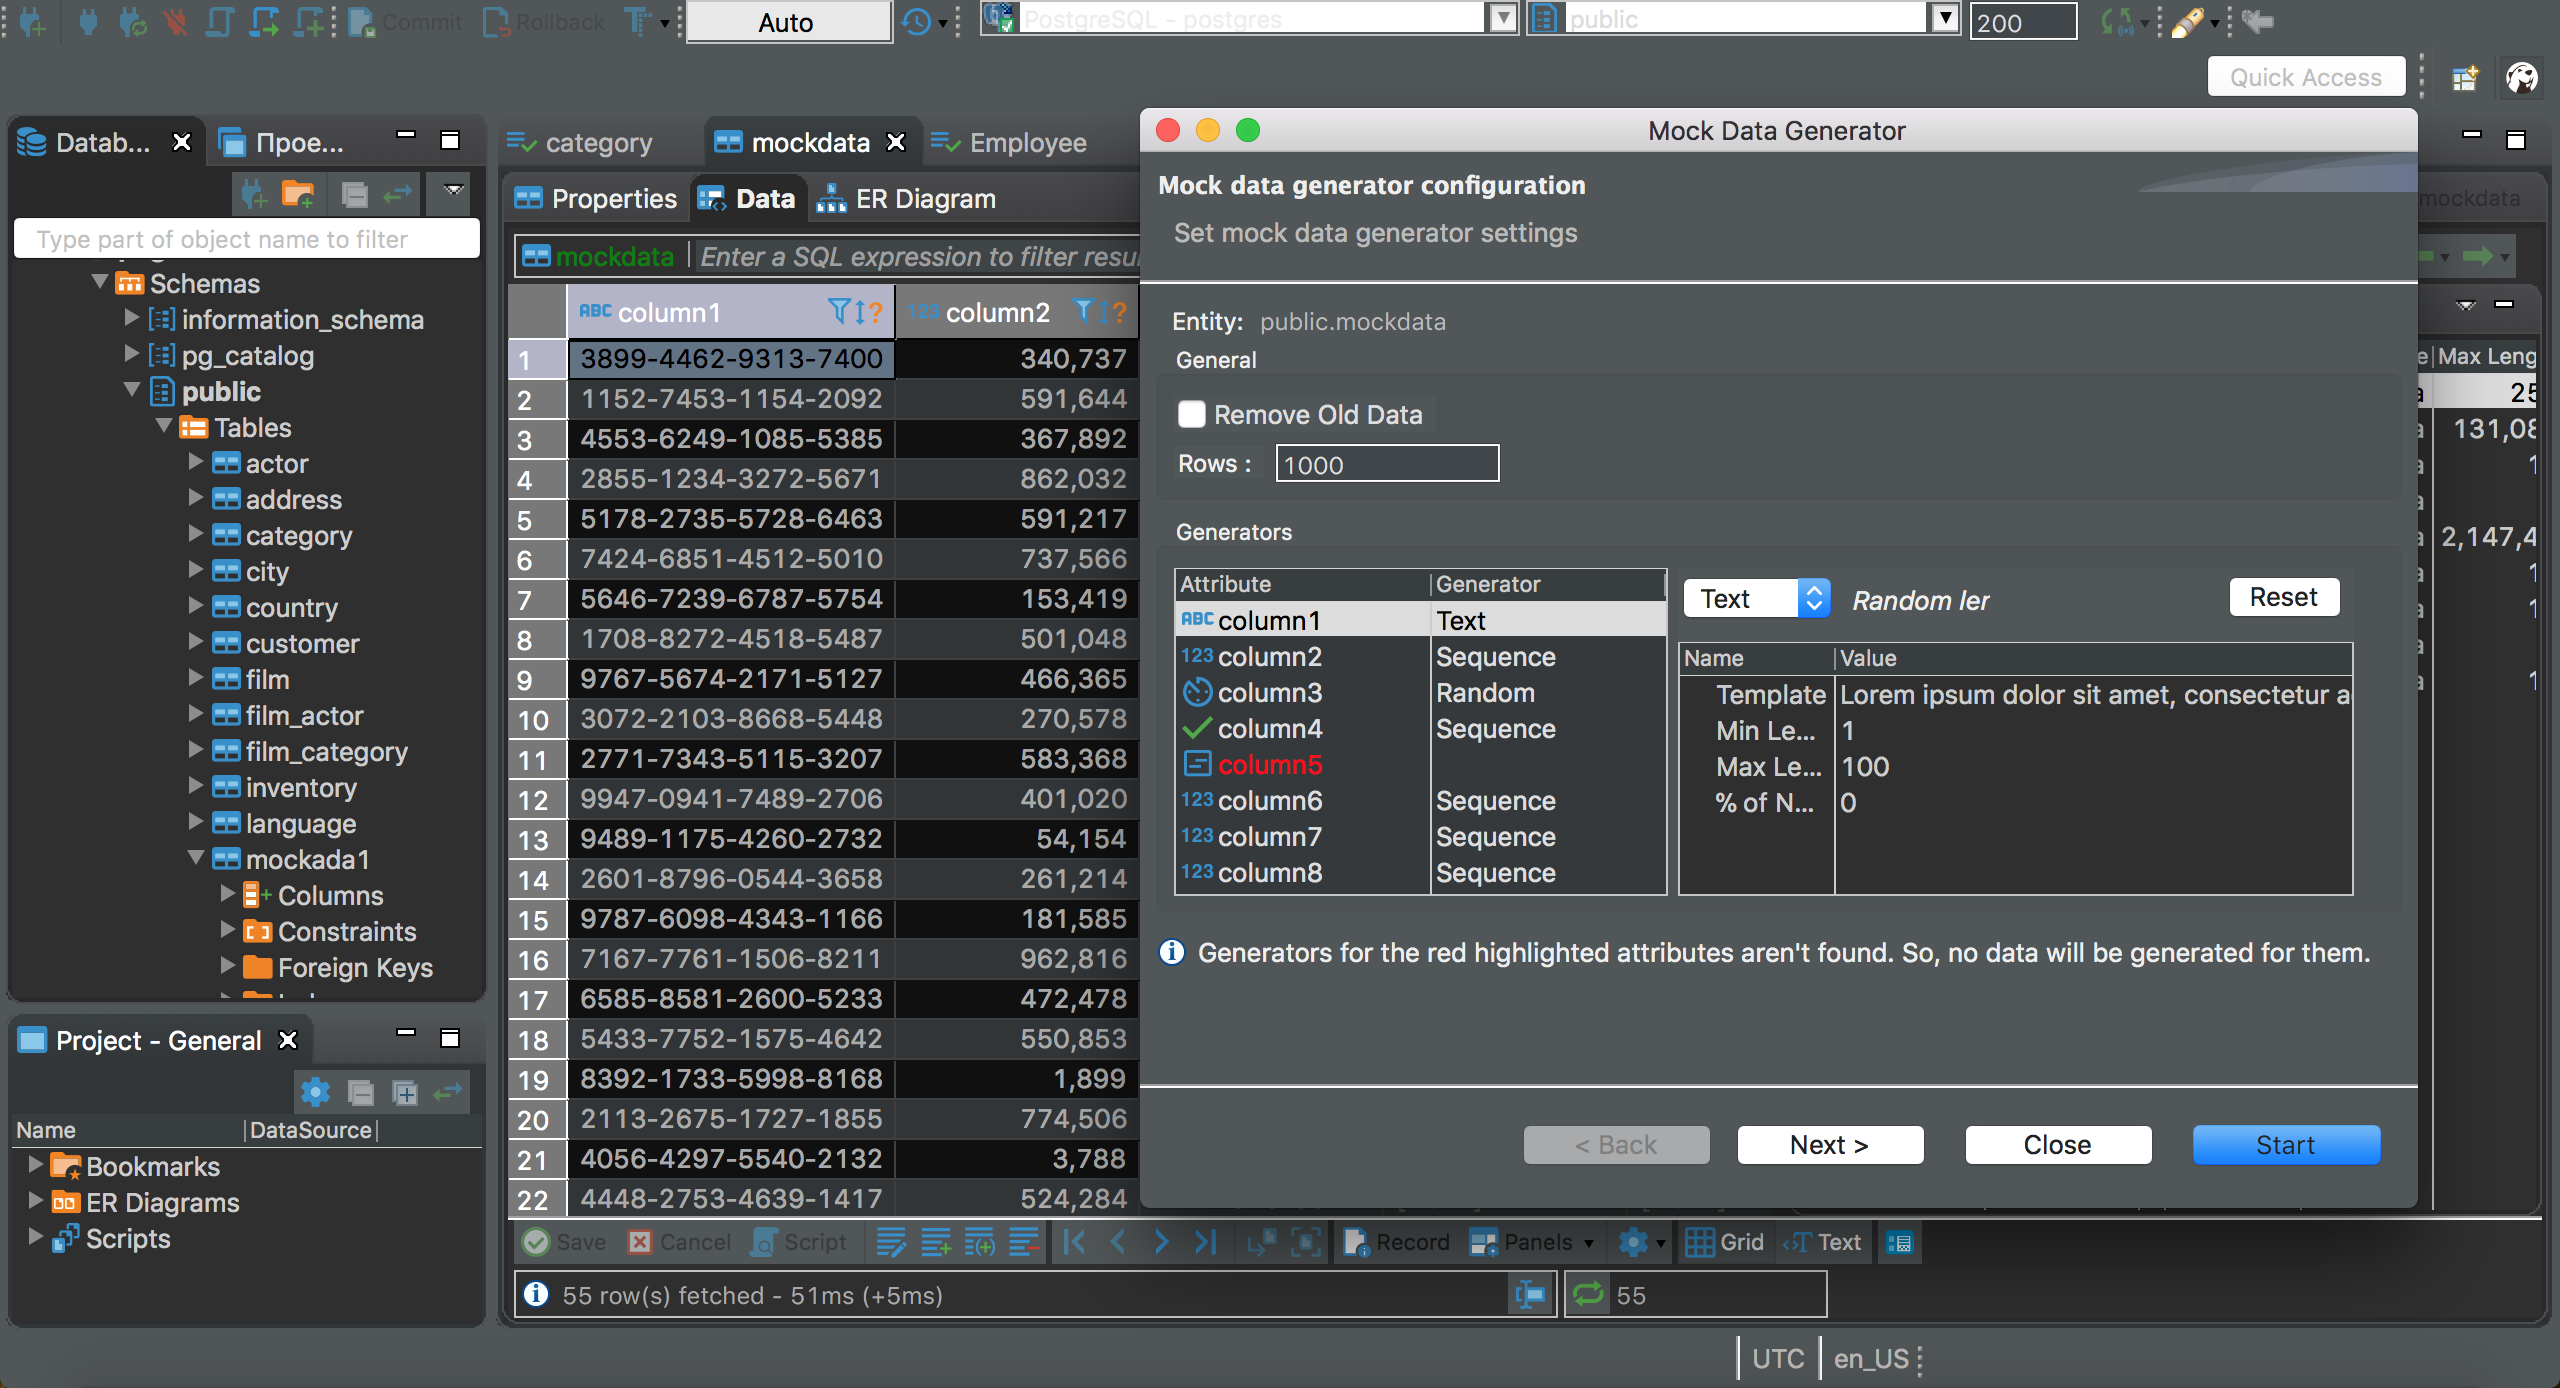
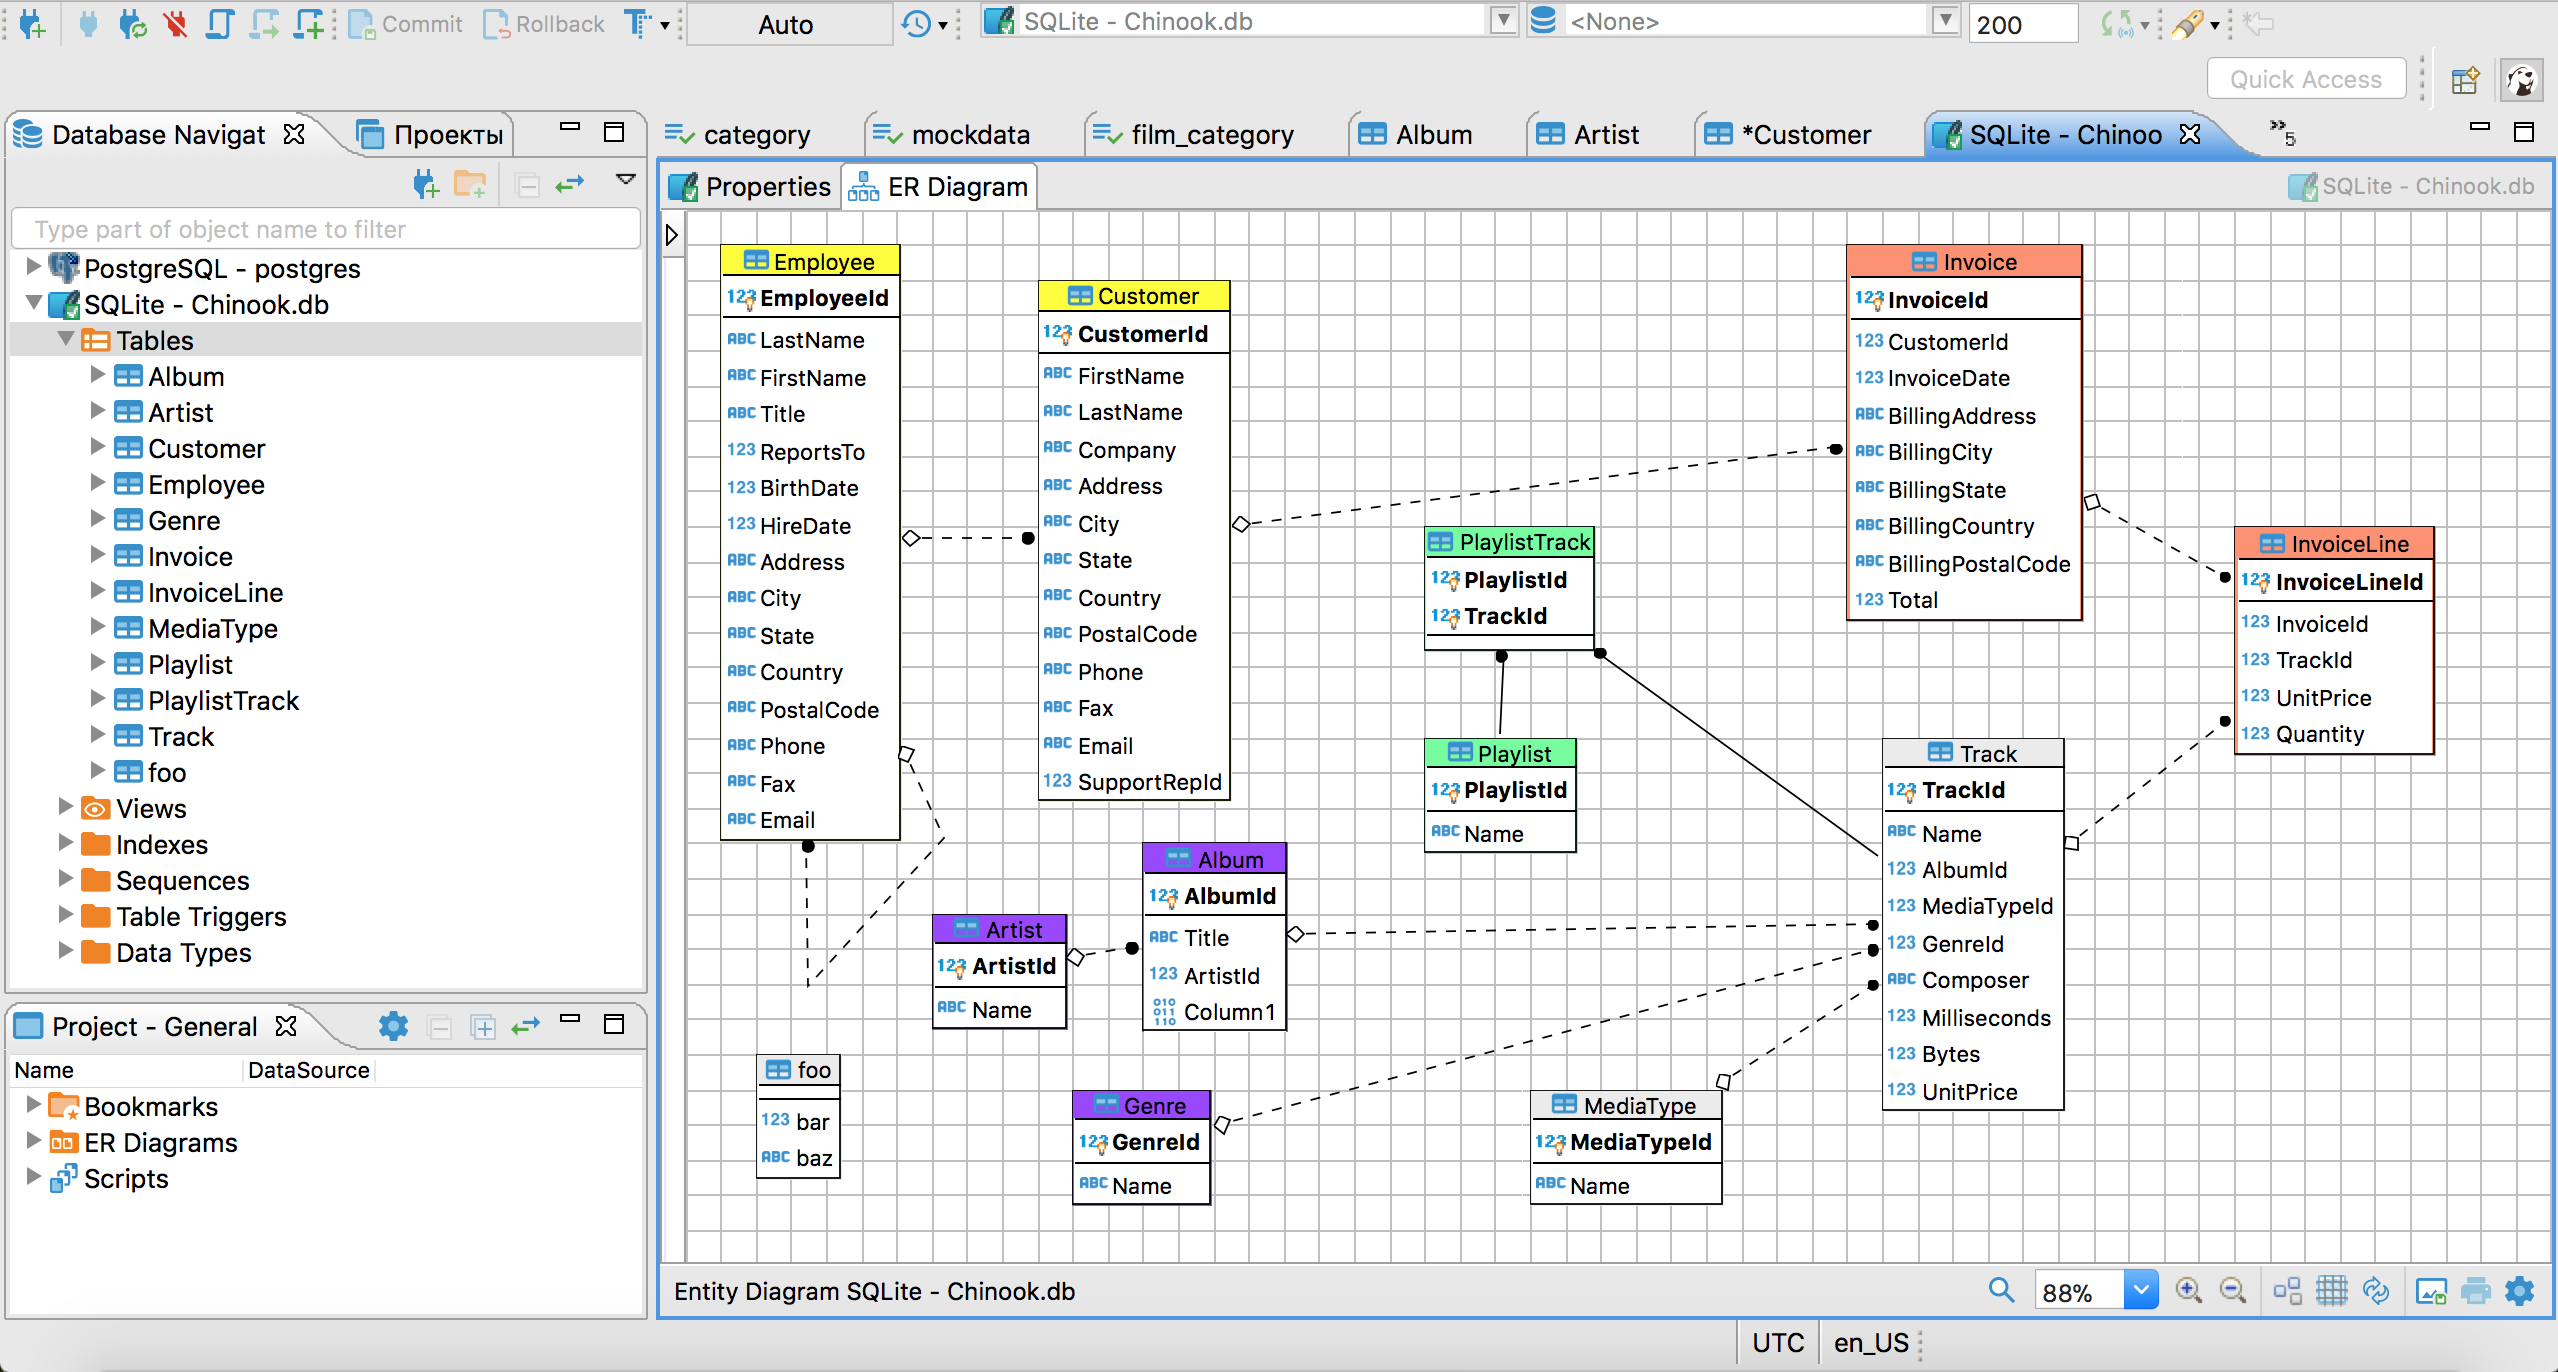
- Генерация диаграмм для структур БД;
- Закладки для запросов и объектов в БД;
- Менеджмент удаленных и локальных подключений;
- Экспорт и Импорт в/из БД/файл;
- Поиск данных в базе;
- И многие другие возможности…
Установка
Программу DBeaver можно скачать и установить с официального сайта: https://dbeaver.io/download/
На странице вы найдете ссылки для скачивания под разные платформы, а также для скачивания исходного кода программы. Есть две версии DBeaver:
- Community Edition;
- Enterprise Edition.
Обе они являются бесплатными, разница лишь в том что у Enterprise Edition есть поддержка NoSQL баз данных, таких как MongoDB и Cassandra.
Для использования программы в портабельном режиме с помещением ее на переносной носитель, лучше всего ее скачать в виде архива. Например для Линукс жмем по ссылке — «Linux 64 bit (zip archive)».
Использование программы
Приведу пример запуска под Linux. Скачиваем файл по ссылке «Linux 64 bit (zip archive)» браузером или при помощи Wget. Вес архива получился примерно ~45 МБ.
Распаковываем его при помощи Dolphin’а, файлового менеджера Krusader или в консоли используя unzip, 7zip (команда «7z x имя_файла.zip»).

Запускаем бинарный файл «dbeaver». После того как программа загрузится будет предложено создать новое подключение к нужной вам базе данных.
Вот как выглядит DBeaver при работе с базой данных в Linux:

Все окна можно расположить в удобном вам порядке, для этого их нужно просто перетащить в нужную вам позицию. На примере ниже я выполнил небольшую реорганизацию окон интерфейса DBeaver, а потом в автоматическом режиме сгенерировал диаграмму для базы данных «wordpress»:

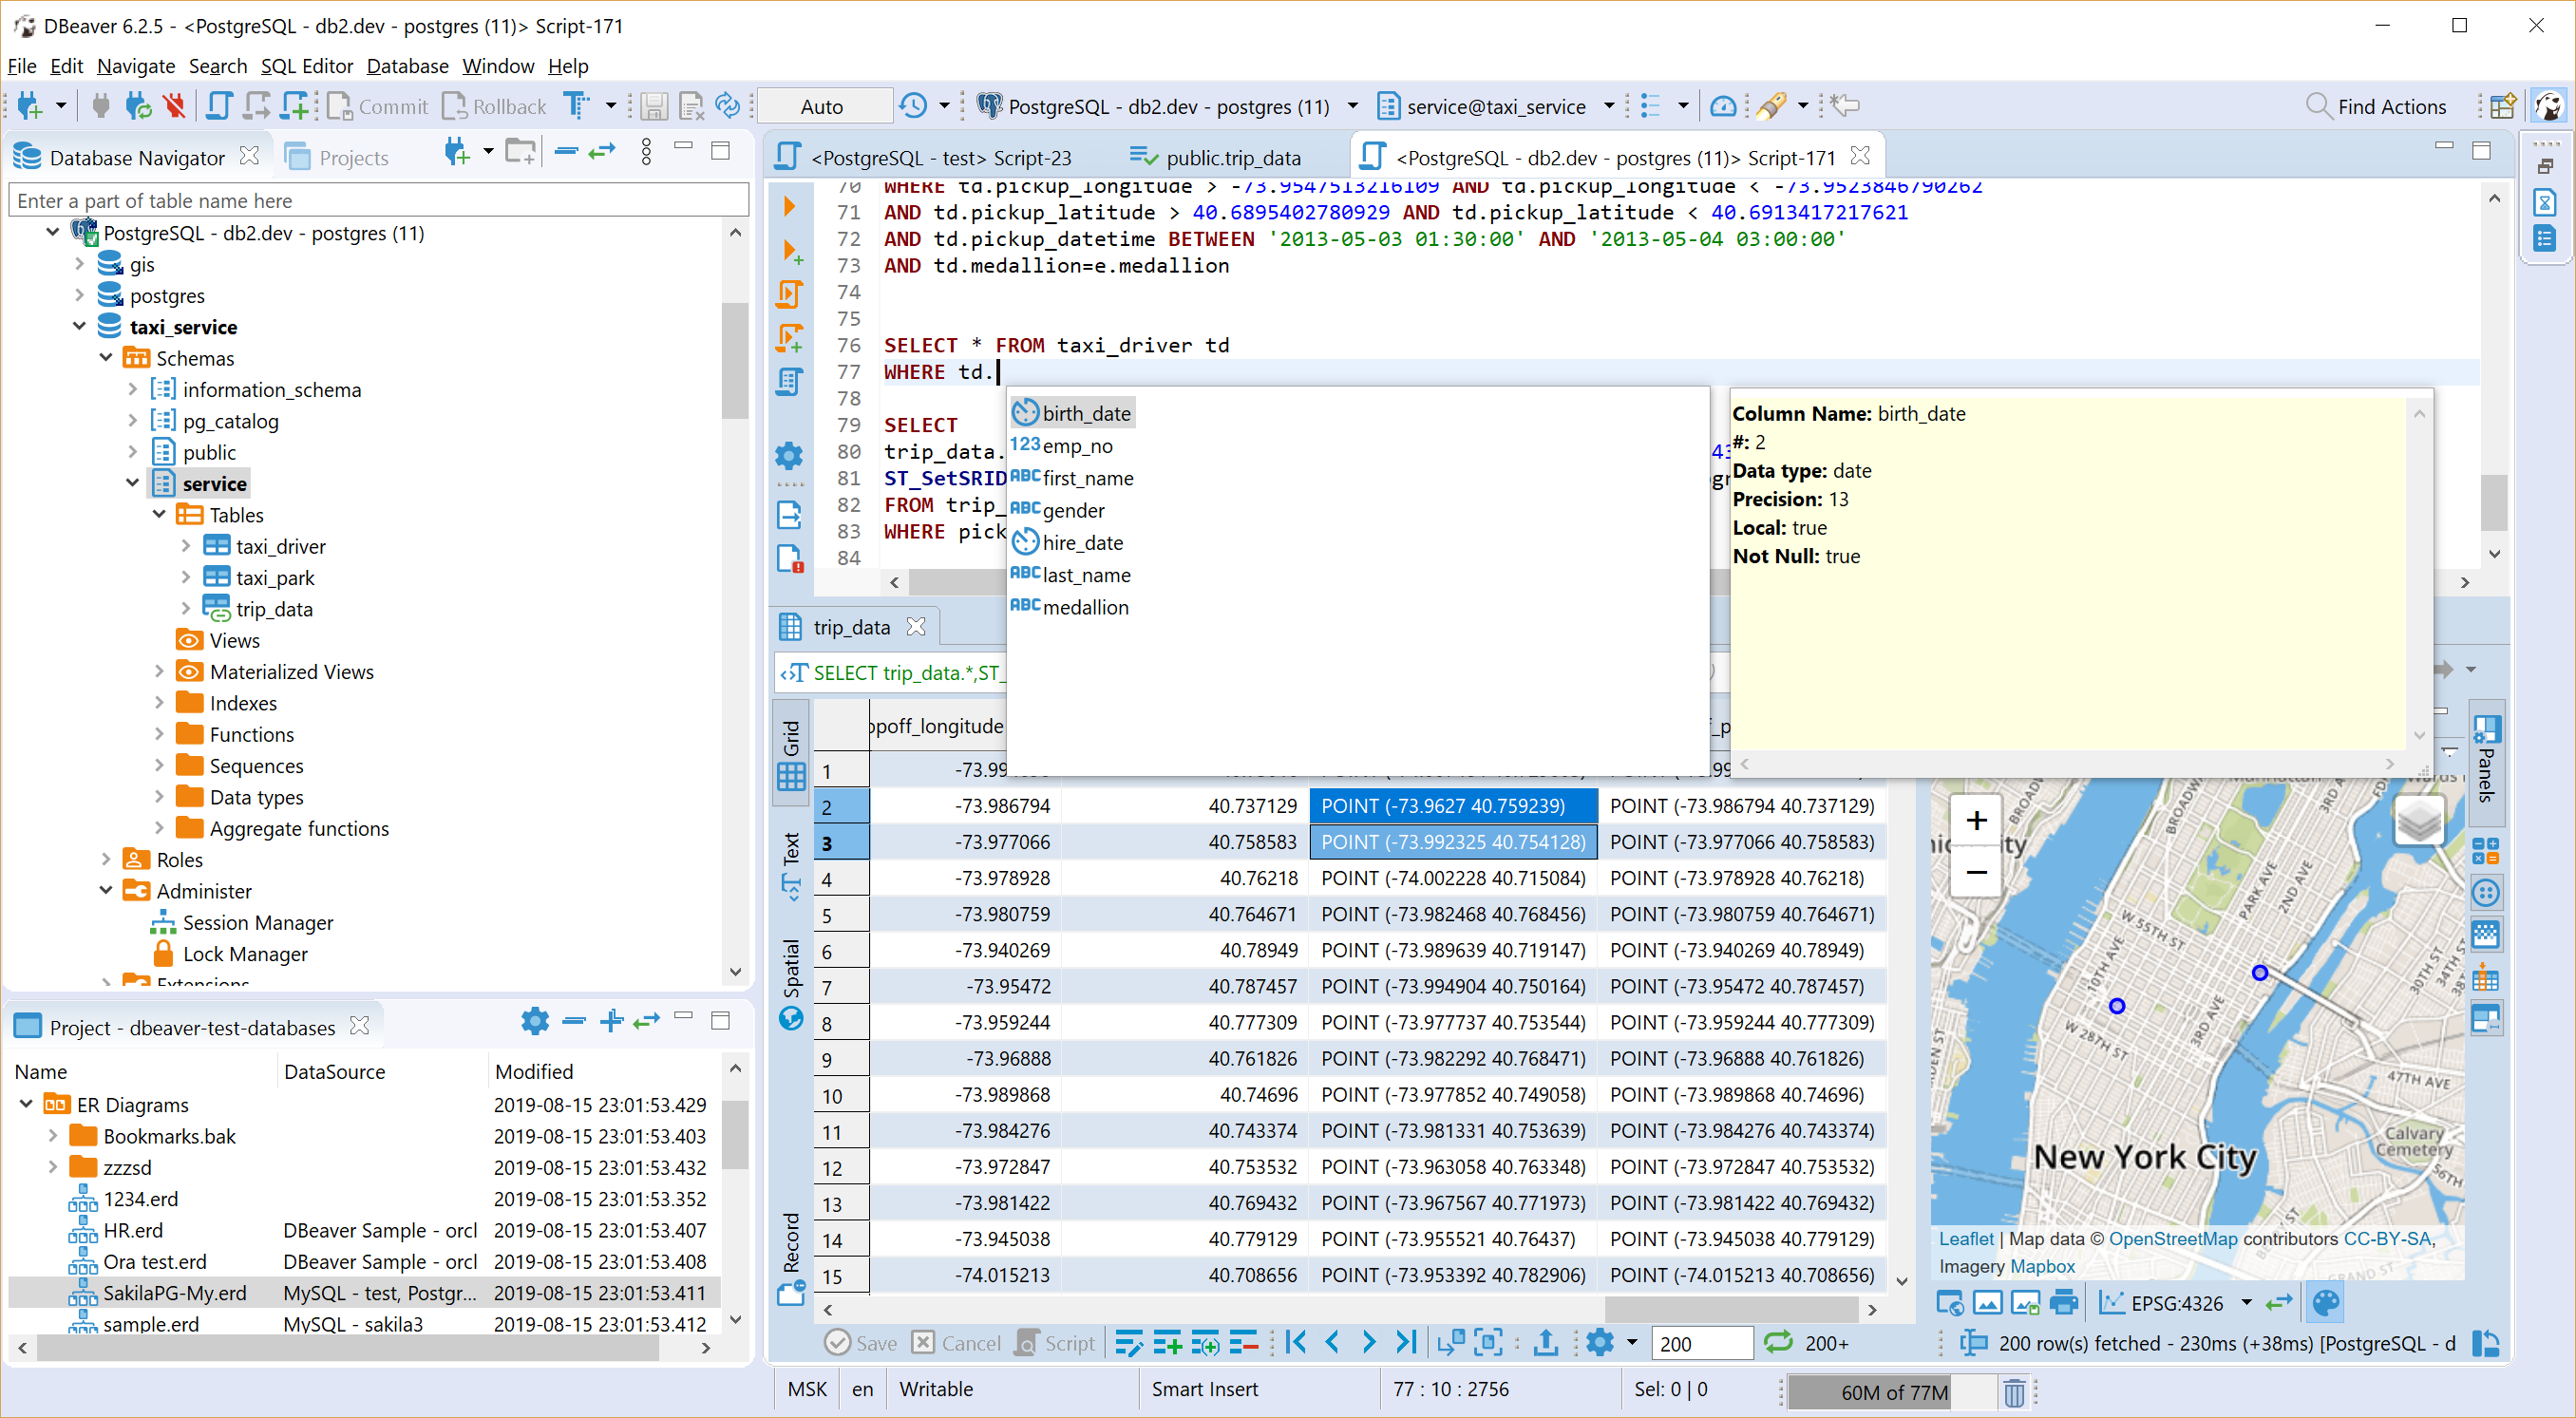
Для выполнения запросов нужно выбрать активную БД и вызвать редактор SQL-кода, ввести нужный запрос и клацнуть иконку «Execute statement» на панели инструментов или же нажать сочетание клавиш Ctrl+Enter:

Если в окне редактора SQL-кода поместить несколько команд и попробовать их запрустить также как выше — то это не сработает. Для запуска нескольких команд (скрипта) нужно нажать другую кнопочку на панели инструментов — «Execute Script».
Немного поигравшись с интерфейсом вы быстро разберетесь что и к чему, все очень удобно.
Как изменить язык интерфейса программы
Для своего интерфейса программа DBeaver автоматически использует тот язык, который установлен у вас по умолчанию в системе. К примеру, если у вас установлена англоязычная версия Debian GNU/Linux, то интерфейс программы будет также на английском.
Как сменить язык интерфейса в DBeaver на русский или другой язык? — как оказалось все очень просто, нужно передать название предпочитаемой локали как параметр при запуске бинарного файла ‘dbeaver’. Вот пример запуска программы с интерфейсом на русском языке:
dbeaver -nl ru_RUЗдесь предполагается что вы находитесь в консоли в каталоге, где распакован DBeaver. Вот что получим в результате:

Для удобства запуска с русскоязычным интерфейсом — создайте ярлык с командой запуска и опцией как приведено выше.
Заключение
Разобравшись с DBeaver вы получите верного помощника для всех дел, касающихся работы с базами данных. Эта программа будет служить и одинаково выполнять свои функции под разными операционными системами, справляться с задачами для различных типов баз данных, предоставляя все свои возможности в удобном и интуитивно-понятном интерфейсе.
А еще эта прекрасная программа является свободным ПО! Вы можете свободно пользоваться ею, делиться с друзьями, а также помогать разработчикам в ее развитии.
Отличный менеджер БД. Рекомендую!
Для управления базами данных витрины рекомендуется использовать DBeaver — это бесплатное программное обеспечение с открытым исходным кодом для управления базами данных (БД). Для взаимодействия с реляционными БД в витрине используется программный интерфейс JDBC (через JDBC-драйвер).
Для подключения к базе данных витрины необходимо выполнить следующие действия:
- установить приложение DBeaver (менеджер баз данных);
- получить у системного программиста учетные записи для доступа к базе данных (название БД, логин и пароль пользователя БД);
- настроить приложение DBeaver;
- установить и настроить JDBC-драйвер для работы с базой данных витрины;
- выполнить проверку подключения к базе данных витрины.
Установка приложения DBeaver
Для установки DBeaver скачайте дистрибутив приложения с официального сайта https://dbeaver.io/download/.
Установите программу стандартным способом в соответствии с операционной системой, установленной на вашем компьютере.
Установка и настройка JDBC-драйвера
Дистрибутив с актуальной версией JDBC-драйвера находится в установочном пакете витрины данных.
Процесс установки JDBC-драйвера и настройки подключения к базам данных в приложении Dbeaver, работающем под операционными системами Windows или Linux (на примере Ubuntu, версия 20.04), идентичный. Для этого выполните следующие действия:
- Откройте приложение Dbeaver;
- В главном меню приложения выберите Базы данных/Database и нажмите пункт Управление драйверами/Driver Manager;
- В открывшемся окне Менеджер драйверов/Driver Manager нажмите кнопку Новый/New;
- В открывшемся окне Создать драйвер/Create new driver заполните следующую информацию:
- Имя драйвера/Driver Name: DtmDriver;
- Имя класса/Class Name: ru.datamart.prostore.jdbc.Driver;
- Шаблон URL/URL Template: jdbc:prostore://{host}:{port}.
- Установите галочку в поле Без авторизации/No authentication и Пустой пароль/Allow Empty Password;
- Во вкладке Библиотеки/Libraries нажмите кнопку Добавить файл и укажите путь к jar-файлу JDBC-драйвера укажите путь к jar-файлу с JDBC-драйвер;
- Нажмите кнопку Ок;
- Проверьте, что драйвер был добавлен в приложение. Для этого откройте окно Менеджер драйверов»/«Driver Manager (Базы данных/Database > Управление драйверами/Driver Manager) и в поисковой строке введите название драйвера – DtmDriver.
Подключение к базе данных витрины для ОС Windows/Linux
Для подключения к базам данных через JDBC-драйвер, выполните следующие действия:
- Откройте Dbeaver;
- В главном меню приложения выберите пункт База данных/Database > Новое соединение/Connect to a Database;
- В окне Создать соединение/Connect to a Database в поисковой строке введите dtmdriver;
- Выберите DtmDriver и нажмите кнопку Далее/Next;
- Нажмите кнопку Тест соединения/Connection test для проверки подключения.
- Закройте окно проверки соединения, для этого нажмите кнопку OK;
- В окне Настройка базового соединения/Connection Settings нажмите кнопку Готово/Finish.
В окне Настройка соединения/Connection Settings заполните следующие поля:
— Хост — DNS-name или IP адрес сервера базы данных. Например, 172.16.0.17.
— Порт — порт для сервера базы данных, например, 9090.
В результате выполненных действий, в поле JDBC URL будет отображено следующее значение jdbc:prostore://172.16.0.17:9090;
В случае успешного подключение отобразится сообщение о корректном подключении:

Проверка загрузки данных в БД витрины
Для проверки загрузки данных следует выполнить на тестовом стенде следующие действия:
1. Откройте приложение Dbeaver, установите подключение к БД витрины и проверьте, что логическая БД test_upload_data отсутствует, для этого выполните следующий sql-запрос:
FROM INFORMATION_SCHEMA.schemata
WHERE schema_name = UPPER(‘test_upload_data’);
Результат выполнения должен быть Пустым.
2. Для создания тестовой БД с таблицей Trip выполните следующий sql-запрос:
CREATE TABLE test_upload_data.trip (
id varchar NULL,
«number» int NOT NULL,
duration varchar NULL,
length float NULL,
PRIMARY KEY (number))
DISTRIBUTED BY (number);
3. Для проверки, что логическая БД test_upload_data создана, выполните sql-запрос:
FROM INFORMATION_SCHEMA.schemata
WHERE schema_name = UPPER(‘test_upload_data’);
SQL-запрос должен вернуть одну строку, в которой поле SCHEMA_NAME имеет значение TEST_UPLOAD_DATA
4. Для проверки, что в созданной БД существует таблица Trip, выполните sql-запрос:
FROM INFORMATION_SCHEMA.tables
WHERE table_schema = UPPER(‘test_upload_data’);
SQL-запрос должен вернуть запись о созданной логической таблице.
5. Для вставки произвольных данных в таблицу Trip выполните последовательно следующие sql-запросы:
(id, «number», duration, «length»)
VALUES(‘a001’, 1, ‘Moscow’, 800),(‘a002’, 2, ‘Saratov’, 680) ,(‘a003’, 3, ‘Omsk’, 890);
6. Для проверки загрузки данных выполните следующий sql-запрос:
SELECT COUNT(*) FROM test_upload_data.trip;
SQL-запрос должен вернуть значение 3 – три созданных строки в таблице.