И снова о DHCP. В предыдущей статье мы рассмотрели базовые принципы работы этого протокола. Сегодня перейдем к практике и настроим DHCP-сервер на базе Windows Server 2016.
Служба DHCP входит в состав Windows Server и является одной из серверных ролей, поэтому первое, что нам надо сделать — эту роль установить.
Установка
Открываем оснастку Server Manager, запускаем мастер добавления ролей и компонентов (Add Roles and Features Wizard) и выбираем тип установки «Role-based or feature-based installation».

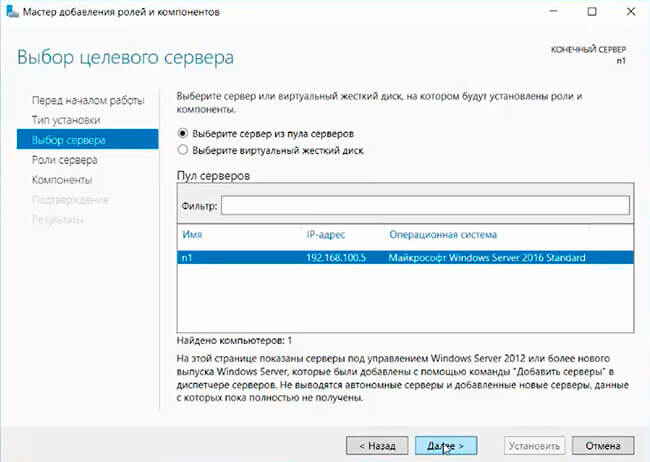
Указываем сервер, на котором будет производиться установка.

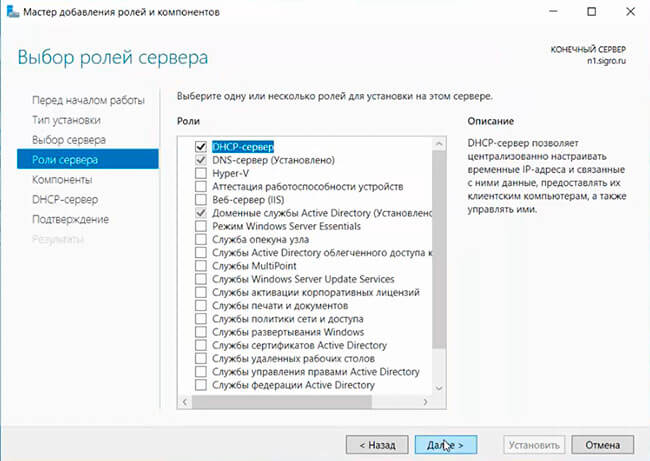
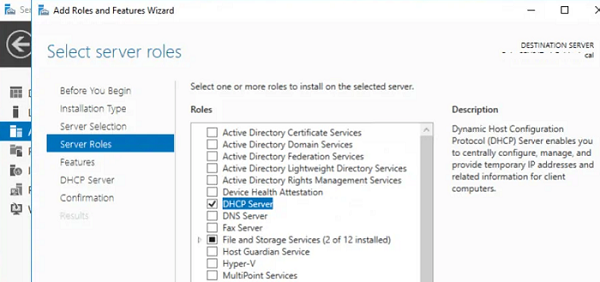
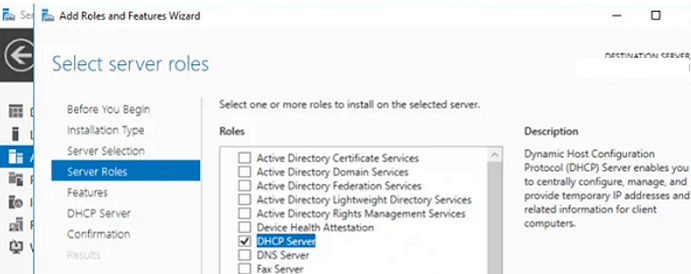
В разделе «Server Roles» отмечаем отмечаем для установки пункт «DHCP Server».

В процессе установки мастер напомнит о необходимости заранее спланировать структуру сети, а также о том, что для работы DHCP на сервере должен быть хотя бы один статический IP адрес.

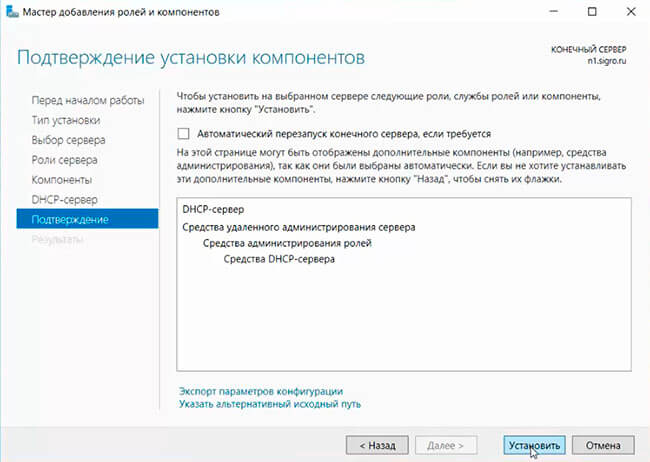
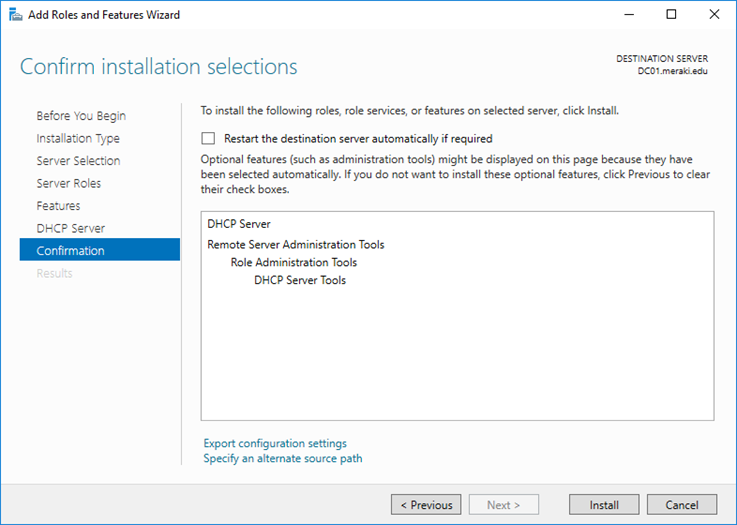
Проверяем список устанавливаемых компонентов и и запускаем установку.

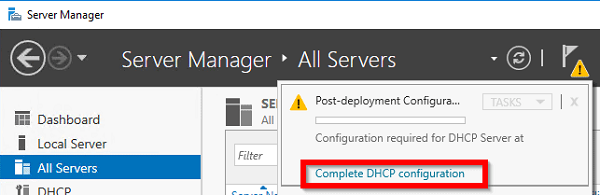
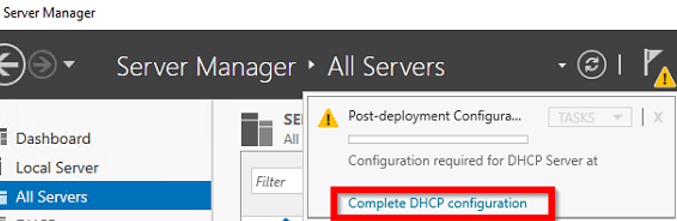
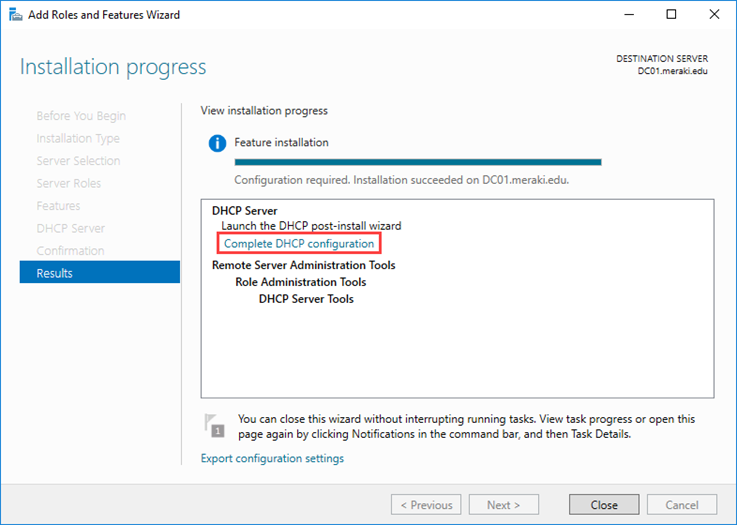
По завершении установки не надо сразу закрывать окно мастера, поскольку в нем будет предложено произвести первоначальную настройку DHCP. Для этого надо кликнуть по ссылке «Complete DHCP configuration».

Если же вы поторопились и закрыли окно, то найти ссылку можно в главном окне Server Manager, кликнув на значок уведомления.

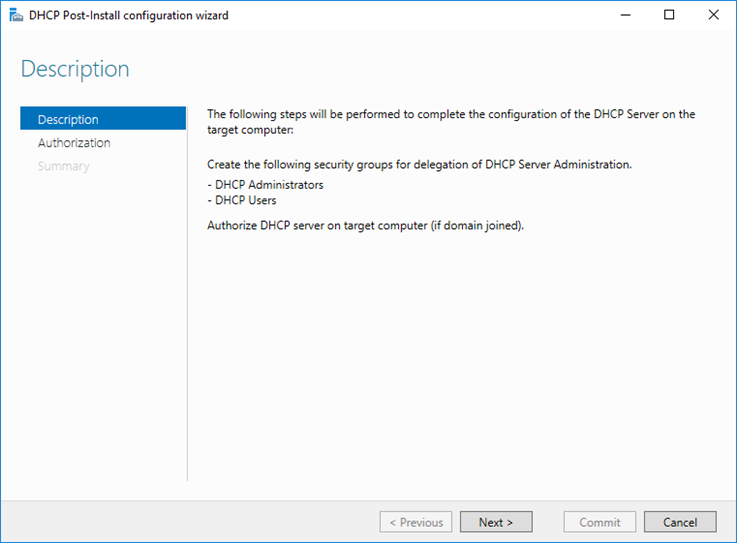
Переход по ссылке запускает еще один мастер первоначальной настройки DHCP (DHCP Post-Install configuration wizard). В процессе первоначальной настройки производится два действия:
1. Создание групп безопасности, которым будет разрешено управлять данным DHCP сервером. Всего создаются 2 группы:
DHCP Administrators — члены этой группы имеют полные права на DHCP сервер и могут изменять его настройки;
DHCP Users — членам этой группы даны права только на чтение. Они могут просматривать текущие настройки DHCP и статистику подключений.
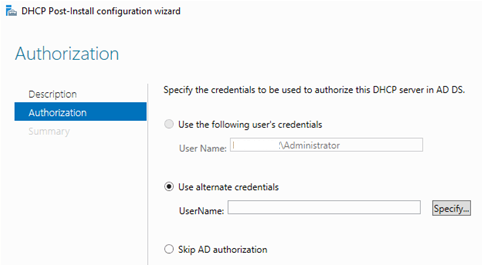
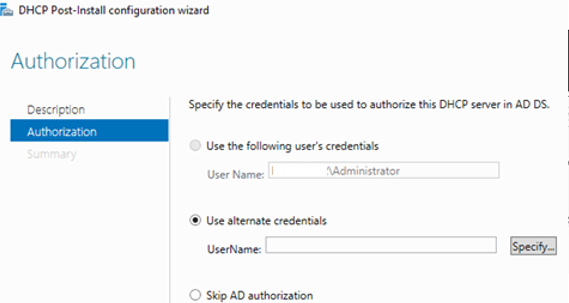
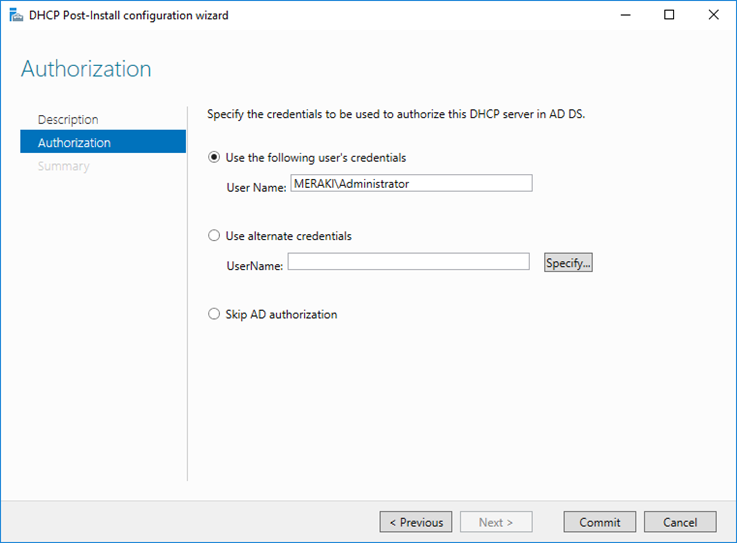
2. Авторизация DHCP сервера в домене Active Directory. Авторизация необходима для того, чтобы предотвратить появление в сети ″левых″ DHCP серверов. Если сервер является членом домена, то при запуске служба DHCP обращается к AD для того, чтобы просмотреть список авторизованных серверов. Если она не обнаруживает в списке свой адрес, то считает себя неавторизованной и останавливает работу. Таким образом, пока сервер не пройдет авторизацию, служба DHCP на нем просто не запустится.

Сама процедура настройки заключается в том, чтобы указать учетные данные пользователя, от имени которого будет производится настройка, нажать кнопку «Commit»

и дождаться завершения процесса.

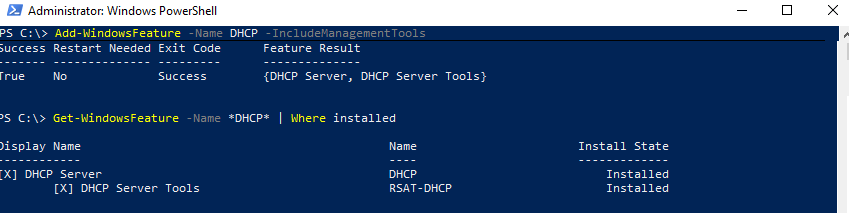
Все то же самое можно сделать с помощью PowerShell, нужно выполнить всего несколько команд. Установка роли DHCP:
Add-WindowsFeature -Name DHCP -IncludeManagementTools
Авторизация в AD. Здесь указываем DNS-имя сервера и IP-адрес, с которого он будет обслуживать клиентов:
Add-DhcpServerInDC -DnsName SRV1.test.local -IPAddress 10.0.0.1
Создание групп безопасности:
Add-DhcpSecurityGroup
Изменение состояния конфигурации сервера. Без этого он считается несконфигурированным и Server Manager будет постоянно выдавать предупреждение о необходимости настройки:
Set-ItemProperty -Path HKLM:SOFTWAREMicrosoftServerManagerRoles12 -Name ConfigurationState -Value 2
Ну и в завершение необходимо рестартовать службу DHCP:
Restart-Service -Name DHCPServer -Force

Примечание. По умолчанию авторизовывать DHCP сервера в AD имеют право только члены группы Администраторы предприятия (Enterprise Admins). Поэтому пользователь, от имени которого производится настройка, должен входить в группу Enterprise Admins, иначе будет выдана ошибка с отказом в доступе.
Настройка
Для настройки сервера нам понадобится оснастка DHCP. Запустить ее можно из меню «Tools» в Server Manager, либо нажав клавиши Win+R и выполнив команду dhcpmgmt.msc.

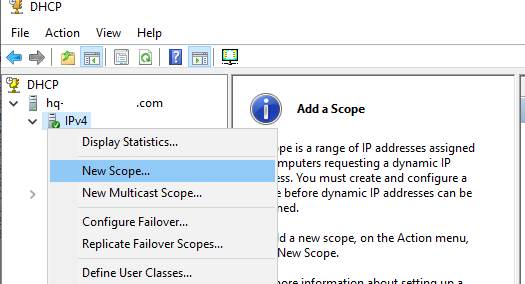
Первым делом нам надо создать область (Scope) — диапазон IP-адресов, которые будут выдаваться клиентам. Поскольку наш DHCP-сервер будет выдавать только IPv4 адреса, то переходим к разделу IPv4, кликаем по нему правой клавишей мыши и в открывшемся меню выбираем пункт «New Scope».

Запускается очередной мастер.

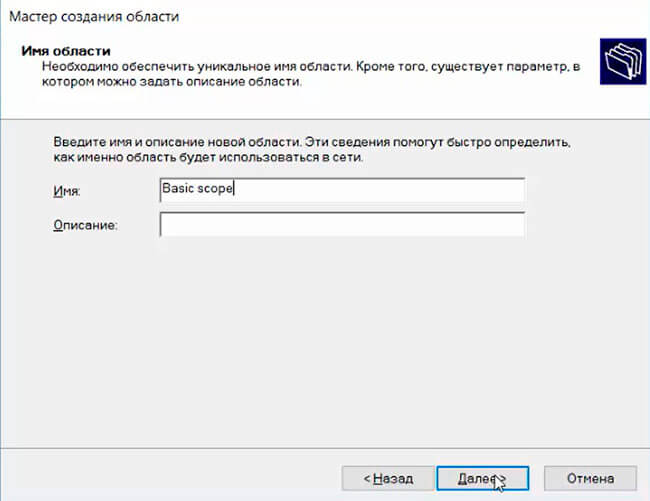
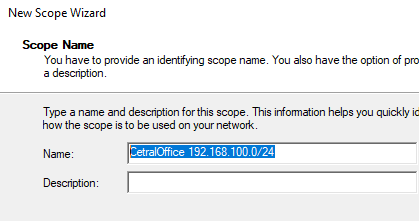
Задаем имя области и, при необходимости, ее описание.

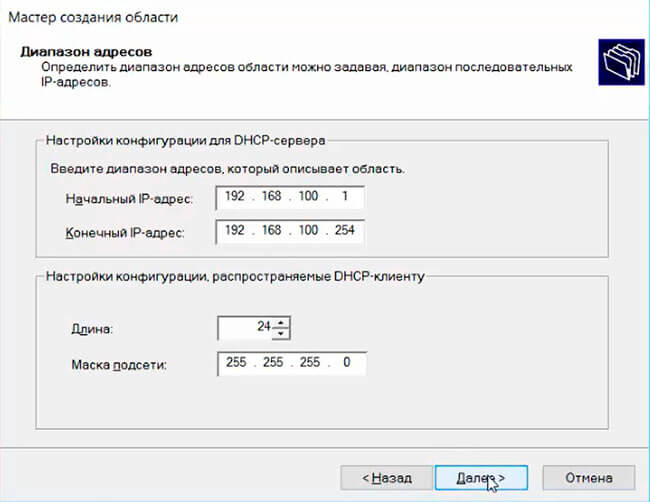
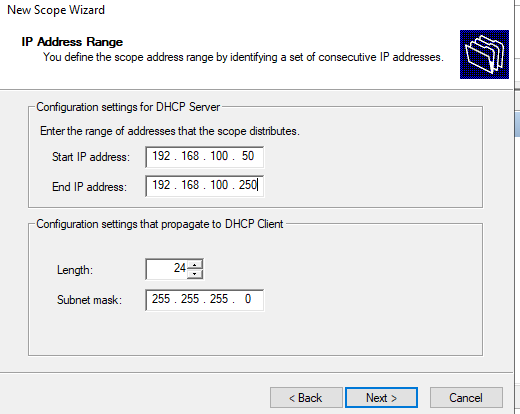
Затем указываем диапазон IP адресов и префиксмаску подсети. На всякий случай напомню, что маска определяет возможное количество адресов в сети, например сеть с префиксом 24 содержит 254 адреса. Кстати, вовсе не обязательно выделять под область все имеющиеся адреса, можно оставить десяток-другой на всякий случай, например для серверов или сетевых устройств.

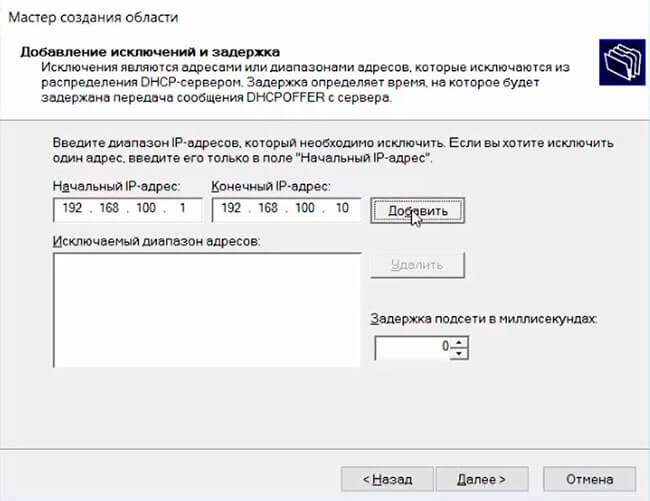
При необходимости можно исключить один или несколько IP-адресов из создаваемой области, добавив их в исключения (Exclusions). Исключения могут потребоваться в том случае, если в указанной подсети уже имеются адреса, выданные вручную.
Здесь же можно задать задержку ответа DHCP-сервера — количество миллисекунд, которое выжидает сервер перед тем, как ответить на запрос клиента.
Примечание. В DHCP существует понятие раздельной области, когда одна область разбита на две части (обычно в соотношении 80/20) и обслуживается двумя DHCP-серверами. Такая конфигурация нужна для того, чтобы в случае недоступности первого сервера второй продолжал выдачу адресов из данной области. Но поскольку необходимо, чтобы все запросы по возможности обслуживал первый (основной) сервер, на втором выставляется задержка, чтобы он не смог ответить раньше первого.

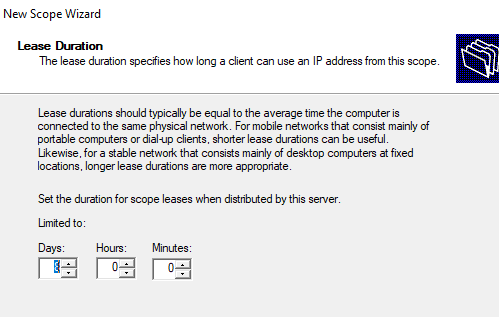
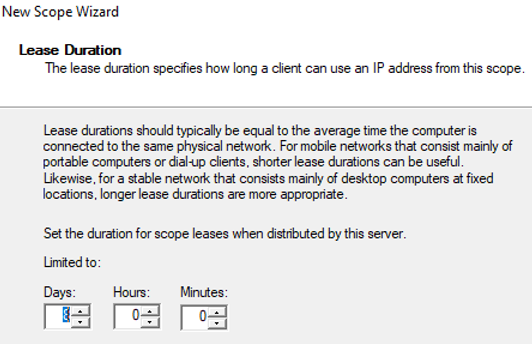
На следующем шаге указываем время аренды (Lease Duration) — срок, на который клиенту выдается IP адрес. Выбор этого параметра напрямую зависит от особенностей обслуживаемой сети, так при наличии большого числа часто меняющихся клиентов (напр. публичная сеть) время аренды нужно сделать поменьше, а если сеть статична и редко изменяется (сеть предприятия), то время аренды можно увеличить. По умолчанию в Windows установлено 8 дней.

Теперь перейдем к настройке дополнительных параметров области.

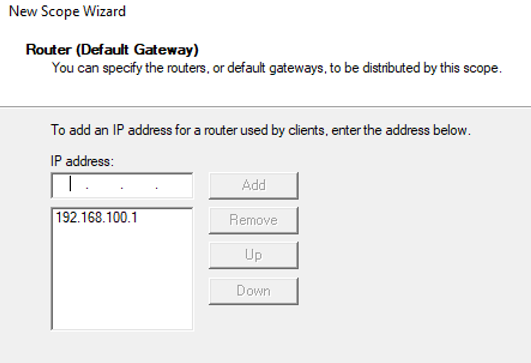
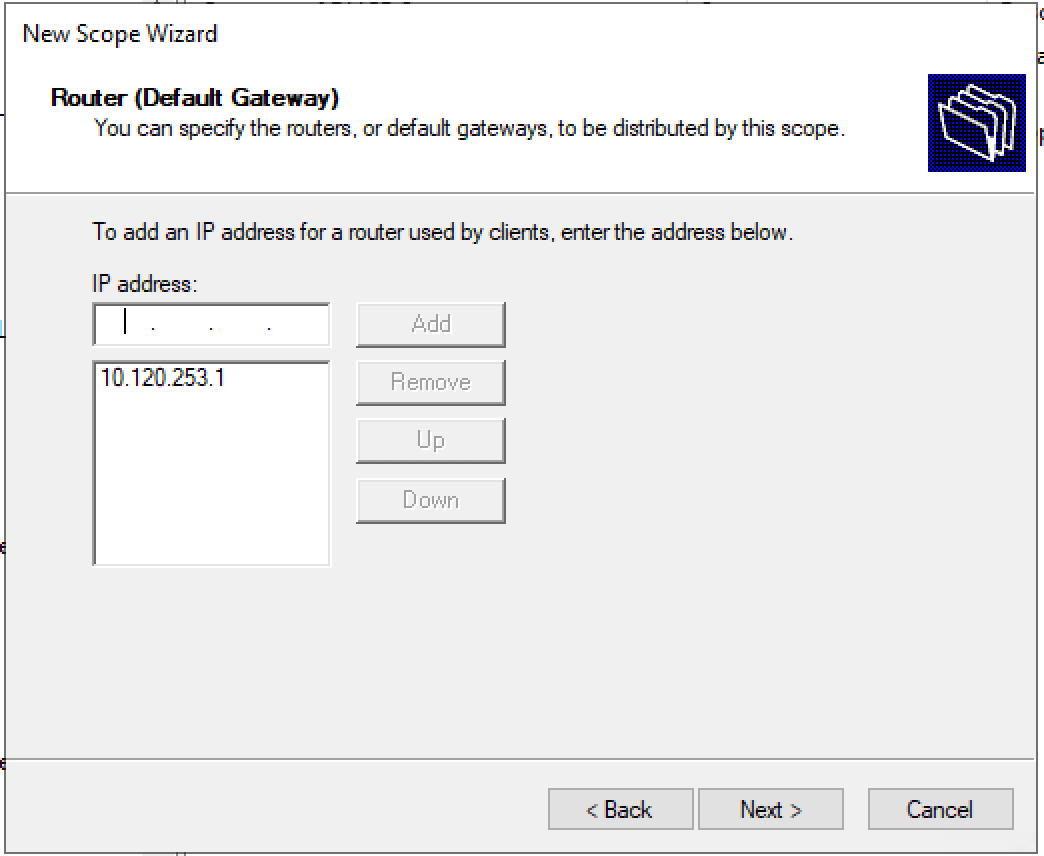
Сначала указываем адрес шлюза по умолчанию (Default Gateway).

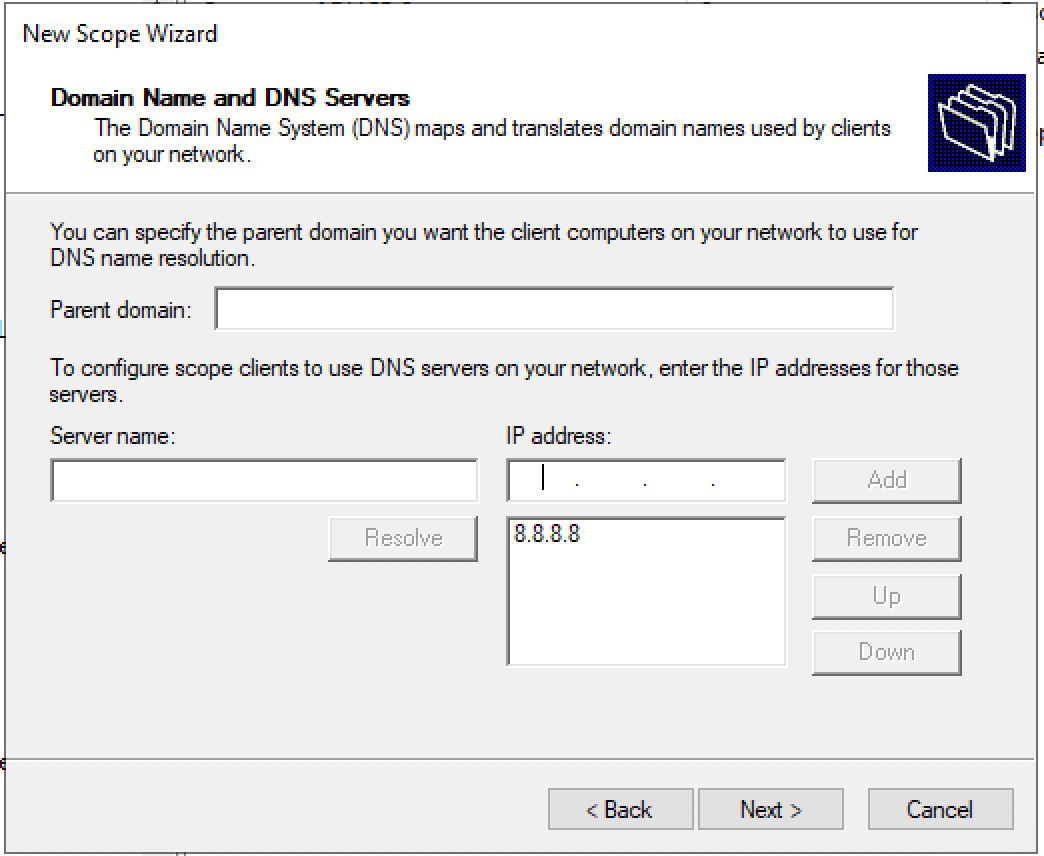
Затем вводим имя домена и добавляем DNS-сервера. Для добавления можно указать имя сервера и нажать «Resolve», либо указать IP адрес.

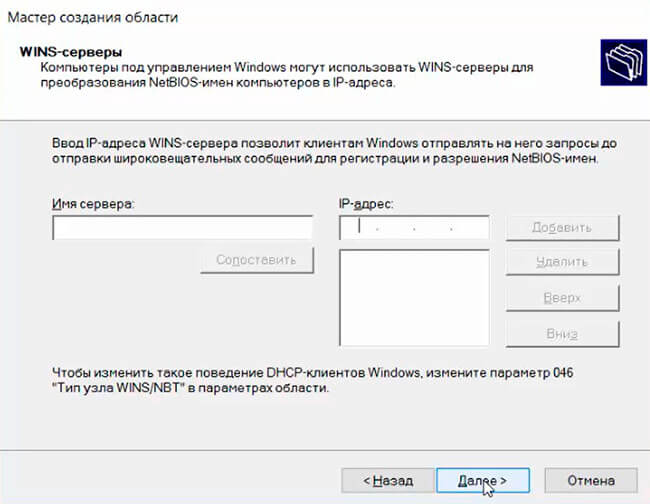
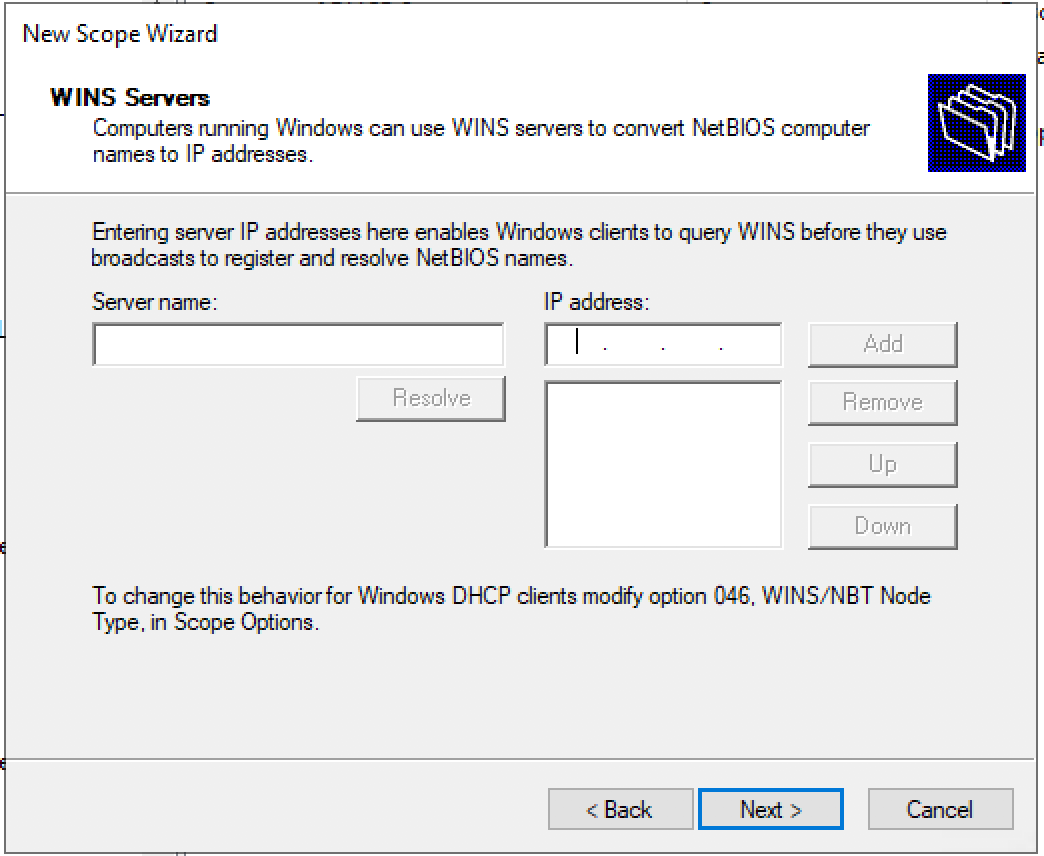
По аналогии с DNS можно добавить WINS сервера, если конечно они у вас есть.

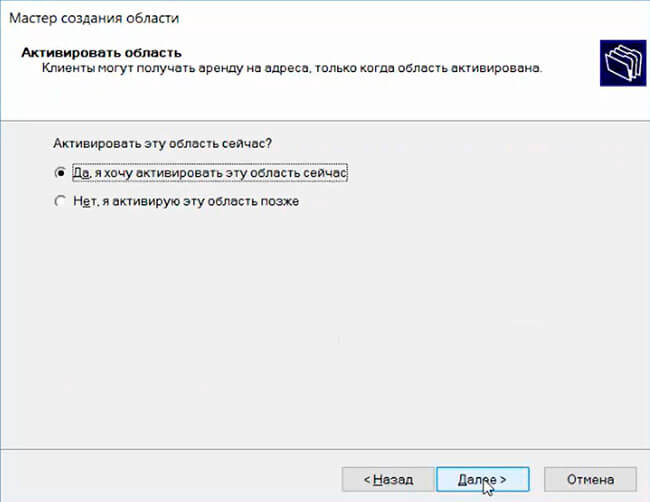
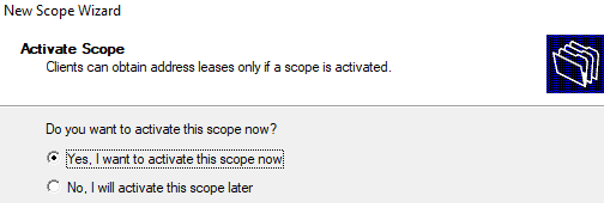
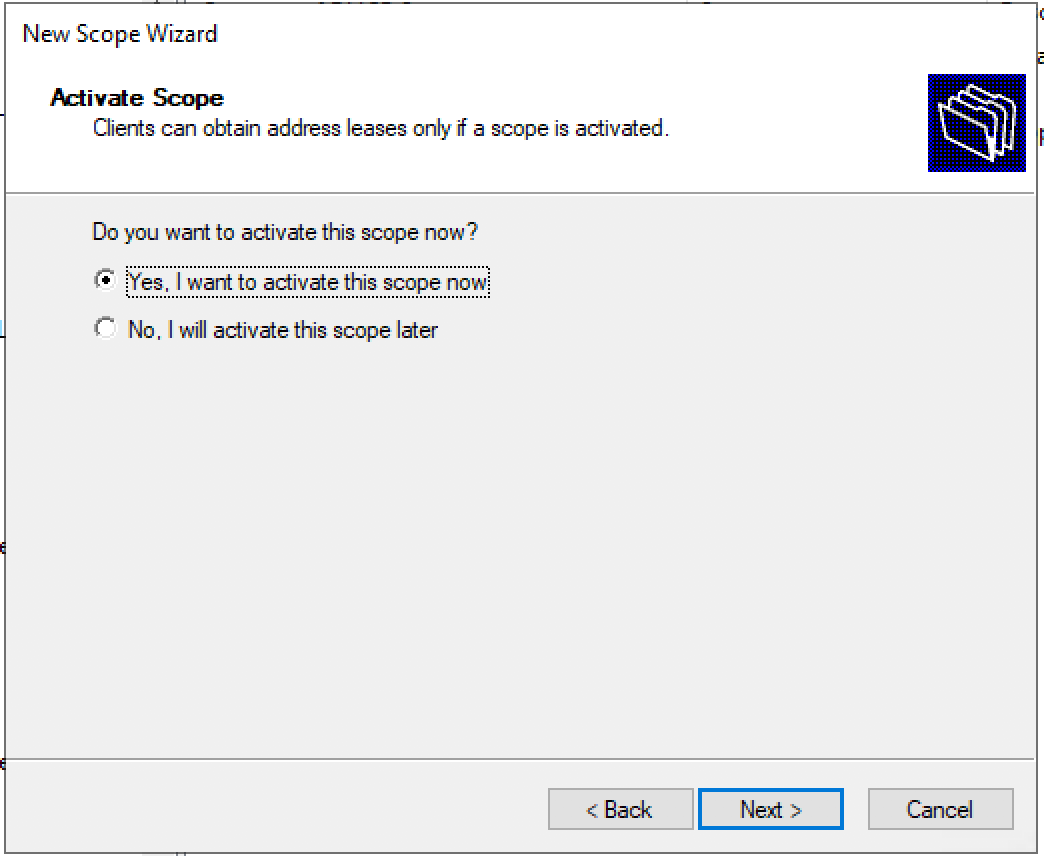
Можем сразу активировать область, либо отложить это действие.

На этом настройка DHCP сервера завершена, остается только проверить работу сервера.

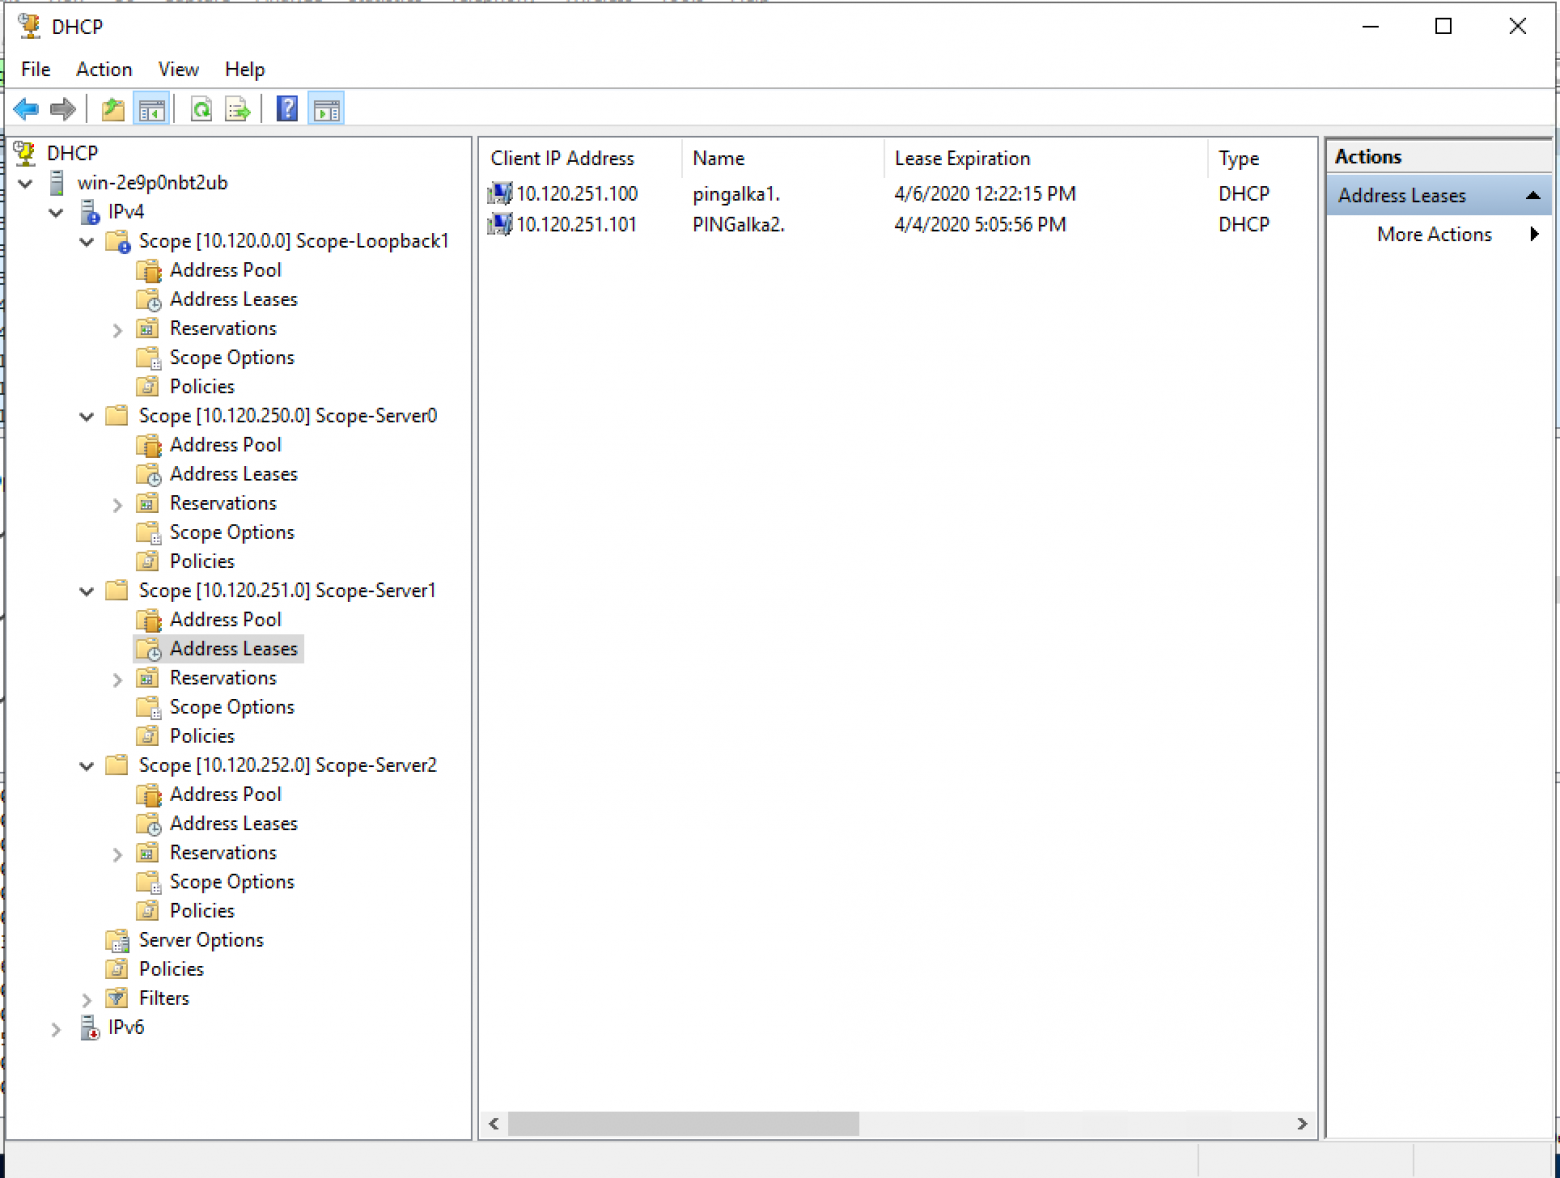
Посмотреть клиентов, получивших адреса из данной области, можно в разделе «Address Leases». В моей тестовой сети есть всего один клиент, который успешно получил свой IP адрес.

Ну и на всякий случай зайдем на клиента и проверим, что он успешно получил свой адрес.

Все настройки можно произвести с помощью PowerShell. Cоздаем область (неактивную):
Add-DhcpServerv4Scope -Name Workstations -StartRange 10.0.0.20 -EndRange 10.0.0.200 -SubnetMask 255.255.255.0 -LeaseDuration 00:30 -State InActive
Добавляем исключения:
Add-DhcpServerv4ExclusionRange -ScopeID 10.0.0.0 -StartRange 10.0.0.90 -EndRange 10.0.0.100
Добавляем доп. опции (DNS, gateway и т.п.):
Set-DhcpServerv4OptionValue -ScopeID 10.0.0.0 -DnsDomain test.local -DnsServer 10.0.0.1 -Router 10.0.0.1
И активируем область:
Set-DhcpServerv4Scope -ScopeID 10.0.0.0 -State Active

Посмотреть список клиентов можно также из консоли, командой:
Get-DhcpServerv4Lease -ScopeID 10.0.0.0

Стоит уточнить, что хотя в статье использовался Windows Server 2016, настройка для Windows Server 2008-2012 ничем особо не отличается.
На этом все, на сегодня. А в следующей статье мы рассмотрим развертывание двух DHCP-серверов в отказоустойчивой конфигурации.
После того, как развернут и настроен DNS-сервер и развернуты Доменные службы Active Directory, приходит время установки и настройки DHCP-сервера. Это очень удобно, так как компьютеры в сети будут получать автоматически IP-адреса, которые не будут конфликтовать друг с другом. Не будет опасности, что сетевой адрес неправильно настроен или в сети несколько одинаковых ip-адресов, что ведет к сетеввым конфликтам и неработоспособности оборудования. Нет необходимости тратить время на настройку IP-адресов компьютеров в сети.
Установка и настройка DHCP-сервера.
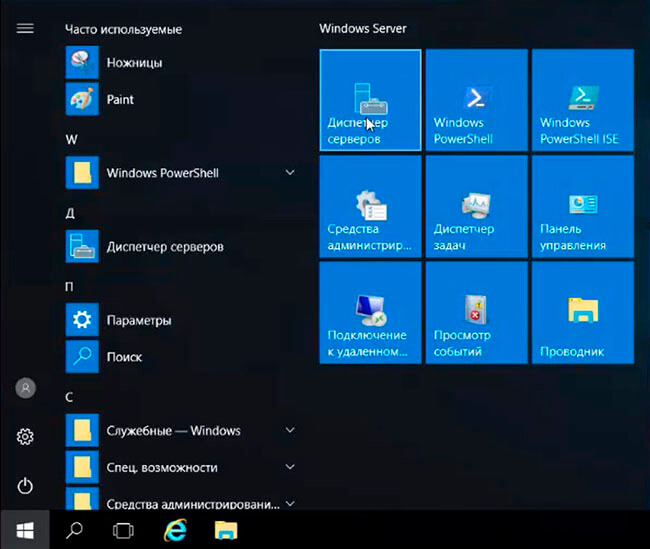
1. Нажимаем «Пуск», далее «Диспетчер серверов».
2. В следующем окне — «Добавить роли и компоненты».

3. В окне «Перед началом работы» читаем сведения и нажимаем «Далее». В следующем окне оставляем по умолчанию «Установка ролей или компонентов». Затем выбираем сервер, на котором будет развернута роль DHCP-сервера, затем «Далее».
4. Ставим чекбокс напротив DHCP-сервер. В появившемся окне нажимаем «Добавить компоненты». Нажимаем «Далее».
5. В новом окне «Выбор компонентов» и «DHCP-сервер» — нажимаем «Далее». Проверяем, что произойдет установка роли «DHCP-сервера» и нажимаем «Установить». После этого окно установки можно закрыть. После установки необходимого программного обеспечения появится предупреждение о том, что установка роли DHCP-сервер закончена.
6. После появления предупреждения об окончании установки роли DHCP-сервер, нажимаем «Завершение настройки DHCP».
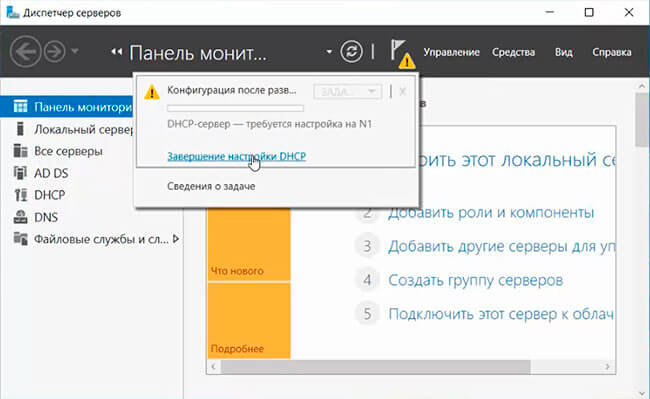
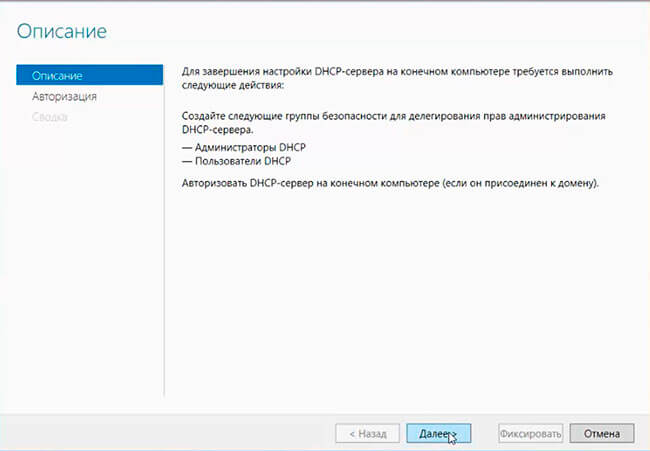
7. В окне «Описание» читаем, что требуется выполнить для завершения настройки DHCP-сервера. Нажимаем «Далее».
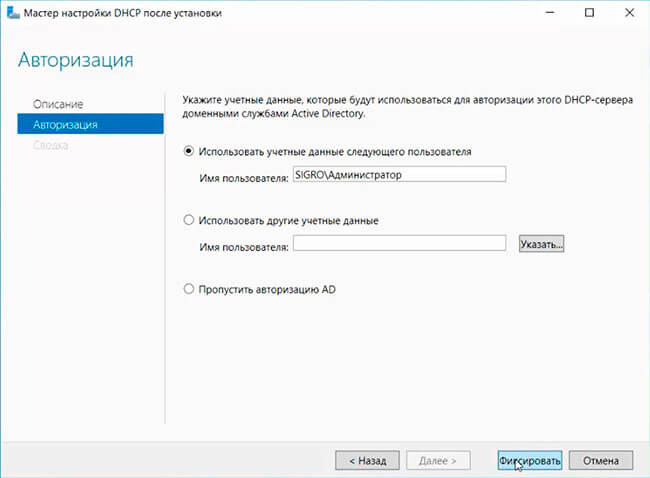
8. Оставляем по умолчанию учетную запись администратора домена для авторизации DHCP-сервера. Нажимаем «Фиксировать». В последнем окне нажимаем «Закрыть».
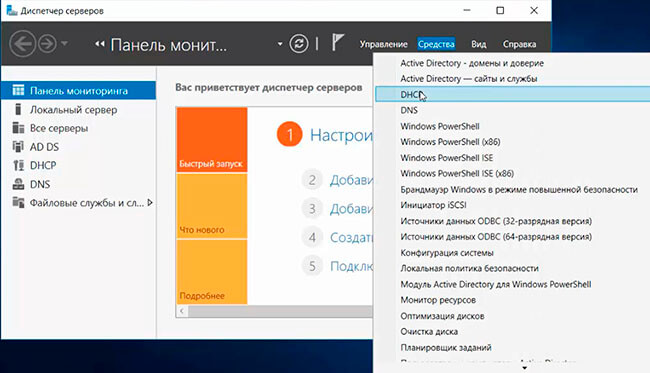
9. Пришло время настроить DHCP-сервер. Для этого в «Диспетчер серверов» выбираем «Средства», далее «DHCP».
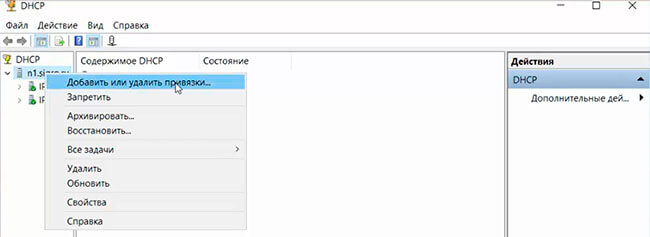
10. В окне настройки DHCP, нажимаем правой клавиши мыши на сервер домена, выбираем «Добавить или удалить зону привязки…».
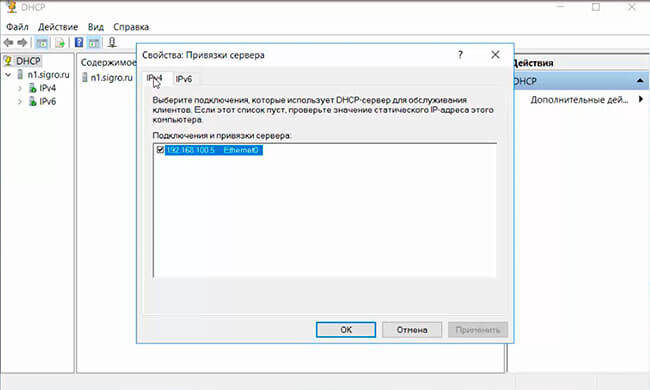
11. Проверяем настройку сетевого интерфейса, через который будут обслуживаться DHCP-клиенты, для выхода нажимаем «ОК».
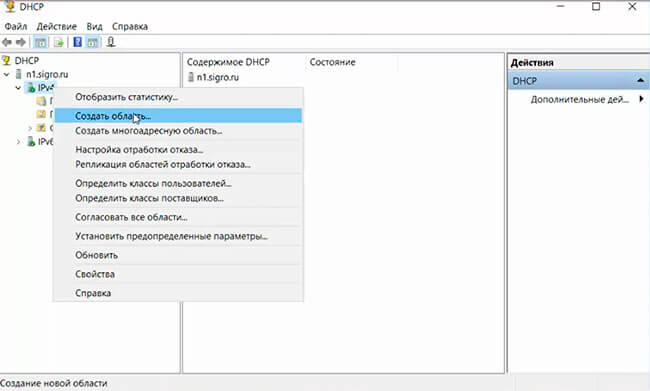
12. Для создания области нажимаем правой клавиши мыши на IPv4 и выбираем «Создать область..».
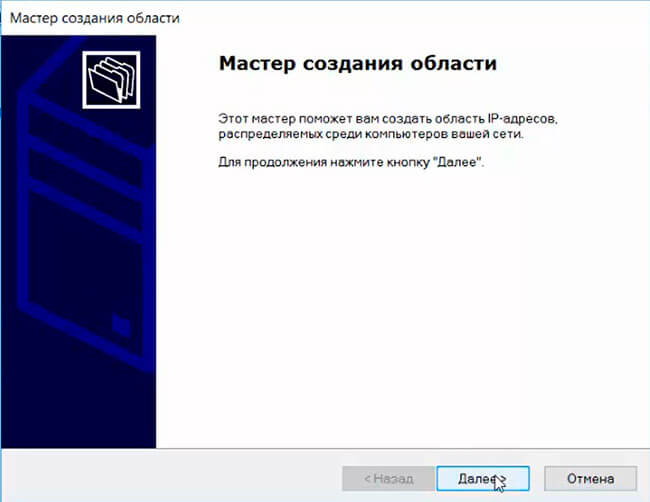
13. Попадаем в «Мастер создания области», нажимаем «Далее».
14. Задаем имя области, затем нажимаем «Далее».
15. В следующем окне задаем начальный и конечный IP-адрес, которые будут использоваться DHCP-сервером. Если необходимо, исправляем маску подсети, затем «Далее».
16. В следующем окне вводим диапазон IP-адресов, которые необходимо исключить. Определив диапазон, нажимаем «Добавить».
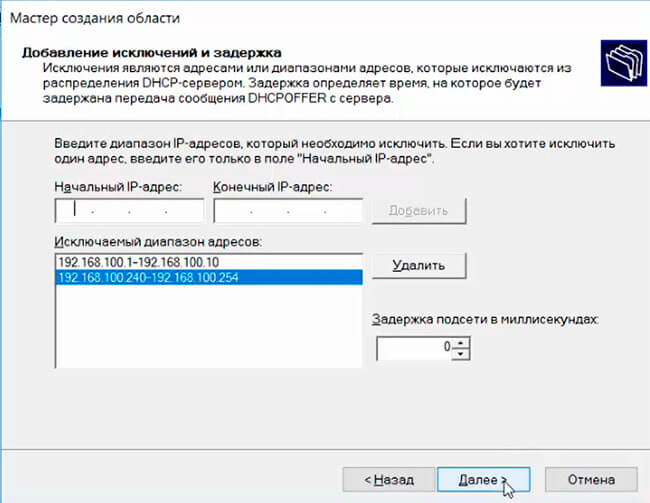
17. Если необходимо, создаём несколько дапазонов IP-адресов, которые необходимо исключить. После их добавления, нажимаем «Далее».
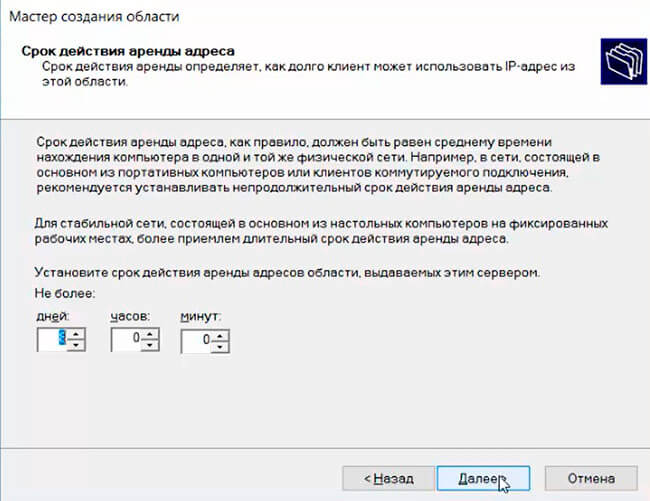
18. Срок действия аренды адресов оставляем по умолчанию или задаём другой, нажимаем «Далее».
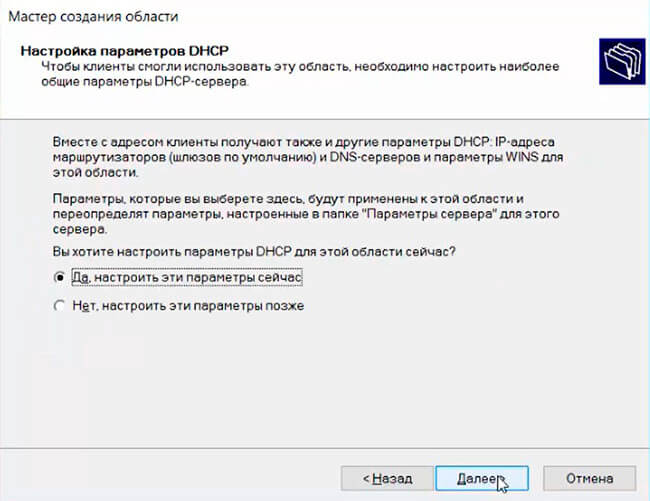
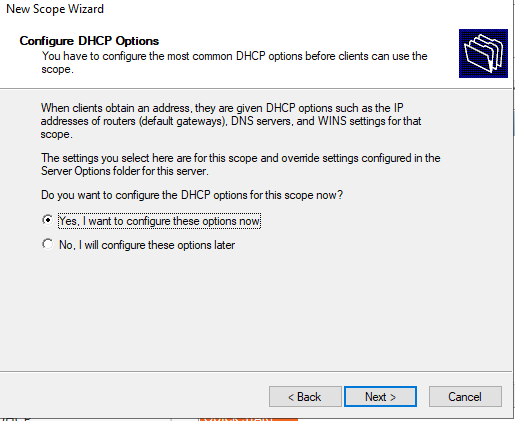
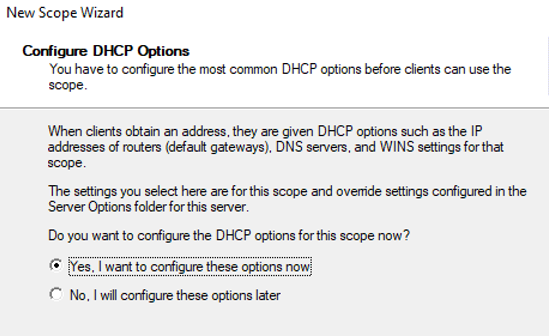
19. Если необходимо, настраиваем общие параметры DHCP-сервера. Для этого устанавливаем чекбокс «Да, настроить эти параметры сейчас» и нажимаем «Далее».
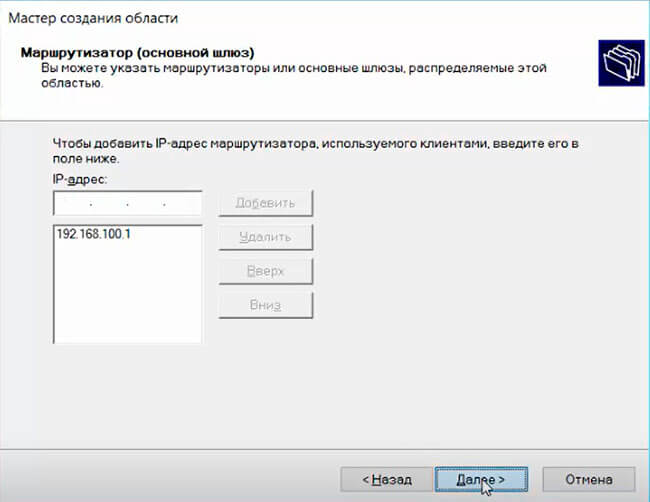
20. Если имеется шлюз, то указываем его IP-адрес. Затем нажимаем «Добавить», потом «Далее».
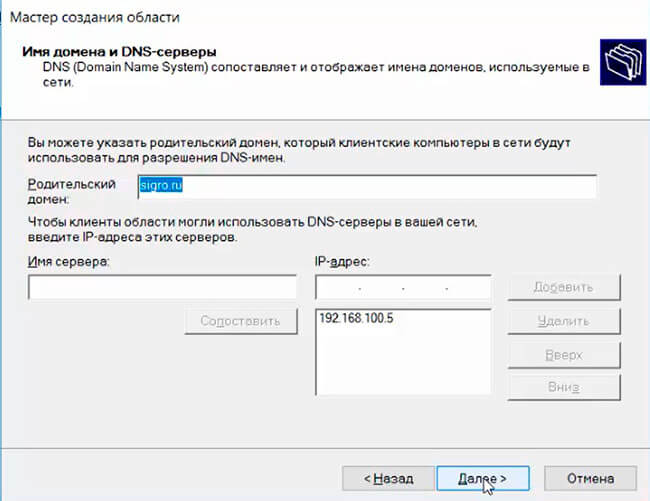
21. Для разрешения DNS-имен указываем родительский домен, который клиентские компьютеры в сети будут использовать для разрешения DNS-имен. Также указываем IP-адрес этого сервера. Затем «Далее».
22. Если используется WINS-серверы, то можно указать «Имя сервера» и его IP-адрес. Можно ничего не добавлять, просто нажать «Далее».
23. В новом окне ставим чекбокс «Да, я хочу активировать эту область сейчас», затем «Далее».
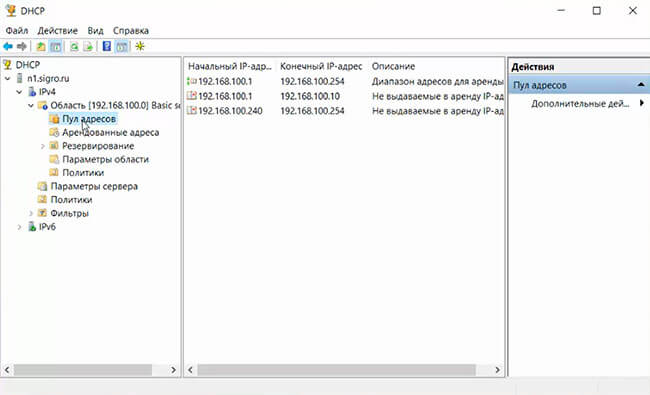
24. Будет создана область IP-адресов для аренды, которую можно использовать.
Посмотреть, что и как делать, можно здесь:
Читайте также:
- Установка DNS и Active Directory — Windows Server 2016
- Второй контроллер домена — Windows Server 2016
- Ввод компьютера в домен — Windows Server 2016
- Создание и удаление пользователя, восстановление из корзины — Windows Server 2016
- Переименование учётной записи администратора домена — Windows Server 2016
- Windows server 2019 — установка и настройка Active Directory, DNS, DHCP
Table of Contents
- Summary
- Objective
- Installation Procedure
- Install using PowerShell
- Install Using GUI
- DORA (Discover, Offer, Request Acknowledgment)
Summary
This article is about Dynamic Host Configuration Protocol (DHCP) is to assign network settings automatically to every workstation in the network by a central server rather than configuring them locally on each. A host configured
to use DHCP is enabled to configure itself completely and automatically according to directions from the server.
Objective
Main Functionality of DHCP server is to provide clients auto IP Address, Subnet mask, DNS Address and Gateway Address whenever clients request in the network in auto-configure mode. This document provides information on How to
install & Configure DHCP Server.
Installation Procedure
There are two methods of installation DHCP Server feature in the server manager.
- Install using PowerShell
- Role & Feature-based Installation
Install using PowerShell
DHCP role can be installed using the PowerShell. It is a command line interface for running command to perform the installation with minimal resources, the same installation which can be done in GUI based environment can be done
in PowerShell.
Follow the below instructions. Click the Windows button, then Windows PowerShell folder and Windows PowerShell as shown in the diagram.

The other way to open PowerShell is to click Windows button, then Server Manager and from the Server Manager window click the tools and select Windows PowerShell.

Write down the command add-WindowsFeature –IncludeManagementTools dhcp This will install the DHCP role with the following output.

Install Using GUI
To install the DHCP role in a GUI environment using the following instructions.
To start installation first click the Windows button and then Server Manager.

OIn the Server Manager window click Dashboard and then click Add roles and features.

In the Add roles and features Wizard, click Next.

Note: Read out the information on the screen that is relevant to the installation of roles and windows sever requirements.
First Select the installation type as role-based or feature-based installation as shown in the following diagram then click on Next.

Select the server from the server pool on which you are going to install the role as shown in following window then click Next.

In next screen you can select multiple roles here we will Click on DHCP Server then a new window appears which show that required tools to be added click on Add Feature.

Click Next to go to next step.

Click Next.

First click on the checkbox. Restart the destination server automatically if required, then click Yes and in the last click Install to start the installation process.

When the feature installation succeeded message shown under the progress bar Then click on Close to exit from the wizard.

After installation of the DHCP role, the next section is configuration, how and what IP addresses range to use, which gateway router and DNS server may be used and for how much time it should be used. Now to open DHCP Console
go to Window Button on the taskbar then click Server Manager.

In the server manager window Click on Tools then DHCP to open the DHCP configuration console.

DHCP scope has a valid range of IP addresses pool to be given to clients by leasing, the mac address reservation, exclusion and other scope option can be done. Further information is shared as follows with stepwise actions. In
the DHCP console right click on IPV4 then click on New Scope…to create a new scope.

The new scope wizard helps you set up scope for distributing IP addresses to network computers in the network. To continue further Click Next.

Here we define the scope name that will identify the scope. First, enter the Name of the scope the click Next.

Enter the range of IP address that client will have assigned as in the following diagram. The Length and Subnet mask can be customized also according to requirements. Click Next.

If there is an IP address that comes in the range of IP address given in DHCP server can be excluded by adding the range of IP addresses. Click Next.

The lease duration specifies how long a client can use an IP address from this scope. The default is 8 days time for leasing one IP address, this time is customization. Set the lease duration time then click Next.

If you have some other options like DNS servers WiNS you can add it here by choosing Yes radio button. Then click Next.

Here we can specify the routers, default gateways to be distributed by this scope. Enter the IP address of the Router or Gateway by typing the IP address in a text box, then click the Add button.

Now the IP address is added now click Next to continue to next step.

Enter the DNS server IP addresses according to set up that we want our client to use. Then click Next.

If there is no DNS server in the network the WINS server can be used, which convert the NetBIOS computer name to IP address. Enter the WINS server IP addresses according to your setup. Then click Next.

After almost creation of the scope at this step, the scope needs to be activated that clients can obtain address leases only if a scope is activated. Chose Yes, I want to activate this scope now then click Next to go to the last step.

The completing the new scope wizard show you have successfully completed the new wizard scope On successful configuration of scope click Finish.

The Scope is created and activated as well as shown in the following diagram.

DORA (Discover, Offer, Request Acknowledgment)
The process of obtaining automatic IP address on DHCP client.
- DHCPDiscover: whenever the computer turned on connected to LAN send a broadcast message and look for the DHCP server.
- DHCPOffer: when the DHCP server receives the Discover message, the DHCP server sends a broadcast message to the client that I have an offer(TCP/IP configuration) for you.
- DHCPRequest: when the client receives the offer broadcast then it sends a request that I am ready to accept the offer (TCP/IP configuration).
- DHCPACK: the request is entertained by DHCP server and sends an acknowledgment broadcast that you got it (TCP/IP configuration) but it will be with lease duration. The default lease duration is 8 days when 50%
of the time is consumed the DHCP client request DHCP server unicast the to renew the lease duration.
Further readings:-https://docs.microsoft.com/en-us/windows-server/networking/technologies/dhcp/dhcp-top
Данная статья описывает процедуру установки и настройки DHCP сервера на базе Windows Server 2019. В статье описаны особенности установки и настройки DHCP роли, создания областей DHCP, настройки их параметров и резервации статических адресов. Мы рассмотрим как привычный способ настройки параметров DHCP сервера через графическую консоль, так и настройку DHCP из командной строки PowerShell.
Протокол DHCP (Dynamic Host Configuration Protocol) используется для автоматического назначения сетевых настроек (IP адрес, маска подсети, шлюз, DNS сервера и т.д.) устройствам в вашей сети (компьютеры, ноутбуки, сканеры, принтеры и т.д.). Также DHCP сервер позволяет более эффективно использовать адресное пространство, избегать конфликта IP адресов в сети и централизованно управлять сетевыми параметрами на клиентских устройствах.
Содержание:
- Установка роли DHCP сервера в Windows Server 2019/2016
- Настройка DHCP областей в Windows Server
- Резервация IP адресов на DHCP сервере
- Настройка и управление DHCP сервером с помощью PowerShell
Установка роли DHCP сервера в Windows Server 2019/2016
В этом примере мы установим DHCP сервер на хосте с Windows Server 2019 и IP адресом 192.168.13.4. Вы можете использовать как Server Core версию, так и Full GUI. В маленькой инфраструктуре допустимо устанавливать DHCP сервер на сервер с ролью контроллера домена Active Directory.
Обязательно назначьте статический IP адрес серверу с ролью DHCP сервер. При установке роли DHCP из консоли PowerShell на сервере с автоматическим получением IP адреса появляется предупреждение:
Configure at least one static IP address on your computer before installing DHCP.
WARNING: The following recommended condition is not met for DHCP: No static IP addresses were found on this computer. If the IP address changes, clients might not be able to contact this server. Please configure a static IP address before installing DHCP Server.
Установить роль DHCP Server можно из консоли Server Manager (Add Roles and Features -> Server Roles).
После установки роли DHCP роли нужно выполнить Post-Deployment Configuration. Для этого в консоли Server Manager щелкните по уведомлению и выберите Complete DHCP configuration.
Вам будет предложено аутентифицировать новый DHCP сервер в Active Directory (экран Authorization). Для авторизации DHCP сервера в AD учетная запись должна состоять в доменной группе Enterprise Admins.
Если у вас нет прав на авторизацию DHCP в AD, вы можете указать, чтобы ваш DHCP сервер запускался без проверки авторизации в домене:
Set-ItemProperty -Path "HKLM:SYSTEMCurrentControlSetServicesDHCPServerParameters" -Name DisableRogueDetection -Value 1 -Force
Также вы можете установить и настроить DHCP роль в Windows Server из консоли PowerShell.
Установка роли DHCP:
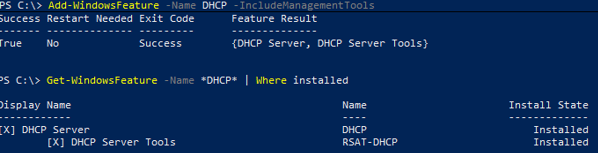
Install-WindowsFeature DHCP –IncludeManagementTools
Проверьте, что роль и инструменты управления RSAT-DHCP установлены:
Get-WindowsFeature -Name *DHCP*| Where Installed
Авторизуйте DHCP сервер в Active Directory (укажите DNS имя сервера и IP адрес, который будет использоваться DHCP клиентами):
Add-DhcpServerInDC -DnsName hq-dc01.contoso.com -IPAddress 192.168.13.4
Создайте локальные группы безопасности DHCP сервера:
Add-DhcpServerSecurityGroup
Чтобы Server Manager перестал показывать уведомление о том, что DHCP роль требует настройки, выполните команду:
Set-ItemProperty -Path HKLM:SOFTWAREMicrosoftServerManagerRoles12 -Name ConfigurationState -Value 2
Перезапустите службу DHCPServer:
Restart-Service -Name DHCPServer -Force
База данных и логи DHCP сервера находятся в каталоге
%systemroot%system32dhcp
.
- dhcp.mdb — файл базы данных сервера DHCP’;
- j50.log – транзакционный журнал (используется при восстановлении конфигурации DHCP);
- j50.chk — файл контрольной точки;
- tmp.edb — временный рабочий файл DHCP-сервера.
Настройка DHCP областей в Windows Server
После установки роли DHCP вам нужно создать DHCP области (Scopes), которые описывают диапазоны IP адресов и другие настройки, выдающиеся сервером клиентам.
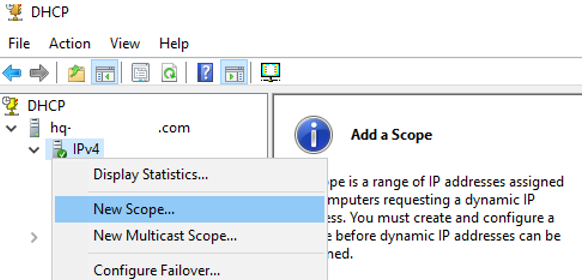
Для управления сервером DHCP используется консоль dhcpmgmt.msc (вы можете управлять DHCP сервером локально или с удаленного компьютера с установленным RSAT). Запустите консоль DHCP, разверните ваш сервер -> IPv4.
Чтобы создать новую область выберите New Scope.
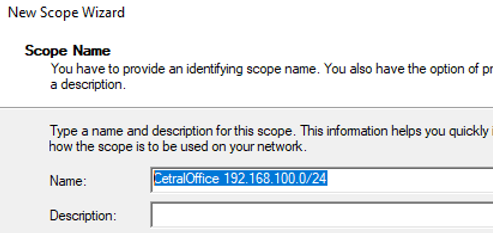
Укажите название DHCP области.
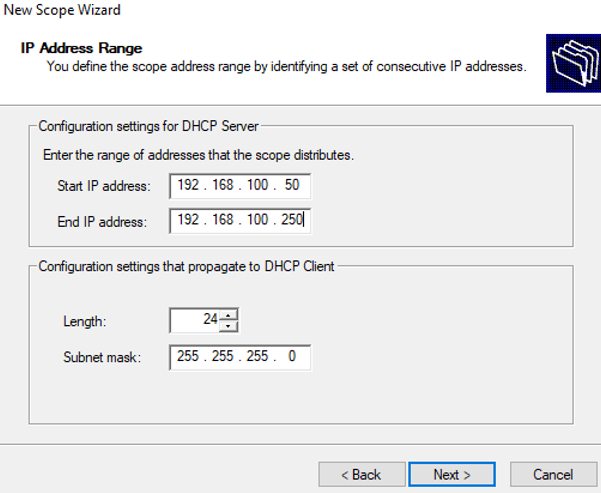
Укажите диапазон IP адресов, который будет выдаваться этой областью и маску сети. В этом примере я хочу использовать эту DHCP область для обслуживания подсети 192.168.100.0/24. В рамках этой сети DHCP сервером будет назначаться динамические IP адреса из диапазона 192.168.100.50 — 192.168.100.250. В следующем окне можно добавить исключения в этот диапазон (Add Exclusions and Delay).
Далее нужно указать длительность аренды (Lease Duration) IP адреса DHCP клиентом (по умолчанию 8 дней, менять без особой необходимости не нужно).
Укажите, что вы хотите настроить дополнительный параметры DHCP области.
 .
.
Укажите IP адрес шлюза в подсети, который должен назначаться клиентам (в нашем примере это 192.168.100.1).

Затем укажите имя домена и адреса DNS серверов, которые будут назначены клиентам DHCP.
Осталось активировать DHCP область (разрешить ей обслуживать клиентов).
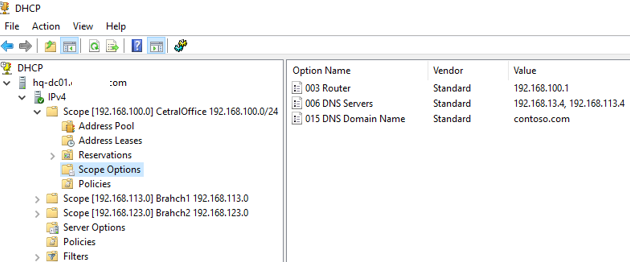
DHCP сервер может выдавать клиентам различный настройки (кроме IP адреса). Для этого используются Scope Options.
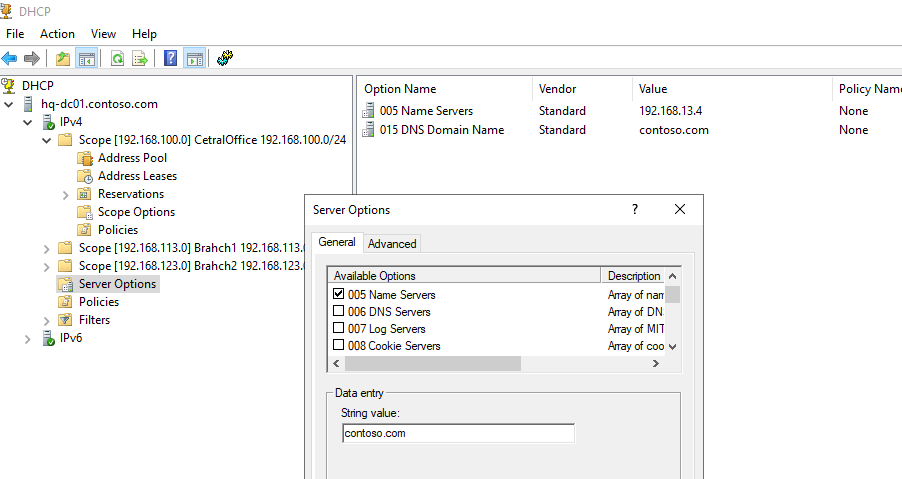
В Windows Server DHCP можно настроить глобальные настройки области или Scope Options для каждой области.

Ранее мы уже настроили три опции области:
-
003 Router -
006 DNS Server -
015 DNS Domain Name
Можно добавить и другие опции (NTP сервера, PXE и т.д.).
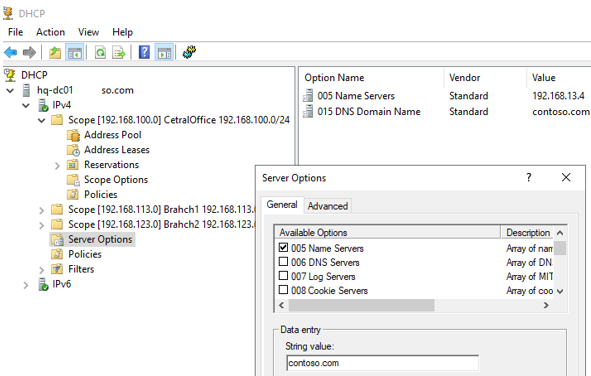
В разделе Server Options DHCP сервера можно настроить глобальные опции, которые будут наследуются всеми областями. Но вы можете переопределить глобальные настройки в настройках каждой области (опции области имеют приоритет над опциями сервера).
Один DHCP сервер может обслуживать сотни удаленных подсетей и VLAN. Поэтому вы можете создать на нем несколько областей. Главное, чтобы в каждой из подсетей был настроен ретранслятор (DHCP relay agent), который пересылает широковещательные DHCP-запросы на указанный DHCP сервер. В терминах Cisco DHCP ретранслятор называется ip helper. Вы можете настроить DHCP Relay даже на Windows Server.
Протокол DHCP в качестве транспорта использует протокол UDP. Пакеты от клиента к серверу передаются по порту 67 UDP, обратно через UDP 68
Резервация IP адресов на DHCP сервере
По умолчанию DCHP сервер выдает клиентам динамические адреса. Это означает что IP адрес у любого клиента может меняться. Если вы хотите, чтобы определенные устройства всегда получали от DHCP сервера один и тот же адрес, вы можете его зарезервировать (например, для сетевых принтеров, которые настроены у пользователей).
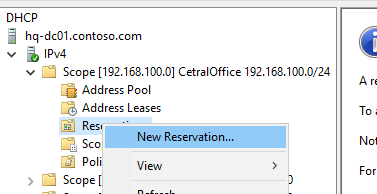
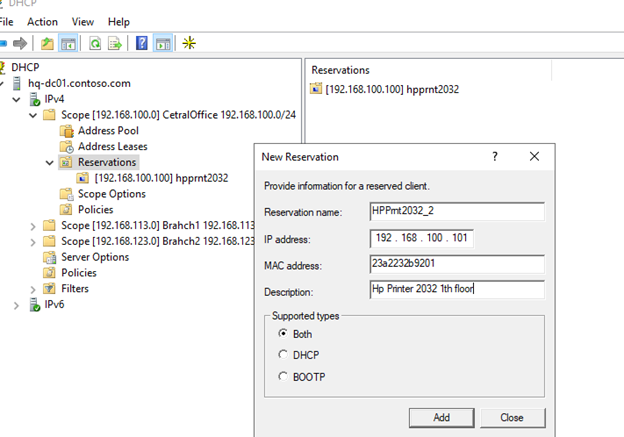
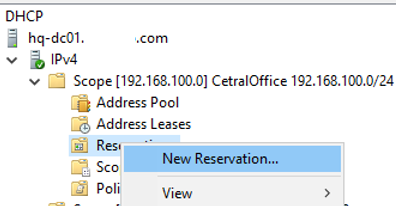
Для DHCP резервации выберите область и перейдите в секции Reservation. В меню выберите New Reservation.
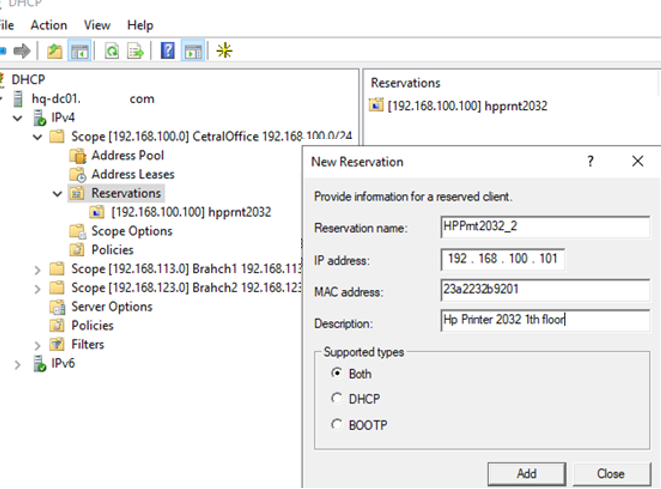
При создании резервации нужно указать IP адрес, который нужно сохранить за клиентом и его MAC адрес (уникальное значение). MAC адрес в Windows можно получить из результатов команды
ipconfig /all
или с помощью PowerShell
get-netadapter|select name,macaddress
). Опционально можно указать имя и описание устройства.
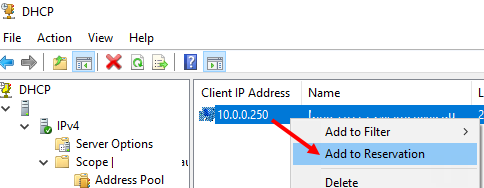
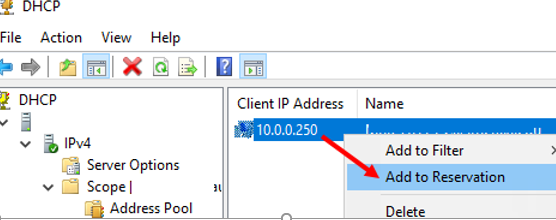
Также вы можете зарезервировать текущий динамический адрес за устройством, найдя его в разделе Address Leases. Щелкните по устройству и выберите Add to Reservation.
Настройка и управление DHCP сервером с помощью PowerShell
Все операции по настройке и управлению DHCP сервером на Windows Server 2019/2016 можно выполнять из консоли PowerShell. Рассмотрим основные команды управления DHCP. Для этого используется модуль DHCPServer. Импортируйте модуль в сессию:
Import-Module DHCPServer
Вывести полный список командлетов в моделе DHCP можно так:
Get-Command -Module DHCPServer

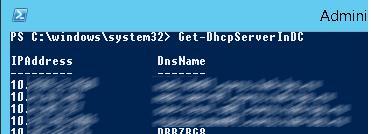
Следующая команда выведет список авторизованных DHCP серверов в Active Directory:
Get-DhcpServerInDC

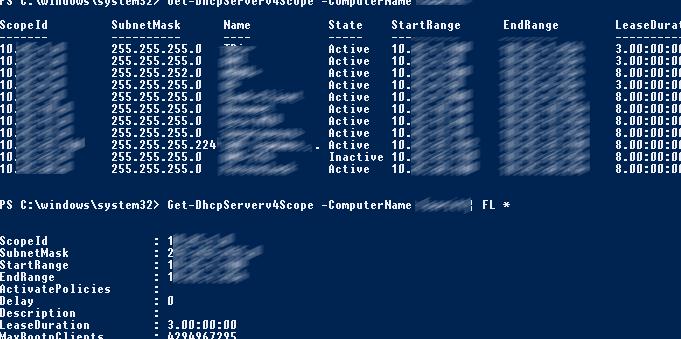
Вывести список DHCP областей на указанном сервере:
Get-DhcpServerv4Scope –ComputerName msk-dhcp1
Если нужно показать все параметры области (Delay, Description, Name и т.д.):
Get-DhcpServerv4Scope –ComputerName msk-dhcp1| FL *
Если нужно отобразить данные о IPv6 областях:
Get-DHCPServerv6Scope
Получить настройки для конкретной области:
Get-DhcpServerv4Scope –ComputerName msk-dhcp1 –ScopeID 10.10.1.0
Создадим новую (неактивную) область с диапазоном адресов с 192.168.113.50 до 192.168.113.250:
Add-DhcpServerv4Scope -Name “Brahch1 192.168.113.0” -StartRange 192.168.113.50 -EndRange 192.168.113.250 -SubnetMask 255.255.255.0 -State InActive
Настроить следующие параметры DHCP сервера: DNS сервер, домен и адрес шлюза по-умолчанию:
Set-DhcpServerv4OptionValue -ScopeID 192.168.113.0 -DnsDomain contoso.com -DnsServer 192.168.13.4 -Router 192.168.113.1
Добавить исключения в DHCP область:
Add-DhcpServerv4ExclusionRange -ScopeID 192.168.113.0 -StartRange 192.168.113.90 -EndRange 192.168.113.100
Активировать DHCP область:
Set-DhcpServerv4Scope -ScopeID 192.168.113.0 -State Active

Для удобства можно использовать такую команду PowerShell при создании новой области:
$HashArgs = @{
'Name' = 'EKB Office Scope';
'Description' = 'workstations';
'StartRange' = '192.168.140.10';
'EndRange' = '192.168.140.200';
'SubnetMask' = '255.255.255.0';
'State' = 'Active';
'LeaseDuration' = '1.00:00:00';
}
Add-DhcpServerv4Scope @HashArgs
Опции для DHCP сервера добавляется так (к примеру, WPAD):
Add-DhcpServerv4OptionDefinition -ComputerName msk-dhcp1 -Name WPAD -OptionId 252 -Type String
Вывести список настроенных опций DHCP сервера можно так:
Get-DHCPServerv4OptionValue -ComputerName msk-dhcp1 | Format-List
Выведем список настроенных параметров зоны:
Get-DHCPServerv4OptionValue -ComputerName msk-dhcp1 -ScopeId 10.10.1.0 | Format-List
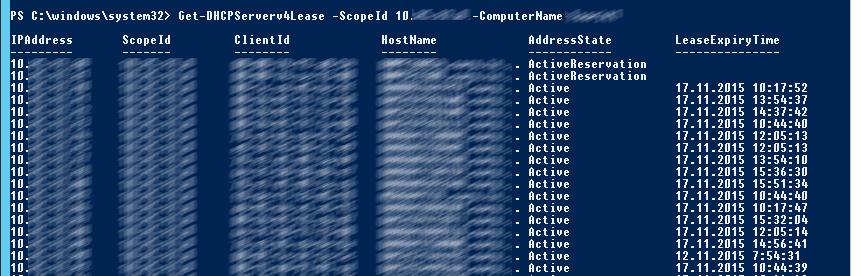
Показать текущий список арендованных адресов для области 10.10.1.0:
Get-DHCPServerv4Lease -ScopeId 10.10.1.0 -ComputerName msk-dhcp1
Создать DHCP резервацию для клиента, которому назначен динамический IP адрес 10.10.1.88 (конвертировать выданный адрес в зарезервированный):
Get-DhcpServerv4Lease -ComputerName msk-dhcp1 -IPAddress 10.10.1.88| Add-DhcpServerv4Reservation -ComputerName msk-dhcp1
Можно массово зарезервировать IP адреса для компьютеров по списку из csv файла. Для этого создайте текстовый файл в формате:
ScopeId,IPAddress,Name,ClientId,Description
10.10.1.0,10.10.1.88,Client1,ba-ab-5c-3d-4e-6f,Reservation PC-msk-s1
10.10.1.0,10.10.1.89,Client2,ba-ab-5c-5d-2e-3f,Reservation PC-msk-s2
Сохраните файл с именем
c:dhcpDHCPReservations.csv
и запустите следующую команду, которая импортирует данные из csv файла и создаст DHCP резервации для клиентов:
Import-Csv –Path c:dhcpDHCPReservations.csv | Add-DhcpServerv4Reservation -ComputerName msk-dhcp1
Отключить область на DHCP сервере:
Set-DhcpServerv4Scope -ComputerName msk-dhcp1-ScopeId 10.10.1.0-State InActive
Удалить область с DHCP сервера:
Remove-DHCPServerv4Scope -ComputerName msk-dhcp1-ScopeId 10.10.1.0 -Force
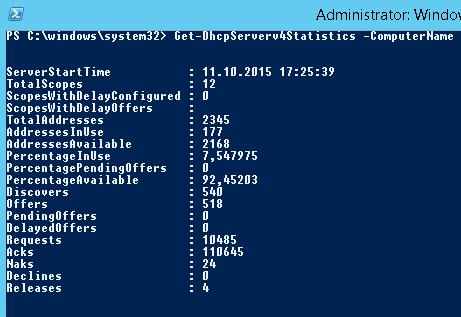
Возможно получить статистику DHCP сервера (количество областей, резерваций, процент использования адресов и пр.).
Get-DhcpServerv4Statistics -ComputerName msk-dhcp1
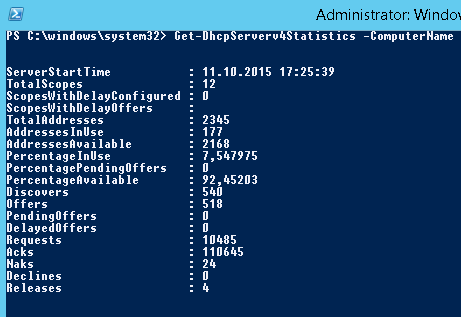
Аналогичная информация для конкретной области может быть получена с помощью командлета Get-DhcpServerv4ScopeStatistics.
Конфигурацию DHCP сервера можно экспортировать в указанный XML файл с помощью команды:
Export-DHCPServer -ComputerName msk-dhcp1 -File C:dhcpdhcp-export.xml
Совет. Заданием с такой командой в планировщике задач можно реализовать регулярное резервное копирование конфигурации DHCP сервера.
В дальнейшем эти настройки DHCP сервера можно импортировать (перенести) на другой DHCP сервер:
Import-DHCPServer -ComputerName msk-dhcp2 -File C:dhcpdhcp-export.xml -BackupPath C:dhcpbackup
DHCP — это протокол динамической настройки узла, который позволяет автоматизировать настройку сетевых параметров клиента, таких как IP-адрес, шлюз, DNS, маска подсети. DHCP-сервер контролирует выдачу IP—адресов, предотвращает их дублирование и освобождает неиспользуемые адреса.
Ниже рассмотрим как установить и настроить DHCP-сервер на ОС Windows Server 2016 для одной подсети.
Процесс установки
- Запустим Диспетчер серверов и выберем «Add roles and features». Выберем первый пункт «Role — based or feature — based installation»:

- Укажем сервер, на который будем устанавливать роль DHCP:

- Далее необходимо найти и выбрать роль DHCP в списке. Соглашаемся добавить компоненты, требуемые для правильной работы службы DHCP. Так как компоненты добавлены на шаге «Server Roles», то шаг «Features» пропускаем:

- Мастер напомнит вам о то, что нужно заранее спланировать подсети, области и исключения:

- Проверяем устанавливаемые компоненты и нажимаем «Install»:

- После завершения установки можно начать первичную настройку DHCP. Переходим по ссылке «Complete DHCP configuration»:

Процесс первичной настройки проходит в два этапа:
1. Создание «Группы безопасности» для управления этим DHCP—сервером. Всего их две:
- DHCP Administrators — у членов группы имеются полные права на управление DHCP—сервером;
- DHCP Users — у членов группы есть возможность просмотра настроек сервера и списка подключенных устройств.
2. Авторизация DHCP-сервера в Active Directory (если он присоединен к домену). Данная настройка нужна, чтобы избежать появления в сети посторонних DHCP-серверов. Сервер должен пройти авторизацию чтобы служба DHCP запустилась:

- Вписываем учетные данные администратора и жмем кнопку «Commit». Если сервер не присоединен к домену, то выбираем последний пункт:

- Если всё сделано верно, мастер оповещает об успешном выполнении настройки:

Процесс настройки
Запускаем «Диспетчер серверов». Находим пункт DHCP в открывающемся списке «Tools»:

В нашем варианте мы рассматриваем выдачу IPv4 адресов, поэтому нужно создать новую область (Scope) — пул IP-адресов, выдаваемых клиентам. Нажимаем правой кнопкой мыши на IPv4 и выбираем «New Scope…»:

Открывается Мастер создания области, где мы вводим имя пула. Если необходимо, то можно ввести описание:

Определяем границы нашего пула, задав начальный и конечный IP-адрес. Также вводим маску подсети:

В случае необходимости можно добавить в исключения один или несколько IP-адресов из создаваемого пула. В этом диапазоне могут находиться сетевые устройства которым уже назначен статический IP. Тут же есть параметр задержки ответа сервера перед отправкой данных на запрос от хоста:

Далее можно указать время аренды IP-адреса. По умолчанию выставлено 8 дней:

Теперь Мастер предложит указать сетевые параметры (Gateway, DNS, WINS), выдаваемые клиентам в сети:

Укажем адрес сетевого шлюза:

Далее введем имя домена и DNS-сервер. DNS можно найти либо по имени сервера, либо указать IP-адрес:

Следующий этап позволяет добавить WINS-сервер:

Выбираем «Активировать» заданную нами область сейчас:

После настройки пула можно проверить работает ли сервер. Посмотреть подключенных клиентов можно перейдя в раздел «Address Leases». В нашем случае видим, что подключено одно устройство:

Если мы зайдем на клиентскую машину, то можем проверить правильность полученных настроек:

Хоть мы и рассматривали настройку на Windows Server 2016, данная инструкция так же подойдет и для Windows Server 2008—2012, так как процесс не сильно отличается.
Аverage rating : 4.8
Оценок: 4
191028
Санкт-Петербург
Литейный пр., д. 26, Лит. А
+7 (812) 403-06-99
![]()
700
300
ООО «ИТГЛОБАЛКОМ ЛАБС»
191028
Санкт-Петербург
Литейный пр., д. 26, Лит. А
+7 (812) 403-06-99
![]()
700
300
ООО «ИТГЛОБАЛКОМ ЛАБС»
![]()
700
300
RIn this guide, we’ll walk you through how to install and configure a DHCP server based on Windows Server 2019. We’ll cover both the usual way to configure DHCP server options through a GUI console and DHCP configuration from the PowerShell command line. This article describes the specifics of installing and configuring a DHCP role on Windows Server, creating DHCP scopes, configuring scope options, and reserving static IP addresses.
DHCP (Dynamic Host Configuration Protocol) is used to automatically assign network settings (IP address, subnet mask, gateway, DNS server, etc.) to devices on your network (computers, laptops, scanners, printers, etc.). Also, the DHCP server allows you to more efficiently use the IP address space, avoid the conflict of IP addresses in the network and centrally manage the network parameters on client devices.
Installing DHCP Server Role on Windows Server 2019/2016
In this example, we will install a DHCP server on a Windows Server 2019 host with an IP address 192.168.13.4. You can use both Windows Server Core and Full GUI versions. In a small infrastructure, it is acceptable to install a DHCP server on a server with the role of an Active Directory domain controller.
Be sure to assign a static IP address to the DHCP server host. When installing the DHCP role from the PowerShell console on a server with a dynamic IP address, a warning appears:
Configure at least one static IP address on your computer before installing DHCP.
WARNING: The following recommended condition is not met for DHCP: No static IP addresses were found on this computer. If the IP address changes, clients might not be able to contact this server. Please configure a static IP address before installing DHCP Server.
You can install the DHCP Server role from the Server Manager console (Add Roles and Features -> Server Roles).
After installing the DHCP role, you need to perform post-deployment configuration. To do this, in the Server Manager console, click on the notification and select Complete DHCP configuration.
You will be prompted to authorize the new DHCP server in Active Directory (Authorization screen). To authorize the DHCP server in AD, your account must be a member of the Enterprise Admins domain group.
If you don’t have permission to authorize DHCP in AD, you can specify that your DHCP server can start without checking for domain authorization:
Set-ItemProperty -Path "HKLM:SYSTEMCurrentControlSetServicesDHCPServerParameters" -Name DisableRogueDetection -Value 1 -Force
You can also use the following commands in the PowerShell console to install and configure the DHCP server role on Windows Server:
Install-WindowsFeature DHCP –IncludeManagementTools
Verify that the DHCP role and RSAT-DHCP management tools are installed:
Get-WindowsFeature -Name *DHCP*| Where Installed
Authorize the DHCP server in Active Directory (specify the DNS name of the server and the IP address that will be used by DHCP clients):
Add-DhcpServerInDC -DnsName hq-dc01.woshub.com -IPAddress 192.168.13.4
Create local security groups for the DHCP server:
Add-DhcpServerSecurityGroup
To stop Server Manager from displaying a notification that the DHCP role requires additional configuration, run the command:
Set-ItemProperty -Path HKLM:SOFTWAREMicrosoftServerManagerRoles12 -Name ConfigurationState -Value 2
Restart the DHCPServer service:
Restart-Service -Name DHCPServer -Force
The DHCP server database and logs are stored in %systemroot%system32dhcp:
- dhcp.mdb — DHCP server database file;
- j50.log – transaction log file (used when restoring DHCP configuration);
- j50.chk — checkpoint file;
- tmp.edb — DHCP server temporary working file.
Configuring DHCP Scopes on Windows Server 2019
After installing the DHCP role, you need to create DHCP scopes that describe the IP address ranges and other parameters that the server assigns to clients.
The dhcpmgmt.msc console is used to manage the DHCP server (you can manage the DHCP server locally or from a remote computer with RSAT installed). Open the DHCP console, expand your server, right-click IPv4, then select New Scope.
Set the name of the DHCP scope.
Specify the range of IP addresses that will be issued by this DHCP scope and the subnet mask. In this example, I want to use this DHCP scope for the 192.168.100.0/24 network. Within this network, the DHCP server will assign dynamic IP addresses from the range 192.168.100.50 - 192.168.100.250. In the next window, you can add exclusions to this range (Add Exclusions and Delay).
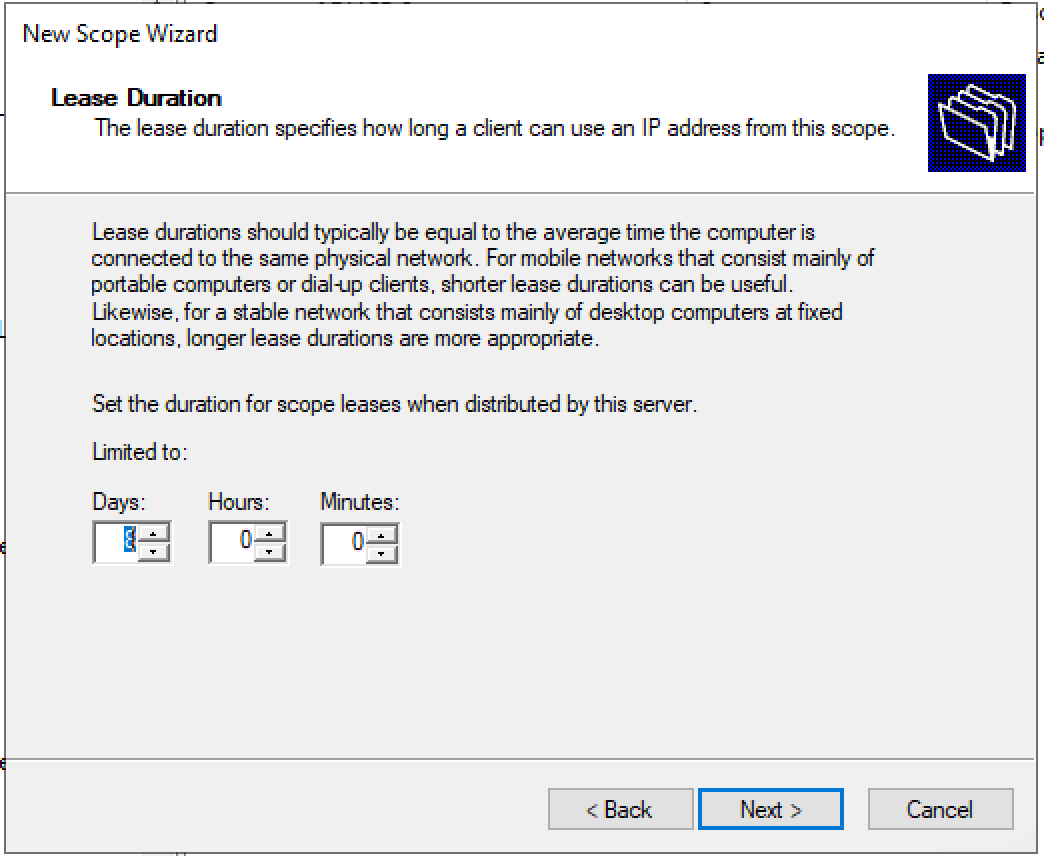
Next, you need to specify the lease duration of the DHCP client’s IP address (by default, it is 8 days, and you don’t need to change it without special need).
Select that you want to configure additional DHCP scope options.
 .
.
Specify the IP address of the default gateway in the network that should be assigned to clients (in our example, this is 192.168.100.1).
Then specify the domain name and DNS IP server addresses to be propagated to DHCP clients.

It remains to activate the DHCP scope (allow it to serve clients).
DHCP server can assign different settings to clients (except IP address). Scope Options are used for this.
In Windows Server DHCP, you can configure global scope settings or Scope Options for each scope.
We have previously configured three scope options:
- 003 Router
- 006 DNS Server
- 015 DNS Domain Name
Other options can be added (NTP server, PXE settings, etc.).
In the Server Options section of the DHCP server, you can configure global options that will be inherited by all scopes. However, you can override the global settings in the settings of each scope (scope options take precedence over server options).
A single DHCP server can serve hundreds of subnets and VLANs. Thus, you can create multiple scopes on it. The main thing is that a DHCP relay agent must be configured on each of the subnets that forwards broadcast DHCP requests to your DHCP server. In Cisco terms, the DHCP relay is called ip helper. You can even configure DHCP Relay on the Windows Server host.
DHCP uses UDP protocol as a transport. Packets from the client to the server are transmitted over port 67 UDP, and back over UDP 68.
Configuring IP Address Reservation on a DHCP Server
By default, the DCHP server leases dynamic addresses to clients. This means that the IP address of any client can change. If you want certain devices to always receive the same static IP address from the DHCP server, you can reserve it (for example, for network printers connected to users’ computers).
To create a DHCP reservation, select a scope and go to the Reservation section. Select New Reservation from the menu.
When creating a reservation, you need to specify the IP address you want to assign to the device and its unique MAC address. The MAC address in Windows can be obtained from the results of the ipconfig /all command or by using PowerShell (Get-NetAdapter | select Name, Macaddress). Optionally, you can specify the name and description of the device.
You can also reserve the current dynamic address for a device by finding it in the Address Leases section of the DHCP console. Click on the device and select Add to Reservation.
How to Configure and Manage DHCP Server with PowerShell?
You can perform all the operations for configuring and managing the DHCP server in Windows Server 2019/2016 from the PowerShell console. Let’s take a look at the basic DHCP management commands. The DHCPServer module is used for this. Import the module into the PowerShell session:
Import-Module DHCPServer
You can display a complete list of cmdlets in the DHCP module like this:
Get-Command -Module DHCPServer

Let’s display the list of authorized DHCP servers in Active Directory:
Get-DhcpServerInDC
Get the list of DHCP scopes on the specified server:
Get-DhcpServerv4Scope –ComputerName be-dhcp1
If more scope displayed fields are required (Delay, Description, Name, etc.):
Get-DhcpServerv4Scope –ComputerName be-dhcp1| FL *

If the information about IPv6 scopes has to be displayed:
Get-DHCPServerv6Scope
Get the settings of a certain DHCP scope:
Get-DhcpServerv4Scope –ComputerName be-dhcp1 –ScopeID 192.168.12.0
Let’s create a new inactive DHCP scope with the IP address range from 192.168.113.50 to 192.168.113.250:
Add-DhcpServerv4Scope -Name “NY Branch1 192.168.113.0” -StartRange 192.168.113.50 -EndRange 192.168.113.250 -SubnetMask 255.255.255.0 -State InActive
Set the following DHCP scope options: DNS server, domain, and default gateway address:
Set-DhcpServerv4OptionValue -ScopeID 192.168.113.0 -DnsDomain woshub.com -DnsServer 192.168.13.4 -Router 192.168.113.1
Add exceptions to DHCP scope:
Add-DhcpServerv4ExclusionRange -ScopeID 192.168.113.0 -StartRange 192.168.113.90 -EndRange 192.168.113.100
Activate DHCP scope:
Set-DhcpServerv4Scope -ScopeID 192.168.113.0 -State Active

For convenience, you can use the following PowerShell command when creating a new scope:
$HashArgs = @{

'Name' = 'NY Office Scope';

'Description' = 'Workstations';

'StartRange' = '192.168.120.10';

'EndRange' = '192.168.120.200';

'SubnetMask' = '255.255.255.0';

'State' = 'Active';

'LeaseDuration' = '7.00:00:00';

}

Add-DhcpServerv4Scope @HashArgs
You can add other DHCP server options (e. g., WPAD) as follows:
Add-DhcpServerv4OptionDefinition -ComputerName be-dhcp1 -Name WPAD -OptionId 252 -Type String
You can display a list of configured DHCP server options:
Get-DHCPServerv4OptionValue -ComputerName be-dhcp1 | Format-List
Display a list of configured scope options:
Get-DHCPServerv4OptionValue -ComputerName be-dhcp1 -ScopeId 192.168.12.0 | Format-List
Show the current list of leased IP addresses for the DHCP scope 192.168.12.0:
Get-DHCPServerv4Lease -ScopeId 192.168.12.0 -ComputerName be-dhcp1

Create a DHCP reservation for a client who is assigned a dynamic IP address 192.168.12.88 (convert the leased IP address to a reserved one):
Get-DhcpServerv4Lease -ComputerName be-dhcp1 -IPAddress 192.168.12.88| Add-DhcpServerv4Reservation -ComputerName be-dhcp1
You can perform a bulk reservation of IP addresses for computers listed in a CSV file. To do it, create a text file in the following format:
ScopeId,IPAddress,Name,ClientId,Description
192.168.12.0,192.168.12.88,PC-be-s1,2a-a2-1c-39-42-1f,Reservation PC-be-s1
192.168.12.0,192.168.12.89,PC-be-s2,2a-a2-1c-59-22-2f,Reservation PC-be-s2
Save the file as c:dhcpDHCPReservations.csv and run the following command, which will import data from the CSV file and create DHCP reservations for clients:
Import-Csv –Path c:dhcpDHCPReservations.csv | Add-DhcpServerv4Reservation -ComputerName be-dhcp1
Deactivate a scope on a DHCP server:
Set-DhcpServerv4Scope -ComputerName be-dhcp1 -ScopeId 192.168.12.0 -State InActive
Remove a scope from a DHCP server:
Remove-DHCPServerv4Scope -ComputerName be-dhcp1 -ScopeId 192.168.12.0 -Force
You can get DHCP server statistics (the number of scopes and reservations, the percentage of used addresses, etc.).
Get-DhcpServerv4Statistics -ComputerName be-dhcp1
The same information for a specific scope can be obtained using the Get-DhcpServerv4ScopeStatistics cmdlet.
DHCP server configuration can be exported to the XML file with the following command:
Export-DHCPServer -ComputerName be-dhcp1 -File C:dhcpdhcp-export.xml
Hint. You can use this command in Task Scheduler to back up the DHCP server configuration.
Further, these DHCP server settings can be imported (transferred) to another DHCP server:
Import-DHCPServer -ComputerName be-dhcp2 -File C:dhcpdhcp-export.xml -BackupPath C:dhcpbackup
I don’t think that we should analyze what a DHCP does in your infrastructure. Even a junior administrator knows, even in theory, how it works. That is why we will go straight into practice.
In the steps below, you will see how to install the DHCP role in Windows Server 2016 using both the Server Manager GUI and PowerShell. The installation will take place on a Windows Server 2016 that is already joined in the AD Domain and in this case, is also a Domain Controller and DNS. This is the most common practice in small businesses.
Before you proceed, you’ll need to have your server configured with a static IP address as well as having planned the subnets, scopes, and exclusions in the next step after installing the role.
Install the DHCP role using Server Manager
Open Server Manager, click Manage and then Add Roles and Features.

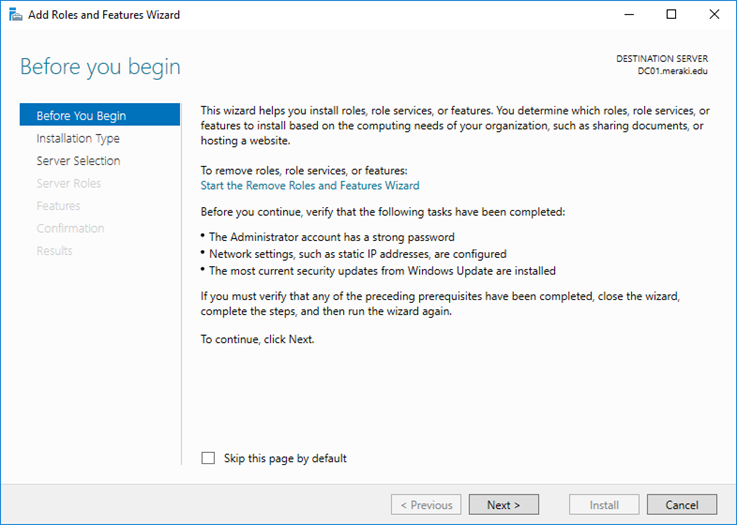
In the Before You Begin section, click Next to continue.
In the Installation Type section, select Role-based or feature-based installation and click Next to continue.
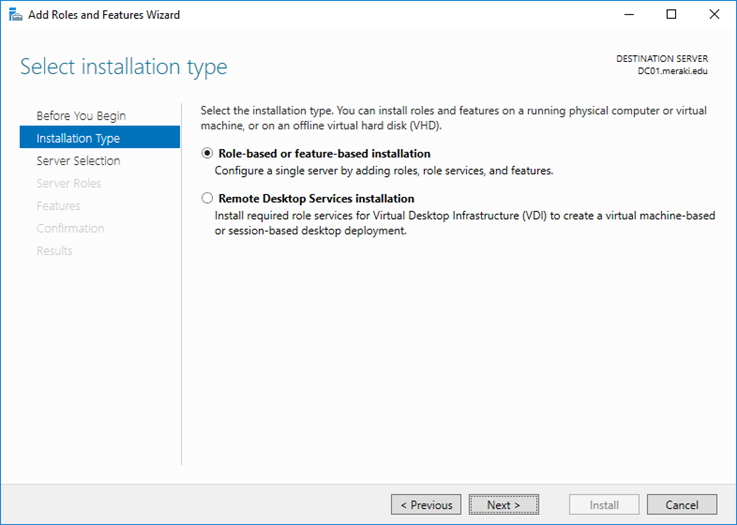
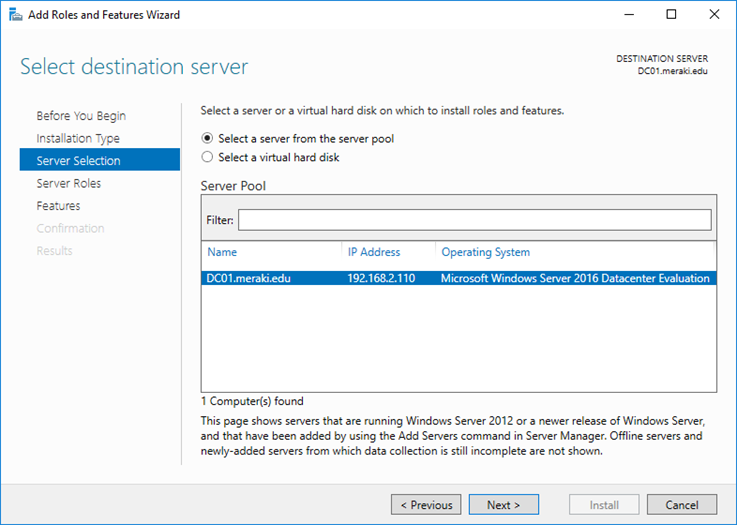
In the Server Selection section, select your server and click Next to continue.
In the Server Roles section, enable the DHCP Server role and in the window that will appear immediately afterward, click the Add Features button, and then click Next to continue.

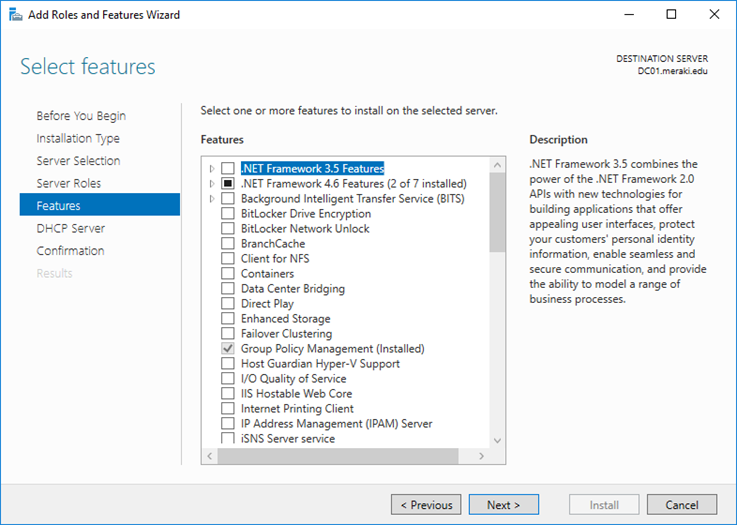
In the Features section, you do not have to choose something, just click Next to continue.
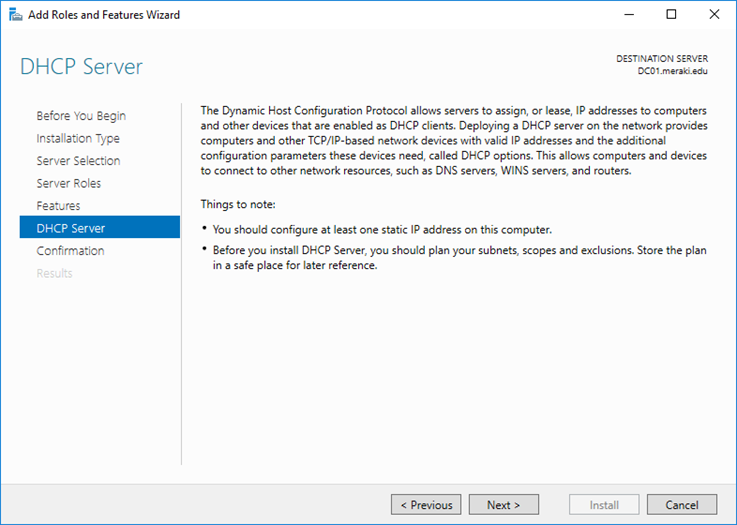
In the DHCP Server section, take a look at the information proposed by Microsoft and click Next to continue.
In the Confirmation section, click the Install button to install the DHCP role. Installation does not require a restart of the server.
Finally, in the Results section, click Close to close the window.
Complete the installation of the DHCP role
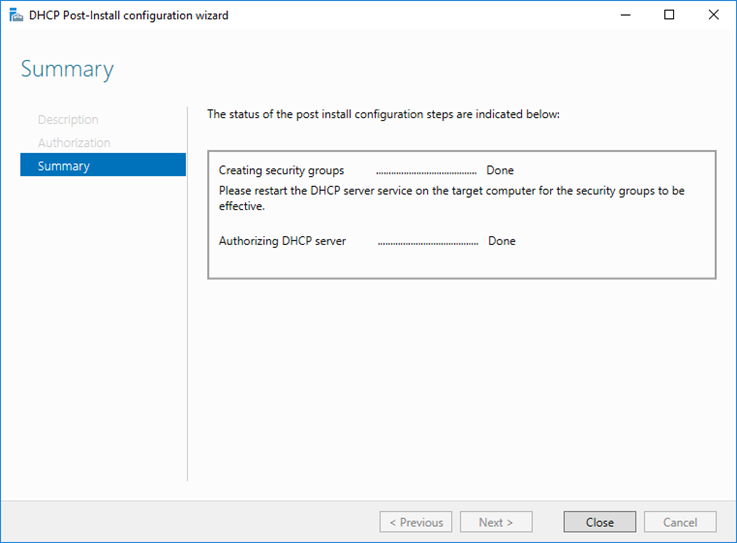
In the last step of the wizard we saw above, there was a Complete DHCP configuration option. Clicking on this it opens the DHCP Post-Install configuration wizard window that enables you to complete the DHCP role installation with two basic settings, setting up the corresponding accounts (DHCP Administrators and DHCP Users) and authorizing the DHCP server.
Alternatively, if you have closed the wizard window, the same option is suggested through the Server Manager window.

Here, in the Description section, you will see what these basic settings are. Click Next to continue.
Under Authorization, select a user account that has the ability to authorize the DHCP server in Active Directory (for example, a Domain Administrator or delegated admin) and press Commit to continue.
Finally, in the Summary section, you will see that both the creation of security groups and the DHCP server authorization have been completed successfully. Click the Close button to close the window.
Install the DHCP role using PowerShell
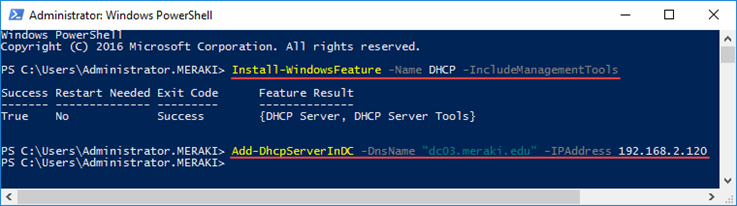
Open PowerShell with Administrator privileges and type the following command to install the DHCP role.
Install-WindowsFeature -Name DHCP -IncludeManagementTools
In addition to installing, you will need to authorize the DHCP server in the AD Domain as previously done with Server Manager. To do this, type the following PowerShell command by changing the values to match those of your infrastructure.
Add-DhcpServerInDC -DnsName "dc03.meraki.edu" -IPAddress 192.168.2.120
Also, using the following command you can easily view the authorized DHCP servers.
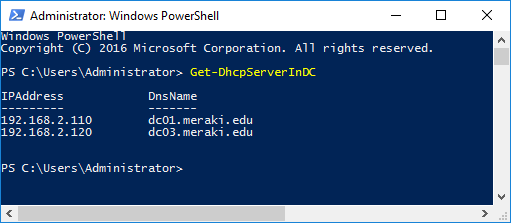
More about the Add-DhcpServerInDC cmdlet and the parameters you can declare.
Note: The DHCP Server on a Domain Controller is automatically authorized.
Now, the next step after installing the DHCP role on Windows Server 2016 is to create a new DHCP Scope through the GUI and PowerShell.
Назначение этой статьи – упростить настройку DHCP сервиса для фабрики VXLAN BGP EVPN and DFA с использованием Microsoft Windows Server 2016/2019.
В официальной документации DHCP сервис на базе Microsoft Windows Server 2012 для фабрики настраивается как SuperScope, содержащий пул Loopback (в данном пуле – изюминка это исключение из пула всех IP адресов пула (excluded IP address = pool)) и пулы выдачи IP адресов для реальный сетей (здесь изюминка – настраиваются policy – в которых фильтруются DHCP Relay Circuit ID и этот DHCP relay Circuit ID содержит VNI для сети, т. е. для другого пула этот DHCP Relay Circuit ID будет чуть другим).
To configure DHCP on Windows server.

1. Create a super scope. Within the super scope, create scope B, S1, S2, S3, …, Sn for the subnet B and the subnets for each segment.
2. In scope B,  specify the 'Exclusion Range' to be the entire address range (so that the offered address range must not be from this scope).
3. For every segment scope Si, specify a policy that matches on Agent Circuit ID with value of '0108000600XXXXXX', where '0108000600' is a fixed value for all segments, the 6 numbers "XXXXXX" is the segment ID value in hexadecimal. Also ensure to check the Append wildcard(*) check box.
4. Set the policy address range to the entire range of the scope.
Данная статья содержит ответы на следующие вопросы:
- Почему не поддерживаются Microsoft Windows Server 2000/2003/2008?
- Почему в Microsoft Windows Server 2012 настройка такая сложная?
- Как упрощается настройка в Microsoft Windows Server 2016/2019?
Содержание
- Введение
- Как настраивается DHCP Relay на фабрике VXLAN BGP EVPN
- RFC которые используются в DHCP Relay с фабрики VXLAN BGP EVPN
- Эволюция документации Cisco в части настройки DHCP на Microsoft Windows Server 2012
- DHCP в Microsoft Windows Server (superscope & policy)
- Основная часть
- Почему не поддерживается Microsoft Windows Server 2000/2003/2008?
- Почему в Microsoft Windows Server 2012 настройка такая сложная?
- Как упрощается настройка в Microsoft Windows Server 2016/2019?
- Пример
- Настройка DHCP сервиса на Microsoft Windows Server 2019
- Заключение
- Список источников
Введение
В этой части кратко перечислены все исходные данные: Инструкции по настройке сетевого оборудования, RFC используемые в DHCP пакетах в фабриках eVPN, справочно приведена эволюция настроек DHCP сервера на Microsoft Windows Server 2012 в документации Cisco. А также краткие сведения о Superscope и Policy в сервисе DHCP на серверах Microsoft Windows Server.
Как настраивается DHCP Relay на фабрике VXLAN BGP EVPN, DFA
Настройка DHCP Relay на фабрике VXLAN BGP EVPN не является основной темой этой статьи, т. к. она достаточно простая. Привожу ссылки на документацию и спойлер по настройкам на сетевом оборудовании.
- Nexus 9000 VXLAN Configuration Guide 7.X
- Nexus 9000 VXLAN Configuration Guide 9.3
- DFA (Cisco Dynamic Fabric Automation)
Пример настройки DHCP Relay на Nexus 9000V v9.2(3)
service dhcp
ip dhcp relay
ip dhcp relay information option
ip dhcp relay information option vpn
interface loopback10
  vrf member VRF1
  ip address 10.120.0.1/32 tag 1234567
interface Vlan12
  no shutdown
  vrf member VRF1
  no ip redirects
  ip address 10.120.251.1/24 tag 1234567
  no ipv6 redirects
  fabric forwarding mode anycast-gateway
  ip dhcp relay address 10.0.0.5
  ip dhcp relay source-interface loopback10
RFC которые реализованы в работе сервиса DHCP Relay в фабриках VXLAN BGP EVPN
- Список RFC, для Nexus 9000 v9.3
- Список RFC, Nexus 9000 v7.x
RFC#6607: Sub-option 151(0x97) — Virtual Subnet Selection
•	Sub-option 151(0x97) - Virtual Subnet Selection (Defined in RFC#6607)
Used to convey VRF related information to the DHCP server in an MPLS-VPN and VXLAN EVPN multi-tenant environment.
Передается «имя» VRF в котором находиться клиент.
RFC#5107: Sub-option 11(0xb) — Server ID Override
• Sub-option 11(0xb) - Server ID Override (Defined in RFC#5107.)
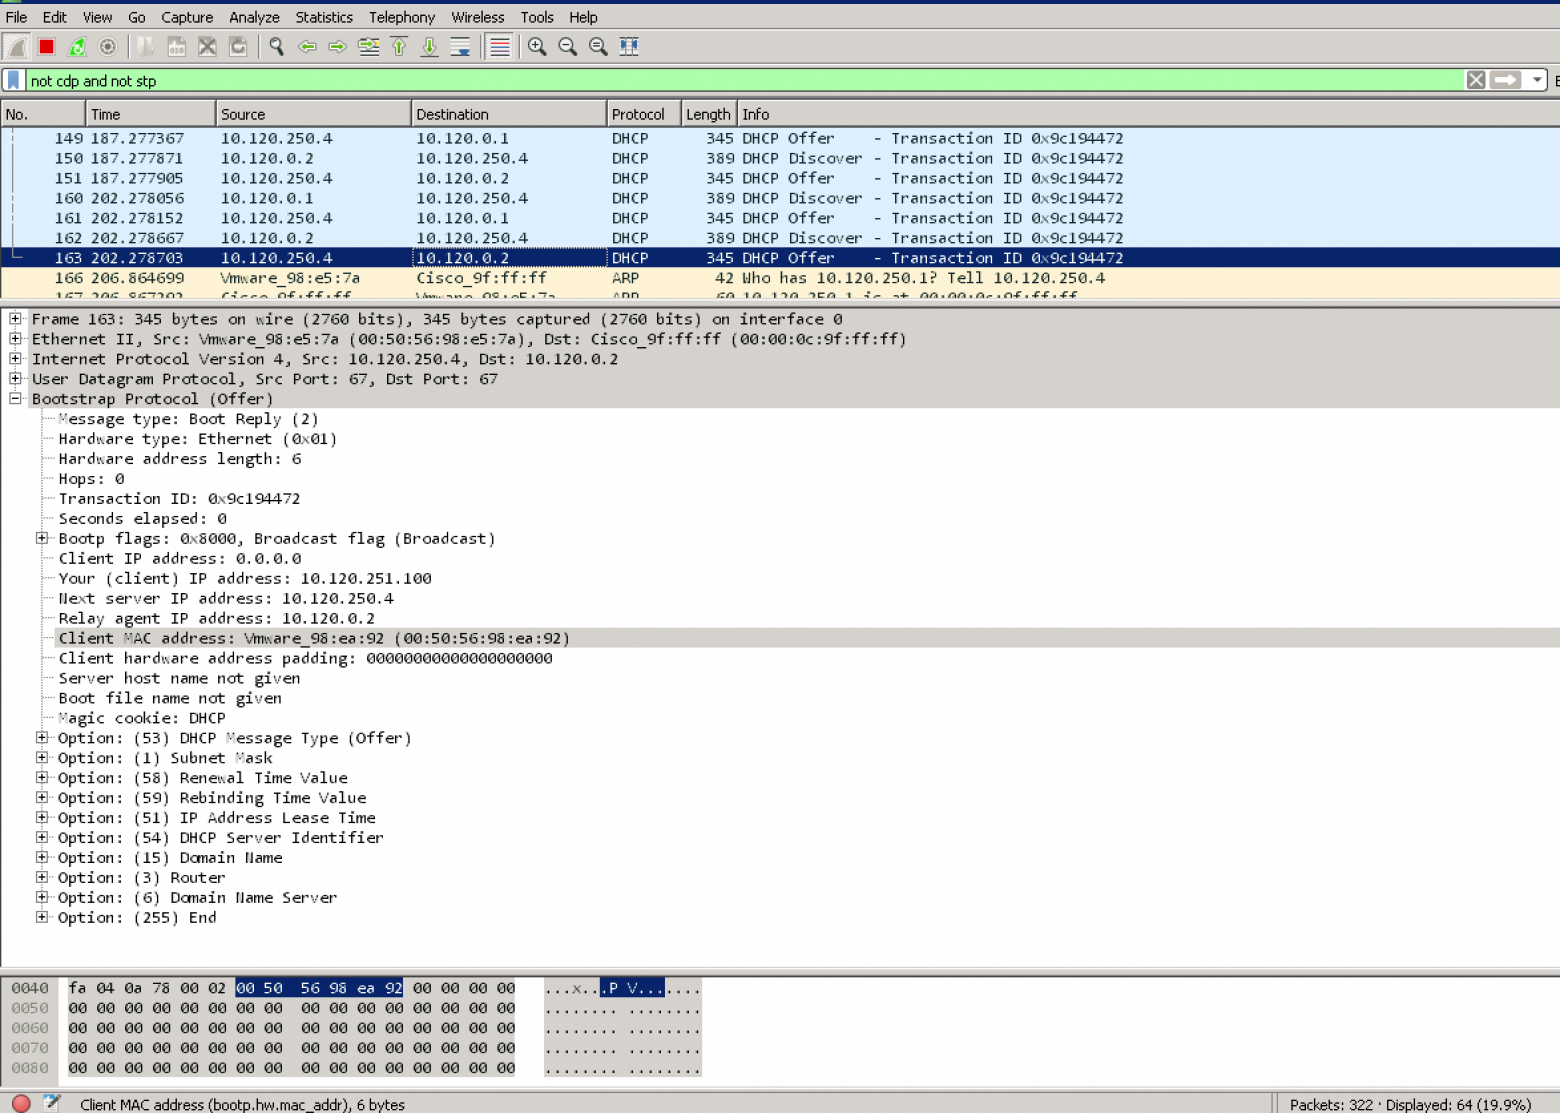
The server identifier (server ID) override sub-option allows the DHCP relay agent to specify a new value for the server ID option, which is inserted by the DHCP server in the reply packet. This sub-option allows the DHCP relay agent to act as the actual DHCP server such that the renew requests will come to the relay agent rather than the DHCP server directly. The server ID override sub-option contains the incoming interface IP address, which is the IP address on the relay agent that is accessible from the client. Using this information, the DHCP client sends all renew and release request packets to the relay agent. The relay agent adds all of the appropriate sub-options and then forwards the renew and release request packets to the original DHCP server. For this function, Cisco’s proprietary implementation is sub-option 152(0x98). You can use the ip dhcp relay sub-option type cisco command to manage the function.Опция используется для того, чтобы клиент посылал запрос о перепродлении аренды адреса на IP адрес используемый в этой опции. (В Cisco VXLAN BGP EVPN – это Anycast адрес шлюза по умолчанию для клиента.)
RFC#3527: Sub-option 5(0x5) — Link Selection
Sub-option 5(0x5) - Link Selection (Defined in RFC#3527.)

The link selection sub-option provides a mechanism to separate the subnet/link on which the DHCP client resides from the gateway address (giaddr), which can be used to communicate with the relay agent by the DHCP server. The relay agent will set the sub-option to the correct subscriber subnet and the DHCP server will use that value to assign an IP address rather than the giaddr value. The relay agent will set the giaddr to its own IP address so that DHCP messages are able to be forwarded over the network. For this function, Cisco’s proprietary implementation is sub-option 150(0x96). You can use the ip dhcp relay sub-option type ciscocommand to manage the function.
Адрес сети, из которой клиенту необходим IP адрес.
Эволюция документации Cisco в части настройки DHCP на Microsoft Windows Server 2012
Включил этот раздел потому, что прослеживается положительная тенденция со стороны вендора:
Nexus 9000 VXLAN Configuration Guide 7.3
В документации приведена только настройка DHCP Relay на сетевом оборудовании.
Для настройки DHCP на Windows Server 2012 использовалась другая статья:
Configuring Microsoft Windows Server 2012 to provide DHCP services in an eVPN Scenario (VXLAN, Cisco One Fabric, etc)
В этой статье указывается, что для каждой сети/VNI необходима своя связка SuperScope и свой собственный набор Loopback адресов:
If multiple DHCP Scopes are required for multiple subnets, you need to create one LoopbackX per subnet/vlan on all LEAFS and create a superscope with a loopbackX range scope and actual client IP subnet scope per vlan.Nexus 9000 VXLAN Configuration Guide 9.3
Добавили настройки Windows 2012 Server в документацию по настройке сетевого оборудования. Для всех используемых пулов адресов необходим один SuperScope на ЦОД и этот SuperScope является границей ЦОД:
Create Superscope for all scopes you want to use for Option 82-based policies.
Note
The Superscope should combine all scopes and act as the administrative boundary.
Cisco Dynamic Fabric Automation
Очень емко рассказано обо всем:
Let us assume the switch is using the address from subnet B (it can be the backbone subnet, management subnet, or any customer designated subnet for this purpose) to communicate with the Windows DHCP server. In DFA we have subnets S1, S2, S3, …, Sn for segment s1, s2, s3, …, sn.

To configure DHCP on Windows server.

1. Create a super scope. Within the super scope, create scope B, S1, S2, S3, …, Sn for the subnet B and the subnets for each segment.
2. In scope B,  specify the 'Exclusion Range' to be the entire address range (so that the offered address range must not be from this scope).
3. For every segment scope Si, specify a policy that matches on Agent Circuit ID with value of '0108000600XXXXXX', where '0108000600' is a fixed value for all segments, the 6 numbers "XXXXXX" is the segment ID value in hexadecimal. Also ensure to check the Append wildcard(*) check box.
4. Set the policy address range to the entire range of the scope.
DHCP в Microsoft Windows Server (superscope & policy)
SuperScope
Superscope is an administrative feature of a DHCP server that can be used to group multiple scopes as a single administrative entity. Superscope allows a DHCP server to provide leases from more than one scope to clients on a single physical network. Scopes added to a superscope are called member scopes.Что такое SuperScope – это функционал, позволяющий объединить несколько пулов IP адресов в одну административную единицу. Чтобы анонсировать пользователям в одной физической сети (в одном VLAN) ip адреса из нескольких пулов. Если запрос пришел к пулу адресов в составе SuperScope, то выдать клиенту адрес можно из другого Scope входящего в этот SuperScope.
Policy
The DHCP Server role in Windows Server 2012 introduces a new feature that allows you to create IPv4 policies that specify custom IP address and option assignments for DHCP clients based on a set of conditions.

The policy based assignment (PBA) feature allows you to group DHCP clients by specific attributes based on fields contained in the DHCP client request packet. PBA enables targeted administration and greater control of the configuration parameters delivered to network devices with DHCP.
Политики – позволяют назначать пользователям IP адреса в зависимости от типа пользователя или параметра. Инженеры Cisco используют политики в Windows Server 2012 для фильтрации по VNI (Virtual Network Identifier).
Основная часть
В данном разделены проведены результаты исследований, почему не поддерживается, как это работает (логика), что нового и как это новое нам поможет.
Почему не поддерживается Microsoft Windows Server 2000/2003/2008?
Microsoft Windows Server 2008 и более ранние версии не обрабатывают опцию 82 (Option 82) и обратный пакет отправляют без опции 82.
Win2k8 R2 DHCP problem with Option82
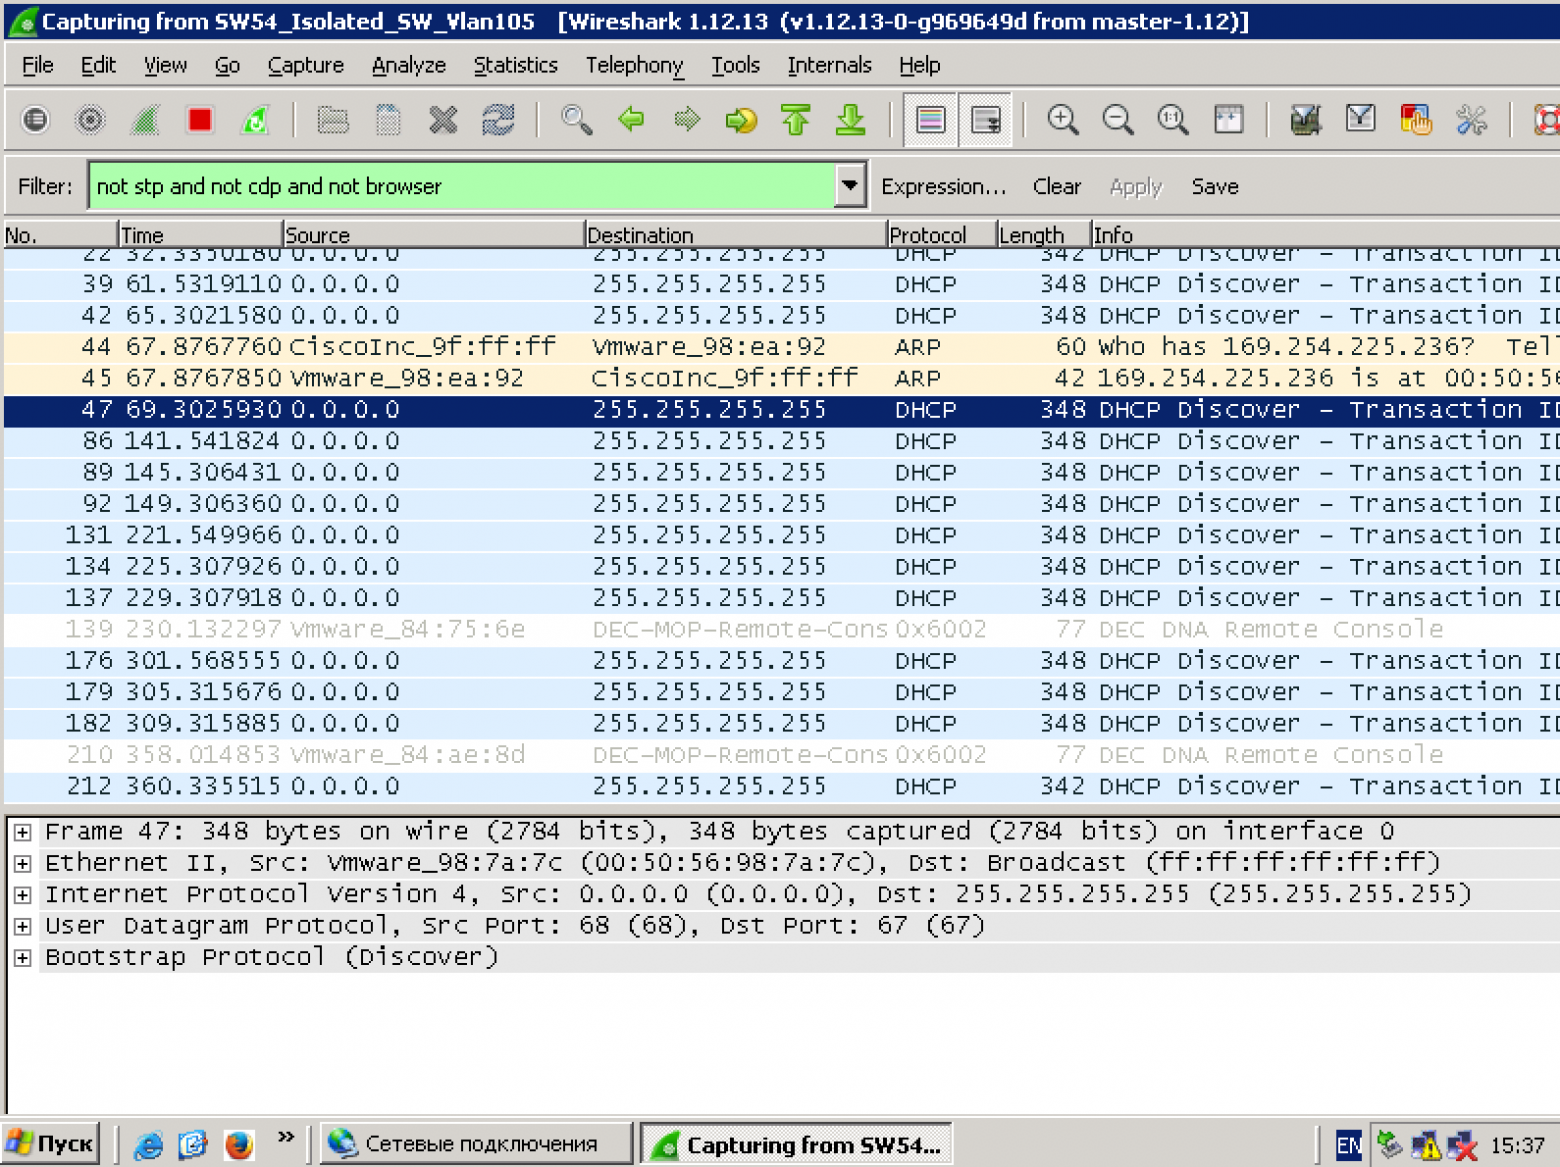
- Запрос от клиента отправляется Broadcast (DHCP Discover).
- Оборудование (Nexus) отправляет пакет к DHCP серверу (DHCP Discover + Option 82).
- DHCP Сервер принимает пакет обрабатывает, отправляет обратно, но без опции 82. (DHCP Offer – without option 82)
- Оборудование (Nexus) принимает пакет от DHCP сервера. (DHCP Offer) Но не отправляет этот пакет к конечному пользователю.
Данные снифера — на Windows Server 2008 и на клиенте DHCP
Windows Server 2008 получает запрос от сетевого оборудования. (Option 82 присутствует в списке)
Windows Server 2008 отправляет ответ к сетевому оборудованию. (Option 82 отсутствует в списке опций в пакете)
Запрос от клиента – присутствуют DHCP Discover и отсутствуют DHCP Offer
Статистика на сетевом оборудовании:
NEXUS-9000V-SW-1# show ip dhcp relay statistics
----------------------------------------------------------------------
Message Type             Rx              Tx           Drops
----------------------------------------------------------------------
Discover                  8               8               0
Offer                     8               8               0
Request(*)                0               0               0
Ack                       0               0               0
Release(*)                0               0               0
Decline                   0               0               0
Inform(*)                 0               0               0
Nack                      0               0               0
----------------------------------------------------------------------
Total                    16              16               0
----------------------------------------------------------------------

DHCP L3 FWD:
Total Packets Received                           :         0
Total Packets Forwarded                          :         0
Total Packets Dropped                            :         0
Non DHCP:
Total Packets Received                           :         0
Total Packets Forwarded                          :         0
Total Packets Dropped                            :         0
DROP:
DHCP Relay not enabled                           :         0
Invalid DHCP message type                        :         0
Interface error                                  :         0
Tx failure towards server                        :         0
Tx failure towards client                        :         0
Unknown output interface                         :         0
Unknown vrf or interface for server              :         0
Max hops exceeded                                :         0
Option 82 validation failed                      :         0
Packet Malformed                                 :         0
Relay Trusted port not configured                :         0
DHCP Request dropped on MCT                      :         0
*  -  These counters will show correct value when switch
receives DHCP request packet with destination ip as broadcast
address. If request is unicast it will be HW switched
NEXUS-9000V-SW-1#
Почему в Microsoft Windows Server 2012 настройка такая сложная?
В Microsoft Windows Server 2012 еще не поддерживается RFC#3527 (Option 82 Sub-option 5(0x5) — Link Selection)
Но уже реализован функционал Policy.
Как это работает:
- Microsoft Windows Server 2012 есть супер-пул (SuperScope) в котором есть адреса Loopback и пулы для реальных сетей.
- Выбор пула для выдачи IP адреса попадает в SuperScope, т. к. ответ пришел от DHCP Relay с Source адреса Loopback, входящего в SuperScope.
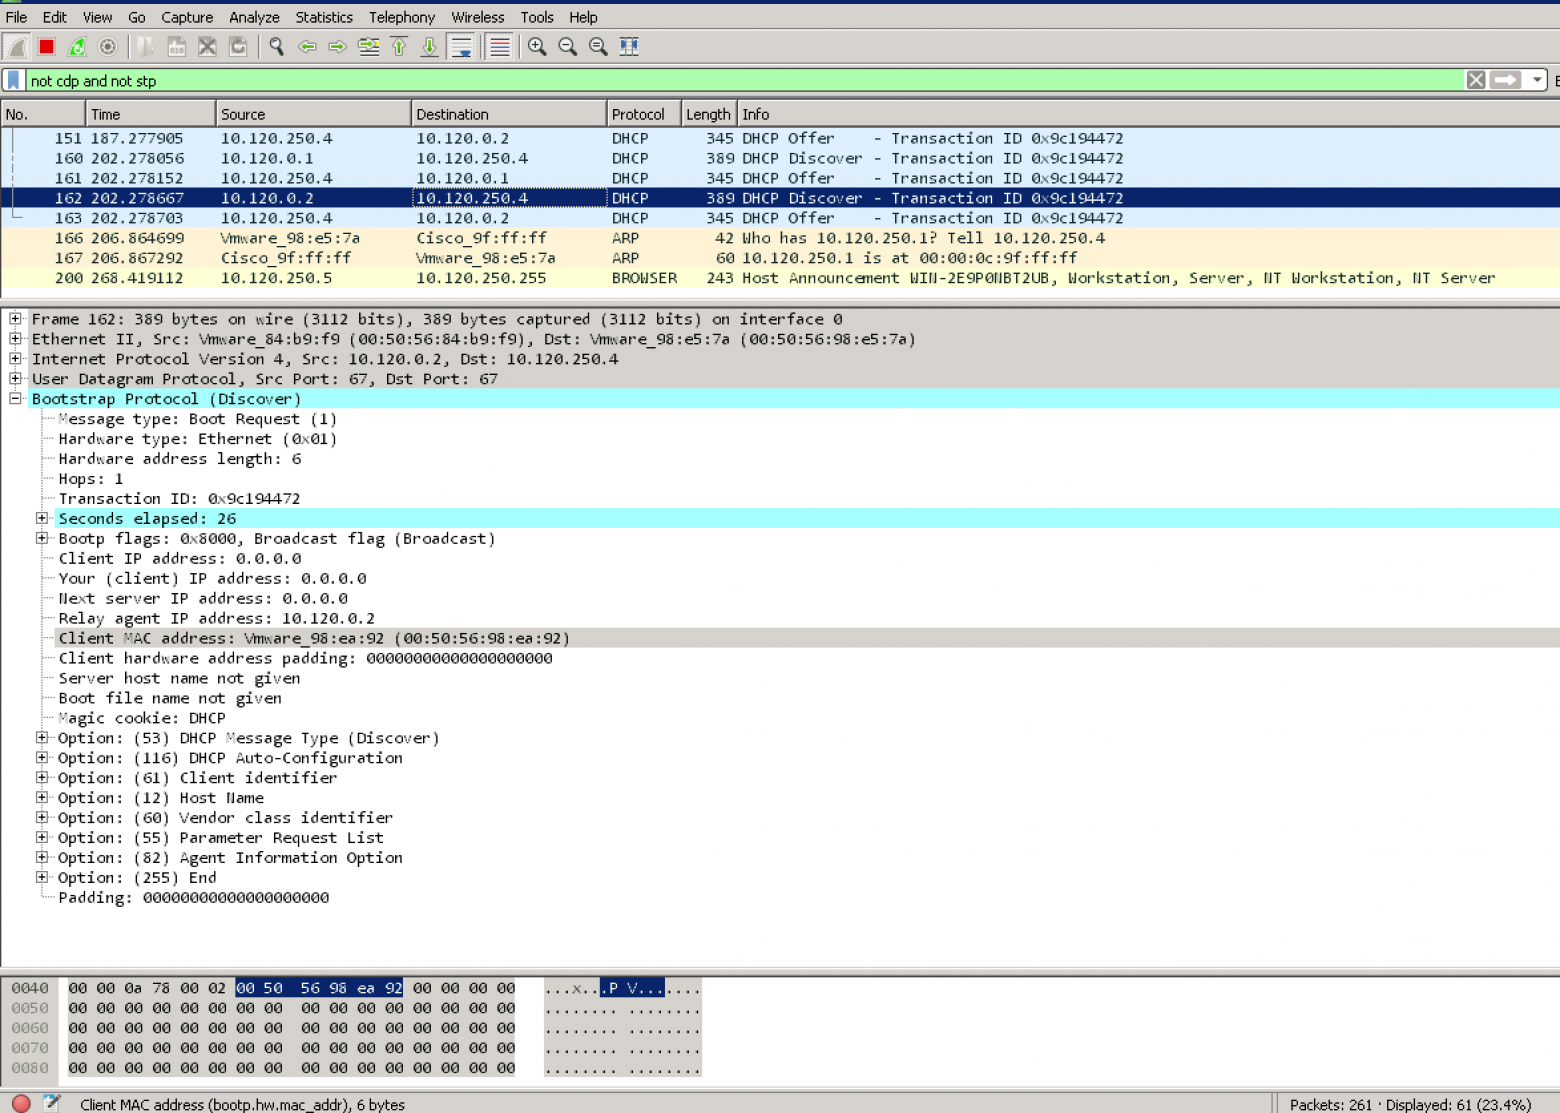
- Используя Policy запрос выбирает из Superscope тот member scope, VNI которого содержится в Option 82 Suboption 1 Agent Circuit ID. (“0108000600”+ 24 бита VNI + 24 бита значения которых мне неизвестно, но сниффер показывает значения 0 в этом поле.)
Как упрощается настройка в Microsoft Windows Server 2016/2019?
В Microsoft Windows Server 2016 реализован функционал RFC#3527. Т. е. Windows Server 2016 умеет распознавать правильную сеть из атрибута Option 82 Sub-option 5(0x5) — Link Selection
Возникают сразу 3 вопроса:
- Можем ли обойтись без Superscope?
- Можем ли обойтись без Policy и перевода VNI в 16-тиричный вид?
- Можем ли обойтись без Scope для Loopback адресов DHCP Source?
Q. Можем ли обойтись без Superscope?
A. Да, scope можно создавать сразу в области IPv4 адресов.
Q. Можем ли обойтись без Policy и перевода VNI в 16-тиричный вид?
A. Да, выбор сети происходит на основе Option 82 Suboption 0x5,
Q. Можем ли обойтись без Scope для Loopback адресов DHCP Source?
A. Нет, не можем. Т. к. в Microsoft Windows Server 2016/2019 действует защита от злонамеренных DHCP запросов. Т. е. все запросы с адресов, которых нет в пуле DHCP сервера считаются злонамеренными.
DHCP Subnet Selection Options
 Note
All relay agent IP addresses (GIADDR) must be part of an active DHCP scope IP address range. Any GIADDR outside of the DHCP scope IP address ranges is considered a rogue relay and Windows DHCP Server will not acknowledge DHCP client requests from those relay agents.

A special scope can be created to "authorize" relay agents. Create a scope with the GIADDR (or multiple if the GIADDR's are sequential IP addresses), exclude the GIADDR address(es) from distribution, and then activate the scope. This will authorize the relay agents while preventing the GIADDR addresses from being assigned.
Т.е. для настройки на Microsoft Windows Server 2016/2019 DHCP пула для VXLAN BGP EVPN фабрики необходимо только:
- Создать пул для Source адресов Relay.
- Создать пул для клиентских сетей
Что не является необходимым (но можно настроить и это будет работать, и не будет мешать работать):
- Создавать Policy
- Создавать SuperScope
Пример
Пример настройки DHCP сервера (присутствуют 2 реальных клиента DHCP — клиенты подключены к VXLAN фабрике)
Пример настройки пользовательского пула:
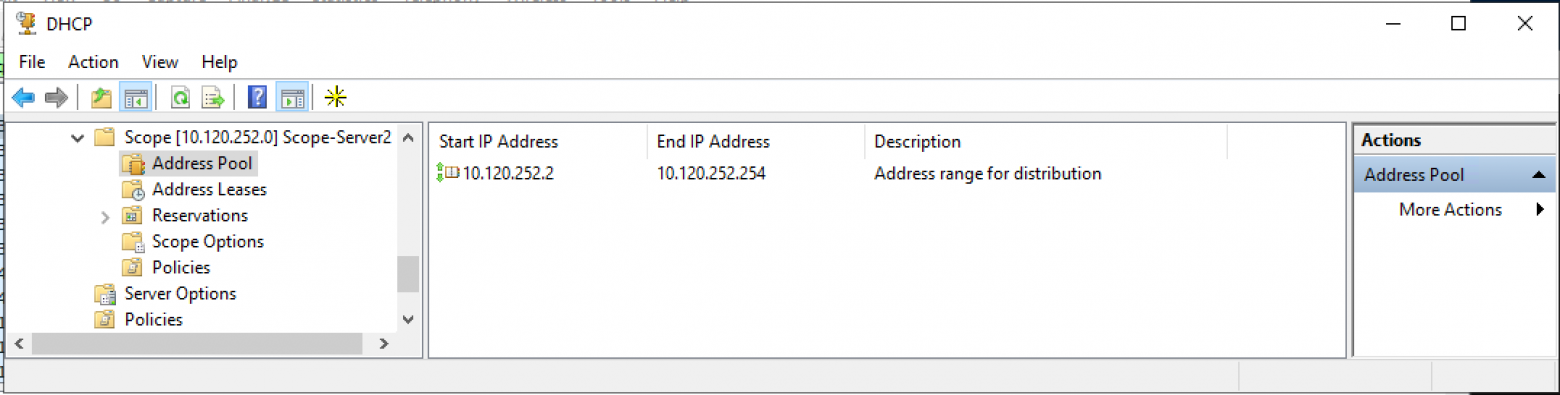
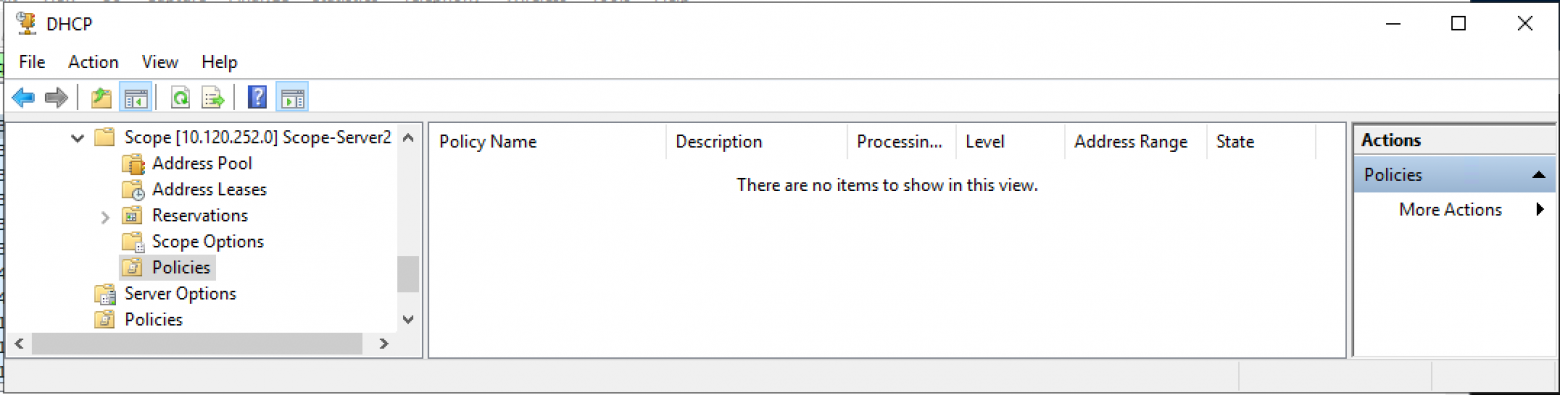
Пример настройки пользовательского пула (выбраны политики — для доказательства что политики не использовались для корректной работы пула):
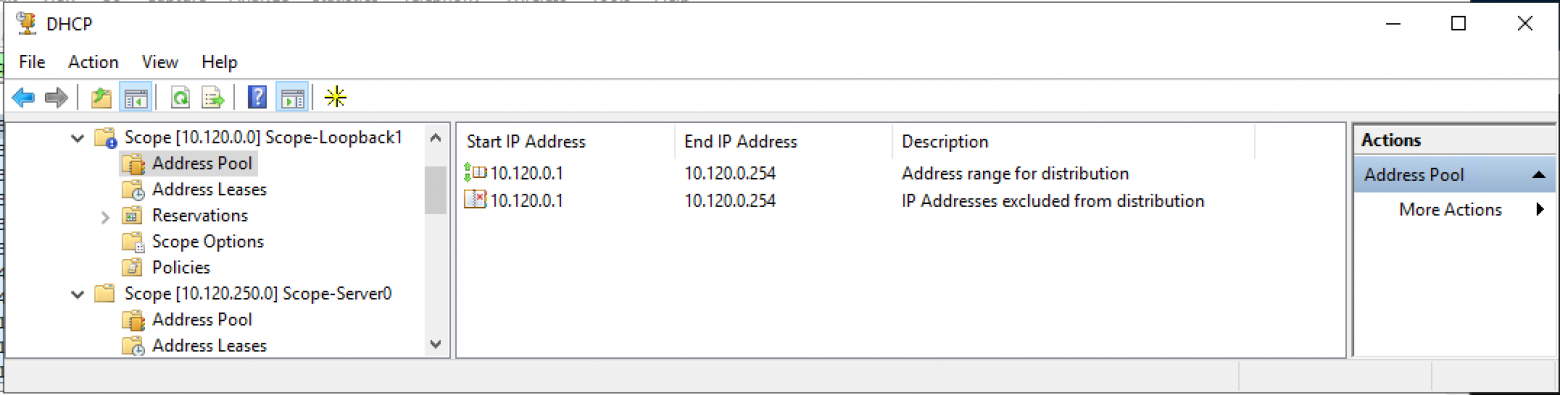
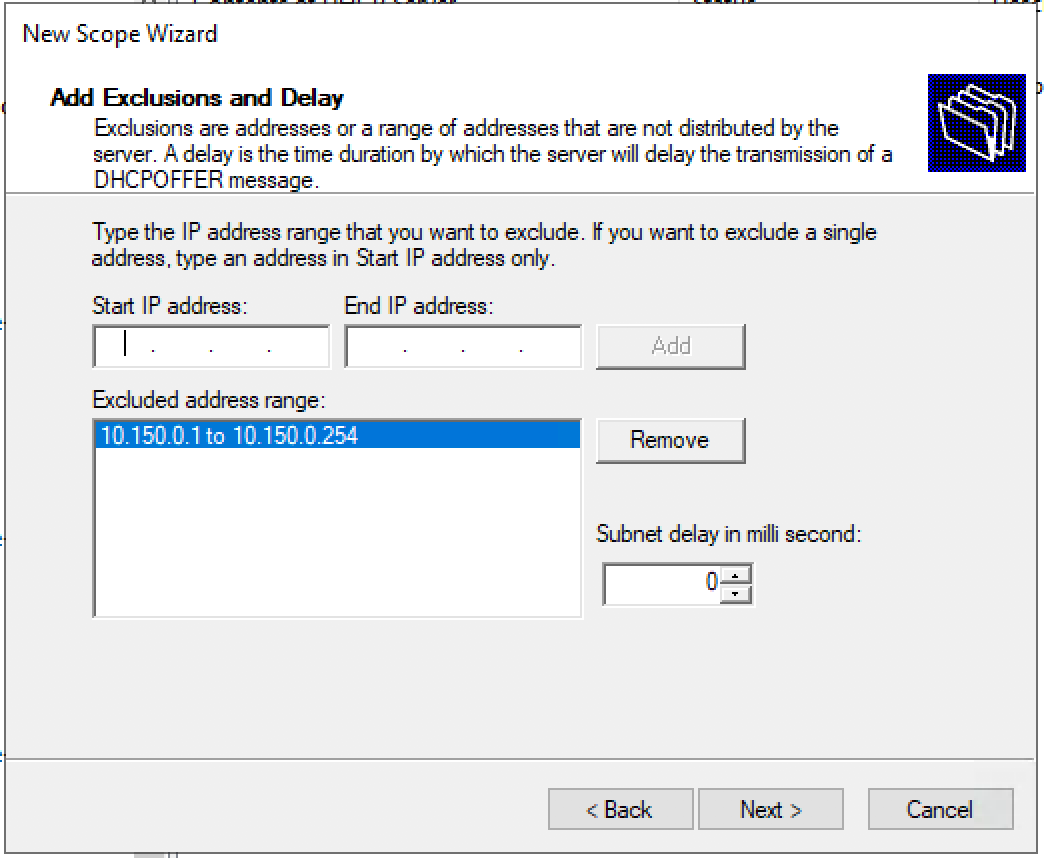
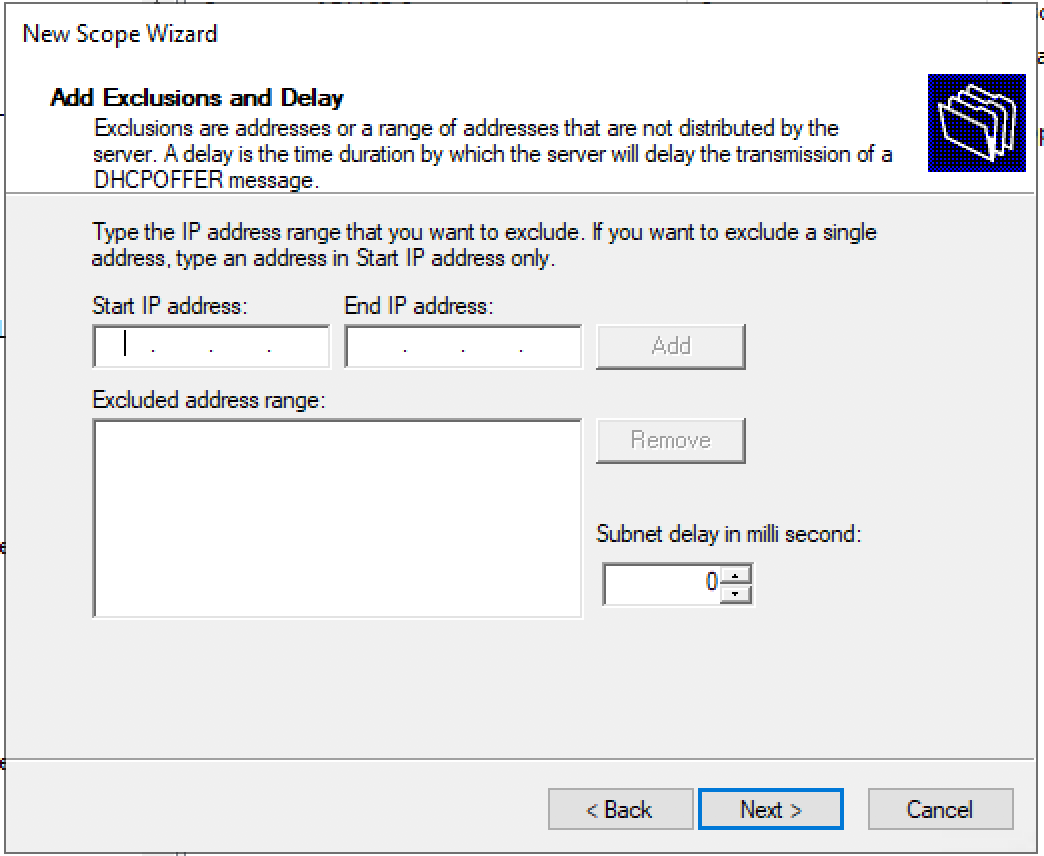
Пример настройки пула для Source адресов DHCP Relay (диапазон адресов для выдачи полностью соответствует исключению из пула адресов):
Настройка DHCP сервиса на Microsoft Windows Server 2019
Настройка пула для Loopback адресов (source) для DHCP Relay.
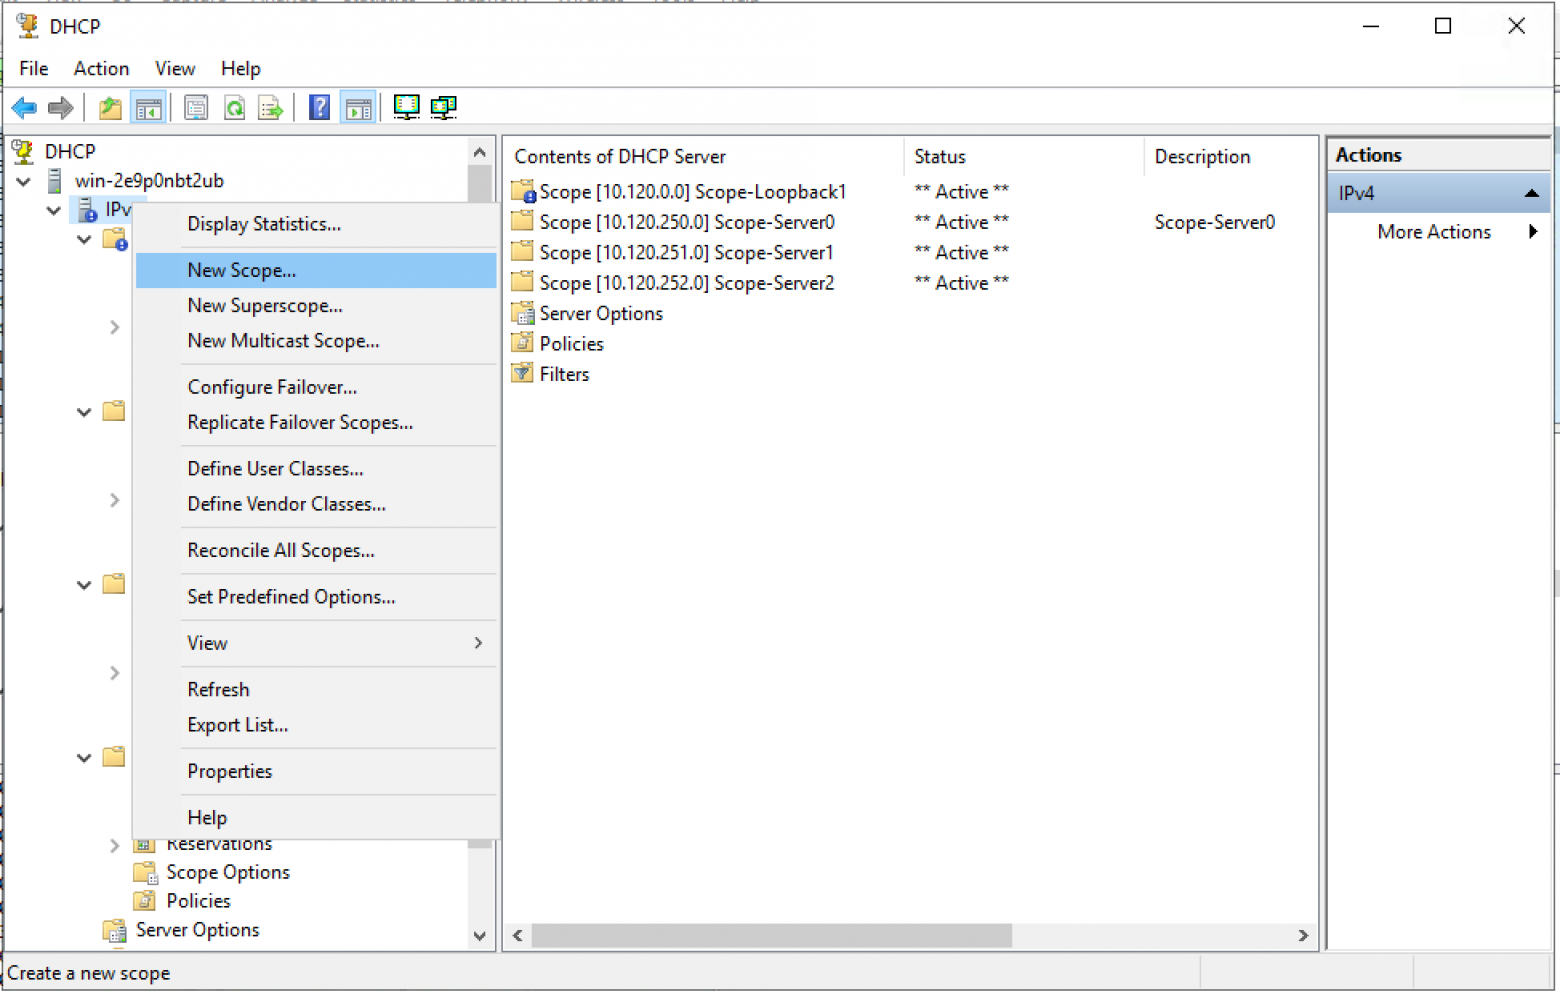
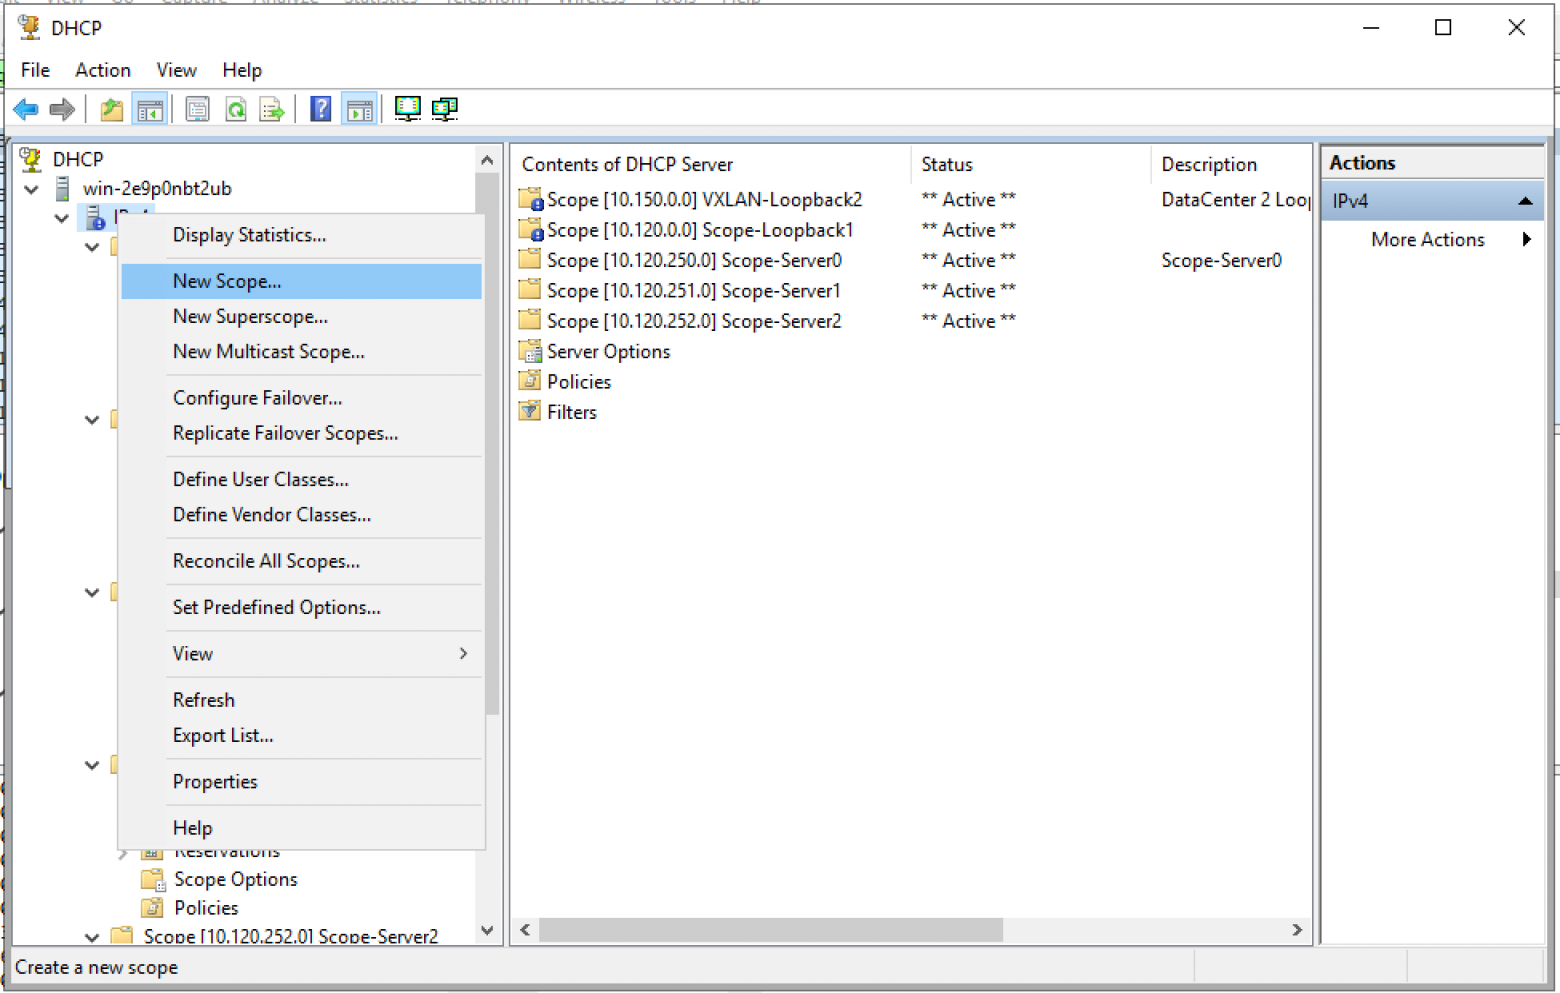
Создаем новый пул (Scope) в пространстве IPv4.
Мастер создания пула. «Next >»
Настраиваем имя пула и описание (Description) пула.

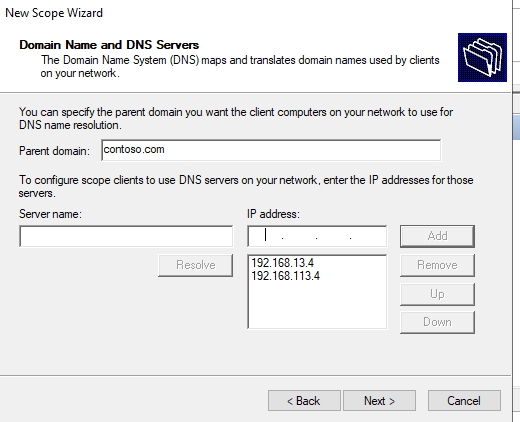
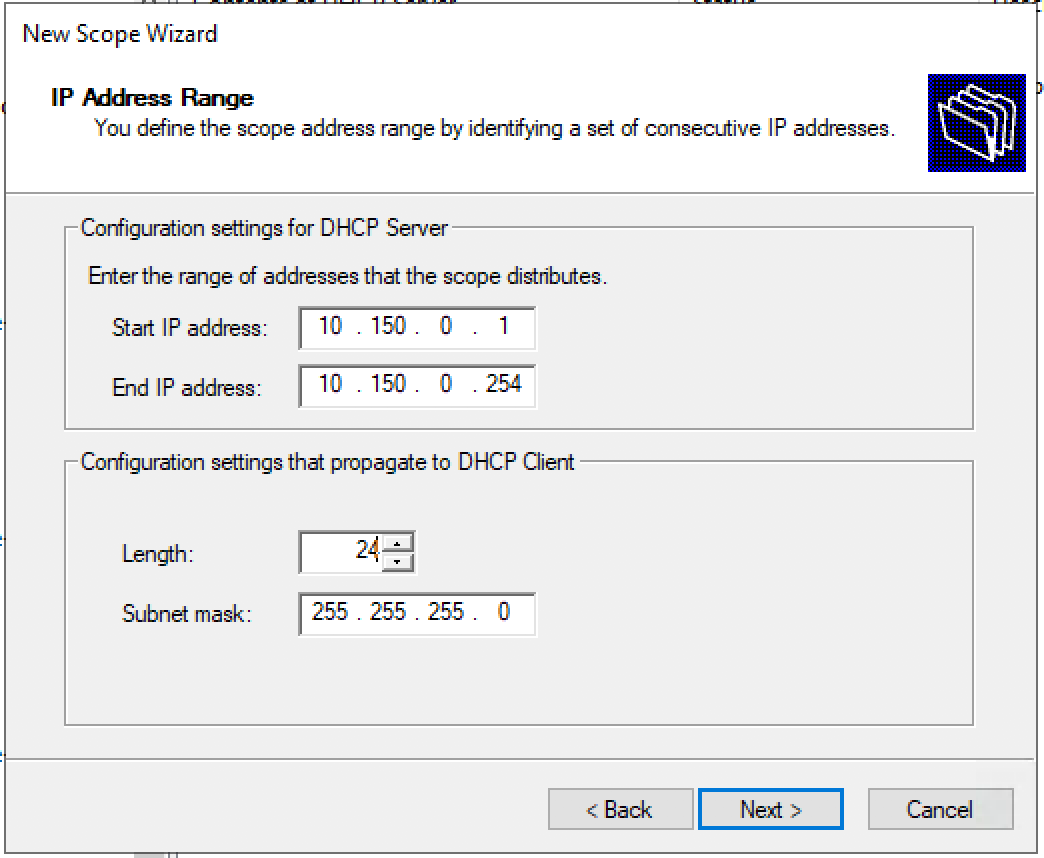
Задаем диапазон IP адресов для Loopback и маску для пула.
Добавляем исключения. Диапазон исключений должен полностью совпадать с диапазоном пула.
Время аренды. «Next >»

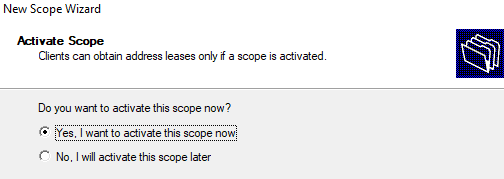
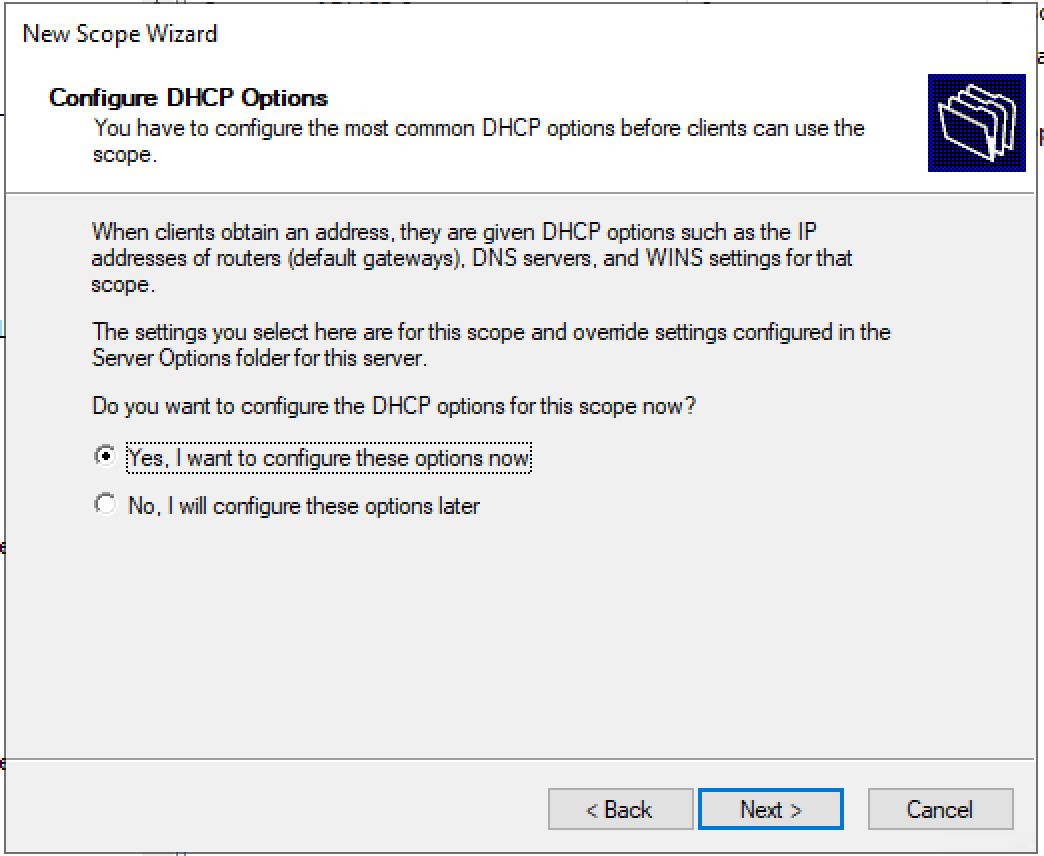
Запрос: Будете настраивать DHCP опции сейчас (DNS, WINS, Gateway, Domain) или сделаете это позже. Быстрее будет ответить нет, и после активировать пул вручную. Либо пройти до конца не заполняя ни какую информацию и в конце мастера активировать пул.
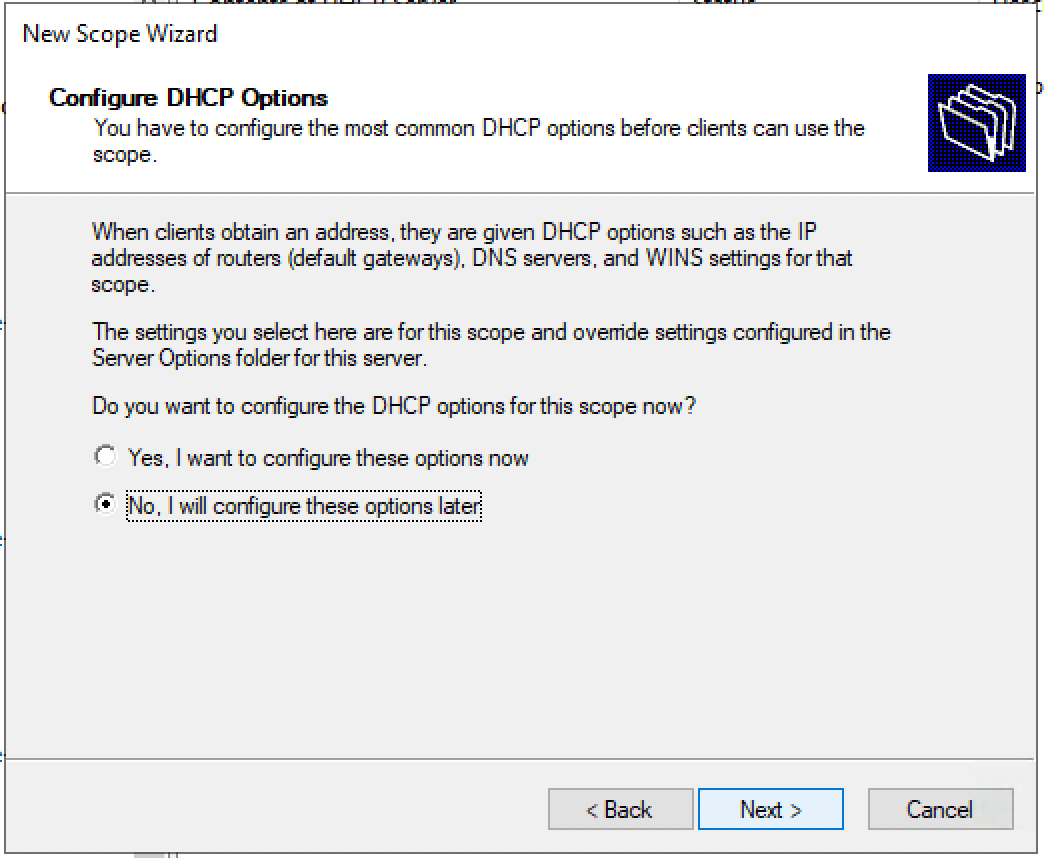
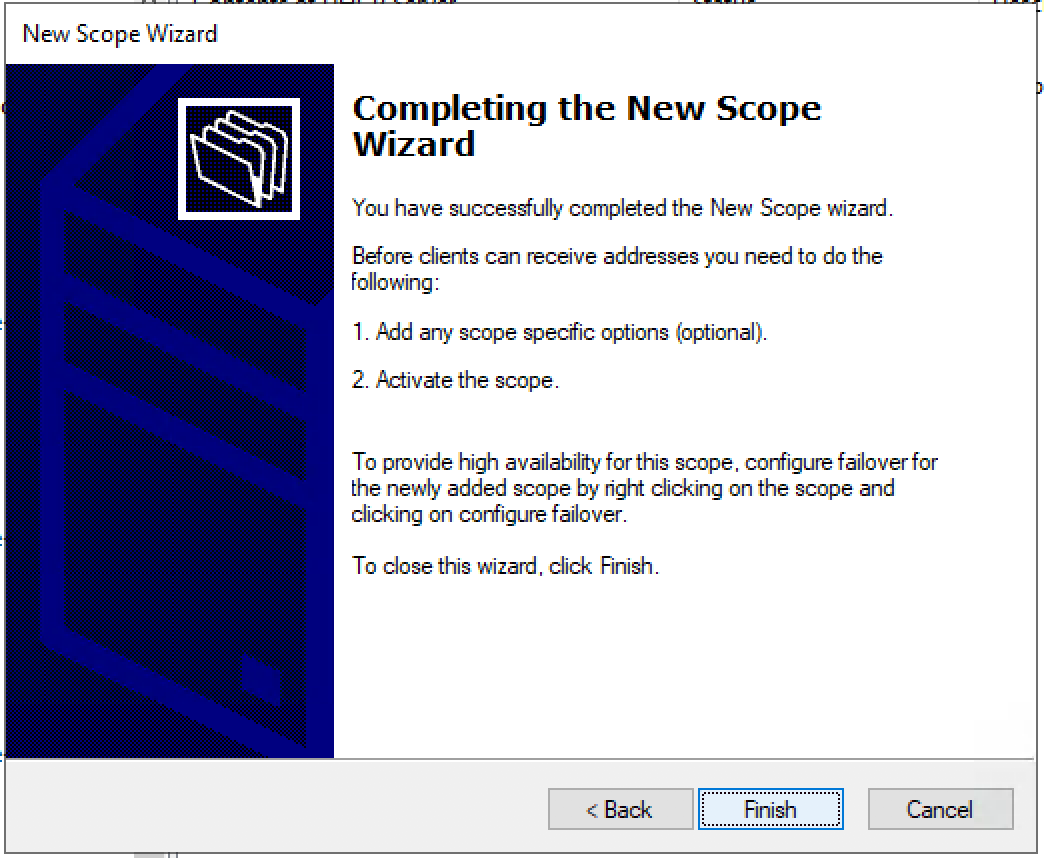
Подтверждаем, что опции не настроены, пул не активирован. «Finish»
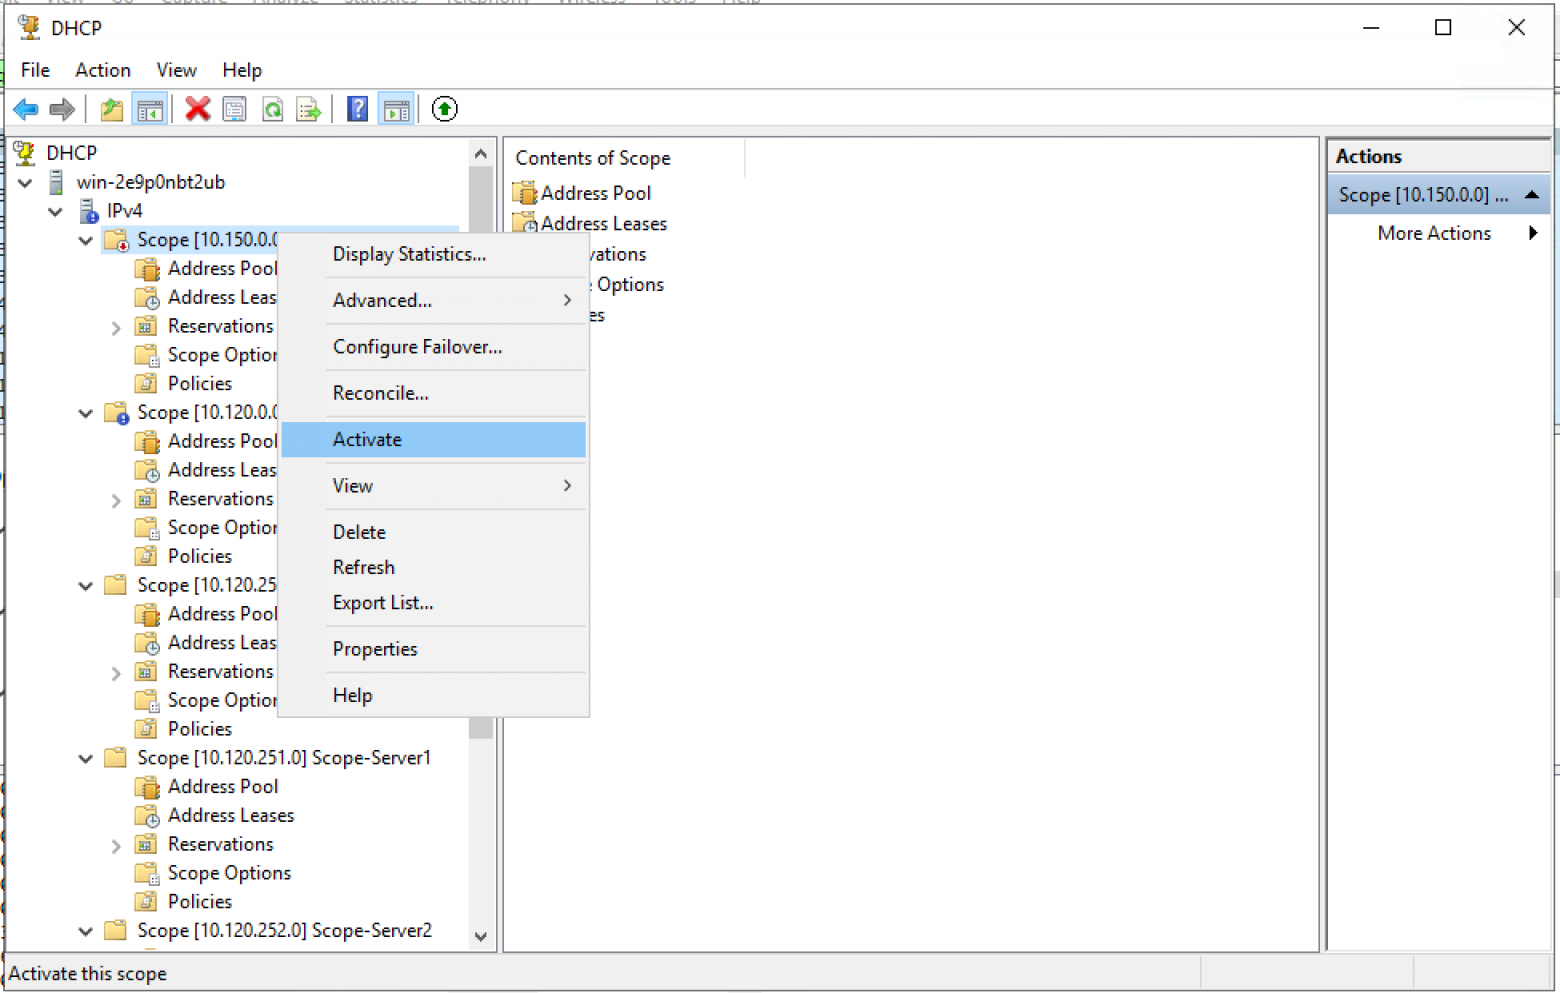
Активируем пул вручную. — Выбираем Scope и в контекстном меню — выбираем «Activate».
Создаем пул для пользователей/серверов.
Создаем новый пул.
Мастер создания пула. «Next >»
Настраиваем имя пула и описание (Description) пула.

Задаем диапазон IP адресов для Loopback и маску для пула.
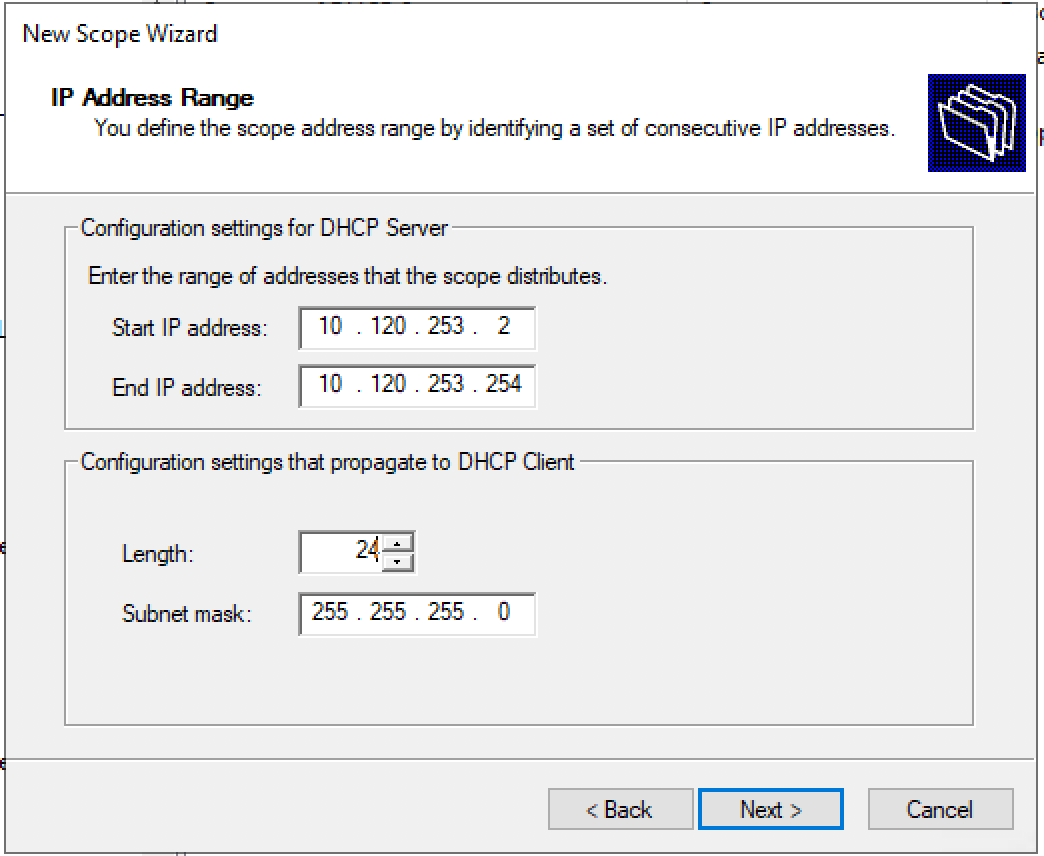
Добавляем исключения. (По умолчанию исключений не требуется) «Next >»
Время аренды. «Next >»
Запрос: Будете настраивать DHCP опции сейчас (DNS, WINS, Gateway, Domain) или сделаете это позже. Да настроим сейчас.
Настраиваем адрес шлюза по умолчанию.
Настраиваем домен и адреса DNS серверов.
Настраиваем IP адреса WINS серверов.
Активация Scope.
Пул настроен. «Finish»

Заключение
Использование Windows Server 2016/2019 уменьшает сложность настройки DHCP сервера для VXLAN фабрики (или любой другой фабрики). (Не требуется передача IT специалистам специальные связки: Network/Agent Circuit ID для прописывания фильтров.)
Будет ли работать конфигурация для Windows Server 2012 на новых серверах 2016/2019 – да будет работать.
В данном документе приведены ссылки на 2 версии: 7.X и 9.3. Это связано с тем, что версия 7.0(3)I7(7) — Cisco Suggested release, а версия 9.3 — является самой инновационной (вплоть до поддержки Multicast через VXLAN Multisite).
Список источников
- Nexus 9000 VXLAN Configuration Guide 7.x
- Nexus 9000 VXLAN Configuration Guide 9.3
- DFA (Cisco Dynamic Fabric Automation)
- Configuring Microsoft Windows Server 2012 to provide DHCP services in an eVPN Scenario (VXLAN, Cisco One Fabric, etc)
- 3.4 DHCP Superscopes
- Introduction to DHCP Policies
- Win2k8 R2 DHCP problem with Option82
- DHCP Subnet Selection Options