Update 2021: docker-compose has been rewritten in Go, and is now a docker command docker compose
As such, there is no longer the need to «install» it.
See docker compose.
Update 7th of november 2018:
On desktop systems like Docker for Mac and Windows, Docker Compose is
included as part of those desktop installs.
Accordingly to the documentation, Docker for Windows and Docker Toolbox already include Compose along with other Docker apps, so most Windows users do not need to install Compose separately.
Update 2017: this is now officially managed (for Windows 10 supporting Hyper-V) with «Docker for Windows».
See «Install Docker for Windows».
It does have a chocolatey installation package for Docker, so:
choco install docker-for-windows
# or
choco upgrade docker-for-windows
Again, this requires a 64bit Windows 10 Pro, Enterprise and Education (1511 November update, Build 10586 or later) and Microsoft Hyper-V.
For other Windows, you still need VirtualBox + Boot2Docker.
Update: docker compose 1.5 (Nov 2015) should make it officially available for Windows (since RC2).
Pull requests like PR 2230 and PR 2143 helped.
Commit 13d5efc details the official Build process for the Windows binary.
Original answer (Q1-Q3 2015).
Warning: the original answer («docker-compose in a container») below seems to have a bug, according to Ed Morley (edmorley).
There appear to be caching issues with the «docker-compose in a container» method (See issue #6: «Changes to docker-compose.yml and Dockerfile not being detected»)
Ed recommends:
As such for now, running the Python
docker-composepackage insideboot2dockerseems to be the most reliable solution for Windows users (having spent many hours trying to battle with the alternatives).To install docker-compose from PyPI, run this from inside
boot2docker:docker@boot2docker:~$ tce-load -wi python && curl https://bootstrap.pypa.io/get-pip.py | sudo python - && sudo pip install -U docker-composeTo save having to run the above every time the
boot2dockerVM is restarted (since changes don’t persist), you can usebootlocal.shlike so:docker@boot2docker:~$ echo 'su docker -c "tce-load -wi python" && curl https://bootstrap.pypa.io/get-pip.py | python - && pip install -U docker-compose' | sudo tee /var/lib/boot2docker/bootlocal.sh > /dev/null && sudo chmod +x /var/lib/boot2docker/bootlocal.sh(The
su docker -cgymnastics are required sincetce-loadcannot be run asroot, andbootlocal.shis run asroot. Thechmodofbootlocal.shshould be unnecessary once #915 is fixed.
Add-ato theteecommand if you need to append, rather than overwritebootlocal.sh.)If you wish to use a pre-release version of docker-compose, then replace
pip install -U docker-composewithpip install -U docker-compose>=1.3.0rc1or equivalent.
Original answer:
I also run docker-compose (on Windows boot2docker) in a image by:
-
cloning https://github.com/docker/compose in
/c/Users/<username>/myproject/compose(in order to have persistence, since/c/Users/<username>is automatically mounted, when I use VirtualBox with its extension pack ) -
building the docker-compose image:
cd /c/Users/<username>/myproject/compose # that will put the repo in a detached HEAD, but it does not matter here git checkout 1.2.0 docker build -t docker-compose . -
adding a ‘
dc‘ alias (in aprofilefile that I copy to my/home/docker/.ashrcbefore launching the boot2docker ssh session.)dc='docker run --rm -i -t -v /var/run/docker.sock:/var/run/docker.sock -v `pwd`:`pwd` -w `pwd` docker-compose'
From there, a ‘dc up‘ or ‘dc ps‘ just works. On Windows. With boot2docker 1.6.
Docker-compose — это утилита, позволяющая запускать одновременно несколько контейнеров, используя при этом единый файл конфигурации всего стека сервисов, нужных вашему приложению. Например, такая ситуация: запускаем node.js webapp, которому нужна для работы mongodb, compose выполнит build вашего контейнера с webapp (традиционный Dockerfile) и перед его запуском запустит контейнер с mongodb внутри; так же может выполнить линк их между собой. Что крайне удобно как в разработке, так и в CI самого приложения. Так сложилось, что Windows пользователи были обделены возможностью использовать столько удобное средство, ввиду того, что официальной поддержки данной ОС все еще нет. А python версия для *nix не работает в окружении windows cmd, ввиду ограничений консоли Windows.
Для того, чтобы запустить docker-compose, мы можем использовать консольную оболочку Babun. Это, так сказать, «прокаченный» форк cygwin.
Итак, рецепт запуска docker-compose в Windows из консоли babun такой:
1. Скачиваем(~280MB!) и устанавливаем сам babun, узнать больше об этой оболочке можно на ее домашней странице babun.github.io;
2. Распаковываем архив (после установки полученную папку можно удалять);
3. Запускаем файл install.bat и ждем, пока пройдет установка;
4. После в открывшемся окне babun введем команду:
babun update
И убедимся, что у нас самая последняя версия оболочки (далее все команды выполняются только внутри оболочки babun);
5. Если вам не нравится дефолтный shell babun (используется zsh), его можно изменить на bash. Для этого вводим:
babun shell /bin/bash
6. Теперь нам нужно установить те самые зависимости Python, которых так не хватает docker-compose. Для этого выполним следующие команды по очереди:
pact install python-setuptools
pact install libxml2-devel libxslt-devel libyaml-devel
curl -skS https://bootstrap.pypa.io/get-pip.py | python
pip install virtualenv
curl -skS https://raw.githubusercontent.com/mitsuhiko/pipsi/master/get-pipsi.py | python
7. Теперь мы готовы установить сам docker-compose:
pip install -U docker-compose
Если все прошло успешно, увидим:
{ ~ }  » docker-compose --version
docker-compose 1.2.0
Если же вы получили ошибку, error python fcntl или сообщение о не найдом файле docker-compose, попробуйте найти файл docker-compose в папках /usr/local/bin, /usr/sbin и подобных, затем можно сделать симлинк на /bin/. либо добавить в системный PATH недостающий путь.
Для правильной работы docker-compose нужно иметь уже настроенное окружение консоли для работы с docker-machine или boot2docker, а так же сам клиент docker должен быть доступен в системном PATH. О том, что такое docker, docker-machine и как с ними работать отлично рассказывает официальная документация.
Для входа в окружение нашего хоста докера, запущенного в docker-machine, нужно выполнить:
eval "$(docker-machine env ИМЯ_МАШИНЫ)"
Либо тоже самое для boot2docker:
eval "$(boot2docker shellinit)"
Проверить правильность работы клиента docker можно так:
docker ps
Если получаем список контейнеров или просто заголовки таблицы, значит, все ок!
docker ps
CONTAINER ID        IMAGE                         COMMAND                CREATED             STATUS              PORTS                                          NAMES
Для запуска стека приложения переходим в каталог нашего приложения, где у нас уже должен быть заготовлен файл docker-compose.yml или fig.yml. Синтаксис yml файла описан тут.
Далее для запуска вводим команду:
docker-compose up
Если нужно запустить в фоне, добавляем -d. Compose построит нужный образ и запустит его согласно вашему файлу docker-compose.yml.
На этом все.
Спасибо за внимание, надеюсь было полезно.
p.s. Я умышлено не стал говорить о варианте запуска compose как контейнера, т.к. считаю его неудобным.
| description | keywords | title | toc_max | redirect_from |
|---|---|---|---|---|
|
How to install Docker Compose |
compose, orchestration, install, installation, docker, documentation |
Overview |
3 |
/compose/compose-desktop/ |
{% include compose-eol.md %}
This page contains summary information about the available options for getting Docker Compose.
Installation scenarios
Scenario one: Install Docker Desktop
The easiest and recommended way to get Docker Compose is to install Docker Desktop. Docker Desktop
includes Docker Compose along with Docker Engine and Docker CLI which are Compose prerequisites.
Docker Desktop is available on:
- Linux
- Mac
- Windows
If you have already installed Docker Desktop, you can check which version of Compose you have by selecting About Docker Desktop from the Docker menu  {: .inline}
Scenario two: Install the Compose plugin
If you already have Docker Engine and Docker CLI installed, you can install the Compose plugin from the command line, by either:
- Using Docker’s repository
- Downloading and installing manually
Note
This is only available on Linux
{: .important}
Scenario three: Install the Compose standalone
You can install the Compose standalone on Linux or on Windows Server.
Note
This install scenario is no longer supported.
{: .important}
Docker Compose is available on multiple platforms.In this lab we’ll demonstrate some of the ways to install it on Linux, Windows and Mac.
Installing Docker Compose on Linux
Installing Docker Compose on Linux is a two-step process. Firt you will be downloading binary from github, Second giving executable permission.
Download the current stable release of Docker Compose
$ curl -L https://github.com/docker/compose/releases/download/1.24.1/docker-compose-`uname -s`-`uname -m` -o /usr/local/bin/docker-compose
$ chmod +x /usr/local/bin/docker-compose
Test the installation
You can run this command from a terminal window
$ docker-compose --version
Installing Docker Compose on Windows 10
If you have already installed Docker Desktop for Windows or Docker Toolbox then no need of separate installation for docker compose, since its part of the package.
Check Docker Compose is installed
You can run this command from a PowerShell or CMD terminal.
Installing Docker Compose on Mac
Docker Compose is installed as part of Docker for Mac. So if you have Docker for MAC, you have Docker Compose.
Check Docker Compose is installed
You can run this command from a terminal window.
$ docker-compose --version
Contributor
Savio Mathew
Инсталляционный докерный состав
На этой странице содержится информация о том,как установить Docker Compose.Вы можете запустить Compose на macOS,Windows и 64-битной Linux.
Prerequisites
Docker Compose полагается на Docker Engine для любой значимой работы,поэтому убедитесь,что Docker Engine установлен как локально,так и удаленно,в зависимости от ваших настроек.
-
На таких настольных системах,как Docker Desktop для Mac и Windows,компонент Docker Compose входит в состав этих настольных систем.
-
В системах Linux вы можете установить Docker Compose с Docker Engine с помощью удобного сценария . Выберите страницу установки Docker Engine для вашего дистрибутива, а затем найдите инструкции по установке с помощью удобного сценария.
В противном случае вам следует сначала установить Docker Engine для вашей ОС, а затем обратиться к этой странице за инструкциями по установке Compose в системах Linux. -
Чтобы запустить Compose от имени пользователя без полномочий root, см. раздел Управление Docker от имени пользователя без полномочий root .
Install Compose
Чтобы установить Compose на системы Mac,Windows,Windows Server или Linux,следуйте приведенным ниже инструкциям.
Установить другую версию
В приведенных ниже инструкциях описывается установка текущей стабильной версии ( v2.5.0 ) Compose. Чтобы установить другую версию Compose, замените указанный номер версии на нужный.
Выпуски Compose также перечислены и доступны для прямой загрузки на странице выпуска репозитория Compose на GitHub .
Чтобы установить Python-версию Compose, следуйте инструкциям в ветке Compose v1 GitHub .
- Mac
- Windows
- Windows Server
- Linux
- Linux Standalone binary
Установите Compose on macOS
Docker Desktop для Mac включает Compose вместе с другими приложениями Docker, поэтому пользователям Mac не нужно устанавливать Compose отдельно. Инструкции по установке см. в разделе Установка Docker Desktop на Mac .
Установить композицию на настольные системы Windows
Docker Desktop для Windows включает Compose вместе с другими приложениями Docker, поэтому большинству пользователей Windows не нужно устанавливать Compose отдельно. Инструкции по установке см. в разделе Установка Docker Desktop в Windows .
Если вы используете демона и клиента Docker непосредственно на сервере Microsoft Windows Server,следуйте инструкциям во вкладке Windows Server.
Установите композицию на Windows Server
Следуйте этим инструкциям,если вы запускаете демон и клиент Docker непосредственно на Microsoft Windows Server и хотите установить Docker Compose.
-
Запустите PowerShell с повышенными правами (запустите его от имени администратора). Найдите PowerShell, щелкните правой кнопкой мыши и выберите « Запуск от имени администратора» . Когда вас спросят, хотите ли вы разрешить этому приложению вносить изменения в ваше устройство, нажмите «Да » .
-
В PowerShell,поскольку GitHub теперь требует TLS1.2,выполните следующее:
[Net.ServicePointManager]::SecurityProtocol = [Net.SecurityProtocolType]::Tls12
Затем выполните следующую команду для загрузки текущего стабильного выпуска Compose (v2.5.0):
Invoke-WebRequest "https://github.com/docker/compose/releases/download/v2.5.0/docker-compose-Windows-x86_64.exe" -UseBasicParsing -OutFile $Env:ProgramFilesDockerdocker-compose.exe
Note
В Windows Server 2019 вы можете добавить исполняемый файл Compose в
$Env:ProgramFilesDocker. Поскольку этот каталог зарегистрирован в системномPATH, вы можете запустить командуdocker-compose --versionна последующем шаге без дополнительной настройки.Чтобы установить другую версию Compose, замените
v2.5.0версией Compose, которую вы хотите использовать. -
Проверьте установку.
$ docker compose version
Docker Compose version v2.5.0
Установить композицию на системы Linux
Вы можете установить Docker Compose разными способами,в зависимости от ваших потребностей:
- В средах тестирования и разработки некоторые пользователи предпочитают использовать автоматизированные удобные сценарии для установки Docker.
- Большинство пользователей настраивают репозитории Docker и устанавливают из них для простоты установки и обновления. Это рекомендуемый подход.
- Некоторые пользователи загружают и устанавливают двоичный файл и управляют обновлениями вручную.
Установите с помощью удобного скрипта
Поскольку Docker Compose теперь является частью Docker CLI,его можно установить с помощью удобного скрипта с Docker Engine и CLI.
Выберите свой дистрибутив Linux и следуйте инструкциям.
Установка с использованием репозитория
Если вы уже следовали инструкциям по установке Docker Engine,Docker Compose уже должен быть установлен.
В противном случае вы можете настроить репозиторий Docker, как указано в установке Docker Engine, выбрать свой дистрибутив Linux и перейти к разделу « Set up the repository ».
When finished
-
Обновите индекс пакета
aptи установите последнюю версию Docker Compose или перейдите к следующему шагу, чтобы установить конкретную версию:$ sudo apt-get update $ sudo apt-get install docker-compose-plugin
-
Чтобы установить определенную версию Docker Engine, перечислите доступные версии в репозитории, затем выберите и установите:
a.Перечислите версии,доступные в вашем репозитории:
$ apt-cache madison docker-compose-plugin

  docker-compose-plugin | 2.3.3~ubuntu-focal | https://download.docker.com/linux/ubuntu focal/stable arm64 Packages
б. Установите конкретную версию, используя строку версии из второго столбца, например,
2.3.3~ubuntu-focal.$ sudo apt-get install docker-compose-plugin=<VERSION_STRING> -
Убедитесь,что Docker Compose установлен правильно,проверив его версию.
$ docker compose version
Docker Compose version v2.3.3
Установите двоичный файл вручную
В Linux вы можете загрузить двоичный файл Docker Compose со страницы выпуска репозитория Compose на GitHub и скопировать его в $HOME/.docker/cli-plugins как docker-compose . Следуйте инструкциям по ссылке, которые включают запуск команды curl в вашем терминале для загрузки двоичных файлов. Эти пошаговые инструкции также приведены ниже.
-
Выполните эту команду,чтобы загрузить текущий стабильный выпуск Docker Compose:
$ DOCKER_CONFIG=${DOCKER_CONFIG:-$HOME/.docker}
$ mkdir -p $DOCKER_CONFIG/cli-plugins
$ curl -SL https://github.com/docker/compose/releases/download/v2.5.0/docker-compose-linux-x86_64 -o $DOCKER_CONFIG/cli-plugins/docker-compose
Эта команда устанавливает Compose для активного пользователя в каталог
$HOME.Чтобы установить Docker Compose для всех пользователей вашей системы, замените~/.docker/cli-pluginsна/usr/local/lib/docker/cli-plugins.Чтобы установить другую версию Compose, замените
v2.5.0версией Compose, которую вы хотите использовать. -
Применить исполняемые разрешения к двоичному файлу:
$ chmod +x $DOCKER_CONFIG/cli-plugins/docker-compose
или если вы решили установить Compose для всех пользователей
$ sudo chmod +x /usr/local/lib/docker/cli-plugins/docker-compose
-
Проверьте установку.
 $ docker compose version
 Docker Compose version v2.5.0
Установите Compose как отдельный двоичный файл в системах Linux
Вы можете использовать Compose как отдельный двоичный файл без установки Docker CLI.
- Выполните эту команду,чтобы загрузить текущий стабильный выпуск Docker Compose:
$ curl -SL https://github.com/docker/compose/releases/download/v2.5.0/docker-compose-linux-x86_64 -o /usr/local/bin/docker-compose
Чтобы установить другую версию Compose, замените
v2.5.0версией Compose, которую вы хотите использовать.
- Применить исполняемые разрешения к двоичному файлу:
$ sudo chmod +x /usr/local/bin/docker-compose
Note:
Если команда
docker-composeне работает после установки, проверьте свой путь. Вы также можете создать символическую ссылку на/usr/binили любой другой каталог на вашем пути.For example:
$ sudo ln -s /usr/local/bin/docker-compose /usr/bin/docker-compose
-
Проверьте установку.
 $ docker-compose
 Docker Compose version v2.5.0
Uninstallation
Чтобы удалить Docker Compose, если вы установили с помощью curl :
$ rm $DOCKER_CONFIG/cli-plugins/docker-compose
или если вы решили установить Compose для всех пользователей
$ sudo rm /usr/local/lib/docker/cli-plugins/docker-compose
Получили ошибку «Разрешение отклонено»?
Если вы получаете сообщение об ошибке «Отказано в доступе» с помощью любого из вышеперечисленных методов, у вас, вероятно, нет необходимых прав для удаления
docker-compose. Чтобы принудительно удалить, добавьтеsudoк любой из приведенных выше команд и запустите снова.
Куда идти дальше
- User guide
- Getting Started
- Ссылка на командную строку
- Ссылка на композитный файл
- Примеры приложений с Compose
компоновка , оркестровка , установка , установка , докер , документация
Docker
20.10
-
Обеспечение доступа к GPU с помощью Compose
Службы Compose могут определять резервирование устройств GPU, если хост Docker содержит такие устройства. Демон настроен соответствующим образом.
-
Обзор Докерский состав
Ищете ссылку на файл Compose? Найдите последнюю версию здесь.
-
Состав сети
Эта страница относится к форматам файлов Compose версии 2 и выше.
-
Применение Состав в производстве
Когда вы определяете свое приложение с помощью разработки Compose, вы можете использовать это определение для запуска приложений в различных средах, таких как CI, промежуточная и производственная.

Pick Your Operating System
You came here to ask, «how do I install Docker?» The answer can be straightforward if you’re willing to accept my way, but the steps differ based on which operating system is utilized. To make things more complicated, there are a few ways to install Docker on your OS that are largely based on preference. Today I’m going to walk you through my preferred method. This isn’t the only way, but I’ve found it to be the best way to get up and running with ease. For Ubuntu, we’ll be setting up the Docker Engine. For Windows and macOS, we’ll be using Docker Desktop.
Click on any of the links below to get started with installing Docker.
- Installing Docker on Ubuntu
- Installing Docker Compose on Ubuntu
- Automated Installation Script for Linux (Ubuntu)
- Installing Docker Desktop on macOS
- Installing Docker Desktop on Windows and WSL2
Installing Docker on Ubuntu
For Ubuntu, we’re going to install Docker Engine and Docker Compose using the Docker and Compose repositories. This also happens to be the recommended approach by Docker.
Follow Along on YouTube
Set Up
- Delete any prior versions if you had installed them.
sudo apt-get remove docker docker-engine docker.io containerd runc
- Update your system and install the necessary dependencies.
sudo apt-get update
sudo apt-get install apt-transport-https ca-certificates curl gnupg lsb-release
- For security purposes, add Docker’s official GPG key. Read more about that here.
curl -fsSL https://download.docker.com/linux/ubuntu/gpg | sudo gpg --dearmor -o /usr/share/keyrings/docker-archive-keyring.gpg
- Set up the stable repository.
echo
"deb [arch=amd64 signed-by=/usr/share/keyrings/docker-archive-keyring.gpg] https://download.docker.com/linux/ubuntu
$(lsb_release -cs) stable" | sudo tee /etc/apt/sources.list.d/docker.list > /dev/null
That’s quite a few steps, but if you followed along exactly, you should be ready to install Docker!
Installation
- Install the latest version of Docker, along with its dependencies.
sudo apt-get update
sudo apt-get install docker-ce docker-ce-cli containerd.io
If you are running a later version of Ubuntu than what Docker has official builds for, you may get the following
error during this step.
Reading package lists... Done
Building dependency tree
Reading state information... Done
Package docker-ce is not available, but is referred to by another package.
This may mean that the package is missing, has been obsoleted, or
is only available from another source
E: Package 'docker-ce' has no installation candidate
E: Unable to locate package docker-ce-cli
E: Unable to locate package containerd.io
E: Couldn't find any package by glob 'containerd.io'
E: Couldn't find any package by regex 'containerd.io'
But don’t worry! We’ll just need to go install the latest version that is available. This can be done with the
following command INSTEAD of the one above.
sudo apt-get install -y docker.io
- Verify your install by running your first image.
sudo docker run hello-world
- Add your user as an admin to the Docker user group.
sudo usermod -aG docker $USER
Doing this last step means you no longer have to append sudo to run Docker commands!
Uninstall
Fed up with Docker on your Ubuntu box? Uninstall and remove the configuration files with the following commands.
sudo apt-get purge docker-ce docker-ce-cli containerd.io
sudo rm -rf /var/lib/docker
sudo rm -rf /var/lib/containerd
Installing Docker Compose on Ubuntu
Install
You must have completed the installation of Docker Engine in the steps above before you can install Docker Compose. Assuming you’ve done so without any errors, let’s continue on!
- Download the stable release of Docker compose.
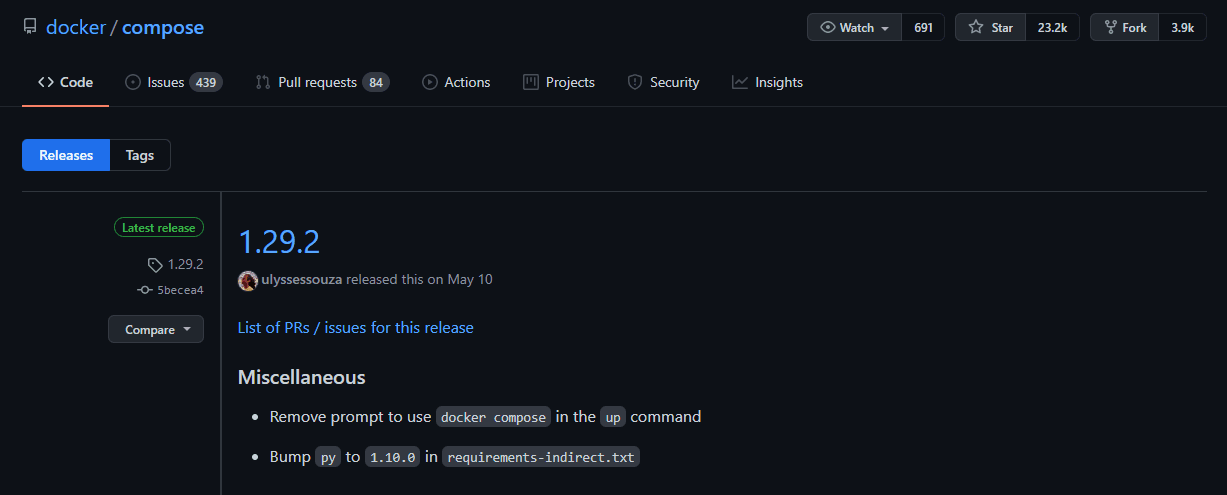
sudo curl -L "https://github.com/docker/compose/releases/download/1.29.2/docker-compose-$(uname -s)-$(uname -m)" -o /usr/local/bin/docker-compose
Unlike the installation for Docker Engine where it automatically installs the latest version, Docker Compose has to have the version manually specified. At the time of writing, the latest version is 1.29.2. The latest version can be viewed at the Compose repository release page on GitHub. Feel free to substitute the version in the command above as needed.
- Make the downloaded binary executable.
sudo chmod +x /usr/local/bin/docker-compose
Uninstall
To remove Docker Compose, utilize the following command (assuming you installed with curl as we did above).
sudo rm /usr/local/bin/docker-compose
Automated Installation Script for Linux (Ubuntu)
An automated installation script can be found here. The contents are pasted below.
#!/bin/sh
echo "Starting docker community edition install..."
echo "Removing any old instances of docker and installing dependencies"
apt remove -y docker docker-engine docker.io containerd runc
apt update
apt install -y apt-transport-https ca-certificates curl gnupg-agent software-properties-common
echo "Dowloading latest docker and adding official GPG key"
curl -fsSL https://download.docker.com/linux/ubuntu/gpg | apt-key add -
echo "Pulling the latest repository"
add-apt-repository "deb [arch=amd64] https://download.docker.com/linux/ubuntu $(lsb_release -cs) stable"
apt update
echo "Installing docker community edition"
apt install -y docker-ce docker-ce-cli containerd.io
echo "Docker install completed, installing docker-compose"
echo "Dowloading docker-compose 1.29.2 - be sure to update to the latest stable"
curl -L "https://github.com/docker/compose/releases/download/1.29.2/docker-compose-$(uname -s)-$(uname -m)" -o
/usr/local/bin/docker-compose
echo "Setting binary permissions"
chmod +x /usr/local/bin/docker-compose
echo “Docker and docker-compose install complete”
# Run docker as non-root user on Ubuntu
sudo usermod -aG docker $USER
Installing Docker Desktop on macOS
Note that Docker Desktop comes pre-equipped with Docker Engine, Docker Compose, Kubernetes, and a few other goodies.
Installation
Intel or Apple Silicon
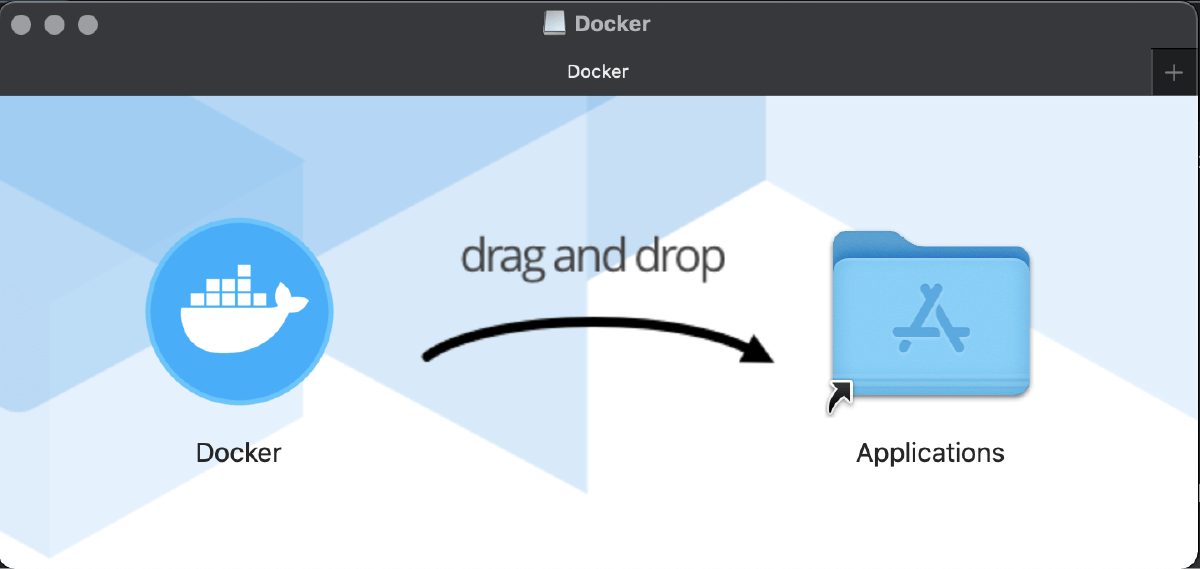
Depending on which chipset you have on your Mac, you’ll need to install one of two versions of the Docker Desktop application. As this is a GUI application, there’s not much needed other than navigating to the correct site and installing the .dmg file. Just drag and drop the Docker icon into your Applications directory.
Docker for macOS with Intel
The official link for installing Docker Desktop for macOS with an Intel chipset can be found here.
Apple Silicon
We’ll also need to take a few prior steps to get Docker Desktop running with Apple Silicon. Namely, you’ll need to install Rosetta 2 with the following command.
softwareupdate --install-rosetta
Afterward, install Docker Desktop for macOS with an Apple Silicon chipset from here.
Uninstall
Within the Docker Desktop toolbar item, navigate to the menu > Troubleshoot > Uninstall. See the screenshot below.

Installing Docker Desktop on Windows and WSL2
Note that Docker Desktop comes pre-equipped with Docker Engine, Docker Compose, Kubernetes, and a few other goodies. Firstly, you will need Docker Desktop even if you want Docker to only run on WSL. This is due to the sandboxed nature of WSL.
Installation
Windows
- First, you’ll need to ensure that virtualization is enabled for your CPU in the BIOS. This differs amongst motherboard manufacturers and chipsets (namely Intel and AMD). A quick Google search will get you going though.
- The executable for Docker Desktop for Windows can be found here. It can also be found on Docker Hub. Click the installer, follow the prompts and wait for it to be downloaded.
- During the process, be sure to allow the prompts for
Enable Hyper-V Windows Featuresand theInstall required Windows components for WSL 2.
WSL2
You’ll need to complete the steps for installing Docker Desktop on Windows before you can utilize WSL2. However, once you’ve completed it, feel free to come back to this section.
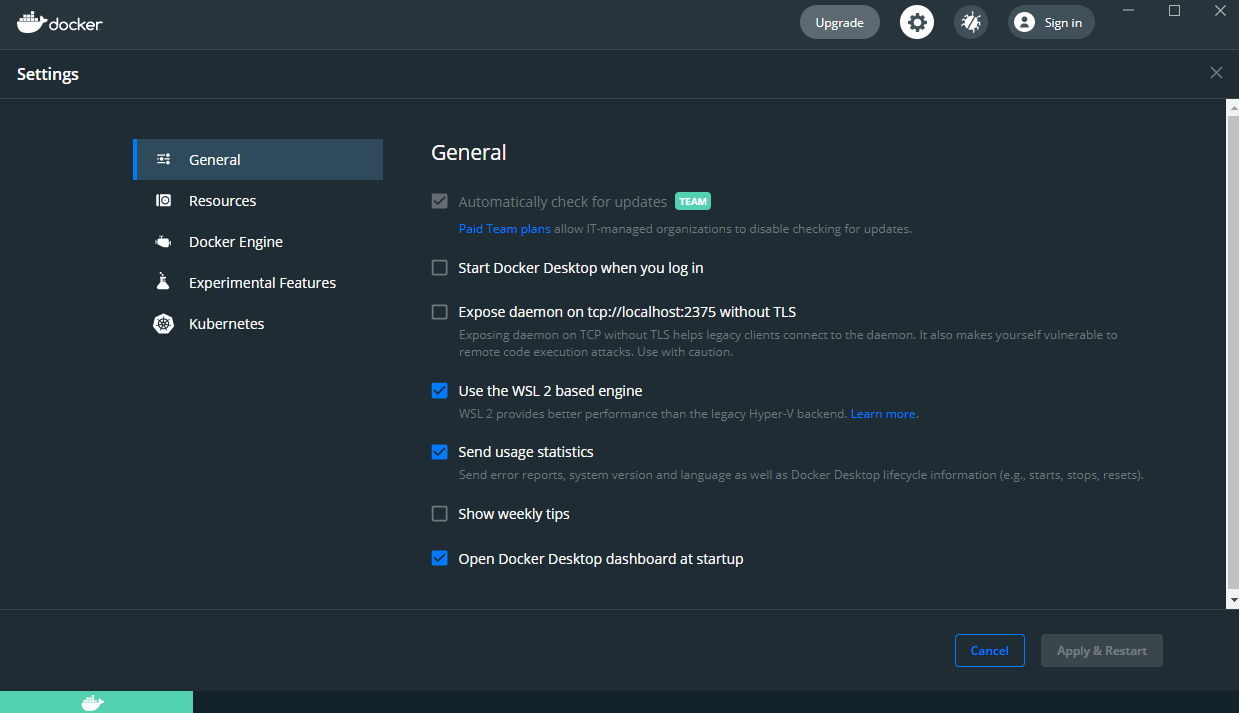
- Enable
Use the WSL2 based enginein the Docker Desktop for Windows settings andApply & Restart.
- Be sure that WSL2 is set as your default and current distribution.
Check the current WSL mode.
If not set to v2, upgrade your existing Linux.
wsl.exe --set-version (distro name) 2
Set v2 as the default version.
wsl.exe --set-default-version 2
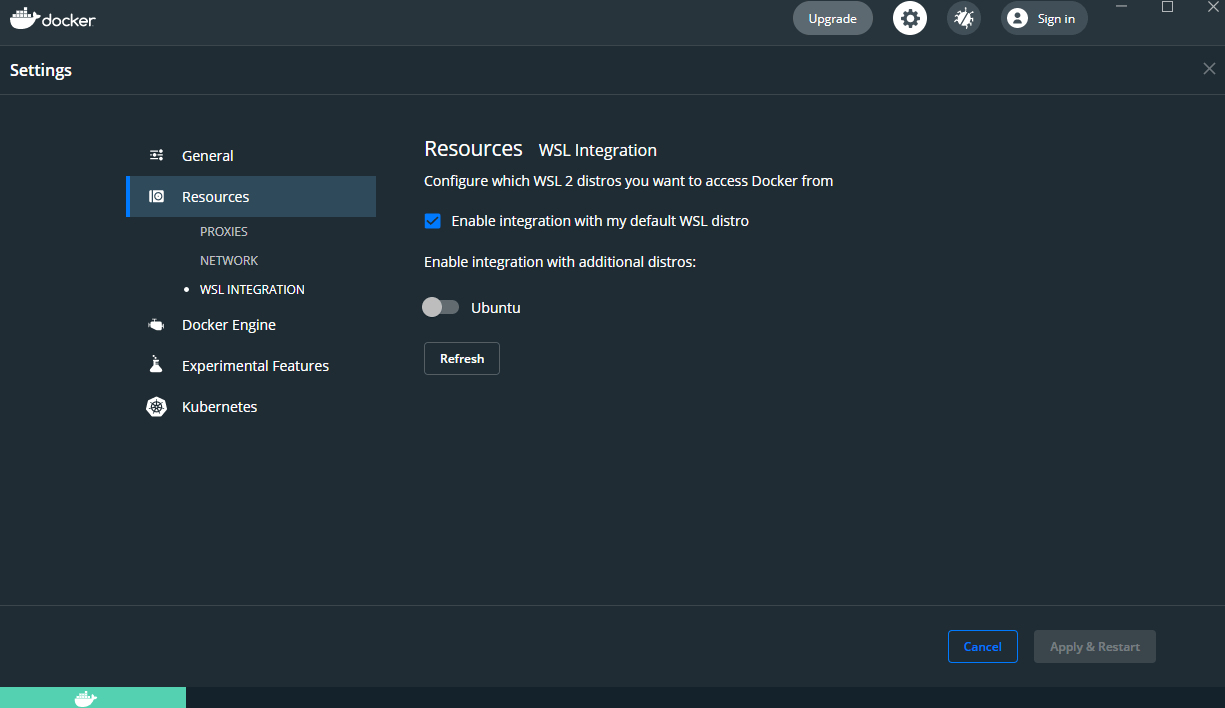
- Navigate to
WSL Integrationand make sureEnable Integration with my default WSL distrois checked.
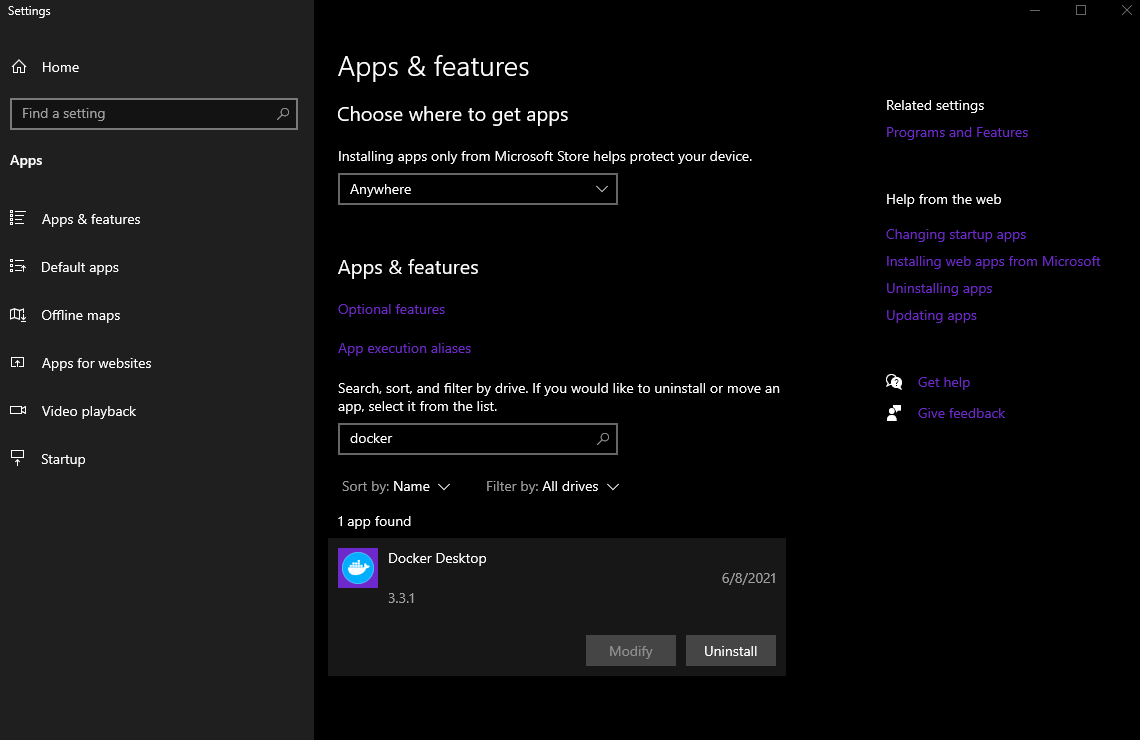
Uninstall
Docker Desktop can be uninstalled from the Apps & features system settings. Just search for Docker Desktop and select Uninstall. Follow the prompts.
More Questions or Need Help
Be sure to check out the official documentation for Docker Engine and Docker Desktop and if you have more questions, feel free to send a message with any of the media icons below!
Docker Compose «is a tool for defining and running multi-container Docker applications. With Compose, you use a YAML file to configure your application’s services.» In this post, I will show how you can work with Docker Compose.
- Author
- Recent Posts

Josh’s primary focus is in Windows security and PowerShell automation. He is a GIAC Certified Windows Security Administrator (GCWN) and GIAC Certified Forensic Analyst (GCFA). You can reach Josh at MSAdministrator.com or on Twitter at @MS_dministrator.
Docker on Windows is now commonplace, and it comes with additional features you may not be familiar with. In my previous posts Install Docker and run containers on Windows and Create a Docker container on Windows with a Dockerfile, I showed you how to create a single container. In this article, I will walk you through how to use docker-compose to create and run multiple containers at once.
When you install the Docker Toolbox on Windows, you already have Docker, but you also get Docker Compose. Before we get started, make sure you have docker-compose installed on your machine by opening up a cmd prompt or PowerShell console, and run the following command:
docker-compose -v
If you did not receive an error, you are good to go. If you did, please make sure you look at my previous posts mentioned above.
During this article we are going to create a simple Microsoft IIS Server in one Docker container and have a second container that will test the first to make sure it is running. To do this, we first need to understand that Docker Compose uses a docker-compose.yml file to detail the specifics for our running containers.
Our docker-compose.yml file looks like this:
version: "3"
services:
    web:
        build:
            context: ./iis-server
            dockerfile: Dockerfile
    test:
        build:
            context: ./iis-server-test
            dockerfile: Dockerfile
        command: powershell -executionpolicy bypass "c:tempiis-server-test.ps1"
        depends_on:
            - "web"
A Docker Compose file uses a YAML configuration syntax to build and manage our containers. Additionally, Docker has specified that a docker-compose.yml file can only have a few top-level keys, which define «sections» within our configuration file. For this example, we are only going to be focusing on version, services, and (later on) networks.
With this simple file, we will create two containers. One will be our actual IIS Server with a sample Home.html page. The second container will be a nanoserver that just runs and tests that our IIS Server is up and running (as expected). Now let’s break down our folder structure:
./docker-compose.yml
./iis-server/Dockerfile
./iis-server/Home.html
./iis-server-test/Dockerfile
./iis-server-test/iis-server-test.ps1
We have specified at the top of our docker-compose.yml file that we would like to use version 3 of the Docker Compose file reference. We could use additional versions if needed, but version 3 is the recommended one.
The second section, services, is where the fun stuff is! We are going to specify two separate containers (or services) in this section. First, we define our actual web application (site). We give it the simple name web, but it can be anything as long as it is a string with no spacing. We then specify that when we run docker-compose, we want it to build a brand-new image/container using the Dockerfile in the specified location (context). You can see this in the following code snippet:
services:	# A "section" that specifies services
  web:	# The name of our service
    build:	# We specify that we want to build an image
      context: ./iis-server	# The location (can be a URL) of our image
      dockerfile: Dockerfile	# The name of the file to reference (could be any name)
Let’s take a look at what is in our ./iis-server/Dockerfile:
FROM microsoft/iis
RUN mkdir c:myapp
RUN powershell -NoProfile -Command
    Install-WindowsFeature NET-Framework-45-ASPNET;
    Install-WindowsFeature Web-Asp-Net45;
    Import-Module IISAdministration;
    New-IISSite -Name "MyApp" -PhysicalPath C:myapp -BindingInformation "*:8000:"
EXPOSE 8000
ADD . /myapp
If you are curious about what this file means, please review my last post titled Create a Docker container on Windows with a Dockerfile. This goes into more detail about Dockerfiles. To summarize though, this Dockerfile will pull down an image from the official Docker repository named Microsoft/iis. It will then create a directory, install Windows Features, create a new IIS website, and add my Home.html to the container in our created directory (c:myappHome.html).
The ./iis-server/Home.html file contains just a simple HTML page:
<HTML>
<HEAD>
<TITLE>Using Docker Compose on Windows</TITLE>
</HEAD>
<BODY BGCOLOR="FFFFFF">
<H1>Using Docker Compose on Windows</H1>
<H2><a href="https://4sysops.com">4sysops</a> is a great site!</H2>
<H3>Josh Rickard</H3>
You can reach me here:</br>
<a href="https://twitter.com/MS_dministrator">Twitter</a></br>
<a href="https://github.com/MSAdministrator">GitHub</a></br>
<a href="https://4sysops.com/archives/author/msadministrator/">4sysops Author Page</a></br>
<a href="https://msadministrator.com">MSAdministrator.com</a>
</BODY>
</HTML>
Next, let’s talk about our test image/container. The reason I’m creating this container is to simulate how you would have two (or more) containers running at the same time. Like we did with our web container, we specify a name: test.
test:
   build:
      context: ./iis-server-test
      dockerfile: Dockerfile
  command: powershell -executionpolicy bypass "c:tempiis-server-test.ps1"
  depends_on:
      - "web"
After we have given our container a name, we next specify that we want to build it. By the way, there are additional options when writing a docker-compose.yml file. For example, you could use the image tag. After specifying our build tag, we then pass in our context (or location) and our Dockerfile name.
Let’s look at what is inside both of these next files:
./iis-server-test/Dockerfile
FROM microsoft/nanoserver:latest

RUN mkdir c:temp
ADD iis-server-test.ps1 c:/temp/

# The command: tag in our docker-compose.yml will run the following
# after we have successfully built our container image
# powershell -executionpolicy bypass c:tempiis-server-test.ps1

./iis-server-test/ iis-server-test.ps1
try {
    If((Invoke-WebRequest web).StatusCode -eq 200) {
        Write-Output "IIS Server is alive!"
    } Else {
        Write-Output "IIS Server is not responding"
    }
} catch {
    throw $Error[0]
Understanding the processing order for these two next two tags better explains how they work. First, let’s look at the depends_on tag. When we use this value, we are saying to create/build our first container web initially before this container (service). With this setting, we are now forcing the Docker Compose image to build web first before we do anything else. The command tag will only run after building web, which is exactly what we want.
Now that we understand our file structure and what our two containers are doing, all we need to do is run one of two simple commands. I prefer using the second one to see what is happening.
docker-compose up
	or
docker-compose up -build
You should see the following when everything is up and running. Please note that the first time you run this, it may take a while. This is because we are downloading our images from the Docker repository, but after the first time, it should only take a few seconds to build.
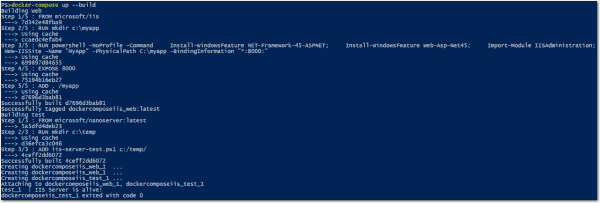
Running docker compose up build should display the output above
Once you are satisfied your containers are working, you can do the following with them:
docker-compose down		# stops resources up created
docker-compose stop 	# use this to stop any running containers
docker-compose kill		# use this to stop any running containers forcefully
docker-compose rm		# removes stopped service containers
You can find all the files I referenced below:
Subscribe to 4sysops newsletter!
# ./docker-compose.yml
version: "3"
services:
    web:
        build:
            context: ./iis-server
            dockerfile: Dockerfile
    test:
        build:
            context: ./iis-server-test
            dockerfile:  Dockerfile
        command: powershell -executionpolicy bypass "c:tempiis-server-test.ps1"
        depends_on:
            - "web"

# ./iis-server/Dockerfile
FROM microsoft/iis
RUN mkdir c:myapp
RUN powershell -NoProfile -Command
    Install-WindowsFeature NET-Framework-45-ASPNET;
    Install-WindowsFeature Web-Asp-Net45;
    Import-Module IISAdministration;
    New-IISSite -Name "MyApp" -PhysicalPath C:myapp -BindingInformation "*:8000:"
EXPOSE 8000
ADD . /myapp
# ./iis-server/Home.html
<HTML>
<HEAD>
<TITLE>Using Docker Compose on Windows</TITLE>
</HEAD>
<BODY BGCOLOR="FFFFFF">
<H1>Using Docker Compose on Windows</H1>
<H2><a href="https://4sysops.com">4sysops</a> is a great site!</H2>
<H3>Josh Rickard</H3>
You can reach me here:</br>
<a href="https://twitter.com/MS_dministrator">Twitter</a></br>
<a href="https://github.com/MSAdministrator">GitHub</a></br>
<a href="https://4sysops.com/archives/author/msadministrator/">4sysops Author Page</a></br>
<a href="https://msadministrator.com">MSAdministrator.com</a>
</BODY>
</HTML>
# ./iis-server-test/Dockerfile
FROM microsoft/nanoserver:latest

RUN mkdir c:temp
ADD iis-server-test.ps1 c:/temp/

# The commannd: tag in our docker-compose.yml will run the following
# after we have successfully built our container image
# powershell -executionpolicy bypass c:tempiis-server-test.ps1
# ./iis-server-test/iis-server-test.ps1
try {
    If((Invoke-WebRequest web).StatusCode -eq 200) {
        Write-Output "IIS Server is alive!"
    } Else {
        Write-Output "IIS Server is not responding"
    }
} catch {
    throw $Error[0]
}
![]()