In this tutorial, we will discuss all the steps required to install Android Platform Tools and SDK Manager on Windows 10. This tutorial provides the steps for Windows 10, though the steps should be the same on other versions of Windows.
This post is useful for the developers using Android Platform Tools and SDK manager without installing Android Studio for the use cases including hybrid app development using Ionic. It also assumes that a valid JAVA_HOME environment variable exists pointing to the installation directory of Java.
You can follow How To Install Java 8 On Windows 10, How To Install Java 11 On Windows, How To Install Java 15 On Windows, or How To Install OpenJDK 15 On Windows to install Java on Windows. In case you are interested in developing Android applications using Android Studio, you can also follow How To Install Android Studio On Windows.
Step 1 — Download SDK Tools
Open the download tab of Android Studio and scroll down to the Command line tools only section. This section shows various options to download the SDK tools as shown in Fig 1.

Fig 1
Click the first link having the download option for Windows as highlighted in Fig 1. It will ask to accept to terms and conditions as shown in Fig 2.

Fig 2
Go through the details, agree on the terms and conditions and click the Download Button to start the download.
Step 2 — Install Command Line Tools
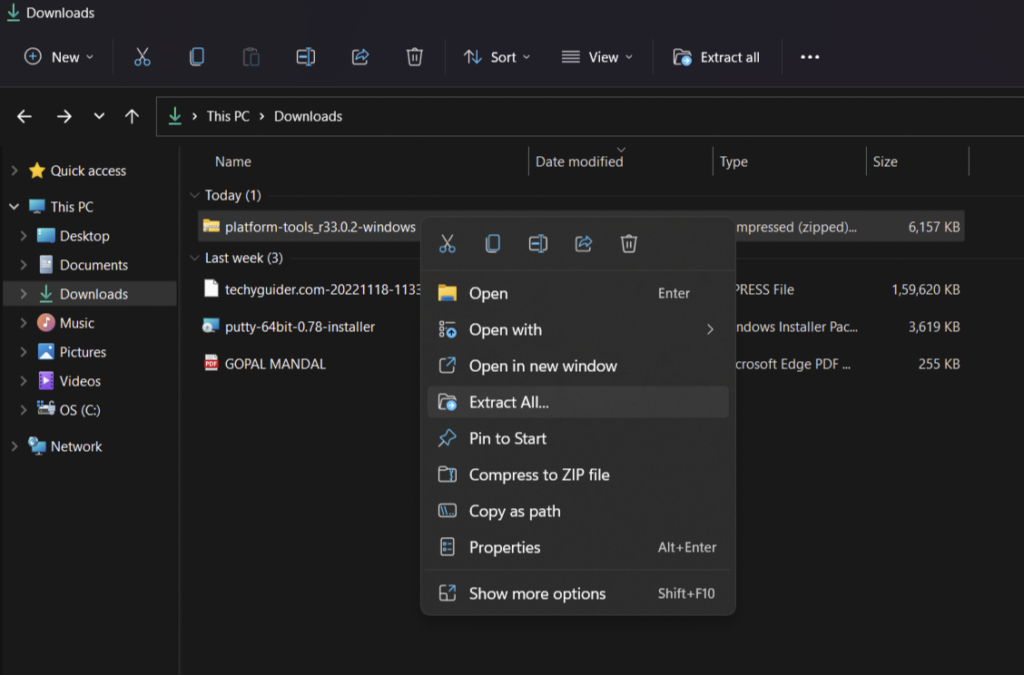
In this step, we will install the Android Command Line Tools on Windows 10. Create the directory android-sdk at your preferred location and extract the content of the downloaded SDK Tools zip to this directory. Make sure that the extracted content is available within the android-sdk directory created by us as shown in Fig 3.

Fig 3
Step 3 — Install Platform Tools
In this step, we will install the Android Platform Tools on Windows 10. Follow the same steps similar to Android SDK Tools to install Android Platform Tools using the download link as shown in Fig 4, Fig 5, and Fig 6.

Fig 4

Fig 5

Fig 6
Step 4 — Configure Environment Variable
Right-click the My Computer or This PC on the desktop and click the Properties Option. Now click the Advanced system settings. It will show the System Properties dialog having Advanced Tab options as shown in Fig 7.

Fig 7
Click the Environment Variables Button and click the New Button in the first section. Set the Variable Name field to ANDROID_HOME and Variable Value to the android-sdk directory created by us in the previous step.
Similarly, also configure the environment variable ANDROID_SDK_ROOT to the android-sdk directory.
Also, make sure that the JAVA_HOME environment variable is set to the JDK installation directory. It must not end with the bin as we do with the system path variable.

Fig 8
Step 5 — Configure Commands
In previous steps, we have downloaded and extracted the Command Line Tools and Platform Tools to the android-sdk directory. Both the tools provide several command-line utilities which we need to run by going to the appropriate directory having the executable files.
We can make these commands available at the system level without going to these directories by adding the path to tools, toolsbin, and platform-tools to the system path as shown in Fig 9. Make sure that these executables do not break other commands having the same name before adding these paths to the PATH environment variable.

Fig 9
Now open the Command Prompt and check the ADB and SDK Manager versions as shown in Fig 10. You might be required to restart the system to apply the environment variables set by us.
# Check adb version
adb --version# It must show the installed adb version
Android Debug Bridge version 1.0.41
Version 31.0.0-7110759
Installed as E:toolsjavaandroid-sdkplatform-toolsadb.exe# Check sdkmanager version
sdkmanager --version# It will show the error as shown below
Error: Could not determine SDK root.
Error: Either specify it explicitly with --sdk_root= or move this package into its expected location: <sdk>cmdline-toolslatest
We can see that the ADB command works well and shows the version details, but the sdkmanager shows an error — «error: could not determine sdk root. error: either specify it explicitly with —sdk_root= or move this package into its expected location: <sdk>cmdline-toolslatest» since it expects the Command Line Tools in a version-specific directory. Now open the source.properties file from the cmdline-tools directory to check the version. It will show the version details as shown below.
Pkg.Revision=3.0
Pkg.Path=cmdline-tools;3.0
Pkg.Desc=Android SDK Command-line Tools
Now move all the files to the directory cmdline-tools/3.0 as shown in Fig 10.

Fig 10
Also, update the system path as shown in Fig 11.

Fig 11
Now close and open the Command Prompt. Also, check the ADB and SDK Manager versions as shown in Fig 12.

Fig 12
Step 6 — Using the SDK Manager
List — We can list the installed and available packages and images using the list command as shown below.
// List all the installed and available platforms, system images and other resources
sdkmanager --list// Output should look like
Installed packages:=====================] 100% Computing updates...
  Path           | Version | Description                   | Location
  -------        | ------- | -------                       | -------
  platform-tools | 31.0.0  | Android SDK Platform-Tools 31 | platform-toolsAvailable Packages:
  Path                                                                                     | Version      | Description
  -------                                                                                  | -------      | -------
  add-ons;addon-google_apis-google-15                                                      | 3            | Google APIs
...
...// We can see that it shows the tools and platform-tools installed by us
Install Platform — Use the below-mentioned command to install the Android 10 (API level 30) using the SDK manager.
# Go to the SDK Tools bin directory to access sdkmanager
# Start download the most recent package
sdkmanager "platforms;android-30"
It will ask to accept the terms and conditions as shown in Fig 13. Enter y and hit Enter Key to accept the terms and conditions. This command creates the directory platforms within android-sdk and installs the package android-30 having all the required files to run the emulator for Android 10.

Fig 13
If we again check the installed packages, the list command shows the installed options as shown below.
sdkmanager --list
Installed packages:=====================] 100% Computing updates...
  Path                 | Version | Description                   | Location
  -------              | ------- | -------                       | -------
  platform-tools       | 31.0.0  | Android SDK Platform-Tools 31 | platform-tools
  platforms;android-30 | 3       | Android SDK Platform 30       | platformsandroid-30Available Packages:
  Path                                                                                     | Version      | Description
  -------                                                                                  | -------      | -------
  add-ons;addon-google_apis-google-15                                                      | 3            | Google APIs
  add-ons;addon-google_apis-google-16                                                      | 4            | Google APIs
...
...
Update SDK Manager — Update the SDK manager using the below-mentioned command.
sdkmanager --updateAdd System Image — We can add system images from available images shown by the list command using the SDK manager as shown below. We are adding the most recent default 64-bit system image.
// Install default system image for platform android-30
sdkmanager "system-images;android-30;google_apis;x86_64"
Accept the License Agreement to complete the download.
There are several projects which need Google Play Services. We need system images specific to Google Play Services as shown below.
// Install Google Play Services system image
sdkmanager "system-images;android-30;google_apis_playstore;x86_64"
Accept the License Agreement to complete the download.
Install Emulator — We need to install the emulator before creating the AVD using SDK Manager.
// Install Emulator
sdkmanager --channel=3 emulator
Accept the License Agreement to complete the download.
Install Build Tools — Install the most recent build tool listed by the list command.
// Install Build Tools
sdkmanager "<build tools version>"// Example
sdkmanager "build-tools;30.0.3"
Step 7 — Using the Emulator and AVD Manager
Create Android Emulator — Create the emulator using the system image downloaded in the previous step as shown below. Replace <emulator name> with the actual name preferred by you.
// Create the emulator using default system image
avdmanager create avd -n <emulator name> -k "system-images;android-30;google_apis;x86_64" -g "google_apis"// Example:
avdmanager create avd -n emulator30 -k "system-images;android-30;google_apis;x86_64" -g "google_apis"// Create emulator using Google Play Services system image
avdmanager create avd -n <emulator name> -k "system-images;android-30;google_apis_playstore;x86_64"// Example:
avdmanager create avd -n emulator30ps -k "system-images;android-30;google_apis_playstore;x86_64"
The above commands ask a bunch of questions to configure the AVD if we choose the custom hardware profile option. We have excluded the details of these options from this tutorial since these configuration details depend on the actual needs. After completing all the configurations, it creates the AVD using the name provided by us while configuring it.
Similarly, we can also install the AVD of older versions as shown below.
// Create the emulator using default system image
avdmanager create avd -n <emulator name> -k "system-images;android-29;default;x86_64" -g "default"// Example:
avdmanager create avd -n emulator29 -k "system-images;android-29;default;x86_64" -g "default"// Create emulator using Google Play Services system image
avdmanager create avd -n <emulator name> -k "system-images;android-29;google_apis_playstore;x86_64"// Example:
avdmanager create avd -n emulator29ps -k "system-images;android-29;google_apis_playstore;x86_64"
List Android Emulators — Now go to the tools directory on the command line and check the installed platform as shown below.
Notes: Add Emulator to the system path as shown in Fig 14.

Fig 14
Close and re-open the Command Prompt to check the AVDs created by us in the previous steps.
// List the available emulators
emulator -list-avds// Output
default28
emulator30
emulator30ps
It will list all the AVDs installed by us.
Run Emulator — We can run the emulator created by us as shown below.
// Run Emulator
emulator -avd <emulator name>// Example
emulator -avd emulator30
The emulator will take some time to completely launch the AVD. The final results should look similar to Fig 15.

Fig 15
Delete Emulator — We can also delete an existing emulator as shown below.
// Delete Emulator
avdmanager delete avd -n <emulator name>
Summary
This tutorial provided all the steps required to install Android Platform Tools and Android SDK Manager on Windows 10. It also provided the steps required to create and launch the AVDs using the Emulator.
The Android SDK Platform Tools are programs used to directly interface with the Android operating system. This includes tools such as adb and fastboot.
It supports Windows, Linux, and Mac OS X. There is an installable version and a portable version.
Android SDK Platform Tools
Windows
- Download the Android SDK (from Google’s website) and install it.
 ]
]
-
Be sure to record the destination folder, or choose where you would like it. Default is
C:androidandroid-sdk. -
Once installed, start SDK Manager (the checkbox will already be selected)
-
Once the SDK opens, check the first three (3) boxes; they are labeled «Tools,» «Android SDK Tools,» and «Android SDK Platform-tools«. Install these packages.
-
Once the packages have finished installing, you can close the program.
-
You will have to be in the
platform-toolsfolder to use the tools, so move any needed files there.
Mac OS X
Ubuntu/Debian/Linux Mint
On Ubuntu 12.10, android-tools are inside the repositories and can be easily downloaded.
sudo apt-get install android-tools-adb android-tools-fastboot
This package includes adb, fastboot, and other binaries.
On older Ubuntu version or Debian systems, you’ll need to manually add the PPA:
sudo add-apt-repository ppa: nilarimogard/webupd8
sudo apt-get update
sudo apt-get install android-tools-adb android-tools-fastboot
Once that package is installed, adb and fastboot can be run from anywhere in the terminal.
Fedora
Arch Linux/Chakra
Just install these two packages from the AUR:
android-sdk-platform-toolsudev-android-rules
You can now use adb and fastboot from the terminal, anywhere.
Other Linux Distros
If all else fails or your distro doesn’t support the packages we give you, no worries. Just use the linux_sdk_adb-installer_v2.sh script under the «linux» folder in the archive, and everything will be installed in no time.
This script comes from here
Make sure your phone is being recognized- type:
If your drivers are installed correctly, this should show your phone’s serial number. You should hear the found device noises when you plug your phone in. if it starts installing drivers,wait for it to finish before typing the adb devices command.
Quick and Dirty ADB
If you need ADB on a portable drive or don’t feel like installing the Platform Tools, just use this.
{{Note|Put all files to be used by ADB in the folder where you extracted it to, since it is not a system program.}}
Files to Get
You will need to download this archive and extract it.
- miniadb_inc.zip — Modified from Scotty’s original miniadb package. Now with Linux installation instructions and binaries, and cleaned up to work for all phones.
Quick and Dirty ADB (Windows)
First, unzip your miniadb-inc.zip file into the root folder of your hard drive, such as C:. This means the top level, not inside any folders, so just copy and paste the folder onto C: with everything else that is there.
You actually can call it whatver you want,but directions from here forward will assume this folder to be named miniadb_inc
Open a command window. In Windows 7, click the start bubble in the lower left and type command in the search box to find the Command Prompt application. In Windows XP, go to Run and type cmd.exe to run it.
Type the following at the prompt in your cmd window to change to your miniadb_inc directory.
Your command prompt should display c:miniadb_inc> provided you:
- unzipped the miniadb_inc zip
- put the folder on your c drive
- didn’t change the name
Now make sure usb debugging is checked in Settings/Apps/Development on your phone,and plug your phone into your PC with a usb cable
Quick and Dirty ADB (Mac and Linux)
Extract the miniadb-inc.zip somewhere accessible, like the /home folder.
- Mac OS X: Use the
adbmacbinary: substitute alladbcommands with./adbmac. - Linux: Use the
adblinuxbinary: substitute alladbcommands with./adblinux.
Sources
- Reddit r/Nexus4: IAmAN00bie — How to unlock/root your Nexus 4 with ADB.
- Droid Forums — Linux Android SDK Auto Installer
- XDA-Developers — Set up ADB and Fastboot On A Mac Easily
In this guide, we will show you the steps to download and install the Android SDK Platform Tools on your PC. Among the plethora of tools and custom binaries doing the rounds in the open-source ecosystem, there’s no denying the fact that the ADB and Fastboot Tools are probably the most important ones. Moreover, it is among the very few tools that are used by both tech enthusiasts and normal users alike.
If we talk about the latter set of users, they could use it to boot their device to Stock Recovery and then format their device or flash the firmware via ADB Sideload. Likewise, they could also use it to execute ADB Shell commands and remove bloatware or preinstalled apps from their device. Then if we shift our attention towards the tech geeks, well, the platform-tools is the gateway to entering the custom development market.

Right from booting their device to Fastboot Mode, to flashing Magisk patched boot.img for root, flashing firmware to unbrick their device, or flashing custom ROMs and recoveries, probably none of these tweaks would be possible if it wasn’t for this tool. Well, enough of the praise, let’s now get straight to the task and make you aware of the steps to download and install the Android SDK Platform Tools on your PC.
How to Install Android SDK Platform Tools
The below instructions are listed under separate sections for ease of understanding. Make sure to follow the same sequence as mentioned.
STEP 1: Download Android SDK Platform Tools
- To begin with, download the Android SDK Platform Tools on your PC from below:
Windows | Linux | macOS
[Note: Links are automatically updated from Google's servers]
- Once downloaded, extract it to any convenient location on your PC.

- Doing so will give you the platform-tools folder, which will be used throughout this guide.
STEP 2: Add ADB to Path
So you have downloaded and extracted the Android SDK Platform Tools to a convenient location of your choice. Your next step should be to inform your system about this location as well. And this could be done by adding the ADB path to the system’s Environmental Variables. To do so, you may either refer to our detailed guide on How to Add ADB to Path in Windows 11 or check out the below shorter instructions-
- To begin with, note down the location where you have extracted the Android SDK Platform Tools.
- Then head over to the Start menu, search View Advanced System Settings, and open it.

- You shall now be taken to the Advanced tab of System Properties.
- Click on the Environmental Variables button situated at the bottom right.

- Now select the Path field under System Variable and click on the Edit button.

- After that, click on the New button and paste the platform-tools folder location (that you had earlier copied) in the space provided.

- Then click OK to save this path. Again click OK to close Environmental Variable and finally click OK to close System Properties.
- That’s it. Now restart your PC (optional but recommended) and your tasks stand complete.


STEP 3: Install Fastboot Drivers
The ADB is just the tip of the iceberg, most of your work would usually be carried out in the Fastboot Environment. However, your PC wouldn’t be able to identify the connected device in Fastboot Mode unless it has the necessary Fastboot Drivers installed. So please refer to our guide on How to Install Fastboot Drivers in Windows 11.

How to Check if ADB and Platform Tool is Successfully Installed?
Now that we are done setting up the ADB and Fastboot environment, let’s put it to test and verify the results. In this regard, first, we will verify the ADB Connection and then the Fastboot Connection. Follow along.
Verify ADB Connection
- To begin with, enable USB Debugging on your device so as to make it recognizable by the PC in ADB mode.
- To do so head over to Settings > About Phone > Tap on Build Number 7 times [MIUI Number in Xiaomi Devices].
- Then go back to Settings > System > Developer Options > Enable USB Debugging.

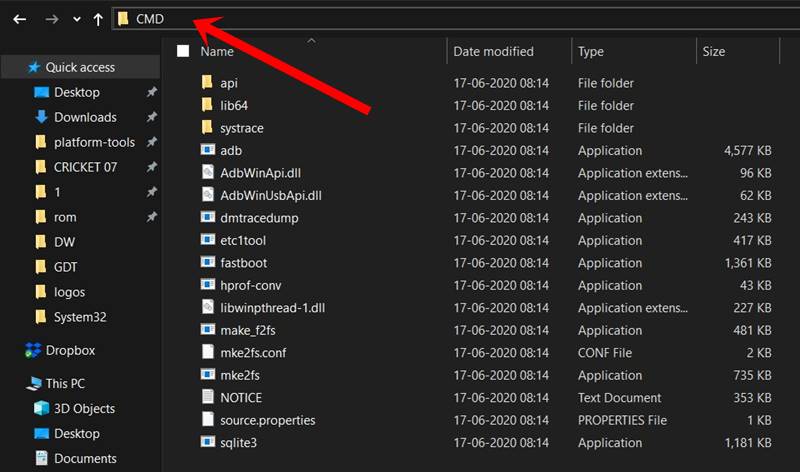
- Head over to the platform-tools folder, type in CMD in the address bar, and hit Enter.

- This will launch the CMD window with the platform-tools folder directory.
- Now execute the below command to verify the ADB Connection
adb devices

- You should now get your unique device ID, signifying that the ADB connection is successful.
- If you also get an unauthorized message, then check your device, there will be a prompt, tap on Allow.

- Then again execute the above command and this time you wouldn’t get the unauthorized alert in the CMD.


Verify Fastboot Connection
- To begin with, make sure that you have carried out all the steps mentioned in the above ADB section.
- Then execute the below command in the CMD window that is opened in the platform-tools folder:
adb reboot bootloader

- Your device will now boot to the Fastboot Mode, signifying that the connection stands successful.

Can I use any other ADB Tool?
It is not advised to use any other third-party ADB and/or Fastboot Tools. This is because most of these tools are outdated and haven’t received updates in years. Moreover, they aren’t in sync with newer Android changes either [such as the FastbootD Mode, dynamic partitions, etc].
Can I use Powershell instead of CMD to Execute Commands?
While you could use Powershell instead of Command Prompt, but I wouldn’t advise you to do so. This is because Powershell requires you to append a couple of additional characters or keywords before each command which makes it quite difficult and confusing. So stick with CMD and you wouldn’t face any issues as such.
How to Open CMD as Admin inside platform-tools
If you want to open the Command Prompt as an administrator inside the platform-tools folder, then there are two different approaches that you could take-
- Open CMD as an administrator from the Start Menu and then use the cd command to change the directory to the platform-tool folder.
Benefit- it is easier to carry out.
Drawback- You will have to do this everytime.
- Add the Open CMD as administrator option in the right-click menu. [Personally, I would recommend this approach].
Benefit- it just requires a one-time setup required.
Drawback- Slightly technical to set up.


List of all ADB and Fastboot Commands
From this guide, you will be able to get hold of all the important and most frequently used ADB and Fastboot Commands as well as their usage instructions. So do check out our guide on A List of Useful ADB and Fastboot Commands and their Usage.

How to Fix ADB and Fastboot Errors
it is no hidden secret that the ADB and Fastboot domain is prone to quite a few issues. From the inability of the device to be recognized in Fastboot Mode to the inability of the CMD to flash a file, you might com across quite a few bugs and issues. Fortunately, we have it all covered, do check out our guide on How to Fix All Possible ADB and Fastboot Errors.

So this was all from this guide on how you could download and install the Android SDK Platform Tools. We have also addressed some of the most commonly asked queries relating to this tool. If you have any queries concerning the aforementioned steps, do let us know in the comments. We will get back to you with a solution at the earliest.
- Fastboot Commands not working: How to Fix
- How to Execute Android ADB Fastboot Commands Wirelessly
- How to Use ADB and Fastboot Commands on Android Without PC
- ADB VENDOR KEYS Not Set: How to Fix
About Chief Editor

Sadique Hassan
administrator
A technical geek by birth, he always has a keen interest in the Android platform right since the birth of the HTC Dream. The open-source environment always seems to intrigue him with the plethora of options available at his fingertips. “MBA by profession, blogger by choice!”
Nobody can call oneself an avid Android user without being familiar with ADB and Fastboot. They are very useful command-line tools that can be used to perform countless developer-level tasks on Android devices. You can use ADB and Fastboot commands on Windows, macOS, or Linux to control and customize your Android phone or tablet. Before you can do that, however, you must download and install the ADB drivers on your computer. The SDK Platform tools pack together all required files to execute ADB and Fastboot commands. Below, you can download the latest SDK platform tools Zip for Windows, Linux, and macOS X directly from the Google servers.
Using ADB and Fastboot commands, you can install, uninstall, debug and emulate apps, customize your Android device, enable and disable hidden settings, back up your data, push and full files, and remotely control your device from your computer. Moreover, you can also flash factory images, custom recovery, sideload APK, and so on. If you want to learn about the possibilities you can explore after installing the Android SDK platform tools, please refer check out the following lists of commands.
- ADB commands list
- ADB Shell commands list
- Fastboot commands cheat sheet
What is SDK Platform Tools?
SDK is an abbreviation for Software Development Kit. The SDK platform tools contain the ADB and Fastboot drivers for Android. These drivers are very essential because they let a computer establish a connection with an Android phone, tablet, or smartwatch connected over a USB cable or WiFi. Originally, the Android SDK platform tools were a part of the Android SDK Manager and Android Studio. Later, Google decided to release the Platform-tools separately in a compact easy-to-download Zip package for operating systems like Windows, Linux, and Mac.
Download ADB and Fastboot SDK Platform-Tools
Below you can download the Android SDK Tools for all three major operating systems for computers.
Android SDK Tools (Windows)
Having downloaded the latest version of Android SDK platform tools for Windows, you can follow the steps given below to set it up.
platform-tools-latest-windows.zip
Android SDK Platform Tools (Mac OS X)
platform-tools-latest-darwin.zip
(Learn, how to install and use ADB and Fastboot on Mac)
ADB Platform Tools (Linux & Ubuntu)
platform-tools-latest-linux.zip
I wrote a detailed guide on installing ADB and Fastboot on Linux to help you with using ADB commands easily.
Don’t Miss: How to Install Use ADB Commands on Android Phones
How to Set up SDK Platform-Tools
Now that you have already downloaded the SDK platform tools, you need to install or set them up on your computer. If you don’t know what to do with the zip file you just downloaded and how to execute the ADB and Fastboot commands, I am going to explain everything you need to know.
First of all, you need to unzip the “platform-tools-latest.zip“. You can extract it anywhere on your computer but I prefer saving the files to a folder created as “Android” on the C drive on my Windows PC. Having extracted the zip file, you need to launch a command prompt window before you can execute an ADB or Fastboot command.
Launching a Command Window with ADB/Fastboot Path
It’s very easy to launch a command prompt window on a Windows PC. Click the Search icon next to the Windows menu icon on the taskbar and hit the Enter key. In case you need to launch the Command or CMD window from inside the Platform-tools folder, there are 2 ways to do that.
Method 1
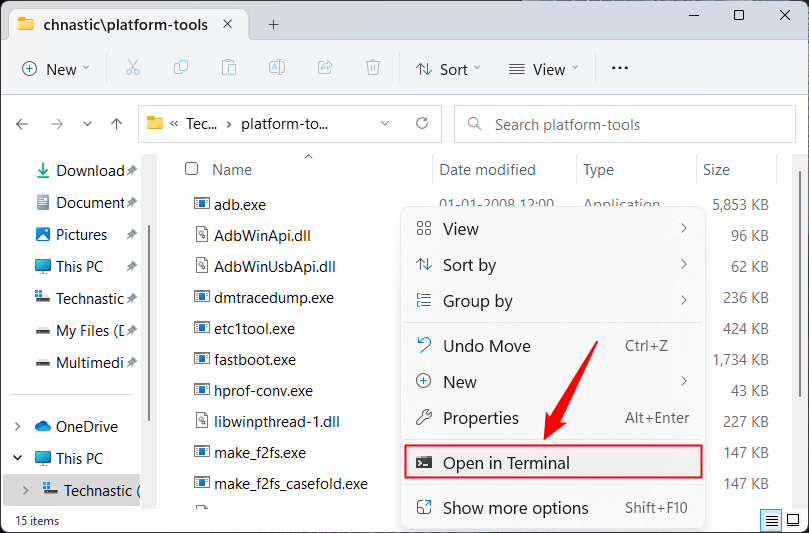
- Open the folder in which you extracted the content of the Platform-tool.zip file.
- While pressing the Shift key on the keyboard, perform a right-click on your mouse at an empty place inside the folder window.
- In the context menu, select the “Open command prompt here” or “Open in Terminal” option.

- You can now execute any ADB or Fastboot command.
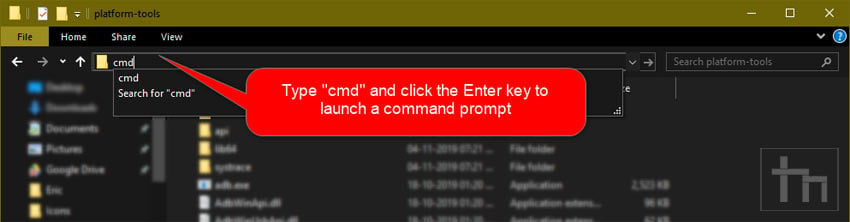
Method 2
Well, this method is far easier than the one I described above. You can simply launch a command window from inside the platform-tools folder by typing “cmd” or “powershell” in the Windows file explorer address bar as shown below and hitting the Enter key on your PC’s keyboard.
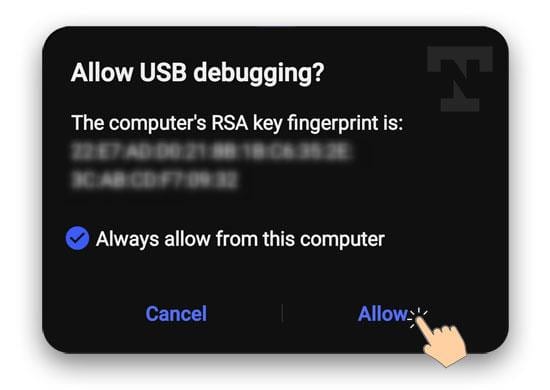
Note: Make sure to enable the USB debugging option on your Android device. You can find it under Settings> Developer options. In case you don’t see Developer Options listed under device Settings, open About device> Software Information and tap the Build number 7 times to unlock the hidden Developer options on your Android device.
You need to allow the debugging option so that your devices and computer can communicate and interact with each other. When you execute a command in the command window, you’ll get a pop-up on your Android phone’s screen asking you to Allow USB debugging.
Verify ADB Connection
Note: Make sure you have already installed the proper Android USB Driver from your device’s manufacturer on your computer.
- Having enabled USB Debugging from Developer options, connect your phone or tablet to the computer using a compatible USB cable.
- Now launch a command window and type the following command and click the Enter key on the keyboard.
adb devices
- You’ll see the list of the IDs of attached devices in the Command Prompt window represented by a string of alphanumeric values as shown below.


Please note that to sideload an APK on your Android phone via ADB or to flash a system image (.img) file using Fastboot commands, you need to place those files inside the “platform-tools” folder first. You can also enable system-wide ADB and fastboot so that you can execute commands without navigating to the “platform-tools” directory every time. If you encounter any problem while running commands, read my tutorial on fixing ADB or Fastboot is not recognized error.
That’s all for now! I’ve also prepared a very exhaustive list of useful ADB, ADB Shell, and Fastboot commands in a dedicated tutorial. Don’t forget to check that.
Now that you have set up SDK Platform tools on your computer, here are a few things that you should start with.
- Uninstall system apps on Android without root
- Turn Safe Mode On or Off using ADB command
- Turn off USB Debugging and Developer options using ADB command
В этом руководстве мы покажем вам шаги по загрузке и установке Android SDK Platform Tools на ваш компьютер. Среди множества инструментов и пользовательских двоичных файлов, которые используются в экосистеме с открытым исходным кодом, нельзя отрицать тот факт, что инструменты ADB и Fastboot, вероятно, являются наиболее важными. Более того, это один из немногих инструментов, которые используются как техническими энтузиастами, так и обычными пользователями.
Если говорить о последнем наборе пользователей, они могут использовать его для загрузки своего устройства в Stock Recovery, а затем отформатировать свое устройство или прошить прошивку через ADB Sideload. Кроме того, они также могут использовать его для выполнения команд ADB Shell и удаления вредоносных программ или предустановленных приложений со своего устройства. Затем, если мы переключим наше внимание на технарей, платформа-инструменты — это ворота для выхода на рынок заказной разработки.
Начиная с загрузки их устройства в режиме быстрой загрузки, заканчивая прошивкой исправленного Magisk boot.img для root, прошивкой прошивки, чтобы разблокировать их устройство, или прошивкой пользовательских ПЗУ и восстановлением, вероятно, ни одна из этих настроек не была бы возможна, если бы не этот инструмент. Что ж, хватит похвал, давайте теперь перейдем непосредственно к задаче и расскажем вам о шагах по загрузке и установке Android SDK Platform Tools на ваш ПК.
Приведенные ниже инструкции перечислены в отдельных разделах для простоты понимания. Обязательно следуйте той же последовательности, как указано.
ШАГ 1. Загрузите инструменты платформы Android SDK
- Для начала загрузите Android SDK Platform Tools на свой компьютер снизу:Окна | линукс | macOS
[Note: Links are automatically updated from Google’s servers] - После загрузки извлеките его в любое удобное место на вашем ПК.
- Это даст вам папку platform-tools, которая будет использоваться в этом руководстве.
ШАГ 2: Добавьте ADB в путь
Итак, вы загрузили и распаковали Android SDK Platform Tools в удобное место по вашему выбору. Ваш следующий шаг должен заключаться в том, чтобы сообщить вашей системе об этом местоположении. И это можно сделать, добавив путь ADB к системным переменным среды. Для этого вы можете либо обратиться к нашему подробному руководству о том, как добавить ADB в путь в Windows 11, либо ознакомиться с приведенными ниже более короткими инструкциями:
- Для начала запишите место, куда вы распаковали Android SDK Platform Tools.
- Затем перейдите в меню «Пуск», найдите «Просмотр дополнительных параметров системы» и откройте его.
- Теперь вы попадете на вкладку «Дополнительно» в свойствах системы.
- Нажмите кнопку «Переменные среды», расположенную в правом нижнем углу.
- Теперь выберите поле «Путь» в разделе «Системная переменная» и нажмите кнопку «Изменить».
- После этого нажмите кнопку «Создать» и вставьте папку с инструментами платформы (которую вы ранее скопировали) в предоставленное место.
- Затем нажмите OK, чтобы сохранить этот путь. Снова нажмите «ОК», чтобы закрыть переменную среды, и, наконец, нажмите «ОК», чтобы закрыть «Свойства системы».
- Вот и все. Теперь перезагрузите компьютер (необязательно, но рекомендуется), и ваши задачи будут выполнены.
ШАГ 3: Установите драйверы Fastboot
ADB — это лишь верхушка айсберга, большая часть вашей работы обычно выполняется в среде Fastboot. Однако ваш компьютер не сможет идентифицировать подключенное устройство в режиме быстрой загрузки, если на нем не установлены необходимые драйверы быстрой загрузки. Поэтому, пожалуйста, обратитесь к нашему руководству по установке драйверов Fastboot в Windows 11.
Как проверить, успешно ли установлены ADB и Platform Tool?
Теперь, когда мы закончили настройку среды ADB и Fastboot, давайте протестируем ее и проверим результаты. В связи с этим сначала мы проверим соединение ADB, а затем соединение Fastboot. Следуйте вместе.
Проверьте соединение с АБР
- Для начала включите отладку по USB на вашем устройстве, чтобы сделать его распознаваемым ПК в режиме ADB.
- Для этого перейдите в «Настройки»> «О телефоне»> «Семь раз нажмите на номер сборки». [MIUI Number in Xiaomi Devices].
- Затем вернитесь в «Настройки»> «Система»> «Параметры разработчика»> «Включить отладку по USB».
- Перейдите в папку с инструментами платформы, введите CMD в адресной строке и нажмите Enter.
- Это запустит окно CMD с каталогом папки platform-tools.
- Теперь выполните приведенную ниже команду, чтобы проверить устройства ADB Connectionadb.
- Теперь вы должны получить уникальный идентификатор устройства, означающий, что соединение с ADB установлено успешно.
- Если вы также получили несанкционированное сообщение, проверьте свое устройство, появится подсказка, нажмите «Разрешить».
- Затем снова выполните приведенную выше команду, и на этот раз вы не получите несанкционированное предупреждение в CMD.
Проверьте соединение Fastboot
- Для начала убедитесь, что вы выполнили все шаги, упомянутые в приведенном выше разделе ADB.
- Затем выполните приведенную ниже команду в окне CMD, открытом в папке инструментов платформы: adb reboot bootloader
- Теперь ваше устройство загрузится в режиме быстрой загрузки, что означает успешное подключение.
Могу ли я использовать любой другой инструмент ADB?
Не рекомендуется использовать какие-либо другие сторонние инструменты ADB и/или Fastboot. Это связано с тем, что большинство этих инструментов устарели и не получали обновлений годами. Более того, они также не синхронизированы с более новыми изменениями Android. [such as the FastbootD Mode, dynamic partitions, etc].
Могу ли я использовать Powershell вместо CMD для выполнения команд?
Хотя вы можете использовать Powershell вместо командной строки, но я бы не советовал вам этого делать. Это связано с тем, что Powershell требует, чтобы вы добавили пару дополнительных символов или ключевых слов перед каждой командой, что делает ее довольно сложной и запутанной. Так что придерживайтесь CMD, и у вас не возникнет никаких проблем.
Как открыть CMD от имени администратора внутри инструментов платформы
Если вы хотите открыть командную строку от имени администратора в папке инструментов платформы, вы можете воспользоваться двумя разными подходами:
- Откройте CMD от имени администратора из меню «Пуск», а затем с помощью команды cd измените каталог на папку platform-tool. Преимущество — это проще выполнить. Недостаток — вам придется делать это каждый раз.
- Добавьте параметр «Открыть CMD от имени администратора» в контекстное меню. [Personally, I would recommend this approach].Преимущество — требуется только однократная настройка. Недостаток — немного технический в настройке.
Список всех команд ADB и Fastboot
Из этого руководства вы сможете получить все важные и наиболее часто используемые команды ADB и Fastboot, а также инструкции по их использованию. Так что ознакомьтесь с нашим руководством «Список полезных команд ADB и Fastboot и их использование».
Как исправить ошибки ADB и Fastboot
ни для кого не секрет, что домен ADB и Fastboot подвержен множеству проблем. От невозможности распознавания устройства в режиме быстрой загрузки до неспособности CMD прошить файл — вы можете столкнуться с множеством ошибок и проблем. К счастью, у нас все есть, ознакомьтесь с нашим руководством «Как исправить все возможные ошибки ADB и Fastboot».
Итак, все это было из этого руководства о том, как загрузить и установить Android SDK Platform Tools. Мы также рассмотрели некоторые из наиболее часто задаваемых вопросов, связанных с этим инструментом. Если у вас есть какие-либо вопросы относительно вышеупомянутых шагов, сообщите нам об этом в комментариях. Мы вернемся к вам с решением в ближайшее время.
- 1 1. Install Java for Windows 10
- 2 2. Install Android SDK Command Line tools
- 2.1 2.1 Download Android SDK Command Line tools
- 2.2 2.2 Setting environment variables
- 2.3 2.3 Check if Android command line tools work
- 2.4 2.3 Install Android SDK
This post was completed with the help of my friend NamNV, who pointing out the way to install Android SDK on Ubuntu without install Android Studio
Thanks to my friend
Welcome to my blog, today I write this post to guide you installing Android SDK on Windows 10 without installing Android Studio. You may wonder why we need it?
For most cases, we just need to install Android Studio and it will do all the necessary works include installing Android SDK. In other cases, you just need the Android SDK rather than install Android Studio to get the Android SDK. For example, if you are a Web/Backend developer and want to try Flutter for Desktop, so installing Android Studio is not necessary. Flutter for Desktop is a new technology, it helps to develop a Desktop app as same as what you do when developing a mobile app with Flutter. For the time being, even if you are developing Windows Desktop app you still have to install Android SDK, otherwise, you have to switch to another programming language.
Let’s going into the installation process.
1. Install Java for Windows 10
The first thing we need is to install Java, Android is based on Java, so Java is a must have thing before we do any works relative to Android development.
Because we don’t want to use Android Studio and just want the Android SDK command line version, so we don’t need to install Java SE Development Kit
Go to Java Windows 10 download page and click Download button: https://java.com/en/download/win10.jsp


2. Install Android SDK Command Line tools
This part is the most important thing in this tutorial. Android Studio help us on doing every works through it’s GUI, sometime we don’t want to use it’s GUI but using command line to interact with it’s core functions, so Android SDK Command Line tool will help us archive this
2.1 Download Android SDK Command Line tools
Go to Android Studio downloads page and select the right package: https://developer.android.com/studio/#downloads
Scroll to Command line tools only and click on the download link from Windows platform, accept the license and click on Download button

The downloaded file is not an installation file, it is a zip file that contains Android SDK tools, so we have to extract and place it in a convenient place that we will use later. Let’s place it in this location C:Android
Create folder Android at drive C and extract the downloaded file here

2.2 Setting environment variables
Open Edit the system environment variables windows by following these steps:
- On windows search box (at the task bar), type “env” and wait for it to run
- Click to open “Edit the system environment variables” program
- After “System Properties” opened at tab “Advanced“, click on “Environment Variables” button

Now we have to setting the “ANDROID_HOME” environment variable to “C:Android“
When the “Environment Variables” windows is opened, click on “New” button at “User variables for…” section. Fill ANDROID_HOME at the “Variable name:” input and fill C:Android at “Variable value:” input. Then click OK button

We will need to use Android tools binary, so let’s modify the PATH variable to add C:Androidtoolsbin to it

2.3 Check if Android command line tools work
Open Windows Power Shell in Administrator mode

type this command and check the result
sdkmanager --helpIf the result is something like the bellow, then you are ready for the next step. If not, please re-check above steps or try restarting your computer
Usage:
  sdkmanager [--uninstall] [<common args>] [--package_file=<file>] [<packages>...]
  sdkmanager --update [<common args>]
  sdkmanager --list [<common args>]
  sdkmanager --licenses [<common args>]
  sdkmanager --version

With --install (optional), installs or updates packages.
    By default, the listed packages are installed or (if already installed)
    updated to the latest version.
With --uninstall, uninstall the listed packages.

    <package> is a sdk-style path (e.g. "build-tools;23.0.0" or
             "platforms;android-23").
    <package-file> is a text file where each line is a sdk-style path
                   of a package to install or uninstall.
    Multiple --package_file arguments may be specified in combination
    with explicit paths.

With --update, all installed packages are updated to the latest version.

With --list, all installed and available packages are printed out.

With --licenses, show and offer the option to accept licenses for all
     available packages that have not already been accepted.

With --version, prints the current version of sdkmanager.
2.3 Install Android SDK
Open Windows Power Shell in Administrator mode and run this command to install Android SDK 29, you can change this number to your desired version
sdkmanager --install "platform-tools" "platforms;android-29" "build-tools;29.0.2"For the first time running the installation, you will be asked for reading and accept the license, type y and press enter key

Congratulation, you have just installed the Android SDK on Windows 10 without installing Android Studio, if you have any problems or questions regrading this tutorial, please let me know. Thank you!
There are various tools available on the Android Software Development Kit, popularly referred to as Android SDK or Android Devkit. The many tools you will find on this devkit are all unique and designed to serve various specific purposes in Android development. Talking about Android SDK Platform-Tools; this is one of the components of the Android SDK, which includes some essential tools for Android development; the tools included are ADB, Fastboot, and Systrace. These tools are useful in the hands of Android app developers. That is to say, if you’re not an app developer for Android mobile OS, it does not mean it will not use for you. Nevertheless, these tools can be employed by ROM, Root, Recovery developers and phone technicians to root Android devices, unlock bootloaders, as well as flash new custom files.
What Platform Can It support? Where Can It be used?
As said above, the platform-tools is a component of Android SDK containing what are considered to be the essential tools for Android app development, viz, ADB, Fastboot, and Systrace. These tools are available for Windows, Linux, and macOS computers. So, if you’re an Android developer, these tools are vital to you, and you can get the version for your computer OS.
Download links
Please refer Android License regarding the software before download.
- Windows
- Mac
- Linux
How to use Android SDK Platform Tools?
- Firstly, you have to download the tools in its ZIP format and extract it to your computer. Make sure you download the version for your OS.
- You should boot your mobile into fastboot/recovery mode and connect with your PC.
- Navigate to the extracted folder using Command Prompt or Terminal. Use the following ADB and Fastboot commands as per your requirements.
Minimal ADB and Fastboot
If you are a regular user who uses adb and fastboot for simple usage like a flash, bootloader unlocks, you can use this software. It is a Windows version. All you have to do is download, extract, and install the executable file.
- Download the ADB drivers.
Installation Steps
- Download and extract the files. Select the adb setup file and run this as Administrator.

- The installation window will open press “Y” twice to install adb system-wide.
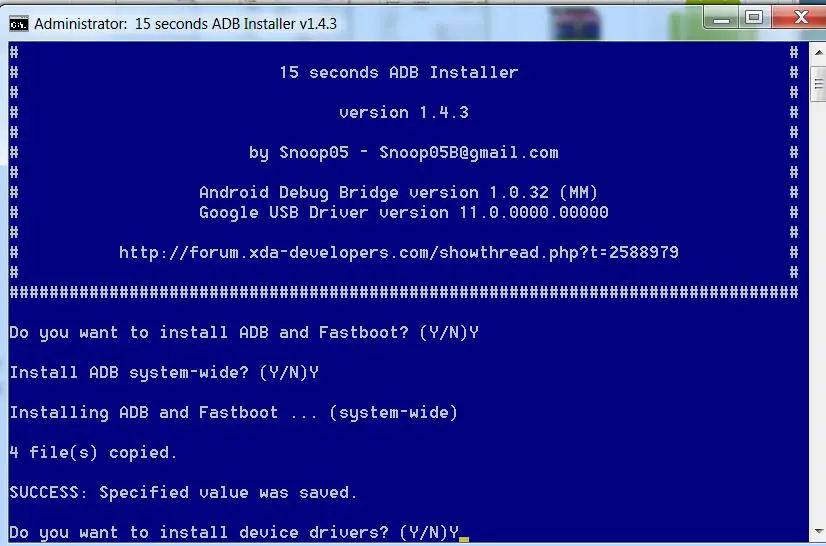
- Now you can find the adb files in your installed folder. You can access the command anywhere within your PC. But, it is better to copy the flash and boot files in this folder for the process.

How to use ADB
There are various things you can do with ADB; this tool supports a lot of commands to trigger most functions. Most of them deal with the recovery mode. I try to cover some essential commands.
Note: you must activate “Developer Options” on the device and turn on “USB Debugging” on the Android device before running ADB commands.
ADB commands
|
ADB Command |
Function |
|
adb reboot – bootloader |
Reboots Android device in bootloader mode |
|
adb reboot |
Reboots Android phone in normal mode |
|
adb push |
Move a file from local system to an Android phone’s location |
|
adb devices |
Displays all connected ADB compatible devices |
|
adb pull |
Moves a file from Android to your PC |
|
adb install |
Installs an app from your system’s .apk file location to your Android device |
|
adb connect |
Use ADB commands over Wi-Fi Network |
|
adb backup |
Backs up the Android device |
|
adb shell screencap |
Captures a screenshot of the device |
|
adb sideload file |
Push the file to your mobile device and Install it. |
Launching ADB requires you know about CMD – Command Prompt. This is because you need to start CMD and use commands to access the folder where you extracted the Platform Tools and launch adb.exe.
How to use Fastboot
Fastboot installs alongside ADB when you extract the ZIP file. Fastboot allows you to run commands on and Android device that is in bootloader mode. There are, however, other ways to use an Android device in bootloader mode, but using Fastboot is the best option. Also, it is possible to unlock an Android device bootloader using Fastboot to install a custom system file.
However, before Fastboot commands can work on an Android device, you must activate “Developer Options” on the device and turn on “USB Debugging.”

Fastboot commands
|
Fastboot Commands |
Functions |
|
fastboot oem lock |
re-locks the bootloader of an unlocked device |
|
fastboot devices |
Shows the serial number of a connected Android device |
|
fastboot flash recovery (filename) |
Flash the file from PC |
|
fastboot boot recovery (filename) |
Boot the data from PC |
|
fastboot oem unlock |
Unlock the bootloader of connected Android device |
What is Systrace?
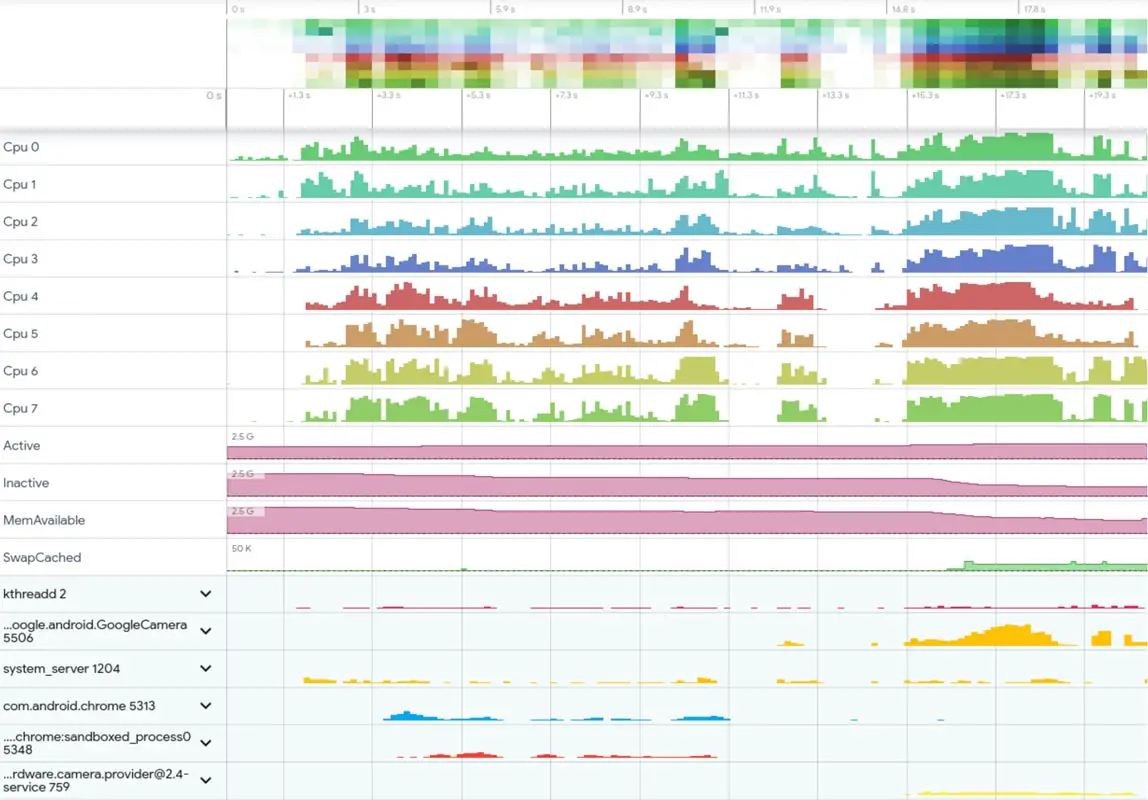
We can say it is an in-built advanced tool in Android Studio to understand your app performance in your Android mobile. It can give you an overview of background process performance, How much CPU it is accessing to do things like that. It also needs ADB to perform the commands. Refer- Systrace Commands.
What More?
The use of these tools is infinite. Our ideas limit it. I try to give some ideas about how to use them. I can say I gave 0.1%. There is plenty of add ons are available, and you can use them as per your requirement. These SDK tools are essential to interact with your mobile with the Android commands. You can do plenty of customizations using these commands. If you hear about the country restriction pixel 4 soli, Yes, you can also lift the restriction. You can also disable bloatware apps in Samsung devices. If you face any problem, or you need additional adb commands, comment below.
Source, (2)

Selva Ganesh is the Chief Editor of this Blog. He is a Computer Science Engineer, An experienced Android Developer, Professional Blogger with 8+ years in the field. He completed courses about Google News Initiative. He runs Android Infotech which offers Problem Solving Articles around the globe.
Are you looking for a method to download the platform tools in 2022? If yes, you have come across the exact place where you will attain an easy guide with a walkthrough.
On the other hand, if you’re in a hurry and know about the primary steps to run the core commands, learn how to use this tool. Get the latest version tool from below.
The platform tools are like the building block in the SDK Android tools that provide several things for the developer to quickly transform the internal system settings.
Are you also intrigued to know how you can unlock those fascinating privileges? Yes, you are! For that, you need to be aware of the usual way to root any android device.
You can’t achieve those rooting privileges without having proper knowledge about the standalone software necessary to unlock those features, and this tool is one of them.
After installing all the necessary tools, the users quickly enter into the system settings and perform the modification, while rooting with the Magisk app is the safest choice.
Indeed, the platform tools are equipped with the ADB commands bundle that will help flash the TWRP custom recovery and further aid in making the patched boot img file.
But before heading to the unknown forest of endless customization, let’s have a look at what this tool is and understand what exciting things you can accomplish with it.
What are Platform Tools?
The platform tools are an all-in-one standalone application for controlling the fastboot and ADB commands, and they can be considered a piece of the Android SDK tools.
The primary work of this tool is to work as an interlink bridge to connect the device to the laptop/PC in the best way possible so that users can run command instructions.
With this setup, you can frequently carry out the fastboot commands and check each section of your device, while the tool also offers to unlock bootloader on any android.
The SDK platform tools are encrypted codes that unlock the backdoor of the system firmware from which the users can unleash impressive features and function precisely.
In simple words, you will receive access to transform the administer directory that will allow you to unleash the performance beast, enhance battery life, root assets, more.
Last but not least, the things covered here are just the top of the mountain and several left. If you are prepared to take the risk, you will discover exceptional highlights ahead.
Features
Automatic reboot
You have to follow a lengthy process to open the fastboot mode, but with this tool, you quickly move from the fastboot to normal mode with a single command hassle-free.
Custom features
Once you have rooted the device, you will receive custom traits options that help build a personalized interface ecosystem. Besides, there are diverse choices on the internet.
Flash custom-made recovery
One of the reasons to install these excellent tools is that you aspire to flash apt TWRP recovery on the device to flash various features compared to tedious stock recovery.
New system image
Following that, you will also perceive options to wear distinctive interface settings and change the system img. You can also upgrade and downgrade the android version.
| Software Name | Platform Tools |
| Version | 33.0.1 |
| Last Updated | May 30, 2022 |
| File Size | 6.3 MB |
Setup Platform Tools To Run Basic Commands
Disclaimer: In this post, you will get the actual application, yet if you are facing any problem downloading or installing, visit the official page. While Magisk update is not responsible for any device or computer damage, download the software at your risk.
Step 1 – Download and install the tool
- I’m assuming that you have downloaded the latest version of flashable tools.
- Navigate to the download location or click on show in the folder options first.
- Next, you have to extract the zip file. You can also utilize the 7zip tool to rar file.
- Extract the tool wherever you like to put it. It’s recommended to use a C-drive.
Step 2 – Adding to the path variable
- After unzipping the file, copy the above section – folder path – to utilize it later.
- Search for the Edit the system environment variables to open a new prompt.
- Select the environment variables option, and you will notice the system variable section. In that white section, choose the path part, paste the folder path there.
- Press on “Ok” in all three opened the prompt to run everything smoothly.
Step 3 – Apply primary commands
- Apply the fastboot command pattern by pressing the Volume + Power button.
- Connect both ends of the UBS cable in the device and other to the computer.
- Inside the PC, insert cmd in the search bar to unlock the command prompt.
- Enter adb command to confirm everything is working correctly! Next, upload the adb devices to check whether the smartphone device is connected or not.
Note: Every smartphone maker provides a different boot method to enter the fastboot mode. Thus, you have to check the pattern for your device to boot into the fastboot.
F.A.Q (Frequently Asked Questions)
Q- How do you use Platform Tools?
Ans. This tool is pretty straightforward to use, download and install the latest version from this post, extract the file, and run the cmd prompt to use the ADB commands.
Q- How do I download Platform Tools SDK?
Ans. In this post, you will receive the proper method to download and install the SDK tool, which will further aid you in rooting any android phone without any annoyance.
Q- How do I use Platform Tools on Windows?
Ans. To utilize this tool on the Windows operating system, you must head toward the Edit the system environment variable section and insert the folder path for access.
Q- What are ADB shell commands?
Ans. The ADB shell commands are the fundamental commands that allow users to perform specific tasks that include removing the bootloader, reset, reboot, and more.
Q- How do I install Platform Tools on Windows 10?
Ans. Grab the latest version of the platform SDK tools for Windows 7, 10, 11 from this article. Then, extract the zip file into the PC, and later enjoy the fastboot commands.
Q- Why is ADB not recognized?
Ans. When the operating system understands the path of this tool, the ADB does not recognize error occurs, follow Step-2 to avoid this problem once and for all quickly.