- Introduction
- Connect to Microsoft SQL Server
- Setup ODBC
- Troubleshooting
- More Information
Introduction
This article explains how to connect to Microsoft Access with ODBC from Windows 10.
It covers the following topics:
- How to connect to Microsoft Access (with code samples).
- How to setup ODBC:
- Configure ODBC using the ODBC Data Source Administrator:
We recommend using system DSNs (available to all users).
- Configure ODBC using the ODBC Data Source Administrator:
Connect to Microsoft Access [top]
We strongly recommend using connection objects to connect to databases, and this is what we demonstrate in the code samples.
Follow these steps to connect:
- Create a new channel to try out the code:
- Create a channel like this:
- Name: DB Access Connection (or similar)
- Source: From Translator
- Destination: To Channel
- Alternatively use an existing channel:
Your channel will need a From/To Translator or a Filter component.
- Create a channel like this:
- Connect to a database using ODBC:
- Paste this code into the Translator:
If your script uses connection object methods
conn:query{}orconn:execute{}to connect to a remote Microsoft SQL Server database, the location of the remote host is specified as part of the name parameter in thedb.connect{ }command. If you useconn:merge{}to connect the remote host is specified as part of the name parameter in theconn:merge{}command itself.function main() local conn = db.connect{ api=db.ACCESS, name='your_odbc_server_name', user='', -- use empty string for integrated security password='', -- use empty string for integrated security use_unicode = true, live = true } conn:execute{sql='SELECT * FROM <your table>', live=true} end - The name is the name of an ODBC source that you create using the ODBC Administrator.
- Paste this code into the Translator:
- Adapt the code to your requirements.
Setup ODBC [top]
To set up a new ODBC data source for Microsoft Access:
- Install the latest Microsoft Access Database Engine Redistributable:
At the time of writing this was the 2016 version. This version contains 64 bit ODBC drivers.
- Download the latest redistributable from the Microsoft Download Center.
- Run the installer and accept the defaults.
- Open the 64 bit ODBC Administrator:
Windows 10 (64 bit version) supports 32 and 64 bit ODBC sources — always use the 64 bit ODBC Administrator.
- Open the System DSN tab and click Add:

- Choose the latest Access ODBC driver and click Finish:

- Enter the ODBC credentials:
- Use any Name and Description you prefer.
- Click Select and browse to choose your Access database file.
- Alternatively you Create a new database.
- Click OK to create the ODBC data source:

- Your Access ODBC source should now be ready to use.


Troubleshooting [top]
- Problems with connection settings:
Speak to your DBA (database administrator) for general connection issues like: User name and password, Database Server network name etc.
- Using integrated security:
Using integrated security is the usual way to connect to a Microsoft Access database. If this does not work speak to your DBA (database administrator) about the user credentials you should use to connect to the database.
If you need more help please contact us at support@interfaceware.com.
More Information [top]
- Using Database Connection Objects
- Forum thread on Windows ODBC
Содержание
- Installing and Configuring an ODBC Driver in Windows 10 (32 / 64-bit)
- What is ODBC Driver and Data Source?
- Installing ODBC Driver for Windows 10
- Configuring a DSN for ODBC Driver in Windows 10 (64-bit)
- Configuring a DSN for ODBC Driver in Windows 10 (32-bit)
- Step-by-step ODBC Data Source Setup in Windows 10
- Скачивание драйвера ODBC Driver for SQL Server
- Скачать для Windows
- Сведения о версии
- Доступные языки
- Заметки о выпуске для Windows
- Предыдущие выпуски для Windows
- Загрузка для Linux и macOS
- Системные требования, установка и файлы драйвера
- Совместимость с версиями SQL
- Сведения о строке подключения
- Поддерживаемые операционные системы
- Установка Microsoft ODBC Driver for SQL Server
- Параллельно с Native Client
- Лицензия пользователя
- Удаление без взаимодействия с пользователем
- Указание зависимость
- Программы командной строки: sqlcmd.exe и bcp.exe
- Компоненты Microsoft ODBC Driver for SQL Server в Windows
- Вот как вы можете исправить проблемы ODBC в Windows 10
- Как исправить проблемы ODBC в Windows 10
- Решение 1. Удалите SMBv1 и включите SMBv2/SMBv3)
- Решение 2. Проверьте брандмауэр Windows и Защитник Windows
- Решение 3 – Обновление драйверов
- Решение 4 – Откат к предыдущей версии Windows
- Download ODBC Driver for SQL Server
- Download for Windows
- Version information
- Available languages
- Release notes for Windows
- Previous releases for Windows
- Download for Linux and macOS
Installing and Configuring an ODBC Driver in Windows 10 (32 / 64-bit)
This tutorial explores how to install 32-bit and 64-bit ODBC drivers in Windows 10 and create a DSN for an ODBC data source.
What is ODBC Driver and Data Source?
Open Database Connectivity (ODBC) is a standard application programming interface that allows external applications to access data from diverse database management systems. The ODBC interface provides for maximum interoperability – an application that is independent of any DBMS, can access data in various databases through a tool called an ODBC driver, which serves as an interface between an external program and an ODBC data source, i.e. a specific DBMS or cloud service.
The ODBC driver connection string is a parameterized string that consists of one or more name-value pairs separated by semi-colons. Parameters may include information about the data source name, server address and port, username and password, security protocols, SQL dialects, and many more. The required information is different depending on the specific driver and database. Here’s an example of ODBC connection string:
Devart ODBC Drivers are powerful connectors for a host of database management systems and cloud services that allow you to connect to your data from virtually any third-party application or programming language that supports the ODBC API. By a third-party application, we mean tools like Power BI, Tableau, Microsoft Excel, etc. See this page for the list of external applications that have been tested for compatibility with our drivers.
Installing ODBC Driver for Windows 10
1. Run the downloaded installer file. If you already have another version of the driver installed in the system, you will get a warning — click Yes to overwrite the old files, though it’s recommended to first uninstall the old version. If this is the first time you install Devart ODBC driver, just click Next.

2. Read and accept the license agreement, then click Next.

3. Select the installation directory for the ODBC driver and click Next.

4. In the Select Components tab, select which version of the driver to install (64-bit / 32-bit), and whether to include the help files.

5. Confirm or change the Start Menu Folder and click Next.
6. Input your activation key or choose Trial if you want to evaluate the product before getting a license. You can load the activation key by clicking on the Load Activation Key… button and selecting the license file from your machine. Click Next and then Install.

7. After the installation is completed, click Finish.

Configuring a DSN for ODBC Driver in Windows 10 (64-bit)
Before connecting a third-party application to a database or cloud source through ODBC, you need to set up a data source name (DSN) for the ODBC driver in the Data Source Administrator. A 64-bit version of the Microsoft Windows operating system includes both the 64-bit and 32-bit versions of the Open Database Connectivity (ODBC) Data Source Administrator tool (odbcad32.exe):
1. In your Windows Search bar, type ODBC Data Sources. The ODBC Data Sources (64 bit) and ODBC Data Sources (32 bit) apps should appear in the search results.

Alternatively, you can open the Run dialog box by pressing Windows+R, type odbcad32 and click OK.

Yet another way to open the ODBC Data Source Administrator is via the command prompt: enter cmd in the search bar and click the resulting Command Prompt button. Enter the command odbcad32 and hit Enter.

2. Since most modern computer architectures are 64-bit, we’ll select the 64-bit version of the ODBC Data Source Administrator to create a DSN for our ODBC driver. The odbcad32.exe file displays two types of data source names: System DSNs and User DSNs. A User DSN is only accessible to the user who created it in the system. A System DSN is accessible to any user who is logged in into the system. If you don’t want other users on the workstation to access your data source using the DSN, choose a User DSN.

3. In the administrator utility, click on the Add button. The Create New Data Source dialog box will display the list of installed ODBC drivers in the system. Choose the needed driver from the list. The choice of the driver is determined by the data source you are trying to connect to — for example, to access a PostgreSQL database, choose Devart OBDC Driver for PostgreSQL. Click Finish.

4. Enter a name for your data source in the corresponding field. Fill in the parameters for the ODBC connection string, which is driver-specific. In most of our ODBC drivers for databases, a connection string with basic parameters requires the user to only input their server address, port number, and login credentials, since Devart ODBC drivers allow direct access to the database without involving additional client libraries.

5. Click Test Connection to verify connectivity. If you see the Connection Successful message, click OK to save the DSN. You should now see your new DSN in the User DSN tab of the ODBC Data Source Administrator tool.

Configuring a DSN for ODBC Driver in Windows 10 (32-bit)
The steps for configuring an ODBC DSN for a 32-bit driver are practically the same as for the 64-bit driver, except for the step where you select the 32-bit version of the ODBC Data Source Administrator. Running the odbcad32 command in the Command Prompt or in the Run dialog box will start the 64-bit version of the ODBC administrator on the 64-bit Windows by default, therefore your best option is to select the 32-bit version of the administrator in the search results of the Windows search box.
Note though that if you have both versions (32-bit and 64-bit) of the driver installed and you have configured a User DSN (in contrast to a System DSN), you will be able to use the same DSN for 32-bit and 64-bit applications (see the Platform column in the screenshot below).

In a situation where you need to use an application that is available only in 32-bit, the 32-bit ODBC driver does the trick. An example is Apache OpenOffice, which is distributed as a 32-bit application.

Step-by-step ODBC Data Source Setup in Windows 10
If you would like to test our ODBC connectors, visit the ODBC drivers page.
Источник
Скачивание драйвера ODBC Driver for SQL Server
Microsoft ODBC Driver for SQL Server — это отдельная библиотека динамической компоновки (DLL), которая содержит поддержку времени выполнения для приложений, использующих API машинного кода для подключения к SQL Server. Используйте Microsoft ODBC Driver 17 for SQL Server для создания новых и расширения существующих приложений, которым необходимо использовать новые возможности SQL Server.
Скачать для Windows
Распространяемый установщик Microsoft ODBC Driver for SQL Server версии 17 устанавливает клиентские компоненты, необходимые во время выполнения, чтобы воспользоваться преимуществами функциями нового SQL Server. При необходимости он устанавливает файлы заголовков, которые требуются для разработки приложения, использующего API ODBC. Начиная с версии 17.4.2, установщик также включает и устанавливает библиотеку проверки подлинности Microsoft Active Directory (ADAL.dll).
Версия 17.8.1 является последней общедоступной (GA) версией. Если у вас установлена предыдущая версия Microsoft ODBC Driver for SQL Server 17, то при установке версии 17.8.1 она обновляется до версии 17.8.1.
Сведения о версии
Если вы открываете локализованную версию этой страницы и хотите просмотреть наиболее актуальное содержимое, выберите элемент Прочитать на английском в верхней части этой страницы. С версии сайта US-English вы можете скачать SSMS на других языках из числа доступных.
Доступные языки
Этот выпуск драйвера Microsoft ODBC Driver for SQL Server доступен для установки на следующих языках:
Заметки о выпуске для Windows
Дополнительные сведения об этом выпуске для Windows см. в заметках о выпуске для Windows.
Предыдущие выпуски для Windows
Чтобы скачать предыдущие версии для Windows, см. страницу с предыдущими выпусками Microsoft ODBC Driver for SQL Server.
Загрузка для Linux и macOS
Microsoft ODBC Driver for SQL Server можно скачать и установить с помощью диспетчеров пакетов для Linux и macOS, используя соответствующие инструкции по установке.
Установка ODBC для SQL Server (Linux)
Установка ODBC для SQL Server (macOS)
Если необходимо скачать пакеты для автономной установки, все версии доступны по следующим ссылкам.
Пакеты с именем msodbcsql17-* являются последней версией. Пакеты с именем msodbcsql-* являются версией 13 драйвера.
Источник
Системные требования, установка и файлы драйвера
Скачать драйвер ODBC
В этой статье обсуждаются драйверы ODBC, подключающиеся к SQL Server.
Совместимость с версиями SQL
Совместимость указывает, что драйвер был протестирован на совместимость с существующими выпусками SQL во время выпуска драйвера. Выпуски SQL Server обычно пытаются поддерживать обратную совместимость с существующими драйверами клиента. Но новые функции в выпусках SQL Server могут быть недоступны для более старых версий клиентских драйверов.
| Версия базы данных → ↓ Версия драйвера |
База данных SQL Azure | Azure Synapse Analytics | Управляемый экземпляр SQL Azure | SQL Server 2019 | SQL Server 2017 | SQL Server 2016 | SQL Server 2014 | SQL Server 2012 | SQL Server 2008 R2 | SQL Server 2008 | SQL Server 2005 |
|---|---|---|---|---|---|---|---|---|---|---|---|
| 17.8 | Да | Да | Да | Да | Да | Да | Да | Да | |||
| 17,7 | Да | Да | Да | Да | Да | Да | Да | Да | |||
| 17.6 | Да | Да | Да | Да | Да | Да | Да | Да | |||
| 17.5 | Да | Да | Да | Да | Да | Да | Да | Да | |||
| 17.4 | Да | Да | Да | Да | Да | Да | Да | Да | |||
| 17.3 | Да | Да | Да | Да | Да | Да | Да | Да | Да | Да | |
| 17.2 | Да | Да | Да | Да | Да | Да | Да | Да | Да | ||
| 17.1 | Да | Да | Да | Да | Да | Да | Да | Да | Да | ||
| 17,0 | Да | Да | Да | Да | Да | Да | Да | Да | Да | ||
| Версия 13.1 | Да | Да | Да | Да | Да | Да | |||||
| 13 | Да | Да | Да | Да | Да | ||||||
| 11 | Да | Да | Да | Да | Да |
Сведения о строке подключения
Поддерживаемые операционные системы
Следующая таблица указывает на поддержку версии драйвера для версий операционной системы Windows:
| Операционная система → ↓ Версия драйвера |
Windows Server 2019 | Windows Server 2016 | Windows Server 2012 R2 | Windows Server 2012 | Windows Server 2008 R2 | Windows 10 | Windows 8.1 | Windows 7 | Windows Vista с пакетом обновления 2 (SP2) |
|---|---|---|---|---|---|---|---|---|---|
| 17.8 | Да | Да | Да | Да | Да | Да | |||
| 17,7 | Да | Да | Да | Да | Да | Да | |||
| 17.6 | Да | Да | Да | Да | Да | Да | |||
| 17.5 | Да | Да | Да | Да | Да | Да | |||
| 17.4 | Да | Да | Да | Да | Да | Да | Да | Да | |
| 17.3 | Да | Да | Да | Да | Да | Да | Да | Да | |
| 17.2 | Да | Да | Да | Да | Да | Да | Да | ||
| 17.1 | Да | Да | Да | Да | Да | Да | Да | ||
| 17,0 | Да | Да | Да | Да | Да | Да | Да | ||
| Версия 13.1 | Да | Да | Да | Да | Да | Да | Да | ||
| 13 | Да | Да | Да | Да | |||||
| 11 | Да | Да | Да | Да |
Установка Microsoft ODBC Driver for SQL Server
Драйвер устанавливается при запуске msodbcsql.msi из одной из загрузок для Windows.
Для тех, кто установил драйвер 17.1.0.1 или ниже, рекомендуется удалить его вручную перед установкой новой версии драйвера.
Параллельно с Native Client
Драйвер можно установить параллельно с SQL Server Native Client. Основные версии драйвера (11, 13, 17) могут быть установлены параллельно друг с другом.
Лицензия пользователя
Удаление без взаимодействия с пользователем
В следующем примере показано выполнение удаления без взаимодействия с пользователем.
Указание зависимость
Программы командной строки: sqlcmd.exe и bcp.exe
bcp.exe и sqlcmd.exe устанавливаются во вложенную папку 110Tools в %PROGRAMFILES%Microsoft SQL ServerClient SDKODBC для версии 11, и 130Tools для 13 и 13.1.
Приложение, использующее функции BCP, должно указывать драйвер из той же версии, которая поставлялась с файлом заголовка и библиотекой, применявшимися при компиляции приложения.
Например, при компиляции приложения ODBC с помощью msodbcsql11.lib и msodbcsql.h используйте «DRIVER=» в строке подключения.
Компоненты Microsoft ODBC Driver for SQL Server в Windows
Драйвер ODBC для Windows состоит из следующих компонентов:
| Компонент | Описание |
|---|---|
| msodbcsql17.dll или msodbcsql13.dll или msodbcsql11.dll |
Файл библиотеки динамической компоновки (DLL), содержащий все функциональные возможности драйвера. Этот файл устанавливается в папку %SYSTEMROOT%System32. |
| msodbcdiag17.dll или msodbcdiag13.dll или msodbcdiag11.dll |
Файл библиотеки динамической компоновки (DLL), содержащий интерфейс диагностики (трассировка). Этот файл устанавливается в папку %SYSTEMROOT%System32. |
| msodbcsqlr17.rll или msodbcsqlr13.rll или msodbcsqlr11.rll |
Сопутствующий файл ресурса для библиотеки драйвера. Этот файл устанавливается в папку %SYSTEMROOT%System321033. |
| s13ch_msodbcsql.chm или s11ch_msodbcsql.chm |
Файл справки мастера источников данных, описывающий, как создать источник данных для драйвера. Этот файл устанавливается в папку %SYSTEMROOT%System321033
ПРИМЕЧАНИЕ. Для драйвера ODBC 17 отсутствует CHM-файл. |
| msodbcsql.h | Файл заголовка, содержащий все новые определения, необходимые для использования драйвера.
Примечание. В одной программе нельзя сочетать ссылки на msodbcsql.h и odbcss.h. Файл msodbcsql.h для ODBC Driver 17 или 13 устанавливается в папку %PROGRAMFILES%Microsoft SQL ServerClient SDKODBC130SDK. |
| msodbcsql17.lib или msodbcsql13.lib или msodbcsql11.lib |
Файл библиотеки, необходимый для вызова функций служебной программы bcp, являющихся частью драйвера.
Примечание. Если вы включаете в программу ссылку на этот файл библиотеки, убедитесь, что этот файл находится в вашем системном пути, а также в системном пути других пользователей, которые используют это приложение. Источник Вот как вы можете исправить проблемы ODBC в Windows 10ODBC весьма полезен для процедур доступа к приложениям, особенно для профессиональных пользователей. И, похоже, существует множество проблем для пользователей Windows 10, которые либо перешли с Windows 7, либо обновили свою версию Windows 10 до последней версии. Если вы один из них и у вас есть определенные проблемы с ODBC в Windows 10, проверьте решения ниже. Как исправить проблемы ODBC в Windows 10
Решение 1. Удалите SMBv1 и включите SMBv2/SMBv3)
Некоторые пользователи решили проблему, отключив SMBv1 и включив SMBv2 или SMBv3. Это можно сделать различными способами, начиная с PowerShell или редактора реестра. Последний способ быстрее и проще, но может негативно повлиять на ваш компьютер при неправильном использовании. Поэтому, прежде чем выполнять следующие шаги, обязательно сделайте резервную копию вашего реестра. Вот как отключить SMBv1 и включить SMBv2/SMBv3: Сделайте это на каждой уязвимой машине и не забудьте перезагрузить ее, чтобы изменения вступили в силу. Решение 2. Проверьте брандмауэр Windows и Защитник Windows
Некоторым пользователям удалось решить проблему, просто добавив белый список или временно отключив брандмауэр Windows и включив Защитник Windows. Это долгосрочное решение, но оно того стоит. Если у вас уже есть сторонний антивирус, попробуйте объединить его с нативным антивирусом. После этого перезагрузите компьютер и попробуйте снова получить доступ к приложению ODBC. Решение 3 – Обновление драйверов
В случае, если вы используете 32-битный Office на 64-битной машине через ODBC, вам потребуется некоторая перенастройка, чтобы избежать ошибок драйвера. Или, скорее, доступ к версии ODBC32 вместо стандартной 64-битной версии, представленной в архитектуре x64. Вот где его найти и как его запустить: Решение 4 – Откат к предыдущей версии Windows
Как говорили многие из затронутых пользователей, проблема возникла после того, как они обновили Windows 10 до версии 1803. То же самое можно применить к 1809. И вместо того, чтобы ждать, пока Microsoft решит проблемы ODBC в их текущем выпуске, мы скорее предлагаем откат до предыдущей версии, где сервис был полностью функциональным. Вот как перейти к предыдущей версии Windows 10: Источник Download ODBC Driver for SQL ServerMicrosoft ODBC Driver for SQL Server is a single dynamic-link library (DLL) containing run-time support for applications using native-code APIs to connect to SQL Server. Use Microsoft ODBC Driver 17 for SQL Server to create new applications or enhance existing applications that need to take advantage of newer SQL Server features. Download for WindowsThe redistributable installer for Microsoft ODBC Driver 17 for SQL Server installs the client components, which are required during run time to take advantage of newer SQL Server features. It optionally installs the header files needed to develop an application that uses the ODBC API. Starting with version 17.4.2, the installer also includes and installs the Microsoft Active Directory Authentication Library (ADAL.dll). Version 17.8.1 is the latest general availability (GA) version. If you have a previous version of Microsoft ODBC Driver 17 for SQL Server installed, installing 17.8.1 upgrades it to 17.8.1. Version informationIf you are accessing this page from a non-English language version, and want to see the most up-to-date content, please select Read in English at the top of this page. You can download different languages from the US-English version site by selecting available languages. Available languagesThis release of Microsoft ODBC Driver for SQL Server can be installed in the following languages: Release notes for WindowsFor details about this release on Windows, see the Windows release notes. Previous releases for WindowsDownload for Linux and macOSThe Microsoft ODBC Driver for SQL Server can be downloaded and installed using package managers for Linux and macOS using the relevant installation instructions: If you need to download the packages for offline installation, all versions are available via the below links. Packages named msodbcsql17-* are the latest version. Packages named msodbcsql-* are version 13 of the driver. Источник Adblock |
by Matthew Adams
Matthew is a freelancer who has produced a variety of articles on various topics related to technology. His main focus is the Windows OS and all the things… read more
Updated on March 7, 2022
- When you install an Oracle ODBC driver in Windows 10, you can connect to an Oracle database with Access and other ODBC-compliant database applications.
- Users can download and install an ODBC driver for Oracle 19c, which is the current release with a high level of stability.
- You can establish an Oracle ODBC connection in Windows 10 by setting up an ODBC data source after installing the ODBC driver.
- You’ll also need to have installed certain Visual C++ packages for the Oracle setup.

XINSTALL BY CLICKING THE DOWNLOAD FILE
This software will repair common computer errors, protect you from file loss, malware, hardware failure and optimize your PC for maximum performance. Fix PC issues and remove viruses now in 3 easy steps:
- Download Restoro PC Repair Tool that comes with Patented Technologies (patent available here).
- Click Start Scan to find Windows issues that could be causing PC problems.
- Click Repair All to fix issues affecting your computer’s security and performance
- Restoro has been downloaded by 0 readers this month.
Oracle Database is one of the foremost DBMS (Database Management Systems) for Windows. However, Windows 10 doesn’t include any built-in Oracle ODBC connection tool.
So, you’ll need to install an Oracle ODBC driver to connect to an Oracle database with an ODBC-compliant application.
You basically have to do a bit more than simply download and install an ODBC package to connect to an Oracle database with an application.
On top of that, you’ll also need to add new environment variables and set up a DSN for the driver before you can connect with the Oracle database.
How can I install an Oracle ODBC driver in Windows 10?
1. Download and extract the Oracle packages
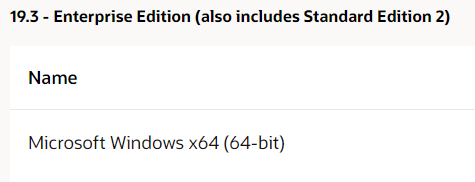
- First, open the Oracle Instant Client page in your browser.

- Next, click the Instant Client for Microsoft Windows 32 or 64-bit link (or an alternative one that matches your PC’s platform).
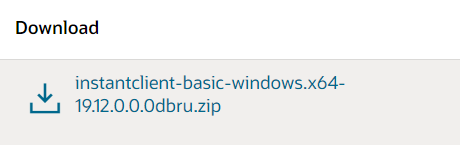
- Click the Basic package download link.
- Scroll down and click the SDK package hyperlink to download that archive.
- In addition, click the download link for the ODBC package.
- Open the File Explorer window by clicking the folder taskbar button for it.
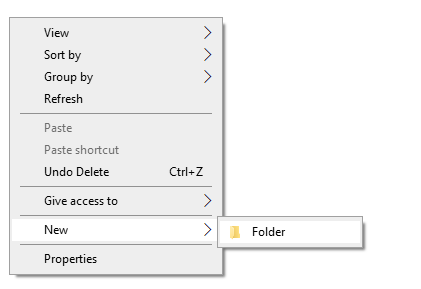
- Click the C: root drive in File Explorer.
- Then right-click a space within the C: drive and select New > Folder.

- Enter Oracle as the new folder name. Then you should have a new folder with this path:
C:Oracle - Move all three of the downloaded Oracle ZIP archives into the Oracle folder. You can do that by selecting the ZIP files, clicking the Move to button, and selecting Choose location within File Explorer.
- Next, extract all three of the ZIP archives into the Oracle folder. To extract a ZIP, select it and click the Extract all button on File Explorer’s Compressed Folder Tools tab.
 folders window")
- Then you can click the Browse button in the Extract Compressed window to select the Oracle folder. Click the Extract button.
- Open the extracted instantclient-basic-windows.x64-19.11.0.0.0dbru folder.
- Move the instantclient_19_11 subfolder from there into the Oracle folder.
- Then erase the now empty instantclient-basic-windows.x64-19.11.0.0.0dbru folder that previously included the instantclient_19_11 subfolder by right-clicking it and selecting Delete. Thereafter, you’ll have a single instantclient_19_11 folder within the Oracle directory.


 folders window")
The ODBC and basic ZIP archives must be unzipped to exactly the same folder. Select to extract the ODBC ZIP to the path of your unzipped Basic package.
Delete instantclient_19_11 at the end of the path in the Extract Compressed window so that an additional subfolder isn’t included.
The SDK package is a non-essential optional one. However, it’s recommended you download that package too.
The SDK ZIP archive should also be extracted to the same instantclient_19_11 folder that includes the Basic and ODBC package files. In case that did not help, you can give a try to DriverFix that has a big database of drivers and might have the right ones for Oracle, besides that, updating your drivers is a common good practice of maintaining a functional PC.
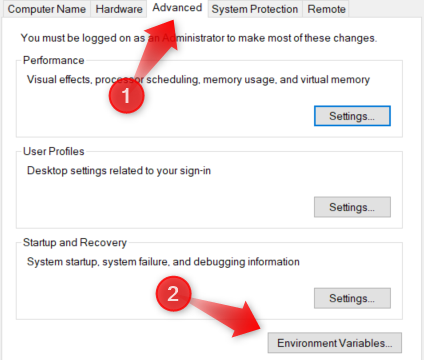
2. Add an Oracle Client directory environment variable
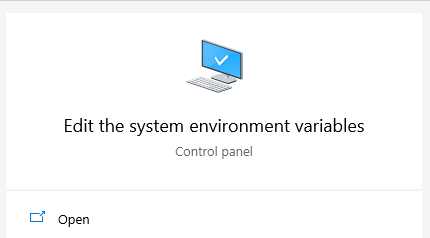
- Press the Windows and S keys simultaneously to open a search box.
- Type the keyword system environment variables with the search text box.
- Click Edit the system environment variables to open the window in the screenshot directly below.

- Press the Environment Variables button.

- Click the New button for system variables.
- Next, input OCI_LIB32 within the Variable name box.
- Input your Oracle folder path in the Variable value box. If you followed the guidelines above, that folder path would be this:
C:Oracleinstantclient_19_11.
- Next, Double-click Path in system variables to open the window in the snapshot directly below.

- Click the New button, and enter the same folder path you input within the Variable value box.
- Press the OK button.


NOTE
To get the list of TNS services when establishing ODBC connections, you’ll also need to set up a TNS_NAMES system environment variable that points to the directory that includes the tnsnames.ora file.
3. Install your ODBC Oracle client package
Some PC issues are hard to tackle, especially when it comes to corrupted repositories or missing Windows files. If you are having troubles fixing an error, your system may be partially broken.
We recommend installing Restoro, a tool that will scan your machine and identify what the fault is.
Click here to download and start repairing.
To install the ODBC client, open the instantclient_19_11 folder you extracted the ODBC package to in File Explorer. Then right-click odbc_install.exe and select the Run as administrator option.
Note that there isn’t any kind of GUI installation wizard for that file. So, that’s all you need to do here.

4. Set up the DSN for Oracle driver
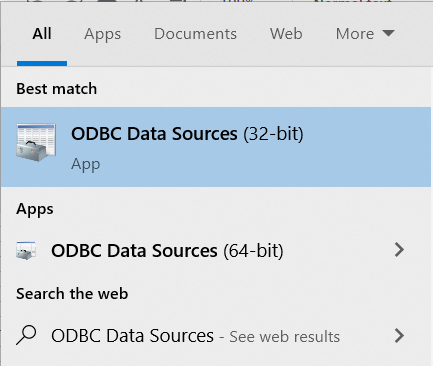
- Bring up the search tool within Windows.
- Enter ODBC Data Sources in the search box.
- Click ODBC Data Sources to open the window in the screenshot directly below.
 window")
- Next, click the Add button on the User DSN (or System) tab to open the Create New Data Source window.

- Select your Oracle ODBC driver, and press the Finish button.
- Fill out the required details on the ODBC configuration window.
- Click Test Connection to check your Oracle Database Server connection.
- Press the OK button to exit.
 window")

5. Install missing Visual C++ libraries
You can’t set up data sources for an Oracle driver with the ODBC Data Source Administration if a required Visual C++ package for it is not installed on your PC.
If an error message pops up when your try to set up an Oracle driver data source, you might be missing a required Visual C++ package.
You’ll need to have Visual Studio 17 installed for the current Oracle 19 client. You can download Visual Studio 2017, and older redistributable packages, via the C++ downloads page.
Then click the VC EXE file you downloaded to the install Visual Studio package. So, that’s how you can install the Oracle ODBC driver on Windows 10.
When you’ve installed the current Oracle ODBC driver, you’ll be able to connect to Oracle Database DBMS versions from 11.2 up to 19.1 with the 19c client.
Moreover, if you need to fix Windows 10 ODBC issues, just check out our dedicated article. As for your opinion, the comments area is waiting for you.
![]()
Newsletter
by Matthew Adams
Matthew is a freelancer who has produced a variety of articles on various topics related to technology. His main focus is the Windows OS and all the things… read more
Updated on March 7, 2022
- When you install an Oracle ODBC driver in Windows 10, you can connect to an Oracle database with Access and other ODBC-compliant database applications.
- Users can download and install an ODBC driver for Oracle 19c, which is the current release with a high level of stability.
- You can establish an Oracle ODBC connection in Windows 10 by setting up an ODBC data source after installing the ODBC driver.
- You’ll also need to have installed certain Visual C++ packages for the Oracle setup.
XINSTALL BY CLICKING THE DOWNLOAD FILE
This software will repair common computer errors, protect you from file loss, malware, hardware failure and optimize your PC for maximum performance. Fix PC issues and remove viruses now in 3 easy steps:
- Download Restoro PC Repair Tool that comes with Patented Technologies (patent available here).
- Click Start Scan to find Windows issues that could be causing PC problems.
- Click Repair All to fix issues affecting your computer’s security and performance
- Restoro has been downloaded by 0 readers this month.
Oracle Database is one of the foremost DBMS (Database Management Systems) for Windows. However, Windows 10 doesn’t include any built-in Oracle ODBC connection tool.
So, you’ll need to install an Oracle ODBC driver to connect to an Oracle database with an ODBC-compliant application.
You basically have to do a bit more than simply download and install an ODBC package to connect to an Oracle database with an application.
On top of that, you’ll also need to add new environment variables and set up a DSN for the driver before you can connect with the Oracle database.
How can I install an Oracle ODBC driver in Windows 10?
1. Download and extract the Oracle packages
- First, open the Oracle Instant Client page in your browser.
- Next, click the Instant Client for Microsoft Windows 32 or 64-bit link (or an alternative one that matches your PC’s platform).
- Click the Basic package download link.
- Scroll down and click the SDK package hyperlink to download that archive.
- In addition, click the download link for the ODBC package.
- Open the File Explorer window by clicking the folder taskbar button for it.
- Click the C: root drive in File Explorer.
- Then right-click a space within the C: drive and select New > Folder.
- Enter Oracle as the new folder name. Then you should have a new folder with this path:
C:Oracle - Move all three of the downloaded Oracle ZIP archives into the Oracle folder. You can do that by selecting the ZIP files, clicking the Move to button, and selecting Choose location within File Explorer.
- Next, extract all three of the ZIP archives into the Oracle folder. To extract a ZIP, select it and click the Extract all button on File Explorer’s Compressed Folder Tools tab.
- Then you can click the Browse button in the Extract Compressed window to select the Oracle folder. Click the Extract button.
- Open the extracted instantclient-basic-windows.x64-19.11.0.0.0dbru folder.
- Move the instantclient_19_11 subfolder from there into the Oracle folder.
- Then erase the now empty instantclient-basic-windows.x64-19.11.0.0.0dbru folder that previously included the instantclient_19_11 subfolder by right-clicking it and selecting Delete. Thereafter, you’ll have a single instantclient_19_11 folder within the Oracle directory.
The ODBC and basic ZIP archives must be unzipped to exactly the same folder. Select to extract the ODBC ZIP to the path of your unzipped Basic package.
Delete instantclient_19_11 at the end of the path in the Extract Compressed window so that an additional subfolder isn’t included.
The SDK package is a non-essential optional one. However, it’s recommended you download that package too.
The SDK ZIP archive should also be extracted to the same instantclient_19_11 folder that includes the Basic and ODBC package files. In case that did not help, you can give a try to DriverFix that has a big database of drivers and might have the right ones for Oracle, besides that, updating your drivers is a common good practice of maintaining a functional PC.
2. Add an Oracle Client directory environment variable
- Press the Windows and S keys simultaneously to open a search box.
- Type the keyword system environment variables with the search text box.
- Click Edit the system environment variables to open the window in the screenshot directly below.
- Press the Environment Variables button.
- Click the New button for system variables.
- Next, input OCI_LIB32 within the Variable name box.
- Input your Oracle folder path in the Variable value box. If you followed the guidelines above, that folder path would be this:
C:Oracleinstantclient_19_11. - Next, Double-click Path in system variables to open the window in the snapshot directly below.
- Click the New button, and enter the same folder path you input within the Variable value box.
- Press the OK button.
NOTE
To get the list of TNS services when establishing ODBC connections, you’ll also need to set up a TNS_NAMES system environment variable that points to the directory that includes the tnsnames.ora file.
3. Install your ODBC Oracle client package
Some PC issues are hard to tackle, especially when it comes to corrupted repositories or missing Windows files. If you are having troubles fixing an error, your system may be partially broken.
We recommend installing Restoro, a tool that will scan your machine and identify what the fault is.
Click here to download and start repairing.
To install the ODBC client, open the instantclient_19_11 folder you extracted the ODBC package to in File Explorer. Then right-click odbc_install.exe and select the Run as administrator option.
Note that there isn’t any kind of GUI installation wizard for that file. So, that’s all you need to do here.
4. Set up the DSN for Oracle driver
- Bring up the search tool within Windows.
- Enter ODBC Data Sources in the search box.
- Click ODBC Data Sources to open the window in the screenshot directly below.
- Next, click the Add button on the User DSN (or System) tab to open the Create New Data Source window.
- Select your Oracle ODBC driver, and press the Finish button.
- Fill out the required details on the ODBC configuration window.
- Click Test Connection to check your Oracle Database Server connection.
- Press the OK button to exit.
5. Install missing Visual C++ libraries
You can’t set up data sources for an Oracle driver with the ODBC Data Source Administration if a required Visual C++ package for it is not installed on your PC.
If an error message pops up when your try to set up an Oracle driver data source, you might be missing a required Visual C++ package.
You’ll need to have Visual Studio 17 installed for the current Oracle 19 client. You can download Visual Studio 2017, and older redistributable packages, via the C++ downloads page.
Then click the VC EXE file you downloaded to the install Visual Studio package. So, that’s how you can install the Oracle ODBC driver on Windows 10.
When you’ve installed the current Oracle ODBC driver, you’ll be able to connect to Oracle Database DBMS versions from 11.2 up to 19.1 with the 19c client.
Moreover, if you need to fix Windows 10 ODBC issues, just check out our dedicated article. As for your opinion, the comments area is waiting for you.
![]()
Newsletter
Содержание
- Installing and Configuring an ODBC Driver in Windows 10 (32 / 64-bit)
- What is ODBC Driver and Data Source?
- Installing ODBC Driver for Windows 10
- Configuring a DSN for ODBC Driver in Windows 10 (64-bit)
- Configuring a DSN for ODBC Driver in Windows 10 (32-bit)
- Step-by-step ODBC Data Source Setup in Windows 10
- Настройка драйвера ODBC для Oracle
- Настройка драйвера ODBC для Oracle
- How to Install Oracle ODBC Driver on Windows 10
- Steps to Install Oracle ODBC Driver on Windows 10
- Step 1. Install Oracle Instant Client Basic
- Step 2. Add the Oracle Client directory to the PATH environment
- Step 3. Install the Oracle ODBC Client
- Step 4. Create a new ODBC Data Source on Windows 10
- Troubleshooting
- Share this:
- Like this:
- 9 Comments
- Iguana Documentation
- Introduction
- Connect to Oracle [top]
- Setup ODBC [top]
- Troubleshooting [top]
Installing and Configuring an ODBC Driver in Windows 10 (32 / 64-bit)
This tutorial explores how to install 32-bit and 64-bit ODBC drivers in Windows 10 and create a DSN for an ODBC data source.
What is ODBC Driver and Data Source?
Open Database Connectivity (ODBC) is a standard application programming interface that allows external applications to access data from diverse database management systems. The ODBC interface provides for maximum interoperability – an application that is independent of any DBMS, can access data in various databases through a tool called an ODBC driver, which serves as an interface between an external program and an ODBC data source, i.e. a specific DBMS or cloud service.
The ODBC driver connection string is a parameterized string that consists of one or more name-value pairs separated by semi-colons. Parameters may include information about the data source name, server address and port, username and password, security protocols, SQL dialects, and many more. The required information is different depending on the specific driver and database. Here’s an example of ODBC connection string:
Devart ODBC Drivers are powerful connectors for a host of database management systems and cloud services that allow you to connect to your data from virtually any third-party application or programming language that supports the ODBC API. By a third-party application, we mean tools like Power BI, Tableau, Microsoft Excel, etc. See this page for the list of external applications that have been tested for compatibility with our drivers.
Installing ODBC Driver for Windows 10
1. Run the downloaded installer file. If you already have another version of the driver installed in the system, you will get a warning — click Yes to overwrite the old files, though it’s recommended to first uninstall the old version. If this is the first time you install Devart ODBC driver, just click Next.
2. Read and accept the license agreement, then click Next.
3. Select the installation directory for the ODBC driver and click Next.
4. In the Select Components tab, select which version of the driver to install (64-bit / 32-bit), and whether to include the help files.
5. Confirm or change the Start Menu Folder and click Next.
6. Input your activation key or choose Trial if you want to evaluate the product before getting a license. You can load the activation key by clicking on the Load Activation Key… button and selecting the license file from your machine. Click Next and then Install.
7. After the installation is completed, click Finish.
Configuring a DSN for ODBC Driver in Windows 10 (64-bit)
Before connecting a third-party application to a database or cloud source through ODBC, you need to set up a data source name (DSN) for the ODBC driver in the Data Source Administrator. A 64-bit version of the Microsoft Windows operating system includes both the 64-bit and 32-bit versions of the Open Database Connectivity (ODBC) Data Source Administrator tool (odbcad32.exe):
1. In your Windows Search bar, type ODBC Data Sources. The ODBC Data Sources (64 bit) and ODBC Data Sources (32 bit) apps should appear in the search results.
Alternatively, you can open the Run dialog box by pressing Windows+R, type odbcad32 and click OK.
Yet another way to open the ODBC Data Source Administrator is via the command prompt: enter cmd in the search bar and click the resulting Command Prompt button. Enter the command odbcad32 and hit Enter.
2. Since most modern computer architectures are 64-bit, we’ll select the 64-bit version of the ODBC Data Source Administrator to create a DSN for our ODBC driver. The odbcad32.exe file displays two types of data source names: System DSNs and User DSNs. A User DSN is only accessible to the user who created it in the system. A System DSN is accessible to any user who is logged in into the system. If you don’t want other users on the workstation to access your data source using the DSN, choose a User DSN.
3. In the administrator utility, click on the Add button. The Create New Data Source dialog box will display the list of installed ODBC drivers in the system. Choose the needed driver from the list. The choice of the driver is determined by the data source you are trying to connect to — for example, to access a PostgreSQL database, choose Devart OBDC Driver for PostgreSQL. Click Finish.
4. Enter a name for your data source in the corresponding field. Fill in the parameters for the ODBC connection string, which is driver-specific. In most of our ODBC drivers for databases, a connection string with basic parameters requires the user to only input their server address, port number, and login credentials, since Devart ODBC drivers allow direct access to the database without involving additional client libraries.
5. Click Test Connection to verify connectivity. If you see the Connection Successful message, click OK to save the DSN. You should now see your new DSN in the User DSN tab of the ODBC Data Source Administrator tool.
Configuring a DSN for ODBC Driver in Windows 10 (32-bit)
The steps for configuring an ODBC DSN for a 32-bit driver are practically the same as for the 64-bit driver, except for the step where you select the 32-bit version of the ODBC Data Source Administrator. Running the odbcad32 command in the Command Prompt or in the Run dialog box will start the 64-bit version of the ODBC administrator on the 64-bit Windows by default, therefore your best option is to select the 32-bit version of the administrator in the search results of the Windows search box.
Note though that if you have both versions (32-bit and 64-bit) of the driver installed and you have configured a User DSN (in contrast to a System DSN), you will be able to use the same DSN for 32-bit and 64-bit applications (see the Platform column in the screenshot below).
In a situation where you need to use an application that is available only in 32-bit, the 32-bit ODBC driver does the trick. An example is Apache OpenOffice, which is distributed as a 32-bit application.
Step-by-step ODBC Data Source Setup in Windows 10
If you would like to test our ODBC connectors, visit the ODBC drivers page.
Источник
Настройка драйвера ODBC для Oracle
Эта функция будет удалена в следующей версии Windows. Избегайте использования этого компонента в новых разработках и запланируйте изменение существующих приложений, в которых он применяется. Вместо этого используйте драйвер ODBC, предоставляемый Oracle.
Производительностью драйвера ODBC для Oracle можно управлять, зная среду данных и правильно задавая параметры подключения к источнику данных с помощью диалогового окна Администратор источников данных ODBC или параметров строки подключения. Диалоговое окно предоставляет следующие элементы управления для подключения к источнику данных с помощью диалогового окна или строк подключения.
Вкладка «DSN пользователя» Перечисляет имена источников данных, которые являются локальными для компьютера.
Вкладка «Системное DSN» Позволяет добавлять или удалять системные источники данных. К системным источникам данных могут обращаться все пользователи на локальном компьютере.
Вкладка «Файловый DSN» Позволяет добавлять или удалять файловый источник данных с локального компьютера. Файловые источники данных могут совместно использоваться всеми пользователями, у которых установлен один и тот же драйвер.
Вкладка «драйверы» Выводит список установленных драйверов ODBC.
Вкладка «трассировка» Позволяет указать, каким образом диспетчер драйверов ODBC отслеживает вызовы функций ODBC. Трассировку можно настроить отдельно для каждого установленного приложения ODBC.
Вкладка «пулы соединений» Позволяет выбрать параметры подключения для каждого установленного драйвера.
Вкладка «о программе» Список установленных файлов компонентов ODBC.
После добавления источника данных можно использовать диалоговое окно Администратор источников данных ODBC для настройки доступа к источнику данных. Выберите источник данных, а затем щелкните одну из вкладок, чтобы изменить или проверить сведения.
Источник
How to Install Oracle ODBC Driver on Windows 10

Hello everyone, welcome to my blog. In this article, I am going to show you how to install Oracle ODBC Driver on Windows 10. I have a working Oracle Database 12c on another computer on my home network. I am trying to connect to my Oracle database from Microsoft Access using ODBC connection. By default, Windows 10 does not shipped with Oracle ODBC connection utility. In other word, I was unable to connect to my Oracle database from MS Access.
Installing Oracle ODBC Driver on Windows 10 is a bit tricky. It’s not as simple as installing PostgreSQL ODBC driver or MySQL ODBC Driver. I was struggling to get it works. The following method works very well on my home network. So let’s dig inside.
My Setup
Steps to Install Oracle ODBC Driver on Windows 10
Step 1. Install Oracle Instant Client Basic
Oracle ODBC Driver needs this Instant Client package to run. So, we need to download this package from the official download website of Oracle.

Select the correct architecture of your system either 32 bit or 64 bit. In this example I am going to install the 32 bit version since I have MS Office 32 bit version.

Next, download the Instant Client Basic package as shown on the picture above. Also, you will need to download the Instant Client SDK and Instant Client ODBC as shown below

So now we have three packages:
Now Create a new folder for the Oracle client. For example, in this case I created a new folder : C:OracleProductclient. Put all those three zip packages in that new directory. Next, extract them all. It will produce a new directory called: instantclient_12_2. If you download the different version, for example version 18.3, it will create new directory instantclient_18_3.
Step 2. Add the Oracle Client directory to the PATH environment
Now we need to add our Oracle Client directory to the Windows PATH environment. Right-click My Computer >> Advanced System Settings >> Environment Variables

On the System Variables, click New and then enter the following details:
Change C:OracleProductclientinstantclient_12_2 with your actual Oracle Client folder.
Next step is to add the Oracle Client directory to system path. Double click the path and create a new entry as follow

Step 3. Install the Oracle ODBC Client
Now open the folder instantclient_12_2, in your Oracle Client folder created on the Step 1 and double click the file odbc_install.

Please note that there is no GUI installation wizard when you open this file.
Step 4. Create a new ODBC Data Source on Windows 10
To create a new Oracle ODBC Data Source, open Control Panel >> Administrative Tools >> ODBC Data Sources (32bit). If you are using 64 bit version, choose the ODBC Data Sources (64bit).
Click Add to add a new DSN. Select “Oracle in instantclient_12_2” from the list. Click Finish. Next, enter the Oracle ODBC Driver Configuration. Give the new Data Source Name, select TNS Service Name and User ID. Click Test Connection to validate the connection to the Oracle Database Server.


Troubleshooting
On my first attempt, I cannot get the list of the TNS Service when creating a new ODBC Connection. To solve this, we need to copy or create the tnsnames.ora in the Oracle Client Directory. Open Notepad and then copy and paste these lines and then save it as tnsname.ora. Save the file in the Oracle Client directory (C:OracleProductclientinstantclient_12_2).
This is the content of my tnsnames.ora which is works well
After that, we need to tell the system to use this tnsnames.ora config file. Open the Environment Variable again and add a new entry with the following value:
Don’t forget to change the variable value with your Oracle Client Directory.

Now you should be able to pick or select the TNS service. Thanks for reading this how to install Oracle ODBC driver on Windows 10. Cheers
Like this:
Mejor explicado no puedo quedar, mil gracias.
You have saved my life!!
I tryedl everything, and no solution. This looks to first “some” open SQLORA32.DLL and not release it, or I do not know something stay blocked and cannot connect again.
No help reinstall driver, unistal/install, nothing. Interesting is that test connection from ODBC driver assistent still work,only my app cannot connect more than once, sometimes after some delay I connect but again still blocked.
Interesting is that on third PC with also W10 64 bit this works for me that I mean some can be in Windows configuration, some process or dll open and stay opened, or rewrite some parameter in registry, do not know.
Please thanks for any advice.
Thanks for the article! One more possible solution is ODBC Driver for Oracle
https://www.devart.com/odbc/oracle/
Devart ODBC Driver for Oracle provides a high-performance and feature-rich connectivity solution for ODBC-compliant applications to access Oracle databases from Windows, macOS, or Linux, both 32-bit and 64-bit. Full support for standard ODBC API functions and data types implemented in our driver makes interaction of your database applications with Oracle fast, easy and extremely handy.
Thanks for the suggestion, will try it next.
Источник
Iguana Documentation
Introduction
This article explains how to connect to Oracle with ODBC when using Windows 10.
It covers the following topics:
We recommend using system DSNs (available to all users).
Connect to Oracle [top]
We strongly recommend using connection objects to connect to databases, and this is what we demonstrate in the code samples.
Follow these steps to connect:
Your channel will need a From/To Translator or a Filter component.
If your script uses connection object methods conn:query<> or conn:execute<> to connect to a remote Oracle database, the location of the remote host is specified as part of the name parameter in the db.connect < >command. If you use conn:merge<> to connect the remote host is specified as part of the name parameter in the conn:merge<> command itself.
Setup ODBC [top]
Note: Iguana may not always support the very latest version of Oracle drivers, so you can simply download an earlier version if necessary. This is particularly true if you are not able to use the the latest version of Iguana.
If you need to know which versions of Oracle drivers are supported by the version of Iguana you are using please contact us at support@interfaceware.com.
To set up a new ODBC data source for Oracle Server:
The Oracle ODBC package depends on the OCI drivers — so you need to set them up first.
Windows 10 (64 bit version) supports 32 and 64 bit ODBC sources — always use the 64 bit ODBC Administrator.
Troubleshooting [top]
Speak to your DBA (database administrator) for general connection issues like: User name and password, Database Server network name etc.
Please contact us at support@interfaceware.com if you need to know the latest supported version of the ODBC drivers.
Login authentication errors:
Authentication errors usually relate to how the Oracle Server you are connecting to is setup. You will need to talk to the DBA (database administrator) that manages the Oracle server.
If you wish to use Windows integrated security speak to your DBA (database administrator).
Источник
Are you planning to install the Oracle ODBC Driver on Windows 10?
Open Database Connectivity (ODBC) is a standard interface that gives one application access to several different data sources. As a result, the Oracle ODBC can be used to access Oracle databases.
This is a great advantage for advanced users and programmers, who need access to the Oracle ODBC for running online transaction processing, data warehousing, and mixed database workloads — which Oracle is widely used for.
However, it is not as easy as installing a program, as it requires downloading and compiling files together. You may also need to input additional data the application will need to run properly. Luckily, we’re here to help.
In this article, we’ll introduce you to a structured process behind procuring and installing the Oracle ODBC Driver in Windows 10.
1. Download the Oracle Instant Client Package From the Website.
Before installing and setting up your driver, you’ll need to download three separate files from the Oracle website and place them into the appropriate folder location. These files are essential in making the software function as it should, enabling your ODBC applications to work by providing additional libraries and resources.
Additionally, you need to download the right files; they must be compatible with each other, as well as your operating system. Downloading or otherwise using the wrong version of each file may cause errors for your driver and your system.
Here’s where you can find and download the Oracle packages:
- Begin by going to the Oracle Instant Client page on your browser.
- Next, click the Instant Client for Microsoft Windows. Look for the link that matches your PC’s platform.
- Follow by choosing the Basic package download link.
- Once it’s finished downloading, scroll down and press the SDK package hyperlink to download that archive.
- Then, click the download link for the ODBC package.
- Now that it’s on your PC, go to your File Explorer window.
- Check the C: root drive in File Explorer.
- Then, right-click a space within the C: drive and make a new folder.
- Name your new folder Oracle and make sure that it has this path: C:Oracle.
- After that, move the three downloaded Oracle ZIP archives into the Oracle folder and extract them there.
- Look for the extracted instantclient-basic-windows.x64-19.11.0.0.0dbru folder and open it.
- Inside, find a subfolder entitled instantclient_19_11 and move it into the Oracle folder.
- Finally, erase the instantclient-basic-windows.x64-19.11.0.0.0dbru folder.
This process ensures that the ODBC and basic ZIP archives have been extracted to the same folder by the end of this process. You can also get the SDK package and extract it to the instantclient_19_11 folder. It’s not necessary, but we recommend getting it as well.
2. Add an Oracle Client Directory to PATH Environment.
An environment variable is an editable value that other programs and applications can access within your computer. This lets the Oracle driver know where to install files, store them, and find user settings.
After extracting and setting up the necessary files for your driver to work, you’ll need to add the Oracle Client directory as an environment variable. This lets other applications and programs access your ODBC driver, allowing you to access the Oracle Database.
Here’s how to properly add the Oracle Client as an environment variable:
- Press the Windows+S keys. This will open the search bar.
![]()
- Type in the phrase system environment variables into the search bar.
- Next, select the Edit the system environment variables option. This should open the System Properties window.
- Select the Environment Variables... under the Advanced tab.
- Next, select New… under the system variables list.
- Input OCI_LIB32 into the Variable Name box.
- Under the Variable Value box, input the directory path of your Oracle folder.
- Considering you properly formatted the folders previously, your directory path should be: C:Oracleinstantclient_19_11.
- Within the system variables list, double-click the Path variable.
- Once opened, click the New button and input the same directory path you added under the Variable Value box. (This would be C:Oracleinstantclient_19_11).
- Click OK and exit the window.
Finishing this process should allow your Oracle Client to run its processes properly. Your previously downloaded Oracle packages can now act as an environment variable for your programs that require the Oracle driver.
3. Install the Oracle ODBC Client.
This step is fairly straightforward. We’ll be installing the Oracle client itself, which can be done in just a few moves.
Here’s how you can install the Oracle ODBC client:
- First, start by opening the instantclient_19_11 folder.
- Next, right-click the odbc_install.exe file.
- Finally, select Run as Administrator.
4. Create New ODBC Data Source.
Finally, we’ll be setting up the DSN (Data Source Name) for your newly installed Oracle driver. Note that the information you’ll be adding will be specific to the database you’re trying to connect to. Hence, this information will be different.
Your DSN will contain information that your ODBC driver will need to connect to a specific database. This will include information like the name, directory, and driver of the database. Depending on the type of DSN, it may also include the ID and password of the user.
Here is how to set up your DSN:
- Press both the Windows and S keys to open up the search bar.
- Enter ODBC Data Sources into the search box.
- Select the ODBC Data Sources to open a window.
- Click the Add button to open the Create New Data Sources
- Select your Oracle driver and click Finish.
- Open the Oracle ODBC Driver Configuration window and enter your information; such as the Data Source Name, TNS Service Name, and User ID.
- Press the OK button to exit.
After setting this up, your driver should be able to connect to the Oracle Database server directly.
That wraps it up for this tutorial on how you can install the Oracle ODBC driver in Windows 10. We hope this article has helped you in setting up your own ODBC driver. If you have concerns or inquiries, don’t hesitate to leave a comment don’t below.
If this guide helped you, please share it. 🙂
Join 50,000+ subscribers
Stay updated on the latest discounts, exclusive promos, and news articles from Saint.
На чтение 3 мин. Просмотров 2.4k. Опубликовано 03.09.2019
ODBC весьма полезен для процедур доступа к приложениям, особенно для профессиональных пользователей. И, похоже, существует множество проблем для пользователей Windows 10, которые либо перешли с Windows 7, либо обновили свою версию Windows 10 до последней версии.
Если вы один из них и у вас есть определенные проблемы с ODBC в Windows 10, проверьте решения ниже.
Содержание
- Как исправить проблемы ODBC в Windows 10
- Решение 1. Удалите SMBv1 и включите SMBv2/SMBv3)
- Решение 2. Проверьте брандмауэр Windows и Защитник Windows
- Решение 3 – Обновление драйверов
- Решение 4 – Откат к предыдущей версии Windows
Как исправить проблемы ODBC в Windows 10
- Удалить SMBv1 и включить SMBv2/SMBv3)
- Проверьте брандмауэр Windows и Защитник Windows
- Обновление драйверов
- Откат к предыдущей версии Windows
Решение 1. Удалите SMBv1 и включите SMBv2/SMBv3)
Некоторые пользователи решили проблему, отключив SMBv1 и включив SMBv2 или SMBv3. Это можно сделать различными способами, начиная с PowerShell или редактора реестра. Последний способ быстрее и проще, но может негативно повлиять на ваш компьютер при неправильном использовании. Поэтому, прежде чем выполнять следующие шаги, обязательно сделайте резервную копию вашего реестра.
Вот как отключить SMBv1 и включить SMBv2/SMBv3:
- В строке поиска Windows введите regedit и откройте редактор реестра.
-
Перейдите в ComputerHKEY_LOCAL_MACHINESYSTEMCurrentControlSetServicesLanmanServerParameters .

- Щелкните правой кнопкой мыши пустое пространство и создайте новый Dword, назовите его SMB1 и установите его значение равным 0.
- Щелкните правой кнопкой мыши на пустом месте и создайте новый Dword, назовите его SMB2 и установите его значение равным 1.
- Закройте редактор реестра и перезагрузите компьютер.

Сделайте это на каждой уязвимой машине и не забудьте перезагрузить ее, чтобы изменения вступили в силу.
- ЧИТАЙТЕ ТАКЖЕ: отключите SMBv1 в Windows с помощью этих быстрых методов
Решение 2. Проверьте брандмауэр Windows и Защитник Windows
Некоторым пользователям удалось решить проблему, просто добавив белый список или временно отключив брандмауэр Windows и включив Защитник Windows. Это долгосрочное решение, но оно того стоит. Если у вас уже есть сторонний антивирус, попробуйте объединить его с нативным антивирусом.
После этого перезагрузите компьютер и попробуйте снова получить доступ к приложению ODBC.
Решение 3 – Обновление драйверов
В случае, если вы используете 32-битный Office на 64-битной машине через ODBC, вам потребуется некоторая перенастройка, чтобы избежать ошибок драйвера. Или, скорее, доступ к версии ODBC32 вместо стандартной 64-битной версии, представленной в архитектуре x64.
Вот где его найти и как его запустить:
- Перейдите к C: WindowssysWOW64odbcad32.exe и запустите его. Это 32-битный администратор источника данных ODBC.
-
Попробуйте применить драйверы снова.
- После того, как вы применили драйверы, перезагрузите компьютер.

Решение 4 – Откат к предыдущей версии Windows
Как говорили многие из затронутых пользователей, проблема возникла после того, как они обновили Windows 10 до версии 1803. То же самое можно применить к 1809. И вместо того, чтобы ждать, пока Microsoft решит проблемы ODBC в их текущем выпуске, мы скорее предлагаем откат до предыдущей версии, где сервис был полностью функциональным.
- Читайте также: исправлено: синий экран после отката Windows 10
Вот как перейти к предыдущей версии Windows 10:
- Откройте Настройки .
- Выберите Обновление и безопасность .
- Выберите Восстановление на левой панели.
-
Нажмите « Вернуться к предыдущей версии Windows 10 ».
- Нажмите Начало работы и следуйте инструкциям.
