I had two versions of Python installed on my machine (versions 2.6 and 2.5). I want to run 2.6 for one project and 2.5 for another.
How can I specify which I want to use?
I am working on Windows XP SP2.
![]()
Karl Knechtel
60.6k11 gold badges93 silver badges139 bronze badges
asked Jan 3, 2011 at 9:30
![]()
Bilal BasharatBilal Basharat
2,9365 gold badges21 silver badges20 bronze badges
4
Running a different copy of Python is as easy as starting the correct executable. You mention that you’ve started a python instance, from the command line, by simply typing python.
What this does under Windows, is to trawl the %PATH% environment variable, checking for an executable, either batch file (.bat), command file (.cmd) or some other executable to run (this is controlled by the PATHEXT environment variable), that matches the name given. When it finds the correct file to run the file is being run.
Now, if you’ve installed two python versions 2.5 and 2.6, the path will have both of their directories in it, something like PATH=c:python2.5;c:python2.6 but Windows will stop examining the path when it finds a match.
What you really need to do is to explicitly call one or both of the applications, such as c:python2.5python.exe or c:python2.6python.exe.
The other alternative is to create a shortcut to the respective python.exe calling one of them python25 and the other python26; you can then simply run python25 on your command line.
![]()
answered Jan 3, 2011 at 11:54
![]()
16
Adding two more solutions to the problem:
- Use pylauncher (if you have Python 3.3 or newer there’s no need to install it as it comes with Python already) and either add shebang lines to your scripts;
#! c:[path to Python 2.5]python.exe — for scripts you want to be run with Python 2.5
#! c:[path to Python 2.6]python.exe — for scripts you want to be run with Python 2.6
or instead of running python command run pylauncher command (py) specyfing which version of Python you want;
py -2.6 – version 2.6
py -2 – latest installed version 2.x
py -3.4 – version 3.4
py -3 – latest installed version 3.x
- Install virtualenv and create two virtualenvs;
virtualenv -p c:[path to Python 2.5]python.exe [path where you want to have virtualenv using Python 2.5 created][name of virtualenv]
virtualenv -p c:[path to Python 2.6]python.exe [path where you want to have virtualenv using Python 2.6 created][name of virtualenv]
for example
virtualenv -p c:python2.5python.exe c:venvs2.5
virtualenv -p c:python2.6python.exe c:venvs2.6
then you can activate the first and work with Python 2.5 like this
c:venvs2.5activate
and when you want to switch to Python 2.6 you do
deactivate
c:venvs2.6activate
answered Nov 3, 2012 at 17:09
![]()
Piotr DobrogostPiotr Dobrogost
40.7k39 gold badges233 silver badges361 bronze badges
6
From Python 3.3 on, there is the official Python launcher for Windows (http://www.python.org/dev/peps/pep-0397/). Now, you can use the #!pythonX to determine the wanted version of the interpreter also on Windows. See more details in my another comment or read the PEP 397.
Summary: The py script.py launches the Python version stated in #! or Python 2 if #! is missing. The py -3 script.py launches the Python 3.
![]()
answered Jun 21, 2013 at 23:15
![]()
peprpepr
19.7k15 gold badges73 silver badges137 bronze badges
9
As per @alexander you can make a set of symbolic links like below. Put them somewhere which is included in your path so they can be easily invoked
> cd c:bin
> mklink python25.exe c:python25python.exe
> mklink python26.exe c:python26python.exe
As long as c:bin or where ever you placed them in is in your path you can now go
> python25
answered Dec 19, 2012 at 13:37
![]()
4
For example for 3.6 version type py -3.6.
If you have also 32bit and 64bit versions, you can just type py -3.6-64 or py -3.6-32.
answered Mar 13, 2019 at 18:31
![]()
8
-
install python
- C:Python27
- C:Python36
-
environment variable
PYTHON2_HOME: C:Python27PYTHON3_HOME: C:Python36Path: %PYTHON2_HOME%;%PYTHON2_HOME%Scripts;%PYTHON3_HOME%;%PYTHON3_HOME%Scripts;
-
file rename
- C:Python27python.exe → C:Python27python2.exe
- C:Python36python.exe → C:Python36python3.exe
-
pip
python2 -m pip install packagepython3 -m pip install package
answered Dec 19, 2018 at 8:03
![]()
山茶树和葡萄树山茶树和葡萄树
1,8241 gold badge18 silver badges17 bronze badges
3
I strongly recommend the pyenv-win project.
Thanks to kirankotari’s work, now we have a Windows version of pyenv.
answered May 31, 2019 at 5:03
![]()
Xin LvXin Lv
1511 silver badge3 bronze badges
One easy way for this is that you can use
py -3.8 -m pip install virtualenv here -3.8 goes with your [version number]
After installing the virtualenv, you can create the virtual environment of your application using
py -3.8 -m virtualenv [your env name]
then cd to venv, enter activate
This would activate the python version you like.
Just change the version number to use a different python version.
answered Oct 4, 2020 at 17:28
![]()
Jithin PalepuJithin Palepu
5661 gold badge5 silver badges18 bronze badges
1
When you install Python, it will not overwrite other installs of other major versions. So installing Python 2.5.x will not overwrite Python 2.6.x, although installing 2.6.6 will overwrite 2.6.5.
So you can just install it. Then you call the Python version you want. For example:
C:Python2.5Python.exe
for Python 2.5 on windows and
C:Python2.6Python.exe
for Python 2.6 on windows, or
/usr/local/bin/python-2.5
or
/usr/local/bin/python-2.6
on Windows Unix (including Linux and OS X).
When you install on Unix (including Linux and OS X) you will get a generic python command installed, which will be the last one you installed. This is mostly not a problem as most scripts will explicitly call /usr/local/bin/python2.5 or something just to protect against that. But if you don’t want to do that, and you probably don’t you can install it like this:
./configure
make
sudo make altinstall
Note the «altinstall» that means it will install it, but it will not replace the python command.
On Windows you don’t get a global python command as far as I know so that’s not an issue.
![]()
martineau
117k25 gold badges161 silver badges290 bronze badges
answered Jan 3, 2011 at 9:39
![]()
Lennart RegebroLennart Regebro
164k41 gold badges222 silver badges251 bronze badges
5
Here’s a quick hack:
- Go to the directory of the version of python you want to run
- Right click on python.exe
- Select ‘Create Shortcut‘
- Give that shortcut a name to call by( I use p27, p33 etc.)
- Move that shortcut to your home directory(
C:UsersYour name) - Open a command prompt and enter
name_of_your_shortcut.lnk(I usep27.lnk)
answered Oct 7, 2015 at 19:47
![]()
David GreydanusDavid Greydanus
2,3581 gold badge22 silver badges42 bronze badges
cp c:python27binpython.exe as python2.7.exe
cp c:python34binpython.exe as python3.4.exe
they are all in the system path, choose the version you want to run
C:Usersusername>python2.7
Python 2.7.8 (default, Jun 30 2014, 16:03:49) [MSC v.1500 32 bit (Intel)] on win
32
Type "help", "copyright", "credits" or "license" for more information.
>>>

C:Usersusername>python3.4
Python 3.4.1 (v3.4.1:c0e311e010fc, May 18 2014, 10:38:22) [MSC v.1600 32 bit Intel)] on win32
Type "help", "copyright", "credits" or "license" for more information.
>>>
![]()
answered Jul 21, 2014 at 15:12
![]()
1
The easiest way to run multiple versions of python on windows is described below as follows:-
1)Download the latest versions of python from python.org/downloads by selecting the relevant version for your system.
2)Run the installer and select Add python 3.x to the path to set path automatically in python 3 (you just have to click the checkbox). For python 2 open up your python 2 installer, select whatever preferences you want but just remember to set Add python.exe to path to Will be installed on local hard drive, Now just click next and wait for the installer to finish.
3)When both the installations are complete. Right click on my computer—Go to properties—Select advanced system settings—Go to environment variables—Click on new under System variables and add a new system variable with variable name as PY_PYTHON and set this variable value to 3. Now click on OK and you should be done.
4)Now to test this open the command prompt. Once you are in there type python or py, It should open up python3.
5)Now exit out of python3 by typing exit(). Now type py -2 it should open python 2.
If none of this works then restart the computer and if the problem still persists then uninstall everything and repeat the steps.
Thanks.
answered Mar 6, 2018 at 17:35
![]()
This is a simple and elegant solution to easily run 2 or more different versions of python without using scripts in Windows. Whatever the version of python, it will start from the Command prompt.
I have python versions 3.6.6 and 3.9. The Environment Variable paths are normal and were automatically added when each version of python was installed.
It’s best to install python using the «all users» option. This way the python will simply install to:
C:program filespython36
C:program filespython39
Open each of these python folders and find the python.exe file. Copy and paste the python.exe file into those same folders. Then carefully rename the copies to:
python36.exe
python39.exe
Open and edit Environment Variables. Add 4 new User Variables.
C:Program FilesPython36Scripts
C:Program FilesPython36python36.exe
C:Program FilesPython39Scripts
C:Program FilesProgram39python39.exe
Save and exit Environment Variables.
Open a new Command Prompt terminal window. To run one or the other version of python, type:
python36

python39
More versions of python can easily be added by repeating the same as shown above. Elegant and simple. Done.
answered Oct 21, 2021 at 7:47
![]()
GrayGray
1,0578 silver badges23 bronze badges
1
Using a batch file to switch, easy and efficient on windows 7. I use this:
In the environment variable dialog (C:WindowsSystem32SystemPropertiesAdvanced.exe),
In the section user variables
-
added %pathpython% to the path environment variable
-
removed any references to python pathes
In the section system variables
- removed any references to python pathes
I created batch files for every python installation (exmple for 3.4 x64
Name = SetPathPython34x64 !!! ToExecuteAsAdmin.bat  just to remember.
Content of the file =
     Set PathPython=C:Python36AMD64Scripts;C:Python36AMD64;C:Tclbin

     setx PathPython %PathPython%
To switch between versions, I execute the batch file in admin mode.
!!!!! The changes are effective for the SUBSEQUENT command prompt windows OPENED. !!!
So I have exact control on it.
answered Mar 17, 2018 at 16:09
![]()
AmanAman
112 bronze badges
let’s say if we have python 3.7 and python 3.6 installed.
they are respectively stored in following folder by default.
C:UsersnameAppDataLocalProgramsPythonPython36
C:UsersnameAppDataLocalProgramsPythonPython37
if we want to use cmd prompt to install/run command in any of the above specific environment do this:
There should be python.exe in each of the above folder.
so when we try running any file for ex. (see image1) python hello.py. we call that respective python.exe. by default it picks lower version of file. (means in this case it will use from python 3.6 )
image
so if we want to run using python3.7. just change the .exe file name. for ex. if I change to python37.exe and i want to use python3.7 to run hello.py
I will use python37 hello.py . or if i want to use python3.7 by default i will change the python.exe filename in python3.6 folder to something else . so that it will use python3.7 each time when I use only python hello.py
answered Sep 17, 2020 at 18:32
![]()
Shows your installed pythons
py -0
Uses version of python to do something
py -*version*
ex.
py -3.8 venv venv
Will create virtual environment in python 3.8
Note:
python -0
 or
python -3.8
doesn’t work, I assume it has to be «py»
answered Sep 8, 2022 at 8:55
![]()
You can create different python development environments graphically from Anaconda Navigator.
I had same problem while working with different python versions so I used anaconda navigator to create different python development environments and used different python versions in each environments.
Here is the help documentation for this.
https://docs.anaconda.com/anaconda/navigator/tutorials/manage-environments/
answered Jul 5, 2019 at 7:50
![]()
Introduce more details based on the answer given by @Aman.
Define different environment variables for different python versions.
For example:
- You have
E:python2python.exeandE:python3python.exeat the same time. - Then you can set an environment variable
%python2%forE:python2python.exeand%python2%forE:python3python.exe. - Finally, when you want to run python2 (or python3), you can enter
%python2%(or%python3%) directly in command prompt.
answered Apr 7, 2022 at 13:01
![]()
Here is a solution:
- First, install all versions which you want to run in your pc. https://www.python.org/
- Second, create virtual environment with which python version you want to use.
«py [python_version] -m venv [vritual_environment_name]» example: «py -3.9 -m venv env»
Note: You don’t need to run «pip install virtualenv»
answered Nov 5, 2022 at 14:42
![]()
Using the Rapid Environment Editor you can push to the top the directory of the desired Python installation. For example, to start python from the c:Python27 directory, ensure that c:Python27 directory is before or on top of the c:Python36 directory in the Path environment variable. From my experience, the first python executable found in the Path environment is being executed. For example, I have MSYS2 installed with Python27 and since I’ve added C:MSYS2 to the path before C:Python36, the python.exe from the C:MSYS2…. folder is being executed.
answered Aug 24, 2017 at 15:37
![]()
I thought this answer might be helpful to others having multiple versions of python and wants to use pipenv to create virtual environment.
- navigate to the project directory, and run
py -[python version] pip install pipenv, example:py -3.6 pip install pipenv - run
pipenv --python [version]to create the virtual environment in the version of the python you desire. example:pipenv --python 3.6 - run
pipenv shellto activate your virtual environment.
answered Sep 15, 2020 at 9:39
![]()
0
Just call the correct executable
answered Jan 3, 2011 at 9:33
![]()
albertovalbertov
2,30620 silver badges15 bronze badges
3
I had two versions of Python installed on my machine (versions 2.6 and 2.5). I want to run 2.6 for one project and 2.5 for another.
How can I specify which I want to use?
I am working on Windows XP SP2.
![]()
Karl Knechtel
60.6k11 gold badges93 silver badges139 bronze badges
asked Jan 3, 2011 at 9:30
![]()
Bilal BasharatBilal Basharat
2,9365 gold badges21 silver badges20 bronze badges
4
Running a different copy of Python is as easy as starting the correct executable. You mention that you’ve started a python instance, from the command line, by simply typing python.
What this does under Windows, is to trawl the %PATH% environment variable, checking for an executable, either batch file (.bat), command file (.cmd) or some other executable to run (this is controlled by the PATHEXT environment variable), that matches the name given. When it finds the correct file to run the file is being run.
Now, if you’ve installed two python versions 2.5 and 2.6, the path will have both of their directories in it, something like PATH=c:python2.5;c:python2.6 but Windows will stop examining the path when it finds a match.
What you really need to do is to explicitly call one or both of the applications, such as c:python2.5python.exe or c:python2.6python.exe.
The other alternative is to create a shortcut to the respective python.exe calling one of them python25 and the other python26; you can then simply run python25 on your command line.
![]()
answered Jan 3, 2011 at 11:54
![]()
16
Adding two more solutions to the problem:
- Use pylauncher (if you have Python 3.3 or newer there’s no need to install it as it comes with Python already) and either add shebang lines to your scripts;
#! c:[path to Python 2.5]python.exe — for scripts you want to be run with Python 2.5
#! c:[path to Python 2.6]python.exe — for scripts you want to be run with Python 2.6
or instead of running python command run pylauncher command (py) specyfing which version of Python you want;
py -2.6 – version 2.6
py -2 – latest installed version 2.x
py -3.4 – version 3.4
py -3 – latest installed version 3.x
- Install virtualenv and create two virtualenvs;
virtualenv -p c:[path to Python 2.5]python.exe [path where you want to have virtualenv using Python 2.5 created][name of virtualenv]
virtualenv -p c:[path to Python 2.6]python.exe [path where you want to have virtualenv using Python 2.6 created][name of virtualenv]
for example
virtualenv -p c:python2.5python.exe c:venvs2.5
virtualenv -p c:python2.6python.exe c:venvs2.6
then you can activate the first and work with Python 2.5 like this
c:venvs2.5activate
and when you want to switch to Python 2.6 you do
deactivate
c:venvs2.6activate
answered Nov 3, 2012 at 17:09
![]()
Piotr DobrogostPiotr Dobrogost
40.7k39 gold badges233 silver badges361 bronze badges
6
From Python 3.3 on, there is the official Python launcher for Windows (http://www.python.org/dev/peps/pep-0397/). Now, you can use the #!pythonX to determine the wanted version of the interpreter also on Windows. See more details in my another comment or read the PEP 397.
Summary: The py script.py launches the Python version stated in #! or Python 2 if #! is missing. The py -3 script.py launches the Python 3.
![]()
answered Jun 21, 2013 at 23:15
![]()
peprpepr
19.7k15 gold badges73 silver badges137 bronze badges
9
As per @alexander you can make a set of symbolic links like below. Put them somewhere which is included in your path so they can be easily invoked
> cd c:bin
> mklink python25.exe c:python25python.exe
> mklink python26.exe c:python26python.exe
As long as c:bin or where ever you placed them in is in your path you can now go
> python25
answered Dec 19, 2012 at 13:37
![]()
4
For example for 3.6 version type py -3.6.
If you have also 32bit and 64bit versions, you can just type py -3.6-64 or py -3.6-32.
answered Mar 13, 2019 at 18:31
![]()
8
-
install python
- C:Python27
- C:Python36
-
environment variable
PYTHON2_HOME: C:Python27PYTHON3_HOME: C:Python36Path: %PYTHON2_HOME%;%PYTHON2_HOME%Scripts;%PYTHON3_HOME%;%PYTHON3_HOME%Scripts;
-
file rename
- C:Python27python.exe → C:Python27python2.exe
- C:Python36python.exe → C:Python36python3.exe
-
pip
python2 -m pip install packagepython3 -m pip install package
answered Dec 19, 2018 at 8:03
![]()
山茶树和葡萄树山茶树和葡萄树
1,8241 gold badge18 silver badges17 bronze badges
3
I strongly recommend the pyenv-win project.
Thanks to kirankotari’s work, now we have a Windows version of pyenv.
answered May 31, 2019 at 5:03
![]()
Xin LvXin Lv
1511 silver badge3 bronze badges
One easy way for this is that you can use
py -3.8 -m pip install virtualenv here -3.8 goes with your [version number]
After installing the virtualenv, you can create the virtual environment of your application using
py -3.8 -m virtualenv [your env name]
then cd to venv, enter activate
This would activate the python version you like.
Just change the version number to use a different python version.
answered Oct 4, 2020 at 17:28
![]()
Jithin PalepuJithin Palepu
5661 gold badge5 silver badges18 bronze badges
1
When you install Python, it will not overwrite other installs of other major versions. So installing Python 2.5.x will not overwrite Python 2.6.x, although installing 2.6.6 will overwrite 2.6.5.
So you can just install it. Then you call the Python version you want. For example:
C:Python2.5Python.exe
for Python 2.5 on windows and
C:Python2.6Python.exe
for Python 2.6 on windows, or
/usr/local/bin/python-2.5
or
/usr/local/bin/python-2.6
on Windows Unix (including Linux and OS X).
When you install on Unix (including Linux and OS X) you will get a generic python command installed, which will be the last one you installed. This is mostly not a problem as most scripts will explicitly call /usr/local/bin/python2.5 or something just to protect against that. But if you don’t want to do that, and you probably don’t you can install it like this:
./configure
make
sudo make altinstall
Note the «altinstall» that means it will install it, but it will not replace the python command.
On Windows you don’t get a global python command as far as I know so that’s not an issue.
![]()
martineau
117k25 gold badges161 silver badges290 bronze badges
answered Jan 3, 2011 at 9:39
![]()
Lennart RegebroLennart Regebro
164k41 gold badges222 silver badges251 bronze badges
5
Here’s a quick hack:
- Go to the directory of the version of python you want to run
- Right click on python.exe
- Select ‘Create Shortcut‘
- Give that shortcut a name to call by( I use p27, p33 etc.)
- Move that shortcut to your home directory(
C:UsersYour name) - Open a command prompt and enter
name_of_your_shortcut.lnk(I usep27.lnk)
answered Oct 7, 2015 at 19:47
![]()
David GreydanusDavid Greydanus
2,3581 gold badge22 silver badges42 bronze badges
cp c:python27binpython.exe as python2.7.exe
cp c:python34binpython.exe as python3.4.exe
they are all in the system path, choose the version you want to run
C:Usersusername>python2.7
Python 2.7.8 (default, Jun 30 2014, 16:03:49) [MSC v.1500 32 bit (Intel)] on win
32
Type "help", "copyright", "credits" or "license" for more information.
>>>

C:Usersusername>python3.4
Python 3.4.1 (v3.4.1:c0e311e010fc, May 18 2014, 10:38:22) [MSC v.1600 32 bit Intel)] on win32
Type "help", "copyright", "credits" or "license" for more information.
>>>
![]()
answered Jul 21, 2014 at 15:12
![]()
1
The easiest way to run multiple versions of python on windows is described below as follows:-
1)Download the latest versions of python from python.org/downloads by selecting the relevant version for your system.
2)Run the installer and select Add python 3.x to the path to set path automatically in python 3 (you just have to click the checkbox). For python 2 open up your python 2 installer, select whatever preferences you want but just remember to set Add python.exe to path to Will be installed on local hard drive, Now just click next and wait for the installer to finish.
3)When both the installations are complete. Right click on my computer—Go to properties—Select advanced system settings—Go to environment variables—Click on new under System variables and add a new system variable with variable name as PY_PYTHON and set this variable value to 3. Now click on OK and you should be done.
4)Now to test this open the command prompt. Once you are in there type python or py, It should open up python3.
5)Now exit out of python3 by typing exit(). Now type py -2 it should open python 2.
If none of this works then restart the computer and if the problem still persists then uninstall everything and repeat the steps.
Thanks.
answered Mar 6, 2018 at 17:35
![]()
This is a simple and elegant solution to easily run 2 or more different versions of python without using scripts in Windows. Whatever the version of python, it will start from the Command prompt.
I have python versions 3.6.6 and 3.9. The Environment Variable paths are normal and were automatically added when each version of python was installed.
It’s best to install python using the «all users» option. This way the python will simply install to:
C:program filespython36
C:program filespython39
Open each of these python folders and find the python.exe file. Copy and paste the python.exe file into those same folders. Then carefully rename the copies to:
python36.exe
python39.exe
Open and edit Environment Variables. Add 4 new User Variables.
C:Program FilesPython36Scripts
C:Program FilesPython36python36.exe
C:Program FilesPython39Scripts
C:Program FilesProgram39python39.exe
Save and exit Environment Variables.
Open a new Command Prompt terminal window. To run one or the other version of python, type:
python36

python39
More versions of python can easily be added by repeating the same as shown above. Elegant and simple. Done.
answered Oct 21, 2021 at 7:47
![]()
GrayGray
1,0578 silver badges23 bronze badges
1
Using a batch file to switch, easy and efficient on windows 7. I use this:
In the environment variable dialog (C:WindowsSystem32SystemPropertiesAdvanced.exe),
In the section user variables
-
added %pathpython% to the path environment variable
-
removed any references to python pathes
In the section system variables
- removed any references to python pathes
I created batch files for every python installation (exmple for 3.4 x64
Name = SetPathPython34x64 !!! ToExecuteAsAdmin.bat just to remember.
Content of the file =
     Set PathPython=C:Python36AMD64Scripts;C:Python36AMD64;C:Tclbin

     setx PathPython %PathPython%
To switch between versions, I execute the batch file in admin mode.
!!!!! The changes are effective for the SUBSEQUENT command prompt windows OPENED. !!!
So I have exact control on it.
answered Mar 17, 2018 at 16:09
![]()
AmanAman
112 bronze badges
let’s say if we have python 3.7 and python 3.6 installed.
they are respectively stored in following folder by default.
C:UsersnameAppDataLocalProgramsPythonPython36
C:UsersnameAppDataLocalProgramsPythonPython37
if we want to use cmd prompt to install/run command in any of the above specific environment do this:
There should be python.exe in each of the above folder.
so when we try running any file for ex. (see image1) python hello.py. we call that respective python.exe. by default it picks lower version of file. (means in this case it will use from python 3.6 )
image
so if we want to run using python3.7. just change the .exe file name. for ex. if I change to python37.exe and i want to use python3.7 to run hello.py
I will use python37 hello.py . or if i want to use python3.7 by default i will change the python.exe filename in python3.6 folder to something else . so that it will use python3.7 each time when I use only python hello.py
answered Sep 17, 2020 at 18:32
![]()
Shows your installed pythons
py -0
Uses version of python to do something
py -*version*
ex.
py -3.8 venv venv
Will create virtual environment in python 3.8
Note:
python -0
 or
python -3.8
doesn’t work, I assume it has to be «py»
answered Sep 8, 2022 at 8:55
![]()
You can create different python development environments graphically from Anaconda Navigator.
I had same problem while working with different python versions so I used anaconda navigator to create different python development environments and used different python versions in each environments.
Here is the help documentation for this.
https://docs.anaconda.com/anaconda/navigator/tutorials/manage-environments/
answered Jul 5, 2019 at 7:50
![]()
Introduce more details based on the answer given by @Aman.
Define different environment variables for different python versions.
For example:
- You have
E:python2python.exeandE:python3python.exeat the same time. - Then you can set an environment variable
%python2%forE:python2python.exeand%python2%forE:python3python.exe. - Finally, when you want to run python2 (or python3), you can enter
%python2%(or%python3%) directly in command prompt.
answered Apr 7, 2022 at 13:01
![]()
Here is a solution:
- First, install all versions which you want to run in your pc. https://www.python.org/
- Second, create virtual environment with which python version you want to use.
«py [python_version] -m venv [vritual_environment_name]» example: «py -3.9 -m venv env»
Note: You don’t need to run «pip install virtualenv»
answered Nov 5, 2022 at 14:42
![]()
Using the Rapid Environment Editor you can push to the top the directory of the desired Python installation. For example, to start python from the c:Python27 directory, ensure that c:Python27 directory is before or on top of the c:Python36 directory in the Path environment variable. From my experience, the first python executable found in the Path environment is being executed. For example, I have MSYS2 installed with Python27 and since I’ve added C:MSYS2 to the path before C:Python36, the python.exe from the C:MSYS2…. folder is being executed.
answered Aug 24, 2017 at 15:37
![]()
I thought this answer might be helpful to others having multiple versions of python and wants to use pipenv to create virtual environment.
- navigate to the project directory, and run
py -[python version] pip install pipenv, example:py -3.6 pip install pipenv - run
pipenv --python [version]to create the virtual environment in the version of the python you desire. example:pipenv --python 3.6 - run
pipenv shellto activate your virtual environment.
answered Sep 15, 2020 at 9:39
![]()
0
Just call the correct executable
answered Jan 3, 2011 at 9:33
![]()
albertovalbertov
2,30620 silver badges15 bronze badges
3
В большинстве операционных систем Python предустановлен
(ну, кроме Windows, но даже там теперь есть
команда python, которая предложит установить интерпретатор из магазина приложений).
В Unix-подобных операционных системах, таких как Linux и MacOS, Python
пустил корни очень глубоко. Множество компонентов ОС рассчитывают, что Python
установлен и работает стабильно. Это и хорошо, и плохо.
Это хорошо, потому что хотя бы какой-то Python в большинстве систем доступен из
коробки — бери и пользуйся. Иногда доступно сразу несколько версий
интерпретатора, например, python2 указывает на устаревшую версию 2.7,
python3 — на какую-нибудь стабильную версию Python 3, типа 3.6 или 3.7, а
просто python указывает либо на одно, либо на другое (в последнее время
предпочтение чаще отдаётся третьей версии). Для обучения или для
тестирования этого может быть вполне достаточно.
С другой стороны, это плохо, потому что, как правило, предустановленный Python
настолько стабилен, что уже успел зарасти мхом.
В некоторых системах до сих пор предустановлен только Python 2,
но даже если вам повезёт получить Python третьей версии,
то наверняка он будет отставать от последней версии на пару минорных релизов.
Не факт, что вам это подойдёт.
Иногда нужно иметь сразу несколько версий Python для работы над
разными проектами, например, 3.7 и 3.8. В некоторых ОС нужные версии можно
установить через пакетный менеджер (например, в Fedora через dnf)
— из основных репозиториев или из сторонних.
Но зачастую такие репозитории содержат не все релизы
интерпретаторов, а лишь выбранное мейнтейнерами репозиториев подмножество.
Решение у всех этих проблем одно — нужно установить недостающие версии
интерпретатора, какими бы они ни были. Этому и посвящён пост.
pyenv — утилита, которая позволяет
легко переключаться между несколькими версиями интерпретатора Python, а
также устанавливать новые. Позволяет устанавливать, наверное, вообще
все известные науке версии интерпретаторов Python. Работает просто и незаметно.
pyenv — это всего лишь один из последователей аналогичного инструмента
из мира Ruby — rbenv.
Есть ещё и nodenv для Node.js,
который тоже вдохновился rbenv.
Проект написан целиком на bash. Это значит, что он никак не зависит
от Python — было бы забавно, если бы для установки Python нужен был бы Python.
Также это означает, что на Windows pyenv работать не будет
(тред с обсуждением).
Следует отметить, что в Windows проблема установки нескольких версий
и не возникает — там всегда можно скачать и установить
сколько угодно интерпретаторов с официального сайта,
а pylauncher поможет выбрать
из них нужную версию.
Кроме того, пользователи современных версий
Windows могут использовать pyenv внутри WSL (Windows Subsystem for Linux).
Ещё это означает, что у авторов много отваги — я бы не решился писать
на bash что-то настолько сложное. Как же хорошо, что всё уже написано.
Установка
-
Скачаем
pyenv.Установка
pyenvпроизводится простым клонированием git-репозитория.У проекта есть умный скрипт,
который скачаетpyenvи его сотоварищей:$ curl https://pyenv.run | bashСкрипт не требует прав суперпользователя (без
sudo), потому что
всё устанавливается в домашнюю директорию пользователя. Туда же
будут устанавливаться и интерпретаторы. Если страшно запускать
какие-то скрипты из интернета (так и должно быть), то прочитать код скрипта можно
здесь. -
Настроим шелл.
Предыдущая команда перед завершением должна была напечатать инструкции
по настройке шелла. Допустим, в случае сbashона выводит
следующее:WARNING: seems you still have not added 'pyenv' to the load path. # Load pyenv automatically by adding # the following to ~/.bashrc: export PATH="~/.pyenv/bin:$PATH" eval "$(pyenv init -)" eval "$(pyenv virtualenv-init -)"В случае с
zshнужно будет добавить те же самые строки в~/.zshrc.В случае с
fishв связи с особенностями самого шелла инструкции отличаются:# Load pyenv automatically by adding # the following to ~/.config/fish/config.fish: set -x PATH "~/.pyenv/bin" $PATH status --is-interactive; and . (pyenv init -|psub) status --is-interactive; and . (pyenv virtualenv-init -|psub)Кстати, горячо рекомендую попробовать
fish, очень удобный шелл. -
Установим зависимости для сборки.
При установке новой версии интерпретатора через
pyenvпод капотом
происходит сборка из исходников, поэтому для успешной установки
необходимы некоторые зависимости. Полный и актуальный список
для своей ОС смотрите здесь
или здесь.
Лучше установить всё заранее. -
Перезапустим шелл и проверим установку.
$ pyenv --version
pyenv 1.2.18
Как это работает
pyenv работает благодаря манипуляциям над переменной окружения $PATH.
Эта переменная содержит в себе список директорий, в которых ОС будет искать
исполняемые файлы, вызванные без указания полного пути. Именно
благодаря этой переменной мы можем в терминале вместо /bin/cat вызывать
просто cat. Когда мы набираем в терминале имя программы (cat),
ОС перебирает директории из $PATH слева направо, пока в одной
из них (в данном примере /bin) не найдёт программу с именем cat,
которую и запустит. Поиск прекращается после первого совпадения.
Команда pyenv init -, которую мы добавили в конфиг шелла (.bashrc или аналог)
добавляет директории pyenv в самое начало переменной $PATH.
Зачем это нужно? pyenv создаёт небольшие исполняемые файлы,
так называемые файлы-прослойки (shims), для всех команд,
которыми он собирается управлять, например, python, pip, ipython и так далее.
Эти файлы-прослойки должны попасть в $PATH прежде самих управляемых программ
и «затенить» системные python, pip и так далее.
Эти файлы-прослойки в конечном счёте просто вызывают сам pyenv
с нужными аргументами.
Таким образом pyenv перехватывает обращения к некоторым именам,
и анализируя поступившую к нему информацию,
принимает решение о том, какую именно версию Python нужно запустить.
При выборе версии pyenv принимает во внимание следующие факторы в
указанном порядке:
-
Переменная окружения
PYENV_VERSION, если указана.В неё можно указать какую конкретно версию Python нужно использовать
в рамках текущего сеанса. Удобно, если вам по какой-то причине понадобится
сменить выбранную версию интерпретатора, например, в одном
из окон терминала. -
Локальная версия Python.
При помощи специального файла
.python-versionможно настроить
версию интерпретатора для определенного проекта. Захо́дите внутрь
директории (cd project/), иpyenvвнезапно понимает, что нужно
сменить Python. Выхо́дите обратно — версия Python меняется на глобальную.
Это распространяется и на все поддиректории проекта —
pyenvрекурсивно ищет файл.python-versionвверх по файловой системе,
пока не дойдёт до корня. -
Глобальная версия Python.
В файле
~/.pyenv/versionзаписана глобальная версия Python, которая
будет использоваться по умолчанию, если не сконфигурирована локальная
версия.
Вам вряд ли придётся вручную трогать эти файлы, потому что у pyenv есть
удобные команды (pyenv local и pyenv global),
чтобы ими управлять, но знать о файлах всё равно полезно.
Использование
Установка новой версии Python
Сначала посмотрим, какие версии Python pyenv может установить:
$ pyenv install --list
...
3.6.0
3.6-dev
3.6.1
3.6.2
3.6.3
3.6.4
3.6.5
3.6.6
3.6.7
3.6.8
3.6.9
3.6.10
3.7.0
3.7-dev
3.7.1
3.7.2
3.7.3
3.7.4
3.7.5
3.7.6
3.7.7
3.8.0
3.8-dev
3.8.1
3.8.2
3.9.0a6
3.9-dev
...
Список довольно длинный, поэтому я его подсократил. Обычно вас будут
интересовать такие версии, как 3.8.2 или 3.7.7 — это версии самой
распространённой реализации интерпретатора CPython. Но если
вам нужна экзотика, то pyenv умеет устанавливать любые сорта интерпретаторов
Python (pypy3.6-7.3.0, stackless-3.7.5, jython-2.7.1,
ironpython-2.7.7, micropython-1.12 и т.д.). Для вас ведь не стало
новостью, что существует много разных реализаций интерпретатора Python?
Установим CPython 3.8.2:
$ pyenv install 3.8.2
Downloading Python-3.8.2.tar.xz...
Installing Python-3.8.2...
Через пару минут ожидания ваш новоиспечённый Python будет готов.
Можно сразу же назначить эту версию глобальной:
$ pyenv global 3.8.2
$ python -V
Python 3.8.2
Давайте в целях демонстрации установим ещё парочку интерпретаторов:
$ pyenv install 2.7.18
$ pyenv install 3.9.0a6
Получим список установленных версий интерпретатора:
$ pyenv versions
  2.7.18
* 3.8.2 (set by /home/br0ke/.pyenv/version)
  3.9.0a6
Кстати, если нужно, то можно делать активными сразу несколько
версий одновременно:
$ pyenv global 3.8.2 2.7.18
Теперь вывод версий покажет следующее:
$ pyenv versions
* 2.7.18 (set by /home/br0ke/.pyenv/version)
* 3.8.2 (set by /home/br0ke/.pyenv/version)
  3.9.0a6
А работать это будет вот таким образом:
$ python -V
Python 3.8.2
$ python3 -V
Python 3.8.2
$ python2 -V
Python 2.7.18
Грубо говоря, та версия, которая указана первой (3.8.2),
имеет приоритет и занимает все нужные ей имена. Следующие версии (2.7.18)
могут занять любые оставшиеся свободные имена (в данном случае, это только имя
python2).
А файл глобальной версии ~/.pyenv/version на данный момент имеет вот
такое содержимое:
$ cat ~/.pyenv/version
3.8.2
2.7.18
Локальная версия
Давайте создадим директорию и войдём в неё:
$ mkdir my_project
$ cd my_project
Представим, что в этой директории мы будем разрабатывать некий
проект, на котором мы хотим опробовать фишки нового Python 3.9.
Сообщим об этом pyenv:
В директории появился файл .python-version со следующим содержимым:
$ cat .python-version
3.9.0a6
На данный момент список версий показывает следующее (удобно использовать
эту команду, чтобы понять какую версию и почему pyenv активирует):
$ pyenv versions
  2.7.18
  3.8.2
* 3.9.0a6 (set by /home/br0ke/my_project/.python-version)
Изменения немедленно вступили в силу:
$ python -V
Python 3.9.0a6
Но эта конфигурация никак не влияет на работу pyenv вне директории проекта:
$ cd ..
$ python -V
3.8.2
Как и в случае с глобальной конфигурацией, можно локально активировать
сразу несколько версий интерпретатора.
Установим IPython
Часто бывает нужно установить какой-нибудь пакет так, чтобы он тоже
стал доступен из командной строки. Допустим, что нам нужно установить
ipython — более удобную версию REPL Python.
Сделаем это:
$ cd my_project
$ pip install ipython
Запустим:
$ ipython
Python 3.9.0a6 (default, May  3 2020, 16:58:20)
Type 'copyright', 'credits' or 'license' for more information
IPython 7.14.0 -- An enhanced Interactive Python. Type '?' for help.

In [1]:
Программа сразу доступна, благодаря тому, что pyenv очень умный и
создал новый файл-прослойку (shim) автоматически:
$ which ipython
/home/br0ke/.pyenv/shims/ipython
Вне директории с проектом ipython будет недоступен, ведь он же установлен
в локальный интерпретатор 3.9.0a6, а снаружи активирован другой
интерпретатор — можете проверить самостоятельно.
Возникают ситуации, когда по какой-то причине прослойка не создалась
или с ней случилось что-то ещё, например, удалилась:
$ rm $(which ipython)
$ ipython
No such file or directory
Не беда! Можно попросить pyenv пересоздать их все заново:
И всё работает снова:
$ ipython
Python 3.9.0a6 (default, May  3 2020, 16:58:20)
Type 'copyright', 'credits' or 'license' for more information
IPython 7.14.0 -- An enhanced Interactive Python. Type '?' for help.

In [1]:
Можно вообще добавить команду pyenv rehash в свой ~/.bashrc (или аналог),
чтобы при запуске шелла гарантированно иметь рабочие файлы-прослойки (shims).
Заключение
pyenv — очень удобный и полезный инструмент в ситуациях, когда нужную вам
версию Python нельзя установить средствами операционной системы.
Я вообще предпочитаю устанавливать все нужные мне версии интерпретатора
самостоятельно через pyenv или asdf, даже если ОС уже содержит точно
такую же версию — пусть ОС использует свою копию для служебных целей,
а я для разработки буду использовать свою собственную копию, где смогу
проводить любые кровавые эксперименты, не боясь поломать ОС.
Обязательно
подпишитесь на уведомления
о новых постах в блоге, чтобы ничего не пропустить!
Дополнительное чтение
- Репозиторий проекта на GitHub;
- Туториал на RealPython;
- Альтернатива: универсальный менеджер версий
asdf.
Обложка: Schwoaze, Snakes Black Snakes Animal Free Photo
I had two versions of Python installed on my machine (versions 2.6 and 2.5). I want to run 2.6 for one project and 2.5 for another.
How can I specify which I want to use?
I am working on Windows XP SP2.
![]()
Karl Knechtel
60.6k11 gold badges93 silver badges139 bronze badges
asked Jan 3, 2011 at 9:30
![]()
Bilal BasharatBilal Basharat
2,9365 gold badges21 silver badges20 bronze badges
4
Running a different copy of Python is as easy as starting the correct executable. You mention that you’ve started a python instance, from the command line, by simply typing python.
What this does under Windows, is to trawl the %PATH% environment variable, checking for an executable, either batch file (.bat), command file (.cmd) or some other executable to run (this is controlled by the PATHEXT environment variable), that matches the name given. When it finds the correct file to run the file is being run.
Now, if you’ve installed two python versions 2.5 and 2.6, the path will have both of their directories in it, something like PATH=c:python2.5;c:python2.6 but Windows will stop examining the path when it finds a match.
What you really need to do is to explicitly call one or both of the applications, such as c:python2.5python.exe or c:python2.6python.exe.
The other alternative is to create a shortcut to the respective python.exe calling one of them python25 and the other python26; you can then simply run python25 on your command line.
![]()
answered Jan 3, 2011 at 11:54
![]()
16
Adding two more solutions to the problem:
- Use pylauncher (if you have Python 3.3 or newer there’s no need to install it as it comes with Python already) and either add shebang lines to your scripts;
#! c:[path to Python 2.5]python.exe — for scripts you want to be run with Python 2.5
#! c:[path to Python 2.6]python.exe — for scripts you want to be run with Python 2.6
or instead of running python command run pylauncher command (py) specyfing which version of Python you want;
py -2.6 – version 2.6
py -2 – latest installed version 2.x
py -3.4 – version 3.4
py -3 – latest installed version 3.x
- Install virtualenv and create two virtualenvs;
virtualenv -p c:[path to Python 2.5]python.exe [path where you want to have virtualenv using Python 2.5 created][name of virtualenv]
virtualenv -p c:[path to Python 2.6]python.exe [path where you want to have virtualenv using Python 2.6 created][name of virtualenv]
for example
virtualenv -p c:python2.5python.exe c:venvs2.5
virtualenv -p c:python2.6python.exe c:venvs2.6
then you can activate the first and work with Python 2.5 like this
c:venvs2.5activate
and when you want to switch to Python 2.6 you do
deactivate
c:venvs2.6activate
answered Nov 3, 2012 at 17:09
![]()
Piotr DobrogostPiotr Dobrogost
40.7k39 gold badges233 silver badges361 bronze badges
6
From Python 3.3 on, there is the official Python launcher for Windows (http://www.python.org/dev/peps/pep-0397/). Now, you can use the #!pythonX to determine the wanted version of the interpreter also on Windows. See more details in my another comment or read the PEP 397.
Summary: The py script.py launches the Python version stated in #! or Python 2 if #! is missing. The py -3 script.py launches the Python 3.
![]()
answered Jun 21, 2013 at 23:15
![]()
peprpepr
19.7k15 gold badges73 silver badges137 bronze badges
9
As per @alexander you can make a set of symbolic links like below. Put them somewhere which is included in your path so they can be easily invoked
> cd c:bin
> mklink python25.exe c:python25python.exe
> mklink python26.exe c:python26python.exe
As long as c:bin or where ever you placed them in is in your path you can now go
> python25
answered Dec 19, 2012 at 13:37
![]()
4
For example for 3.6 version type py -3.6.
If you have also 32bit and 64bit versions, you can just type py -3.6-64 or py -3.6-32.
answered Mar 13, 2019 at 18:31
![]()
8
-
install python
- C:Python27
- C:Python36
-
environment variable
PYTHON2_HOME: C:Python27PYTHON3_HOME: C:Python36Path: %PYTHON2_HOME%;%PYTHON2_HOME%Scripts;%PYTHON3_HOME%;%PYTHON3_HOME%Scripts;
-
file rename
- C:Python27python.exe → C:Python27python2.exe
- C:Python36python.exe → C:Python36python3.exe
-
pip
python2 -m pip install packagepython3 -m pip install package
answered Dec 19, 2018 at 8:03
![]()
山茶树和葡萄树山茶树和葡萄树
1,8241 gold badge18 silver badges17 bronze badges
3
I strongly recommend the pyenv-win project.
Thanks to kirankotari’s work, now we have a Windows version of pyenv.
answered May 31, 2019 at 5:03
![]()
Xin LvXin Lv
1511 silver badge3 bronze badges
One easy way for this is that you can use
py -3.8 -m pip install virtualenv here -3.8 goes with your [version number]
After installing the virtualenv, you can create the virtual environment of your application using
py -3.8 -m virtualenv [your env name]
then cd to venv, enter activate
This would activate the python version you like.
Just change the version number to use a different python version.
answered Oct 4, 2020 at 17:28
![]()
Jithin PalepuJithin Palepu
5661 gold badge5 silver badges18 bronze badges
1
When you install Python, it will not overwrite other installs of other major versions. So installing Python 2.5.x will not overwrite Python 2.6.x, although installing 2.6.6 will overwrite 2.6.5.
So you can just install it. Then you call the Python version you want. For example:
C:Python2.5Python.exe
for Python 2.5 on windows and
C:Python2.6Python.exe
for Python 2.6 on windows, or
/usr/local/bin/python-2.5
or
/usr/local/bin/python-2.6
on Windows Unix (including Linux and OS X).
When you install on Unix (including Linux and OS X) you will get a generic python command installed, which will be the last one you installed. This is mostly not a problem as most scripts will explicitly call /usr/local/bin/python2.5 or something just to protect against that. But if you don’t want to do that, and you probably don’t you can install it like this:
./configure
make
sudo make altinstall
Note the «altinstall» that means it will install it, but it will not replace the python command.
On Windows you don’t get a global python command as far as I know so that’s not an issue.
![]()
martineau
117k25 gold badges161 silver badges290 bronze badges
answered Jan 3, 2011 at 9:39
![]()
Lennart RegebroLennart Regebro
164k41 gold badges222 silver badges251 bronze badges
5
Here’s a quick hack:
- Go to the directory of the version of python you want to run
- Right click on python.exe
- Select ‘Create Shortcut‘
- Give that shortcut a name to call by( I use p27, p33 etc.)
- Move that shortcut to your home directory(
C:UsersYour name) - Open a command prompt and enter
name_of_your_shortcut.lnk(I usep27.lnk)
answered Oct 7, 2015 at 19:47
![]()
David GreydanusDavid Greydanus
2,3581 gold badge22 silver badges42 bronze badges
cp c:python27binpython.exe as python2.7.exe
cp c:python34binpython.exe as python3.4.exe
they are all in the system path, choose the version you want to run
C:Usersusername>python2.7
Python 2.7.8 (default, Jun 30 2014, 16:03:49) [MSC v.1500 32 bit (Intel)] on win
32
Type "help", "copyright", "credits" or "license" for more information.
>>>

C:Usersusername>python3.4
Python 3.4.1 (v3.4.1:c0e311e010fc, May 18 2014, 10:38:22) [MSC v.1600 32 bit Intel)] on win32
Type "help", "copyright", "credits" or "license" for more information.
>>>
![]()
answered Jul 21, 2014 at 15:12
![]()
1
The easiest way to run multiple versions of python on windows is described below as follows:-
1)Download the latest versions of python from python.org/downloads by selecting the relevant version for your system.
2)Run the installer and select Add python 3.x to the path to set path automatically in python 3 (you just have to click the checkbox). For python 2 open up your python 2 installer, select whatever preferences you want but just remember to set Add python.exe to path to Will be installed on local hard drive, Now just click next and wait for the installer to finish.
3)When both the installations are complete. Right click on my computer—Go to properties—Select advanced system settings—Go to environment variables—Click on new under System variables and add a new system variable with variable name as PY_PYTHON and set this variable value to 3. Now click on OK and you should be done.
4)Now to test this open the command prompt. Once you are in there type python or py, It should open up python3.
5)Now exit out of python3 by typing exit(). Now type py -2 it should open python 2.
If none of this works then restart the computer and if the problem still persists then uninstall everything and repeat the steps.
Thanks.
answered Mar 6, 2018 at 17:35
![]()
This is a simple and elegant solution to easily run 2 or more different versions of python without using scripts in Windows. Whatever the version of python, it will start from the Command prompt.
I have python versions 3.6.6 and 3.9. The Environment Variable paths are normal and were automatically added when each version of python was installed.
It’s best to install python using the «all users» option. This way the python will simply install to:
C:program filespython36
C:program filespython39
Open each of these python folders and find the python.exe file. Copy and paste the python.exe file into those same folders. Then carefully rename the copies to:
python36.exe
python39.exe
Open and edit Environment Variables. Add 4 new User Variables.
C:Program FilesPython36Scripts
C:Program FilesPython36python36.exe
C:Program FilesPython39Scripts
C:Program FilesProgram39python39.exe
Save and exit Environment Variables.
Open a new Command Prompt terminal window. To run one or the other version of python, type:
python36

python39
More versions of python can easily be added by repeating the same as shown above. Elegant and simple. Done.
answered Oct 21, 2021 at 7:47
![]()
GrayGray
1,0578 silver badges23 bronze badges
1
Using a batch file to switch, easy and efficient on windows 7. I use this:
In the environment variable dialog (C:WindowsSystem32SystemPropertiesAdvanced.exe),
In the section user variables
-
added %pathpython% to the path environment variable
-
removed any references to python pathes
In the section system variables
- removed any references to python pathes
I created batch files for every python installation (exmple for 3.4 x64
Name = SetPathPython34x64 !!! ToExecuteAsAdmin.bat just to remember.
Content of the file =
     Set PathPython=C:Python36AMD64Scripts;C:Python36AMD64;C:Tclbin

     setx PathPython %PathPython%
To switch between versions, I execute the batch file in admin mode.
!!!!! The changes are effective for the SUBSEQUENT command prompt windows OPENED. !!!
So I have exact control on it.
answered Mar 17, 2018 at 16:09
![]()
AmanAman
112 bronze badges
let’s say if we have python 3.7 and python 3.6 installed.
they are respectively stored in following folder by default.
C:UsersnameAppDataLocalProgramsPythonPython36
C:UsersnameAppDataLocalProgramsPythonPython37
if we want to use cmd prompt to install/run command in any of the above specific environment do this:
There should be python.exe in each of the above folder.
so when we try running any file for ex. (see image1) python hello.py. we call that respective python.exe. by default it picks lower version of file. (means in this case it will use from python 3.6 )
image
so if we want to run using python3.7. just change the .exe file name. for ex. if I change to python37.exe and i want to use python3.7 to run hello.py
I will use python37 hello.py . or if i want to use python3.7 by default i will change the python.exe filename in python3.6 folder to something else . so that it will use python3.7 each time when I use only python hello.py
answered Sep 17, 2020 at 18:32
![]()
Shows your installed pythons
py -0
Uses version of python to do something
py -*version*
ex.
py -3.8 venv venv
Will create virtual environment in python 3.8
Note:
python -0
 or
python -3.8
doesn’t work, I assume it has to be «py»
answered Sep 8, 2022 at 8:55
![]()
You can create different python development environments graphically from Anaconda Navigator.
I had same problem while working with different python versions so I used anaconda navigator to create different python development environments and used different python versions in each environments.
Here is the help documentation for this.
https://docs.anaconda.com/anaconda/navigator/tutorials/manage-environments/
answered Jul 5, 2019 at 7:50
![]()
Introduce more details based on the answer given by @Aman.
Define different environment variables for different python versions.
For example:
- You have
E:python2python.exeandE:python3python.exeat the same time. - Then you can set an environment variable
%python2%forE:python2python.exeand%python2%forE:python3python.exe. - Finally, when you want to run python2 (or python3), you can enter
%python2%(or%python3%) directly in command prompt.
answered Apr 7, 2022 at 13:01
![]()
Here is a solution:
- First, install all versions which you want to run in your pc. https://www.python.org/
- Second, create virtual environment with which python version you want to use.
«py [python_version] -m venv [vritual_environment_name]» example: «py -3.9 -m venv env»
Note: You don’t need to run «pip install virtualenv»
answered Nov 5, 2022 at 14:42
![]()
Using the Rapid Environment Editor you can push to the top the directory of the desired Python installation. For example, to start python from the c:Python27 directory, ensure that c:Python27 directory is before or on top of the c:Python36 directory in the Path environment variable. From my experience, the first python executable found in the Path environment is being executed. For example, I have MSYS2 installed with Python27 and since I’ve added C:MSYS2 to the path before C:Python36, the python.exe from the C:MSYS2…. folder is being executed.
answered Aug 24, 2017 at 15:37
![]()
I thought this answer might be helpful to others having multiple versions of python and wants to use pipenv to create virtual environment.
- navigate to the project directory, and run
py -[python version] pip install pipenv, example:py -3.6 pip install pipenv - run
pipenv --python [version]to create the virtual environment in the version of the python you desire. example:pipenv --python 3.6 - run
pipenv shellto activate your virtual environment.
answered Sep 15, 2020 at 9:39
![]()
0
Just call the correct executable
answered Jan 3, 2011 at 9:33
![]()
albertovalbertov
2,30620 silver badges15 bronze badges
3
Иногда полезно держать несколько версий python на одной машине. Допустим для разработки двух проектов нам необходима вторая и третья ветка python. Или вы поддерживаете проект который использует старую версию python.
Обычно для этого мы используем виртуальное окружение virtualenv или же обертку для него virtualenvwrapper. Об этом я рассказывать не буду, так как есть уже много подобных статей, да и в документациях к самим утилитам все очень хорошо объяснено. Достаточно только забить virtualenv или virtualenvwrapper в поисковик.
Но в дополнение к ним я хочу рассказать в этой статье про менеджер версий python. Кому любопытно прошу под кат.
Чтобы использовать несколько версий python, можно установить их вручную или воспользоваться менеджер версий. Таких есть два: pythonbrew(который более не развивается) и pyenv. Оба менеджера не поддерживают windows(pythonbrew, pyenv) так что питонистам пишущим на этой платформе, придется пока разруливать все руками, либо сделать свою утилиту для смены путей до нужных версий. Кто как справляется с данной ситуацией можете оставлять в комментариях.
Так как pythonbrew более не поддерживается в этой статье он рассмотрен не будет.
P.S. В статье приведены примеры проверенные для OS Ubuntu 12.04. При попытке повторить их, делайте поправки относительно своего дистрибутива.
Ручной способ
Для того чтобы работать с несколькими версиями питона, можно установить необходимые версии в указанный префикс. Например чтобы не мудрить с правами, установим дополнительно 2 версии python(2.7.6 и 3.3.2) в директорию пользователю:
2.7.6
$ mkdir -p ~/python/src/ && cd ~/python/src/
$ wget http://www.python.org/ftp/python/2.7.6/Python-2.7.6.tar.xz
$ tar -xf ~/python/src/Python-2.7.6.tar.xz && cd ./Python-2.7.6
$ ./configure --prefix=$HOME/python/2.7.6/
$ make && make install
для 3.3.2 делаем аналогичные операции:
$ wget http://www.python.org/ftp/python/3.3.2/Python-3.3.2.tar.xz ~/python/src/
$ tar -xf ~/python/src/Python-3.3.2.tar.xz && cd ./Python-3.3.2
$ ./configure --prefix=$HOME/python/3.3.2/
$ make && make install
Теперь можно создать виртуальное окружение чтобы использовать эти версии:
$ virtualenv -p ~/python/2.7.6/bin/python env && . ./env/bin/activate
или через virtualenvwrapper:
$ mkvirtualenv -p ~/python/2.7.6/bin/python evnwrapper
Собственно на основании такого способа описана статья по созданию мультихостинга.
Далее если вам необходимо использовать какую-то из этих версий как python по умолчанию, то вам необходимо добавить в переменную окружения путь до интерпретатора python.
$ echo 'export PATH=~/python/2.7.6/bin/' >> ~/.bashrc
Соответственно вместо bashrc вы ставите bash_profile, zshrc, kshrc, profile в зависимости от вашей командной оболочки.
$ . ~/.bashrc
И по необходимости можно установить pip, предварительно установив setuptools.
$ wget https://bitbucket.org/pypa/setuptools/raw/bootstrap/ez_setup.py -O - | python
$ wget https://raw.github.com/pypa/pip/master/contrib/get-pip.py -O - | python
Фух, ну вроде бы все. А теперь о том как можно сделать это проще использую менеджер версий python.
PyEnv
В общем если вы достаточно ленивы, то можно не делать всего того что описано выше а воспользоваться утилитой pyenv, которая упростит вам данное взаимодействие с окружением и путями.
Так в чем же заключается особенность этой утилиты? Вот что она может со слов автора проекта:
- Let you change the global Python version on a per-user basis.
- Provide support for per-project Python versions.
- Allow you to override the Python version with an environment variable.
- Search commands from multiple versions of Python at a time. This may be helpful to test across Python versions with tox.
По умолчанию все версии Python будут доступны в ~/.pyenv/versions/. Изменять версии Python можно как в глобальном контексте так и в локальном(например под конкретный проект).
Как ставить pyenv хорошо описывается в инструкции. Так же у автора есть скрипт который по мимо самой pyenv ставит еще и дополнительные плагины, в том числе и для virtualenv. Есть возможность установить плагин и для virtualenvwrapper.
Перед установкой необходимо поставить некоторые зависимости:
# apt-get install make libssl-dev zlib1g-dev libbz2-dev libreadline-dev libsqlite3-dev
Прежде чем начать установку, убедитесь, что у вас установлен git:
# apt-get install git
Далее устанавливаем по инструкции:
$ git clone git://github.com/yyuu/pyenv.git ~/.pyenv
Или так:
$ curl https://raw.github.com/yyuu/pyenv-installer/master/bin/pyenv-installer | bash
Во втором случае установка произойдет с дополнительными плагинами.
Далее, для того чтобы все заработало, дополним наш bashrc и перезагрузим оболочку:
$ echo 'export PYENV_ROOT="$HOME/.pyenv"' >> ~/.bashrc
$ echo 'export PATH="$PYENV_ROOT/bin:$PATH"' >> ~/.bashrc
$ echo 'eval "$(pyenv init -)"' >> ~/.bashrc
$ . ~/.bashrc
Для обновления утилиты или смены ее версии используем git.
Инструкция
Для управления версиями pyenv необходимо перейти в директорию с утилитой:
$ cd ~/.pyenv
Для просмотра доступных версий:
$ git tag
для смены версии
$ git checkout <version>
для обновления
$ git pull
Пример использования
~ $ pyenv install 2.7.5
~ $ pyenv install 3.3.2
~ $ pyenv rehash
~ $ pyenv versions
* system
  2.7.5
  3.3.2
~ $ pyenv global 2.7.5
~ $ python --version
Python 2.7.5
~ $ cd projects/
~/projects $ pyenv local 3.3.2
~/projects $ python --version
Python 3.3.2
~/projects $ cd test_prj/
~/projects/test_prj $ python --version
Python 3.3.2
~/projects/test_prj $ cd ..
~/projects $ pyenv local --unset
~/projects $ python --version
Python 2.7.5
В добавок ко всему все довольно подробно и детально расписано у автора проекта в его репозиториях на github.
Виртуальное окружение
Все, а дальше как хотите. Если вы используете 3 ветку python то для создания виртуального окружения можно воспользоваться утилитой venv которая работает из коробки. Про это есть статья на хабре. Если вы больше привыкли к virtualenv или ее обертке virtualenvwrapper то тут есть два варианта: либо поставить плагин к pyenv, или использовать их к той версии python c которой вы работаете. Соответственно если выбрать первый вариант, то созданные вами окружения будут добавлены к вашим версиям python и доступны через команду:
$ pyenv versions
Добавить плагин легко, просто клонируем его из репозитория pyenv-virtualenv или pyenv-virtualenvwrapper:
$ mkdir -p ~/.pyenv/plugins
$ git clone git://github.com/yyuu/pyenv-virtualenv.git ~/.pyenv/plugins/pyenv-virtualenv
$ git clone git://github.com/yyuu/pyenv-virtualenvwrapper.git ~/.pyenv/plugins/pyenv-virtualenvwrapper
Пример использования можно посмотреть в документации для pyenv-virtualenv и pyenv-virtualenvwrapper.
Все, а дальше пользуйтесь, как вам привычнее.
Пример использования
$ pyenv versions
* system
  2.7.5
  3.3.2

$ mkdir -p ~/test_project/prj_for_2.7.5 && cd ~/test_project/prj_for_2.7.5
$ pyenv virtualenv 2.7.5 my-virtualenv-2.7.5
$ pyenv local my-virtualenv-2.7.5
$ pip install django==1.4
$ pip freeze
Django==1.4
wsgiref==0.1.2
$ python --version
Python 2.7.5

$ mkdir -p ~/test_project/test_project && cd ~/test_project/test_project
$ pyenv virtualenv 3.3.2 my-virtualenv-3.3.2
$ pyenv local my-virtualenv-3.3.2
$ pip install django==1.5
$ pip freeze
Django==1.5
$ python --version
Python 3.3.2
Теперь находясь в директории проекта можно запускать скрипт от нужной версии python не прилагая никаких действий. pyenv создает в директории файл .python-version который содержит в себе информацию о том какую версию python с каким окружение использовать для данного проекта.
Полезные ссылки
github.com/utahta/pythonbrew
github.com/yyuu/pyenv
github.com/yyuu/pyenv-installer
github.com/yyuu/pyenv-virtualenv
github.com/yyuu/pyenv-virtualenvwrapper
docs.python.org/dev/library/venv.html
www.virtualenv.org/en/latest
virtualenvwrapper.readthedocs.org/en/latest
Вы здесь, потому что:
- Вы используете ОС Windows версии 10+
- Вы хотели бы использовать несколько версий Python на одном компьютере
- Вы устали от интернета, говорящего вам «Просто используйте Virtualenv»
TL; DR
- Откройте
Command Promptи введитеpip install virtualenv - Скачайте нужную версию
python(НЕ добавляйте в PATH!) И запомните путь только что установленной версииpathtonew_python.exe - Чтобы создать virtualenv, откройте
Command Promptи введитеvirtualenv pathtoenv -p pathtonew_python.exe - Если вы используете
PyCharm, обновитеProject InterpreterиCode compatibility inspection. - Чтобы установить пакеты:
(I) Активируйте virtualenv: откройтеCommand Promptи введитеpathtoenvScriptsactivate.bat
(II) Установите нужные пакеты
(III) Деактивируйте с помощьюdeactivate.
Длинная версия; Читать
пролог
Если вы используете приложение Anaconda, этот процесс может быть проще с их графическим интерфейсом. Я сам не пробовал, пожалуйста, дайте мне знать, как все прошло, если вы идете по этому пути 
1. Установите virtualenv
Если у вас уже есть некоторые виртуальные среды или вы используете Anaconda, убедитесь, что следующие шаги выполняются извне всех этих сред.
2. Установите Python
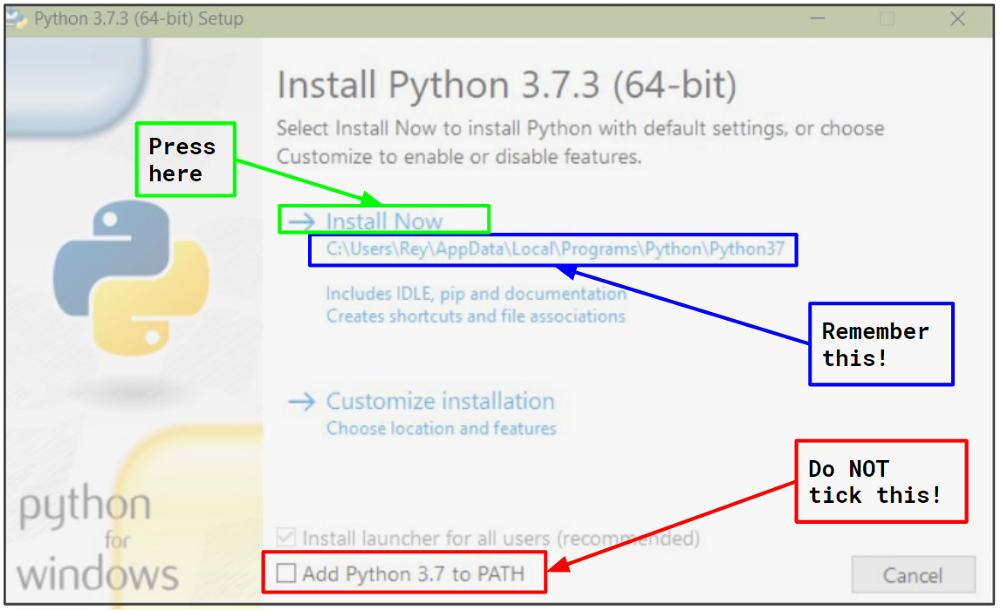
Вы можете скачать Python с официального сайта, например, python3.7.3 здесь.
Файл, который вы должны загрузить, называется Windows x86–64 executable installer, или, Windows x86 executable installer если по какой-то причине вы используете 32-битные окна.
После завершения загрузки откройте исполняемый файл и появится приглашение для установки.
- Вы НЕ хотите добавлять новый python в вашу PATH, поскольку у нас будет несколько версий python на одном компьютере, и мы хотим, чтобы каждое приложение знало только одну версию python.
- Либо используйте предложенное по умолчанию местоположение для нового питона, либо укажите местоположение по вашему выбору. В любом случае, запомните это место, и давайте теперь будем обозначать его
C:\Python37.
3. Создать virtualenv
Откройте Command Prompt, или, если вы используете Anaconda, откройте Anaconda Prompt.
Решите , где вы хотите хранить virtualenv, например, C:Users\Anaconda3envs.
Введите:
virtualenv C:Users\Anaconda3envs -p C:\Python37python.exe
4. Обновите интерпретатор PyCharm
Если вы используете PyCharm, откройте проект, над которым вы хотели бы поработать (то есть / будет написано с новой версией Python), и затем File -> Settings -> Project -> Project Interpreter нажмите значок шестеренки, а затем Add...
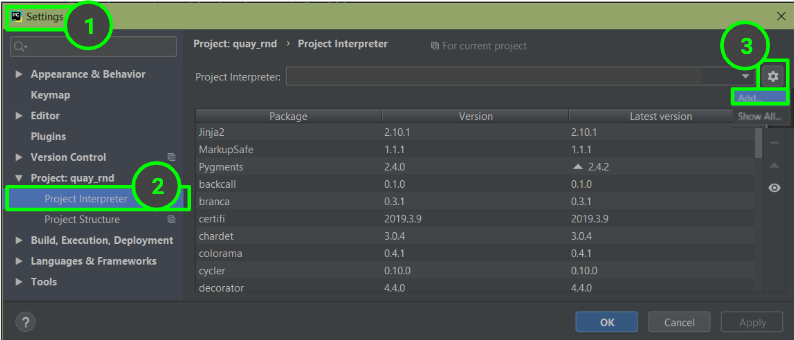
Откроется окно с подсказкой, которое позволит вам определить нового интерпретатора:
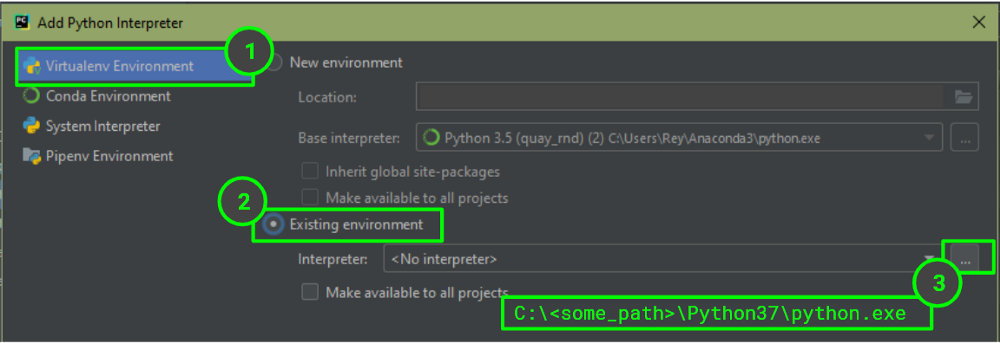
Предполагая, что вы используете проверку кода, вам может потребоваться указать PyCharm, какую версию Python проверять. Перейдите File -> Settings-> Editor -> Inspections -> Python -> Code compatibility Inspection, убедитесь, что поле вверху указывает на конкретный проект, над которым вы работаете, и отметьте поле вашей версии Python.
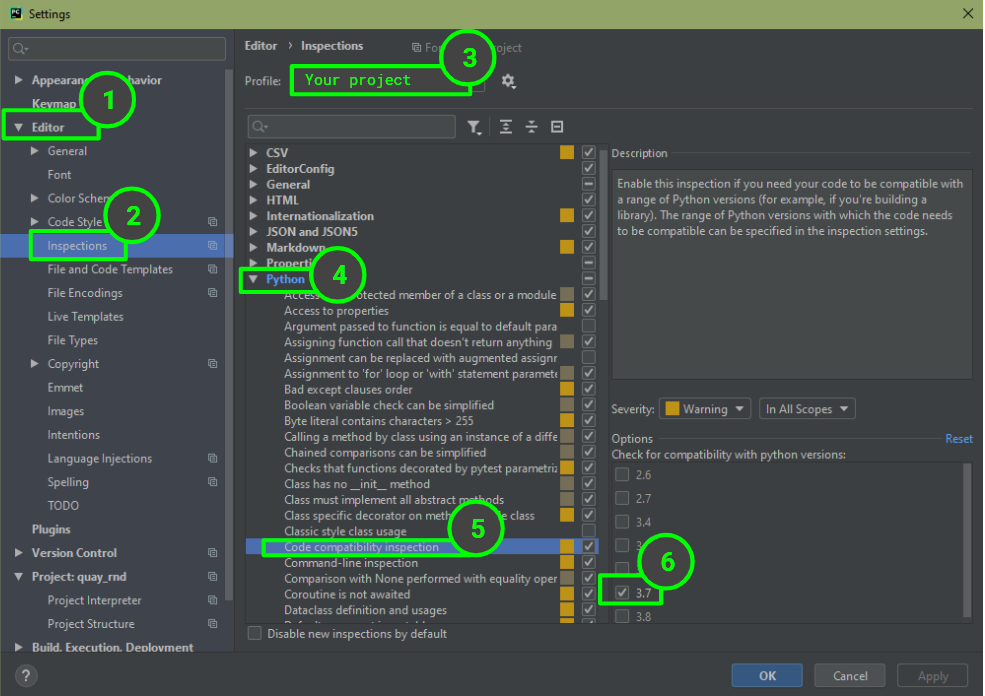
Если вы не видите свою версию Python в списке параметров, возможно настала пора для обновления PyCharm … да, со мной тоже случилось …
5. Установите пакеты
В настоящее время ваш virtualenv содержит только важные пакеты, pip и setuptools. Чтобы установить больше пакетов:
- Откройте
Command PromptилиAnaconda Prompt, и активируйте свой virtualenv, введяC:Users\Anaconda3envs\activate.bat - Используйте
pipдля установки пакетов, как вы обычно делаете. - Деактивировать свой virtualenv, введя
deactivate.
Перевод статьи: Installing Multiple Python Versions on Windows Using Virtualenv
Последнее обновление: 16.12.2022
На одной рабочей машине одновременно может быть установлено несколько версий Python. Это бывает полезно, когда идет работа с некоторыми внешними библиотеками, которые поддерживают разные версии python, либо в силу каких-то
других причин нам надо использовать несколько разных версий. Например, на момент написания статьи последней и актуальной является версия Python 3.11.
Но, допустим, необходимо также установить версию 3.10, как в этом случае управлять отдельными версиями Python?
Windows
На странице загрузок https://www.python.org/downloads/ мы можем найти ссылку на нужную версию:
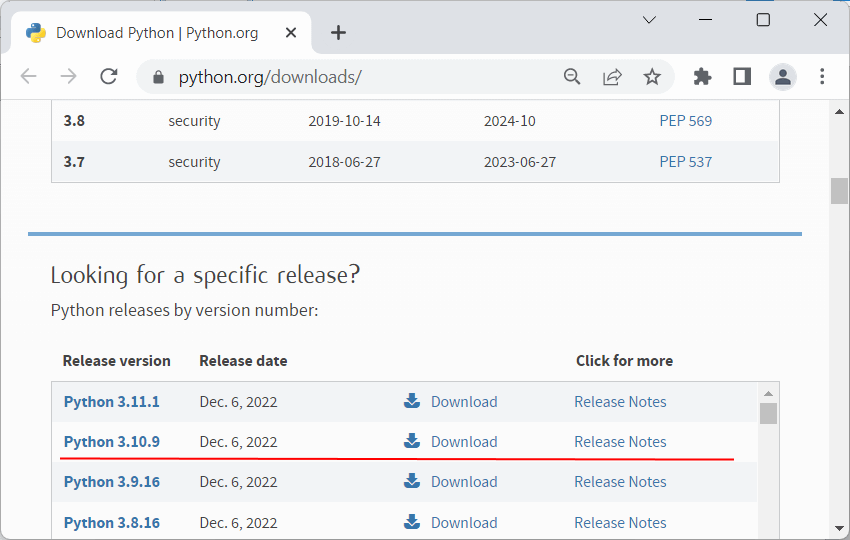
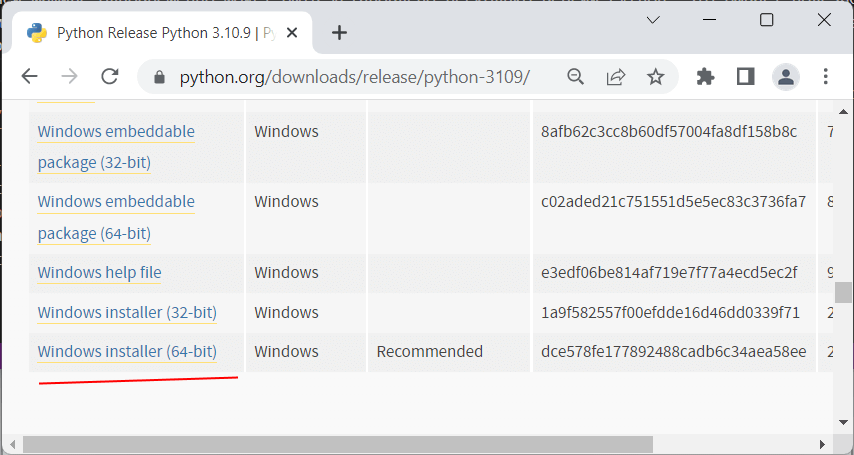
И также загрузить ее и установить:
Чтобы при использовании интерпретатора Python не прописывать к нему весь путь, добавим при установке его в переменные среды. Но здесь надо учитывать, что в переменных среды
может содержаться несколько путей к разным интерпретаторам Python:
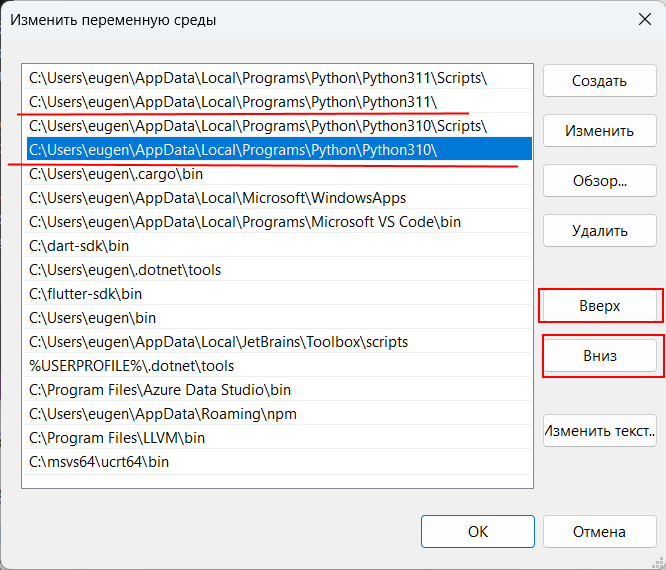
Та версия Python, которая находится выше, будет версией по умолчанию. С помощью кнопки «Вверх» можно нужную нам версию переместить в начало, сделав версией по умолчанию.
Например, в моем случае это версия 3.11. Соответственно, если я введу в терминале команду
или
то консоль отобразит версию 3.11:
C:python>python --version
Python 3.11.0
Для обращения к версии 3.10 (и всем другим версиям) необходимо использовать указывать номер версии:
C:python>py -3.10 --version
Python 3.10.9
например, выполнение скрипта hello.py с помощью версии 3.10:
Подобным образом можно вызывать и другие версии Python.
MacOS
На MacOS можно установить разные версии, например, загрузив с официального сайта пакет установщика для определенной версии.
Для обращения к определенной версии Python на MacOS указываем явным образом подверсию в формате python3.[номер_подверсии]. Например, у меня установлена версия
Python 3.10. Проверим ее версию:
Аналогично обращении к версии python3.9 (при условии если она установлена)
К примеру выполнение скрипта hello.py с помощью версии python 3.10:
Linux
На Linux также можно установить одновременно несколько версий Python. Например, установка версий 3.10 и 3.11:
sudo apt-get install python3.10
sudo apt-get install python3.11
Одна из версий является версий по умолчанию. И для обращения к ней достаточно прописать python3, например, проверим версию по умолчанию:
Для обращения к другим версиям надо указывать подверсию:
python3.10 --version
python3.11 --version
Например, выполнение скрипта hello с помощью версии Python 3.10:
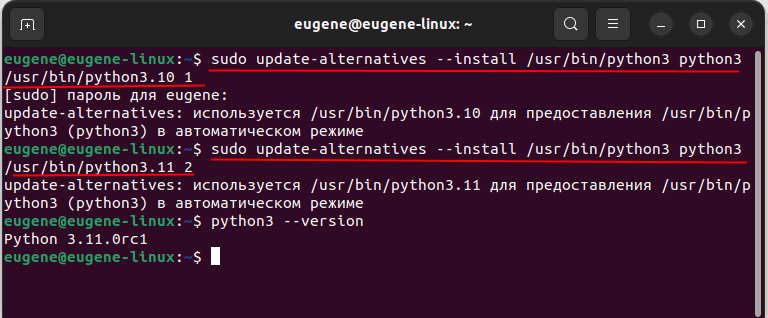
Но может сложиться ситуация, когда нам надо изменить версию по умолчанию. В этом случае применяется команда update-alternatives для связывания
определенной версии Python с командой python3. Например, мы хотим установить в качестве версии по умолчанию Python 3.11. В этом случае последовательно выполним следующие команды:
sudo update-alternatives --install /usr/bin/python3 python3 /usr/bin/python3.10 1
sudo update-alternatives --install /usr/bin/python3 python3 /usr/bin/python3.11 2
Числа справа указывают на приоритет/состояние. Так, для версии 3.11 указан больший приоритет, поэтому при обращении к python3 будет использоваться именно версия 3.11 (в моем случае это Python 3.11.0rc1)
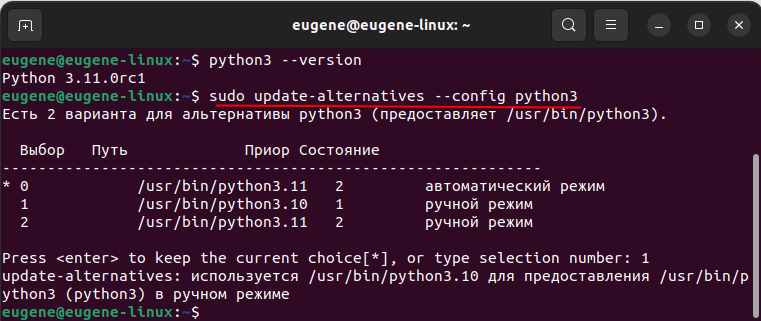
С помощью команды
sudo update-alternatives --config python3
можно изменить версию по умолчанию
Watch Now This tutorial has a related video course created by the Real Python team. Watch it together with the written tutorial to deepen your understanding: Start Managing Multiple Python Versions With pyenv
Have you ever wanted to contribute to a project that supports multiple versions of Python but aren’t sure how you would easily test all the versions? Are you ever curious about the latest and greatest versions of Python? Maybe you’d like to try out these new features, but you don’t want to worry about messing up your development environment. Luckily, managing multiple versions of Python doesn’t have to be confusing if you use pyenv.
This article will provide you with a great overview of how to maximize your time spent working on projects and minimize the time spent in headaches trying to use the right version of Python.
In this article, you’ll learn how to:
- Install multiple versions of Python
- Install the latest development version of Python
- Switch between the installed versions
- Use virtual environments with
pyenv - Activate different Python versions and virtual environments automatically
Why Use pyenv?
pyenv is a wonderful tool for managing multiple Python versions. Even if you already have Python installed on your system, it is worth having pyenv installed so that you can easily try out new language features or help contribute to a project that is on a different version of Python. Using pyenv is also a great way to install pre-release versions of Python so that you can test them for bugs.
Why Not Use System Python?
“System Python” is the Python that comes installed on your operating system. If you’re on Mac or Linux, then by default, when you type python in your terminal, you get a nice Python REPL.
So, why not use it? One way to look at it is that this Python really belongs to the operating system. After all, it came installed with the operating system. That’s even reflected when you run which:
$ which python
/usr/bin/python
Here, python is available to all users as evidenced by its location /usr/bin/python. Chances are, this isn’t the version of Python you want either:
$ python -V
Pyhton 2.7.12
To install a package into your system Python, you have to run sudo pip install. That’s because you’re installing the Python package globally, which is a real problem if another user comes along and wants to install a slightly older version of the package.
Problems with multiple versions of the same package tend to creep up on you and bite you when you least expect it. One common way this problem presents itself is a popular and stable package suddenly misbehaving on your system. After hours of troubleshooting and Googling, you may find that you’ve installed the wrong version of a dependency, and it’s ruining your day.
Even if your Python version is installed in /usr/local/bin/python3, you’re still not safe. You will run into the same permissions and flexibility problems described above.
In addition, you don’t really have much control over what version of Python comes installed on your OS. If you want to use the latest features in Python, and you’re on Ubuntu for example, you might just be out of luck. The default versions might be too old, which means you’ll just have to wait for a new OS to come out.
Finally, some operating systems actually use the packaged Python for operation. Take yum for example, which makes heavy use of Python to do its job. If you install a new version of Python and aren’t careful to install it into your user space, you could seriously damage your ability to use your OS.
What About a Package Manager?
The next logical place to look is package managers. Programs such as apt, yum, brew, or port are typical next options. After all, this is how you install most packages to your system. Unfortunately, you’ll find some of the same problems using a package manager.
By default, package managers tend to install their packages into the global system space instead of the user space. Again, these system level packages pollute your development environment and make it hard to share a workspace with others.
Once again, you still don’t have control over what version of Python you can install. It’s true some repositories give you a greater selection, but by default, you’re looking at whatever version of Python your particular vendor is up to on any given day.
Even if you do install Python from a package manager, consider what would happen if you’re writing a package and want to support and test on Python 3.4 — 3.7.
What would happen on your system when you type python3? How would you switch quickly between the different versions? You can certainly do it, but it is tedious and prone to error. Nevermind the fact that if you want PyPy, Jython, or Miniconda, then you’re probably just out of luck with your package manager.
With these constraints in mind, let’s recap the criteria that would let you install and manage Python versions easily and flexibly:
- Install Python in your user space
- Install multiple versions of Python
- Specify the exact Python version you want
- Switch between the installed versions
pyenv lets you do all of these things and more.
Installing pyenv
Before you install pyenv itself, you’re going to need some OS-specific dependencies. These dependencies are mostly development utilities written in C and are required because pyenv installs Python by building from source. For a more detailed breakdown and explanation of the build dependencies, you can check out the official docs. In this tutorial, you’ll see the most common ways to install these dependencies.
Build Dependencies
pyenv builds Python from source, which means you’ll need build dependencies to actually use pyenv. The build dependencies vary by platform. If you are on Ubuntu/Debian and want to install the build dependencies, you could use the following:
$ sudo apt-get install -y make build-essential libssl-dev zlib1g-dev
libbz2-dev libreadline-dev libsqlite3-dev wget curl llvm libncurses5-dev
libncursesw5-dev xz-utils tk-dev libffi-dev liblzma-dev python-openssl
This uses Apt to install all the build dependencies. Let this run, and you’ll be ready to go for Debian systems.
If you use Fedora/CentOS/RHEL, you could use yum to install your build dependencies:
$ sudo yum install gcc zlib-devel bzip2 bzip2-devel readline-devel sqlite
sqlite-devel openssl-devel xz xz-devel libffi-devel
This command will install all the build dependencies for Python using yum.
macOS users can use the following command:
$ brew install openssl readline sqlite3 xz zlib
This command relies on Homebrew and installs the few dependencies for macOS users.
If you’re instead using openSUSE then you would run the following:
$ zypper in zlib-devel bzip2 libbz2-devel libffi-devel
libopenssl-devel readline-devel sqlite3 sqlite3-devel xz xz-devel
Once again, this command installs all the Python build dependencies for your system.
Finally, for Alpine users, you can use this:
$ apk add libffi-dev ncurses-dev openssl-dev readline-dev
tk-dev xz-dev zlib-dev
This command uses apk as the package manager and will install all build dependencies for Python on Alpine.
Using the pyenv-installer
After you’ve installed the build dependencies, you’re ready to install pyenv itself. I recommend using the pyenv-installer project:
$ curl https://pyenv.run | bash
This will install pyenv along with a few plugins that are useful:
pyenv: The actualpyenvapplicationpyenv-virtualenv: Plugin forpyenvand virtual environmentspyenv-update: Plugin for updatingpyenvpyenv-doctor: Plugin to verify thatpyenvand build dependencies are installedpyenv-which-ext: Plugin to automatically lookup system commands
At the end of the run, you should see something like this:
WARNING: seems you still have not added 'pyenv' to the load path.

Load pyenv automatically by adding
the following to ~/.bashrc:

export PATH="$HOME/.pyenv/bin:$PATH"
eval "$(pyenv init -)"
eval "$(pyenv virtualenv-init -)"
The output will be based on your shell. But you should follow the instructions to add pyenv to your path and to initialize pyenv/pyenv-virtualenv auto completion. Once you’ve done this, you need to reload your shell:
$ exec "$SHELL" # Or just restart your terminal
That’s it. You now have pyenv and four useful plugins installed.
Using pyenv to Install Python
Now that you have pyenv installed, installing Python is the next step. You have many versions of Python to choose from. If you wanted to see all the available CPython 3.6 through 3.8, you can do this:
$ pyenv install --list | grep " 3.[678]"
  3.6.0
  3.6-dev
  3.6.1
  3.6.2
  3.6.3
  3.6.4
  3.6.5
  3.6.6
  3.6.7
  3.6.8
  3.7.0
  3.7-dev
  3.7.1
  3.7.2
  3.8-dev
The above shows all the Python versions that pyenv knows about that match the regular expression. In this case, that is all available CPython versions 3.6 through 3.8. Likewise, if you wanted to see all the Jython versions, you could do this:
$ pyenv install --list | grep "jython"
  jython-dev
  jython-2.5.0
  jython-2.5-dev
  jython-2.5.1
  jython-2.5.2
  jython-2.5.3
  jython-2.5.4-rc1
  jython-2.7.0
  jython-2.7.1
Again, you can see all the Jython versions that pyenv has to offer. If you want to see all the versions, you can do the following:
$ pyenv install --list
...
# There are a lot
Once you find the version you want, you can install it with a single command:
$ pyenv install -v 3.7.2
/tmp/python-build.20190208022403.30568 ~
Downloading Python-3.7.2.tar.xz...
-> https://www.python.org/ftp/python/3.7.2/Python-3.7.2.tar.xz
Installing Python-3.7.2...
/tmp/python-build.20190208022403.30568/Python-3.7.2 /tmp/python-build.20190208022403.30568 ~
[...]
Installing collected packages: setuptools, pip
Successfully installed pip-18.1 setuptools-40.6.2
Installed Python-3.7.2 to /home/realpython/.pyenv/versions/3.7.2
This will take a while because pyenv is building Python from source, but once it’s done, you’ll have Python 3.7.2 available on your local machine. If you don’t want to see all the output, just remove the -v flag. Even development versions of CPython can be installed:
For the rest of the tutorial, the examples assume you’ve installed 3.6.8 and 2.7.15, but you’re free to substitute these values for the Python versions you actually installed. Also note that the system Python version in the examples is 2.7.12.
Installation Location
As mentioned before, pyenv works by building Python from source. Each version that you have installed is located nicely in your pyenv root directory:
$ ls ~/.pyenv/versions/
2.7.15  3.6.8  3.8-dev
All of your versions will be located here. This is handy because removing these versions is trivial:
$ rm -rf ~/.pyenv/versions/2.7.15
Of course pyenv also provides a command to uninstall a particular Python version:
Using Your New Python
Now that you’ve installed a couple of different Python versions, let’s see some basics on how to use them. First, check what versions of Python you have available:
$ pyenv versions
* system (set by /home/realpython/.pyenv/version)
  2.7.15
  3.6.8
  3.8-dev
The * indicates that the system Python version is active currently. You’ll also notice that this is set by a file in your root pyenv directory. This means that, by default, you are still using your system Python:
$ python -V
Python 2.7.12
If you try to confirm this using which, you’ll see this:
$ which python
/home/realpython/.pyenv/shims/python
This might be surprising, but this is how pyenv works. pyenv inserts itself into your PATH and from your OS’s perspective is the executable that is getting called. If you want to see the actual path, you can run the following:
$ pyenv which python
/usr/bin/python
If, for example, you wanted to use version 2.7.15, then you can use the global command:
$ pyenv global 2.7.15
$ python -V
Python 2.7.15

$ pyenv versions
  system
* 2.7.15 (set by /home/realpython/.pyenv/version)
  3.6.8
  3.8-dev
If you ever want to go back to the system version of Python as the default, you can run this:
$ pyenv global system
$ python -V
Python 2.7.12
You can now switch between different versions of Python with ease. This is just the beginning. If you have many versions that you want to switch between, typing these commands consistently is tedious. This section goes over the basics, but a better workflow is described in working with multiple environments.
Exploring pyenv Commands
pyenv offers many commands. You can see a complete list of all available commands with this:
$ pyenv commands
activate
commands
completions
deactivate
...
virtualenvs
whence
which
This outputs all command names. Each command has a --help flag that will give you more detailed information. For example, if you wanted to see more information on the shims command you could run the following:
$ pyenv shims --help
Usage: pyenv shims [--short]

List existing pyenv shims
The help message describes what the command is used for and any options you can use in conjunction with the command. In the following sections, you’ll find a quick, high-level overview of the most used commands.
install
You’ve already seen the install command above. This command can be used to install a specific version of Python. For example, if you wanted to install 3.6.8 you would use this:
The output shows us pyenv downloading and installing Python. Some of the common flags you may want to use are the following:
| Flag | Description |
|---|---|
-l/--list |
Lists all available Python versions for installation |
-g/--debug |
Builds a debug version of Python |
-v/--verbose |
Verbose mode: print compilation status to stdout |
versions
The versions command displays all currently installed Python versions:
$ pyenv versions
* system (set by /home/realpython/.pyenv/version)
  2.7.15
  3.6.8
  3.8-dev
This output shows not only that 2.7.15, 3.6.8, 3.8-dev, and your system Python are installed, but also shows you that the system Python is active. If you only care about the current active version, you can use the following command:
$ pyenv version
system (set by /home/realpython/.pyenv/version)
This command is similar to versions but only shows you the current active Python version.
which
The which command is helpful for determining the full path to a system executable. Because pyenv works by using shims, this command allows you to see the full path to the executable pyenv is running. For example, if you wanted to see where pip is installed, you could run this:
$ pyenv which pip
/home/realpython/.pyenv/versions/3.6.8/bin/pip
The output displays the full system path for pip. This can be helpful when you’ve installed command-line applications.
global
The global command sets the global Python version. This can be overridden with other commands, but is useful for ensuring you use a particular Python version by default. If you wanted to use 3.6.8 by default, then you could run this:
This command sets the ~/.pyenv/version to 3.6.8. For more information, see the section on specifying your Python version.
local
The local command is often used to set an application-specific Python version. You could use it to set the version to 2.7.15:
This command creates a .python-version file in your current directory. If you have pyenv active in your environment, this file will automatically activate this version for you.
shell
The shell command is used to set a shell-specific Python version. For example, if you wanted to test out the 3.8-dev version of Python, you can do this:
This command activates the version specified by setting the PYENV_VERSION environment variable. This command overwrites any applications or global settings you may have. If you want to deactivate the version, you can use the --unset flag.
Specifying Your Python Version
One of the more confusing parts of pyenv is how exactly the python command gets resolved and what commands can be used to modify it. As mentioned in the commands, there are 3 ways to modify which version of python you’re using. So how do all these commands interact with one another? The resolution order looks a little something like this:
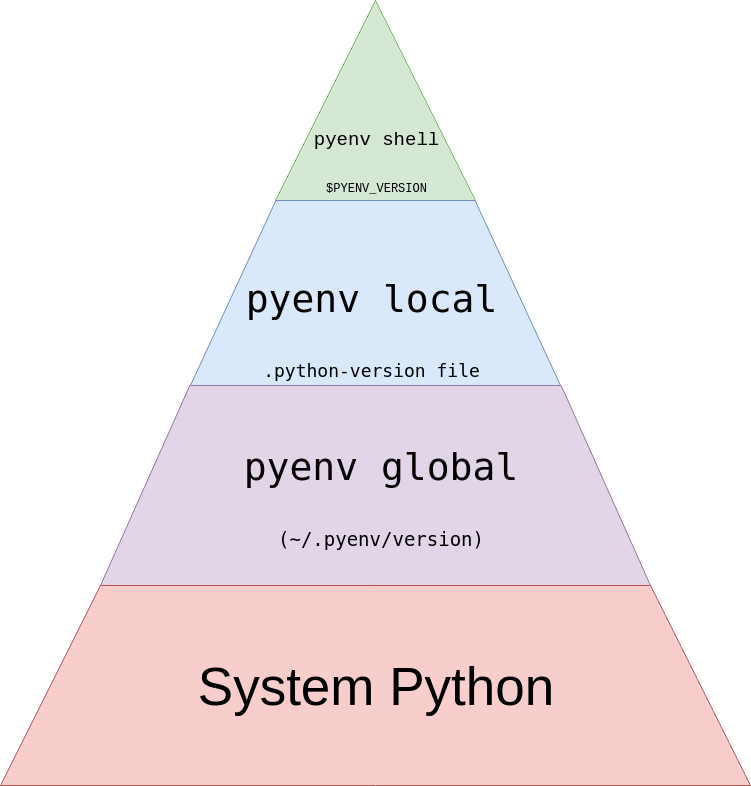
This pyramid is meant to be read from top to bottom. The first of these options that pyenv can find is the option it will use. Let’s see a quick example:
$ pyenv versions
* system (set by /home/realpython/.pyenv/version)
  2.7.15
  3.6.8
  3.8-dev
Here, your system Python is being used as denoted by the *. To exercise the next most global setting, you use global:
$ pyenv global 3.6.8
$ pyenv versions
  system
  2.7.15
* 3.6.8 (set by /home/realpython/.pyenv/version)
  3.8-dev
You can see that now pyenv wants to use 3.6.8 as our Python version. It even indicates the location of the file it found. That file does indeed exist, and you can list its contents:
$ cat ~/.pyenv/version
3.6.8
Now, let’s create a .python-version file with local:
$ pyenv local 2.7.15
$ pyenv versions
  system
* 2.7.15 (set by /home/realpython/.python-version)
  3.6.8
  3.8-dev
$ ls -a
.  ..  .python-version
$ cat .python-version
2.7.15
Here again, pyenv indicates how it would resolve our python command. This time it comes from ~/.python-version. Note that the searching for .python-version is recursive:
$ mkdir subdirectory
$ cd subdirectory
$ ls -la # Notice no .python-version file
. ..
$ pyenv versions
  system
* 2.7.15 (set by /home/realpython/.python-version)
  3.6.8
  3.8-dev
Even though there isn’t a .python-version in subdirectory, the version is still set to 2.7.15 because .python-version exists in a parent directory.
Finally, you can set the Python version with shell:
$ pyenv shell 3.8-dev
$ pyenv versions
  system
  2.7.15
  3.6.8
* 3.8-dev (set by PYENV_VERSION environment variable)
All this did is set the $PYENV_VERSION environment variable:
$ echo $PYENV_VERSION
3.8-dev
If you’re feeling overwhelmed by the options, the section on working with multiple environments goes over an opinionated process for managing these files, mostly using local.
Virtual Environments and pyenv
Virtual environments are a big part of managing Python installations and applications. If you haven’t heard of virtual environments before, you can check out Python Virtual Environments: A Primer.
Virtual environments and pyenv are a match made in heaven. pyenv has a wonderful plugin called pyenv-virtualenv that makes working with multiple Python version and multiple virtual environments a breeze. If you’re wondering what the difference is between pyenv, pyenv-virtualenv, and tools like virtualenv or venv, then don’t worry. You’re not alone.
Here’s what you need to know:
- pyenv manages multiple versions of Python itself.
- virtualenv/venv manages virtual environments for a specific Python version.
- pyenv-virtualenv manages virtual environments for across varying versions of Python.
If you’re a die-hard virtualenv or venv user, don’t worry: pyenv plays nicely with either. In fact, you can keep the same workflow you’ve had if you’d prefer, though I think pyenv-virtualenv makes for a nicer experience when you’re switching between multiple environments that require different Python versions.
The good news is that since you used the pyenv-installer script to install pyenv, you already have pyenv-virtualenv installed and ready to go.
Creating Virtual Environments
Creating a virtual environment is a single command:
$ pyenv virtualenv <python_version> <environment_name>
Technically, the <python_version> is optional, but you should consider always specifying it so that you’re certain of what Python version you’re using.
The <environment_name> is just a name for you to help keep your environments separate. A good practice is to name your environments the same name as your project. For example, if you were working on myproject and wanted to develop against Python 3.6.8, you would run this:
$ pyenv virtualenv 3.6.8 myproject
The output includes messages that show a couple of extra Python packages getting installed, namely wheel, pip, and setuptools. This is strictly for convenience and just sets up a more full featured environment for each of your virtual environments.
Activating Your Versions
Now that you’ve created your virtual environment, using it is the next step. Normally, you should activate your environments by running the following:
You’ve seen the pyenv local command before, but this time, instead of specifying a Python version, you specify an environment. This creates a .python-version file in your current working directory and because you ran eval "$(pyenv virtualenv-init -)" in your environment, the environment will automatically be activated.
You can verify this by running the following:
$ pyenv which python
/home/realpython/.pyenv/versions/myproject/bin/python
You can see a new version has been created called myproject and the python executable is pointing to that version. If you look at any executable this environment provides, you will see the same thing. Take, for example, pip:
$ pyenv which pip
/home/realpython/.pyenv/versions/myproject/bin/pip
If you did not configure eval "$(pyenv virtualenv-init -)" to run in your shell, you can manually activate/deactivate your Python versions with this:
$ pyenv activate <environment_name>
$ pyenv deactivate
The above is what pyenv-virtualenv is doing when it enters or exits a directory with a .python-version file in it.
Working With Multiple Environments
Putting everything you’ve learned together, you can work effectively with multiple environments. Let’s assume you have the following versions installed:
$ pyenv versions
* system (set by /home/realpython/.pyenv/version)
  2.7.15
  3.6.8
  3.8-dev
Now you want to work on two different, aptly named, projects:
- project1 supports Python 2.7 and 3.6.
- project2 supports Python 3.6 and experiments with 3.8-dev.
You can see that, by default, you are using the system Python, which is indicated by the * in the pyenv versions output. First, create a virtual environment for the first project:
$ cd project1/
$ pyenv which python
/usr/bin/python
$ pyenv virtualenv 3.6.8 project1
...
$ pyenv local project1
$ python -V
/home/realpython/.pyenv/versions/project1/bin/python
Finally, notice that when you cd out of the directory, you default back to the system Python:
$ cd $HOME
$ pyenv which python
/usr/bin/python
You can follow the above steps and create a virtual environment for project2:
$ cd project2/
$ pyenv which python
/usr/bin/python
$ pyenv virtualenv 3.8-dev project2
...
$ pyenv local 3.8-dev
$ pyenv which python
/home/realpython/.pyenv/versions/3.8-dev/bin/python
These are one time steps for your projects. Now, as you cd between the projects, your environments will automatically activate:
$ cd project2/
$ python -V
Python 3.8.0a0
$ cd ../project1
$ python -V
Python 3.6.8
No more remembering to activate environments: you can switch between all your projects, and pyenv will take care of automatically activating the correct Python versions and the correct virtual environments.
Activating Multiple Versions Simultaneously
As described in the example above, project2 uses experimental features in 3.8. Suppose you wanted to ensure that your code still works on Python 3.6. If you try running python3.6, you’ll get this:
$ cd project2/
$ python3.6 -V
pyenv: python3.6: command not found

The `python3.6' command exists in these Python versions:
  3.6.8
  3.6.8/envs/project1
  project1
pyenv informs you that, while Python 3.6 is not available in the current active environment, it is available in other environments. pyenv gives you a way to activate multiple environments at once using a familiar command:
$ pyenv local project2 3.6.8
This indicates to pyenv that you would like to use the virtual environment project2 as the first option. So if a command, for example python, can be resolved in both environments, it will pick project2 before 3.6.8. Let’s see what happens if you run this:
$ python3.6 -V
Python 3.6.8
Here, pyenv attempts to find the python3.6 command, and because it finds it in an environment that is active, it allows the command to execute. This is extremely useful for tools like tox that require multiple versions of Python to be available on your PATH in order to execute.
Suppose that in the above example, you’ve found a compatibility problem with your library and would like to do some local testing. The testing requires that you install all the dependencies. You should follow the steps to create a new environment:
$ pyenv virtualenv 3.6.8 project2-tmp
$ pyenv local project2-tmp
Once you’re satisfied with your local testing, you can easily switch back to your default environment:
$ pyenv local project2 3.6.8
Conclusion
You can now more easily contribute to a project that wants to support multiple environments. You can also more easily test out the latest and greatest Python versions without having to worry about messing up your development machine, all with a wonderful tool: pyenv.
You’ve seen how pyenv can help you:
- Install multiple versions of Python
- Switch between the installed versions
- Use virtual environments with
pyenv - Activate different Python versions and virtual environments automatically
If you still have questions, feel free to reach out either in the comments section or on Twitter. Additionally, the pyenv documentation is a great resource.
Bonus: Displaying Your Environment Name in Your Command Prompt
If you’re like me and constantly switching between various virtual environments and Python versions, it’s easy to get confused about which version is currently active. I use oh-my-zsh and the agnoster theme, which by default makes my prompt look like this:
At a glance, I don’t know which Python version is active. To figure it out, I would have to run python -V or pyenv version. To help reduce my time spent on figuring out my active Python environment, I add the pyenv virtual environment I’m using to my prompt:
My Python version in this case is project1-venv and is displayed immediately at the beginning of the prompt. This allows me to quickly see what version of Python I’m using right away. If you’d like to use this too, you can use my agnoster-pyenv theme.
Watch Now This tutorial has a related video course created by the Real Python team. Watch it together with the written tutorial to deepen your understanding: Start Managing Multiple Python Versions With pyenv