The Eclipse Installer 2022‑12 R now includes a JRE for macOS, Windows and Linux.
Try the Eclipse Installer 2022‑12 R
The easiest way to install and update your Eclipse Development Environment.
- 1,398,501 Installer Downloads
5 Steps to Install Eclipse
We’ve recently introduced the Eclipse Installer, a new and more efficient way
to install Eclipse. It is a proper installer (no zip files), with a
self-extracting download that leads you through the installation process. For
those who prefer not to use the Installer, the packages and zip files are still
available on our package download page.
1. Download the Eclipse Installer
Download Eclipse Installer from http://www.eclipse.org/downloads
Eclipse is hosted on many mirrors around the world. Please select
the one closest to you and start to download the Installer
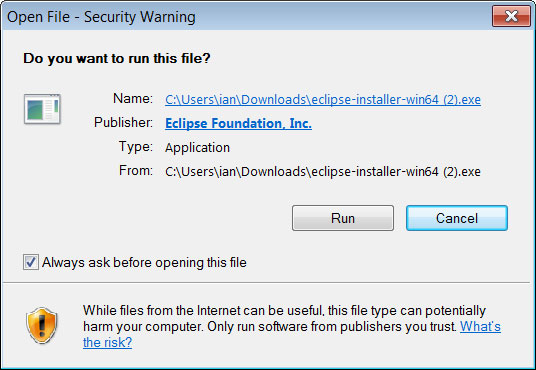
2. Start the Eclipse Installer executable
For Windows users, after the Eclipse Installer executable has finished downloading it should be
available in your download directory. Start the Eclipse Installer executable.
You may get a security warning to run this file. If the Eclipse Foundation is
the Publisher, you are good to select Run.
For Mac and Linux users, you will still need to unzip the download to create the Installer.
Start the Installer once it is available.
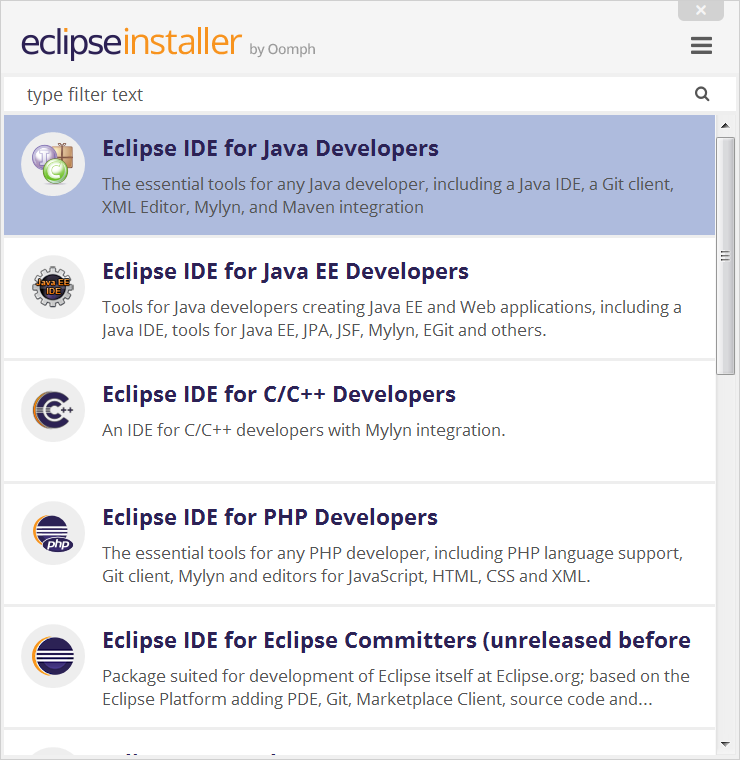
3. Select the package to install
The new Eclipse Installer shows the packages available to Eclipse users.
You can search for the package you want to install or scroll through the list.
Select and click on the package you want to install.
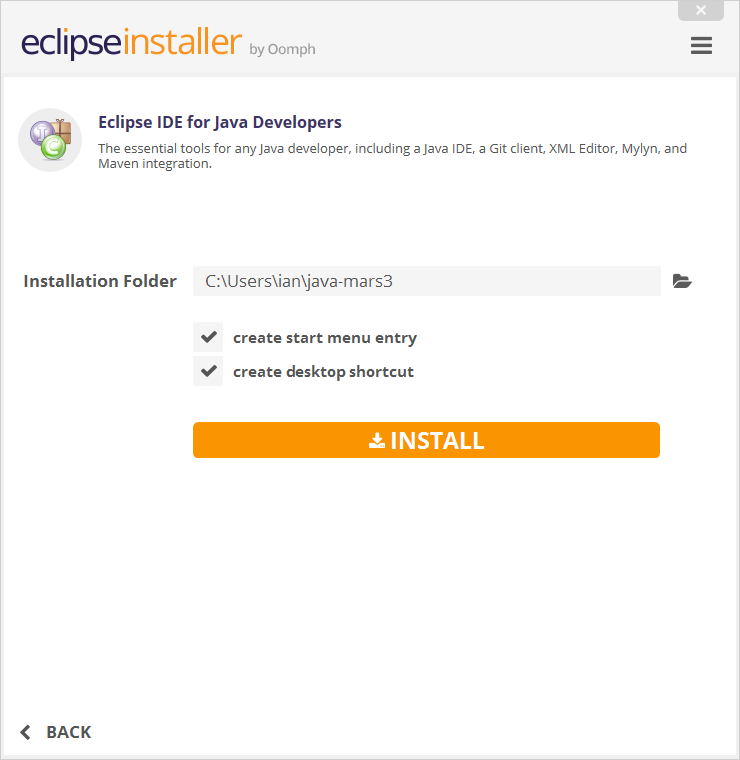
4. Select your installation folder
Specify the folder where you want Eclipse to be installed. The default folder will be in your User directory.
Select the ‘Install’ button to begin the installation.
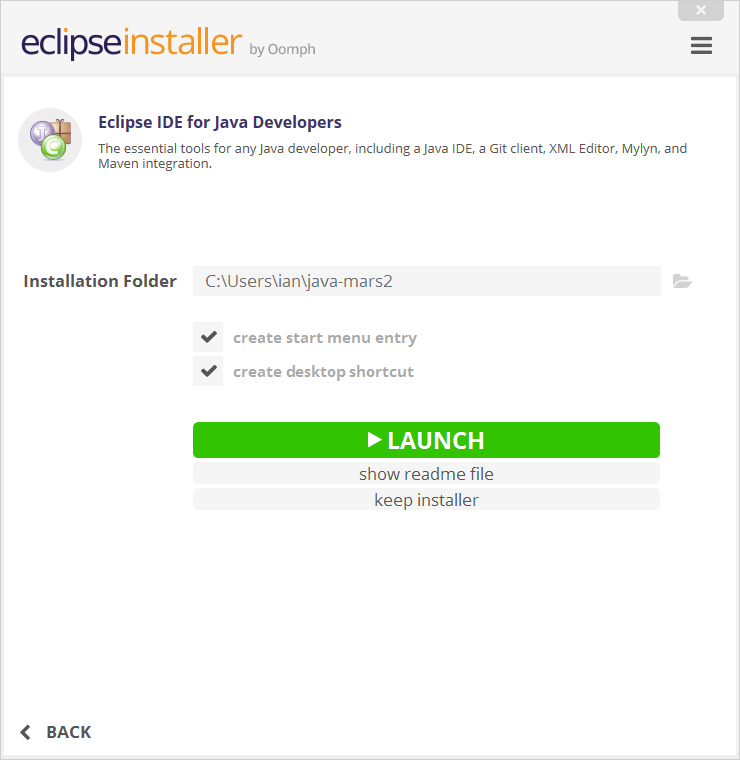
5. Launch Eclipse
Once the installation is complete you can now launch Eclipse.
The Eclipse Installer has done it’s work. Happy coding.
На чтение 5 мин. Опубликовано 28.06.2021
Eclipse — универсальная среда разработки программного обеспечения для компьютеров и мобильных устройств на множестве языков программирования. Она включает в себя богатый набор классов и библиотек, которые расширяют возможности разработки, а также встроенные инструменты для создания мобильных приложений. Чаще всего ее используют для программирования на Java.
Прежде, чем загрузить и установить Eclipse
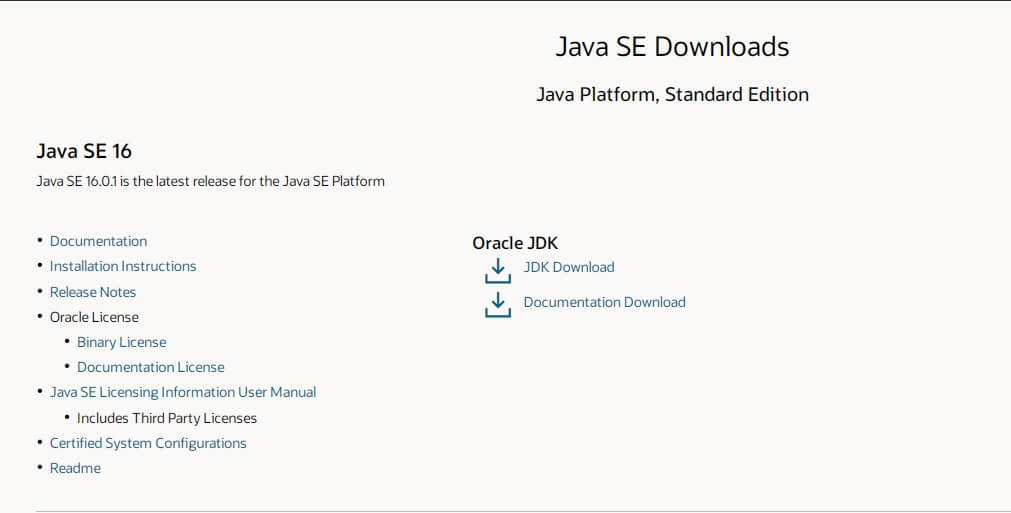
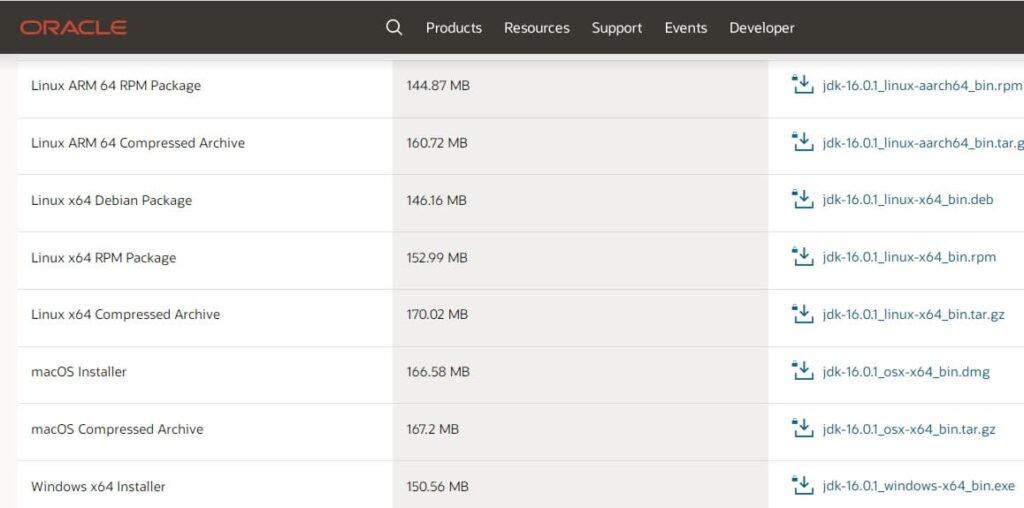
Для установки Eclipse потребуется установить JDK и JVM для разработки приложений Java в Eclipse. Для этого нужно перейти на сайт https://www.oracle.com/java/technologies/javase-downloads.html, найти нужную версию Java и выбрать Download JDK. В открывшемся окне выбрать пакет для нужной операционной системы и загрузить его.
Далее нужно установить JDK, следуя всем инструкциям установщика. После того, как первоначальная установка JDK будет завершена, всплывающее окно запросит установить адрес расположения всех Java файлов. Адрес можно задать свой или оставить по умолчанию. После того, как установка пакета завершена, можно приступать к установке Eclipse.
Загрузка и установка Eclipse
Загрузка Eclipse осуществляется в следующем порядке:
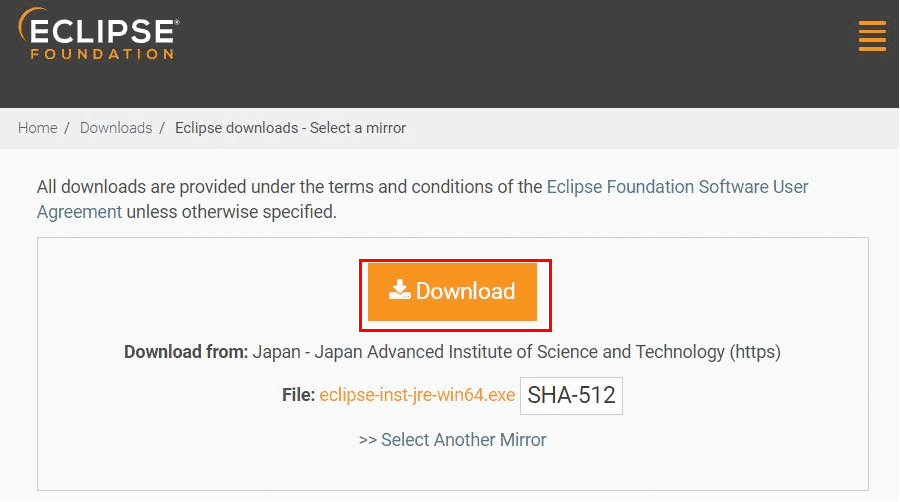
- Переходим на официальный сайт Eclipse https://www.eclipse.org/.
- Переходим в раздел Download, а затем download 2021-06.

- Нажать на оранжевую кнопку с надписью Download x86-64 b и скачать установочный файл.

Установка Eclipse осуществляется в следующем в порядке:
- Запустить скачанный установщик и нажать Run.
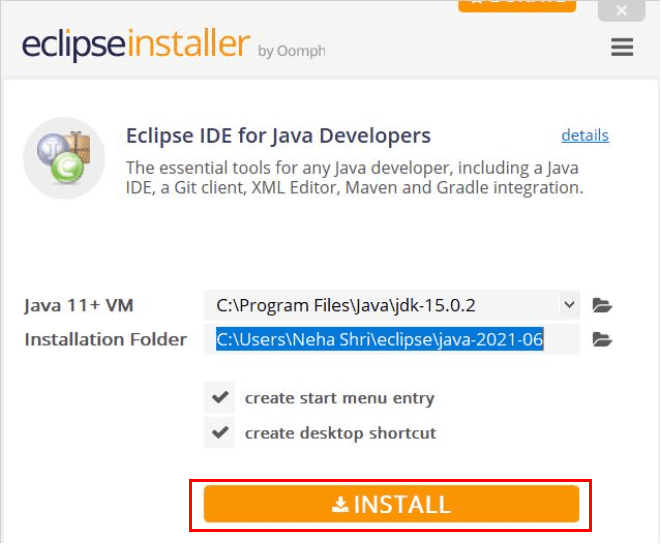
- Далее из списка нужно выбрать пакет, который более подходит под разработку на Java. В списке есть пакеты и для других языков. Здесь Eclipse IDE for Java Developers дает базовый пакет возможностей, а Eclipse IDE for Enterprise Java Developers расширенный для опытных разработчиков.

- Выбрать путь установки Eclipse, а также путь к файлам JDK и нажать Install

- Дождаться конца установки.

Настройка Eclipse
После первого запуска Eclipse, сразу откроется окно, где будет предложено указать папку для разрабатываемых проектов. Следует указать нужный путь или оставить его по умолчанию и нажать «Далее».

Затем нужно в открывшемся окне рабочей среды Eclipse нажать на File, затем выбрать New -> Project. Откроется окно выбора типа проекта. Выбираем Java Project и нажимаем Next. Откроется окно настройки проекта. Здесь нужно задать любое имя проекту. И установить версию JRE, которая будет использоваться в проекте. Ее наименование можно оставить по умолчанию. Но по желанию можно установить и ту версию, которая была загружена на компьютер.

Остальное можно оставить по умолчанию. Затем нажимаем «Далее» и в открывшемся окне пишем любое название проекта. Но эта операция не обязательная, поэтому для ее отмены можно нажать кнопку Don’t Created. В следующем окне будет вопрос: надо ли раскрывать проект? Здесь нажмите кнопку Open Perspective. После этого проект откроется в главном окне ведения разработки. Если по каким-либо причинам проект не открылся, то можно нажать «Restore» в левом верхнем углу рабочего пространства.
Изначально проект будет пустой и перед программистом откроется поле. Сбоку от поля разработки будет проводник по папкам и файлам проекта. Сздесь все файлы проекта находятся в папке src. Нужно нажать на эту папку правой кнопкой мыши и в открывшемся меню выбрать New, а затем Class. Откроется диалоговое окно для настроек нового класса.

Здесь в поле Name нужно указать имя класса и сборки (package). Остальные настройки на первых порах оставляйте по умолчанию, так как они для более опытных пользователей. Нажмите кнопку Finish. После этого в проекте появится новый класс с функцией Main. Его файл можно увидеть в папке src, где будет указано имя сборки, а в ней будет файл самого класса. Открыв этот файл в рабочем пространстве Eclipse, вы увидите непосредственно код самого класса на языке Java. Запустить программу можно кнопкой пуск вверху экрана, как изображено на картинке.

В окне вывода будет результат выполненной программы.
Все созданные классы и другие файлы в проекте будут сохранятся непосредственно в корневую папку проекта, которая была указана изначально при его создании. Создавая новые классы, вы сможете подключать их к проекту через диалоговые окна. Среда разработки Eclipse позволяет создавать множество различных проектов — консольный, с формами, а также тестировать проекты на виртуальных смартфонах.
Eclipse позволяет устанавливать расширения, которые увеличивают ее возможности. Однако стоит помнить, что ввиду наличия огромного количества ресурсных файлов, программа требовательна к ресурсам компьютера. Конечно в самой программе можно по удалять ненужные инструменты и увеличить скорость работы самой Eclipse. Однако этого не рекомендуется делать на стадии знакомства с ней.

Что дальше?
Вы можете редактировать созданный класс, создавая главный код в программе. Не обязательно нужно создавать новые классы через панель управления. Java позволяет создавать отдельные классы в главном файле программы. При этом, если все таки вы решили создавать отдельные классы через контекстное меню, то вам потребуется подключать их к проекту посредством импорта.
Расширить возможности Eclipse можно путем установки расширений, позволяющих визуализировать создаваемые программы. Так это могут быть Windows Forms или виртуальный смартфон. Сама Eclipse создана для того, чтобы упростить жизнь разработчикам. Без IDE тексты программ пишутся в текстовых файлах и компилируются в консоли. Пользователю нужно постоянно писать ненужные команды и подключать библиотеки и классы вручную.
Когда уже готовая IDE сама подключит расширения как надо, соберет проект в одно целое и выдаст готовый apk или jar файл, который готов к установке и использованию на устройстве. Кроме того, Eclipse снабжен отличной системой отладки программ и пошаговым выполнением команд, что позволяет отслеживать порядок выполнения программного кода.
![]()
Загрузить PDF
![]()
Загрузить PDF
Компьютерное программирование с использованием Java, возможно, самый важный аспект вычислений. Многие из популярных современных приложений и программ используют Java как главный исходный код, начиная от компьютерных игр до мобильных телефонов. Eclipse является лишь одним из многочисленных приложений редактирования скриптов для разработки Java- программ и позволяет студентам писать и компилировать Java-код и выполнять программы.
Шаги
-

1
-
2
Как только вы выбрали загрузку, примите условия обслуживания и выберите правильный ОС ,соответствующую для конкретного JDK. (Windows, Mac, Linux и т.д.).
-
3
После завершения загрузки дважды щелкните файл, чтобы начать установку JDK.
-
4
После завершения первоначальной установки всплывающее окно вас спросит, где будет находиться источник ваших Java файлов. Вы можете изменять место, где сохранять папку, но лучше придерживаться того, что вы получили в первую очередь.
-
5
-
6
Для пользователей ОС Windows: вы должны знать, какой тип версии вашей ОС у вас есть. Если ваш компьютер — 64 битная ОС Windows, выберите Windows 64, и если у вас — 32-битная Windows, выберите Windows 32 bit.
-
7
Как только вы загрузите архив Eclipse, вам необходимо распаковать архивный файл . zip, который создаст распакованную папку Eclipse. Вы можете извлечь архив в корневой каталог C:диск, тем самым создавая папку «C:eclipse «, или только переместив извлеченную папку Eclipse в корневой каталог C:диск, если вы извлекли ее уже. Так как Eclipse не имеет инсталлятора, там будет файл в папке Eclipse под названием eclipse.exe (). Вы можете дважды нажать по файлу, чтобы запустить Eclipse.
-
8
После того, как Eclipse будет полностью установлена и распакована, создайте рабочую папку, куда вы будете включать все созданные программные файлы.
-
9
Теперь, когда вы закончили установку Eclipse, перезагрузите компьютер. Перезагрузка компьютера «освежает» системную память и позволяет изменениям регистрации или конфигурации, выполненные инсталляторами и деинсталляторами, вступать в силу.
-
10
Оттуда создайте тестовую программу для проверки функциональности Eclipse.
Реклама


Об этой статье
Эту страницу просматривали 46 224 раза.
Была ли эта статья полезной?
Eclipse is a free open source platform, Integrated Development Environment (IDE) with the help of which applications are made using the Java programming languages and other programming languages are also used such as C/C++, PERL, Python, Ruby, etc.
It is composed of many plug-ins and is designed to be extensible using additional plug-ins. Eclipse IDE can be used for any programming language for which a plug-in is available.
Following are some plug-ins used in Eclipse IDE :
- The Java Development Tools (JDT) is a plugin that allows Eclipse to be used as a Java IDE.
- PyDev is a plugin that allows Eclipse to be used as a Python IDE.
- C/C++ Development Tools (CDT) is a plug-in that allows Eclipse to be used as C/C++ development.
- The Scala is a plug-in that allows Eclipse to be used as an IDE to develop Scala applications.
- PHPeclipse is a plug-in that allows Eclipse to be used as an IDE to develop PHP applications.
Installation of Eclipse IDE on Windows:
Follow the below steps to install Eclipse IDE on Windows:
Step 1: In the first step, Open your browser and navigate to this URL.

Step 2: Then, click on the “Download” button to download Eclipse IDE.

Step 3: Now, click on the “Download x86_64” button.

Step 4: Then click on the “Download” button. After clicking on the download button the .exe file for the eclipse will be downloaded.
Step 5: Now go to File Explorer and click on “Downloads” after that click on the “eclipse-inst-jre-win64.exe” file to install Eclipse IDE.

Step 6: Then, click on “Eclipse IDE for Java Developers”.

Step 7: Then, click on the “Install” button.
Step 8: Now click on “Create a new Java project”.

Now, you are ready to make new Java projects using eclipse IDE and the screen will look like this :

Eclipse is a free open source platform, Integrated Development Environment (IDE) with the help of which applications are made using the Java programming languages and other programming languages are also used such as C/C++, PERL, Python, Ruby, etc.
It is composed of many plug-ins and is designed to be extensible using additional plug-ins. Eclipse IDE can be used for any programming language for which a plug-in is available.
Following are some plug-ins used in Eclipse IDE :
- The Java Development Tools (JDT) is a plugin that allows Eclipse to be used as a Java IDE.
- PyDev is a plugin that allows Eclipse to be used as a Python IDE.
- C/C++ Development Tools (CDT) is a plug-in that allows Eclipse to be used as C/C++ development.
- The Scala is a plug-in that allows Eclipse to be used as an IDE to develop Scala applications.
- PHPeclipse is a plug-in that allows Eclipse to be used as an IDE to develop PHP applications.
Installation of Eclipse IDE on Windows:
Follow the below steps to install Eclipse IDE on Windows:
Step 1: In the first step, Open your browser and navigate to this URL.
Step 2: Then, click on the “Download” button to download Eclipse IDE.
Step 3: Now, click on the “Download x86_64” button.
Step 4: Then click on the “Download” button. After clicking on the download button the .exe file for the eclipse will be downloaded.
Step 5: Now go to File Explorer and click on “Downloads” after that click on the “eclipse-inst-jre-win64.exe” file to install Eclipse IDE.
Step 6: Then, click on “Eclipse IDE for Java Developers”.
Step 7: Then, click on the “Install” button.
Step 8: Now click on “Create a new Java project”.
Now, you are ready to make new Java projects using eclipse IDE and the screen will look like this :
На чтение 2 мин Просмотров 488 Опубликовано 12.10.2021
Там было много программного обеспечения, такого как IntelliJ IDEA, Eclipse и т. д., Из которых большинство разработчиков склоняются к использованию Eclipse — это программное обеспечение с открытым исходным кодом. Он в основном используется для разработки приложений JAVA. Мы также можем использовать его для разработки приложений на различных языках программирования, таких как C, C ++, C #, Python, JavaScript и т.д.
Шаги по установке Eclipse IDE
- Загрузите и установите JDK (это предварительный важный шаг).
- Перейдите на веб-сайт eclipse и загрузите, выбрав версию вкачестве операционной системы и требований к битам.
- Откройте загруженное расширение файла и следуйте стандартному процессу установки программного обеспечения.
- Выберите пакет в соответствии с языковыми потребностями разработчика.
- Новое окно будет перезапущено, а если не перезапустить eclipse.
- Перейдите в новый проект и создайте классы, внутри которых можно использовать java-приложения (или программы).
Примечание: обязательно обратитесь к настройке eclipse, поскольку это очень важно, что позже очень поможет, когда разработка достигнет тонкого уровня. Сделайте этот первый шаг осторожно, поскольку он устраняет беспорядок, который позже вступает в игру.
Давайте обсудим вышеупомянутые шаги, как описано выше, с наглядными пособиями, чтобы упростить загрузку и настройку позже. Итак, чтобы установить IDE, необходимо выполнить следующие шаги:
1: Чтобы запустить Eclipse на рабочем месте, сначала необходимо загрузить и установить JDK (Java Development Kit). Откройте браузер по умолчанию, выполните поиск по запросу «Загрузка JDK» и щелкните ссылку oracle.com. Oracle предоставляет вам последнюю версию JDK. Вы можете скачать отсюда в соответствии с вашей необходимой конфигурацией.

После установки JDK в вашем рабочем пространстве мы можем установить Eclipse IDE.
2: Щелкните ссылку https://www.eclipse.org/downloads и выберите совместимую версию IDE в зависимости от вашей 32-разрядной или 64-разрядной версии Windows.

3: После загрузки откройте загруженный файл и выберите RUN во всплывающем окне, открывшемся на вашем экране.
4: Теперь нам нужно выбрать пакет для «Разработчики Java». И укажите путь к каталогу для IDE для дальнейшего процесса.

Приняв Соглашение, вы можете завершить установку. Для завершения установки потребуется некоторое время. Вы также можете создать ярлык на главном экране.

5: Теперь вы готовы к «Программированию на Java» в Eclipse.
Как установить Eclipse на компьютер? Необходимо сделать 3 шага:
Шаг №1: Перейдите по ссылке http://www.eclipse.org/downloads/packages/eclipse-ide-java-ee-developers/keplerr
Шаг №2: Скачайте Eclipse, соответствующий Вашей операционной системе. Где находятся ссылки для скачивания мы показали Вам на картинке ниже — см. в красной рамочке.

Шаг №3: Затем необходимо распаковать скаченный .zip архив в директорию C:Program Files
Всё — Eclipse установлен на Вашем компьютере. Поздравляем!
Как запустить Eclipse у Вас на компьютере? Делается это тоже в 3 шага:
Шаг №1: Зайдите на своём компьютере в C:Program Fileseclipse и откройте файл eclipse.exe
Шаг №2: При запуске eclipse.exe откроется вот такое окно (см. картинку ниже). Необходимо в workspace указать где будут храниться программные файлы проекта. Указываем удобную для нас директорию, например, C:myWorkspace, как мы показали на картинке и далее нажимаем OK.

Шаг №3: Необходимо закрыть приветственное сообщение — см. картинку ниже. Как только Вы закроете это сообщение, Вы перейдете в рабочую среду Eclipse. А как с ней работать мы рассмотрим ниже.

Основы работы с Eclipse
СТАТЬЯ ОБНОВЛЯЕТСЯ…
Содержание
- Eclipse Installer 2022-09 R
- Try the Eclipse Installer 2022‑09 R
- 5 Steps to Install Eclipse
- 1. Download the Eclipse Installer
- 2. Start the Eclipse Installer executable
- 3. Select the package to install
- 4. Select your installation folder
- 5. Launch Eclipse
- 5 Steps to Install Eclipse
- 1. Download the Eclipse Installer
- 2. Start the Eclipse Installer executable
- 3. Select the package to install
- 4. Select your installation folder
- 5. Launch Eclipse
- Eclipse/Installation
- Contents
- Install a JVM
- Eclipse 4.23 (2022-03)
- Eclipse 4.22 (2021-12)
- Eclipse 4.21 (2021-09)
- Eclipse 4.20 (2021-06)
- Eclipse 4.19 (2021-03)
- Eclipse 4.18 (2020-12)
- Eclipse 4.17 (2020-09)
- Eclipse 4.16 (2020-06)
- Eclipse 4.15 (2020-03)
- Eclipse 4.14 (2019-12)
- Eclipse 4.13 (2019-09)
- Eclipse 4.12 (2019-06)
- Eclipse 4.11 (2019-03)
- Eclipse 4.10 (2018-12)
- Eclipse 4.9 (2018-09)
- Eclipse 4.8 (Photon)
- Eclipse 4.7 (Oxygen)
- Eclipse 4.6 (Neon)
- Eclipse 4.5 (Mars)
- Eclipse 4.4 (Luna)
- Eclipse 4.3 (Kepler)
- JRE/JDK Sources
- Download Eclipse
- Configure Eclipse to use the JVM
- Extending Eclipse
- Troubleshooting
Eclipse Installer 2022-09 R
The Eclipse Installer 2022‑09 R now includes a JRE for macOS, Windows and Linux.
Try the Eclipse Installer 2022‑09 R
The easiest way to install and update your Eclipse Development Environment.
Download
5 Steps to Install Eclipse
We’ve recently introduced the Eclipse Installer, a new and more efficient way to install Eclipse. It is a proper installer (no zip files), with a self-extracting download that leads you through the installation process. For those who prefer not to use the Installer, the packages and zip files are still available on our package download page.
1. Download the Eclipse Installer
Eclipse is hosted on many mirrors around the world. Please select the one closest to you and start to download the Installer
2. Start the Eclipse Installer executable
For Windows users, after the Eclipse Installer executable has finished downloading it should be available in your download directory. Start the Eclipse Installer executable. You may get a security warning to run this file. If the Eclipse Foundation is the Publisher, you are good to select Run.
For Mac and Linux users, you will still need to unzip the download to create the Installer. Start the Installer once it is available.
3. Select the package to install
The new Eclipse Installer shows the packages available to Eclipse users. You can search for the package you want to install or scroll through the list.
Select and click on the package you want to install.
4. Select your installation folder
Specify the folder where you want Eclipse to be installed. The default folder will be in your User directory.
Select the ‘Install’ button to begin the installation.
5. Launch Eclipse
Once the installation is complete you can now launch Eclipse. The Eclipse Installer has done it’s work. Happy coding.
Источник
Eclipse/Installation
Installing Eclipse is relatively easy, but does involve a few steps and software from at least two different sources. Eclipse is a Java-based application and, as such, requires a Java Runtime Environment or Java Development Kit (JRE or JDK) in order to run.
Note that on recent versions of Mac, a full JDK needs to be installed, not just a JRE; see instructions below.
Contents
Install a JVM

If you are using Eclipse to do Java development, or are on macOS, install a JDK. In all cases, Eclipse requires a 64-bit JVM
A Java Development Kit (JDK) includes many useful extras for Java developers including the source code for the standard Java libraries.
Regardless of your operating system, you will need to install some Java virtual machine (JVM). You may either install a Java Runtime Environment (JRE), or a Java Development Kit (JDK), depending on what you want to do with Eclipse. If you intend to use Eclipse for Java development, then you should install a JDK. If you aren’t planning to use Eclipse for Java development and want to save some disk space, install a JRE.
- If you’re using Windows, you may already have a JRE installed, but upgrading usually won’t hurt.
- If you’re using Mac, and you don’t have a JDK installed, you may get a bogus message from the OS stating that you should «install the legacy Java SE 6 runtime». Installing that will not solve the problem, because recent versions of Eclipse require a higher version. If you install just a JRE, and not a full JDK, that error message will persist. You must install a full JDK.
- If using Linux, read this
- GCJ (if you’re somehow still using it) will NOT work.
Eclipse 4.23 (2022-03)
Eclipse 4.23 (2022-03) was released on March 16, 2022. It is the supported release.
A Java 11 or newer JRE/JDK is required, LTS release are preferred to run all Eclipse 2022-03 packages based on Eclipse 4.23, with certain packages choosing to provide one by default. The Installer now also includes a JRE—consider using the Installer. Please see 5 Steps to Install Eclipse.
Eclipse 4.22 (2021-12)
Eclipse 4.22 (2021-12) was released on December 8, 2021.
A Java 11 or newer JRE/JDK is required, LTS release are preferred to run all Eclipse 2021-12 packages based on Eclipse 4.22, with certain packages choosing to provide one by default.
Eclipse 4.21 (2021-09)
Eclipse 4.21 (2021-09) was released on September 15, 2021.
A Java 11 or newer JRE/JDK is required, LTS release are preferred to run all Eclipse 2021-09 packages based on Eclipse 4.21, with certain packages choosing to provide one by default.
Eclipse 4.20 (2021-06)
Eclipse 4.20 (2021-06) was released on June 16, 2021.
A Java 11 or newer JRE/JDK is required, LTS release are preferred to run all Eclipse 2021-06 packages based on Eclipse 4.20, with certain packages choosing to provide one by default.
Eclipse 4.19 (2021-03)
Eclipse 4.19 (2021-03) was released on March 17, 2021.
A Java 11 or newer JRE/JDK is required, LTS release are preferred to run all Eclipse 2021-03 packages based on Eclipse 4.19, with certain packages choosing to provide one by default.
Eclipse 4.18 (2020-12)
Eclipse 4.18 (2020-12) was released on December 16, 2020.
A Java 11 or newer JRE/JDK is required, LTS release are preferred to run all Eclipse 2020-12 packages based on Eclipse 4.18, with certain packages choosing to provide one by default.
Eclipse 4.17 (2020-09)
Eclipse 4.17 (2020-09) was released on September 16, 2020.
A Java 11 or newer JRE/JDK is required, LTS release are preferred to run all Eclipse 2020-09 packages based on Eclipse 4.17, as well as the Installer.
Eclipse 4.16 (2020-06)
Eclipse 4.16 (2020-06) was released on June 17, 2020.
A Java 8 or newer JRE/JDK is required, LTS release are preferred to run all Eclipse 2020-06 packages based on Eclipse 4.16, as well as the Installer.
Eclipse 4.15 (2020-03)
Eclipse 4.15 (2020-03) was released on March 18, 2020.
A Java 8 or newer JRE/JDK is required, LTS release are preferred to run all Eclipse 2020-03 packages based on Eclipse 4.15, as well as the Installer.
Eclipse 4.14 (2019-12)
Eclipse 4.14 (2019-12) was released on December 18, 2019. See Eclipse 2019-12 schedule.
A Java 8 or newer JRE/JDK is required to run all Eclipse 2019-09 packages based on Eclipse 4.14, as well as the Installer.
Eclipse 4.13 (2019-09)
Eclipse 4.13 (2019-09) was released on September 18, 2019. See Eclipse 2019-09 schedule.
Consider using the Installer. Please see 5 Steps to Install Eclipse.
A Java 8 or newer JRE/JDK is required to run all Eclipse 2019-09 packages based on Eclipse 4.13, as well as the Installer.
Eclipse 4.12 (2019-06)
Eclipse 4.12 (2019-06) was released on June 19, 2019. See Eclipse 2019-06 schedule.
Consider using the Installer. Please see 5 Steps to Install Eclipse.
A Java 8 or newer JRE/JDK is required to run all Eclipse 2019-03 packages based on Eclipse 4.12, as well as the Installer.
Eclipse 4.11 (2019-03)
Eclipse 4.11 (2019-03) was released on March 20, 2019. See Eclipse 2019-03 schedule.
Consider using the Installer. Please see 5 Steps to Install Eclipse.
A Java 8 or newer JRE/JDK is required to run all Eclipse 2019-03 packages based on Eclipse 4.11, as well as the Installer.
Eclipse 4.10 (2018-12)
Eclipse 4.10 (2018-12) was released on December 20, 2018. It is the supported release. See Eclipse 2018-12 schedule.
Consider using the Installer. Please see 5 Steps to Install Eclipse.
A Java 8 or newer JRE/JDK is required to run all Eclipse 2018-12 packages based on Eclipse 4.10, including running the Installer. The reasoning behind requiring Java 8 are discussed here.
Eclipse 4.9 (2018-09)
Eclipse 4.9 (2018-09) was released on September 19, 2018. See Eclipse 2018-09 schedule.
A Java 8 or newer JRE/JDK is required to run all Eclipse 2018-09 packages based on Eclipse 4.9, including running the Installer. The reasoning behind requiring Java 8 are discussed here.
Eclipse 4.8 (Photon)
Eclipse 4.8 (Photon) was released on June 27, 2018. See Photon schedule.
A Java 8 or newer JRE/JDK is required to run all Oxygen packages based on Eclipse 4.7, including running the Installer. The reasoning behind requiring Java 8 are discussed here.
Eclipse 4.7 (Oxygen)
Eclipse 4.7 (Oxygen) was released on June 28, 2017. See Oxygen schedule.
A Java 8 or newer JRE/JDK is required to run all Oxygen packages based on Eclipse 4.7, including running the Installer. The reasoning behind requiring Java 8 are discussed here.
Eclipse 4.6 (Neon)
Eclipse 4.6 (Neon) was released on June 22, 2016. See Neon schedule.
A Java 8 JRE/JDK is required to run all Neon packages based on Eclipse 4.6, including the Installer. The reasoning behind requiring Java 8 are discussed here.
Eclipse 4.5 (Mars)
Eclipse 4.5 (Mars) was released on June 24, 2015.
A Java 7 JRE/JDK is required for all Mars package downloads based on Eclipse 4.5, including the Installer. Information concerning tested configurations for Eclipse 4.5 is provided here.
Eclipse 4.4 (Luna)
Eclipse 4.4 (Luna) was released on June 25, 2014.
A Java 7 JRE/JDK is required for most of the Luna package downloads based on Eclipse 4.4. Information concerning tested configurations for Eclipse 4.4 is provided here.
Eclipse 4.3 (Kepler)
Eclipse 4.3 (Kepler) was released in June 2013.
A Java 6 JRE/JDK is recommended for Eclipse 4.3. More information concerning tested configurations for Eclipse 4.3 is provided here.
JRE/JDK Sources
There are several sources for a JRE/JDK. Here are some of the more common/popular ones (listed alphabetically):
Download Eclipse
Download Eclipse from the Eclipse Downloads Page.
There are several package choices. Note that you can install the features from any package into any other package. If you are, for example, planning to do mostly Java development and some C/C++ development, you should download the Eclipse IDE for Java Developers and then add the C/C++ development tools via the «Help > Install New Software. » menu option.
The download will be delivered as a compressed (i.e. a «.zip», or «.tar.gz») file. Decompress this file into the directory of your choice (e.g. «c:eclipse» on Windows) and ensure you have full Read and Execute permissions. You can optionally create a shortcut of the executable file («eclipse.exe» on Windows, or «eclipse» on Linux).
Note that there is a known problem with the built-in decompression utility on all current versions of Windows. We recommend that you use a more robust decompression utility such as the open source 7zip when decompressing an Eclipse download. Some people report success when initially decompressing Eclipse into a root directory (e.g. c:) and then moving it to a more appropriate home (e.g. c:Program FilesEclipse)
Configure Eclipse to use the JVM
It is strongly recommended to configure Eclipse with the specific JVM that you want. See the instructions at Eclipse.ini This is a very important step to be sure that Eclipse is using the JVM you intend and can’t be influenced by any other software that might alter your system. The JVM used to launch Eclipse has no affect on whether it can compile Java sources for other Java language versions.
Extending Eclipse
Use the Help > Install new software. menu option to add Kepler features to your Eclipse installation (you can, for example, use this option to add C/C++ development support). Additionally, you can tap into a vast collection of extensions provided by the Eclipse community and ecosystem via the Eclipse Marketplace Client (Help > Eclipse Marketplace). Note that not all Eclipse packages contain the Eclipse Marketplace Client.
Troubleshooting
Java was started but returned exit code = 13
If you’ve «installed» Eclipse but are having trouble getting it to run, the most likely cause is that you have not correctly specified the JVM for it to run under. You may need to edit the eclipse.ini file.
Another common mistake on Microsoft Windows is a mismatch between the «bittedness» of Eclipse and the JVM/JDK. This is the most frequent cause of an Error 13. 64-bit Eclipse requires a 64-bit JVM, and 32-bit Eclipse requires 32-bit JVM—you can not mix-and-match between 32-bit and 64-bit, so make sure the version of Eclipse you installed matches the JVM/JDK that you’re using to run it (and make sure you’re using eclipse.ini to specify the exact JVM used to run Eclipse, described above).
As a simple test, open a Command Prompt window, move to the directory that is pointed to by the -vm argument in your eclipse.ini, and run the intended java.exe with the -d32 switch to test if it supports 32-bit, or -d64 to test for 64-bit support. It’s often simplest to download a version of Eclipse that will work with whatever Java you already have installed.
To open «Eclipse» you need to install the legacy Java SE 6 runtime
On more recent versions of the Mac, if you don’t have a full JDK of an appropriately high version installed, the OS produces this bogus message. Installing any JRE will not eliminate this problem. A full JDK needs to be installed on the Mac.
Extraction requires a password or otherwise fails on Windows.
Источник