This tutorial provides all the steps required to install Eclipse for developing Python applications on Windows. It explains how to install Eclipse with PyDev to develop Python applications on Windows 10. The same setup can also be used to develop web-based applications using Django. All the steps should be similar for other versions of Windows.
PyDev is a plugin that enables Eclipse for Python development. It adds the features to Eclipse for Python language which includes Code Completion, Code Analysis, Debugger, Interactive Console, Refactoring, Tokens Browser, Django Integration, etc. The main advantage of installing PyDev plugin is that it can be installed on the pre-installed Eclipse that is already available on the system. We can also do a fresh install of Eclipse as shown in this tutorial.
It assumes that Java is already installed on the system. You may also be interested in How To Install Java 14 On Windows, How To Install OpenJDK 14 On Windows and How To Install Java 11 On Windows. It also assumes that Python is already installed on the system. You may also be interested in How To Install Python 3.8 On Windows and How To Install Python On Windows.
You might also be interested in Python Cheatsheet to learn or brush up the basics of Python.
Step 1 — Download Eclipse
Open the Eclipse packages Download Page and scroll down to Eclipse IDE for Web and JavaScript Developers as highlighted in Fig 1.

Fig 1
Click on the Windows 64-bit link as highlighted in Fig 1. It will navigate to the download page as shown in Fig 2.

Fig 2
Click on the Download Button to start the download.
Step 2 — Install Eclipse
We can simply extract the zip file downloaded in the previous step to complete the installation. The files that ships with the zip are as shown in Fig 3.

Fig 3
You can also create a desktop shortcut icon to launch the Eclipse from the desktop. Launch the Eclipse by double-clicking on either the executable file or desktop shortcut added by you. It will show the option to configure the current workspace as shown in Fig 4.

Fig 4
Keep the checkbox unchecked as highlighted in Fig 4. It will show the workspace selection every time we launch the Eclipse IDE to choose the current workspace. After providing an appropriate workspace location, click on the Launch Button to start Eclipse. It will show the Welcome Screen as shown in Fig 5.

Fig 5
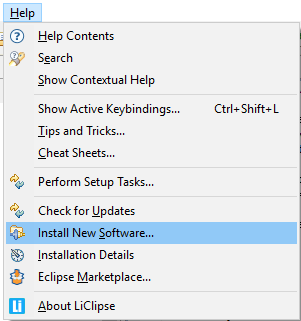
Step 3 — Install PyDev Plugin
Click on Help -> Eclipse Marketplace to open the Eclipse Marketplace wizard. Search for PyDev on the marketplace. It will show the search results as shown in Fig 6.

Fig 6
Click the Install Button to start installing the PyDev plugin for Eclipse. It will fetch the details of the plugin from the marketplace and shows the available options as shown in Fig 7.

Fig 7
Click the Confirm Button to confirm the plugin installation. On the next window, it will ask to accept the License Agreement as shown in Fig 8.

Fig 8
Click the Finish Button to complete the installation of the PyDev plugin for Eclipse. In the end, it will also ask to restart the IDE.
Step 4 — Getting Started with Python — Hello World
In this step, we will create our first Python Project using eclipse and create the first program to print Hello World on the console.
Click on Windows -> Perspective -> Open Perspective -> Other to open the PyDev perspective for Python development as shown in Fig 9.

Fig 9
Choose the PyDev perspective and click the Open Button to open the perspective. With the PyDev perspective open, we will create the first Python project. Click on File -> New -> PyDev Project as shown in Fig 10 to start creating the project.

Fig 10
The next wizard shows the options to configure the Project as shown in Fig 11.

Fig 11
We can see that the project configuration wizard shows a link to configure the Python interpreter. Now click the highlighted link to start configuring the interpreter. It will show the available options as shown in Fig 12.

Fig 12
Click the Choose From List Button. It will show the available interpreters as shown in Fig 13.

Fig 13
Choose the main interpreter as highlighted in Fig 13 and click the Ok Button. It will also ask to configure the python path as shown in Fig 14.

Fig 14
Keep the paths selected on click on the OK Button. It will configure the interpreter and shows the Default interpreter selected for the project as shown in 15. It will also ask for system permission to allow Eclipse to make required changes as shown in Fig 15.

Fig 15
Notes: We only need to configure the interpreter for the first project. It will show the list of available interpreters from the second project onwards and we can update the interpreter configuration if required.
Click the Finish Button to complete the project configuration and create the project. It will add the project on the projects list as shown in Fig 16.

Fig 16
Now right-click on Src and click New -> PyDev Package as shown in Fig 17.

Fig 17
Provide an appropriate package name and click the OK Button to create the package. It will ask to confirm PyDev preferences as shown in Fig 18.

Fig 18
Click the Ok Button to confirm the preferences. We can change them later if required. It will create the Regular Package and also creates the corresponding __init__.py as shown in Fig 19.

Fig 19
Now we will create our first Python Module to print Hello World on the console. Keep the package selected and right-click -> New -> PyDev Module to start creating the Module as shown in Fig 20.

Fig 20
It will show the wizard to configure the Module name. Now provide the appropriate Module name and click the Finish Button to create the module. It will also ask to choose the module template as shown in Fig 21.

Fig 21
I have selected the Empty Template for this tutorial to keep it simple. Click the OK Button to configure the module template.
Now update the module to print Hello World as shown in Fig 22.

Fig 22
Finally, we will execute the module to print the output on the console. Click on Run -> Run As -> Python Run to execute the program as shown in Fig 23.

Fig 23
It will execute the program and shows the output on the console as shown in Fig 24.

Fig 24
Summary
This tutorial provided all the steps to download, install and configure Eclipse with PyDev on Windows 10. We have also created the first project, the first module, and the first package to print Hello Python on the console. This is all about beginning Python programming using Eclipse with PyDev. You may join the discussion on installing Eclipse with PyDev on Windows using the comment box.
Note for users with LiClipse
PyDev already comes preinstalled in LiClipse, so, this step can be skipped
(note that if LiClipse is
used, PyDev cannot be installed or update separately, as it must always be
updated as a whole).
Requisites
PyDev requires Java 11 and Eclipse 4.6 (Neon) in order to run and only supports Python 2.6 onwards. I.e.:
- Python (2.6 or newer)
- Jython (2.6 or newer)
- IronPython (2.6 or newer) — excluding 2.7.6 and 2.7.7, which have a bug which makes them unusable in PyDev.
If you don’t have Java 11, the update process may appear to succeed, but PyDev
will simply not show in the target installation. Please double-check if you’re using a Java 11 vm in about > installation
details > configuration before trying to install PyDev.
Need to use older Eclipse/Java/Python
If you need to use an older version of Eclipse/Java/Python, below is the latest PyDev version to be used based on your requisites.
- Eclipse 4.18, Java 8: PyDev 8.2.0
- Eclipse 4.5, Java 8: PyDev 5.2.0
- Eclipse 3.8, Java 7: PyDev 4.5.5
- Eclipse 3.x, Java 6: PyDev 2.8.2
- Python 2.5 or older: PyDev 5.5.0
Note: Java 16 (which broke backward compatibility) is only supported in PyDev 9.0.0.
Note: Eclipse 4.19 has a critical issue which prevents PyDev from working properly.
Before starting the install
The first thing to choose before the install is a folder where you have
permissions to write (otherwise, remember to install Eclipse running as an Administrator and remember to
run as an Administrator whenever any plugin needs to be updated).
PyDev Certificate
From version 5.9.0 onwards, PyDev is built with a certificate in the name of «Brainwy Software Ltda»
(previously it used a self-signed certificate).
Installing with the update site
Note: Instructions are targeted at Eclipse 4.6 onwards
To install PyDev and PyDev Extensions using the Eclipse Update Manager,
you need to use the Help > Install New Software… menu.
In the next screen, add the update site(s) you want to work with from the list below:
Latest version:
- http://www.pydev.org/updates
Nightly builds:
- http://www.pydev.org/nightly
Browse other versions (open in browser to select URL for Eclipse):
- http://www.pydev.org/update_sites
and press <Enter> so that Eclipse will query the update site you just entered
for contents.
Before proceeding, it’s recommended that you UNCHECK the
‘Contact all update sites during install to find required software’
(it will still work if you don’t do that, but it’ll query all the update
sites available, which is much slower than querying only the PyDev update
site, which should be all that’s needed to install PyDev).
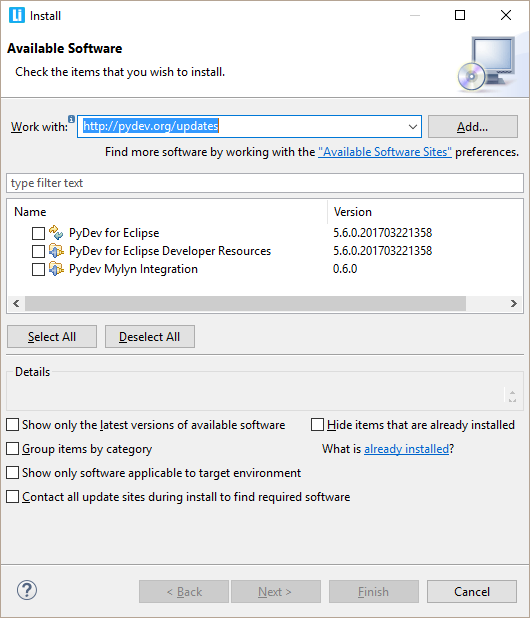
Now, select PyDev for Eclipse to install PyDev (and optionally the
PyDev Mylyn integration or the developer resources, which provide the
PyDev source code) and click Next.
Now, read the license agreement and if you accept, select the
accept radio button and click Finish.
At that point, Eclipse should automatically download the plugin
contents and present you to a dialog asking
if you want to restart (to which you should say yes).
Installing with the zip file
The available locations for the zip files are:
- SourceForge
download
After downloading the zip file:
Extract the contents of the zip file in the eclipse/dropins folder
and restart Eclipse.
If it doesn’t work, try restarting Eclipse with the -clean flag (if
you’re a regular user and installing with admin, make sure you call
-clean logged in as admin, so that Eclipse finds out about it).
If it’s still not found, double check the requisites (such as the Java
vm version).
Checking the installation
You can verify if it is correctly installed going to the menu ‘window
> preferences’ and checking if there is a PyDev item under that.
Troubleshooting installation problems
Unable to load repository
While most times things work as explained, some users may have messages such as:
Unable to load the repository http://pydev.org/updates
Unknown Host: http://pydev.org/updates/content.xml
This means there’s some issue accessing the update site in your current connection.
In that case, you can try using a direct URL for the download (all the http://pydev.org/updates/
URLs are actually redirects to the final location). Currently, those redirects
point to links on http://bintray.com, so, you can visit the related update
site page (such as http://pydev.org/updates) in a browser and see to
where it’s being redirected (you may want to try that direct link with
http or https to see if it makes a difference in your use case).
Possible issue on download
If you have any problem at this point with a message such as:
- An error occurred while collecting items to be installed
- No repository found containing:
- org.python.pydev/osgi.bundle/1.4.7.2843
- No repository found containing:
- org.python.pydev.ast/osgi.bundle/1.4.7.2843
that might indicate that the mirror you selected is having some network
problem at that time, so, please retry it later on (possibly with a direct
URL such as in the Unable to load repository tip above).
PyDev does not appear after install!
Well, the main issue at this time is that PyDev requires Java 8 in order to run.
Tip: LiClipse (which is mostly a PyDev standalone plus some goodies) is pre-configured
so that none of the hassle of installing PyDev into Eclipse nor any pre-requisite is needed 
Java 8 requisite
If you don’t have Java 8, make sure you download/install the latest Java 8 JRE or JDK, try restarting to see if it got it automatically.
I.e.: in help > about > installation details > configuration check if it’s actually using the Java 8 version you pointed at.
If it didn’t get it automatically, follow the instructions from:
http://wiki.eclipse.org/Eclipse.ini to add the -vm argument to eclipse.ini on «Specifying the JVM» to specify the Java 8 vm.
Note on Mac OS: You can use the command «/usr/libexec/java_home -v 1.8» to get the base path for the JVM (though you also need to append «/bin/java» to the output of said command to the -vm arg in eclipse.ini).
Corrupted install
Eclipse sometimes is not able to correctly get the plugin, from the
update site but will do no checking on whether it is really correct (no md5 checking), and when this
happens, you’ll usually get a ClassNotFoundException (similar to the example below).
When that happens, you should uninstall it and reinstall again with
the update site… if that still fails, you could try to get the zip files, as it will at
least give you a warning when it is corrupt.
Note that the chance of the files being corrupt in the server is pretty
low, as that’s something that’s always checked in a new release, but if you’re
suspicious about it, please report it at https://www.brainwy.com/tracker/PyDev
so that it can be double-checked.
Also, there have been reports with that error where the only solution
that has been consistent has been removing all previous versions of
PyDev and then installing the latest version.
EXAMPLE
Unable to create this part due to an internal error. Reason for the
failure: The editor class could not be instantiated. This usually indicates that
the editor’s class name was mistyped in plugin.xml.
- java.lang.ClassNotFoundException: org.python.pydev.editor.PyEdit
- at
- org.eclipse.osgi.framework.internal.core.BundleLoader.findClass(BundleLoader.java:405)
- at
- org.eclipse.osgi.framework.internal.core.BundleLoader.findClass(BundleLoader.java:350)
- at
- org.eclipse.osgi.framework.adaptor.core.AbstractClassLoader.loadClass(AbstractClassLoader.java:78)
- at java.lang.ClassLoader.loadClass(ClassLoader.java:235)
at- org.eclipse.osgi.framework.internal.core.BundleLoader.loadClass(BundleLoader.java:275)
- …
Uninstalling
Follow the instructons below if at any time you wish to stop using the
PyDev plugin (or any other Eclipse plugin):
Eclipse 3.5 onwards
If you installed with the update site, go to the menu help > about >
installation details then on the Installed Software tab, select the plugins you want to uninstall
and click Uninstall.
If you installed with the zip file, just remove the com.python.pydev and
org.python.pydev features and plugins from the dropins folder.
PyDev development
PyDev is open source and depends on your contributions! This may be in the form of
bug fixes, answers on stackoverflow, new features…
Another option is financially supporting it at:
Patreon (which provides a way to support it monthly and get rewards starting with $1).
Or through 1-time contributions at:
Paypal
Search PyDev-related content
In this article I’ll explain how you can set-up your Windows 10 machine for some extreme Python development.
UPDATE: Here is a video version of the tutorial (updated to use the latest Python3 and Eclipse Neon).
Install Python
First we install Python. I recommend Python 2.7 because it has the most compatible packages. Visit www.python.org and navigate to Downloads > Windows and click Python 2.7.9.

Next, select Download Python 2.7.9 from options.

Wait for the Python installer to download, and then double click on it.

The Python Windows Installer will launch.

In the Python Setup screen, select Install for all users and click Next >.

I recommend you leave the destination directory as default and click Next >.

Leave the Customize Python 2.7.9 screen as default and select Next >.

Wait for the installation to complete.

Once the installation completes, choose Finish.

Now we need to add Python to the environment variables. This means when you type “python” into the Windows Command Prompt window, it will start Python. Right click the Start Menu in the bottom left and select System to load the System menu.

In the System menu, click on Advanced system settings.

In the System Properties window, select the Advanced tab and click Environment Variables…

Under System variables, find the variable with the name Path. Click it and choose Edit…

Being careful to leave the existing values intact, navigate to the end of the Variable value text box. Then append “;C:Python27” to the end (without quotes). The semicolon is used to separate the variables. Then click OK to save the update.

Then click OK on the Environment Variables screen.

Click OK on the System Properties screen.

Exit the System menu by clicking X.

Now left click the start menu again and choose Command Prompt to load a new Command Prompt window.

Now enter “python” into the window and hit Enter.

If you type print “hello world” it should output “Hello World” on the screen. Python has been successfully installed.

Install the Eclipse PyDev Plugin
Next we will install the Eclipse PyDev plugin. Launch Eclipse by double clicking on the eclipse executable.

Eclipse will launch.

Once Eclipse loads, select Help > Install New Software…

The Install menu will load. Next to the text box that says type or select a site, click on Add… to add a new repository.

In the Add Repository window, type the name PyDev, and enter the location as http://pydev.org/updates. Then click OK.

Now ensure that the PyDev repository is selected in the Work with menu. Check the box next to PyDev in the list and click Next >.

Review the Install Details screen and select Next >.

Have a fleet of lawyers review the license agreement and if they advise it’s safe, select I accept the license agreement. Then click Finish.

The Installing Software box will display the progress of the installation.

During the installation, you should be prompted if you trust the certificate. Check the box next to Branwy Software; PyDev; Brainwy and click OK.

After the installation completes you will be prompted to restart eclipse. Choose Yes.

Once Eclipse restarts, click on Window > Open Perspective > Other.

In the Open Perspective menu you should be able to find one called PyDev. Select it and click OK to open the PyDev perspective.

If the Welcome screen is still visible, you can close it by clicking the X.

PyDev is now installed and you can begin coding!

В предыдущей заметке были рассмотрены только дистрибутивы Linux, где Python поставляется «из коробки» и есть замечательный редактор gedit, в котором можно редактировать скрипты.
Однако пока еще не все перешли на Linux
Кроме того, для разработки на Python удобно использовать полноценную IDE. Eclipse — кросплатформенная среда разработки, поэтому рассмотрим его настройку как в Windows, так и в Linux. Eclipse распространяется под свободной лицензией EPL.
Постараюсь описать все максимально подробно. Если будут вопросы — задавайте в комментариях.
Установка интерпретатора Python в Windows
Скачиваем последнюю версию Python 2.7.x для Windows с официального сайта: <http://python.org/download/>. На момент написания это версии:
- Python 2.7.3 Windows Installer
- Python 2.7.3 Windows X86-64 Installer (для 64-битных систем)
Нужно скачивать последнюю версию в ветке 2.7, то есть 2.7.3, 2.7.4, 2.7.5…
Устанавливаем интерпретатор Python в директорию C:Python2.7.
Скачиваем версию Eclipse IDE for Java Developers (или Classic) для нужной операционной системы и разрядности (32-бита/64-бита) с официального сайта: <http://www.eclipse.org/downloads/>.
Установка очень простая — распаковываем содержимое архива в C:eclipse, либо в /home/username/eclipse и запускаем исполняемый файл eclipse.exe (eclipse в Linux).
Устанавливаем PyDev
PyDev (<http://pydev.org/>) — плагин для работы с Python в Eclipse.
Запускаем Eclipse.
Выбираем Help — «Install New Software…»:

Открывается окно:

Нажимаем «Add…». Появляется диалоговое окно:

В поле Name пишем: «Pydev and Pydev Extensions», в поле Location: «http://pydev.org/updates». Нажимаем «OK».

Ставим галочку напротив «Pydev for Eclipse» и нажимаем «Next».

Снова нажимаем «Next».

Изучаем лицензию. Если лицензия подходит, помечаем «I accept the terms of the license agreement» и нажимаем «Finish».
На запрос:

Отвечаем «OK».
Pydev установлен. Перезапускаем Eclipse.
Создаем проект ‘Hello World’
Нажимаем правой кнопкой мыше в пространстве Package Explorer, выбираем New—Project…:

Выбираем «Pydev Project» и нажимаем «Next»:

На следующей странице:

Project Name: «Hello World», нажимаем ссылку: «Please configure an interpreter in the related preferences before proceeding.».
Появляется окно настройки интерпретаторов Python:

Нажимаем «New…».
В появившемся диалоговом окне:

В поле Interpreter Name пишем «Python 2.x», где x — установленная версия интерпретатора Python.
В поле Interpreter Executable выбираем путь к исполняемому файлу Python.
Для Windows здесь будет: C:Python2.7python.exe, если был установлен интерпретатор Python 2.7 в директорию «C:Python2.7».
Для Linux это:
/usr/bin/python — для системной версии Python (для начала этот вариант подойдет),
/usr/local/bin/python2.7 — для версии Python, установленной вручную.
Нажимаем «OK».
В окнах:


Нажимаем «OK», «OK», «Yes».
В «Pydev Package Explorer» нажимаем правой кнопкой на директорию src и выбираем в появившемся меню: New—Pydev Module:

Появится окно:

В поле Name пишем «helloworld» и нажимаем «Finish».
Создаем программу «Hello World», описанную в предыдущей заметке:

Запускаем скрипт (меню: Run — Run, Ctrl-F11):

И видим результат в Console:

Вот и все! Теперь можно переходить к более серьезным скриптам.
Перейти к содержимому
Для поддержки языка программирования Python в Eclipse нужно установить PyDev. Для этого открываем Marketplace:

В строке поиска наберите “Python” и нажмите клавишу Enter. В списке кликаем “Install” у пункта “PyDev — Python IDE for Eclipse”:

Дальше прокликиваем все остальные окошки, со всем соглашаемся. На странице с лицензионным соглашением ставим переключатель на “I accept the terms of the license agreements”. Перезапускаем Eclipse, как нам и предлагают.
При запуске у вас появится сообщение, что Python не настроен. Кликаем мышкой на “Manual config”:

Открывается вот такое окно:

Теперь нам нужно установить интерпретатор Python. Как это делается под Linux я уже рассказывал вот в этой статье. Под Windows же нам нужно скачать установщик с официального сайта. После установки возвращаемся в Eclipse и выбираем установленный Python. У меня он по умолчанию установился по пути:
|
C:Users<Имя_Пользователя>AppDataLocalProgramsPython |
В Eclipse кликаем на кнопку “Browse for python/pypy exe” (см. картинку выше). Указываем путь к python.exe. Кликаем на экранную кнопку “Apply and close”.
Теперь в меня Window -> Open Perspective -> Other… у вас появится пункт PyDev. Выберите его и откройте.
Создайте свой первый проект на Python с помощью пунктов меню File -> new -> PyDev Project:

Создайте свой первый модуль Python через меню File -> New -> PyDev Module и напишите какую-нибудь программу на Python:
|
»’ Created on Apr 10, 2019 »’ print(«Hello, World!») |
Запустите его на выполнение клавишей через меню Run -> Run:

Install Python before installing Eclipse; Eclipse installs Java.
You may want to print these instructions before proceeding, so that you can
refer to them while downloading and installing Eclipse.
Or, just keep this document in your browser.
You should read each step completely before performing the action that it
describes.
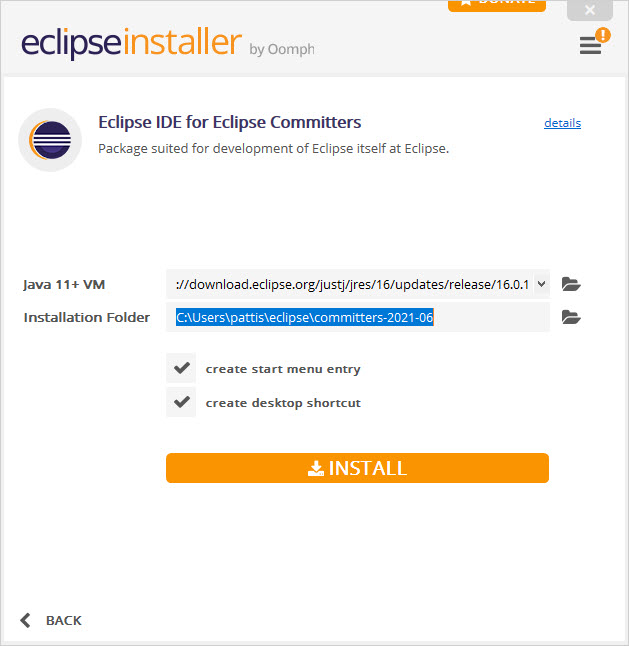
This document shows downloading and installing Eclipse (2021-06) on Windows 10
in Summer 2021.
You should download and install the latest version of Eclipse.
The current latest (as of Summer 2021) is Eclipse 2021-06.
Remember that you must install Python, and Eclipse as 64-bit applications.
In fact, Eclipse can be installed only as a 64-bit application.
The Eclipse download requires about 54 MB of disk space; keep it on your
machine, in case you need to re-install Eclipse.
When installed, Eclipse requires an additional 350 MB of disk space.
It might take a few seconds to a a few minutes, but watch for the following
Eclipse Installer pop-up window to appear.
It will soon disappear and be replaced by another Eclipse Installer
pop-up window.
Scroll down in this window until you see
Eclipse IDE for Eclipse Committers
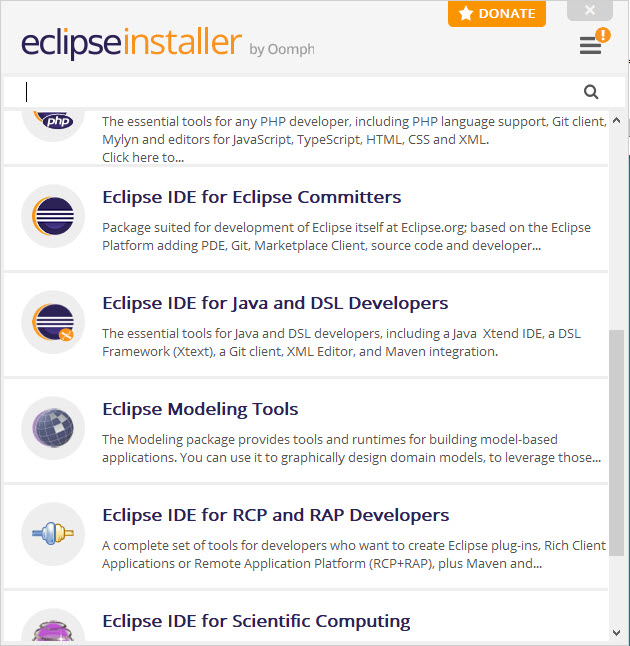
Another Eclipse Installer pop-up window will appear.
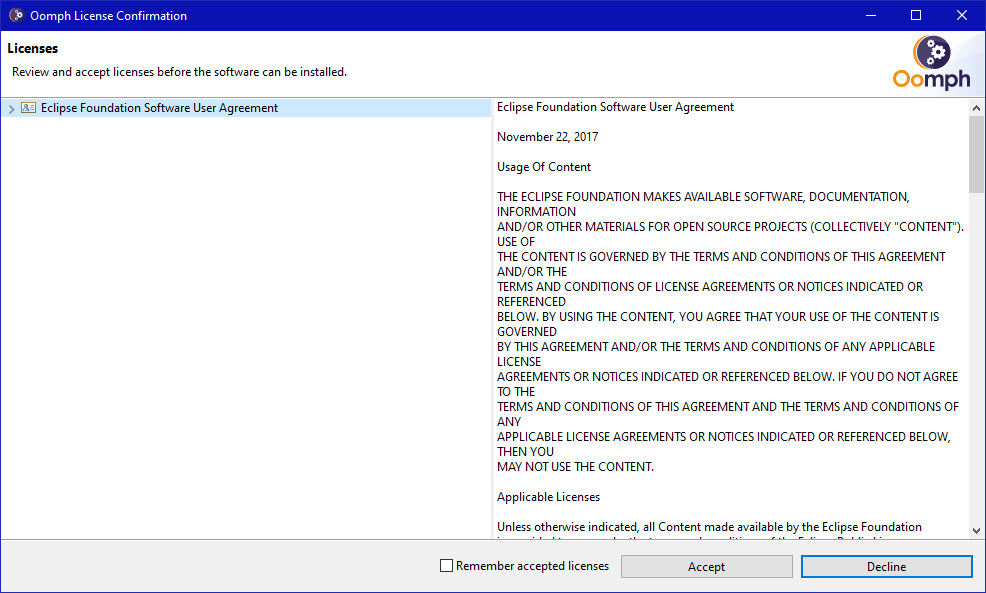
(When I installed Eclipse on my Surface, I was first presented with an
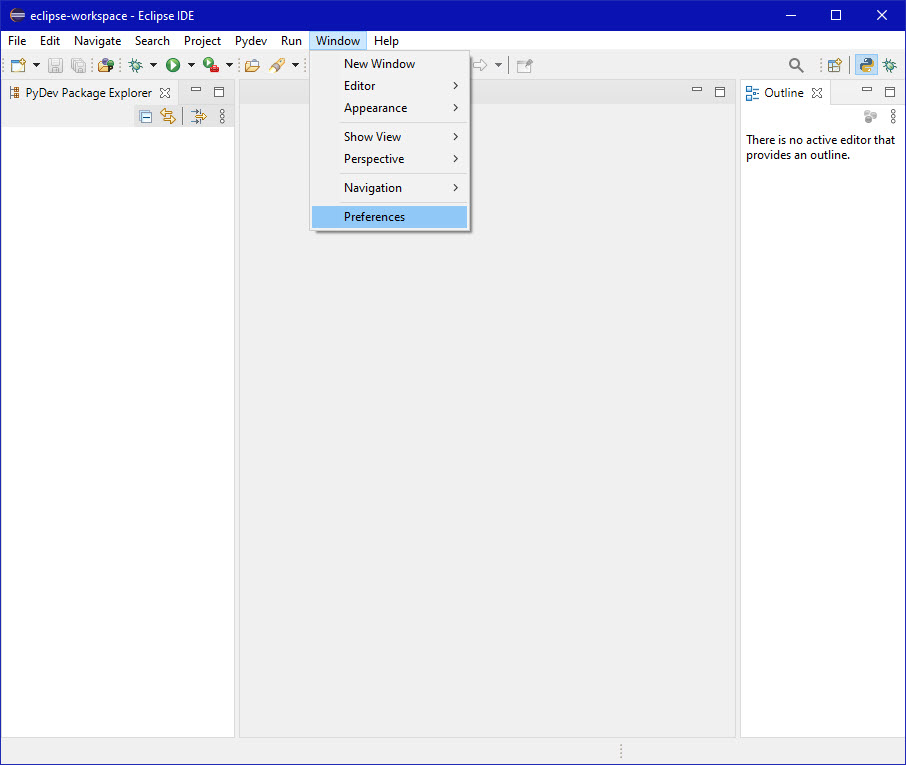
Eclipse Foundation Software User Agreement, on which I
clicked Accept Now.
After installation, there was no Oomph License Confirmation.)
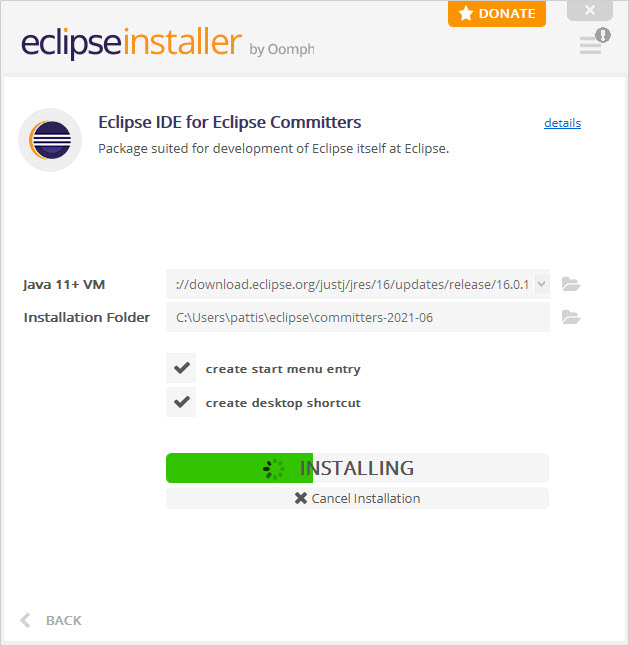
The Eclipse Installer pop-up window will continue to show a green
progress bar
Eventually, an Oomph License Confirmation pop-up window will appear.
The Eclipse Installer pop-up window will continue to show a green
progress bar
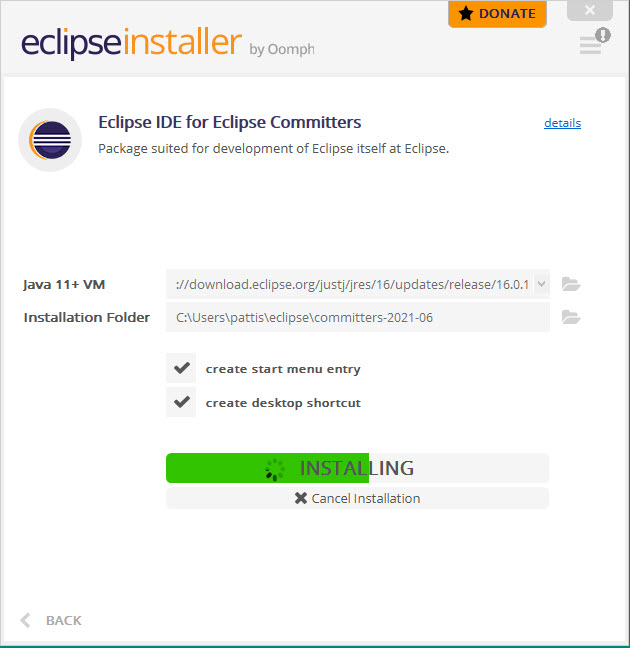
Eventually, the Ecliplse Installer pop-up window will appear.

The installer will create a shortcut (the «death-star» icon) on your
desktop to the eclipse.exe file in this eclipse folder.
Generally, you will double-click this icon to start Eclipse.
But the Eclipse Installer will automatically start it for you, at which
point the following splash window will appear

and then an Eclipse Launcher pop-up window will appear.
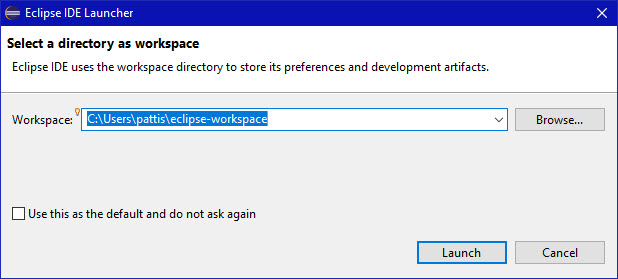
In the Workspace text box, your name should appear between
C:Users and eclipse-workspace, instead of pattis.
Leave unchecked the
Use this as the default and do not ask again box.
Although you will use this same workspace for the entire quarter (checking
projects in and out of it), it is best to see this
Workspace Launcher pop-up window each time you start Eclipse, to
remind you where your workspace is located.
In fact, it is a good idea to create on your desktop a shortcut to your
workspace folder; but you must click Launch (see below) before
Eclipse creates this folder and you can create a shortcut to it.
If you have an older version of Eclipse installed, the following pop-up
window will apperar.
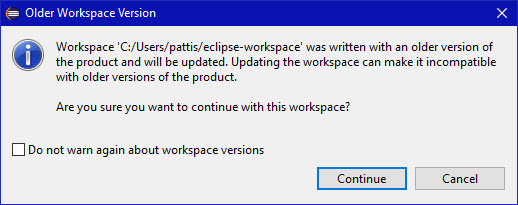
If this pop-up window appears, click Continue to update the
workspace for the newer version of Eclipse.
Progress bars will appear on the Splash window as Eclipse loads.

Eventually the Eclipse Workbench will appear.
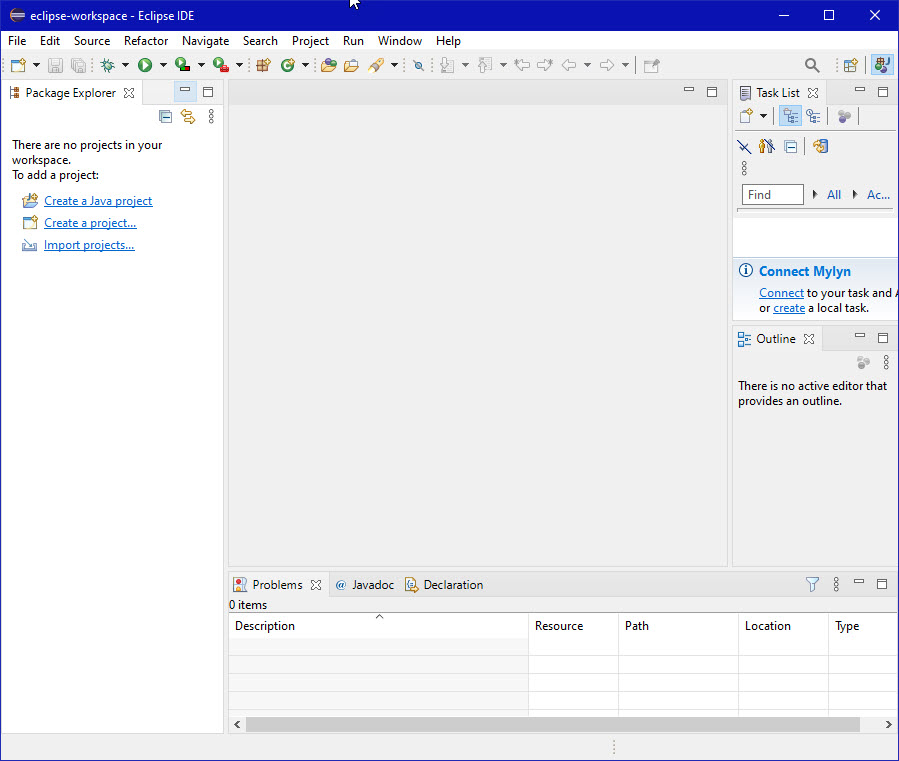
If it shows as being covered with a Welcome tab,
terminate it by clicking X on the Welcome tab.
You will not see the Welcome tab when you start Eclipse again, after
this first time.
If it further shows a Donate tab,
terminate it by clicking X on the Donate tab.
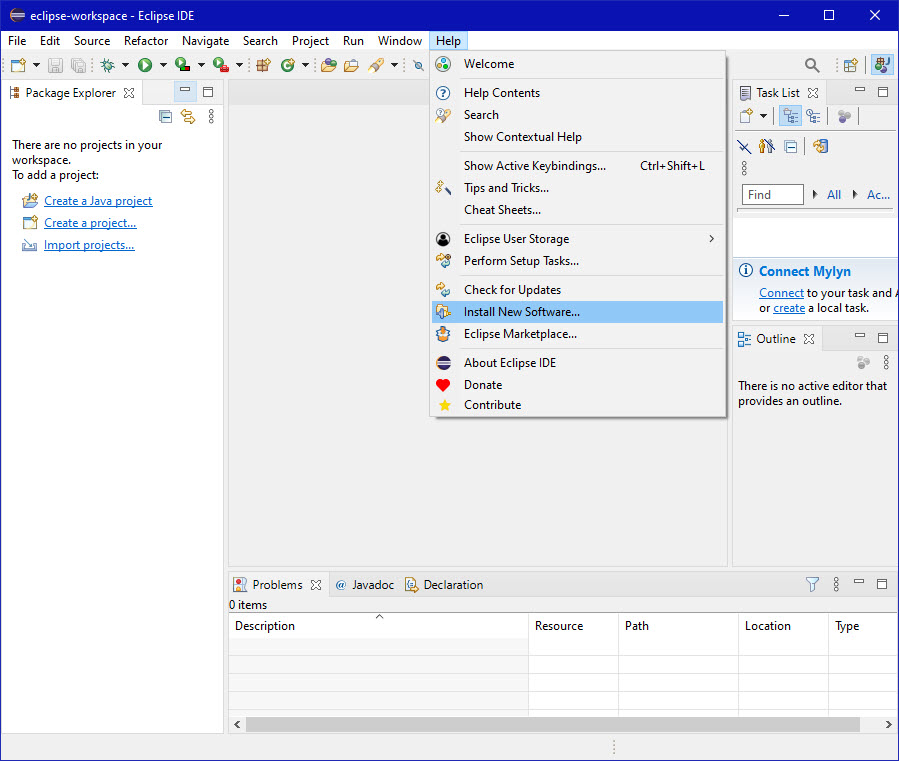
title eclipse-workspace — Eclipse IDE) and then click
Install New Software… in its pull-down menu, as shown below.
The Install pop-up window will appear.
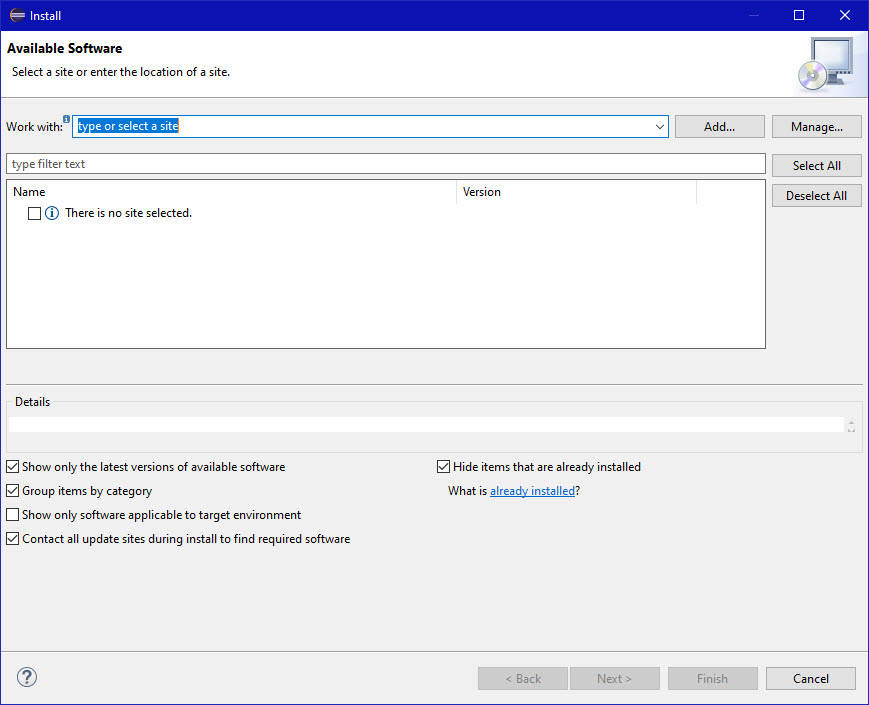
http://pydev.org/updates into the Work with text box and
press Enter (if that doesn’t work, try
http://www.pydev.org/updates).
In a few seconds the information under Name should change from
There is no site selected to Pending and ultimately to

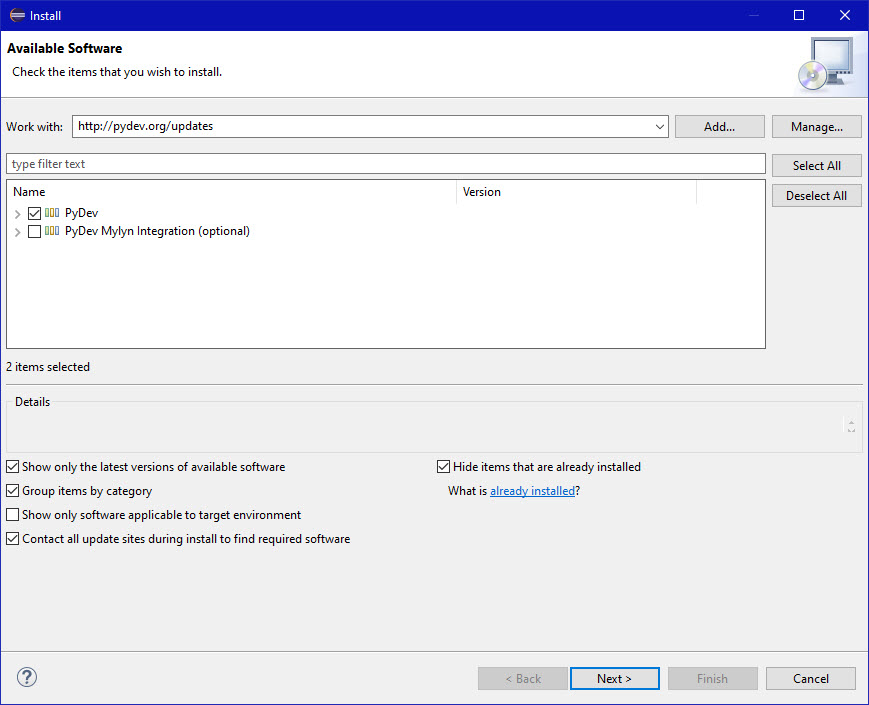
Select only the top PyDev checkbox; do NOT select the
PyDev Mylyn Integration (optional) box.
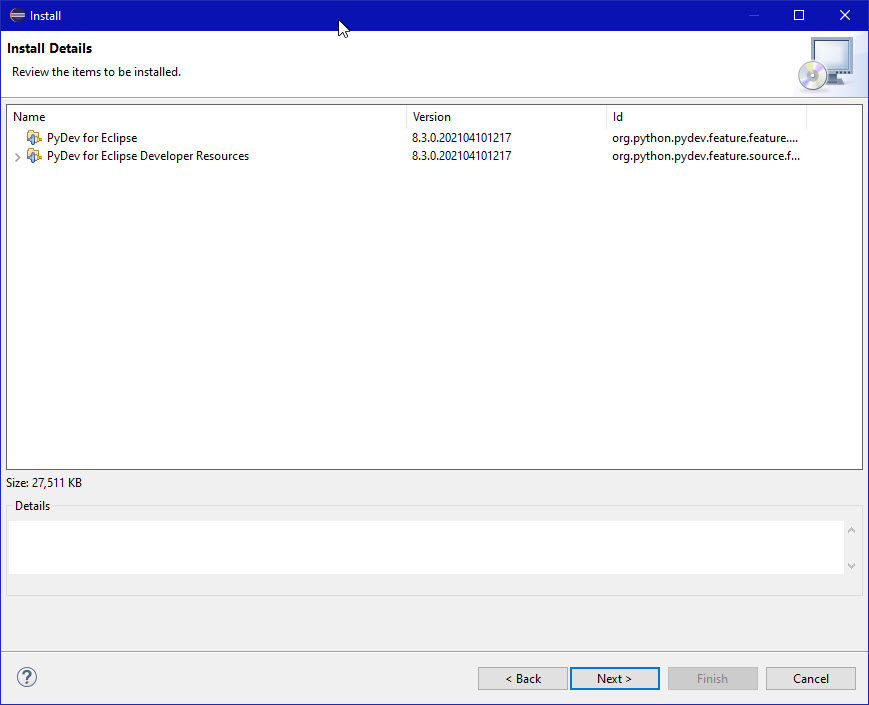
Check before proceeding that the Install pop-up window appears as
A new Install pop-up window will appear.
A new Install pop-up window will appear.
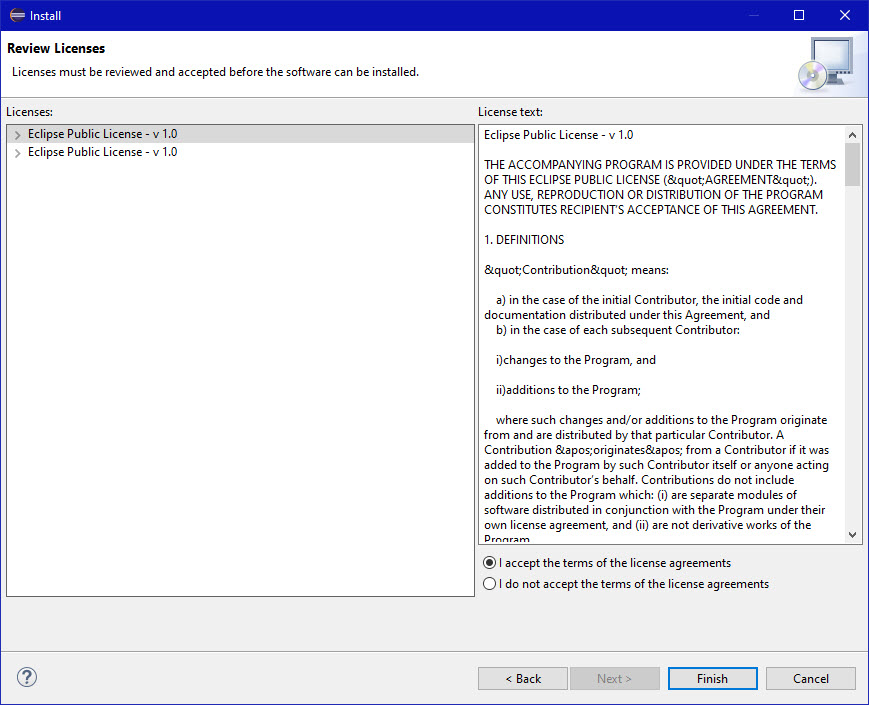
Select the I accept the terms of the license agreement radio button,
so the window appears as
The lower right-hand corner of the eclipse-workspace — Eclipse IDE
window will show the various operations it is performing and a progress
bar for each one.

Because the installer is fetching various files online, this process might
take a few minutes.
If you see a Security Warning pop-up window
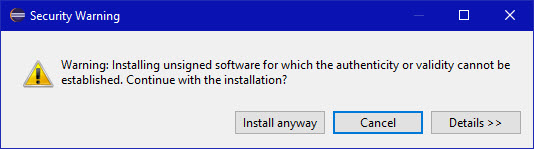
Click Install anyway.
The installation will finish (the progress bar will disappear).
A Software Updates pop-up window will appear.
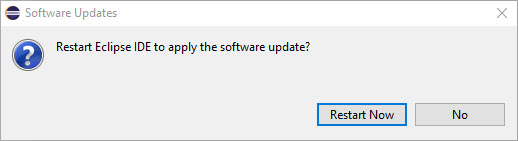
Eclipse will terminate and restart.
Once again will show the Eclipse Workbench.
As you did in step 4, if you see a Welcome Tab covering the window,
terminate it by clicking OK on the Welcome Tab.
If a Windows Security Alert pop-up window appears

click Allow Access.
Notice in the upper right-hand corner of the Eclipse Workbench, you should
see the following 2 icons.

window.
Click on the «double-snake» Python icon labelled PyDev and then
click on the Open button.

The Eclipse Workbench will now appear as
Repeat this process selecting the «green bug» icon labelled Debug
in the Open Perspective pop-up window.
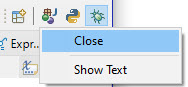
Now the top-right corner should show four icons:

Next, right-click the «J» icon (the second one) and then click
Close.
Finally, click on the «double-snake» icon.
Now the top-right corner should show three icons:

line below this window’s blue title
eclipse-workspace — Eclipse IDE)
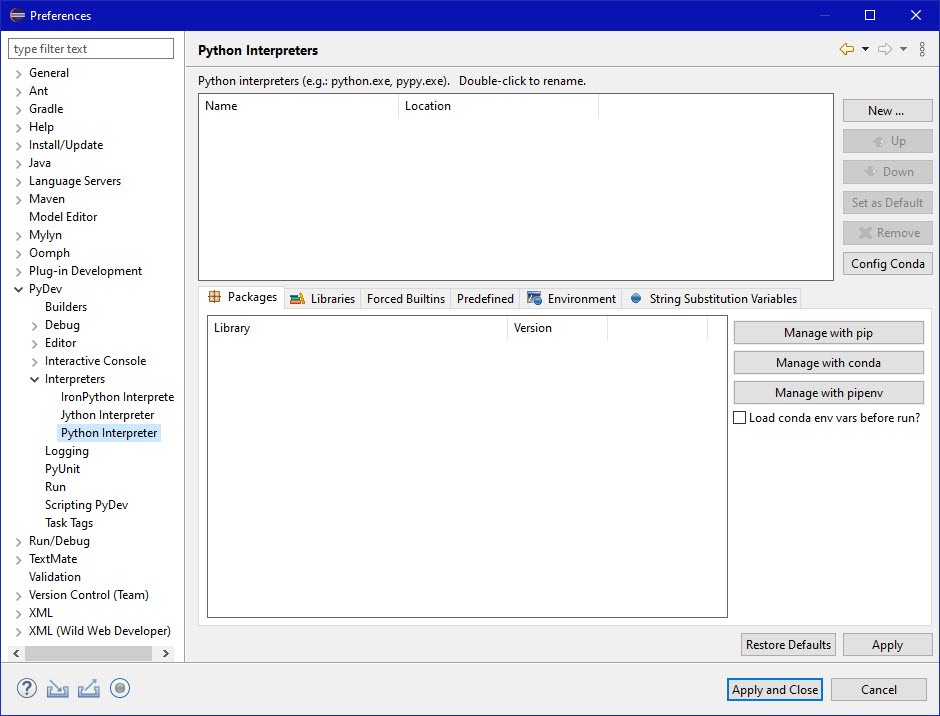
and then click Preferences in its pull-down menu, as shown below.
- Disclose PyDev by clicking the > in front of
PyDev or double-clicking PyDev (after the
>); the > changes to a v. - Disclose Interpreters by clicking the > in front of
Interpreters or double-clicking Interpreters
(after the >); the > changes to a v. - Select/Click Python — Interpreter.
The Preferences pop-up window should appear as follows.
Browse for python/pypy.exe.
A Select Interpreter and Open pop-up window appear.
In the Open pop-up window, navigate to that folder in which Python
was installed:
C:UserspattisAppDataLocalProgramsPythonPython39.
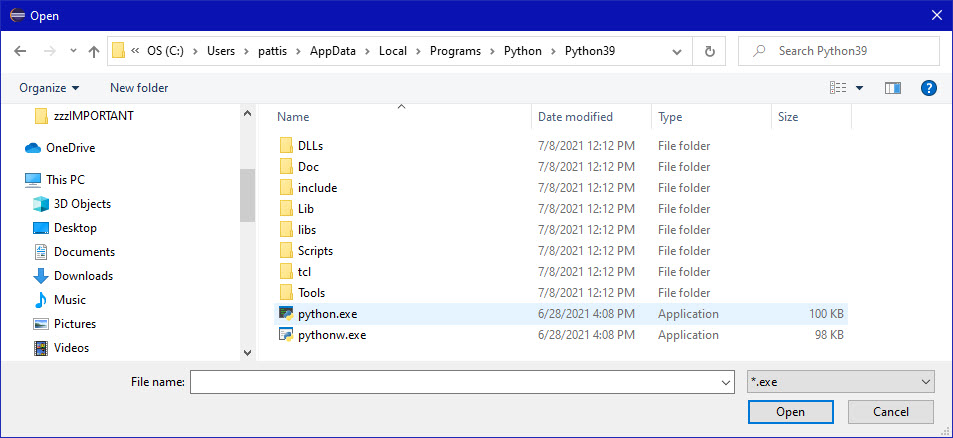
Double-click python.exe (or select it and click Open).
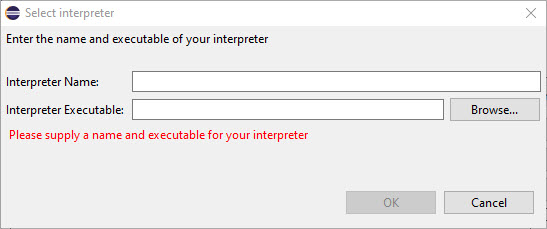
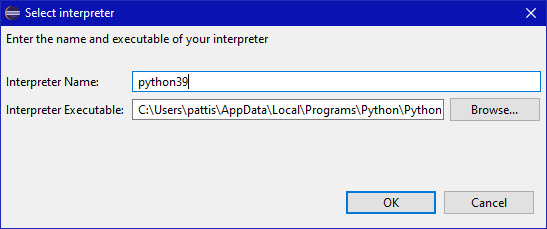
Change the Interpreter Name in the Select Interpreter pop-up
window from python to Python39
(or whatever the latest version of Python you have installed).
The Select Interpreter pop-up window should appear as
A Selection needed pop-up window will appear.
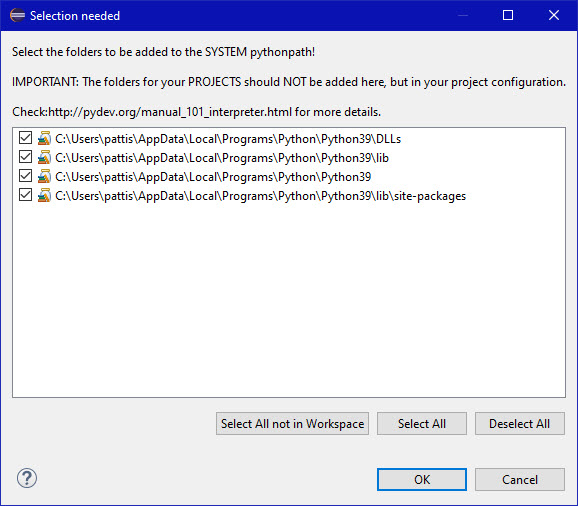
Your window should have all four of these checkboxes checked.
Click the Libraries tab (2nd one) above the lower pane.
The Preferences pop-up window will appear as
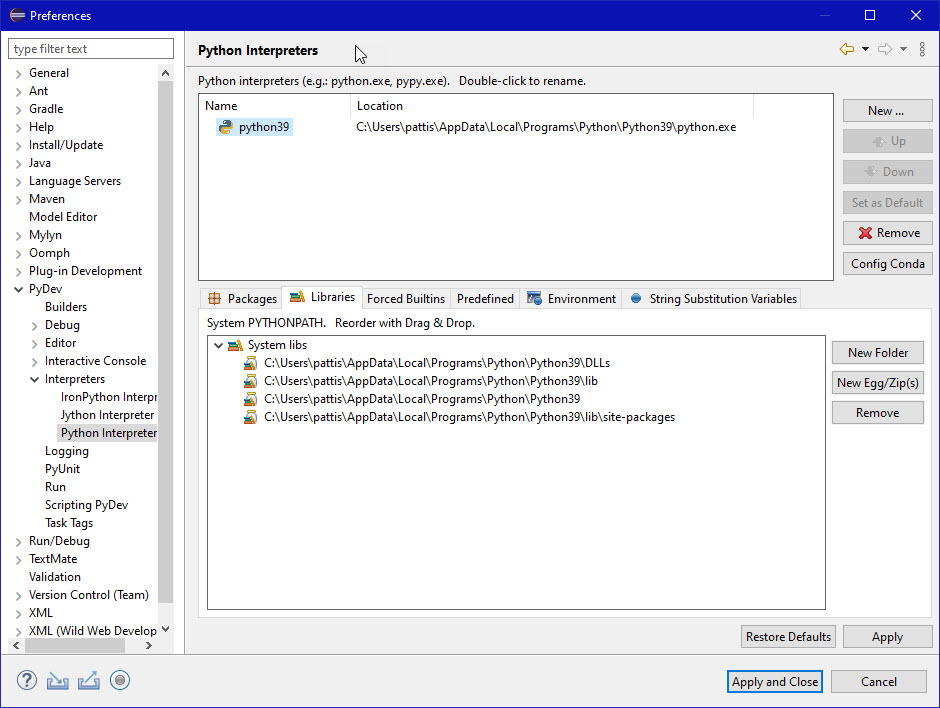
Actually, on my system I had to first shrink the Name tab and then
enlarge the Location tab for the top pane, so that I could see the
entire path to the Python interpreter.
A Progress Information pop-up window will appear.
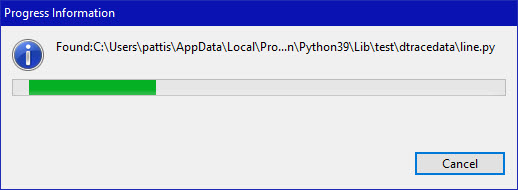
During installation, it will show the various operations it is
performing and a progress bar for each one.
Eventually the installation will terminate.
If the following pop-up window appears

Ensure the «Public networks, such as those in airports….»
checkbox is NOT checked, and then click Allow Access.
(see C:Usersyournameeclipse-workspace)
and download the
courselib.zip
file into this workspace and unzip it there, producing the
courselib folder; it should should contain a bunch of Python
module files (ending in .py).
From time to time you may be asked to put other course-specific Python
module files into this courselib folder; these modules will be
usable (via import) in all Python projects in Eclipse.
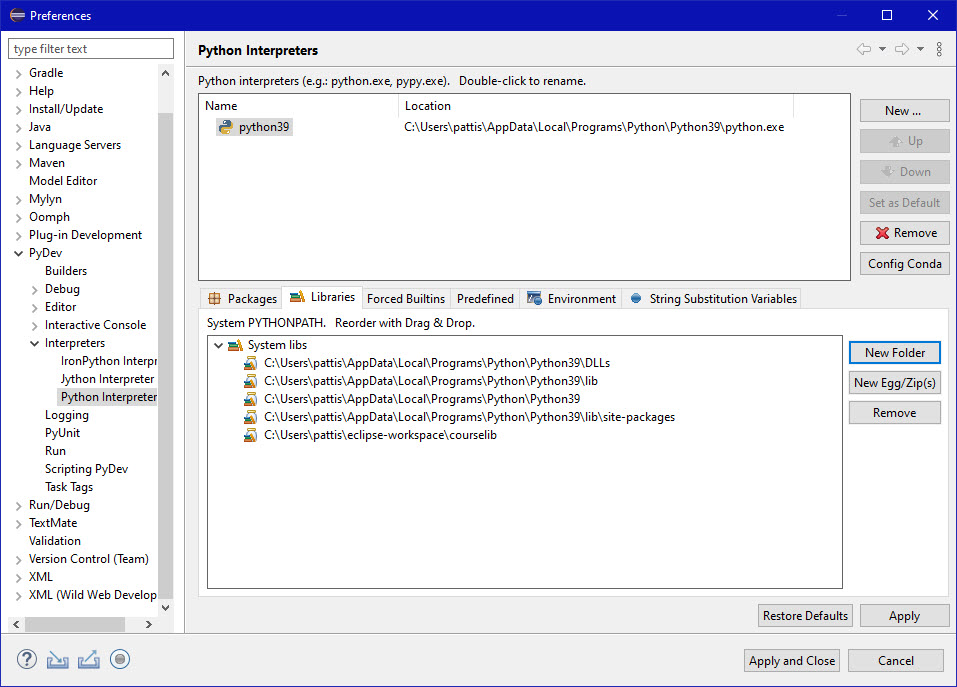
- Select Window | Preferences.
- Disclose PyDev by clicking the + in front of
PyDev or double-clicking PyDev (after the +); the
+ changes to a —. - Disclose Interpreters by clicking the + in front of
Interpreters or double-clicking Interpreters
(after the +); the + changes to a —. - Select Python — Interpreter.
- Click the Libraries tab (2nd above the bottom pane).

- Click the New Folder button (topmost, right of the bottom pane).
- Browse to the courselib folder (added above) in the
Browse for Folder pop-up window
(C:Usersyournameeclipse-workspacecourselib). - Click the courselib folder selected, and then click SelectFolder.
Notice a fifth entry
(C:Usersyournameeclipse-workspacecourselib)
appears in the bottom-right pane named
System PYTHONPATH. Reorder with Drag & Drop. - Click Apply (you will see some progress bars).
The pop-up window should now appear as
- Cick Apply and Close.
You will see a brief progress bar on your screen.
You may see a Confirm Exit pop-up window.
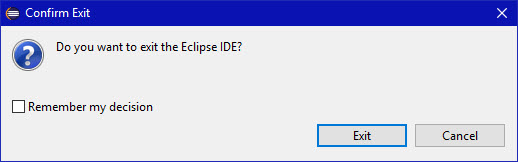
If you do,
Click the Exit button.
Eclipse will terminate.

Published: 7 December 2016
by
Last updated: 31 October 2019
Eclipse IDE is a wonderful piece of free IDE software and Python is the language that makes many programmers very “excited” – so why not bring them together? Python is also a great programming language for new programmers.
Eclipse IDE added full functionality for Python developers through PyDev. For existing Eclipse users, PyDev can be added as an add-on. Alternatively, a version of Eclipse with PyDev pre-installed can be downloaded from the Eclipse download page. For more information on how to install and set up Eclipse IDE, see Eclipse IDE for web developers for more information.
Other options for new Python developers, probably among many others, include Raspbian (on the Raspberry Pi), PyCharm and Geany.
Installing Python on your computer
For PyDev to function, Python needs to be installed on your PC.
By default, some computers come pre-installed with Python, which will usually be Python 2.x. Python 2 is considered legacy, which means it is no longer maintained or supported. Python 2 and Python 3 are very similar, but does have small differences when it comes to some commands. Python 2 code cannot be executed in Python 3 and vice versa. While setting up the IDE, the version of Python installed (2 or 3) needs to be known. By repeating the installation process, multiple versions of Python can be installed on the same computer.
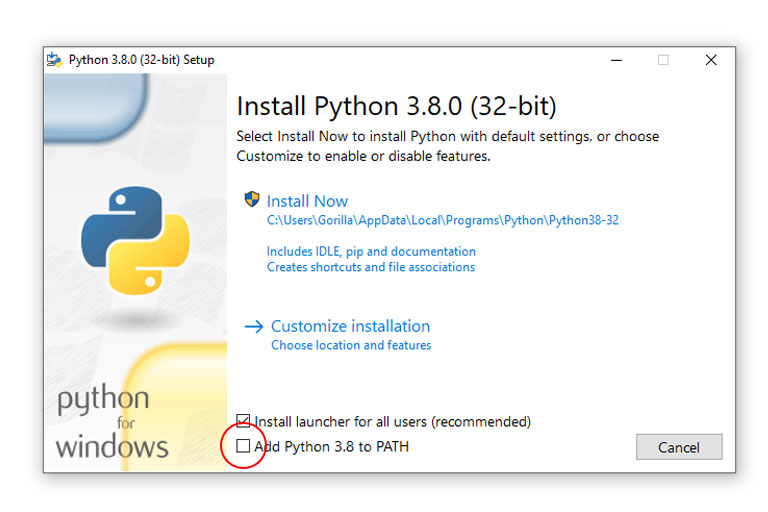
Taking this into consideration, the desired version of Python (version 2.x or 3.x) can be obtained from www.python.org. To add Python to PATH (recommended), make sure to click the Add Python to PATH checkbox. Simply use the Install Now option. All the other installation settings can be left to their defaults.
After the installation is finished, click on the Close button and move on to installing PyDev for Eclipse.
Installing PyDev for Eclipse
PyDev is installed onto Eclipse the same way any other Eclipse add-on is installed. A working version of Python needs to be installed first (see earlier).
- In the Eclipse Workbench choose Help > Install New Software
- Click on the Available Software Sites link and click on the Add… button.
- For the name use any name (e.g., “PyDev”)
- For the location use
http://pydev.org/updates, then click OK and OK again to go back to the Install screen. - Under Work with: type “pydev” and select the first PyDev entry > Next
- Click Next, Next, read and accept the license, Finish
- If Eclipse asks whether to trust the PyDev certificate, agree.
- When the install is complete, allow Eclipse to restart.
Setting up the Eclipse, Python Interpreter
The Python interpreter is basically a program, that knows how to execute Python code. It will interpret, or translate, Python instructions into instructions that a computer can understand. After the required version of Python (version 2.x or version 3.x) has been installed, the following steps are needed to set up the Python interpreter in Eclipse (note the small differences between Python 2.x and 3.x):
- Start > All Programs and search for the Python version installed
- In the Python menu directory, right-click on ‘Python (command line)’ when using Python version 2.x, or right-click on ‘Python’ when using Python version 3.x
- Select Properties
- In the Shortcut tab, copy the target directory line (Right-click, copy).
- In the Eclipse Workbench, choose Window > Preferences
- Click on PyDev > Interpreters > Python Interpreter
- In the top box, click on New… and copy the target directory from the Start Menu to the Interpreter Executable field
- Make sure the line ends with python.exe, give it a name (i.e. Python x) and press OK, then OK again.
Creating a project with PyDev and Eclipse
To create a new Python project:
- File > New > Project
- In the Wizard, click on Pydev to expand it, select Pydev Project and click Next.
- Give the project a name.
- Make sure the grammar version matches the installed version of Python and the Interpreter is the one just set up.
- If asked to include the Pydev Perspective, say yes.
After creating a Pydev project, the PyDev Package Explorer will be available in the Eclipse Perspectives area (top right corner of the Eclipse Workbench). To start working on a Pydev project, make sure to be in this perspective (by clicking on the perspective icon).
Hello, world
To test Eclipse’s new Python environment, get started with “Hello, World”. The main file types to be used when programming in Python is Python files. Python files have .py as its extension. To create a new .py file, right-click on the Pydev Project > New > File, and name the file hello.py.
For Python 2.x use:
#!/usr/bin/python
print "Hello, World!"
and for Python 3.x use:
#!/usr/bin/python3
print("Hello, World!")
Save the file and click on run (the green play triangle sign). Choose Python Run. If all is in order the result should show in the Eclipse Console (on the bottom of the screen).

About the author
Renier busies himself with improving his English writing, creative web design and his websites, photoshopping, micro-electronics, multiple genres of music, superhero movies and badass series.
Behind the Scenes is a free, informative website. If you find value in any of our content, please consider making a donation to our cause, or becoming a Patron for exclusive content.
Save, share & discuss
Your comment is important, but don’t be a knob. Keep it constructive and polite.
More coding related posts

Introducing Aptana Studio 3
28 February 2020 | Updated 24 March 2020
Aptana Studio 3 makes for a great IDE to code HTML, CSS, PHP and JavaScript. Introducing Aptana Studio 3 also shows new users how to get started. More…
Eclipse is the most popular IDE for java development. A lot of users are familiar with it. Besides the java project, it can also be used to develop Python applications. This article just wants to tell you how to use it to develop Python applications.
1. Install PyDev Eclipse Plugin.
- Before you can develop the Python applications, you should install PyDev ( an eclipse plugin ) in eclipse. Below are the two installation methods.
1.1 Install Eclipse PyDev Plugin From Eclipse Marketplace.
- Before you can install the Eclipse PyDev plugin, you should make sure you have installed JDK 11 or above and python 2.6 or newer.
- Open Eclipse, and click Help —> Eclipse Marketplace… menu item at the top toolbar.
- Input PyDev in the Find: search text box and click the Go button to search. Then click the Install button to install it.
- The installation process may take several minutes, and during the process, you just need to click Confirm, Next, or Finish button. You should restart Eclipse when the installation is completed.
1.2 Use Eclipse PyDev Plugin With LiClipse.
- If you can not install the Eclipse PyDev plugin, you can use LiClipse instead.
- LiClipse is a lightweight eclipse editor that has integrated the eclipse Pydev plugin.
- You can go to the LiClipse download page to download the version that you need.
- Just double-click the installer file to install it.
- After installation, it will start the LiClipse automatically, you can find that it is similar to Eclipse.
1.3 Configure Python In Eclipse.
- After eclipse restart, if this is the first time you install the PyDev plugin, it will pop up a Python not configured dialog window like below.
Python not configured

   It seems that the Python interpreter is not currently configured.

   How do you want to proceed?

   Manual-config     Config-first-in-PATH     Choose-from-list    Don't-ask-again
- If you click the Choose-from-list button, it may pop up the Unable to auto-config dialog like below.
Auto-configurer could not find a valid interpreter. Please manually configure a new interpreter instead. Note: the system environment variables that are used when auto-searching for a Jython interpreter are the following: — PATH — PYTHONHOMEI P"'THON_HOME Reason: Errors getting info on discovered interpreter{s). See error log for details. OK Details - Click the OK button to return back to the Python not configured dialog, then click the Manual config button.
- It will open the eclipse Preferences dialog window. It will automatically expand the PyDev —> Interpreters —> Python Interpreter menu item in the dialog left side.
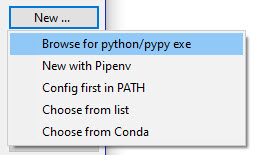
- Then you can click the New… button on the right side Python Interpreters area, and it will show a list of buttons including Browse for python/pypy exe, New with Pipenv, Config first in PATH, Choose from list, Choose from Conda.
- You can click the Browse for python/pypy exe button to browse the python executable file ( python.exe ) that you have installed on your OS.
- If you use anaconda, you can open one anaconda virtual environment and open it’s terminal and run the command conda info to get your anaconda installed directory, then you can find the python.exe file in that directory ( How To Find Where Anaconda Python Is Installed ).
(MyPythonEnv) C:Userszhaosong>conda info

     active environment : MyPythonEnv
    active env location : C:Userszhaosonganaconda3envsMyPythonEnv
            shell level : 1
       user config file : C:Userszhaosong.condarc
 populated config files : C:Userszhaosong.condarc
          conda version : 4.10.1
    conda-build version : 3.20.5
         python version : 3.8.5.final.0
       virtual packages : __win=0=0
                          __archspec=1=x86_64
       base environment : C:Userszhaosonganaconda3  (writable)
      conda av data dir : C:Userszhaosonganaconda3etcconda
  conda av metadata url : https://repo.anaconda.com/pkgs/main
           channel URLs : https://repo.anaconda.com/pkgs/main/win-64
                          https://repo.anaconda.com/pkgs/main/noarch
                          https://repo.anaconda.com/pkgs/r/win-64
                          https://repo.anaconda.com/pkgs/r/noarch
                          https://repo.anaconda.com/pkgs/msys2/win-64
                          https://repo.anaconda.com/pkgs/msys2/noarch
          package cache : C:Userszhaosonganaconda3pkgs
                          C:Userszhaosong.condapkgs
                          C:UserszhaosongAppDataLocalcondacondapkgs
       envs directories : C:Userszhaosonganaconda3envs
                          C:Userszhaosong.condaenvs
                          C:UserszhaosongAppDataLocalcondacondaenvs
               platform : win-64
             user-agent : conda/4.10.1 requests/2.24.0 CPython/3.8.5 Windows/10 Windows/10.0.19041
          administrator : False
             netrc file : None
           offline mode : False
2. Create Eclipse Python Project, Package, And Module In PyDev.
- After successfully installing the eclipse PyDev plugin, you can now use it to create a python project.
2.1 Create PyDev Python Project In Eclipse.
- Open eclipse, and click the menu item File —> New —> Other in the top toolbar. And input the keyword PyDev in the popup dialog Wizards input text box. Then select PyDev Project in the bottom PyDev list, then click the Next button.
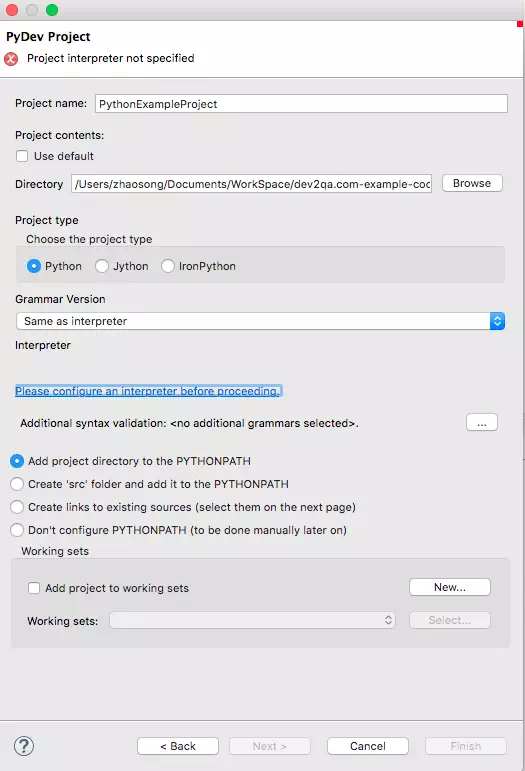
- Then the PyDev Project settings dialog popup. In this dialog, you should select the project directory, input the project name, and most importantly you need to configure an interpreter for the PyDev project.

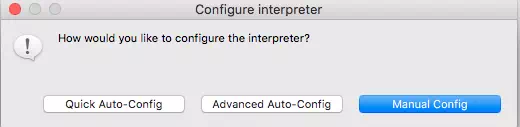
- Just click the blue link under the Interpreter section in the above dialog, the link text is Please configure an interpreter before proceeding. A Configure interpreter dialog will pop up like below.

- Click the Advanced Auto-Config button, it will pop up all the installed python interpreter executable file paths for you to select, just select the one you need then click the OK button.
- In the next popup dialog, select all the libraries that you want to add to the system python path. Click the OK button to complete the PyDev project creation.
2.2 Create Python Package With PyDev.
- Click File —> New —> Other menu item. Input the keyword PyDev in the Wizards filter text box, and select PyDev P&ackage in the PyDev-related items list window below the filter text box.
- In the next Create a new Python package dialog, browse to select a Source Folder, input a package Name, and click the Finish button.
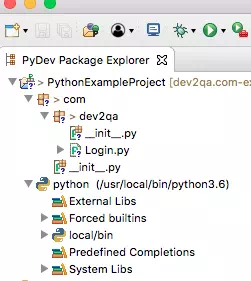
- Now you can see that the package structure files have been created in the left PyDev Package Explorer panel. There is an __init__.py file in each package, you can write package initialization code in this file. The below picture also contains a Login.py file, this is not the package default file, it is just a module file I created, I will introduce it later.

2.3 Create Python Module With PyDev.
- Click File —> New —> Other menu item again.
- Select PyDev —> PyDev &Module wizard item at this time.
- In the Create a new Python module wizard dialog, browse to select the module package Source Folder and input the Package (com.dev2qa) and module Name (Login), please note the module name is case sensitive. Click the Finish button, then you can see the Login.py file on the left side PyDev Package Explorer file list.
2.4 Open Exist PyDev Project In Eclipse.
- Open eclipse, then click File —> Open Projects from File System.. menu item.
- Click the Directory… button in the popup window, and select the PyDev project exist directory.
- Click the Finish button in the above window, then you may meet the below popup dialog to let you configure the python interpreter.
         Python not configured
It seams that the Python interpreter is not currently configured.

How do you want to proceed?

Cunfig first in PATH    Choose from list   Don't ask again    Manual config
- Click the Choose from list button in the above dialog. Then select the python version that you want to use and click the OK button.
3. Run And Debug Python Code In Eclipse Using PyDev.
- Now the login python module has been created, you can copy the below python code in it.
- Login.py
def login(* usernamepassword):
    username = usernamepassword[0]
    password = usernamepassword[1]

    if(username=='hello') and (password == 'hello'):
        print("Login Success!")
    else:
        print("Login Failed!")

if __name__ == '__main__':
    login('hello', 'hello')
3.1 Run Python Code In Eclipse.
- Right-click the python file source code, click Run As —> Python Run menu item, then the python file will be executed. You can see the output in the bottom console window.
3.2 Debug Python Code In Eclipse.
- Double-click the column before the line number in the source code editor area to set a break point.
- Then right-click the python file source code, click Debug As —> Python Run menu item to run the python source code in debug mode. When it runs to the breakpoint, the execution will be paused, you can then watch variable values and debug the code.
- This example demo video URL is How To Run Python In Eclipse With PyDev.