I have a project to do for after create a webpage that display the latest weather from my CSV file.
I would like some details how to do it (don’t really get the http://flask.pocoo.org/docs/installation/#installation installation setup)
Can anyone mind explain me how to do it simply?
Thanks.
I’m running on Windows 7, with the Windows Powershell.
![]()
Santosh Kumar
25.7k19 gold badges67 silver badges115 bronze badges
asked Jul 29, 2013 at 6:24
![]()
0
Install pip as described here: How do I install pip on Windows?
Then do
pip install flask
That installation tutorial is a bit misleading, it refers to actually running it in a production environment.
![]()
answered Jul 29, 2013 at 6:33
![]()
Uku LoskitUku Loskit
40.3k9 gold badges90 silver badges93 bronze badges
0
First install flask using pip,
pip install Flask
* If pip is not installed then install pip
Then copy below program (hello.py)
from flask import Flask
app = Flask(__name__)

@app.route("/")
def hello():
    return "Hello World!"

if __name__ == "__main__":
    app.run()
Now, run the program
python hello.py
Running on http://127.0.0.1:5000/ (Press CTRL+C to quit)
Just copy paste the above address line in your browser.
Reference: http://flask.pocoo.org/
answered Feb 27, 2017 at 12:42
![]()
imbondimbond
1,9601 gold badge19 silver badges22 bronze badges
1
Assuming you are a PyCharm User, its pretty easy to install Flask
This will help users without shell pip access also.
- Open Settings(Ctrl+Alt+s) >>
- Goto Project Interpreter>>
- Double click pip>> Search for flask
- Select and click Install Package ( Check Install to site users if intending to use Flask for this project alone
Done!!!
Cases in which flask is not shown in pip:
Open Manage Repository>>
Add(+) >> Add this following url
https://www.palletsprojects.com/p/flask/
Now back to pip, it will show related packages of flask,
- select flask>>
- install package>>
Voila!!!
answered Jun 20, 2018 at 4:42
![]()
Follow as in the url
This is how i do :
1) create an app.py in Sublime Text or Pycharm, or whatever the ide, and in that app.py have this code
from flask import Flask

app = Flask(__name__)

@app.route('/')
def helloWorld():
    return'<h1>Hello!</h1>'
This is a very basic program to printout a hello , to test flask is working.I would advise to create app.py in a new folder, then locate where the folder is on command prompt
enter image description here
type in these line of codes on command prompt
>py -m venv env
>envScriptsactivate
>pip install flask
Then
>set FLASK_APP=app.py
>flask run
Then press enter all will work
The name of my file is app.py, give the relevant name as per your file in code line
set FLASK_APP=app.py
Also if your python path is not set, in windows python is in AppData folder its hidden, so first have to view it and set the correct path under environment variables. This is how you reach environment variables
Control panel ->> system and security ->> system ->> advanced system setting
Then in system properties you get environment variables
answered Sep 27, 2019 at 1:52
![]()
On Windows, installation of easy_install is a little bit trickier, but still quite easy. The easiest way to do it is to download the distribute_setup.py file and run it. The easiest way to run the file is to open your downloads folder and double-click on the file.
Next, add the easy_install command and other Python scripts to the command search path, by adding your Python installation’s Scripts folder to the PATH environment variable. To do that, right-click on the “Computer” icon on the Desktop or in the Start menu, and choose “Properties”. Then click on “Advanced System settings” (in Windows XP, click on the “Advanced” tab instead). Then click on the “Environment variables” button. Finally, double-click on the “Path” variable in the “System variables” section, and add the path of your Python interpreter’s Scripts folder. Be sure to delimit it from existing values with a semicolon. Assuming you are using Python 2.7 on the default path, add the following value:
;C:Python27Scripts
And you are done! To check that it worked, open the Command Prompt and execute easy_install. If you have User Account Control enabled on Windows Vista or Windows 7, it should prompt you for administrator privileges.
Now that you have easy_install, you can use it to install pip:
easy_install pip
answered May 3, 2015 at 9:23
![]()
PriyanshPriyansh
1,12311 silver badges27 bronze badges
First: I assumed you already have Python 2.7 or 3.4 installed.
1: In the Control Panel, open the System option (alternately, you can right-click on My Computer and select Properties). Select the “Advanced system settings” link.
-
In the System Properties dialog, click “Environment Variables”.
-
In the Environment Variables dialog, click the New button underneath the “System variables” section.
-
if someone is there that above is not working, then kindly append to your PATH with the C:Python27 then it should surely work. C:Python27Scripts
-
Run this command (Windows cmd terminal): pip install virtualenv
-
If you already have pip, you can upgrade them by running:
pip install —upgrade pip setuptools
-
Create your project. Then, run virtualenv flask
answered Mar 25, 2018 at 20:56
![]()
Ansi Ansi
111 bronze badge
1
heres a step by step procedure (assuming you’ve already installed python):
- first install chocolatey:
open terminal (Run as Administrator) and type in the command line:
C:/> @powershell -NoProfile -ExecutionPolicy Bypass -Command «iex ((new-object net.webclient).DownloadString(‘https://chocolatey.org/install.ps1’))» && SET PATH=%PATH%;%ALLUSERSPROFILE%chocolateybin
it will take some time to get chocolatey installed on your machine. sit back n relax…
-
now install pip. type in terminal
cinst easy.install pip -
now type in terminal:
pip install flask
YOU’RE DONE !!!
Tested on Win 8.1 with Python 2.7
answered Sep 16, 2015 at 17:34
![]()
Anum SherazAnum Sheraz
2,1111 gold badge27 silver badges48 bronze badges
I have windows 10 and pythonv3.5. @uku answer is correct. however, problem I was facing is that where are python scripts which are to be added in environment variable. So I found out that we need to add
C:Users\AppDataLocalProgramsPythonPython35Scripts
above location as environment variable. If it still doesnot work search for python in C Drive then find out script locations.
answered Aug 29, 2017 at 17:25
![]()
If You are using windows then go to python installation path like.
D:Python37Scripts>pip install Flask
it take some movement to download the package.
answered Apr 3, 2019 at 10:42
![]()
you are a PyCharm User, its good easy to install Flask
First open the pycharm press
Open Settings(Ctrl+Alt+s)
Goto Project Interpreter
Double click pip>>
search bar (top of page) you search the flask and click install package
such Cases in which flask is not shown in pip: Open Manage Repository>> Add(+) >> Add this following url
https://www.palletsprojects.com/p/flask/
Now back to pip, it will show related packages of flask,
select flask>>
install package
answered Aug 24, 2019 at 8:30
![]()
Инсталляция
Flask зависит от некоторых внешних библиотек — таких, как
Werkzeug
и Jinja2. Werkzeug — это инструментарий для
WSGI — стандартного интерфейса Python между веб-приложениями и различными
серверами, предназначен как для разработки, так и развёртывания. Jinja2
занимается отображением шаблонов.
Итак, как же быстро получить всё необходимое на ваш компьютер? Есть много
способов, которыми вы это можете проделать, но самый обалденный — это
virtualenv, так что давайте глянем в первую очередь на него.
Для начала вам понадобится Python 2.6 или новее, так что убедитесь, что
у вас инсталлирован свежий Python 2.x. При использовании Flask с Python 3
загляните в раздел python3-support.
virtualenv
Возможно, Virtualenv — именно то, что вы захотите использовать при
разработке, а если у вас на рабочем сервере есть доступ к командной оболочке,
вероятно, вы захотите использовать Virtualenv и здесь.
Какую из проблем решает virtualenv? Если вам нравится Python так, как он
нравится мне, скорее всего, вы захотите использовать его и в других проектах —
вне приложений, созданных на базе Flask.
Но чем больше у вас проектов, тем больше вероятность, что вы будете работать
с разными версиями самого Python, или, по крайней мере, с различными версиями
библиотек Python. Посмотрим правде в глаза: довольно часто библиотеки нарушают
обратную совместимость, и маловероятно, что серьёзное приложение будет работать
вообще без каких-либо зависимостей. Так что же делать, если два или более из
ваших проектов имеют конфликтующие зависимости?
Наше спасение — Virtualenv! Virtualenv предоставляет несколько соседствующих
друг с другом установленных версий Python, по одной для каждого проекта. На
самом деле он реально не устанавливает различные версии Python, но обеспечивает
хитрый способ создать для проектов несколько изолированных друг от друга
окружений. Давайте посмотрим, как работает virtualenv.
Если вы работаете с MacOS X или с Linux, есть вероятность, что заработает
одна из следующих двух команд:
$ sudo easy_install virtualenv
или даже лучше:
$ sudo pip install virtualenv
Возможно, одна из этих команд установит virtualenv на вашей системе. А может
быть, это позволит сделать ваш пакетный менеджер. Если вы используете Ubuntu,
попробуйте:
$ sudo apt-get install python-virtualenv
Если у вас Windows и команда easy_install не работает, вам необходимо
сначала установить её. Чтобы получить дополнительную информацию о том, как это
можно сделать, проверьте раздел pip и setuptools в MS Windows. Установив данную
команду, запустите её, как указано чуть выше, но без префикса sudo.
После того, как virtualenv была установлена, просто запустите командный
интерпретатор и создайте ваше собственное окружение. Обычно в таких случаях
я создаю папку проекта, а в ней — папку venv:
$ mkdir myproject
$ cd myproject
$ virtualenv venv
New python executable in venv/bin/python
Installing setuptools, pip............done.
Теперь, когда вы захотите работать над проектом, вам необходимо лишь
активировать соответствующее окружение. Под MacOS X и Linux, выполните
следующее:
Если вы используете Windows, для вас подойдёт следующая команда:
В любом случае, теперь вы должны использовать ваш virtualenv (обратите
внимание, как изменилось приглашение вашей командной оболочки — для того,
чтобы показать активное окружение).
А если вы захотите вернуться обратно в «реальный мир», используйте команду:
Полсе этого подсказка вашей командной оболочки вернёт свой прежний привычный
вид.
Теперь, двинемся дальше. Для того, чтобы Flask появился в вашем виртуальном
окружении, введите команду:
Через несколько секунд вы сможете двинуться в дальнейший путь.
Установка непосредственно в систему
Возможен и такой вариант установки, но я бы вам его не рекомендовал. Просто
запустите pip с привилегиями суперпользователя:
(Под Windows, запустите ту же команду, но только без sudo, внутри окна с
командной строкой, запущенного с привилегиями администратора системы)
Жизнь на переднем краю
Если вы хотите работать с самой последней версией Flask, существует два пути:
можно указать pip, чтобы он загрузил версию для разработки, или можно
работать со срезом с текущего состояния репозитория git. В обоих случаях,
рекомендуется пользоваться virtualenv.
Получите срез с последнего состояния git в новом окружении virtualenv и
запустите в режиме разработки:
$ git clone http://github.com/mitsuhiko/flask.git
Initialized empty Git repository in ~/dev/flask/.git/
$ cd flask
$ virtualenv venv
New python executable in venv/bin/python
Installing setuptools, pip............done.
$ . venv/bin/activate
$ python setup.py develop
...
Finished processing dependencies for Flask
Будет скачана и активирована в virtualenv текущая версия, соответствующая
последнему (головному) срезу из git. В дальнейшем, чтобы обновиться до
последней версии, всё, что вам будет необходимо сделать — это выполнить
git pull origin.
— Advertisement —
Today we will see how to install FLASK in Windows 10. This is a framework written in Python designed to create web applications. Also, it offers to do it quickly and without having to enter and edit many lines of code. It is based on the WSGI specification by Werkzeug and the Jinja2 template engine. On the other hand, it has a BSD license. Some of its features are the following:
- It is based on Unicode
- WSGI compliant
- Allows the execution of individual tests
- It has development servers and debugging features
- Use Jinja2 template styles
- Allows the creation of secure cookies for sites
Prerequisite
As mentioned, this is an application written in Python. Consequently, it is essential to have this language installed. To know how to do it, see our tutorial.
How to download and install Flask in Windows 10. Step by step.
In the first place, it is necessary to create a folder where you will save the configuration of the app. With this in mind, we will create it inside Documents and call it my_flask.

Then open a CMD as an administrator from the folder location and run the following command:
py -m venv env

With this command we have created the virtual environment of Flask. In effect, all you have to do is go to the folder and look at the content.


Back to the terminal, please run the following command to activate the environment:
envScriptsactivate

Now, install Flask with the following command:
pip install flask

Once Flask is downloaded and installed, the wizard recommends updating the pip. With this in mind, run the following command:
python.exe -m pip install --upgrade pip

Creating the configuration file.
Now it’s time to create an app.py file. Consequently, some advanced text editor like Notepad++ is recommended. Finally, save it in the newly created folder.

Then, please establish the application with the following order:
set FLASK_APP=app.py

Then open the app.py file and add the following lines:
from flask import Flask
app = Flask(name)
@app.route('/')
def index():
return '<h1>Hello</h1>'

To run this environment go to the terminal and there run:
flask run

Then, select the assigned IP address in the terminal. Then open it in any browser.

Ultimately we have seen how you install Flask on Windows 10. Besides, it is written in python so it has a great support. See you later!
Installation
Python Version
We recommend using the latest version of Python. Flask supports Python
3.7 and newer.
Dependencies
These distributions will be installed automatically when installing Flask.
- Werkzeug implements WSGI, the standard Python interface between
applications and servers. - Jinja is a template language that renders the pages your application
serves. - MarkupSafe comes with Jinja. It escapes untrusted input when rendering
templates to avoid injection attacks. - ItsDangerous securely signs data to ensure its integrity. This is used
to protect Flask’s session cookie. - Click is a framework for writing command line applications. It provides
theflaskcommand and allows adding custom management commands.
Optional dependencies
These distributions will not be installed automatically. Flask will detect and
use them if you install them.
- Blinker provides support for :doc:`signals`.
- python-dotenv enables support for :ref:`dotenv` when running
flask
commands. - Watchdog provides a faster, more efficient reloader for the development
server.
greenlet
You may choose to use gevent or eventlet with your application. In this
case, greenlet>=1.0 is required. When using PyPy, PyPy>=7.3.7 is
required.
These are not minimum supported versions, they only indicate the first
versions that added necessary features. You should use the latest
versions of each.
Virtual environments
Use a virtual environment to manage the dependencies for your project, both in
development and in production.
What problem does a virtual environment solve? The more Python projects you
have, the more likely it is that you need to work with different versions of
Python libraries, or even Python itself. Newer versions of libraries for one
project can break compatibility in another project.
Virtual environments are independent groups of Python libraries, one for each
project. Packages installed for one project will not affect other projects or
the operating system’s packages.
Python comes bundled with the :mod:`venv` module to create virtual
environments.
Create an environment
Create a project folder and a :file:`.venv` folder within:
.. tabs::

   .. group-tab:: macOS/Linux

      .. code-block:: text

         $ mkdir myproject
         $ cd myproject
         $ python3 -m venv .venv

   .. group-tab:: Windows

      .. code-block:: text

         > mkdir myproject
         > cd myproject
         > py -3 -m venv .venv
Activate the environment
Before you work on your project, activate the corresponding environment:
.. tabs::

   .. group-tab:: macOS/Linux

      .. code-block:: text

         $ . .venv/bin/activate

   .. group-tab:: Windows

      .. code-block:: text

         > .venvScriptsactivate
Your shell prompt will change to show the name of the activated
environment.
Install Flask
Within the activated environment, use the following command to install
Flask:
Flask is now installed. Check out the :doc:`/quickstart` or go to the
:doc:`Documentation Overview </index>`.
Introduction
Flask is one of the most popular web application frameworks written in Python. It is a microframework designed for an easy and quick start. Extending with tools and libraries adds more functionality to Flask for more complex projects.
This article explains how to install Flask in a virtual testing environment and create a simple Flask application.
Prerequisites
- Installed Python 2.7 or Python 3.5 and newer
- CLI with administrator privileges
Step 1: Install Virtual Environment
Install Flask in a virtual environment to avoid problems with conflicting libraries. Check Python version before starting:
- Python 3 comes with a virtual environment module called venv preinstalled. If you have Python 3 installed, skip to Step 2.
- Python 2 users must install the virtualenv module. If you have Python 2, follow the instructions outlined in Step 1.
Install virtualenv on Linux
The package managers on Linux provides virtualenv.
- For Debian/Ubuntu:
1. Start by opening the Linux terminal.
2. Use apt to install virtualenv on Debian, Ubuntu and other related distributions:
sudo apt install python-virtualenv- For CentOS/Fedora/Red Hat:
1. Open the Linux terminal.
2. Use yum to install virtualenv on CentOS, Red Hat, Fedora and related distributions:
sudo yum install python-virtualenvInstall virtualenv on MacOS
1. Open the terminal.
2. Install virtualenv on Mac using pip:
sudo python2 -m pip install virtualenvInstall virtualenv on Windows
1. Open the command line with administrator privileges.
2. Use pip to install virtualenv on Windows:
py -2 -m pip install virtualenvStep 2: Create an Environment
1. Make a separate directory for your project:
mkdir <project name>2. Move into the directory:
cd <project name>3. Within the directory, create the virtual environment for Flask. When you create the environment, a new folder appears in your project directory with the environment’s name.
Create an Environment in Linux and MacOS
- For Python 3:
To create a virtual environment for Python 3, use the venv module and give it a name:
python3 -m venv <name of environment>- For Python 2:
For Python 2, use the virtualenv module to create a virtual environment and name it:
python -m virtualenv <name of environment>Listing the directory structure with the ls command shows the newly created environment:

Create an Environment in Windows
- For Python 3:
Create and name a virtual environment in Python 3 with:
py -3 -m venv <name of environment>- For Python 2:
For Python 2, create the virtual environment with the virtualenv module:
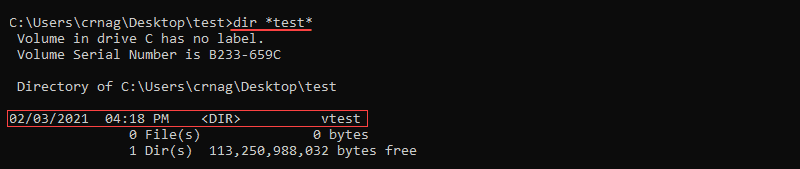
py -2 -m virtualenv <name of environment>List the folder structure using the dir command:
dir *<project name>*The project directory shows the newly created environment:
Step 3: Activate the Environment
Activate the virtual environment before installing Flask. The name of the activated environment shows up in the CLI after activation.
Activate the Environment on Linux and MacOS
Activate the virtual environment in Linux and MacOS with:
. <name of environment>/bin/activate
Activate the Environment on Windows
For Windows, activate the virtual environment with:
<name of environment>Scriptsactivate
Step 4: Install Flask
Install Flask within the activated environment using pip:
pip install FlaskFlask is installed automatically with all the dependencies.
Step 5: Test the Development Environment
1. Create a simple Flask application to test the newly created development environment.
2. Make a file in the Flask project folder called hello.py.
3. Edit the file using a text editor and add the following code to make an application that prints «Hello world!«:
from flask import Flask
app = Flask(__name__)
@app.route('/')
def hello_world():
    return 'Hello world!'
Note: Pick any name for the project except flask.py. The Flask library is in a flask.py file.
4. Save the file and close.
5. Using the console, navigate to the project folder using the cd command.
6. Set the FLASK_APP environment variable.
- For Linux and Mac:
export FLASK_APP=hello.py- For Windows:
setx FLASK_APP "hello.py"7. Run the Flask application with:
flask run
The output prints out a confirmation message and the address.
8. Copy and paste the address into the browser to see the project running:

Conclusion
Flask web applications are easy to configure and run. It is one of the most popular web application frameworks for Python.
Read about the best Python IDEs and code editors to choose the best environment for further web development with Flask.
Improve Article
Save Article
Improve Article
Save Article
Flask is basically a python module. It can work with python only and it is a web-developing framework. It is a collection of libraries and modules. Frameworks are used for developing web platforms. Flask is such a type of web application framework. It is completely written in Python language. Unlike Django, it is only written in Python. As a new user Flask is to be used. As it is easier to handle. As it is only written in Python, before installing Flask on the machine, Python should be installed previously. Also, Python Pip should be installed. Nowadays, the latest version of Python Pip is already installed.
Features:
- Flask is easy to use and easily understandable for new users in Web Framework.
- It can also be used as any third-party plugin extension.
- It is also used for prototyping purposes.
Installing Flask in Windows
Prerequisite:
- Python
- Pip
To install Flask in Windows follow the following steps:
Step 1: At first, open the command prompt in administrator mode. Then the following command should be run. This command will help to install Flask using Pip in Python and will take very less time to install. According to the machine configuration, a proper Flask version should be installed. Wait for some time till the process is completed. After completion of the process, Flask is completed successfully, the message will be displayed. Hence Installation is successful.
pip install flask

Step 2: After that, also the following two commands should be run. These commands will start Flask in the command prompt. Hence, the process is completed successfully.
python
import flask

Project description
Project details
Download files
Download the file for your platform. If you’re not sure which to choose, learn more about installing packages.
Source Distribution
Built Distribution
Close
Hashes for Flask-2.2.2.tar.gz
| Algorithm | Hash digest | |
|---|---|---|
| SHA256 | 642c450d19c4ad482f96729bd2a8f6d32554aa1e231f4f6b4e7e5264b16cca2b |
|
| MD5 | c0d2276cb7d59a06d62c915da9c77ba6 |
|
| BLAKE2b-256 | 69b653cfa30eed5aa7343daff36622843688ba8c6fe9829bb2b92e193ab1163f |
Close
Hashes for Flask-2.2.2-py3-none-any.whl
| Algorithm | Hash digest | |
|---|---|---|
| SHA256 | b9c46cc36662a7949f34b52d8ec7bb59c0d74ba08ba6cb9ce9adc1d8676d9526 |
|
| MD5 | e737537775d400ad00adf8f59358f7ab |
|
| BLAKE2b-256 | 0f4315f4f9ab225b0b25352412e8daa3d0e3d135fcf5e127070c74c3632c8b4c |