- System requirements
- Get the Flutter SDK
- Update your path
- Run flutter doctor
- Android setup
- Install Android Studio
- Set up your Android device
- Set up the Android emulator
- Agree to Android Licenses
- Windows setup
- Additional Windows requirements
- Web setup
- Next step
System requirements
To install and run Flutter,
your development environment must meet these minimum requirements:
- Operating Systems: Windows 10 or later (64-bit), x86-64 based.
- Disk Space: 1.64 GB (does not include disk space for IDE/tools).
-
Tools: Flutter depends on these tools being available in your environment.
- Windows PowerShell 5.0 or newer (this is pre-installed with Windows 10)
-
Git for Windows 2.x, with the
Use Git from the Windows Command Prompt option.If Git for Windows is already installed,
make sure you can rungitcommands from the
command prompt or PowerShell.
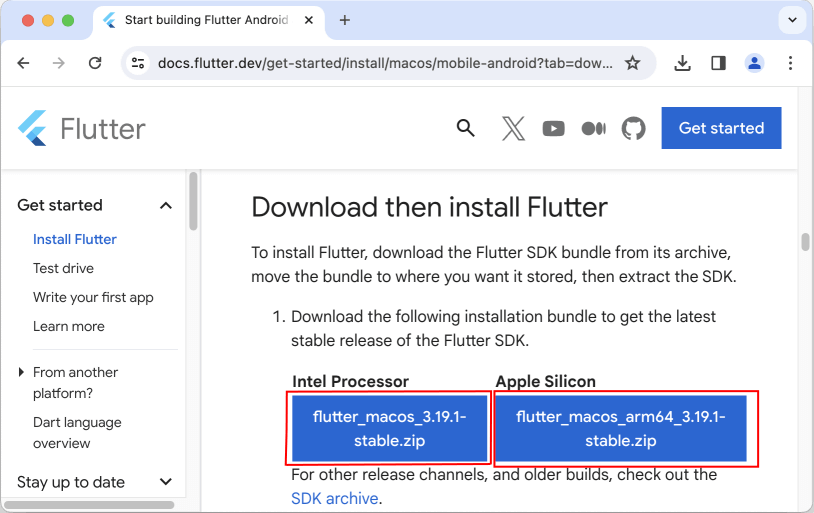
Get the Flutter SDK
-
Download the following installation bundle to get the latest
stable release of the Flutter SDK:(loading…)
For other release channels, and older builds,
see the SDK releases page. -
Extract the zip file and place the contained
flutter
in the desired installation location for the Flutter SDK
(for example,C:srcflutter).
If you don’t want to install a fixed version of the installation
bundle, you can skip steps 1 and 2. Instead, get the source code
from the Flutter repo on
GitHub, and change branches or tags as needed. For example:
C:src>git clone https://github.com/flutter/flutter.git -b stable
You are now ready to run Flutter commands in the Flutter Console.
Update your path
If you wish to run Flutter commands in the regular Windows console,
take these steps to add Flutter to the PATH environment variable:
- From the Start search bar, enter ‘env’
and select Edit environment variables for your account. - Under User variables check if there is an entry called Path:
- If the entry exists, append the full path to
flutterbinusing
;as a separator from existing values. - If the entry doesn’t exist,
create a new user variable namedPathwith
the full path toflutterbinas its value.
- If the entry exists, append the full path to
You have to close and reopen any existing console windows
for these changes to take effect.
Run flutter doctor
From a console window that has the Flutter directory in the
path (see above), run the following command to see if there
are any platform dependencies you need to complete the setup:
C:srcflutter>flutter doctor
This command checks your environment and displays a report of the status
of your Flutter installation. Check the output carefully for other
software you might need to install or further tasks to perform
(shown in bold text).
For example:
[-] Android toolchain - develop for Android devices
    • Android SDK at D:Androidsdk
    ✗ Android SDK is missing command line tools; download from https://goo.gl/XxQghQ
    • Try re-installing or updating your Android SDK,
      visit https://docs.flutter.dev/setup/#android-setup for detailed instructions.
The following sections describe how to perform these tasks and
finish the setup process. Once you have installed any missing
dependencies, you can run the flutter doctor command again to
verify that you’ve set everything up correctly.
Android setup
Install Android Studio
- Download and install Android Studio.
- Start Android Studio, and go through the ‘Android Studio Setup Wizard’.
This installs the latest Android SDK, Android SDK Command-line Tools,
and Android SDK Build-Tools, which are required by Flutter
when developing for Android. - Run
flutter doctorto confirm that Flutter has located
your installation of Android Studio. If Flutter cannot locate it,
runflutter config --android-studio-dir <directory>to set the
directory that Android Studio is installed to.
Set up your Android device
To prepare to run and test your Flutter app on an Android device,
you need an Android device running Android 4.1 (API level 16) or higher.
- Enable Developer options and USB debugging on your device.
Detailed instructions are available in the
Android documentation. - Windows-only: Install the Google USB
Driver. - Using a USB cable, plug your phone into your computer. If prompted on your
device, authorize your computer to access your device. - In the terminal, run the
flutter devicescommand to verify that
Flutter recognizes your connected Android device. By default,
Flutter uses the version of the Android SDK where youradb
tool is based. If you want Flutter to use a different installation
of the Android SDK, you must set theANDROID_SDK_ROOTenvironment
variable to that installation directory.
Set up the Android emulator
To prepare to run and test your Flutter app on the Android emulator,
follow these steps:
- Enable
VM acceleration
on your machine. - Launch Android Studio, click the AVD Manager
icon, and select Create Virtual Device…- In older versions of Android Studio, you should instead
launch Android Studio > Tools > Android > AVD Manager and select
Create Virtual Device…. (The Android submenu is only present
when inside an Android project.) - If you do not have a project open, you can choose
Configure > AVD Manager and select Create Virtual Device…
- In older versions of Android Studio, you should instead
- Choose a device definition and select Next.
- Select one or more system images for the Android versions you want
to emulate, and select Next.
An x86 or x86_64 image is recommended. - Under Emulated Performance, select Hardware — GLES 2.0 to enable
hardware
acceleration. -
Verify the AVD configuration is correct, and select Finish.
For details on the above steps, see Managing
AVDs. - In Android Virtual Device Manager, click Run in the toolbar.
The emulator starts up and displays the default canvas for your
selected OS version and device.
Agree to Android Licenses
Before you can use Flutter, you must agree to the
licenses of the Android SDK platform. This step should be done after
you have installed the tools listed above.
-
Make sure that you have a version of Java 8 installed and that your
JAVA_HOMEenvironment variable is set to the JDK’s folder.Android Studio versions 2.2 and higher come with a JDK, so this should
already be done. - Open an elevated console window and run the following command to begin
signing licenses.$ flutter doctor --android-licenses - Review the terms of each license carefully before agreeing to them.
- Once you are done agreeing with licenses, run
flutter doctoragain
to confirm that you are ready to use Flutter.
Windows setup
Additional Windows requirements
For Windows desktop development,
you need the following in addition to the Flutter SDK:
-
Visual Studio 2022 or Visual Studio Build Tools 2022
When installing Visual Studio or only the Build Tools,
you need the “Desktop development with C++” workload installed
for building windows, including all of its default components.
For more information, see Desktop support for Flutter
Web setup
Flutter has support for building web applications in the
stable channel. Any app created in Flutter 2 automatically
builds for the web. To add web support to an app created
before web was in stable, follow the instructions on
Building a web application with Flutter
when you’ve completed the setup above.
Next step
Set up your preferred editor.
Что такое Flutter. Установка
Последнее обновление: 12.05.2022
Flutter представляет фреймворк от компании Google, который позволяет создавать кроссплатформенные приложения, которые могут использовать однин и тот же код. Спектр платформ широк — это веб-приложения,
мобильные приложения под Android и iOS, графические приложения под настольные операционные системы Windows, MacOS, Linux, а также веб-приложения.
Особенностью работы с Flutter является то, что приложения под разные платформы могут иметь один и тот же код. Поскольку используемые платформы не эквиваленты, то какие-то отдельные части кода необходимо настраивать под определенную ОС, например, под iOS, но тем не менее
большая часть кода может совпадать. Это позволяет разработчикам существенно сэкономить время и ресурсы на создание приложений под все поддерживаемые платформы.
В качестве языка разработки используется язык программирования Dart.
При постороении приложения Flutter транслирует код на Dart в нативный код приложения с помощью Dart AOT (компиляция приложения перед его запуском), которое можно запускать на Android или iOS или
другой платформе. Однако при разработке приложения для ее ускорения Flutter использует JIT (компиляция приложения в процессе его запуска).
Надо отметить, что Flutter относительно новый фреймворк. Хотя прототип фреймворка появился еще в 2015 году, а первая альфа-версия вышла в мае 2017
года, но первый стабильный релиз — Flutter 1.0 увидел свет только в декабре 2018 года. Тем не менее регулярно с небольшой периодичностью ыходят подверсии,
добавляя новую функциональноть и исправляя имеющиеся баги. На момент публикации данной статьи последней стабильной версией является
Flutter 3, которая вышла в мае 2022 года, но постоянно выходят новые подверсии, которые также привносят нововведения во фреймворк (например, на момент
написания данной статьи последней подверсией является 3.0).
Что используется для разрабоки под Flutter? Для для написания кода программы можно использовать любой полюбившийся текстовый редактор и затем
с помощью утилит командной строки из Flutter SDK компилировать приложение. Однако для таких сред как Android Studio и IntelliJ IDEA, а также текстового редактора Visual Studio Code компания Google выпустила специальные
плагины, которые позволяют упростить разработку. Поэтому зачастую для разработки под Flutter используются именно Android Studio и IntelliJ IDEA.
Установка Flutter SDK
На странице https://flutter.dev/docs/get-started/install/ можно найти ссылки на на загрузку SDK для разных операционных систем. Рассмотрим,
как установить Flutter SDK на Windows и MacOS.
Установка Flutter на Windows
Чтобы начать разрабатывать приложения с помощью Flutter, необходимо установить SDK. Но прежде всего следует отметить, что для работы Flutter SDK
в Windows в системе должен быть установлен Git for Windows, который можно найти по адресу https://git-scm.com/download/win.
Также Flutter использует Android SDK. Самый легкий способ установить Android SDK — сразу установить Android Studio, вместе с которой будут установлены вс необходимые инструменты.
Непосредственно для установки Flutter SDK перейдем на страницу https://flutter.dev/docs/get-started/install/windows.
На этой странице найдем в секции Get the Flutter SDK ссылку на zip-архив с Flutter SDK и загрузим его:
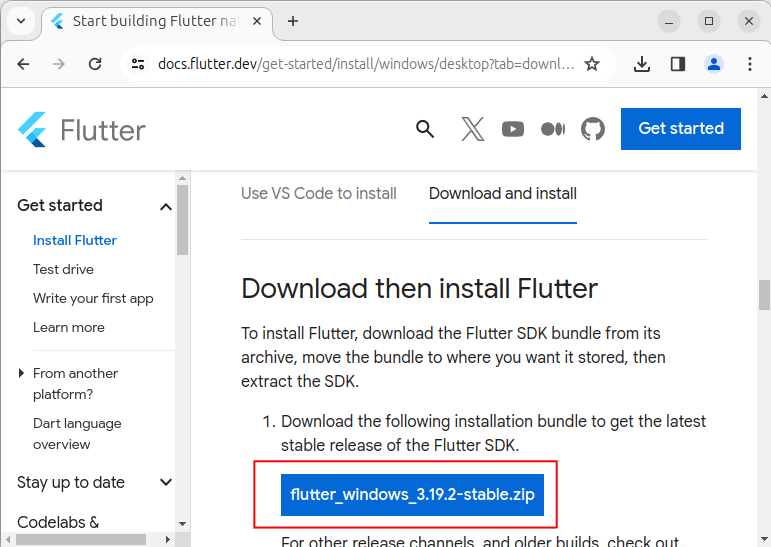
Далее распакуем архив, например, на диске С. Например, в моем случае архив распакован в папку C:flutter.
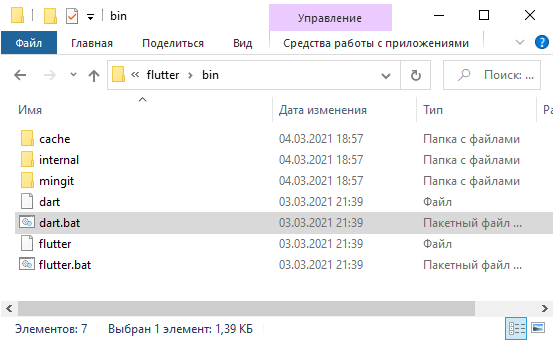
В распакованном архиве в папке flutterbin мы найдем инструменты для компиляции приложения. Например,
в моем случае полный путь к этой папке C:flutterbin:
Если мы работаем в Windows, то для добавления переменной среды через поиск найдем найдем параметр «Изменение переменных среды текущего пользователя». Для этого введем в поле поиска «Изменение переменных»:
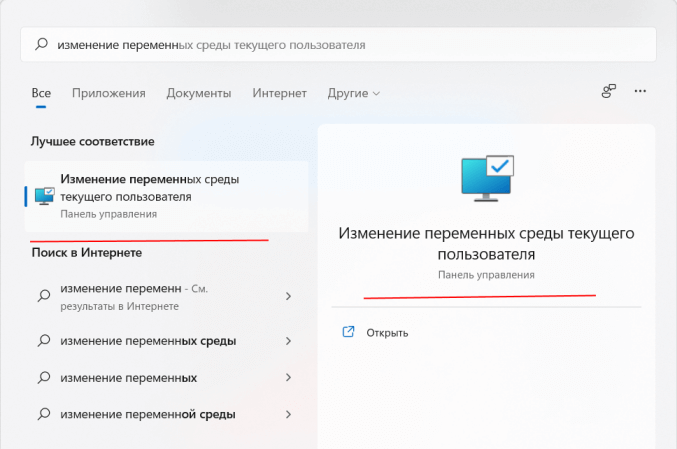
Выберем пункт «Изменение переменных среды текущего пользователя». Затем нам откроется окно, где мы можем увидеть все переменные среды. (Также можно перейти через Параметры и пункт Система ->Дополнительные параметры системы ->Переменные среды)
Здесь нам надо изменить переменную Path, добавив путь к папке bin в Flutter SDK. Для этого выберем пункт Path и нажмем на
кнопку «Изменить»:
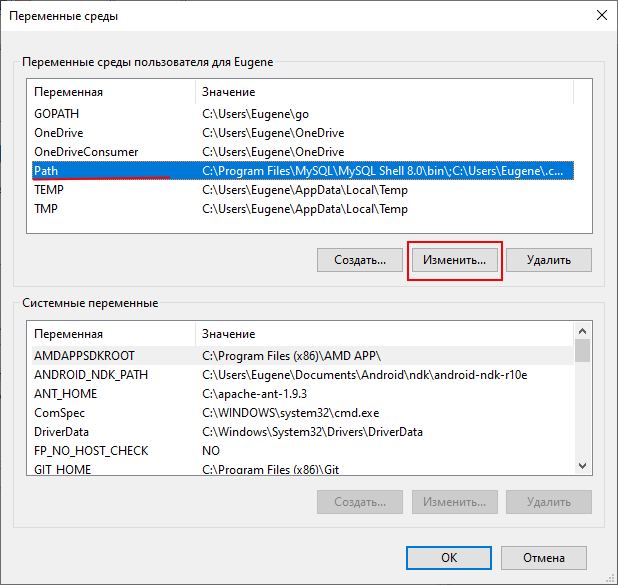
Далее нажмем на кнопку «Создать» и появившееся поле ввода введем путь к папке bin из Flutter SDK:

Чтобы проверить корректность установки Flutter, откроем командную строку и введем команду flutter. Если Windows распознает
ее, и последует вывод некоторой справочной информации (например, как использовать те или иные команды в консоли), то flutter установлен и настроен.

В качестве альтернативы установить Flutter SDK можно через Git. Для этого необходимо в командной строке перейти к папке, где должен располагаться
SDK и далее выполнить в командной строке следующую команду:
git clone -b stable https://github.com/flutter/flutter.git
В данном случае с репозитария на гитхабе будет загружена последняя стабильная версия Flutter SDK. И опять же подчеркиваю, что для выполнения этой команды необходимо
установить Git for Windows, как было написано выше.
Установка Flutter на MacOS
Для установки и обновления Flutter использует git, поэтому необходимо установить git.
Однако если установлен Xcode, то git устанавливать не надо, так как Xcode уже включает git.
Для установки Flutter SDK перейдем на страницу https://flutter.dev/docs/get-started/install/macos и
найдем на странице ссылку на Flutter SDK и загрузим его:
Далее поместим папку с Flutter SDK где-нибудь на жестком диске. Например, в моем случае Flutter SDK расположен в корневой папке текущего пользователя
(Users/eugene).
Для использования Flutter SDK в треминале, необходимо добавить путь к папке bin в SDK в системные переменные. Добавление для текущего окна терминала:
export PATH="$PATH:[Путь к папке с Flutter SDK]/flutter/bin"
При первом использовании команды flutter произойдет загрузка Dart SDK.
Обновление Flutter
Если впоследствии необходимо будет обновить Flutter, то для этого достаточно будет выполнить в командной строке команду
Поскольку Flutter активно развивается, то лучше обновляться регулярно.
If you’ve already built the engine and have the configuration set up but merely need a refresher on
actually compiling the code, see Compiling the engine.
Make sure you have the following dependencies available:
- Linux, macOS, or Windows.
- Linux supports cross-compiling artifacts for Android and Fuchsia, but not iOS.
- macOS supports cross-compiling artifacts for Android and iOS.
- Windows doesn’t support cross-compiling artifacts for any of Android, Fuchsia, or iOS.
- git (used for source version control).
- An IDE. See also the section at the bottom of this page for advice on setting up syntax highlighting while editing the engine.
- An ssh client (used to authenticate with GitHub).
-
Chromium’s
depot_tools
(make sure it’s in your path). We use thegclienttool from depot_tools.- Make sure to install gclient by running ./gclient in the command line.
- Python (used by many of our tools, including
gclient). - On macOS and Linux: curl and unzip (used by
gclient sync). - On Windows:
- Visual Studio 2017 or later (required for non-Googlers only).
- Windows 10 SDK (required for non-Googlers only). Be sure to install the «Debugging Tools for Windows» feature.
- On macOS: the latest Xcode.
- Recommended for Googlers: Goma for distributed builds. The compiling page has more information on how to set this up.
You do not need Dart installed,
as a Dart tool chain is automatically downloaded as part of the «getting the code»
step. Similarly for the Android SDK, it’s downloaded by the gclient sync step below.
Run the following steps to set up your environment:
- Fork
https://github.com/flutter/engineinto your own GitHub account. If
you already have a fork, and are now installing a development environment on
a new machine, make sure you’ve updated your fork so that you don’t use stale
configuration options from long ago. Do not clone this repo locally, scripts
will take care of that for you. - If you haven’t configured your machine with an SSH key that’s known to github then
follow the directions here: https://help.github.com/articles/generating-ssh-keys/. - Non-Googler Windows users should set the following environment variables to point
depot_toolsto their Visual Studio installation directory:DEPOT_TOOLS_WIN_TOOLCHAIN=0-
GYP_MSVS_OVERRIDE_PATH=C:Program FilesMicrosoft Visual Studio2022Community(use the path of your installation)
- Create an empty directory called
enginefor your copy of the repository and
cdinto it. (It is possible to use a different name, but some tools assume this
name unless configured otherwise, so calling itenginewill make thing easier.) - Create a
.gclientfile in theenginedirectory with the
following contents, replacing<your_name_here>with your GitHub
account name:solutions = [ { "managed": False, "name": "src/flutter", "url": "git@github.com:<your_name_here>/engine.git", "custom_deps": {}, "deps_file": "DEPS", "safesync_url": "", }, ]
If you plan to build the Web engine, you should add the following to your
.gclientfile:solutions = [ { # Same as above... "custom_vars": { "download_emsdk": True, }, }, ]
-
gclient syncin that directory. On Windows,gclient syncmust be run as Administrator due to this issue. This will fetch all the source code
that Flutter depends on. Avoid interrupting this script, as doing so
can leave your
repository in an inconsistent state that is tedious to clean up.
(This step automatically runsgit clone, among other things.) - Add a remote for the upstream repository:
-
cd src/flutter(This was created in yourenginedirectory
bygclient sync.) -
git remote add upstream git@github.com:flutter/engine.git(So
that you fetch from the masterflutter/enginerepository, not
your clone, when runninggit fetchet al.) -
cd ..(Return to thesrcdirectory thatgclient synccreated
in yourenginedirectory.)
-
- If you’re on Linux, the following may or may not help you install
required dependencies. Note: These scripts are
distro- and version-specific, so are not guaranteed to work on
any configuration. If they fail, you may need to find comparable
packages to the ones that weren’t found. You are free to update
them if you wish for your distribution, but it is often easier to
just install the packages you need as you go, particularly for the
install-build-deps.shscript.sudo ./build/install-build-deps-android.shsudo ./build/install-build-deps.shsudo ./flutter/build/install-build-deps-linux-desktop.sh
- If you’re on Mac:
- install Oracle’s Java JDK, version 1.8 or later
- If you’re planning on working on the
buildroot repository as
well, and have a local checkout of that repository, run the
following commands in thesrcdirectory to update your git
remotes accordingly:git remote rename origin upstream git remote add origin git@github.com:<your_name_here>/buildroot.git
Next steps:
- Compiling the engine explains how to actually get builds, now that you have the code.
- The flutter tool has a section explaining how to use custom engine builds.
- Signing commits, to configure your environment to securely sign your commits.
Editor autocomplete support
Xcode [Objective-C++]
On Mac, you can simply use Xcode (e.g., open out/host_debug_unopt/products.xcodeproj).
VSCode with C/C++ Intellisense [C/C++]
VSCode can provide some IDE features using the C/C++ extension. It will provide basic support on install without needing any additional configuration. There will probably be some issues, like header not found errors and incorrect jump to definitions.
Intellisense can also use our compile_commands.json for more robust functionality. Either symlink src/out/compile_commands.json to the project root at src or provide an absolute path to it in the c_cpp_properties.json config file. See «compile commands» in the c_cpp_properties.json reference. This will likely resolve the basic issues mentioned above.
For adding IDE support to the Java code in the engine with VSCode, see «Using VSCode as an IDE for the Android Embedding».
cquery/ccls (multiple editors) [C/C++/Objective-C++]
Alternatively, cquery and a derivative ccls are highly scalable C/C++/Objective-C language server that supports IDE features like go-to-definition, call hierarchy, autocomplete, find reference etc that works reasonably well with our engine repo.
They(https://github.com/cquery-project/cquery/wiki/Editor-configuration) supports editors like VSCode, emacs, vim etc.
To set up:
- Install cquery
-
brew install cqueryorbrew install cclson osx; or - Build from source
-
- Generate compile_commands.json which our GN tool already does such as via
src/flutter/tools/gn --ios --unoptimized - Install an editor extension such as VSCode-cquery or vscode-ccls
- VSCode-query and vscode-ccls requires the compile_commands.json to be at the project root. Copy or symlink
src/out/compile_commands.jsontosrc/orsrc/flutterdepending on which folder you want to open. - Follow Setting up the extension to configure VSCode-query.
- VSCode-query and vscode-ccls requires the compile_commands.json to be at the project root. Copy or symlink

Using VSCode as an IDE for the Android Embedding [Java]
-
Install the extensions vscjava.vscode-java-pack and vscjava.vscode-java-dependency.
-
Right click on the
shell/platform/androidfolder in the engine source and click onAdd Folder to Java Source Path. This creates an anonymous workspace and turns those files from «syntax mode» to «compile mode». At this point, you should see a lot of errors since none of the external imports are found. -
Find the «Java Dependencies» pane in your Explorer view. Use the «Explorer: Focus on Java Dependencies View» command if hidden.
-
Refresh the view and find the «flutter_*» project. There should be a «_/shell/platform/android» source folder there.
-
In the «Referenced Libraries» sibling node, click the + button, navigate to
engine/src/third_party/android_embedding_dependenciesand add the entire folder. This is the equivalent of adding"java.project.referencedLibraries": [ "{path to engine}/src/third_party/android_embedding_dependencies/lib/**/*.jar" ]to your VSCode’s settings.json for your user or for your workspace.
-
If you previously had a
shell/platform/android/.classpath, delete it.
VSCode Additional Useful Configuration
-
Create snippets for header files with this configuration. This will let you use
hdrkeyboard macro to create the boiler plate header code. Also consider some of these settings and more tips. -
To format GN files on save, consider using this extension.
Let’s learn how to setup an environment for the successful development of the Flutter application. Flutter installation is the first step to get started in the journey of Cross platform mobile application development using Flutter. In this guide, we will focus in Flutter installation for both Windows and Mac.
Table of contents
- System requirements for Windows
- Install Git
- Install Flutter SDK for Windows
- System Requirements for macOS
- Install Flutter SDK for Mac
System requirements for Windows
For Window to install and run Flutter, we need first to meet these requirements for your development environment.
| Operating System | Windows 7 or Later Version |
| Disk Space | 400 MB (It does not include disk space for IDE/tools). |
| Tools | 1. Windows PowerShell 2. Git for Windows 2.x |
| SDK | Flutter SDK for Windows |
| IDE | Android Studio Visual Studio |
Install Git
Before starting Flutter Installation Guide, Let’s start the guide by installing Git first.
Step1: To download Git go to this Offical Website https://git-scm.com/download/win The Offical Page look Like

Step 2: Run the .exe file to complete the installation. During installation process, make sure that you have selected the recommended option.
Click on the downloaded installer file and select yes to continue. After the selecting yes the installation begins, and the screen will look like as

Click on next to continue.
Step 3 Default components are automatically selected in this step. You can also choose your required part.

Click next to continue.
Step 4 The default Git command-line options are selected automatically. You can choose your preferred choice. Click next to continue.

Step 5 The default transport backend options are selected in this step. Click next to continue.

Step 6 Select your required line ending option and click next to continue.

Step 7 Select preferred terminal emulator clicks on the next to continue.

Step 8 This is the last step that provides some extra features like system caching, credential management and symbolic link. Select the required features and click on the next option.

Step 9 The files are being extracted in this step.

Therefore, The Git installation is completed. Now you can access the Git Gui and Git Bash.
The Git Bash looks like as

Install Flutter SDK for Windows
Step 1: To download Flutter SDK, Go to its official website, click on Get started button, you will get the following screen.

Step 2: Next, to download the latest Flutter SDK, click on the Windows icon. Here, you will find the download link for SDK.
Step 3: When your download is complete, extract the zip file and place it in the desired installation folder or location, for example, C: /Flutter.
Step 4: To run the Flutter command in regular windows console, you need to update the system path to include the flutter bin directory. The following steps are required to do this:
Step 4.1: Go to MyComputer properties -> advanced tab -> environment variables. You will get the following screen.

Step 4.2: Now, select path -> click on edit. The following screen appears.

Step 4.3: In the above window, click on New->write path of Flutter bin folder in variable value -> ok -> ok -> ok.
Step 5: Then, run the $ flutter doctor command. This command checks for all the requirements of Flutter app development and displays a report of the status of your Flutter installation.
$ flutter doctor Step 6: When you run the above command, it will analyze the system and show its report, as shown in the below image. Here, you will find the details of all missing tools, which required to run Flutter as well as the development tools that are available but not connected with the device.

Step 7: Install the Android SDK. If the flutter doctor command does not find the Android SDK tool in your system, then you need first to install the Android Studio IDE. To install Android Studio IDE, do the following steps.
Step 7.1: Download the latest Android Studio executable or zip file from the official site.
Step 7.2: When the download is complete, open the .exe file and run it. You will get the following dialog box.

Step 7.3: Follow the steps of the installation wizard. Once the installation wizard completes, you will get the following screen.

Step 7.4: In the above screen, click Next-> Finish. Once the Finish button is clicked, you need to choose the ‘Don’t import Settings option’ and click OK. It will start the Android Studio.

Step 8: Next, you need to set up an Android emulator. It is responsible for running and testing the Flutter application.
Step 8.1: To set an Android emulator, go to Android Studio > Tools > Android > AVD Manager and select Create Virtual Device. Or, go to Help->Find Action->Type Emulator in the search box. You will get the following screen.

Step 8.2: Choose your device definition and click on Next.
Step 8.3: You can then select the system image for the latest Android version and click on Next.
Step 8.4: After that, verify the all AVD configuration. If it is correct, click on Finish. The following screen appears.

Step 8.5: Lastly, click on the icon pointed into the red color rectangle. The Android emulator displayed as below screen.

Step 9: Now, install Flutter and Dart plugin for building Flutter application in Android Studio. These plugins provide a template to create a Flutter application, give an option to run and debug Flutter application in the Android Studio itself. Do the following steps to install these plugins.
Step 9.1: Open the Android Studio and then go to File->Settings->Plugins.
Step 9.2: Now, search the Flutter plugin. If found, select Flutter plugin and click install. When you click on install, it will ask you to install Dart plugin as below screen. Click yes to proceed.

Step 9.3: Restart the Android Studio.

You can use VS Code or andriod Studio as an IDE for coding
Also read: How To Create Responsive Layout In Flutter
System Requirements for macOS
For Mac OS to install and run Flutter, we need first to meet these requirements for your development environment.
| Operating System | macOS (64-bit) |
| Disk Space | 2.8 GB (It does not include disk space for IDE/tools). |
| Tools | bash curl git 2.x mkdir rm unzip which |
| IDE | Xcode (Official) |
For downloading Git in mac it is same process for the Window OS
Install Flutter SDK for Mac
Step 1: Download the installation bundle of the Flutter Software Development Kit for macOS. To download Flutter SDK, Go to its official website.
Step 2: After your download is complete, extract the zip file and place it in the desired installation folder or location.
Step 3: Next, to run the Flutter command, you need to update the system path to include the flutter bin directory.
$ export PATH="$PATH:`pwd`/flutter/bin" Step 4: Then enable the updated path in the current terminal window using the below command and then verify it also.
source ~/.bashrc
source $HOME/.bash_profile
echo $PATH
Step 5: After that, run the $ flutter doctor command. This command checks for all the requirements of Flutter app development and displays a report of the status of your Flutter installation.
$ flutter doctor Step 6: When you run the above command, it will analyze the system and the details of all missing tools, which required to run Flutter as well as the development tools that are available but not connected with the device.
Step 7: Do Install the latest Xcode tools if reported by the Flutter doctor tool.
Step 8: If Flutter doctor tool reports you to install the latest Android Studio and SDK then do the same.
Step 9: Next, you need to set up an iOS simulator or connect an iPhone device to the system for developing an iOS application.
Step 10: Again, set up an android emulator or connect an android device to the system for developing an android application which is similar to the window os.
Step 11: FInally install Flutter and Dart plugin for building Flutter application in Android Studio. These plugins provide a template to create a Flutter application, give an option to run and debug Flutter application in the Android Studio itself.
Related Guide: Learn Flutter Version Management (FVM), The easiest Way To Manage Multiple Flutter SDK Version