![]()
Загрузить PDF
![]()
Загрузить PDF
Из данной статьи вы узнаете, как установить программу Minecraft Forge на компьютере под управлением Windows или Mac OS X. Forge позволяет создавать и загружать моды для Minecraft.
-

1
Убедитесь, что на компьютере установлен Minecraft. Чтобы установить Forge, необходимо иметь установленный Minecraft; также необходимо запустить игру хотя бы один раз. Только в этом случае все нужные файлы будут в наличии.
- Если создается сервер Forge, Minecraft и серверная программа не нужны. Установочный файл Forge включает все файлы сервера.
-
2
Перейдите на сайт Minecraft Forge. Откройте сайт https://files.minecraftforge.net/ в веб-браузере — откроется страница, на которой можно скачать последнюю версию Minecraft Forge.
-
3
Нажмите Installer (Установочный файл). Выберите кнопку, которая соответствует вашей операционной системе:
- Windows. Нажмите большую кнопку «Windows Installer» (Установочный файл для Windows) слева от кнопки «Changelog» (Изменения) в разделе «Download Latest» (Последние версии) в верхней части страницы.
- Mac OS X. Нажмите маленькую кнопку «Installer» (Установочный файл) справа от кнопки «Changelog» (Изменения) в разделе «Download Latest» (Последние версии) в верхней части страницы.
-
4
Нажмите Skip (Пропустить). Эта кнопка находится в верхнем правом углу страницы; чтобы она отобразилась на экране, подождите шесть секунд. Запустится процесс скачивания установочного файла Forge.
- Возможно, вам придется выбрать расположение для скачиваемого файла (например, рабочий стол) или подтвердить, что вы хотите скачать файл.
Реклама


-
1
Дважды щелкните по установочному файлу Forge. Его значок имеет вид белой наковальни на темно-синем фоне. Запустится мастер установки Forge.
- Если открылось всплывающее сообщение о том, что нужно установить/обновить Java, перейдите на сайт https://www.java.com/ru/download/ в веб-браузере, нажмите «Загрузить Java бесплатно», нажмите «Согласиться и начать бесплатную загрузку», а затем установите Java.
-
2
Поставьте флажок у опции «Установить клиент».
-
3
Щелкните по OK. Эта кнопка находится в нижнем правом углу экрана. Так вы установите клиентские файлы и папки для Minecraft Forge.
- Если хотите, измените папку для установки файлов; нажмите «…», а затем выберите папку.
-
4
Нажмите OK, когда появится запрос. Процесс установки будет завершен.
Реклама


-
1
Дважды щелкните по установочному файлу Forge. Это JAR-файл со значком в виде чашки кофе.
-
2
Нажмите OK в окне с сообщением об ошибке, а затем щелкните по значку
. Это значок меню Apple, который находится в верхнем левом углу экрана.
- Если окно с сообщением об ошибке не открылось, перейдите к шагу 8.
-
3
Нажмите Системные настройки. Эта опция находится в верхней части выпадающего меню.
-
4
Щелкните по Защита и безопасность. Эта опция имеет значок в виде дома и расположена в верхней части меню «Системные настройки».
-
5
Щелкните по значку в виде замка. Он находится в нижнем левом углу окна.
- Если нужно, введите пароль администратора.
-
6
Нажмите Открыть. Эта кнопка находится рядом с именем файла Forge, которое будет чем-то вроде «forge-1.12-14.21.1.2387-installer.jar».
- Если в окне «Защита и безопасность» нет опции «Открыть», перейдите на вкладку «Основные» (в верхней части страницы).
-
7
Щелкните по Открыть, когда появится запрос. Откроется окно мастера установки Minecraft Forge.
-
8
Поставьте флажок у опции «Установить клиент».
- Если система предложит установить Java, во всплывающем окне нажмите «Дополнительная информация», затем нажмите «Загрузить» (под Java), щелкните по DMG-файлу, дважды щелкните по PKG-пакету и следуйте инструкциям на экране.
-
9
Щелкните по OK. Эта кнопка находится в нижнем правом углу экрана. Так вы установите клиентские файлы и папки для Minecraft Forge.
- Чтобы изменить папку для установки файлов, нажмите «…» (над кнопкой «OK»), а затем выберите папку.
-
10
Нажмите OK, когда появится запрос. Процесс установки будет завершен.
Реклама


-
1
Нажмите OK. Запустите загруженный установочный файл с помощью Java и поставьте флажок у опции «Установить клиент».
- Вы также можете изменить папку для установки файлов.
-
2
Нажмите OK, когда появится запрос. Процесс установки будет завершен.
Реклама

Советы
- Чтобы использовать Forge в Minecraft, выберите опцию «Forge» в окне «Профиль» на экране запуска Minecraft.
Реклама
Предупреждения
- Использование некоторых модов может привести к нестабильной работе игры. В этом случае удалите мод из папки «Mods» и перезапустите Minecraft.
Реклама
Об этой статье
Эту страницу просматривали 148 970 раз.
Была ли эта статья полезной?
![]()
Download Article
![]()
Download Article
This wikiHow teaches you how to install the Minecraft Forge program on your Windows, Mac or Linux computer. Forge is a free and open-source app that is used to make and create mods for Minecraft: Java Edition.
-
1
Make sure you have Minecraft installed. In order to install Forge, you will need to have Minecraft installed and have run it at least once. This will ensure that all of the necessary files are in place.
- Minecraft Forge only works for Minecraft: Java Edition. Minecraft for XBox One and PS4 cannot be modded. You can use smartphone apps to mod Minecraft for Android and iPhone/iPad versions of Minecraft.
- If you are creating a Forge server, You don’t need Minecraft official server software installed. The Forge installer contains all of the server files.
-
2
Go to https://files.minecraftforge.net/ in a web browser. This will take you to the download page of the latest recommended version of Minecraft Forge.
- It is recommended that you install the version of Minecraft Forge that corresponds to the version of Minecraft you are playing. For example, if you are playing Minecraft 1.13, you should download Minecraft Forge 1.13. You can find the link to the different versions of Minecraft Forge in the list that says «Minecraft Version» to the left.
- The latest version of Minecraft Forge is 1.16.1, but this version of Minecraft Forge has had the least amount of testing. The latest recommended version of Minecraft Forge is 1.15.2.
- Some mods require a specific version of Minecraft Forge. If the mod you want to install requires you to install a specific version of Minecraft Forge, click Show all versions to see all versions of Minecraft Forge.
Advertisement
-
3
Click the Installer button below «Recommended Download». It’s the button that has an icon that resembles a filing cabinet in the box labeled «Recommended Download» on the right. This takes you to the website that hosts the download file.
- Warning: The website that hosts the download file is an ad wall website called adfoc.us. This website is full of malware and false download links. Do not click any buttons or links on this website, regardless of what they say. If you see an alert that says adfoc.us wants to send you notifications, click Block.
-
4
Wait 6 seconds and click Skip. It’s the red button in the top-right corner of the adfoc.us page. You’ll have to wait six seconds before this button appears. Doing so prompts the Forge install file to download.
- You may have to select a save location (e.g., the desktop) or confirm that you wish to download the file before the download commences.
- You may see a notification that says the downloaded file may be harmful to your computer. Click Keep to keep the file. If the downloaded file is called «forge-[version number]-installer.jar», it is safe. If you accidentally download any other files from adfoc.us, delete them immediately.


Advertisement
-
1
Double-click the Forge file. It’s a file called «forge-[version number]-installer.jar». You can open downloaded files in your web browser or in your Downloads folder.
- If you receive a pop-up message telling you to install Java, go to https://www.java.com/en/download/ in your browser, click Free Java Download, click Agree and Start Free Download, and then install Java once it finishes downloading.
-
2
Make sure the «Install client» radio option is checked. If it isn’t, click the box or circle next to «Install client» before proceeding.
-
3
Make sure the Minecraft install location is correct. By default, your Minecraft install location should be «C:Users[username]AppDataRoaming.minecraft» on Windows. If the path listed at the bottom of the installer window isn’t correct, click … to the right of the path. Then navigate to the Minecraft install folder and click Open.
-
4
Click OK. It’s in the bottom-right corner of the page. Doing so will install the client files and folders for Minecraft Forge.
- You can change the destination folder by clicking … and then selecting a new folder.
-
5
Click OK when prompted. This will complete the installation process.
Advertisement
-
1
Double-click the Forge file. It’s a .jar file with an image of a cup of coffee on it.
-
2
Click OK on the error message. You will most likely get a message that explains that Forge is from an unidentified developer. Mac blocks files from unidentified sources for security reasons. You will need to adjust the security settings to allow your Mac to run this file.
-
3
Click the
icon. The Apple menu icon is in the top-left corner of the screen.
- If you don’t receive an error message, skip ahead to the «Make sure the ‘Install client’ box is checked» step.
-
4
Click System Preferences. It’s near the top of the drop-down menu.
-
5
Click Security & Privacy. This is a house-shaped icon in the top row of the «System Preferences» menu.
-
6
Click the lock icon. It’s in the bottom-left corner of the window.
- You’ll have to enter your administrator password before continuing.
-
7
Click Open Anyway. It’s under the General tab in Security & Privacy. This will open the Minecraft Forge installer window.
- If this option is not available, open the Finder and navigate to your Downloads folder. Double-click the forge installer JAR file.
-
8
Click Open. This confirms that you want to open the file.
-
9
Make sure the «Install client» radio option is checked. If it isn’t, click the box or circle next to «Install client» before proceeding.
- If prompted to install Java, first click More Info… on the pop-up window, click Download below Java, click the Java .dmg file, double-click the Java .pkg folder, and follow the on-screen instructions.
-
10
Ensure the install folder for Minecraft is correct. It’s listed at the bottom of the Forge installer window. By default, your Minecraft install folder location should be «/Users/[username]/Library/Application Support/minecraft/». If this is not correct, click … next to the file location and navigate to your Minecraft install location. Then click Choose.
-
11
Click OK. It’s in the bottom-right corner of the page. Doing so will install the client files and folders for Minecraft Forge.
- You can change the destination folder by clicking … above OK and then selecting a new folder.
-
12
Click OK when prompted. This will complete the installation process.


Advertisement
-
1
Navigate to the downloaded file. By default, your downloaded files can be found in your «Downloads» folder. Open the File Manager and navigate to the Downloads folder.
-
2
Right-click the Minecraft Forge install file and click Properties. This opens the properties menu for the file. By default, the forge install file is «forge-[version number]-installer.jar.
-
3
Click Permissions. It’s at the top of the Properties window.
-
4
Check the box that says «Allow executing file as program». This makes the file executable. Without this, Linux will not allow you to run the file.
- To make the file executable in the Terminal, navigate to the folder location and type «sudo chmod +x forge-[version number]-installer.jar» and press Enter. [1]
- To make the file executable in the Terminal, navigate to the folder location and type «sudo chmod +x forge-[version number]-installer.jar» and press Enter. [1]
-
5
Double-click the Forge install file. This run the file and open the Installer. By default, the forge install file is «forge-[version number]-installer.jar.
-
6
Make sure the «Install client» radio option is checked. If it isn’t, click the box or circle next to «Install client» before proceeding.
-
7
Ensure the Minecraft install folder is correct. In Linux, the Minecraft install folder should be «/home/[username]/.minecraft». If this is not correct, click … next to the folder location at the bottom of the Forge install window. Navigate to the correct file location and click Ok.
-
8
Click OK button. This will install Forge for Minecraft.
-
9
Click OK. After installation is complete you’ll see a window with this message.
Advertisement
Add New Question
-
Question
I don’t want to install Java because I’m afraid that I will get a virus. What should I do?

Java shouldn’t have a virus if it’s coming from the actual Java website, so just make sure you’re downloading it from the correct source.
-
Question
I accidentally deleted the mods folder with Forge installed. What should I do?
Simply create another folder titled «mods» then redownload all of your mods and put them back. It won’t mess anything up.
-
Question
Do you have to have a server?
Mike16576
Community Answer
No, you do not. Forge is a mod runner you can use as a version of Minecraft.

See more answers
Ask a Question
200 characters left
Include your email address to get a message when this question is answered.
Submit
Advertisement
-
To use Forge in Minecraft, you’ll select Forge from the Profile box on the Minecraft launcher page.
-
Some mods add dimensions that don’t work with other mods that add dimensions. You might be able to fix this by editing the dimension id.
Thanks for submitting a tip for review!
Advertisement
-
Many mods are unstable, and may lead to instability or crashes or inability to play Minecraft. If this occurs, simply remove the mod from your mods folder and start Minecraft again.
Advertisement
References
About This Article
Article SummaryX
1. Install and run Minecraft: Java Edition.
2. Go to https://files.minecraftforge.net/ in your web browser.
3. Click Installer below the recommended download box.
4. Wait 6 second and click Skip in the upper-right corner.
5. Navigate to the «forge-[version number]-installer.jar» file in your Downloads folder.
6. Double-click the «forge-[version number]-installer.jar» file.
7. Ensure the «Install Client» option is selected.
8. Ensure the Minecraft install folder is correct.
9. Click Ok to install Minecraft Forge.
10. Click Ok when the installation is complete.
To learn how to install Minecraft Forge on your Mac, keep reading!
Did this summary help you?
Thanks to all authors for creating a page that has been read 1,569,259 times.
Did this article help you?
![]()
Download Article
![]()
Download Article
This wikiHow teaches you how to install the Minecraft Forge program on your Windows, Mac or Linux computer. Forge is a free and open-source app that is used to make and create mods for Minecraft: Java Edition.
-
1
Make sure you have Minecraft installed. In order to install Forge, you will need to have Minecraft installed and have run it at least once. This will ensure that all of the necessary files are in place.
- Minecraft Forge only works for Minecraft: Java Edition. Minecraft for XBox One and PS4 cannot be modded. You can use smartphone apps to mod Minecraft for Android and iPhone/iPad versions of Minecraft.
- If you are creating a Forge server, You don’t need Minecraft official server software installed. The Forge installer contains all of the server files.
-
2
Go to https://files.minecraftforge.net/ in a web browser. This will take you to the download page of the latest recommended version of Minecraft Forge.
- It is recommended that you install the version of Minecraft Forge that corresponds to the version of Minecraft you are playing. For example, if you are playing Minecraft 1.13, you should download Minecraft Forge 1.13. You can find the link to the different versions of Minecraft Forge in the list that says «Minecraft Version» to the left.
- The latest version of Minecraft Forge is 1.16.1, but this version of Minecraft Forge has had the least amount of testing. The latest recommended version of Minecraft Forge is 1.15.2.
- Some mods require a specific version of Minecraft Forge. If the mod you want to install requires you to install a specific version of Minecraft Forge, click Show all versions to see all versions of Minecraft Forge.
Advertisement
-
3
Click the Installer button below «Recommended Download». It’s the button that has an icon that resembles a filing cabinet in the box labeled «Recommended Download» on the right. This takes you to the website that hosts the download file.
- Warning: The website that hosts the download file is an ad wall website called adfoc.us. This website is full of malware and false download links. Do not click any buttons or links on this website, regardless of what they say. If you see an alert that says adfoc.us wants to send you notifications, click Block.
-
4
Wait 6 seconds and click Skip. It’s the red button in the top-right corner of the adfoc.us page. You’ll have to wait six seconds before this button appears. Doing so prompts the Forge install file to download.
- You may have to select a save location (e.g., the desktop) or confirm that you wish to download the file before the download commences.
- You may see a notification that says the downloaded file may be harmful to your computer. Click Keep to keep the file. If the downloaded file is called «forge-[version number]-installer.jar», it is safe. If you accidentally download any other files from adfoc.us, delete them immediately.
Advertisement
-
1
Double-click the Forge file. It’s a file called «forge-[version number]-installer.jar». You can open downloaded files in your web browser or in your Downloads folder.
- If you receive a pop-up message telling you to install Java, go to https://www.java.com/en/download/ in your browser, click Free Java Download, click Agree and Start Free Download, and then install Java once it finishes downloading.
-
2
Make sure the «Install client» radio option is checked. If it isn’t, click the box or circle next to «Install client» before proceeding.
-
3
Make sure the Minecraft install location is correct. By default, your Minecraft install location should be «C:Users[username]AppDataRoaming.minecraft» on Windows. If the path listed at the bottom of the installer window isn’t correct, click … to the right of the path. Then navigate to the Minecraft install folder and click Open.
-
4
Click OK. It’s in the bottom-right corner of the page. Doing so will install the client files and folders for Minecraft Forge.
- You can change the destination folder by clicking … and then selecting a new folder.
-
5
Click OK when prompted. This will complete the installation process.
Advertisement
-
1
Double-click the Forge file. It’s a .jar file with an image of a cup of coffee on it.
-
2
Click OK on the error message. You will most likely get a message that explains that Forge is from an unidentified developer. Mac blocks files from unidentified sources for security reasons. You will need to adjust the security settings to allow your Mac to run this file.
-
3
Click the
icon. The Apple menu icon is in the top-left corner of the screen.
- If you don’t receive an error message, skip ahead to the «Make sure the ‘Install client’ box is checked» step.
-
4
Click System Preferences. It’s near the top of the drop-down menu.
-
5
Click Security & Privacy. This is a house-shaped icon in the top row of the «System Preferences» menu.
-
6
Click the lock icon. It’s in the bottom-left corner of the window.
- You’ll have to enter your administrator password before continuing.
-
7
Click Open Anyway. It’s under the General tab in Security & Privacy. This will open the Minecraft Forge installer window.
- If this option is not available, open the Finder and navigate to your Downloads folder. Double-click the forge installer JAR file.
-
8
Click Open. This confirms that you want to open the file.
-
9
Make sure the «Install client» radio option is checked. If it isn’t, click the box or circle next to «Install client» before proceeding.
- If prompted to install Java, first click More Info… on the pop-up window, click Download below Java, click the Java .dmg file, double-click the Java .pkg folder, and follow the on-screen instructions.
-
10
Ensure the install folder for Minecraft is correct. It’s listed at the bottom of the Forge installer window. By default, your Minecraft install folder location should be «/Users/[username]/Library/Application Support/minecraft/». If this is not correct, click … next to the file location and navigate to your Minecraft install location. Then click Choose.
-
11
Click OK. It’s in the bottom-right corner of the page. Doing so will install the client files and folders for Minecraft Forge.
- You can change the destination folder by clicking … above OK and then selecting a new folder.
-
12
Click OK when prompted. This will complete the installation process.
Advertisement
-
1
Navigate to the downloaded file. By default, your downloaded files can be found in your «Downloads» folder. Open the File Manager and navigate to the Downloads folder.
-
2
Right-click the Minecraft Forge install file and click Properties. This opens the properties menu for the file. By default, the forge install file is «forge-[version number]-installer.jar.
-
3
Click Permissions. It’s at the top of the Properties window.
-
4
Check the box that says «Allow executing file as program». This makes the file executable. Without this, Linux will not allow you to run the file.
- To make the file executable in the Terminal, navigate to the folder location and type «sudo chmod +x forge-[version number]-installer.jar» and press Enter. [1]
- To make the file executable in the Terminal, navigate to the folder location and type «sudo chmod +x forge-[version number]-installer.jar» and press Enter. [1]
-
5
Double-click the Forge install file. This run the file and open the Installer. By default, the forge install file is «forge-[version number]-installer.jar.
-
6
Make sure the «Install client» radio option is checked. If it isn’t, click the box or circle next to «Install client» before proceeding.
-
7
Ensure the Minecraft install folder is correct. In Linux, the Minecraft install folder should be «/home/[username]/.minecraft». If this is not correct, click … next to the folder location at the bottom of the Forge install window. Navigate to the correct file location and click Ok.
-
8
Click OK button. This will install Forge for Minecraft.
-
9
Click OK. After installation is complete you’ll see a window with this message.
Advertisement
Add New Question
-
Question
I don’t want to install Java because I’m afraid that I will get a virus. What should I do?
Java shouldn’t have a virus if it’s coming from the actual Java website, so just make sure you’re downloading it from the correct source.
-
Question
I accidentally deleted the mods folder with Forge installed. What should I do?
Simply create another folder titled «mods» then redownload all of your mods and put them back. It won’t mess anything up.
-
Question
Do you have to have a server?
Mike16576
Community Answer
No, you do not. Forge is a mod runner you can use as a version of Minecraft.
See more answers
Ask a Question
200 characters left
Include your email address to get a message when this question is answered.
Submit
Advertisement
-
To use Forge in Minecraft, you’ll select Forge from the Profile box on the Minecraft launcher page.
-
Some mods add dimensions that don’t work with other mods that add dimensions. You might be able to fix this by editing the dimension id.
Thanks for submitting a tip for review!
Advertisement
-
Many mods are unstable, and may lead to instability or crashes or inability to play Minecraft. If this occurs, simply remove the mod from your mods folder and start Minecraft again.
Advertisement
References
About This Article
Article SummaryX
1. Install and run Minecraft: Java Edition.
2. Go to https://files.minecraftforge.net/ in your web browser.
3. Click Installer below the recommended download box.
4. Wait 6 second and click Skip in the upper-right corner.
5. Navigate to the «forge-[version number]-installer.jar» file in your Downloads folder.
6. Double-click the «forge-[version number]-installer.jar» file.
7. Ensure the «Install Client» option is selected.
8. Ensure the Minecraft install folder is correct.
9. Click Ok to install Minecraft Forge.
10. Click Ok when the installation is complete.
To learn how to install Minecraft Forge on your Mac, keep reading!
Did this summary help you?
Thanks to all authors for creating a page that has been read 1,569,259 times.
Did this article help you?

Описание
Minecraft Forge это библиотека для Minecraft, которая является основной для большинства модов. По умолчанию добавлять новые возможности в игру могут только команды и датапаки, но с помощью фордж появляется возможность модифицировать игру с помощью сторонних модов. Фордж для майнкрафт дает разработчикам модов почти безграничные возможности по изменению игры, они могут добавлять новые блоки и мобов, предметы, измерения и многое другое.
Скриншоты

Как установить/обновить Minecraft Forge
- Установи Java
- В лаунчере запусти и закрой майнкрафт нужной версии
- Скачай файл, по ссылке расположенной ниже
- Запусти файл
(Если файл открывается как архив, то кликни по нему правой кнопкой мыши и выбери «Открыть с помощью» -> «Java») - Нажми «Оk»
- Готово
Для 1.19:
Показать
В forge 41.0.64 для майнкрафт 1.19, были сделаны изменения, которые ломают работоспособность большинства модов созданных для старых версий forge. Разработчики модов сейчас постепенно обновляют свои модификаии для поддержки новой версии лоадера. Для модов загруженных на сайт от 9 июля вам необходимо использовать 41.0.91, для остальных же воспользуйтесь версией 41.0.63. Дополнение: В 41.0.94 ситуация повторилась, теперь загруженные на сайт моды от 12 июля будут работать только на версии 41.0.94 и выше.
Скачать Minecraft Forge
Версии:
| # | Ссылка | Размер | Дата |
|---|---|---|---|
| Для 1.19.3 https://minecraft-inside.ru/download/252382/ |
6,89 МБ | 26 января 2023 | |
| Для 1.19.2 https://minecraft-inside.ru/download/249323/ |
6,89 МБ | 2 января 2023 | |
| Для 1.19.1 https://minecraft-inside.ru/download/232824/ |
6,78 МБ | 16 августа 2022 | |
| Для 1.19 (41.1.0) https://minecraft-inside.ru/download/229332/ |
6,74 МБ | 27 июля 2022 | |
| Для 1.19 (41.0.91) https://minecraft-inside.ru/download/226891/ |
6,72 МБ | 11 июля 2022 | |
| Для 1.19 (41.0.63) https://minecraft-inside.ru/download/226567/ |
6,66 МБ | 9 июля 2022 | |
| Для 1.18.2 https://minecraft-inside.ru/download/249322/ |
6,65 МБ | 2 января 2023 | |
| Для 1.18.1 https://minecraft-inside.ru/download/216001/ |
6,92 МБ | 14 апреля 2022 | |
| Для 1.18 https://minecraft-inside.ru/download/216000/ |
6,51 МБ | 14 апреля 2022 | |
| Для 1.17.1 https://minecraft-inside.ru/download/216002/ |
5,29 МБ | 14 апреля 2022 | |
| Для 1.16.5 https://minecraft-inside.ru/download/218413/ |
7,37 МБ | 7 мая 2022 | |
| Для 1.16.4 https://minecraft-inside.ru/download/171119/ |
7,03 МБ | 31 декабря 2020 | |
| Для 1.16.3 https://minecraft-inside.ru/download/166503/ |
6,86 МБ | 30 октября 2020 | |
| Для 1.16.2 https://minecraft-inside.ru/download/162598/ |
6,80 МБ | 11 сентября 2020 | |
| Для 1.16.1 https://minecraft-inside.ru/download/159681/ |
6,72 МБ | 10 августа 2020 | |
| Для 1.15.2 https://minecraft-inside.ru/download/232241/ |
6,62 МБ | 11 августа 2022 | |
| Для 1.15.1 https://minecraft-inside.ru/download/138190/ |
8,06 МБ | 18 января 2020 | |
| Для 1.15 https://minecraft-inside.ru/download/134072/ |
8,00 МБ | 18 декабря 2019 | |
| Для 1.14.4 https://minecraft-inside.ru/download/164036/ |
6,47 МБ | 27 сентября 2020 | |
| Для 1.14.3 https://minecraft-inside.ru/download/118452/ |
7,26 МБ | 23 июля 2019 | |
| Для 1.14.2 https://minecraft-inside.ru/download/115309/ |
7,51 МБ | 26 июня 2019 | |
| Для 1.13.2 https://minecraft-inside.ru/download/112463/ |
7,92 МБ | 1 июня 2019 | |
| Для 1.12.2 https://minecraft-inside.ru/download/226855/ |
4,61 МБ | 10 июля 2022 | |
| Для 1.12.2 (14.23.5.2768) https://minecraft-inside.ru/download/172971/ |
4,91 МБ | 21 января 2021 | |
| Для 1.12.2 (14.23.4.2759) https://minecraft-inside.ru/download/172970/ |
4,86 МБ | 21 января 2021 | |
| Для 1.12.1 https://minecraft-inside.ru/download/75264/ |
4,86 МБ | 10 декабря 2017 | |
| Для 1.11.2 https://minecraft-inside.ru/download/186427/ |
4,78 МБ | 9 июля 2021 | |
| Для 1.10.2 https://minecraft-inside.ru/download/186428/ |
4,57 МБ | 9 июля 2021 | |
| Для 1.9.4 https://minecraft-inside.ru/download/186429/ |
4,32 МБ | 9 июля 2021 | |
| Для 1.8.9 https://minecraft-inside.ru/download/186430/ |
4,12 МБ | 9 июля 2021 | |
| Для 1.7.10 https://minecraft-inside.ru/download/186222/ |
3,33 МБ | 7 июля 2021 | |
| Для 1.6.4 https://minecraft-inside.ru/download/186431/ |
2,27 МБ | 9 июля 2021 | |
| Для 1.5.2 https://minecraft-inside.ru/download/186432/ |
2,28 МБ | 9 июля 2021 | |
| 23 файла скрыто. показать все | |||
![]()
100+ публикаций

Forge — это библиотека, с которой работают большинство модов. В этой статье мы покажем, как скачать и установить официальный Forge за пару шагов.
Как скачать и установить Forge
Шаг 1. Заходим на официальный сайт Minecraft Forge. В меню слева выбираем свою версию Minecraft. (для примера, у меня 1.16.5)
Шаг 2. Выбираем рекомендованный файл и кликаем на ссылку для скачивания установщика (Installer).
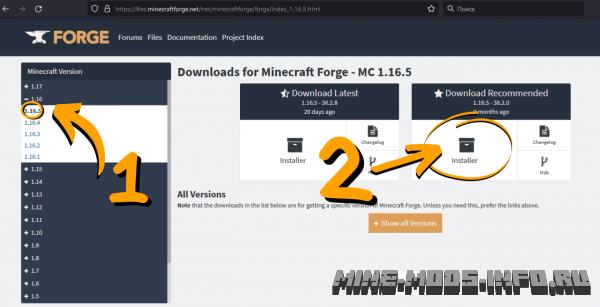
После этого нас перенаправляет на другой сайт, так и нужно.
Шаг 3. Ждем несколько секунд, пока в правом верхнем углу не появится красная кнопка SKIP:
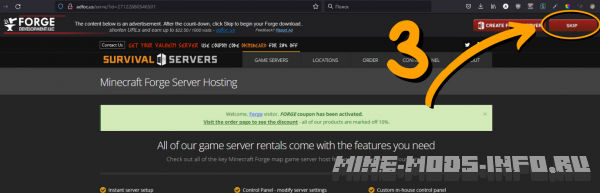
Кликаем на SKIP — начинается загрузка. Теперь мы скачали jar-установщик Forge нужной версии:

Шаг 4. Два раза кликаем по скачанному файлу — появится предупреждение, в предупреждении нажимаем ОК, и после этого запускается установщик Forge:
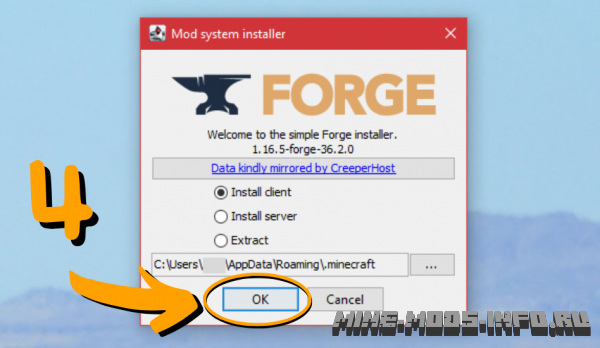
Можно не менять параметры и сразу нажать OK — начнется установка. Ждем, когда установка закончится.
Готово! Forge установлен! А моды можно скачать в этом разделе.
Возможные трудности
Что делать, если jar-установщик не запускается?
Скорее всего, у вас старая версия java. Попробуйте зайти на сайт java, оттуда скачать и установить новую версию java, а затем попробовать снова запустить установщик Forge.
Версии до 1.16.5 должны использовать Java 8.
Версия 1.17.1 — Java 16
Версия 1.18.2 и выше — Java 17
Установка Forge для версии до 1.16.5
- Удалите все файлы сервера без исключений
- Скачайте Installer с сайта http://files.minecraftforge.net/ (Не Windows, файл должен иметь расширение .jar)
- Загрузите скачанный файл в корневой каталог сервера.
- Переименуйте его в server.jar
- В панели перейдите в Параметры запуска и измените значение Установка Forge на «—installServer» (без кавычек)
- Запустите сервер и дождитесь его остановки
- Удалите server.jar который переименовывали в пункте 4
- Переименуйте файл с названием forge-1.16.5-31.2.48.jar (у вас название может отличаться, но всегда начинается с «forge-«) в server.jar
- В панели перейдите в Параметры запуска и измените значение Установка Forge на «nogui» (без кавычек)
- Готово можно запускать сервер и играть
Установка Forge для версии 1.17.1, 1.18.2 и выше
- Если вы устанавливаете forge в первый раз то сначала напишите в поддержку о том что вы хотите установить forge 1.17.1, 1.18.2 или выше, мы изменим параметры запуска для этих версий.
- Удалите все файлы сервера без исключений
- Скачайте Installer с сайта http://files.minecraftforge.net/ (Не Windows, файл должен иметь расширение .jar)
- Загрузите скачанный файл в корневой каталог сервера.
- Переименуйте его в server.jar
- В панели перейдите в Параметры запуска и измените значение Установка Forge на «—installServer» (без кавычек)
- Запустите сервер и дождитесь его остановки
- Удалите server.jar который переименовывали в пункте 5
- Зайдите в файловом менеджере по пути /libraries/net/minecraftforge/forge/1.18.2-40.1.20 и скопируйте файл unix_args.txt в корневую папку там где обычно server.jar
- В панели перейдите в Параметры запуска и измените значение Установка Forge на «nogui» (без кавычек)
- Дождитесь ответа из пункта 1, затем запускайте сервер.
- Forge, Установка Forge, Java, Java 8, Java 16, Java 17, Версия Java, Моды
- 69 Пользователи нашли это полезным
Связанные статьи
Смена версии сервера
После оплаты заказа ваш сервер автоматически устанавливается с выбранными параметрами.
В любой…

Minecraft Forge — это специальный проект, который представляет из себя программу modding API, упрощающую установку и выбор в игре нескольких модов для игры Minecraft. В этом руководстве Мы объясним Вам, как правильно установить Forge для Minecraft.
Установка Minecraft Forge
1
Для начала Вам нужно загрузить с сайта разработчика рекомендуемую для Майнкрафта инсталляцию Minecraft Forge с страницы загрузки => http://files.minecraftforge.net/.

2
Запустите файл с расширением .jar, который Вы только что загрузили, убедитесь в том, что Вы выбрали пункт «Install client» (Установка клиента) и нажмите на «ОК». После завершения установки, программа выведет на Ваш экран сообщение об успешном завершении установки Minecraft Forge.
3
Запустите игру Minecraft, выберите профиль Forge и далее нажмите клавишу «Play».
4
При правильно проведённой установке Forge, после запуска Майнкрафта на стартовом экране, в нижнем левом углу Вы увидите надпись Minecraft Forge, а в меню игры появится клавиша Mods, расположившись под клавишей Multiplayer.
Итак, если Вы получили результат описанный в четвёртом пункте, то можно Вас поздравить с успешной установкой Minecraft Forge. Теперь Вы можете спокойно устанавливать различные моды для Майнкрафт на своём компьютере.
Установка Minecraft Forge
Minecraft — новости и события