Before connecting to the GlobalProtect network,
you must download and install the GlobalProtect app on your Windows
endpoint. To ensure that you get the right app for your organization’s
GlobalProtect or Prisma Access deployment, you must download the
app directly from a GlobalProtect portal within your organization.
For this reason, there is no direct GP app download link available
on the Palo Alto Networks site.
Before you can download and
install the GP app, you must obtain the IP address or fully qualified
domain name (FQDN) of the GlobalProtect portal from your GP administrator.
In addition, your administrator should verify which username and
password information you can use to connect to the portal and gateways.
In most instances, the username and password is the same username
and password that you use to connect to your corporate network.
After you gather the required information, use the following steps
to download and install the app:
To run GlobalProtect
app 5.0 and later, Windows endpoints require Visual C++ Redistributables
12.0.3 for Visual Studio 2013. If you have not already installed
any redistributable packages on your endpoint, the GlobalProtect
app installs Visual C++ Redistributables 12.0.3 automatically. If
you have already installed Visual C++ Redistributables 12.0.2 or
an earlier release, you must either uninstall the existing redistributable
packages from your endpoint or upgrade to Visual C++ Redistributables
12.0.3 prior to installing the GlobalProtect app.
-
Log in to the GlobalProtect portal.
-
Launch a web browser and go to the following
URL:https://<portal IP address or FQDN>
Example:
http://gp.acme.com
-
On the portal login page, enter your
Name
(username) and
Password
,
and then clickLOG IN
. In most instances,
you can use the same username and password that you use to connect
to your corporate network.
-
-
Navigate to the app download page.
In most instances, the app download page appears immediately
after you log in to the portal. Use this page to download the latest
app software package.If your system administrator
has enabled GlobalProtect Clientless VPN access, the applications page
opens after you log in to the portal (instead of the app download
page). SelectGlobalProtect Agent
to open
the download page. -
Download the app.
-
To begin the download, click the software
link that corresponds to the operating system running on your computer.
If you are not sure whether the operating system is 32-bit or 64-bit,
ask your system administrator before you proceed. -
Open the software installation file.
-
When prompted,
Run
the software.
-
When prompted again,
Run
the
GlobalProtect Setup Wizard.
-
-
Complete the GlobalProtect app setup.
-
In the GlobalProtect Setup Wizard, click
Next
.
-
Click
Next
to accept the default
installation folder (C:Program FilesPalo Alto NetworksGlobalProtect)
and then clickNext
twice.
Although you can
Browse
to
select a different location in which to install the GlobalProtect
app, the best practice is to install it in the default location.
The default installation location is read-only for non-privileged
users and therefore installing to this location protects against
malicious access to the app. -
After installation is complete,
Close
the
wizard.
-


Before connecting to the GlobalProtect network,
you must download and install the GlobalProtect app on your Windows
endpoint. To ensure that you get the right app for your organization’s
GlobalProtect or Prisma Access deployment, you must download the
app directly from a GlobalProtect portal within your organization.
For this reason, there is no direct GP app download link available
on the Palo Alto Networks site.
To download and install the
app, you must obtain the IP address or fully qualified domain name (FQDN)
of the GlobalProtect portal from the administrator. In addition,
your administrator should verify which username and password information
you can use to connect to the portal and gateways. In most instances,
the username and password, is the same username and password that
you use to connect to your corporate network. After you gather the
required information, use the following steps to download and install
the app:
To run GlobalProtect app 5.0 and above, Windows
endpoints require Visual C++ Redistributables 12.0.3 for Visual
Studio 2013. If you have not already installed any redistributable packages
on your endpoint, the GlobalProtect app installs Visual C++ Redistributables
12.0.3 automatically. If you have already installed Visual C++ Redistributables
12.0.2 or an earlier release, you must either uninstall the existing
redistributable packages from your endpoint or upgrade to Visual C++
Redistributables 12.0.3 prior to installing the GlobalProtect app.
-
Log in to the GlobalProtect portal.
-
Launch a web browser and go to the following
URL:https://<portal IP address or FQDN>
Example:
http://gp.acme.com
-
On the portal login page, enter your
Name
(username) and
Password
,
and then clickLOG IN
. In most instances,
you can use the same username and password that you use to connect
to your corporate network.
-
-
Navigate to the app download page.
In most instances, the app download page appears immediately
after you log in to the portal. Use this page to download the latest
app software package.If your
system administrator has enabled GlobalProtect Clientless VPN access,
the applications page opens after you log in to the portal (instead
of the app download page). SelectGlobalProtect Agent
to
open the download page. -
Download the app.
-
To begin the download, click the software
link that corresponds to the operating system running on your computer.
If you are not sure whether the operating system is 32-bit or 64-bit,
ask your system administrator before you proceed. -
Open the software installation file.
-
When prompted,
Run
the software.
-
When prompted again,
Run
the
GlobalProtect Setup Wizard.
-
-
Complete the GlobalProtect app setup.
-
In the GlobalProtect Setup Wizard, click
Next
.
-
Click
Next
to accept the default
installation folder (C:Program FilesPalo Alto NetworksGlobalProtect)
and then clickNext
twice.
Although you can
Browse
to
select a different location in which to install the GlobalProtect
app, the best practice is to install it in the default location.
The default installation location is read-only for non-privileged
users and therefore installing to this location protects against
malicious access to the app. -
After installation is complete,
Close
the
wizard.
-
-
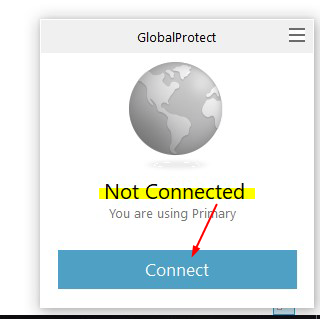
Log in to GlobalProtect.
-
Launch the GlobalProtect app by clicking
the system tray icon. The status panel opens. -
Enter the FQDN or IP address of the portal that your
GlobalProtect administrator provided, and then clickConnect
.
-
(
Optional
) By default, you are automatically
connected to theBest Available
gateway,
based on the configuration that the administrator defines and the
response times of the available gateways. To connect to a different
gateway, select the gateway from theGateway
drop-down
(for external gateways only).This option is only available if your administrator
enables manual gateway selection. -
(
Optional
) Depending on the connection mode,
clickConnect
to initiate the connection.
-
(
Optional
) If prompted, enter your
Username
and
Password
,
and then clickSign In
.
If your administrator has allowed you to use biometric
(fingerprint) information to sign in, you need to first sign-in
with a username and password twice (once to save it and again to authenticate);
you can then use biometric information to sign in.If authentication
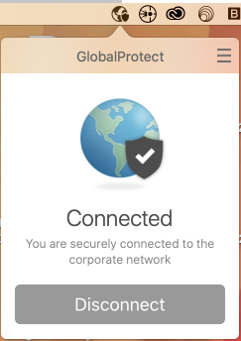
is successful, you are connected to your corporate network, and
the status panel displays theConnected
or
Connected —
Internalstatus. If your administrator sets up a GlobalProtect
welcome page, it displays after you log in successfully.
-


Most Popular
Скачать
 GlobalProtect for Windows 10 О
GlobalProtect for Windows 10 Технические характеристики
| Версия: |
|
Добавлен: 31 января 2018 г. |
|
Дата выпуска: 16 июня 2017 г. |
|
Цена: Free |
|
Операционная система:
Windows 10/Mobile, |
|
Загрузки на прошлой неделе: 261 |
|
Дополнительные требования
Доступно для Windows 10, Windows 10 Mobile (ARM, x86, x64) |
GlobalProtect для Windows Unified Platform подключается к шлюзу GlobalProtect на брандмауэре следующего поколения Palo Alto Networks, что позволяет пользователям мобильной связи пользоваться защитой корпоративной безопасности
GlobalProtect for Windows 10 Рейтинг редакции
FromPalo Alto Networks: GlobalProtect для Windows Unified Platform подключается к шлюзу GlobalProtect на брандмауэре следующего поколения Palo Alto Networks, что позволяет мобильным пользователям пользоваться защитой корпоративной безопасности. Приложение автоматически адаптируется к местоположению конечного пользователя и подключает пользователя к оптимальному шлюзу, чтобы обеспечить максимальную производительность для всех пользователей и их трафика, без каких-либо усилий со стороны пользователя. Это позволяет пользователям работать безопасно и эффективно в местах за пределами традиционного офиса. Перед установкой этого приложения обратитесь в свой ИТ-отдел, чтобы убедиться, что ваша организация включила подписку на шлюз GlobalProtect на брандмауэре. Особенности: Автоматическое VPN-соединение — Автоматическое обнаружение оптимального шлюза — Подключение через SSL — Поддерживает все существующие методы проверки подлинности PAN-OS, включая Kerberos, RADIUS, LDAP, клиентские сертификаты и локальную базу данных пользователей — Обеспечивает полную выгоду от собственного опыта и позволяет пользователям безопасно использовать любое приложение. Требования: Сетевые администраторы; обратитесь к торговому представителю Palo Alto Networks или партнеру по каналам, чтобы добавить подписку на GlobalProtect на ваши брандмауэры, чтобы включить поддержку GlobalProtect для Windows Unified Platform
Скачать
Similar Suggested Software
Лучшие загрузки
Бизнес-приложения
Содержание
- Скачать GlobalProtect™ для ПК
- GlobalProtect™ для ПК Скриншоты
- загрузить и установить GlobalProtect™ на вашем персональном компьютере и Mac
- Шаг 1: Загрузите эмулятор Android для ПК и Mac
- Шаг 2: установите эмулятор на ПК или Mac
- Шаг 4: GlobalProtect™ для Mac OS
- GlobalProtect™ Особенности и описания
- IT Knowledge Base
- Download & Install GlobalProtect (the VPN Agent)
- IT Knowledge Base
- Download & Install GlobalProtect (the VPN Agent)
- GlobalProtect 5.2.7 на компьютер
- Cкачать и установить GlobalProtect на компьютер бесплатно.
- Установка GlobalProtect на компьютер с помощью Bluestacks
- Установка GlobalProtect на компьютер с помощью NoxPlayer
- Information Technology
- Services at a Glance
- How to Install and Use Global Protect VPN Client
- On This Page:
- What is Global Protect?
- Install & Use Global Protect VPN Client on Mac OS
- Install & Use Global Protect VPN Client on Windows
- Install & Use Global Protect VPN Client on Android
- Install & Use Global Protect VPN Client on iOS:
Скачать GlobalProtect™ для ПК
GlobalProtect™ для ПК Скриншоты


загрузить и установить GlobalProtect™ на вашем персональном компьютере и Mac
Некоторые приложения, например, те, которые вы ищете, доступны для Windows! Получите это ниже:
| SN | заявка | Скачать | рецензия | Разработчик |
|---|---|---|---|---|
| 1. |  GlobalProtect GlobalProtect |
Скачать | 1.8/5 99 рецензия |
Или следуйте инструкциям ниже для использования на ПК :
Если вы хотите установить и использовать GlobalProtect™ на вашем ПК или Mac, вам нужно будет загрузить и установить эмулятор Desktop App для своего компьютера. Мы усердно работали, чтобы помочь вам понять, как использовать app для вашего компьютера в 4 простых шагах ниже:
Шаг 1: Загрузите эмулятор Android для ПК и Mac
Шаг 2: установите эмулятор на ПК или Mac
Теперь, когда вы загрузили эмулятор по вашему выбору, перейдите в папку «Загрузка» на вашем компьютере, чтобы найти приложение эмулятора или Bluestacks.
Как только вы его нашли, щелкните его, чтобы установить приложение или exe на компьютер или компьютер Mac.
Теперь нажмите «Далее», чтобы принять лицензионное соглашение.
Чтобы правильно установить приложение, следуйте инструкциям на экране.
Если вы правильно это сделаете, приложение Emulator будет успешно установлено.
Шаг 4: GlobalProtect™ для Mac OS
Получить совместимый APK для ПК
| Скачать | Разработчик | Рейтинг | Score | Текущая версия | Совместимость |
|---|---|---|---|---|---|
| Проверить APK → | Palo Alto Networks | 17 | 2.17647 | 5.2.9 | 4+ |
GlobalProtect™ На iTunes
| Скачать | Разработчик | Рейтинг | Score | Текущая версия | Взрослый рейтинг |
|---|---|---|---|---|---|
| Бесплатно На iTunes | Palo Alto Networks | 17 | 2.17647 | 5.2.9 | 4+ |
GlobalProtect™ Особенности и описания
GlobalProtect for iOS connects to a GlobalProtect gateway on a Palo Alto Networks next-generation firewall to allow mobile users to benefit from enterprise security protection. Enterprise administrator can configure the same app to connect in either Always-On VPN, Remote Access VPN or Per App VPN mode. The app automatically adapts to the end user’s location and connects the user to the best available gateway in order to deliver optimal performance for all users and their traffic, without requiring any effort from the user. This allows users to work safely and effectively at locations outside of the traditional office. Before installing this app, please check with your IT department to ensure that your organization has enabled a GlobalProtect gateway subscription on the firewall. Features: Automatic VPN connection using iOS VPN On-Demand Support for BYOD with Remote Access VPN and App Level VPN Automatic discovery of best available gateway Manual gateway selection capability Connection over IPSec or SSL Integration with MDM for easy provisioning Support for changing an expired AD/RADIUS password when the user connects remotely Support for 2 Factor One Time Password based Authentication using RADIUS, SAML Support for other PAN-OS authentication methods, including LDAP, Client Certificates, and Local User Databases Full benefits of the native iOS experience with integrated notifications Capability for enterprises to enable users to use any app securely Requirements: Supported on Palo Alto Networks next-generation firewalls running PAN-OS 7.1, 8.0, 8.1 and above Requires a GlobalProtect gateway subscription installed on the Palo Alto Networks firewall in order to enable support for GlobalProtect app for iOS. Supported on iOS 10 and later releases
Источник
IT Knowledge Base
User guides relating to IT access, software, services, security, requests, and training.
Download & Install GlobalProtect (the VPN Agent)
This article will show you how to download and install the campus VPN agent.
For more information on the campus Virtual Private Network (VPN), view the document VPN Overview.
If you do not currently have VPN privileges, go to http://www.fullerton.edu/it/services/software/ and select VPN. On this site you will fill out and submit the Software Request Form to request VPN access.
GlobalProtect calls health checks Host Information Profiles (HIP). After the user installs the client, it runs an initial health check on the system and then keeps track of the systems health. When a user connects to campus, the client supplies the HIP status to the GlobalProtect Gateway. The HIP status is then used by firewall polices to allow or deny access to resources.
Download the GlobalProtect VPN Client
1. Press the «Windows» icon + the «Pause» or «Pause Break» buttons simultaneously on the keyboard to access the System properties window.

Or on your Windows 10 machine, right-click on the folder This PC > Computer > My Computer > then select Properties.
2. Under «System», check the «System type» for the bit version of your machine.
The GlobalProtect VPN client is currently supported and available for download for the following:
Install the GlobalProtect Setup Wizard.
1. After double-clicking on the GlobalProtect agent, click Next.
2. Click Next to maintain the default folder.
3. Click Next to confirm the installation.
After you Install the GlobalProtect VPN agent:
For this purpose of this document we will define local system and remote system as the following:
4. Congratulations, the GlobalProtect VPN agent has been installed, click Close.
Источник
IT Knowledge Base
User guides relating to IT access, software, services, security, requests, and training.
Download & Install GlobalProtect (the VPN Agent)
This article will show you how to download and install the campus VPN agent.
For more information on the campus Virtual Private Network (VPN), view the document VPN Overview.
If you do not currently have VPN privileges, go to http://www.fullerton.edu/it/services/software/ and select VPN. On this site you will fill out and submit the Software Request Form to request VPN access.
GlobalProtect calls health checks Host Information Profiles (HIP). After the user installs the client, it runs an initial health check on the system and then keeps track of the systems health. When a user connects to campus, the client supplies the HIP status to the GlobalProtect Gateway. The HIP status is then used by firewall polices to allow or deny access to resources.
Download the GlobalProtect VPN Client
1. Press the «Windows» icon + the «Pause» or «Pause Break» buttons simultaneously on the keyboard to access the System properties window.
Or on your Windows 10 machine, right-click on the folder This PC > Computer > My Computer > then select Properties.
2. Under «System», check the «System type» for the bit version of your machine.
The GlobalProtect VPN client is currently supported and available for download for the following:
Install the GlobalProtect Setup Wizard.
1. After double-clicking on the GlobalProtect agent, click Next.
2. Click Next to maintain the default folder.
3. Click Next to confirm the installation.
After you Install the GlobalProtect VPN agent:
For this purpose of this document we will define local system and remote system as the following:
4. Congratulations, the GlobalProtect VPN agent has been installed, click Close.
Источник
GlobalProtect 5.2.7 на компьютер
Cкачать и установить GlobalProtect на компьютер бесплатно.
Многие из нас стали задавать простой вопрос: как скачать, установить и сыграть в нашу любимую игру прямо на компьютере?
Если вы не любите маленькие экраны смартфона или планшета, то сделать это можно с помощью программы-эмулятора. С ее помощью можно создать на своем компьютере среду Android и через нее запустить приложение. На данный момент самыми популярными утилитами для этого являются: Bluestacks и NoxPlayer.
Установка GlobalProtect на компьютер с помощью Bluestacks
Bluestacks считается самым популярным эмулятором для компьютеров под управлением Windows. Кроме того, есть версия этой программы для Mac OS. Для того, чтобы установить этот эмулятор на ПК нужно, чтобы на нем была установлена Windows 7 (или выше) и имелось минимум 2 Гб оперативной памяти.
Установите и настройте Bluestacks. Если на компьютере нет Bluestacks, перейдите на страницу https://www.bluestacks.com/ru/index.html и нажмите зеленую кнопку «Скачать Bluestacks» посередине страницы. Щелкните по зеленой кнопке «Скачать» в верхней части следующей страницы, а затем установите эмулятор:
+ Windows: дважды щелкните по скачанному EXE-файлу, нажмите «Да», когда появится запрос, щелкните по «Установить», нажмите «Завершить», когда эта опция станет активной. Откройте Bluestacks, если он не запустился автоматически, а затем следуйте инструкциям на экране, чтобы войти в свою учетную запись Google.
+ Mac: дважды щелкните по скачанному файлу DMG, дважды щелкните по значку Bluestacks, нажмите «Установить», когда будет предложено, разрешите устанавливать программы сторонних разработчиков (если понадобится) и нажмите «Продолжить». Откройте Bluestacks, если он не запустился автоматически, и следуйте инструкциям на экране, чтобы войти в свою учетную запись Google.
Скачайте файл APK на компьютер. APK-файлы являются установщиками приложений. Вы можете скачать apk-файл с нашего сайта.
Щелкните по вкладке «Мои приложения». Она находится в верхней левой части окна Bluestacks.
Нажмите «Установить APK». Эта опция находится в нижнем правом углу окна. Откроется окно Проводника (Windows) или Finder (Mac).
Выберите скачанный файл APK. Перейдите в папку со скачанным файлом APK и щелкните по нему, чтобы выбрать.
Нажмите «Открыть». Эта опция находится в нижнем правом углу окна. Файл APK откроется в Bluestacks, то есть начнется установка приложения.
Запустите приложение. Когда значок приложения отобразится на вкладке «Мои приложения», щелкните по нему, чтобы открыть приложение.
Установка GlobalProtect на компьютер с помощью NoxPlayer
Nox App Player бесплатна и не имеет никакой навязчивой всплывающей рекламы. Работает на Андроиде версии 4.4.2, позволяя открывать множество игр, будь то большой симулятор, требовательный шутер или любое другое приложение.
+ Перейти на официальный сайт разработчика https://www.bignox.com/
+ Для того чтобы установить эмулятор Nox App Player, нажимаем на кнопку «СКАЧАТЬ».
+ Далее начнется автоматическая загрузка, по завершении которой необходимо будет перейти в папку «Загрузки» и нажать на установочный файл скачанной программы.
Установка и запуск программы:
+ Для продолжения установки необходимо в открывшемся окне нажать на кнопку «Установить». Выберите дополнительные параметры инсталляции, нажав на кнопку «Настроить», если вам это необходимо. Не снимайте галочку с пункта «Принять «Соглашение»», иначе вы не сможете продолжить.
+ После того как эмулятор будет установлен на компьютер, вы увидите на экране окно запуска, где необходимо будет нажать на кнопку «Пуск».
+ Все, на этом этапе установка эмулятора Nox App Player завершена. Для полноценной работы программы вам необходимо будет зайти в свой аккаунт Play Market — нажмите на иконку приложения в папке Google, введите логин и пароль от вашей учетной записи.
Загрузка и установка приложений: Для этого вам необходимо скачать файл приложения в формате APK и просто перетащить его на рабочий стол Nox App Player. После этого сразу начнется установка, по окончании которой вы увидите значок этого приложения на главном экране.
Источник
Information Technology
Services at a Glance
How to Install and Use Global Protect VPN Client
On This Page:
What is Global Protect?
Global Protect is the system used to connect to the Virtual Private Network (VPN) at UMass Amherst. A VPN provides an encrypted connection between your off-campus computer and the campus network. Members of the university community can use our VPN service at no cost to connect to some campus servers remotely.
Install & Use Global Protect VPN Client on Mac OS
Check with your IT administrator before installing the Global Protect VPN client.
Starting in September 2022, two-step login is required to access VPN. Be sure to enroll in two-step login before attempting to log in to VPN.

Install & Use Global Protect VPN Client on Windows
Check with your IT administrator before installing the Global Protect VPN client.
Starting in September 2022, two-step login is required to access VPN. Be sure to enroll in two-step login before attempting to log in to VPN.


Install & Use Global Protect VPN Client on Android
Starting in September 2022, two-step login is required to access VPN. Be sure to enroll in two-step login before attempting to log in to VPN.

Install & Use Global Protect VPN Client on iOS:
Starting in September 2022, two-step login is required to access VPN. Be sure to enroll in two-step login before attempting to log in to VPN.
Источник
1. GlobalProtect for iOS connects to a GlobalProtect gateway on a Palo Alto Networks next-generation firewall to allow mobile users to benefit from enterprise security protection.
2. Requires a GlobalProtect gateway subscription installed on the Palo Alto Networks firewall in order to enable support for GlobalProtect app for iOS.
3. The app automatically adapts to the end user’s location and connects the user to the best available gateway in order to deliver optimal performance for all users and their traffic, without requiring any effort from the user.
загрузить и установить GlobalProtect™ на вашем персональном компьютере и Mac
Некоторые приложения, например, те, которые вы ищете, доступны для Windows! Получите это ниже:
| SN | заявка | Скачать | рецензия | Разработчик |
|---|---|---|---|---|
| 1. | GlobalProtect
|
Скачать | 1.8/5 99 рецензия 1.8 |
Palo Alto Networks |
Или следуйте инструкциям ниже для использования на ПК :
Выберите версию для ПК:
- Windows 7-10
- Windows 11
Если вы хотите установить и использовать GlobalProtect™ на вашем ПК или Mac, вам нужно будет загрузить и установить эмулятор Desktop App для своего компьютера. Мы усердно работали, чтобы помочь вам понять, как использовать app для вашего компьютера в 4 простых шагах ниже:
Шаг 1: Загрузите эмулятор Android для ПК и Mac
Хорошо. Прежде всего. Если вы хотите использовать приложение на своем компьютере, сначала посетите магазин Mac или Windows AppStore и найдите либо приложение Bluestacks, либо Приложение Nox . Большинство учебных пособий в Интернете рекомендуют приложение Bluestacks, и у меня может возникнуть соблазн рекомендовать его, потому что вы с большей вероятностью сможете легко найти решения в Интернете, если у вас возникнут проблемы с использованием приложения Bluestacks на вашем компьютере. Вы можете загрузить программное обеспечение Bluestacks Pc или Mac here .
Шаг 2: установите эмулятор на ПК или Mac
Теперь, когда вы загрузили эмулятор по вашему выбору, перейдите в папку «Загрузка» на вашем компьютере, чтобы найти приложение эмулятора или Bluestacks.
Как только вы его нашли, щелкните его, чтобы установить приложение или exe на компьютер или компьютер Mac.
Теперь нажмите «Далее», чтобы принять лицензионное соглашение.
Чтобы правильно установить приложение, следуйте инструкциям на экране.
Если вы правильно это сделаете, приложение Emulator будет успешно установлено.
Шаг 3: GlobalProtect™ для ПК — Windows 7/8 / 10/ 11
Теперь откройте приложение Emulator, которое вы установили, и найдите его панель поиска. Найдя его, введите GlobalProtect™ в строке поиска и нажмите «Поиск». Нажмите на GlobalProtect™значок приложения. Окно GlobalProtect™ в Play Маркете или магазине приложений, и он отобразит Store в вашем приложении эмулятора. Теперь нажмите кнопку «Установить» и, например, на устройстве iPhone или Android, ваше приложение начнет загрузку. Теперь мы все закончили.
Вы увидите значок под названием «Все приложения».
Нажмите на нее, и она перенесет вас на страницу, содержащую все установленные вами приложения.
Вы должны увидеть . Нажмите на нее и начните использовать приложение.
Шаг 4: GlobalProtect™ для Mac OS
Привет. Пользователь Mac!
Шаги по использованию GlobalProtect™ для Mac точно такие же, как для ОС Windows выше. Все, что вам нужно сделать, это установить Nox Application Emulator или Bluestack на вашем Macintosh. Вы можете получить Это здесь .
Спасибо за чтение этого урока. Хорошего дня!
Получить совместимый APK для ПК
| Скачать | Разработчик | Рейтинг | Score | Текущая версия | Совместимость |
|---|---|---|---|---|---|
| Проверить APK → | Palo Alto Networks | 39 | 3.64103 | 6.0.2 | 4+ |
Скачать Android
Как скачать и установить GlobalProtect в Windows 11
Чтобы использовать мобильные приложения в Windows 11, необходимо установить Amazon Appstore. Как только он будет настроен, вы сможете просматривать и устанавливать мобильные приложения из кураторского каталога. Если вы хотите запускать приложения Android на своей Windows 11, это руководство для вас..
Шаги по настройке компьютера и загрузке приложения GlobalProtect в Windows 11:
- Проверьте, совместим ли ваш компьютер: Вот минимальные требования:
- RAM: 8GB (минимум), 16GB (рекомендованный)
- Хранение: SSD
- Processor:
- Intel Core i3 8th Gen (минимум или выше)
- AMD Ryzen 3000 (минимум или выше)
- Qualcomm Snapdragon 8c (минимум или выше)
- Processor Architecture: x64 or ARM64
- Проверьте, имеет ли GlobalProtect собственную версию Windows. Сделай это здесь ». Если собственная версия отсутствует, перейдите к шагу 3.
- Установите Amazon Appstore из Microsoft Store. Сделай это здесь ». При выборе «Получить» начнется установка приложения и автоматически установится подсистема Windows для Android.
- После установки Amazon Appstore и приложение «Настройки подсистемы Windows для Android» появятся в меню «Пуск» и списке приложений. Откройте Amazon Appstore и войдите в свою учетную запись Amazon.
- Перейдите в магазин приложений Amazon и выполните поиск по слову « GlobalProtect ». Откройте страницу приложения, щелкнув значок приложения. Нажмите «Установить». После установки нажмите «Открыть», чтобы начать использовать приложение GlobalProtect.
GlobalProtect for iOS connects to a GlobalProtect gateway on a Palo Alto Networks next-generation firewall to allow mobile users to benefit from enterprise security protection. Enterprise administrator can configure the same app to connect in either Always-On VPN, Remote Access VPN or Per App VPN mode. The app automatically adapts to the end user’s location and connects the user to the best available gateway in order to deliver optimal performance for all users and their traffic, without requiring any effort from the user. This allows users to work safely and effectively at locations outside of the traditional office.
Before installing this app, please check with your IT department to ensure that your organization has enabled a GlobalProtect gateway subscription on the firewall.
Features:
Automatic VPN connection using iOS VPN On-Demand
Support for BYOD with Remote Access VPN and App Level VPN
Automatic discovery of best available gateway
Manual gateway selection capability
Connection over IPSec or SSL
Integration with MDM for easy provisioning
Support for changing an expired AD/RADIUS password when the user connects remotely
Support for 2 Factor One Time Password based Authentication using RADIUS, SAML
Support for other PAN-OS authentication methods, including LDAP, Client Certificates, and Local User Databases
Full benefits of the native iOS experience with integrated notifications
Capability for enterprises to enable users to use any app securely
Requirements:
Supported on Palo Alto Networks next-generation firewalls running PAN-OS 7.1, 8.0, 8.1 and above
Requires a GlobalProtect gateway subscription installed on the Palo Alto Networks firewall in order to enable support for GlobalProtect app for iOS.
Supported on iOS 10 and later releases
VPN Service Overview
What is Global Protect?
Global Protect is the application used to connect to the Virtual Private Network (VPN) at UMass Amherst. A VPN provides an encrypted connection between your off-campus computer and the campus network. More about VPN at UMass Amherst
Install & Use GlobalProtect VPN Client Windows and Mac OS
Check with your IT administrator before installing the GlobalProtect VPN client.
GlobalProtect may already be installed on university-managed computers.
- Go to https://vpn.umass.edu in your web browser.
- Log in with your NetID@umass.edu and password.
- Click the download option for your computer and operating system, and then save file to download the installer.
- Run the downloaded file. You will need your computer’s admin username and password to install.
You may be prompted for your computer’s admin username and password.- Windows computers: Click Yes on the User Account Control dialog.
- Windows computers: Click Yes on the User Account Control dialog.
- Once the client has been installed, the Global Protect icon will appear in the menu bar at the top of your screen for Mac OS computers, or in the notifications area of the taskbar at the bottom of the screen on Windows computers. Click the icon to set up the VPN connection, following the steps below.


Connect to VPN using GlobalProtect on Windows and Mac OS
-
Click on the GlobalProtect icon.
-
Mac OS: Click the icon in the menu bar at the top right of your screen.
-
Windows: Click the icon in the notifications area of the status bar in the lower right of your screen.
-
- Type vpn.umass.edu into the Portal Address field and click Connect.
Mac OS computers: If the application stays on the Connecting screen and does not prompt for your NetID and password, open System Preferences, navigate to Security & Privacy and then General, unlock the settings page using your Mac’s administrator username and password, and then Allow the computer to load the Palo Alto software (Global Protect).
- You will be prompted to sign in with your NetID@umass.edu and password, and then to finish logging in using Microsoft two-step login.
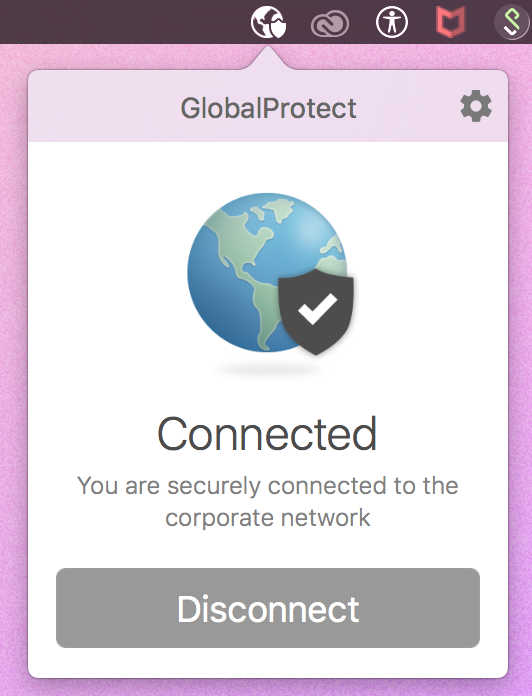
- Once you are connected to the VPN, the global protect icon in the menu bar or taskbar will show a shield icon next to the globe.


Install & Use Global Protect VPN Client on Android
- Open the Play Store and install the Global Protect app by Palo Alto Networks. Tap Open to launch the app.
- In the Portal field, type vpn.umass.edu, and then tap Connect.
- Enter your NetID and password in the Username and Password fields, and then tap Connect. You will be prompted to authenticate with Microsoft two-step login to finish connecting.
- Tap OK on the Connection request dialog to let Global Protect set up the vpn connection.


Install & Use Global Protect VPN Client on iPhone and iPad
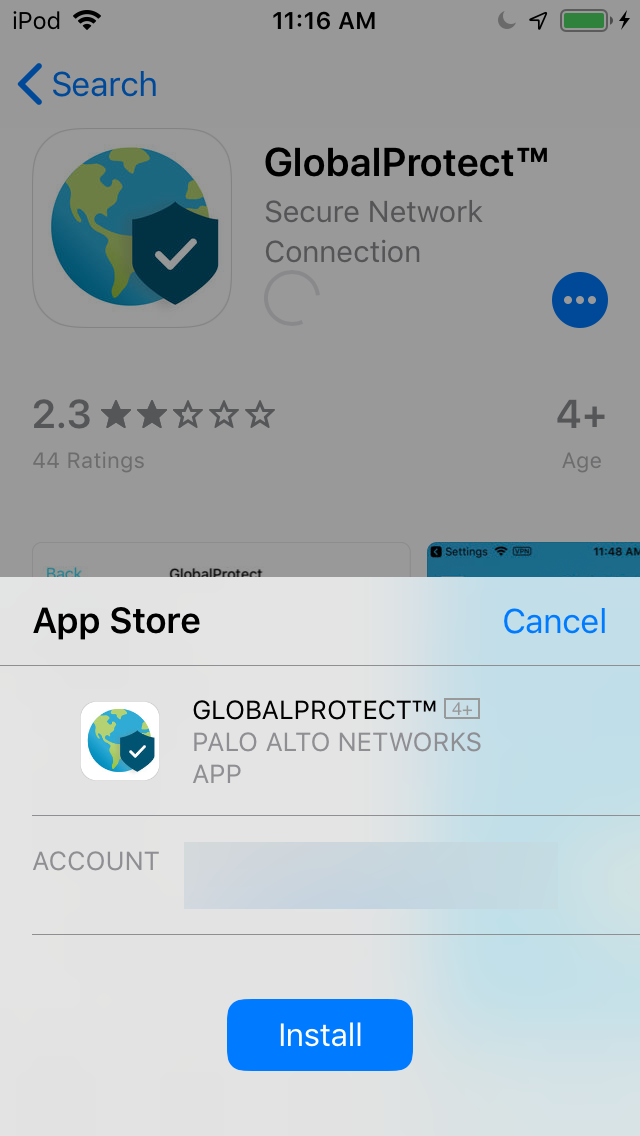
- Open the App Store and install the Global Protect app by Palo Alto Networks. Once it is installed, launch the app.
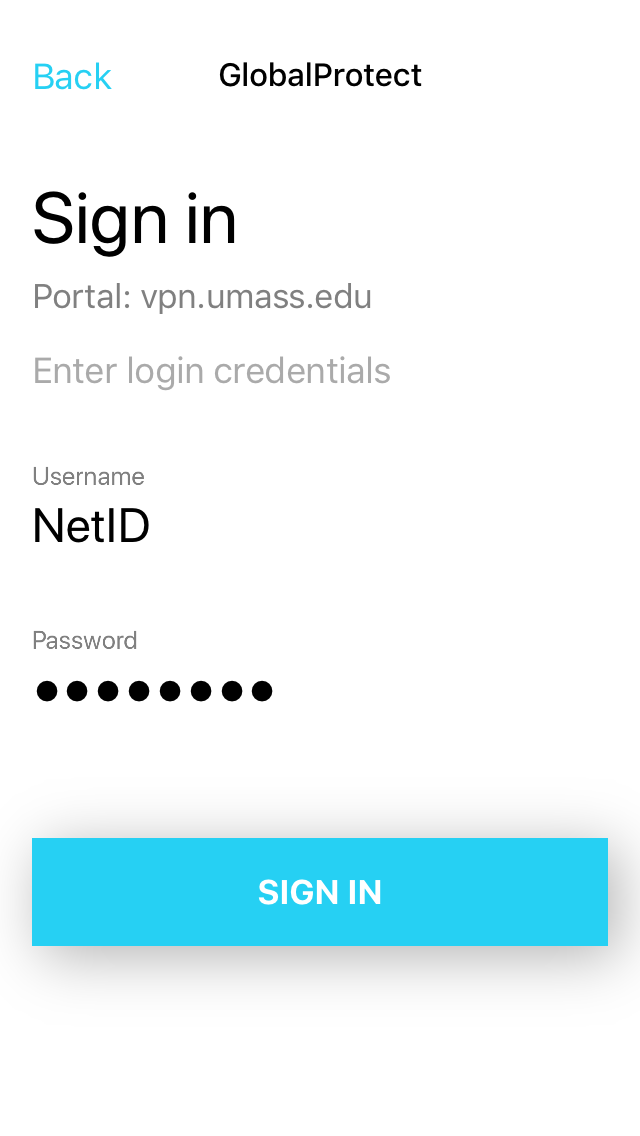
- Type vpn.umass.edu in the portal Address field and tap Connect.
- Tap Allow on the dialog asking to give Global Protect permission to add VPN configurations. You will be prompted for your iOS device’s pin (or other authentication method).
- Enter your NetID and password in the username and password fields, and then tap Connect. You will be prompted to authenticate with Microsoft two-step login to finish connecting.
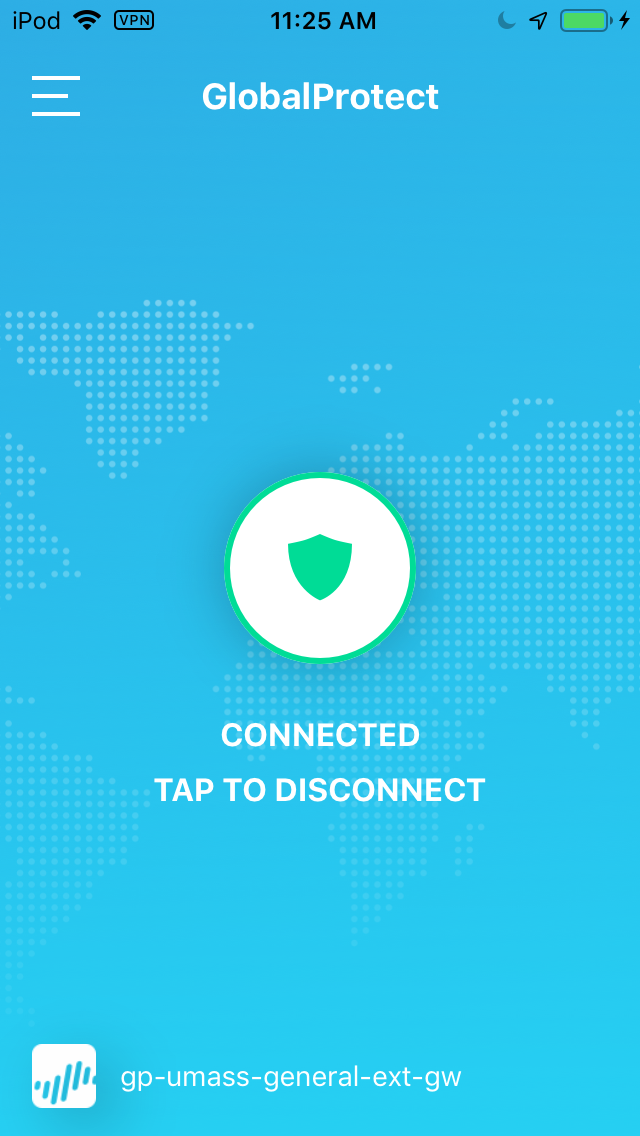
- The VPN icon will be displayed in your iOS device’s statusbar when you are connected to the VPN service.


Linux
- Contact IT User Services for a copy of the UMass Amherst GlobalProtect Linux vpn client installer packages.
- Unzip the file, which contains DEB installation packages for Ubuntu and RPM for CentOS and Red Hat, alogn with the scripts to install and uninstall the packages.
- Install the app package using either the sudo dpkg -i <gp-app-pkg> or apt-get install
<gp-app-pkg> command where <gp-app-pkg> is the name of your distribution package for
your Linux version. - The GlobalProtect app for Linux installs to the /opt/paloaltonetworks/globalprotect
directory. After GlobalProtect first runs, the app also creates a GlobalProtect user folder
$HOME/.globalprotect to save user registry configuration and other CLI related settings. - In the Global Protect client application, enter vpn.umass.edu for Portal Address.
- Sign in with your NetID and password.
For further instructions, see GlobalProtect App for Linux support documentation.
 Printer-friendly version
Get IT Help
Ask an expert at the IT Service Desk.
- Email and Chat Support
8:30 a.m. — 10 p.m. Monday — Friday
10 a.m. — 10 p.m. Saturday and Sunday - Phone Support | 413-545-9400
8:30 a.m. — 5 p.m. Monday — Friday - In-Person Support (Campus Center)
8:30 a.m. — 10 p.m. Monday — Friday
No appointment necessary.
Walk-ins and calls accepted until 15 minutes before closing. - Computer, Phone & Other Device Repairs
- For thesis or dissertation help, please email thesishelp@umass.edu.
2FA REQUIRED
In order to use the Georgia Tech VPN, you must be enrolled in Duo Two-Factor Authentication (2FA). This applies to everyone — faculty, staff, students, employees, affiliates, and guests. If you are not already enrolled in 2FA, most users can enroll via self-service in Passport. If you need assistance enrolling in 2FA, please contact the OIT Enterprise Service Desk.
TERMS OF USE
This service is provided by the Georgia Institute of Technology. Any user of this service must comply with all Institute and Board of Regents policies, including the Acceptable Use Policy, Cyber Security Policy and Data Privacy Policy (http://b.gatech.edu/it-policies). While Georgia Tech upholds a commitment to respecting the privacy expectations of all employees and students, please be aware that any electronic information transmitted over or stored in Georgia Tech systems and networks is subject to audit, inspection, and disclosure to fulfill administrative or legal obligations. It is important to note that any personal communications and files transmitted over or stored on Georgia Tech systems are also subject to the same regulations as business communications.
Last updated Monday, Sept. 26, 2022, at 8:31 a.m.
In order to access your Shared Drives from your computer or device from an off-campus location, you must connect to our network via a VPN.
IMPORTANT NOTE:
You must enroll in DUO before you can use the VPN
Contents:
- Windows
- Installing GlobalProtect and Connect on University Windows Computers
- Installing GlobalProtect and Connect on Personal Windows Computers
- Moving GlobalProtect to the Windows Taskbar
- Mac
- Installing GlobalProtect and Connect on University Macs
- Installing GlobalProtect and Connect on Personal Macs
- Mobile Devices
- Installing GlobalProtect and Connect on Mobile Devices
- Android
- iPhone
- Installing GlobalProtect and Connect on Mobile Devices
-
Troubleshooting
-
An Error Occurred during sign in
-
Installing GlobalProtect on University Windows Computers
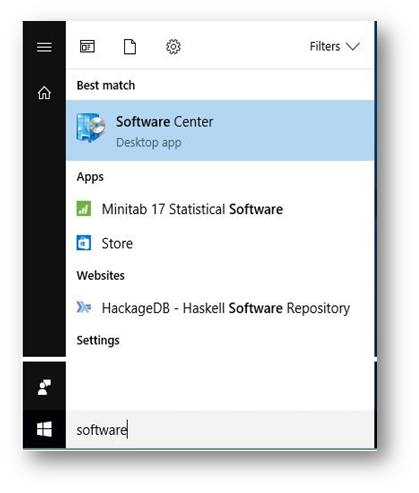
- Click the Start button in the lower left corner.
- Type Software Center.
- Open Software Center.
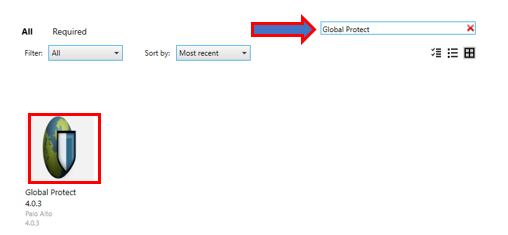
- In the search field, type Global Protect.
- Click Global Protect.
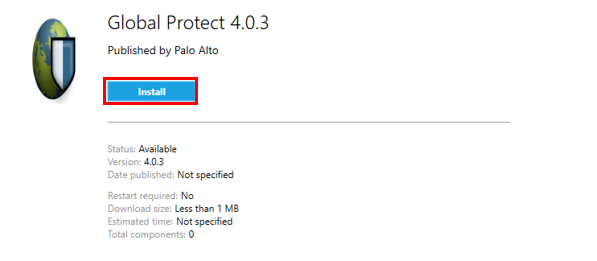
- Click Install.
- Once GlobalProtect is installed, it will start up automatically.
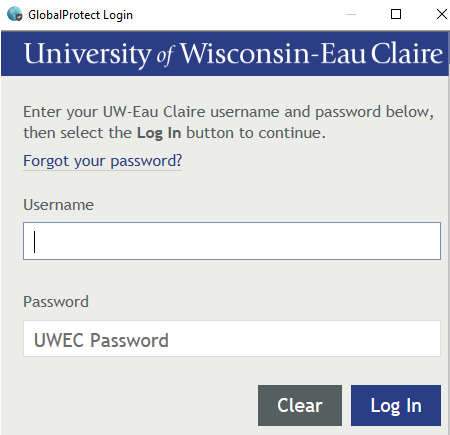
- Type vpn.uwec.edu into the Portal field and click Connect.
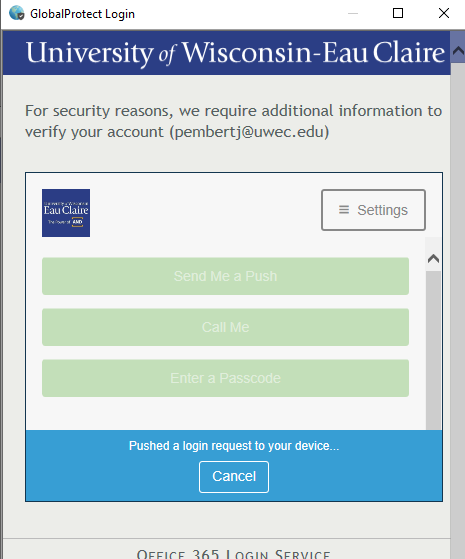
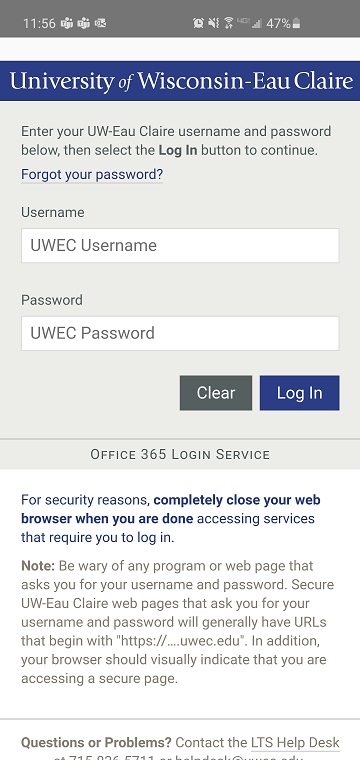
- After clicking connect, you will have to authorize through Duo. First you should see a university login window come up. Enter your UWEC username and password.
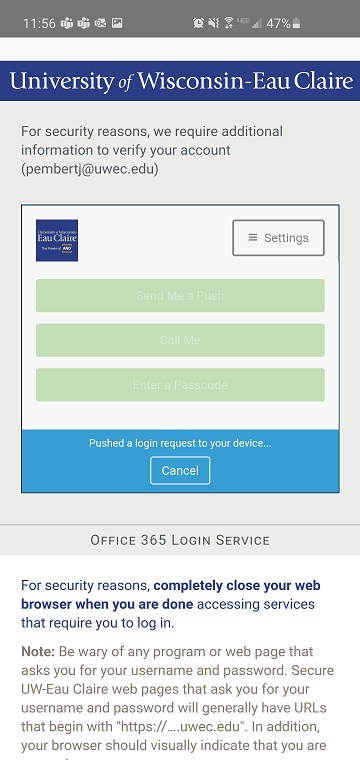
- After the university login window, select your Duo authentication method (Push, Call Me, Passcode), and then respond to the appropriate Duo prompt/call/passcode.
- To connect or disconnect to the VPN, click the arrow to bring up the tray.
- Right click the VPN icon.
- Click the Connect button.

Installing GlobalProtect on Personal Windows Computers
In order to access your university files and documents off campus, you need to use a VPN.
- Navigate to https://vpn.uwec.edu.
- Login using your university username and password.
- Click the link that best fits your computer.
- Locate the GlobalProtect agent installation program (may vary between web browsers/user preferences) and install the program.
- After the installation, open the client, if it didn’t automatically.
- Type vpn.uwec.edu into the Portal field, then click connect.
- After clicking connect, you will have to authorize through Duo. First you should see a university login window come up. Enter your UWEC username and password.
- After the university login window, select your Duo authentication method and authenticate through Duo.
- To connect or disconnect to the VPN, click on the GlobalProtect systray icon.
- Select the Connect option.
Once you are connected to the university’s network, you can access your files by following the directions in the Network Drives Overview article.
Moving GlobalProtect to the Windows Taskbar
GlobalProtect will automatically be in your system tray once it is installed. You can move this to your taskbar so you can easily connect or disconnect to UW-Eau Claire’s network.
Method 1
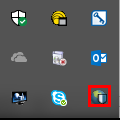
- Click the up arrow.
- Click and hold the GlobalProtect icon.
- Drag it to the Taskbar.


Method 2
- Right-click the up arrow.
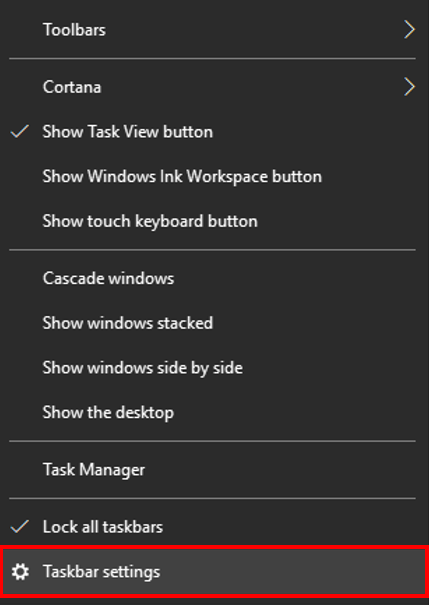
- Select Taskbar settings.
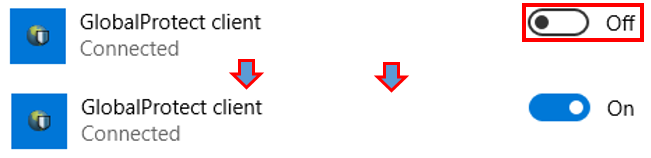
- Click Select which icons appear on the taskbar.
- Click the slider next to GlobalProtect client to turn it on.
GlobalProtect will appear in the Taskbar.
Installing GlobalProtect on University Macs
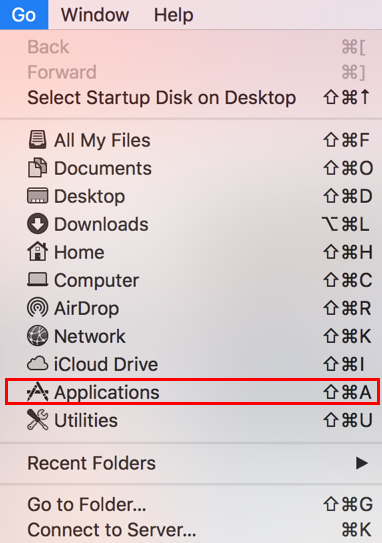
- Select Applications from the Go menu.
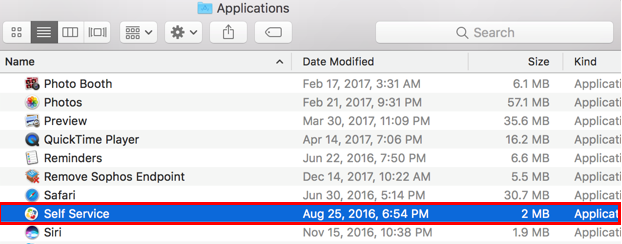
- Double Click Self Service.
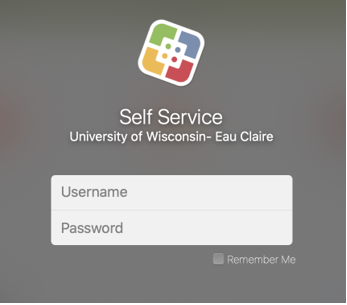
- Login using your University username and password.
- Click Install.
- After GlobalProtect begins the installation process, you may be prompted to enter a server address. If this happens, wait a few moments while the install completes, and the prompt will clear itself. Otherwise, enter vpn.uwec.edu and click the Connect button.
- Login using your University username and password.
- NOTE: Whenever you log off or shut down your Mac, you will have to relaunch GlobalProtect.
- From your desktop, select Applications from the Go menu.
- Double click on GlobalProtect.
- To reconnect, simply click on the GlobalProtect icon in your menu bar and log in with your University credentials.


Installing GlobalProtect on Personal Macs
In order to access your university files and documents off campus, you need to use a VPN. Once you are connected to the university’s network, you can access your files by following the directions in the Network Drives Overview article.
- Navigate to https://vpn.uwec.edu.
- Login using your university username and password.
- Click Download Mac 32/64 bit GlobalProtect agent.
- Install the program.
- (Optional) If you see the System Extension Blocked error message, click Open Security Preferences.
- (Optional) In Security Preferences, click Allow to unblock Pal Alto Networks.
- Type vpn.uwec.edu in the Portal Address field.
- Click Connect.
- Click Sign In after entering your University username and password. Your username will automatically be saved from this point forward.
NOTE: Whenever you log off or shut down your Mac, you will have to relaunch GlobalProtect. - To disconnect, click on the GlobalProtect icon in your menu bar and then click the Disconnect button.
- To reconnect, simply click on the GlobalProtect icon in your menu bar and log in with your University credentials.

Installing GlobalProtect on Mobile Devices
In order to use GlobalProtect, you need to install the respective apps.
Android
- Download GlobalProtect from the Play Store.
- Launch GlobalProtect.
- Type vpn.uwec.edu into the Portal field and tap Connect.
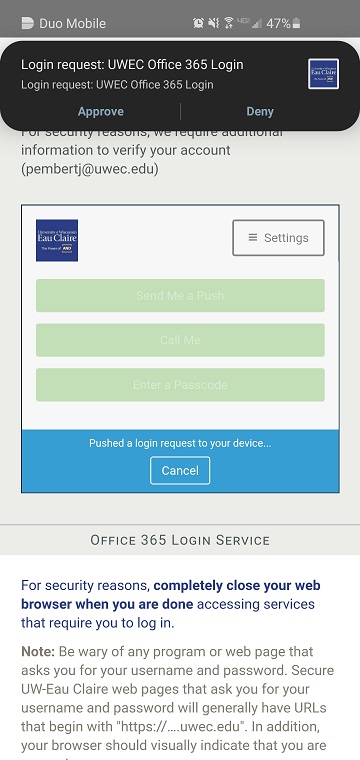
- Login using your university username and password and tap Log In.
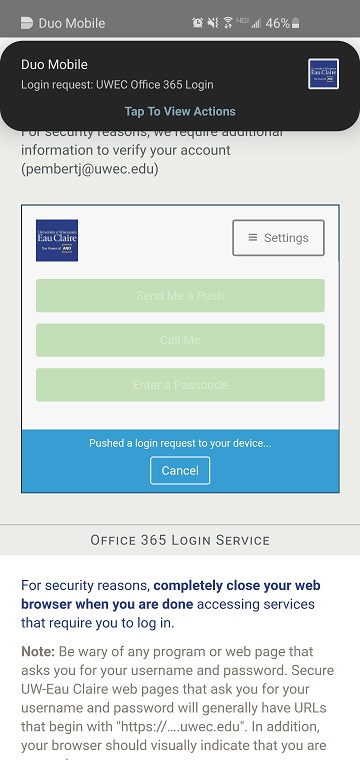
- Select your Duo Authentication method (Push, Call Me, Passcode) and respond to the appropriate Duo prompt.
Example: Duo Push Prompt
Click «Tap To View Actions.»
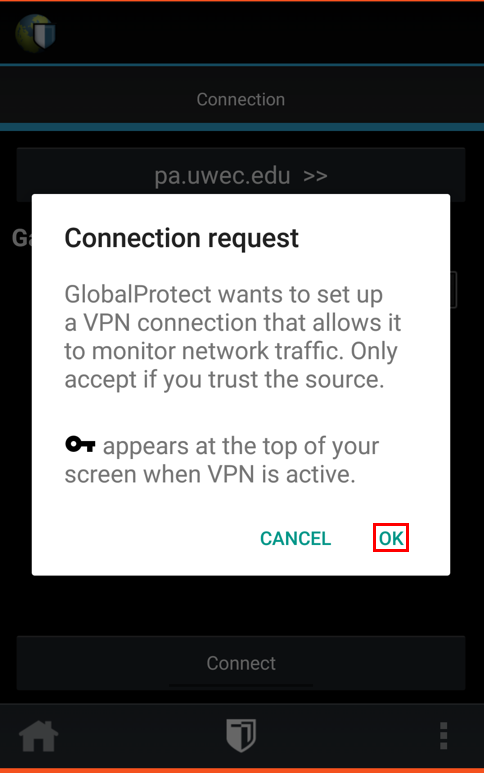
Click «Approve.» - Tap OK at the Connection request screen (if it is shown).
- Tap Connect.
NOTE: To disconnect, tap Disconnect.
iPhone
- Download GlobalProtect from the App Store.
- Launch GlobalProtect.
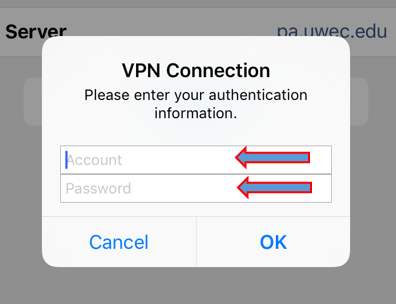
- Type vpn.uwec.edu into the Portal field and tap Connect.
- Login using your university username and password.
- Tap OK at the Connection request screen.
- Tap Connect.
NOTE: To disconnect from the VPN, tap Disconnect.

Troubleshooting
«An Error Occurred» during sign-in
- You receive the following error during the UWEC & Duo sign-in process.
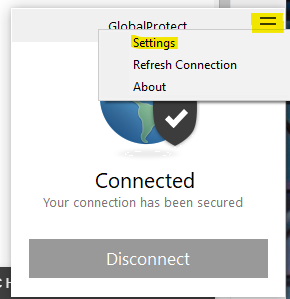
- Close out of the error message and go back to GlobalProtect down in the system tray. Click the «Hamburger» menu, then «settings.»
- Once the settings window opens, click the Sign Out button and click OK on the confirmation prompt. This will completely clear the credentials for the currently signed in account.
- Re-open GlobalProtect from the System tray and click connect again. Go through the sign-in process one more time and the «An Error Occurred» message should not happen.


Was this article helpful?
Yes
No
View / Print PDF