Introduction
This document explains how to install GNS3 using a Windows environment. You will learn how to:
- Download the required software
- Install prerequisite and optional software
Supported Operating Systems
GNS3 supports the following Windows operating systems:
- Windows 7 SP1 (64 bit)
- Windows 8 (64 bit)
- Windows 10 (64 bit)
- Windows Server 2012 (64 bit)
- Windows Server 2016 (64 bit)
Note: The 32 bit version is not discussed in this guide. For 32-bit CPU or older operating systems, please read this documentation.
Minimum Requirements
The following are the minimum requirements for a Windows GNS3 environment:
| Item | Requirement |
|---|---|
| Operating System | Windows 7 (64 bit) or later |
| Processor | 2 or more Logical cores |
| Virtualization | Virtualization extensions required. You may need to enable this via your computer’s BIOS. |
| Memory | 4 GB RAM |
| Storage | 1 GB available space (Windows Installation is < 200 MB). |
| Additional Notes | You may need additional storage for your operating system and device images. |
important
The hardware requirements listed here are minimum requirements for a small GNS3 environment. If you want to create complex environments with many devices, your hardware requirements will increase.
Recommended Requirements
The following are the recommended requirements for a Windows GNS3 environment:
| Item | Requirement |
|---|---|
| Operating System | Windows 7 (64 bit) or later |
| Processor | 4 or more Logical cores — AMD-V / RVI Series or Intel VT-X / EPT |
| Virtualization | Virtualization extensions required. You may need to enable this via your computer’s BIOS. |
| Memory | 16 GB RAM |
| Storage | Solid-state Drive (SDD) with 35 GB available space |
| Additional Notes | Virtualizing devices is processor and memory intensive. More is better but properly configured device trumps RAM and Processing power. |
important
The hardware requirements listed here are recommended for a small GNS3 environment. If you want to create complex environments with many devices, your hardware requirements will increase.
Optimal Requirements
The following are the optimal requirements for a Windows GNS3 environment:
| Item | Requirement |
|---|---|
| Operating System | Windows 7 (64 bit) or later |
| Processor | Core i7 or i9 Intel CPU / R7 or R9 AMD CPU / 8 or more Logical cores — AMD-V / RVI Series or Intel VT-X / EPT |
| Virtualization | Virtualization extensions required. You will need to enable this via your computer’s BIOS. |
| Memory | 32 GB RAM |
| Storage | Solid-state Drive (SDD) with 80 GB available space |
| Additional Notes | Virtualizing devices is processor and memory intensive. More is better, but a properly configured device trumps RAM and processing power. |
important
If you want to create complex environments with many devices, your hardware requirements will increase.
Video
- Video: https://www.youtube.com/watch?v=x9pGYyEqLYs
- Video: https://www.youtube.com/watch?v=lFEDmM_lsxI
Download the GNS3 all-in-one-installer
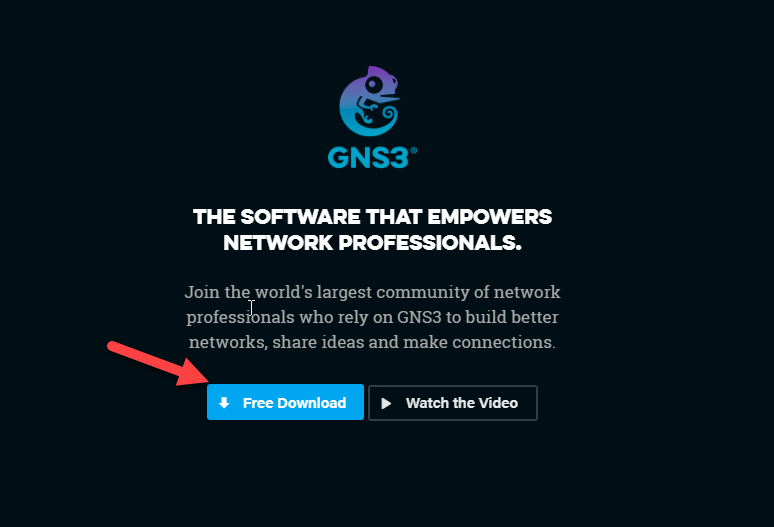
Follow these steps to download GNS3 to you MAC. Using a web browser, browse to https://gns3.com and click the Free Download link:
If you have not already registered on the GNS3 site, create an account and then click Create Account & Continue:
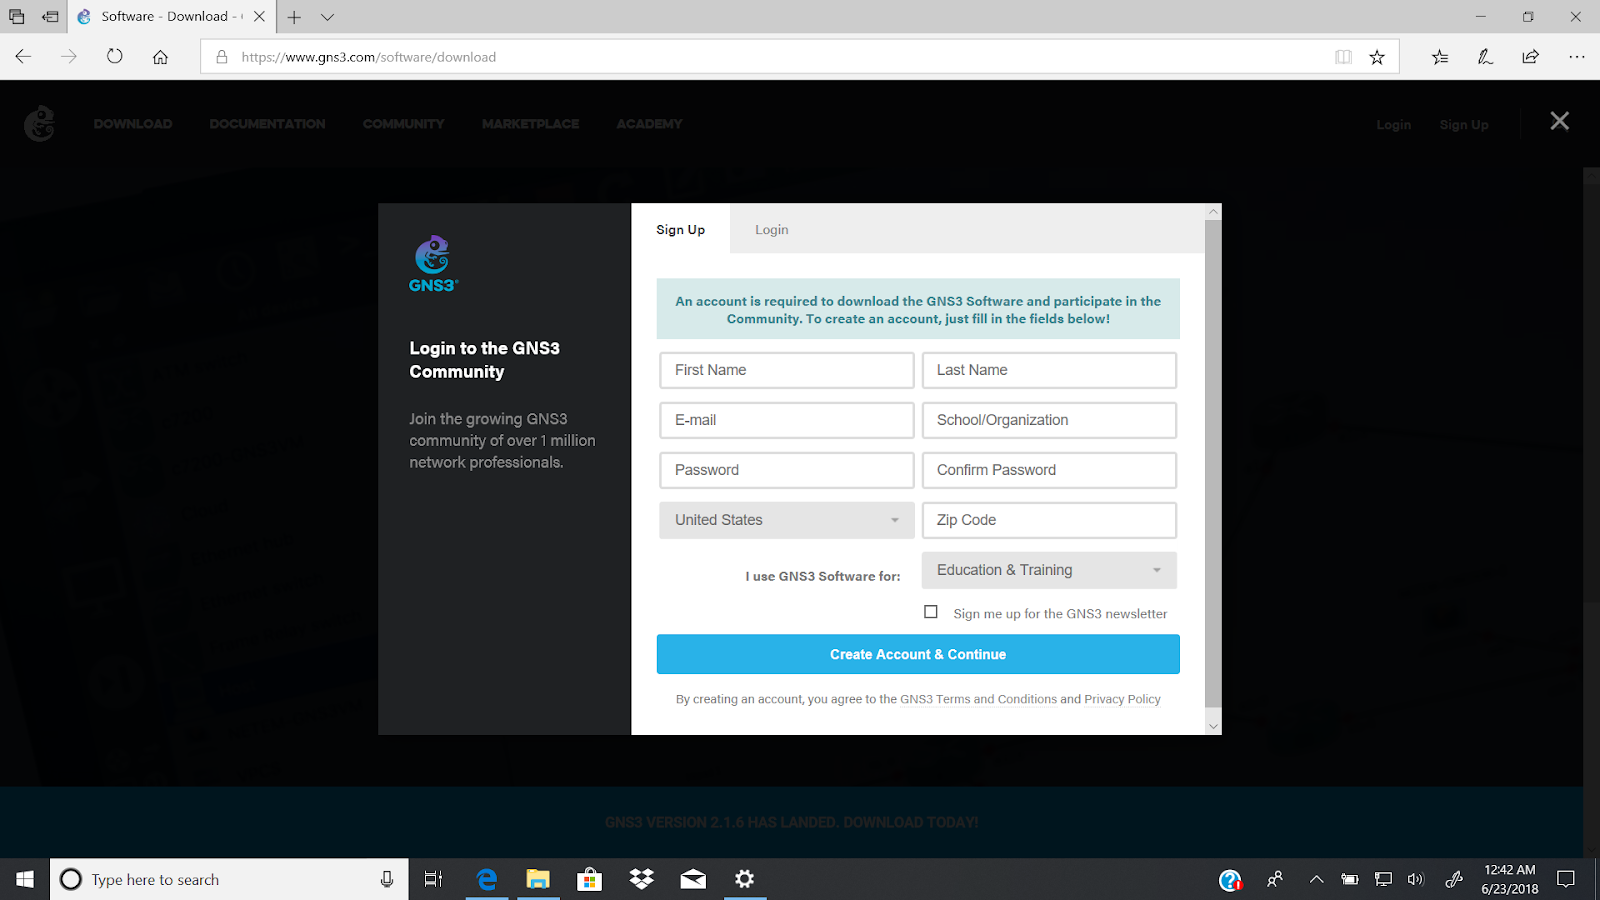
Or, if you already have an account, click Login, fill in the your details and then click Login & Continue:
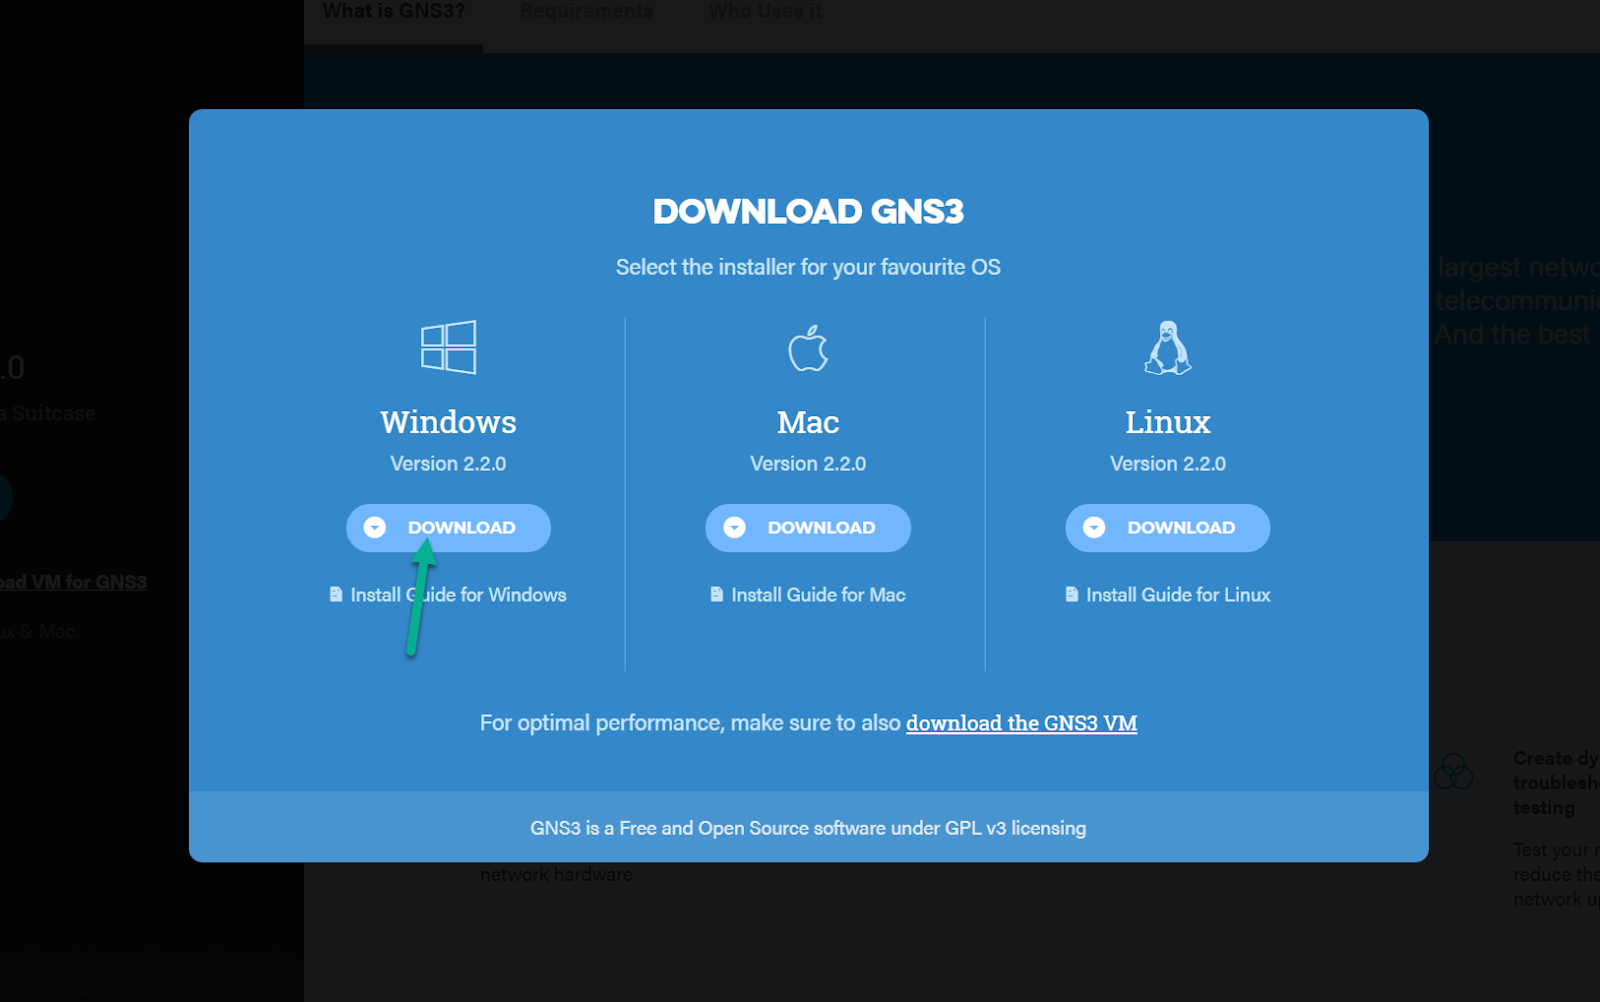
After login, you will be prompted to select the version of GNS3 to download. In this guide, we will select the Windows installation. Click the Download button to download the GNS3-all-in-one package.
note
The GNS3 executable file is about 85MB in size. The amount of time it takes to download will depend on the speed of your Internet connection.
note
The GNS3 downloaded file is an executable Windows file. If you have issues downloading, ensure that your security policies such as firewall and antivirus rules allow for the downloading of .exe files.
The GNS3-all-in-one package will automatically be downloaded to your PC.
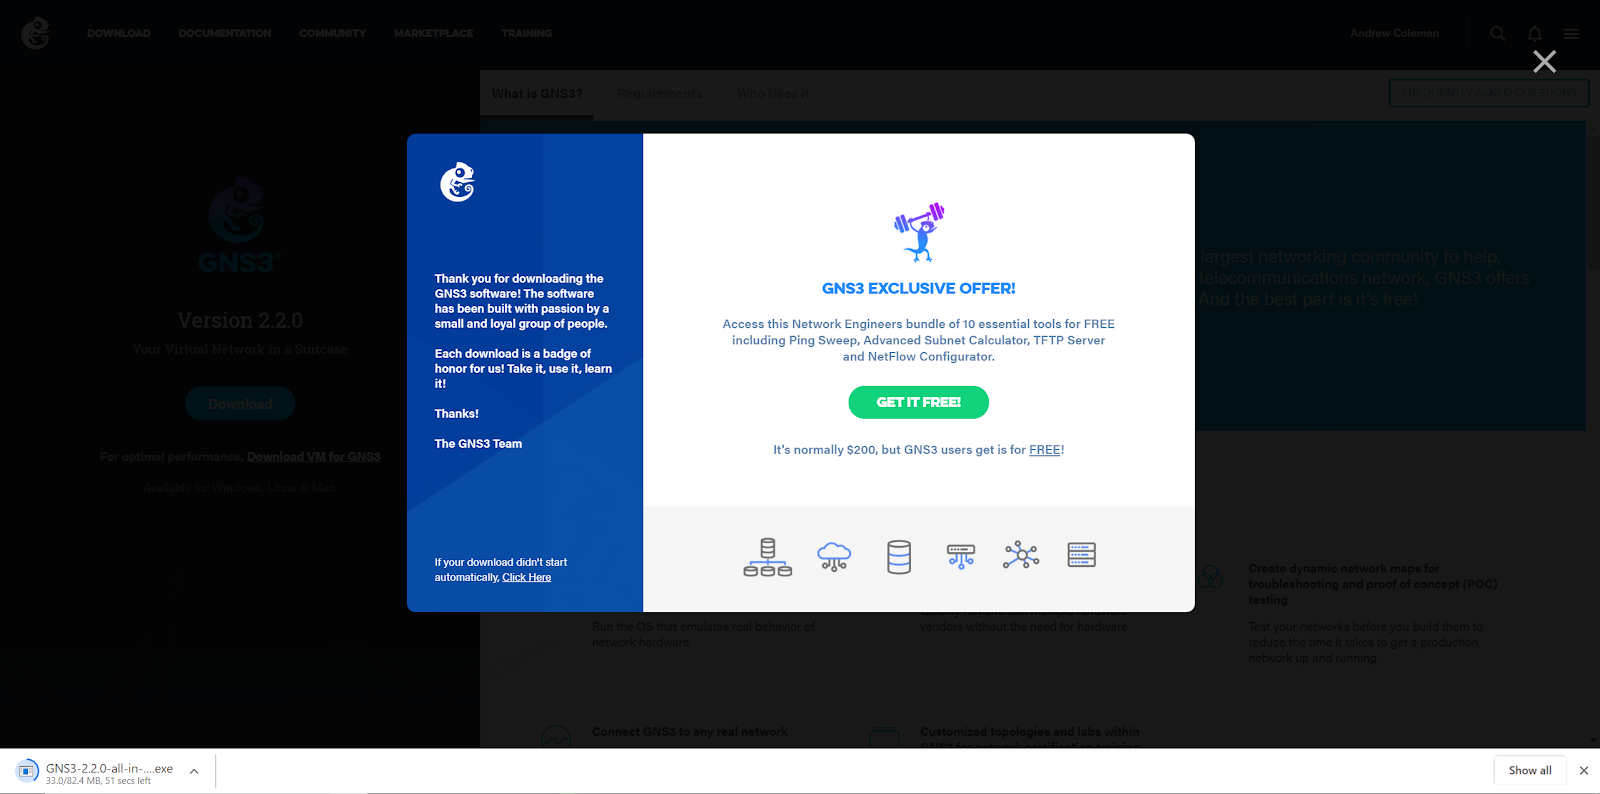
You also get an option to download a free version of the SolarWinds Network Engineers Toolkit (this is a subset of the full Pro version).
Install GNS3
Follow these steps to download GNS3 on a local Windows PC.
note
This guide only discusses a local Windows installation (Dynamips). If you are using the GNS3 VM, please refer to the GNS3 VM installation guide.
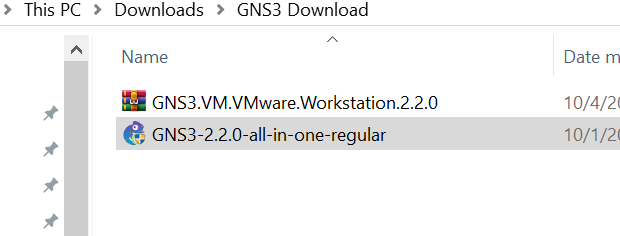
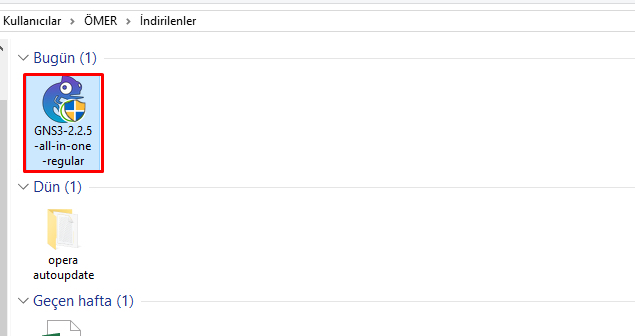
Navigate in Windows Explorer to your Downloads folder and then double-click the GNS3-2.2.0-all-in-one-regular.exe file:
note
If you have configured your browser to download files to a different directory to the default Downloads directory, look for the GNS3-2.2.0-all-in-one-regular.exe file (or the version of file you downloaded) in that directory.
If displayed, click the Run button to start the GNS3 installation (it’s not possible to take a screenshot of the UAC prompt for this, but allow setup to continue)
note
The GNS install process will run multiple installation wizards. If the process seems to have stalled, check if additional windows have been opened that are waiting for your input.
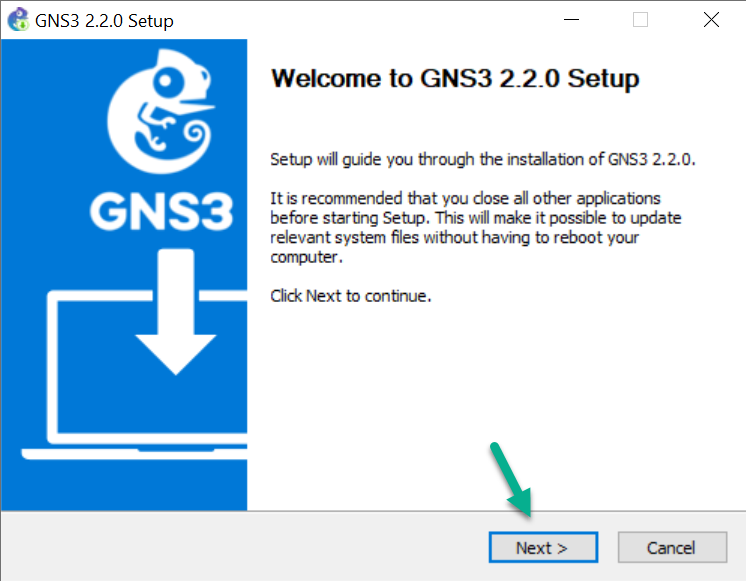
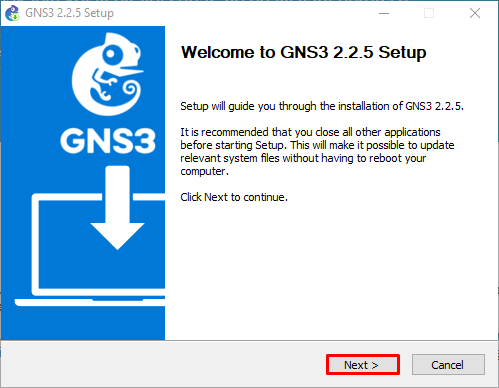
The GNS3 Setup wizard displays. Click Next > to start the installation:
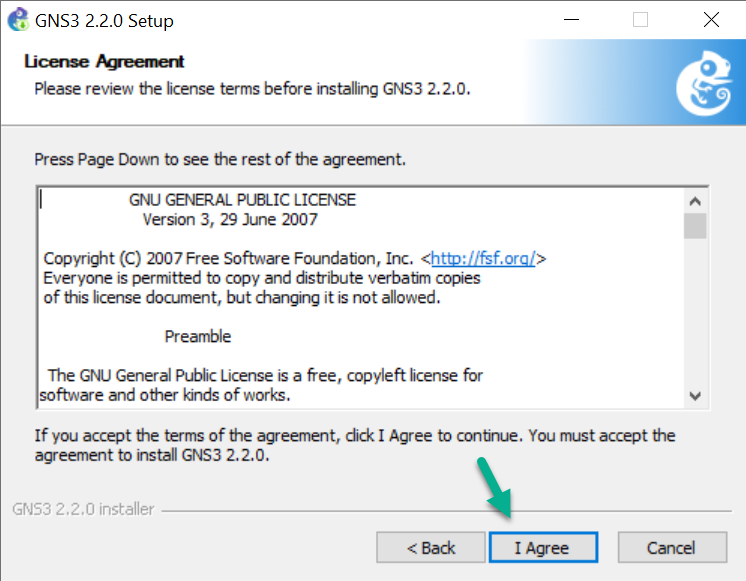
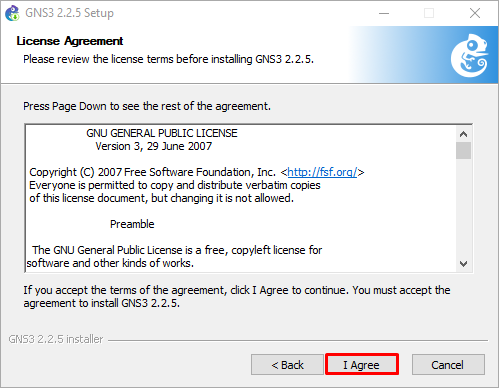
GNS3 is free open source software distributed under the GNU General Public License Version 3. Read the license agreement, and if you agree with the contents, click the I Agree button to continue the installation:
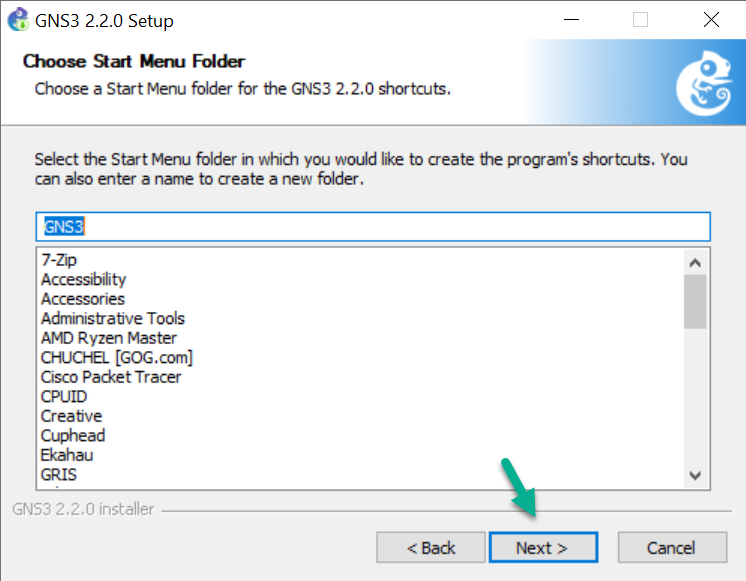
Select the Start Menu folder for the GNS3 shortcut. The default is the GNS3 folder. Click Next > to continue the installation:
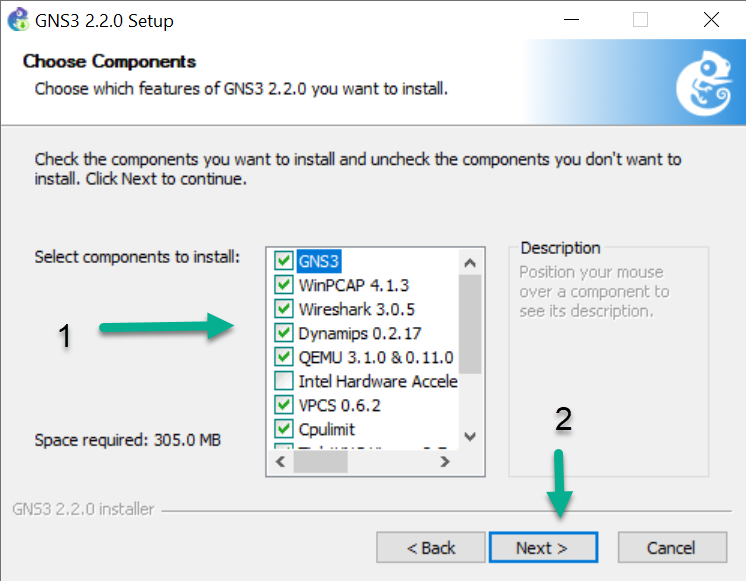
GNS3 comes bundled with various prerequisite and optional software. By default most software is selected for installation, but you can decide to only install specific software.
If you are unsure, leave all software selections at their default selection and click Next > to continue the installation:
note
Recent versions of Windows 10 have an issue with WinPcap. If Wireshark hangs while trying to use it in a GNS3 topology, consider switching to Npcap instead. Instructions can be found lower down in this document.
Here is a brief description of software:
| Item | Required | Description |
|---|---|---|
| WinPCAP | Required | Required to connect GNS3 to your computer network. Used by Cloud and NAT nodes to allow your projects to communicate with the outside world. |
| Npcap | Optional | Modern replacement to WinPCAP know to fix issues with Win10 but is less tested than WinPCAP. Install Npcap with the “WinPcap API-compatible Mode” option selected, if using without WinPcap. Npcap can co-exist with WinPcap, if that option is not selected. |
| Wireshark | Recommended | Allows you to capture and view network traffic sent between nodes. |
| Dynamips | Required | Required to run a local installation of GNS3 with Cisco routers. Only unselect if you are going to exclusively use the GNS3 VM. |
| QEMU 3.1.0 and 0.11.0 | Optional | A computer emulator used to emulate a full computer which could for example be Linux. The older Qemu version 0.11.0 is installed in order to support old ASA devices. It is recommended to use the GNS3 VM instead. |
| VPCS | Recommended | A very light PC emulator that supports basic commands like ping and traceroute |
| Cpulimit | Optional | Used to avoid QEMU using 100% of your CPU (when it is running) in some cases like with the old ASA devices |
| GNS3 | Required | The core GNS3 software. This is always required. |
| TightVNC Viewer | Recommended | A VNC client used to connect to appliance graphical user interfaces. |
| Solar-Putty | Recommended | The new default Console application. |
| Virt-viewer | Recommended | Alternate displayer of Qemu desktop VMs that have qemu-spice pre-installed. |
| Intel Hardware Acceleration Manager (HAXM) | Optional | Only available on systems with Intel CPUs (and VT-X enabled), that are not using Hyper-V. Used for hardware acceleration of Android emulation, as well as QEMU. |
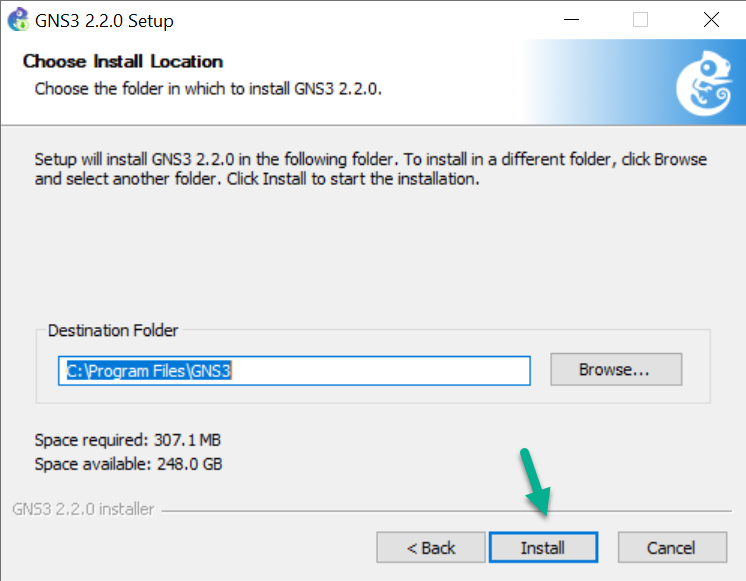
Choose an install location. The default location is C:Program FilesGNS3. Then click Install:
The output displayed will depend on what you have selected to install.
- If you are new to GNS3 and this is a new install, go to the next step.
- For WinPCAP install instructions go to the next step.
- For Wireshark install instructions
- For SolarWinds Response Time Viewer install instructions
- For GNS3 install instructions
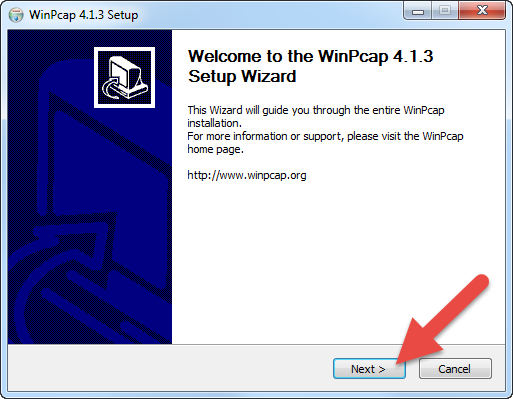
If WinPcap is already installed, a warning message is displayed. It is not necessary to reinstall WinPcap. Click Cancel if you do not want to reinstall WinPcap and go directly to the next step. Click OK to continue re-installing WinPcap:

The WinPcap installation wizard displays. Click Next > to continue the installation:
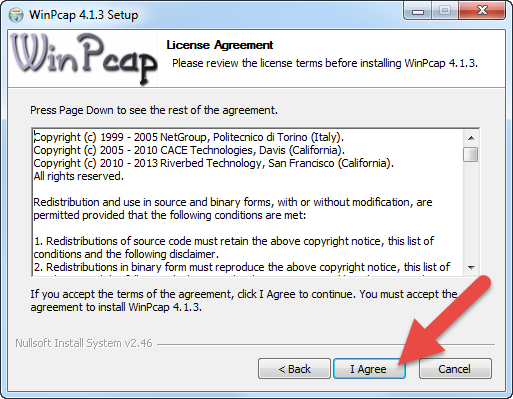
The WinPcap License Agreement displays. Read the agreement and if you agree, click the I Agree button to continue with the installation:
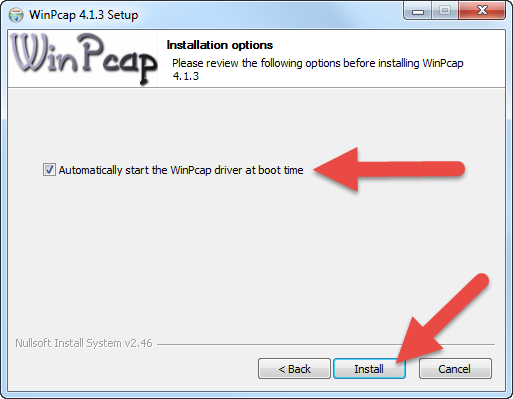
Leave the checkbox Automatically start the WinPcap driver at boot time checked and click Install:
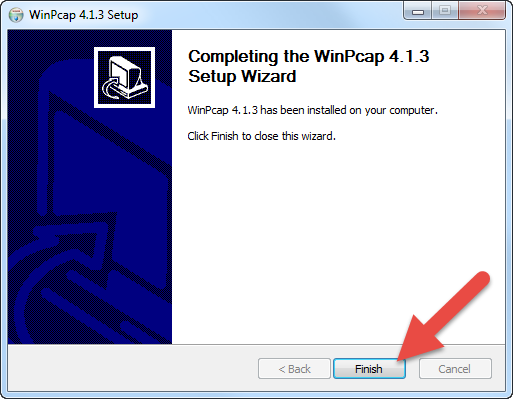
The WinPcap installation continues. Click Finish to complete the installation:
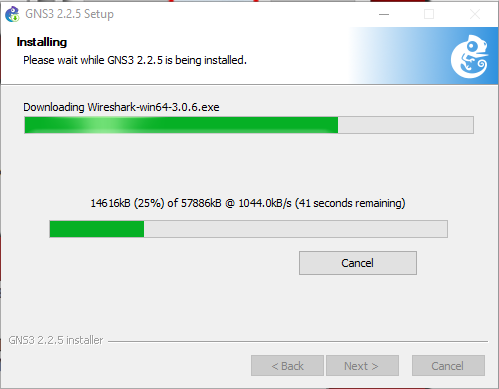
If you selected that Wireshark should be installed, the GNS3 setup software will download the Wireshark install files. Wait for the process to complete:
GNS3 will then perform a silent install of Wireshark. Wait for the process to complete:
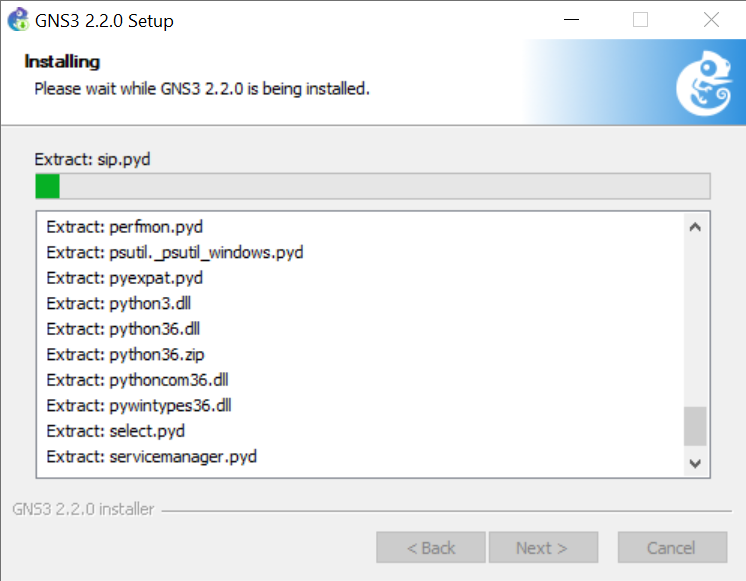
Once the core GNS3 software (and any optional selected items) is installed, Click Next>
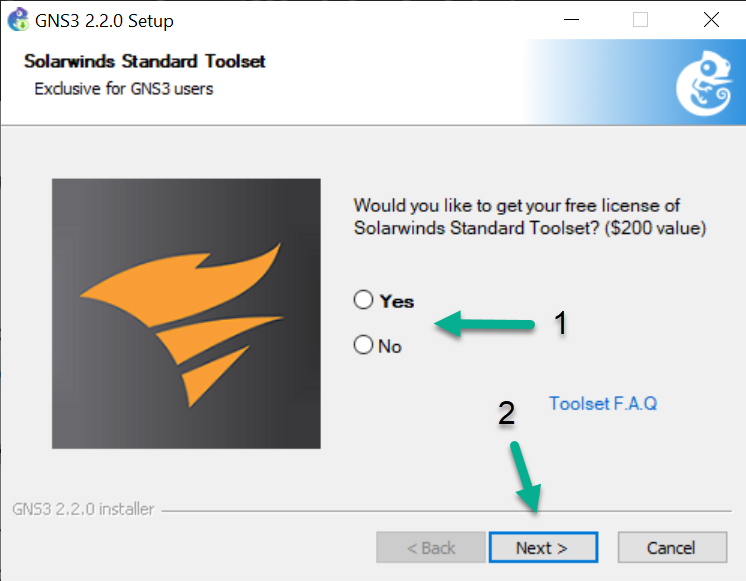
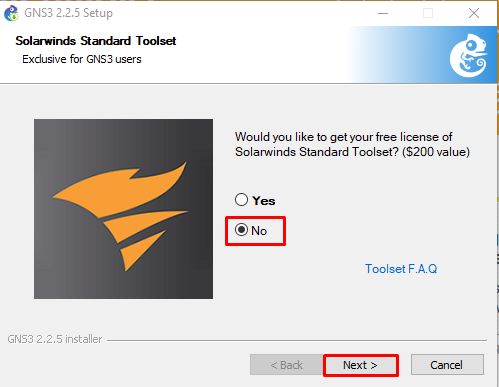
Optional: If you are interested, install the Solarwinds Standard Toolset. This is free evaluation (a $200 value). Otherwise Select No and click Next > to continue:
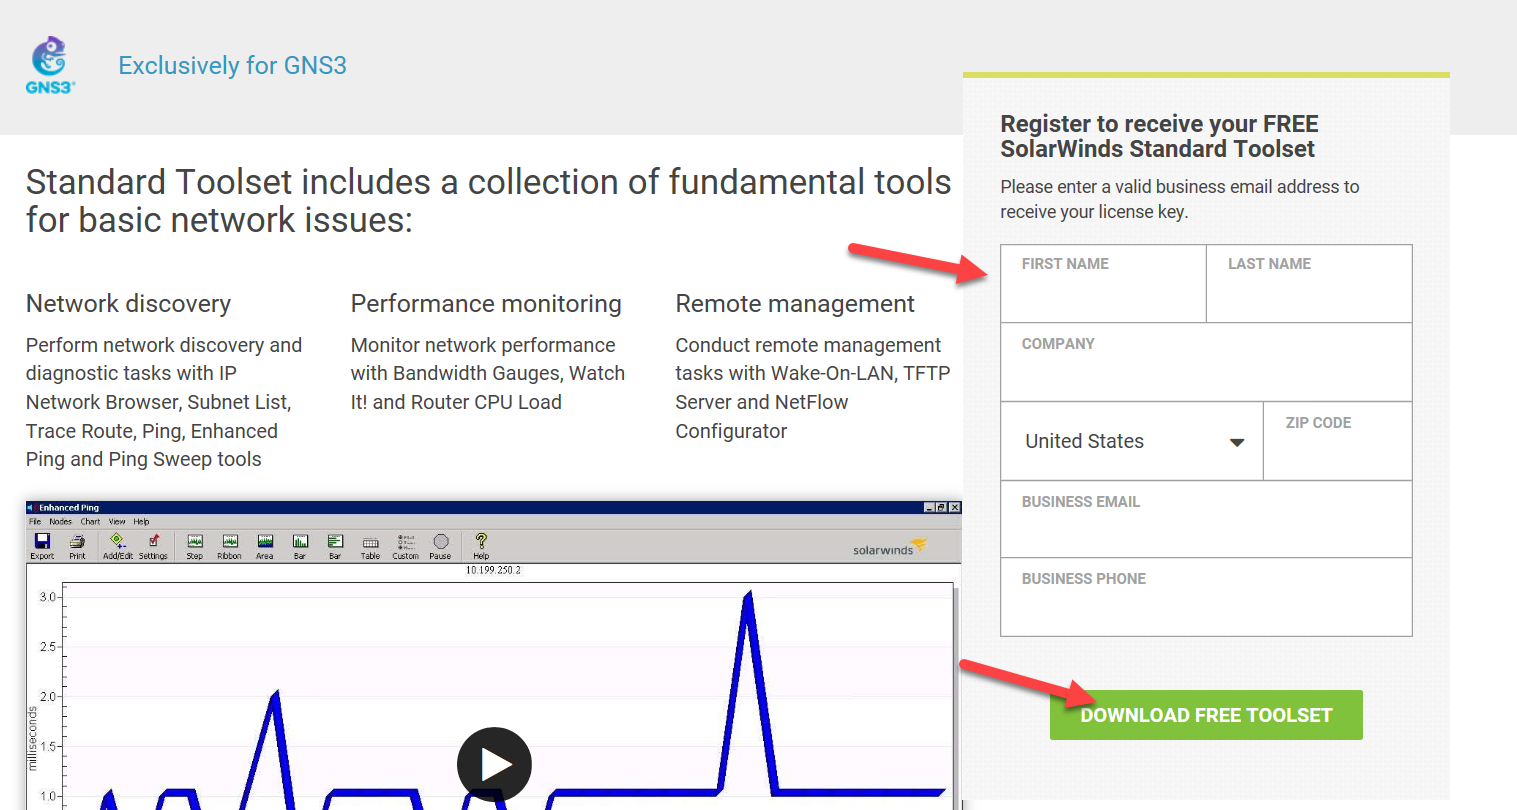
If you elect to download the Standard Toolset, you’ll be redirected to a webpage on Solarwinds, where you enter registration information, in order to download the software:
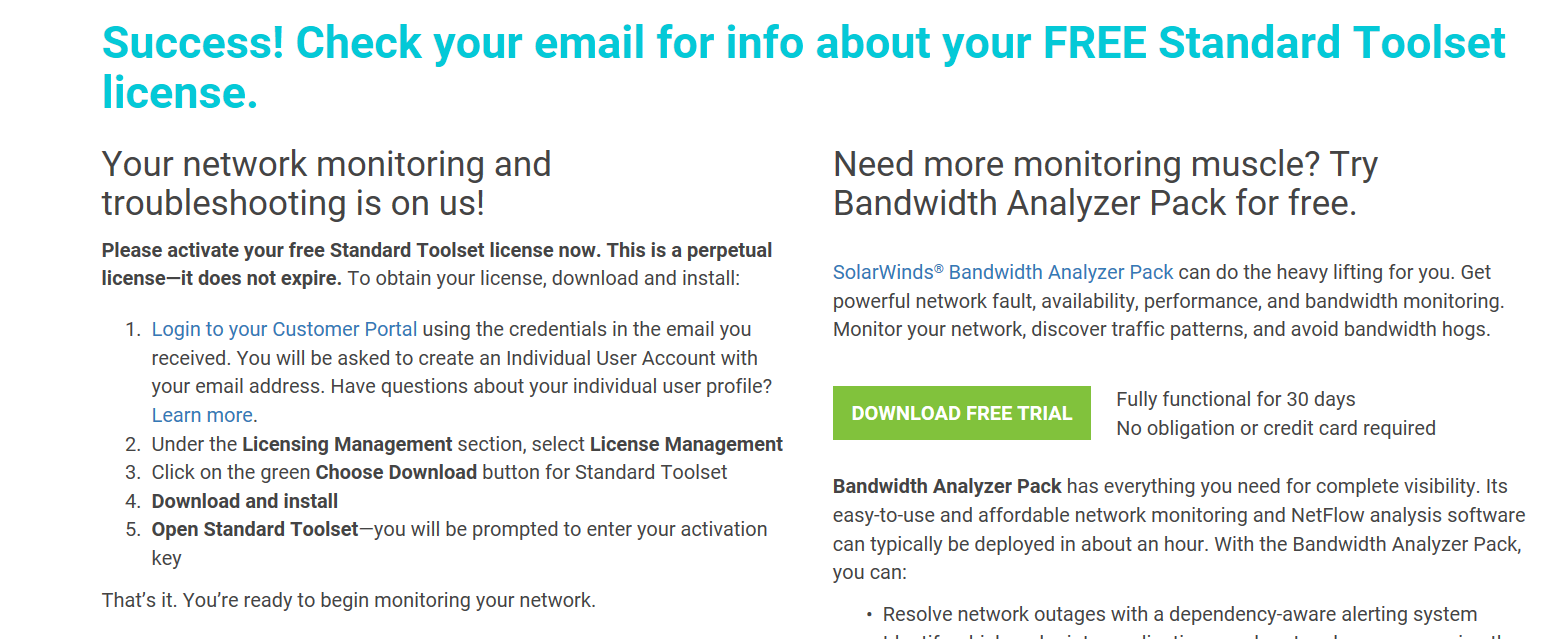
After registration and clicking the Download Free Toolkit link, you’ll be redirected to an informational page asking that you check your email, as well as instructions on how to activate your license for the Standard Toolset:
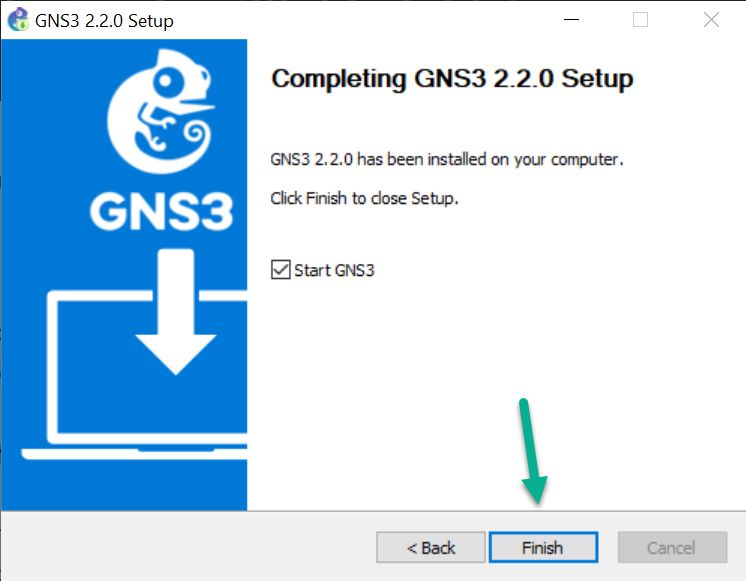
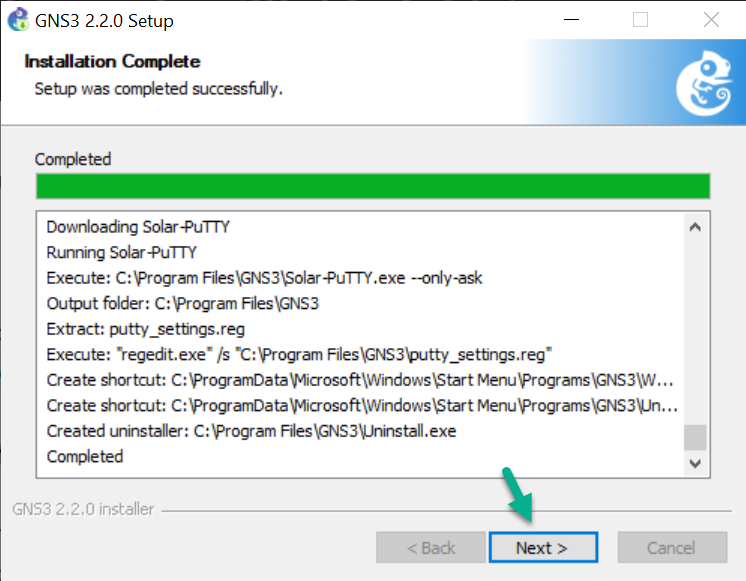
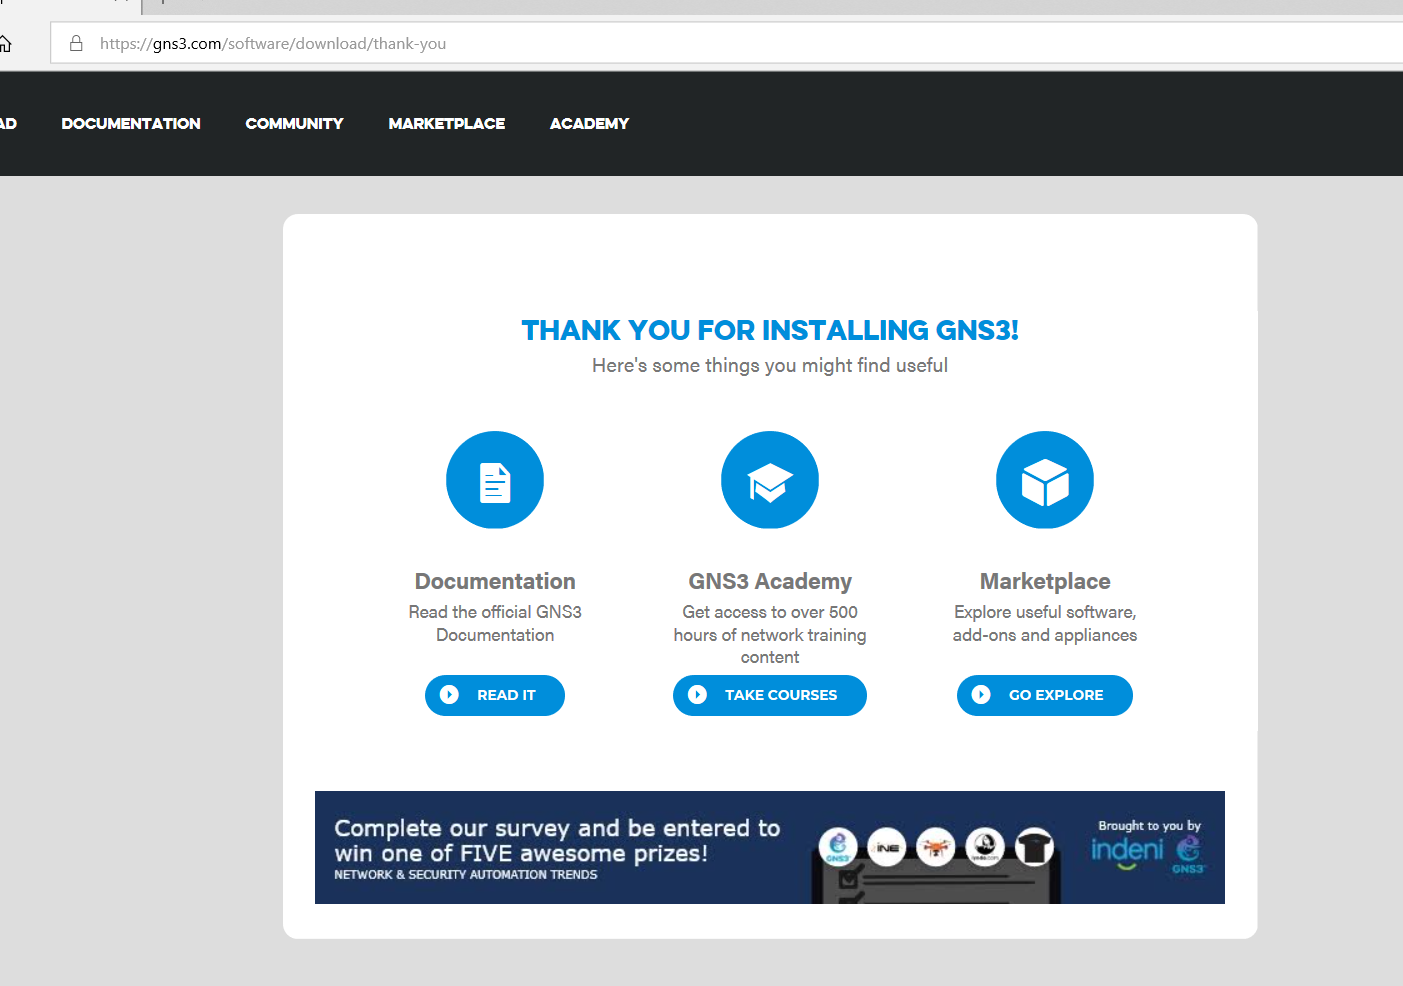
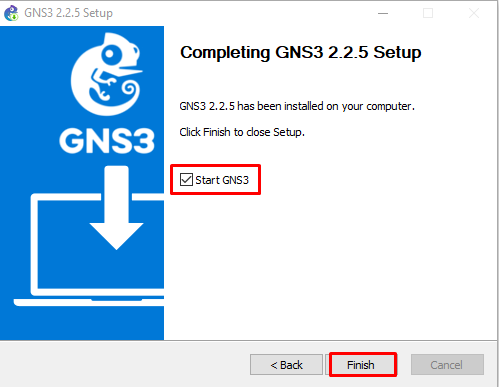
Congratulations! You have successfully installed GNS3. A browser window will open showing additional help and options. Leave the Start GNS3 checkbox enabled and click Finish to complete the GNS3 installation. Click here to for a walkthrough of using the Setup Wizard to configure and use the Local Server.
note
If you intend on using the GNS3-VM to run your devices, the please leave this window open and minimized in your taskbar, proceed with importing the GNS3-VM first (please click here to see those steps), and then come back to complete this step once the GNS3-VM has been imported.
note
If you are running Win10 with the latest updates, and experience issues with Wireshark hanging while trying to initialize interfaces, it’s worth giving the most recent Npcap a shot.
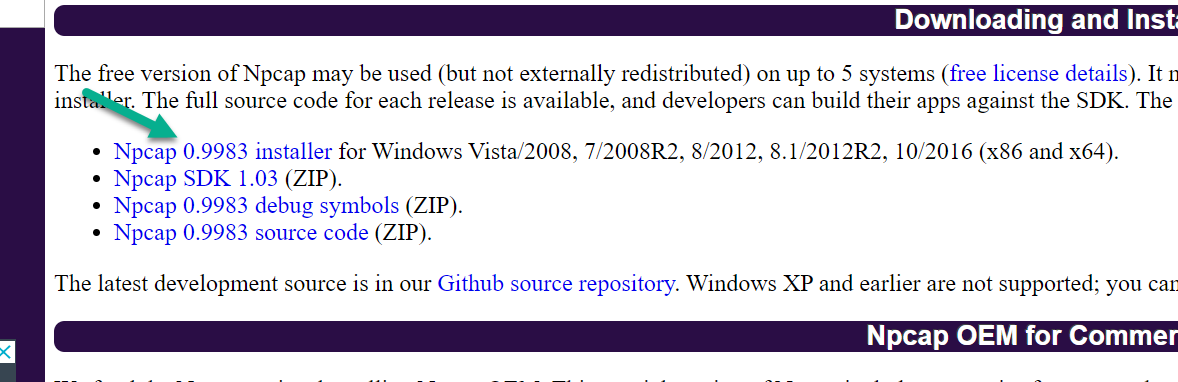
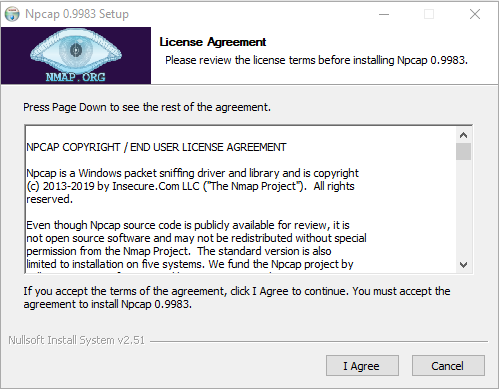
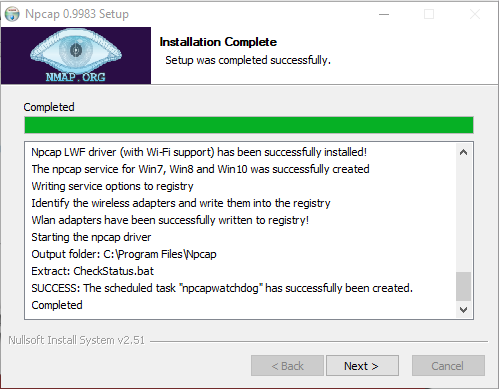
First, uninstall WinPcap and reboot. Next, either re-run the GNS3 All-In-One installer (ncap v0.9982 is included as an optional install), or open up your web browser and navigate to www.nmap.org/npacp/.
Scroll down the page a little bit, and look for the most recent version (v0.9983 as of Oct 7th, 2019):
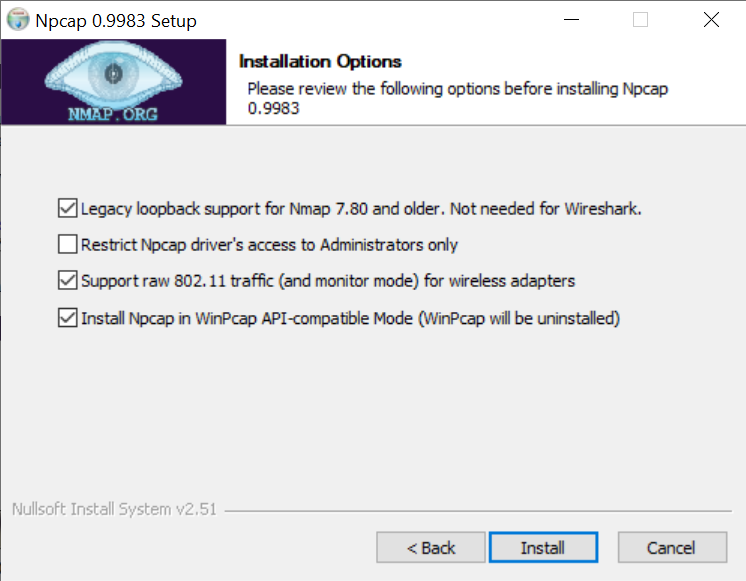
When installing Npcap with WinPcap, make sure to enable the “WinPcap API-compatible Mode” option before completing the installation:
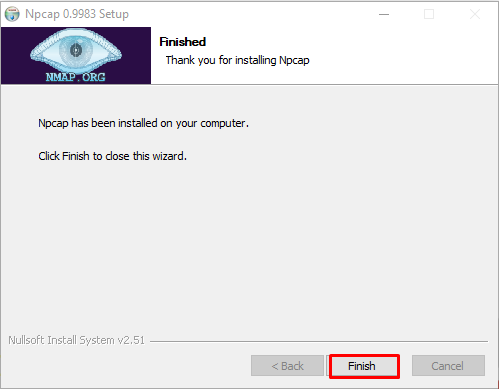
Click Install, and then reboot Windows a final time.
If you do wish to also have WinPcap installed, make sure that “WinPcap API-compatible Mode” is not selected, so that they can co-exist.
If you wish to install Npcap before installing GNS3, you’re free to do so. Just ensure that the options to install WinPcap and Npcap as part of the GNS3 installation process are deselected
note
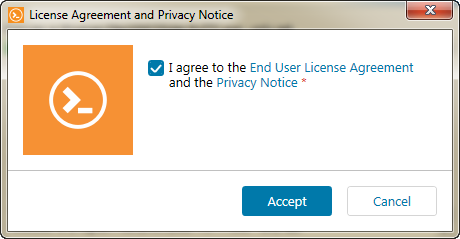
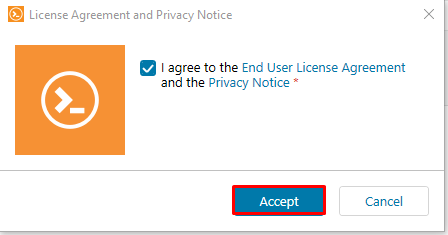
Solar-Putty is now the new default terminal emulation application for GNS3 in Windows, if you downloaded the GNS3 AIO installer from gns3.com (see note 3) . During GNS3 installation, if you elected to install Solar-Putty, you’ll be prompted to accept a License Agreement and Privacy Notice:
After clicking ‘Accept’, you’ll be prompted to enter a valid email address:
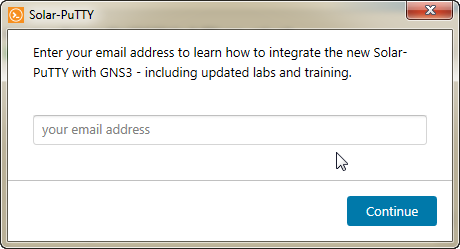
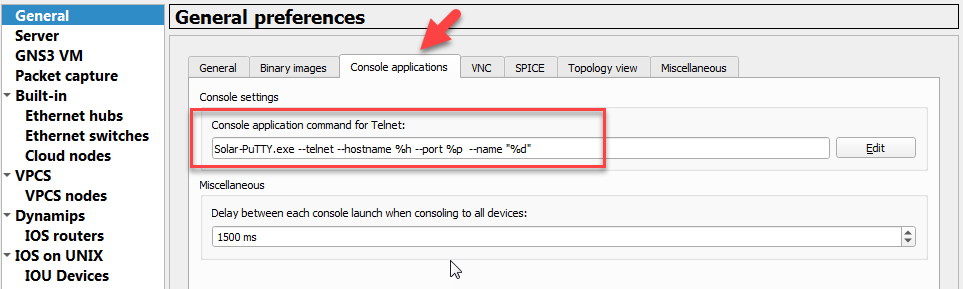
Clicking Continue will finish this part of the installation, and takes you back to the main GNS3 installation. Solar-Putty will now be the default console application, unless you choose to select a different one, by click Edit->Preferences->GNS3->Console in the main GNS3 GUI:
David Bombal has several videos online, showing Solar-Putty in general, along with configuration changes you can make:
- Video: https://www.youtube.com/watch?v=3utfGQyQOkA
- Video: https://www.youtube.com/watch?v=iuev1Hyc-f4
- Video: https://www.youtube.com/watch?v=mQKbXMIxHSk
- Video: https://www.youtube.com/watch?v=Q2TnxcJa0wI
- Video: https://www.youtube.com/watch?v=shoDldraAsE
note
GNS3, as well as the various versions of the GNS3 VM and the source code can also be downloaded from Github. This version of the Windows GNS3 AIO installer does not include Solar-PuTTY by default, and will use the original PuTTY instead.
You can still use Solar-PuTTY with GNS3 as your terminal emulator if you wish, by downloading it directly from SolarWinds. It’s still free to use (registration required). It will download as a .zip archive. You can then extract the Solar-PuTTY executable file from the .zip archive, and copy/paste that file into the main GNS3 installation directory (C:Program FilesGNS3 by default). In the GNS3 GUI, click Edit->Preferences->GNS3->Console, and select Solar-PuTTY from the dropdown menu, to make it the default terminal emulator.
As you know, GNS3 is a graphical network simulator program that you can easily run devices such as Cisco Switch, Router, Firewall, or virtual machine.

How to Set Up GNS3 2.2 (2.2.18) on Windows 10
With GNS3 software, you can improve yourself by making network designs and become a system and network expert. Since this network simulator has been developed in accordance with the technology by its developers, it is good to always check for updates to get new features.
Although the working logic of this program is very similar to the Cisco Packet Tracer program, the biggest difference between them is that Cisco Router and Switch IOS images can be used more comprehensively and in detail. For example, Packet Tracer includes entry-level IOS commands, while other software offers advanced commands for more advanced projects.
With this simulator software, you can use the IOS images of real Cisco devices to make network designs on your computer, but the IOS image of each device may not work compatibly. However, it is a more advanced segment software compared to the Packet Tracer program because the IOS images in other software are insufficient and have limited features.
For those preparing for Cisco’s entry-level networking exams, the first program they should use is Packet Tracer. If more advanced and professional network designs and projects are planned to be developed, then it would be more appropriate to choose and use the Graphical Network program.
Before proceeding with the steps to install GNS3, you can download the latest version of the program by visiting this article or you can create a new account on the official website and download it to your computer.
Minimum System Requirements
- Operating System: It should be at least Windows 7 64.
- Processor: You must have at least a Dual-Core processor.
- RAM (Memory): 4 GB minimum is sufficient.
- Disk Space: A minimum of 1 GB is sufficient. However, more space may be needed for Cisco images.
Recommended System Requirements
- Operating System: Again, it should be at least Windows 7 64 Bit.
- Processor: 4 or more logical processors. Core i7 or i9 is recommended.
- RAM (Memory): 8 GB is sufficient, but if it is 16 GB, it will be more stable.
- Disk Space: Definitely using it with an SSD disk helps you get more performance. Also, you must have a minimum of 35 GB of free space.
In addition to the system requirements of the recommended GNS3 simulator program, you can enable the virtualization setting from the BIOS menu of your computer.
GNS3 Setup, Configuration, and Usage
Follow the steps below to install, configure and use GNS3, the most advanced network simulator program used to prepare for Cisco exams on your Windows 7, 8, 8.1, and Windows 10 computer.
Step 1
After creating a new account, log in and click the Free Download button on the homepage.

Step 2
Since you will install it on the Windows 10 operating system, click the Download button under the Windows platform option.

Step 3
When the download process starts on the Google Chrome web browser, you can see the program downloaded from the lower-left corner.

Step 4
After downloading the setup file, right-click on GNS3-all-in-one-regular.exe as in the image below, and then click Run as administrator.

Step 5
Click the Next button to start the installation in the Setup window and continue.

Step 6
Click the I Agree button to accept the license agreement for the Cisco network simulator program.

Step 7
Click Next to use the folder name configured by default in the Choose Start Menu Folder window.

Step 8
In the Choose Components window, check one of its new features, WebClient, and click on Next.

Step 9
In the Choose Install Location window, select where you want to set up the program and click Next.

Step 10
Wait while the Cisco simulator program is installed on your Windows 10 computer.

Step 11
One of the necessary applications for the simulator software during the installation phase is WinPcap. Click Next to install the WinPcap software.

Step 12
Accept the license agreement of the WinPcap software and continue the installation process.

Step 13
In the Installation Options window, if you want to run WinPcap when you restart your computer, check “Automatically start the WinPcap driver at boot time” and click Next.

Step 14
After completing the WinPcap installation, click the Finish button and continue the installation.

Step 15
Npcap needs to be installed separately for the software. In this step, continue by clicking the I Agree button to accept the Npcap license agreement.

Step 16
In the Installation Options window, continue with the option configured by default.

Step 17
In the Installation Options window, continue with the option configured by default.

Step 18
Click Finish to close the Npcap setup wizard.

Step 19
Finally, if the Wireshark package analysis program is not installed on your system, it will be downloaded and installed over the Internet.

Step 20
Likewise, wait for the Solar-PuTTY software to be downloaded and installed, which is necessary for managing network devices such as Routers or Switches.

Step 21
After installing Wireshark process, click the Accept button to accept the Solar-PuTTY license agreement.

Step 22
For Solar-PuTTY use, click Continue after typing in your email address.

Step 23
After the Start menu folder and desktop shortcuts created, and the Uninstall.exe copied to the corresponding location to uninstall it, click Next.

Step 24
If you want to use Solarwinds tools for free, you can select Yes. If you do not want it, select the No option and click Next.

Step 25
After successfully installing the program, click Finish to run the program.

Local Server Configuration Settings
After installing GNS3, click the desktop shortcut to run it and the Setup Wizard window will open to check the Local Server settings. In this window, you need to configure the Localhost connection and port.
Step 1
In the Setup Wizard window, select Run appliances on my local computer and click Next.

Step 2
In the Local Server Configuration window, check that the Host Binding setting is localhost, and also, if there is an application using the 3080 TCP port in your system, specify a different port number in this window.

Step 3
You can see that there is no problem to use Graphical Network Simulator on your system in the Local Server Status window.

Step 4
Check the server’s type, path, host status, and port number in the Summary window and click Finish.

Step 5
Finally, you can check the version of the program from Help / About.

Adding Router/Switch Router Image
After installing and running the Cisco simulator, you need to add an IOS image to the program. After adding and configuring the IOS images of Cisco network devices to GNS3, you will now be ready to do your projects. To add an IOS image, click on the image below and browse the related article!

Adding Routers to the Workspace and Connecting Two Routers Each Other
After adding the Router IOS image to the simulator program, you can see the device you added by clicking on Devices.
Step 1
Now, create a new project and add two c7200 Routers to the workspace.

Step 2
To connect the two routers, click on the cable-like vehicle and click once on R1 to view the empty ports. For example, connect one end of the network cable to the FastEthernet0/0 port of R1 and the other end to the FastEthernet0/0 interface of R2.

Step 3
After connecting the two Cisco Routers with the FastEthernet interface, run them by clicking the start button.

Step 4
You can open the CLI prompt by double-clicking on Router R1, or you can right-click and click Console from the displayed options.

Step 5
To give an IP address to the FastEthernet0/0 interface of the router R1 and to activate the port, follow the commands below.
R1(config)# interface fastethernet 0/0
R1(config-if)# ip address 192.168.1.1 255.255.255.0
R1(config-if)# no shutdown
To verify that the Fa0/0 port is open, execute the following command in the CLI:
R1# show ip interface brief
Step 6
Likewise, make the settings you have made on R1, also on R2.
R2(config)# interface fastethernet 0/0
R2(config-if)# ip address 192.168.1.2 255.255.255.0
R2(config-if)# no shutdown
Ping R1 via R2 to test the connection between the two routers.
R2# ping 192.168.1.1
How to Use SecureCRT Instead of Solar-PuTTY in GNS3
As you can see while installing GNS3, Solar-PuTTY is configured as a console application by default. However, if you do not want to use Solar-PuTTY software, you can use SecureCRT instead.
Install SecureCRT on your computer before changing the Console application.
Step 1
After installing SecureCRT, run GNS3 again and click Edit / Preferences. In the General Preferences window, click the Edit button under General / Console Applications.
Select SecureCRT in the Choose a predefined command section and change the location where the program is installed and click the OK button to save the setting.

Step 2
Double click on Router R1 and check if the SecureCRT console application is opened. SecureCRT works fine on GNS3 as shown below.

Video
Installing Older Versions
GNS3 Version
YouTube Video
Slide
Final Word
Using GNS3 on your Windows computer, you can create detailed network projects and study more specifically for Cisco exams. Thanks for following us!
Related Articles
♦ How to Use VPCS
♦ Cisco Switch Basic Configuration
♦ VMware Connection
♦ Adding a Cisco Router
♦ Router Interface Configuration
GNS3 (Graphic Simulator Network) – это приложение сетевого симулятора, выпущенное в 2008 году на основе графического интерфейса пользователя. GNS3 функционирует для моделирования сложных сетей, чем другие симуляторы, с помощью технологии эмулятор / виртуальность.
Раньше, если вы хотели имитировать маршрутизатор Cisco, вы должны были установить Dynamips (технология эмулятора) в Linux, WindowsMacOS или FreeBSD. С GNS3 все включено упаковано с хорошим интерфейсом, так что его использование более выгодно и проще для пользователей.
GNS3 является обязательным для людей, которые находятся в мире компьютерных сетей. Почему? давайте послушаем причину, прочитав статью ниже, а также объясним, как установить GNS3 на Windows!
Причина, по которой люди, работающие в мире компьютерных сетей, должны использовать GNS3, заключается в том, что GNS3 имеет открытый исходный код и является бесплатным. Теперь программа бесплатна, чтобы пользователи могли ее использовать. Кроме того, мы можем внести свой вклад в github благодаря его неограниченным возможностям.
Поэтому использование GNS3 становится основным инструментом, который приносит прибыль, и многие используют его, потому что поддержку также легко получить.
Особенности в GNS3
- Не включен. Режим симуляции недоступен. Потому что то, что моделируется, это оригинальное устройство (реальные устройства). Как смоделировать это с помощью приложения Sniffer, например, tcpdump и wireshark. Есть уроки (академия) по основному использованию GNS3 для сети, которая использует GNS3, но нет конкретного учебника, который можно увидеть в приложении, придется снова искать в Интернете, книгах, YouTube или других, чтобы изучить его.
Этапы установки GNS3
Относительно того, как установить GNS3, ниже поясняются шаги по установке GNS3 на Windows:
1. Загрузите последнюю версию GNS3 по этой ссылке,
2. Если вы хотите установить программное обеспечение, если вы можете подключить интернет-соединение (необязательно).

3. После этого появится окно для установки, вы должны обратить внимание на шаги, которые необходимо сделать. В появившемся окне нажмите ниже следующий,

4. В окне Лицензионное соглашение нажмите на него Я согласен,

5. Затем в окне Выберите папку меню Пуск нажмите на него следующий,

6. После этого появится окно Выберите компонентынажмите следующий,

7. Далее в окне Выберите место установкивыберите место для хранения программного обеспечения. Как нажать просматривать чтобы определить место хранения, затем нажмите Установить его (следуйте инструкциям стрелки ниже).

8. Дождитесь завершения процесса установки.

9. После завершения установки нажмите следующий,

10. Появится окно следующего этапа Лицензионное соглашение для WinPcap, щелчок Я согласен одобрить это.

11. После этого на окне Варианты установки нажмите на него Установить его,

12. WinPcap установлен, затем нажмите отделка (этап установки завершен).

13. Дождитесь завершения процесса установки. щелчок следующий продолжить.
Примечание. Если программное обеспечение удалено и мы хотим установить его с файлом GNS3.exe, который все еще остается на устройстве, шаги 1-8 будут такими же, затем перейдите к этапам 13-15, поскольку некоторые файлы все еще хранятся на устройстве.

14. И появится окно Solarwinds Стандартный набор инструментов затем нажмите Нет. и Далее.

15. И, наконец, все процессы установки завершены, просто нажмите отделка, Программное обеспечение GNS3 установлено на ноутбуке / ПК.

16. На следующем шаге откройте GNS3, и на дисплее появится следующее изображение. и вы уже можете использовать программное обеспечение GNS3 в соответствии с вашими потребностями.

Таким образом, учебник о том, как установить GNS3 на Windows на ноутбуке / ПК для тех из вас, кто не знает раньше. Этапы довольно много, но на самом деле, что нужно учитывать, это инструкции и положения, сделанные программным обеспечением, просто следуйте ему. Надеюсь, это полезно.
Просмотров: 3282
GNS3 предоставляет широкие возможности для виртуализации, до этого мы рассматривали Linux, теперь же пришла очередь Windows.
В составе образа виртуальной машины GSN3 присутствует QEMU. Этот гипервизор может работать с Windows. Обратите внимание, на вашем ПК должно быть не менее 8 Гб оперативной памяти, а лучше если у вас все 16. Для самой виртуальной машины GNS3 выделите как минимум 4 Гб RAM. Крайне рекомендую использовать SSD под систему и запуск виртуальной машины GNS3.
Минимум, на котором, без проблем, запуститься чистая Windows 2012 R2 – 1024 Mb, этот объем можно теоретически уменьшить, но GNS3, насколько мне известно, не поддерживает, memory ballooning, так что выделять придется некий минимум. Так же имейте ввиду, что при установке дополнительных компонентов требования к памяти будут только увеличиваться. Например, в Hyper-V при использовании виртуальной памяти, контроллер домена GC занимает 1134 Мб памяти.
Читать далее…
Время прочтения
5 мин
Просмотры 29K
GNS3 (Graphical Network Simulator) — это графический симулятор сети, который позволяет смоделировать виртуальную сеть из маршрутизаторов и виртуальных машин. Незаменимый инструмент для обучения и тестов. Работает практически на всех платформах. Отлично подходит для создания стендов на десктоп машинах.
В зависимости от аппаратной платформы, на которой будет использоваться GNS3, возможно построение комплексных проектов, состоящих из маршрутизаторов Cisco, Cisco ASA, Juniper, а также серверов под управлением сетевых операционных систем.
GNS3 имеет два серьёзных недостатка:
- Сильно требователен к CPU и памяти. 10 маршрутизаторов уже всерьёз нагрузят ПК. Использование процессора можно снизить с помощью механизма Idle PC. Без этого и 3-4 с трудом бы, пожалуй, пошли.
- Очень слабо поддерживает функции L2. Есть только подобие коммутаторов, на которых можно максимум настроить Access/Trunk порты и свичовые платы для маршрутизаторов, L2-функционал которых также очень ограничен.
Помимо этого, необходимо ещё где-то раздобыть образы IOS. GNS — это практически виртуальный маршрутизатор и для запуска ему также необходимо ПО, которым и является IOS.
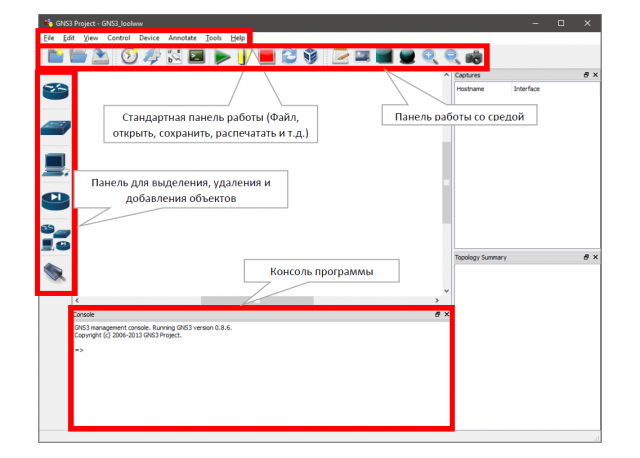
Окно программы и его структура представлены ниже.
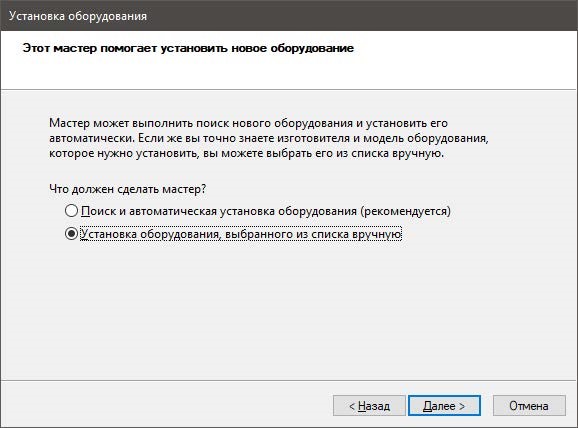
Так как задача выходит за пределы моделирования сети внутри эмулятора, нам необходимо подготовить операционную систему к дальнейшему взаимодействию с GNS3. Для этого нам необходимо настроить сеть, взаимодействующую с GNS3, а не с внешними протоколами передачи данных. Все сети, которые подключены к вычислительной машине направлены на передачу файлов вне её системы. Машина переводит файлы в биты, собирает их в пакеты, помечает и отправляет по протоколу TCP/IP в сеть. Принимающая машина взаимодействует не с сеть, а с переданным пакетом. Она распаковывает его всё по тому же протоколу TCP/IP и предоставляет файл пользователю через свою файловую систему. Наша задача – пустить трафик таким образом, чтобы компьютер смоделировал сеть внутри себя и проанализировал ответ на свой же запрос в сети. Задача не из простых, но есть и усложняющий факто – Wi-Fi. Кабельные сети легко построить на эмуляторе, как и беспроводные, а эмулировать сеть, которая работает по определённым принципам упрощения передачи – это уже не так просто. Для решения поставленной задачи создадим loop-back adapter. Это сеть, которая обращается сама к себе. Чтобы создать loop-back сеть в Windows Win+R и введём hdwwiz.exe


Нажимаем кнопку «Далее» и выбираем пункт «Установка оборудования, выбранного из списка вручную». Сразу оговорюсь, что я в данной лабораторной работе использовал операционную систему Windows 10 (64 бита), так как она является последней и самой актуальной.
Нажимаем кнопку «Далее» и выбираем пункт «Сетевые адаптеры»

Нажимаем кнопку «Далее» и в левом меню выбираем компанию Microsoft, а в правом – «Адаптер замыкания на себя Microsoft KM-TEST»

Далее выполняем установку и переходим в настройки адаптера. Для этого переходим «Пуск» -> «Панель управления» -> «Сеть и Интернет» -> «Центр управления сетями и общим доступом» -> «Изменение параметров адаптера».
Далее нам необходимо настроить систему так, чтобы наша lookback сеть имела доступ в Интернет. Для этого переходим в свойства беспроводной сети и во вкладке «Доступ» ставим галочки на «Разрешить другим пользователям сети использовать подключение к Интернету данного компьютера» и на «Разрешить другим пользователям сети управлять общим доступом к подключению к Интернет». В случае если у Вас несколько сетей выберете созданную нами замкнутую сеть, так как с другими сетями способ работать не будет.

Если Вы сделали всё правильно, то у Вас должно быть две сети с такими расшифровками:

В моём случае «Беспроводная сеть 2» — это сеть Wi-Fi, а «Ethernet 3» -это замкнутая сеть.
Подготовительная работа с системой окончена. Я не буду рассказывать как установить ISO образы на GNS3, так как у каждого пользователя свои версии и в каждой системе устойчивы свои роутеры. Я использовал версию 0.87 и роутер c3660, так как в моей версии это самый устойчивы маршрутизатор.
Перетаскиваем на рабочую область роутер и облако, чтобы получилась схема как на рисунке ниже

Настроим облако. Перейдя во вкладку NIO Ethernet (Network Input Output Ethernet) выбираем нашу замкнутую сеть и нажимаем кнопку «Add», а затем ОК.

Соединяем облако и роутер кабелем FastEthernet и запускаем роутер нажатием на зеленую кнопку «Play».
Настроим роутер. Введём последовательность команд:
conf t
int fa 0/0
no shut
ip address dhcp
ip domain-lookup
Разберём каждую команду.
conf t (Режим глобальной конфигурации)
int fa 0/0 (Режим конфигурирования интерфейса)
no shut (команда включения интерфейса)
ip address dhcp (указывает, что интерфейс получает IP-адрес через DHCP)
ip domain-lookup (разрешения имён хостов на IP-адреса и наоборот)
Осталось проверить есть ли подключение к сети Интернет. Для этого пропингуем любой сайт. Например, гугл.
Как видно на скрине, всё работает.
Дополнительно прикреплю дамп настроек роутера, так как процедура оказалась сложнее, чем кажется на первый взгляд.
Connected to Dynamips VM "R1" (ID 0, type c3600) - Console port
Press ENTER to get the prompt.
This product contains cryptographic features and is subject to United
States and local country laws governing import, export, transfer and
use. Delivery of Cisco cryptographic products does not imply
third-party authority to import, export, distribute or use encryption.
Importers, exporters, distributors and users are responsible for
compliance with U.S. and local country laws. By using this product you
agree to comply with applicable laws and regulations. If you are unable
to comply with U.S. and local laws, return this product immediately.
A summary of U.S. laws governing Cisco cryptographic products may be found at:
http://www.cisco.com/wwl/export/crypto/tool/stqrg.html
If you require further assistance please contact us by sending email to
export@cisco.com.
Cisco 3660 (R527x) processor (revision 1.0) with 124928K/6144K bytes of memory.
Processor board ID FTX0945W0MY
R527x CPU at 250MHz, Implementation 40, Rev 1.2, 512KB L2 Cache
3660 Chassis type: ENTERPRISE
2 FastEthernet interfaces
DRAM configuration is 64 bits wide with parity enabled.
125K bytes of NVRAM.
8192K bytes of processor board System flash (Read/Write)
SETUP: new interface FastEthernet0/0 placed in "shutdown" state
SETUP: new interface FastEthernet0/1 placed in "shutdown" state
Press RETURN to get started!
*Mar 1 00:00:03.091: %LINEPROTO-5-UPDOWN: Line protocol on Interface VoIP-Null0, changed state to up
*Mar 1 00:00:03.183: %SYS-5-CONFIG_I: Configured from memory by console
*Mar 1 00:00:03.319: %LINEPROTO-5-UPDOWN: Line protocol on Interface IPv6-mpls, changed state to up
*Mar 1 00:00:03.463: %SYS-5-RESTART: System restarted --
Cisco IOS Software, 3600 Software (C3660-A3JK9S-M), Version 12.4(15)T14, RELEASE SOFTWARE (fc2)
Technical Support: http://www.cisco.com/techsupport
Copyright (c) 1986-2010 by Cisco Systems, Inc.
Compiled Tue 17-Aug-10 11:00 by prod_rel_team
*Mar 1 00:00:03.467: %SNMP-5-COLDSTART: SNMP agent on host R1 is undergoing a cold start
*Mar 1 00:00:03.491: %LINK-5-CHANGED: Interface FastEthernet0/0, changed state to administratively down
*Mar 1 00:00:03.503: %CRYPTO-6-GDOI_ON_OFF: GDOI is OFF
*Mar 1 00:00:03.507: %CRYPTO-6-ISAKMP_ON_OFF: ISAKMP is OFF
*Mar 1 00:00:03.507: %CRYPTO-6-GDOI_ON_OFF: GDOI is OFF
*Mar 1 00:00:03.507: %CRYPTO-6-ISAKMP_ON_OFF: ISAKMP is OFF
*Mar 1 00:00:03.543: %LINK-5-CHANGED: Interface FastEthernet0/1, changed state to administratively down
*Mar 1 00:00:04.491: %LINEPROTO-5-UPDOWN: Line protocol on Interface FastEthernet0/0, changed state to down
*Mar 1 00:00:04.543: %LINEPROTO-5-UPDOWN: Line protocol on Interface FastEthernet0/1, changed state to down
R1#
R1#conf t
Enter configuration commands, one per line. End with CNTL/Z.
R1(config)#int fa 0/0
R1(config-if)#no shut
R1(config-if)#
*Mar 1 00:00:45.887: %LINK-3-UPDOWN: Interface FastEthernet0/0, changed state to up
*Mar 1 00:00:46.887: %LINEPROTO-5-UPDOWN: Line protocol on Interface FastEthernet0/0, changed state to up
R1(config-if)#ip address dhcp
R1(config-if)#
*Mar 1 00:01:13.071: %DHCP-6-ADDRESS_ASSIGN: Interface FastEthernet0/0 assigned DHCP address 192.168.137.31, mask 255.255.255.0, hostname R1
R1(config-if)#ip domain-lookup
R1(config)#^Z
R1#
*Mar 1 00:02:15.551: %SYS-5-CONFIG_I: Configured from console by console
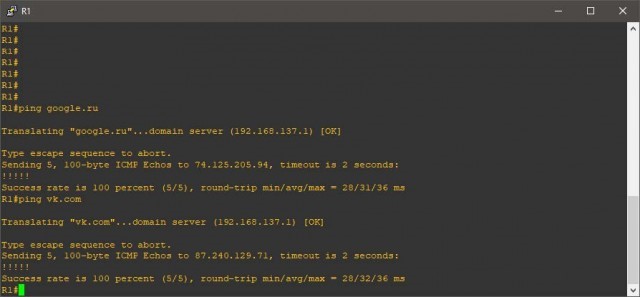
R1#ping google.ru
Translating "google.ru"...domain server (192.168.137.1) [OK]
Type escape sequence to abort.
Sending 5, 100-byte ICMP Echos to 173.194.73.94, timeout is 2 seconds:
!!!!!
Success rate is 100 percent (5/5), round-trip min/avg/max = 28/35/44 ms
R1#
GNS3 is a Graphical Network Simulation program. You can easily operate devices such as Cisco Switch and Router on GNS3.
You can improve yourself and become a network expert by making network designs with GNS3. Since this network simulator is a constantly developed program, it is always useful to check for updates to have new features.
Although the operating logic of this program is very similar to the Cisco Packet Tracer program, the biggest difference between them is that Cisco IOS images can be used more comprehensively and in detail.
With this simulator software, you can use IOS images of real Cisco devices for network designs on your computer. In other software, IOS images have insufficient and limited features.
Before proceeding to the GNS3 installation, you can download the latest version of the GNS3 program to your computer from the button below.
https://www.gns3.com/
Minimum System Requirements
Operating System: Must be at least Windows 7 64.
Processor: You must have at least Dual Core processors.
RAM (Memory): Minimum 4 GB is sufficient.
Disk Space: Minimum 1 GB is sufficient.
Recommended System Requirements
Operating System: It must be at least Windows 7 64 bit again.
Processor: 4 or more logical processors.
RAM (Memory): 8 GB is sufficient.
Disk Space: You must have a minimum of 35 GB of free space
Step-by-step GNS3 Installation and Configuration
After logging into GNS3, click the Free Download button.

Since you will install GNS3 on Windows 10, click the Download button under Windows option.

Wait while the GNS3 is downloading to your computer.
After the download is completed, start the installation by running the GNS3-all-in-one.exe file as an administrator.
Click “Next” to start the installation in the Setup window.
Click the “I Agree” button to accept the license agreement of the network simulator program.
Leave the default setting in the “Choose Start Menu Folder” window and continue by clicking the “Next” button.

In the “Choose Components” window, after selecting the required applications to be installed on your computer, continue with the “Next” button. In the next step, in the “Choose Install Location” window, select where you want to install the program and click the “Next” button.

Wait while the Cisco simulator program is installed on your computer.

One of the applications required for GNS3 during the installation phase is Npcap. Click Next to install the Npcap software.
One of the applications required for GNS3 during the installation phase is Npcap. Click Next to install the Npcap software.
After completing the Npcap installation, click on the “Finish” button and continue installing GNS3.
Now, wait while Wireshark is downloading for GNS3. If you do not have an Internet connection, you can install Wireshark on your computer later.
After completing the Wireshark installation process, click the “Accept” button to accept the Solar-PuTTY license agreement. For the use of “Solar-PuTTY”, click the “Continue” button after typing the email address.
After completing the GNS3 installation process, continue with the “Next” button.

If you want to use Solarwinds tools for free, you can select “Yes” option. If you do not want, select the No option and click the “Next” button.
After successfully installing the GNS3 program, simply click the “Finish” button to run the program.
![]()
Эта статья проведёт вас через все шаги, чтобы начать работу с GNS3 в среде Windows. Будут покрыты , все критические и наиболее важные вещи, чтобы вы не только знали , но и для углубленного обсуждения. Если вы используете Linux, на следующей странице есть GNS3 Краткое руководство для пользователей Linux .
Шаг 1 — Скачать GNS3
Самый простой способ установить вариант GNS3 в среде Windows.Файл представляет собой чуть меньше 16 Мб в размерах и займет меньше минуты, чтобы загрузить по DSL или кабельному соединению. Удаленный доступ к сети займет несколько больше времени.
Шаг 2 — Установка GNS3

Найдите загрузочный файл и дважды щелкните по нему, чтобы начать установку GNS3.
Начнёт работать Мастер GNS3 установки . Все что вам остаётся сделать , это нажимать на следующую кнопку и соглашаться. Работа с GNS3 зависит от ряда других программ . Эти зависимости включают WinPCap, Dynamips и Qemu и эти компоненты вместе с GNS3 все выбраны по умолчанию для установки. По умолчанию мастер установки GNS3 . выбрал всё за вас.
Кроме того отмечу, что в случае необходимости, WinPcap Мастер установки будет запущен для Вас, чтобы установить его, эту зависимость необходима для общения GNS3 с реальными сетями через физическую сеть внутреннего контроллера. Начнётся установка WinPcap . Однако, если у вас установлена предыдущая версия WinPcap на вашем компьютере, мастер попросит удалить старую версию и установить новую версию.
Вы завершили установку GNS3. Нажмите кнопку Пуск — Все программы , GNS3 , а затем выберите GNS3 из списка установленных программ. Вы увидите основное окно GNS3. Мы обсудим её панель на более позднем этапе, а сначала нам нужно настроить место для Cisco IOS.
Шаг 3 — Определение Cisco IOS файлов
Как упоминалось ранее, вы должны предоставить собственный Cisco IOS для использования с GNS3 из-за проблем с лицензированием. GNS3 предназначен для использования в лабораторных условиях для тестирования и обучения. После того как вы получили свой экземпляр Cisco IOS для одной из поддерживаемых платформ, вы будете готовы продолжить. Поддерживаемые платформы Cisco 7200, 3600 серии (3620, 3640 и 3660), 3700 (3725, 3745) и 2600 (2610 для 2650XM, 2691).

В меню Редактирование — Edit , выберите образ IOS и гипервизор. На вкладке BIOS образы , а потом найдите Cisco IOS файл и нажмите кнопку Открыть — Open.Файл появится в вашем файле образов. Затем щелкните стрелку рядом с Платформой — Platform и выберите платформу, которая соответствует файлу IOS.
Теперь нажмите на стрелку рядом с Модели — Model и выберите модель, соответствующую файлу IOS. На данный момент мы принимаем значения по умолчанию. Тем не менее, есть очень важное значение,которое называется значением IDLE PC, которое мы хотим включить. Мы вернемся к этому позже. Нажмите кнопку Сохранить — Save , а затем кнопку Закрыть — Close. Это вернет вас к окну GNS3 по умолчанию.
P.P.S. Если у Вас есть вопросы, желание прокомментировать или поделиться опытом, напишите, пожалуйста, в комментариях ниже.
- Распечатать
Оцените статью:
- 5
- 4
- 3
- 2
- 1
(1 голос, среднее: 5 из 5)
Поделитесь с друзьями!