Windows Installation[edit]
Binary Installers[edit]
There are a few different unofficial GNU Radio binary installers that are maintained by the community:
1) Radioconda installer. This binary installer tends to be the most up-to-date, but you should check the list of packages to see if it includes what you need. It utilizes the conda package/environment manager and provides easy access to thousands of Python and other packages that are not strictly related to GNU Radio. This also lets you stay up-to-date without having to re-install. Since this provides the same conda-forge packages available without the installer, the conda install guide might be useful for additional instructions, including how to build additional OOT modules from source.
After installing Radioconda you will get a «GNU Radio Companion» added to your start menu. Run this to start GNU Radio Companion, the graphical GNU Radio design tool.
2) Geof Nieboer’s installer hosted at gcndevelopment.com (recently unreachable in 2022-07, but reachable currently 2022-10-23). This is a binary installer for 64-bit Windows 7/8/10 that includes all dependencies for Windows, a custom python distro, commonly used SDR drivers, and several OOT blocks.
3) Pothos SDR development environment installer. This binary installer includes GNU Radio, Pothos, CubicSDK, and other tools. It has historically been updated about once or twice per year.
Current Windows Status[edit]
Installing core GNU Radio and USRP on Windows is becoming more routine. Many OoT modules may still require compiling locally. Please report any success or failures. Patches and enhancements are especially welcome!
Windows Porting Issues[edit]
Considerable effort has been put into making the GNU Radio code portable among various operating systems, but there are several reasons why it cannot be «simply» compiled and run under Windows:
- The build and install procedures are based on Linux scripts and tools
- Several third-party libraries are used, each with its own, often system-dependent, installation procedure
- Most GNU Radio applications must interface to hardware (e.g., a sound card or USRP) which require system-dependent drivers and installation procedures
- Because GNU Radio is written as an extension to Python, there are potential problems on Windows if different runtime libraries are used for GNU Radio and Python
The following sections show how these issues can be addressed.
Installation Options[edit]
GNU Radio is designed to be flexible. It has a number of modules, capabilities, and options that can be enabled or disabled to suit the needs of the user, and the user can add custom blocks or modules to the system.
To support this flexibility, it comes with a set of files and scripts to be used with GNU software build tools (sh, make, autoconf, automake, etc.). These tools use Linux-like commands and filenames that are not normally available on Windows systems.
Fortunately, we are not the first to face this problem, and several solutions exist. These are presented in order of increasing difficulty:
Building on Windows with Native Tools[edit]
Ettus Application note [1] describes how to build from source. Similar is a post at [2] for OOT modules.
Powershell scripts are now available at https://www.github.com/gnieboer/gnuradio_windows_build_scripts that fully automate the build process for GNURadio 3.7.9.2+. A few build dependencies are required (MSVC 2015, Git, Doxygen, CMake, Perl, Wix) but all are free. The script has two options:
- Build all dependencies from source (including python itself)
- Download a prebuilt custom dependency package and then build only GNURadio and a few OOT modules on top.
The binary installers described above are built with these scripts. They ensure that all dependencies are built with the same toolchain against the same runtime libraries, and handle the patches and configuration «tweaks» needed to build them on Windows.
If option 1 is desired, note that to build scipy, the non-free Intel Fortran compiler is required, gfortran cannot build objects that can link with MSVC C objects. If you do not have said compiler, the scripts will download pre-compiled wheels instead.
More information on the build process is available on the GitHub repo readme, and also at http://www.gcndevelopment.com/gnuradio.
GNURadio 3.6 has also been compiled on Windows using native tools as well (see http://voltronics.blogspot.com/2013/01/gnu-radio-windows-build-guide.html and https://lists.gnu.org/archive/html/discuss-gnuradio/2013-08/msg00284.html)
More helpful tips on dependency version information have been reported:
https://lists.gnu.org/archive/html/discuss-gnuradio/2013-12/msg00497.html
MinGW/MSYS[edit]
MinGW (http://www.mingw.org/) provides GNU compilers and Window-specific header files for compiling native Windows applications.
MSYS (http://www.mingw.org/msys.shtml) is a companion set of Linux-like commands, shell, and build tools.
MinGW does not include a Linux programming interface; programs should be smaller and faster than with Cygwin (in theory), but will require more Windows-specific code.
MSYS is intended primarily as a build environment, making it more compact than Cygwin.
Because there is no Linux API emulation, GNU Radio built with MinGW should be used with standard Windows versions of Python and the third-party libraries.
MinGW does not provide as much support as Cygwin for installing third-party libraries, but in many cases precompiled binaries are available.
For detailed installation instructions using MinGW and MSYS see Installing GNU Radio with MinGW.
Cygwin[edit]
Cygwin (http://www.cygwin.com/) is a Linux-like environment for Windows.
It provides the Linux-like shell, file naming, and build tools we need and also makes it easy to install many of the third-party libraries required by GNU Radio. It also provides a Linux programming interface (API); this is not required by GNU Radio, but it lets us use the better-tested Linux versions of some functions.
Because the Linux API uses its own C runtime library, it is best to use Cygwin versions of Python and the third-party libraries when building GNU Radio with Cygwin.
For detailed installation instructions using Cygwin see Installing GNU Radio with Cygwin.
Chocolatey[edit]
To quote from the [|https://chocolatey.org/ Chocolatey homepage]: Chocolatey NuGet is a Machine Package Manager, somewhat like apt-get, but built with Windows in mind..
There are packages for gnuradio (and its dependencies) available in a separate repository (currently the best known source is: https://github.com/ariovistus/chocolatey-packages)
To install, open an Administrative command line session and run:
iex ((new-object net.webclient).DownloadString('https://chocolatey.org/install.ps1'))
Now you need to install a source which has the recipes for gnuradio and dependents. The easiest method is to clone the chocolatey-packages from the github repository listed above (https://github.com/ariovistus/chocolatey-packages), then add the local source from within an Administrative command line session:
choco source add -name gnuradio -source C:<path-to>chocolatey-packages
Create the numpy package:
cd <path-to>chocolatey-packagenumpy
cpack
Create the gnuradio package:
cd <path-to>chocolatey-packagegnuradio
cpack
Now install the gnuradio package:
choco install gnuradio
Follow the command prompts.
WSL | Ubuntu[edit]
Enable WSL from windows features.
Install Ubuntu 20.04 (or newer) from Microsoft Store.
Using the Ubuntu terminal, install gnuradio as you would on linux [3]. If you want to develop GNU Radio’s core you will need to build GNU Radio from source.
WSL 1/2 (before WSLg)[edit]
Install additional package «libgtk-3-dev»
sudo apt install libgtk-3-dev
WSL 1 and 2 (before WSLg) do not have an X server for displaying graphical applications. Install an X server, either VcXsrv [4] or Xming [5] as WSL does not come with an X server. VcXsrv is recommended as it is open source and self-contained instead of being tied to Cygwin, whereas Xming «asks for donations» to the developer as a dubious «sale» for non-existent support.
Launch VcXsrv, making sure to select «Disable access control» option in the Extra settings so that any application can export to X11.
Edit bashrc to set up the display by adding the following lines at the bottom of the file.
WSL1:
 # X11 forwarding for Windows
 export DISPLAY=:0.0
 export LIBGL_ALWAYS_INDIRECT=1
WSL2:
 # X11 forwarding for Windows
 export DISPLAY=$(awk '/nameserver / {print $2; exit}' /etc/resolv.conf 2>/dev/null):0
 export LIBGL_ALWAYS_INDIRECT=1
Restart the Ubuntu terminal and run
gnuradio-companion
WSLg[edit]
Currently in early testing stages, the WSLg update contains a Wayland graphics server and X interface layer allowing graphical applications to run without extra setup.
From the Ubuntu terminal run
gnuradio-companion
Using an Azure VM[edit]
Another way to generate a GNU Radio environment if you’re using Windows, is to create an Azure Virtual Machine running Ubuntu Server 18.04 LTS.
If you already have an existing Azure account you can follow the instructions here[6] to create an Ubuntu VM using the Azure portal. Otherwise, you can sign up for an account here[7]. Azure provides free accounts for students[8] with a limited set of credits.
Once your VM is created you should be able to SSH into it, to install a desktop environment. Full instructions can be found here, but in summary:
Install xfce
 sudo apt-get update
 sudo apt-get -y install xfce4
Install xrdp as a remote desktop server
 sudo apt-get -y install xrdp
 sudo systemctl enable xrdp
Configure xrdp to use xfce
echo xfce4-session >~/.xsession
Restart the xrdp service
sudo service xrdp restart
You will need to create a local password for your Linux VM (on top of your existing SSH key), and open port 3389[9] on the VM.
Finally you can use a remote desktop client, such as Remote Desktop Connection to connect to your VM and follow the instructions for GNU Radio on Ubuntu found here[10].
Known Windows Build Issues[edit]
So far, we have workarounds for all reported problems:
- I got the following error after a clean install «This application failed to start because no Qt platform plugin could be initialized. Reinstalling the application may fix this problem.». I fixed this by finding qwindows.dll on my PC (for me it was in C:Program FilesGNURadio-3.8binplatforms), creating a new directory C:Program FilesGNURadio-3.8binpluginsplatforms, and copying the 4 DLLs to C:Program FilesGNURadio-3.8binpluginsplatforms (I had to create the «….pluginsplatforms» sub-directory). I’m sure there’s a more elegant fix, but this seems to work.
Время прочтения
10 мин
Просмотры 34K
Привет, Хабр.
В третьей части было рассказано, как получить доступ к SDR-приемнику посредством языка Python. Сейчас мы познакомимся с программой GNU Radio — системой, позволяющей создать достаточно сложную конфигурацию радиоустройства, не написав ни единой строчки кода.

Для примера рассмотрим задачу параллельного приема нескольких FM-станций на один приемник. В качестве приемника будем использовать все тот же RTL SDR V3.
Продолжение под катом.
Установка
Для начала работы GNU Radio необходимо установить, дистрибутив для Windows можно скачать здесь. Система эта кроссплатформенная, версии есть также под Linux и под OSX (вроде бы GNU Radio успешно запускали и на Raspberry Pi, но 100% гарантии дать не могу).
По сути, GNU Radio это целый фреймворк для цифровой обработки сигналов, в котором программа «собирается» из отдельных модулей. Есть большое количество уже готовых блоков, при желании также можно создавать свои собственные. Сами модули написаны на С++, а для взаимодействия блоков друг с другом используется Python. Желающие могут посмотреть на API более подробно, но на практике это, скорее всего, не пригодится — все действия можно делать визуально в программе GNU Radio Companion.
Система ориентирована на обработку потоков данных, так что каждый блок обычно имеет вход и выход. Далее, соединяя блоки в редакторе, мы получаем готовую систему. Сам интерфейс GNU Radio довольно простой, сложность состоит в понимании того, что делает тот или иной блок. Как говорилось ранее, низкоуровневая работа с SDR имеет высокий порог входа и требует некоторого знания в DSP и математике. Но мы рассмотрим простую задачу, для которой никаких специальных знаний не потребуется. Итак, приступим.
Начало работы
Запускаем GNU Radio Companion, создаем новый проект, тип проекта выбираем WX GUI, добавляем на экран и соединяем два блока, как показано на скриншоте.
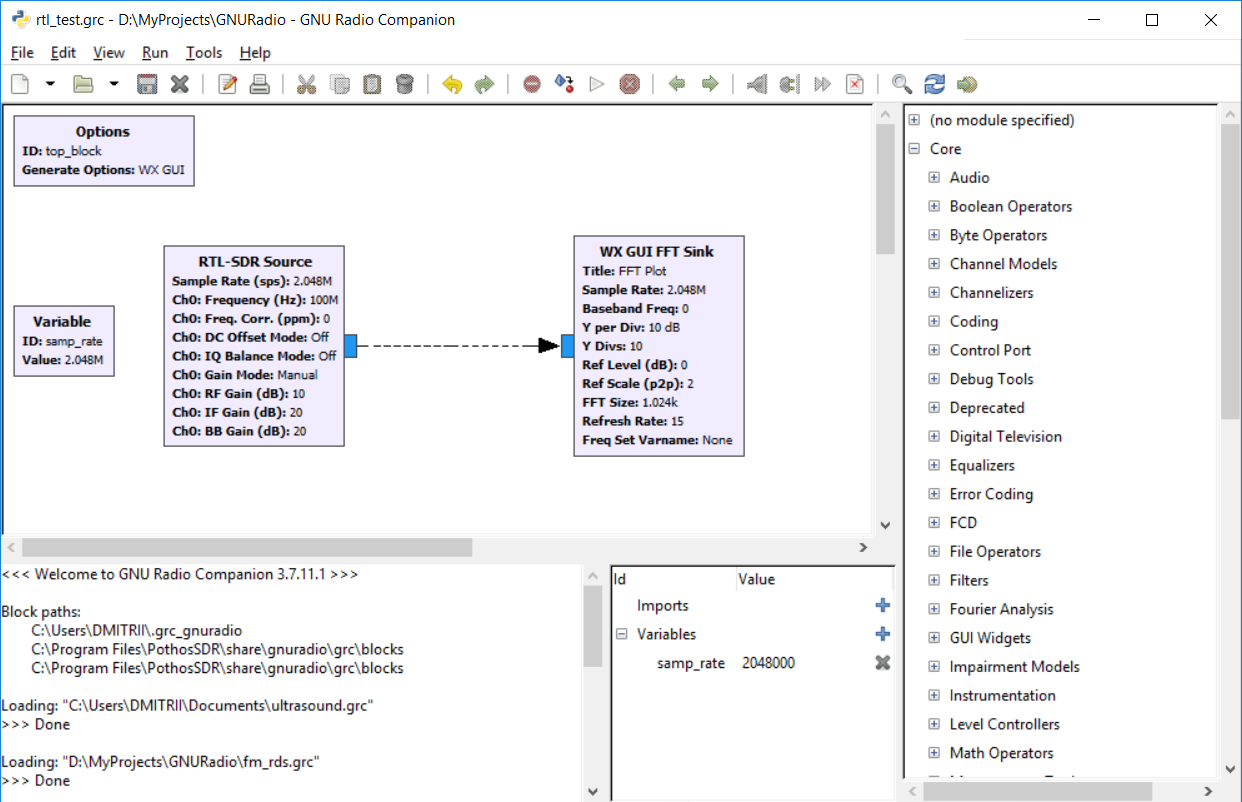
Мы видим два типа блоков — Source (источник) и Sink (выход, «слив»). RTL-SDR — это наш приемник, FFT GUI — это виртуальный спектроанализатор.
Переменную Sample Rate устанавливаем в 2048000, это частота дискретизации нашего приемника. Частоту RTL-SDR оставляем по умолчанию равной 100МГц.
Запускаем проект — все работает, мы видим спектр FM-станций. Первая программа для GNU Radio готова!

Если мы посмотрим лог, то увидим такие строки.
Generating: ‘D:\MyProjects\GNURadio\top_block.py’
Executing: C:Python27python.exe -u D:MyProjectsGNURadiotop_block.py
Да, мы можем посмотреть файл top_block.py, который сгенерил нам GNU Radio Companion. Истинные джедаи могут писать непосредственно в Python, но требуемый код, как мы видим, довольно большой. Мы же создали его за 1 минуту.
top_blocks.py
#!/usr/bin/env python2
# -*- coding: utf-8 -*-
##################################################
# GNU Radio Python Flow Graph
# Title: Top Block
# Generated: Wed May 22 22:05:14 2019
##################################################

if __name__ == '__main__':
    import ctypes
    import sys
    if sys.platform.startswith('linux'):
        try:
            x11 = ctypes.cdll.LoadLibrary('libX11.so')
            x11.XInitThreads()
        except:
            print "Warning: failed to XInitThreads()"

from gnuradio import eng_notation
from gnuradio import gr
from gnuradio import wxgui
from gnuradio.eng_option import eng_option
from gnuradio.fft import window
from gnuradio.filter import firdes
from gnuradio.wxgui import fftsink2
from grc_gnuradio import wxgui as grc_wxgui
from optparse import OptionParser
import osmosdr
import time
import wx


class top_block(grc_wxgui.top_block_gui):

    def __init__(self):
        grc_wxgui.top_block_gui.__init__(self, title="Top Block")

        ##################################################
        # Variables
        ##################################################
        self.samp_rate = samp_rate = 2048000

        ##################################################
        # Blocks
        ##################################################
        self.wxgui_fftsink2_0 = fftsink2.fft_sink_c(
        	self.GetWin(),
        	baseband_freq=0,
        	y_per_div=10,
        	y_divs=10,
        	ref_level=0,
        	ref_scale=2.0,
        	sample_rate=samp_rate,
        	fft_size=1024,
        	fft_rate=15,
        	average=False,
        	avg_alpha=None,
        	title='FFT Plot',
        	peak_hold=False,
        )
        self.Add(self.wxgui_fftsink2_0.win)
        self.rtlsdr_source_0 = osmosdr.source( args="numchan=" + str(1) + " " + '' )
        self.rtlsdr_source_0.set_sample_rate(samp_rate)
        self.rtlsdr_source_0.set_center_freq(100e6, 0)
        self.rtlsdr_source_0.set_freq_corr(0, 0)
        self.rtlsdr_source_0.set_dc_offset_mode(0, 0)
        self.rtlsdr_source_0.set_iq_balance_mode(0, 0)
        self.rtlsdr_source_0.set_gain_mode(False, 0)
        self.rtlsdr_source_0.set_gain(10, 0)
        self.rtlsdr_source_0.set_if_gain(20, 0)
        self.rtlsdr_source_0.set_bb_gain(20, 0)
        self.rtlsdr_source_0.set_antenna('', 0)
        self.rtlsdr_source_0.set_bandwidth(0, 0)


        ##################################################
        # Connections
        ##################################################
        self.connect((self.rtlsdr_source_0, 0), (self.wxgui_fftsink2_0, 0))

    def get_samp_rate(self):
        return self.samp_rate

    def set_samp_rate(self, samp_rate):
        self.samp_rate = samp_rate
        self.wxgui_fftsink2_0.set_sample_rate(self.samp_rate)
        self.rtlsdr_source_0.set_sample_rate(self.samp_rate)


def main(top_block_cls=top_block, options=None):

    tb = top_block_cls()
    tb.Start(True)
    tb.Wait()


if __name__ == '__main__':
    main()
Впрочем, если убрать громоздкую инициализацию, то мы увидим, что ключевых строк кода не так уж много.
from gnuradio import gr
from gnuradio.wxgui import fftsink2
import osmosdr

class top_block(grc_wxgui.top_block_gui):

    def __init__(self):
        grc_wxgui.top_block_gui.__init__(self, title="Top Block")
        self.samp_rate = samp_rate = 2048000
        self.wxgui_fftsink2_0 = fftsink2.fft_sink_c(...)
        self.Add(self.wxgui_fftsink2_0.win)
        self.rtlsdr_source_0 = osmosdr.source(args="numchan=" + str(1) + " " + '' )
        self.connect((self.rtlsdr_source_0, 0), (self.wxgui_fftsink2_0, 0))

def main(top_block_cls=top_block, options=None):
    tb = top_block_cls()
    tb.Start(True)
    tb.Wait()
Так что в принципе, это можно написать вручную. Но мышью оно все-таки быстрее. Хотя возможность поменять код иногда может пригодиться, если захочется добавить какую-то нестандартную логику.
Принимаем FM-радио
Теперь попробуем принять одну из станций. Как было видно из скриншотов, центральная частота приемника 100МГц и ширина полосы пропускания около 2МГц. На спектре мы видим две станции, на 100.1МГц и 100.7МГц соответственно.
Первым шагом необходимо перенести спектр станции в центр, сейчас он отстоит вправо на 100КГц. Для этого вспоминаем школьную формулу умножения косинусов — в результате будет две частоты, сумма и разность — нужная станция сдвинется в центр, что нам и нужно (а лишнее мы потом отфильтруем).
Создаем две переменные для хранения частоты freq_center=100000000 и freq_1=100100000, также добавляем генератор сигналов с частотой freq_center — freq_1.
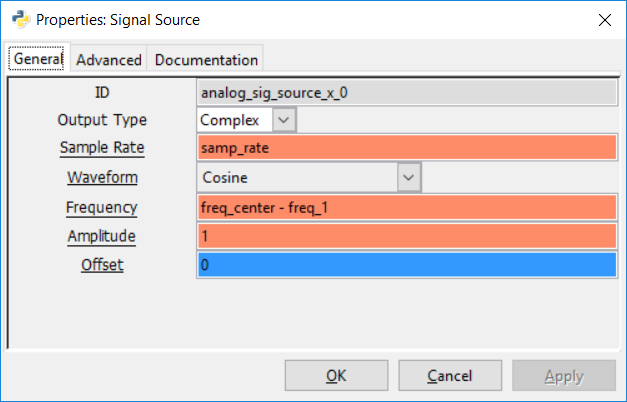
Т.к. система построена на базе Python, то в полях ввода параметров мы можем использовать выражения, что достаточно удобно.
Схема в итоге должна выглядеть так:
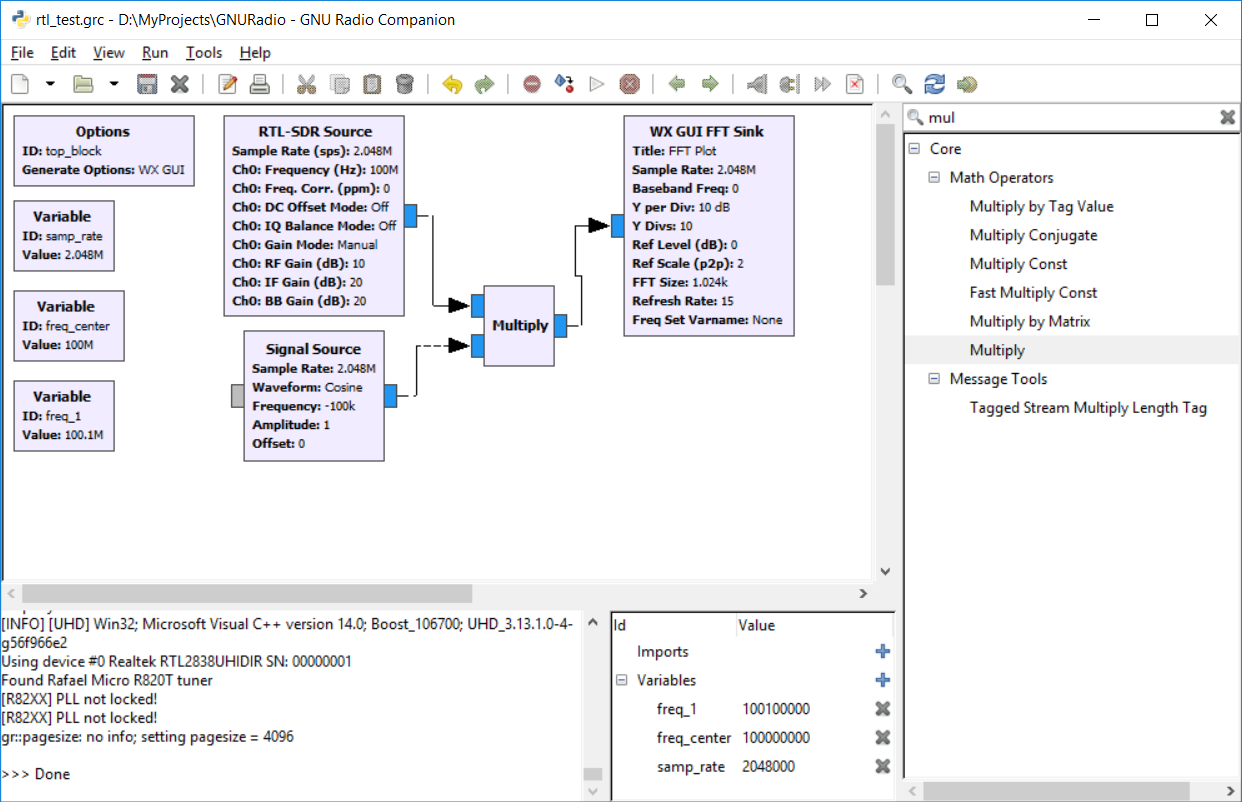
Теперь необходимо добавить сразу несколько блоков — уменьшить тактовую частоту входного сигнала (она равна 2048КГц), отфильтровать сигнал, подать его на FM-декодер, затем еще раз уменьшить тактовую частоту до 48КГц.
Результат показан на картинке:
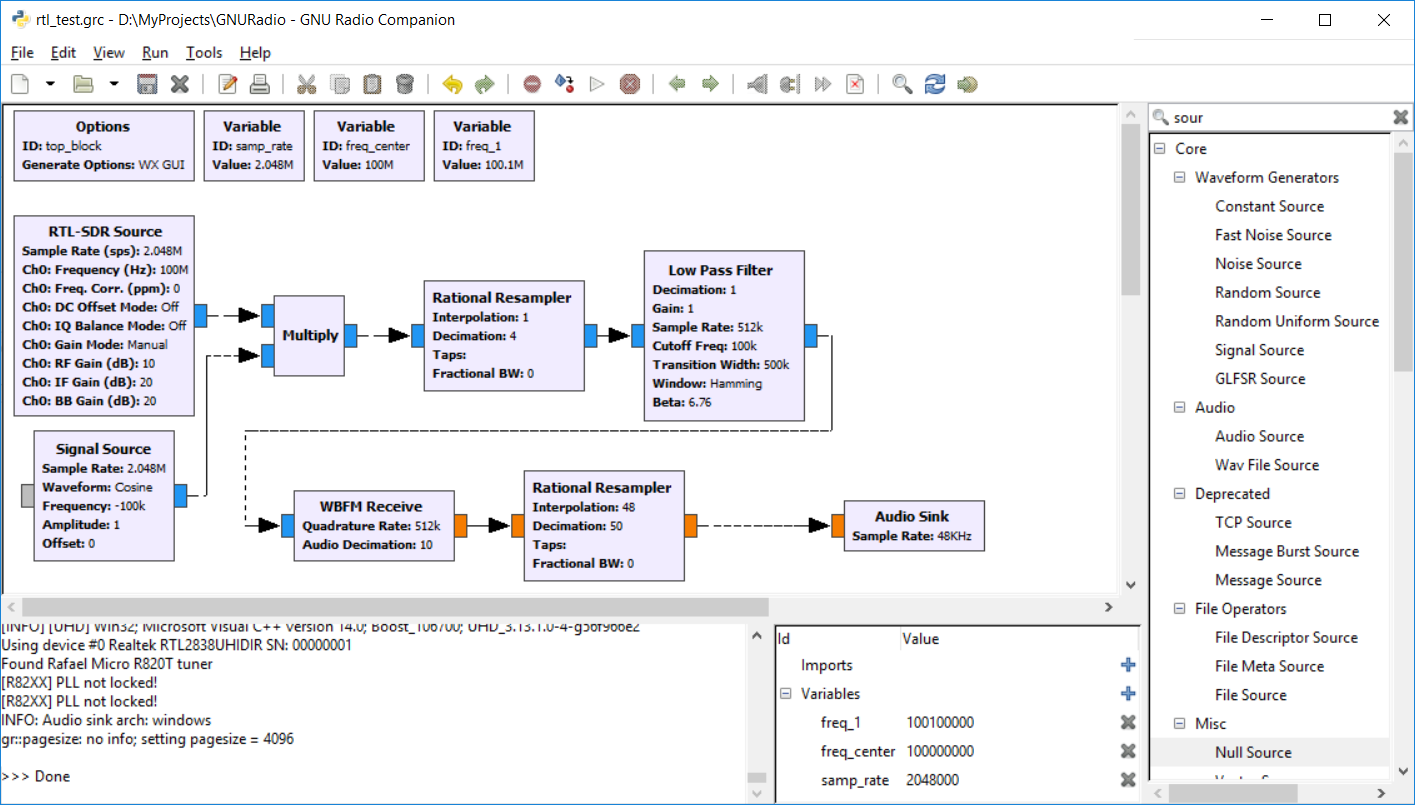
Считаем внимательно. Мы делим тактовую частоту 2048КГц в 4 раза блоком Rational Resampler (получаем 512КГц), затем после Low Pass фильтра стоит WBFM-декодер с децимацией 10 (получаем 51.2КГц). В принципе, этот сигнал уже можно подать на звуковую карту, но высота тона будет чуть отличаться. Еще раз меняем тактовую частоту в 48/51, в результате будет тактовая частота 48.2КГц, разницей уже можно пренебречь.
Второй важный момент — тип входов. С приемника поступает комплексный IQ-сигнал (входы-выходы синего цвета), с FM-декодера выходит вещественный сигнал — входы и выходы желтого цвета. Если перепутать, ничего не заработает. Подробнее уже было на Хабре, нам достаточно понять общий принцип.
В общем, запускаем, убеждаемся что все работает. Можно запустить программу и слушать радио. Мы пойдем дальше — у нас же все-таки Software Defined радио — добавим одновременный прием второй станции.
Многоканальный прием
Второй приемник добавляется любимым программистским методом — Ctrl+C/Ctrl+V. Добавляем переменную freq_2, копируем блоки и соединяем их точно также.

Результат вполне сюрреалистичный — две FM-станции можно слушать одновременно. Тем же самым методом (Ctrl+V) можно добавить и третью станцию.
Запись
Слушать две станции оригинально, но на практике мало полезно. Сделаем что-то более нужное, например добавим запись звука в отдельные файлы. Это может быть достаточно удобно — с одного физического приемника можно параллельно записывать несколько каналов.
Добавим к каждому выходу компонент File Sink, как показано на скриншоте.
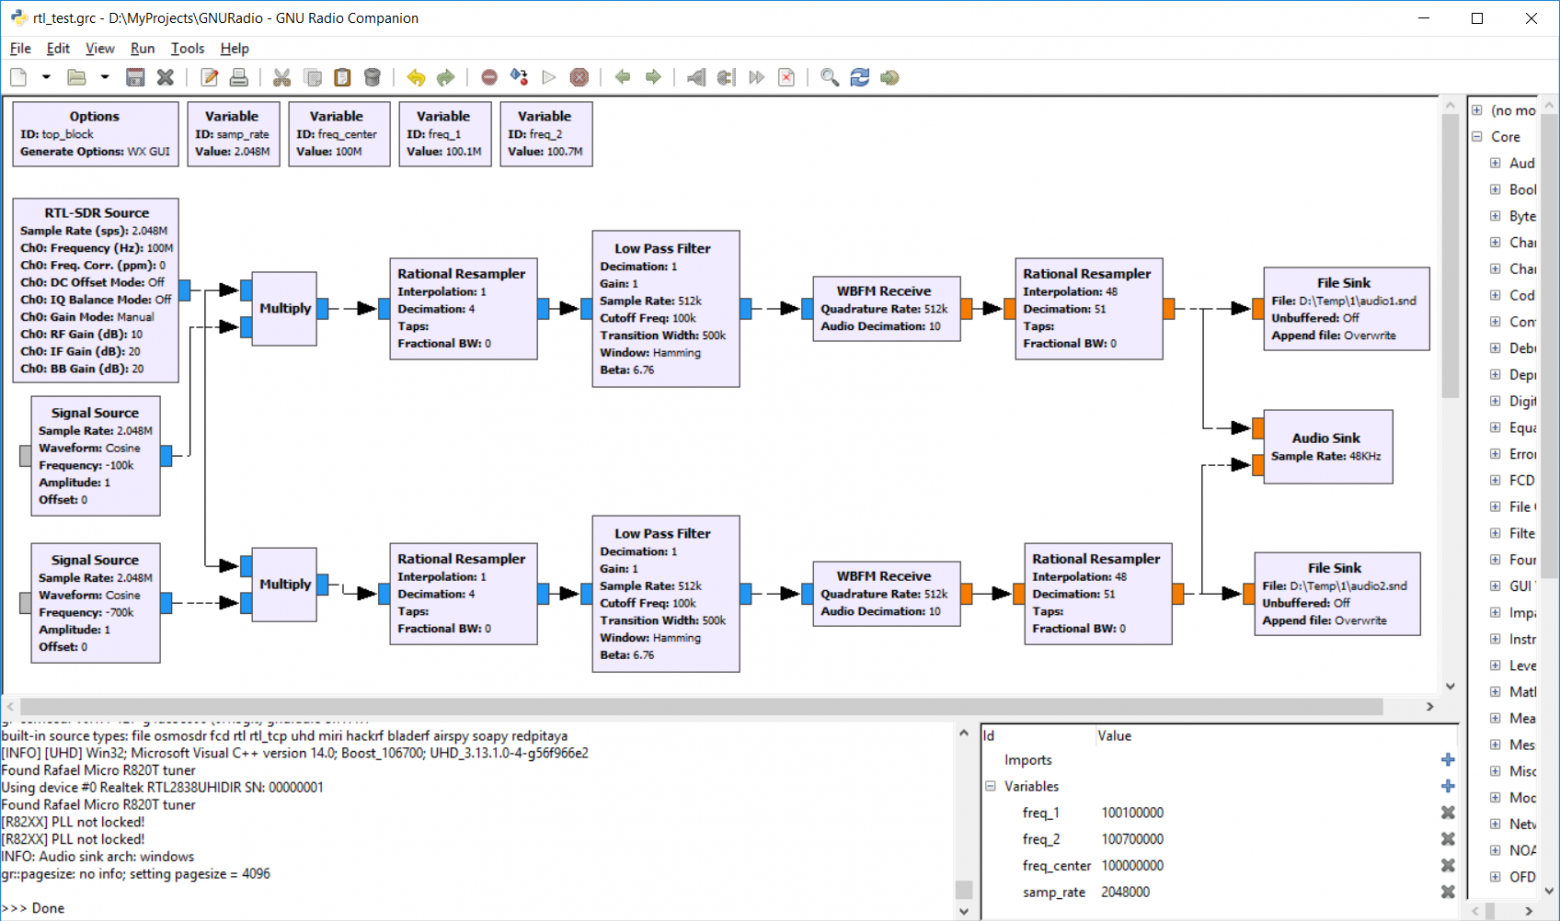
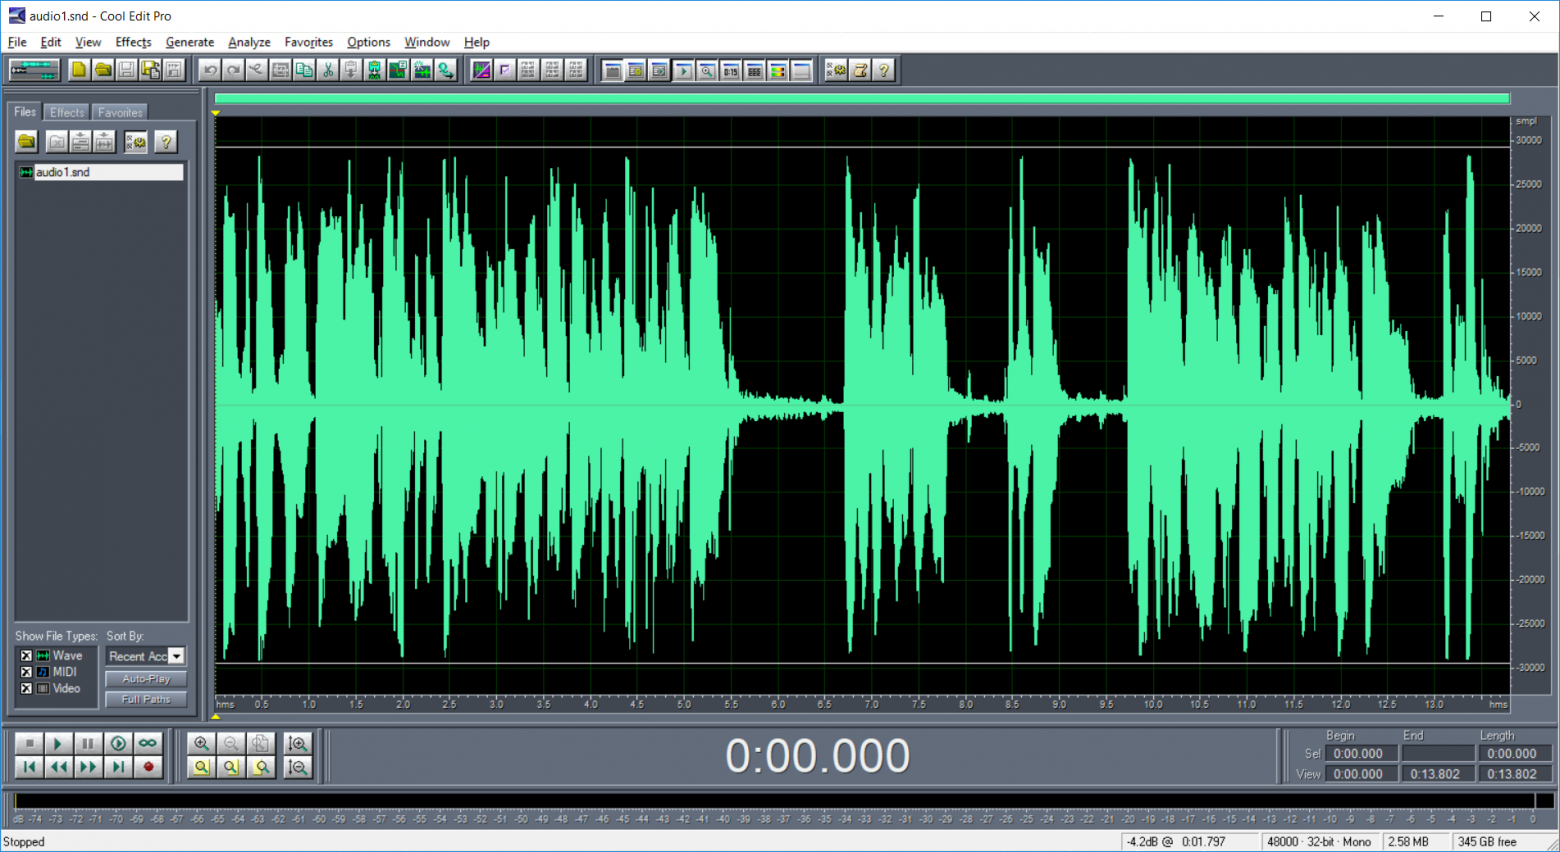
Windows-версия почему-то требует абсолютные пути файлов, иначе запись не работает. Запускаем, убеждаемся что все нормально. Размер сохраняемых файлов довольно большой, т.к. по умолчанию записывается формат float. Запись в формате int оставлю читателям в качестве домашнего задания.
Получившиеся файлы можно открыть в Cool Edit и убедиться, что звук записался нормально.

Разумеется, число записываемых каналов можно увеличить, оно ограничено только полосой пропускания приемника и мощностью компьютера. Кроме File Sink можно использовать и UDP Sink, так что программу можно использовать для трансляции по сети.
Запуск из командной строки
И последнее. Если использовать программу автономно, например для многоканальной записи, то UI в принципе и не нужен. В верхнем левом блоке Options меняем параметр Run Options на No UI. Запускаем программу еще раз, убеждаемся что все работает. Теперь сохраняем сгенерированный файл top_block.py — мы можем просто запускать его из командной строки, например из bat-файла или из консоли.
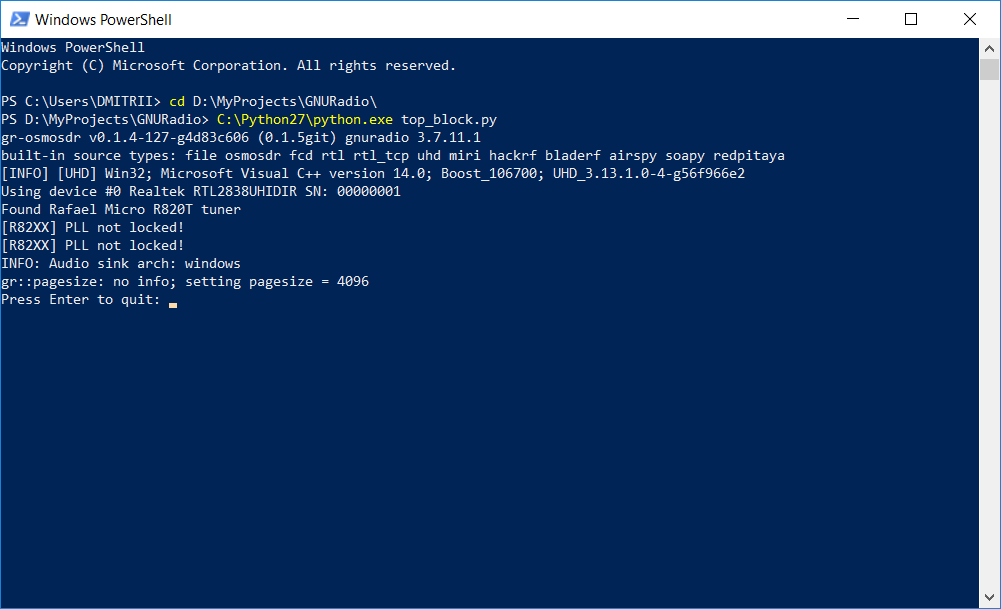
Если кому интересно, сгенерированный файл сохранен под спойлером.
recorder.py
#!/usr/bin/env python2
# -*- coding: utf-8 -*-
##################################################
# GNU Radio Python Flow Graph
# Title: Top Block
# Generated: Fri May 24 21:47:03 2019
##################################################

from gnuradio import analog
from gnuradio import audio
from gnuradio import blocks
from gnuradio import eng_notation
from gnuradio import filter
from gnuradio import gr
from gnuradio.eng_option import eng_option
from gnuradio.filter import firdes
from optparse import OptionParser
import osmosdr
import time


class top_block(gr.top_block):

    def __init__(self):
        gr.top_block.__init__(self, "Top Block")

        ##################################################
        # Variables
        ##################################################
        self.samp_rate = samp_rate = 2048000
        self.freq_center = freq_center = 100000000
        self.freq_2 = freq_2 = 100700000
        self.freq_1 = freq_1 = 100100000

        ##################################################
        # Blocks
        ##################################################
        self.rtlsdr_source_0 = osmosdr.source( args="numchan=" + str(1) + " " + '' )
        self.rtlsdr_source_0.set_sample_rate(samp_rate)
        self.rtlsdr_source_0.set_center_freq(freq_center, 0)
        self.rtlsdr_source_0.set_freq_corr(0, 0)
        self.rtlsdr_source_0.set_dc_offset_mode(0, 0)
        self.rtlsdr_source_0.set_iq_balance_mode(0, 0)
        self.rtlsdr_source_0.set_gain_mode(False, 0)
        self.rtlsdr_source_0.set_gain(10, 0)
        self.rtlsdr_source_0.set_if_gain(20, 0)
        self.rtlsdr_source_0.set_bb_gain(20, 0)
        self.rtlsdr_source_0.set_antenna('', 0)
        self.rtlsdr_source_0.set_bandwidth(0, 0)

        self.rational_resampler_xxx_1_0 = filter.rational_resampler_fff(
                interpolation=48,
                decimation=51,
                taps=None,
                fractional_bw=None,
        )
        self.rational_resampler_xxx_1 = filter.rational_resampler_fff(
                interpolation=48,
                decimation=51,
                taps=None,
                fractional_bw=None,
        )
        self.rational_resampler_xxx_0_0 = filter.rational_resampler_ccc(
                interpolation=1,
                decimation=4,
                taps=None,
                fractional_bw=None,
        )
        self.rational_resampler_xxx_0 = filter.rational_resampler_ccc(
                interpolation=1,
                decimation=4,
                taps=None,
                fractional_bw=None,
        )
        self.low_pass_filter_0_0 = filter.fir_filter_ccf(1, firdes.low_pass(
        	1, samp_rate/4, 100000, 500000, firdes.WIN_HAMMING, 6.76))
        self.low_pass_filter_0 = filter.fir_filter_ccf(1, firdes.low_pass(
        	1, samp_rate/4, 100000, 500000, firdes.WIN_HAMMING, 6.76))
        self.blocks_multiply_xx_0_0 = blocks.multiply_vcc(1)
        self.blocks_multiply_xx_0 = blocks.multiply_vcc(1)
        self.blocks_file_sink_0_0 = blocks.file_sink(gr.sizeof_float*1, 'D:\Temp\1\audio2.snd', False)
        self.blocks_file_sink_0_0.set_unbuffered(False)
        self.blocks_file_sink_0 = blocks.file_sink(gr.sizeof_float*1, 'D:\Temp\1\audio1.snd', False)
        self.blocks_file_sink_0.set_unbuffered(False)
        self.audio_sink_0 = audio.sink(48000, '', True)
        self.analog_wfm_rcv_0_0 = analog.wfm_rcv(
        	quad_rate=samp_rate/4,
        	audio_decimation=10,
        )
        self.analog_wfm_rcv_0 = analog.wfm_rcv(
        	quad_rate=samp_rate/4,
        	audio_decimation=10,
        )
        self.analog_sig_source_x_0_0 = analog.sig_source_c(samp_rate, analog.GR_COS_WAVE, freq_center - freq_2, 1, 0)
        self.analog_sig_source_x_0 = analog.sig_source_c(samp_rate, analog.GR_COS_WAVE, freq_center - freq_1, 1, 0)

        ##################################################
        # Connections
        ##################################################
        self.connect((self.analog_sig_source_x_0, 0), (self.blocks_multiply_xx_0, 1))
        self.connect((self.analog_sig_source_x_0_0, 0), (self.blocks_multiply_xx_0_0, 1))
        self.connect((self.analog_wfm_rcv_0, 0), (self.rational_resampler_xxx_1, 0))
        self.connect((self.analog_wfm_rcv_0_0, 0), (self.rational_resampler_xxx_1_0, 0))
        self.connect((self.blocks_multiply_xx_0, 0), (self.rational_resampler_xxx_0, 0))
        self.connect((self.blocks_multiply_xx_0_0, 0), (self.rational_resampler_xxx_0_0, 0))
        self.connect((self.low_pass_filter_0, 0), (self.analog_wfm_rcv_0, 0))
        self.connect((self.low_pass_filter_0_0, 0), (self.analog_wfm_rcv_0_0, 0))
        self.connect((self.rational_resampler_xxx_0, 0), (self.low_pass_filter_0, 0))
        self.connect((self.rational_resampler_xxx_0_0, 0), (self.low_pass_filter_0_0, 0))
        self.connect((self.rational_resampler_xxx_1, 0), (self.audio_sink_0, 0))
        self.connect((self.rational_resampler_xxx_1, 0), (self.blocks_file_sink_0, 0))
        self.connect((self.rational_resampler_xxx_1_0, 0), (self.audio_sink_0, 1))
        self.connect((self.rational_resampler_xxx_1_0, 0), (self.blocks_file_sink_0_0, 0))
        self.connect((self.rtlsdr_source_0, 0), (self.blocks_multiply_xx_0, 0))
        self.connect((self.rtlsdr_source_0, 0), (self.blocks_multiply_xx_0_0, 0))

    def get_samp_rate(self):
        return self.samp_rate

    def set_samp_rate(self, samp_rate):
        self.samp_rate = samp_rate
        self.rtlsdr_source_0.set_sample_rate(self.samp_rate)
        self.low_pass_filter_0_0.set_taps(firdes.low_pass(1, self.samp_rate/4, 100000, 500000, firdes.WIN_HAMMING, 6.76))
        self.low_pass_filter_0.set_taps(firdes.low_pass(1, self.samp_rate/4, 100000, 500000, firdes.WIN_HAMMING, 6.76))
        self.analog_sig_source_x_0_0.set_sampling_freq(self.samp_rate)
        self.analog_sig_source_x_0.set_sampling_freq(self.samp_rate)

    def get_freq_center(self):
        return self.freq_center

    def set_freq_center(self, freq_center):
        self.freq_center = freq_center
        self.rtlsdr_source_0.set_center_freq(self.freq_center, 0)
        self.analog_sig_source_x_0_0.set_frequency(self.freq_center - self.freq_2)
        self.analog_sig_source_x_0.set_frequency(self.freq_center - self.freq_1)

    def get_freq_2(self):
        return self.freq_2

    def set_freq_2(self, freq_2):
        self.freq_2 = freq_2
        self.analog_sig_source_x_0_0.set_frequency(self.freq_center - self.freq_2)

    def get_freq_1(self):
        return self.freq_1

    def set_freq_1(self, freq_1):
        self.freq_1 = freq_1
        self.analog_sig_source_x_0.set_frequency(self.freq_center - self.freq_1)


def main(top_block_cls=top_block, options=None):

    tb = top_block_cls()
    tb.start()
    try:
        raw_input('Press Enter to quit: ')
    except EOFError:
        pass
    tb.stop()
    tb.wait()


if __name__ == '__main__':
    main()
Удобно и то, что система является кросс-платформенной, и получившаяся программа может работать на Linux, Windows и OSX.
Заключение
Можно сказать, что GNU Radio достаточно сложная система, не в плане рисования блоков конечно, а в плане понимания того, как все это работает. Но какие-то несложные вещи сделать вполне посильно и интересно. GNU Radio также удобно использовать как «виртуальную лабораторию» для обучения — к любой части схемы можно подключить виртуальный осциллограф или спектроанализатор и посмотреть, как выглядит сигнал.
Если не будет каких-то отдельных пожеланий, тему SDR-приема наверно можно закрыть — все основные моменты уже рассмотрены, да и количество просмотров от первой к третьей части падает почти по экспоненте (хотя еще можно написать про передачу, но оно требует более дорогого «железа» для тестов чем RTL SDR). Надеюсь все же, что некоторое понимание того как это работает, у читателей осталось. Ну и всем удачных экспериментов.
Содержание
- Software Defined Radio — как это работает? Часть 4
- Установка
- Начало работы
- Принимаем FM-радио
- Многоканальный прием
- Запись
- Запуск из командной строки
- Заключение
- WindowsInstall
- Contents
- Windows Installation [ edit ]
- Binary Installers [ edit ]
- Current Windows Status [ edit ]
- Windows Porting Issues [ edit ]
- Installation Options [ edit ]
- Building on Windows with Native Tools [ edit ]
- MinGW/MSYS [ edit ]
- Cygwin [ edit ]
- Chocolatey [ edit ]
- WSL | Ubuntu [ edit ]
- WSL 1/2 (before WSLg) [ edit ]
- WSLg [ edit ]
- Using an Azure VM [ edit ]
- Known Windows Build Issues [ edit ]
- GNU Radio on Windows
- Setting up the environment
- Installing the drivers
- Installing the Python dependencies
- Give it a try!
- Compiling GNU Radio
- Visual Studio 2010
- Prerequisites
- Boost 1.53
- libusb-1.0
- Qwt 6
- Ettus Research UHD
- FFTW 3.3
- Oil Runtime Compiler
- cppunit
- GNU Radio
- Gnu radio windows 10 установка
- About
Software Defined Radio — как это работает? Часть 4
В третьей части было рассказано, как получить доступ к SDR-приемнику посредством языка Python. Сейчас мы познакомимся с программой GNU Radio — системой, позволяющей создать достаточно сложную конфигурацию радиоустройства, не написав ни единой строчки кода.

Для примера рассмотрим задачу параллельного приема нескольких FM-станций на один приемник. В качестве приемника будем использовать все тот же RTL SDR V3.
Продолжение под катом.
Установка
Для начала работы GNU Radio необходимо установить, дистрибутив для Windows можно скачать здесь. Система эта кроссплатформенная, версии есть также под Linux и под OSX (вроде бы GNU Radio успешно запускали и на Raspberry Pi, но 100% гарантии дать не могу).
По сути, GNU Radio это целый фреймворк для цифровой обработки сигналов, в котором программа «собирается» из отдельных модулей. Есть большое количество уже готовых блоков, при желании также можно создавать свои собственные. Сами модули написаны на С++, а для взаимодействия блоков друг с другом используется Python. Желающие могут посмотреть на API более подробно, но на практике это, скорее всего, не пригодится — все действия можно делать визуально в программе GNU Radio Companion.
Система ориентирована на обработку потоков данных, так что каждый блок обычно имеет вход и выход. Далее, соединяя блоки в редакторе, мы получаем готовую систему. Сам интерфейс GNU Radio довольно простой, сложность состоит в понимании того, что делает тот или иной блок. Как говорилось ранее, низкоуровневая работа с SDR имеет высокий порог входа и требует некоторого знания в DSP и математике. Но мы рассмотрим простую задачу, для которой никаких специальных знаний не потребуется. Итак, приступим.
Начало работы
Запускаем GNU Radio Companion, создаем новый проект, тип проекта выбираем WX GUI, добавляем на экран и соединяем два блока, как показано на скриншоте.
Мы видим два типа блоков — Source (источник) и Sink (выход, «слив»). RTL-SDR — это наш приемник, FFT GUI — это виртуальный спектроанализатор.
Переменную Sample Rate устанавливаем в 2048000, это частота дискретизации нашего приемника. Частоту RTL-SDR оставляем по умолчанию равной 100МГц.
Запускаем проект — все работает, мы видим спектр FM-станций. Первая программа для GNU Radio готова!
Если мы посмотрим лог, то увидим такие строки.
Да, мы можем посмотреть файл top_block.py, который сгенерил нам GNU Radio Companion. Истинные джедаи могут писать непосредственно в Python, но требуемый код, как мы видим, довольно большой. Мы же создали его за 1 минуту.
Впрочем, если убрать громоздкую инициализацию, то мы увидим, что ключевых строк кода не так уж много.
Так что в принципе, это можно написать вручную. Но мышью оно все-таки быстрее. Хотя возможность поменять код иногда может пригодиться, если захочется добавить какую-то нестандартную логику.
Принимаем FM-радио
Теперь попробуем принять одну из станций. Как было видно из скриншотов, центральная частота приемника 100МГц и ширина полосы пропускания около 2МГц. На спектре мы видим две станции, на 100.1МГц и 100.7МГц соответственно.
Первым шагом необходимо перенести спектр станции в центр, сейчас он отстоит вправо на 100КГц. Для этого вспоминаем школьную формулу умножения косинусов — в результате будет две частоты, сумма и разность — нужная станция сдвинется в центр, что нам и нужно (а лишнее мы потом отфильтруем).
Создаем две переменные для хранения частоты freq_center=100000000 и freq_1=100100000, также добавляем генератор сигналов с частотой freq_center — freq_1.
Т.к. система построена на базе Python, то в полях ввода параметров мы можем использовать выражения, что достаточно удобно.
Схема в итоге должна выглядеть так:
Теперь необходимо добавить сразу несколько блоков — уменьшить тактовую частоту входного сигнала (она равна 2048КГц), отфильтровать сигнал, подать его на FM-декодер, затем еще раз уменьшить тактовую частоту до 48КГц.
Результат показан на картинке:
Считаем внимательно. Мы делим тактовую частоту 2048КГц в 4 раза блоком Rational Resampler (получаем 512КГц), затем после Low Pass фильтра стоит WBFM-декодер с децимацией 10 (получаем 51.2КГц). В принципе, этот сигнал уже можно подать на звуковую карту, но высота тона будет чуть отличаться. Еще раз меняем тактовую частоту в 48/51, в результате будет тактовая частота 48.2КГц, разницей уже можно пренебречь.
Второй важный момент — тип входов. С приемника поступает комплексный IQ-сигнал (входы-выходы синего цвета), с FM-декодера выходит вещественный сигнал — входы и выходы желтого цвета. Если перепутать, ничего не заработает. Подробнее уже было на Хабре, нам достаточно понять общий принцип.
В общем, запускаем, убеждаемся что все работает. Можно запустить программу и слушать радио. Мы пойдем дальше — у нас же все-таки Software Defined радио — добавим одновременный прием второй станции.
Многоканальный прием
Второй приемник добавляется любимым программистским методом — Ctrl+C/Ctrl+V. Добавляем переменную freq_2, копируем блоки и соединяем их точно также.
Результат вполне сюрреалистичный — две FM-станции можно слушать одновременно. Тем же самым методом (Ctrl+V) можно добавить и третью станцию.
Запись
Слушать две станции оригинально, но на практике мало полезно. Сделаем что-то более нужное, например добавим запись звука в отдельные файлы. Это может быть достаточно удобно — с одного физического приемника можно параллельно записывать несколько каналов.
Добавим к каждому выходу компонент File Sink, как показано на скриншоте.
Windows-версия почему-то требует абсолютные пути файлов, иначе запись не работает. Запускаем, убеждаемся что все нормально. Размер сохраняемых файлов довольно большой, т.к. по умолчанию записывается формат float. Запись в формате int оставлю читателям в качестве домашнего задания.
Получившиеся файлы можно открыть в Cool Edit и убедиться, что звук записался нормально.
Разумеется, число записываемых каналов можно увеличить, оно ограничено только полосой пропускания приемника и мощностью компьютера. Кроме File Sink можно использовать и UDP Sink, так что программу можно использовать для трансляции по сети.
Запуск из командной строки
И последнее. Если использовать программу автономно, например для многоканальной записи, то UI в принципе и не нужен. В верхнем левом блоке Options меняем параметр Run Options на No UI. Запускаем программу еще раз, убеждаемся что все работает. Теперь сохраняем сгенерированный файл top_block.py — мы можем просто запускать его из командной строки, например из bat-файла или из консоли.
Если кому интересно, сгенерированный файл сохранен под спойлером.
Удобно и то, что система является кросс-платформенной, и получившаяся программа может работать на Linux, Windows и OSX.
Заключение
Можно сказать, что GNU Radio достаточно сложная система, не в плане рисования блоков конечно, а в плане понимания того, как все это работает. Но какие-то несложные вещи сделать вполне посильно и интересно. GNU Radio также удобно использовать как «виртуальную лабораторию» для обучения — к любой части схемы можно подключить виртуальный осциллограф или спектроанализатор и посмотреть, как выглядит сигнал.
Если не будет каких-то отдельных пожеланий, тему SDR-приема наверно можно закрыть — все основные моменты уже рассмотрены, да и количество просмотров от первой к третьей части падает почти по экспоненте (хотя еще можно написать про передачу, но оно требует более дорогого «железа» для тестов чем RTL SDR). Надеюсь все же, что некоторое понимание того как это работает, у читателей осталось. Ну и всем удачных экспериментов.
Источник
WindowsInstall
Contents
Windows Installation [ edit ]
Binary Installers [ edit ]
There are a few different unofficial GNU Radio binary installers that are maintained by the community:
1) Geof Nieboer’s installer hosted at gcndevelopment.com. This is a binary installer for 64-bit Windows 7/8/10 that includes all dependencies for Windows, a custom python distro, commonly used SDR drivers, and several OOT blocks.
2) Radioconda installer. This binary installer tends to be the most up-to-date but currently includes fewer SDR drivers and OOT modules. It utilizes the conda package/environment manager and provides easy access to thousands of Python and other packages that are not strictly related to GNU Radio. This also lets you stay up-to-date without having to re-install. Since this provides the same conda-forge packages available without the installer, the conda install guide might be useful for additional instructions, including how to build OOT modules from source.
3) Pothos SDR development environment installer. This binary installer includes GNU Radio, Pothos, CubicSDK, and other tools. It has historically been updated about once or twice per year.
Current Windows Status [ edit ]
Installing core GNU Radio and USRP on Windows is becoming more routine. Many OoT modules may still require compiling locally. Please report any success or failures. Patches and enhancements are especially welcome!
Windows Porting Issues [ edit ]
Considerable effort has been put into making the GNU Radio code portable among various operating systems, but there are several reasons why it cannot be «simply» compiled and run under Windows:
The following sections show how these issues can be addressed.
Installation Options [ edit ]
GNU Radio is designed to be flexible. It has a number of modules, capabilities, and options that can be enabled or disabled to suit the needs of the user, and the user can add custom blocks or modules to the system.
To support this flexibility, it comes with a set of files and scripts to be used with GNU software build tools (sh, make, autoconf, automake, etc.). These tools use Linux-like commands and filenames that are not normally available on Windows systems.
Fortunately, we are not the first to face this problem, and several solutions exist. These are presented in order of increasing difficulty:
Building on Windows with Native Tools [ edit ]
Ettus Application note [1] describes how to build from source. Similar is a post at [2] for OOT modules.
Powershell scripts are now available at https://www.github.com/gnieboer/gnuradio_windows_build_scripts that fully automate the build process for GNURadio 3.7.9.2+. A few build dependencies are required (MSVC 2015, Git, Doxygen, CMake, Perl, Wix) but all are free. The script has two options:
The binary installers described above are built with these scripts. They ensure that all dependencies are built with the same toolchain against the same runtime libraries, and handle the patches and configuration «tweaks» needed to build them on Windows.
If option 1 is desired, note that to build scipy, the non-free Intel Fortran compiler is required, gfortran cannot build objects that can link with MSVC C objects. If you do not have said compiler, the scripts will download pre-compiled wheels instead.
More information on the build process is available on the GitHub repo readme, and also at http://www.gcndevelopment.com/gnuradio.
MinGW/MSYS [ edit ]
MinGW (http://www.mingw.org/) provides GNU compilers and Window-specific header files for compiling native Windows applications.
MSYS (http://www.mingw.org/msys.shtml) is a companion set of Linux-like commands, shell, and build tools.
MinGW does not include a Linux programming interface; programs should be smaller and faster than with Cygwin (in theory), but will require more Windows-specific code.
MSYS is intended primarily as a build environment, making it more compact than Cygwin.
Because there is no Linux API emulation, GNU Radio built with MinGW should be used with standard Windows versions of Python and the third-party libraries.
MinGW does not provide as much support as Cygwin for installing third-party libraries, but in many cases precompiled binaries are available.
For detailed installation instructions using MinGW and MSYS see Installing GNU Radio with MinGW.
Cygwin [ edit ]
Cygwin (http://www.cygwin.com/) is a Linux-like environment for Windows.
It provides the Linux-like shell, file naming, and build tools we need and also makes it easy to install many of the third-party libraries required by GNU Radio. It also provides a Linux programming interface (API); this is not required by GNU Radio, but it lets us use the better-tested Linux versions of some functions.
Because the Linux API uses its own C runtime library, it is best to use Cygwin versions of Python and the third-party libraries when building GNU Radio with Cygwin.
For detailed installation instructions using Cygwin see Installing GNU Radio with Cygwin.
Chocolatey [ edit ]
To quote from the [|https://chocolatey.org/ Chocolatey homepage]: Chocolatey NuGet is a Machine Package Manager, somewhat like apt-get, but built with Windows in mind..
There are packages for gnuradio (and its dependencies) available in a separate repository (currently the best known source is: https://github.com/ariovistus/chocolatey-packages)
To install, open an Administrative command line session and run:
Now you need to install a source which has the recipes for gnuradio and dependents. The easiest method is to clone the chocolatey-packages from the github repository listed above (https://github.com/ariovistus/chocolatey-packages), then add the local source from within an Administrative command line session:
Create the numpy package:
Create the gnuradio package:
Now install the gnuradio package:
Follow the command prompts.
WSL | Ubuntu [ edit ]
Enable WSL from windows features.
Install Ubuntu 20.04 (or newer) from Microsoft Store.
Using the Ubuntu terminal, install gnuradio as you would on linux [3]. If you want to develop GNU Radio’s core you will need to build GNU Radio from source.
WSL 1/2 (before WSLg) [ edit ]
Install additional package «libgtk-3-dev»
WSL 1 and 2 (before WSLg) do not have an X server for displaying graphical applications. Install an X server, either VcXsrv [4] or Xming [5] as WSL does not come with an X server. VcXsrv is recommended as it is open source and self-contained instead of being tied to Cygwin, whereas Xming «asks for donations» to the developer as a dubious «sale» for non-existent support.
Launch VcXsrv, making sure to select «Disable access control» option in the Extra settings so that any application can export to X11.
Edit bashrc to set up the display by adding the following lines at the bottom of the file.
Restart the Ubuntu terminal and run
WSLg [ edit ]
Currently in early testing stages, the WSLg update contains a Wayland graphics server and X interface layer allowing graphical applications to run without extra setup.
From the Ubuntu terminal run
Using an Azure VM [ edit ]
Another way to generate a GNU Radio environment if you’re using Windows, is to create an Azure Virtual Machine running Ubuntu Server 18.04 LTS.
If you already have an existing Azure account you can follow the instructions here[6] to create an Ubuntu VM using the Azure portal. Otherwise, you can sign up for an account here[7]. Azure provides free accounts for students[8] with a limited set of credits.
Once your VM is created you should be able to SSH into it, to install a desktop environment. Full instructions can be found here, but in summary: Install xfce
Install xrdp as a remote desktop server
Configure xrdp to use xfce
Restart the xrdp service
You will need to create a local password for your Linux VM (on top of your existing SSH key), and open port 3389[9] on the VM.
Finally you can use a remote desktop client, such as Remote Desktop Connection to connect to your VM and follow the instructions for GNU Radio on Ubuntu found here[10].
Known Windows Build Issues [ edit ]
So far, we have workarounds for all reported problems:
Источник
GNU Radio on Windows
Setting up the environment
Disclaimer: this build of GNU Radio is not completely portable.
Installing the drivers
If you have an USB-based device (USRP1, B100, RTL-SDR), you must install the WinUSB driver with http://sourceforge.net/projects/libwdi/files/zadig/zadig_v2.0.1.160.7z/download and possibly reboot.
Installing the Python dependencies
Depending on whether you prefer to employ 32-bit or 64-bit binaries, you will need a matching 32-bit or 64-bit Python 2.7 (http://www.python.org/download/releases/2.7.4/).
The required Python packages can be downloaded in large part from Christoph Gohlke’s excellent collection of packages: http://www.lfd.uci.edu/
If you use 64-bit binaries:
Give it a try!
Run uhd_usrp_probe.exe in a Command Prompt, it should detect your USRP and load the firmware (two tries may be necessary for USB devices), then try running uhd_fft.py or gnuradio-companion.py. A simple GRC example is to connect an RTLSDR Source or USRP Source to the classic WX GUI Waterfall Sink, then click Build => Generate and Execute.
If you get the message «KeyError: Options«, make sure global_blocks_path in your config.conf is setup correctly and if you compiled gnuradio yourself, also check that gr_prefs.cc was patched.
Compiling GNU Radio
Visual Studio 2010
This guide has been validated using Visual Studio 2010 Professional SP1 on Windows 7. Other versions of Visual Studio or MinGW could work as well, but there is no guarantee.
KB2519277 is only required on the Express edition (it restores the x64 compiler).
Prerequisites
This guide is based on specific versions of open-source software, for example boost 1.53.0. Choosing older or newer versions is not recommended and can lead to build failures.
This guide described the compilation of 64-bit binaries. The same procedure can be followed as well to build 32-bit binaries, with minor flags adjustments:
Install cmake, msysgit & Python 2.7 32-bit or 64-bit (they are required). When installing msysgit, choose «Run Git and included Unix tools from the Windows Command Prompt» and «Checkout as-is, commit as-is«.
Recommended but optional: 7-Zip, Notepad++, doxygen and graphviz
Here we compile GNU Radio in release mode with symbols: RelWithDebInfo. Compiling in Debug mode has been tried: it can lead to runtime errors and therefore is not recommended unless you want to debug the Debug mode 😉
Boost 1.53
libusb-1.0
WebKit, Qt3 and examples/demos are disabled since they are not required and take a very long time to compile. Also, adjust the number of parallel jobs (here,  according to how many CPU cores you have. Compilation on a quad-core CPU should take about 20 minutes. Individual examples can be compiled in this way:
If you use a non-Express edition of Visual Studio 2010, consider installing the Qt4 plugin: http://download.qt-project.org/official_releases/vsaddin/qt-vs-addin-1.1.11-opensource.exe
Qwt 6
Ettus Research UHD
gohlke/pythonlibs/ download and install Cheetah-2.4.4.win-amd64-py2.7.exe and docutils-0.10.win-amd64-py2.7.exe (or their 32-bit counterparts)
FFTW 3.3
libfftw (double precision) is used by IT++, while libfftwf (single precision) is used by GNU radio. Download http://www.fftw.org/fftw-3.3.3.tar.gz and ftp://ftp.fftw.org/pub/fftw/fftw-3.3-libs-visual-studio-2010.zip
Steps 3 to 5 are only required on the **Express** edition which lacks OpenMP.
Oil Runtime Compiler
Download http://code.entropywave.com/download/orc/orc-0.4.17.tar.gz, extract into C:src. Copy buildorcc.vcxproj and buildconfig.h into C:srcorc-0.4.17. Open it and compile the executable.
cppunit
Download http://sourceforge.net/projects/cppunit/files/cppunit/1.12.1/cppunit-1.12.1.tar.gz/download, extract into C:src. Open C:srccppunit-1.12.1examplesexamples.dsw, create a new platform x64 and compile cppunit (not cppunit_dll) in Release mode.
GNU Radio
Download and extract into C:src :
Please install the Python dependencies (see «Installing the Python dependencies» above).
To build the documentation (this is optional), install:
If you get the error is «Unable to find file ‘C:srcgnuradio-3.6.4.1gnuradio-coresrclibswiggnuradio_core_filer.i’«, work around it by copying (not renaming) gnuradio_core_filter.i to gnuradio_core_filer.i:
IT++ is not really required. It is mainly an standalone signal processing library which can provide alternatives to several of GNU Radio signal processing primitives.
Источник
Gnu radio windows 10 установка
GNURadio Windows Build Scripts v1.7
For more details on this effort, please see the support website
IF YOU JUST WANT TO USE GNURADIO ON WINDOWS, DON’T USE THESE SCRIPTS. use the binaries that are posted at the above site. The Linux way is to build from source, this is usually not helpful on Windows, so use the installers unless you just want to tinker, in which case enjoy!
The finished MSI includes:
Device Support: UHD, RTL-SDR, hackrf, airspy, airspyhf, BladeRF, osmoSDR, FCD, SoapySDR
GNURadio modules: 3.8.1.0 and 3.7.13.5 with all but gr-comedi modules built and included
OOT modules: gr-iqbal, gr-fosphor, gr-osmosdr, gr-acars, gr-adsb, gr-modtool, gr-air-modes, gr-ais, gr-ax25, gr-burst (incl. bitarray), gr-cdma, gr-display (incl. matplotlib), gr-eventstream, gr-inspector (incl. tensorflow), gr-lte, gr-mapper, gr-nacl, gr-paint (incl. PIL), gr-radar, gr-rds, gr-specest, OpenLTE, gr-gsm (not all modules available in gr 3.8)
Other Applications: gqrx
There are now two options for that for whatever your reason is, want to build these installers themselves. The newest and recommended option is to use an AWS EC2 instance with a custom AMI that has successfully built these scripts, to avoid configuration issues. I recommend a c5d.2xlarge because you must have the 200GB NVMe drive or larger.
The second option is to build your own machine:
The following tools must be installed:
Please note that Visual Studio 2017 is not yet supported.
Also, the complete build requires no less than 120 GB of free disk space.
Run the below from an elevated command prompt (the only command that requires elevation is the Set-ExecutionPolicy. If desired, the rest can be run from a user-privilege account)
Once complete, msi files can be found in the [root]/src-stage4-installer/dist subdirectories. The build can be tested after Step 7 by running run_grc.bat in the src-stage3/staged_install/[config]/bin subdirectory to
1- Ensure your anti-virus is off during installation. even Windows Defender. PyQt4 may fail to create manifest files as a result.
2- Right-click your powershell window, go to «Properties» and ensure QuickEdit and Insert Mode are NOT checked. Otherwise when you click on the window, execution may pause without any indication as to why, leading you to believe the build has hung.
3- This has been tested with a B200 UHD, a hackRF, and an RTL-SDR. Other device drivers have not been phyiscally verified to work. If you own one, please let me know if you had success.
4- In the event of issues, I highly recommend Dependency Walker or similar to troubleshoot what libraries are linked to what.
5- If your connection is spotty, you may get partially downloaded packages which cause build failures. To correct, DELETE the suspect package from the /packages directory so it will retry the download.
6- The following devices are NOT currently supported: FCD Pro+, RFSPACE, MiriSDR, SDRPlay, freeSRP
7- CMake 3.13 is the only version currently supported, though versions after 3.5 may be successful; older versions have been reported to have issues detecting the custom python install when at the BuildGNURadio step.
8- Zadig must be manually added to the /bin directory prior to MSI creation
About
Источник

GNURadio также может работать в Windows.При установке GNURadio серия сценариев PowerShell будет автоматически загружена и встроена в исходный код. Затем это зависит от 64-битного собственного двоичного файла, который упакован в .msi с помощью Visual Studio 2015.

Если вы хотите узнать больше, см.Вот。
В пакет MSI входят:
Поддержка оборудования: UHD, RTL-SDR, hackrf, airspy, BladeRF, osmoSDR, FCD
Модуль GNURadio: была собрана версия 3.7.9.2, кроме gr-comedi.
Модули OOT: gr-iqbal, gr-fosphor, gr-osmosdr, gr-acars, gr-adsb, gr-modtool
Другие приложения: gqrx
Резюме
Необходимо установить следующие инструменты:
MS Visual Studio 2015 (Сообщество или выше)
Git For Windows
CMake
Doxygen
ActiveState Perl
Wix toolset for VS 2015
Чтобы получить этот набор вещей, вам потребуется не менее 60 ГБ на жестком диске.
Установить и собрать
Выполните следующую команду с высокими полномочиями, на самом деле только «Set-ExecutionPolicy» лицемерно, а остальные можно запускать с обычной учетной записью.

git clone http://www.github.com/gnieboer/GNURadio_Windows_Build_Scripts

cd GNURadio_Windows_Build_Scripts

powershell

Set-ExecutionPolicy Unrestricted

./~RUNME_FIRST.ps1
Журнал сборки находится в каталоге $ root / logs. Сценарий проверяет ключевое содержание каждого шага, но нет гарантии, что ошибки сборки могут быть обнаружены. Таким образом, вы можете использовать журнал для дальнейшей диагностики проблемы.
Когда установка будет завершена, вы увидите файл msi в подкаталоге [root] / src-stage4-installer / dist. Эту сборку можно протестировать, запустив run_grc.bat в подкаталоге src-stage3 / staged_install / [config] / bin после седьмого шага.
Меры предосторожности
Сценарий сгенерирует msi-файл Release, но его нельзя запустить на машине, отличной от AVX. Это связано с ошибкой VOLK. Решение здесь, просто измените одну строку кода в определенном файле.
1. Выключите антивирусное программное обеспечение во время установки, и Защитник Windows также должен быть выключен. PyQt4 может не создать файл манифеста из-за этого.
2. Щелкните правой кнопкой мыши на панели управления Windows и выберите «Свойства», чтобы увидеть, не были ли отменены режимы быстрого редактирования и вставки. В противном случае при нажатии на окно выполнение программы может зависнуть.
3. Данный набор тестировался под B200 UHD, hackRF и RTL-SDR. Другие устройства не были проверены. Если друг провел тест, не забудьте сообщить мне об этом.
4. Есть проблема, я настоятельно рекомендую Dependency Walker решить проблему зависимости библиотеки.
5. Если ваше соединение нестабильно, вы можете загрузить пакет, который может привести к сбою сборки.В этом случае вы можете удалить потенциально проблемный пакет из каталога / packages, и сценарий попытается загрузить его снова.
6. Теперь отладка сборки приведет к сбою сборки PyGTK и Wx, поэтому GRC будет недоступен. Сборка будет продолжена, но GNURadio включит эти функции, и сочетания клавиш во время процесса установки также потеряют свою силу. При этом gr-acars вылетит только при отладке сборки.
7. Эти устройства пока не поддерживают: FCD Pro +, RFSPACE, MiriSDR, SoapySDR.
8. Если вы устанавливаете MSVC по нестандартному пути при установке MSVC, это может привести к сбою обнаружения зависимостей.
9. Этот набор вещей теперь поддерживает только CMake 3.3. Считается, что CMake 3.5 имеет проблемы, когда на этапе сборки обнаруживаются пользовательские установки python.
10. Перед созданием MSI-файла Zadig необходимо вручную добавить в каталог / bin.
* Справочный источник:github
Update March 21:
At the moment on my Windows 10 PC there are GNU Radio 3.7.11 and 3.8.2 installed side by side without issues.
Both can be found following the link below:
http://www.gcndevelopment.com/gnuradio/downloads.htm
I tried some of the precompiled installers but not all worked. I got lucky with 3.7.11 and 3.8.2 :
Version 3.7.11 comes with osmosdr plugin preinstalled. Gr-osmosdr can be used to access AIRSPY and other SDR devices. In addition to that 3.7.11 is compatible with Myriad RF’s GR-limesdr plugin so you can control Lime SDR as well.
Version 3.8.2 comes with soapy and Osmosdr as well.
The direct link to GNU Radio 64 bit 3.7.11 is here :
http://www.gcndevelopment.com/gnuradio/downloads/installers/v1.2.0/gnuradio_3.7.11_win64.msi
The direct link to GNU Radio 64 but 3.8.2 is here:
http://www.gcndevelopment.com/gnuradio/downloads/installers/v3.8.2.1/gnuradio_3.8.2.0_win64.msi
###############################################
In the past I worked with 3.6.4.1 on WinXP, Win7 32 bits and had compiled the instructions below:
Older instruction how to install GNU RADIO 3.6.4.1 on Windows 7 (32 bit)
Most probably, these will work for Windows XP and 8 (32 bit) as well.
I wanted to install GNU Radio 3.6.4.1 on Windows 7 and found some excellent instructions here (click) . User Bhaskar11 uploaded them and below I have just recompiled the instructions based on my experience. Following these instructions GNU Radio worked on my Win7 machine.
Note: I could not get QT GUI blocks working , but this is not a problem for my needs, since WX GUI blocks work fine including FFT, Waterfall, Scope etc.
I have gathered all necessary packages required to install GNU Radio 3.6.4.1 in one place and created a zip folder “stuff_gnuradio” and uploaded it to Dropbox. You just need to download it from there , unzip it to C:stuff_gnuradio and follow the instructions.
Download “stuff_gnuradio” folder (177MB)
INSTRUCTIONS how to install GNU-RADIO 3.6.4.1 on Windows 7 (32 bit).
Most probably, these will work for Windows XP and 8 (32 bit) as well.
GNU Radio will be installed to C:gnuradio and the UHD USRP driver to C:UHD.
Follow the …21 steps below 🙂
1.
Read carefully the provided html file:
“[Discuss-gnuradio] Successful installation of GNURadio 3.6.4.1 on Window”
All the instructions below come from this link
All credits go to user Bhaskar11 !
I have just recompiled his instructions based on my experience on Win7 and created a zip folder with all the necessary files in one place.
2.
Ensure your Internet connection is up and running
3.
If not already done, download all the necessary files (stuff_gnuradio.zip) from Dropbox and unzip this folder to C:stuff_gnuradio
4.
Ensure that you have administrative privileges
5.
Go to the stuff_gnuradio folder, double click “vcredist_x86” and install C++ 2010 redistributable package, only if required.
If it says a copy is already installed and offers to repair it, accept to repair.
If it says a later version is already installed, then accept to close.
6.
Double click “python-2.7.3”, select install for all users and keep the default settings.
7.
Double click “lxml-3.0.2.win32-py2.7” and keep the default settings.
8.
Double click “numpy-1.7.1-win32-superpack-python2.7” and keep the default settings.
9.
Double click “PyQt-Py2.7-x86-gpl-4.9.6-1” and keep the default settings.
10.
Double click “PyQwt-5.2.1-py2.7-x32-pyqt4.9.6-numpy1.7.1” and keep the default settings
11.
At this point you need to install pip.
Open a command terminal (cmd) and change directory to the “stuff_gnuradio” folder:
cd C:stuff_gnuradio
Then type:
python get-pip.py
If this does not work, you need to add python to your system path.
To do so, add the following paths to your “Path” in the “System variables” :
C:Python27;C:Python27Scripts;
Close the command terminal you opened before and open a new one.
Type again :
cd C:stuff_gnuradio
Then type
python get-pip.py
Now the installation of pip should start.
12.
Install the Cheetah whl file by typing
pip install Cheetah-2.4.4-cp27-none-win32.whl
By the way , pip must be recognized as a command . If not,you need to add C:Python27Scripts to your “Path” in the “System variables” as mentioned above.
13.
Install the PyOpenGL whl file by typing:
pip install PyOpenGL-3.1.1b1-cp27-none-win32.whl
14.
Double click “pygtk-all-in-one-2.24.2.win32-py2.7” and keep the default settings.
15.
Double click “wxPython-2.8.12.1.win32-py2.7” and keep the default settings.
On Windows 7 and 8 you may get:
Runtime error R6034 “An application has made an attempt to load the C runtime library incorrectly.
Please contact the application’s support team for more information.”
Ignore the message and continue.
16.
Double click “wxPython-common-2.8.12.1.win32-py2.7”
On Windows 7 and 8 you may get:
Runtime error R6034 “An application has made an attempt to load the C runtime library incorrectly.
Please contact the application’s support team for more information.”
Ignore the message and continue.
17.
If you have a USRP install the drivers now by double-clicking
“uhd_003.005.004-release_Win32”
This is not the latest UHD driver.
I tried the latest but could not get connected to my USRP1.
Select the option to “Add gnuradio to the system path for all users”.
Change installation directory to C:UHD.
All other settings default.
Double check that your system path includes C:UHDbin; If not,add it.
When you plug in the USRP1 for the first time, point it to this directory:
erllc_uhd_winusb_driver found in the stuff_gnuradio folder.
18.
Double click “gnuradio_3.6.4.1_Win32”
Select the option to “Add gnuradio to the system path for all users”.
Change installation directory to C:gnuradio.
On Windows 8 you may receive “Warning! PATH too long installer unable to modify PATH!” which seems to be a NSIS
installer problem when it finds the total path to be longer than 1024.
If you receive this message then you must manually add the installation bin directory to the system path.
Double check that your system path includes C:gnuradiobin; If not,add it.
19.
Manually add the PYTHONPATH environment variable.
Create a new environmental variable “PYTHONPATH”
Since we have installed gnuradio to C:gnuradio , its value should be:
C:gnuradiolibsite-packages;
20.
Check that the GRC_BLOCKS_PATH environment variable has been set to by GNURadio installer.
Normally this should happen automatically.
If it has not been set, then first create a system variable GRC_BLOCKS_PATH and then set its value manually:
C:gnuradiosharegnuradiogrcblocks;
21.
You are done! Close all open command windows, open a new one and type
gnuradio-companion.py
This will open GNU Radio!
Open TEST_GRC.grc file , hit F5( Generate) ,then hit F6(Execute) .
You can also use the provided “gnuradio.bat” file and create a shortcut to easily launch GNU Radio.
Enjoy !
Michael Margaras – SV1CAL
GNURadio Windows Build Scripts v1.7
A series of Powershell scripts to automatically download, build from source, and install GNURadio and -all- it’s dependencies as 64-bit native binaries then package as an .msi using Visual Studio 2015.
For more details on this effort, please see the support website
IF YOU JUST WANT TO USE GNURADIO ON WINDOWS, DON’T USE THESE SCRIPTS… use the binaries that are posted at the above site. The Linux way is to build from source, this is usually not helpful on Windows, so use the installers unless you just want to tinker, in which case enjoy!
The finished MSI includes:
Device Support: UHD, RTL-SDR, hackrf, airspy, airspyhf, BladeRF, osmoSDR, FCD, SoapySDR
GNURadio modules: 3.8.1.0 and 3.7.13.5 with all but gr-comedi modules built and included
OOT modules: gr-iqbal, gr-fosphor, gr-osmosdr, gr-acars, gr-adsb, gr-modtool, gr-air-modes, gr-ais, gr-ax25, gr-burst (incl. bitarray), gr-cdma, gr-display (incl. matplotlib), gr-eventstream, gr-inspector (incl. tensorflow), gr-lte, gr-mapper, gr-nacl, gr-paint (incl. PIL), gr-radar, gr-rds, gr-specest, OpenLTE, gr-gsm
(not all modules available in gr 3.8)
Other Applications: gqrx
There are now two options for that for whatever your reason is, want to build these installers themselves. The newest and recommended option is to use an AWS EC2 instance with a custom AMI that has successfully built these scripts, to avoid configuration issues. I recommend a c5d.2xlarge because you must have the 200GB NVMe drive or larger.
The AMI is: GnuRadio Windows Build — ami-0ac7160e7f16f76ac. AMIs are regional, so you must connect to USA N. Virginia to see it, but you should be able to make a copy as you wish.
Once you log in, there are two shortcuts. The first will initialize the NVMe to your Z: drive. The second will run the scripts.
The second option is to build your own machine:
PREREQUISITES
Windows 10 64-bit (though binaries will run on Win 7)
The following tools must be installed:
- MS Visual Studio 2015
- Git For Windows (not just the version that comes with MSVC)
- CMake 3.13
- Doxygen
- ActiveState Perl
- Wix toolset for VS 2015
Please note that Visual Studio 2017 is not yet supported.
Also, the complete build requires no less than 120 GB of free disk space.
INSTALLATION & BUILD
Run the below from an elevated command prompt (the only command that requires elevation is the Set-ExecutionPolicy. If desired, the rest can be run from a user-privilege account)
git clone http://www.github.com/gnieboer/GNURadio_Windows_Build_Scripts
cd GNURadio_Windows_Build_Scripts
powershell
Set-ExecutionPolicy Unrestricted
./~RUNME_FIRST.ps1
Build logs can be found in the $root/logs directory. The scripts will validate key parts of each step, but are not 100% guaranteed to detect a partial build failure. Use the logs to further diagnose issues.
Once complete, msi files can be found in the [root]/src-stage4-installer/dist subdirectories. The build can be tested after Step 7 by running run_grc.bat in the src-stage3/staged_install/[config]/bin subdirectory to
ISSUES
1- Ensure your anti-virus is off during installation… even Windows Defender. PyQt4 may fail to create manifest files as a result.
2- Right-click your powershell window, go to «Properties» and ensure QuickEdit and Insert Mode are NOT checked. Otherwise when you click on the window, execution may pause without any indication as to why, leading you to believe the build has hung.
3- This has been tested with a B200 UHD, a hackRF, and an RTL-SDR. Other device drivers have not been phyiscally verified to work. If you own one, please let me know if you had success.
4- In the event of issues, I highly recommend Dependency Walker or similar to troubleshoot what libraries are linked to what.
5- If your connection is spotty, you may get partially downloaded packages which cause build failures. To correct, DELETE the suspect package from the /packages directory so it will retry the download.
6- The following devices are NOT currently supported: FCD Pro+, RFSPACE, MiriSDR, SDRPlay, freeSRP
7- CMake 3.13 is the only version currently supported, though versions after 3.5 may be successful; older versions have been reported to have issues detecting the custom python install when at the BuildGNURadio step.
8- Zadig must be manually added to the /bin directory prior to MSI creation
LICENSE
The scripts themselves are released under the GPLv3. The resulting MSI’s are also GPLv3 compatible, see www.gcndevelopment.com/gnuradio for details and access to all modifications to original source code. All patches are released under the same license as the original package it applies to.
Older Releases
![]()
GNURadio_3.10.1.1-0_win64_release
This is the release version of GNU Radio for Windows.
Size: 83.30 MB
Version: 3.10.1.1
Published: 1 April, 2022
SHA-256 checksum
c0e6e1eb4c807411f96add295904ff0c9aae109ec640f22baa07d120fcf38dea
GNURadio_3.10.1.1-0_win64_symbols
PDB files for debugging.
Size: 42.80MB
Version: 3.10.1.1
Published: 1 April, 2022
![]()
GNURadio_3.10.0-0_win64_release
This is the release version of GNU Radio for Windows.
Size: 83.29 MB
Version: 3.10.0
Published: 18 January, 2022
SHA-256 checksum
cdeb047ade57d7d242329b6c4baaa49044591b6c4a4ed2ff6ecd12010657e0d6
GNURadio_3.10.0-0_win64_symbols
PDB files for debugging.
Size: 44.56MB
Version: 3.10.0
Published: 18 January, 2022
![]()
GNURadio_3.9.3-0_win64_release
This is the release version of GNU Radio for Windows.
Size: 82.36 MB
Version: 3.9.3
Published: 22 October, 2021
SHA-256 checksum
5c1f054a8b99b317c28a703a3bd2337bac77674cde09d5360845f6e730281d4f
GNURadio_3.9.3-0_win64_symbols
PDB files for debugging.
Size: 103.16 MB
Version: 3.9.3
Published: 22 October, 2021
![]()
GNURadio_3.9.2-1_win64_release
This is the release version of GNU Radio for Windows.
Size: 82.31 MB
Version: 3.9.2
Published: 25 June, 2021
SHA-256 checksum
5ef7b85408500de4da8b8e3e47c6ab2bcf95e6d9c4fb9803ded6cc60eb654039
GNURadio_3.9.2-0_win64_symbols
PDB files for debugging.
Size: 99.55 MB
Version: 3.9.2
Published: 25 June, 2021
![]()
GNURadio_3.8.3-0_win64_release
This is the release version of GNU Radio for Windows.
Size: 59.97 MB
Version: 3.8.3
Published: 28 May, 2021
SHA-256 checksum
bf26ba0cfd8539b74a7e37c7d623a8b5f2581ef3848d14e519b096d9de039850
GNURadio_3.8.3-0_win64_symbols
PDB files for debugging.
Size: 28.85 MB
Version: 3.8.3
Published: 28 May, 2021
![]()
GNURadio_3.8.3.1-1_win64_release
This is the release version of GNU Radio for Windows.
Size: 59.98 MB
Version: 3.8.3.1
Published: 25 June, 2021
SHA-256 checksum
eb4a2e969ce869ef33d96b75e657d25d0a8eaa26b2718e6687686aca187aeac1
GNURadio_3.8.3.1-0_win64_symbols
PDB files for debugging.
Size: 28.69 MB
Version: 3.8.3.1
Published: 25 June, 2021
![]()
GNURadio_3.9.1-3_win64_release
This is the release version of GNU Radio for Windows.
Size: 81.74 MB
Version: 3.9.1
Published: 13 April, 2021
SHA-256 checksum
8c4d6641145c771e8ccb6e6cf8528eb22609430265b38135ccc9101168d290ee
GNURadio_3.9.1-0_win64_symbols
PDB files for debugging.
Size: 96.33 MB
Version: 3.9.1
Published: 13 April, 2021
![]()
GNURadio_3.9.0-0_win64_release
This is the release version of GNU Radio for Windows.
Size: 53.04 MB
Version: 3.9.0
Published: 20 January, 2021
SHA-256 checksum
0280aeefc4a1ba2707d4d13a08ba6f6e4594b0e37902b15e4c84197ff01af566
GNURadio_3.9.0-0_win64_symbols
PDB files for debugging.
Size: 98.22 MB
Version: 3.9.0
Published: 20 January, 2021
![]()
GNURadio_3.8.2-0_win64_release
This is the release version of GNU Radio for Windows.
Size: 59.30 MB
Version: 3.8.2
Published: 25 August, 2020
SHA-256 checksum
b9da954df3b0d1c1db336ae50e8dc9c294dc7f42202ce3949a6236b168129fed
GNURadio_3.8.2-0_win64_symbols
PDB files for debugging.
Size: 99.6 MB
Version: 3.8.2
Published: 25 August, 2020
![]()
GNURadio_3.8.1-0_win64_release
This is the release version of GNU Radio for Windows.
Size: 56.37 MB
Version: 3.8.1
Published: 22 April, 2020
SHA-256 checksum
9459b6b87c396e1ca99b0e55db1ea7b7e8e1eddb0b888b086b776e701e175847
GNURadio_3.8.1-0_win64_symbols
PDB files for debugging.
Size: 99.3 MB
Version: 3.8.1
Published: 22 April, 2020
![]()
GNURadio_3.8.0-0_win64_release
This is the release version of GNU Radio for Windows.
Size: 57.45 MB
Version: 3.8.0
Published: 30 September, 2019
SHA-256 checksum
c7f994bfcf23af1f2cfc58d5b53f89a0748feb3692a845b7238333e4ff481db0
GNURadio_3.8.0-0_win64_symbols
PDB files for debugging.
Size: 91.79 MB
Version: 3.8.0
Published: 1 October, 2019
Краткая инструкция как начать работать с LimeSDR-Mini на Windows 10
Данный метод проверен на Windows 10 версии 1709, 1803.
За основу была взята чистая операционная система Windows 10 версии 1803 без предустановленного какого-либо ПО.
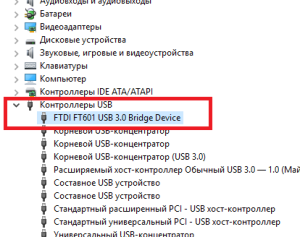
После подключения LimeSDR-Mini ОС самостоятельно установит все необходимые драйвера для работы с SDR. Проверить это можно в Диспетчере устройств, в «Контроллеры USB» должно появиться устройство «FTDI FT601 USB 3.0 Bridge Device», если это не произошло необходимо обновить драйвера вручную, в крайнем случае скачать драйвера с официального сайта.
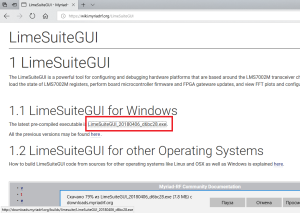
Следующим шагом необходимо обновить прошивку LimeSDR-Mini, с помощью предоставленной программы от разработчиков LimeSuiteGUI, скачать которую можно по ссылке:
https://wiki.myriadrf.org/LimeSuiteGUI
+++++++++++++++++++++++++
Однако при запуске может возникнуть проблема из-за отсутствия MSVCR120.dll и msvcp120.dll, решить которую можно установкой компонента Visual Studio С++ 2013, скачать который можно с официального сайта по следующей ссылке:
https://www.microsoft.com/ru-RU/download/details.aspx?id=40784
*проблема решается только при установке Visual Studio С++ 2013 x86 даже на x64 ОС
+++++++++++++++++++++++++
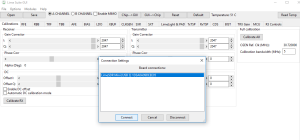
Подключаем LimeSDR-Mini в разделе Options -> ConnectionSettings, выбираем устройство.
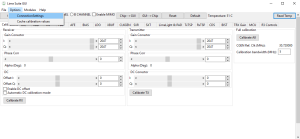
Обновление прошивки осуществляется в Modules -> Programming
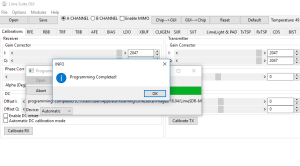
Если обновить прошивку по какой-либо причине не удалось, то кликните Default на верхней панели, светодиод LimeSDR-Mini должен сменить цвет и заморгать зеленым, после чего попробуйте обновить прошивку снова.
ВАЖНО: LimeSDR-Mini, как и другие приемо передающие устройства необходимо включать с антеннами, иначе Вы рискуете сжечь свое устройство так и не успев с ним поработать ![]()
Следующим шагом будет полезно проверить работоспособность SDR как ресивера, так и трансивера. Для этого необходимо настроить центральную частоту трансивера и ресивера во вкладках SRX и TRX в разделе Frequency (частоту лучше настроить с небольшим разносом в пару МГц.)
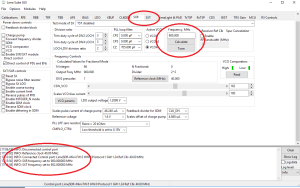
После чего открываем Modile -> FFT viewer
В результате получаем следующее…
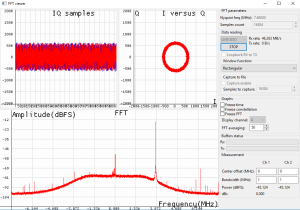
(Результат который Вы получите может достаточно сильно отличаться. Это может быть вызвано разной версией прошивки 1.1.24, например, разница между версией 1.1.01 с которой пришла SDR видна «на глаз»)
«Если нужно, можно установить HDSDR, а также драйвер для работы с LimeSDR-Mini
HDSDR скачиваем по ссылке: http://www.hdsdr.de/download/HDSDR_install.exe
После загружаем предварительно скомпилированный файл ExtIO_LimeSDR.dll по ссылке: http://downloads.myriadrf.org/project/limesuite/18.04/ExtIO_LimeSDR_1.05.dll
И копируем в каталог программы HDSDR (каталог установки по умолчанию: C:Program Files (x86)HDSDR)»
Также следует установить PothosSDR
http://downloads.myriadrf.org/builds/PothosSDR/?C=M;O=D
А вместе с ним установится GnuRadio, который попросит докинуть Python2.7 и после запуска самостоятельно докачает тонну зависимостей.
Если самостоятельное FnuRadio это делать не стал, то следует запустить ..PothosSDRbinGNURadioHelper
Теперь для того чтобы использовать LimeSDR-Mini в GnuRadio необходимо использовать блок источника «Osmocom Source» с параметром Device Arguments «driver=lime,soapy=0»