26.09.2014 / Wakko / 0 Comments
После нескольких лет работы в консоли (Linux или OS X), возвращаясь в коммандную строку Windows – очень не хватает простейших утилит, типа diff, grep, md5sum, sort, uniq и, конечно же, wget/curl.
Когда-то, в бытность Windows XP пользовался пакетом UnxUtils. Пакет этот, судя по всему, сейчас заброшен и давно не обновлялся. Есть ещё пакет GNUWin32 (для него есть утилита GetGNUWin32, для автоматизации процесса скачивания и установки пакетов GNUWin32). Он посвежее, но последние версии тоже датируются аж 2010-м годом. А ещё этот GNUWin32 показался мне каким-то большим и слишком громоздким.
После небольших поисков был найден ещё один вариант – GNU on Windows. Этот пакет судя по всему основан на GNUWin32, но какие-то программы в нём немного новее, нежели в исходном GNUWin32.
Пакет устанавливается, прописывается в $PATH и мы получаем следующие утилитки:
C:Userswakko>gow --version
Gow 0.8.0

C:Userswakko>gow --list
Available executables:

  awk, basename, bash, bc, bison, bunzip2, bzip2, bzip2recover, cat,
  chgrp, chmod, chown, chroot, cksum, clear, cp, csplit, curl, cut, dc,
  dd, df, diff, diff3, dirname, dos2unix, du, egrep, env, expand, expr,
  factor, fgrep, flex, fmt, fold, gawk, gfind, gow, grep, gsar, gsort,
  gzip, head, hostid, hostname, id, indent, install, join, jwhois, less,
  lesskey, ln, ls, m4, make, md5sum, mkdir, mkfifo, mknod, mv, nano,
  ncftp, nl, od, pageant, paste, patch, pathchk, plink, pr, printenv,
  printf, pscp, psftp, putty, puttygen, pwd, rm, rmdir, scp, sdiff, sed,
  seq, sftp, sha1sum, shar, sleep, split, ssh, su, sum, sync, tac, tail,
  tar, tee, test, touch, tr, uname, unexpand, uniq, unix2dos, unlink,
  unrar, unshar, uudecode, uuencode, vim, wc, wget, whereis, which,
  whoami, xargs, yes, zip
Нужно только иметь в виду что gnu-тый sort здесь переименован в gsort, для того чтобы не перекрываться sort'ом из Windows. В установленном виде пакет занимает всего 22Мб.
Update: Правда есть в пакете и глючная утилитка, tail из этого пакета не выполняет своих обязанностей, вместо отображения последних строк текстового файла и ожидания дополнения файла, ругается ошибками "Bad file descriptor" и "no files remaining". Поэтому tail лучше всего взять из пакета UnxUtils.
Update 2: А вот отсюда можно взять свежий wget версии 1.16.1.
Командная строка в Windows 10 не сравнивается с терминалом в Linux. Чтобы восполнить недостатки, в Windows можно установить такие инструменты, как wget и Cygwin, чтобы получить больше возможностей из командной строки. Вот как вы можете установить и использовать wget в Windows 10.
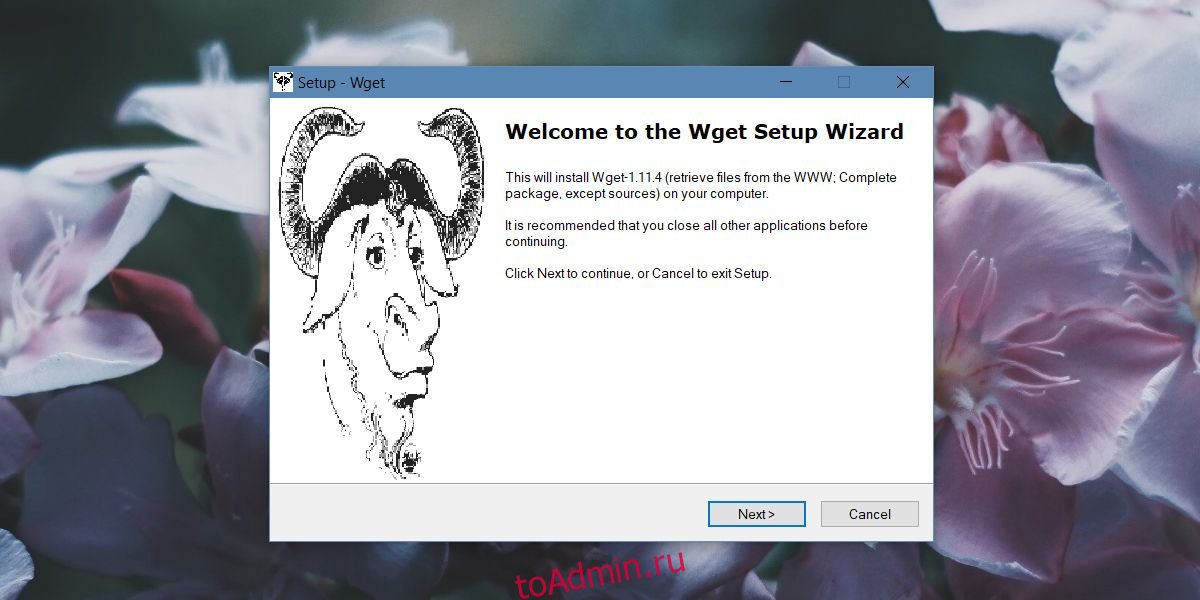
Wget — бесплатный инструмент, но загрузить нужный файл довольно сложно. Трудно сказать, какой именно из них вам следует скачать, и одно из наиболее популярных зеркал для EXE печально известно своими сбоями в Windows 10. Чтобы установить wget, скачать этот файл с Sourceforge.
Распакуйте файл и запустите в нем EXE. Установка довольно проста. Кроме лицензионного соглашения и ничего больше не меняйте.
Использование Wget
Есть два способа использовать Wget в Windows 10. Это инструмент командной строки, поэтому у него нет графического интерфейса. Вы получаете доступ к нему через командную строку. Чтобы использовать его из командной строки, вы можете либо добавить его как переменную среды, либо вручную перейти в каталог, в котором находится приложение Wget, и использовать его оттуда. Второй метод неудобен, если вы собираетесь часто использовать этот инструмент, но мы подробно рассмотрим оба метода, и вы можете выбрать тот, который вам больше всего подходит.
CD в Wget
Это менее удобный способ. Откройте проводник и перейдите в следующее место. Здесь будет файл Wget.exe. Вам действительно нужен только путь к этому файлу. Скопируйте его в буфер обмена.
C:Program Files (x86)GnuWin32bin
Затем откройте командную строку и введите следующую команду, чтобы перейти в указанное выше место.
cd C:Program Files (x86)GnuWin32bin
Оказавшись в этой папке, вы можете ввести wget и использовать любые его функции и переключатели.
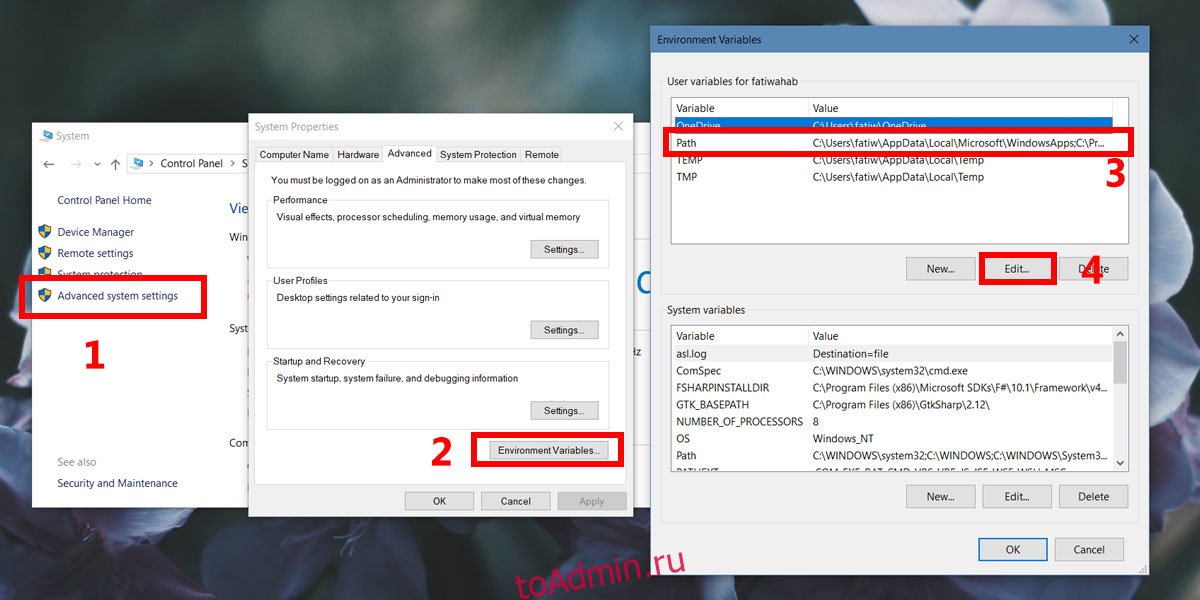
Добавить переменную среды
Перемещение в папку bin, где Wget.exe находится каждый раз, когда вы хотите использовать инструмент, требует много времени. Если вы добавите его как переменную среды, вы можете просто ввести wget из любого каталога и использовать его. Для этого вам потребуются права администратора.
Чтобы добавить wget в качестве переменной среды, откройте проводник и вставьте следующее в адресную строку.
Control PanelSystem and SecuritySystem
В левом столбце щелкните Расширенные настройки системы. В открывшемся окне нажмите Переменные среды. В окне «Переменные среды» выберите «Путь» в разделе вверху и нажмите «Изменить».
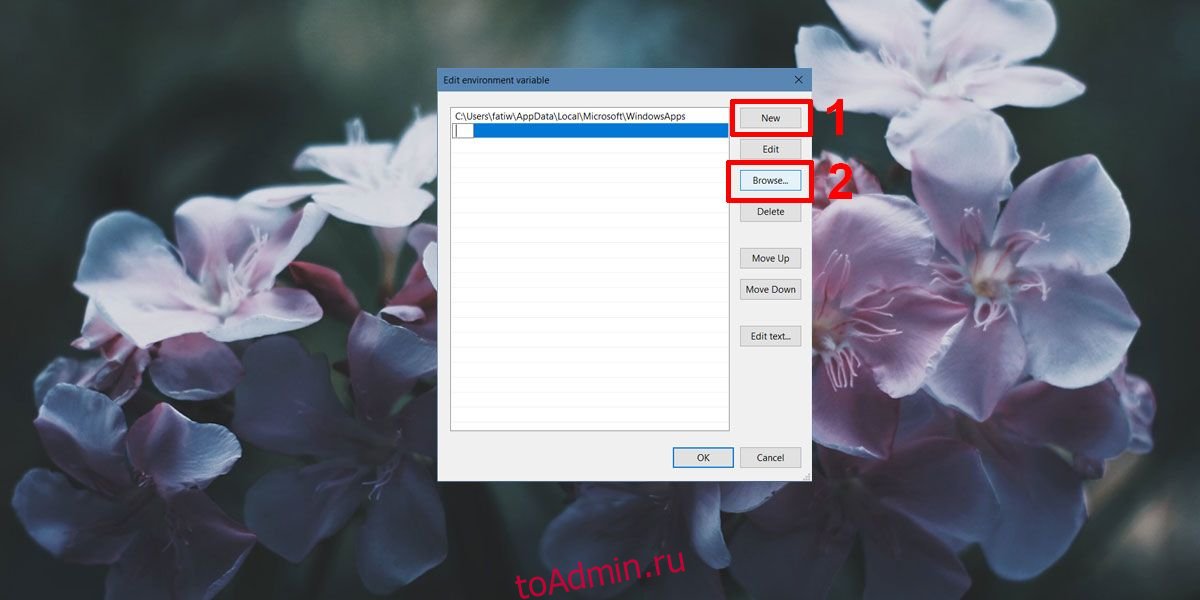
В открывшемся окне нажмите «Создать», затем нажмите кнопку «Обзор». Введите это место;
C:Program Files (x86)GnuWin32bin
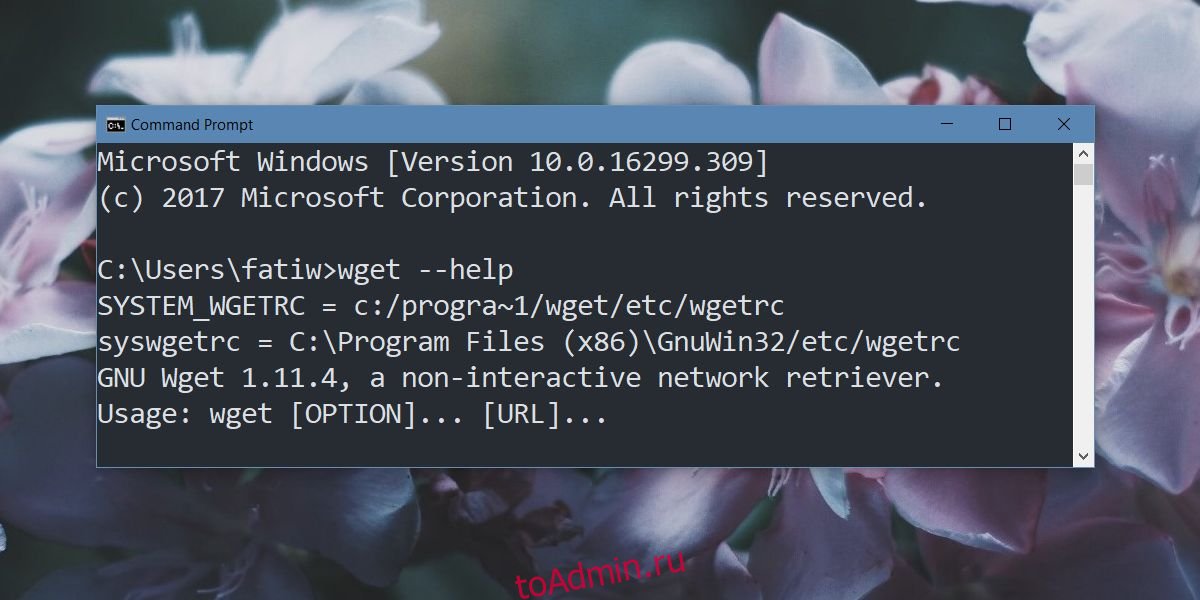
Для выхода щелкните ОК в каждом окне.
Теперь, когда вы открываете командную строку, вы можете ввести wget независимо от того, в каком каталоге / папке вы находитесь, и вы сможете получить доступ к этому приложению и использовать его команды.
Что вы думаете об этой статье?
Содержание
- Gnuwin32 для windows 10
- Installation and Usage
- Requirements
- Installation
- Usage
- Path separators
- Temporary-file directory
- Home directory
- Filename globbing and quoted arguments
- Large-file support
- Native-language support
- Notes on compilation
- Prerequisites
- Configure and Make
- Compiler options
- Unix functions
- Dynamic libraries
- Auto-import
- Text files and binary files
- Filenames
- Filename globbing
- Default locations
- Large-file support
- Subprocesses
- Inode numbers
- Cross compilation
Gnuwin32 для windows 10
Being a geek that uses many OS’s you always run into instances that you think, that would be great if I could do that on Windows, Linux or OSX.
The command line tools available with Linux are very handy and Windows is starting to get there with each release of Powershell, but personally I want them now and that is possible with several tools available. One such tool is GnuWin32.
The GnuWin project provides Win32-versions of GNU tools, or tools with a similar open source license. The ports are native ports, that is they rely only on libraries provided with any standard 32-bits MS-Windows operating system. Unlike CygWin or Msys, native ports do not rely on some kind of Unix emulation, so that there is no need to install additional emulation libraries. At present, all developments have been done under MS-Windows-XP, using the Mingw port of the GNU C and C++ (GCC) compilers. Utilities and libraries provided by GnuWin, are used and distributed with packages such as GNU Emacs and KDE-Windows.
SO let’s get started and download GetGnuWin32-0.6.3.exe and double-click to extract it to a folder on your system. Once you have it extracted open a command prompt and navigate to the extracted location and run download.bat. The process will connect and download all the GnuWin32 packages available and download them to the directory. You will be prompted several times and should accept the defaults.
Now lets install what has just been downloaded. While still at the command prompt type:
c:DownloadsGetGnuWin32> install c:gnuwin32
This will install all the downloaded packages to c:gnuwin32. I recommend using this directory for the main reason if you install under C:Program Files you can be faced with NTFS permissions that will possibly inhibit proper operation. Be patient as this will take awhile to complete.
Now you are ready to use the tools, but there is one issue. If you type the command and not be in the c:gnuwin32bin directory or specify it in the command line you will get a command not found error. You can remedy this by adding c:gnuwin32 to the path.
- From the desktop, right-click My Computer and click Properties.
- In the System Properties window, click on the Advanced tab.
- In the Advanced section, click the Environment Variables button.
- Finally, in the Environment Variables window (as shown below), highlight the Path variable in the Systems Variable section and click the Edit button. Add or modify the path lines with the paths you wish the computer to access. Each different directory is separated with a semicolon as shown below.
Now test it by typing any one of the many commands at your disposal.
Installation and Usage
Requirements
All packages require MS Windows 2000 / XP / 2003 / Vista / 2008 / 7 with msvcrt.dll . If msvcrt.dll is not in your system folder (WindowsSystem or WindowsSystem), get it from Microsoft or by installing Internet Explorer 4.0 or higher. Some packages also require msvcp60.dll , which is in the same Microsoft sources. Packages from 2009 and earlier usually run also on 9x (MS Windows 95 / 98 / ME) and NT systems. Newer packages may also run on 9x and NT, but no new code to make them run on these systems, will be added. So, if a package does not run on 9x or NT, use an older release.
Some packages require other packages as well (and these may require still other packages!). Usually they require only the dynamic link library (DLL), contained in
— -bin.zip. All required packages from GnuWin, i.e. excluding msvcrt.dll , perl, etc, are included in the Setup programs and the dependencies zip files.
Be careful not to use another version of a library that depends on crtdll.dll ; any call to an executable with an implicit dependence on both msvcrt.dll and crtdll.dll , crashes. Nor should you mix CygWin dlls and native dlls.
Installation
There are two ways to install: by a setup program and by zip files. From the package list, you can download a package by means of a setup program. Just follow the instructions. You may install more than one package in the same directory, e.g. E:Program FilesGnuWin . The setup program, created with Inno Setup Compiler, accepts command-line options, amongst others for silent install.
At the end of the installation setup you will be given the option to download the sources. If after the installation you wish to get the sources, then go to the package page by clicking on the entry in the column Package. There you can also install from individual zip files, which are smaller in size than the install programs; but then you will have to take care of any dependencies, as listed in the requirements section of the package page, yourself. Download the zip files you need, copy them to a directory and unzip the archives. Some packages must be installed in their default directories (usually c:progra
), or you have to set corresponding environment variables or set options at the command line; see the documentation of the package, or, when available, the installation instructions on the package page. Packages newer than 1 April 2002 may be installed in any directory, provided the subdirectory structure is maintained; native language support, if supplied by the package, is then also active.
Usage
Most programs are command-line programs, and so should be run from a command prompt (DOS-box: command.com or cmd.exe). In the Windows Explorer, you may also associate a program or a batch file that calls the program, with a file extension. The length of the command-line is limited; see MSDN.
Path separators
The MS-Windows command interpreters, command.com and cmd.exe, understand both the backward slash ‘’ (which is the default) and the forward slash ‘/’ (such as on Unix) in filenames. In general, it is best to use forward slashes, since some programs internally use the filename, e.g. to derive a directory name, and in doing this rely on the forward slash as path separator.
Temporary-file directory
On MS-Windows 95 / 98 / ME, the standard temporary-file directory is usually pointed at by the environment variable TEMP . Programs with a Unix origin use however the environment variables TMP or TMPDIR . If these have not been defined, then the program tries the directory /tmp , which on MS-Windows usually does not exist, and so they exit with a failure. It is therefore best to add TMP =% TEMP % and TMPDIR =% TEMP % to your environment.
Home directory
Several programs search for user-specific configuration files in the directory pointed at by the environment variable HOME or in one of its subdirectories. Therefore, set HOME to the directory where these files are to be found. On MS-Windows NT / 2000 / XP, it is usually best to set HOME to %HOMEDRIVE%%HOMEPATH% . In user and reference manuals, the HOME directory is often abbreviated by
Filename globbing and quoted arguments
The MS-Windows command interpreters expand wildcards on the command-line sometimes differently from Unix:
- ‘*’ is copied literally, and thus the program gets ‘*’ , with the single quotes included, as argument, whereas a Unix shell passes * , without the single quotes, to the program. If you want the program to get * as argument, then enclose it in double quotes: «*» .
- Filename wildcards are interpreted by the command shell, not by the program.
The use of quoted arguments on MS-Windows is quite complicated. An short explanation is given when you type help cmd at the cmd prompt. The following characters must be enclosed in double quotation marks: & [ ] < >^ = ; ! ‘ + , `
[white space] , since otherwise the command shell strips them and they will not be passed as argument.
Filename wildcards are being matched by means of the short filename. This may lead to unexpected results. For example, the short file name of test2.abcx is TEST2
1.ABC (to see this, give the command dir /x ), and this matches *.abc . Therefore a command such as ls *.abc will also report test2.abcx ; see the MS-Windows description of the dir command.
Large-file support
Packages newer than 1 April 2003, have been compiled with large-file support (LFS). These programs should be able to access files up to 9 EB (exabyte) = 9,000,000 TB (terabyte) = 9,000,000,000 GB. If you never use files larger than 2 GB, there is no need to upgrade packages just because large-file support has been added. Note that the current MS-Windows implementation of file systems allow for maximum file sizes of 4 GB on FAT16, 128 GB on FAT and 256 TB = 256,000 GB on NTFS; see Chapter 13: Working with file systems of the MS-Windows XP Resource Kit.
Native-language support
Most GNU packages have the ability to output messages in several languages. This native-language support (NLS) requires the LibIntl and the LibIconv libraries. On MS-Windows they have been adapted so that NLS chooses the system language, unless the environment variables LANG and LANGUAGE have been set. The language codes (ISO 639) for these environment variables are different from the MS-Windows ones. When using a program in a console window ( command.com or cmd.exe ) and setting LANG and LANGUAGE , you must also set the correct code page with the chcp command; for Western European languages, code page 1252 usually suffices. You can change the default code page by changing the OEMCP value in the registry key HKEY_LOCAL_MACHINESYSTEMCurrentControlSetControlNlsCodePage
For other languages, such as those with a Cyrillic character set, NLS may not operate correctly, unless a TrueType font with these characters has been chosen. If you want to disable NLS, then set the environment variables LANGUAGE and LANG to en ; then all messages will be in English.
Notes on compilation
Prerequisites
If you wish to compile yourself: get the source package
— -src.zip . You need GNU Bash, GNU Make and Mingw32 GCC and BinUtils. In these notes it is assumed that you are familiar with Bash, Make and GCC. Win32 implementations of Bash can be found in the CygWin tools, in the Msys tools, and in the DJGPP tools. Win32 implementations of Make can be found in CygWin, Msys, DJGPP, and Mingw. CygWin Bash and Make work quite well. Note that, when you mix CygWin or Msys Bash and a native Make, problems may occur because CygWin and Msys have their own way of absolute filenames (for example c:/tools becomes /cygdrive/c/tools in CygWin and /c/tools in Msys).
You can install Cygwin and its basic utilities (Autoconf, Automake, Bash, Bison, Coreutils, Diffutils, Bash, Findutils, Flex, Gawk, Grep, Libtool, M4, Make, Patch, Sed, Which) from any Cygwin mirror by using the setup program.
Then install Mingw; you’d best use the latest regular release («Current»). Mingw can be downloaded from its Sourceforge site. You’ll need GCC, Binutils and Windows API. Do not install these into the Cygwin directory. Make sure the directory with the GCC and Binutils executables comes before the Cygwin ones in your Path. You cannot use the Cygwin GCC and Binutils, because the executables they create are not native Windows ones, but depend on the Cygwin emulation layer (cygwin1.dll).
Configure and Make
If you use the sources from GnuWin, then these have already been patched and configured and there is no need to execute configure. Remove any .deps directories, because they contain the dependencies, mostly header files, for the sources and these may be different for your machine; then execute ./config.status to recreate the default .deps directories.
If you use the original sources, the configuration and ad hoc changes needed to compile are done in Makefile.mingw ; type make -f makefile.mingw at the Bash prompt. General configure options have been set in a config.site ; make sure that the environment variable CONFIG_SITE points to this file. If there is no Makefile.mingw, then type . /configure .
When configure has finished, type make . Sometimes you need additional libraries and include files. Usually the line export LIBS = . and other lines with -l. in Makefile.mingw show which additional libraries are needed. If you have these libraries, then you will also have the include files needed by these libraries. Rarely you need more include files; if on compiling you get an error message about a missing include file, then these might be found somewhere in the CygWin, Msys, or DJGPP distributions, but be careful not to replace any native declarations. If you make from the original sources, then you may need to apply patches from the patches directory in the GnuWin sources, in particular when make exits prematurely with an error message.
In Makefiles, you may have to change ln -s to cp , or use a version of ln that actually copies instead of making soft links.
More and more packages use LibTool for compiling, linking and installing. When installing into a directory with
in its name, such as c:/progra
1 , it gets confused; so change all occurrences of
in libtool into some other character, e.g. !
Compiler options
There have been reports that GnuWin executables have crashed on systems with processors other than Intel, e.g. on systems with an AMD processor. These crashes can be avoided by compiling with options specific to Win32 systems, e.g. by using -mms-bitfields -march=i386 as options to GCC.
Unix functions
Several packages use functions that are standard on Unix, for example for obtaining the user name. Some have MS-Windows equivalents, others don’t. You will have to provide a MS-Windows equivalent that does something sensible; usually a dummy that does nothing, also works. Equivalents for several functions are in the LibGw32C library, which is an extension of the Msup and Mstubs libraries. Source code, e.g. from LibGw32C, for the needed functions can be copied to the package sources; you’ll also have to adapt your own Makefiles and include files. Examples of code conversion between Unix and MS-Windows can also be found in Chapter 9 of the Unix Application Migration Guide on MSDN.
Dynamic libraries
Packages that contain a library, usually build only a static library (with extension .a ). A dynamic link library (DLL) with corresponding import library can be built from this static library with the linker ld , by dlltool or by dllwrap (provided in the Mingw BinUtils collection). The shell scripts a2dll and o2dll show more details.
If a package has originally been configured by means of autoconf (shown by the existence of the file configure.in or configure.ac ), then it might be reconfigured to make dynamic libraries, but very often this does not seem to be worth the trouble.
When you have built the DLL, you can rebuild the executables such that they use the DLL. Delete or rename the executable first. Since often the Makefile calls the library explicitly (for example ../.libs/foo.a ) rather than with the -L/-l- options (in the example: -L ../.libs -lfoo ), either change the Makefile or temporarily rename the import library to the name of the static library. Then run make again.
For libraries that are called in the standard way with -L/-l, Mingw automatically chooses the import library for the DLL rather than the static library if the import library has extension .dll.a .
For packages that use LibTool, this will not work, since LibTool then remakes the static library. Instead change in libfoo.la (in the directory just above the . libs directory that contains libfoo.a ), the term libfoo.a to libfoo.dll.a , and run make again. In principle, LibTool will build dynamic libraries if the option — -enable-shared to configure has been set, but in practice only the latest versions of LibTool can handle this and even then you may still end up with a static library. Some helper scripts, latool and rctool may be used instead of LibTool when dynamic libraries are to be created.
It is possible to create import libraries for use with MSVC and BCC.
On Unix it is practice to add a version number to the names of shared libraries; releases of a shared library that have the same version number have compatible interfaces, i.e. functions are called in the same way. On MS-Windows this seems also useful, so GnuWin dynamic libraries have a version number attached, usually computed from the LibTool interface version number.
Be careful not to mix different versions of the same library, since this may lead to crashes. In particular do not mix different run-time libraries, such as crtdll.dll , msvcrt.dll , msvcrtnn.dll , where nn denotes the version number ( 20 , 30 , . ); see the MS Knowledge Base and MSDN. Nor should you mix CygWin dlls and native dlls.
Auto-import
Mingw versions 2.95.3-3 and earlier cannot import static data from a DLL in the standard way, i.e. by using the extern declaration. This shows as an auto import warning when linking an executable that uses the DLL: Warning: resolving vvvvv by linking to __imp__vvv (auto-import) where vvv is the name of the static variable. It may also show as an Undefined reference to _nm__vvv or Undefined reference to dllname_dll_a_iname where dllname is the name of the dll to be created. If this occurs you may have to change some include files that declare these static data. Include at the start of the source:
#ifndef __GNUC__
# define __DLL_IMPORT __declspec(dllimport)
#else
# define __DLL_IMPORT __attribute__((dllimport)) extern
#endif
#if defined (BUILD_ddd_DLL) || !defined (__WIN32__)
# define DLL_IMPORT extern
#else
# define DLL_IMPORT __DLL_IMPORT
#endif
Replace extern by DLL_IMPORT in all relevant places in the include files, and add — DBUILD_ddd_DLL=1 , where ddd indicates the DLL, as flag to the compiler when compiling code that imports from the DLL.
Versions 2.95.3-4 and higher circumvent this auto-import problem when the option —enable-auto-import is given to the linker; for versions 2.95.3-6 and higher this is the default behaviour, so you need not set the option. Very occasionally you still get an error message; solve this in the above manner (see also the documentation of the GNU linker ld , section 2.1.1).
Text files and binary files
On MS-Windows there is a difference between text filemode and binary filemode. Normal text files are files where CR-LF signifies a line ending. Text file with LF as line endings can be correctly read by the input functions of the runtime library; the only error occurs with ftell in the last part of the file (see below).
Unless you are sure that a file is always a text file, it is best to open it in binary mode; so add «b» to the mode when using fopen and O_BINARY when using open . For O_BINARY to be defined, you may have to include fcntl.h . After a file has been opened, its mode may be changed by calling setmode before any output or input has occurred.
Standard input, output and error can be opened in binary mode by adding
#include
int _CRT_fmode = _O_BINARY;
to the beginning of the main program file, or by including stdbin.h . Alternatively, you can compile stdbin.h into a small library and link it to the executable.
Similarly, all other files will be opened in binary mode, even when «b» has not been specified in the mode parameter of fopen , when
#include
int _fmode = _O_BINARY;
is added to the beginning of the main program file, when binmode.h is included, or when binmode.h has been compiled into a library and linked to the executable.
The result of ftell when a file with LF characters as line endings is opened as a text file may differ from the result when the same file is opened as binary file. When a file containing CR-LF characters is opened as text file, the CR’s are deleted while reading; this is done when characters from the file are transferred to the read buffer. Ftell correctly computes the number of bytes for a position in this file by doubling the number of LF’s that are still in the read buffer. When a file with LF’s as line endings is opened as a text file, then ftell again doubles the number of LF’s still in the read buffer when computing the number of bytes, but now this is of course incorrect. Because of the particular way the CR’s in a CR-LF text file are deleted, this error only matters when the last part of the file is in the read buffer, so that normally positions in the last 512 bytes of the file are incorrectly determined by ftell . This does not matter when the result of ftell is only used as input for fseek to return to a previous position, but it does matter when ftell is used to determine the absolute position in a file.
Filenames
The path separator on Unix is the colon ( : ) and the directory separator is the forwardslash ( / ); on MS-Windows these are the semicolon ( ; ) and the backslash ( ). Filenames with forwardslashes are understood by MS-Windows, but you will have to change colons to semicolons when used as path separator. Tests for absolute filenames (on Unix filenames starting with / , on MS-Windows filenames starting with x:/ or \ ) must also be changed, as well as absolute filenames such as /tmp/. , /usr/. , /dev/. , /etc/. . These filename issues may also occur in shell scripts provided with the package. Often they are also the cause of failure in tests or checks with make test or make check .
Temporary file names may either be hardcoded ( /tmp/. ) or created with the help of an environment variable, usually TMP or TMPDIR . On Windows, the temporary file directory is Temp or Windows/Temp ; and on Win9x the corresponding environment variable is TEMP . You will have to change the Unix names, set the Unix environment variables, or adapt the source to look also for the Windows environment variable TEMP .
Filename globbing
Wildcards on the command-line are expanded by the command-line interpreter. If you wish to disable this filename globbing, then add
int _CRT_glob = 0;
to the beginning of the main program file.
Default locations
On Unix, executables usually are installed into /usr/bin and implementation-independent files, such as configuration and language files, in /usr/share or in /usr/etc , whose names are often hard coded in the executable; see the File System Hierarchy Standard. On MS-Windows there is no default location, and instead most packages go into a directory of their own, e.g. E:/Program Files/
. When the name of the implementation-independent directory is hard-coded in the program, packages with implementation-independent files must be installed in their default installation directory, which for GnuWin is always C:/Progra
It is not very difficult to change a program such that it also looks into the implementation-independent directory relative to the directory where the executable is installed; for example, when the program has been installed into D:/Applic/
, it looks for its configurations in say C:/Progra
/share and when nothing has been found there, it looks in D:/Applic/
/share . This solution has been followed in the later ports on GnuWin , which thus may be installed in any directory provided the subdirectory structure is maintained. Native language support (NLS) in LibIntl has also been adapted in this way. An alternative solution would have been to let the program read an initialization file in its program directory or let it read the registry.
For this so-called run-time relocation it is best to use Gnulib. You’ll need the source files error.c , progname.c , progreloc.c , relocatable.c , and the header files areadlink.h , error.h , progname.h , relocatable.h . Add the additional source files to the files to be compiled either in the package library, usually in the directory gl or lib , or to the sources, usually in the directory src . You must also define the macros INSTALLPREFIX equal to the original installation directory, INSTALLDIR equal to the original installation directory of the executables, EXEEXT equal to the extension of the executable, as well as NO_XMALLOC (unless you have a function xmalloc , in which case you must use xreadlink.h instead of areadlink.h ). In the language of Autoconf, this usually amounts to
-DINSTALLPREFIX=»$(prefix)» -DINSTALLDIR=»$(bindir)» -DEXEEXT=»$(EXEEXT)» -DNO_XMALLOC
In the source files you must replace each occurrence of filenames to be relocated by relocate( ) ; in each source file where you do this, you must include the header file relocatable.h , preferably in the form
#ifdef ENABLE_RELOCATABLE
# include
#else
# define relocate(path) (path)
#endif
In the main source file, usually main.c , you must add the statement set_program_name(argv[0]); and include the header file progname.h . If in main.c , a variable program_name has already been declared, you must remove this declaration as well as the statement that assigns a value to program_name , usually argv[0] .
Large-file support
Normally the functions of the MS-Windows C-runtime library ( msvcrt.dll ) can access files up to 2 31 -1 bytes, i.e. 2 GB. In particular this holds for the group of stat and seek functions: stat, fstat, seek, fseek, lseek, tell , and ftell as well as the related types ino_t and off_t . Special msvcrt -functions and types, indicated by the addition of i64 to their name, can access files up to 2 63 -1 bytes, i.e. 9 EB (exabyte) = 9,000,000 TB (terabyte) = 9,000,000,000 GB. Large-file support (LFS) has been implemented by redefining the stat and seek functions and types to their 64-bits equivalents. For fseek and ftell , separate LFS versions, fseeko and ftello , based on fsetpos and fgetpos , are provided in LibGw32C.
More information about LFS on Unix can be found at Freshmeat, in the Single Unix Specification, and the documents of the Large File Summit.
Subprocesses
fork is the function that implements subprocesses on Unix. It does not exist on MS-Windows, and has to be replaced by a series of different API calls, such as spawn or CreateProcess . Chapter 9 of the Unix Application Migration Guide, topics Interprocess Communication and Appendixes E and F, gives some examples.
Inode numbers
The MS-Windows equivalent of the Unix inode number is the FileIndex from the BY_HANDLE_FILE_INFORMATION structure, returned by the Win32 API function GetFileInformationByHandle . The FileIndex is a 64-bit number that on WnNT systems (NT, 2000, XP, 2003, Vista, 2008) indicates the position of the file in the Master File Table (MFT). On Windows XP and higher, one can also obtain this number by using the command fsutil usn readdata
. It is stable between successive starts of the system, provided the MFT does not overflow and therefore has to be rebuilt. It is not stable for files on network drives; successive calls to GetFileInformationByHandle return different values. For FAT file systems, the MSDN documentation for BY_HANDLE_FILE_INFORMATION says: «In the FAT file system, the file ID is generated from the first cluster of the containing directory and the byte offset within the directory of the entry for the file. Some defragmentation products change this byte offset. (Windows in-box defragmentation does not.) Thus, a FAT file ID can change over time. Renaming a file in the FAT file system can also change the file ID, but only if the new file name is longer than the old one.» Because of this, on FAT systems the file index for directories is zero. Note that in the Windows FileId API Library, the file index is named FileId .
The FileIndex consists of two parts: the low 48 bits are the socalled and contain the actual index in the MFT; the high 16 bits are the socalled : each time an entry in the MFT is reused for another file, the sequence number is increased by one. This behavior of the sequence number can be observed by creating a file, printing its FileIndex , deleting it, creating a new file and printing its FileIndex ; the FileIndex of the newest file is equal to that of the first file, with the sequence number, in the left most part of the FileIndex , increased by one. So the file reference number appears to be the equivalent of the Unix inode.
Linux-NTFS has some documentation about NTFS as well as some programs that can be used to investigate the MFT and which show the described behavior of the FileIndex . For example, the docs say, and the programs confirm this, that the root directory of a volume always has a file reference number of 5, because that is its index in the MFT.
An inode number for regular files, and for directories on WinNT, might be created as follows:
(0ULL)) >> SEQNUMSIZE); /* strip sequence number */
/* transform 64-bits ino into 16-bits by hashing */
ino = (ino_t) (
( (LODWORD(refnum)) ^ ((LODWORD(refnum)) >> INOSIZE) )
^
( (HIDWORD(refnum)) ^ ((HIDWORD(refnum)) >> INOSIZE) )
);
CloseHandle (hFile);
return ino;
>
An inode for fstat can be implemented similarly, by obtaining the handle
from the file descriptor:
/* obtain handle to file descriptor «fd» */
hFile = _get_osfhandle (fd);
Do not close the handle after obtaining the FileInformation, since otherwise fd will also be closed.
For directories on Win9x and for network files, one might use a hashed value of the full path of the file.
Cross compilation
For cross-compiling on a Linux system, see Volker Grabsch’s cross-compiling pages.
|
0 / 0 / 0 Регистрация: 25.11.2019 Сообщений: 26 |
|
|
06.12.2019, 14:34 [ТС] |
5 |
|
Damenikx, когда пытался загрузить в первый раз, то он ругался на старую версию pip’а, после того, как я обновил и попытался опять установить zip, консоль начала выдавать такую ошибку:
0 |
- Окна
Как установить и использовать Wget в Windows 10
- /2023
Командная строка в Windows 10 не сравнивается с терминалом в Linux. Чтобы восполнить его недостатки, в Windows можно установить такие инструменты, как wget и Cygwin, чтобы получить больше пользы от командной строки. Вот как вы можете установить и использовать wget в Windows 10.
Wget — бесплатный инструмент, но загрузка правильного файла странно сложна. Трудно сказать, какое из них следует загружать, и одно из самых популярных зеркал для EXE печально известно из-за сбоя в Windows 10. Чтобы установить wget, загрузите этот файл с Sourceforge.
Извлеките файл и запустите EXE внутри него. Установка довольно проста. За исключением лицензионного соглашения, и ничего не меняйте.

Использование Wget
Есть два способа использовать Wget в Windows 10. Это инструмент командной строки, поэтому он не имеет графического интерфейса. Вы получаете доступ к нему через командную строку. Чтобы использовать его из командной строки, вы можете либо добавить его в качестве переменной среды, либо вручную перейти в каталог, в котором находится приложение Wget, и использовать его оттуда. Второй метод не удобен, если вы собираетесь использовать этот инструмент часто, но мы собираемся подробно описать оба метода, и вы можете выбрать тот, который вам больше подходит.
CD To Wget
Это менее удобный метод. Откройте проводник и перейдите в следующую папку. Здесь будет файл Wget.exe. Вам действительно нужен только путь к этому файлу. Скопируйте его в буфер обмена.
C: Program Files (x86) GnuWin32 bin
Затем откройте командную строку и введите следующую команду, чтобы перейти в указанное место.
cd C: Program Files (x86) GnuWin32 bin
Попав в эту папку, вы можете набрать wget и использовать любые его функции и переключатели.
Добавить переменную среды
Чтобы переместиться в папку bin, Wget.exe в каждый раз, когда вы хотите использовать инструмент, занимает много времени. Если вы добавите его как переменную окружения, вы можете просто набрать wget из любого каталога и использовать его. Вам понадобятся права администратора, чтобы сделать это.
Чтобы добавить wget в качестве переменной среды, откройте проводник и вставьте следующее в адресную строку.
Панель управления Система и безопасность Система
В левом столбце щелкните «Дополнительные параметры системы». В открывшемся окне нажмите Переменные среды. В окне «Переменные среды» выберите «Путь» в верхней части раздела и нажмите «Изменить».

В открывшемся окне нажмите New, затем нажмите кнопку обзора. Введите это место;
C: Program Files (x86) GnuWin32 bin

Нажмите Ok в каждом окне, чтобы выйти.
Теперь, когда вы открываете командную строку, вы можете ввести wget независимо от того, в каком каталоге / папке вы находитесь, и вы сможете получить доступ к этому приложению и использовать его команды.
