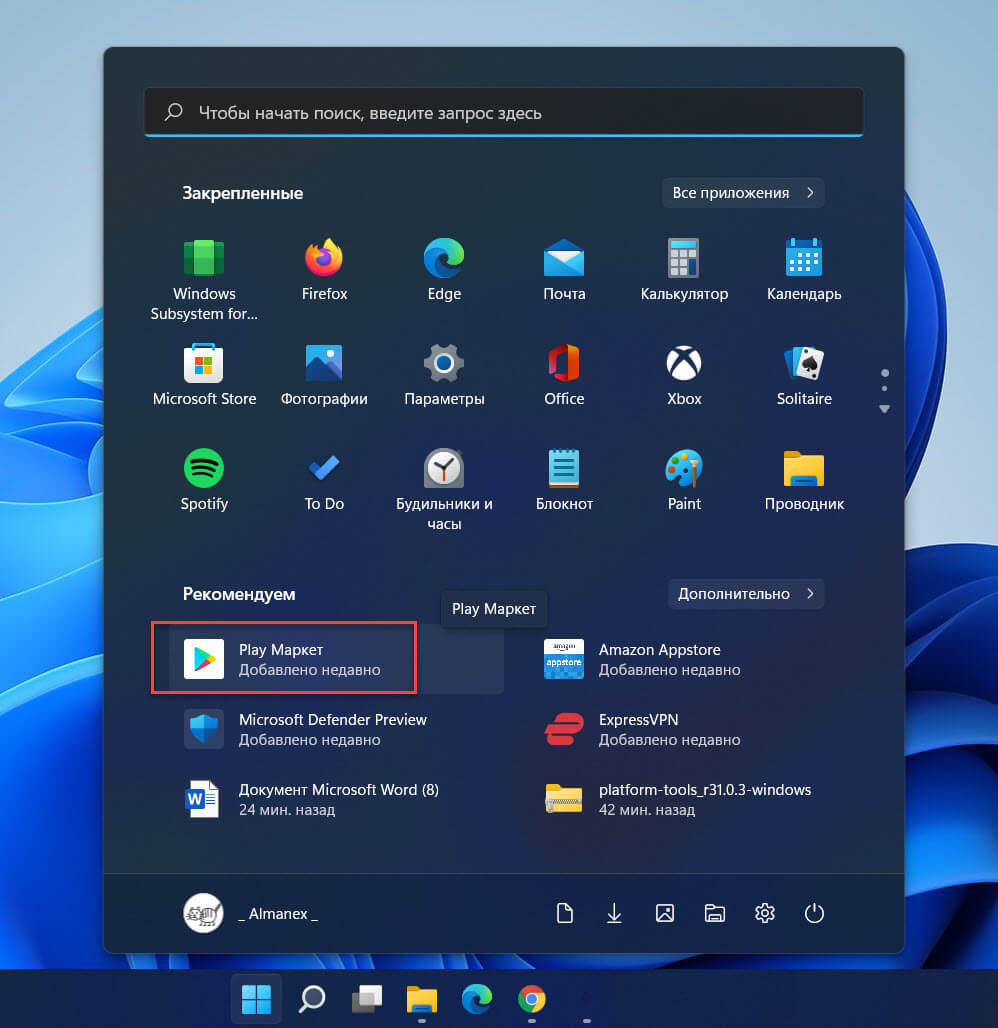
Энтузиаст смог установить Google сервисы и приложения на WSA. Оригинал тут.
Я же попробую описать это в виде инструкции, и предоставить готовый архив, для тех кому лень вводить кучу команд в терминал или устанавливать WSL.
Внимание, после установки WSA, перестает запускаться эмулятор Android Studio. С этой проблемой еще не разобрался! И не говорите потом, что я вас не предупреждал 
Для ленивых — архив с готовой директорией для установки WSA. Распаковать строго в папку C:WindowsSubsystemAndroid. После этого перейти к пункту Установка WSA с Google приложениями. То что ниже пропустить.
Как понятно из второго абзаца данной статьи, для установки WSA c Google сервисами и приложениями необходимо наличие установленной WSL. Если она не установлена, это не проблема, запускаем PowerShell от имени администратора и вводим команду
wsl –installОстальная установка интуитивно понятна и в комментариях не нуждается
Скачивание файлов:
-
Скачиваем WSA подробнее тут, в конце статьи в разделе UPD1 (далее файл_1)
-
Скачиваем репозиторий в виде архива .zip (далее файл_2)
-
Переходим на сайт opengapps , выбираем параметры platform: x86_64, android: 11, variant: pico и скачиваем архив. (далее файл_3)
Подготовка установочных файлов:
-
Создаем папку C:WindowsSubsystemAndroid
-
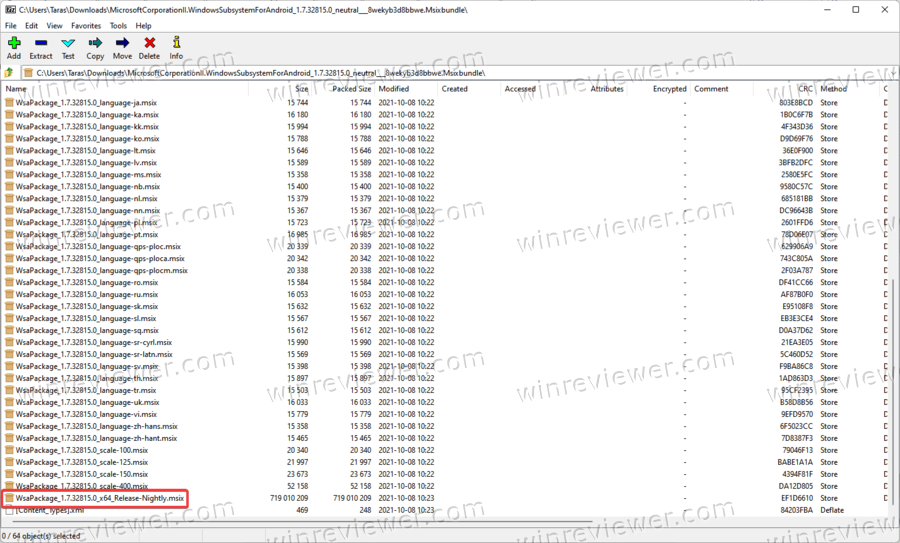
Открываем архиватором файл_1. Находим в архиве файл вида «WsaPackage_XXX_x64_Release-Nightly.msix» размер более 700мб, у меня находился в самом конце списка. И открываем этот файл так же архиватором
-
В открывшемся архиве выделяем все файлы и папки, снимаем выделение с папки AppxMetadata и файлов [Content_Types].xml AppxBlockMap.xml AppxSignature.p7x выделенное копируем и вставляем в папку C:WindowsSubsystemAndroid
-
Создаем папку C:GAppsWSA и разархивируем туда репозиторий файл_2 из пункта скачивания файлов
-
Переходим в директорию C:GAppsWSA#GAPPS и кладем туда архив файл_3. ВНИМАНИЕ, разархивировать не нужно!
-
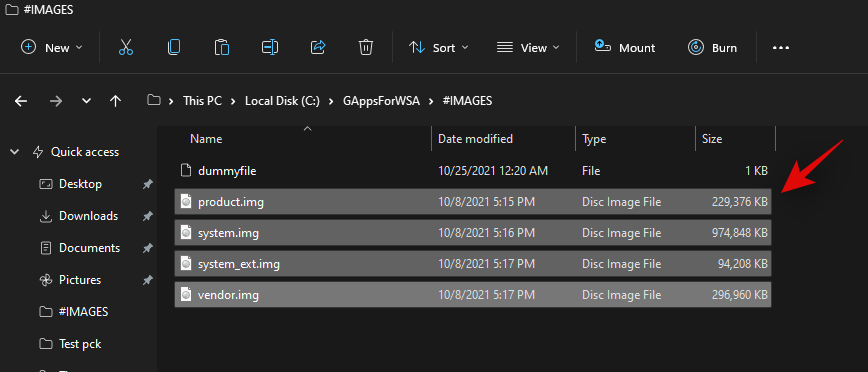
Переходим в директорию C:WindowsSubsystemAndroid копируем из нее 4 файла: product.img vendor.img system_ext.img system.img в папку C:GAppsWSA#IMAGES
-
Открываем консоль WSL
-
Вводим команду:
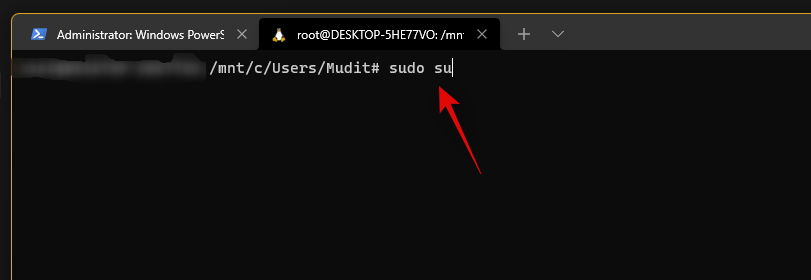
sudo su -
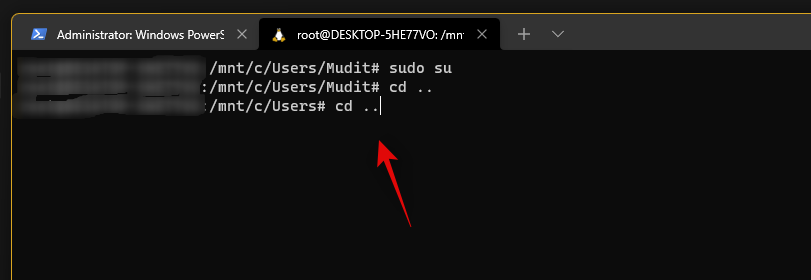
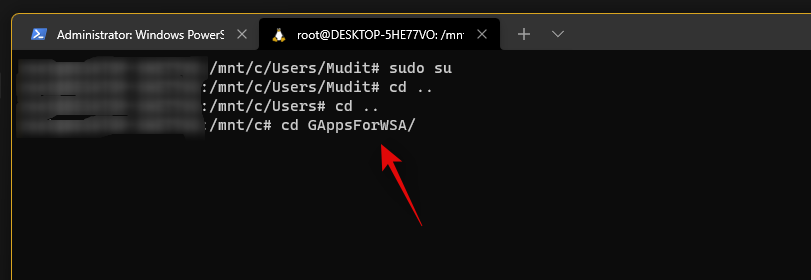
Меняем в консоли директорию на C:GAppsWSA (команды cd)
-
Выполняем команду
sudo apt-get update -
Выполняем команду
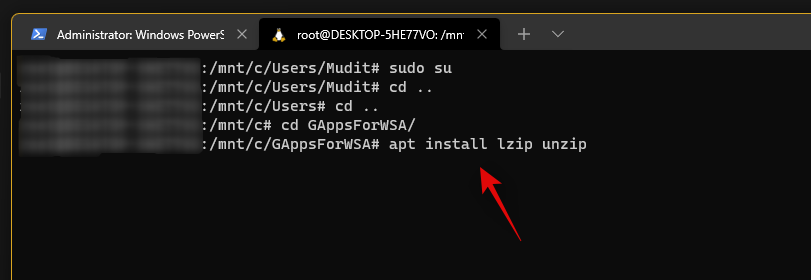
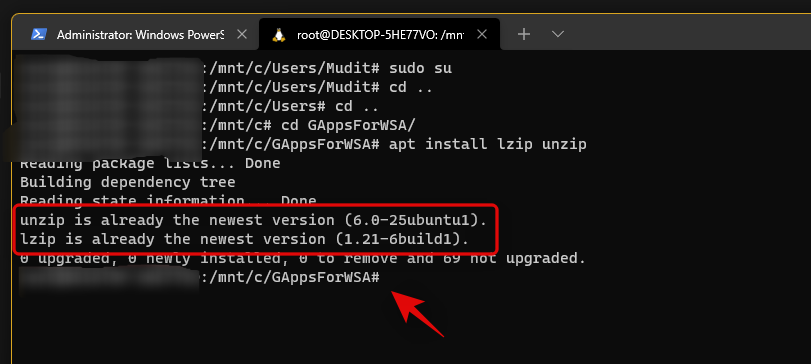
sudo apt-get install unzip lzip -
Выполняем команду
apt install lzip unzip -
Выполняем команду
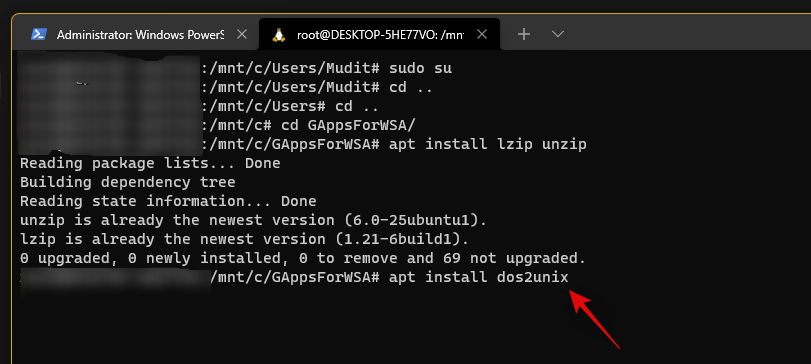
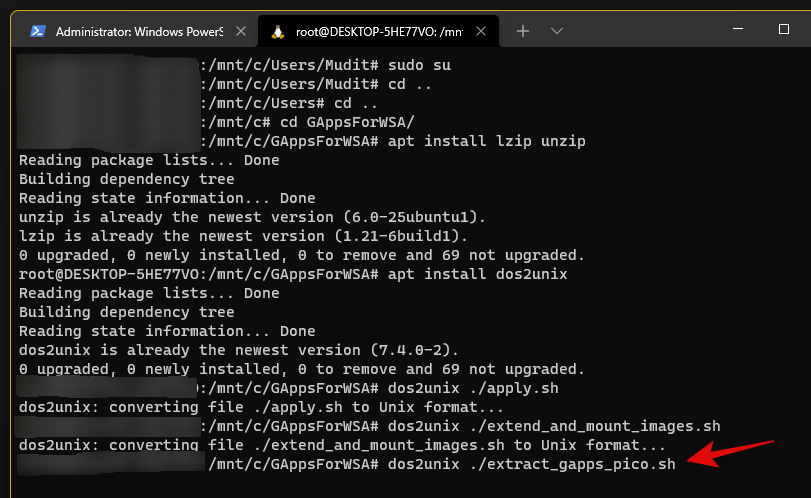
apt install dos2unix -
Выполняем команду
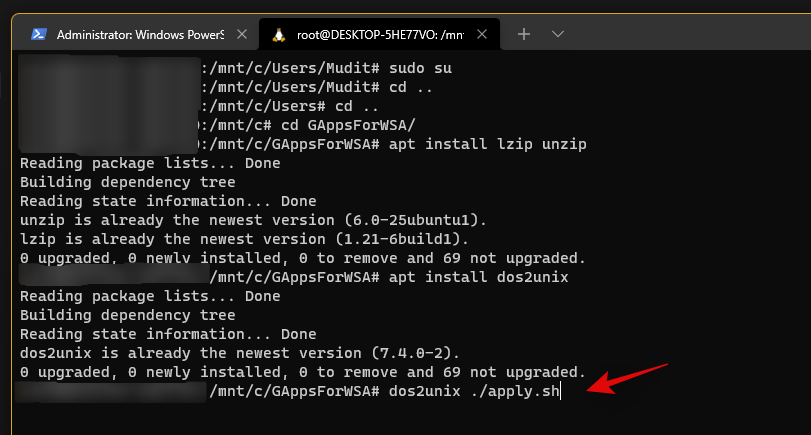
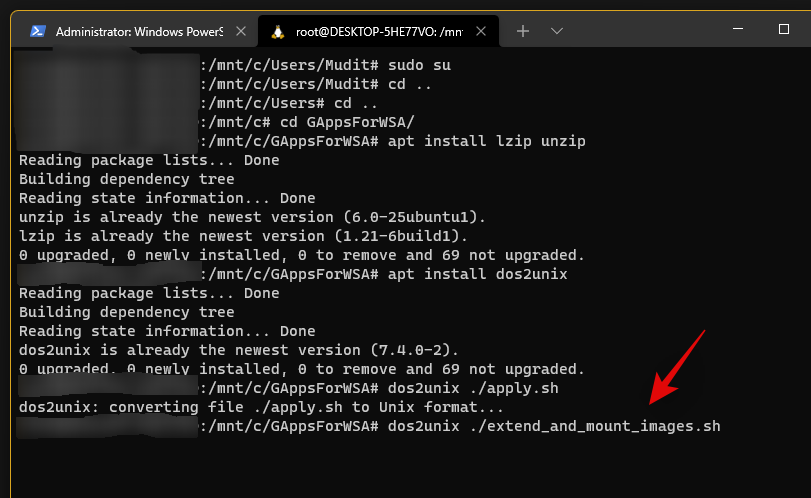
dos2unix apply.sh -
Выполняем команду
dos2unix extend_and_mount_images.sh -
Выполняем команду
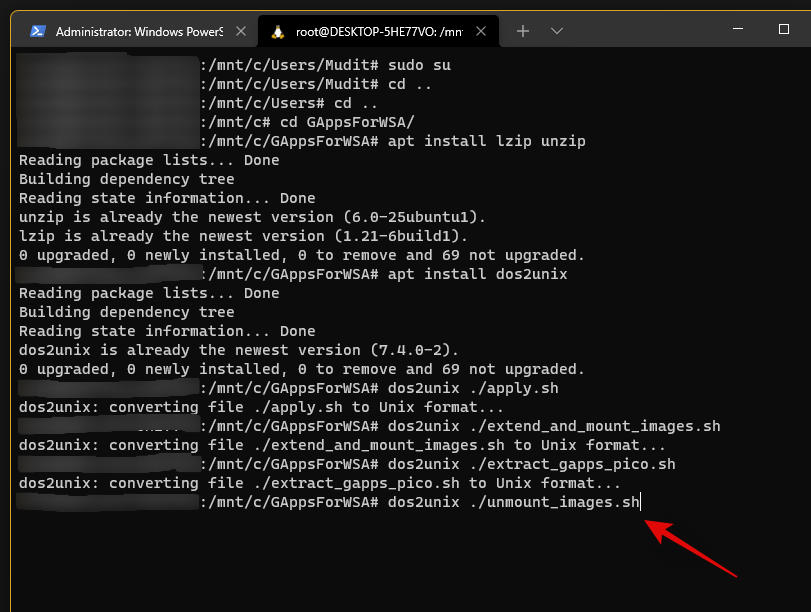
dos2unix extract_gapps_pico.sh -
Выполняем команду
dos2unix unmount_images.sh -
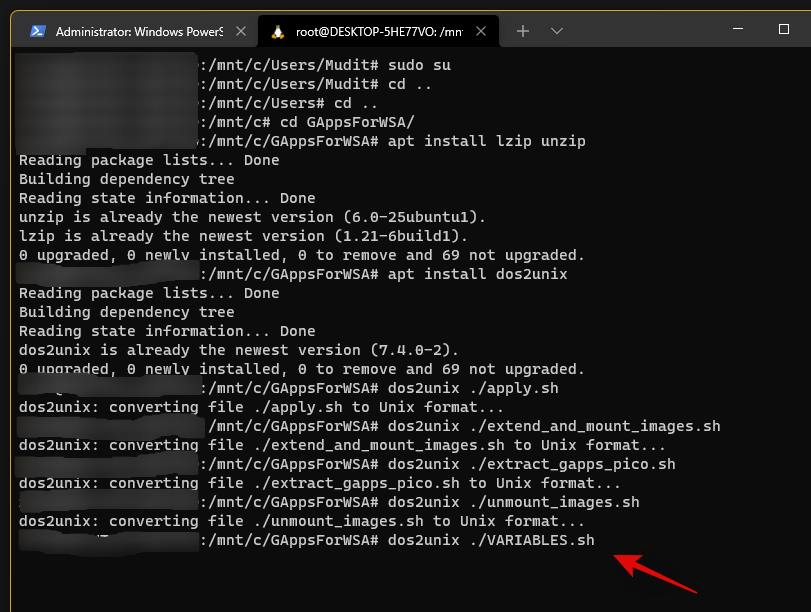
Выполняем команду
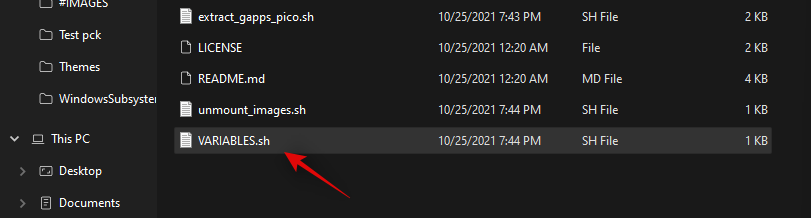
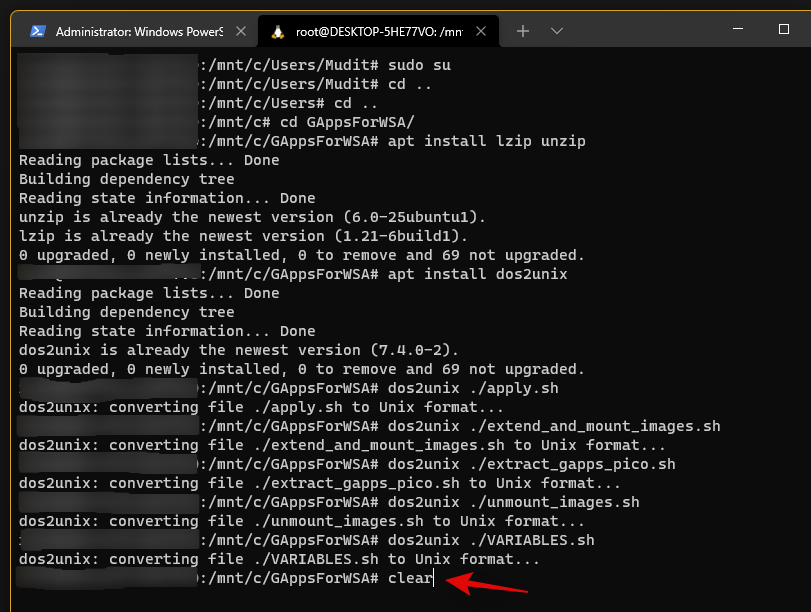
dos2unix VARIABLES.sh -
Выполняем команду
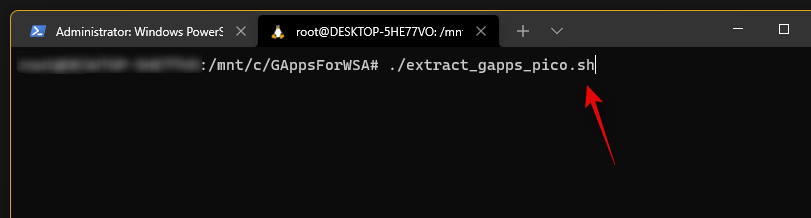
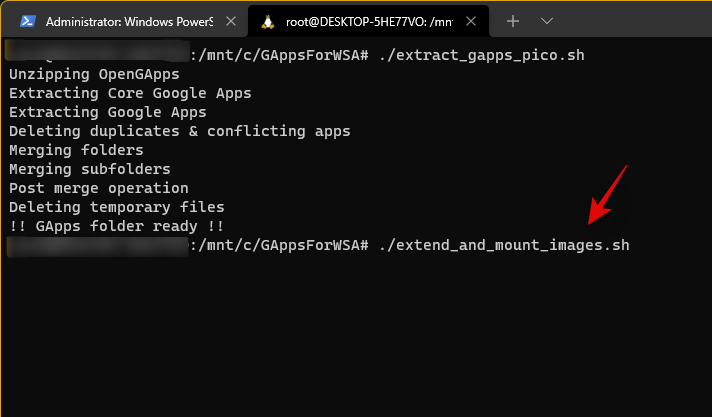
./extract_gapps_pico.sh -
Выполняем команду
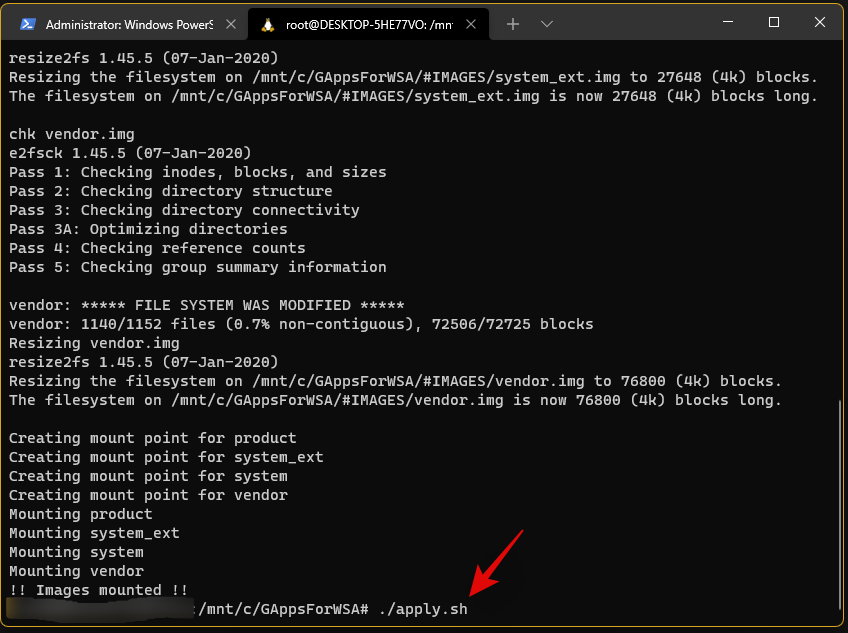
./extend_and_mount_images.sh -
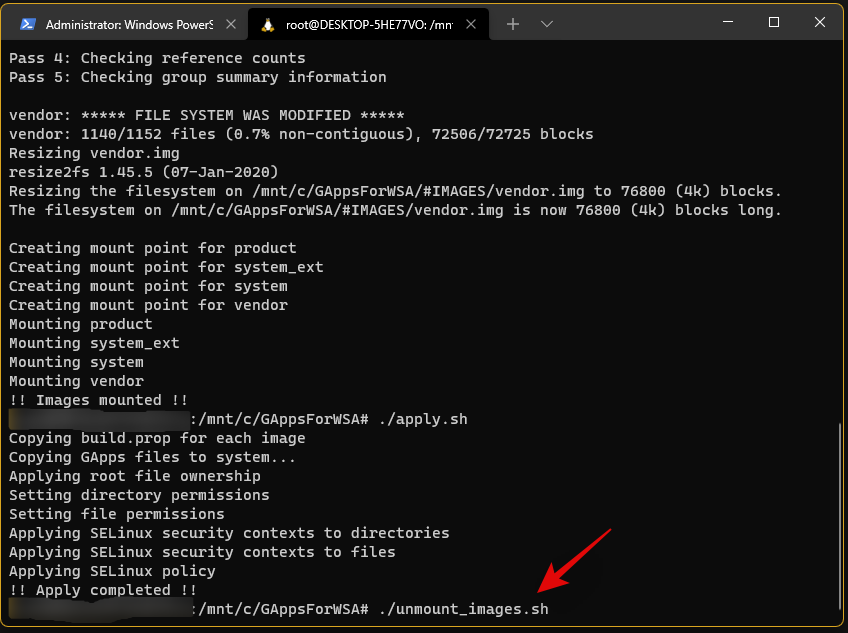
Выполняем команду
./apply.sh -
Выполняем команду
./unmount_images.sh -
Переходим в директорию C:GAppsWSA#IMAGES копируем из нее 4 файла product.img vendor.img system_ext.img system.img в папку C:WindowsSubsystemAndroid
-
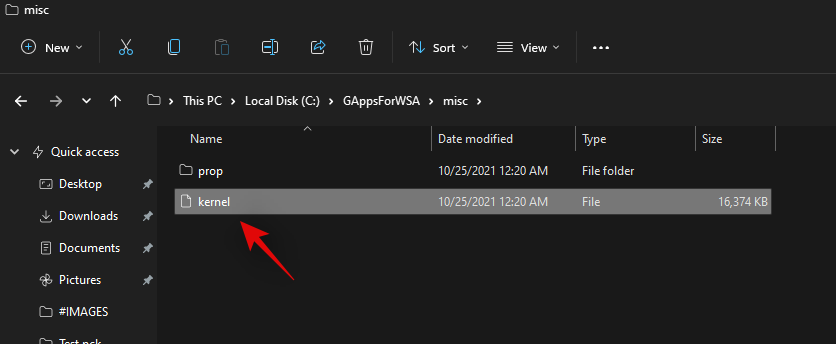
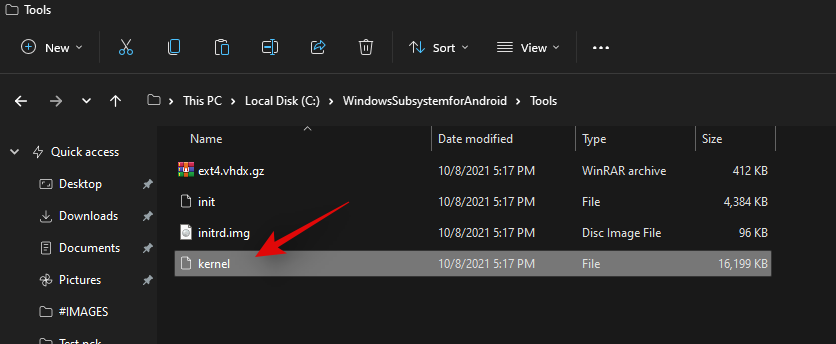
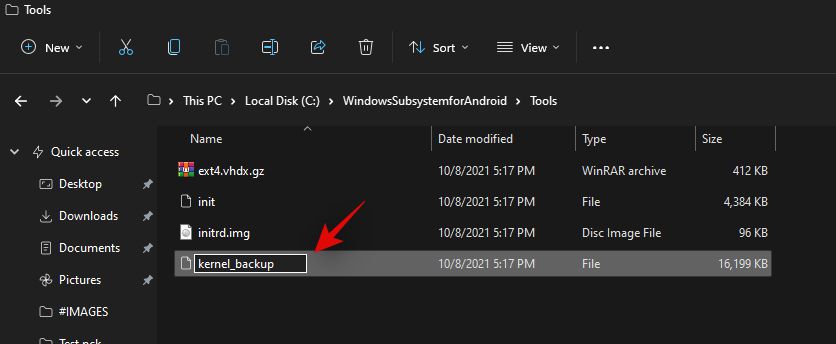
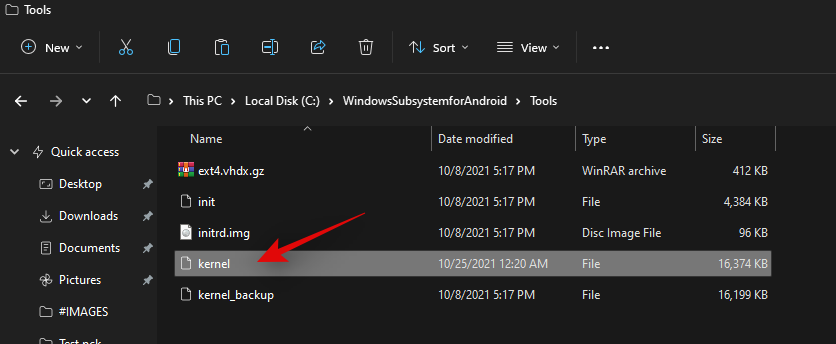
Переходим в директорию C:WindowsSubsystemAndroidTools переименовываем файл kernel в kernel_bak
-
Копируем файл kernel из C:GAppsWSAmisc в C:WindowsSubsystemAndroidTools
Установка WSA с Google приложениями. Сюда переходим, если скачали готовый архив и не делали инструкцию выше
Для дальнейшей установки необходимо включить developer mode в Windows. Как включить посмотреть можно тут
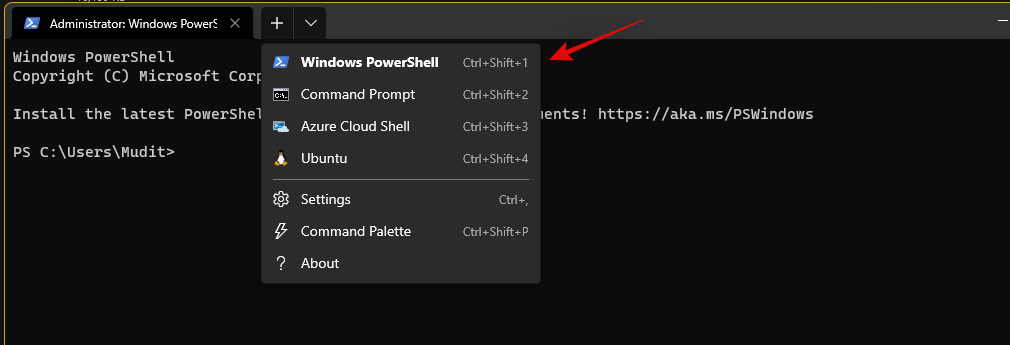
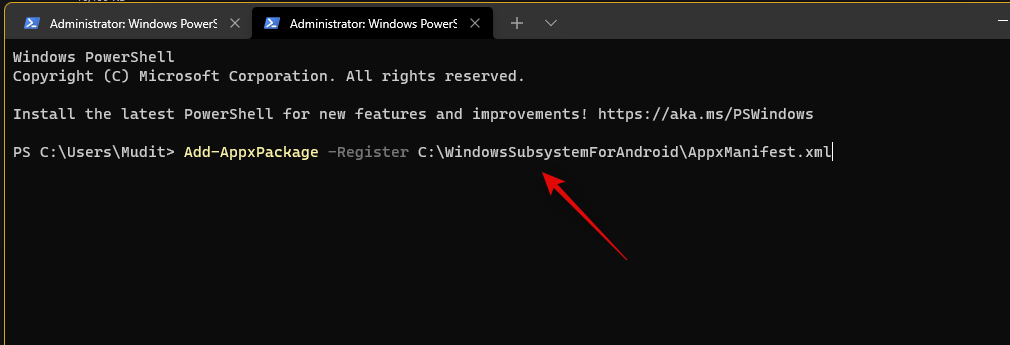
Запускаем PowerShell от имени администратора
-
Выполняем команду
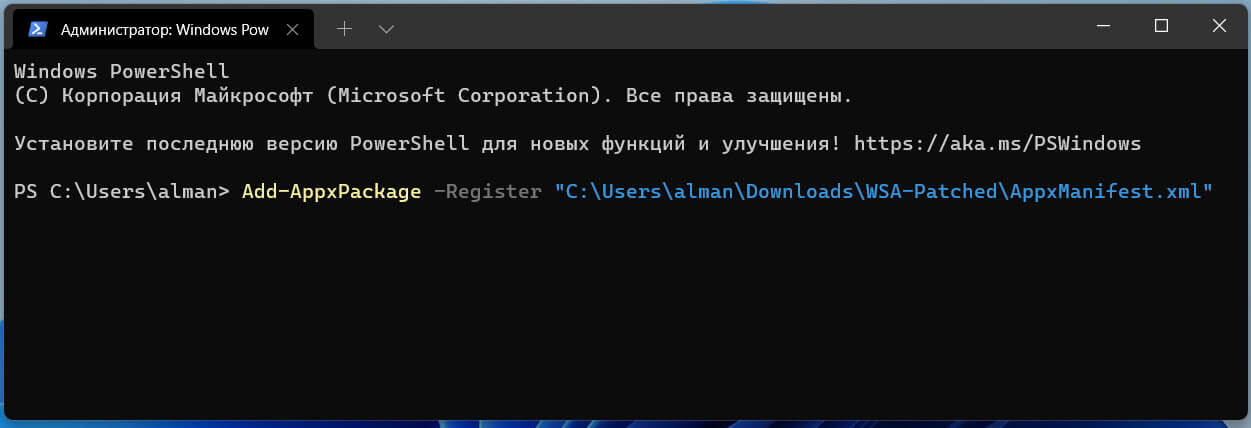
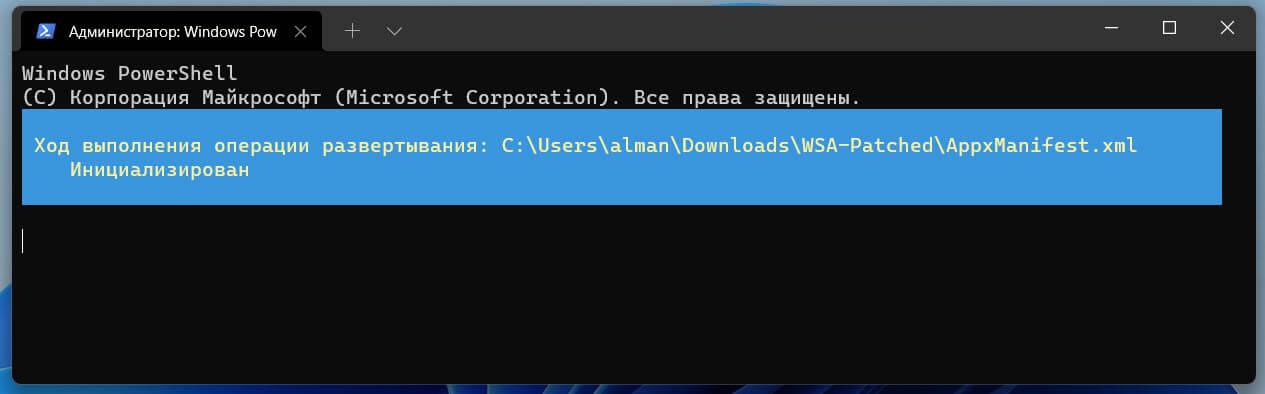
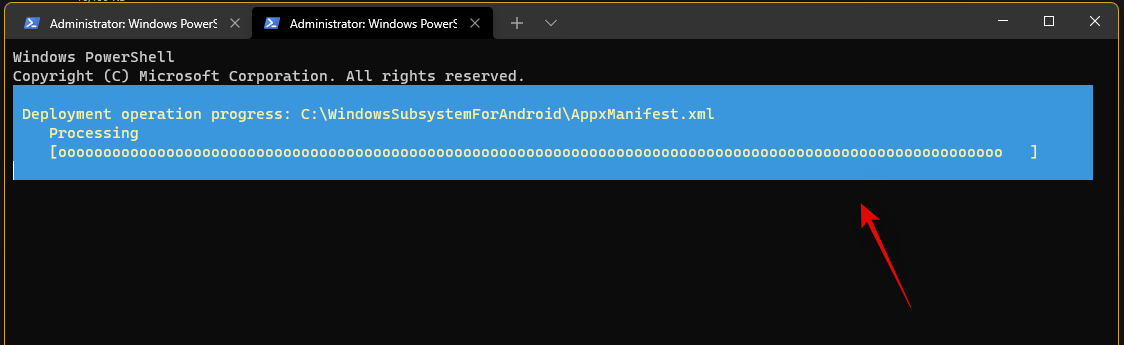
Add-AppxPackage -Register C:WindowsSubsystemAndroidAppxManifest.xml
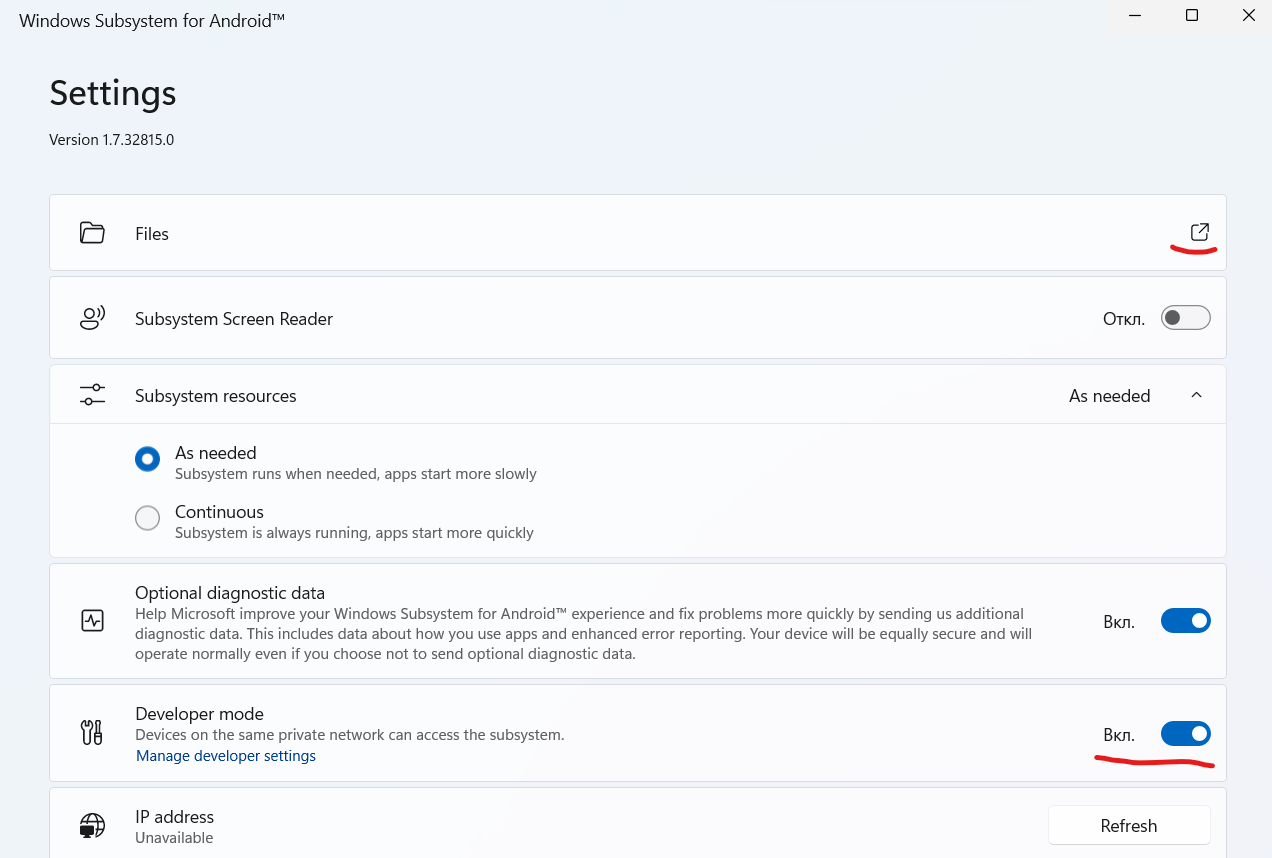
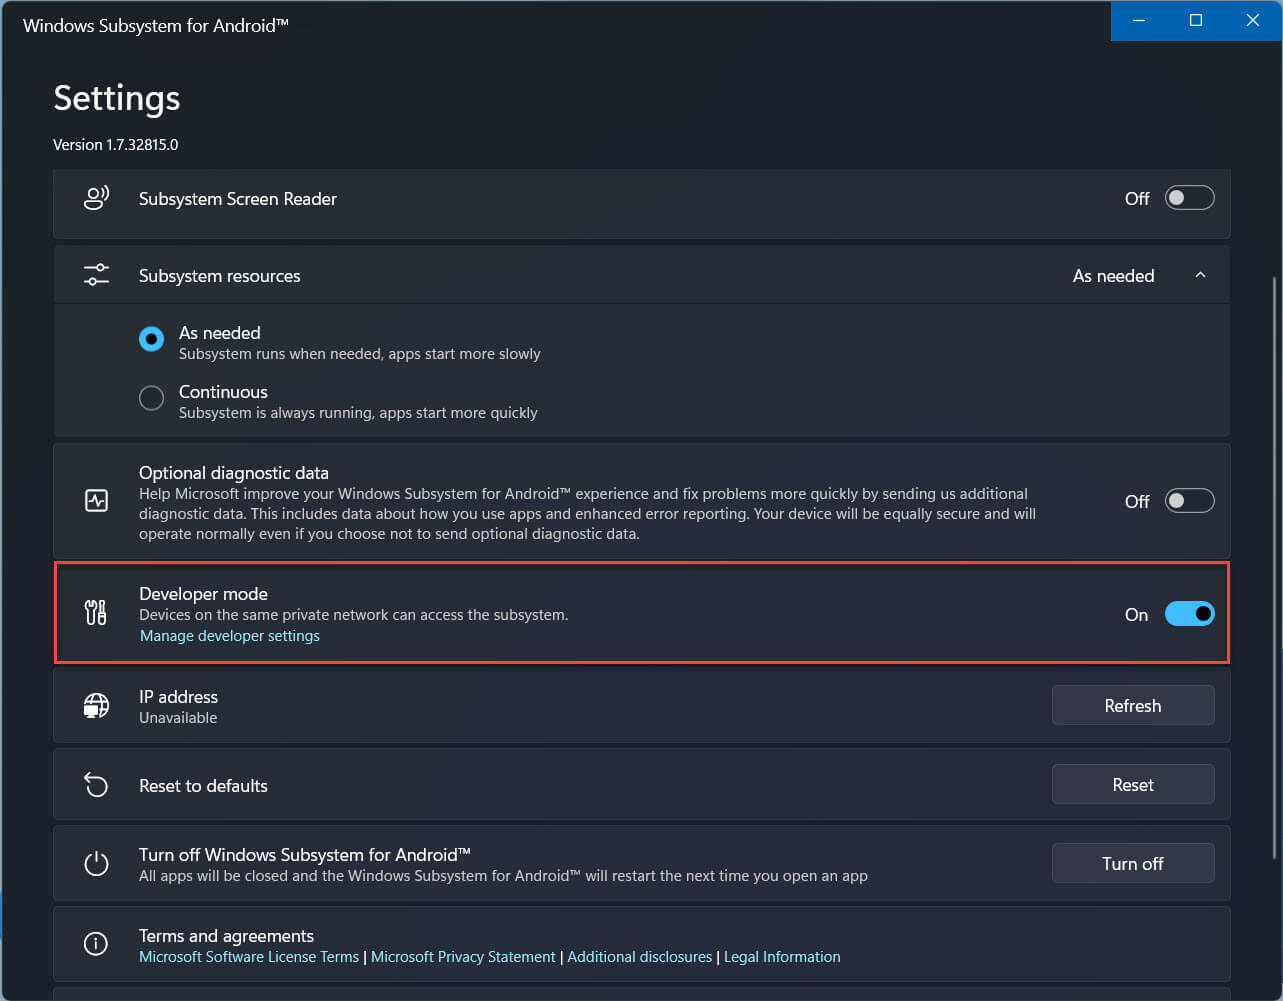
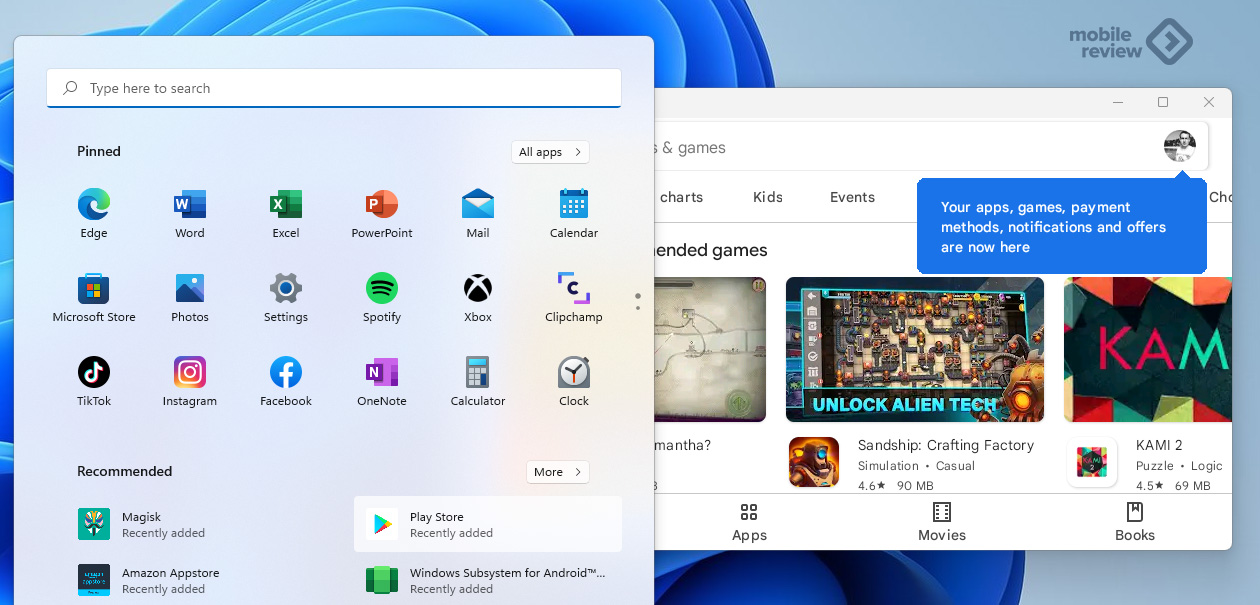
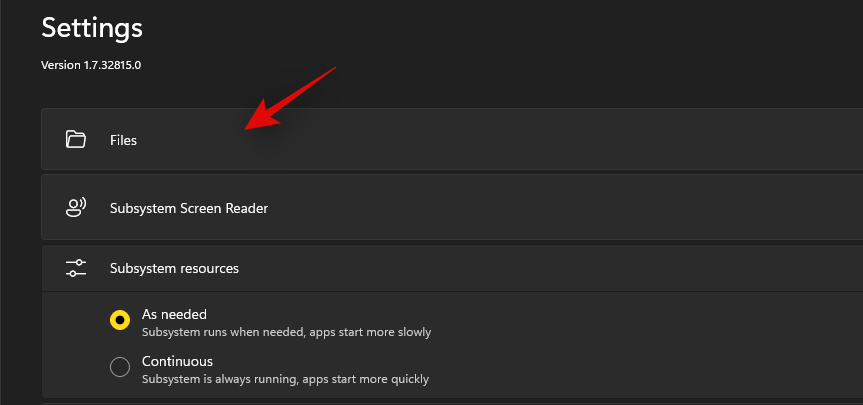
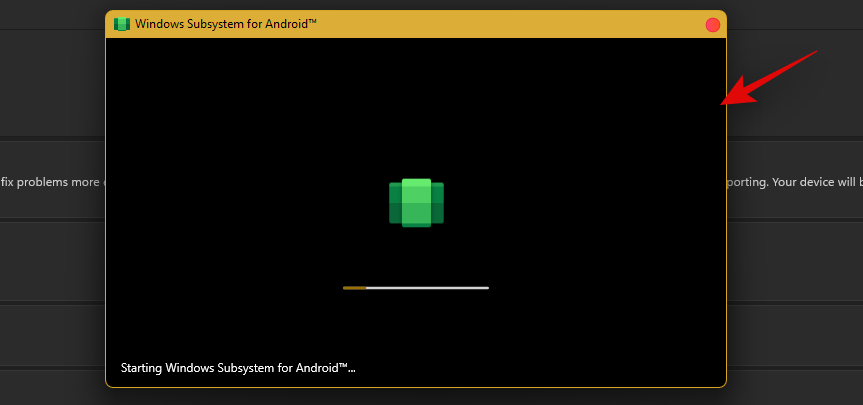
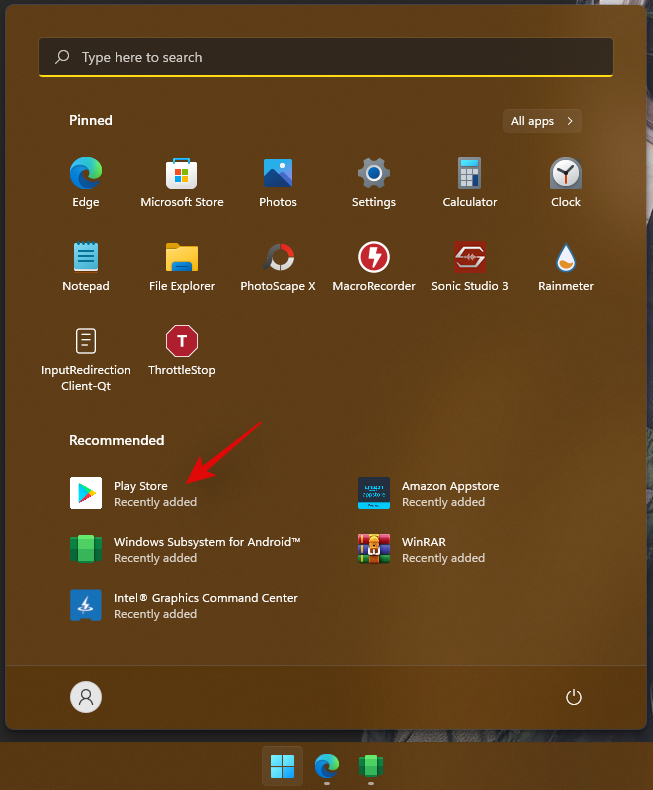
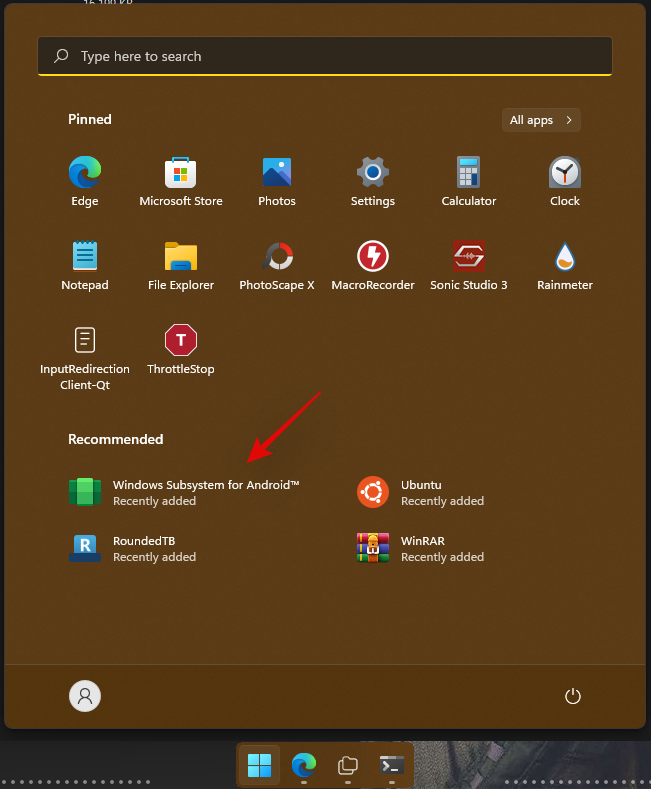
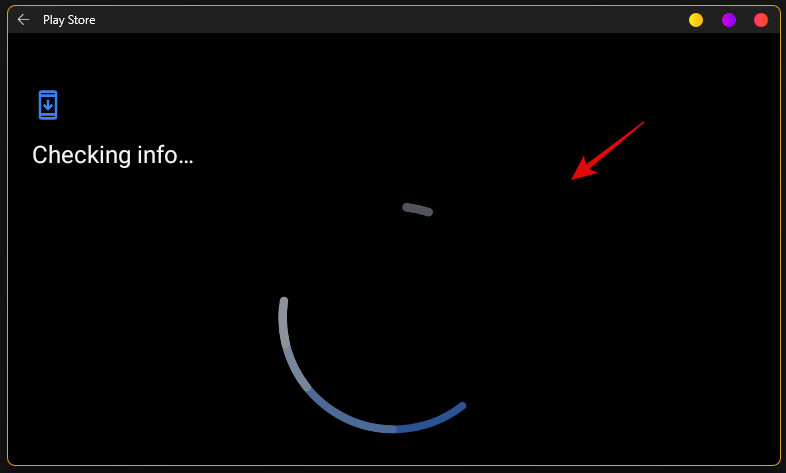
WSA установлена, запускаем ее из меню пуск. Включаем Developer Mode, и запускаем подсистему значком рядом с пунктом Files. Авторизовываться в Google пока рано! еще немного терпения
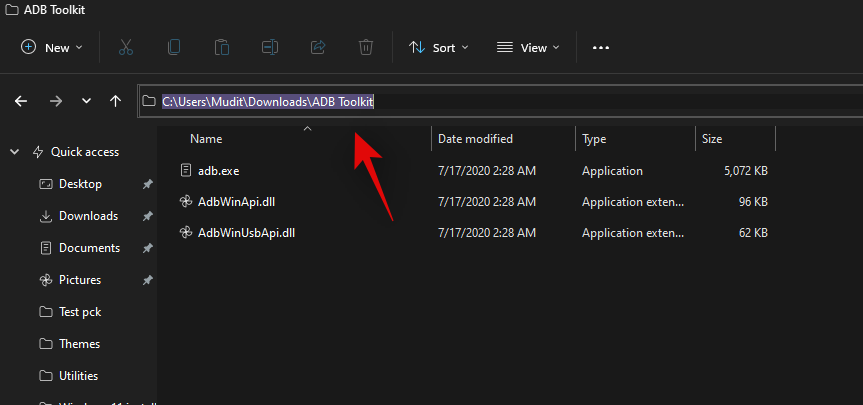
Скачиваем ADBKit и разархивируем его в папку C:ADBKit
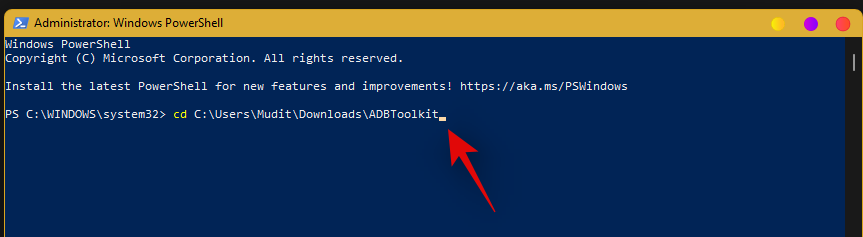
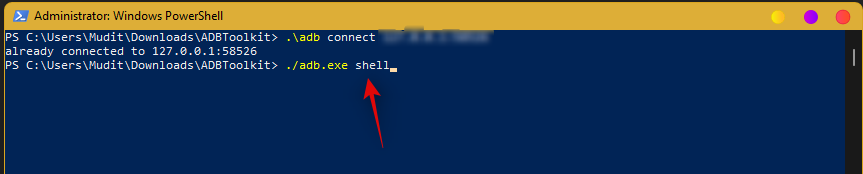
В PowerShell переходим в директорию C:ADBKit. Далее выполняем команды
-
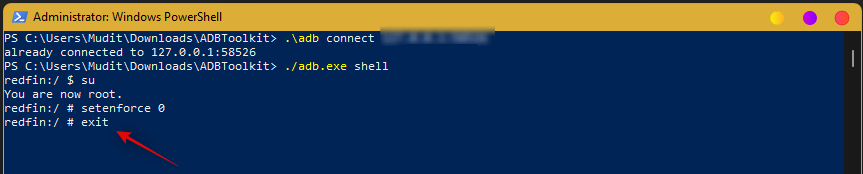
.adb.exe connect 127.0.0.1:58526 -
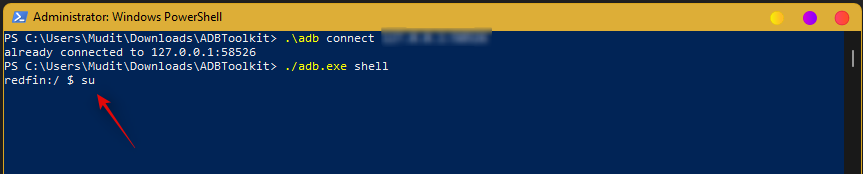
.adb.exe shell -
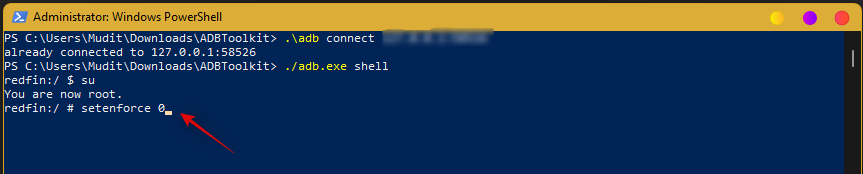
su -
setenforce 0
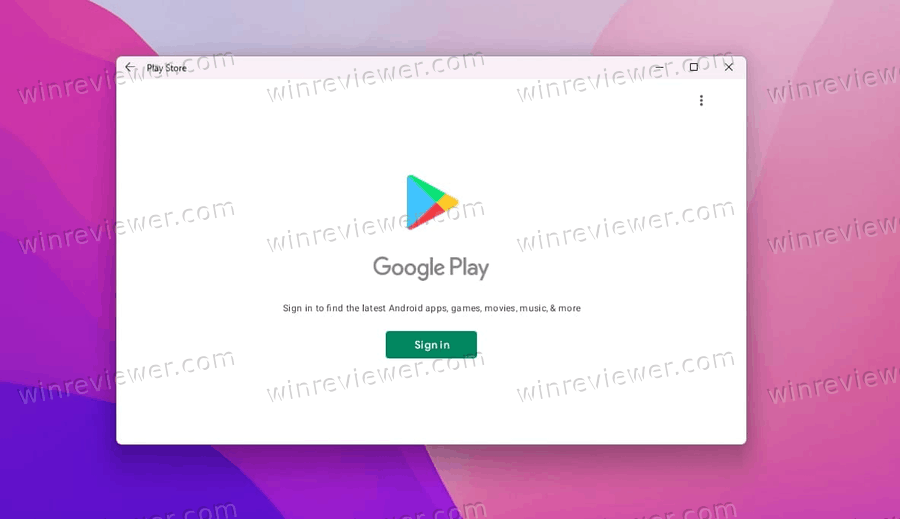
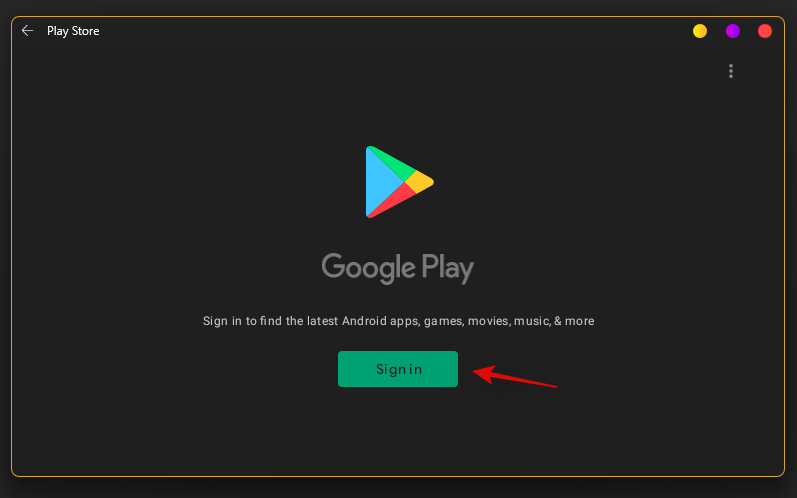
После этого можно авторизовываться в Google.
Осталось пару шагов.
-
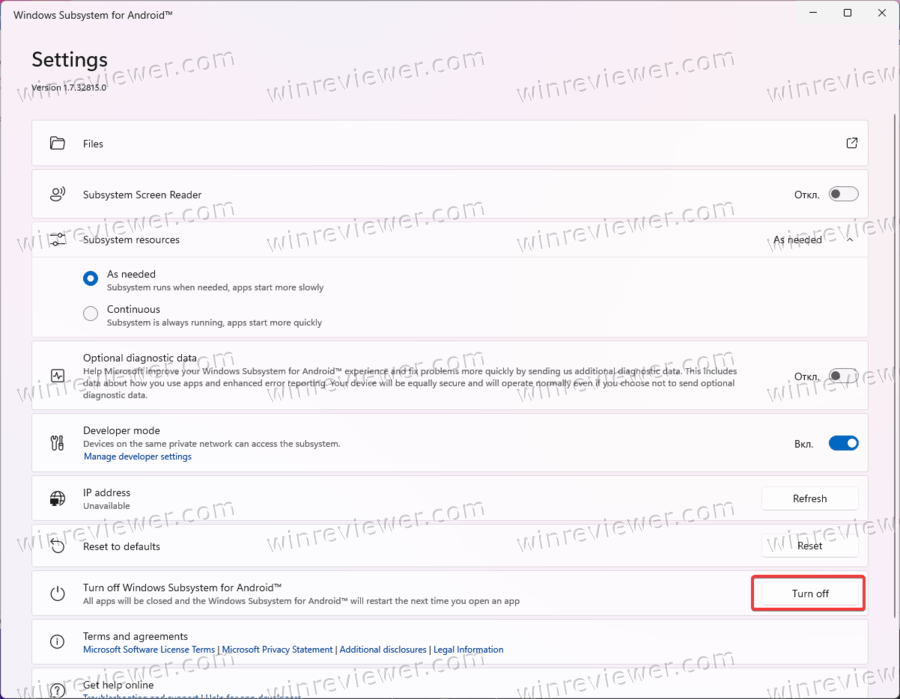
Выключаем WSA, для этого нажимаем кнопку «Turn off» в настройках
-
Переходим в директорию C:WindowsSubsystemAndroidTools
-
Файл kernel переименовываем в kernel_root
-
Файл kernel_bak переименовываем в kernel
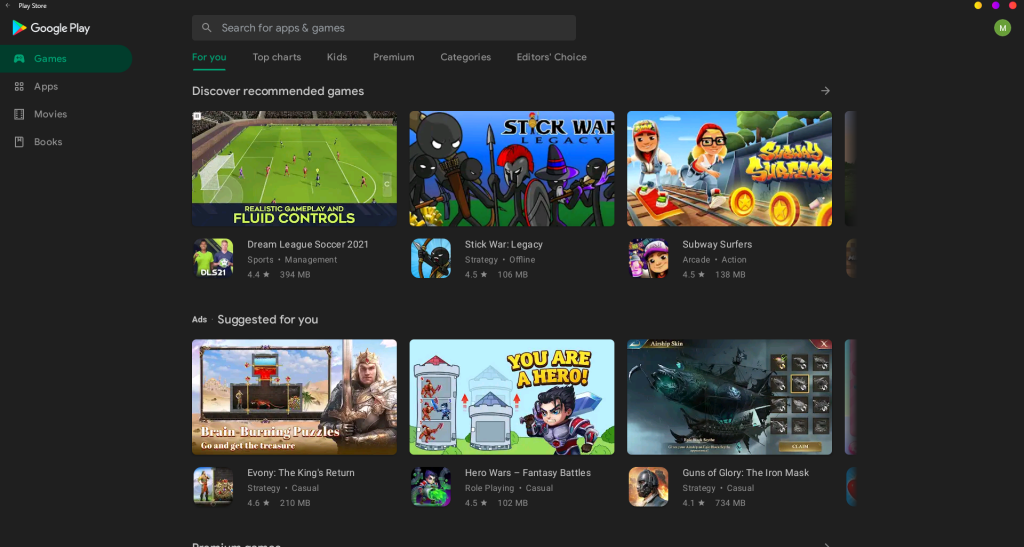
Можно пользоваться Google Play и устанавливать оттуда приложения. Полноценно оценить какие работают а какие нет — еще не успел, возможно разберу позже
Надеюсь помог тем кто хотел это опробовать)
P.S устройство определяется как Google Pixel 5

В Windows 11 с помощью подсистемы Windows для Android (WSA) вы можете установить магазин Google Play Store, загружать и устанавливать любые приложения Android на свой компьютер с помощью определенных действий, которые включает в себя множество шагов.
Это был просто вопрос времени, теперь вы можете устанавливать Android приложения из Play Store в Windows 11, но не официально. Пользователь твиттера — ADeltaX, разработал процедуру, позволяющую обойти подсистему Windows для Android и установить приложение Google Play Store, что дает вам доступ в Windows 11 ко всему каталогу приложений для Android.
Пока, неясно, как это повлияет на будущие обновления. Другими словами, данный способ вполне может быть только временным решением, поскольку до сих пор не понятно, что произойдет после того, как WSA получит обновление через Магазин Microsoft. Вероятно, любому, кто использует этот метод, придется повторить весь процесс настройки. Конечно, если вы не отключите автоматическое обновление приложений в параметрах приложения Магазин Microsoft.
Этот способ установки магазина Google Play Store в Windows 11 является сокращением инструкций ADeltaX, но, если есть желание, вы можете следовать полной инструкции из репозитория Github.
Следуйте шагам ниже, чтобы установить магазин приложений Google и иметь возможность устанавливать приложения для Android в Windows 11.
Подготовка компьютера с Windows 11 для установки WSA
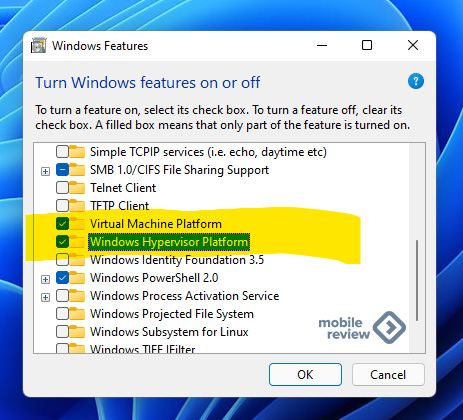
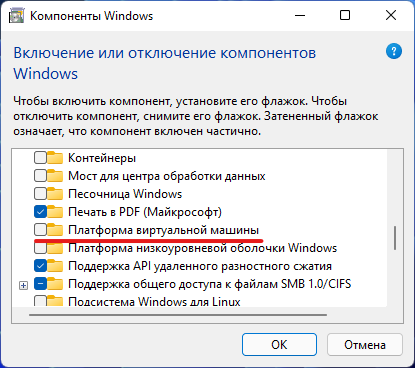
Прежде чем перейти к загрузке и установке, необходимо убедиться, что на вашем компьютере включены дополнительные функции Hyper-V и Virtual Machine Platform.
Шаг 1: Для этого, нажмите сочетание клавиш Win R, чтобы открыть диалоговое окно «Выполнить».
Шаг 2: Введите или скопируйте и вставьте:
OptionalFeatures
Шаг 3: Здесь в окне «Компоненты Windows» для «Hyper-V» и «Платформа виртуальной машины» установите флажок, чтобы включить его.
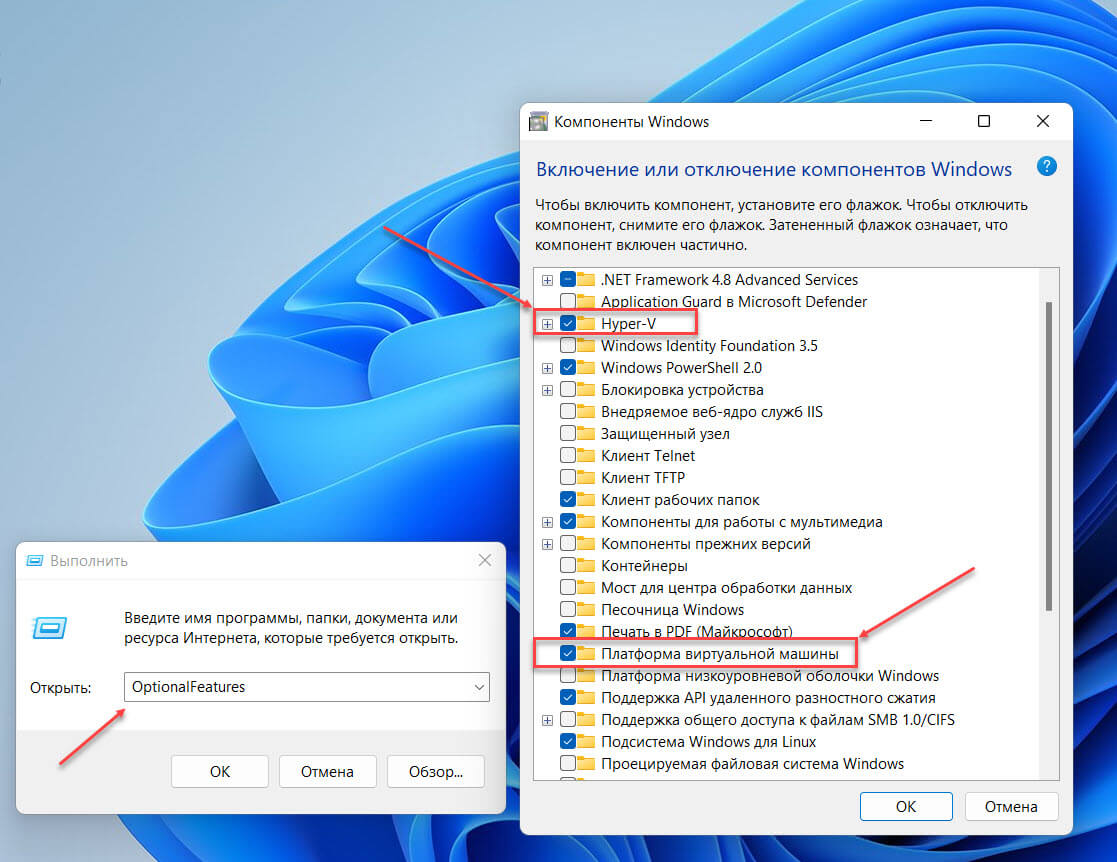
Шаг 4: Нажмите кнопку «ОК», чтобы установить эти дополнительные функции на свой компьютер с Windows.
Удалите любой ранее установленный пакет WSA
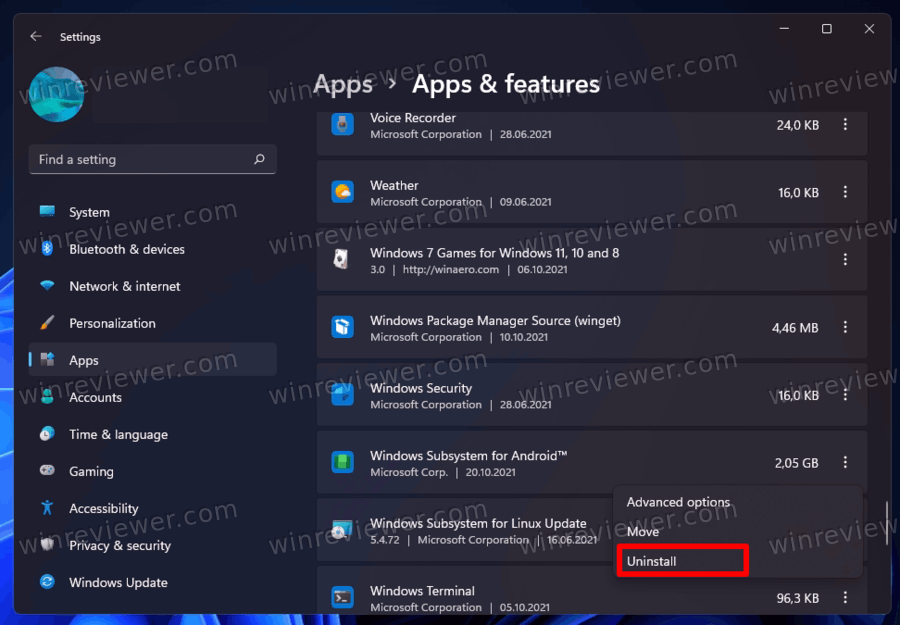
Удалите подсистему Windows для Android, если она уже установлена. Это связано с тем, что мы будем устанавливать новую подсистему Windows для Android, в которой существует интеграция Google Apps.
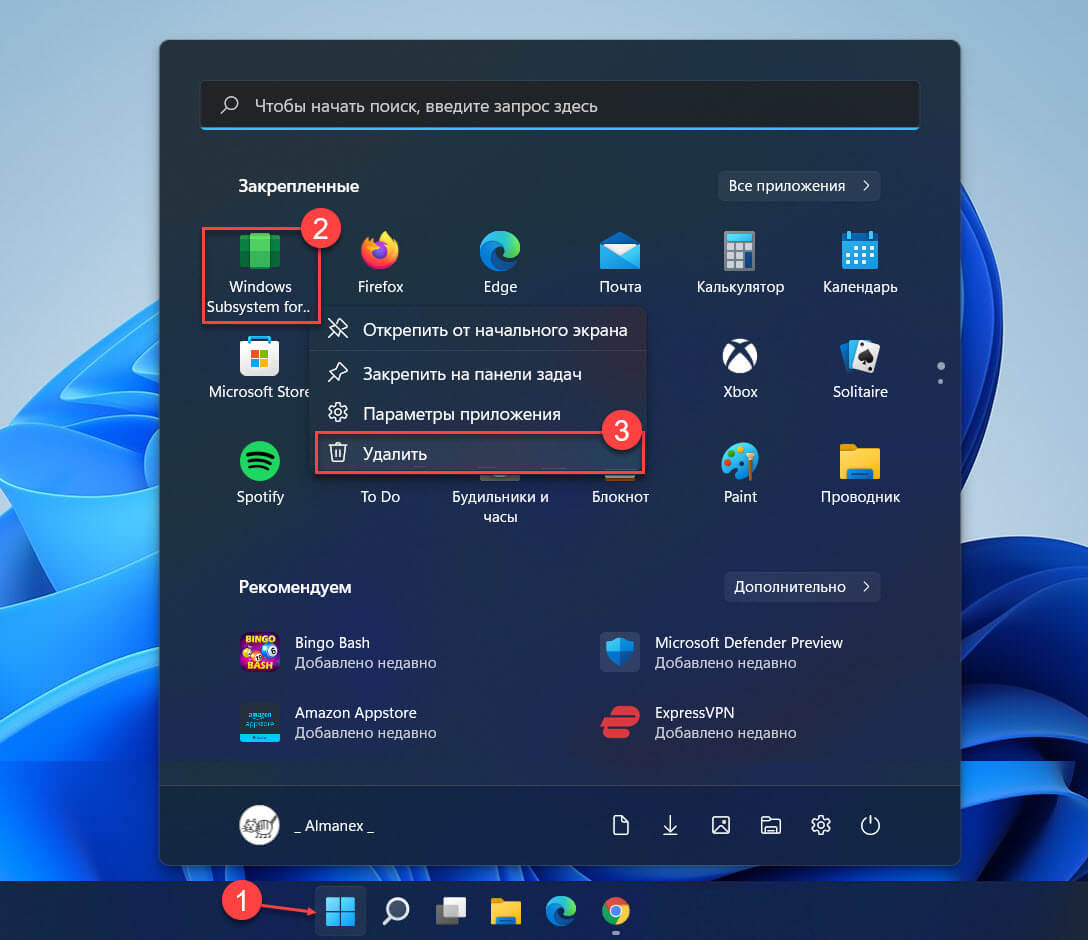
Шаг 5: Для этого, откройте меню «Пуск», найдите и кликните на подсистему «Windows Subsystem for Android» правой кнопкой мыши и выберите в контекстном меню пункт «Удалить». Затем следуйте инструкциям на экране, чтобы завершить процесс удаления.
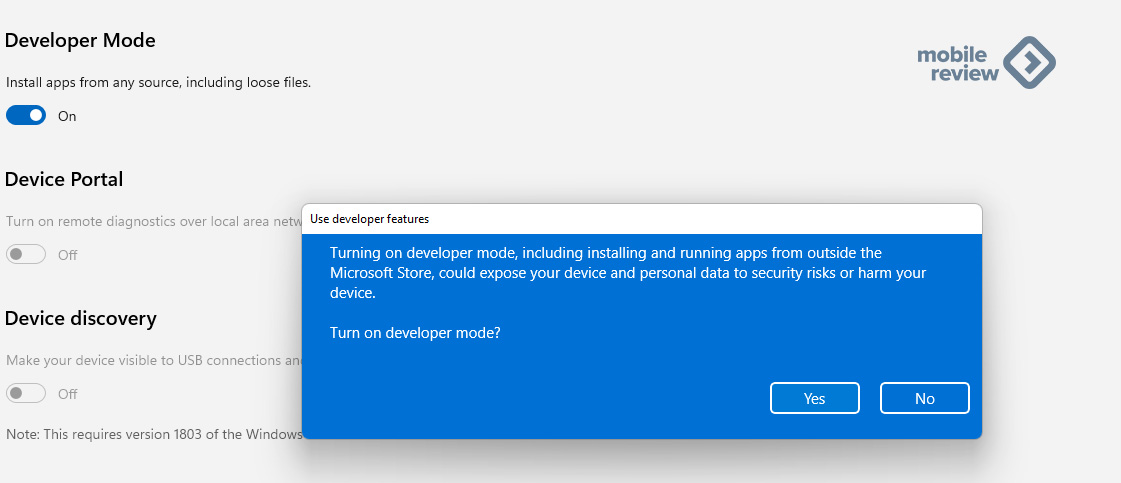
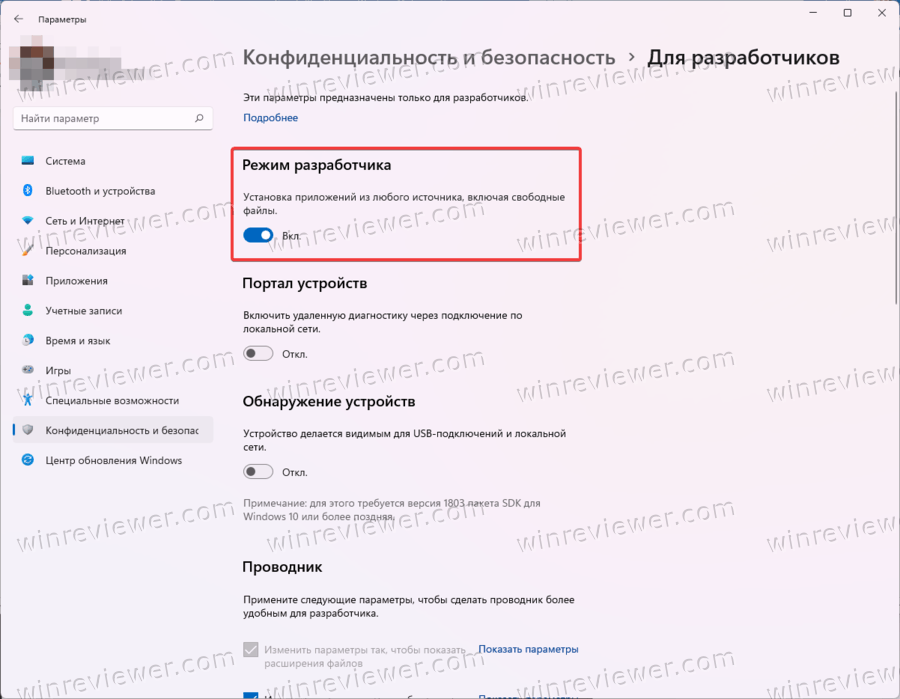
Включите параметры разработчика в Windows 11.
Вам нужно будет включить параметры разработчика в Windows (в Windows 11, а не в WSA!).
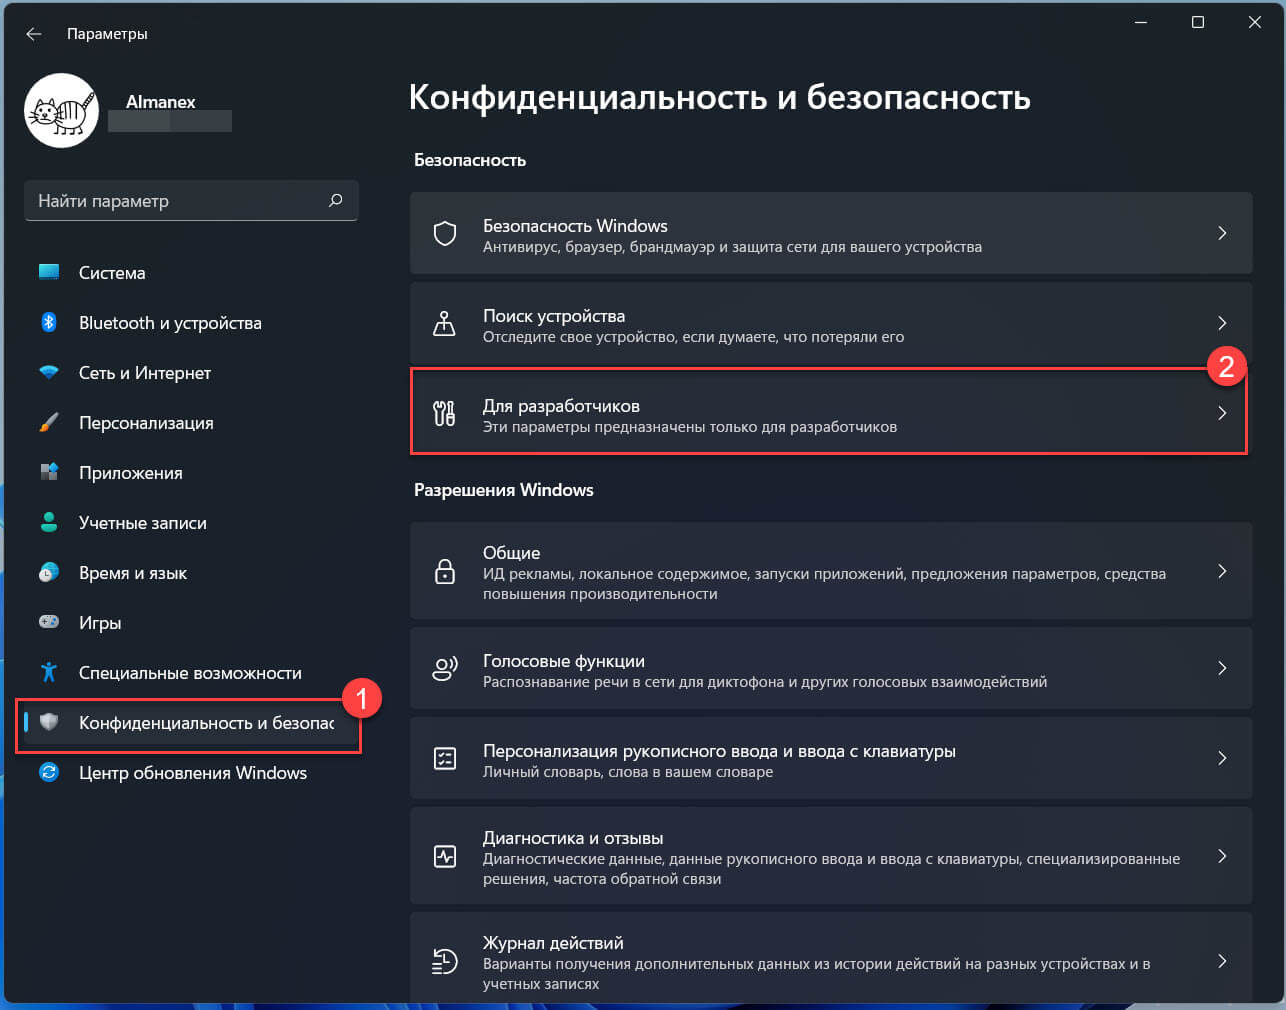
Шаг 6: Откройте параметры Windows 11, перейдите в раздел «Конфиденциальность и безопасность» → «Для разработчиков».
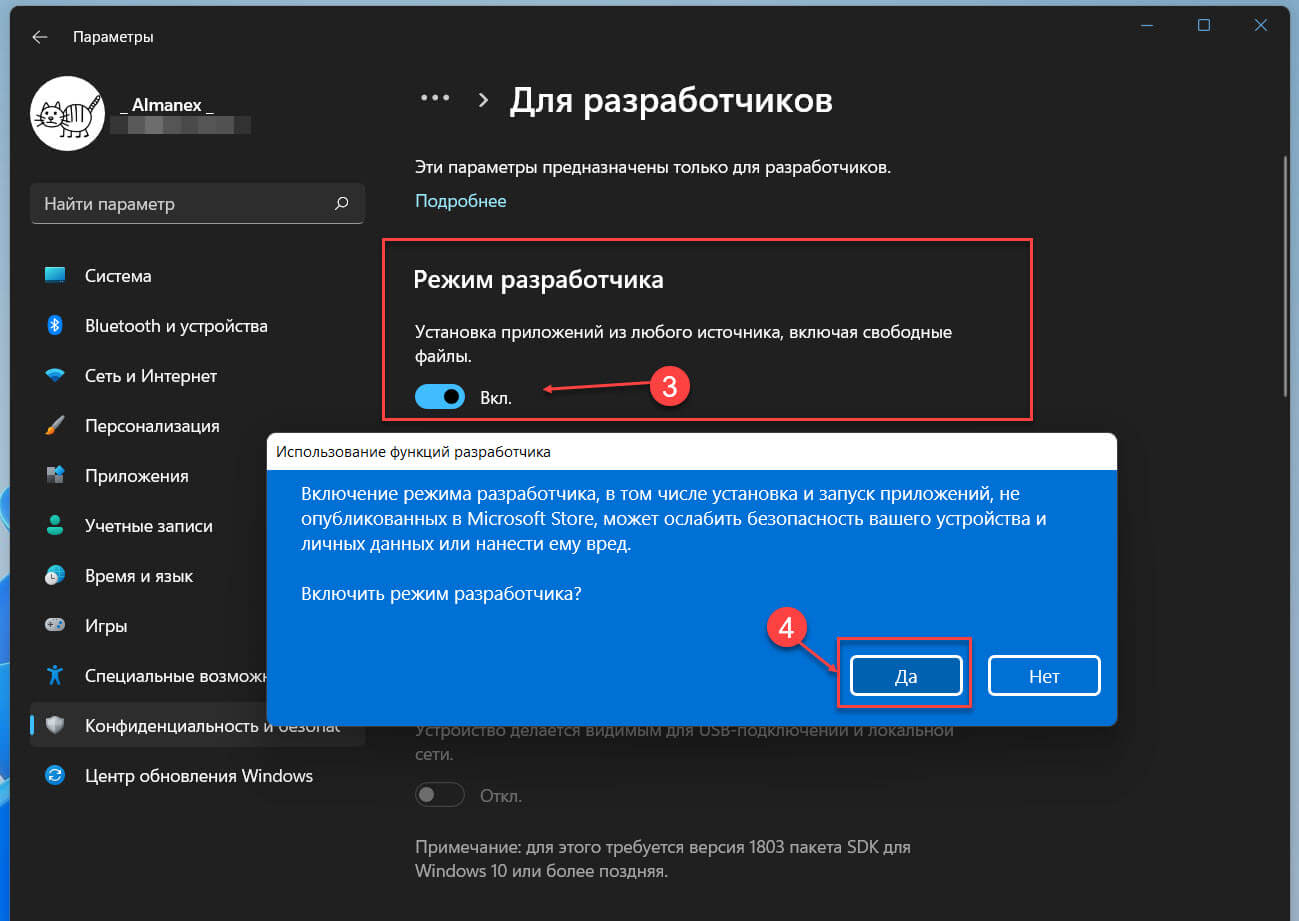
Шаг 7: В разделе режим разработчика передвиньте ползунок переключателя в положение «Вкл.»
Шаг 8: В следующем всплывающем окне подтвердите свои действия нажав кнопку «Да».
Загрузите WSA + GApps пакет MSIX:
Выберите для загрузки файл в зависимости от вашего устройства.
Шаг 9: Это модифицированная версия – «Windows Subsystem for Android (WSA-x86 64-бит + GApps)».
Модифицированная версия файл MSIX для 64-разрядных компьютеров ARM, таких как Surface Pro X.
Обновление: Благодаря новому методу от LSPposed у нас теперь есть WSA со встроенной поддержкой Magisk.
Вам понадобится приложение Magisk после установки одного из пакетов ниже.
- Модифицированная версия 64-разрядной версии WSA x86, в нее встроены приложения Google и поддержка Magisk.
- Модифицированная версия 64-разрядной версии WSA ARM, в нее встроены приложения Google и поддержка Magisk.
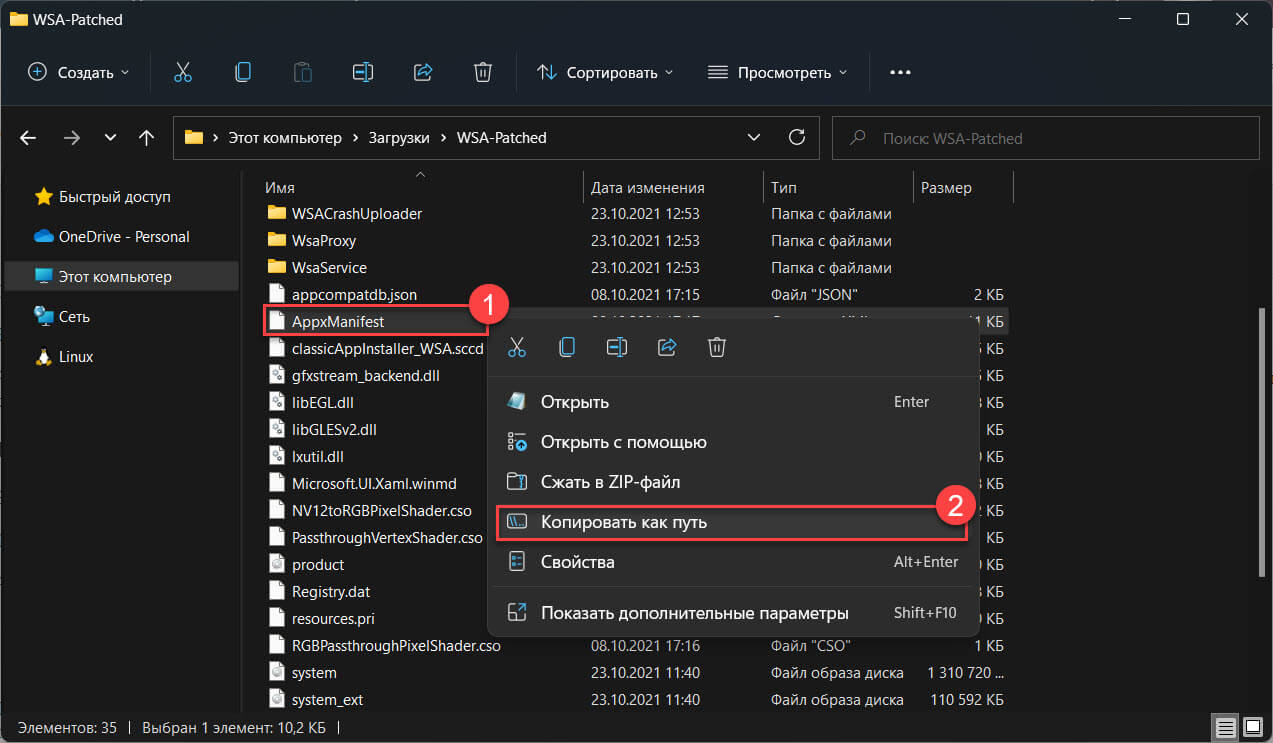
Шаг 10: Распакуйте загруженный Zip-архив в любое расположение, в дальнейшем нам потребуется указать путь к файлу AppxManifest.xml из этой папки.
Чтобы быстро получить путь к расположению файла, кликните на AppxManifest.xml правой кнопкой мыши и выберите «Копировать как путь», чтобы скопировать путь к файлу в буфер обмена ПК с Windows 11.
Зарегистрируйте пакет WSA + GApps:
Шаг 11: Запустите Powershell от имени администратора с помощью Терминала или любым другим удобным вам способом.
Шаг 12: Измените команду Powershell, указав расположение извлеченного Zip-файла
Add-AppxPackage -Register "Путь_к_папке_с_WSAAppxManifest.xml"
В моем случае команда выглядит так:
Add-AppxPackage -Register "C:UsersalmanexDownloadsWSA-PatchedAppxManifest.xml"
Приложение WSA будет установлено на ваше устройство в фоновом режиме. Если вы получите сообщение об ошибке, убедитесь, что все шаги были выполнены правильно.
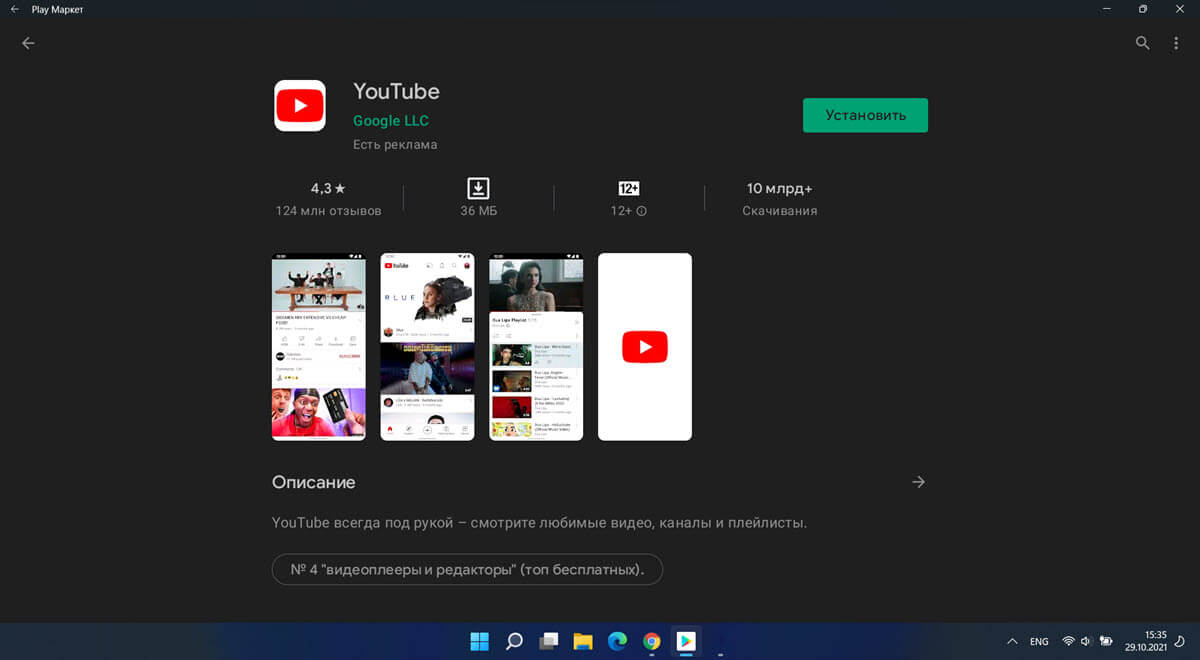
После регистрации WSA, магазин Google Play должен быть доступен в меню «Пуск».
И последнее, что нужно сделать, прежде чем вы сможете войти в свою учетную запись Google.
Загрузите ADBKit:
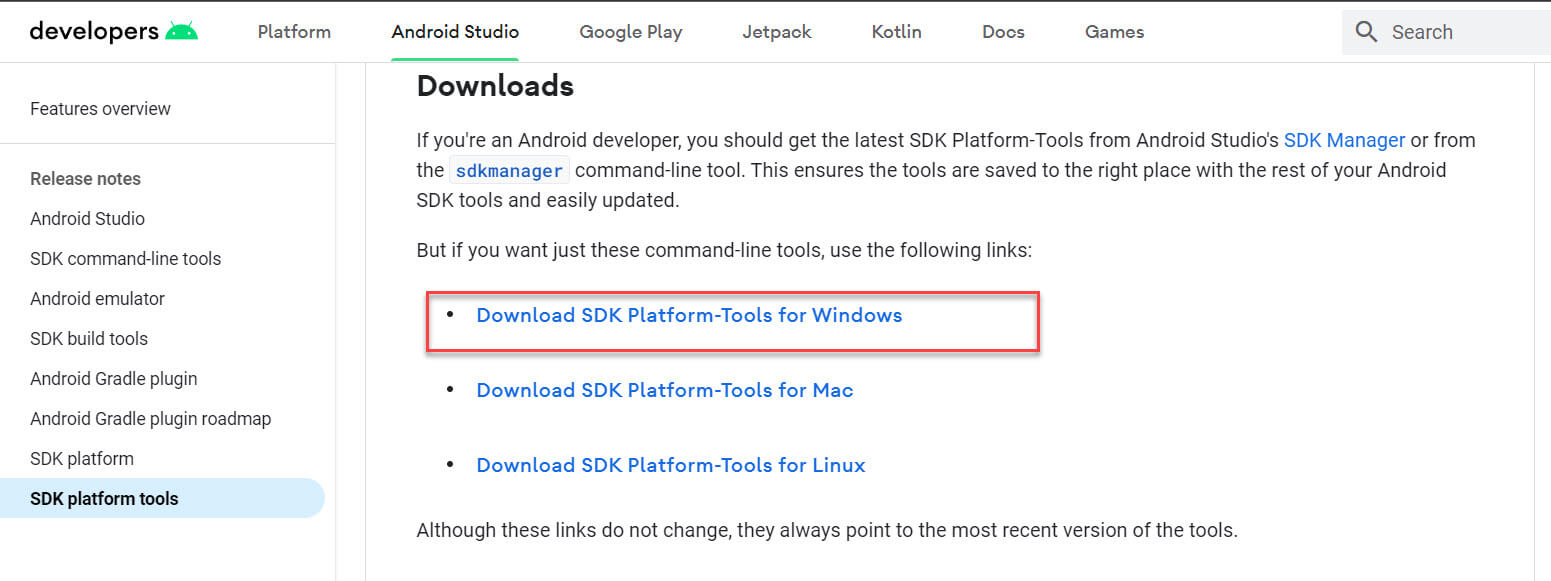
Шаг 13: На странице developer.android.com загрузите «SDK Platform-Tools for Windows».
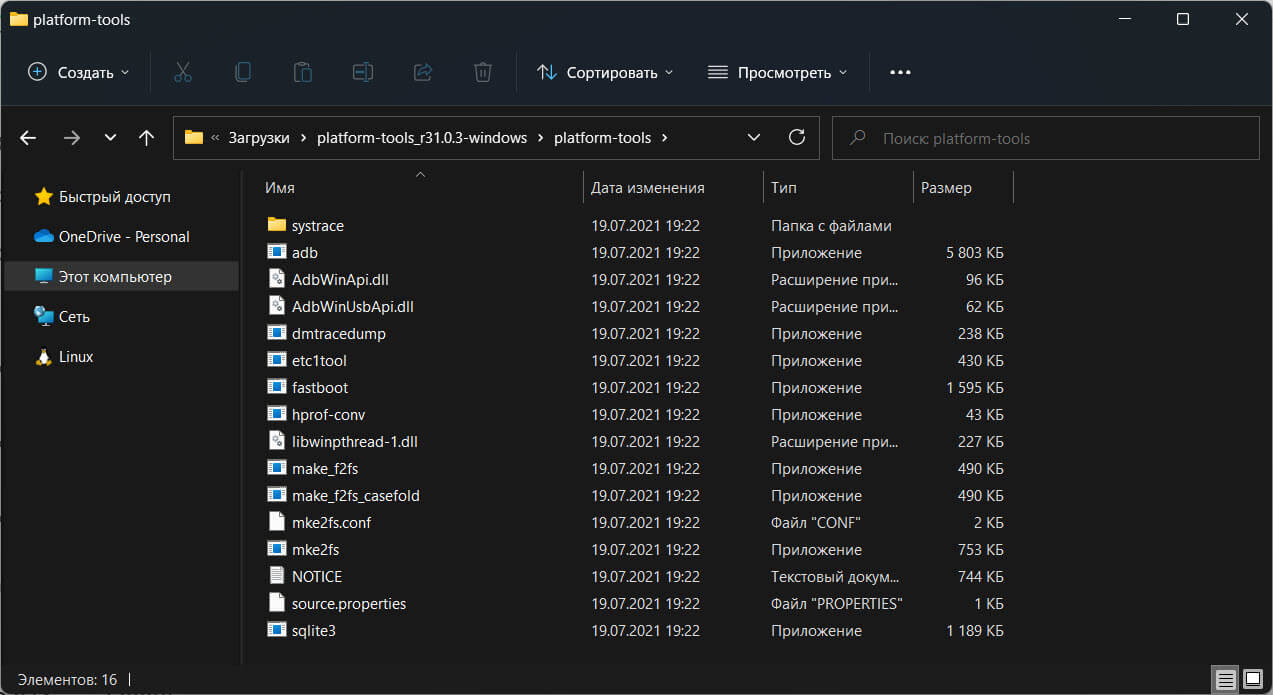
Шаг 14: Pаспакуйте zip-архив в любую папку.
Настройка WSA
Шаг 15: С помощью меню «Пуск» откройте приложение «Windows Subsystem for Android».
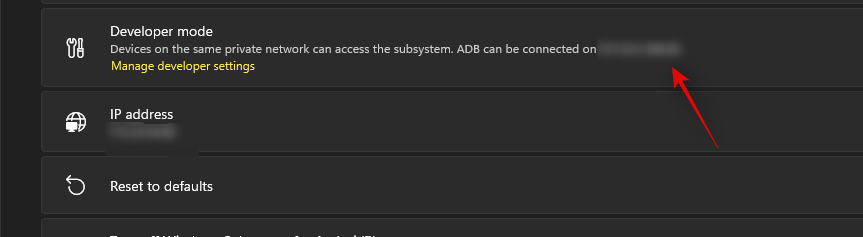
Шаг 16: В разделе «Режим разработчика» передвиньте ползунок переключателя в положение «Вкл.», как показано на экране ниже.
При появлении запроса брандмауэра разрешите доступ ADB.
Скопируйте IP-адрес
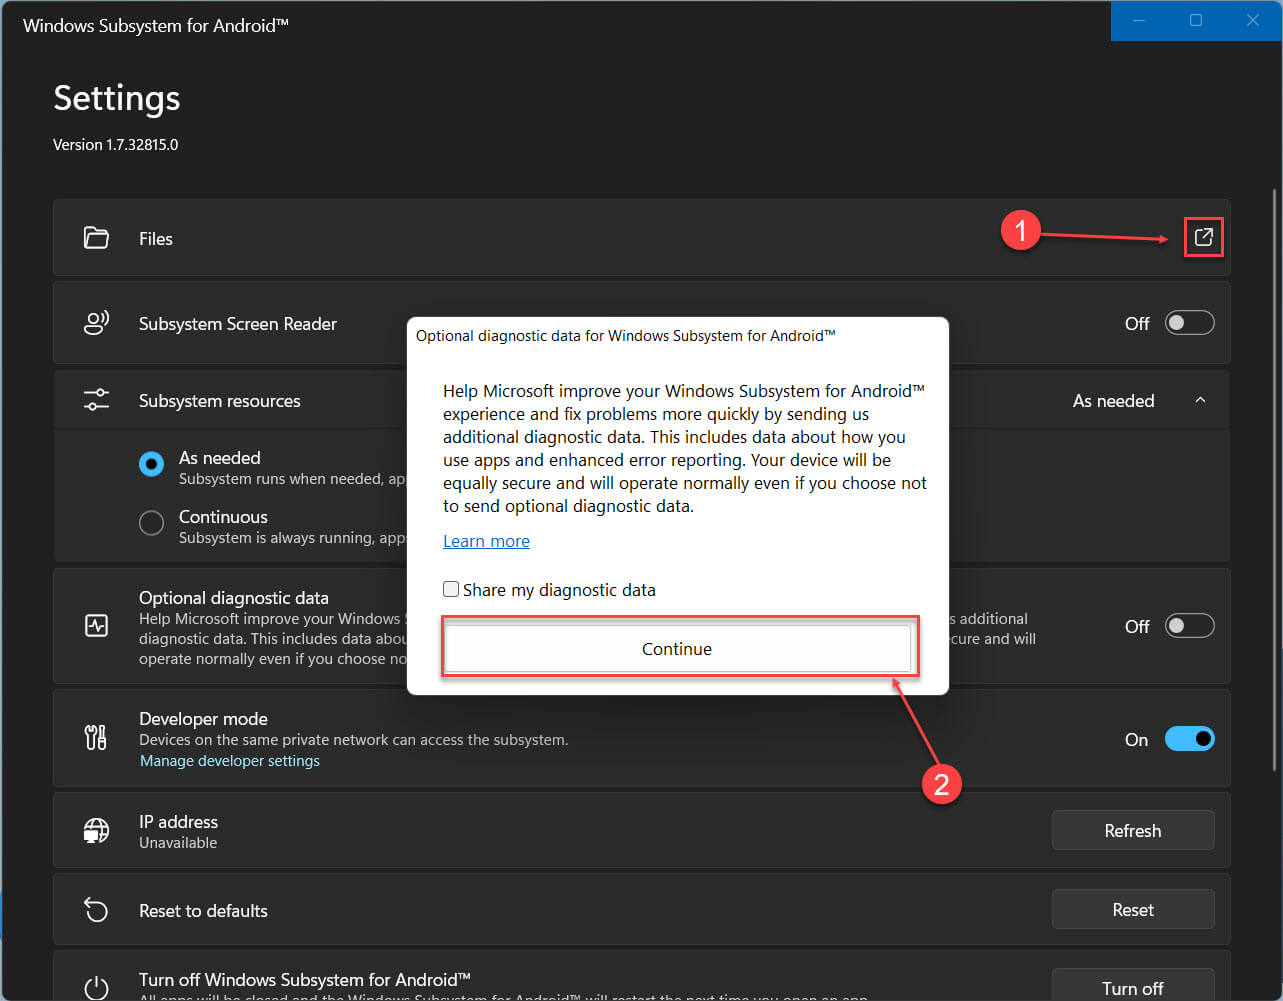
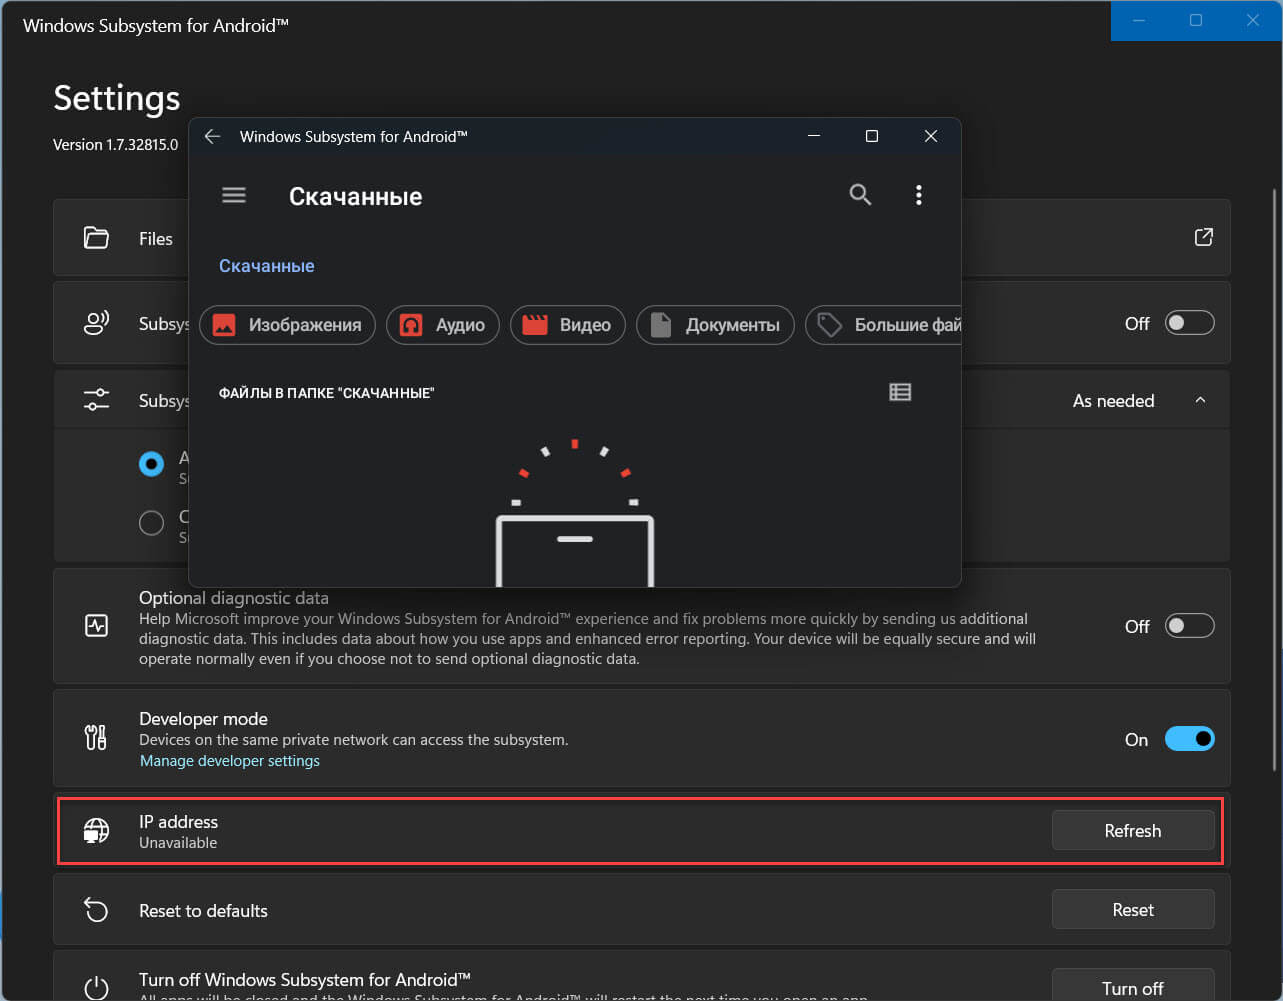
Шаг 17: Теперь в верхней части страницы параметров WSA откройте опцию «Файлы», в появившемся диалоговом окне нажмите «Продолжить».
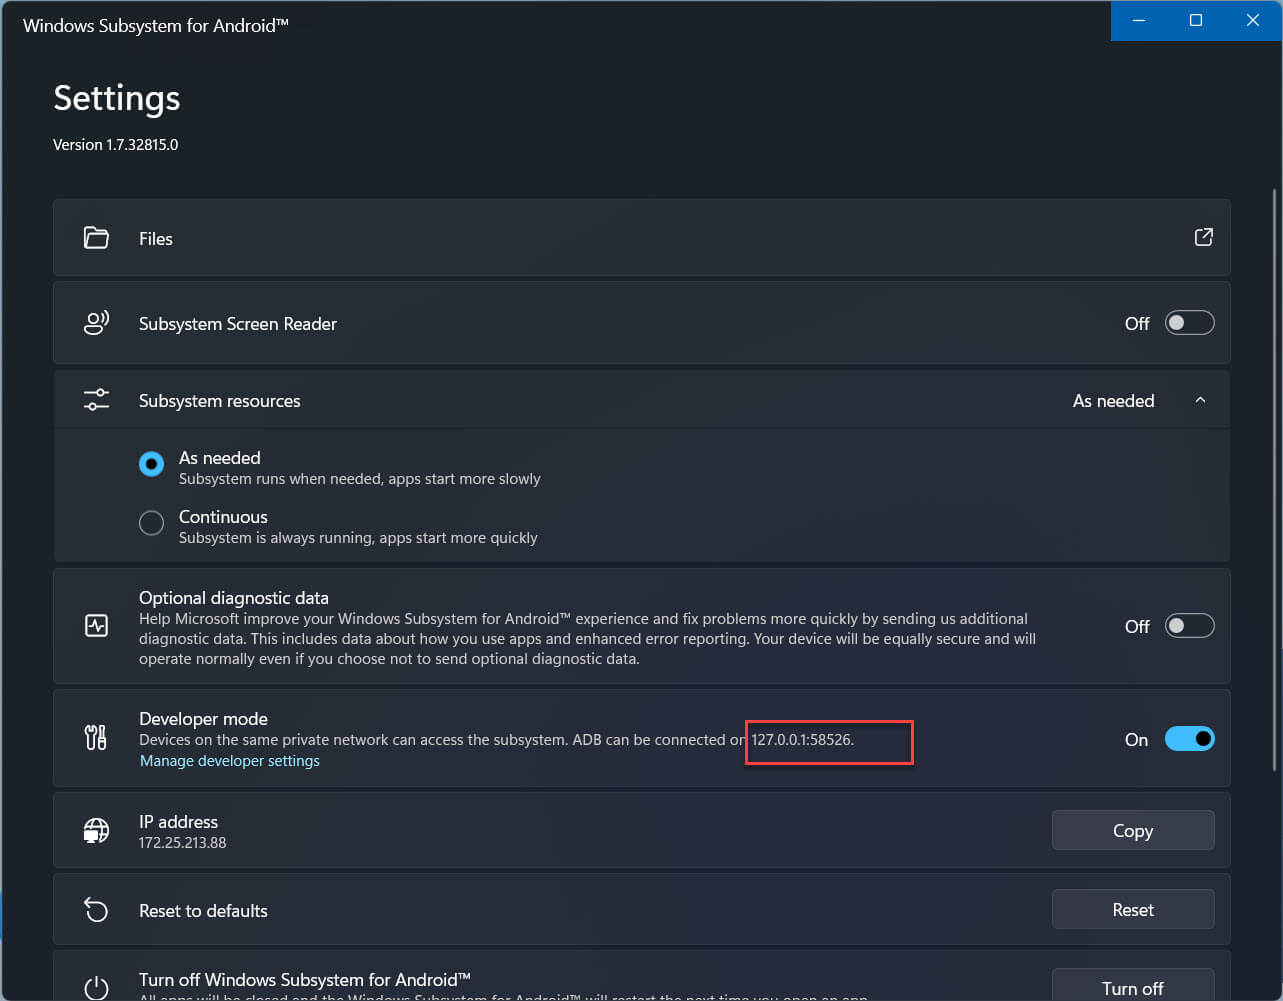
Шаг 18: Затем нажмите кнопку «Обновить» напротив опции IP-адрес.
Шаг 19: Обратите внимание на адрес ADB, в разделе «Developer mode» отображается как 127.0.0.1:58526 (он должен быть таким же для вас)
Установите соединение
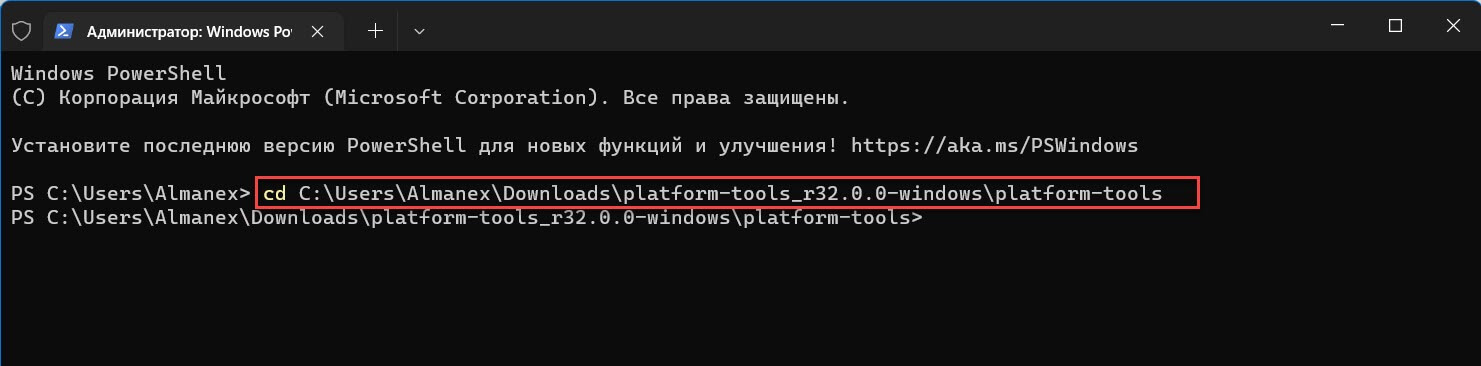
Шаг 20: Откройте Powershell от имени администратора и перейдите в папку «C:UsersAlmanexDownloadsplatform-tools_r32.0.0-windowsplatform-tools» для этого можно использовать команду, предварительно заменив Имя_пользователя:
cd C:UsersИмя_пользователяDownloadsplatform-tools_r32.0.0-windowsplatform-tools
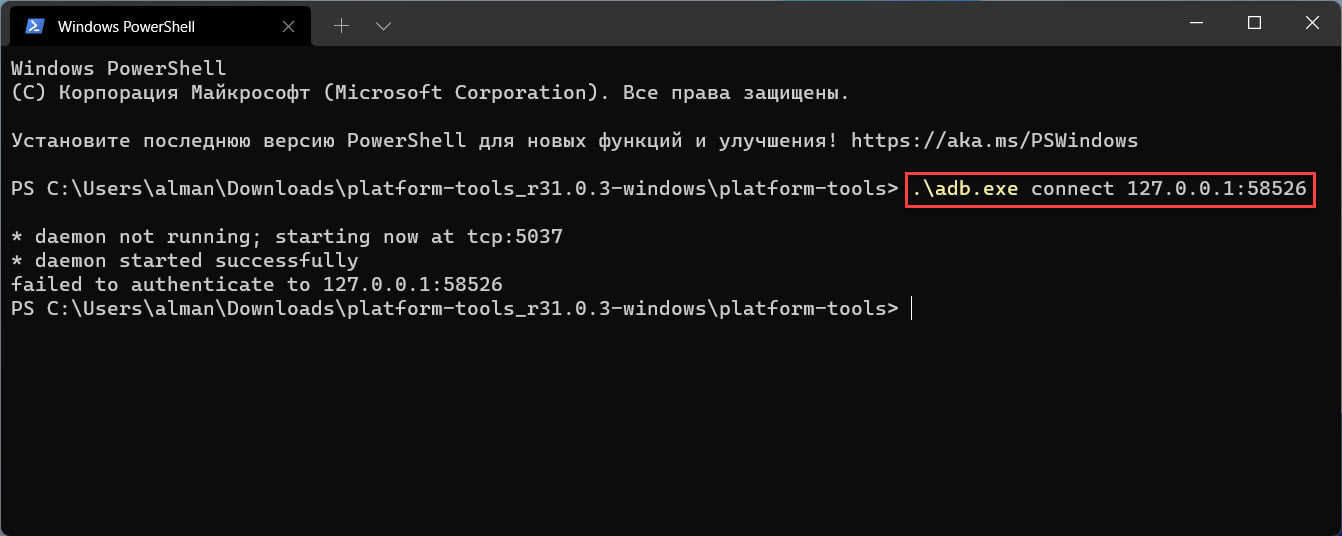
Теперь, выполните команду:
.adb.exe connect 127.0.0.1:58526
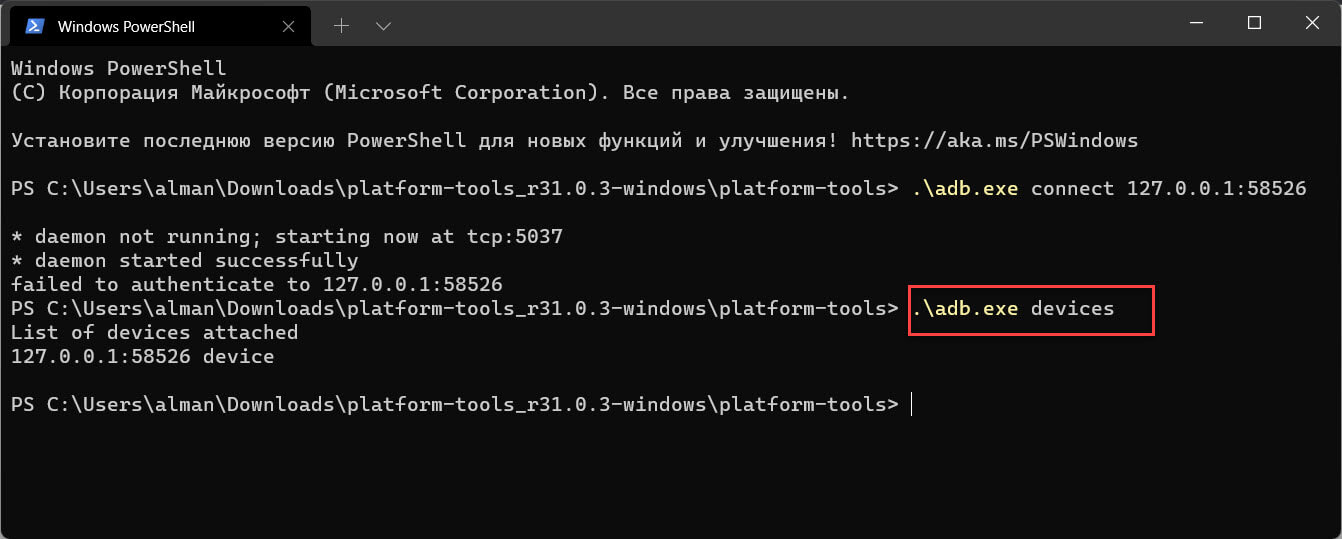
Шаг 21: Убедитесь, что adb подключен, выполнив:
.adb.exe devices
Установите Google Play Store в Windows 11
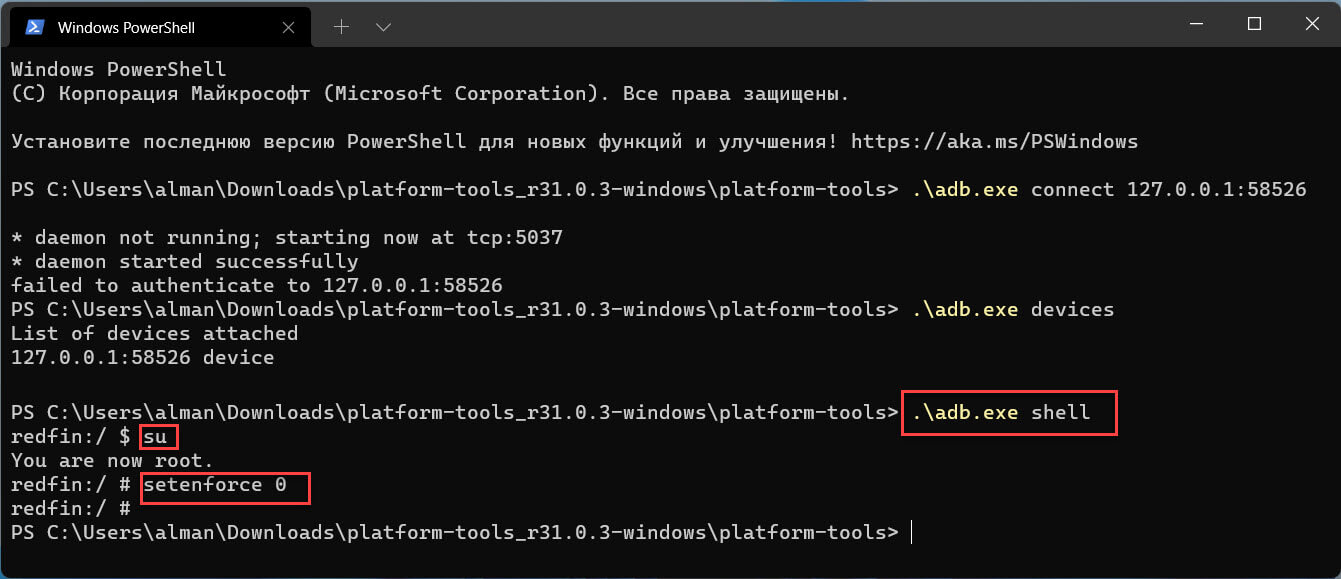
Шаг 22: Чтобы иметь возможность авторизироваться в магазине Google Play, выполните по очереди три команды:
.adb.exe shell
su
setenforce 0
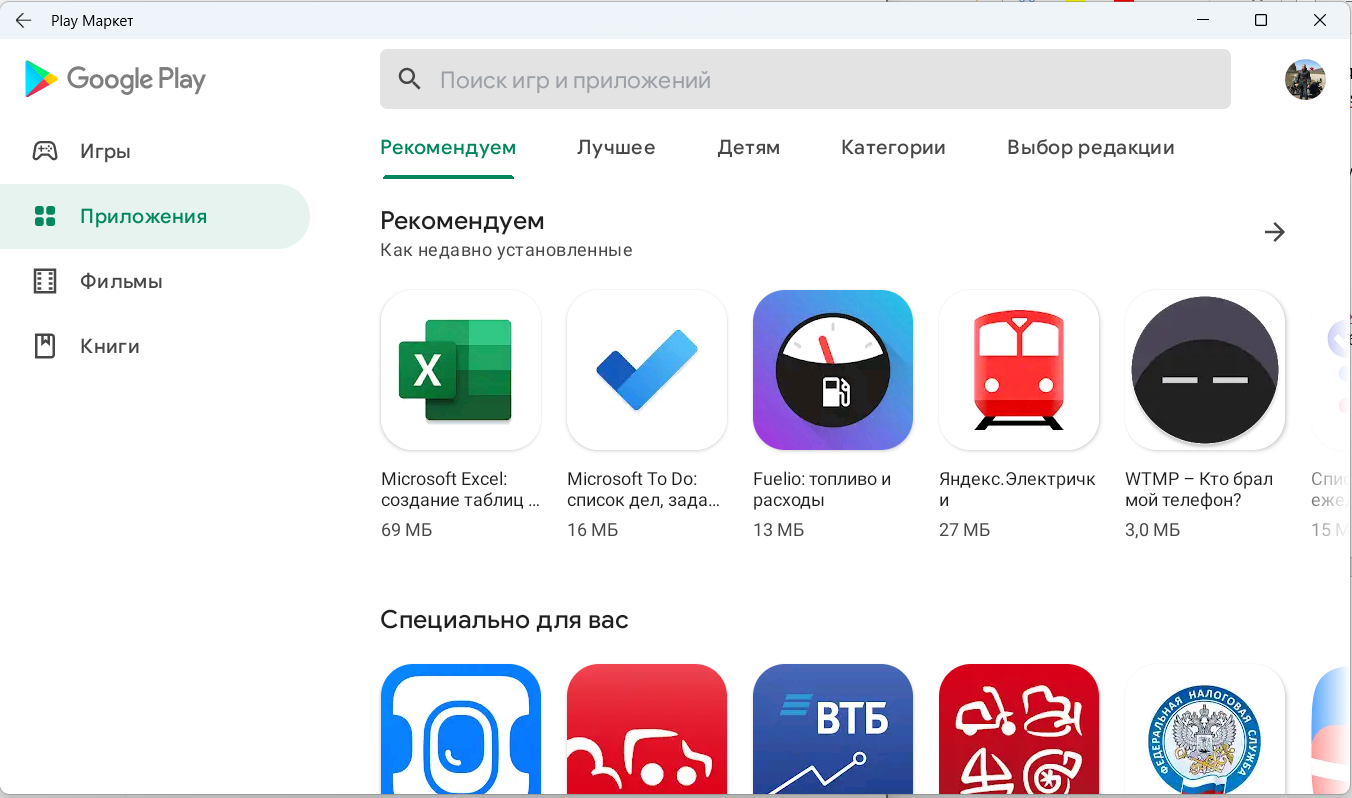
Если вы все сделали правильно, вы сможете войти в Google Play Store со своей учетной записью Google.
Теперь вы можете пользоваться полным набором приложений Google Play на наших компьютерах с Windows 11.
Большое спасибо ADeltaX, благодаря которому это стало возможным!
На этом мы завершаем руководство о том, как установить Google Play Store на ПК с Windows 11 с помощью подсистемы Windows для Android. Play Маркет, вероятно, лучший вариант, потому что он может похвастаться большим каталогом приложений и обеспечивает безопасную и надежную экосистему.
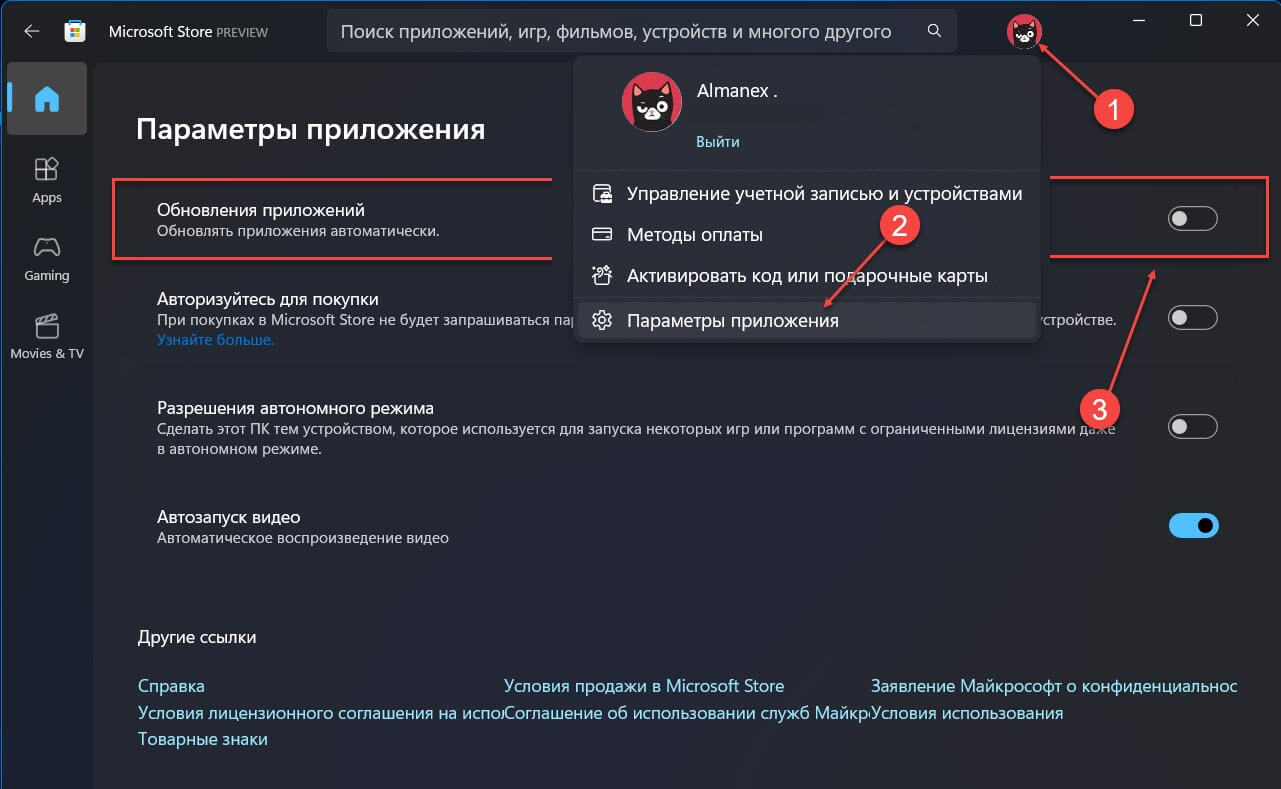
Если вы хотите, чтобы будущие обновления для подсистемы Windows для Android не сбросили выполненный вами процесс, вы можете отключить автоматические обновления для приложений в Магазине Microsoft: перейдите в меню «Профиль» → «Параметры приложения» и отключите автоматическое «Обновление приложений». Если вы хотите обновить другие приложения, вам необходимо обновить их вручную.
Вопросы.
- Могу ли я использовать Google Play Store для установки приложений в Windows 11?
Да, Google Play Store полностью работает в Windows 11. Спасибо пользователю Twitter ADeltaX.
- Нужен ли мне канал Windows Beta для запуска приложений Android в Windows 11?
Официально да. Но вы можете установить модифицированный пакет Msixbundle, чтобы он работал в любой сборке Windows 11.
- Как удалить приложение Android из Windows 11?
Чтобы удалить приложение Android из Windows 11, откройте меню «Пуск» найдите приложение, которое хотите удалить. кликните приложение правой кнопкой мыши и выберите «Удалить».
Зачем нужны Android-приложения на Windows? Несколько причин:
- Android на Windows запускается в отдельной подсистеме, которая никак не связана с основной системой. Соответственно, это оптимальный вариант для запуска приложений, которые скачаны непонятно где и уверенности в которых нет. Зачем запускать скачанные непонятно где приложения? Возможно, у вас есть проблемы с покупкой приложений в Google Play.
- Запуск игр. На Android есть интересные игрушки, некоторые даже довольно красивые и вызывают желание поиграть в них с комфортом на большом экране.
- Приложения для чтения книг. Беда Windows в том, что тут ужасно мало бесплатных, но хороших приложений для чтения книг. Та же Sumatra PDF – хороша, но настраивать размер шрифта, открывая в блокноте файл настроек?
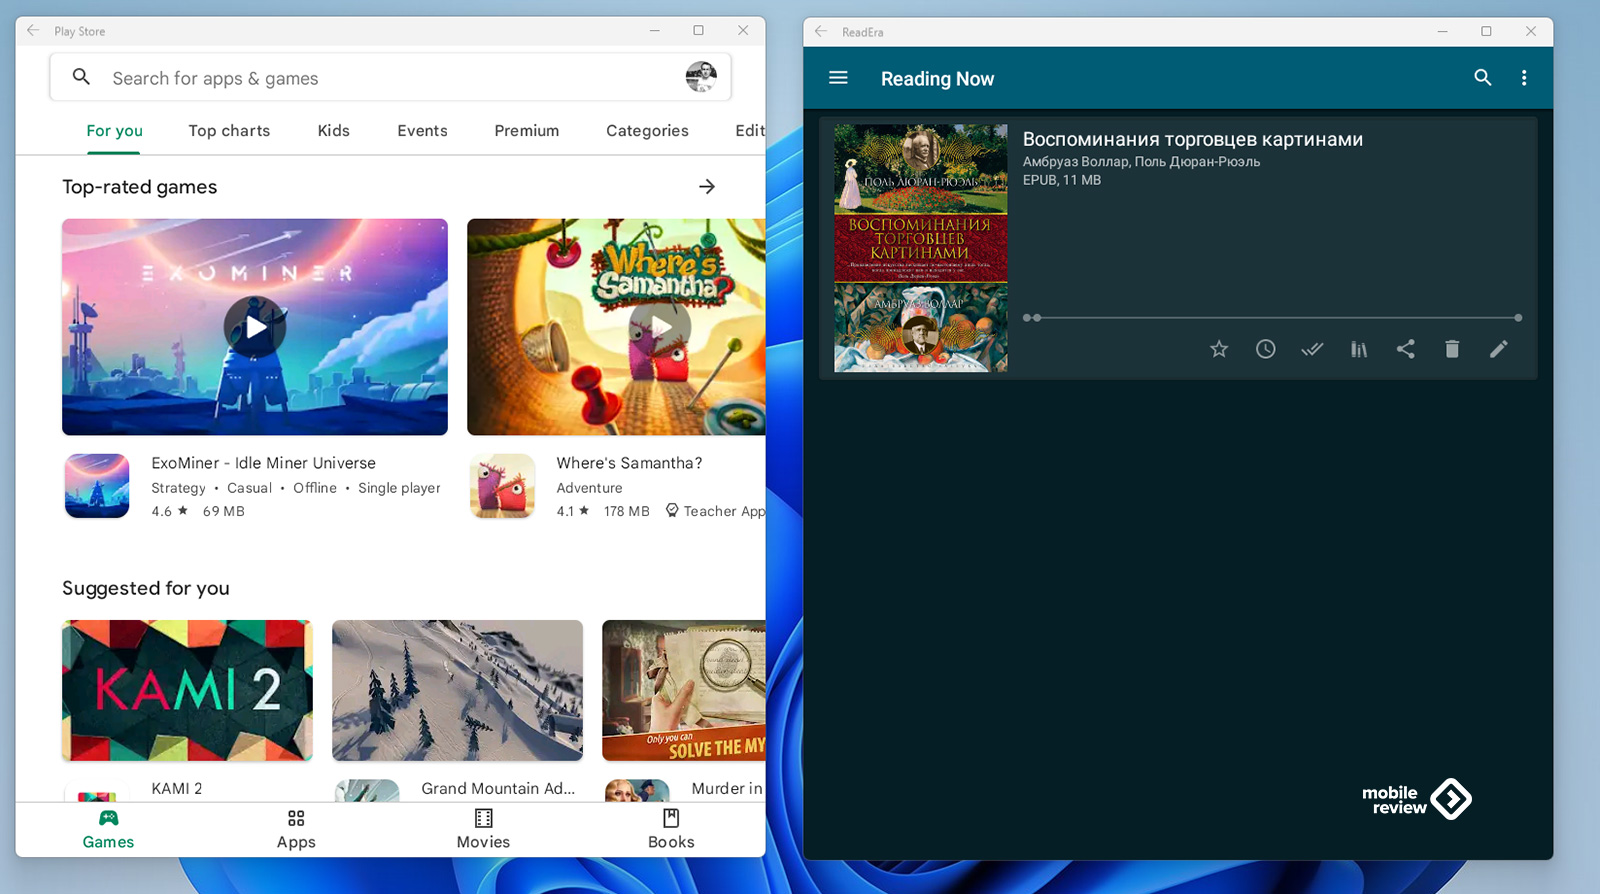
- Защита от вирусов. Или вот понадобилась мне недавно читалка DJVU-файлов, пошел скачивать с привычного депозитария, проверил по привычке антивирусом и нашел 15 зловредов. Видимо, кто-то нехороший подсунул взломанную версию. Специально взял установочный файл этой же программы с ноутбука, проверил – всё чисто. А Google Play предлагает большой набор «чистых» программ. Например, у меня есть любимое приложение ReadEra, открывающее большинство файлов, всё без рекламы, есть все необходимые настройки.
- Приложение для подкастов. Это хороший вариант, так как позволяет не только установить привычное приложение, но и, войдя в Google-аккаунт, всё быстро синхронизировать.
- При этом, оценивая идею запуска Android-приложений на Windows, не забывайте, что Microsoft давно и упорно работает над идеей компьютеров 2-в-1, то есть устройств с сенсорным экраном и поддержкой стилуса. Соответственно, если у вас такой ноутбук, то Android-приложения – это множество хороших журналов для рисования и заметок.
Короче говоря, Android на Windows позволяет запустить любое приложение, аналог которого вам лень искать на Windows.
Основная беда заключается в том, что по умолчанию Windows использует магазин приложений Amazon. Это пустой и грустный магазин, в котором ничего нет. Соответственно, сразу же хочется что-то нормальное – Google или ApkPure.
Попутно рекомендую к прочтению материал, посвященный другому способу установки Google Play. Тот способ гораздо проще, но, к сожалению, оказалось, что это проделки хакеров и компьютер полон вирусов.
Table of Contents
-
Как установить магазин приложений Google Play
- Шаг 1: подготовка
- Шаг 2: модифицированная «Подсистема Windows для Android»
- Шаг 3: установка Google Play
- Шаг 4: установка ApkPure
- Заключение
Как установить магазин приложений Google Play
К сожалению, скриншоты в данной статье будут на английском языке, так как такая у меня лицензия Windows. Поскольку зачастую вся интересная документация к Windows, Office (и любым другим программам) публикуется на английском, то проще держать систему на английском языке, чем заморачиваться с переводом и поиском в меню нужных опций.
Шаг 1: подготовка
Если у вас уже была установлена Windows Subsystem for Android (WSA), то её придётся удалить. Это можно сделать привычным способом. Открыть в меню «Пуск», найти там «Подсистема Windows для Android», правая кнопка мышки и выбрать «Удалить».
Дальше надо включить режим разработчика. Эта опция находится по пути «Настройки» — «Конфиденциальность и безопасность» — «Для разработчиков» и выбрать соответствующий пункт. Но гораздо проще нажать на значок лупы рядом с кнопкой «Старт» и начать писать «разрабо…», и Windows сама предложит нужное меню.
Далее нужно включить в настройках виртуальную машину и Hyper-V платформу. Снова нажимаем на значок лупы и печатаем «включение или отключение компонентов windows» (Turn Windows features On or Off). Нажимаем Ok, и нужно немного подождать установки новых компонентов. После чего система предложит перезагрузиться.
Шаг 2: модифицированная «Подсистема Windows для Android»
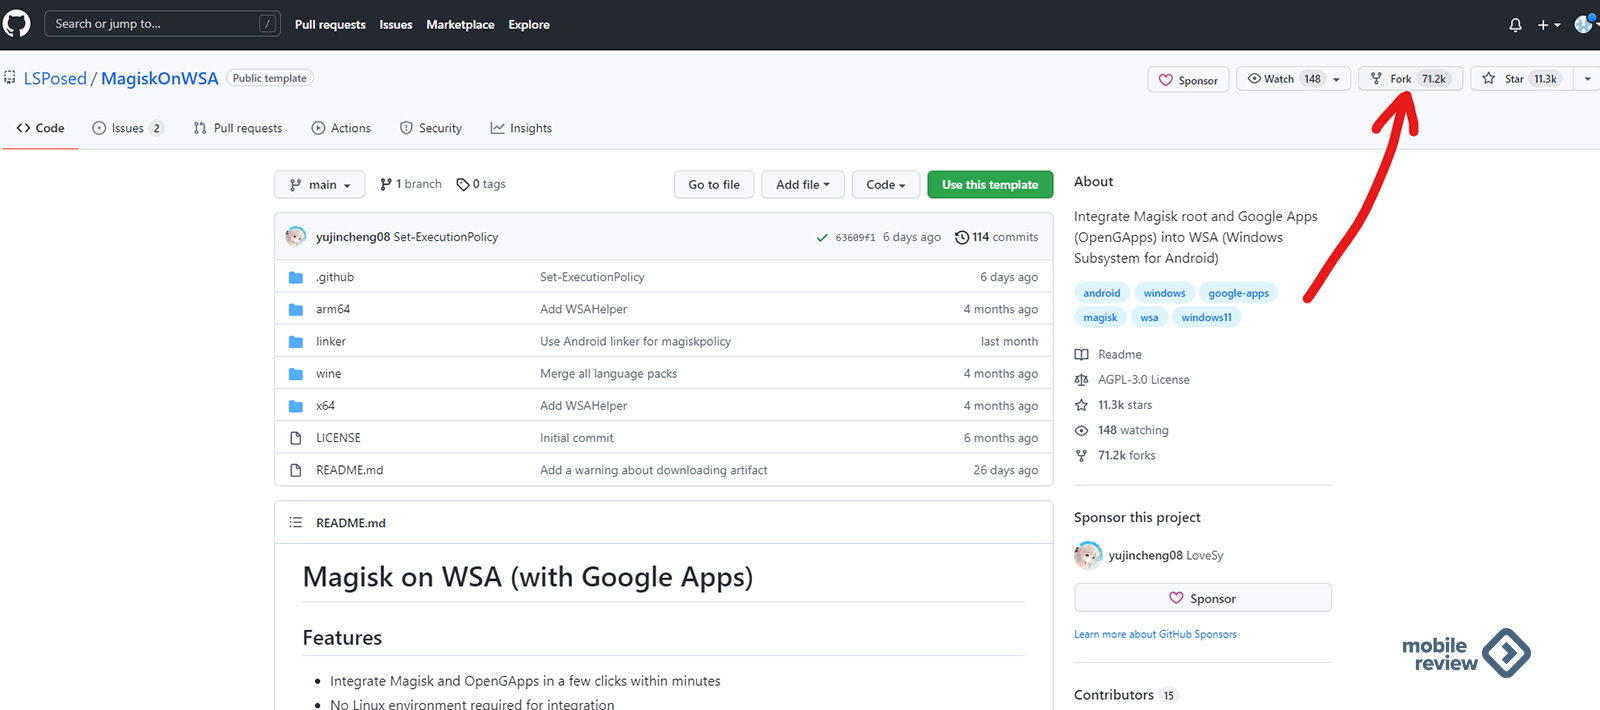
Теперь понадобится модифицированная подсистема. Модификация заключается в интеграции Magisk. Полагаю, Magisk знаком всем, кто когда-либо «рутовал» свой Android-смартфон.
Magisk – это самая скучная часть нашего процесса, так как придётся отправиться на GitHub и создать копию репозитория. Нужная нам страница находится по адресу: https://github.com/LSPosed/MagiskOnWSA
Если вы на GitHub впервые, то придется потратить время на создание аккаунта. Зарегистрировавшись, идем по ссылке, указанной выше, и создаем собственную копию Magisk on WSA (with Google Apps). Для этого в правом верхнем углу нажимаем на кнопку «Fork» и ждем пару секунд.
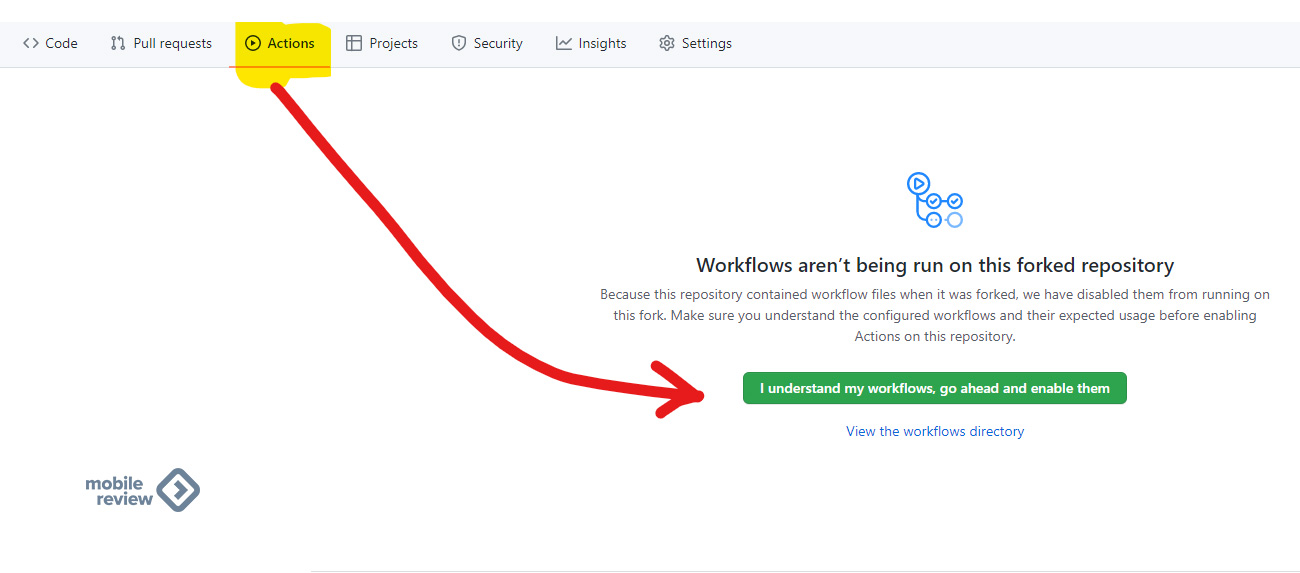
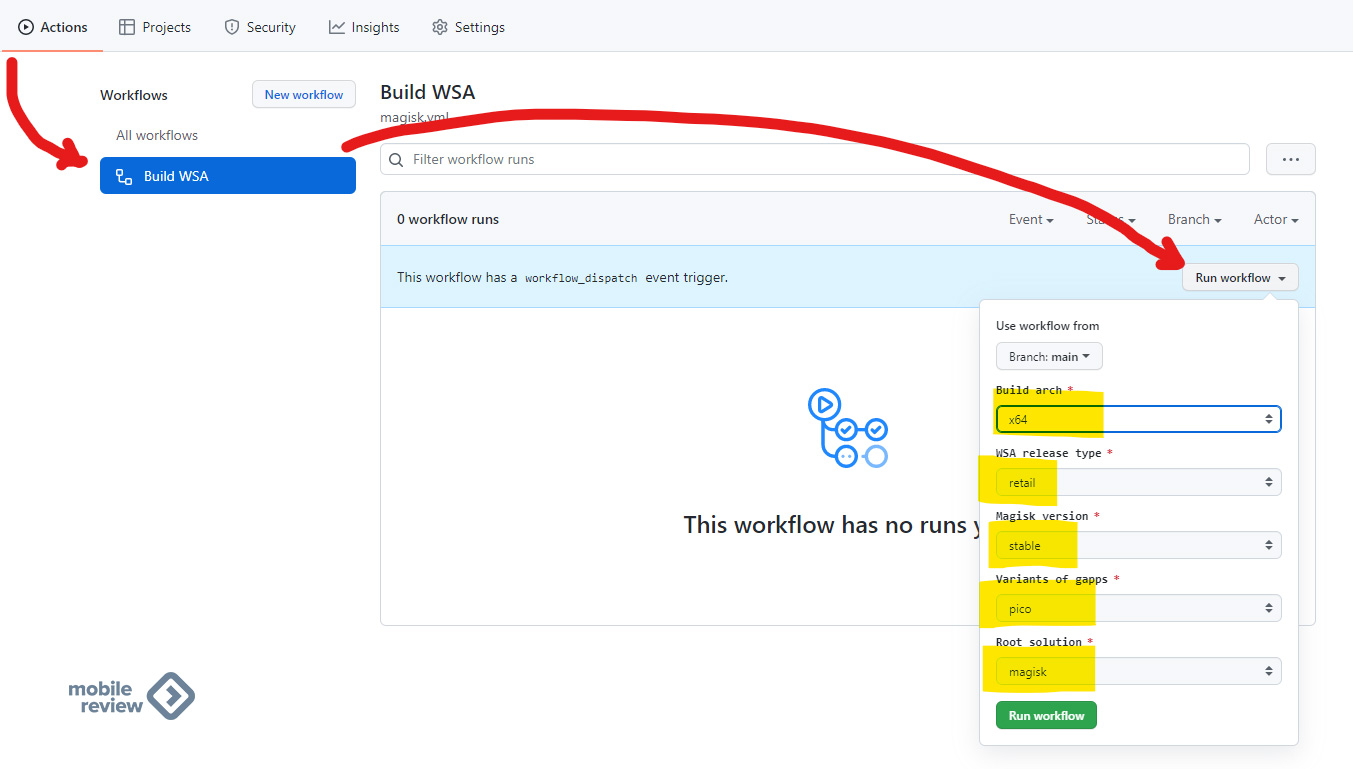
Теперь у нас появился собственный репозиторий, с которым можем делать что угодно. Идем на вкладку «Actions» и нажимаем зеленую кнопку «I understand my workflows, go ahead and enable them».
Теперь нажимаем на «Build WSA», а дальше на кнопку «Запустить рабочий процесс» (Run Workflow). В появившемся меню выбираем всё как на скриншоте ниже. Версия x64 (если у вас компьютер на ARM-процессоре, то поменяйте вариант), выбирайте сборку для ритейла, стабильную версию Magisk, версию Gapps – PICO, а в конце Magisk в качестве решения для рутинга.
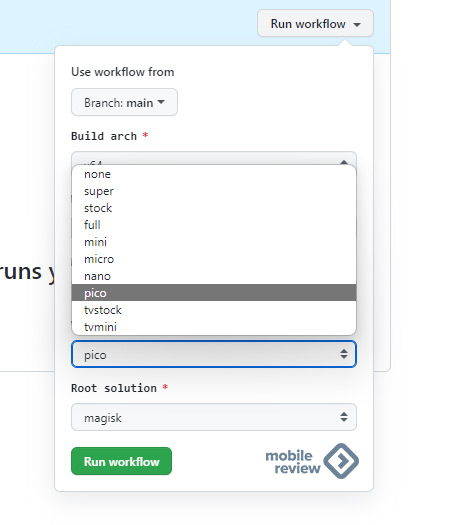
Поясню для любопытствующих. Google требует, чтобы все производители, создающие смартфоны на Android ОС, использовали Google-приложения (GApps) и проходили тест совместимости. Мы же сейчас занимаемся тем, что, по сути, создаём виртуальный Google-смартфон, так что нам нужно установить Google-приложения.
Существует множество версий наборов Google-приложений. PICO – это минимальный набор. Nano – чуть больше, TVStock – это набор для Android TV. Думаю, смысл вы уловили. Возможно, глаз зацепился за Super. Super – это набор вообще всех Google-приложений, которые когда-либо были в наборе. Соответственно, лучше всего выбрать комплект PICO, дабы не захламлять систему. Но отказываться от Google-приложений нельзя, оставляя в графе «none», так как Google Play и Play Services входят в набор.
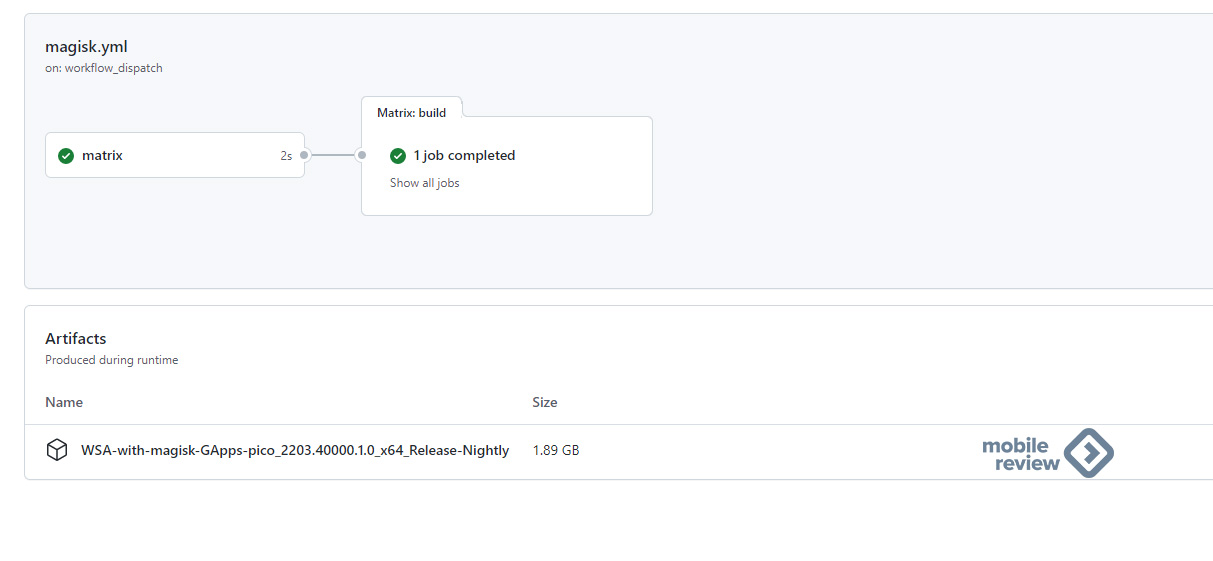
Итак, выбрав все пункты и запустив выполнение, придется подождать компиляции. В принципе, можно сходить попить чаю или даже пообедать (минут 5-15 у вас есть). Когда сборка готова (появится зеленая галочка напротив), то остаётся её скачать. Сборка весит около 2 ГБ.
Шаг 3: установка Google Play
Распаковываем скачанный архив, находим файл Instal.ps1 и запускаем правой кнопкой через PowerShell. Соглашаемся с тем, что данный скрипт может вносить изменения. Ну а дальше процесс происходит автоматически, а мы уже подключаемся на том этапе, когда нужно завершить настройку своего новенького виртуального Pixel 5!
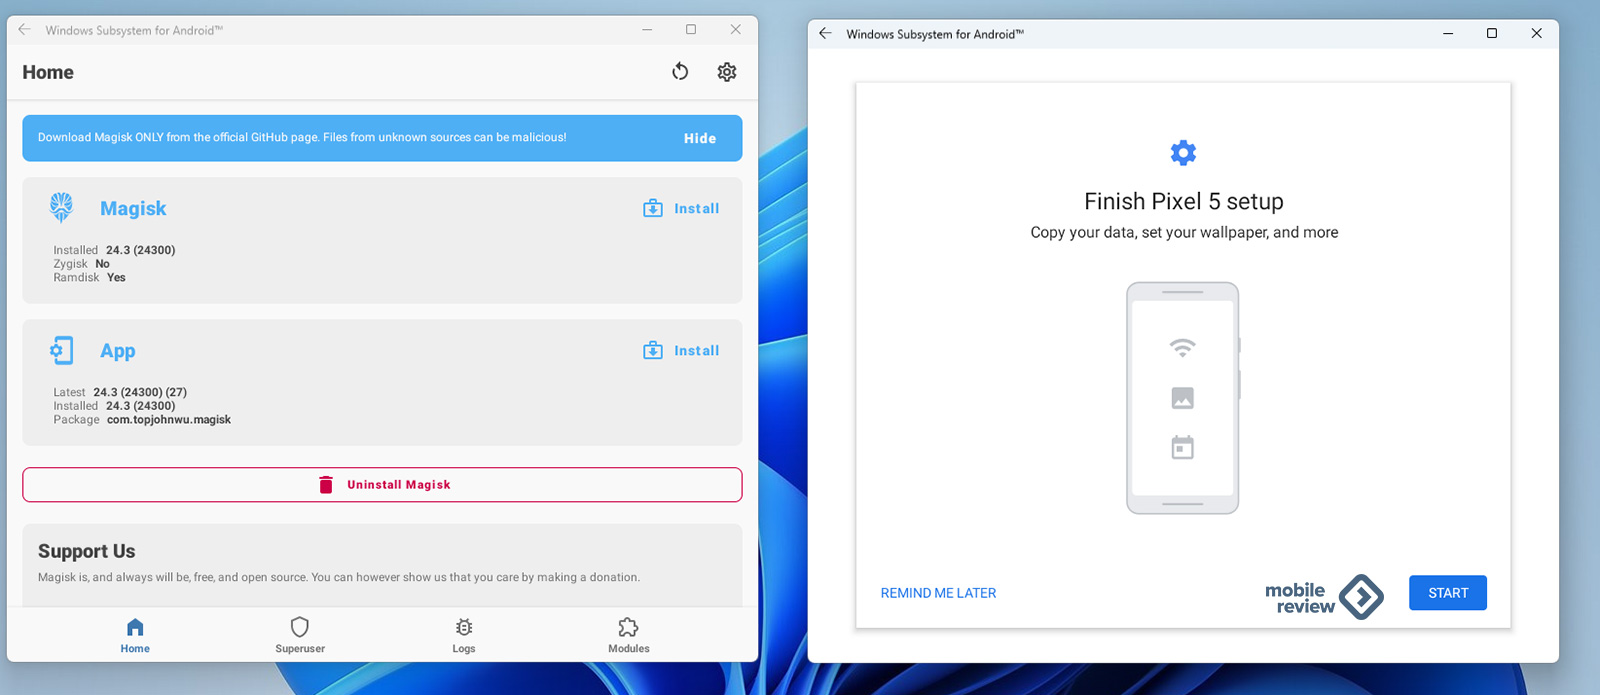
Создаём или новый Google-аккаунт, или вводим текущий. Вот и всё. Теперь у вас в меню «Пуск» появились две иконки: Amazon AppStore (он нам не нужен, но без него нельзя) и Google Play. Ну и, пока Android-система запущена, какое-то время вы будете получать уведомления про обновленный софт, как это бывает, когда запущен новый смартфон.

Шаг 4: установка ApkPure
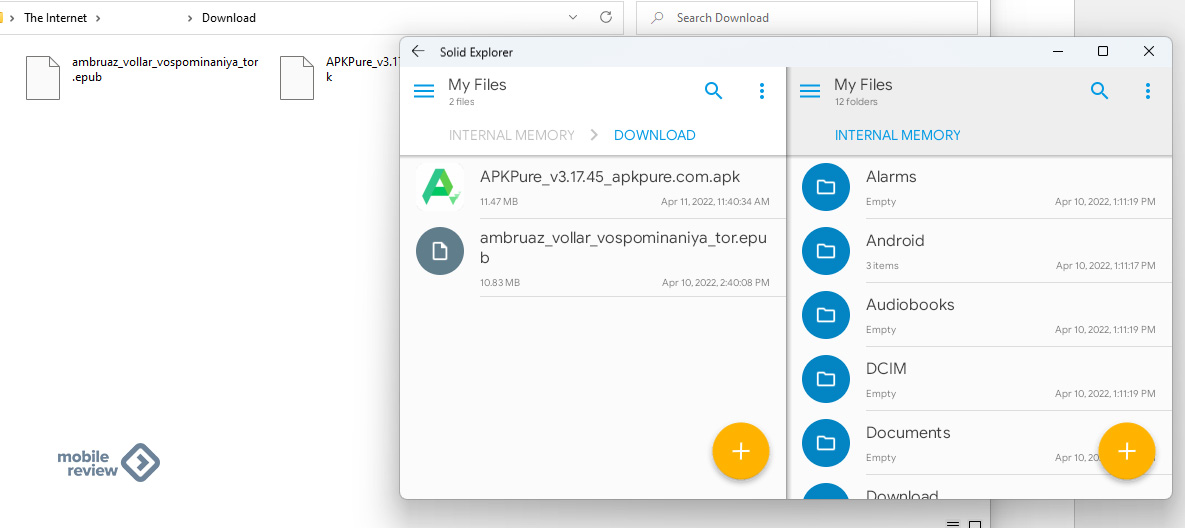
Solid Explorer, как и любой другой файл-менеджер, поможет нам с установкой любых других приложений. Всего лишь надо скопировать в наш виртуальный смартфон нужный apk-файл, а потом в файл-менеджере запустить его, попутно система попросит разрешения установить стороннее приложение. Я знаю, что можно ставить приложения через командную строку, прописывая адрес и путь. Но тут про простые пути для простых пользователей, которые хотят мышкой тык-тык, и всё.
Альтернативный магазин приложений может быть полезен, если Google вдруг решит запретить доступ к своему магазину приложений.

Я выбрал Solid Explorer, так как купил это приложение ещё для своей Android TV приставки. В принципе, подойдет любой другой файловый менеджер, позволяющий создавать ftp-сервер.
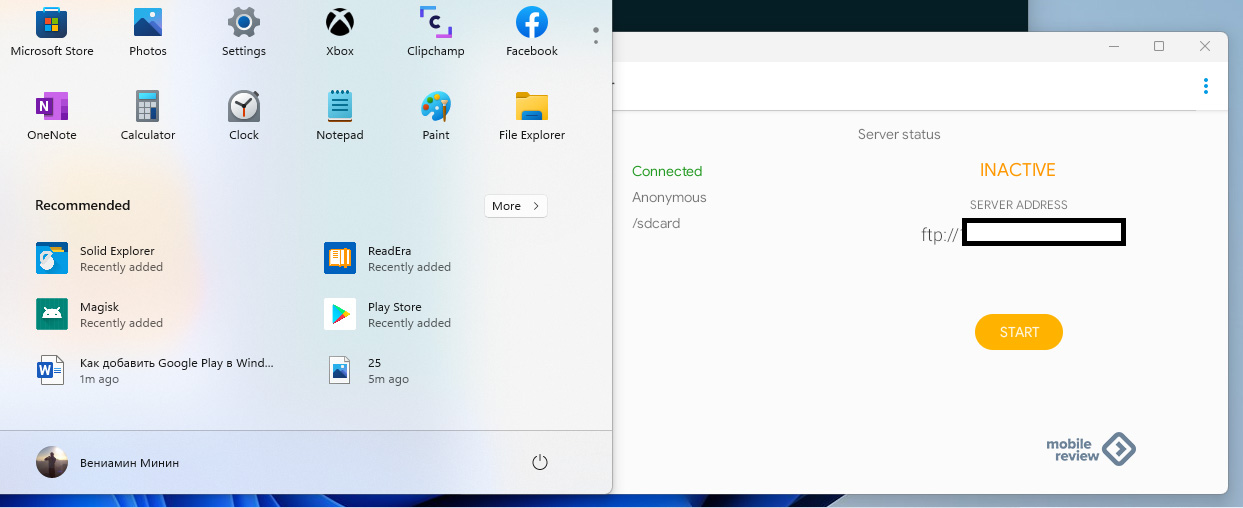
Заходишь на ftp через «Проводник» и скидываешь все нужные тебе файлы.
Другой бонус Solid Explorer в возможности подключать облака, включая «Яндекс». В данном случае тогда и ftp открывать не надо, а просто сохраняешь файл в папку облака на компьютере, и вот он уже доступен на виртуальном смартфоне.
Заключение
Удалять установленные приложения очень просто. Достаточно в «Пуске» щелкнуть правой кнопкой и выбрать «Удалить».
Точно так же можно удалить и всю систему, найдя в меню «Пуск» пункт WSA и удалив его. Также не забывайте, что даже после закрытия Android-приложения WSA остаётся в памяти компьютера. Чтобы выключить WSA, надо запустить одноименное приложение и выбрать пункт «Выключить».
Напоследок можно сказать, что, с одной стороны, Windows Subsystem For Android (WSA) довольно бесполезная штука для простых пользователей. С другой — она, безусловно, сделает пользовательский опыт чуть более комфортным, особенно для тех, у кого компьютеры с сенсорным экраном. Всё-таки Android-приложения ориентированы на сенсорное управление, в отличие от Windows.
Эта статья расскажет, как установить Google Play Store на Windows 11 и GApps в подсистему Windows для Android. В октябре 2021 года Microsoft наконец-таки запустила тестирование подсистемы Android на Windows 11, благодаря чему у пользователей появилась возможность устанавливать приложения Android на свои компьютеры. Официально тестирование проходит только в США (Microsoft часто обходит вниманием другие страны при тестировании) и только в паре с магазином Amazon App Store, где выбор приложений, мягко говоря, не самый богатый. Обойти проблему можно установкой APK-файлов, но многие из них не будут работать из-за отсутствия Play Store и соответствующих сервисов.
Обратите внимание: эта статья описывает неофициальный способ установить Google Play Store на Windows 11, поэтому действуйте на свой страх и риск. Также стоит отметить, что вам не нужно регистрироваться в программе предварительной оценки Windows и скачивать ранние версии Windows 11. В процессе написания этой инструкции нам удалось запустить Google Play Store на стабильной версии Windows 11.
Чтобы установить Google Play в подсистему Windows для Android на Windows 11, вам надо выполнить следующие шаги.
- Удалить существующую подсистему Windows для Android.
- Включить подсистему Windows для Linux и платформу виртуальных машин.
- Добавить GApps в подсистему Windows для Android и модифицировать ядро WSA.
- Установить Google Play Store в подсистему Windows 11 для Android.
- Восстановить исходное ядро для подсистемы Windows для Android.
Рассмотрим каждый шаг подробно.
Удалите существующую подсистему Windows для Android
- Откройте приложение «Параметры» сочетанием Win + I.
- Щелкните Приложения.
- Нажмите на кнопку «Приложения и функции» справа.
- Выберите «магазин приложений Amazon«.
- Нажмите кнопку меню с тремя точками справа и выберите кнопку Удалить.

- Снова нажмите кнопку «Удалить» для подтверждения.
- Поищите в списке оставшихся программ подсистему Windows для приложений Android. Если она там есть — тоже удалите её.

Готово, можно приступать к следующему шагу.
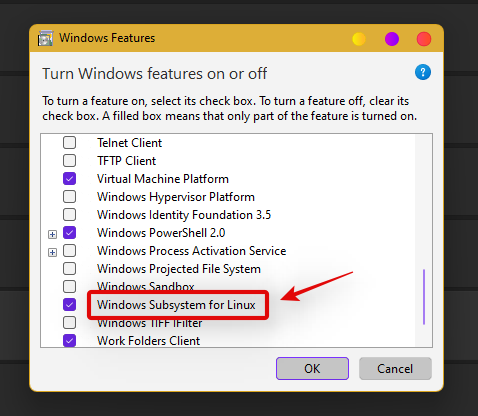
Включите подсистему Windows для Linux и платформу виртуальных машин
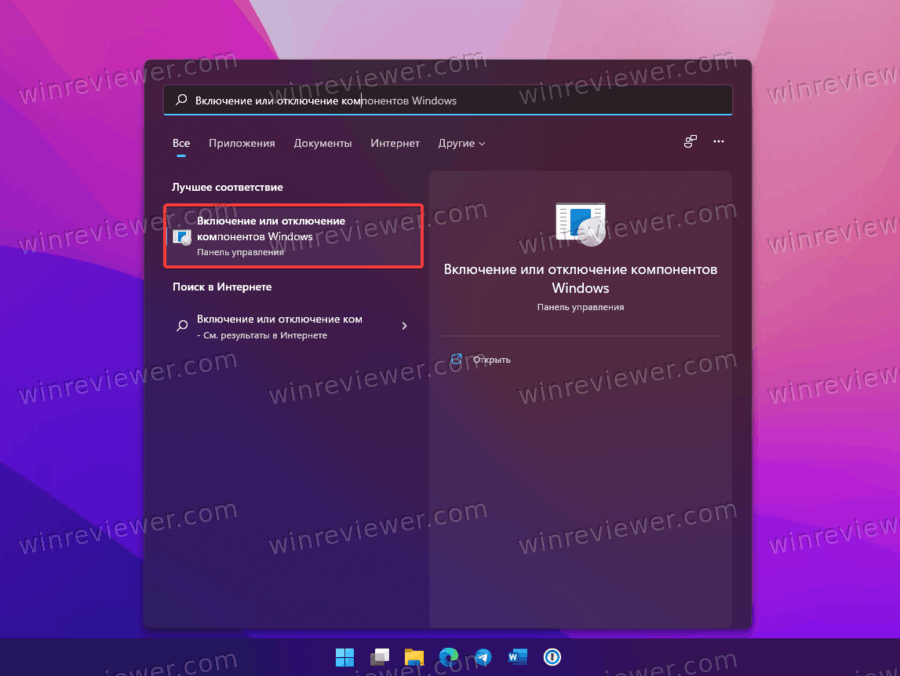
- Откройте меню Пуск и введите Включение или отключение компонентов Windows, затем нажмите Enter.

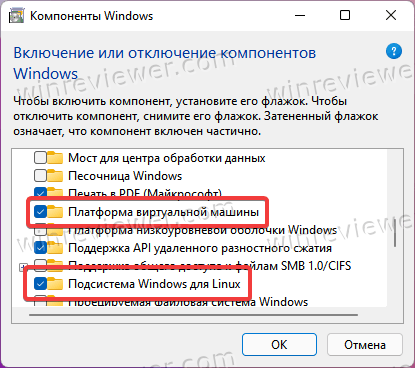
- В новом окне установите отметку возле пункта Платформа виртуальной машины, а затем Подсистема Windows для Linux.

- Нажмите Ок и подождите, пока Windows скачает необходимые компоненты.
- Перезагрузите компьютер для применения изменений.
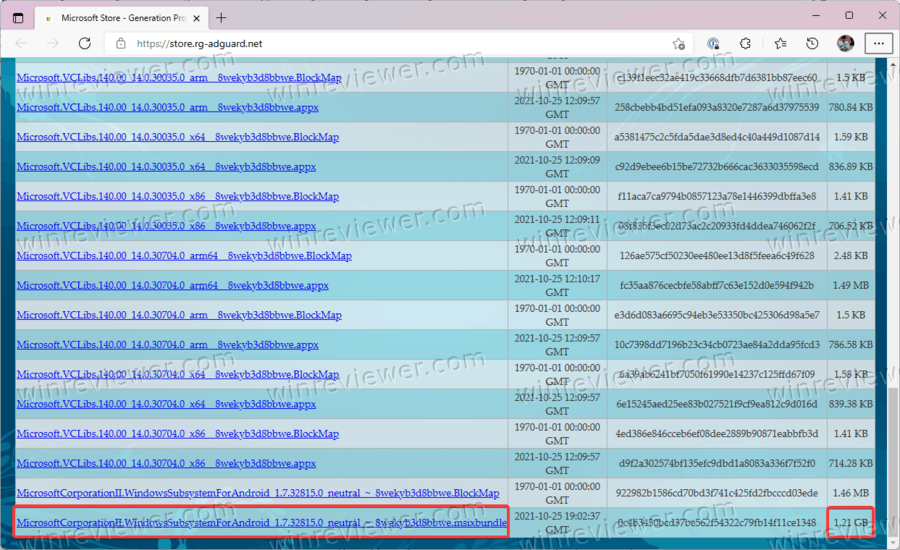
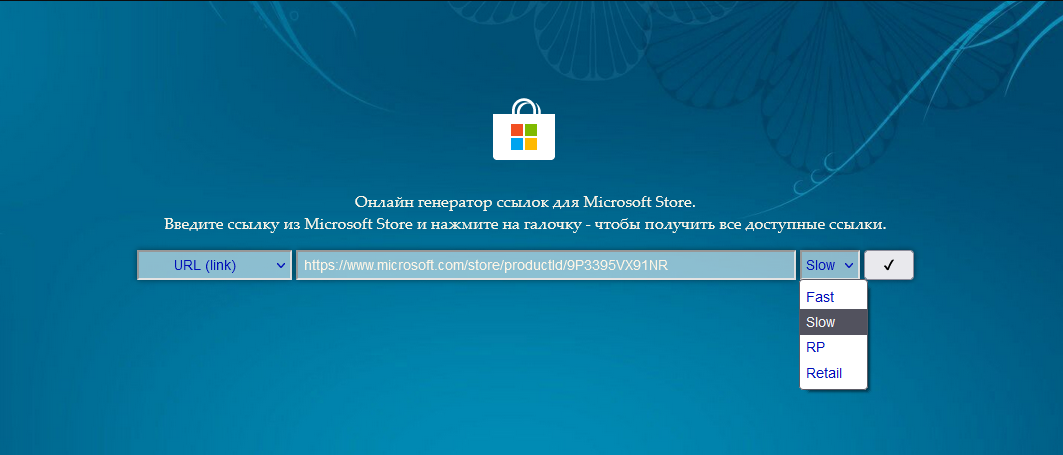
- После включения компьютера откройте любой браузер и перейдите по ссылке store.rg-adguard.net. На этом этапе вам надо скачать файлы подсистемы Android для последующей модификации и интеграции сервисов Google.
- В первом выпадающем списке выберите ProductID.
- В поисковую строку на странице (не в браузере) введите 9P3395VX91NR.
- В последнем выпадающем списке выберите Slow.
- Нажмите на кнопку с галочкой для поиска нужных компонентов.

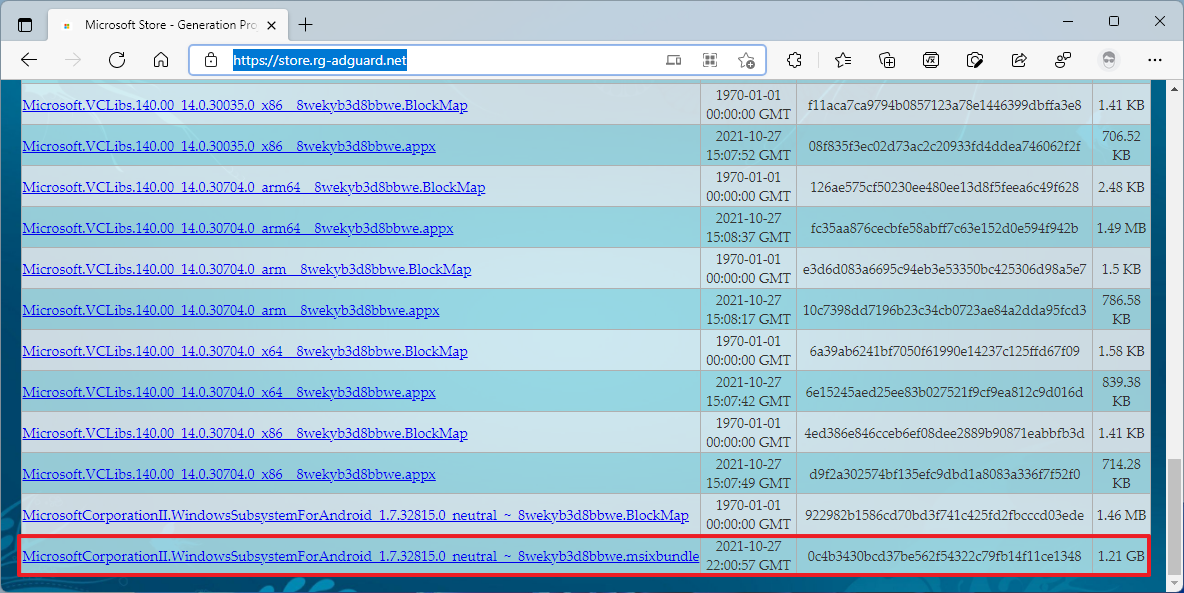
- Пролистайте список и найдите самый большой файл размером 1.2Гб. Скачайте его.

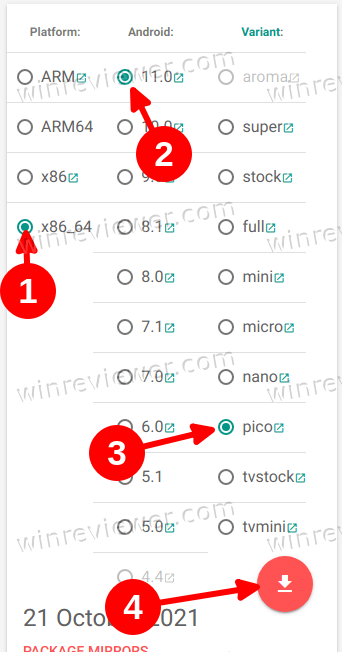
- Перейдите на сайт OpenGapps и установите платформу x86_64, Android 11, а затем выберите вариант Pico. Для загрузки выбранного набора нажмите на большую красную кнопку со стрелкой.

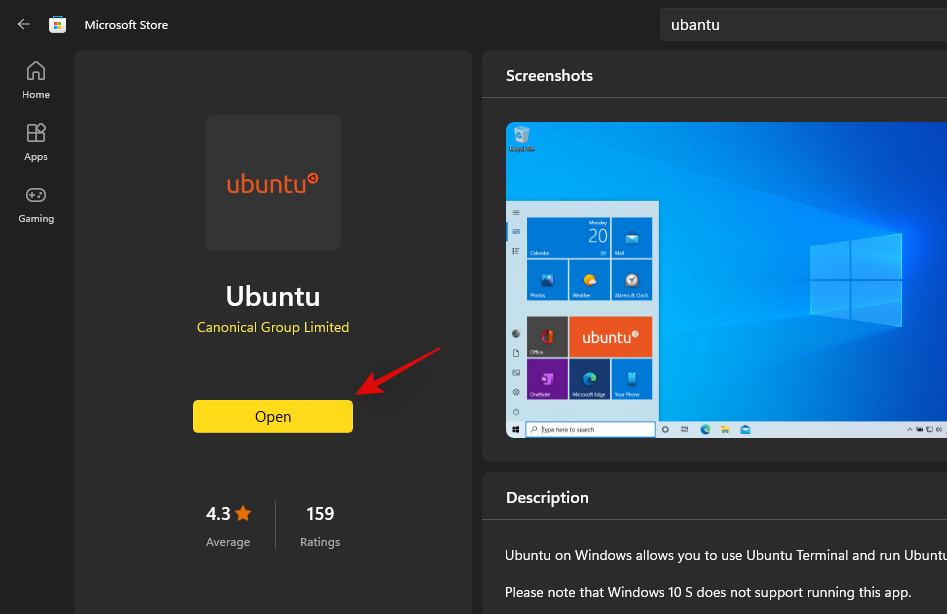
- Пока вы ждете загрузки подсистемы и сервисов Google, перейдите в магазин Microsoft Store по ссылке для загрузки и установки Ubuntu. Если Ubuntu в WSL уже установлена, пропустите этот шаг.

На этом этапе у вас есть все файлы, необходимые для объединения GApps и WSA. Теперь вам нужно распаковать оба пакета и выборочно объединить их компоненты.
Распаковка файлов
- Теперь откройте ранее скачанный msixbundle файл с помощью любого удобного вам архиватора. Например, 7Zip.
- Внутри файла найдите файл WsaPackage_1.7.32815.0_x64_Release-Nightly.msix. Он занимает приблизительно 700 Мб.

- Откройте Проводник и перейдите на диск С. Создайте папку WindowsSubsystemAndroid.
- Скопируйте в созданную папку все файлы из msix-файла в архиваторе.
- После копирования файлов удалите следующее: папку AppxMetadata и файлы AppxBlockMap.xml, AppxSignature.p7x и [Content_Types].xml.
- Вернитесь в корень диска С и создайте папку GAppsWSA.
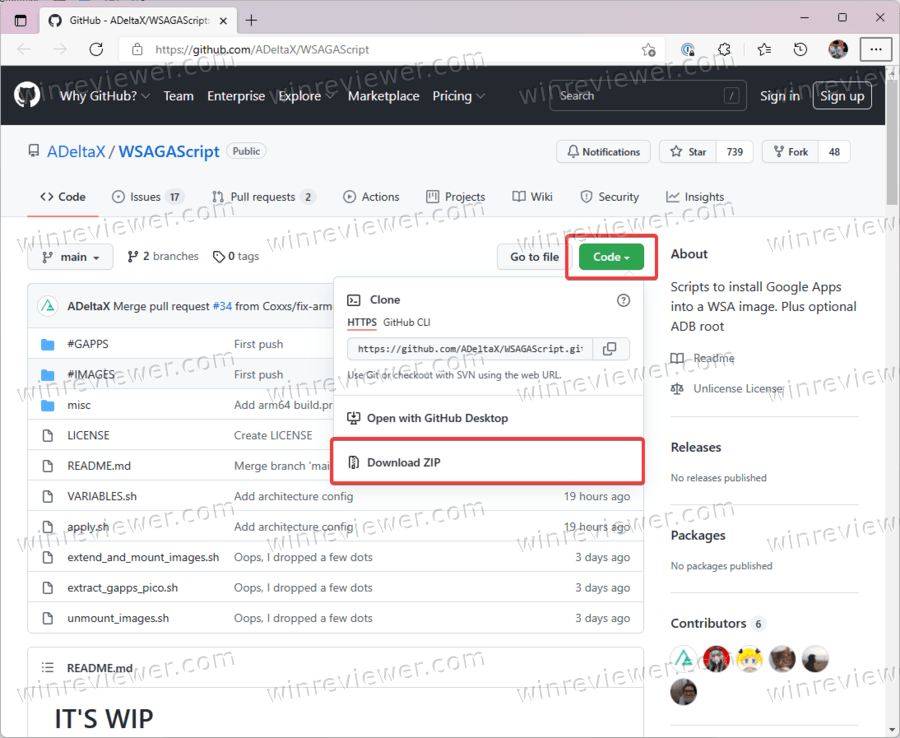
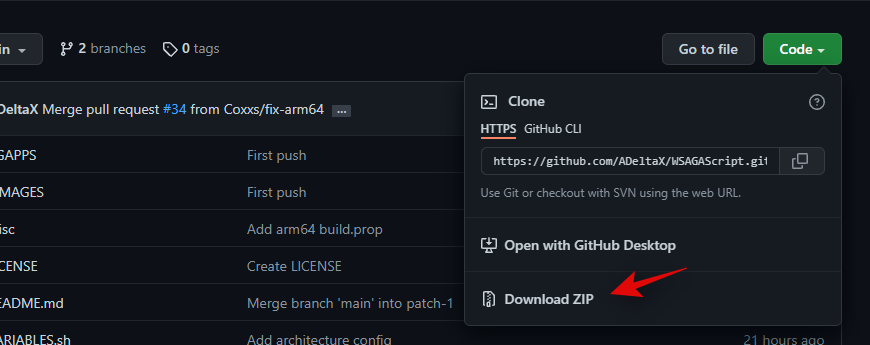
- Откройте браузер и перейдите по ссылке на страницу репозитория проекта, с помощью которого стало возможным установить Google Play Store на Windows 11.
- Нажмите Code > Download ZIP.(прямая ссылка на архив)

- Откройте загруженный архив, а затем папку внутри него. Скопируйте все содержимое папки в ранее созданную папку GAppsWSA.
- Теперь скопируйте ранее скачанный архив с сервисами Google (GAPPS) и скопируйте его в папку C:GAppsWSA#GAPPS.
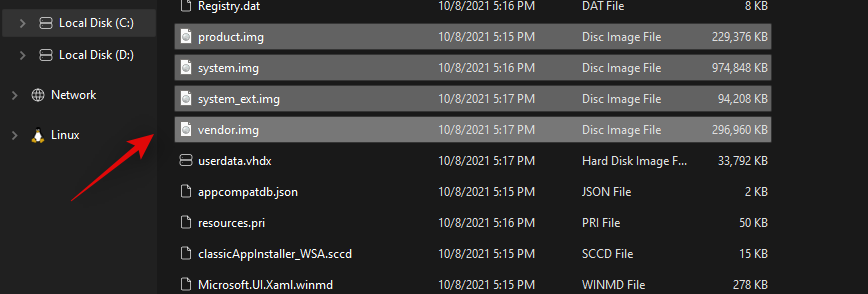
- Перейдите в папку WindowsSubsystemAndroid и скопируйте следующие файлы: product.img, system.img, system_ext.img, vendor.img.
- Скопируйте файлы в папку C:GAppsWSA#IMAGES.
Готово. Теперь выполним пересборку ядра и включим GApps в состав WSA.
Пересборка ядра WSA
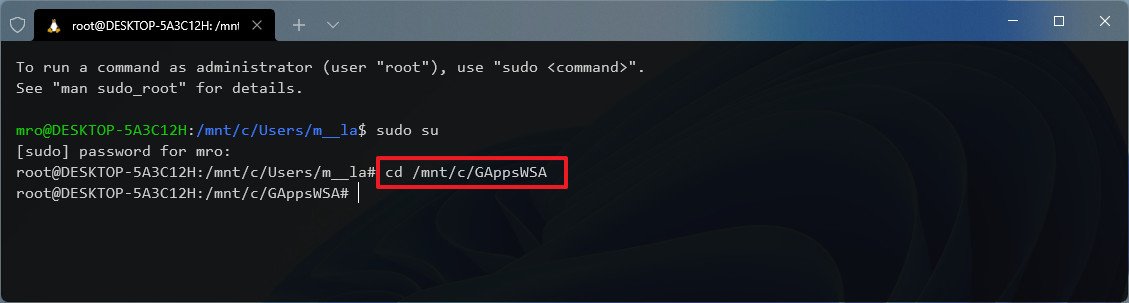
- Запустите Ubuntu в Терминале Windows и введите команду sudo su для получения рут-прав.
- Введите команду
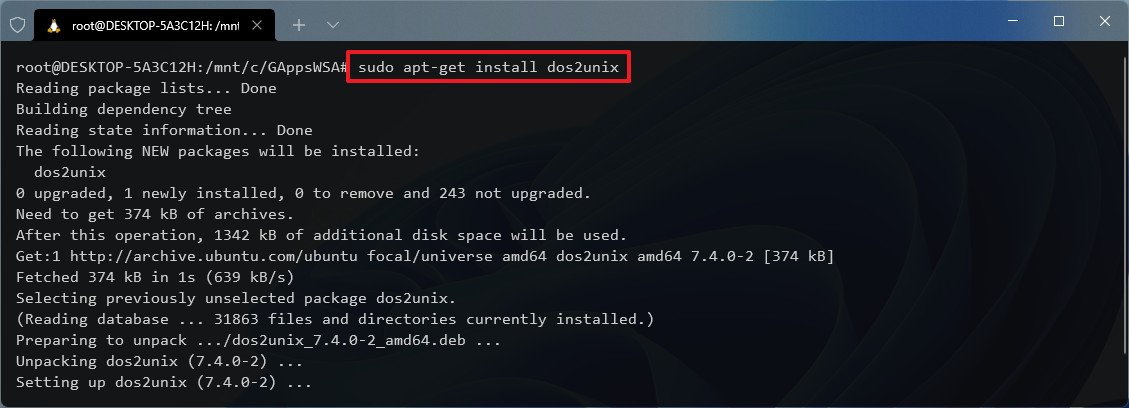
cd /mnt/c/GAppsWSA/и нажмите Enter. - Теперь надо установить lzip и unzip. Для этого воспользуйтесь следующими командой apt install lzip unzip. Нажмите Y для подтверждения действия.
- Теперь надо установить dos2unix. Для этого используйте команду apt install dos2unix.
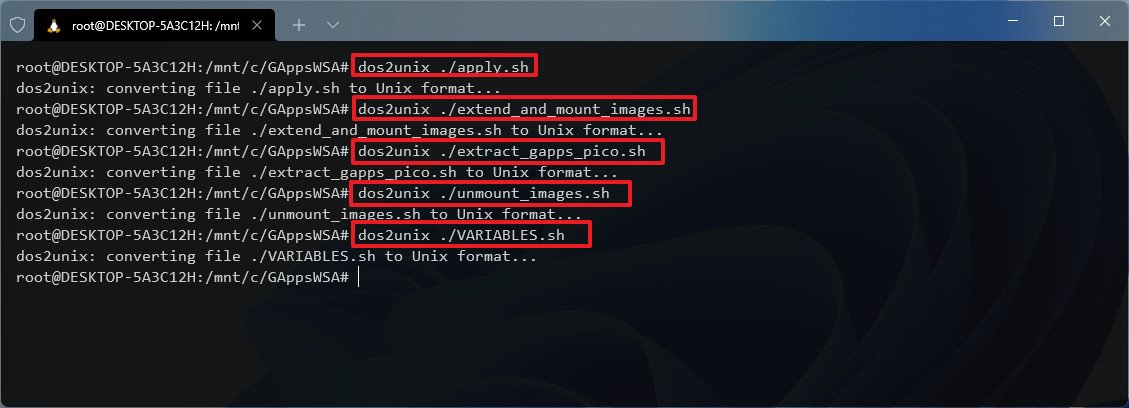
- Выполните следующие команды одна за другой:
- dos2unix ./appli.sh,
- dos2unix ./extend_and_mount_images.sh,
- dos2unix ./extract_gapps_pico.sh,
- dos2unix ./unmount_images.sh, и
- dos2unix ./VARIABLES.sh.
- Введите команду clear для удобства в дальнейшей работе с консолью.
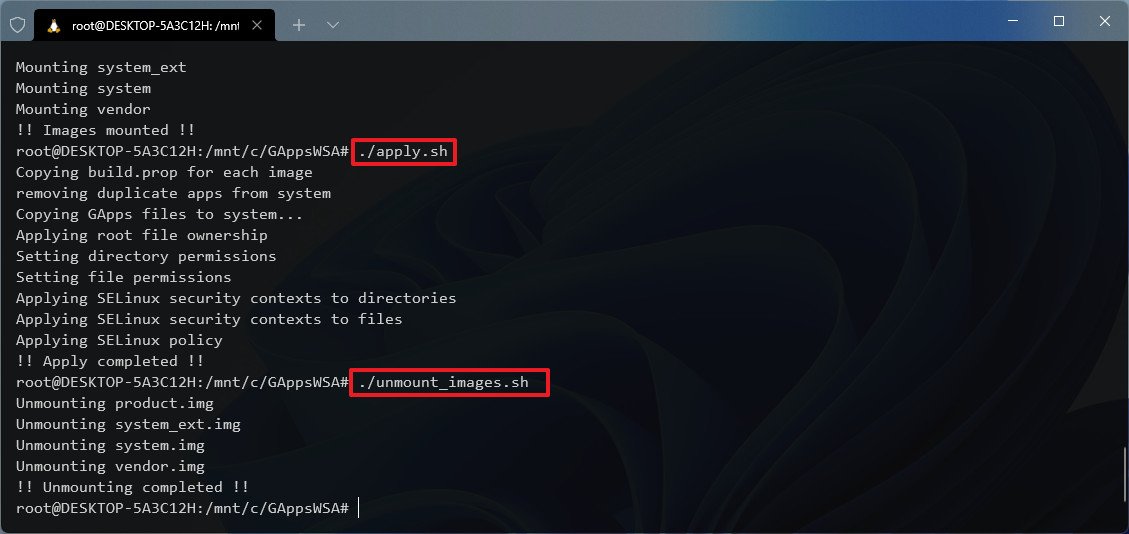
- Теперь вводите следующие команды последовательно одна за другой, каждый раз нажимая Enter для выполнения. Обратите внимание, что Терминал должен возвращать сообщения об успешном выполнении команд. Команды:
- ./extract_gapps_pico.sh,
- ./extend_and_mount_images.sh,
- ./apply.sh
- ./unmount_images.sh.
Теперь соберем все файлы вместе и установим Google Play в Windows 11.
Установка Google Play и GApps в Windows 11
- Перейдите в папку
c:GAppsWSA#IMAGESи скопируйте файлы product.img, system.img, syste_ext.img и vendor.img. - Вставьте скопированные файлы в папку WindowsSubsystemAndroid.
- Перейдите в
C:GAppsWSAmiscи скопируйте файл kernel. - Перейдите в папку WindowsSubsystemAndroid > Tools и переименуйте файл kernel в kernel_bak.
- Вставьте сюда ранее скопированный файл kernel.
- Откройте Параметры Windows и перейдите в раздел Конфиденциальность и безопасность > Для разработчиков. Включите режим разработчика.

- Запустите Терминал Windows с правами Администратора и откройте профиль PowerShell (запускается по умолчанию).

- В Терминале вставьте следующую команду: Add-AppxPackage -Register C:WindowsSubsystemAndroidAppxManifest.xml
- Откройте меню Пуск и запустите Windows Subsystem for Android.

- Включите режим разработчика.
- Нажмите на кнопку со стрелкой возле Files.
- Снимите отметку возле пункта делиться диагностическими данными (в этом нет смысла, так как используется модифицированная подсистема).
- Закройте приложение Файлы и подождите минуту-две.
- Откройте меню Пуск и введите Google Play. Windows отобразит магазин Google Play Store в поисковой выдаче. Запустите магазин.

Готово! Теперь вы можете войти в свою учетную запись, после чего откроется главная страница магазина.
Однако, мы настойчиво рекомендуем на этом этапе закрыть магазин Google Play и вернуть на место оригинальный файл ядра в WSA.
Восстанавливаем оригинальный файл ядра
- Откройте Windows Subsystem for Android и нажмите кнопку Выключить. Подождите, пока не исчезнет анимация загрузки.
- Перейдите в
C:WindowsSubsystemAndroidToolsи переименуйте файл kernel в kernel_root. - Наконец, переименуйте kernel_bak в kernel.
Готово. Теперь вы можете запустить магазин Google Play на Windows 11 и устанавливать любые необходимые вам приложения. Обратите внимание, что не все из них могут работать корректно, но подавляющее большинство популярных программ все же работают без особых проблем.
Источник
💡Узнавайте о новых статьях быстрее. Подпишитесь на наши каналы в Telegram и Twitter.
Судя по тому, что вы читаете этот текст, вы дочитали эту статью до конца. Если она вам понравилась, поделитесь, пожалуйста, с помощью кнопок ниже. Спасибо за вашу поддержку!
На презентации Windows 11 нам обещали полную поддержку Android приложений, и их установку прямо из Microsoft Store. Однако Windows 11 вышла, а этой возможности нет, и не предвидится до 2022 года, обидно.
Однако в тестовых сборках Windows 11 Microsoft открыла доступ к Windows Subsystem for Android — компоненту, позволяющему запускать Android-приложения внутри настольной операционной системы. Но по умолчанию пользователям доступны только 50 отобранных программ из Amazon Appstore. А это совсем не то, что обещали. К счастью, умельцы не стали это терпеть, и запилили решение, которое даёт возможность установить и комфорта работать практически с любым приложением Android и с самим магазином GooglePlay.
Внимание: Мы не несём ответственности за возможные сбои программного обеспечения или оборудования вследствие выполнения этой инструкции. Все действия выполняются на ваш страх и риск.
Для начала нужно удалить Windows Subsystem for Android, если он есть на компьютере, это происходит ровно так же, как с любой другой программой: заходим в «Параметры», далее «Приложения», «Приложение и возможности».

Вбиваем в поиске Windows Subsystem for Android, если находим, удаляем, если такого приложения не установлено, движемся далее.
Далее необходимо активировать функцию виртуализации. Она должна быть включена в BIOS компьютера, на большинстве устройств это работает по умолчанию.

Также необходимо активировать компонент Hyper-V. Для этого заходим в «Панель управления», далее «Программы», «Включение или отключение компонентов Windows»

Там нужно найти и включить пункты «Платформа виртуальной машины» и Hyper-V.

Система попросит перезагрузить компьютер. Перезагружаем.
Далее необходимо скачать на ваш компьютер некоторые файлы, скачать их можно по ссылке с нашего сайта.
WsaPackage_1.7.32815.0_x64_Release-Nightly
.zip
Download ZIP • 805.21MB
Также потребуется загрузить Android SDK Platform Tool по этой ссылке: https://developer.android.com/studio/releases/platform-tools
Скаченные архивы распаковываем в любое место, можно в корневой каталог диска «C». Не удаляйте эти папки с компьютера.
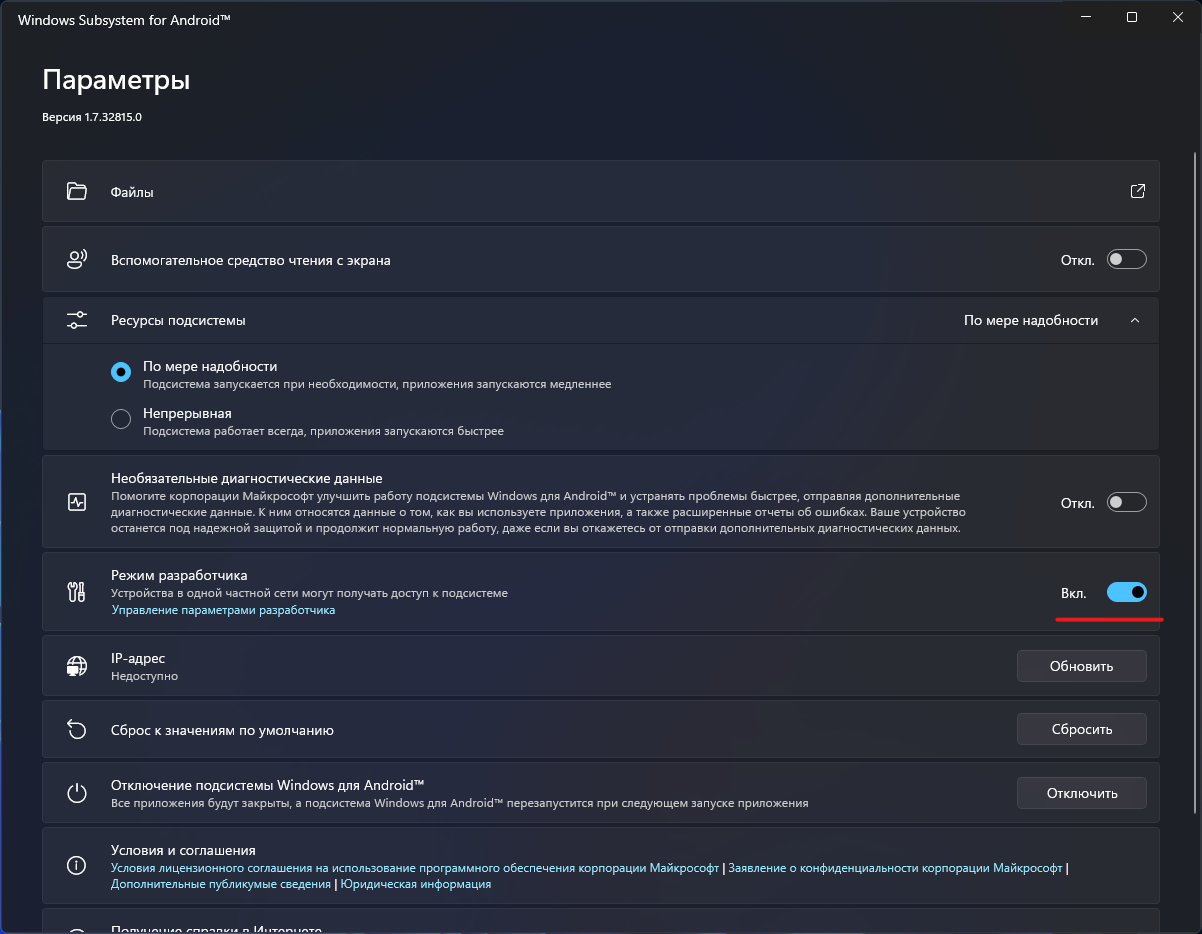
Теперь нам нужно активировать режим разработчика, для этого переходим в «Параметры», далее «Конфиденциальность и безопасность» и выбираем пункт «Для разработчиков», здесь включаем пункт «Режим разработчика».

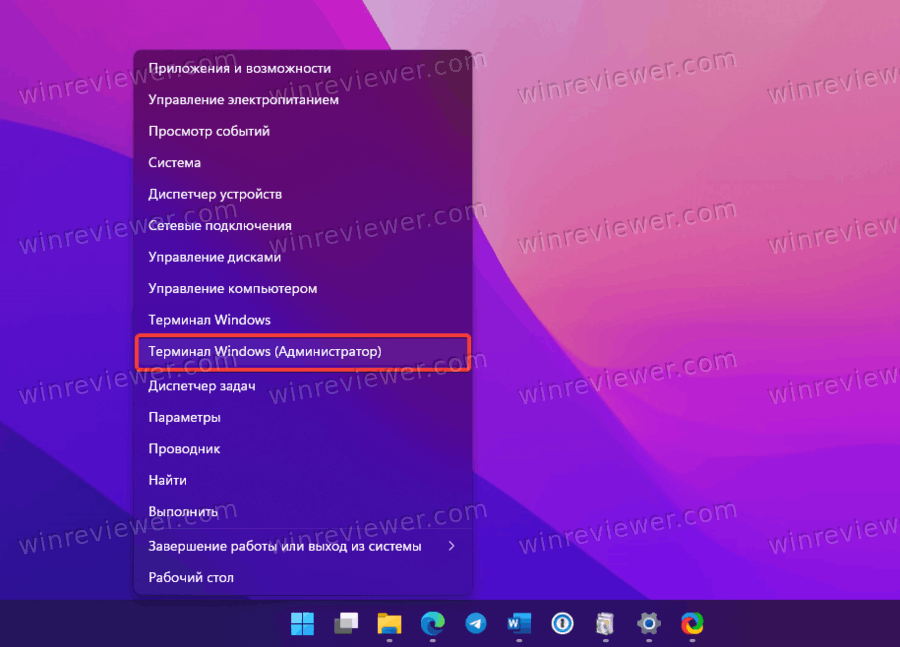
Откройте «Терминал» от имени администратора через поиск или кликнув правой кнопкой мыши по иконке «Пуск»;

В терминале вводим следующую команду, в данной команде %полный адрес до распакованной папки% замените на полный путь к папке из первого архива
Add-AppxPackage -Register %полный адрес до распакованной папки%AppxManifest.xml
После завершения установки, на компьютере должен появиться модифицированный Windows Subsystem for Android.

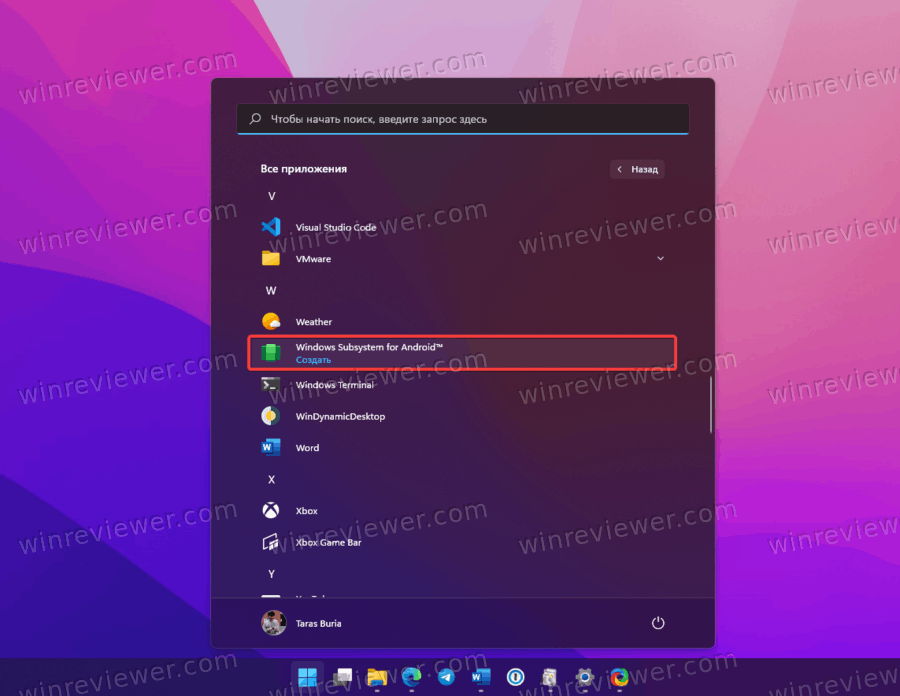
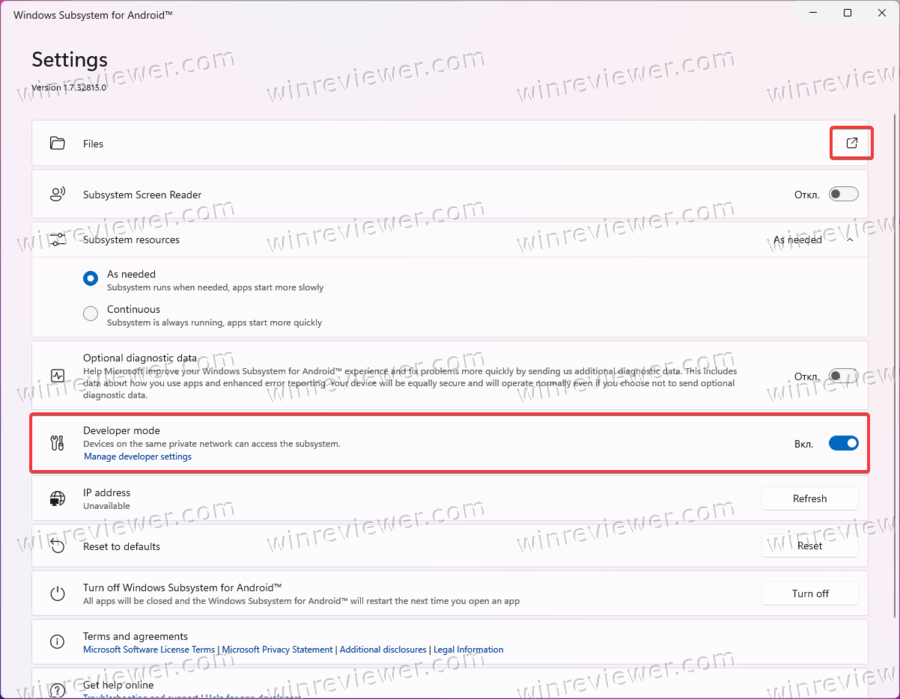
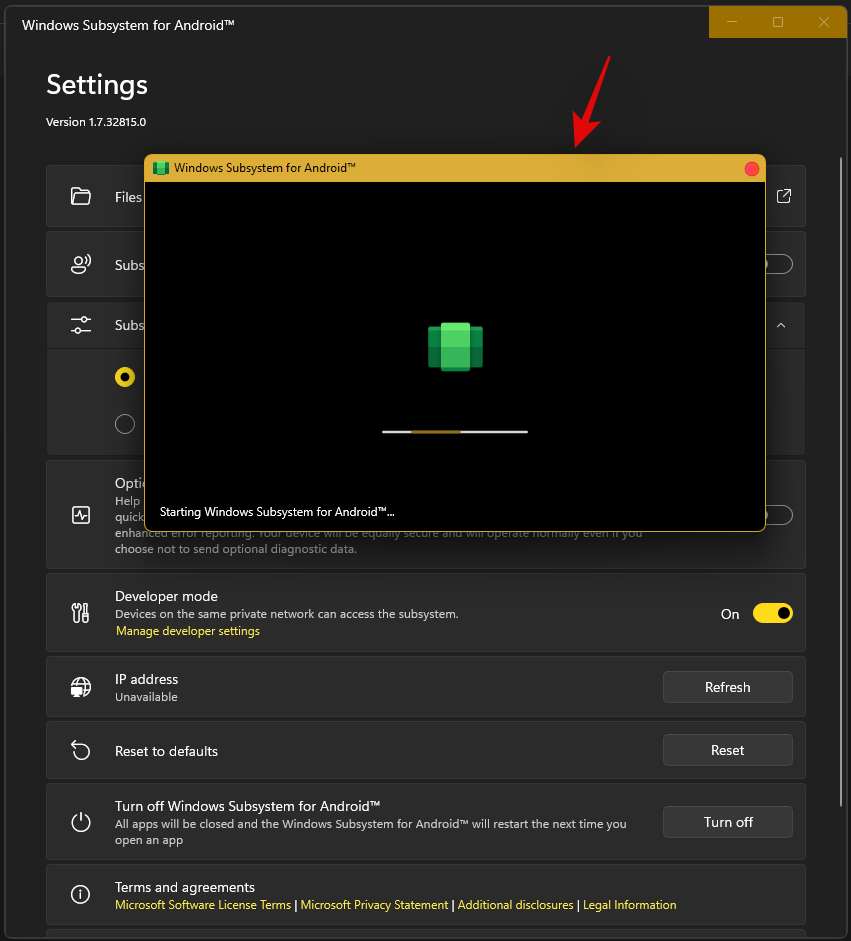
Запускаем приложение Windows Subsystem for Android из меню «Пуск» и активируем Developer Mode, затем жмём на подпункт Manage developer settings, даём необходимые разрешения, и ждём окончания процесса. Окна не закрываем!

Далее нам нужно настроить работу PlayMarket. Переходим в распакованную папку Android SDK Platform Tool, и с зажатой клавишей «Shift» кликаем правой кнопкой мыши на свободном пространстве папки, в контекстном меню выбираем пункт «Открыть в Терминале Windows»

Переходим к окну Windows Subsystem for Android. В данном окне ищем пункт «IP-adress», и в данной строке жмём кнопку «Refresh». Копируем или запоминаем появившийся IP адрес.

Переходим к окну терминала. Вводим следующую команду:
.adb connect %скопированный ip-адрес%
фрагмент %скопированный ip-адрес% меняем на скопированный IP адрес.
Далее последовательно вводим команды:
.adb shell
su
setenforce 0
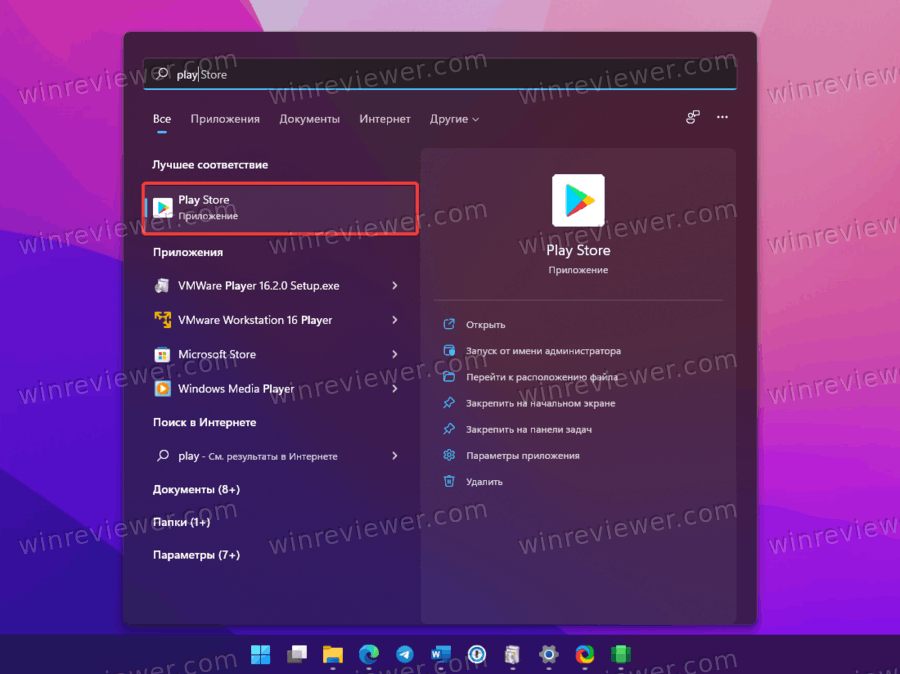
Готово! Теперь мы можем авторизоваться в «Play Маркете» через свой Google аккаунт.

Модифицированный Windows Subsystem for Android монтирует на компьютере образ Google Pixel 5. После регистрации в «Play Маркете» он ведёт себя как полноценный смартфон.
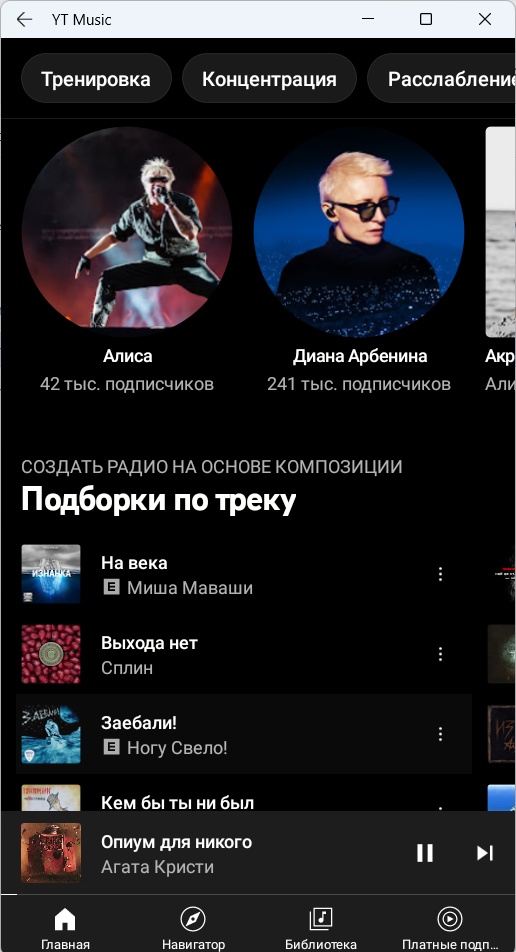
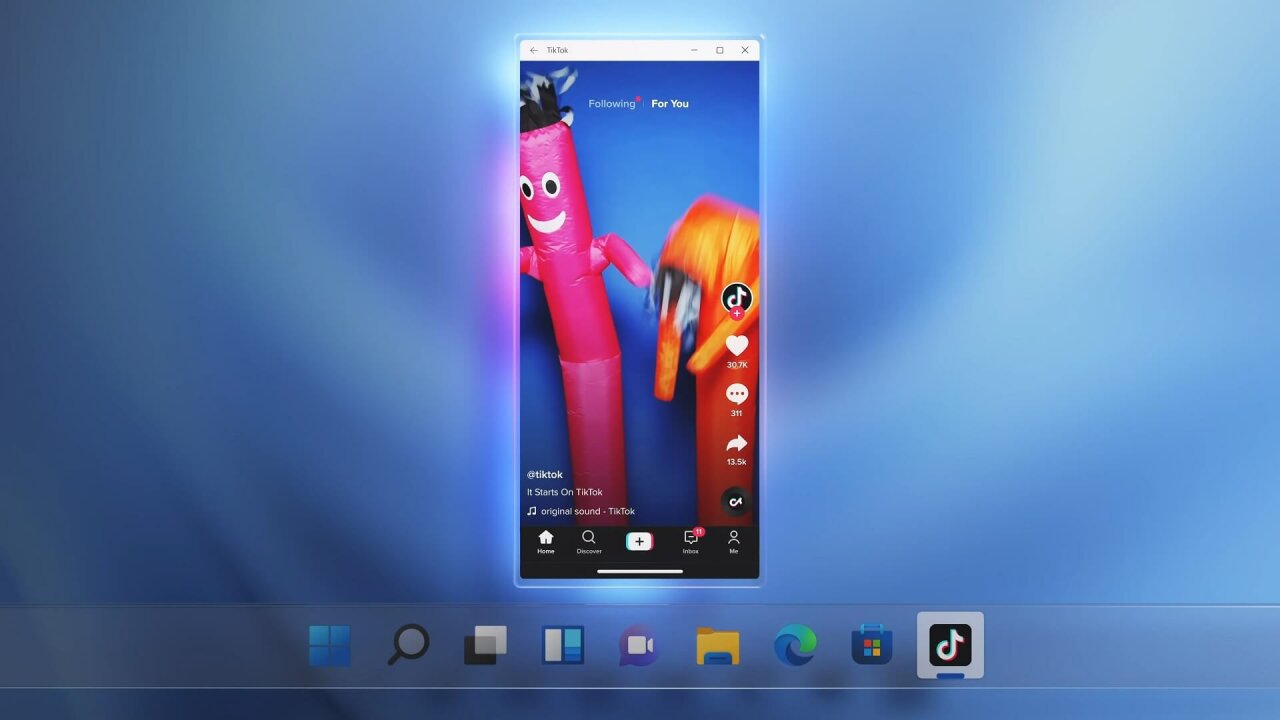
Приложения устанавливаются из Google Play практически как родные, они появляются в списке всех программ Windows 11, открываются в отдельном окне и свободно добавляются в панель задач. А так как копия Pixel 5 регистрируется в Google как самостоятельное устройство, с веб-версии «Play Маркета» можно удалённо отправлять приложения на установку — и всё сработает, как с настоящим смартфоном.

Теперь мы можем ставить Инстаграм, ТикТок и множество других приложений и игр, полезных и не очень.

Также можно установить любое приложение с APK файла. Для этого вам необходимо скачать сам APK файл, например с сайта 4PDA, затем запустить Windows Subsystem for Android и терминал из папки Platform Tool.
Переходим к окну терминала. Вводим следующую команду:
.adb connect %скопированный ip-адрес%
фрагмент %скопированный ip-адрес% меняем на скопированный IP адрес.
Далее вводим команду:
.adb install %полный адрес до скачанного файла%
фрагмент %полный адрес до скачанного файла% меняем полный адрес до скачанного файла.
И ждём окончания установки.

В случае успешной установки ярлыки приложения появятся в списке установленных программ. Теоретически можно установить любое Android-приложение: например, LazyMediaDeluxe, Инстаграм, Google Keep и многое другое.

Однако при попытке загрузить приложение, которое полагается на сервисы Google, ничего не выйдет: Windows Subsystem for Android не содержит нужных компонентов по умолчанию.
Видео версия:
#новости #обновления #приложения #Microsoft #Windows #Windows11 #Google #GooglePlayStore #приложенияAndroid #Android #microsoftwindows #androidwindows
Несколько дней назад Microsoft начала тестирование подсистемы Windows Subsystem for Android (WSA), которая позволяет запускать Android-приложения в Windows 11.
Сейчас функция доступна только участникам программы Windows Insider на канале Beta, что несколько удивительно, так как обычно все новшества вначале появляются на канале Dev. Но даже если вы используете канал Beta, то для установки подсистемы из Microsoft Store потребуется сменить регион на США в самой Windows 11.
Microsoft обещает, что инсайдеры на канале Dev также вскоре получат доступ к Windows Subsystem for Android, но какие-либо конкретные сроки не называются. Если вы не хотите ждать, то можете установить подсистему вручную. Для этого вам потребуются прямые руки и небольшие навыки работы в PowerShell.
Важно! Все действия вы делаете на свой страх и риск.
Благодарим aleks242007 и участников чата Community в Telegram за помощь в составлении инструкции.
Инструкция
Установка Windows Subsystem for Android
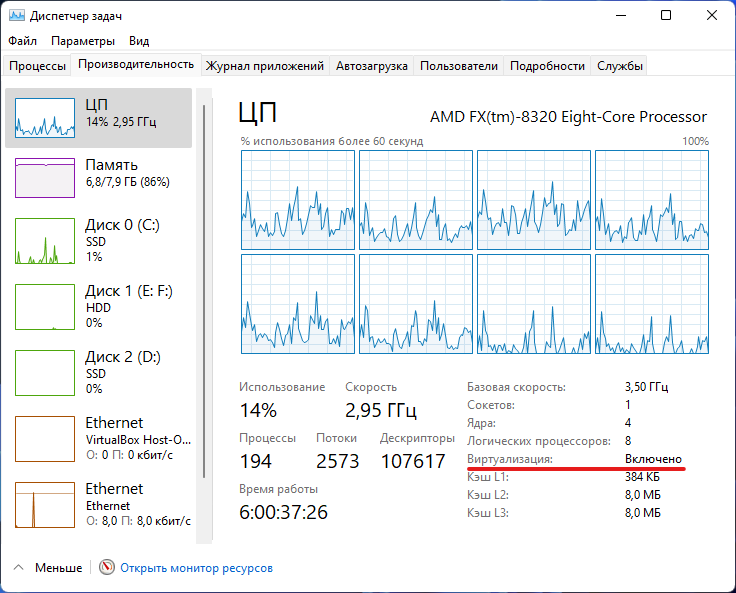
- Для начала убедитесь, что ваш компьютер поддерживает виртуализацию. Для этого откройте «Диспетчер задач», перейдите на вкладку «Производительность», выберите CPU и посмотрите текст под графиком. Там должно было указано: «Виртуализация: Включено».

- Если виртуализация отключена, то вам необходимо включить её в BIOS. У разных производителей настройка может располагаться в разных разделах и называться по-разному, так что можно поискать информацию в Google для вашего конкретного устройства.
- Если в BIOS настройка отсутствует или значение в «Диспетчере задач» не меняется, то вы вряд ли сможете запустить Windows Subsystem for Android на своём компьютере.
- Следом откройте меню «Пуск», введите в поле поиска «Включение или отключение компонентов Windows» и выберите соответствующий результат.
- В открывшемся окне установите галочку напротив пункта «Платформа виртуальной машины», нажмите «ОК», дождитесь применения изменений и перезагрузите ПК.
- Далее нам потребуется скачать установщик Windows Subsystem for Android в формате MSIXBUNDLE с сервера Microsoft Store:
- Перейдите на сайт Microsoft Store — Generation Project (от rgadguard) по этой ссылке.
- В поле на сайте вставьте следующую ссылку:
https://www.microsoft.com/store/productId/9P3395VX91NR - Справа от поля в выпадающем меню выберите Slow и нажмите на галочку.
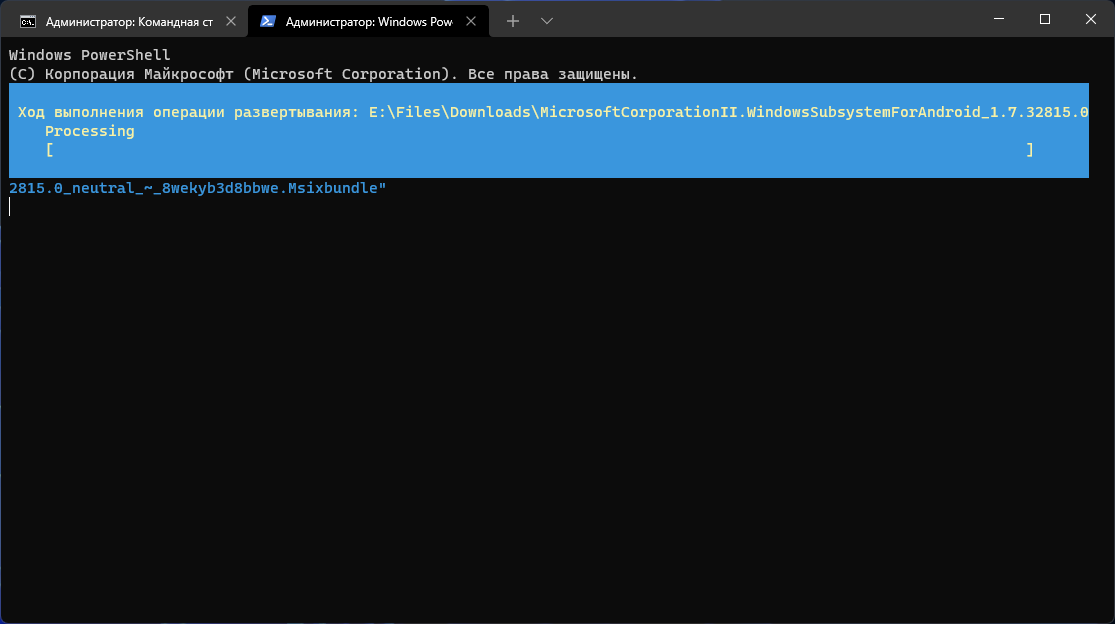
- В появившемся списке найдите файл с примерно таким названием (номер версии может отличаться):
MicrosoftCorporationII.WindowsSubsystemForAndroid_1.7.32815.0_neutral_~_8wekyb3d8bbwe.msixbundle - Нажмите на название этого файла и сохраните файл в любой папке на вашем компьютере. Обратите внимание, что файл должен быть в формате .MSIXBUNDLE. Если это не так, то просто смените расширение файла на нужное. Файл должен весить примерно 1,2 ГБ.
- Запустите PowerShell или Windows Terminal (нужна вкладка с PowerShell) от имени администратора.
- Введите в консоль следующую команду:
Add-AppxPackage -Path "C:Usersuser1DesktopMyApp.msix"- «C:Usersuser1DesktopMyApp.msix» — путь к файлу MSIXBUNDLE, сохранённому на шаге 4. Чтобы быстро его получить, вы можете нажать правой кнопкой мыши по файлу в «Проводнике» и выбрать пункт «Копировать как путь».
- Решение ошибки:
Add-AppxPackage: The ‘Add-AppxPackage’ command was found in the module ‘Appx’, but the module could not be loaded. For more information, run ‘Import-Module Appx’.
Если вы увидели такое сообщение в PowerShell, то введите следующую команду:
Import-Module Appx -UseWindowsPowerShellПосле этого вновь введите команду Add-AppxPackage из шага 6.
- Нажмите Enter и дождитесь завершения установки.
- Если всё прошло успешно, то в меню «Пуск» появится приложение под названием Windows Subsystem for Android.
Установка APK-файлов
Теперь подсистема Windows Subsystem for Android работает, однако с установкой приложений есть некоторые сложности. Как вы уже знаете, вместо Google Play здесь используется Amazon Appstore. Причём отображаются там лишь приложения, которые Microsoft и Amazon протестировали на работоспособность в подсистеме.
Правда воспользоваться Amazon Appstore всё равно не получится. Приложение не только требует учётную запись Amazon, но и проверяет ваше местоположение. Можно, конечно, подключить VPN, но есть ли в этом смысл?
К счастью, Windows Subsystem for Android поддерживает установку приложений с помощью APK-файлов. Вы можете воспользоваться либо утилитой WSATools, о которой мы рассказали в статье по этой ссылке, либо устанавливать вручную с помощью командной строки по инструкции ниже.
- Скачайте SDK Platform Tools для Windows с сайта Android, перейдя по этой ссылке.
- Извлеките папку
platform-tools, например, в корень диска C (рядом с папками Windows, Program Files и т. д.) - Откройте приложение Windows Subsystem for Android и включите «Режим разработчика».
- Нажмите на кнопку рядом с элементом «Файлы». Начнётся запуск подсистемы Windows Subsystem for Android.
- Нажмите на кнопку «Обновить» рядом с элементом «IP-адрес».
- В описании для элемента «Режим разработчика» появится IP-адрес, который мы будем использовать для подключения к подсистеме с помощью ADB.
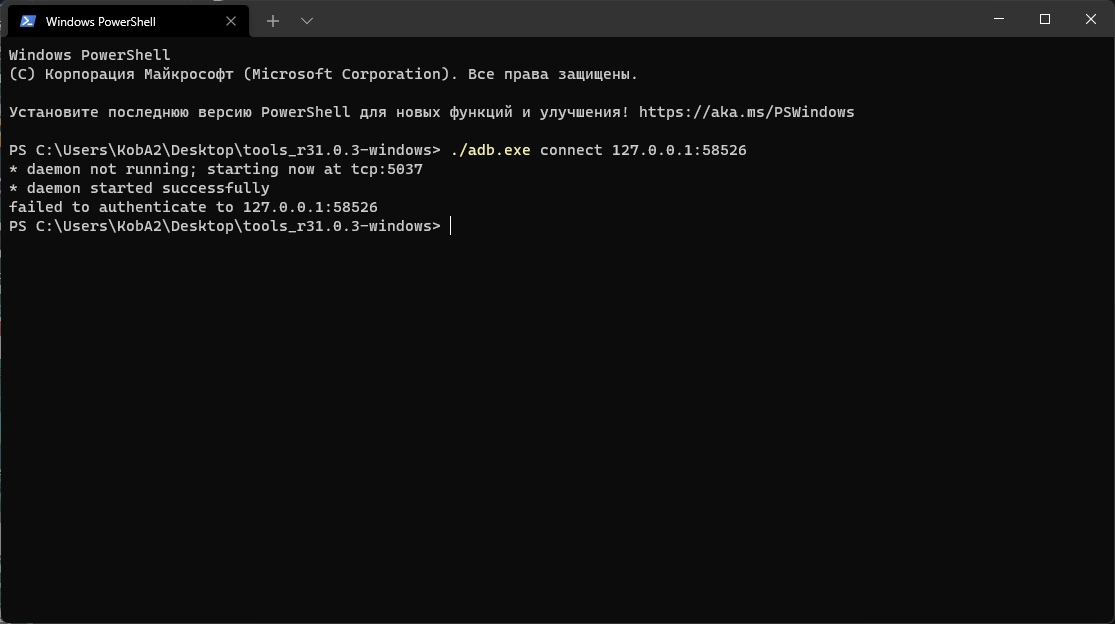
- Откройте командную строку (или Windows Terminal) и перейдите в папку с установленным SDK Platform Tools, подставив нужный путь к папке:
cd C:platform-tools - Введите следующую команду, подставив в неё IP-адрес из предыдущего пункта:
adb.exe connect 127.0.0.1:58526Примечание. Если выполнять команды через PowerShell, то перед ADB следует прописать ./
- Убедитесь, что результат в командной строке примерно такой, как на скриншоте ниже:
- Скачайте APK-файл нужного Android-приложения, например, воспользовавшись сервисом APKMirror.
- В командной строке выполните следующую команду, подставив в неё путь к скачанному APK-файлу:
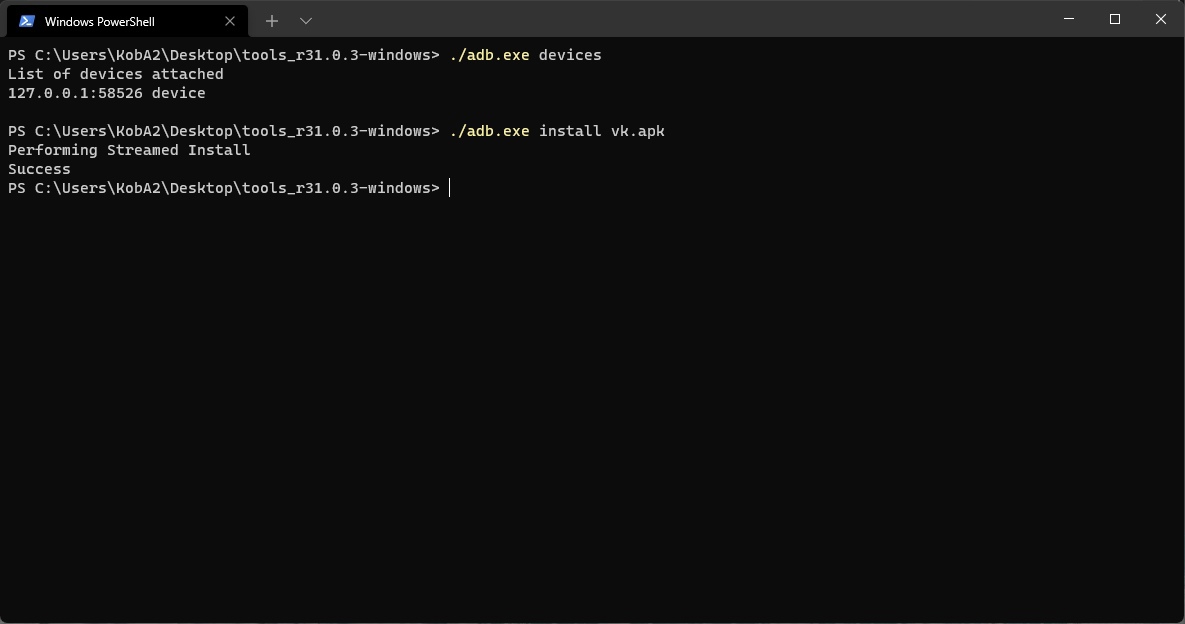
adb.exe install edge.apkЧтобы быстро скопировать путь к файлу, нажмите по нему правой кнопкой мыши и выберите «Копировать как путь». Затем вставьте его после adb.exe install и нажмите Enter.
- Дождитесь надписи «Success» в командной строке.
- Если всё прошло успешно, то ярлык установленного приложения должен появиться в меню «Пуск». Установленные приложения запускаются так же, как и приложения для Windows, то есть простым нажатием по иконке в меню «Пуск».
Поделиться впечатлениями о работе Windows Subsystem for Android и обсудить сценарии её использования вы можете в нашем чате в Telegram. Там же можете задавать вопросы, если возникли какие-либо сложности с установкой подсистемы или Android-приложений.
Поскольку далеко не все Android-приложения корректно работают в подсистеме, пользователи решили составить таблицу с информацией о работоспособности приложений в WSA. Найти и внести свой вклад вы можете на GitHub.
When Windows 11 announced the ability to install and use Android apps, everybody was over the moon. People were excited to run social media apps, games, and more directly from their PC. Sadly this excitement was cut short when Microsoft revealed that they would be using the Amazon App Store instead of the Google Play Store.
For comparison, the Amazon apps store only has around 460,000 while the Google alternative has 3.48 million apps in total. This is one of the reasons many users have been looking to install Google Play Services and Store manually. Are you in the same boat? Then we have the perfect guide for you!
Use the methods below to get and use Google Play Store and Gapps on your Windows 11 PC.
Related: How to Ungroup Icons on Windows 11 Taskbar With a Registry Hack
Method #1: Install custom WSA with Gapps and Play Store pre-installed
A simpler way to get Google Apps and Google Play Store with WSA is by using a pre-modified WSA that has the Gapps pre-installed. This WSA was shared by a Redditor called Rageman666 (see here). Once downloaded, you can use the mod given below to sign in to Google Play Store with your Google account. (However, if you want to install WSA officially only and then take on the complex method of installing Gapps yourself, then look at Method 2 below.)
What do you need
- Modified WSA | Download Link (Mirror | Mirror 2)
- ADBToolkit | Download Link
- Important: You will need to uninstall the original WSA from your system in case you have it installed before proceeding with this guide.
Step-by-step guide
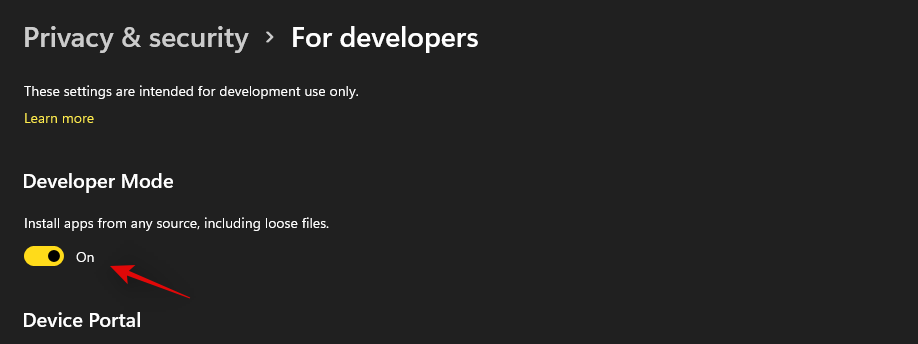
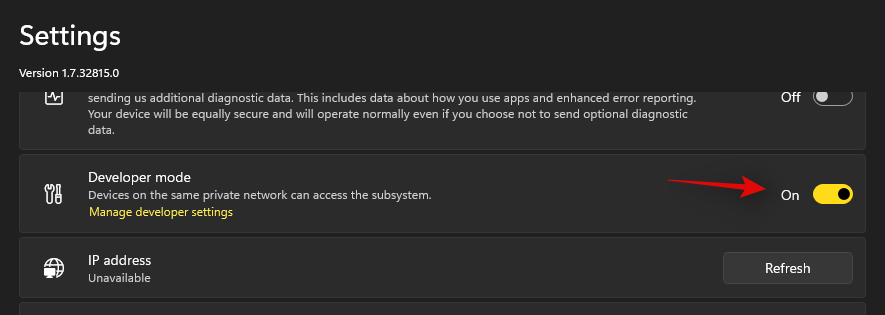
We will first need to enable developer mode on your installation of Windows 11. Press Windows + i on your keyboard and select ‘Privacy & security’ from the left sidebar.
Click on ‘For developers’ on your right.

Click and turn on the toggle for ‘Developer Mode’. Click on ‘Yes’ to confirm your choice.
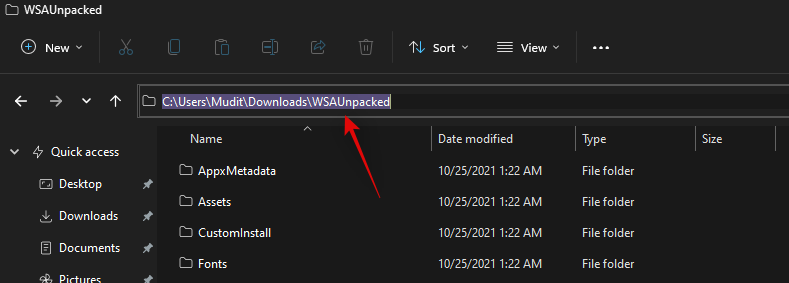
Now download the WSA linked above to a convenient location on your local storage. Unzip the files to a new folder named ‘WSAUnpacked’. Click on the address bar in the ‘WSAUnpacked’ folder and copy the path to your clipboard.
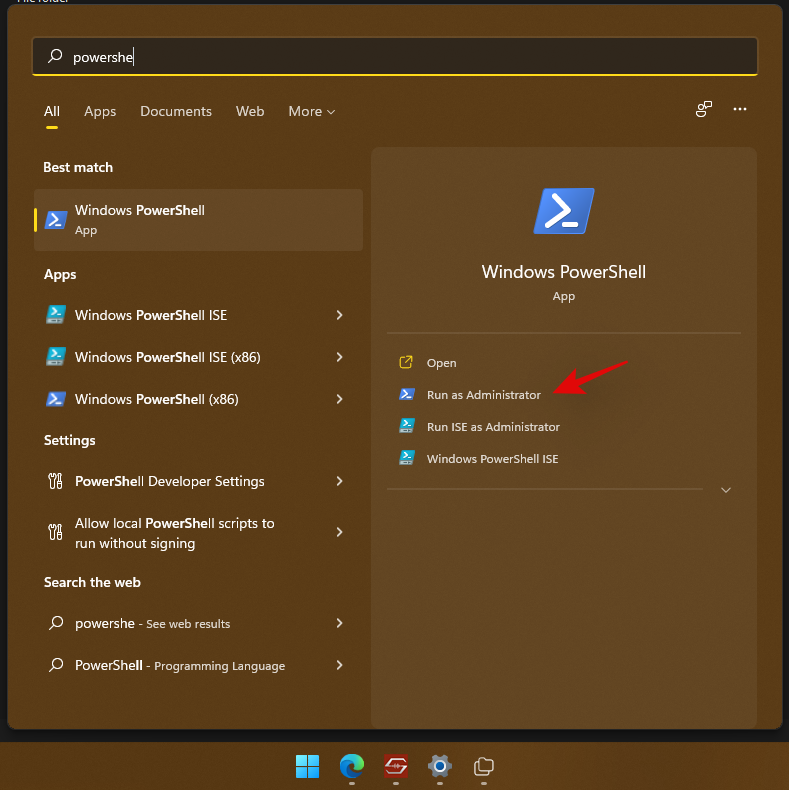
Press Windows + S on your keyboard, search for ‘Powershell’ and click on ‘Run as administrator’ once it shows up in your search results.
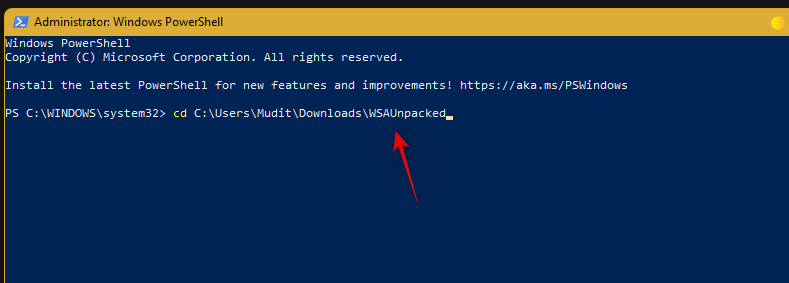
Type in the following command and replace PATH with the path we copied to your clipboard. Ensure that you remove the quotes from the pasted path.
cd PATH
Now type in and execute the following command.
Add-AppxPackage -Register .AppxManifest.xml

The modified WSA will now be installed on your system. Press the Windows key and launch the same from your Start menu.

Once the Subsystem launches, click and enable ‘Developer Mode’.
Now click on ‘Files’ at the top so that it launches Windows Subsystem for Android on your system.
Close the Files app. We now need to use a workaround to sign in to the Play Store.
Download ADBToolkit linked above and extract it to a new folder on your desktop named ‘ADBToolkit’. Once extracted, click on the address bar at the top and copy the address to your clipboard.
Press Windows + S on your keyboard and search for Powershell. Click on ‘Run as administrator’ once Powershell shows up in your search results.
Type in the following command and replace PATH with the path to ADBToolkit we copied earlier.
cd PATH
Note: Ensure that you remove the quotes from the pasted path to ADBToolkit.
Now switch back to the subsystem window and copy the address given below ‘Developer Mode’.
Execute the command given below to launch and connect ADB. Replace ‘ADDRESS’ with the address copied to your clipboard (from above).
.adb.exe connect ADDRESS

Type in the following command to launch ADB shell.
.adb.exe shell
Now use the following command to gain root access.
su
Now type in the following command.
setenforce 0
Type in ‘Exit’ to exit PowerShell.
You can now close all the windows open on your desktop. Press Windows + S and search for ‘Play Store’ now. Click and launch the app once it shows up in your search results.
Now click on ‘Sign in’ and sign in with your Google account.
You will now be signed in with your Google Account and you should now be able to use Google Play Store on your Windows 11 PC.

And that’s it! You can now download and install the desired Android apps on your system directly from the Google Play Store.
Related: Sideload APK on Windows 11 using ADB manually | Automatically with a script
Method #2: Install WSA and then install Gapps yourself
The method above is much easier and thus easy to go with even though not exactly recommendable, as it’s a pre-modified (custom) WSA package. But if you want an official WSA package from Microsoft and want to install Gapps yourself over this, then this is the method for you. It’s quite complex btw, so may often wonder whether simply installing a custom WSA package that comes with Gapps pre-installed is worth it, which we’d say, is.
Getting Google Apps and Play Store on your PC on official WSA by installing Gapps package yourself is recommended as you wouldn’t need a pre-modified WSA which helps if you are concerned about the security of a custom WSA package under method 1.
What do you need
- WSGA script | Download Link (Gapps script for Windows Subsystem for Android)
- Windows Subsystem For Android | Link
- Store Adguard | Link
- OpenGApps | Link
- ADBToolkit | Download Link
- WinRAR | Download Link
- WSL: Windows Subsystem for Linux
- Ubuntu: Download Link
- Important: Uninstall the original Windows Subsystem For Android if you already have it installed on your PC before proceeding with this guide.
Step-by-step guide
Visit the WSA link above and copy and paste the following link given below or above in the text box.
Link
Now click on the drop-down menu beside the text box and click on ‘Slow’.
Click on the ‘Check Mark’ to process the given link.
Once processed, all the linked download files will now be available on your screen. Scroll to the bottom and click on the .msix bundle at the bottom and download it to a convenient location on your local storage.

Now go to the downloaded file, right-click on it and open it with WinRAR. If you do not have WinRAR on your PC then use the link above to download and install the same.

Once the bundle is open in WinRAR, scroll to the bottom and check the architecture of the .msix bundle. It should match your CPU architecture, if not, you can select the desired version from the list and proceed with the guide.

Double click and open the same bundle in WinRAR. Once you are done, go to your C/boot drive and create a new folder named ‘WindowsSubsystemForAndroid’.
Switch back to Winrar and select all the files except the following folders and files.
- AppxMetadata (folder)
- AppxBlockMap.xml (file)
- AppxSignature.p7x (file)
- [Content Types].xml (file)
Copy all the selected files to the new ‘WindowsSubsystemForAndroid’ folder we created earlier.
Once copied, create another new folder on your boot drive named ‘GAppsForWSA’.
Open the link for the WSGA script at the top and download the same as a .zip to your local storage.
Extract the .zip to the new ‘GAppsForWSA’ folder that we created in your boot drive.
Note: Extract the contents of the ‘WSGAScript-main’ folder contents inside the archive.
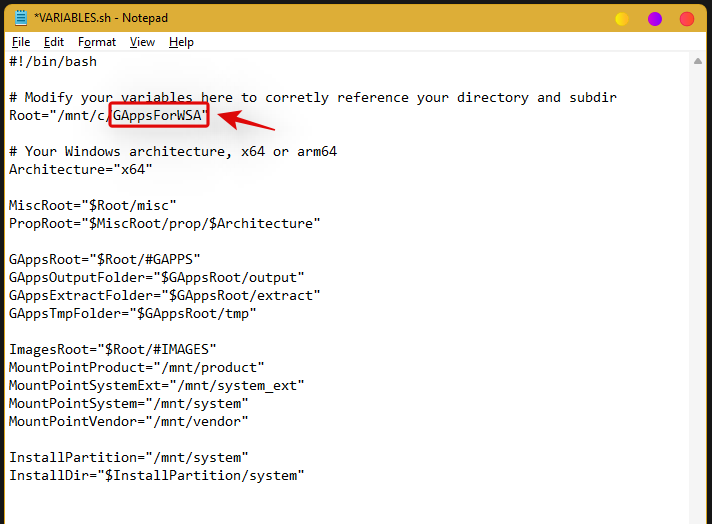
With the contents archived, right-click on ‘VARIABLEs.sh’ and open it with Notepad.
Replace ‘GAppsWSA’ with ‘GAppsForWSA’.
Press Ctrl + S on your keyboard to save the changes. We will now download GApps for your WSA installation. Visit the link for OpenGApps at the top and select the following options given below.
- Platform: x86_64
- Android: 11.0
- Variant: pico
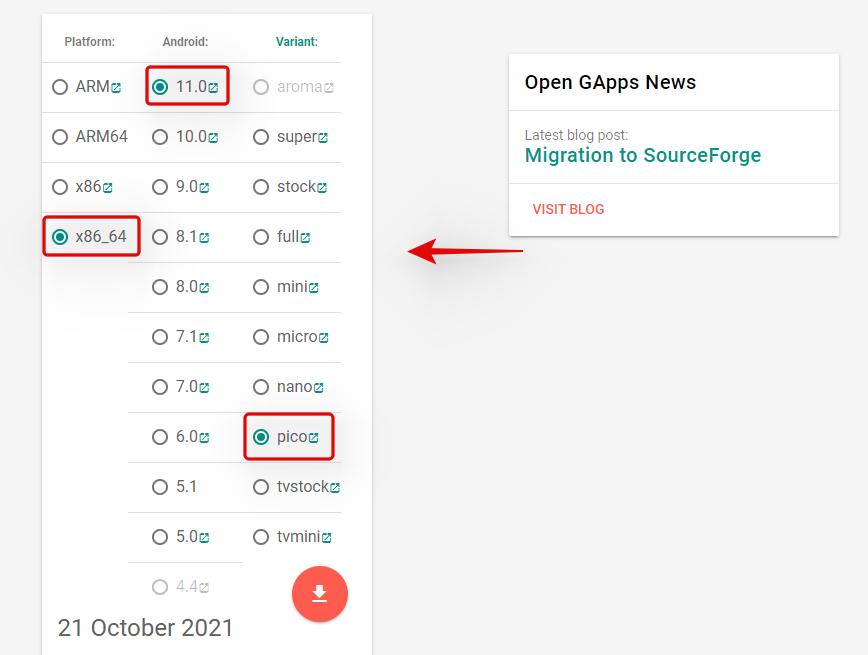
Click on the ‘Download icon’.

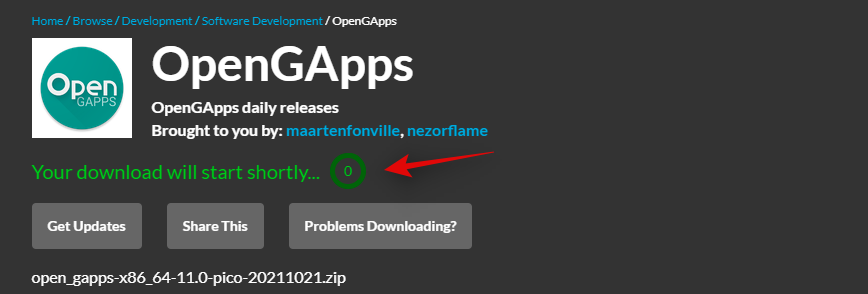
You will now be redirected to Sourceforge, wait a few seconds and the download should automatically be initiated for you.
Download and store the archive in the following location in the ‘GAppsForWSA’ folder on your boot drive.
Boot DriveGAppsForWSA#GAPPS

Now go back to your boot drive and open the ‘WindowsSubsystemForAndroid’. Copy the following 4 files.
- vendor.img
- system_ext.img
- system.img
- product.img
Navigate to the following location and paste all your copied files.
Boot DriveGAppsForWSA#IMAGES
We will now install WSL for your system. WSL is a Linux Subsystem that will allow you to use executables and scripts developed for Linux. Press Windows + i on your keyboard to open the Settings app and then click on ‘Apps’ on your left.
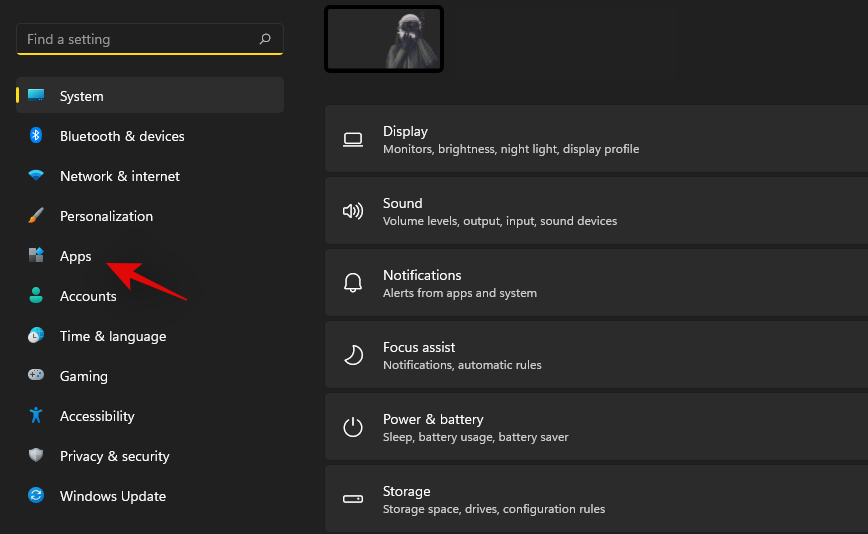
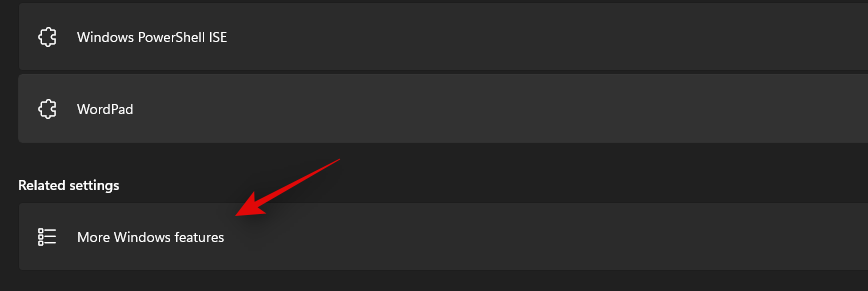
Now click on ‘Optional Features’.

Scroll down and click on ‘More Windows features’.
A new window for available features will now open on your screen. Scroll to the bottom and check the box for ‘Windows Subsystem for Linux’.
Click on ‘Ok’ once you are done. The Linux Subsystem will now be installed on your PC. You will now be prompted to restart your PC. We recommend you restart your PC at this point even if you are not prompted.
We will now install a distro that will help us during this setup. We recommend you use Ubuntu available on the Microsoft Store as it is easily downloaded and removed from your system. Use the link below to visit and download Ubuntu in the Microsoft Store.
- Ubuntu | Microsoft Store Link
Click on ‘Open’ once the app is installed to configure your installation. You can also launch the app from your Start menu depending on your preference.
Ubuntu will now be installed on your system. Once installed, proceed to set a Username to protect your installation. Subsequently, enter a password to protect root access on your system.
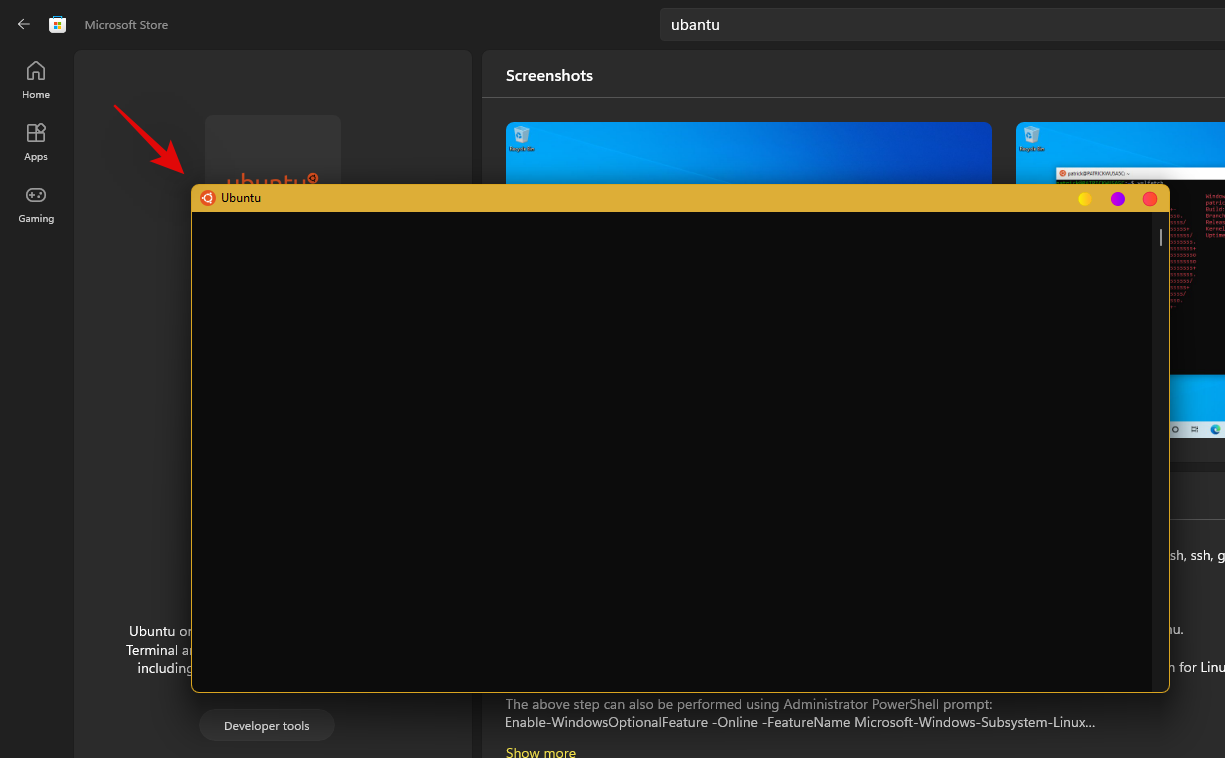
The Distro has now been setup on your system, you can close the current window and press Windows + X instead. Select ‘Windows Terminal (admin)’.
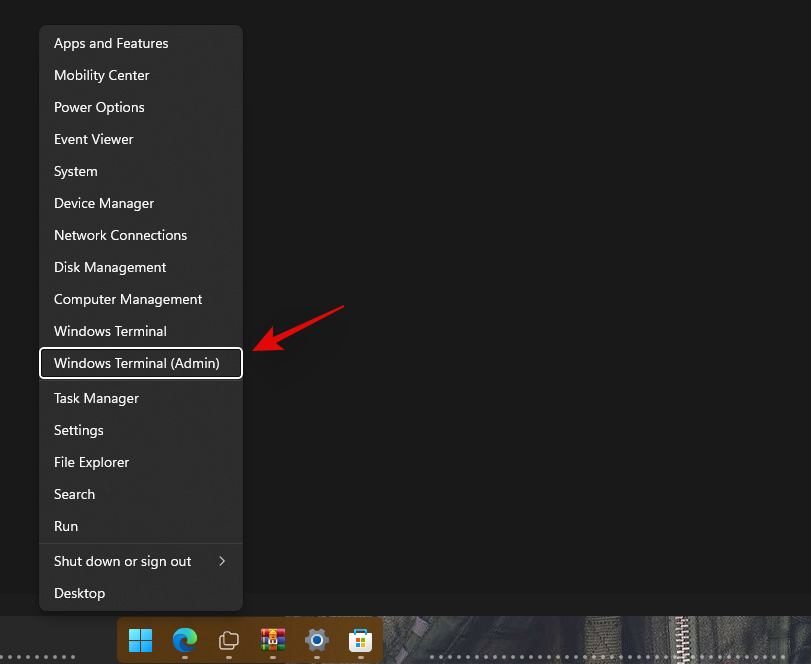
Click on the drop-down arrow at the top and select the same to launch a WSL terminal in the new tab. We’ll now need root access to modify your WSA with GApps. Type in the following command and press Enter on your keyboard. If you did not set a username or password then you should already have root access in the terminal. You can skip this step and move to the next one instead.
sudo su
Enter your password to grant root access (if applicable). Now type in the following commands one by one.
cd ..

cd ..
Finally use the command below to navigate to ‘GAppsForWSA’.
cd GAppsForWSA/
Now type in the following command to install ‘lzip’ and ‘unzip’ which will be needed for this process.
apt install lzip unzip
Note: If you are unable to get lzip or unzip setup, then run apt-get update -y to update your repositories and packages.
Confirm your choice by typing in ‘Y‘.
We will now install ‘dos2unix’ which will also be needed for this modification. Use the command below to install the same on your PC.
apt install dos2unix
Now it’s time to modify your WSA image. Type in and execute the following commands in the terminal one by one in the same order.
-
Command 1:
dos2unix ./apply.sh
-
Command 2:
dos2unix ./extend_and_mount_images.sh
-
Command 3:
dos2unix ./extract_gapps_pico.sh
-
Command 4:
dos2unix ./unmount_images.sh
-
Command 5:
dos2unix ./VARIABLES.sh
Once the process completes, type in the following to clear up your terminal for better management.
clear
Now that we have our scripts, let’s execute them. Type in and execute the commands given below one by one in the same order.
-
Command 1:
./extract_gapps_pico.sh
-
Command 2:
./extend_and_mount_images.sh
-
Command 3:
./apply.sh
-
Command 4:
./unmount_images.sh
We are now done with the console, for now, you can close the same. Go to your boot drive and navigate to the following location.
GAppsForWSA#IMAGES
Copy the following files to your clipboard.
- product.img
- system.img
- system_ext.img
- vendor.img
Now navigate to the ‘WindowsSubsystemForAndroid’ folder on your boot drive and paste all the copied images in the same location. Choose to replace the files when prompted.
We’re almost done with the modification now. Navigate to your ‘GAppsForWSA’ folder on your boot drive and double click and open the ‘misc’ folder.
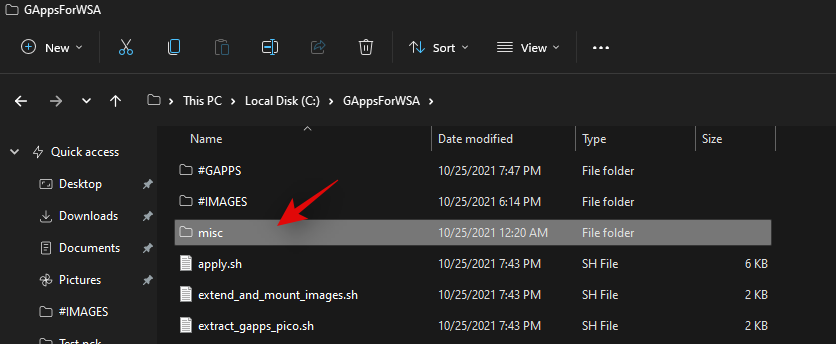
Copy ‘kernel’ to your clipboard.
Navigate to the following location.
Boot driveWindowsSubsystemForAndroidTools
Rename ‘kernel’ to ‘kernel_backup’.
Now paste the kernel file we copied to your clipboard earlier in the same location.
We will now need to enable developer mode for your installation of Windows 11. Press Windows + i to open the Settings app and then click on ‘Privacy and Security’ on your right.
Click on ‘For developers’.
Enable the toggle for ‘Developer Mode’ at the top.
Click on ‘Yes’ to confirm your choice. Now press Windows + X and select ‘Windows Terminal (admin)’.
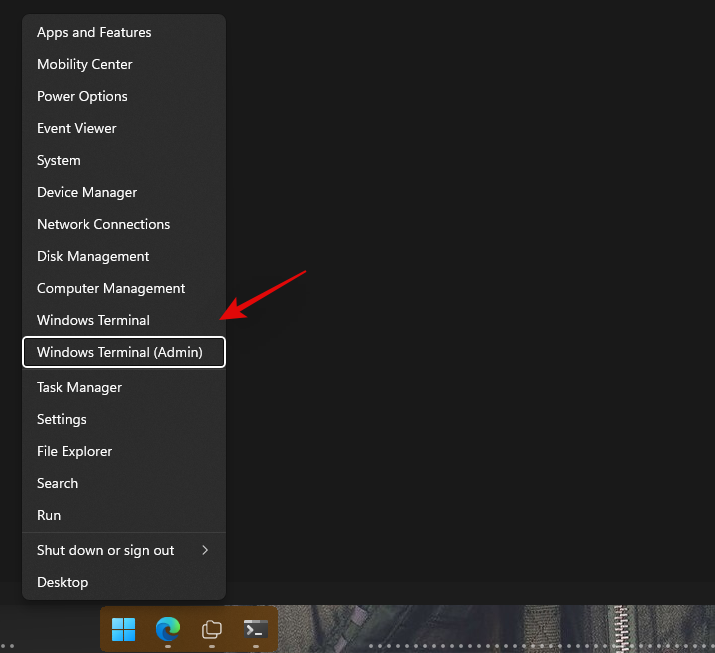
Click on the drop-down arrow at the top and select ‘Windows Powershell’.
Note: Do not select ‘Powershell’, ensure that you select ‘Windows Powershell’.
Now run the following command.
Add-AppxPackage -Register C:WindowsSubsystemForAndroidAppxManifest.xml
The modified subsystem will now be installed on your PC.
Press the Windows key and launch the same once the process completes.
Enable the toggle for ‘Developer mode’ in the Android Subsystem.
Click on ‘Files’ at the top to launch the Subsystem on your PC. You might have to wait a few minutes now depending on your PC.
Close the Files app once it opens and download the ADBToolkit linked above.
Now create a new folder on your boot drive and name it ‘ADBToolkit’.
Extract the archive in the same location, and delete the archive and the original folder.
Press the Windows key, search for Play Store and launch it on your system. Do not click ‘Sign-in’ yet.
Go back to the ‘ADBToolkit’ folder and click on the address bar at the top, type in ‘Powershell’ and press Enter on your keyboard.
Go back to the Android Subsystem and note down the address shown below ‘Developer Mode’.
Note: If the address does not show up, simply click on ‘Refresh’ beside IP address.
Type in and execute the following command. Replace ADDRESS with the address shown in the ‘Developer Mode’ section in the Android Subsystem.
.adb.exe connect ADDRESS
Once you are connected, execute the following command.
.adb.exe shell
Type in the following command to gain root access.
su

Execute the following command next.
setenforce 0

Now go back to the Play Store and click on ‘Sign-in’.
Sign in with your desired Google account now.
Note: This will also enable Google Sync, which by default will sync your Google data to Windows including things like Contacts, Calendar events, Browser history, and more.
Once you are signed in, close the Play Store. We now need to restore your original kernel. Open the Windows Subsystem for Android window and click on ‘Turn off’.
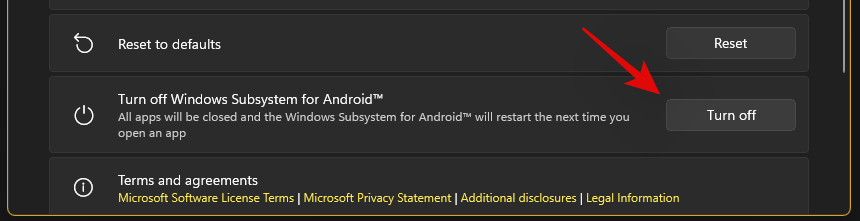
The Subsystem will now stop running in the background on your PC. Navigate to the ‘WindowsSubsystemForAndroid’ folder on your boot drive and open the ‘Tools’ folder.

Rename the ‘kernel’ file to ‘kernel_Root_mod’.
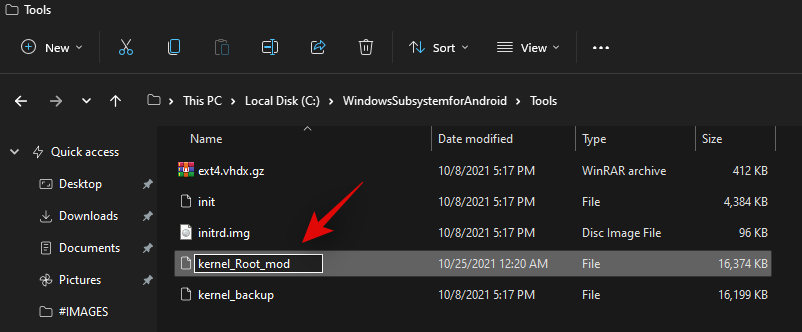
Similarly, rename ‘kernel_backup’ to ‘kernel’.

You can now close everything. We recommend you restart your system at this point. Once restarted, you should now be able to use the Play Store on your system while signed in with your Google account.
We hope you were able to easily set up and use GApps and Play Store on your PC using the guide above. If you face any issues or have any questions, feel free to reach out using the comments section below.
Related:
- How to Remove Appraiserres.dll to Bypass Requirements When Using Windows 11 Setup
- How to Install WSA Manually Using Msixbundle
- How to Fix ‘Virtualization Not Enabled’ Error for WSA on Windows 11
- How to Change Refresh Rate on Windows 11
- Windows 11 Start Menu Not Working: How to Fix
- Fix VAN 1067 Valorant Issue on Windows 11
- How to Disable CSM to install Windows 11
- How To Remove Language Switcher on Windows 11
- Right Click Menu Not working on Windows 11? How to Fix
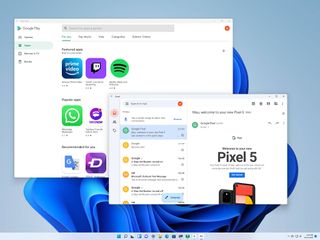
(Image credit: Windows Central)
On Windows 11, you can now install the Windows Subsystem for Android (WSA) to run Android apps. The problem is that officially, you can only install apps available from the custom version of the Amazon Appstore, which currently only has around 50 apps.
You can sideload Android apps on Windows 11, but it’s not possible to use apps that require the Google Play Services, such as Gmail and Google Maps. However, an Italian UX design student (ADeltaX on Twitter) has found a way to make it possible to install the Google Play Store app to bring virtually every Android app to Windows 11.
It’s a tedious process, and it may not work on the first try, but once you get it working, you can install all your favorite Android apps.
In this Windows 11 guide, we will walk you through the steps to create a custom version of the Windows Subsystem for Android to install and run Android apps from the Google Play Store.
Disclaimer: Trying to install the Google Play Services may violate the Play Services Agreement. Also, these instructions involve downloading third-party tools and using unsupported methods. Use this guide at your own risk.
How to install Google Play Store and run Android apps
The Google Play Store’s installation process on Windows 11 requires the setup of various tools running several Linux, Command Prompt, and PowerShell commands. The instructions below have everything you need to complete this task. If something isn’t working correctly, you probably did something wrong. If this is the case, start over with the instructions until it works.
Setting up environment
The preparation process includes removing any previous installation of the Windows Subsystem for Android (WSA) from your device and installing the Windows Subsystem for Android and Ubuntu. It’s also a requirement to enable Developer mode on Windows 11 and install a tool like 7-zip to extract files. Furthermore, you have to download a copy of the original Windows Subsystem for Android, OpenGApps, the WSAGAScript scripts, and the ADBKit tools.
Uninstall WSA
Since you cannot run both the original and custom versions of WSA, you will need to remove the original if it’s installed on your computer. Otherwise, continue the WSL2 installation.
To uninstall the original WSA, use these steps:
- Open Settings.
- Click on Apps.
- Click the Apps & features page from the right side.
- Select the Amazon Appstore.
- Click the menu (three-dotted button) on the right side.
- Click the Uninstall button.

- Click the Uninstall button again.
Once you complete the steps, you can continue with the Linux subsystem installation.
Install WSL2
You will need a Linux distribution to complete this setup. If you don’t have the Windows Subsystem for Linux already installed on your computer, then continue with the steps below. Otherwise, continue with the steps to eanble the Developer mode on Windows 11.
To install WSL alongside the Ubuntu distro, use these steps:
- Open Start.
- Search for Command Prompt, right-click the top result, and select the Run as administrator option.
- Type the following command to install the Windows Subsystem for Linux and Ubuntu and press Enter:
wsl --install
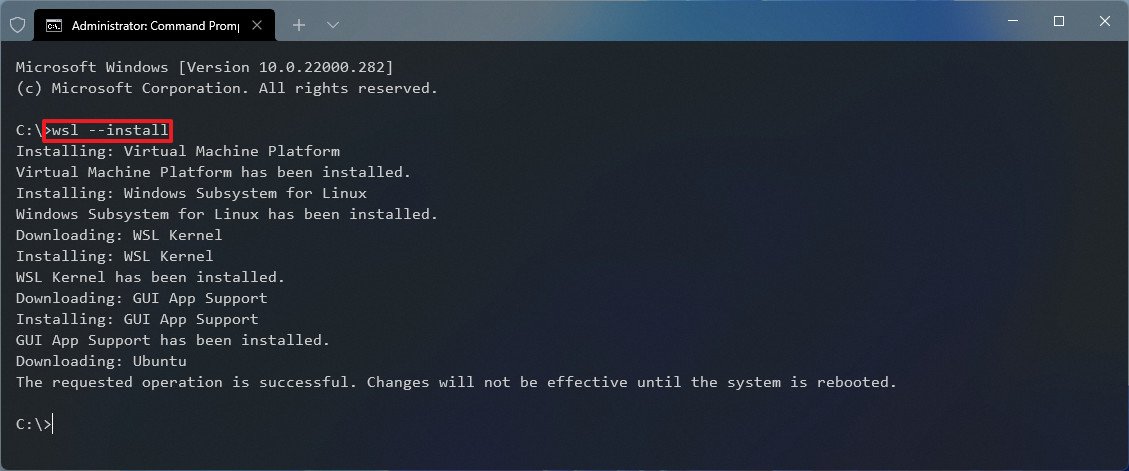
- Restart the computer to apply the changes.
- Continue with the on-screen directions to set up the Ubuntu distro.
After you complete the steps, the Linux subsystem will install with the Ubuntu distro.
Enable Developer mode
The next step is to make sure that Developer mode is enabled on Windows 11:
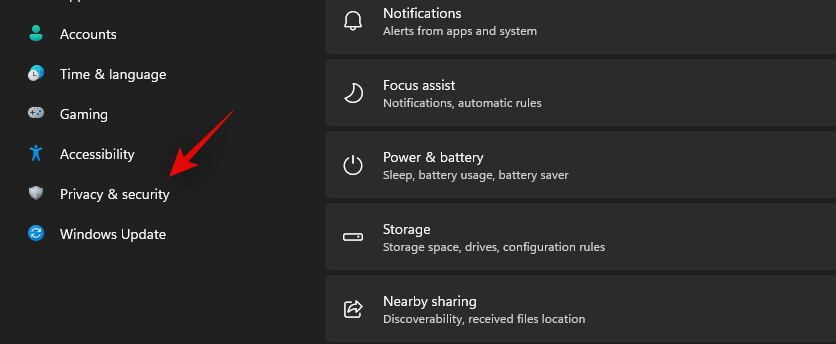
- Open Settings.
- Click on Privacy & security.
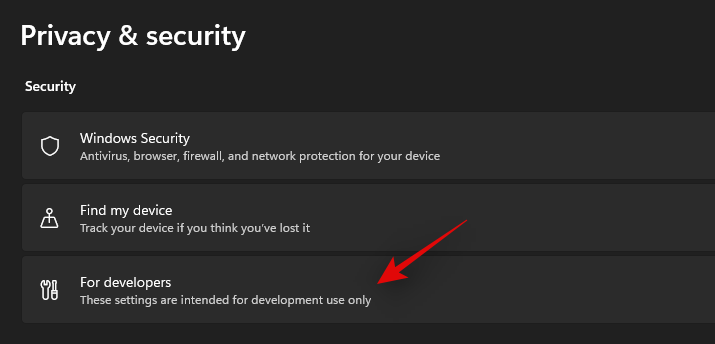
- Click the For developers page on the right side.
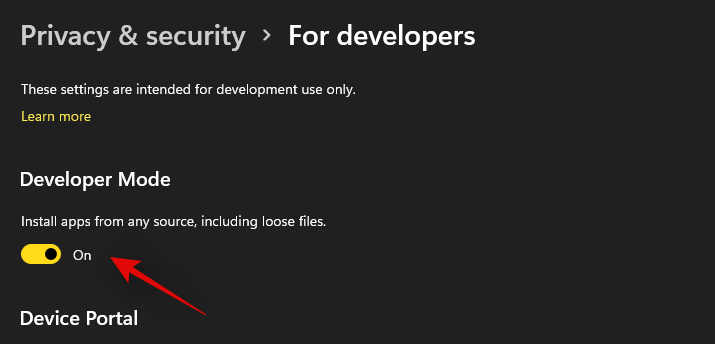
- Turn on the Developer mode toggle switch.
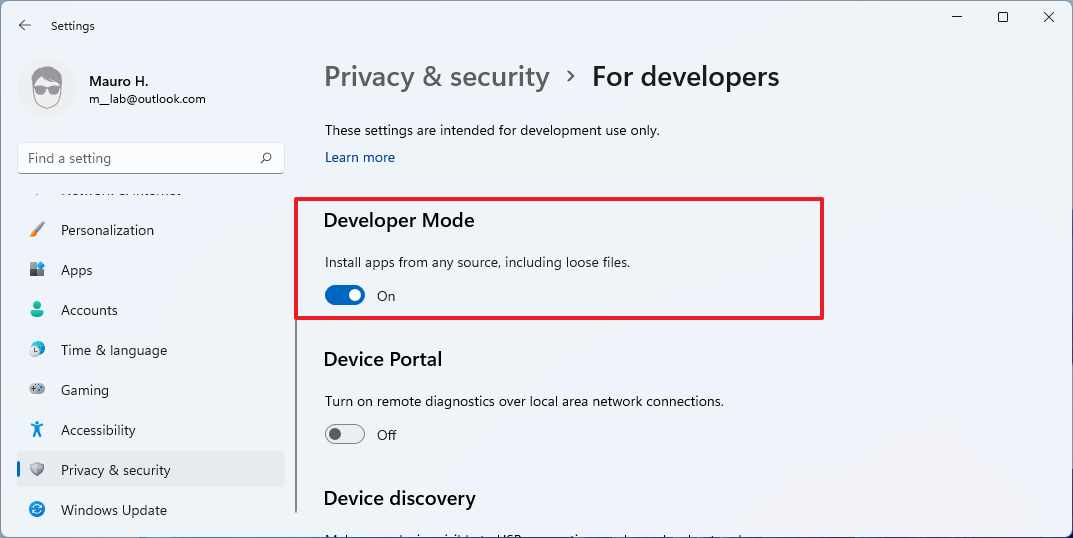
Once you complete the steps, you can sideload applications on Windows 11.
Install 7-zip
Since you will need to retrieve files from different containers, you will need an application like 7-zip. If you already have it, you can skip these steps.
To install 7-zip from the Microsoft Store, use these steps:
- Open the 7-zip Microsoft Store page (opens in new tab).
- Click the Get button.
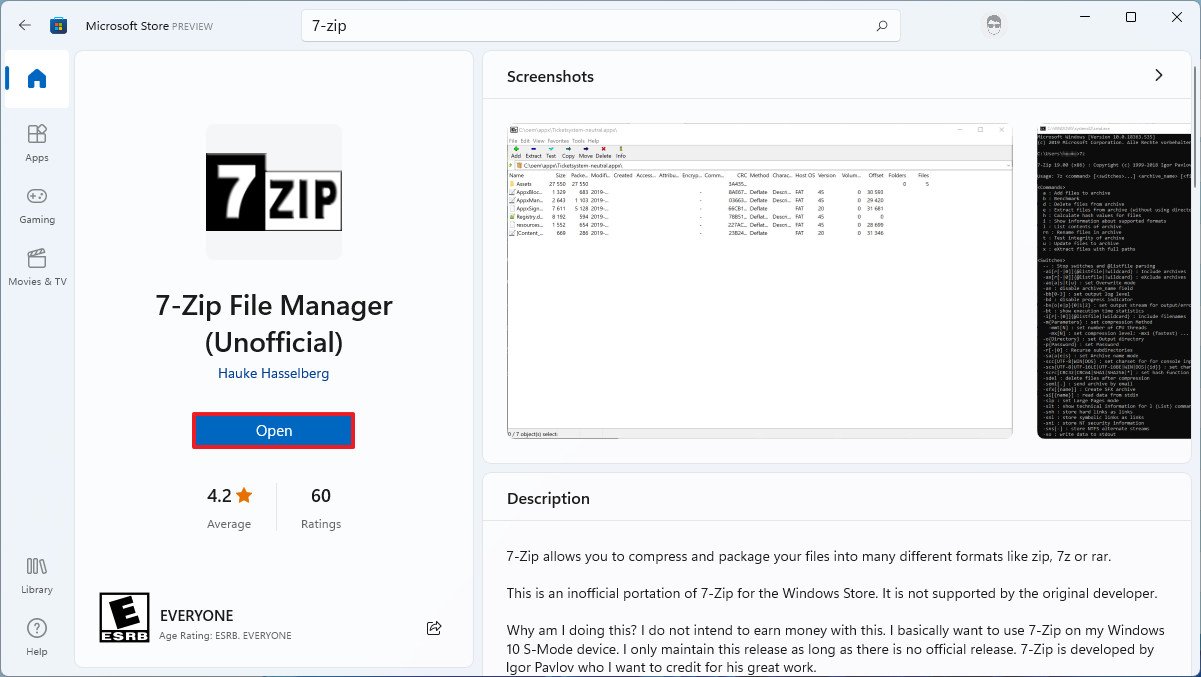
After you complete the steps, the file manager application will install on Windows 11.
Download WSA
The process to run Android apps from the Google Play Store requires creating a custom version of the Windows Subsystem for Android, which means that you will need to download the package to modify it.
To download the Windows Subsystem for Android package, use these steps:
- Open the rg.adguard website.
- Select the Productid option.
- Copy and paste this ID 9P3395VX91NR.
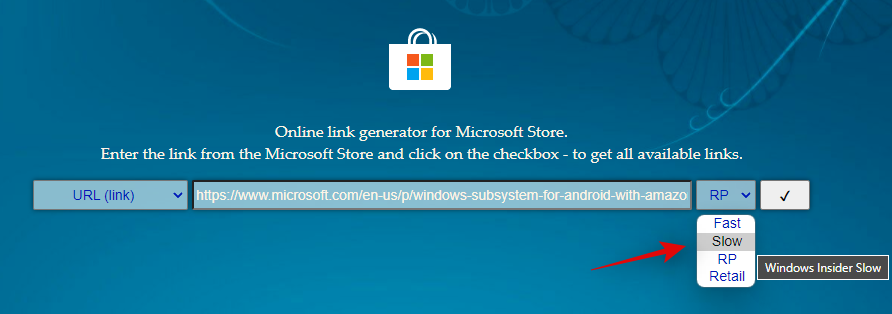
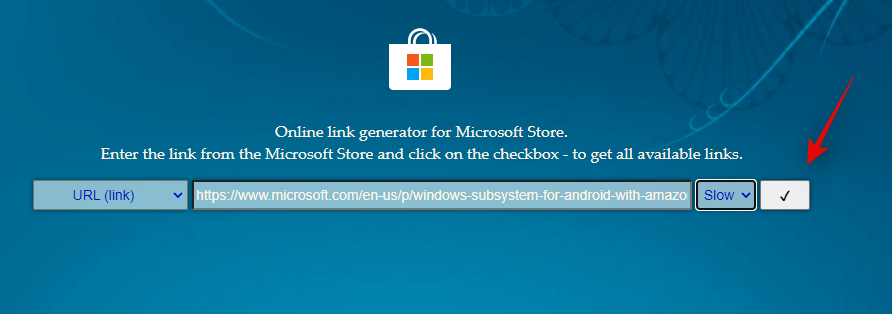
- Select the Slow option.
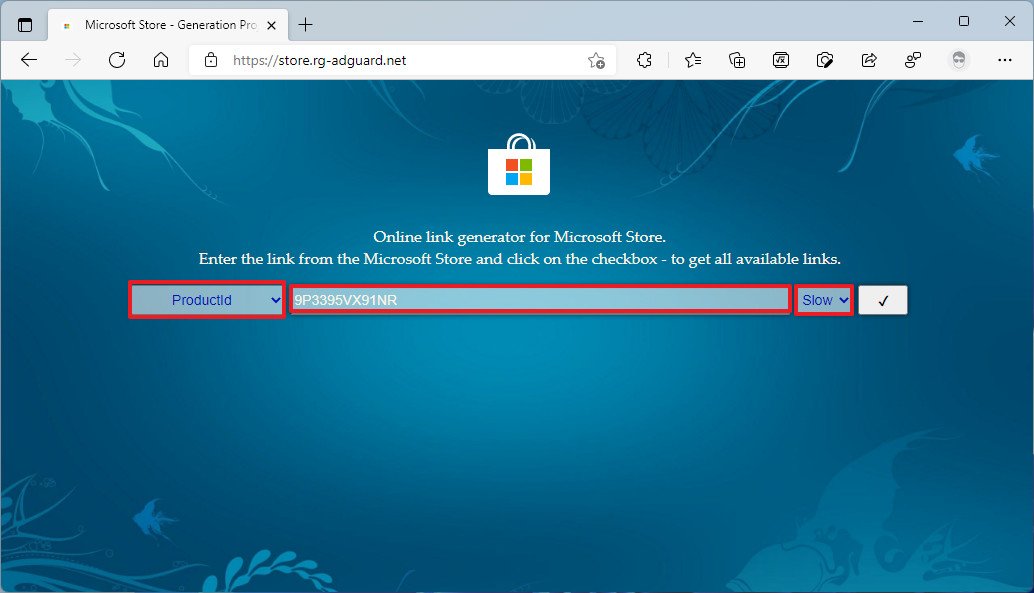
- Click the Check button.
- Scroll down and click the MicrosoftCorporationII.WindowsSubsystemForAndroid_1.7.32815.0_neutral_~_8wekyb3d8bbwe.msixbundle link to download the Windows Subsystem for Android package.Quick note: If the browser refuses to download the file, select the Keep option from the download menu.
Once you complete the steps, there are other components you will need to download to continue with the process, including the OpenGApps tools and the custom WSAScript scripts.
Download OpenGApps
To download the OpenGAapps tools, use these steps:
- Open the OpenGApps website.
- Select the x86_64 option for the platform.
- Select the 11 option for the Android version.
- Select the pico option for the variant.
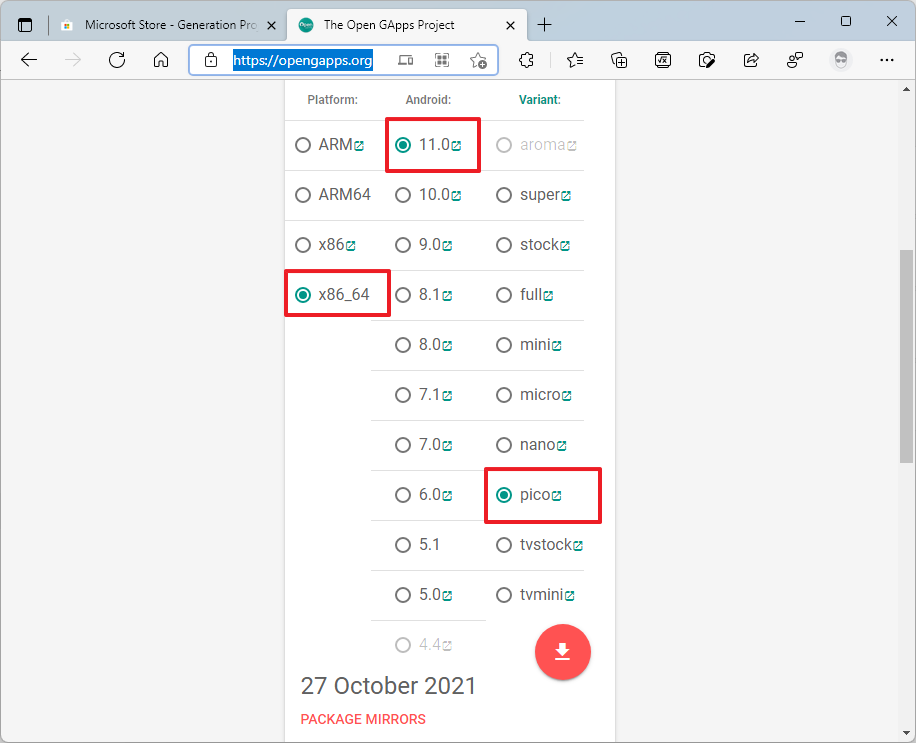
- Click the Download button to save the file on your device.
After you complete the steps, you need to download the WSAGAScript package.
Download WSAGAScript
To download the WSAGAScript scripts, use these steps:
- Open the WSAGAScript GitHub page.
- Click the Code menu and select the Download ZIP option.
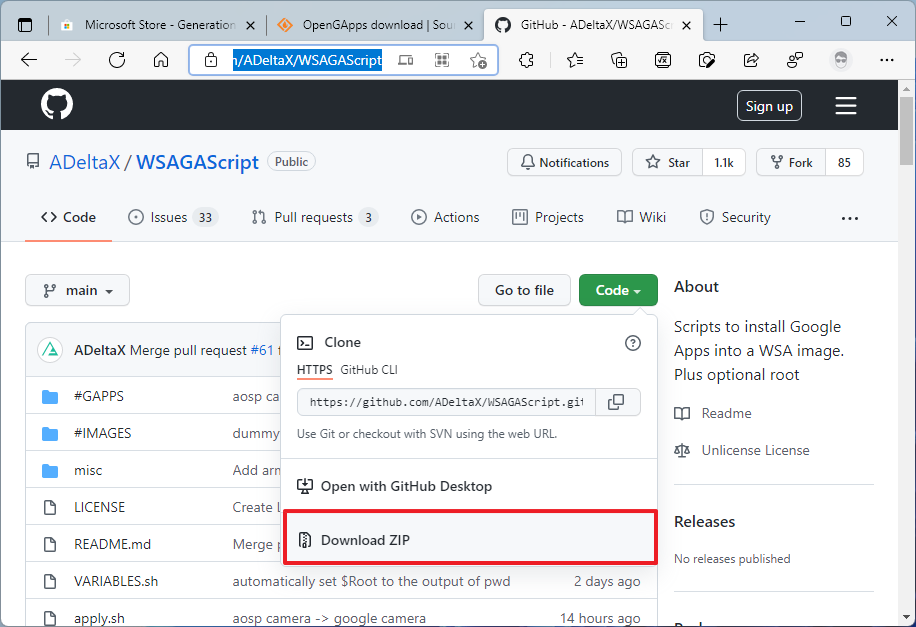
- Save the file to your computer.
Once you complete the steps, the scripts package will download on the computer.
Download ADB toolkit
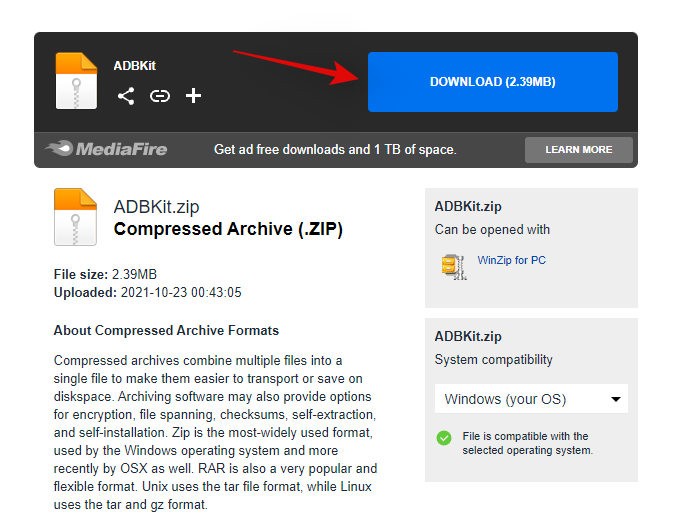
At the end of the process, you will need to use the Android Debugging Bridge (ADB) tools to make the Google Play Store usable.
To download the ADB toolkit, use these steps:
- Open the MediaFire download page.
- Click the Download button.
- Save the file on the computer.
After you complete the steps, the zip will download onto your device.
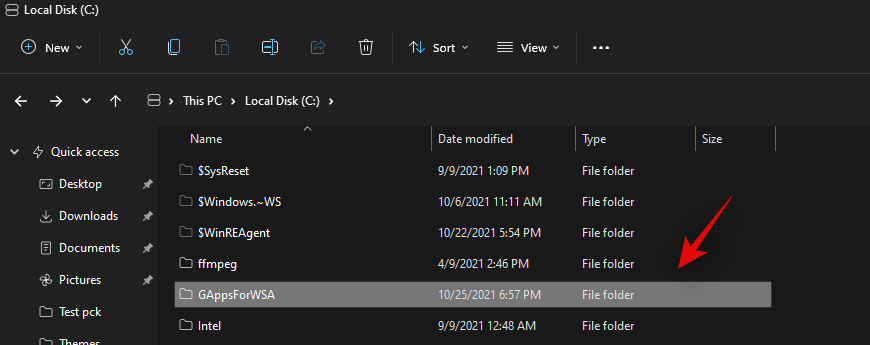
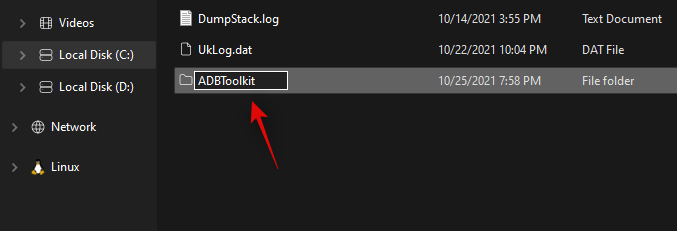
Create setup folders
Also, you will need to create three folders in the «C» drive to extract all the packages you downloaded earlier.
To set up the folder structure to create a custom version of WSA, use these steps:
- Open File Explorer.
- Click on This PC from the left navigation pane.
- Open the Local Disk (C drive).
- Click the New menu and select the Folder option.
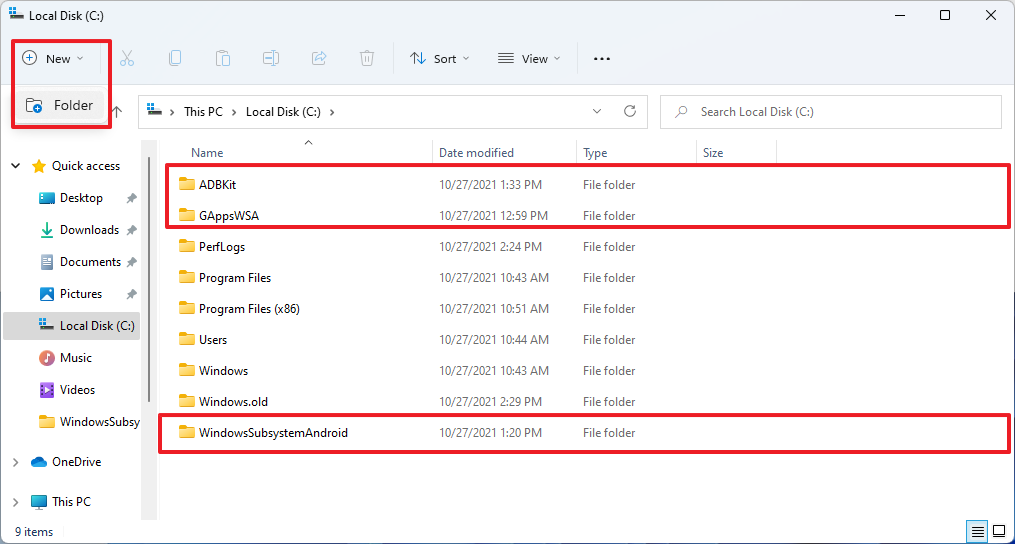
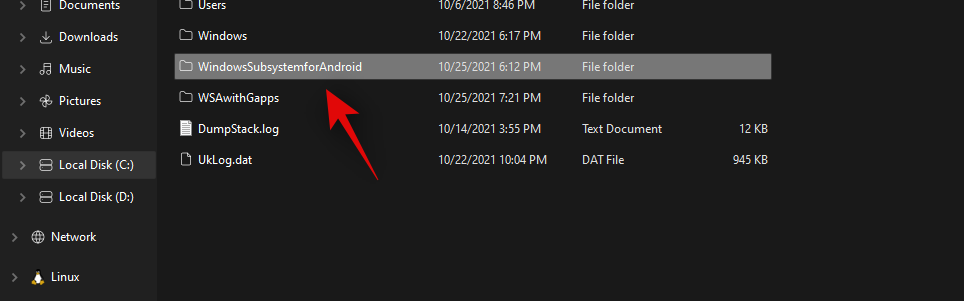
- Name the folder WindowsSubsystemAndroid and press Enter.
- Click the New menu and select the Folder option.
- Name the folder GAppsWSA and press Enter.
- Click the New menu and select the Folder option.
- Name the folder ADBKit and press Enter.
Once you complete the steps, the setup folders will be created.
Create a custom version of Windows Subsystem for Android
Since the original version of WSA doesn’t allow the Google Play Store, you will need to create a custom version. The process involves extracting and modifying files from the original version of the Windows Subsystem for Android.
Set up WindowsSubsystemAndroid contents
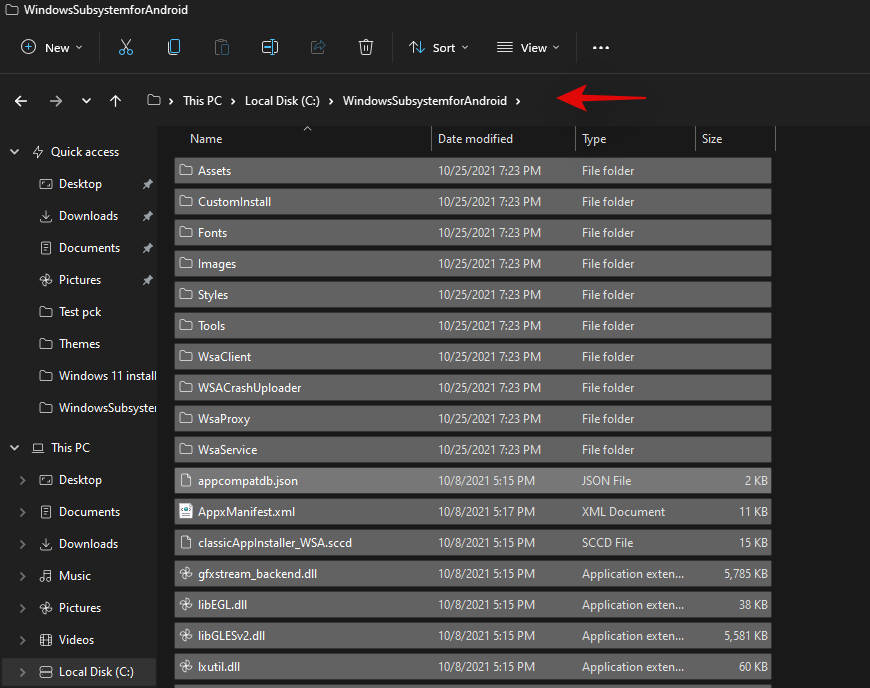
To extract the files of the original WSA package to the WindowsSubsystemAndroid folder, use these steps:
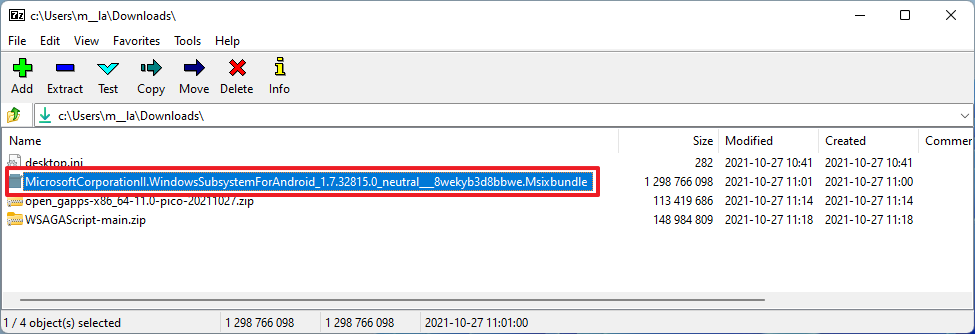
- Open Start.
- Search for 7-zip File Manager and click the top result to open the app.
- Browse to the folder where you downloaded the Msixbundle file.
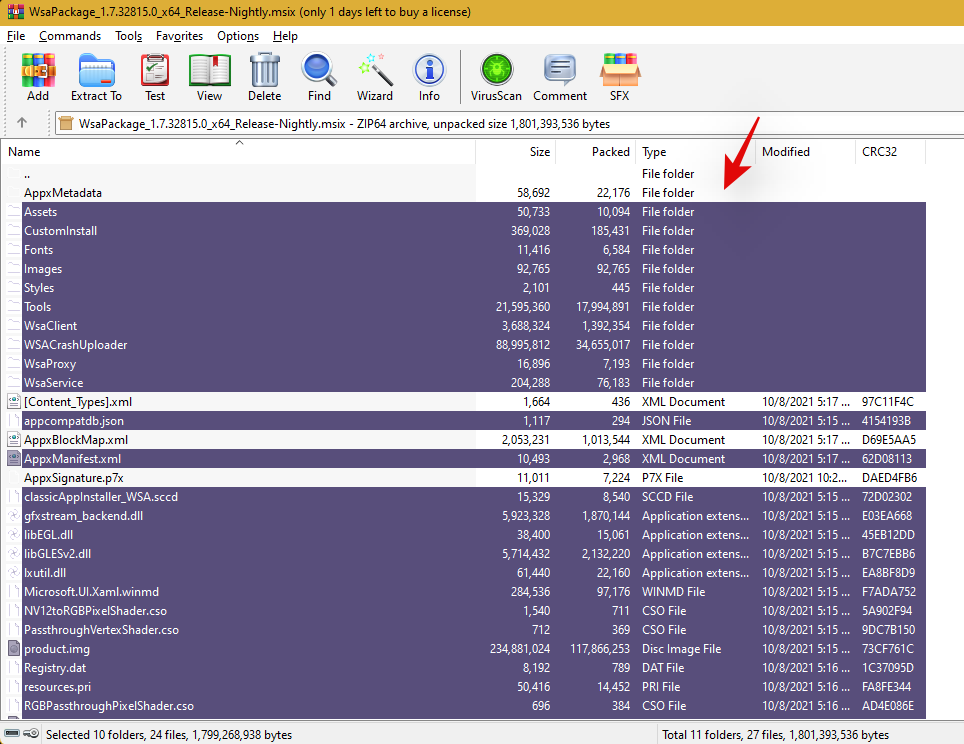
- Double-click the MicrosoftCorporationII.WindowsSubsystemForAndroid_1.7.32815.0_neutral_~_8wekyb3d8bbwe.msixbundle file.
- Double-click the WsaPackage_1.7.32815.0_x64_Release-Nightly.msix file.
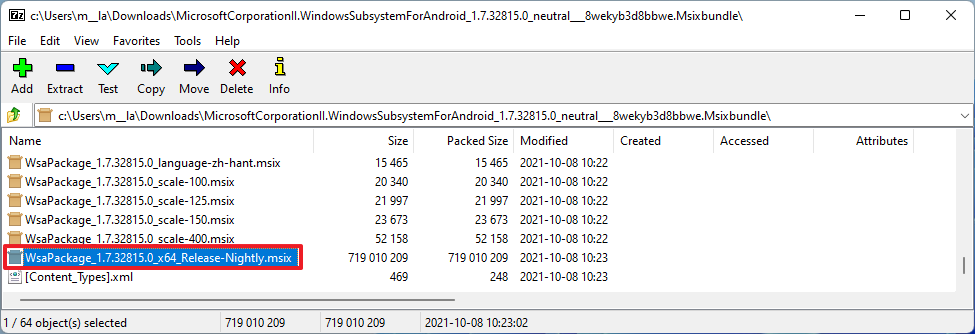
- Select all the files (Ctrl + A keyboard shortcut).
- Click the Extract button.
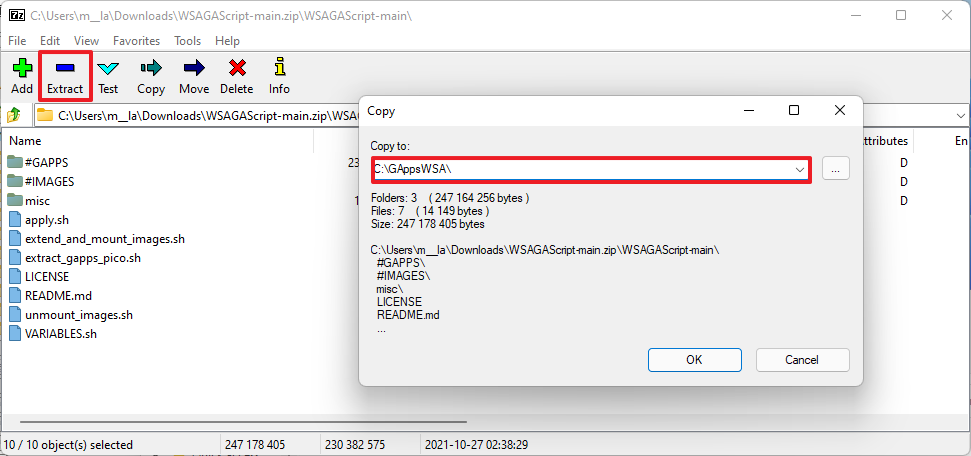
- In the «Copy to» field, specify the following path, and click the OK button:
C:WindowsSubsystemAndroid

- Type the following path in the address bar and press Enter:
C:WindowsSubsystemAndroid - Select the following files while holding the Ctrl key:
- AppxMetadata.
- AppxBlockMap.xml.
- AppxSignature.p7x.
- Content_Type.xml.
- Click the Delete button.
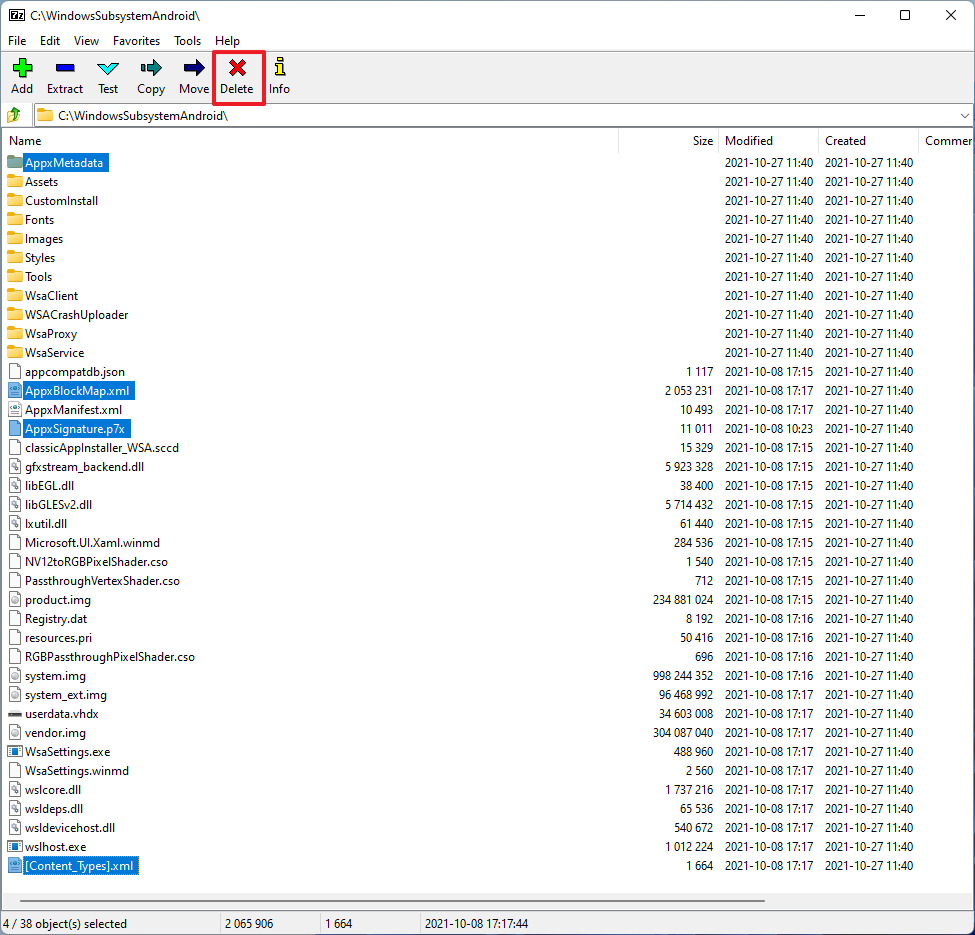
After you complete the steps, the files necessary to continue with the process will be available in the WindowsSubsystemAndroid folder.
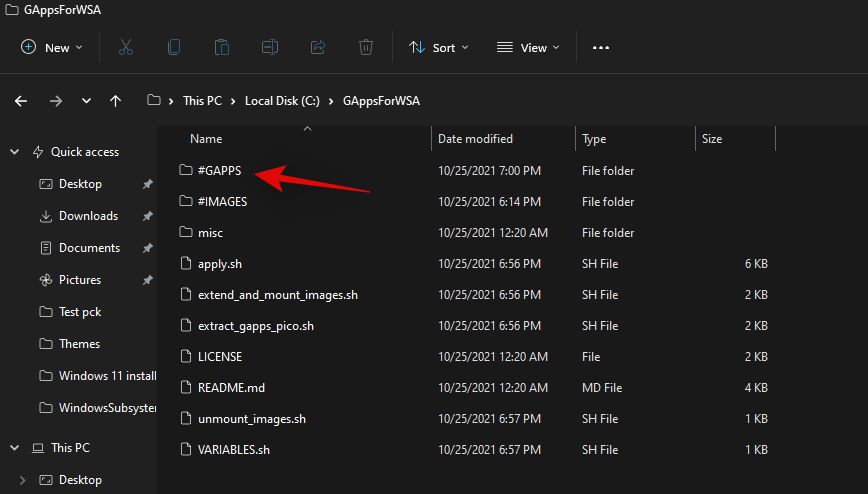
Set up the GAppsWSA contents
To extract the WSAGAscripts to modify the original Windows Subsystem for Android package, use the steps:
- Open Start.
- Search for 7-zip File Manager and click the top result to open the app.
- Browse to the folder where you downloaded the WSAGAScript-main.zip file.
- Open the WSAGAScript-main folder.
- Select all the files (Ctrl + A keyboard shortcut).
- Click the Extract button.
- In the «Copy to» field, specify the following path and click the OK button:
C:GAppsWSA
- Browse to the folder where you downloaded the open_gapps-x86_64-11.0-pico-xxxxxxxx.zip file.
- Select the open_gapps-x86_64-11.0-pico-xxxxxxxx.zip file.
- Click the Copy button.
- Type the following path in the address bar and press Enter:
C:GAppsWSA#GAPPS

- Click the OK button.
Once you complete the steps, the GAppsWSA folder will include all the files to continue with the process.
Set up the ADBKit folder
To extract the contents of the ADBKit zip folder, use these steps:
- Open Start.
- Search for 7-zip File Manager and click the top result to open the app.
- Browse to the folder where you downloaded the ADBKit.zip file.
- Select all the files (Ctrl + A keyboard shortcut).
- Click the Extract button.
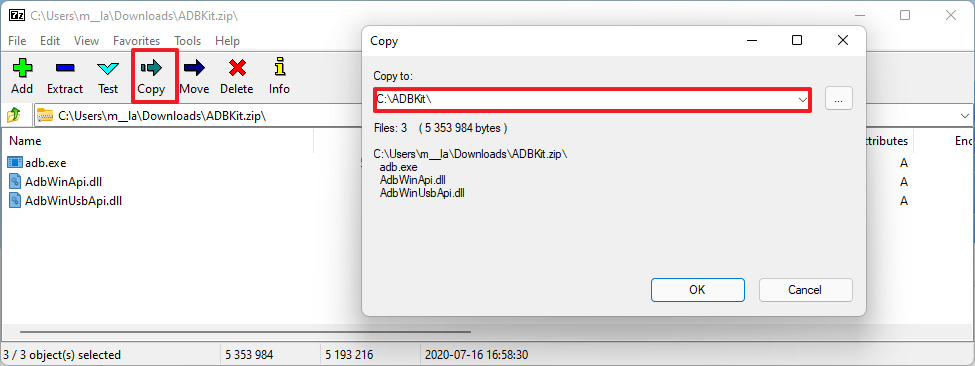
- In the «Copy to» field, specify the following path, and click the OK button:
C:ADBKit
You will be these tools at the end of this guide to fix access to the Google Play Store.
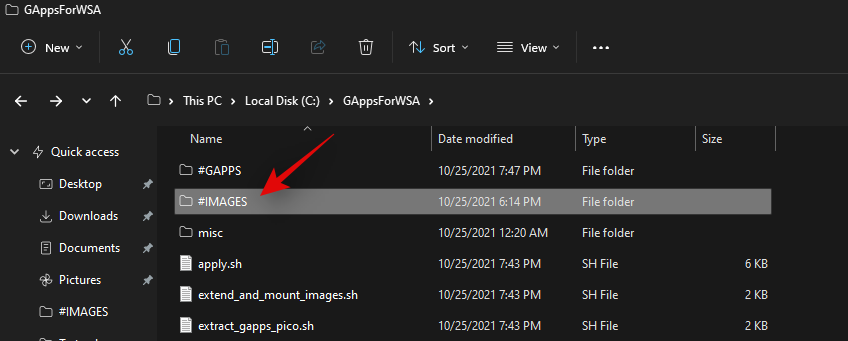
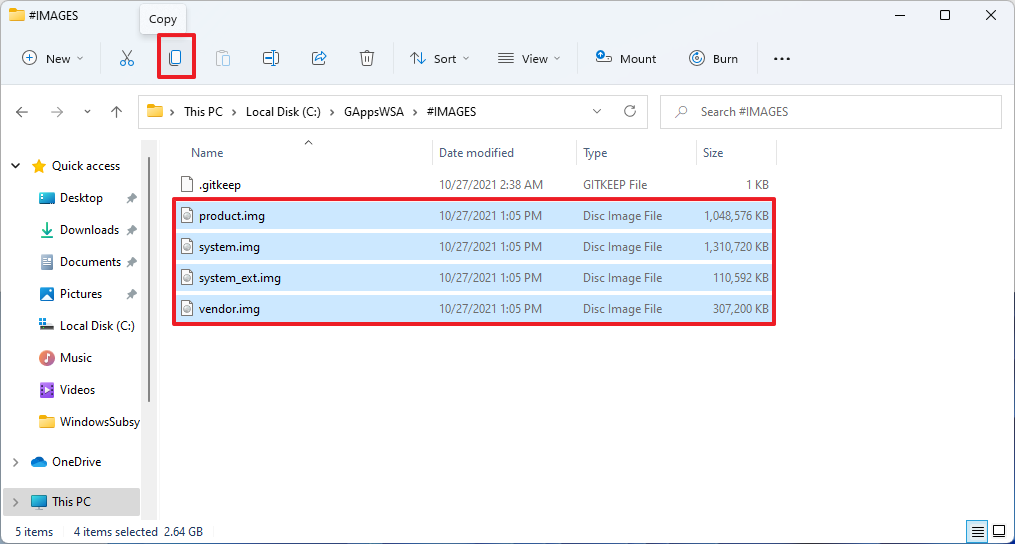
Copy images files
Before proceeding, you will need to copy four essential files from the WindowsSubsystemAndroid folder to the #IMAGES folder using these steps:
- Open File Explorer.
- Browse to the following path:
C:WindowsSubsystemAndroid - Select these four files while holding the Ctrl key:
- vendor.img.
- system_ext.img.
- system.img.
- product.img.
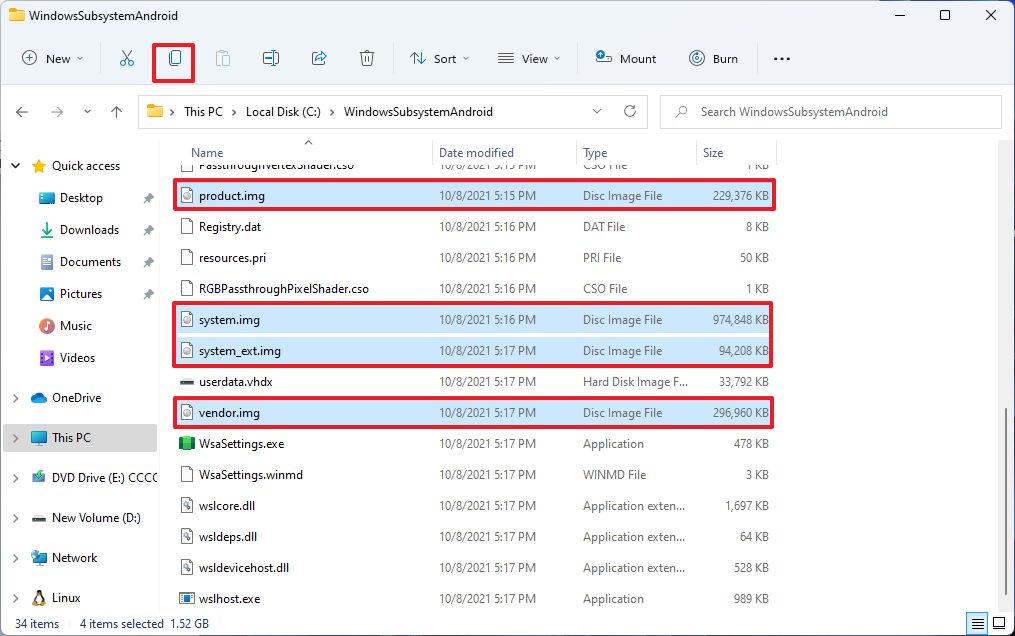
- Click the Copy button from the command bar.
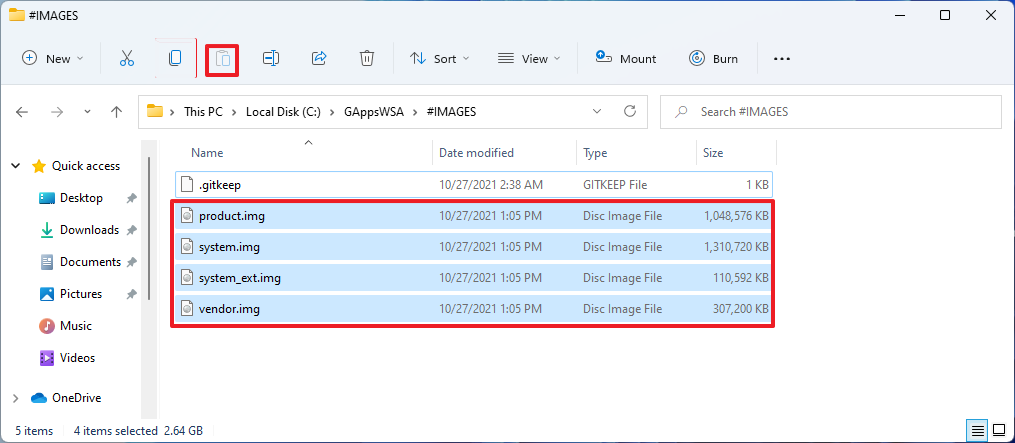
- Browse to the following path:
C:GAppsWSA#IMAGES - Click the Paste button from the command bar.
After you complete the steps, you will need to use a Linux distro to create a custom version of the Windows Subsystem for Android.
Modify Windows Subsystem for Android to install Google Play Store
To modify WSA to allow the Google Play Store, use these steps:
- Open Start.
- Search for Ubuntu, right-click the top result, and select the Run as administrator option.
- Type the following command and press Enter:
sudo su - Type the following command to change location to the GAppsWSA directory and press Enter:
cd /mnt/c/GAppsWSA
- Type the following command to update the system and press Enter:
sudo apt-get update - Type the following command to install the lzip unzip tool and press Enter:
sudo apt-get install unzip lzip

- Type the following command to install the dos2unix tool and press Enter:
sudo apt-get install dos2unix
- Type the following command to convert the script to Unix format and press Enter:
dos2unix ./apply.sh - Type the following command to convert the script to Unix format and press Enter:
dos2unix ./extend_and_mount_images.sh - Type the following command to convert the script to Unix format and press Enter:
dos2unix ./extract_gapps_pico.sh - Type the following command to convert the script to Unix format and press Enter:
dos2unix ./unmount_images.sh - Type the following command to convert the script to Unix format and press Enter:
dos2unix ./VARIABLES.sh
- Type the following command to execute the first step and press Enter:
./extract_gapps_pico.sh - Type the following command to execute the second step and press Enter:
./extend_and_mount_images.sh - Type the following command to execute the third step and press Enter:
./apply.sh
- Type the following command to execute the fourth step and press Enter:
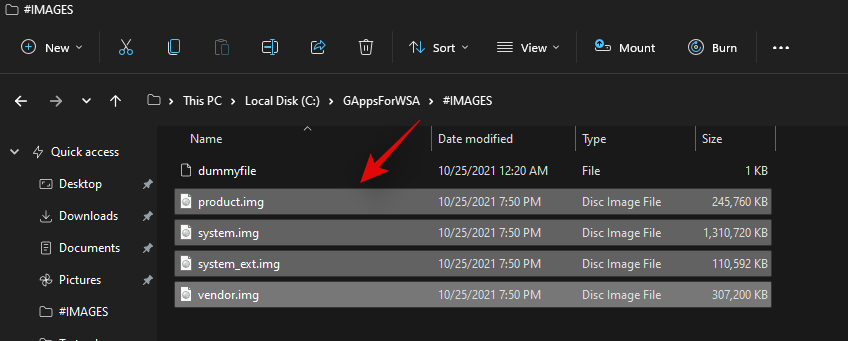
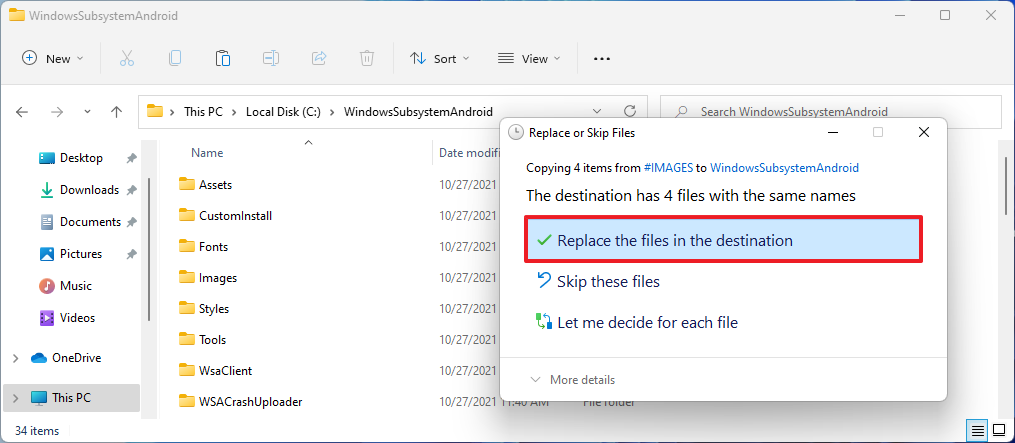
./unmount_images.sh - Open File Explorer.
- Browse to the following path:
C:GAppsWSA#IMAGES - Select these four files while holding the Ctrl key:
- vendor.img.
- system_ext.img.
- system.img.
- product.img.
- Click the Copy button from the command bar.
- Browse to the following path:
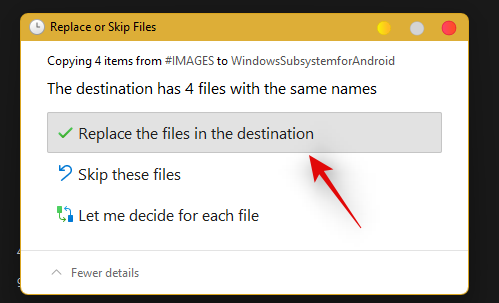
C:WindowsSubsystemAndroid - Click the Paste button from the command bar.
- Click the Replace the files in the destination option.
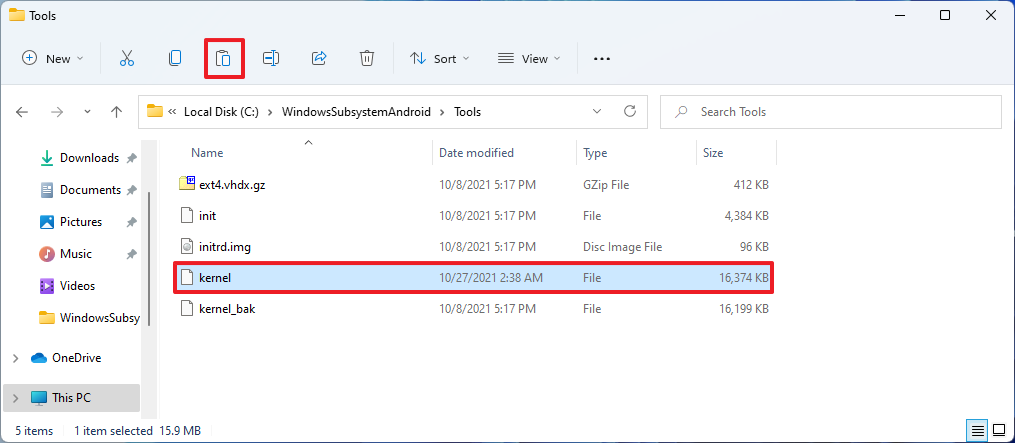
- Browse to the following path:
C:GAppsWSAmisc - Select the kernel file.
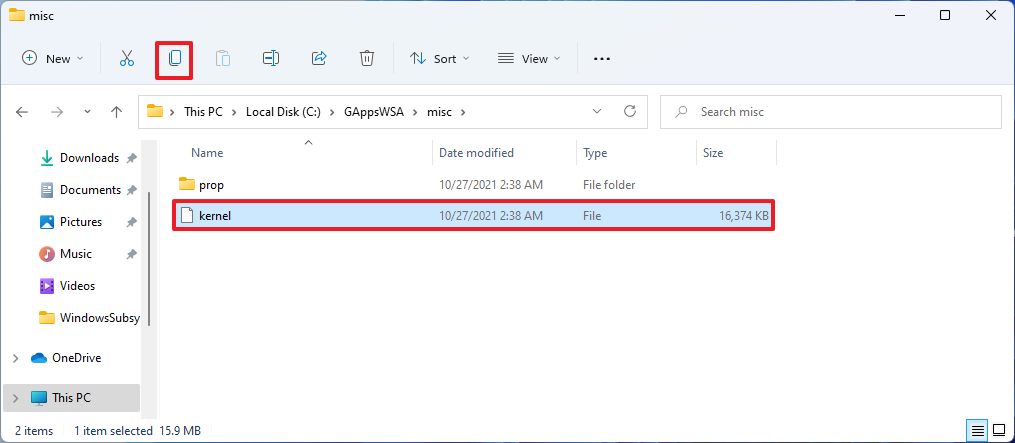
- Click the Copy button from the command bar.
- Browse to the following path:
C:WindowsSubsystemAndroidTools - Select the kernel file.
- Click the Rename button from the command bar.
- Change the name to kernel_bak and press Enter:
- Click the Paste button from the command bar to paste the new kernel file.
Once you complete the steps, the custom version of WSA is ready to be installed on Windows 11.
Install custom version of WSA on Windows 11
To install the Windows Subsystem for Android with PowerShell, use these steps:
- Open Start.
- Search for PowerShell, right-click the top result, and select the Run as administrator option.
- Type the following command to install the custom WSA package and press Enter:
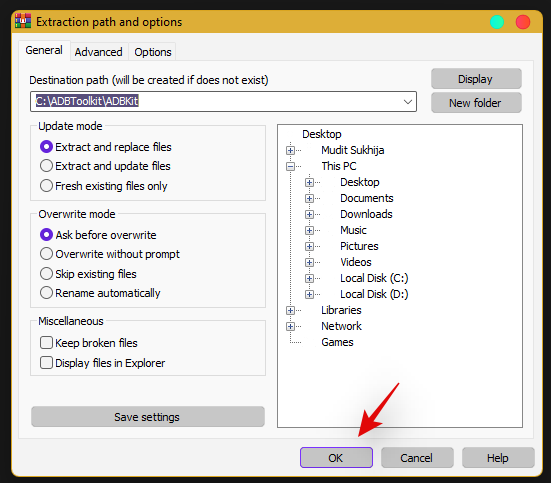
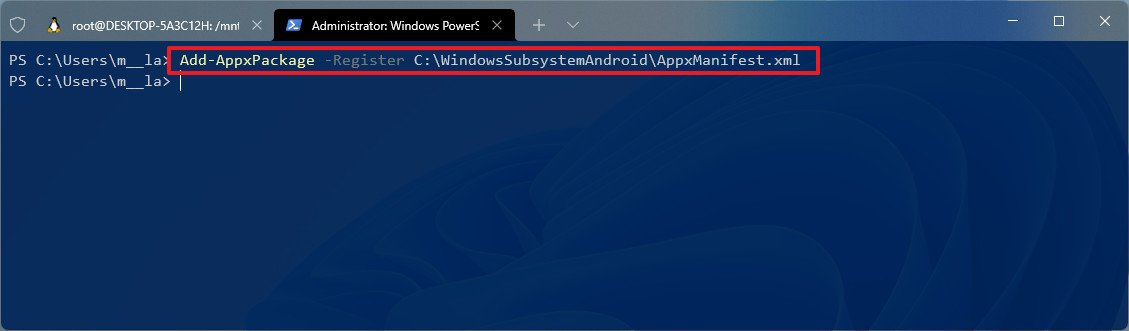
Add-AppxPackage -Register C:WindowsSubsystemAndroidAppxManifest.xml
After you complete the steps, the Windows Subsystem for Android and Google Play Store will install on Windows 11. However, the Google Play Store won’t work until you do some modifications with the steps below.
Set up Google Play Store on WSA
To set up the Play Store correctly to download Android apps on Windows 11, use these steps:
- Open Start.
- Search for Windows Subsystem for Android and click the top result to open the app.
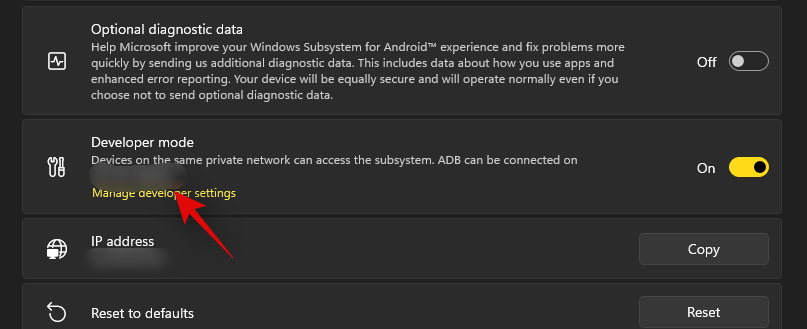
- Turn on the Developer mode toggle switch.
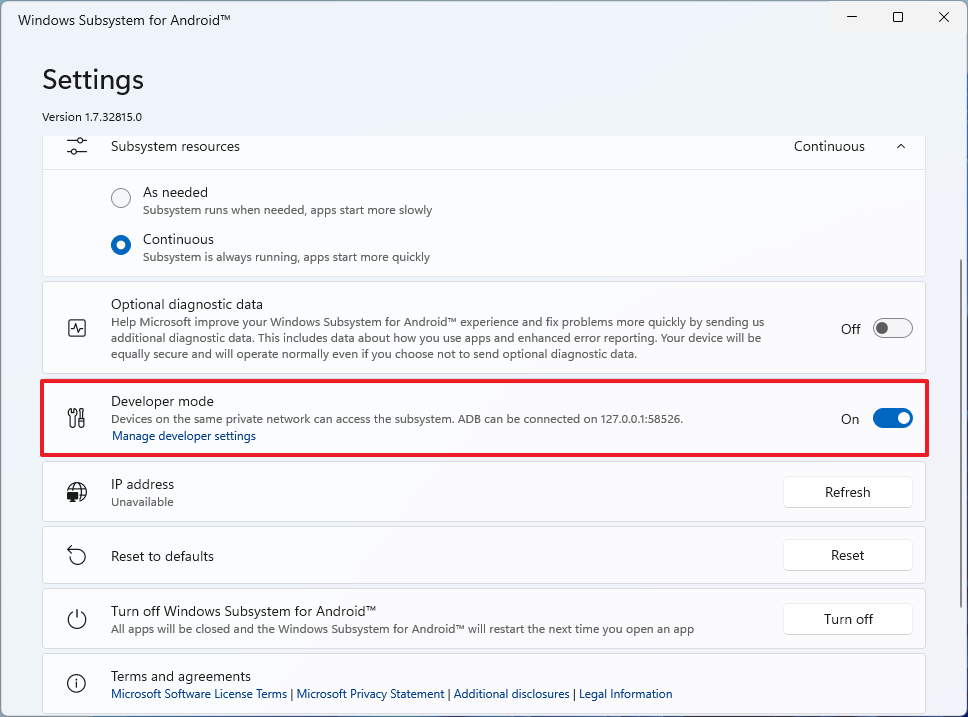
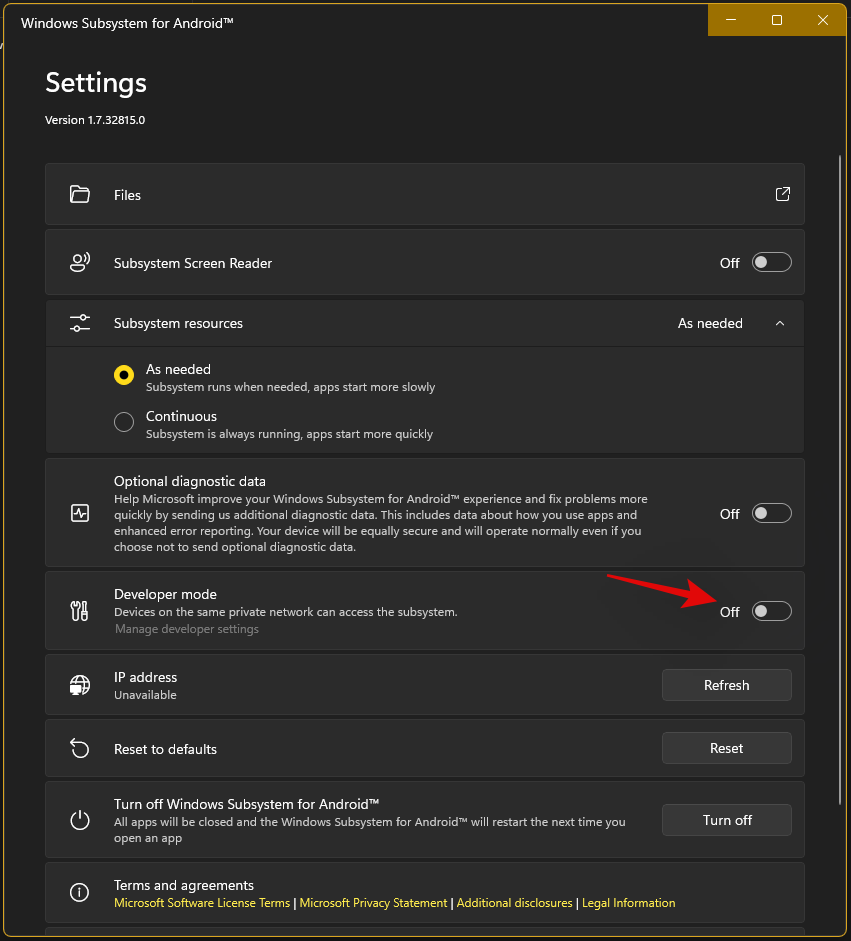
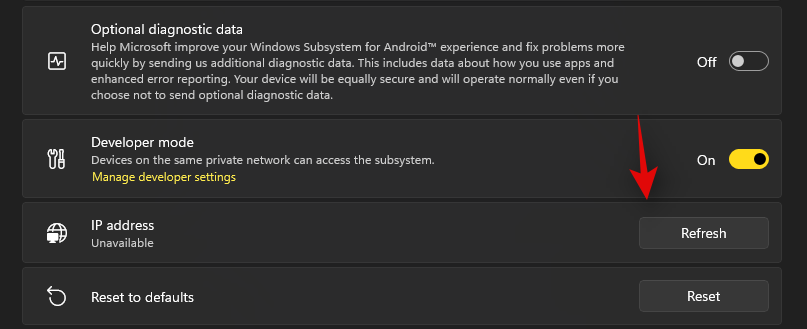
- Click the Manage developer settings option to spin the WSA virtual machine.
- Clear the Share my diagnostic data option.
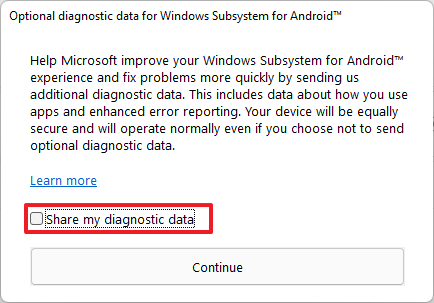
- Click the Continue button.
- Click the Close button.
- Open Start.
- Search for Command Prompt, right-click the top result, and select the Run as administrator option.
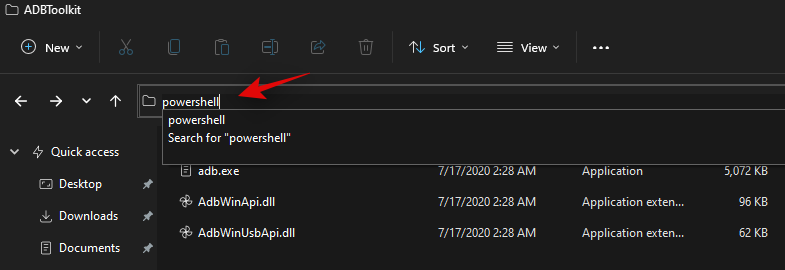
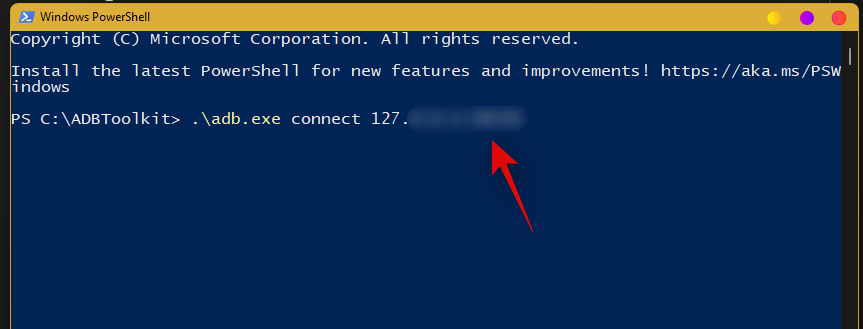
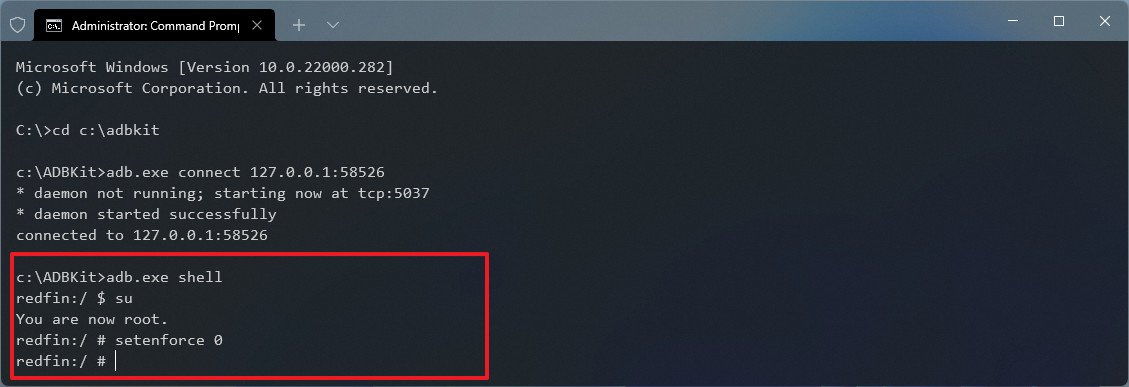
- Type the following command to change location to the ADBKit folder and press Enter:
cd C:adbkit - Type the following command to connect to the Windows Subsystem for Android and press Enter:
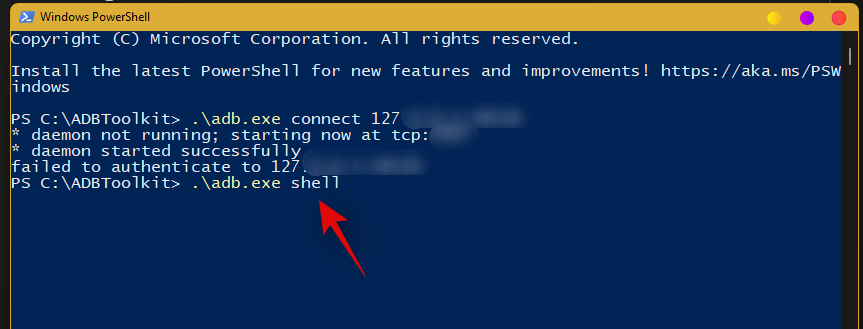
adb.exe connect 127.0.0.1:58526
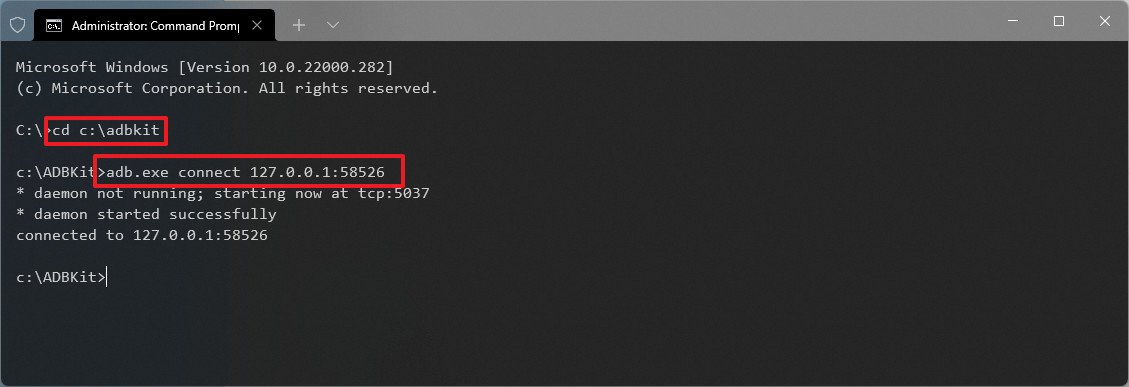
- Type the following command to open the shell and press Enter:
adb.exe shell - Type the following to gain root access and press Enter:
su - Type the following command to make the Google Play Store work and press Enter:
setenforce 0
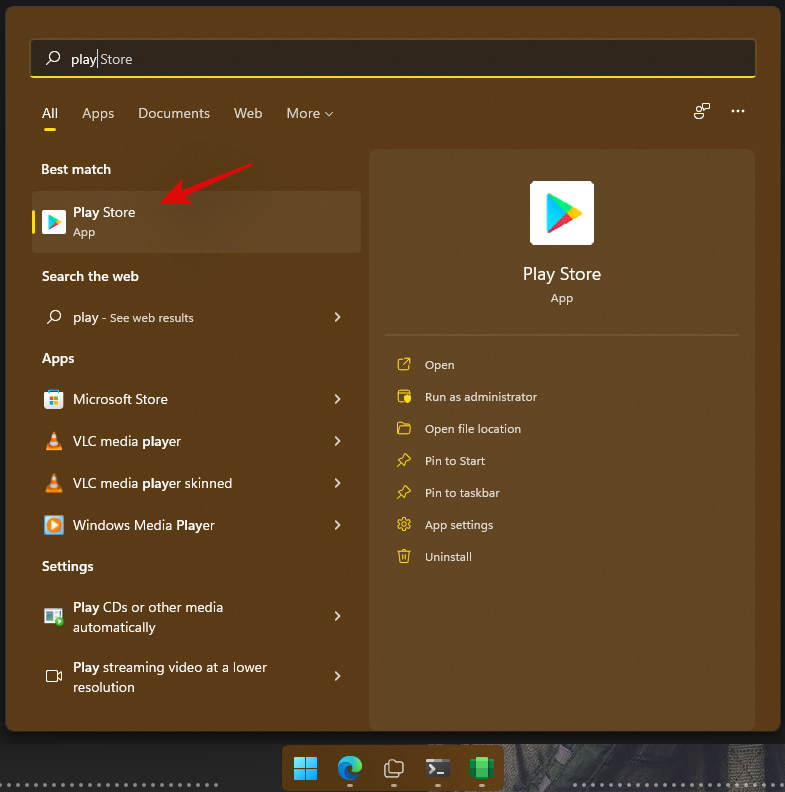
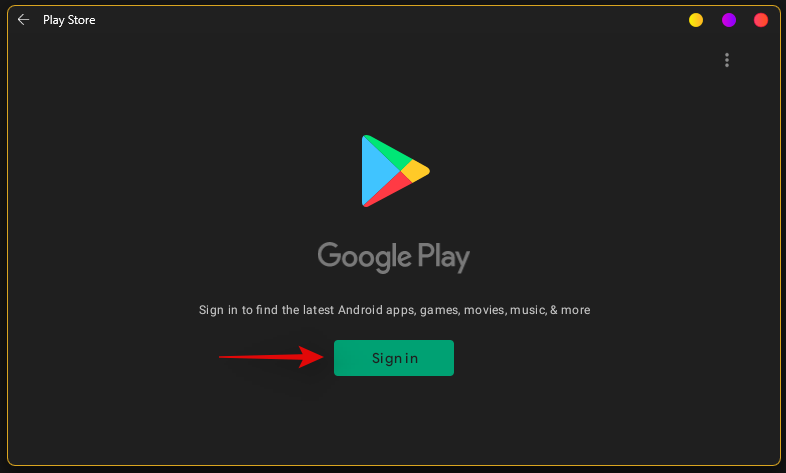
- Open Start.
- Search for Play Store and click the top result to open the app.
- Click the Sign in button.
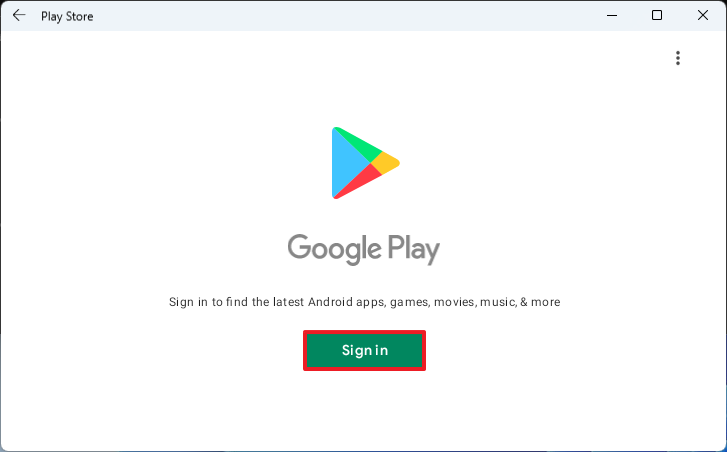
- Sign in with your Google credentials.
- Click the Agree button to agree to the terms.
Once you complete the steps, you can now start downloading and installing Android apps from the Google Play Store.
Install Android apps from the Google Play Store
To install and run Play Store Android apps on Windows 11, use these steps:
- Open Start.
- Search for Play Store and click the top result to open the app.
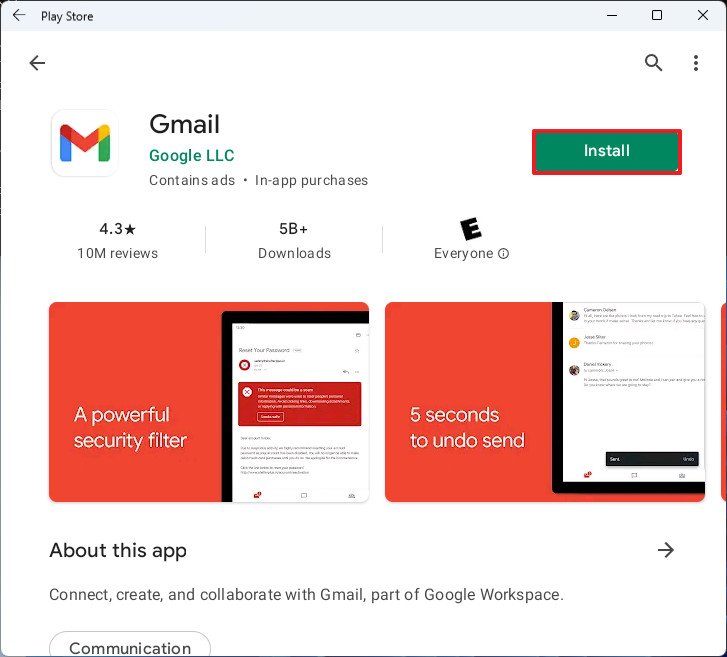
- Search for an app – for example, Gmail.
- Click the Install button.
- Click the Continue button.
- Click the Skip button.
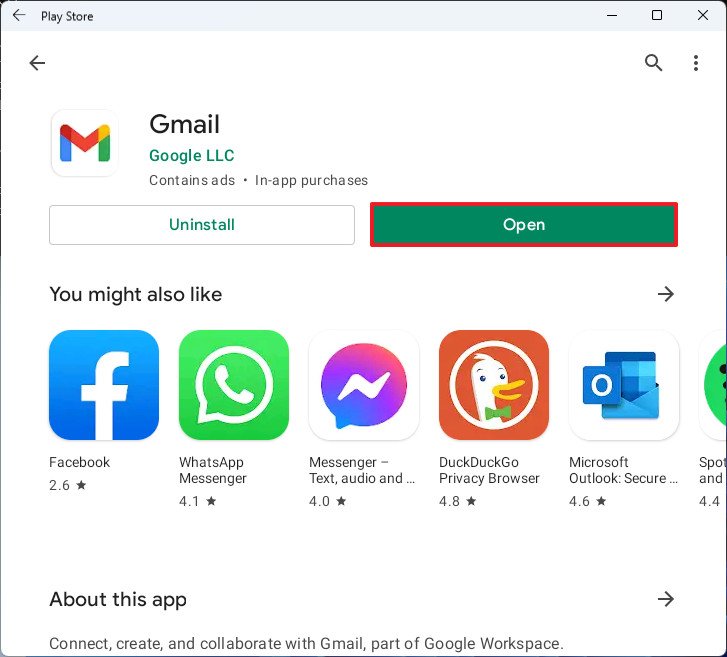
- Click the Open button.
- Continue with the on-screen directions to set up and use the app.
After you complete the steps, you can repeat the above instructions to install virtually any app from the Google Play Store on Windows 11.
More Windows resources
For more helpful articles, coverage, and answers to common questions about Windows 10 and Windows 11, visit the following resources:
- Windows 10 on Windows Central — All you need to know
- Windows 10 help, tips, and tricks
- Windows 11 on Windows Central — All you need to know
Get the best of Windows Central in in your inbox, every day!
Mauro Huculak is technical writer for WindowsCentral.com. His primary focus is to write comprehensive how-tos to help users get the most out of Windows 10 and its many related technologies. He has an IT background with professional certifications from Microsoft, Cisco, and CompTIA, and he’s a recognized member of the Microsoft MVP community.