This detailed step-by-step guide shows you how to install the latest Hadoop (v3.2.1) on Windows 10. It’s based on the previous articles I published with some updates to reflect the feedback collected from readers to make it easier for everyone to install.
Please follow all the instructions carefully. Once you complete the steps, you will have a shiny pseudo-distributed single node Hadoop to work with.
*The yellow elephant logo is a registered trademark of Apache Hadoop; the blue window logo is registered trademark of Microsoft.
References
Refer to the following articles if you prefer to install other versions of Hadoop or if you want to configure a multi-node cluster or using WSL.
- Install Hadoop 3.0.0 on Windows (Single Node)
- Configure Hadoop 3.1.0 in a Multi Node Cluster
- Install Hadoop 3.2.0 on Windows 10 using Windows Subsystem for Linux (WSL)
Required tools
Before you start, make sure you have these following tools enabled in Windows 10.
| Tool | Comments |
| PowerShell |
We will use this tool to download package. In my system, PowerShell version table is listed below: $PSversionTable
Name Value
---- -----
PSVersion 5.1.18362.145
PSEdition Desktop
PSCompatibleVersions {1.0, 2.0, 3.0, 4.0...}
BuildVersion 10.0.18362.145
CLRVersion 4.0.30319.42000
WSManStackVersion 3.0
PSRemotingProtocolVersion 2.3
SerializationVersion 1.1.0.1
|
| Git Bash or 7 Zip |
We will use Git Bash or 7 Zip to unzip Hadoop binary package. You can choose to install either tool or any other tool as long as it can unzip *.tar.gz files on Windows. |
| Command Prompt | We will use it to start Hadoop daemons and run some commands as part of the installation process. |
| Java JDK |
JDK is required to run Hadoop as the framework is built using Java. In my system, my JDK version is jdk1.8.0_161. Check out the supported JDK version on the following page. https://cwiki.apache.org/confluence/display/HADOOP/Hadoop+Java+Versions |
Now we will start the installation process.
Step 1 — Download Hadoop binary package
Select download mirror link
Go to download page of the official website:
Apache Download Mirrors — Hadoop 3.2.1
And then choose one of the mirror link. The page lists the mirrors closest to you based on your location. For me, I am choosing the following mirror link:
http://apache.mirror.digitalpacific.com.au/hadoop/common/hadoop-3.2.1/hadoop-3.2.1.tar.gz
info In the following sections, this URL will be used to download the package. Your URL might be different from mine and you can replace the link accordingly.
Download the package
info In this guide, I am installing Hadoop in folder big-data of my F drive (F:big-data). If you prefer to install on another drive, please remember to change the path accordingly in the following command lines. This directory is also called destination directory in the following sections.
Open PowerShell and then run the following command lines one by one:
$dest_dir="F:big-data"
$url = "http://apache.mirror.digitalpacific.com.au/hadoop/common/hadoop-3.2.1/hadoop-3.2.1.tar.gz"
$client = new-object System.Net.WebClient
$client.DownloadFile($url,$dest_dir+"hadoop-3.2.1.tar.gz")
It may take a few minutes to download.
Once the download completes, you can verify it:
PS F:big-data> cd $dest_dir
PS F:big-data> ls


    Directory: F:big-data


Mode                LastWriteTime         Length Name
----                -------------         ------ ----
-a----       18/01/2020  11:01 AM      359196911 hadoop-3.2.1.tar.gz


PS F:big-data>
You can also directly download the package through your web browser and save it to the destination directory.
warning Please keep this PowerShell window open as we will use some variables in this session in the following steps. If you already closed it, it is okay, just remember to reinitialise the above variables: $client, $dest_dir.
Step 2 — Unpack the package
Now we need to unpack the downloaded package using GUI tool (like 7 Zip) or command line. For me, I will use git bash to unpack it.
Open git bash and change the directory to the destination folder:
cd F:/big-data
And then run the following command to unzip:
tar -xvzf hadoop-3.2.1.tar.gz
The command will take quite a few minutes as there are numerous files included and the latest version introduced many new features.
After the unzip command is completed, a new folder hadoop-3.2.1 is created under the destination folder.

info When running the command you will experience errors like the following:
tar: hadoop-3.2.1/lib/native/libhadoop.so: Cannot create symlink to ‘libhadoop.so.1.0.0’: No such file or directory
Please ignore it for now as those native libraries are for Linux/UNIX and we will create Windows native IO libraries in the following steps.
Step 3 — Install Hadoop native IO binary
Hadoop on Linux includes optional Native IO support. However Native IO is mandatory on Windows and without it you will not be able to get your installation working. The Windows native IO libraries are not included as part of Apache Hadoop release. Thus we need to build and install it.
I also published another article with very detailed steps about how to compile and build native Hadoop on Windows: Compile and Build Hadoop 3.2.1 on Windows 10 Guide.
The build may take about one hourand to save our time, we can just download the binary package from github.
warning These libraries are not signed and there is no guarantee that it is 100% safe. We use if purely for test&learn purpose.
Download all the files in the following location and save them to the bin folder under Hadoop folder. For my environment, the full path is: F:big-datahadoop-3.2.1bin. Remember to change it to your own path accordingly.
https://github.com/cdarlint/winutils/tree/master/hadoop-3.2.1/bin
Alternatively, you can run the following commands in the previous PowerShell window to download:
$client.DownloadFile("https://github.com/cdarlint/winutils/raw/master/hadoop-3.2.1/bin/hadoop.dll",$dest_dir+"hadoop-3.2.1bin"+"hadoop.dll")
$client.DownloadFile("https://github.com/cdarlint/winutils/raw/master/hadoop-3.2.1/bin/hadoop.exp",$dest_dir+"hadoop-3.2.1bin"+"hadoop.exp")
$client.DownloadFile("https://github.com/cdarlint/winutils/raw/master/hadoop-3.2.1/bin/hadoop.lib",$dest_dir+"hadoop-3.2.1bin"+"hadoop.lib")
$client.DownloadFile("https://github.com/cdarlint/winutils/raw/master/hadoop-3.2.1/bin/hadoop.pdb",$dest_dir+"hadoop-3.2.1bin"+"hadoop.pdb")
$client.DownloadFile("https://github.com/cdarlint/winutils/raw/master/hadoop-3.2.1/bin/libwinutils.lib",$dest_dir+"hadoop-3.2.1bin"+"libwinutils.lib")
$client.DownloadFile("https://github.com/cdarlint/winutils/raw/master/hadoop-3.2.1/bin/winutils.exe",$dest_dir+"hadoop-3.2.1bin"+"winutils.exe")
$client.DownloadFile("https://github.com/cdarlint/winutils/raw/master/hadoop-3.2.1/bin/winutils.pdb",$dest_dir+"hadoop-3.2.1bin"+"winutils.pdb")
After this, the bin folder looks like the following:
Step 4 — (Optional) Java JDK installation
Java JDK is required to run Hadoop. If you have not installed Java JDK please install it.
You can install JDK 8 from the following page:
https://www.oracle.com/technetwork/java/javase/downloads/jdk8-downloads-2133151.html
Once you complete the installation, please run the following command in PowerShell or Git Bash to verify:
$ java -version
java version "1.8.0_161"
Java(TM) SE Runtime Environment (build 1.8.0_161-b12)
Java HotSpot(TM) 64-Bit Server VM (build 25.161-b12, mixed mode)
If you got error about ‘cannot find java command or executable’. Don’t worry we will resolve this in the following step.
Step 5 — Configure environment variables
Now we’ve downloaded and unpacked all the artefacts we need to configure two important environment variables.
Configure JAVA_HOME environment variable
As mentioned earlier, Hadoop requires Java and we need to configure JAVA_HOME environment variable (though it is not mandatory but I recommend it).
First, we need to find out the location of Java SDK. In my system, the path is: D:Javajdk1.8.0_161.
Your location can be different depends on where you install your JDK.
And then run the following command in the previous PowerShell window:
SETX JAVA_HOME "D:Javajdk1.8.0_161"
Remember to quote the path especially if you have spaces in your JDK path.
infoYou can setup evironment variable at system by adding option /M however just in case you don’t have access to change system variables, you can just set it up at user level.
The output looks like the following:
Configure HADOOP_HOME environment variable
Similarly we need to create a new environment variable for HADOOP_HOME using the following command. The path should be your extracted Hadoop folder. For my environment it is: F:big-datahadoop-3.2.1.
If you used PowerShell to download and if the window is still open, you can simply run the following command:
SETX HADOOP_HOME $dest_dir+"/hadoop-3.2.1"
The output looks like the following screenshot:
Alternatively, you can specify the full path:
SETX HADOOP_HOME "F:big-datahadoop-3.2.1"
Now you can also verify the two environment variables in the system:
Configure PATH environment variable
Once we finish setting up the above two environment variables, we need to add the bin folders to the PATH environment variable.
If PATH environment exists in your system, you can also manually add the following two paths to it:
- %JAVA_HOME%/bin
- %HADOOP_HOME%/bin
Alternatively, you can run the following command to add them:
setx PATH "$env:PATH;$env:JAVA_HOME/bin;$env:HADOOP_HOME/bin"
If you don’t have other user variables setup in the system, you can also directly add a Path environment variable that references others to make it short:
Close PowerShell window and open a new one and type winutils.exe directly to verify that our above steps are completed successfully:
You should also be able to run the following command:
hadoop -version
java version "1.8.0_161"
Java(TM) SE Runtime Environment (build 1.8.0_161-b12)
Java HotSpot(TM) 64-Bit Server VM (build 25.161-b12, mixed mode)
Step 6 — Configure Hadoop
Now we are ready to configure the most important part — Hadoop configurations which involves Core, YARN, MapReduce, HDFS configurations.
Configure core site
Edit file core-site.xml in %HADOOP_HOME%etchadoop folder. For my environment, the actual path is F:big-datahadoop-3.2.1etchadoop.
Replace configuration element with the following:
<configuration>
   <property>
     <name>fs.default.name</name>
     <value>hdfs://0.0.0.0:19000</value>
   </property>
</configuration>
Configure HDFS
Edit file hdfs-site.xml in %HADOOP_HOME%etchadoop folder.
Before editing, please correct two folders in your system: one for namenode directory and another for data directory. For my system, I created the following two sub folders:
- F:big-datadatadfsnamespace_logs
- F:big-datadatadfsdata
Replace configuration element with the following (remember to replace the highlighted paths accordingly):
<configuration>
   <property>
     <name>dfs.replication</name>
     <value>1</value>
   </property>
   <property>
     <name>dfs.namenode.name.dir</name>
     <value>file:///F:/big-data/data/dfs/namespace_logs</value>
   </property>
   <property>
     <name>dfs.datanode.data.dir</name>
     <value>file:///F:/big-data/data/dfs/data</value>
   </property>
</configuration>
In Hadoop 3, the property names are slightly different from previous version. Refer to the following official documentation to learn more about the configuration properties:
Hadoop 3.2.1 hdfs_default.xml
infoFor DFS replication we configure it as one as we are configuring just one single node. By default the value is 3.
infoThe directory configuration are not mandatory and by default it will use Hadoop temporary folder. For our tutorial purpose, I would recommend customise the values.
Configure MapReduce and YARN site
Edit file mapred-site.xml in %HADOOP_HOME%etchadoop folder.
Replace configuration element with the following:
<configuration>
    <property>
        <name>mapreduce.framework.name</name>
        <value>yarn</value>
    </property>
    <property>
        <name>mapreduce.application.classpath</name>
        <value>%HADOOP_HOME%/share/hadoop/mapreduce/*,%HADOOP_HOME%/share/hadoop/mapreduce/lib/*,%HADOOP_HOME%/share/hadoop/common/*,%HADOOP_HOME%/share/hadoop/common/lib/*,%HADOOP_HOME%/share/hadoop/yarn/*,%HADOOP_HOME%/share/hadoop/yarn/lib/*,%HADOOP_HOME%/share/hadoop/hdfs/*,%HADOOP_HOME%/share/hadoop/hdfs/lib/*</value>
    </property>
</configuration>
Edit file yarn-site.xml in %HADOOP_HOME%etchadoop folder.
<configuration>
    <property>
        <name>yarn.nodemanager.aux-services</name>
        <value>mapreduce_shuffle</value>
    </property>
    <property>
        <name>yarn.nodemanager.env-whitelist</name>
        <value>JAVA_HOME,HADOOP_COMMON_HOME,HADOOP_HDFS_HOME,HADOOP_CONF_DIR,CLASSPATH_PREPEND_DISTCACHE,HADOOP_YARN_HOME,HADOOP_MAPRED_HOME</value>
    </property>
</configuration>
Step 7 — Initialise HDFS & bug fix
Run the following command in Command Prompt
hdfs namenode -format
This command failed with the following error and we need to fix it:
2020-01-18 13:36:03,021 ERROR namenode.NameNode: Failed to start namenode.
java.lang.UnsupportedOperationException
        at java.nio.file.Files.setPosixFilePermissions(Files.java:2044)
        at org.apache.hadoop.hdfs.server.common.Storage$StorageDirectory.clearDirectory(Storage.java:452)
        at org.apache.hadoop.hdfs.server.namenode.NNStorage.format(NNStorage.java:591)
        at org.apache.hadoop.hdfs.server.namenode.NNStorage.format(NNStorage.java:613)
        at org.apache.hadoop.hdfs.server.namenode.FSImage.format(FSImage.java:188)
        at org.apache.hadoop.hdfs.server.namenode.NameNode.format(NameNode.java:1206)
        at org.apache.hadoop.hdfs.server.namenode.NameNode.createNameNode(NameNode.java:1649)
        at org.apache.hadoop.hdfs.server.namenode.NameNode.main(NameNode.java:1759)
2020-01-18 13:36:03,025 INFO util.ExitUtil: Exiting with status 1: java.lang.UnsupportedOperationException
Refer to the following sub section (About 3.2.1 HDFS bug on Windows) about the details of fixing this problem.
Once this is fixed, the format command (hdfs namenode -format) will show something like the following:
About 3.2.1 HDFS bug on Windows
This is a bug with 3.2.1 release:
https://issues.apache.org/jira/browse/HDFS-14890
It will be resolved in version 3.2.2 and 3.3.0.
We can apply a temporary fix as the following change diff shows:
Code fix for HDFS-14890
I’ve done the following to get this temporarily fixed before 3.2.2/3.3.0 is released:
- Checkout the source code of Hadoop project from GitHub.
- Checkout branch 3.2.1
- Open pom file of hadoop-hdfs project
- Update class StorageDirectory as described in the above code diff screen shot:
if (permission != null) {
    	  try {
              Set<PosixFilePermission> permissions =
                  PosixFilePermissions.fromString(permission.toString());
              Files.setPosixFilePermissions(curDir.toPath(), permissions);
            } catch (UnsupportedOperationException uoe) {
              // Default to FileUtil for non posix file systems
              FileUtil.setPermission(curDir, permission);
            }
      }
- Use Maven to rebuild this project as the following screenshot shows:
Fix bug HDFS-14890
I’ve uploaded the JAR file into the following location. Please download it from the following link:
https://github.com/FahaoTang/big-data/blob/master/hadoop-hdfs-3.2.1.jar
And then rename the file name hadoop-hdfs-3.2.1.jar to hadoop-hdfs-3.2.1.bk in folder %HADOOP_HOME%sharehadoophdfs.
Copy the downloaded hadoop-hdfs-3.2.1.jar to folder %HADOOP_HOME%sharehadoophdfs.
warning This is just a temporary fix before the official improvement is published. I publish it purely for us to complete the whole installation process and there is no guarantee this temporary fix won’t cause any new issue.
Refer to this article for more details about how to build a native Windows Hadoop: Compile and Build Hadoop 3.2.1 on Windows 10 Guide.
Step 8 — Start HDFS daemons
Run the following command to start HDFS daemons in Command Prompt:
%HADOOP_HOME%sbinstart-dfs.cmdTwo Command Prompt windows will open: one for datanode and another for namenode as the following screenshot shows:
Step 9 — Start YARN daemons
warning You may encounter permission issues if you start YARN daemons using normal user. To ensure you don’t encounter any issues. Please open a Command Prompt window using Run as administrator.
Alternatively, you can follow this comment on this page which doesn’t require Administrator permission using a local Windows account:
https://kontext.tech/article/377/latest-hadoop-321-installation-on-windows-10-step-by-step-guide#comment314
Run the following command in an elevated Command Prompt window (Run as administrator) to start YARN daemons:
%HADOOP_HOME%sbinstart-yarn.cmdSimilarly two Command Prompt windows will open: one for resource manager and another for node manager as the following screenshot shows:
Step 10 — Useful Web portals exploration
The daemons also host websites that provide useful information about the cluster.
HDFS Namenode information UI
http://localhost:9870/dfshealth.html#tab-overview
The website looks like the following screenshot:
HDFS Datanode information UI
http://localhost:9864/datanode.html
The website looks like the following screenshot:
YARN resource manager UI
http://localhost:8088
The website looks like the following screenshot:
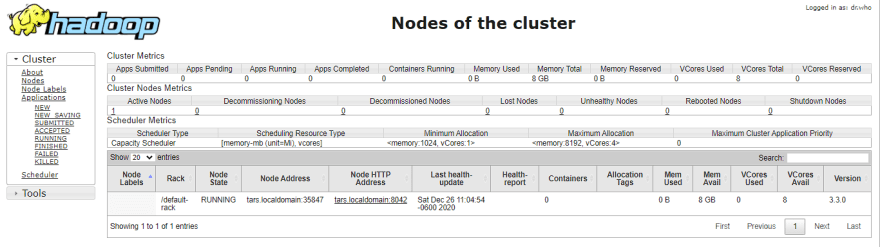
Through Resource Manager, you can also navigate to any Node Manager:
Step 11 — Shutdown YARN & HDFS daemons
You don’t need to keep the services running all the time. You can stop them by running the following commands one by one:
%HADOOP_HOME%sbinstop-yarn.cmd
%HADOOP_HOME%sbinstop-dfs.cmd
check Congratulations! You’ve successfully completed the installation of Hadoop 3.2.1 on Windows 10.
Let me know if you encounter any issues. Enjoy with your latest Hadoop on Windows 10.
Basic Hadoop on Windows
How to install Apache Hadoop (HDFS, YARN, MapReduce) on Windows 10.
Recommended Prerequisites
- Be able to open PowerShell as administrator and run commands
- Be able to stop a PowerShell process with CTRL+C
- Be able to close PowerShell with ALT+SPACE C
- Chocolatey, the Windows package manager
choco install hadoop -y
refreshenv
choco list -local
Close the window with ALT+SPACE C and reopen.
JDK 8 With No Spaces
Choco installs JDK 8 with spaces. We need a JDK 8 path with no spaces for Hadoop.
- Hadoop cannot have spaces in the path.
- Currently, Yarn cannot have a version greater than 8.
- Keep Windows Environment Variables at the original Chocolatey path. (Windows 1 below.)
- Use a special «no spaces in the path» JDK 8 version for Hadoop (set in hadoop-env.cmd below.)
IMPORTANT: In the following, use the path and file name specific to your JDK 8 file and installation.
My versions are only for illustration.
One way to get this version:
- Go to https://adoptopenjdk.net/upstream.html
- Download OpenJDK 8 (LTS) for Windows x64 JDK 103 MB as a zip file to C:.
- If not permitted to download to C:, download to your «Downloads» folder and move to C: when done.
- Right-click / Extract all / Extract.
- Move the openjdk-8u252-b09 folder from C:OpenJDK8U-jdk_x64_windows_8u252b09 to C:.
Now we have a JDK 8 path with no spaces for Hadoop.
Verify you have C:openjdk-8u252-b09 (or similar) with the necessary files.
Edit Windows System Environment Variables
JAVA_HOME = location of your most current OpenJDK (this can have spaces — it is NOT the one we use).
HADOOP_HOME = C:Hadoophadoop-3.3.0
PATH
- only one JDK in the path
- include %HADOOP_HOME%bin
- include C:WINDOWSsystem32
Add winutil files
- Go to https://github.com/cdarlint/winutils.
- Get winutils.exe and download the lastest to your C:Hadoophadoop-3.3.0bin folder. If you get
java.lang.UnsatisfiedLinkError: org.apache.hadoop.io.nativeio.NativeIO$Windows.access0(Ljava/lang/String;I)Zerror then you may have to download hadoop.dll file as well to your bin folder.
Windows 2 — Edit Hadoop Files
Open C:Hadoophadoop-3.3.0etchadoop in VS Code to edit these files as shown in ./etc-hadoop.
- core-site.xml
- hadoop-env.cmd (set JAVA_HOME=C:openjdk-8u252-b09 — no spaces, must be version
- hdfs-site.xml (path values must be formatted as shown in the example)
- mapred-site.xml
- workers
- yarn-site.xml

Windows 3 — Format new namenode
Create and format a new namenode (at the path specified in hdfs-site.xml). In PowerShell as Adminstrator, run:
Verify it runs without errors. The process will shutdown the new namenode after formatting.
Explore the new folder created at the path given in hdfs-site.xml.
Running A Psuedo-Distributed Hadoop Cluster on Windows
Start the namenode first. From your desktop, run PowerShell as Administrator and start the namenode service. Leave the window open to keep the process running.
Then, start the datanode. Important: Make sure the datanode folder does NOT exist. If it does exist, stop the process if necessary and delete the directory. Once gone, from your desktop, run PowerShell as Administrator and start the datanode service. Leave the window open to keep the process running.
Notes:
- These locations are set in hdfs-site.xml. The datanode directory must NOT EXIST before running.
- Open these directories when running to see what’s happening on disk.
- Exit gracefully when done. If you leave processes running, you may need to close them manually with CTRL+ALT+DELETE / Task Manager. Find the process, right-click / End task.
Monitoring Hadoop
Open a browser to http://localhost:9870/. Explore.
Interacting with HDFS
HDFS is a powerful, fast file system for managing large files with commodity hardware. It breaks each file added into blocks and replicates them across different machines (and different racks) on the cluster. By default, it creates 3 copies. It does this automatically.
We can list the contents, get help, make directories in HDFS to organize our work, put files into HDFS directories, and get files out of HDFS.
Make sure your nodes are running. From your desktop, open a third PowerShell as Administrator and use hadoop fs to access the file system. Try these Frequently Used HDFS Shell Commands
hadoop fs -ls /
hadoop fs -df hdfs:/
hadoop fs -mkdir /wordcount
hadoop fs -put C:/romeoandjuliet.txt /wordcount
hadoop fs -ls /
hadoop fs -ls /wordcount
hadoop fs -help
hadoop fs -mkdir -p project1
Start up YARN
Start your namenode and datanode services as shown above.
Open PowerShell as an Administrator and run:
c:hadoop-3.2.1sbinstart-yarn.cmd
This will start the YARN Resource Manager and the YARN Node Manager services.
Open a browser to http://localhost:8088/cluster/nodes to see your managed cluster.
Troubleshooting
Issues? Key things to check for include the following.
Windows Environment Variables
- Verify you only have one java bin directory in your path.
- Verify the paths provided match the locations on your machine (use File Explorer to check).
References
- Romeo and Juliet
- Frequently Used HDFS Shell Commands
Repository
- https://github.com/denisecase/basic-hadoop-on-windows

![]()
This article provides a step-by-step guide to install Hadoop 3.3.0 on Windows 10 via WSL (Windows Subsystem for Linux). These instructions are also applicable for installing Hadoop on Linux systems.
Hadoop 3.3.0 (released on July 14, 2020) is the most recent release in the Apache Hadoop 3.3 line as of the time of this article.
Prerequisites
Follow the steps mentioned on the page below to first enable Windows Subsystem for Linux and then install a Linux distribution of your choice.
Windows Subsystem for Linux Installation Guide for Windows 10
Initial Linux Configuration (optional)
Create a dedicated Hadoop user
We will create a dedicated Hadoop user for executing Hadoop commands. Although not required, it is a recommended step as it separates the Hadoop installation from other software applications and user accounts running on the same machine.
- Create a user group
hadoop
sudo addgroup hadoop
Enter fullscreen mode
Exit fullscreen mode
- Create a user
hduser
sudo adduser hduser
Enter fullscreen mode
Exit fullscreen mode
It will ask for password 2 times followed by user details, just press enter for each prompt and confirm Yes in the end.
- Add user
hduserto user grouphadoop
sudo adduser hduser hadoop
Enter fullscreen mode
Exit fullscreen mode
- Add
hduserto sudoers list so thathdusercan do admin tasks
sudo visudo
Enter fullscreen mode
Exit fullscreen mode
Append after the line «#Allow member of group sudo to execute any command»
hduser ALL=(ALL) ALL
Enter fullscreen mode
Exit fullscreen mode
Then save and close the file.
- Logout of the current session
logout
Enter fullscreen mode
Exit fullscreen mode
- Login again as
hduser
su hduser
cd
Enter fullscreen mode
Exit fullscreen mode
Configure passphraseless ssh
Hadoop requires SSH access to manage its nodes.
This is a critical step and please make sure you follow the steps
Make sure you can SSH to localhost in Ubuntu:
ssh localhost
Enter fullscreen mode
Exit fullscreen mode
If you encounter the error ssh: connect to host localhost port 22: Connection refused, run the following commands:
sudo apt remove openssh-server
sudo apt install openssh-server
sudo service ssh start
Enter fullscreen mode
Exit fullscreen mode
If you cannot ssh to localhost without a passphrase, run the following command to initialize your private and public keys:
ssh-keygen -t rsa -P '' -f ~/.ssh/id_rsa
cat ~/.ssh/id_rsa.pub >> ~/.ssh/authorized_keys
chmod 0600 ~/.ssh/authorized_keys
Enter fullscreen mode
Exit fullscreen mode
Now ssh localhost should work without any passphrase.
Hadoop Installation
Install Java JDK
Update the package index:
sudo apt update
Enter fullscreen mode
Exit fullscreen mode
Check whether Java is already installed:
java -version
Enter fullscreen mode
Exit fullscreen mode
If Java isn’t installed, install Java 8 from OpenJDK via the following command:
sudo apt-get install openjdk-8-jdk
Enter fullscreen mode
Exit fullscreen mode
Check the version installed:
java -version
openjdk version "1.8.0_275"
OpenJDK Runtime Environment (build 1.8.0_275-8u275-b01-0ubuntu1~20.04-b01)
OpenJDK 64-Bit Server VM (build 25.275-b01, mixed mode)
Enter fullscreen mode
Exit fullscreen mode
Download Hadoop binary
Visit the Hadoop releases page to find a download URL for Hadoop 3.3.0:
Hadoop Releases
Run the following command to download the latest binary for Hadoop 3.3.0:
wget https://downloads.apache.org/hadoop/common/hadoop-3.3.0/hadoop-3.3.0.tar.gz
Enter fullscreen mode
Exit fullscreen mode
Wait until the download is completed.
Unzip Hadoop binary
Create a hadoop folder under the user home folder:
mkdir ~/hadoop
Enter fullscreen mode
Exit fullscreen mode
Unzip the downloaded binary package:
tar -xvzf hadoop-3.3.0.tar.gz -C ~/hadoop
Enter fullscreen mode
Exit fullscreen mode
After the package is unzipped, change the current directory to the Hadoop folder:
cd ~/hadoop/hadoop-3.3.0/
Enter fullscreen mode
Exit fullscreen mode
Setup environment variables
nano ~/.bashrc
Enter fullscreen mode
Exit fullscreen mode
Setup Hadoop and Java environment variables at the end of the .bashrc file as below and then save the bash file and close it.
#Set Hadoop-related environment variables
export JAVA_HOME=/usr/lib/jvm/java-8-openjdk-amd64
export HADOOP_HOME=~/hadoop/hadoop-3.3.0
export PATH=$PATH:$HADOOP_HOME/bin
export PATH=$PATH:$HADOOP_HOME/sbin
export HADOOP_CONF_DIR=$HADOOP_HOME/etc/hadoop
export HADOOP_MAPRED_HOME=$HADOOP_HOME
export HADOOP_COMMON_HOME=$HADOOP_HOME
export HADOOP_HDFS_HOME=$HADOOP_HOME
export YARN_HOME=$HADOOP_HOME
Enter fullscreen mode
Exit fullscreen mode
For applying all these changes to the current Terminal, execute the source command.
source ~/.bashrc
Enter fullscreen mode
Exit fullscreen mode
Make sure that Java and Hadoop have been properly installed on your system and can be accessed through the Terminal by,
java -version
openjdk version "1.8.0_275"
OpenJDK Runtime Environment (build 1.8.0_275-8u275-b01-0ubuntu1~20.04-b01)
OpenJDK 64-Bit Server VM (build 25.275-b01, mixed mode)
Enter fullscreen mode
Exit fullscreen mode
hadoop version
Hadoop 3.3.0
Source code repository https://gitbox.apache.org/repos/asf/hadoop.git -r aa96f1871bfd858f9bac59cf2a81ec470da649af
Compiled by brahma on 2020-07-06T18:44Z
Compiled with protoc 3.7.1
From source with checksum 5dc29b802d6ccd77b262ef9d04d19c4
This command was run using /home/daftdey/hadoop/hadoop-3.3.0/share/hadoop/common/hadoop-common-3.3.0.jar
Enter fullscreen mode
Exit fullscreen mode
Configure the pseudo-distributed mode (Single Node mode)
This page below is the official documentation to configure a single node cluster:
Pseudo-Distributed Operation
All the Hadoop configuration files should be located in the ~/hadoop/hadoop-3.3.0/etc/hadoop directory.
cd ~/hadoop/hadoop-3.3.0/etc/hadoop
Enter fullscreen mode
Exit fullscreen mode
The configuration setup steps are as follows:
-
Edit file
hadoop-env.sh:nano hadoop-env.shSet Java environment variable as,
# Java path export JAVA_HOME=/usr/lib/jvm/java-8-openjdk-amd64 -
Edit file
core-site.xml:
core-site.xmlinforms the Hadoop daemon where NameNode runs in the cluster. It contains configuration settings of Hadoop core such as I/O settings that are common to HDFS & MapReduce.nano core-site.xmlAdd the following configuration:
<configuration> <property> <name>fs.defaultFS</name> <value>hdfs://localhost:9000</value> </property> </configuration> -
Edit file
hdfs-site.xml:
hdfs-site.xmlcontains configuration settings of HDFS daemons (i.e. NameNode, DataNode, Secondary NameNode). It also includes the replication factor and block size of HDFS.nano hdfs-site.xmlAdd the following configuration:
<configuration> <property> <name>dfs.replication</name> <value>1</value> </property> </configuration> -
Edit file
mapred-site.xml:
mapred-site.xmlcontains configuration settings of MapReduce application like the number of JVM that can run in parallel, the size of the mapper and the reducer process, CPU cores available for a process, etc.nano mapred-site.xmlAdd the following configuration:
<configuration> <property> <name>mapreduce.framework.name</name> <value>yarn</value> </property> <property> <name>mapreduce.application.classpath</name> <value>$HADOOP_MAPRED_HOME/share/hadoop/mapreduce/*:$HADOOP_MAPRED_HOME/share/hadoop/mapreduce/lib/*</value> </property> </configuration> -
Edit file
yarn-site.xml:
yarn-site.xmlcontains configuration settings of ResourceManager and NodeManager like application memory management size, the operation needed on program & algorithm, etc.nano yarn-site.xmlAdd the following configuration:
<configuration>
    <property>
        <name>yarn.nodemanager.aux-services</name>
        <value>mapreduce_shuffle</value>
    </property>
    <property>
        <name>yarn.nodemanager.env-whitelist</name>
        <value>JAVA_HOME,HADOOP_COMMON_HOME,HADOOP_HDFS_HOME,HADOOP_CONF_DIR,CLASSPATH_PREPEND_DISTCACHE,HADOOP_YARN_HOME,HADOOP_MAPRED_HOME</value>
    </property>
</configuration>
Format namenode
Go to the Hadoop home directory and format the Hadoop namenode:
cd ~/hadoop/hadoop-3.3.0
bin/hdfs namenode -format
Enter fullscreen mode
Exit fullscreen mode
This formats the HDFS via the NameNode. Formatting the file system means initializing the directory specified by the dfs.name.dir variable.
This command should be executed only for the first time. Never format an up and running Hadoop filesystem. You will lose all your data stored in the HDFS.
Run HDFS daemons
The NameNode is the centerpiece of an HDFS file system. It keeps the directory tree of all files stored in the HDFS and tracks all the files stored across the cluster.
On startup, a DataNode connects to the Namenode and it responds to the requests from the Namenode for different operations.
Start NameNode daemon and DataNode daemon
sbin/start-dfs.sh
Starting namenodes on [localhost]
Starting datanodes
Starting secondary namenodes [tars]
Enter fullscreen mode
Exit fullscreen mode
Check status via jps command
jps
8544 SecondaryNameNode
8304 DataNode
8149 NameNode
8702 Jps
Enter fullscreen mode
Exit fullscreen mode
When the HDFS services are successfully initiated, you should be able to see these four processes running.
View name node portal
Now open the browser and go to the following URL to view the NameNode interface. Scroll down and see the number of live nodes.
http://localhost:9870/dfshealth.html#tab-overview
The web UI looks like this:

Data nodes information can be also viewed through the Datanodes menu link:

Run YARN daemon
ResourceManager is the master that arbitrates all the available cluster resources and thus helps in managing the distributed applications running on the YARN system. Its work is to manage each NodeManagers and each application’s ApplicationMaster.
The NodeManager in each machine framework is the agent that is responsible for managing containers, monitoring their resource usage, and reporting the same to the ResourceManager.
Start ResourceManager daemon and NodeManager daemon
sbin/start-yarn.sh
Starting resourcemanager
Starting nodemanagers
Enter fullscreen mode
Exit fullscreen mode
Check status using the jps command
jps
11831 ResourceManager
11352 DataNode
12347 Jps
11196 NameNode
11981 NodeManager
11597 SecondaryNameNode
Enter fullscreen mode
Exit fullscreen mode
Once the YARN services are started, two more processes for NodeManager and ResourceManage can be seen running.
View YARN web portal
Now open the browser and go to the following URL to view the YARN resource manager web UI.
http://localhost:8088/cluster
The web UI looks like this:
Execution of all the Hadoop applications can be monitored through this web portal.
Shutdown Hadoop services
After completion of the execution of all Hadoop applications, the HDFS and YARN services can be stopped as follows:
sbin/stop-yarn.sh
sbin/stop-dfs.sh
Enter fullscreen mode
Exit fullscreen mode
Verify status via jps command, only the jps service should be running:
jps
13257 Jps
Enter fullscreen mode
Exit fullscreen mode
Summary
Congratulations, you have successfully installed a single-node Hadoop cluster in one go on your Linux subsystem of Windows 10. It’s relatively easier compared to installing on Windows as we don’t need to download or build native Hadoop HDFS libraries.
Have fun exploring with Hadoop.
Try out an example application: Hadoop MapReduce computational model to perform analyses on DBLP publication data
If you encounter any issues while following the steps, please post a comment and I will try my best to help.
Further References
Install Hadoop 3.3.0 on Windows 10 using WSL
Install Hadoop: Setting up a Single Node Hadoop Cluster
There are numerous problems with the installation and operation of components such as Hadoop and Hive on Windows systems
With the help of several Internet references, I completed the construction of Hadoop and Hive development environment on Windows 10. This article documents the specific steps, problems encountered, and corresponding solutions for the entire build process.
Environmental Preparation
| Software | Version | Description |
|---|---|---|
| Windows | 10 | Operating System |
| JDK | 8 | Do not use a version greater than or equal to JDK9 for the time being, because unknown exceptions will occur when starting the virtual machine |
| MySQL | 8.x | Metadata for managing Hive |
| Apache Hadoop | 3.3.0 | — |
| Apache Hive | 3.1.2 | — |
| Apache Hive src | 1.2.2 | Because only the 1.x version of the Hive source code provides a .bat startup script, the ability to write their own scripts do not need to download this source code package |
| winutils | hadoop-3.3.0 | Startup dependencies for Hadoop on Windows |
Some of the components are listed below with their corresponding download addresses:
- Apache Hadoop 3.3.0:https://mirror.bit.edu.cn/apache/hadoop/common/hadoop-3.3.0/hadoop-3.3.0.tar.gz
- Apache Hive 3.1.2:https://mirrors.bfsu.edu.cn/apache/hive/hive-3.1.2/apache-hive-3.1.2-bin.tar.gz
- Apache Hive 1.2.2 src:https://mirrors.bfsu.edu.cn/apache/hive/hive-1.2.2/apache-hive-1.2.2-src.tar.gz
- winutils:https://github.com/kontext-tech/winutils
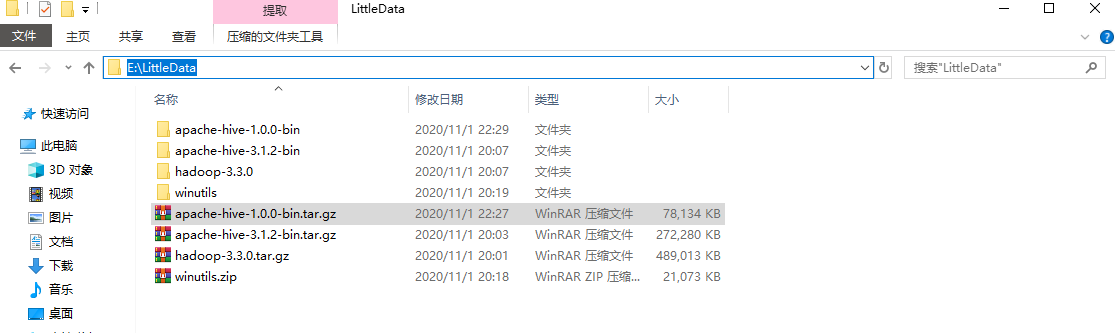
After downloading some of these software, MySQL is installed normally as a system service with system self-start. Unzip hadoop-3.3.0.tar.gz, apache-hive-3.1.2-bin.tar.gz, apache-hive-1.2.2-src.tar.gz and winutils to the specified directory
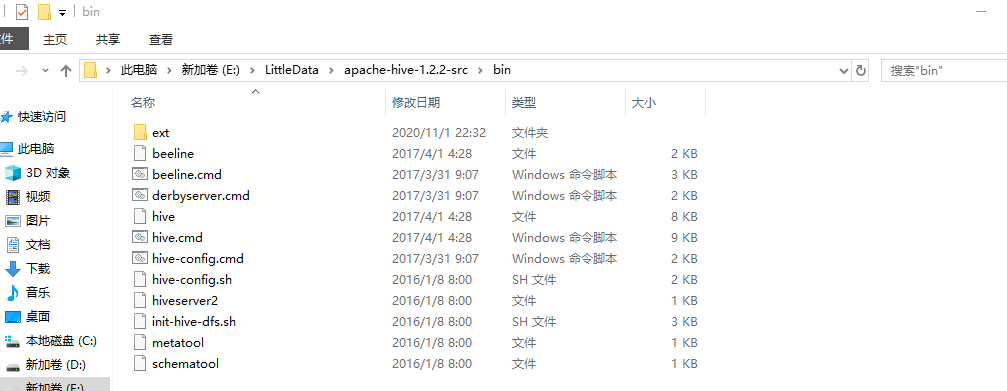
Next, copy the files in the bin directory of the unpacked source package apache-hive-1.2.2-src.tar.gz to the bin directory of `apache-hive-3.1.2-bin:.
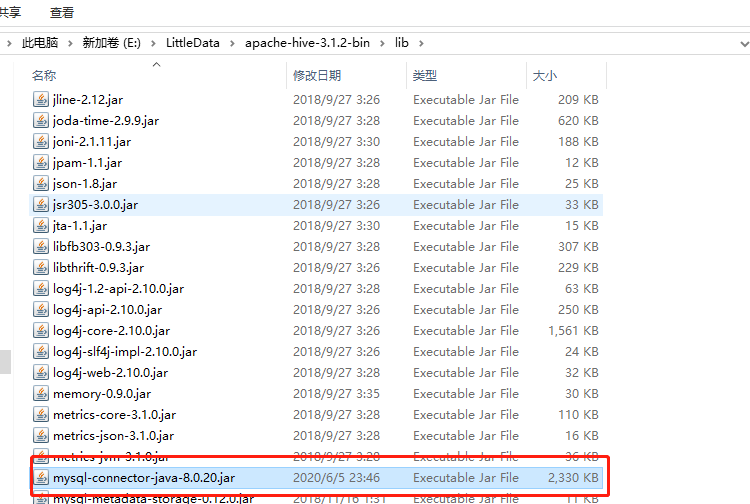
Then copy the hadoop.dll and winutils.exe files from the hadoop-3.3.0bin directory in winutils to the bin folder in the unpacked directory of Hadoop.

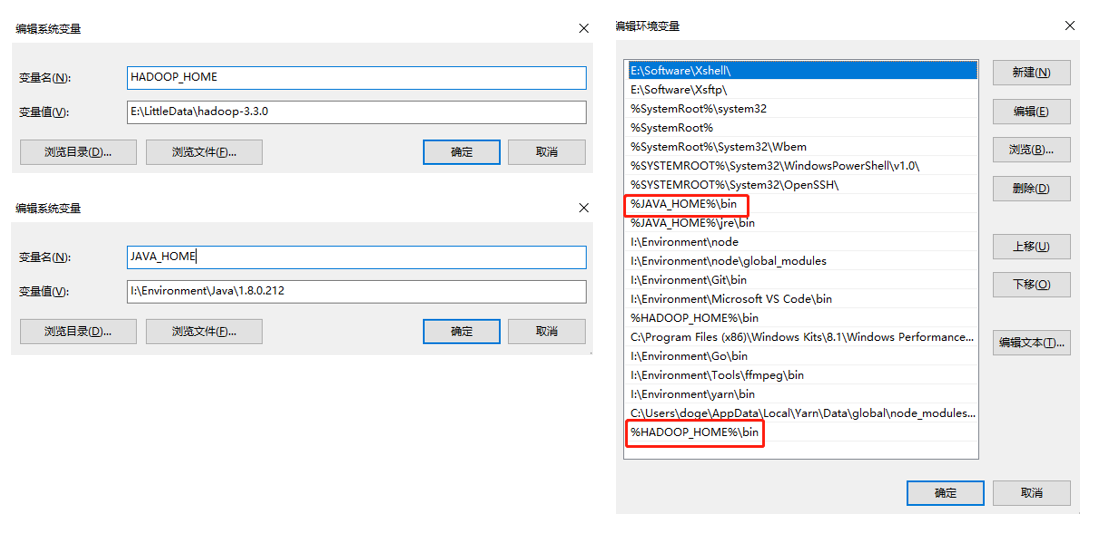
Finally, configure the JAVA_HOME and HADOOP_HOME environment variables, and add %JAVA_HOME%bin; and %HADOOP_HOME%bin to the Path:
Next, test it on the command line. If the above steps are OK, the console output will be as follows.

Configuring and starting Hadoop
In the etchadoop subdirectory of HADOOP_HOME, find and modify the following configuration files.
core-site.xml (the tmp directory here must be configured as a non-virtual directory, don’t use the default tmp directory, otherwise you will encounter permission assignment failure problems later)
|
|
hdfs-site.xml (here to pre-create nameNode and dataNode data storage directory, note that each directory should start with /, I pre-create nameNode and dataNode subdirectories in HADOOP_HOME/data here)
|
|
mapred-site.xml
|
|
yarn-site.xml
|
|
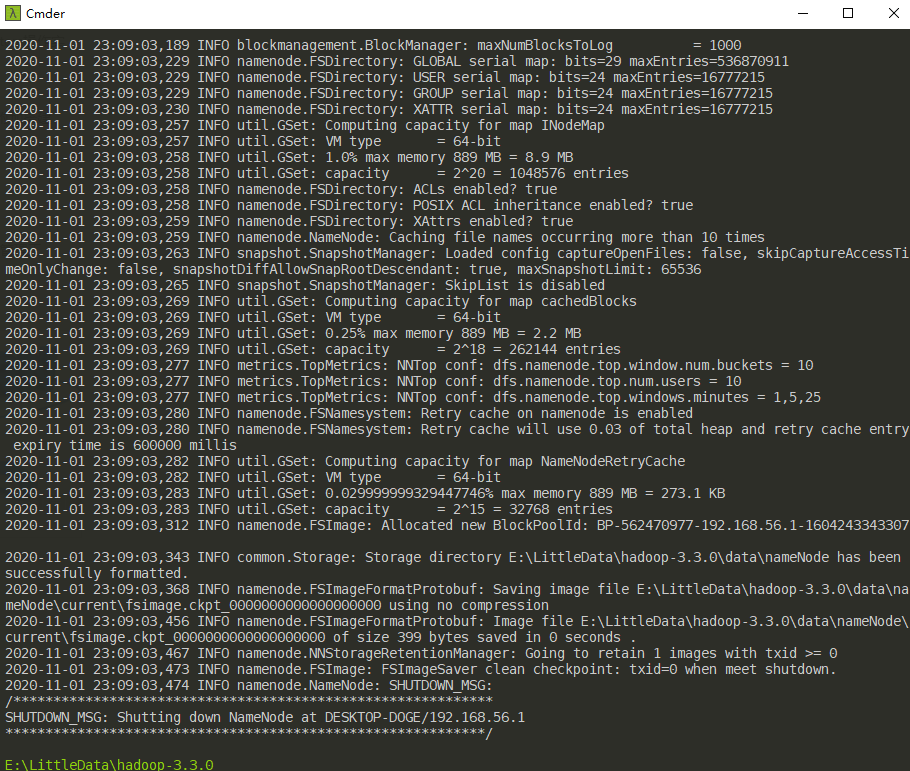
At this point, the minimalist configuration is basically complete. Then you need to format the namenode and start the Hadoop service. Switch to the $HADOOP_HOME/bin directory, use CMD to enter the command hdfs namenode -format (format namenode remember not to repeat the execution).
After formatting namenode, switch to the $HADOOP_HOME/sbin directory and execute the start-all.cmd script.
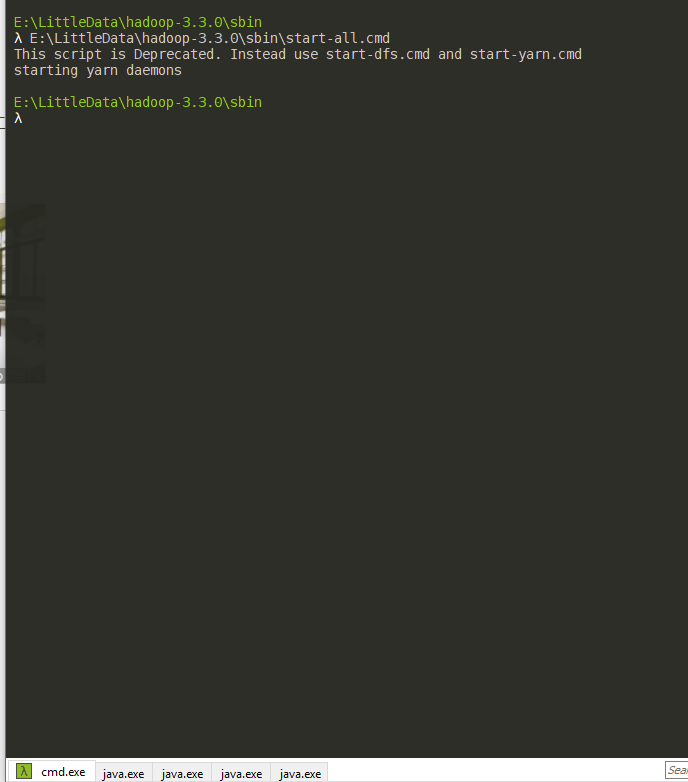
Here the command line will prompt start-all.cmd script has expired, it is recommended to use start-dfs.cmd and start-yarn.cmd instead. Similarly, if the execution of stop-all.cmd will also have a similar prompt, you can use stop-dfs.cmd and stop-yarn.cmd instead. After the successful execution of start-all.cmd, four JVM instances will be created (see the above figure in the Shell window automatically created four new Tabs), at this time you can view the current JVM instances through jps.
|
|
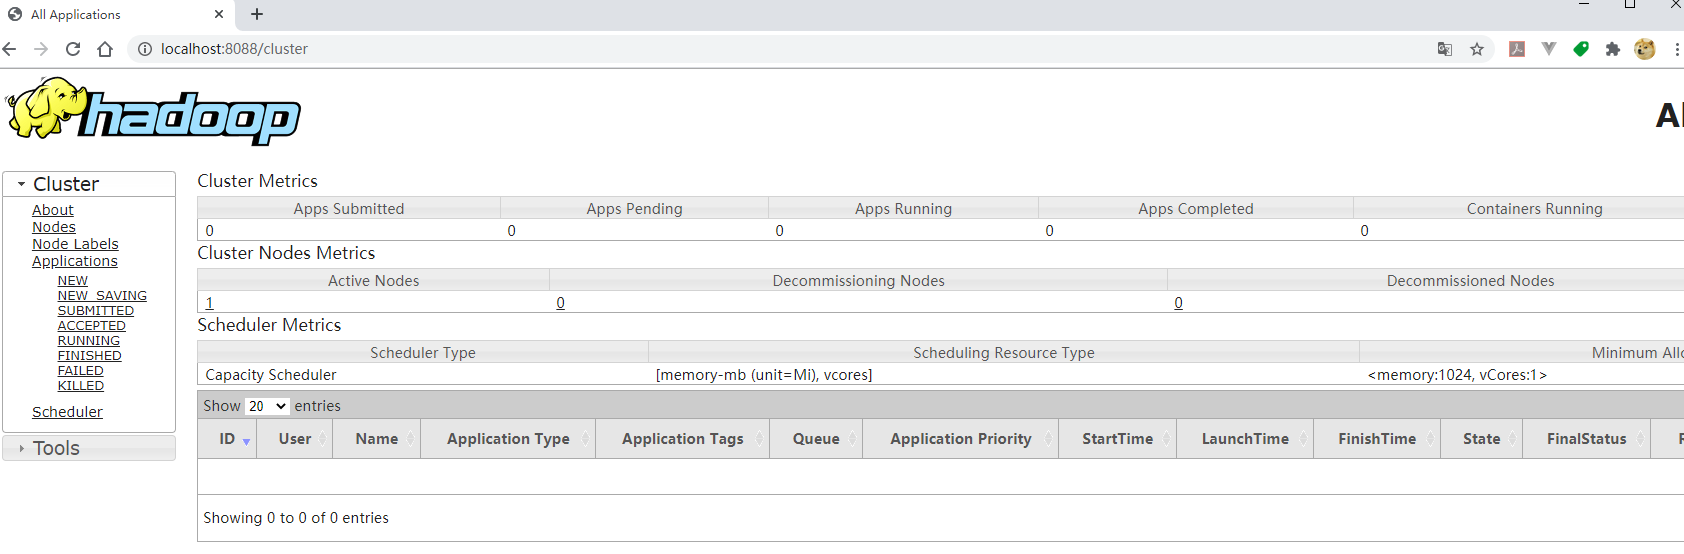
You can see that four applications ResourceManager, NodeManager, NameNode and DataNode have been started, so that the standalone version of Hadoop has been started successfully. Exit these four processes with the stop-all.cmd command. You can check the status of the scheduling tasks via http://localhost:8088/:
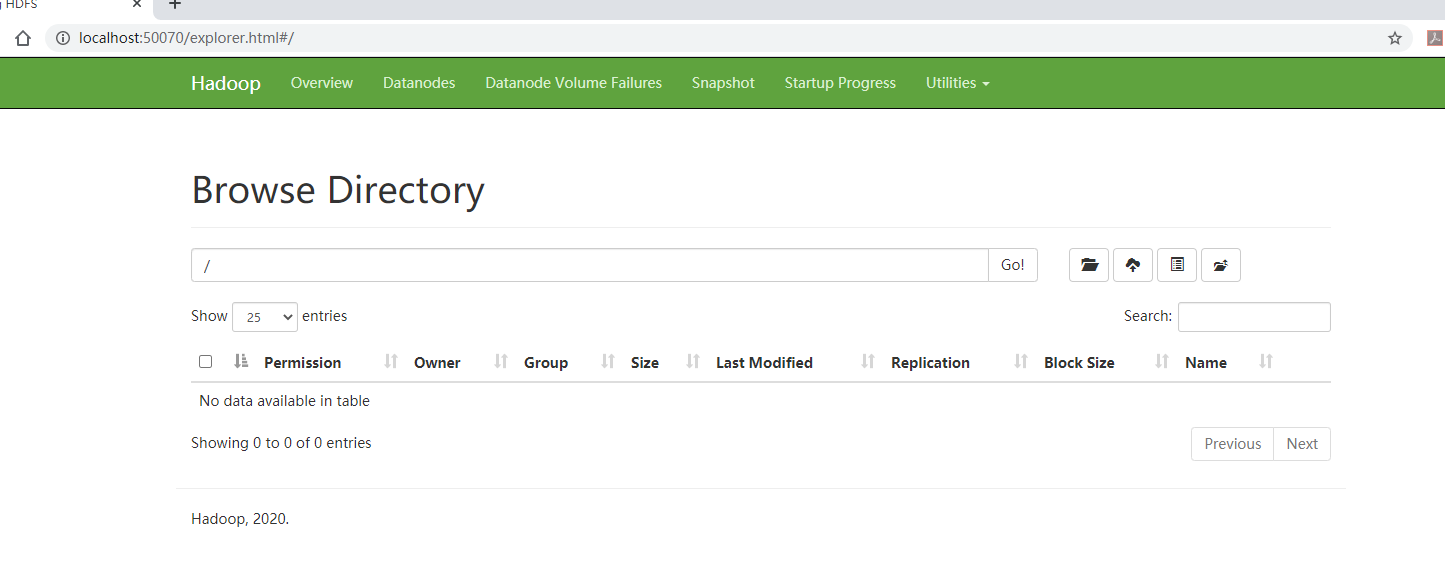
Go through http://localhost:50070/ to see the status of HDFS and the files.
To restart Hadoop: execute the stop-all.cmd script first, then the start-all.cmd script.
Configuring and starting Hive
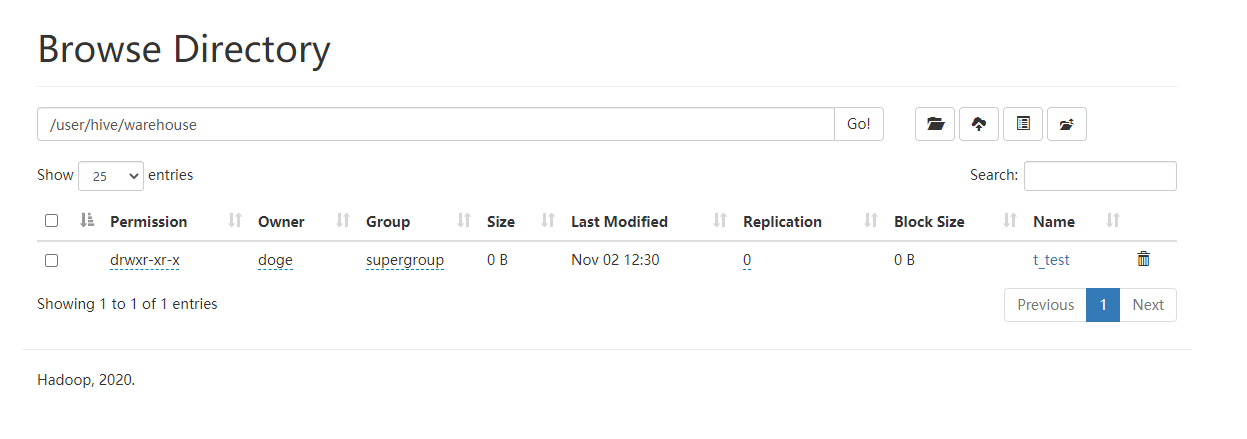
Hive is built on HDFS, so make sure Hadoop is up and running; the default file path for Hive in HDFS is prefixed with /user/hive/warehouse, so you can create this folder in HDFS from the command line first
|
|
You also need to create and grant permissions to the tmp directory with the following command.
|
|
Add HIVE_HOME to the system variables, configure the specific value as E:LittleDataapache-hive-3.1.2-bin, and add %HIVE_HOME%bin; to the Path variable, similar to the previous configuration of HADOOP_HOME. Download and copy a mysql-connector-java-8.0.x.jar to the `$HIVE_HOME/lib directory.
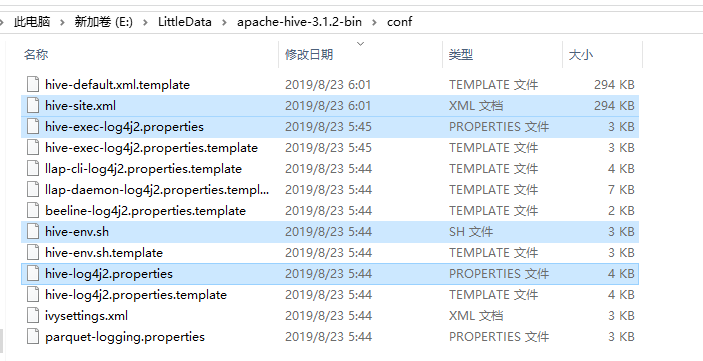
To create the Hive configuration file, there is already a corresponding configuration file template in the $HIVE_HOME/conf directory, which needs to be copied and renamed as follows:
- $HIVE_HOME/conf/hive-default.xml.template => $HIVE_HOME/conf/hive-site.xml
- $HIVE_HOME/conf/hive-env.sh.template => $HIVE_HOME/conf/hive-env.sh
- $HIVE_HOME/conf/hive-exec-log4j.properties.template => — $HIVE_HOME/conf/hive-exec-log4j.properties
- $HIVE_HOME/conf/hive-log4j.properties.template => $HIVE_HOME/conf/hive-log4j.properties
Modify the hive-env.sh script by adding the following to the end.
|
|
Modify the hive-site.xml file, mainly by changing the following property items.
| Property Name | Property Value | Remarks |
|---|---|---|
hive.metastore.warehouse.dir |
/user/hive/warehouse |
The data storage directory for Hive, which is the default value |
hive.exec.scratchdir |
/tmp/hive |
The temporary data directory for Hive, which is the default value |
javax.jdo.option.ConnectionURL |
jdbc:mysql://localhost:3306/hive?characterEncoding=UTF-8&serverTimezone=UTC |
Hive database connection for metadata storage |
javax.jdo.option.ConnectionDriverName |
com.mysql.cj.jdbc.Driver |
Database driver for Hive metadata storage |
javax.jdo.option.ConnectionUserName |
root |
Hive database user for metadata storage |
javax.jdo.option.ConnectionPassword |
root |
Password of the database where Hive metadata is stored |
hive.exec.local.scratchdir |
E:/LittleData/apache-hive-3.1.2-bin/data/scratchDir |
Create local directory $HIVE_HOME/data/scratchDir |
hive.downloaded.resources.dir |
E:/LittleData/apache-hive-3.1.2-bin/data/resourcesDir |
Create local directory $HIVE_HOME/data/resourcesDir |
hive.querylog.location |
E:/LittleData/apache-hive-3.1.2-bin/data/querylogDir |
Create local directory $HIVE_HOME/data/querylogDir |
hive.server2.logging.operation.log.location |
E:/LittleData/apache-hive-3.1.2-bin/data/operationDir |
Create local directory $HIVE_HOME/data/operationDir |
datanucleus.autoCreateSchema |
true |
Optional |
datanucleus.autoCreateTables |
true |
Optional |
datanucleus.autoCreateColumns |
true |
Optional |
hive.metastore.schema.verification |
false |
Optional |
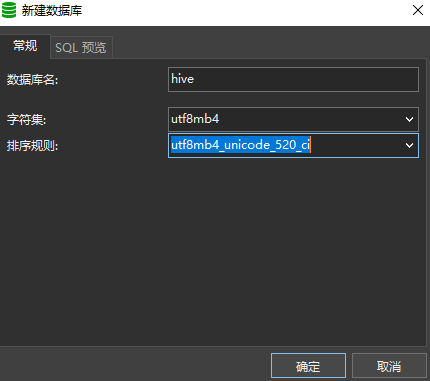
After the modification, the local MySQL service to create a new database hive, encoding and character set can choose a relatively large range of utf8mb4 (although the official recommendation is latin1, but the character set to a wide range of options have no impact):
After the above preparations are done, you can perform the initialization of the Hive metadatabase by executing the following script in the $HIVE_HOME/bin directory.
|
|
Here’s a little problem, line 3215 of the hive-site.xml file has a magic unrecognizable symbol

This unrecognizable symbol will cause Hive’s command execution exceptions and needs to be removed. When the console outputs Initialization script completed schemaTool completed, it means that the metadatabase has been initialized.

In the $HIVE_HOME/bin directory, you can connect to Hive via hive.cmd (close the console to exit)
Try to create a table t_test
|
|
Check http://localhost:50070/ to confirm that the t_test table has been created successfully.
Try to execute a write statement and a query statement.
|
|
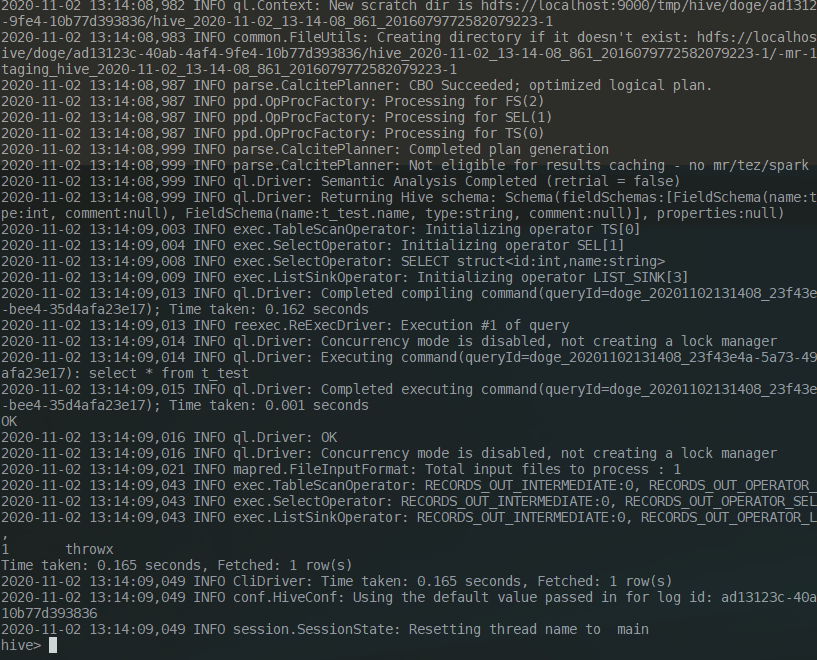
It took more than 30 seconds to write and 0.165 seconds to read.
Connecting to Hive using JDBC
HiveServer2 is the Hive server-side interface module, which must be started for remote clients to write and query data to Hive. Currently, this module is still based on Thrift RPC implementation, which is an improved version of HiveServer, supporting multi-client access and authentication and other functions. The following common properties of HiveServer2 can be modified in the configuration file hive-site.xml
| Property Name | Property Value | Remark |
|---|---|---|
| hive.server2.thrift.min.worker.threads | 5 | Minimum number of threads to work with, default value is 5 |
| hive.server2.thrift.max.worker.threads | 500 | Maximum number of working threads, default value is 500 |
| hive.server2.thrift.port | 10000 | The TCP port number to listen on, the default value is 10000 |
| hive.server2.thrift.bind.host | 127.0.0.1 | Bound host, the default value is 127.0.0.1 |
| hive.execution.engine | mr | Execution engine, default value is mr |
Execute the following command in the $HIVE_HOME/bin directory to start HiveServer2
|
|
The client needs to introduce hadoop-common and hive-jdbc dependencies, and try to correspond to the Hadoop and Hive versions.
|
|
The hadoop-common dependency chain is quite long and will download a lot of other related dependencies along with it, so you can find some free time to hang the task of downloading that dependency in some Maven project first. Finally add a unit test class HiveJdbcTest
|
|
Possible problems encountered
Java virtual machine startup failure
Currently positioned to be Hadoop can not use any version of JDK [9 + JDK, it is recommended to switch to any small version of JDK8.
Hadoop execution file not found exception
Make sure you have copied the hadoop.dll and winutils.exe files from the hadoop-3.3.0bin directory in winutils to the bin folder of the unpacked directory of Hadoop.
When executing the start-all.cmd script, there is a possibility that the batch script cannot be found. This problem has occurred on the company’s development machine, but has not been reproduced on the home development machine. The specific solution is to add cd $HADOOP_HOME to the first line of the start-all.cmd script, such as cd E:LittleDatahadoop-3.3.0.
Unable to access localhost:50070
Generally because the hdfs-site.xml configuration misses the dfs.http.address configuration item, add.
|
|
Then just call stop-all.cmd and then call start-all.cmd to restart Hadoop.
Hive connection to MySQL exception
Note whether the MySQL driver package has been copied correctly to $HIVE_HOME/lib and check whether the four properties javax.jdo.option.ConnectionURL and so on are configured correctly. If they are all correct, pay attention to whether there is a problem with the MySQL version or the service version does not match the driver version.
Hive can’t find the batch file
The general description is xxx.cmd' is not recognized as an internal or external command... , which is usually an exception in Hive’s command execution, you need to copy all the .cmd scripts in the bin directory of the Hive 1.x source package to the corresponding directory of $HIVE_HOME/bin.
Folder permission issues
Common exceptions such as CreateSymbolicLink can cause Hive to be unable to write data using INSERT or LOAD commands. Such problems can be solved by the following.
Win + R and run gpedit.msc — Computer Settings — Windows Settings — Security Settings — Local Policies — User Rights Assignment — Create Symbolic Link — Add Current User.
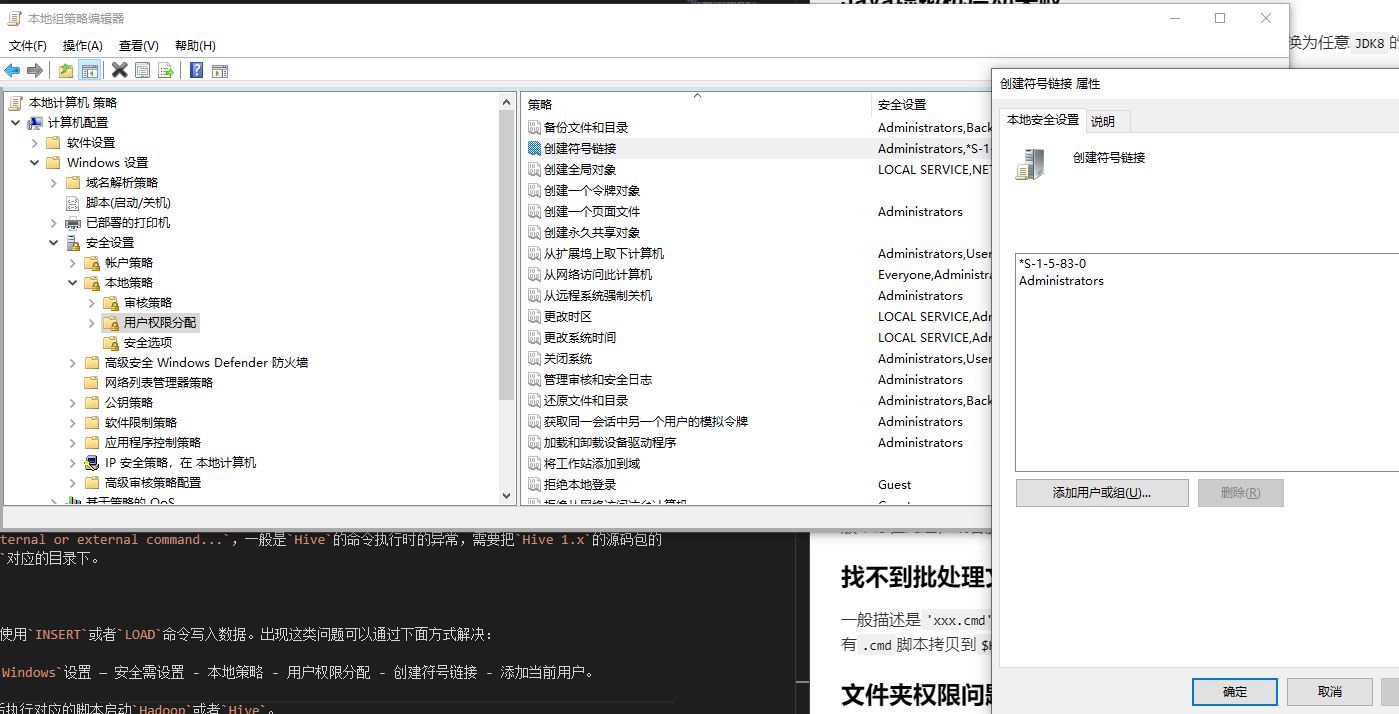
Or just start CMD with administrator account or administrator privileges, and then execute the corresponding script to start Hadoop or Hive.
SessionNotRunning exception
This exception may occur when starting HiveServer2 or when an external client connects to HiveServer2, specifically java.lang.ClassNotFoundException: org.apache.tez.dag.api.TezConfiguration exception. The solution is: the configuration file hive-site.xml in the hive.execution.engine property value from tez to mr, and then restart HiveServer2 can be. Because there is no tez integration, the restart will still report an error, but after 60000ms it will automatically retry to start (usually after the retry will start successfully):
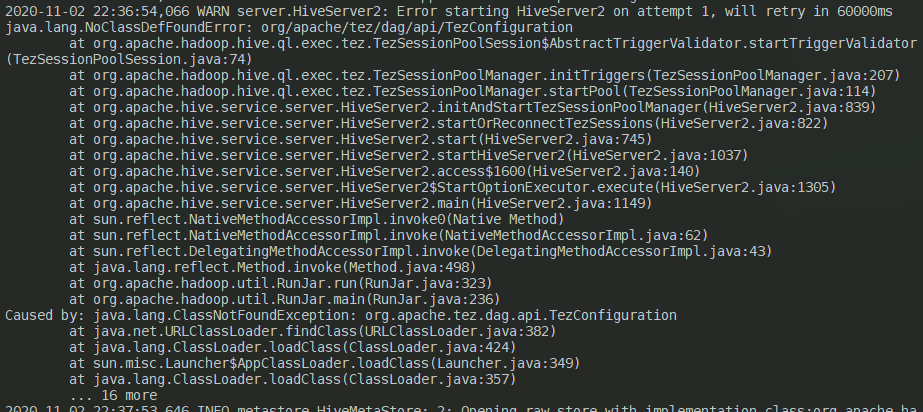
This is a legacy issue, but it does not affect the client’s normal connection, only the startup time will be 60 seconds longer.
HiveServer2 port conflict
Modify the value of the hive.server2.thrift.port property in the configuration file hive-site.xml to an unoccupied port, and restart HiveServer2.
Data node security mode exception
Generally SafeModeException exceptions appear, prompting Safe mode is ON. Through the command hdfs dfsadmin -safemode leave to remove the safe mode.
It is common for this exception to occur when Hive connects to the HiveServer2 service via the JDBC client, specifically the message: `User: xxx is not allowed to impersonate anonymous. this case just needs to modify the Hadoop configuration file core-site. xml, add.
|
|
Then just restart the Hadoop service.
MapRedTask’s Permissions Problem
The common exception is thrown when Hive connects to the HiveServer2 service via a JDBC client to perform an INSERT or LOAD operation, generally described as Execution Error, return code 1 from org.apache.hadoop.hive.ql.exec MapRedTask. Permission denied: user=anonymous, access=EXECUTE, inode="/tmp/hadoop-yarn":xxxx:supergroup:drwx------. Just give the anonymous user /tmp directory read and write access through the command hdfs dfs -chmod -R 777 /tmp.
Summary
It is better to build the development environment of Hadoop and Hive directly in Linux or Unix system. The file path and permission problems of Windows system can lead to many unexpected problems. This article refers to a large number of Internet materials and introductory books on Hadoop and Hive, so I won’t post them here, standing on the shoulders of giants.
Reference https://www.throwx.cn/2020/11/03/hadoop-hive-dev-env-in-win-10/
To Perform setting up and installing Hadoop in the pseudo-distributed mode in Windows 10 using the following steps given below as follows. Let’s discuss one by one.
Step 1: Download Binary Package :
Download the latest binary from the following site as follows.
http://hadoop.apache.org/releases.html

For reference, you can check the file save to the folder as follows.
C:BigData
Step 2: Unzip the binary package
Open Git Bash, and change directory (cd) to the folder where you save the binary package and then unzip as follows.
$ cd C:BigData MINGW64: C:BigData $ tar -xvzf hadoop-3.1.2.tar.gz
For my situation, the Hadoop twofold is extricated to C:BigDatahadoop-3.1.2.
Next, go to this GitHub Repo and download the receptacle organizer as a speed as demonstrated as follows. Concentrate the compress and duplicate all the documents present under the receptacle envelope to C:BigDatahadoop-3.1.2bin. Supplant the current records too.

Step 3: Create folders for datanode and namenode :
- Goto C:/BigData/hadoop-3.1.2 and make an organizer ‘information’. Inside the ‘information’ envelope make two organizers ‘datanode’ and ‘namenode’. Your documents on HDFS will dwell under the datanode envelope.

- Set Hadoop Environment Variables
- Hadoop requires the following environment variables to be set.
HADOOP_HOME=” C:BigDatahadoop-3.1.2” HADOOP_BIN=”C:BigDatahadoop-3.1.2bin” JAVA_HOME=<Root of your JDK installation>”
- To set these variables, navigate to My Computer or This PC.
Right-click -> Properties -> Advanced System settings -> Environment variables.
- Click New to create a new environment variable.

- In the event that you don’t have JAVA 1.8 introduced, at that point you’ll have to download and introduce it first. In the event that the JAVA_HOME climate variable is now set, at that point check whether the way has any spaces in it (ex: C:Program FilesJava… ). Spaces in the JAVA_HOME way will lead you to issues. There is a stunt to get around it. Supplant ‘Program Files ‘to ‘Progra~1’in the variable worth. Guarantee that the variant of Java is 1.8 and JAVA_HOME is highlighting JDK 1.8.
Step 4: To make Short Name of Java Home path


- Set Hadoop Environment Variables
- Edit PATH Environment Variable

- Click on New and Add %JAVA_HOME%, %HADOOP_HOME%, %HADOOP_BIN%, %HADOOP_HOME%/sin to your PATH one by one.

- Now we have set the environment variables, we need to validate them. Open a new Windows Command prompt and run an echo command on each variable to confirm they are assigned the desired values.
echo %HADOOP_HOME% echo %HADOOP_BIN% echo %PATH%
- On the off chance that the factors are not instated yet, at that point it can likely be on the grounds that you are trying them in an old meeting. Ensure you have opened another order brief to test them.
Step 5: Configure Hadoop
Once environment variables are set up, we need to configure Hadoop by editing the following configuration files.
hadoop-env.cmd core-site.xml hdfs-site.xml mapred-site.xml yarn-site.xml hadoop-env.cmd
First, let’s configure the Hadoop environment file. Open C:BigDatahadoop-3.1.2etchadoophadoop-env.cmd and add below content at the bottom
set HADOOP_PREFIX=%HADOOP_HOME% set HADOOP_CONF_DIR=%HADOOP_PREFIX%etchadoop set YARN_CONF_DIR=%HADOOP_CONF_DIR% set PATH=%PATH%;%HADOOP_PREFIX%bin
Step 6: Edit hdfs-site.xml
After editing core-site.xml, you need to set the replication factor and the location of namenode and datanodes. Open C:BigDatahadoop-3.1.2etchadoophdfs-site.xml and below content within <configuration> </configuration> tags.
<configuration>
<property>
<name>dfs.replication</name>
<value>1</value>
</property>
<property>
<name>dfs.namenode.name.dir</name>
<value>C:BigDatahadoop-3.2.1datanamenode</value>
</property>
<property>
<name>dfs.datanode.data.dir</name>
<value>C:BigDatahadoop-3.1.2datadatanode</value>
</property>
</configuration>
Step 7: Edit core-site.xml
Now, configure Hadoop Core’s settings. Open C:BigDatahadoop-3.1.2etchadoopcore-site.xml and below content within <configuration> </configuration> tags.
<configuration> <property> <name>fs.default.name</name> <value>hdfs://0.0.0.0:19000</value> </property> </configuration>
Step 8: YARN configurations
Edit file yarn-site.xml
Make sure the following entries are existing as follows.
<configuration>
    <property>
        <name>yarn.nodemanager.aux-services</name>
        <value>mapreduce_shuffle</value>
    </property>
    <property>
        <name>yarn.nodemanager.aux-services.mapreduce.shuffle.class</name>
        <value>org.apache.hadoop.mapred.ShuffleHandler</value>
    </property>
</configuration>
Step 9: Edit mapred-site.xml
At last, how about we arrange properties for the Map-Reduce system. Open C:BigDatahadoop-3.1.2etchadoopmapred-site.xml and beneath content inside <configuration> </configuration> labels. In the event that you don’t see mapred-site.xml, at that point open mapred-site.xml.template record and rename it to mapred-site.xml
<configuration>
 <property>
    <name>mapreduce.job.user.name</name>    <value>%USERNAME%</value>
 </property>
 <property>
    <name>mapreduce.framework.name</name>
    <value>yarn</value>
 </property>
 <property>
    <name>yarn.apps.stagingDir</name>    <value>/user/%USERNAME%/staging</value>
 </property>
 <property>
    <name>mapreduce.jobtracker.address</name>
    <value>local</value>
 </property>
</configuration>
Check if C:BigDatahadoop-3.1.2etchadoopslaves file is present, if it’s not then created one and add localhost in it and save it.
Step 10: Format Name Node :
To organize the Name Node, open another Windows Command Prompt and run the beneath order. It might give you a few admonitions, disregard them.
- hadoop namenode -format

Format Hadoop Name Node
Step 11: Launch Hadoop :
Open another Windows Command brief, make a point to run it as an Administrator to maintain a strategic distance from authorization mistakes. When opened, execute the beginning all.cmd order. Since we have added %HADOOP_HOME%sbin to the PATH variable, you can run this order from any envelope. In the event that you haven’t done as such, at that point go to the %HADOOP_HOME%sbin organizer and run the order.

You can check the given below screenshot for your reference 4 new windows will open and cmd terminals for 4 daemon processes like as follows.
- namenode
- datanode
- node manager
- resource manager
Don’t close these windows, minimize them. Closing the windows will terminate the daemons. You can run them in the background if you don’t like to see these windows.

Step 12: Hadoop Web UI
In conclusion, how about we screen to perceive how are Hadoop daemons are getting along. Also you can utilize the Web UI for a wide range of authoritative and observing purposes. Open your program and begin.
Step 13: Resource Manager
Open localhost:8088 to open Resource Manager

Step 14: Node Manager
Open localhost:8042 to open Node Manager

Step 15: Name Node :
Open localhost:9870 to check out the health of Name Node

Step 16: Data Node :
Open localhost:9864 to check out Data Node
