New attempt
instaled new test VM
updated the language and found that Power shell responds to
choco version
Chocolatey v0.10.8
installed MSYS2
Used Admin cmd
Missing Instructions
Click on the circle next to windows start button and type cmd.
The search result will show Command Prompt icon. Right click on it and select
Run as administrator.
set the paths
SET PATH=%APPDATA%cabalbin;C:msys64mingw64bin;C:msys64usrbin;C:ProgramDatachocolateylibghctoolsghc-8.0.2bin;C:ProgramDatachocolateylibcabaltools;%PATH%
SET PKG_CONFIG_PATH=C:msys64mingw64libpkgconfig
SET XDG_DATA_DIRS=C:msys64mingw64share
installed choco
choco install ghc --version 8.0.2
used MSYS2 terminal
Inatalled required packages
pacman -S -q --noconfirm mingw64/mingw-w64-x86_64-pkg-config mingw64/mingw-w64-x86_64-gobject-introspection mingw64/mingw-w64-x86_64-gtksourceview3 mingw64/mingw-w64-x86_64-webkitgtk3
restarted machine
optional Emacs configuration
installed Emacs
In MSYS2 terminal I ran
pacman -S mingw64/mingw-w64-x86_64-emacs
created emacslauncher.bat
In MSYS2 terminal I ran
cd c:/Users/IEuser
touch ./emacslauncher.bat
emacs ./emacslauncher.bat
In the editor I have pasted the following
set PATH=C:msys64mingw64bin;C:msys64usrbin;%PATH%

set XDG_DATA_DIRS=c:/msys64/mingw64/share
set PKG_CONFIG_PATH=c:/msys64/mingw64/lib/pkgconfig
set HASKELL_GI_GIR_SEARCH_PATH=c:/msys64/mingw64/share/gir-1.0
saved the file and quit Emacs.
used emacslauncher.bat
Now I clicked on the circle next to Windows start button and searched for
emacslauncher.
That has started Emacs editor. I have pressed “Alt+x” keyboard shortcut and
typed eshell and pressed Enter. That gave me a shell that is in my opinion
more comfortable than MSYS2 shell.
I typed some commands.
c:/Users/IEUser $ pwd
c:/Users/IEUser
c:/Users/IEUser $ echo $PATH
C:msys64mingw64bin;C:msys64usrlocalbin;C:msys64usrbin;C:msys64usrbin;C:WindowsSystem32;C:Windows;C:WindowsSystem32Wbem;C:WindowsSystem32WindowsPowerShellv1.0
c:/Users/IEUser $ printenv
!;=;
ACLOCAL_PATH=C:msys64mingw64shareaclocal;C:msys64usrshareaclocal
ALLUSERSPROFILE=C:ProgramData
APPDATA=C:UsersIEUserAppDataRoaming
ChocolateyInstall=C:ProgramDatachocolatey
ChocolateyLastPathUpdate=Sun Dec  3 02:25:35 2017
COLUMNS=80
COMMONPROGRAMFILES=C:Program FilesCommon Files
CommonProgramFiles(x86)=C:Program Files (x86)Common Files
CommonProgramW6432=C:Program FilesCommon Files
COMPUTERNAME=MSEDGEWIN10
COMSPEC=C:Windowssystem32cmd.exe
CONFIG_SITE=C:/msys64/mingw64/etc/config.site
CONTITLE=MinGW x64
CYGWIN=mintty
DISPLAY=w32
emacs_dir=C:/msys64/mingw64
EM_PARENT_PROCESS_ID=1256
FPS_BROWSER_APP_PROFILE_STRING=Internet Explorer
FPS_BROWSER_USER_PROFILE_STRING=Default
HOME=/home/IEUser
HOMEDRIVE=C:
HOMEPATH=UsersIEUser
HOSTNAME=MSEDGEWIN10
INFOPATH=C:msys64usrlocalinfo;C:msys64usrshareinfo;C:msys64usrinfo;C:msys64shareinfo
LANG=en_US.UTF-8
LINES=35
LOCALAPPDATA=C:UsersIEUserAppDataLocal
LOGONSERVER=\MSEDGEWIN10
MANPATH=C:msys64mingw64shareman;C:msys64usrlocalman;C:msys64usrshareman;C:msys64usrman;C:msys64shareman
MINGW_CHOST=x86_64-w64-mingw32
MINGW_PACKAGE_PREFIX=mingw-w64-x86_64
MINGW_PREFIX=C:/msys64/mingw64
MSYSCON=mintty.exe
MSYSTEM=MINGW64
MSYSTEM_CARCH=x86_64
MSYSTEM_CHOST=x86_64-w64-mingw32
MSYSTEM_PREFIX=C:/msys64/mingw64
NUMBER_OF_PROCESSORS=1
OLDPWD=c:/msys64/home/IEUser
OneDrive=C:UsersIEUserOneDrive
ORIGINAL_PATH=C:WindowsSystem32;C:Windows;C:WindowsSystem32Wbem;C:WindowsSystem32WindowsPowerShellv1.0
ORIGINAL_TEMP=C:/Users/IEUser/AppData/Local/Temp
ORIGINAL_TMP=C:/Users/IEUser/AppData/Local/Temp
OS=Windows_NT
PATH=/mingw64/bin:/usr/local/bin:/usr/bin:/usr/bin:/c/Windows/System32:/c/Windows:/c/Windows/System32/Wbem:/c/Windows/System32/WindowsPowerShell/v1.0
PATHEXT=.COM;.EXE;.BAT;.CMD;.VBS;.VBE;.JS;.JSE;.WSF;.WSH;.MSC
PKG_CONFIG_PATH=C:msys64mingw64libpkgconfig;C:msys64mingw64sharepkgconfig
PROCESSOR_ARCHITECTURE=AMD64
PROCESSOR_IDENTIFIER=Intel64 Family 6 Model 42 Stepping 7, GenuineIntel
PROCESSOR_LEVEL=6
PROCESSOR_REVISION=2a07
ProgramData=C:ProgramData
PROGRAMFILES=C:Program Files
ProgramFiles(x86)=C:Program Files (x86)
ProgramW6432=C:Program Files
PROMPT=$P$G
PS1=[e]0;wa]n[e[32m]u@h [e[35m]$MSYSTEM[e[0m] [e[33m]w[e[0m]n$
PSModulePath=C:Program FilesWindowsPowerShellModules;C:Windowssystem32WindowsPowerShellv1.0Modules
PUBLIC=C:UsersPublic
PWD=c:/Users/IEUser
SESSIONNAME=Console
SHELL=C:/msys64/usr/bin/bash
SHLVL=1
SYSTEMDRIVE=C:
SYSTEMROOT=C:Windows
TEMP=/tmp
TEMP=/c/Users/IEUser/AppData/Local/Temp
TERM=dumb
TMP=/tmp
TMP=/c/Users/IEUser/AppData/Local/Temp
TMPDIR=/tmp
USER=IEUser
USERDOMAIN=MSEDGEWIN10
USERDOMAIN_ROAMINGPROFILE=MSEDGEWIN10
USERNAME=IEUser
USERPROFILE=C:UsersIEUser
WD=C:msys64usrbin
WINDIR=C:Windows
_=C:/msys64/mingw64/bin/runemacs.exe
c:/Users/IEUser $
tried cabal
eshell
In eshell I typed
c:/Users/IEUser $ cabal --help
cabal: command not found
In Powershell and cmd cabal has worked. So I decided to modify the way I launch
Emacs.
set PATH=C:msys64mingw64bin;C:msys64usrbin;%PATH%
set XDG_DATA_DIRS=c:/msys64/mingw64/share
set PKG_CONFIG_PATH=c:/msys64/mingw64/lib/pkgconfig
set HASKELL_GI_GIR_SEARCH_PATH=c:/msys64/mingw64/share/gir-1.0

C:msys64mingw64binrunemacs
and closed Emacs and started it again pressing left Windows button and searching
for enacslaunche.bat. After that my $PATH looked OK, I had nice Unix shell in
Emacs and cabal worked.
modified cabal configuration
The command cabal user-config int gave me the location of cabal file. So I
modified the extra-*-dirs to point to msys libraries.
-- flags:
extra-include-dirs: c:/msys64/mingw64/include
-- deterministic:
-- cid:
extra-lib-dirs: c:/msys64/mingw64/lib
-- extra-framework-dirs:
extra-prog-path: C:UsersIEUserAppDataRoamingcabalbin
-- instantiate-with:
tried cabal again
cabal update
cabal install gi-gtk
And got the error
Warning: The package has an extraneous version range for a dependency on an
internal library: pretty-show ==1.6.13. This version range includes the
current package but isn't needed as the current package's library will always
be used.
cabal.exe: The program 'happy' is required but it could not be found.
Failed to install pretty-show-1.6.13
cabal.exe: Error: some packages failed to install:
gi-atk-2.0.14-9XZ26IbMVDJJOptxM3q72d depends on gi-atk-2.0.14 which failed to
install.
cabal install alex
cabal install happy
cabal install gi-gtk
so far so good
Installing library in
C:UsersIEUserAppDataRoamingcabalx86_64-windows-ghc-8.0.2gi-gtk-3.0.17-3zy3X54uyX9I32tpgdOrjt
Creating package registration file:
C:UsersIEUserAppDataLocalTemppkgConf-gi-gtk-3.0.17-2028pkgConf
Installed gi-gtk-3.0.17
c:/ $
I wanted to try out Haskell on Windows 10 and figured I’d probably use Visual Code for writing code, here’s the steps to get everything installed and configured.
The simplest way to get everything installed seems to be using chocolatey, see Getting Started.
- Install chocolatey
- Run Powershell in admin mode and then run choco install haskell-dev
- Finally, from Powershell run refreshenv
If all of these steps worked, then just run ghc from the Powershell or a command prompt and you should see some output from ghc.
Let’s now set-up Visual Code (I’ll assume you’ve already got Visual Code installed). There’s a few plugins/extensions for Visual Code for use with Haskell. From Visual Code extensions option…
- Add Haskell syntax highlighter
- Also add Haskell-linter
- To configure the linter, from Visual Code select, File | Preferences | Settings, switch to the code view and add the following
"haskell.hlint.executablePath": "C:\ProgramData\chocolatey\lib\ghc\tools\ghc-8.10.1\bin\ghc.exe"
Chocolatey installs the files into C:ProgramDatachocolateylib, however if you’ve installed ghc by some other means of within another folder then replace the folder with your location.
Finally, let’s write a Haskell “Hello World”. Within Visual Code create the file HelloWorld.hs and add the following code
main = putStrLn "Hello, world!"
Open the Visual Code integrated terminal or open your preferred terminal/shell and from the folder that you saved your HelloWorld.hs file, run
ghc HelloWorld.hs
If all goes to plan you’ll compile the Haskell file to a HelloWorld.exe and you’re done for now.
DISCLAIMER: What’s below was valid in Oct, 2013. So there is a good chance it might get outdated soon. Your edits and comments are welcome.
This is what I have done in order to get Haskell set up on my Windows 7 x64
1. Install Haskell Platform
Download and install the Haskell Platform from http://www.haskell.org/platform/windows.html
2. Install Sublime Text 3
Download and install Sublime Text 3 from http://www.sublimetext.com/3
3. Enable the Package manager in Sublime
- Run Sublime
- Open the console:
View>>Show console - Paste the following code to the console and hit Enter (according to this):
import urllib.request,os; pf = 'Package Control.sublime-package'; ipp = sublime.installed_packages_path(); urllib.request.install_opener( urllib.request.build_opener( urllib.request.ProxyHandler()) ); open(os.path.join(ipp, pf), 'wb').write(urllib.request.urlopen( 'http://sublime.wbond.net/' + pf.replace(' ','%20')).read())
- Open the command palette:
Tools>>Command palette - In the command palette popup type in:
Package Control: Install Package - Select the package:
SublimeHaskell
4. Install Haskell tools
Cabal is the standard package manager for Haskell. What you need to do is:
- Start a console with administrative permissions
-
Run:
cabal install cabal-install
cabal update
cabal install aeson
cabal install haskell-src-exts
cabal install ghc-mod
cabal install cmdargs
cabal install haddock
5. Install hdevtools
You can NOT install hdevtools on Windows by running: cabal instal hdevtools. What you need to do instead is:
-
Download the source code of hdevtools for Windows from https://github.com/mvoidex/hdevtools*
(* Currently does not work with GHC 7.10. See this fork for building with GHC 7.10 and above) -
Unpack it to some folder
-
Go to that folder and run:
runhaskell Setup.hs configure --user runhaskell Setup.hs build runhaskell Setup.hs install -
Watch for the path (in the console output) where the hdevtools have been installed. You will need this path when setting up the SublimeHaskell plugin in Sublime. The path should look something like this:
C:UsersAleksey BykovAppDataRoamingcabalbinwhereAleksey Bykovis the name of the current user.
6. Setting up the SublimeHaskell plugin in Sublime:
- Start Sublime
- Go
Preferences>>Package settings>>SumblimeHaskell>>Settings - User -
Make sure you configuration looks like:
{
    "add_to_PATH":
    [
        "C:/Users/Aleksey Bykov/AppData/Roaming/cabal/bin/"
    ],
    "enable_hdevtools": true
}
where C:/Users/Aleksey Bykov/AppData/Roaming/cabal/bin/ is that path (you got at step 5) where hdevtools (all all other toolls have been installed)
4. Save the file and restart Sublime
7. Hello world
- Start Sublime
- Create a new file and save it immediately as
hello-world.hs -
Put the following code there:
main::IO() main = putStrLn "Hello world!" -
Build and run by going
Tools>>Buildx 2 times (first it builds, second it runs)
8. See also
There is another great article: http://howistart.org/posts/haskell/1

If you want to create and run Haskell programming language programs on your computer in Windows 10. This step by step guide and video guideline about Haskell installation will teach you how to install Haskell GHC on windows 10. Haskell Programming environment can be instlled on Windows 7,8,10. Haskell is a general purpose, purely functional programming language. This article will help you you to learn how to install Haskell in a video demonstration for your easiness. LearnHowtoInstall.com explain in urdu and hindi demonstration for a beginner user how he/she can follow step by step guideline installation of Haskell on Windows 10. Haskell is purely advanced functional language.
How to Install Haskell on windows Step by Step guide
Part 1 : How to download Haskell Platform (GHC)
GHC is the recommended way to get started with programming Haskell is the Haskell Platform. This GHC Platform comes the de-facto standard Haskell compiler, with many useful tools that enable a novice/ beginer user to write, compile and run programs of Haskell easily. This Haskell installation is easy and simple enough on most operating systems.
Step 1: Google ” Haskell Platform”
Similarly Step 2: Click on official link for Haskell Platform download
Step 3: You may click on direct link for downloading Haskell given below
https://www.haskell.org/downloads
Note : You must know about your Operating system version either 32bit or 64 bit before downloading Haskell platform properly.

How to start Installation of Haskell – Part 2
Step 4: Browse to downloaded Haskell file
Now Step 5 : Double click or Run the file and follow the installation process
Step 6: Be Default Haskell will be installed in Program Files folder but you may change it as demonstrated in How to install Haskell video at the end of this article.

How to Install Haskell Part 3 – Checking installation of Haskell
One you completed the installation process, now you need to check have you successfully installed the Haskell Platform.
Step 7: Open a Command Prompt terminal in windows
Step 8 : Type ghci (the name of the executable of the GHC interpreter) at the command prompt. Alternatively, if you are on Windows, you may choose WinGHCiin the Start menu.

    Prelude> 2+2
    4
Moreover you are presented with a prompt. The Haskell system now attentively awaits your input.
Write your first Haskell program “Hello World”
Source : https://wiki.haskell.org/Haskell_in_5_steps
Similarly If you’ve learned to program another language, your first program probably was “Hello, world!”, so let’s do that:
Prelude> "Hello, World!"
"Hello, World!"
However The Haskell system evaluated the string, and printed the result. Or we can try a variation to print directly to standard output:
Prelude> putStrLn "Hello World"
Hello World
Similarly Using a Haskell compiler, such as GHC, you can compile the code to a standalone executable. Create a source file hello.hs containing:
main = putStrLn "Hello, World!"
Moreover compile it with:
$ ghc -o hello hello.hs
However You can then run the executable (./hello on Unix systems, hello.exe on Windows):
    $ ./hello
    Hello, World!
Learn How to Install Java 10 (JDK-10) Video Guideline
Moreover Related articles to learn how to install Haskell on windows
- Learn How to install TextPad Java Text Editor
- How to compile and run Java “Hello World” in different text editors
- Learn How to install Notepad++ for Haskell
Post Views: 1,502
Related
There are several ways to install Haskell, pick one and let’s waste no time:
- Using
stack - Using
ghcup - Using
nix
Using stack
On Linux or Mac
Open a terminal an paste the following:
curl -sSL https://get.haskellstack.org/ | shFollow the script instructions if any, then setup a Haskell compiler like so:
If you get a message like “stack command not found” or something along the lines, then probably you need to close an re-open your terminal first.
Now check you have a Haskell compiler, you can verify with:
If you see something like:
The Glorious Glasgow Haskell Compilation System, version 8.10.4
Then you’re set!
On Windows
Grab the Windows installer at the official doc page. Or here is the direct link to download (but don’t trustme blindly on that!).
How to uninstall?
On Linux or Mac
Just delete the ~/.stack folder and any ~/.stack-work folders in your projects, example:
You may need to delete any line mentioning stack in file ~/.bashrc.
On windows
Same as any other windows program, look for “uninstall programs” after pressing the Windows key.
Using ghcup
On Linux or Mac
Open a terminal and run the following:
$ curl --proto '=https' --tlsv1.2 -sSf https://get-ghcup.haskell.org | shFollow the script instructions, read carefully, if you get asked to install GHC, Cabal or Haskell Language Server, say `Yes please!`. After installation finishes you might need to close and reopen your terminal.
Check your installation with:
You should have checkmarks on the recommended versions of GHC, Cabal and Haskell Language Server, but if not, then install them like so:
$ ghcup install ghc 8.10.3   # This installs GHC
$ ghcup install cabal        # This installs Cabal
$ ghcup install hls          # This installs the Haskell Language Server
Check again:
You should now be all set!
On Windows
ghcup does not work on Windows! (AFAIK). Try Windows Subsystem for Linux (WSL) or installing Linux in a VM.
How to uninstall?
On Linux or Mac
Should be sufficient to delete ~/.cabal and ~/.ghcup folders:
$ rm -rf ~/.cabal ~/.ghcupYou may need to delete any line mentioning ghcup in file ~/.bashrc.
On windows
I don’t know 🤷
Using nix
On Linux or Mac
NOTE If you’re on MacOS Catalina or newer (10.15 or higher) the installation is a little bit more tricky, read the Nix manual section on “macOS Installation” carefully.
For the ones using Linux or MacOS Mojave or older (10.14 or lower) keep following:
$ sh <(curl -L https://nixos.org/nix/install) --daemonFollow the script instructions carefully, after it finishes make sure to close and re-open your terminal so that your shell profile is sourced.
Now you can install Haskell either locally (only for a project) or globally (for your whole user system), you can have both or just one as you wish
Haskell locally for a project
In the folder containing a project (or an empty folder if you’re getting started) create a file called shell.nix with the following contents:
let
  pkgs = import <nixpkgs> {};
  ghc = pkgs.haskellPackages.ghcWithHoogle (hpks:
    with hpks; [
      mtl
      text
      time
      aeson
      bytestring
      containers
      scientific
      unordered-containers
    ]);
in
  pkgs.stdenv.mkDerivation {
    name = "wealth-manager-haskell";

    # List non-haskell dependencies as build inputs
    buildInputs = [
      ghc
      pkgs.haskellPackages.cabal-install
      pkgs.haskellPackages.haskell-language-server
    ];

    shellHook = ''
      eval $(egrep ^export ${ghc}/bin/ghc)
      echo "Recommended env vars have been loaded loaded:"
      egrep ^export ${ghc}/bin/ghc
    '';
  }
Now, in your terminal head to that folder using cd and once you’re there open a nix shell that will load the file we just created:
It will start to download a working GHC version, along with Cabal and the Haskell Language Server, once it finishes, you can verify like this:
$ cabal --version
$ ghc --version
Once you’re finished playing with Haskell in that project exit the Nix shell with:
$ exit # Or Ctrl+D also worksWhen you want to use Haskell again, just execute nix-shell again from your project directory, only the first time takes longer, subsequent executions are faster since everything will be already set up on your environment.
-
How to uninstall?
If you don’t want anything Haskell related but you still want Nix around, just exit the Nix shell, delete your
shell.nixand run:$ rm shell.nix # This is deleting the file we created $ nix-collect-garbageIf you don’t want anything, not even Nix around, then:
    $ sudo rm -rf /nix
    $ rm -rf ~/.nix*
You may need to delete any line mentioning Nix in file
~/.bashrc.
Haskell globally for your system
In this case we don’t need a Nix shell, all we have to do is to install the packages like this:
$ nix-env -f "<nixpkgs>" -iA haskellPackages.ghc haskellPackages.cabal-install haskellPackages.haskell-language-serverYou should now have GHC, Cabal and the Haskell Language Server installed, if not, try closing and re-opening your terminal:
$ cabal --version
$ ghc --version
You’re set!
-
How to uninstall?
If you don’t want anything Haskell related but you still want Nix around, just uninstall the packages like this:
    $ nix-env -f "<nixpkgs>" --uninstall haskellPackages.ghc haskellPackages.cabal-install haskellPackages.haskell-language-server
    $ nix-collect-garbage
If that doesn’t work, try removing
haskellPackages.prefix on each package.If you don’t want anything, not even Nix around, then:
    $ sudo rm -rf /nix
    $ rm -rf ~/.nix*
You may need to delete any line mentioning
nixin file~/.bashrc.
On Windows
nix does not work on Windows! (AFAIK). Try Windows Subsystem for Linux (WSL) or installing Linux in a VM.
Sources
- The Haskell Tool Stack.
- Ghcup installation.
- Nix manual — Installtion.
- Haskell4Nix — Nixpkgs user’s guide.
MyselfBoardroom Personal Home、CSDN Personal Home
Reference:[Vs code] WINDOWS10 VS CODE configuration Haskell locale
During the overall environmental installation configuration process, there are many links to Github links and the links that need to be turned over. Some campus networks may have failed, and they can try the hotspots of the mobile phone.
1. Download and install stack
OpenStack official documentationSelect Windows 64-bit Installer to download, double-click the downloaded EXE file for installation, you can customize the C drive path, but you should run as an administrator.


During the installation process, the Stack is also automatically added to the user environment variable path, which will be setSTACK_ROOT=C:sr(The default option for the installer,Remember this path, backAfter the installation is complete, you can check if the command «stack —help» is entered in the CMD terminal to verify that the installation is successful.

2. Install GHC (trouble bug more)
Stack can be used to manage the Haskell compiler GHC and Haskell libraries, so install the GHC using Stack.
Since Haskell’s ecology and version support is not very good, if you install it directly without fixed version numbers, the package installation will easily cause conflicts, resulting in incompatibility between various dependencies. accessThis siteView Haskell’s latest LTS, then lock on this lts, here I choose the latest LTS 18.27.

Some concepts of auxiliary understanding (and the configuration environment is not big, you can not see):
- HackageYesHaskellCommunity Open Source Package Warehouse The Haskell Package Repository, you can distribute libraries and programs, or download and install packages using packages such as Cabal-Install.
- StackageIt is the abbreviation of Stable Haskell Package Set, which is stable.HaskellPackage collection. it’s aHaskellThe release of the package subset, fromHackageAnd it is constructed by the community.StackageThe meaning is that it provides compatible and stableHaskellPackage, each package has chosen a particular version to meet the self-construancy of the package collection, so that the conflict of the package is resolved, build and run the project smoothly.
- StackageProviding and maintaining a bunch of different large versions, each large version corresponds to a compatible uniformly stableHaskellPackage, or oneLTS Long Term Service, is supported by the community. We have selected oneLTSAfter that, only a certain package does not exist during the download and installation, even if there is a conflict, you can easily solve it through Stack, and it will not bury a lot of «mine».
2. Configuring Stack
Execute Stack Install at the CMD terminal, it will find that the download often fails.
(ConnectionFailure user error (Network.Socket.gai_strerror not supported: 11004))
This is because one of the URLs in the download process is needed to access the wall, and if you don’t turn over the wall, you need to switch the source to download success.
Reference:Question about STACK power supply
Among them, two Tsinghua Source URLs, «You can use TUNA’s Stackage Source + Hackage Source Source»,Stackage mirroring helpandHackage mirroring help。
In the STACKAGE mirror use help, «This mirror recommendation is used in conjunction with tuna», so two mirror sources need to be added.
2.2 Source:
Inputstack --versionView the STACK version, then find the source of the corresponding version of the source in the above two source links, my Stack version is 2.7.3, hereby illustrated my source process:
(1) Download files prompt in the Stackage mirror:

Download the picture below the blue linkglobal-hints.yamlFile, find the corresponding folder in the system, different downloadspathThe corresponding folder is different, and the path here is the path to the test mentioned above:
- When the default path is downloaded, enter% appdata% directly on the C drive, then enter the corresponding folder.

- When I downloaded, I changed the default path, so the configuration file to be modified is
%STACK_ROOT%config.yamlThe path corresponding to the configuration file is which one to remember.C:srconfig.yaml。

(2) Replacement source
Now you have found the corresponding directory, put it in the Pantry folder under this directory.global-hints.yamlFile, and change the Stack (default path) or SR (I changed the path) directoryconfig.yamlIn this file, add two mirror sources.CorrespondenceThe code, my version is 2.7.3:


Beconfig.yamlAdd the following code:
package-indices:
  - download-prefix: http://mirrors.tuna.tsinghua.edu.cn/hackage/
    hackage-security:
        keyids:
        - 0a5c7ea47cd1b15f01f5f51a33adda7e655bc0f0b0615baa8e271f4c3351e21d
        - 1ea9ba32c526d1cc91ab5e5bd364ec5e9e8cb67179a471872f6e26f0ae773d42
        - 280b10153a522681163658cb49f632cde3f38d768b736ddbc901d99a1a772833
        - 2a96b1889dc221c17296fcc2bb34b908ca9734376f0f361660200935916ef201
        - 2c6c3627bd6c982990239487f1abd02e08a02e6cf16edb105a8012d444d870c3
        - 51f0161b906011b52c6613376b1ae937670da69322113a246a09f807c62f6921
        - 772e9f4c7db33d251d5c6e357199c819e569d130857dc225549b40845ff0890d
        - aa315286e6ad281ad61182235533c41e806e5a787e0b6d1e7eef3f09d137d2e9
        - fe331502606802feac15e514d9b9ea83fee8b6ffef71335479a2e68d84adc6b0
        key-threshold: 3 # number of keys required

        # ignore expiration date, see https://github.com/commercialhaskell/stack/pull/4614
        ignore-expiry: no


setup-info-locations: ["http://mirrors.tuna.tsinghua.edu.cn/stackage/stack-setup.yaml"]
urls:
  latest-snapshot: http://mirrors.tuna.tsinghua.edu.cn/stackage/snapshots.json

snapshot-location-base: https://mirrors.tuna.tsinghua.edu.cn/stackage/stackage-snapshots/
(3) Configure GHC
Back to the terminal, run the commandstack --resolver lts-18.27 setupDownload the LTS, the success code is as follows:
C:Usershp>stack --resolver lts-18.27 setup
Warning: http://mirrors.tuna.tsinghua.edu.cn/stackage/stack-setup.yaml: Unrecognized field in GHCDownloadInfo: version
Preparing to install GHC to an isolated location.
This will not interfere with any system-level installation.
Already downloaded.
Downloaded 7z.dll.
Downloaded 7z.exe.
Decompressing ghc-8.10.7.tar.xz...

7-Zip 9.20  Copyright (c) 1999-2010 Igor Pavlov  2010-11-18

Processing archive: C:UsershpAppDataLocalProgramsstackx86_64-windowsghc-8.10.7.tar.xz

Extracting  ghc-8.10.7.tar

Everything is Ok

Size:       2768711680
Compressed: 434126144
Extracting ghc-8.10.7.tar...
Extracted total of 10342 files from ghc-8.10.7.tar
GHC installed to C:UsershpAppDataLocalProgramsstackx86_64-windowsghc-8.10.7
Downloaded msys2-20210604.
Already downloaded.
Already downloaded.
Decompressing msys2-20210604.tar.xz...

7-Zip 9.20  Copyright (c) 1999-2010 Igor Pavlov  2010-11-18

Processing archive: C:UsershpAppDataLocalProgramsstackx86_64-windowsmsys2-20210604.tar.xz

Extracting  msys2-20210604.tar

Everything is Ok

Size:       390021120
Compressed: 99822772
Extracting msys2-20210604.tar...
Extracted total of 17688 files from msys2-20210604.tar
Copying skeleton files.
These files are for the users to personalise their msys2 experience.

They will never be overwritten nor automatically updated.

'./.bashrc' -> '/home/hp/.bashrc'
'./.bash_logout' -> '/home/hp/.bash_logout'
'./.bash_profile' -> '/home/hp/.bash_profile'
'./.inputrc' -> '/home/hp/.inputrc'
'./.profile' -> '/home/hp/.profile'
[0mstack will use a sandboxed GHC it installed[0m
[0mFor more information on paths, see 'stack path' and 'stack exec env'[0m
[0mTo use this GHC and packages outside of a project, consider using:[0m
[0mstack ghc, stack ghci, stack runghc, or stack exec[0m
Test if the GHC is installed successfully:
C:Usershp>stack exec -- ghc --version
The Glorious Glasgow Haskell Compilation System, version 8.10.7

C:Usershp>stack exec -- ghci
GHCi, version 8.10.7: https://www.haskell.org/ghc/  :? for help
Prelude> :quit
Leaving GHCi.
At this point, we already have a available Stack and GHC (Wuhu Shuhua).
3. Configure vscode
3.1 Installing Plugin
Since a part of the plug-in version of VSCode is too old, and the new version of the GHC does not match, so download the old version of GHC is ready, in general, LTS9 does not have conflicts.
Do the following command is installed and the installation is successful:
stack --resolver lts-9.21 setup
stack --compiler ghc-8.0.2 exec -- ghc --version
After the configuration is complete, install the following plugins in the VSCode extension:
- Haskell ghc-mod
- Haskell-linter
- Haskell Syntax Highlighting
- Haskelly
- Haskell
- Code Runner
Then configure the plugin on the terminal, perform the following command, respectively, and the time required, if it is not configured once, the second re-open the terminal, you need to re-enterchcp 65001)
chcp 65001
stack --resolver lts-9.21 install ghc-mod
stack --resolver lts-9.21 install hlint
stack --resolver lts-9.21 install intero QuickCheck stack-run
After these installations are completed, the terminal shows the following, do not take the Warning, but to remember his pathC:UsershpAppDataRoaminglocalbinAll expansions of the Stack installation should be in this path, which needs to be used when configuring settings.json.

3.2 Configuring the Haskell Language Learning Environment
(1) Configure GHC-Mod, HLINT, Code Runner
Open the file (File) — Settings) — Settings, click on the position of the red circle below to open Settings.json.


Add the following code to the settings.json file, pay attention to add a comma at the end of the 8th row, where the path of the Haskell-Linter is the path above the prompt.
        / * Haskell GHC-MOD configuration * /
    "haskell.ghcMod.executablePath": "stack",
         / * Haskell-Linter Configuration * /
    "haskell.hlint.executablePath": "C:\Users\hp\AppData\Roaming\local\bin\hlint.exe",
         / * Code-runner configuration * /
    "code-runner.executorMap": {
		"haskell": "cd $dir && stack runhaskell $fileName"
	},

(2) Configuring Haskell
Since the STACK is used, the following configuration item either add to the global profile $ stack_root config.yaml, or add to the project profile stack.yaml:
ghc-options:
  '$ everything': -Haddock # A tool for automatically generating documents from the Haskell source code with comments
4. Try to use
After the above operation, the Haskell’s environment is basically concluded, write a simple Hello World to test whether it is successful. Run in vscode. HS file has basically following three ways:
- Input
Stack Runhankell ".hs file path"(Most stable). - Click on the small triangle run button in the upper right corner.
- Click on the bottom blue row
Run FileRun file.
You can see the successful output of Hello World.

tips:
I want to quote during the actual useimport System.RandomWhen it was found that the system prompt did not have this module. After finding countless data, finallyThis siteFind a feasible solution, you can try to enter the first line of code below the terminal, if it is invalid, try the second line of code:
stack install random
stack ghci --package random
Attachment: Some individuals think more useful Haskell entry information
- Haskell — Condition Judgment
- Haskell Series (3) List
Мы настроили среду программирования на Haskell по адресу: https://www.tutorialspoint.com/compile_haskell_online.php
В этом онлайн-редакторе есть много вариантов, чтобы попрактиковаться в программировании на Haskell. Перейдите в раздел терминала на странице и введите «ghci» . Эта команда автоматически загружает компилятор Haskell и запускает Haskell онлайн. Вы получите следующий вывод после использования команды ghci .
sh-4.3$ ghci
GHCi,version7.8.4:http://www.haskell.org/ghc/:?forhelp
Loading package ghc-prim...linking...done.
Loading packageinteger gmp...linking... done.
Loading package base...linking...done.
Prelude>
Если вы по-прежнему хотите использовать Haskell в автономном режиме в локальной системе, вам необходимо загрузить доступную настройку Haskell с его официальной веб-страницы – https://www.haskell.org/downloads.
На рынке доступны три типа инсталляторов:
-
Минимальный установщик – предоставляет GHC (компилятор Glasgow Haskell), CABAL (общая архитектура для создания приложений и библиотек) и инструменты стека.
-
Установщик стека. В этом установщике GHC можно загрузить в кроссплатформенной цепочке управляемых сборов. Он установит ваше приложение глобально, так что он может обновлять свои инструменты API при необходимости. Он автоматически разрешает все зависимости, ориентированные на Haskell.
-
Платформа Haskell – это лучший способ установить Haskell, потому что он установит всю платформу на ваш компьютер и в одну конкретную папку. Этот установщик не является дистрибутивом, как два вышеупомянутых установщика.
Минимальный установщик – предоставляет GHC (компилятор Glasgow Haskell), CABAL (общая архитектура для создания приложений и библиотек) и инструменты стека.
Установщик стека. В этом установщике GHC можно загрузить в кроссплатформенной цепочке управляемых сборов. Он установит ваше приложение глобально, так что он может обновлять свои инструменты API при необходимости. Он автоматически разрешает все зависимости, ориентированные на Haskell.
Платформа Haskell – это лучший способ установить Haskell, потому что он установит всю платформу на ваш компьютер и в одну конкретную папку. Этот установщик не является дистрибутивом, как два вышеупомянутых установщика.
Мы видели различные типы инсталляторов, доступных на рынке, теперь давайте посмотрим, как использовать эти инсталляторы на нашей машине. В этом руководстве мы собираемся использовать установщик платформы Haskell для установки компилятора Haskell в нашей системе.
Настройка среды в Windows
Чтобы настроить среду Haskell на своем компьютере с Windows, перейдите на их официальный веб-сайт https://www.haskell.org/platform/windows.html и загрузите установщик в соответствии с вашей настраиваемой архитектурой.
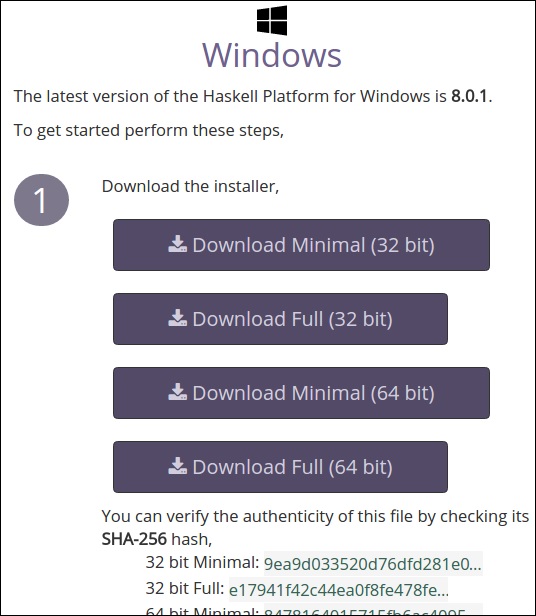
Проверьте архитектуру вашей системы, загрузите соответствующий установочный файл и запустите его. Он будет установлен как любое другое приложение Windows. Возможно, вам придется обновить конфигурацию CABAL вашей системы.
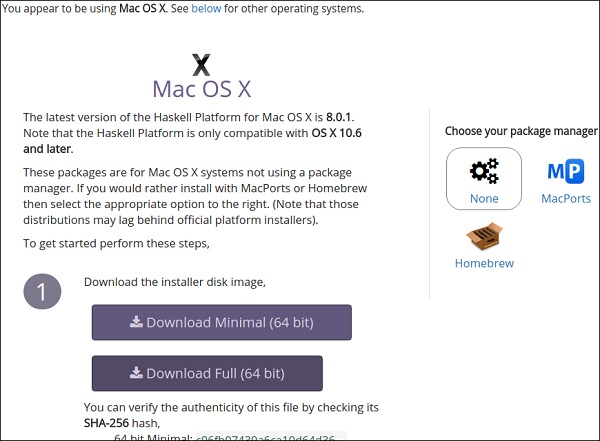
Настройка среды в MAC
Чтобы настроить среду Haskell в своей системе MAC, перейдите на их официальный веб-сайт https://www.haskell.org/platform/mac.html и загрузите установщик Mac.
Настройка среды в Linux
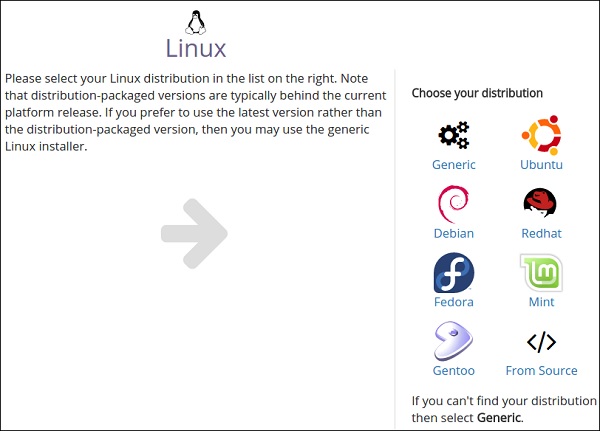
Установка Haskell в системе на основе Linux требует запуска некоторой команды, которая не так проста, как MAC и Windows. Да, это утомительно, но это надежно.
Вы можете следовать инструкциям ниже, чтобы установить Haskell в вашей системе Linux –
Шаг 1 – Чтобы настроить среду Haskell в вашей системе Linux, перейдите на официальный сайт https://www.haskell.org/platform/linux.html и выберите свой дистрибутив. Вы найдете следующий экран в вашем браузере.
Шаг 2 – Выберите ваш дистрибутив. В нашем случае мы используем Ubuntu. Выбрав эту опцию, вы получите следующую страницу на вашем экране с командой для установки Haskell в нашей локальной системе.
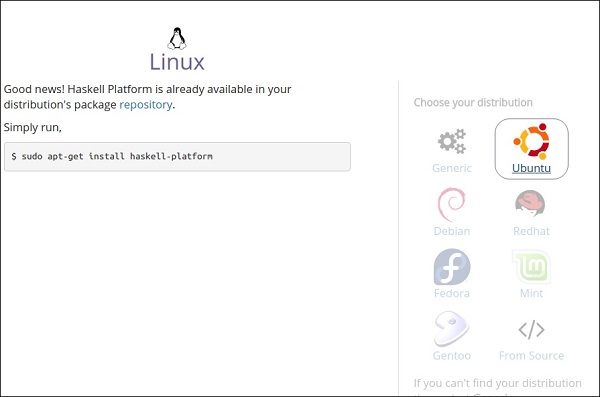
Шаг 3 – Откройте терминал, нажав Ctrl + Alt + T. Запустите команду «$ sudo apt-get install haskell-platform» и нажмите Enter. Он автоматически начнет загрузку Haskell в вашей системе после аутентификации с помощью пароля root. После установки вы получите подтверждающее сообщение.
Шаг 4 – Снова зайдите в свой терминал и выполните команду GHCI. Как только вы получите приглашение Prelude, вы готовы использовать Haskell в вашей локальной системе.
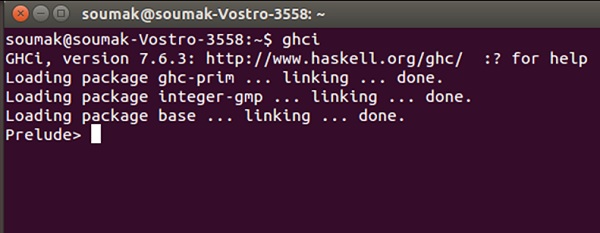
Чтобы выйти из пролога GHCI, вы можете использовать команду “: quit exit”.