Здравствуйте, сегодня я расскажу об установке BMW standart tools как это делал я.
Полный размер
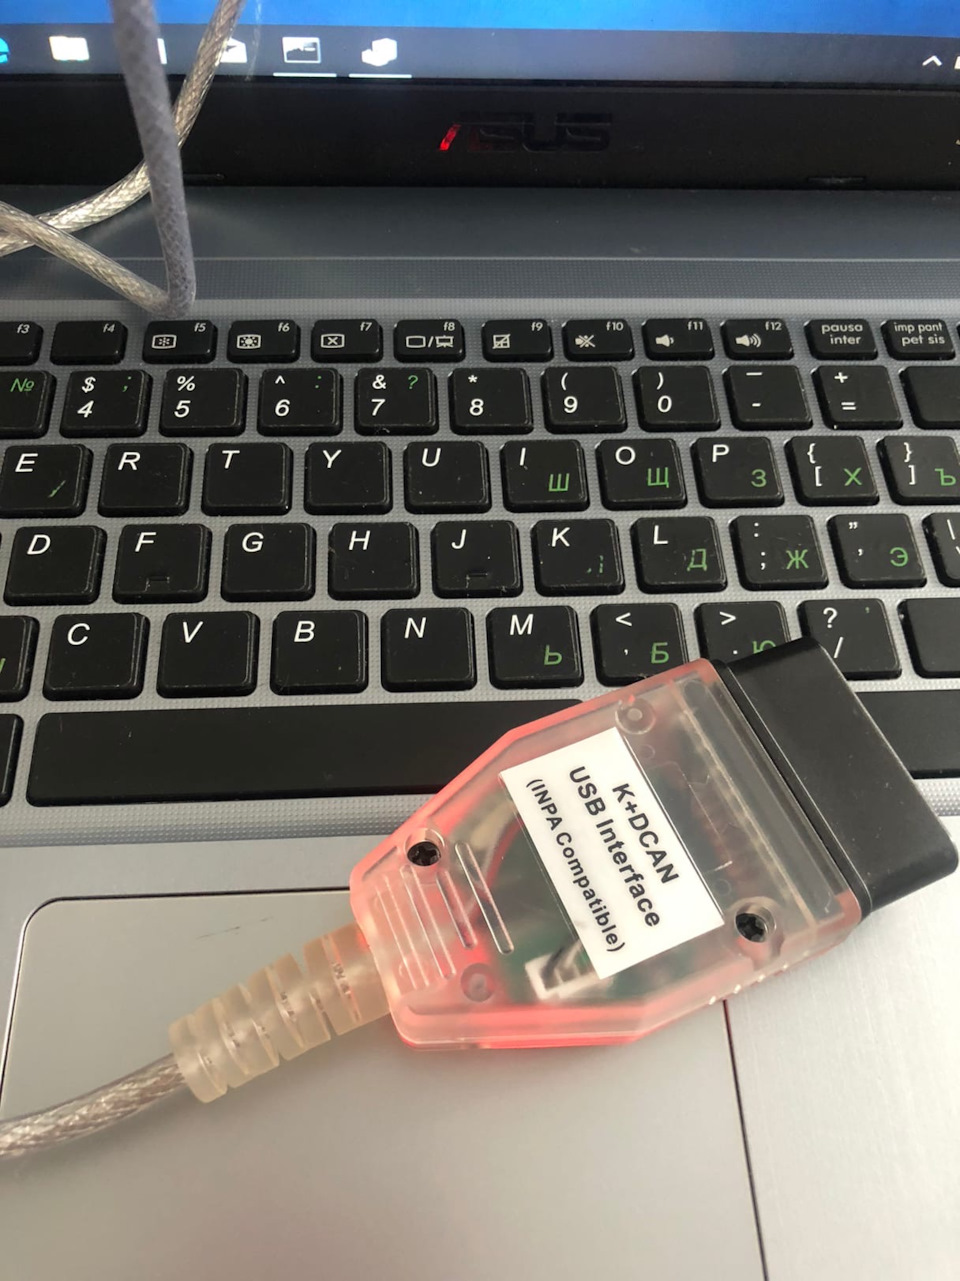
Понадобится вот такой вот шнурок с алиэкспресс.
Скачайте архивы:
Сама IMPA
Драйвер для шнурка.
Русик
Разархивируем BimmerGeeks Standard Tools. В папке находим St212.exe, правой кнопкой на нем и выбираем «исправление проблем с совместимостью»
Система может ругнуться, тогда ещё раз повторите действие или нажмите проверка программы и установка пойдёт. По умолчанию установка пойдёт на диск ц. Так и оставляйте. Потом перенесёте куда удобно.
Во время установки жмём далее и оставляем всё по умолчанию, кроме окошка где предлагают создать бэкап и ярлыки на рабочем столе, тут снимаем все флажки.
По окончанию установки нам предлагают перезагрузить систему, отказываемся. Установка завершена.
Далее идём на диск C: там находим папочки EC-APPS, EDIABAS & NCSEXPER и заменяем их папками EC-APPS, EDIABAS & NCSEXPER из архива BimmerGeeks Standard Tools.
Далее в архиве BimmerGeeks Standard Tools находим папку OCX там находим 3 файлика и копируем их в C:WindowsSyswow64 с заменой.
Теперь нам нужно открыть командную строку. Для этого в поиске windows вводим cmd кликаем на ярлычке командной строки правой кнопкой мыши и запускаем её от имени администратора.
В командной строке печатаем cd c: windows syswow64
(Нажмите Ввод)
regsvr32 mscomctl.ocx
(Нажмите Enter и дождитесь сообщения «Регистрация прошла успешно»)
regsvr32 msflxgrd.ocx
(Нажмите Enter и дождитесь сообщения «Регистрация прошла успешно»)
regsvr32 comdlg32.ocx
(Нажмите Enter и дождитесь сообщения «Регистрация прошла успешно»)
Это должно выглядеть так:
Поместите значок BMW из папки BimmerGeeks Standard Tools на рабочий стол. Ярлыки на все программное обеспечение находятся внутри.
Далее нам понадобится настроить наш шнурок, идём в диспетчер устройств. Открываем вкладку Порты(COM и LTP) Выбираем USB Sireal port (COM3) заходим в свойства, дополнительные параметры и меняем COM3 на COM1 а также время отклика (мсек) на 1. Возможно понадобится установить драйвер, тогда разархивируем архив с драйвером в любое удобное место, в настройках порта жмём обновить драйвер и указываем путь к папке.
При желании можно установить русик, тогда кидаем папки из архива на наш диск с: с заменой файлов.
Этот способ установки INPA на ноут с десяткой показался максимально удобным и быстрым. Если возникнут вопросы пишите.
Сегодня я расскажу как установить программы INPA и DIS для диагностики BMW E-серий, а также утилиты для кодировки NCSExpert и прошивки блоков WinKFP.
Сначала ссылки на сам софт:
INPA+DIS— архив со всеми необходимыми программами для установки
SP-Daten — файл архива SP-Daten.zip
Драйвер DCAN — архив с драйверами для любой версии Windows.
Скачиваем основной архив, распаковываем в любое удобное место на диске, заходим в эту папку.
1. Для начала установки запустите файл Standard_Tools_Setup_2.12.exe.
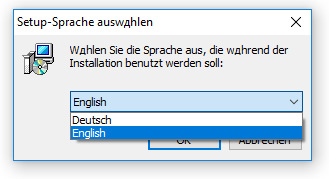
Выберите язык и нажмите ОК:
Если после нажатия ОК, у вас появляется следующее окно:
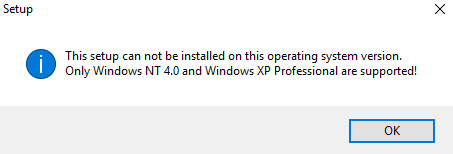
То необходимо изменить настройки совместимости для установочного файла. Для этого нажимаем правой кнопкой мыши на файле Standard_Tools_Setup_2.12.exe и выбираем Свойства:
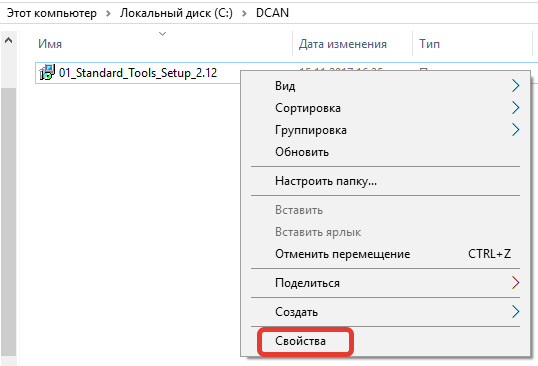
Переходим на вкладку Совместимость, ставим галочку в разделе Режим совместимости, выбираем Windows 7 и нажимаем ОК:

После этого, файл Standard_Tools_Setup_2.12.exe, будет запускаться без ошибок – снова запускаем его, выбираем язык и переходим к следующему пункту.
Нажимаем Next:

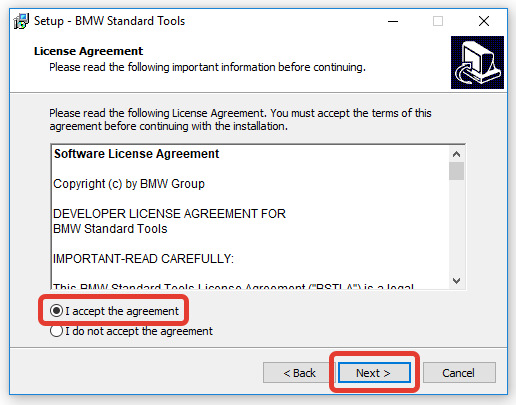
Принимаем условия лицензионного соглашения и нажимаем Next:
Снова Next:
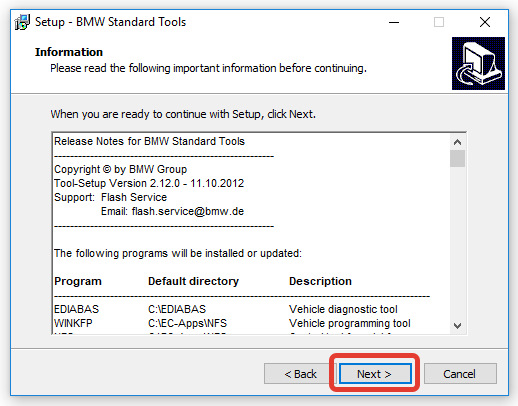
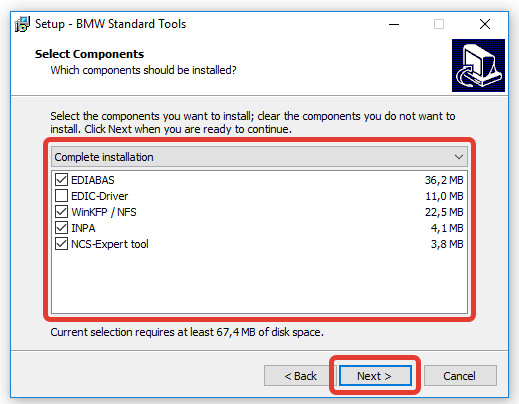
Оставляем все пункты без изменений, Next:
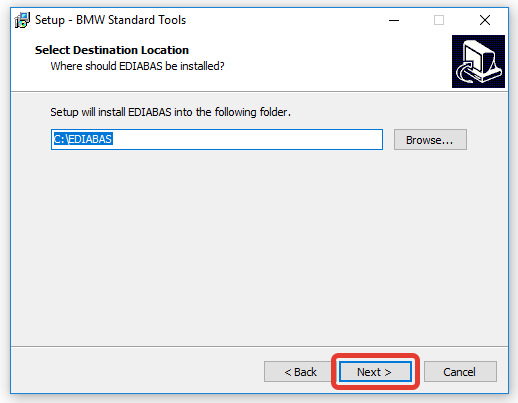
Все пути для установки компонентов программы оставляем без изменений:
В следующем пункте ставим галочки как на картинке:

Жмём ОК:
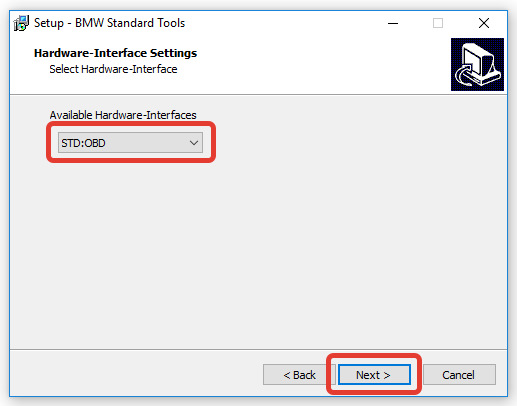
Оставляем STD:OBD, нажимаем Next:
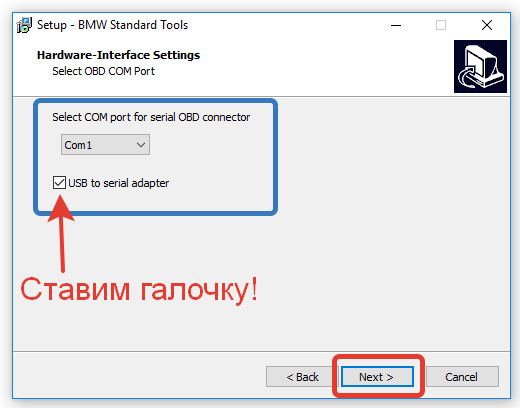
ВАЖНО! Выбираем COM1 и обязательно ставим галочку на пункте USB to serial adapter:
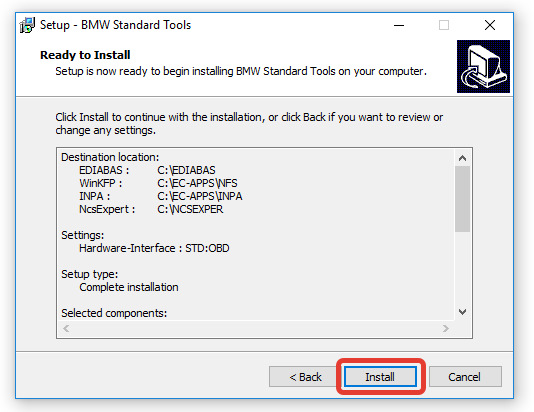
Нажимаем Install и начнётся установка:
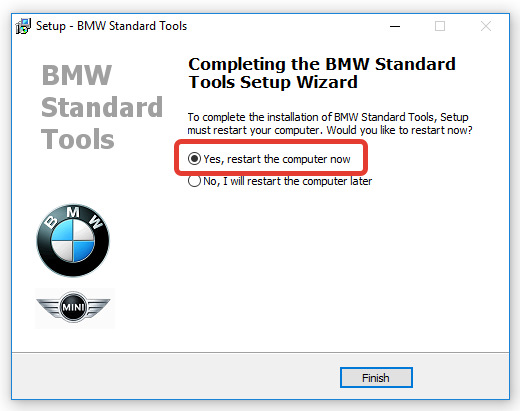
По завершении — перезагружаем компьютер:
2. После перезагрузки запускаем файл Update.exe от имени Администратора (для этого необходимо нажать правой кнопкой мыши на Update.exe):
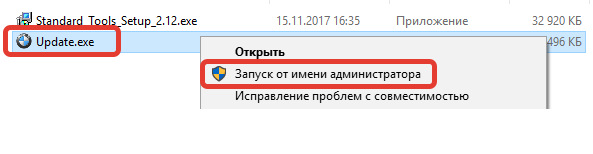
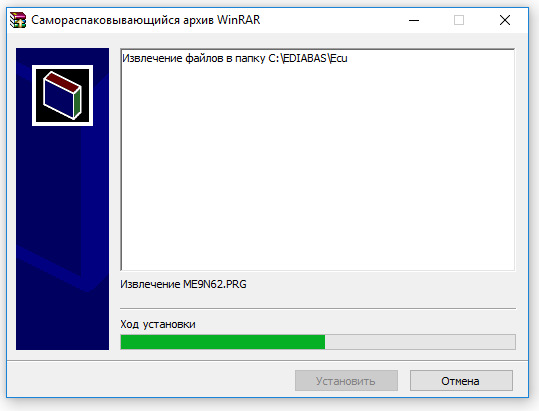
Начнётся процесс распаковки файлов, дополнительных действий не требуется:
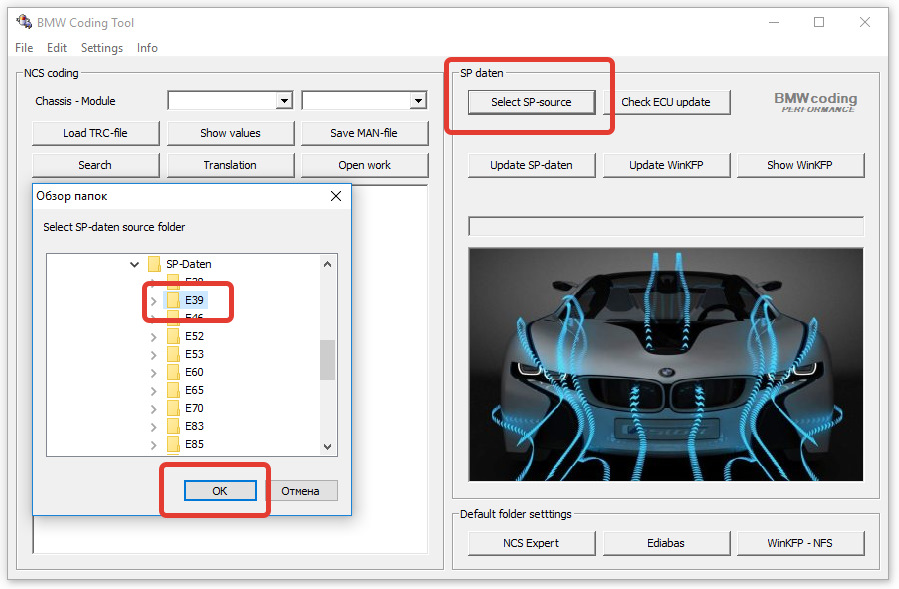
3. Далее нам необходимо импортировать файлы данных (SP-Daten) для работы с программами INPA, NCS-Expert Tool и WinKFP. Распаковываем файл архива SP-Daten.zip, запускаем программу BMW Coding Tools (ярлыка нет на рабочем столе, он находится в: Пуск – BMW Standard Tools).
Если BMW Coding Tools не запускается – откройте папку Coding Tool и запустите файл MSCOMCTL.exe от имени Администратора.
После запуска BMW Coding Tools, нажимаем кнопку Select SP-Source, указываем путь до ранее распакованного архива, выбираем папку с нужным кузовом и нажимаем ОК:
Нажимаем Update SP-daten, отказываемся от создания резерва:
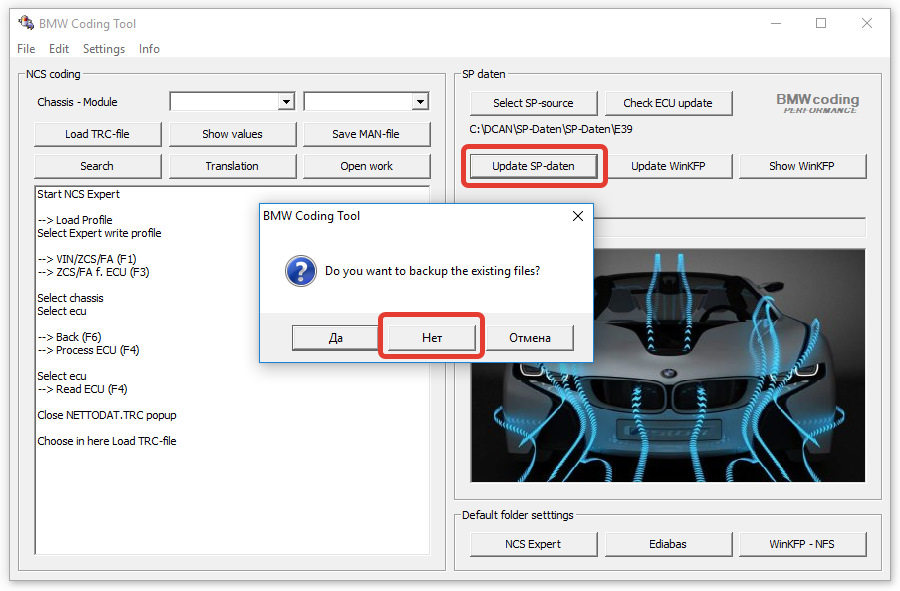
Соглашаемся с созданием папки для файлов:
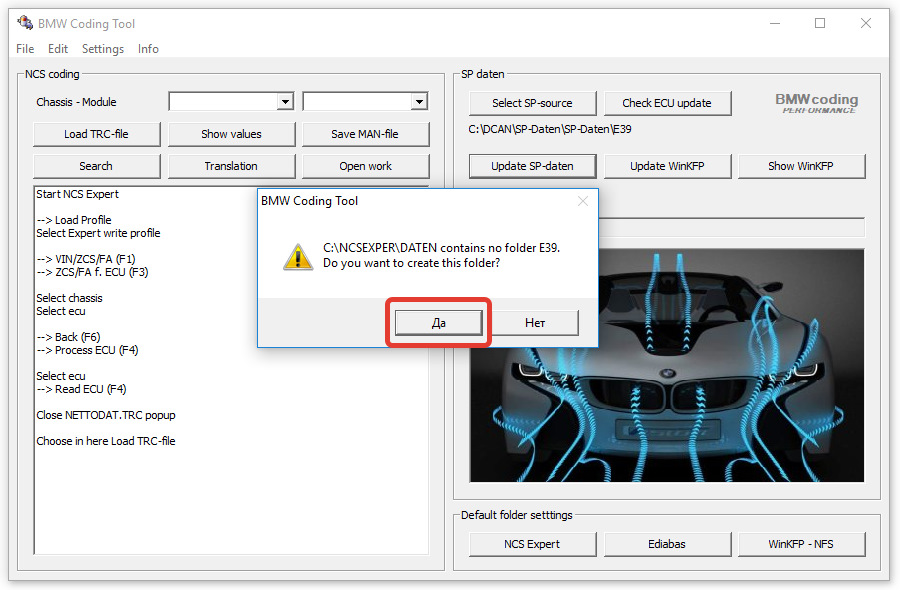
Начнётся процесс импорта файлов. По завершении которого, данную операцию можно повторить для добавления поддержки всех требуемых моделей.
4. Для программирования блоков с помощью программы WinKFP, аналогичным (п.3)
образом необходимо импортировать данные по кузовам через BMW Coding Tools.
Запускаем BMW Coding Tools нажимаем Select SP-source, выбираем папку с нужной моделью и нажимаем ОК:

Нажимаем Update WinKFP, отказываемся от создания резервной копии:
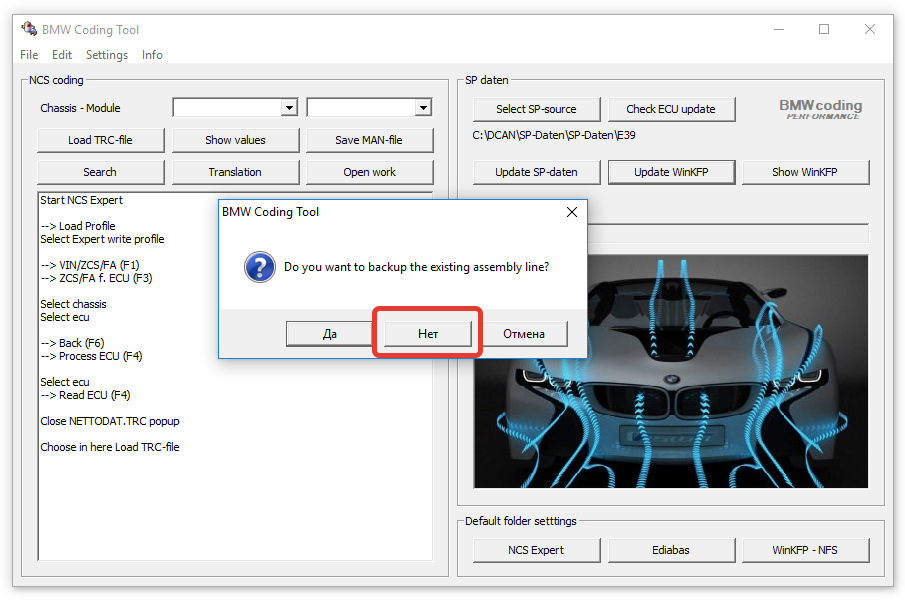
При необходимости, повторяем процедуру для каждого кузова, которому собираетесь программировать блоки.
После этого мы получим полностью работоспособную систему диагностики INPA, а также программирование блоков с помощью NCS Expert и WinKFP с теми моделями/кузовами, которые мы импортировали через BMW Coding Tools.
В следующей части я покажу последовательность действий при установке DIS.

BMW INPA EdiaBas — программный комплекс для профессиональной программирования ЭБУ, кодирования и диагностики BMW, Rolls Royce и Mini.
Данный сканер может получить доступ к любому ЭБУ. Использование в BMW INPA EdiaBas чтения параметров в реальном времени позволяют проконтролировать любой исполняющий механизм.
Перечень автомобилей, поддерживаемых интерфейсом OBD BMW INPA: E36 (некоторые), E38, E39, E46, E52, E53, E60, E65, E83, E85, E87, E90, Mini R50, Rolls Royce RR1.
Модели, поддерживаемые интерфейсом BMW INPA ADS: E31, E32, E34, E36.
Модели, поддерживаемые интерфейсом BMW INPA D-Can: E60, E61 с 03/2007; E83 с 09/2006; E81, E87 с 03/2007; E90, E91, E92, E93 с 03/2007; E70; R56.
Поддерживаемые BMW INPA ЭБУ: все модели BMW, кроме F-серии. Начиная с F-серии можно использовать Rheingold.
Минимальные системные требования настолько незначительны, что программу можно запустить на самых слабых ноутбуках:
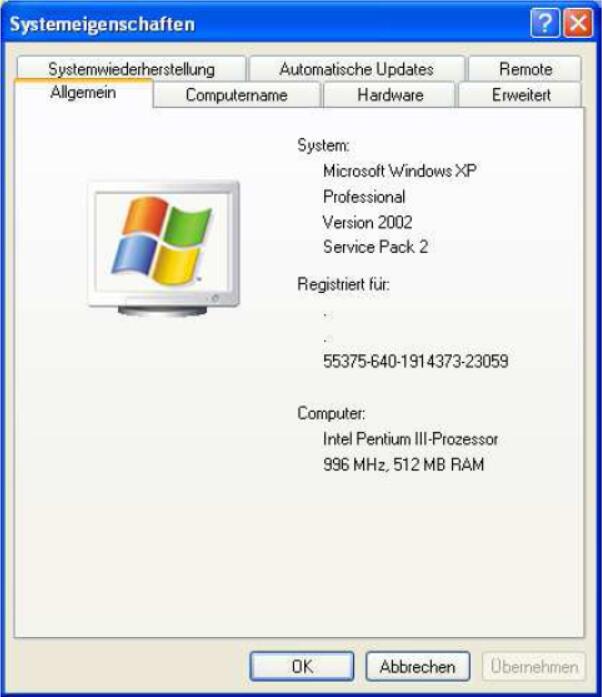
- Операционная система Windows® 98 / 2000 / XP / VISTA (в режиме совместимости с XP) / Windows 7 (в режиме совместимости с XP)
- Процессор не ниже Intel Pentium-II® 300МГц
- Оперативная память от 64Мб
- Свободное место на диске 400Мб
- COM-порт или USB-порт
Если вы ставите BMW INPA EdiaBas на виртуальную машину, то всё равно, какая у вас система, хоть Windows 10: главное иметь WMware определённой версии, способной работать с образом виртуальной машины.
- Чтение и удаление кодов неисправностей
- Кодирование ЭБУ
- Считывание параметров в реальном времени
- Эмуляция работы различных ЭБУ
- Считывание содержимого памяти ЭБУ
- Активация исполнительных механизмов
- Активация/деактивация инженерных функций
Установка BMW INPA EdiaBas
Установка зависит от выбранной версии. Ниже есть как чистые установщики (самостоятельная настройка), либо же VMware-версия с уже настроенными параметрами. В целом, выбор той или иной версии зависит от вашего мастерства. Так же стоит учесть, что эмулятор работает медленнее и потребляет больше ресурсов ноутбука, поэтому на медленных или старых устройствах рекомендуем ставить обычную версию (не VMware).
Скачать BMW INPA EdiaBas (+ .torrent)
Версия 5.0.2
В VMware-версии присутствует WDS (Wiring Diagram System) и TIS (Technical Information System). В раздаче так же присутствует SP-DATEN.iso весом 18Гб (качаете по необходимости, зачем нужен — читаем тут).
Установка WMware-версии:
- Устанавливаете VMware Workstation v10
- Зайдите в папку, куда скачивали раздачу, нажимаете Свойства (правой кнопкой мыши на папку), нажимаете на папку правой кнопкой, и в открытом окне снимаете галочку «Только для чтения»
- Запускаете VMware Workstation v10
- Выбираете пункт «Открыть виртуальную машину»
- Указываете путь до скачанной папки
- Запускаете образ
- Ждёте полной загрузки системы
- Подключаете DCAN к автомобилю и к устройству
- Запускаете Inpa с рабочего стола
- Обратите внимание на статус зажигания: должен появиться значок батареи
Если текущий статус «Отключено» — значит виртуальная машина не видит DCAN или в автомобиле отсутствует питание на разъеме (не включено зажигание).
Установка обычной версии подробно описана тут в двух PDF-файлах.
Версия 5.0
Подробная установка WMware-версии показана на видео ниже:
2.5 10 votes
Рейтинг статьи
03.05.2017
BMW INPA 5.0.2 — профессиональная программа для диагностики, кодирования и программирования автомобилей марок BMW, Mini, Rolls Royce. База BMW EdiaBas Inpa включает в себя такие подпрограммы как INPA, NCS-Expert tool, Tool32, WinKFP. Сборка полностью проверенная и рабочая. Поддерживается прибором BMW Inpa.
BMW INPA скачать
1) устанавливаем «dotNetFx40_Full_x86_x64» из папки «net framework 4.0»

2) устанавливаем галочку «Я прочитал и принимаю условия лицензионного соглашения» и нажимаем кнопку «Установить»

3) нажимаем «Готово»

4) Заходим в папку «Programminstallation» и находим файл «setup»

5) если установлен Windows 7 нажимаем на файл правой кнопкой и выбираем «Свойства», идем в раздел «Совместимость» и ставим галочку «Запустить программу в режиме совместимости с:» и нажимаем «Ок»

6) запускаем файл «setup» выбираем язык и нажимаем «Ок»

7) нажимаем «Next»

 ставим точку «i accept the agreement» и нажимаем «Next»

9) нажимаем «Next»

10) нажимаем «Next»

11) нажимаем «Next»

12) нажимаем «Next»

13) нажимаем «Next»

14) нажимаем «Next»

15) нажимаем «Next»

16) нажимаем «Next»

17) нажимаем «Next»

18) нажимаем «Next»

19) нажимаем «Install»

20) нажимаем «Skip» в следующих окнах


21) выбираем «Yes, restart the computer now» жмем «Finish» и ждем перезагрузки компьютера

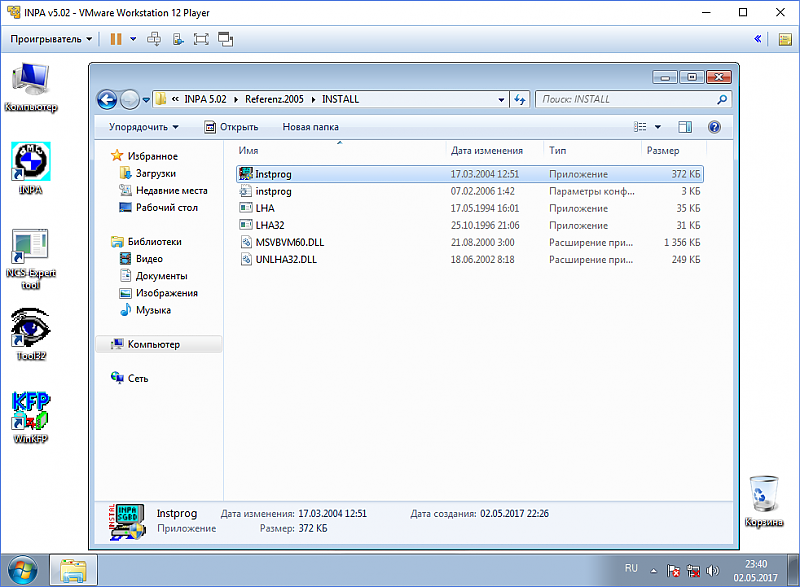
22) заходим в папку «Referenz.2005INSTALL» и запускаем файл «Instprog»

23) нажимаем «Ок»

24) выбираем язык и нажимаем «Continue»

25) нажимаем «Continue»

26) нажимаем «Continue»

27) выбираем «BMW Group Rectification programs UK» и жмем «Continue» (на этом шаге может выбивать ошибку, нам помогло убрать пробел в названии папки с программой, было «Inpa 5.02» переименовали на «Inpa502»)

28) установить галочки напротив EDIABAS, INPA, NCS expert и нажимаем «Continue»

29) нажимаем «Continue»

30) нажимаем «Continue»

31) нажимаем «End»

32) запускаем «Referenz_Apr_2006» из папки «Referenz.2006»

33) ждем конец распаковки

34) повторяем все действия с 23 по 30 пункты и нажимаем «End»

Установка драйверов для BMW INPA:
35) отключить Windows Update, если он будет выключен, то установятся не те драйвера

36) подключаем BMW INPA, видим драйвера не были установлены

37) заходим в диспетчер устройств

38) нажимаем правой кнопкой и «Обновить драйверы…»

39) нажимаем «Выполнить поиск драйверов на этом компьютере»

40) Выбираем папку с драйверами «CDM v2.10.00 WHQL Certified» и нажимаем «Далее»

41) после установки в диспетчере появится новое устройство, с не установленными драйверами

42) выполняем с этим же устройством пункты 38-40. После установки появилось новое устройство USB Serial Port (COM3)

43) Заходим с «Свойства» порта через правую кнопку

44) заходим в раздел «Параметры порта» и нажимаем кнопку «Дополнительно…»

45) выставляем в настройках порт который был выбран в 18 пункте (это не обязательно должен быть COM1, главное что бы они совпадали в 18 и 45 пункте), так же выставляем «Время ожидания (мсек)» значение «1»

Теперь программа полностью готова к работе!
Если нету каких-то моделей, можно изменить главное меню программы (взято на форуме bmwpost.ru)
Вопрос:
«где скачать? дайте линку, чтобы e46 был…. плиз. Какая версия инпы должна быть? 5.0.1 или 5.0.2? от чего зависит есть или нет e46 в инпе? можно в 5.0.2 где нет e46, как-то дописать копированием файлов, чтобы e46 был?»
Ответ:
Откройте файл C:EC-APPSINPACFGDATinpa.ini, и там пишите, что вам надо…
Пример:
//************************************************** ********************
//*
//* Nacharbeitsauswahl INPA
//*
//* Datei INPA.INI
//*
//************************************************** ********************
//* Gall TI-430
//************************************************** ********************
[INFO]
VERSION = 5.01
DATUM = 28.03.2006
VARIANTE = ENGLISH.MET
[ENVIRON]
DRUCKER = WIN
PEM = JA
LANGUAGE = ENGLISCH
[SCRIPT]
EDITOR = WIN
SCRIPTSELECT = LIST
DEFINI =
[CONFIG]
TITEL = BMW Group Rectification programs UK
F2 = E46
F2_Text = E46
F2_ARCHIV = SGBD_E46
F3 = E53
F3_Text = E53
F3_ARCHIV = SGBD_E53
F4 = E60
F4_Text = E60 (E63, E64) / 5er, 6er
F4_ARCHIV = SGBD_E60
F5 = E65
F5_Text = E65 (E66, E67) / 7er
F5_ARCHIV = SGBD_E65
F6 = E70
F6_Text = E70 (E71, E72) / X5
F6_ARCHIV = SGBD_E70
F7 = E83
F7_Text = E83 / X3
F7_ARCHIV = SGBD_E83
F8 = E85
F8_Text = E85 (E86) / Z4
F8_ARCHIV = SGBD_E85
F9 = Sonder
F9_KNOPF = Special
F9_TEXT = Special tests
F12 = R50
F12_Text = Mini R50 (R52, R53)
F12_ARCHIV = SGBD_R50
F13 = R56
F13_Text = Mini R56 (R55, R57)
F13_ARCHIV = SGBD_R56
F15 = RR1
F15_Text = Rolls Royce RR1 (RR2)
F15_ARCHIV = SGBD_RR1
F17 = E87
F17_Text = E87 (E81, E82, E88) / 1er
F17_ARCHIV = SGBD_E87
F18 = E90
F18_Text = E90 (E91, E92, E93) / 3er
F18_ARCHIV = SGBD_E90
F19 = BMW_ALT
F19_KNOPF = Old F19_TEXT = Old modells
F19_ARCHIV = SGBD_BMW
[EXTRA]
SCRIPTS = *
Пример добавления кузова e46 под клавишу F3:


27.03.2020
Важно! Программное обеспечение является бесплатным только для покупателей данного интернет-магазина!
В данной статье четко и просто прописан каждый шаг, который потребуется выполнить при установке INPA для диагностического оборудования BMW INPA K Dcan. Также практически все действия по установке Inpa 5.0.6 подкреплены иллюстрациями. Что бы выполнить данные шаги Вам понадобиться начальный уровень знания персонального компьютера и пользования Windows.
Важно! Так же в статье будет ссылка, по которой возможно INPA K Dcan скачать бесплатно, но скачанный архив будет под паролем (INPA K Dcan Скачать). Важно! Вы можете приобрести пароль за символическую плату если подпишетесь на аккаунт одной из социальных сетей и напишите в ней просьбу с указанием наименования программного обеспечения, в том числе указывайте версию ПО:
— Instagram: xdiag.by — https://instagram.com/xdiag.by?igshid=tumuxztpoxxw
— VK: Автодиагностика XDIAG.by — https://vk.com/xdiagby
— Facebook: Автосканеры — XDiag.by
Так же Вы сможете попасть в социальные сети нажав соответствующую кнопку внизу страницы с права.
Важно! Если Вы незарегистрированы в социальных сетях, то напишите нам в чат и Вам сообщат стоимость услуги предоставления пароля.
Устанавливать INPA лучше на чистую Windows, которая имеет все сопутствующие компоненты. Иначе у Вас могут возникнуть трудности и решение придётся «Гуглить». Консультация оказывается нашими специалистами на платной основе.
В данном случае установка INPA производилась на операционную систему Windows 10.
1. Откройте папку под названием BMW Inpa с диска или скачанную по ссылке.
2. Вставьте прибор в разъем USB (подключать автосканер BMW Inpa K Dcan к диагностическому разъему автомобиля не требуется).
3. Для начала установим драйверы для BMW Inpa. Запустите приложение DRIVER из папки BMW Inpa.

4. Нажмите кнопку Extract.

5. Произойдет установка и за тем нажмите кнопку Далее.

6. Поставьте точку в строке «Я принимаю это соглашение» и нажмите Далее

7. Выполняется установка драйверов к BMW Inpa и после вы увидите, что два драйвера обновлены (напротив строк с названием должны стоять зеленые птички). Нажмите Готово. Установка Завершена.

8. Открыть диспетчер устройств (в меню поиска ввести диспетчер устройств и открыть его или использовать любой другой метод известный Вам).
9. Во вкладке Порты (COM и LTP) выбрать USB Serial Port (COM3) и нажать правую кнопку мыши или тачпада далее в открывшемся списке выбрать Свойства (нумерация COM port может иметь любую цифру).

10. В открывшемся окне открыть вкладку «Параметры порта» и нажать на кнопку «Дополнительно».

11. Установите номер Com port от 1 до 9. Я рекомендую Вам выбрать номер 9

12. Время ожидания установите 2 мсек и нажмите кнопку «ОК», расположенную в правом верхнем углу окна. Установка драйвера и настройка COM-port для BMW Inpa K Dcan завершена. Закройте все лишние окна.

Далее переходим непосредственно к установке программного обеспечения BMW Inpa.
13. В папке с диска или скачанную по ссылке (далее – рабочая папка) под названием BMW Inpa дважды нажмите левой кнопкой мыши по приложению BMW_Standard_Tools_Setup_2.12.0
Примечание! Если производиться установка на операционную систему Windows 8 или 10, то потребуется включить режим совместимости с Windows 7 (правой кнопкой по ярлыку и выбираем свойства. Далее переходим во вкладку «Совместимость» и ставим птичку в строке «Запустить программу в режиме совместимости с:» Windows 7 и жмем «ОК» внизу окна).

14. Выбираем язык: English и жмем «OK». В последующем жмем кнопку «Next>».

15. В новом окне установки ставим точку в строке «I accept the agreement» и жмем «Next>» в каждом новом окне жмем кнопку «Next>» до окна с выбором COM port. В данном окне выбираем Com 9. И жмем кнопку «Next>» и далее «Install».

16. В появившихся окнах нажмите «Skip» несколько раз до начала установки.

17. Нажать кнопку «Finish» и произвести перезагрузку компьютера.

18. С рабочей папки BMW Inpa все содержимое папки «Скопировать на диск С» копируем на диск С:. Программным обеспечением BMW Inpa можно пользоваться.
19. Завершающий штрих – вынесите ярлыки программ-помощников при кодировании, которые называются BMW Coding Tool.exe и NcsDummy.exe и находятся в одноимённых папка на Вашем диске С: (по ярлыку программы кликните правой кнопкой мыши и выберите пункт «Отправить» и далее выбрать пункт «Рабочий стол (создать ярлык)).
NCS Expert наполнен наиболее популярными моделями. WinKFP не наполнен.
Для наполнения нужно скачать SP Daten для интересующей модели. Скачать SP Daten можно по ссылке на диске «BMW — MINI — MOTO — SP-Daten 2.60 [2015].torrent». Скачивание производится через uTorrent (установочный файл на диске). Наиболее простой способ наполнения Standard Tool – это утилита BMW Coding Tool.
Важно! Также Вы можете приобрести флешку с виртуальной машиной и Вам не понадобиться устанавливать программное обеспечение BMW Inpa на Ваш компьютер. Если Вас заинтересовало наше предложение, то свяжитесь с менеджером сайта.
Комментарии: 0
BMW INPA 5.0.2 — профессиональная программа для диагностики, кодирования и программирования автомобилей марок BMW, Mini, Rolls Royce. База BMW EdiaBas Inpa включает в себя такие подпрограммы как INPA, NCS-Expert tool, Tool32, WinKFP. Сборка полностью проверенная и рабочая. Поддерживается прибором BMW Inpa.
BMW INPA скачать
1) устанавливаем «dotNetFx40_Full_x86_x64» из папки «net framework 4.0»
13) нажимаем «Next»
22) заходим в папку «Referenz.2005INSTALL» и запускаем файл «Instprog»
23) нажимаем «Ок»
28) установить галочки напротив EDIABAS, INPA, NCS expert и нажимаем «Continue»
Установка драйверов для BMW INPA:
Вопрос:
«где скачать? дайте линку, чтобы e46 был…. плиз. Какая версия инпы должна быть? 5.0.1 или 5.0.2? от чего зависит есть или нет e46 в инпе? можно в 5.0.2 где нет e46, как-то дописать копированием файлов, чтобы e46 был?»
Ответ:
Откройте файл C:EC-APPSINPACFGDATinpa.ini, и там пишите, что вам надо…
Пример:
//************************************************** ********************
//*
//* Nacharbeitsauswahl INPA
//*
//* Datei INPA.INI
//*
//************************************************** ********************
//* Gall TI-430
//************************************************** ********************
[INFO]
VERSION = 5.01
DATUM = 28.03.2006
VARIANTE = ENGLISH.MET
[ENVIRON]
DRUCKER = WIN
PEM = JA
LANGUAGE = ENGLISCH
[SCRIPT]
EDITOR = WIN
SCRIPTSELECT = LIST
DEFINI =
[CONFIG]
TITEL = BMW Group Rectification programs UK
F2 = E46
F2_Text = E46
F2_ARCHIV = SGBD_E46
F3 = E53
F3_Text = E53
F3_ARCHIV = SGBD_E53
F4 = E60
F4_Text = E60 (E63, E64) / 5er, 6er
F4_ARCHIV = SGBD_E60
F5 = E65
F5_Text = E65 (E66, E67) / 7er
F5_ARCHIV = SGBD_E65
F6 = E70
F6_Text = E70 (E71, E72) / X5
F6_ARCHIV = SGBD_E70
F7 = E83
F7_Text = E83 / X3
F7_ARCHIV = SGBD_E83
F8 = E85
F8_Text = E85 (E86) / Z4
F8_ARCHIV = SGBD_E85
F9 = Sonder
F9_KNOPF = Special
F9_TEXT = Special tests
F12 = R50
F12_Text = Mini R50 (R52, R53)
F12_ARCHIV = SGBD_R50
F13 = R56
F13_Text = Mini R56 (R55, R57)
F13_ARCHIV = SGBD_R56
F15 = RR1
F15_Text = Rolls Royce RR1 (RR2)
F15_ARCHIV = SGBD_RR1
F17 = E87
F17_Text = E87 (E81, E82, E88) / 1er
F17_ARCHIV = SGBD_E87
F18 = E90
F18_Text = E90 (E91, E92, E93) / 3er
F18_ARCHIV = SGBD_E90
F19 = BMW_ALT
F19_KNOPF = Old F19_TEXT = Old modells
F19_ARCHIV = SGBD_BMW
[EXTRA]
SCRIPTS = *
Пример добавления кузова e46 под клавишу F3:
Оценка: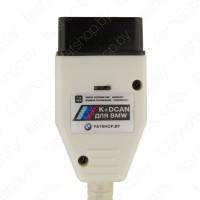
BMW INPA D-CAN
65 BYN
Используемые источники:
- https://fatshop.by/article/ustanovka-bmw-inpa-502
Оценка статьи:
![]()
![]()
![]()
![]()
![]() (пока оценок нет)
(пока оценок нет)
![]() Загрузка…
Загрузка…
Да, программное обеспечение INPA работает с BMW серии Fxx, если у вас установлены файлы Fxx .IPO.
Программа будет использовать интерфейс, который вы указали в файле EDIABAS.ini, поэтому лучше иметь в своем распоряжении кабель BMW ENET.
А также, определенно сканер ICOM A2.
Программа INPA 5.06 со скриптами для серии Fxx:

INPA не обновляет прошивки SP=Daten, поскольку программа использует только файлы .PRG в комплексе EDIABAS и свои собственные файлы .iPO.
Здесь вы найдете полную версию программы INPA, в том числе для работы с BMW серий F и E, но никто, кроме вас, не несет ответственность за последствия ваших действий.
Загрузить полную версию INPA на Mega (под Вашу ответственность) можно по ссылке:
Установите в первую очередь программу BMW Standard Tools 212, которая включает в себя:
· EDIABAS v.7.30, Tool32 v.4.03, INPA v.5.06, WinKFP v.5.31 и NCS Expert v.4.01.
Затем установите INPA_Fxx_v.2:
- Скопируйте папку с программой INPA_Fxx_v.2 в C:EC-AppsINPA_Fxx_v.2 and EDIABAS, в C:EDIABAS, перезаписав существующую папку EDIABAS.
- Запустите файл INPALOAD.exe в папке INPA_Fxx_v.2 BIN (C:EC-AppsINPA_Fxx_v.2BININPALOAD.exe).
- Замечание: ОТКЛЮЧИТЕ БРАНДМАУЭР WINDOWS И АНТИВИРУСНУЮ ПРОГРАММУ.
- Замечание: для подключения программы диагностики BMW версии Exx необходимо заменить файл EDIABAS.ini
на «INTERFACE = STD:OBD» и отредактировать настройки СОМ-порта OBD.ini, чтобы они соответствовали настройкам СОМ-порта вашего ПК.
Экспресс-диагностика с программой inpa становится значительно проще и быстрее по сравнению с ista/d…., в том числе с точки зрения поиска zb-numbers …
One of my blog readers sent the e-mail to ask how to install BMW INPA software on win7/win 8/win10.I searched and found the solution provided by forum members.
Some BMW INPA Source You Need:
BMW INPA 6.4.3 Software Free Download
How To Install BMW Ediabas/INPA On Win XP/Vista
BMW Standard Tools 2.12 Free Download
SP Daten50.2 download here
https://mega.nz/#F!nshRWaLA!NbXQSw7903FIt0JdU81zCA
BMW INPA Win XP Pro Installation:
Step 1 – Prepare the laptop
First, you have to make a tiny change to the Windows environment variables. This is less scary than it sounds. INPA relies on a file called API.DLL being in a folder that is set in the Windows “path” so you need to add the EDIABAS folder to the path variable, like this:
1. Go to control panel, select Classic View and open the “System” item
2. Choose “Advanced” and then “Environment Variables”
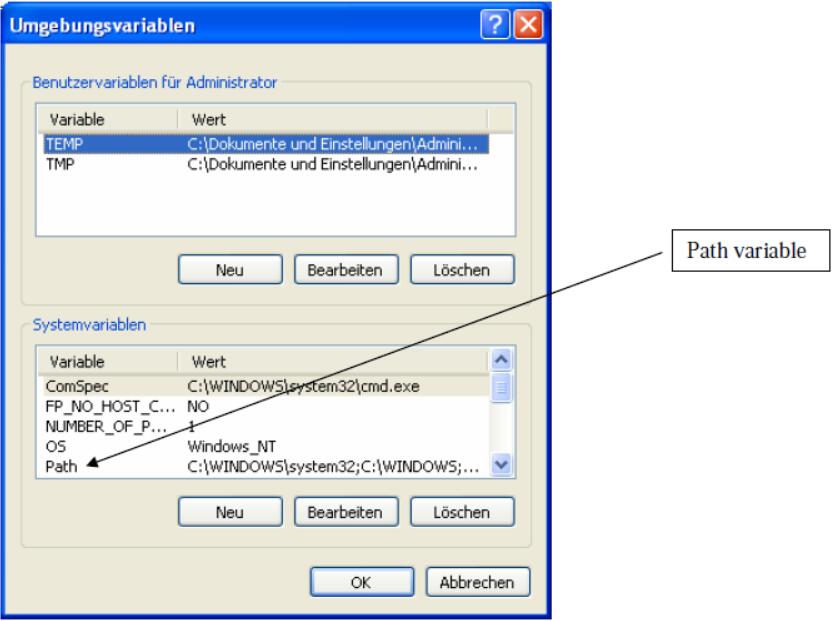
3. You’ll see a system variable called “Path” – double-click this
4. In the “Variable value:” box, add “;c:ediabasbin” to the end of the list of folders – e.g:
%SystemRoot%system32;%SystemRoot%;%SystemRoot%System32Wbem;c:ediabasbin
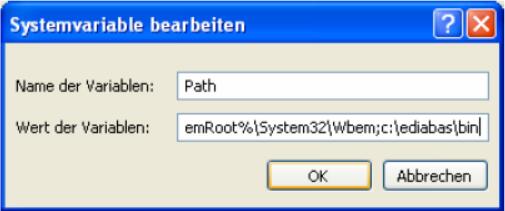
5. OK OK OK until the system window and control panel are gone
6. Reboot (important so that Windows picks up the change to the path)
Step 2 – Install the software
The installation is pretty intuitive. I had some problems trying to install the entire suite of programs, but was successful when I kept the install to INPA and EDIABAS. These two allow me to do what I want to the car so I don’t need the others. I also had some problems
installing from hard disk (rather than CD) but only on one laptop, not the other.
1. Unzip the package, either onto laptop directly or onto CD (I used CD so I could move it on to my old XP laptop easily)
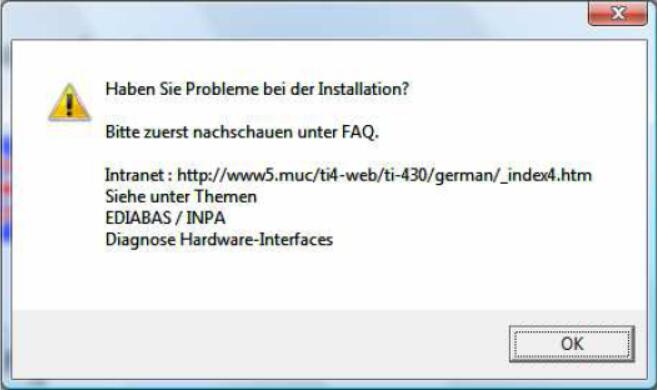
2. Run the Instprog.exe program from the INSTALL folder
3. OK the warning message:
4. Choose English and click continue
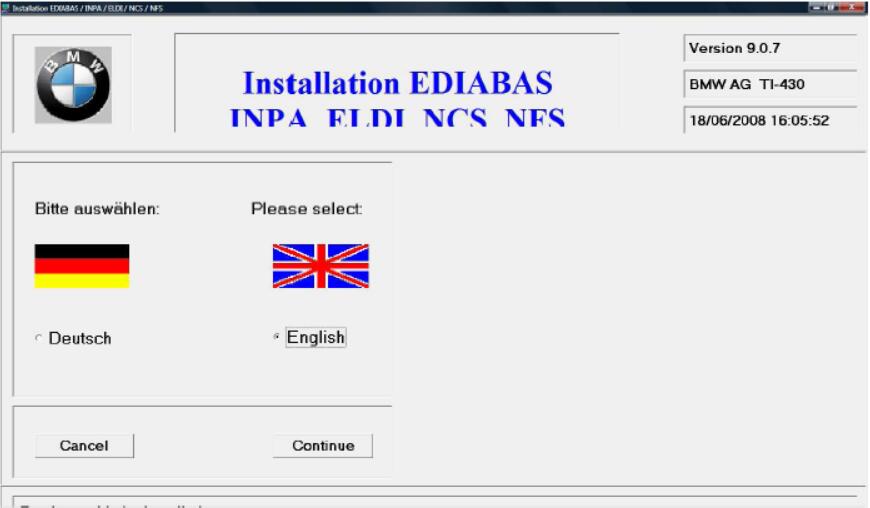
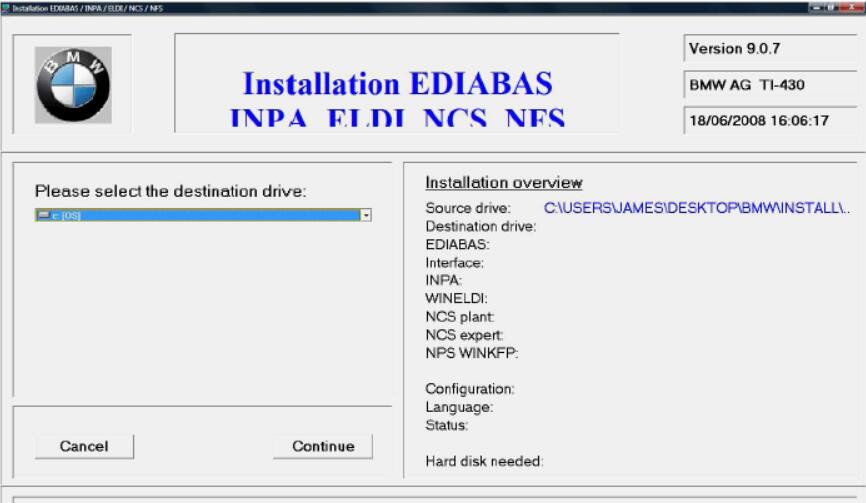
5. Select the drive to install to and click continue
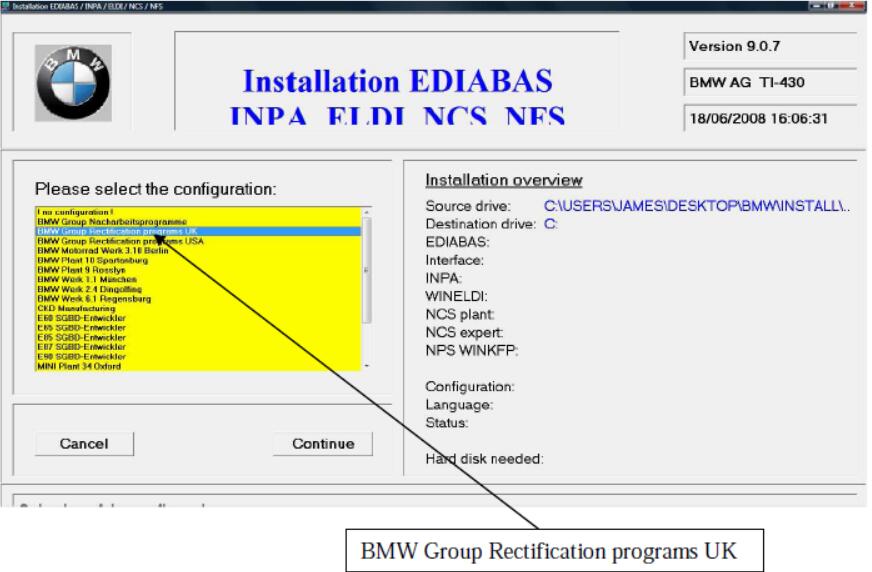
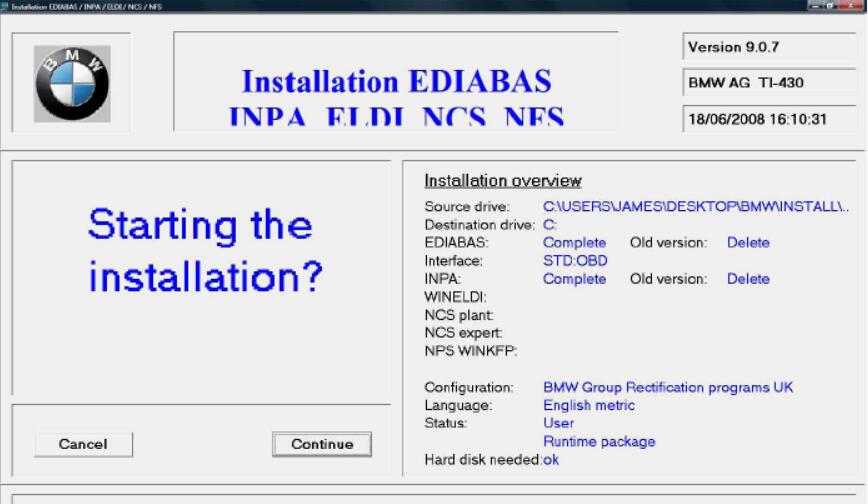
6. Select configuration “BMW Group Rectification programs UK” and click continue (this selection makes INPA run in English which is kind of useful!)
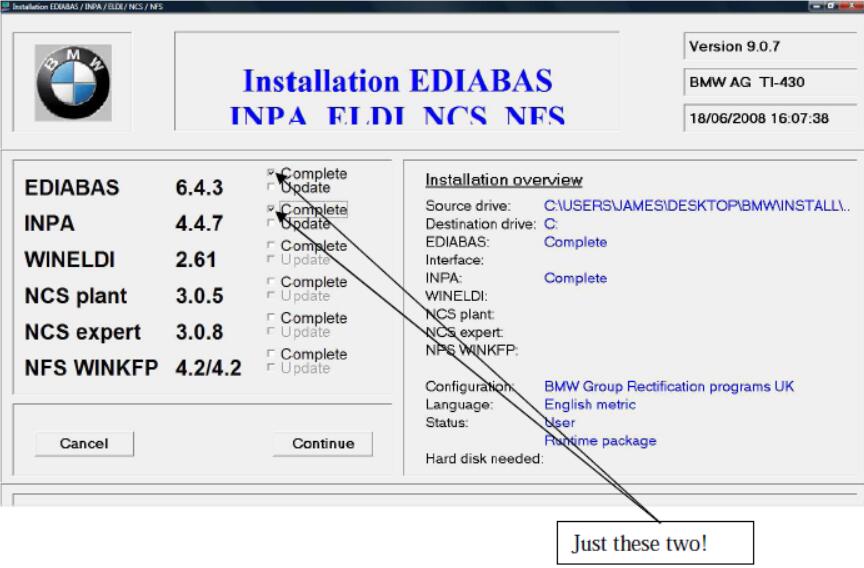
7. Select “complete” for EDIABAS and INPA and click continue (ignore WINELDI / NCS /NFS)
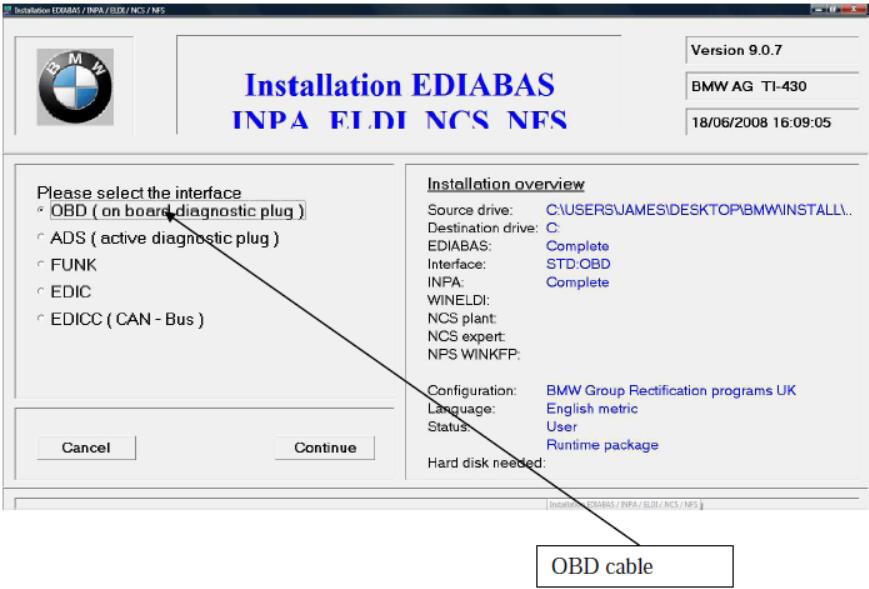
8. Select the interface cable type (the ones on eBay are “OBD” cables)
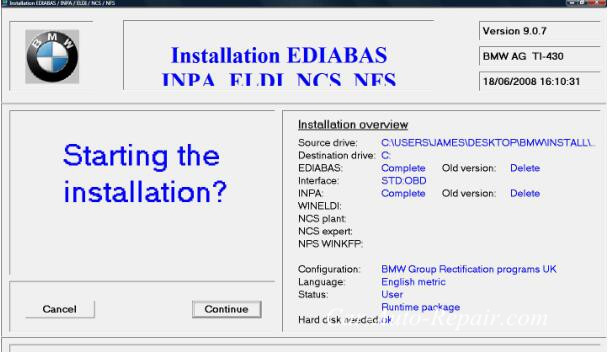
9. Confirm that you want to start the install (if you’ve previously tried and failed to install, it might ask you whether to delete or rename the existing install – choose Delete)
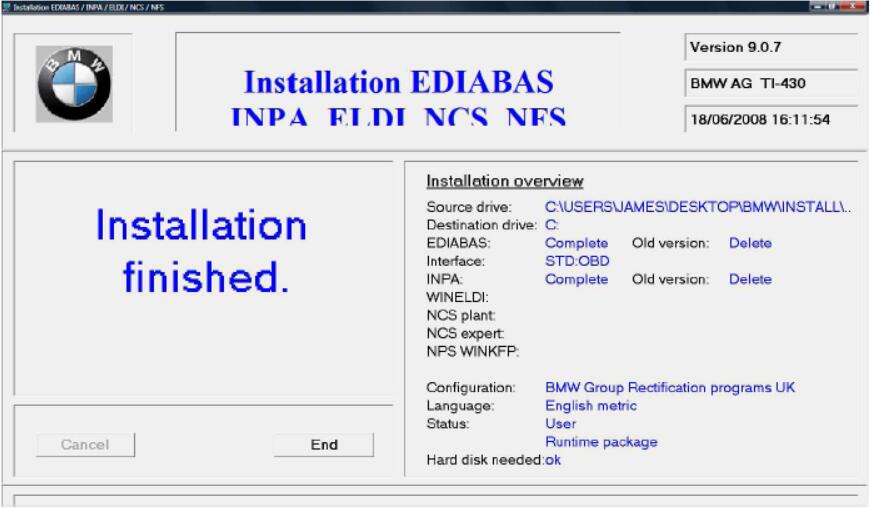
10. You should get an “installation finished” message
11. If you didn’t do the “path” setup I described in step 1, you will get another message. You HAVE to do Step 1 for it to work.
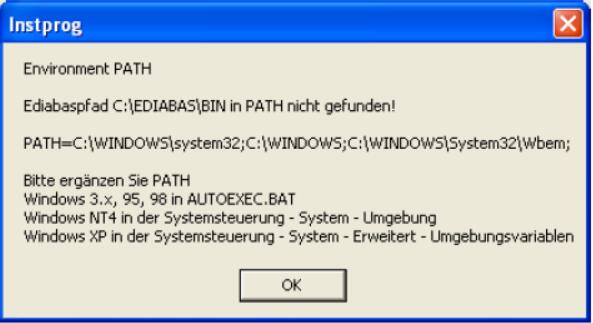
If you try to run it now, it still won’t work because of some duff registry settings. You need one final step to get it sorted!
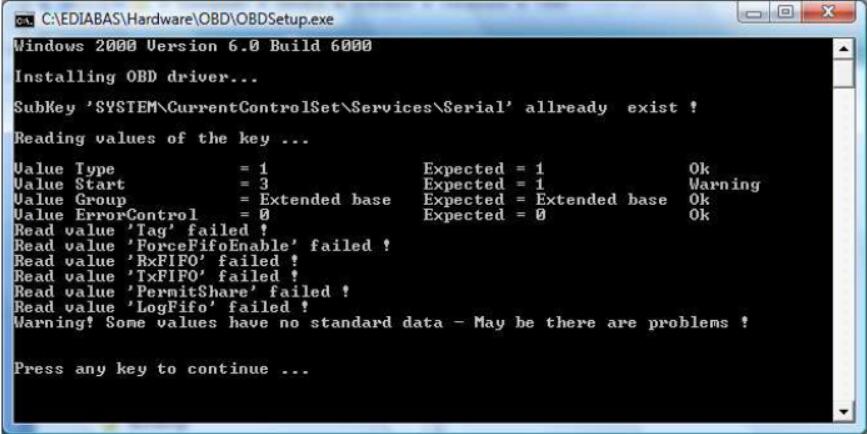
12. Once the install is finished, there will be a folder on your laptop called c:ediabashardwareobd and inside it will be a program called OBDSetup.exe – you need to run this. You can just search for OBDSetup.exe using Windows search.
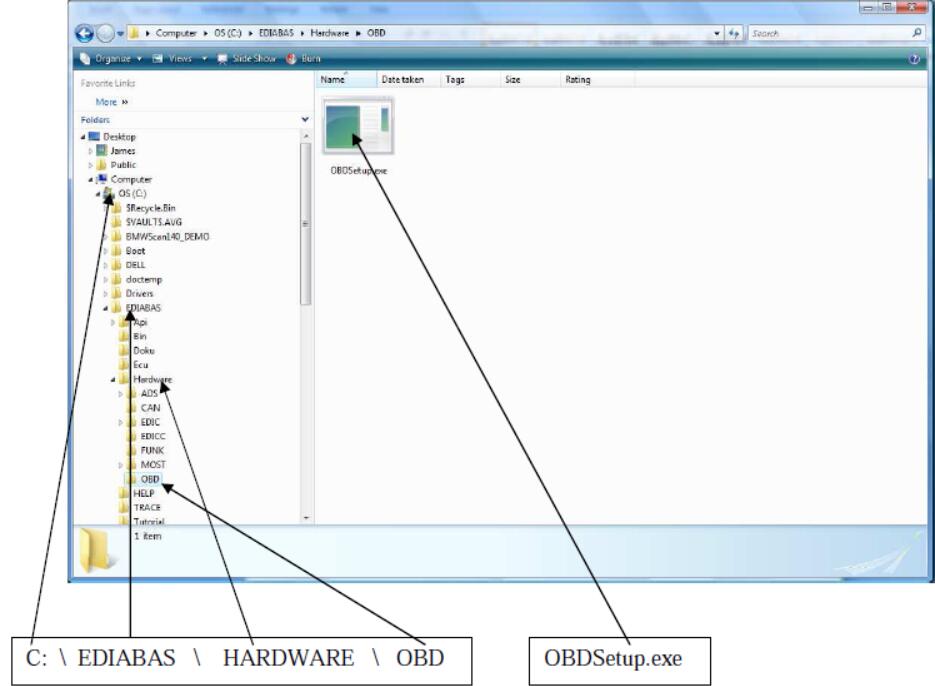
You will see this screen when you run it:
BMW INPA Win7 Installation Guide:
Method 1 BMW INPA work on Win7 32 bit
This DIY was tested with Windows 7 Home Premium Service Pack 1 (SP1) running on a circa 2008 Lenovo S10 netbook with a K+DCAN cable from one stop electronics.com. My netbook is used solely for coding and as such this DIY assumes that your computer is dedicated to this purpose as well.
I recommend starting with a fresh 32-bit Windows 7 installation in order to collect the necessary INPA 5.0.2 configuration files that you will need after installing BMW Standard Tools 2.12. I suggest disabling Windows Update automatic updates during the Windows 7 installation process. After entering your product key, the following screen will pop up security message.
Select “Ask me later”, this will prevent Windows 7 from automatically installing any updates.
If your installing from pre-SP1 Windows 7 media, I highly recommend that you manually install two Microsoft updates:
System Update Readiness Tool (KB947821):
http://www.microsoft.com/en-us/downl…s.aspx?id=3132
Windows 7 Service Pack 1 (KB976932):
http://www.microsoft.com/en-us/downl…s.aspx?id=5842
During testing pre-SP1 Windows 7 no longer displayed a mouse pointer after successfully installing EDIABAS & WinKFP and rebooting the system.
INPA 5.0.2 can be found here:
INPA-EDIABAS full English Edition
Installation Guide
Follow steps 2 through 6 of the installation guide. During the EDIABAS & WinKFP install (step 3), select Windows XP (this is not mentioned in the installation guide.) For all other selections, accept the default and click Weiter which is German for “further.”
The very first time you attempt to install EDIABAS & WinKFP (step 3), regsvr32 will fail to register two Windows ActiveX controls. This is normal, upon re-installation everything will work properly.
Click on OK and then click on the large red circle with a white X at the bottom of the screen to see the second regsvr32 error.
Click on OK to acknowledge the second error.
Press any key to exit the EDIABAS OBD setup program. Don’t be concerned about any registry key warnings, this installation of EDIABAS will never be used.
When prompted to reboot, select Nein for “No” and then click on Beenden or “End” to exit the installation program. Go to Control Panel and uninstall the program.
Once you have uninstalled the program, reinstall it. On the second attempt, the ActiveX controls will register properly.
This time, select Ja for “Yes” and reboot.
Even with SP1 installed, on occasion the system will no longer display a mouse pointer after rebooting the system at this point. If this happens, depress the Windows logo key (on some keyboards it may have an icon of a house instead) to display the Start menu. Depress the right arrow key once and then depress Enter to initiate a proper shutdown. When powered back on, the system should have a functional mouse pointer.
Continue with steps 4-6 in the installation guide.
At the completion of step 5, the Windows Program Compatibility Assistant may appear. Click on “This program installed correctly.”
At this point you could optionally install the latest EDIABAS/INPA update (ES-76) from FAL’s EA-90X distribution. I don’t recommend doing so as the latest INPA scripts are in German and not necessary for coding. Installation of the ES-76 update is outside of the scope of this DIY.
You now have the base INPA scripts and configuration files that you’ll need to get the latest version of INPA (5.0.6) up and running. Copy the the INPA CFGDAT and SGDAT folders to removable media for safe keeping. They are located in C:EC-APPSINPA.
If your curious, INPA 5.0.2 is operable at this point. If you were to install the K+DCAN drivers from Windows Update, set the cable to COM1, etc. the battery and ignition clamps are working properly.
That’s cool, but INPA 5.0.2 and friends are not totally compatible with the latest SP Daten files (i.e. 50.2), so let’s move on to installing BMW Standard Tools 2.12.
Links to BMW Standard Tools 2.12 and NCS Expert profiles can be found in this post:
http://www.e90post.com/forums/showpo…postcount=4476
SP Daten 50.2 can be found in this thread:
http://www.e90post.com/forums/showthread.php?t=882353
Blow away your previous installation of Windows and start over with a fresh install. INPA 5.0.2 and friends made changes to the Windows registry, etc. Now that we have the two folders needed to bootstrap INPA 5.0.6, it’s best to reinstall Windows. If your installing from pre-SP1 Windows 7 media, don’t forget to install the System Update Readiness Tool (KB947821) and Windows 7 Service Pack 1 (KB976932.) In addition, because this will hopefully be your final re-installation of Windows I suggest that you manually install one additional Microsoft update:
Microsoft .NET Framework 4.5.1:
http://www.microsoft.com/en-us/downl….aspx?id=40779
When the K+DCAN cable is initially plugged in, Windows will indicate that the device driver was not successfully installed.
Click on the white box circled above when it appears to change the driver update settings.
Click on “Change setting.”
Select “Always install the best driver software from Windows Update” then click on “Save Changes.”
Windows Update will install the latest FTDI drivers needed for the one stop electronics.com K+DCAN cable. Notice that the FTDI driver has defaulted to USB Serial Port COM3. You need to change this to COM1. Click on “Close.”
Click on the Windows Start button to display the Start menu. In the Start Search box type the following command and depress Enter to launch Device Manager:
Code:
mmc devmgmt.msc
When Device Manager opens, click on the arrow to the left of “Ports (COM & LPT)” to expand the Ports device tree. Double-click on “USB Serial Port (COM3)” to open the device properties.
Click on the “Port Settings” tab and then click on the “Advanced” button to display the Advanced Settings for COM3.
Change the COM Port Number to COM1 and the Latency Timer to 1 msec and click “OK.”
The USB Serial Port should be set to COM1. Close Device Manager.
Install BMW Standard Tools 2.12. Accept the defaults and click “Next.”
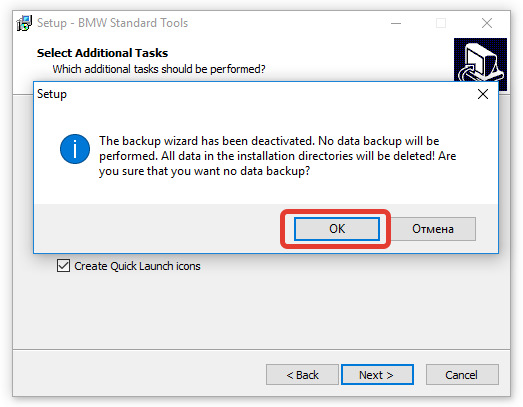
When prompted to select additional tasks, de-select the “Execute backup and restore wizard” selections under Data backup. You don’t have an existing installation of BMW Standard Tools to backup. Click “Next.”
Click “OK” to acknowledge that the backup wizard has been deactivated.
When the Hardware Interface Settings screen appears, select “USB to serial adapter” then click “Next.”
Click “Finish” to complete the BMW Standard Tools setup and restart your computer.
Please note: This section of the DIY could be improved for neophyte Windows users. It assumes that you understand command line syntax. In this context, X: denotes an unknown drive letter (i.e. the USB thumb drive that you saved your INPA CFGDAT and SGDAT folders to.) For example, if in Windows Explorer under Computer your USB thumb drive is denoted as Drive E:, then you should use E: instead.
Code:
C:Users808>copy E:CFGDAT*.ENG C:EC-APPSINPACFGDAT /v14 file(s) copied.
If you chose to store the CFGDAT folder in another folder named MyStuff, then you would have to include MyStuff in the source path.
Code:
C:Users808>copy E:MYSTUFFCFGDAT*.ENG C:EC-APPSINPACFGDAT /v14 file(s) copied.
The drive letter and path to the source file(s) is dependent on where you stored the files.
Click on the Windows Start button to display the Start menu. In the Start Search box type the following command. Right click on the Windows Command Processor (cmd) under Programs and select Run as administrator.
Code:
cmd
When the User Account Control dialog box appears, select Yes to allow the Windows Command Processor to make changes to your computer.
Copy the Windows ActiveX control MSFLXGRD.OCX to C:WINDOWSSYSTEM32 and manually register it.
Copy the Windows ActiveX control RICHTX32.OCX to C:WINDOWSSYSTEM32 and manually register it.
Overwrite the INPA initialization file in the C:EC-APPSINPACFGDAT folder with the INPA.INI from your saved CFGDAT folder.
Code:
C:>copy X:CFGDATINPA.INI C:EC-APPSINPACFGDAT /v /y1 file(s) copied.
Copy the INPA scripts and configuration files from your saved CFGDAT and SGDAT folders.
Code:
C:>copy X:CFGDAT*.ENG C:EC-APPSINPACFGDAT /v14 file(s) copied.C:>copy X:SGDAT*.IPO C:EC-APPSINPASGDAT /v468 file(s) copied.C:>copy X:SGDAT*.SRC C:EC-APPSINPASGDAT /v11 file(s) copied.C:>copy X:SGDAT*.TXT C:EC-APPSINPASGDAT /v2 file(s) copied.
Copy the group files from the SP Daten E89 folder to C:EDIABASECU.
Code:
C:>copy X:E89ECU*.GRP C:EDIABASECU /v80 file(s) copied.
Import your daten files into WinKFP using this guide (steps 2-8):
WinKFP Import.pdf
Create a C:NCSEXPERDATENE89 folder and copy the contents of the E89DATEN folder into it.
Code:
C:>mkdir C:NCSEXPERDATENE89C:>copy X:E89DATEN*.* C:NCSEXPERDATENE89 /v430 file(s) copied.
Copy the contents of the E89SGDAT folder to C:NCSEXPERSGDAT.
Code:
C:>copy X:E89SGDAT*.* C:NCSEXPERSGDAT /v224 file(s) copied.
Go to the E89DATEN directory and execute the LADEN.BAT script.
Code:
C:>cd X:E89DATENX:E89DATEN>laden.bat
You’ll receive errors at the end of the script due to the missing C:EC-APPSCARSERVER directory, ignore them.
Install the patched 32-bit NCS Expert from this thread:
http://www.e90post.com/forums/showthread.php?t=832476
Example:
Code:
rename C:NCSEXPERBINNCSEXPER.EXE NCSEXPER.OLDrename C:NCSEXPERCFGDATNCSEXPER.TXT NCSEXPER.GERcopy NCSEXPER.EXE C:NCSEXPERBIN /vcopy NCSEXPER.TXT C:NCSEXPERCFGDAT /v
Copy the NCS Expert profiles to the C:NCSEXPERPFL folder.
Example:
Code:
copy *.PFL C:NCSEXPERPFL /v
Your done, enjoy!
Method 2 work on Win7 64 bit
This method share by sergeantash on bimmerforums.co.uk forum
I have been trying to find clear instructions on how to achieve this installation successfully over the past few months, I kept giving up due to confusion, frustration, misleading threads and bad information. However, after much research, I have finally got it working and hope to help others searching for solutions. I can’t guarantee that this is absolutely perfectly described but the process below worked in my case, hopefully it’ll get you up and running too.
My specific use is to diagnose codes on my E46 M3 (2004) and so I can confirm that it works fully with this car. If someone wishes to take screenshots, I’ll add them to the guide.
Assumptions and Clarifications
This setup/installation DOES work on Windows 7 64bit.
This setup/installation DOES NOT require VM/Virtual Machine images.
This setup/installation DOES work on an E46 (my car).
This setup/installation DOES give you INPA and EDIABAS 6.4.7 and 5.0.2.
This setup/installation DOES NOT give you NCS Expert or anything other than above mentioned.
This guide assumes that you have a basic knowledge of Windows, Control Panel and Device Manager.
1. Buy a cable
I purchased a USB cable from EBay, it came with software but I didn’t use it and instead used online resources that I downloaded for which I’ll provide links. The cable I purchased is a USB to OBD2 connector that plugs into your BMW to the right hand side of the steering wheel, in the foot-well area.
This is the specific cable that I purchased and that I can confirm works:
BMW Diagnostic Software Cable lead Ediabas Inpa
2. Download the software
There are many sources on the internet for INPA/EDIABAS, some seem to work, others do not – I used these specific downloads and they worked perfectly:
** UNFORTUNATELY THE DOWNLOAD LINKS ARE NO LONGER AVAILABLE – BUT I WILL SEE WHAT I CAN DO **
If for any reason the above links are missing/broken, PM me and I’ll see what I can do. Thank you to whomever is hosting the above files and I hope that you do not mind me providing these links.
3. Setup/Configure your OBD2 USB Cable
Put the DVD that arrived with the cable into the DVD drive on your PC.
Plug in the cable into a USB port on your computer, you must ONLY use this USB port from here-on for this cable. If your computer is connected to the internet it should automatically search and install in the USB cable drivers. If your computer does NOT automatically detect the cable, you may need to use ‘Device Manager’ to manually update/select the driver.
Once installed, go to Control Panel -> System -> Then click on the Hardware tab, then click on Device Manager.
Locate the entry ‘USB Serial Port’ in the ‘Ports’ section of Device Manager. It should read ‘USB Serial Port (COMX)’.
Right-click on the above and select ‘Properties’, then click on the ‘Port Settings’ Tab and then click on ‘Advanced’.
Change the ‘Com Port Number’ entry to ‘COM1’.
Change the ‘Latency Timer (msec)’ to ‘1’.
Click on ‘OK’ and close all the windows, restart your PC to confirm all the changes.
4. Install INPA/EDIABAS 6.4.3 and 4.4.7
Extract the contents of the downloaded file ‘INPA-6.4.3-full.rar’ and you’ll find a .NRG file. This is a CD image that you’ll need to either burn to a CD or extract to a folder using a tool such as ISOBuster.
Once extracted, go into the following folder ‘/REFERENZ/INSTALL/’, right-click on ‘INSTPROG.exe’ and select ‘Properties’, click on the Compatibility tab and change the dropdown to Windows XP SP3 as the Compatibility Mode, also tick ‘Run As Administrator’, then click ‘Ok’, then double-click the file to run the installation.
Select ‘English’ as the language and click ‘Next’.
Select ‘Next’ until asked for ‘Configuration’, scroll to ‘BMW Group Rectification Programs UK’, click ‘Next’.
Tick the option ‘Complete’ for all of the options shown.
Select ‘Next’ and allow the installation to start.
After a minute or so, installation will complete, close the Window.
5. Verify environment variables
Go into Control Panel -> System -> Advanced System Settings.
Select ‘Environment Variables’ and then verify that the System Variables ‘TMP’ and ‘TEMP’ both contain the path ‘C:EDIABASBin’ within the ‘Value’ string – for instance “C:WindowsTemp;C:EDIABASBin”.
6. Prepare Installation Files
Extract the contents of the downloaded file ‘INPA_502_Updated.rar’.
You’ll use the contents of this archive during the next three steps.
7. Install BMW Tools
From the above extracted file set, find the file ‘Step 1_ Install BMW Tools.exe’, right-click on it and select ‘Properties’.
Click on the Compatibility tab and change the dropdown to Windows XP SP3 as the Compatibility Mode, also tick ‘Run As Administrator’, then click ‘Ok’
Double-click on the above file to start the installation.
Set the Destination Path C:BMW Tools (Don’t change this path) -> ‘Install’ -> ‘OK’.
Select ‘English’ -> ‘Continue’ -> ‘Continue’.
Select ‘C:’ -> ‘Continue’.
Select ‘Skip’ -> ‘Next’
Accept the defaults for programs to update, then click ‘Next’.
Select ‘Com1’, ‘OBD’ and ‘USB to Serial Adapter’ -> ‘Continue’ -> ‘Continue’.
The installation will begin and complete.
8. Install INPA/EDIABAS 6.4.7 and 5.0.2
From the above extracted file set, double-click the file ‘Step 2_ Install INPA.exe’.
The Destination Path should be ‘C:temp’, leave as it is and click ‘Next’.
Choose ‘English’ and select ‘Continue’ and ‘Continue’.
Select ‘C:’ and then ‘Continue’.
Select ‘BMW Group Rectification Programs UK’ and click ‘Continue’.
Tick ‘Update’ for all options where not grayed out, then ‘Continue’.
Select ‘OBD’, then ‘Continue’ and ‘Continue’.
The installation will begin and complete.
9. Install OBD Setup
From the above extracted file set, double-click the file ‘Step 3_Final Update.exe’.
The Destination Path should be left as it is, then select ‘Install’.
Select ‘Yes to all’.
Once completed, the window will close itself.
10. Complete Installation
From the above extracted file set, double-click the file ‘serial port.reg’.
When prompted, select ‘Yes’ and ‘Yes’. You will receive confirmation that your registry has been updated.
Locate the file ‘C:EDIABASBinobd.ini’ and copy this file into your Windows folder.
Edit the file ‘C:EC-APPSINPACFGDATINPA.INI’ in Notepad, locate the section that starts with ‘//F3’, remove the slashes at the beginning of the three lines of text, and amend any instance of ‘F10’ to ‘E46’.
In theory, you’ll now have an INPA icon on your desktop and Start Menu – right-click on it, select ‘Troubleshoot Compatibility’, it’ll select ‘Windows XP SP3’, click ‘Next’ and ‘Save’. This step isn’t necessarily required, however it apparently provides a little more stability for the application.
Now, with your interface connected via the USB port (remember NOT to plug the cable into any port other than the port that you originally configured the cable with) – and the other end connected to your car, fire up INPA and hopefully you’ll have a working diagnosis tool
Apologies for any inaccuracies, please do PM me and I’ll make corrections, but to my knowledge the above is the exact process that I used to get mine up and running.
Finally, I’d like to thank FAL for his help/assistance with getting my setup fully working
Procedures of BMW INPA Install on WIN10:
Method 1:
INPA/EDIABAS Windows 10 64-bit Installation Guide
share by perishalive92 from bimmerforums.com
NOTE: I am NOT responsible for any damage YOU do to your car or computer. INPA will work with few select things for an E38 such as restting adaptations, diagnostics, code reading, etc. NCS Expert will NOT run on a 64-bit operating syetm. If you have a 32-bit version of Windows 10, please feel free to try ECS Expert and let me know if it works!
I have NOT tried INPA with any other bmw models. Please feel free to comment your success on other models!!
Should you get ANY errors or pop-ups during any phase of the installation, ignore them. INPA will still install.
Pre-Installation
1.Download all required files and programs,as listed below. Also you should have the K+DCAN cable in your posession(link provided below).
2.Extract the INPA.rar to your desktop. You will be left with INPA folder.
3.Extract INPAcable.rar to your desktop. You will be left with INPA cable folder.
Installation – Phase 1
1.Open INPA cable folder and move the top four folders (step1, step2, step3 and driver) to Windows(C folder of your PC.
2.Whilst in Windows(C, open 01_Step1 folder and copy EC-APPS over to your Windows(C drive.
3.Go back to 01_Step1 folder and open the NFS folder. Open Entpackt folder. Open disk 1, find SETUP.exe and right-click it. Goto Properties/Compatibility and set it to run in compatibilty mode for Windows XP (Service Pack 3). Also, check the box for Run as Administrator. Hit Apply then Ok.
4.Double-click SETUP.exe to launch.
5. Once window pops up, select Windows XP. Click Weiter (it means Next).
6.Click Weiter 3 more times. Make sure User Mode is selected. Click weiter.
7.Make sure top choice is selected (1 Parametri……). Click Weiter.
8.Ensure OBD is selected. Press weiter. Ensure Kein API-TRACE. Click weiter. Ensure Kein IFH-TRACE is selected. Click weiter.Ensure Komfort(.IPO) is selected. Press weiter.
9.Press OK. Let install. Press ok, and again. Press any key to continue.
10.Select Ja,Computer jetzt neu starten. Click Breeden. This will restart your PC as needed.
Phase 2
1.Goto Windows(C/02_Step_2/INSTALL and right click on Instprog. Set it up to run in compatibility mode as mentioned in Phase1, step 3. Then double-click to launch.
2.Press OK if prompted. Select Enlgish then press weiter.
3.Press continue and continue again. Ensure destination is under C:
4. Press continue. Select BMW Group Rectification programs UK. (NOT USA) Press continue.
5.Check off all white boxs. There will be 2 update and 1 complete that needs to be checked. Press continue, and again. You may get error. ignore it. Otherwise, press End.
6.Restart your PC once more manually.
Phase 3
1.Goto Windows(C/03_Step_3/INSTALL and right click on Instprog. Set it up to run in compatibility mode as mentioned in Phase1, step 3. Then double-click to launch.
2.Press OK if prompted. Select Enlgish then press weiter.
3.Press continue and continue again. Ensure destination is under C:
4. Press continue. Select BMW Group Rectification programs UK. (NOT USA) Press continue.
5.Under INPA 5.0.1, check off Update. Under NCS Expert 3.0.8, check off Complete. Press continue.
6.Click on Rename. In the box, type the number 1 and press continue, and again. You might gett error. Ignore it. IF prompted, press End.
Phase 4
1.Plug in your K+DCAN cable. You will from now on use ONLY that port.
**Windows 10 will autoatically update the driver IF needed. Windows 10 also already has a serial function. This is all we need to modify.**
2.In your search box (lower left of screen next to Windows button), type “Device Manager”. Click on the top option.
3.Once in Device Manager, locate Ports(COM & LPT) and click on the little plus sign next to it. It should now show USB Serial Port (COMx) under Ports(COM & LPT). **The little ‘x’ is in place of whatever number you have the cable plugged into).
4.Right-click on USB Serial Port (COMx) and click Properties.
5.Goto Port Settings tab. Click Advanced. Change the COM Port Number to COM1.
6.Change Latency Timer from 16 to 1. Press ok. Press ok again. Close Device Manager.
7.Goto Windows(C/Driver_D_CAN_USB and double-click OBDSetup.exe. Press Enter.
Phase 5
1.Go into Control Panel/System/Advanced System Settings/Environment Variables.
2.Ensure that System Variables TMP and TEMP both contain the path C:EDIABASBin.
3.If not, manually add it in. Example: C:WindowsTemp;C:EDIABASBin
4.the ‘;’ is important to seperate paths. Please ensure you put that in there then add in the rest.
Phase 6
1.From Desktop, open INPA folder then open the second INPA folder. Right click on Step_1_Install_BMW_Tools and click Poperties. Goto Compatibilty and run the program in compatibility mode for Windows 7. Also, run as administrator. Click Apply then ok. Doulbe-click to launch.
2.Enusre destination path is C:BMW Tools , if it is not change it to that.
3.Press Install. You will get an error. Press ok.
4.Goto Windows(C/BMW Tools/Programminstallation and right-click on setup.exe. Set it up for compatibility mode as stated in Phase 1, step 3.
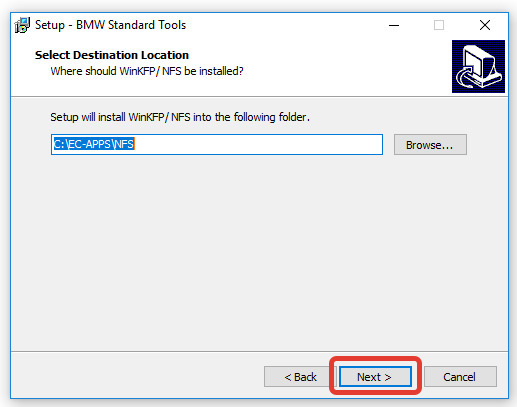
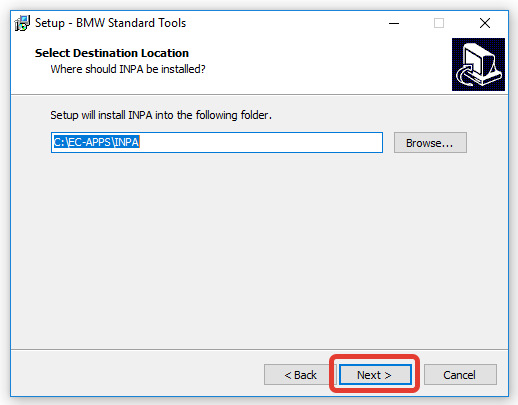
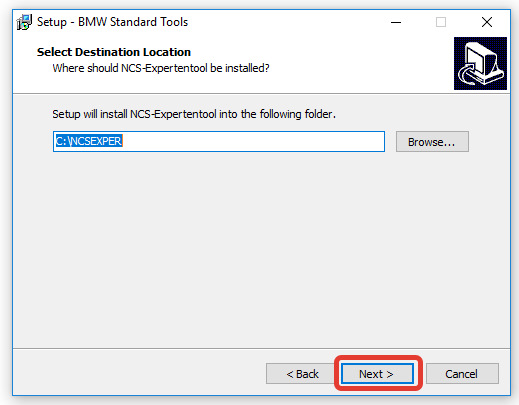
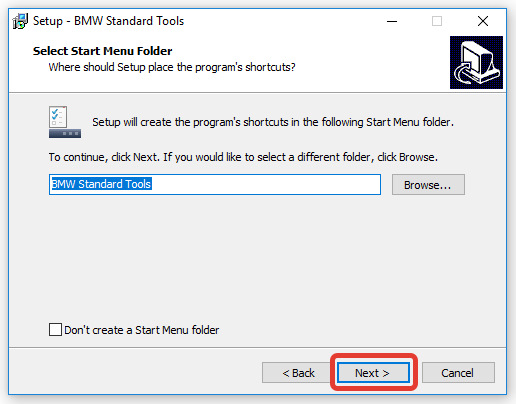
5.double-click to launch. Select English, press ok. Press Next. Accept and press next. Press next again and again.Ensure the installation destination is C:EDIABAS, click next.Ensure installation destination is C:EC-APPSNFS,click next.Ensure installation destination is C:EC-APPSINPA, click next.Ensure installation destination is C:NCSEXPER, click next.Ensure start menu folder is BMW Standard Tools. click next.
6.You do NOT have to perform the data backup if not desired. I didn’t. Uncheck box if not wanting data backup and click next.Ensure hardware-interface setting is STD:OBD and click next.Ensure COM port for serial OBD is Com1. Check the box for USB to serial adapter. click next. Click Install. If any errors, ignore them.
Phase 7
1.Goto Desktop/INPA/INPA and right-click the file ‘Step 2_ Install INPA.exe’.Set up for compatibility as mentioned in Phase 6,step 1.
2.The Destination Path should be ‘C:temp’, leave as it is and click ‘Next’.
3.Choose ‘English’ and select ‘Continue’ and ‘Continue’.
4.Select ‘C:’ and then ‘Continue’.
5.Select ‘BMW Group Rectification Programs UK’ and click ‘Continue’.
6.Tick ‘Update’ for all options where not grayed out, then ‘Continue’.
7.Select ‘OBD’, then ‘Continue’ and ‘Continue’.
8.The installation will begin and complete.
Phase 8
1.Goto Desktop/INPA/INPA and right-click the file ‘Step 3_ Final Update.exe’.Set up for compatibility as mentioned in Phase 6,step 1.
2.The Destination Path should be left as it is, then select ‘Install’.
3.Select ‘Yes to all’.
4.Once completed, the window will close itself.
Phase 9
1.Goto Desktop/INPA/INPA and double-click the file ‘serial port.reg’.
2.When prompted, select ‘Yes’ and ‘Yes’. You will receive confirmation that your registry has been updated.
3.Locate the file ‘C:EDIABASBinobd.ini’ and copy this file into your Windows folder.
4.Edit the file ‘C:EC-APPSINPACFGDATINPA.INI’ in Notepad, locate the section that starts with ‘//F3’, remove the slashes at the beginning of the three lines of text, and amend any instance of ‘F10’ to ‘E46’.
**Step 4 is only needed if you are working on an E46. Otherwise, ignore this step!
In theory, you will not have INPA on your desktop. Right-click it and set up compatibility mode as mentioned in Phase 1, step 3. Double click to launch.
Method 2:
Install the drivers for INPA K+D-CAN cable (version with FTDI FT232RL chip only).
Disconnect from the Internet because it is possible that the drivers are installed from Windows Update (if you want to use the latest home FTDICHIP then disconnect or reinstall) why run the executable CDM 21216_setup.exe; It is compatible with 64-bit versions of Windows 7, If necessary, you can download the latest version according to the OS on the siteFTDICHIP
http://www.ftdichip.com/Drivers/VCP.htm
This is an interface / cable VCP (Virtual COM Port) so there are two features and therefore an installation in 2 phases if done manually
1 – Cable driver
2 – VCP driver if using the automatic executable (.exe) offered on the site, then the 2 self install a result it’s easier and without going through the Device Manager => then plug the INPA cable into a USB port NOTE WELL PORT IDENTIFY THIS CAR ALONE WILL WORK AFTER SETTING IT WILL THEREFORE ALWAYS CONNECT THE CABLE ON THE PORT in Device Manager there will be a new entry: “COM and LPT ports” / sérial USB Port (COM3) eg for now Then you must configure the port that will emulate the virtual COM port 9 (eg. Default for Ediabas 7.3 patched) but it’s tune to your install Open Device Manager, choose COM Ports / USB serial port / port settings / advanced / set “COM 9” and the latency to “1” finally install BMW Standard Tools, all versions are not compatible with win 7 and 64-bit architectures, so use the BMW STD Tools version 2.12, which includes a recent version INPA 5.0.6 and 7.3.0 Ediabas.
(Visited 3,723 times, 1 visits today)
- Гаджет72.Ру
- Полезности

- Диагностическое оборудование
- BMW INPA 5.0.2 на русском языке

07 окт2017
BMW Standard Tools (INPA)
Установка последней доступной версии BMW Standard Tools 2.12, включающую Ediabas 7.3.0. Через эти программы можно читать и кодировать самые новые машинки, наряду со старыми. Для INPA и NCSExpert есть примитивные русификаторы.
1. Ссылка на скачивание: http://rutracker.org/forum/viewtopic.php?t=4336534 (не забудьте включить аномайзер, в google chrome дополнение Browsec)
Получаем папку INPA. В ней содержится много всего, понять где и что расположено непросто. Автор раздачи собрал в нее много разных версий программ, инструкций, написал свои пояснения «читаем.txt». Советую посмотреть на структуру папок, почитать вложенные инструкции, чтобы получить общее представление о том, что мы сейчас будем делать. Или скачать с нашего сайта конкретно для этой иструкции (ничего лишнего) — ссылка . Распаковать архив и далее по инструкции.
2. Запускаем INPAStandard_Tools_Setup 2.12Standard_Tools_Setup_2.12.exe. Устанавливаем с настройками по умолчанию. После окончания установки заменяем файл C:NCSEXPERBINNCSEXPER.exe одноименным файлом из папки. На 32 и 64 битах эта новая версия работает одинаково хорошо.
3. Итак, оболочка программ установлена, можно наполнять их данными.
Наполняем INPA.
Находим файл INPABMWGROUP.ENG.iso. Распаковываем его архиватором, например, WinRar. Получаем одноименную папку.
Теперь идем в в эту папку — INPABMWGROUP.ENG.
— Папку CFGDAT — копируем в C:EC-APPSINPA
— В папке BMWGROUP.ENG есть файлик INPA.ini — копируйте в C:EC-APPSINPACFGDAT
— Из папки BMWGROUP.ENGENGLISH IPO — все файлики копируй в C:EC-APPSINPASGDAT
— Из папки BMWGROUP.ENGENGLISH SGBD все файлы в C:EDIABASEcu
Наполняем NCSExpert. Идем в папку INPAISTAP 2.45 для обновления NCS Inpa, полученную распаковкой одноименного .iso файла.
— Идем в папку ECU и копируем файлы в /ediabas/ecu (замещаем существующие файлы новыми).
— Идем в папку sgdat и копируем все файлы в /NCSEXPER/SGDAT (замещаем существующие файлы новыми).
— Идем в папку Daten и копируем все содержимое /NCSEXPER/DATEN
— Можно обновить данные до еще более новой версии, если будем использовать NCS с машинками еще моложе. Идем в папку INPAISTA 2_48_0 NCS INPA и копируем папки оттуда в /NCSEXPER/DATEN/
Для удобства работы можно менять язык меню NCS и INPA. Идем в папку INPAINPA_RUINPA RUS.
Для NCS:
— Копируем файлик NCSEXPER.TXT в папку C:NCSEXPERCFGDAT. Лично я нашел в интернете перевод меню на английский. Если кому нужен NCSEXPER.TXT на англ., пишите, могу скинуть.
Для руссификации INPA:
— Папку BIN копируем сюда c:EC-APPSINPA с полной заменой всех файлов
— Папку CFGDAT копируем сюда c:EC-APPSINPA с полной заменой всех файлов
— Папку SGDAT копируем сюда c:EC-APPSINPA с полной заменой всех файлов
4. Качаем и устанавлеваем драйверы шнурка отсюда (WIN 7, 8, 10 x32 и x64): ссылка
5. Теперь настраиваем порт. В том же диспетчере устройств вызываем свойства порта и устанавливает COM1.


Вообще, можно выбирать любой номер порта. Главное, чтобы здесь в настройках и при установке Standard Tools были указаны одинаковые значения. У меня при установке программы был выбран COM1, он не был занят, поэтому в настройках я выбрал тоже COM1.
6. Теперь идем в C:EDIABASBIN, находим файлик obd.ini и копируем его в C:Windows.
Готово к использованию!
Источник: https://www.drive2.ru/l/3371935/
Приветствую! Почитал пару дней, не судите строго, постарался минимально решить задачу установки inpa и dis на 10ке, так сказать для совсем ленивых и незнающих (т.е. для себя)…

Собственно, что надо знать:
Ediabas — программная шина от bmw, позволяющая совмещать работу с различными интерфейсами (Dcan, OBD, ADS…) на одном ПО (inpa, DIS…)
ifhsrv32 — Лан сервис (не вникал особо, но для того чтобы увидеть адаптер в дисе, он необходим)
ebasx32 — сам сервер ediabas, осуществляющий обмен между ПО и мозгами автомобиля.
Как ни пытался, полноценно запилить INPA на чистую 10ку — не получилось (также как и увидеть адаптер без Diaghead). На виртуалке вопрос решился за 1 час.
1 — Инструкция
https://drive.google.com/open?id=0B1P0w … nNIa0xSUUE
2 — For10 (собственно чем пользовался)
https://drive.google.com/file/d/0B1P0w5 … 3R3X3A5NWs
3 — Виртуальная машина inpa
https://drive.google.com/file/d/0B1P0w5 … W5aS1o3Q3M
4 — Виртуальная машина DIS
https://drive.google.com/file/d/0B1P0w5 … UNvYUswbmM
Пароли от архивов в инструкции=))) По мере возникновения косяков постараюсь помочь)
Устанавливал всё на ноутбуке, протестил на компьютере, все работает… Занимает всё про всё ну максимум час-полтора…
Удачи 