Kafka is a distributed event streaming platform that can be used for high-performance streaming analytics, asynchronous event processing and reliable applications. This article provides step-by-step guidance about installing Kafka on Windows 10 for test and learn purposes.
Install Git Bash
Download Git Bash from https://git-scm.com/downloads and then install it. We will use it to unzip Kafka binary package. If you have 7-zip of other unzip software, this is then not required.
Install Java JDK
Java JDK is required to run Kafka. If you have not installed Java JDK, please install it.
1) You can install JDK 8 from the following page:
https://www.oracle.com/technetwork/java/javase/downloads/jdk8-downloads-2133151.html
2) Setup environment variable
Let’s configure JAVA_HOME environment variable.
First, we need to find out the location of Java SDK. In my system, the path is: D:Javajdk1.8.0_161.
Your location can be different depends on where you install your JDK.
And then run the following command in PowerShell window:
SETX JAVA_HOME "D:Javajdk1.8.0_161"
Remember to quote the path if you have spaces in your JDK path.
3) Add Java bin folder into PATH system variable.

4) Verify java command
Once you complete the installation, please run the following command in PowerShell or Git Bash to verify:
$ java -version
java version "1.8.0_161"
Java(TM) SE Runtime Environment (build 1.8.0_161-b12)
Java HotSpot(TM) 64-Bit Server VM (build 25.161-b12, mixed mode)
Download Kafka binary package
1) Go to Kafka download portal and select a version. For this tutorial, version Scala 2.13 — kafka_2.13-2.6.0.tgz is downloaded.
2) Unzip the binary package to a installation folder.
Now we need to unpack the downloaded package using GUI tool (like 7 Zip) or command line. I will use git bash to unpack it.
Open git bash and change the directory to the destination folder:
cd F:/big-data
And then run the following command to unzip:
tar -xvzf kafka_2.13-2.6.0.tgz
Most of the scripts that we need to run in the following steps are located in bin/windows folder as the screenshot shows:
3) Setup Kafka environment variable.
Let’s add a environment variable KAFKA_HOME so that we can easily reference it in the following steps.
Remember to change variable value accordingly based on your environment setup.
Start Kafka environment
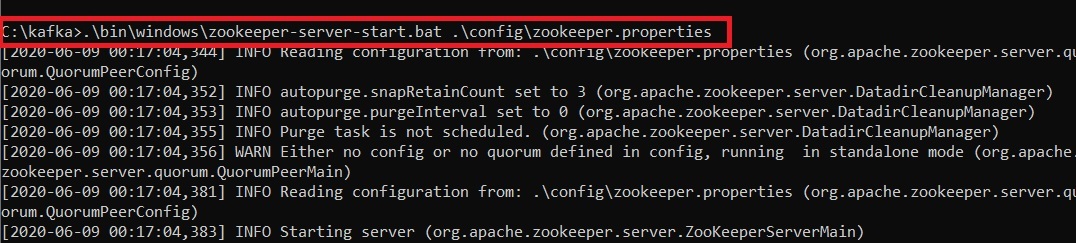
1) Open Command Prompt and start ZooKeeper services by running this command:
%KAFKA_HOME%/bin/windows/zookeeper-server-start.bat %KAFKA_HOME%/config/zookeeper.properties
In this version, ZooKeeper is still required.
2) Start Kafka server
Open another Command Prompt window and run the following command:
%KAFKA_HOME%/bin/windows/kafka-server-start.bat %KAFKA_HOME%/config/server.properties
Once all the services are launched, you will have a Kafka environment ready to use.
You can verify by running jps commands (if you have Hadoop installed in your environment):
Let’s run some tests about Kafka environment.
Create a Kafka topic
Open another Command Prompt window and run the following command:
%KAFKA_HOME%/bin/windows/kafka-topics.bat --create --topic kontext-events --bootstrap-server localhost:9092
The command will create a topic named kontext-events as the above screenshot shows.
Describe Kafka topic
Run the following command to describe the created topic.
%KAFKA_HOME%/bin/windows/kafka-topics.bat --describe --topic kontext-events --bootstrap-server localhost:9092
The output looks like the following:
Topic: kontext-events   PartitionCount: 1       ReplicationFactor: 1    Configs: segment.bytes=1073741824
        Topic: kontext-events   Partition: 0    Leader: 0       Replicas: 0     Isr: 0
Write some events into the topic
Let’s start to write some events into the topic by running the following command:
%KAFKA_HOME%/bin/windows/kafka-console-producer.bat --topic kontext-events --bootstrap-server localhost:9092
Each time represents an event. Let’s type into some events:
Press Ctrl + C to terminate this Console producer client.
Read the events in the topic
Let’s read the events by running the following command:
%KAFKA_HOME%/bin/windows/kafka-console-consumer.bat --topic kontext-events --from-beginning --bootstrap-server localhost:9092
The Console consumer client prints out the following events:
Press Ctrl + C to terminate the consumer client.
Shutdown Kafka services
After finish practices, you can turn off the series by running the following commands:
%KAFKA_HOME%/bin/windows/kafka-server-stop.bat %KAFKA_HOME%/config/server.properties
%KAFKA_HOME%/bin/windows/zookeeper-server-stop.bat %KAFKA_HOME%/config/zookeeper.properties
The output looks like the following screenshot:
References
- Apache Kafka Quick Start
As you can see, it is very easy to configure and run Kafka on Windows 10. Stay tuned and more articles will be published about streaming analytics with Kafka in this Column.
Apache Kafka is an open-source application used for real-time streams for data in huge amount. Apache Kafka is a publish-subscribe messaging system. A messaging system lets you send messages between processes, applications, and servers. Broadly Speaking, Apache Kafka is software where topics can be defined and further processed.
Downloading and Installation
Apache Kafka can be downloaded from its official site kafka.apache.org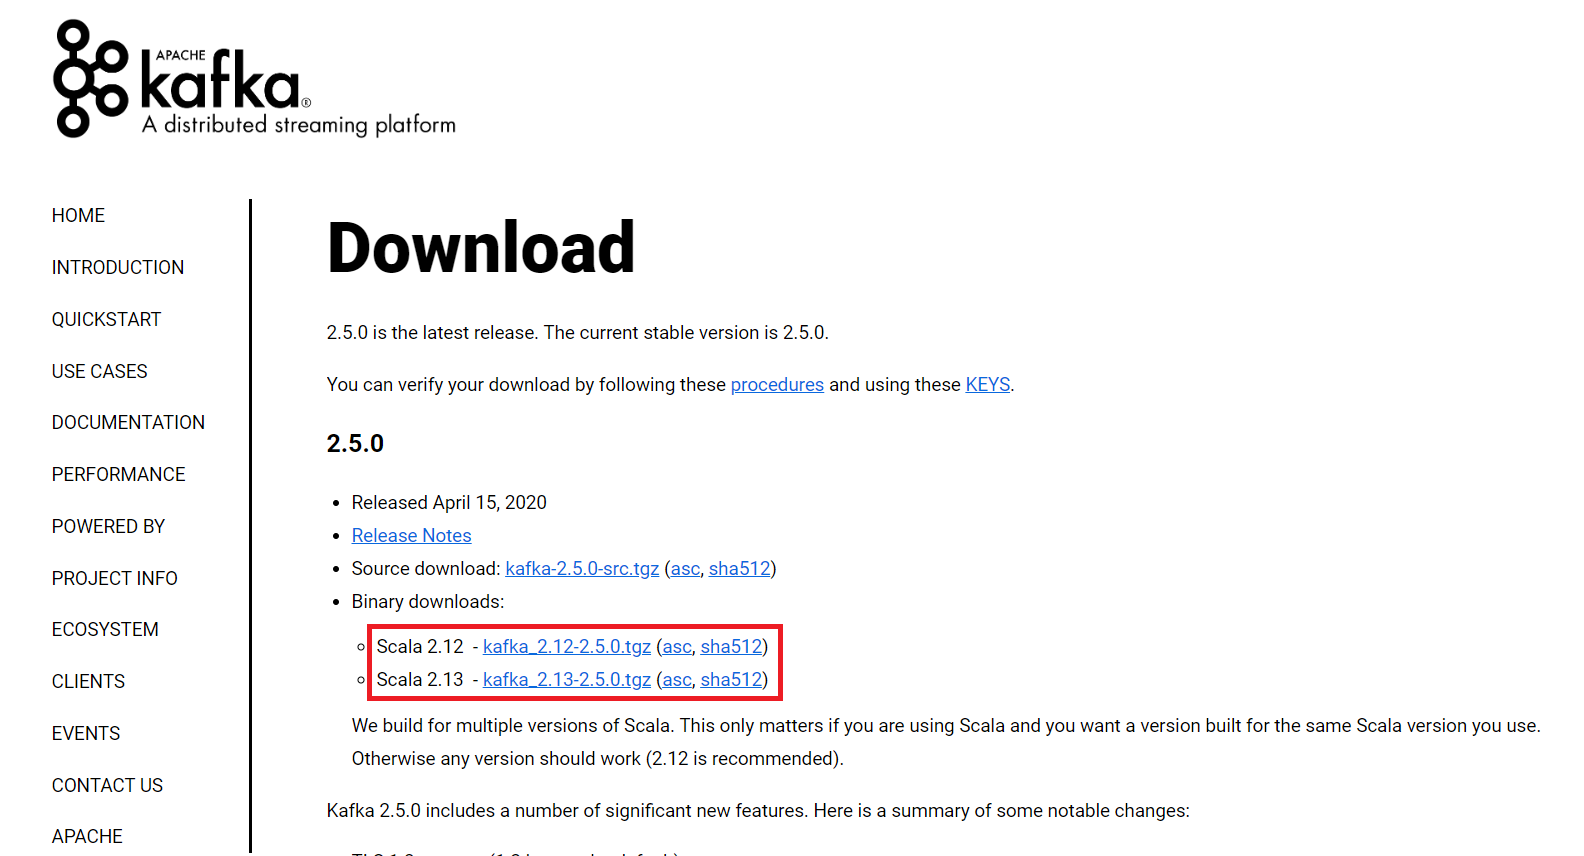
For the installation process, follow the steps given below:
Step 1: Go to the Downloads folder and select the downloaded Binary file.
Step 2: Extract the file and move the extracted folder to the directory where you wish to keep the files.
Step 3: Copy the path of the Kafka folder. Now go to config inside kafka folder and open zookeeper.properties file. Copy the path against the field dataDir and add /zookeeper-data to the path.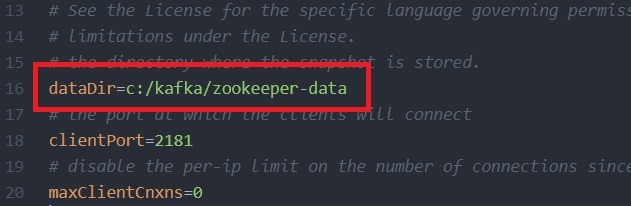
For example if the path is c:/kafka
Step 4: Now in the same folder config open server.properties and scroll down to log.dirs and paste the path. To the path add /kafka-logs
Step 5: This completes the configuration of zookeeper and kafka server. Now open command prompt and change the directory to the kafka folder. First start zookeeper using the command given below:
.binwindowszookeeper-server-start.bat .configzookeeper.properties
Step 6: Now open another command prompt and change the directory to the kafka folder. Run kafka server using the command:
.binwindowskafka-server-start.bat .configserver.properties

Now kafka is running and ready to stream data.
Apache Kafka is an open-source application used for real-time streams for data in huge amount. Apache Kafka is a publish-subscribe messaging system. A messaging system lets you send messages between processes, applications, and servers. Broadly Speaking, Apache Kafka is software where topics can be defined and further processed.
Downloading and Installation
Apache Kafka can be downloaded from its official site kafka.apache.org
For the installation process, follow the steps given below:
Step 1: Go to the Downloads folder and select the downloaded Binary file.
Step 2: Extract the file and move the extracted folder to the directory where you wish to keep the files.
Step 3: Copy the path of the Kafka folder. Now go to config inside kafka folder and open zookeeper.properties file. Copy the path against the field dataDir and add /zookeeper-data to the path.
For example if the path is c:/kafka
Step 4: Now in the same folder config open server.properties and scroll down to log.dirs and paste the path. To the path add /kafka-logs
Step 5: This completes the configuration of zookeeper and kafka server. Now open command prompt and change the directory to the kafka folder. First start zookeeper using the command given below:
.binwindowszookeeper-server-start.bat .configzookeeper.properties
Step 6: Now open another command prompt and change the directory to the kafka folder. Run kafka server using the command:
.binwindowskafka-server-start.bat .configserver.properties
Now kafka is running and ready to stream data.
Это вводная статья по использованию Apache Kafka со Spring Boot. О том, как установить и запустить Apache Kafka на Windows, создать топик и отправить туда первое событие из одного Spring Boot приложения. А получить его из другого Spring Boot приложения.
Kafka запускается в ZooKeeper, но отдельно скачивать ZooKeeper не нужно, он идет вместе с Kafka.
Как запустить Kafka под Windows 10
- Сначала нужно загрузить и распаковать tgz-архив.
- Нужно переименовать папку вида kafka_2.13-2.7.0 — дать более короткое имя, например kafka, иначе возникнут проблемы при запуске из консоли
- Открыть Windows PowerShell (либо командную строку cmd.exe, неважно)
- Перейти в переименованную папку kafka (внутри будут папки bin, config и другие папки и файлы)
- Запустить ZooKeeper, набрав в консоли:
.binwindowszookeeper-server-start.bat .configzookeeper.properties
- Открыть вторую консоль, перейти в ту же переименованную папку kafka и запустить Kafka:
.binwindowskafka-server-start.bat .configserver.properties
Все, Apache Kafka запущен.
Теперь в нем можно создавать топики — как из консоли, так и из Spring Boot. Мы сделаем это из Spring Boot.
У нас будет два Spring Boot приложения. Они совершенно независимы друг от друга. Одно приложение будет отправлять событие в топик (это приложение Producer), а второе — получать их из топика (приложение Consumer).
Mаven-зависимость
Чтобы работать с Kafka, оба приложения (как Producer, так и Consumer) должны иметь зависимость:
<dependency>
    <groupId>org.springframework.kafka</groupId>
    <artifactId>spring-kafka</artifactId>
</dependency>
Spring Boot Producer
Выглядит приложение просто:
@SpringBootApplication
public class ProducerApplication {

    public static void main(String[] args) {
        SpringApplication.run(ProducerApplication.class, args);
    }
    @Bean
    public NewTopic topic() {
        return TopicBuilder.name("topic1")
                .partitions(10)
                .replicas(1)
                .build();
    }

    @Bean
    public ApplicationRunner runner(KafkaTemplate<String, String> template) {
        return args -> {
            template.send("topic1", "test");
        };
    }
}
Бин topic типа NewTopic создает топик topic1, если его нет.
KafkaTemplate отправляет события в топик topic1. У нас это всего одна строка — test.
Перейдем к созданию второго приложения, которое получает события из Kafka.
Spring Boot Consumer
Это приложение слушает топик topic1:
@SpringBootApplication
public class Application {

    public static void main(String[] args) {
        SpringApplication.run(Application.class, args);
    }

    @Bean
    public NewTopic topic() {
        return TopicBuilder.name("topic1")
                .partitions(10)
                .replicas(1)
                .build();
    }

    @KafkaListener(id = "myId", topics = "topic1")
    public void listen(String in) {
        System.out.println(in);
    }

}
Если в топик приходит событие, то оно выводится в консоль.
То есть в консоль будет выведена одна строка:
test
Приложение Spring Boot Producer завершилось быстро, а Spring Boot Consumer висит и слушает топик. Можно запустить Spring Boot Producer еще раз, тогда в консоли Spring Boot Consumer снова будет выведена строка:
test
Итоги
Код примеров доступен на GitHub.
Источники:
- Spring for Apache Kafka
- https://kafka.apache.org/intro