Table Of Contents
- Installing Kivy
- Using pip
- Setup terminal and pip
- Create virtual environment
- Install Kivy
- Pre-compiled wheels
- From source
- Pre-release, pre-compiled wheels
- Development install
- Checking the demo
- Installation using Conda
- Installing Kivy’s dependencies
- Python glossary
- Installing Python
- How to use the command line
- What is pip and what are wheels
- What are nightly wheels
- Using pip
Installation for Kivy version 2.1.0. Read the changelog here.
For other Kivy versions, select the documentation from the dropdown on the top left.
Kivy 2.1.0 officially supports Python versions 3.7 — 3.10.
|
|
Platform |
Installation |
Packaging |
|---|---|---|---|
|
|
Windows |
pip |
PyInstaller |
|
|
macOS |
pip, Kivy.app |
Kivy.app, PyInstaller |
|
|
Linux |
pip, PPA |
— |
|
|
RPi |
pip |
— |
|
|
Android |
python-for-android |
python-for-android |
|
|
iOS |
kivy-ios |
kivy-ios |
|
|
Anaconda |
conda |
— |
.svg)

Using pip
The easiest way to install Kivy is with pip, which installs Kivy using either a
pre-compiled wheel, if available, otherwise from source (see below).
Kivy provides pre-compiled wheels for the supported Python
versions on Windows, macOS, Linux, and RPi. Alternatively, installing
from source is required for newer Python versions not listed
above or if the wheels do not work or fail to run properly.
Setup terminal and pip
Before Kivy can be installed, Python and pip needs to be pre-installed.
Then, start a new terminal that has
Python available. In the terminal, update pip and other installation
dependencies so you have the latest version as follows (for linux users you may have to
substitute python3 instead of python and also add a --user flag in the
subsequent commands outside the virtual environment):
python -m pip install --upgrade pip setuptools virtualenv
Create virtual environment
Create a new virtual environment
for your Kivy project. A virtual environment will prevent possible installation conflicts
with other Python versions and packages. It’s optional but strongly recommended:
-
Create the virtual environment named
kivy_venvin your current directory:python -m virtualenv kivy_venv
-
Activate the virtual environment. You will have to do this step from the current directory
every time you start a new terminal. This sets up the environment so the newkivy_venv
Python is used.For Windows default CMD, in the command line do:
kivy_venvScriptsactivate
If you are in a bash terminal on Windows, instead do:
source kivy_venv/Scripts/activate
If you are in linux or macOS, instead do:
source kivy_venv/bin/activate
Your terminal should now preface the path with something like (kivy_venv), indicating that
the kivy_venv environment is active. If it doesn’t say that, the virtual environment
is not active and the following won’t work.
Install Kivy
Finally, install Kivy using one of the following options:
Pre-compiled wheels
The simplest is to install the current stable version of kivy and optionally kivy_examples
from the kivy-team provided PyPi wheels. Simply do:
python -m pip install "kivy[base]" kivy_examples
This also installs the minimum dependencies of Kivy. To additionally install Kivy with
audio/video support, install either kivy[base,media] or kivy[full].
See Kivy’s dependencies for the list of selectors.
For the Raspberry Pi, you must additionally install the dependencies listed in
source dependencies before installing Kivy above.
From source
If a wheel is not available or is not working, Kivy can be installed from source
with some additional steps. Installing from source means that Kivy will be installed
from source code and compiled directly on your system.
First install the additional system dependencies listed for each platform:
Windows, macOS,
Linux, RPi.
With the dependencies installed, you can now install Kivy into the virtual environment.
To install the stable version of Kivy, from the terminal do:
python -m pip install "kivy[base]" kivy_examples --no-binary kivy
To install the latest cutting-edge Kivy from master, instead do:
python -m pip install "kivy[base] @ https://github.com/kivy/kivy/archive/master.zip"
If you want to install Kivy from a different branch, from your forked repository, or
from a specific commit (e.g. to test a fix from a user’s PR) replace the corresponding
components of the url.
For example to install from the stable branch, the url becomes
https://github.com/kivy/kivy/archive/stable.zip. Or to try a specific commit hash, use e.g.
https://github.com/kivy/kivy/archive/3d3e45dda146fef3f4758aea548da199e10eb382.zip
Pre-release, pre-compiled wheels
To install a pre-compiled wheel of the last pre-release version of Kivy, instead of the
current stable version, add the --pre flag to pip:
python -m pip install --pre "kivy[base]" kivy_examples
This will only install a development version of Kivy if one was released to
PyPi. Instead, one can also install the
latest cutting-edge Nightly wheels from the Kivy server with:
python -m pip install kivy --pre --no-deps --index-url  https://kivy.org/downloads/simple/
python -m pip install "kivy[base]" --pre --extra-index-url https://kivy.org/downloads/simple/
It is done in two steps, because otherwise pip may ignore the wheels on the server and install
an older pre-release version from PyPi.
For the Raspberry Pi, remember to additionally install the dependencies listed in
source dependencies before installing Kivy above.
Development install
If you want to edit Kivy before installing it, or if you want to try fixing some Kivy issue
and submit a pull request with the fix, you will need to first download the Kivy source code.
The following steps assumes git is pre-installed and available in the terminal.
The typical process is to clone Kivy locally with:
git clone git://github.com/kivy/kivy.git
This creates a kivy named folder in your current path. Next, install the additional
system dependencies listed for each OS: Windows,
macOS, Linux,
RPi.
Then change to the kivy directory and install Kivy as an
editable install:
cd kivy
python -m pip install -e ".[dev,full]"
Now, you can use git to change branches, edit the code and submit a PR.
Remember to compile Kivy each time you change cython files as follows:
python setup.py build_ext --inplace
Or if using bash or on Linux, simply do:
to recompile.
To run the test suite, simply run:
or in bash or Linux:
Checking the demo
Kivy should now be installed. You should be able to import kivy in Python or,
if you installed the Kivy examples, run the demo.
on Windows:
python kivy_venvsharekivy-examplesdemoshowcasemain.py
or in bash, Linux and macOS:
python kivy_venv/share/kivy-examples/demo/showcase/main.py
The exact path to the Kivy examples directory is also stored in kivy.kivy_examples_dir.
The 3d monkey demo under kivy-examples/3Drendering/main.py is also fun to see.
Installation using Conda
If you use Anaconda, you can
install Kivy with its package manager Conda using:
conda install kivy -c conda-forge
Do not use pip to install kivy if you’re using Anaconda, unless you’re installing from source.
Installing Kivy’s dependencies
Kivy supports one or more backends for its core providers. E.g. it supports glew, angle,
and sdl2 for the graphics backend on Windows. For each category (window, graphics, video,
audio, etc.), at least one backend must be installed to be able to use the category.
To facilitate easy installation, we provide extras_require
groups
that will install selected backends to ensure a working Kivy installation. So one can install
Kivy more simply with e.g.«pip install “kivy[base,media,tuio]”«. The full list of selectors and
the packages they install is listed in
setup.py. The exact packages in each selector
may change in the future, but the overall goal of each selector will remain as described below.
We offer the following selectors:
- base: The minimum typical dependencies required for Kivy to run,
not including video/audio.
- media: Only the video/audio dependencies required for Kivy to
be able to play media.
- full: All the typical dependencies required for Kivy to run, including video/audio and
most optional dependencies.
- dev: All the additional dependencies required to run Kivy in development mode
(i.e. it doesn’t include the base/media/full dependencies). E.g. any headers required for
compilation, and all dependencies required to run the tests and creating the docs.tuio: The dependencies required to make TUIO work (primarily oscpy).
The following selectors install backends packaged as wheels by kivy under the Kivy_deps namespace.
They are typically released and versioned to match specific Kivy versions, so we provide selectors
to facilitate installation (i.e. instead of having to do pip install kivy kivy_deps.sdl2==x.y.z,
you can now do pip install "kivy[sdl2]" to automatically install the correct sdl2 for the Kivy
version).
- gstreamer: The gstreamer video/audio backend, if it’s available
(currently only on Windows)
- angle: A alternate OpenGL backend, if it’s available
(currently only on Windows)
- sdl2: The window/image/audio backend, if it’s available (currently only on Windows,
on macOS and Linux it is already included in the main Kivy wheel).
glew: A alternate OpenGL backend, if it’s available (currently only on Windows)
Following are the kivy_deps dependency wheels:
-
gstreamer (optional)
kivy_deps.gstreameris an optional dependency which is only needed for audio/video support.
We only provide it on Windows, for other platforms it must be installed independently.
Alternatively, use ffpyplayer instead. -
glew and/or
anglekivy_deps.glewandkivy_deps.angleare for OpenGL.
You can install both, that is no problem. It is only available on Windows. On other
platforms it is not required externally.One can select which of these to use for OpenGL using the
KIVY_GL_BACKENDenvironment variable: By setting it toglew
(the default),angle_sdl2, orsdl2. Here,angle_sdl2is a substitute for
glewbut requireskivy_deps.sdl2be installed as well. -
sdl2
kivy_deps.sdl2is for window/images/audio and optionally OpenGL. It is only available on Windows
and is included in the main Kivy wheel for other platforms.
Python glossary
Here we explain how to install Python packages, how to use the command line and what wheels are.
Installing Python
Kivy is written in
Python
and as such, to use Kivy, you need an existing
installation of Python.
Multiple versions of Python can be installed side by side, but Kivy needs to
be installed as package under each Python version that you want to use Kivy in.
To install Python, see the instructions for each platform:
Windows, macOS,
Linux, RPi.
Once Python is installed, open the console and make sure
Python is available by typing python --version.
How to use the command line
To execute any of the pip or wheel commands given here, you need a command line (here also called console, terminal, shell or bash, where the last two refer to Linux style command lines) and Python must be on the PATH.
The default command line on Windows is the
command prompt, short cmd. The
quickest way to open it is to press Win+R on your keyboard.
In the window that opens, type cmd and then press enter.
Alternative Linux style command lines on Windows that we recommend are
Git for Windows or Mysys.
Note, the default Windows command line can still be used, even if a bash terminal is installed.
To temporarily add your Python installation to the PATH, simply open your command line and then use the cd command to change the current directory to where python is installed, e.g. cd C:Python37.
If you have installed Python using the default options, then the path to Python will already be permanently on your PATH variable. There is an option in the installer which lets you do that, and it is enabled by default.
If however Python is not on your PATH, follow the these instructions to add it:
-
Instructions for the windows command line
-
Instructions for bash command lines
What is pip and what are wheels
In Python, packages such as Kivy can be installed with the python package
manager, named pip (“python install package”).
When installing from source, some packages, such as Kivy, require additional steps, like compilation.
Contrary, wheels (files with a .whl extension) are pre-built
distributions of a package that has already been compiled.
These wheels do not require additional steps when installing them.
When a wheel is available on pypi.org (“Python Package Index”) it can be installed with pip. For example when you execute python -m pip install kivy in a command line, this will automatically find the appropriate wheel on PyPI.
When downloading and installing a wheel directly, use the command
python -m pip install <wheel_file_name>, for example:
python -m pip install C:Kivy-1.9.1.dev-cp27-none-win_amd64.whl
What are nightly wheels
Every day we create a snapshot wheel of the current development version of Kivy (‘nightly wheel’).
You can find the development version in the master branch of the
Kivy Github repository.
As opposed to the last stable release (which we discussed in the previous section), nightly
wheels contain all the latest changes to Kivy, including experimental fixes.
For installation instructions, see Pre-release, pre-compiled wheels.
Warning
Using the latest development version can be risky and you might encounter
issues during development. If you encounter any bugs, please report them.
Table Of Contents
- Installation on Windows
- Installation components
- Installing Python
- Source installation Dependencies
- Making Python available anywhere
- Double-click method
- Send-to method
- Installation components
To install Kivy on Windows via pip, please follow the main installation guide.
Installation components
Following, are additional information linked to from some of the steps in the
main installation guide, specific to Windows.
Installing Python
To install Python on Windows, download it from the main
Python website and follow the
installation steps. You can read about the individual installation options in the
Python guide.
If you installed the
Python launcher,
you will be more easily able to install multiple Python versions side by side
and select, which to run, at each invocation.
Source installation Dependencies
To install Kivy from source, please follow the installation guide until you reach the
Kivy install step and then install the compiler below before continuing.
To install kivy from source, you need a compiler. On Windows, the Visual Studio Build Tools are
required, and they are available for free. You can either:
-
Download and install the complete Visual Studio IDE, which contains the build tools.
This is the easiest approach and the IDE can be downloaded from here. -
The IDE is very big, so you can also download just the smaller build tools, which are used from the command line.
The current download (2019) can be found on this page
under “Tools for Visual Studio 2019”. More info about this topic can be found
in the Kivy wiki.
Now that the compiler is installed, continue to install Kivy.
Making Python available anywhere
There are two methods for launching Python when double clicking on your *.py files.
Double-click method
If you only have one Python installed, and if you installed it using the default options, then *.py files are already
associated with your Python. You can run them by double clicking them in the file manager, or by just executing their name in a console window (without having to prepend python).
Alternatively, if they are not assigned, you can do it the following way:
-
Right click on the Python file (.py file extension) in the file manager.
-
From the context menu that appears, select Open With
-
Browse your hard disk drive and find the
python.exefile that you want
to use (e.g. in the the virtual environment). Select it. -
Select “Always open the file with…” if you don’t want to repeat this
procedure every time you double click a .py file. -
You are done. Open the file.
Send-to method
You can launch a .py file with Python using the Send to menu:
-
Browse to the
python.exeyou want to use. Right click on it and
copy it. -
Open Windows Explorer (the file explorer in Windows 8), and to go the address
‘shell:sendto’. You should get the special Windows directory SendTo. -
Paste the previously copied
python.exefile as a shortcut. -
Rename it to python <python-version>. E.g.
python39.
You can now execute your application by right clicking on the .py file ->
“Send To” -> “python <python-version>”.
MD Jalals method works perfectly for me. Now kivy runs in SublimeText 3 with a 32 bit python 3.8.3! There are a lot of messages in the terminal window when running. I created a new project with sublime and saved the file main.py, listed below (from tech with Tim on YouTube, https://www.youtube.com/watch?v=bMHK6NDVlCM
After installing like MD Jalal says, and changing python interpreter in pycharm/jetbrains to python 3.8.3 32 bit, everything works there too. Anaconda’s python 3.8, 3.7 does not work, python 3.8.3 64 bit also does not work.
Tim’s simple window with label:
# Import kyvi app and label, from uix
from kivy.app import App
from kivy.uix.label import Label

class MyApp(App):
    def build(self):
        return Label(text='Tech with Tim')

if __name__=="__main__":
    MyApp().run()
Thanks to MD Jalal and Tim on the Tube!
To king charles’ remark: It is true that if You have both the 64 bit and the 32 bit python installed, py is the 64 bit and python is the 32 bit, at least if You install the 64 bit version first. I have not tried to install with py -m pip install for MD Jalal’s description, just python -m pip install. And when using the 32 bit interpreter for python, kivy works in SublimeText as well as in PyCharm.
В наши дни каждый разработчик может столкнуться с необходимостью работы над мобильным или веб-приложением на Python. В Python нет встроенных инструментов для мобильных устройств, тем не менее существуют пакеты, которые можно использовать для создания мобильных приложений. Это Kivy, PyQt и даже библиотека Toga от Beeware.
Содержание
- Принципы работы фреймворка Kivy Python
- Установка Kivy
- Работа с виджетами в Kivy
- Запуск программы «Hello, Kivy!»
- Отображение виджета Image в Kivy Python
- Разметка (Layout) в UI Kivy
- Добавление событий в Kivy
- Использование языка дизайна KV
- Создание приложения Kivy Python
- Создаем apk приложения для Android на Python
- Создание приложений для iPhone (iOS) на Python
- Создание exe приложений для Windows на Python используя Kivy
- Создание приложений для macOS на Python используя Kivy
Библиотеки являются основными элементами мобильного мира Python. Однако, говоря о Kivy, нельзя игнорировать преимущества данного фреймворка при работе с мобильными приложениями. Внешний вид приложения автоматически подстраивается под все платформы, разработчику при этом не нужно компилировать код после каждой поправки. Кроме того, здесь для создания приложений можно использовать чистый синтаксис Python.
В руководстве будут разобраны следующие темы:
- Работа с виджетами Kivy;
- Планировка UI и лейауты;
- Добавление событий;
- Использование языка KV;
- Создание приложения-калькулятора;
- Упаковка приложения для iOS, Android, Windows и macOS.
Разбор данного руководства предполагает, что читатель знаком с объектно-ориентированным программированием. Для введения в курс дела можете просмотреть статью об Объектно-ориентированном программировании (ООП) в Python 3.
Приступим!
Принципы работы фреймворка Kivy Python
Kivy был создан в 2011 году. Данный кросс-платформенный фреймворк Python работает на Windows, Mac, Linux и Raspberry Pi. В дополнение к стандартному вводу через клавиатуру и мышь он поддерживает мультитач. Kivy даже поддерживает ускорение GPU своей графики, что во многом является следствием использования OpenGL ES2. У проекта есть лицензия MIT, поэтому библиотеку можно использовать бесплатно и вкупе с коммерческим программным обеспечением.
Во время разработки приложения через Kivy создается интуитивно понятный интерфейс (Natural user Interface), или NUI. Его главная идея в том, чтобы пользователь мог легко и быстро приспособиться к программному обеспечению без чтения инструкций.
Kivy не задействует нативные элементы управления, или виджеты. Все его виджеты настраиваются. Это значит, что приложения Kivy будут выглядеть одинаково на всех платформах. Тем не менее, это также предполагает, что внешний вид вашего приложения будет отличаться от нативных приложений пользователя. Это может стать как преимуществом, так и недостатком, все зависит от аудитории.
Установка Kivy
У Kivy есть множество зависимостей, поэтому лучше устанавливать его в виртуальную среду Python. Можно использовать встроенную библиотеку Python venv или же пакет virtualenv.
Виртуальная среда Python создается следующим образом:
|
$ python3 —m venv my_kivy_project |
По ходу данного действия исполняемый файл Python 3 будет скопирован в папку под названием my_kivy_project, куда также будут добавлено несколько других папок.
Есть вопросы по Python?
На нашем форуме вы можете задать любой вопрос и получить ответ от всего нашего сообщества!
Telegram Чат & Канал
Вступите в наш дружный чат по Python и начните общение с единомышленниками! Станьте частью большого сообщества!
Паблик VK
Одно из самых больших сообществ по Python в социальной сети ВК. Видео уроки и книги для вас!
Для использования виртуальной среды ее нужно активировать. На Mac или Linux это можно сделать, выполнив следующую команду, будучи внутри папки my_kivy_project:
Команда для Windows точно такая же, но активировать скрипт нужно в другом месте — через папку Scripts, а не bin.
После активации виртуальной среды Python можно запустить pip для установки Kivy. На Linux и Mac нужно выполнить следующую команду:
|
$ python —m pip install kivy |
Инсталляция на Windows несколько сложнее. В официальной документации фреймворка изучите пункт, касающийся установки Kivy на Windows. Пользователи Mac также могут скачать файл dmg и установить Kivy данным образом.
В случае возникновения проблем во время установки Kivy на вашу платформу изучите дополнительные инструкции, с которыми можно ознакомиться через страницу загрузки.
Работа с виджетами в Kivy
Виджеты — это отображаемые на экране элементы управления, которыми пользователь может оперировать. Любой инструментарий графического интерфейса пользователя поставляется с набором виджетов. Типичными представителями виджетов, что вы не раз использовали, являются кнопки, выпадающие списки и вкладки. Внутри фреймворка Kivy встроено много виджетов.
Запуск программы «Hello, Kivy!»
Принцип работы Kivy можно уловить, взглянув на следующее приложение «Hello, World!»:
|
from kivy.app import App from kivy.uix.label import Label class MainApp(App): def build(self): label = Label(text=‘Hello from Kivy’, size_hint=(.5, .5), pos_hint={‘center_x’: .5, ‘center_y’: .5}) return label if __name__ == ‘__main__’: app = MainApp() app.run() |
Каждому приложению Kivy требуется создать подкласс App и переопределить метод build(). Сюда вы помещаете код UI или вызываете другие функции, которые определяют код UI. В данном случае создается виджет Label и передается text, size_hint и pos_hint. Последние два аргумента не обязательны.
size_hint говорит Kivy о размерах что нужно использовать при создании виджета. Используются два числа:
- Первое число
xуказывает на размер ширины элемента управления. - Второе число
yуказывает на размер высоты элемента управления.
Значение обоих чисел должно быть в промежутке между 0 и 1. Значение по обоих показателей по умолчанию равно 1. Также можно задействовать pos_hint, что используется для позиционирования виджета. В коде, размещенном выше, указывается, что виджет должен быть размещен в центре осей x и y.
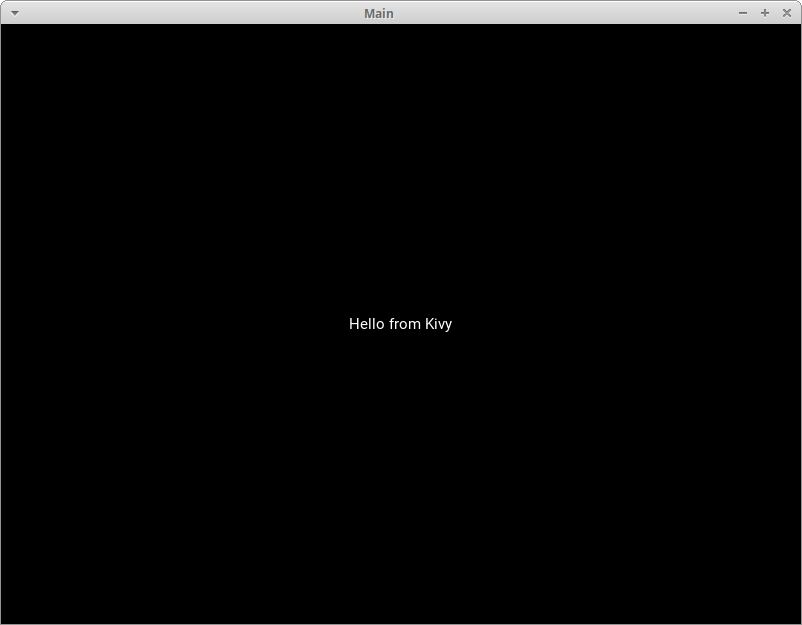
Для запуска приложения нужно инициализировать класс MainApp и вызвать метод run(). После этих действий на экране появится следующее:
Kivy также выводит в stdout довольно много текста:
|
1 2 3 4 5 6 7 8 9 10 11 12 13 14 15 16 17 18 19 20 21 22 23 |
[INFO ] [Logger ] Record log in /home/mdriscoll/.kivy/logs/kivy_19—06—07_2.txt [INFO ] [Kivy ] v1.11.0 [INFO ] [Kivy ] Installed at «/home/mdriscoll/code/test/lib/python3.6/site-packages/kivy/__init__.py» [INFO ] [Python ] v3.6.7 (default, Oct 22 2018, 11:32:17) [GCC 8.2.0] [INFO ] [Python ] Interpreter at «/home/mdriscoll/code/test/bin/python» [INFO ] [Factory ] 184 symbols loaded [INFO ] [Image ] Providers: img_tex, img_dds, img_sdl2, img_gif (img_pil, img_ffpyplayer ignored) [INFO ] [Text ] Provider: sdl2([‘text_pango’] ignored) [INFO ] [Window ] Provider: sdl2([‘window_egl_rpi’] ignored) [INFO ] [GL ] Using the «OpenGL» graphics system [INFO ] [GL ] Backend used <sdl2> [INFO ] [GL ] OpenGL version <b‘4.6.0 NVIDIA 390.116’> [INFO ] [GL ] OpenGL vendor <b‘NVIDIA Corporation’> [INFO ] [GL ] OpenGL renderer <b‘NVS 310/PCIe/SSE2’> [INFO ] [GL ] OpenGL parsed version: 4, 6 [INFO ] [GL ] Shading version <b‘4.60 NVIDIA’> [INFO ] [GL ] Texture max size <16384> [INFO ] [GL ] Texture max units <32> [INFO ] [Window ] auto add sdl2 input provider [INFO ] [Window ] virtual keyboard not allowed, single mode, not docked [INFO ] [Base ] Start application main loop [INFO ] [GL ] NPOT texture support is available |
Это может быть полезно для отладки приложения.
Далее добавим виджет Image и посмотрим, чем он отличается от Label.
Отображение виджета Image в Kivy Python
В Kivy есть несколько видов виджетов, связанных с изображениями. Для загрузки картинок с жесткого диска можно задействовать Image, а при использовании адреса URL подойдет AsyncImage. К следующем примере берется стандартный класс Image:
|
from kivy.app import App from kivy.uix.image import Image class MainApp(App): def build(self): img = Image(source=‘/path/to/real_python.png’, size_hint=(1, .5), pos_hint={‘center_x’:.5, ‘center_y’:.5}) return img if __name__ == ‘__main__’: app = MainApp() app.run() |
В данном коде импортируется Image из подпакета kivy.uix.image. Класс Image принимает много разных параметров, однако единственным для нас нужным является source, что указывает Kivy, какое изображение должно быть загружено. Здесь передается полный путь к выбранному изображению. Оставшаяся часть кода такая же, как и в прошлом примере.
После запуска кода должно выводиться нечто подобное:
Текст из предыдущего примера был заменен картинкой.
Теперь рассмотрим, как добавить и оптимально расположить несколько виджетов в приложении.
Разметка (Layout) в UI Kivy
У каждого фреймворка есть свой собственный метод для размещения виджетов. К примеру, в wxPython используются классификаторы, а в Tkinter будет задействован лейаут, или менеджер геометрии. В Kivy за это отвечают Лейауты (Layouts). Доступно несколько различных типов Лейаутов. Чаще всего используются следующие виды:
- BoxLayout;
- FloatLayout;
- GridLayout.
Найти полный список доступных Лейаутов можно в документации Kivy. Рабочий исходный код можно найти в kivy.uix.
Рассмотрим BoxLayout на примере следующего кода:
|
1 2 3 4 5 6 7 8 9 10 11 12 13 14 15 16 17 18 19 20 21 22 23 24 25 26 27 28 |
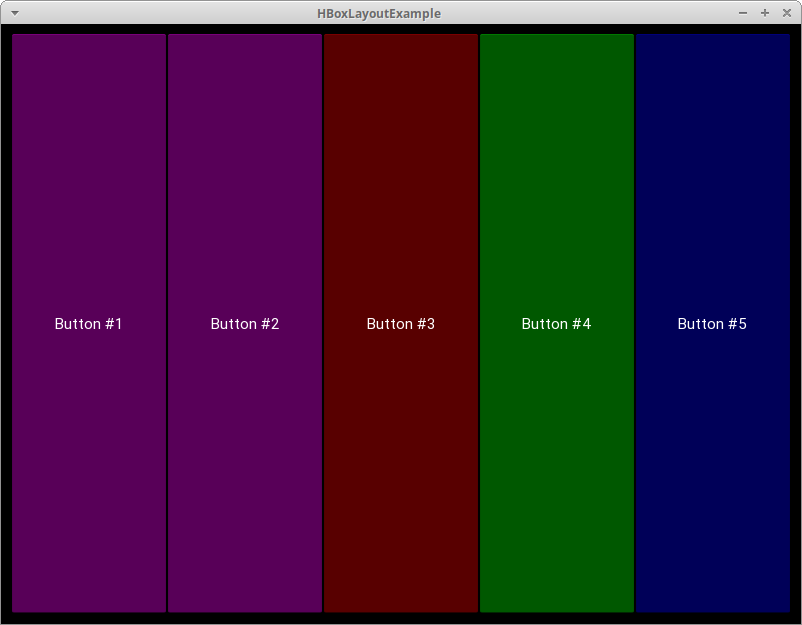
import kivy import random from kivy.app import App from kivy.uix.button import Button from kivy.uix.boxlayout import BoxLayout red = [1,0,0,1] green = [0,1,0,1] blue = [0,0,1,1] purple = [1,0,1,1] class HBoxLayoutExample(App): def build(self): layout = BoxLayout(padding=10) colors = [red, green, blue, purple] for i in range(5): btn = Button(text=«Button #%s» % (i+1), background_color=random.choice(colors) ) layout.add_widget(btn) return layout if __name__ == «__main__»: app = HBoxLayoutExample() app.run() |
Здесь из kivy.uix.boxlayout импортируется модуль BoxLayout и затем устанавливается. После этого создается список цветов, которые представляют собой цвета RGB (Red-Blue-Green).
В конечном итоге формируется цикл для range из 5, результатом чего является кнопка btn для каждой итерации. Сделаем вещи немного интереснее и поставим в качестве фона кнопки background_color случайный цвет. Теперь можно добавить кнопку в лейаут при помощи layout.add_widget(btn).
После запуска кода выведется нечто подобное:
Здесь представлены 5 кнопок, окрашенных случайным образом, по одной для каждой итерации цикла for.
Во время создания лейаута следует учитывать следующие аргументы:
- padding: Отступ
paddingмежду лейаутом и его дочерними элементами уточняется в пикселях. Для этого можно выбрать один из трех способов:- Список из четырех аргументов:
[padding_left, padding_top, padding_right, padding_bottom] - Список из двух аргументов:
[padding_horizontal, padding_vertical] - Один аргумент:
padding=10
- Список из четырех аргументов:
- spacing: При помощи данного аргумента добавляется расстояние между дочерними виджетами.
- orientation: Позволяет изменить значение
orientationдляBoxLayoutпо умолчанию — с горизонтального на вертикальное.
Добавление событий в Kivy
Как и многие другие инструментарии GUI, по большей части Kivy полагается на события. Фреймворк отзывается на нажатие клавиш, кнопки мышки или прикосновение к сенсорному экрану. В Kivy задействован концепт Часов (Clock), что дает возможность создать своего рода график для вызова определенных функций в будущем.
В Kivy также используется концепт Свойств (Properties), что работает с EventDispatcher. Свойства помогают осуществить проверку достоверности. Они также запускают события, когда виджет меняет размер или позицию.
Добавим событие для кнопки из предыдущего кода:
|
1 2 3 4 5 6 7 8 9 10 11 12 13 14 15 16 17 18 |
from kivy.app import App from kivy.uix.button import Button class MainApp(App): def build(self): button = Button(text=‘Hello from Kivy’, size_hint=(.5, .5), pos_hint={‘center_x’: .5, ‘center_y’: .5}) button.bind(on_press=self.on_press_button) return button def on_press_button(self, instance): print(‘Вы нажали на кнопку!’) if __name__ == ‘__main__’: app = MainApp() app.run() |
В данном коде вызывается button.bind(), а событие on_press ссылается на MainApp.on_press_button().
Этот метод неявно принимает экземпляр виджета, который является самим объектом кнопки. Сообщение будет выводиться на stdout всякий раз при нажатии пользователем на кнопку.
Использование языка дизайна KV
Kivy предоставляет язык дизайна KV, что можно использовать в приложениях Kivy. Язык KV позволяет отделить дизайн интерфейса от логики приложения. Он придерживается принципа разделения ответственности и является частью архитектурного паттерна Модель-Представление-Контроллер (Model-View-Controller). Предыдущий пример можно обновить, используя язык KV:
|
from kivy.app import App from kivy.uix.button import Button class ButtonApp(App): def build(self): return Button() def on_press_button(self): print(‘Вы нажали на кнопку!’) if __name__ == ‘__main__’: app = ButtonApp() app.run() |
С первого взгляда данный код может показаться несколько странным, так как кнопка Button создается без указания атрибутов или привязывания к ним событий. Здесь Kivy автоматически ищет файл с таким же названием, что и у класса, только строчными буквами и без части App в названии класса.
В данном случае названием класса является ButtonApp, поэтому Kivy будет искать файл button.kv. Если такой файл существует, и он также форматирован должным образом, тогда Kivy использует его при загрузке UI. Попробуйте создать такой файл и добавить следующий код:
|
<Button>: text: ‘Press me’ size_hint: (.5, .5) pos_hint: {‘center_x’: .5, ‘center_y’: .5} on_press: app.on_press_button() |
Действия каждой строки:
- Строка 1 соответствует вызову
Buttonв коде Python. Kivy должен осмотреть инициализированный объект для определения кнопки; - Строка 2 устанавливает
textкнопки; - Строка 3 устанавливает ширину и высоту при помощи
size_hint; - Строка 4 устанавливает позицию кнопки через
pos_hint; - Строка 5 устанавливает обработчик событий
on_press. Для указания Kivy места обработчика событий используетсяapp.on_press_button(). Здесь Kivy будет искать метод.on_press_button()в классеApplication.
Вы можете установить все ваши виджеты и лейауты внутри одного или нескольких файлов языка KV. Язык KV также поддерживает импорт модулей Python в KV, создавая динамичные классы, и это далеко не предел. Ознакомиться с полным перечнем его возможностей можно в гиде Kivy по языку KV.
Теперь мы можем приступить к созданию настоящего рабочего приложения.
Создание приложения Kivy Python
Создание чего-то полезное несомненно является отличным способом выучить новый навык. Учитывая данное утверждение, давайте используем Kivy при создании калькулятора, который будет поддерживать следующие операции:
- Сложение;
- Вычитание;
- Умножение;
- Деление.
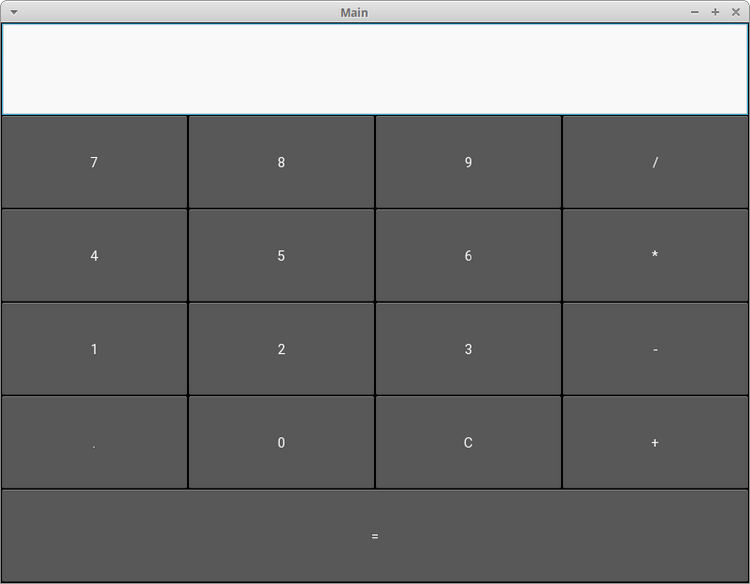
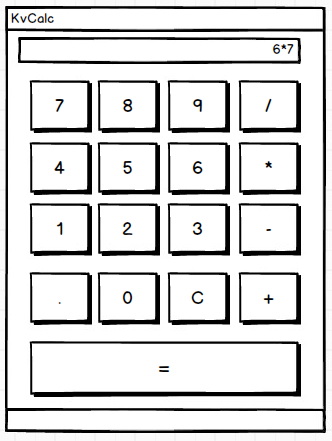
В данном приложении будет использован набор кнопок в своего рода лейауте. В верхней части также будет специальный блок для вывода операций и их результатов. В итоге калькулятор будет выглядеть следующим образом:

Теперь, когда у нас есть в наличии целевой UI, может составить код:
|
1 2 3 4 5 6 7 8 9 10 11 12 13 14 15 16 17 18 19 20 21 22 23 24 25 26 27 28 29 30 31 32 33 34 35 36 37 38 39 |
from kivy.app import App from kivy.uix.boxlayout import BoxLayout from kivy.uix.button import Button from kivy.uix.textinput import TextInput class MainApp(App): def build(self): self.operators = [«/», «*», «+», «-«] self.last_was_operator = None self.last_button = None main_layout = BoxLayout(orientation=«vertical») self.solution = TextInput( multiline=False, readonly=True, halign=«right», font_size=55 ) main_layout.add_widget(self.solution) buttons = [ [«7», «8», «9», «/»], [«4», «5», «6», «*»], [«1», «2», «3», «-«], [«.», «0», «C», «+»], ] for row in buttons: h_layout = BoxLayout() for label in row: button = Button( text=label, pos_hint={«center_x»: 0.5, «center_y»: 0.5}, ) button.bind(on_press=self.on_button_press) h_layout.add_widget(button) main_layout.add_widget(h_layout) equals_button = Button( text=«=», pos_hint={«center_x»: 0.5, «center_y»: 0.5} ) equals_button.bind(on_press=self.on_solution) main_layout.add_widget(equals_button) return main_layout |
Калькулятор работает следующим образом:
- В строках с 8 по 10 создается список
operatorsи несколько полезных значений,last_was_operatorиlast_button, которые будут использованы чуть позже. - В строках с 11 по 15 создается лейаут верхнего уровня
main_layout, к нему также добавляется виджет только для чтенияTextInput. - В строках с 16 по 21 создается вложенный список из списков, где есть большая часть кнопок для калькулятора.
- В строке 22 начинается цикл for для кнопок. Для каждого вложенного списка делается следующее:
- В строке 23 создается
BoxLayoutс горизонтальной ориентацией. - В строке 24 начинается еще один цикл
forдля элементов вложенного списка. - В строках с 25 по 39 создаются кнопки для ряда и связываются обработчиком событий, после чего кнопки добавляются к горизонтальному
BoxLayoutиз строки 23. - В строке 31 этот лейаут добавляется к
main_layout.
- В строке 23 создается
- В строках с 33 по 37 создается кнопка равно (=) и привязывается к обработчику событий, после чего она добавляется к
main_layout.
Далее создается обработчик событий .on_button_press(). Код будет выглядеть следующим образом:
|
1 2 3 4 5 6 7 8 9 10 11 12 13 14 15 16 17 18 19 20 |
def on_button_press(self, instance): current = self.solution.text button_text = instance.text if button_text == «C»: # Очистка виджета с решением self.solution.text = «» else: if current and ( self.last_was_operator and button_text in self.operators): # Не добавляйте два оператора подряд, рядом друг с другом return elif current == «» and button_text in self.operators: # Первый символ не может быть оператором return else: new_text = current + button_text self.solution.text = new_text self.last_button = button_text self.last_was_operator = self.last_button in self.operators |
Почти все виджеты приложения вызывают .on_button_press(). Это работает следующим образом:
- Строка 41 принимает аргумент
instance, в результате чего можно узнать, какой виджет вызвал функцию. - Строки между 42 и 43 извлекают и хранят значения
solutionиtextкнопки. - Строки c 45 по 47 проверяют, на какую кнопку нажали. Если пользователь нажимает с, тогда очищается
solution. В противном случае используется утверждениеelse. - Строка 49 проверяет, было ли у решения предыдущее значение.
- Строки с 50 по 52 проверяют, была ли последняя нажатая кнопка оператором. Если да, тогда
solutionобновляться не будет. Это необходимо для предотвращения создания двух операций в одном ряду. К примеру,1 * /будет недействительным утверждением. - Строки с 53 по 55 проверяют, является ли первый символ оператором. Если да, тогда solution обновляться не будет, так как первое значение не может быть значением оператора.
- Строки с 56 по 58 переходят к условию
else. Если никакое из предыдущих значений не найдено, тогда обновляетсяsolution. - Строка 59 устанавливает
last_buttonк метке последней нажатой кнопки. - Строка 60 устанавливает
last_was_operatorк значениюTrueилиFalseв зависимости от того, был символ оператором или нет.
Последней частью кода будет .on_solution():
|
def on_solution(self, instance): text = self.solution.text if text: solution = str(eval(self.solution.text)) self.solution.text = solution |
Здесь берется текущий текст из solution и используется встроенный в Python eval() для исполнения. Если пользователь создал формулу вроде 1+2, тогда eval() запустит код и вернет результат. В конце результат устанавливается как новое значение виджета solution.
На заметку: порой
eval()бывает опасным, так как он может запустить произвольный код. Многие разработчики избегают его использование именно по этой причине. Тем не менее, ввиду задействования только целых чисел, операторов и точки в качестве вводных данных дляeval(), в данном контексте его можно использовать безопасно.
При запуске данного кода на рабочем столе компьютера приложение будет выглядеть следующим образом:
Полный текст кода примера калькулятора представлен ниже:
|
1 2 3 4 5 6 7 8 9 10 11 12 13 14 15 16 17 18 19 20 21 22 23 24 25 26 27 28 29 30 31 32 33 34 35 36 37 38 39 40 41 42 43 44 45 46 47 48 49 50 51 52 53 54 55 56 57 58 59 60 61 62 63 64 65 66 67 68 69 70 71 |
from kivy.app import App from kivy.uix.boxlayout import BoxLayout from kivy.uix.button import Button from kivy.uix.textinput import TextInput class MainApp(App): def build(self): self.operators = [«/», «*», «+», «-«] self.last_was_operator = None self.last_button = None main_layout = BoxLayout(orientation=«vertical») self.solution = TextInput( multiline=False, readonly=True, halign=«right», font_size=55 ) main_layout.add_widget(self.solution) buttons = [ [«7», «8», «9», «/»], [«4», «5», «6», «*»], [«1», «2», «3», «-«], [«.», «0», «C», «+»], ] for row in buttons: h_layout = BoxLayout() for label in row: button = Button( text=label, pos_hint={«center_x»: 0.5, «center_y»: 0.5}, ) button.bind(on_press=self.on_button_press) h_layout.add_widget(button) main_layout.add_widget(h_layout) equals_button = Button( text=«=», pos_hint={«center_x»: 0.5, «center_y»: 0.5} ) equals_button.bind(on_press=self.on_solution) main_layout.add_widget(equals_button) return main_layout def on_button_press(self, instance): current = self.solution.text button_text = instance.text if button_text == «C»: # Очистка виджета с решением self.solution.text = «» else: if current and ( self.last_was_operator and button_text in self.operators): # Не добавляйте два оператора подряд, рядом друг с другом return elif current == «» and button_text in self.operators: # Первый символ не может быть оператором return else: new_text = current + button_text self.solution.text = new_text self.last_button = button_text self.last_was_operator = self.last_button in self.operators def on_solution(self, instance): text = self.solution.text if text: solution = str(eval(self.solution.text)) self.solution.text = solution if __name__ == «__main__»: app = MainApp() app.run() |
Пришло время разместить приложение в Google Play или в AppStore!
По завершении составления кода вы можете поделиться своим приложением с другими. Хорошим способом сделать это может стать превращение вашего кода в приложения для смартфона на Android. Для этого вначале нужно установить пакет buildozer через pip:
Затем создается новая папка, после чего нужно перейти в нее через терминал. Затем выполняется следующая команда:
После этого создается файл buildozer.spec, который будет использован для конфигурации сборки. К примеру, первые две строчки файла спецификации можно редактировать следующим образом:
|
[app] # (str) Название вашего приложения title = KvCalc # (str) Название упаковки package.name = kvcalc # (str) Домен упаковки (нужен для упаковки android/ios) package.domain = org.kvcalc |
Не бойтесь посмотреть оставшуюся часть файла для выяснения того, что еще можно поменять.
На данный момент приложение почти готово к сборке, однако для начала нужно установить зависимости для buildozer. После их установки скопируйте ваше приложение калькулятора в новую папку и переименуйте его в main.py. Этого требует buildozer. Если файл будет назван неверно, тогда процесс сборки завершится неудачей.
Теперь можно запустить следующую команду:
|
$ buildozer —v android debug |
Этап сборки займет время! На моем компьютере на это ушло около 15-20 минут. Здесь все зависит от вашего железа, так что времени может потребоваться еще больше. Расслабьтесь, налейте чашечку кофе или прогуляйтесь. Buildozer скачает те элементы Android SDK, которые нужны для процесса сборки. Если все идет по плану, тогда в папке bin появится файл под названием, напоминающим что-то вроде kvcalc-0.1-debug.apk.
Далее требуется связать телефон Android с компьютером и перенести туда файл apk. Затем откройте менеджер файлов телефона и кликните на файл apk. Android должен спросить, хотите ли вы установить приложение. Есть вероятность появления предупреждения, ведь приложение было скачано не из Google Play. Тем не менее, вы по-прежнему сможете установить его.
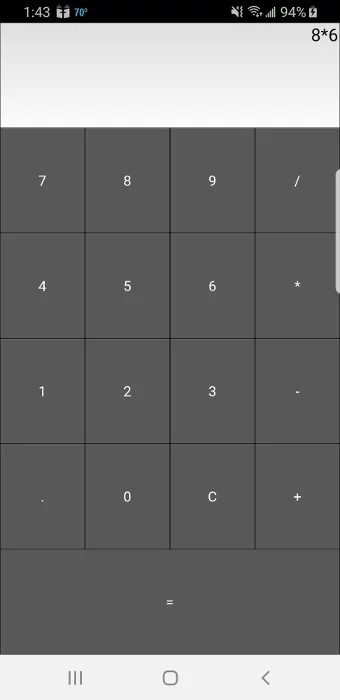
Вот как выглядит калькулятор, запущенный на Samsung S9:
У buildozer также есть несколько других команд, которые вы можете использовать. Изучите документацию, чтобы подробнее узнать об этом.
При необходимости добиться более детального управления упаковку можно осуществить через python-for-android. Здесь это обсуждаться не будет, но если интересно, ознакомьтесь, как еще можно быстро начать проект.
Создание приложений для iPhone (iOS) на Python
Инструкция для сборки приложения для iOS будет немного сложнее, нежели для Android. Для получения последней информации всегда проверяйте обновления официальной документации Kivy.
Вам нужен будет компьютер с операционной системой OS X: MacBook или iMac. На Linux или Windows вы не сможете создать приложения для Apple.
Перед упаковкой приложения для iOS на Mac необходимо выполнить следующие команды:
|
$ brew install autoconf automake libtool pkg—config $ brew link libtool $ sudo easy_install pip $ sudo pip install Cython==0.29.10 |
После успешной установки нужно скомпилировать при использования следующих команд:
|
$ git clone git://github.com/kivy/kivy—ios $ cd kivy—ios $ ./toolchain.py build python3 kivy |
Если вы получаете ошибку, где говорится, что iphonesimulator не найден, тогда поищите способ решение проблемы на StackOverflow, после чего попробуйте запустить команды вновь.
Если вы получаете ошибки SSL, тогда скорее всего у вас не установлен OpenSSL от Python. Следующая команда должна это исправить:
|
$ cd /Applications/Python 3.7/ $ ./Install Certificates.command |
Теперь вернитесь назад и запустите команду toolchain опять.
После успешного выполнения всех указанных выше команд можете создать проект Xcode при помощи использования скрипта toolchain. Перед созданием проекта Xcode переименуйте ваше главное приложение в main.py, это важно. Выполните следующую команду.
|
./toolchain.py create <title> <app_directory> |
Здесь должна быть папка под названием title, внутри которой будет проект Xcode. Теперь можно открыть проект Xcode и работать над ним отсюда. Обратите внимание, что если вы хотите разместить свое приложение на AppStore, вам понадобится создать аккаунт разработчика на developer.apple.com и заплатить годовой взнос.
Создание exe приложений для Windows на Python используя Kivy
Упаковать приложение Kivy для Windows можно при помощи PyInstaller. Если ранее вы никогда не работали с ним, тогда изучите тему использования PyInstaller для упаковки кода Python в исполняемый файл.
Для установки PyInstaller можно использовать pip:
|
$ pip install pyinstaller |
Следующая команда упакует ваше приложение:
Команда создаст исполняемый файл Windows, а вместе с ним еще несколько других файлов. Аргумент -w говорит PyInstaller, что приложение открывается в оконном режиме и не является приложение для командной строки. Если вы хотите, чтобы PyInstaller создал только один исполняемый файл, тогда можете передать в дополнение к -w аргумент --onefile.
Создание приложений для macOS на Python используя Kivy
Как и в случае с Windows, для создания исполняемого файла Mac можно также использовать PyInstaller. Единственным условием является запуск следующей команды на Mac:
|
$ pyinstaller main.py —w —onefile |
Результатом станет один исполняемый файл в папке dist. Название исполняемого файла будет таким же, как и название файла Python, что был передан PyInstaller.
Если вы хотите уменьшить размер исполняемого файла или использовать в приложении GStreamer, тогда для получения дополнительной информации изучите тему упаковки для macOS.
Заключение
Kivy является действительно интересным фреймворком GUI, что можно использовать для создания пользовательских интерфейсов и мобильных приложений для Android и iOS. Внешне приложения Kivy будут отличаться от нативных приложений выбранной платформы. В том случае, если вы хотите выделяться на фоне конкурентов, это может быть выгодным преимуществом.
В данном руководстве были рассмотрены основы Kivy, среди которых стоит выделить добавление виджетов, привязку событий, планировку виджетов и лейауты, а также использование языка KV. В результате мы получили рабочее приложение Kivy и рассмотрели способы его переноса на другие платформы, в том числе мобильные.
В Kivy есть множество виджетов и концептов, которые не были рассмотрены в статьи. Для дальнейшего изучения темы можете изучить официальный сайт Kivy, где размещены разнообразные руководства, примеры приложений и многое другое.
Рекомендации
Для дальнейшего изучения Kivy ознакомьтесь со следующими ресурсами:
- Гид программирования на Kivy
- Документация по упаковке приложений Kivy
- Сборка приложений GUI через Python
Чтобы посмотреть, как создать приложение с графическим интерфейсом при использовании другого GUI фреймфорка Python, можете ознакомиться со статьями о wxPython.

Являюсь администратором нескольких порталов по обучению языков программирования Python, Golang и Kotlin. В составе небольшой команды единомышленников, мы занимаемся популяризацией языков программирования на русскоязычную аудиторию. Большая часть статей была адаптирована нами на русский язык и распространяется бесплатно.
E-mail: vasile.buldumac@ati.utm.md
Образование
Universitatea Tehnică a Moldovei (utm.md)
- 2014 — 2018 Технический Университет Молдовы, ИТ-Инженер. Тема дипломной работы «Автоматизация покупки и продажи криптовалюты используя технический анализ»
- 2018 — 2020 Технический Университет Молдовы, Магистр, Магистерская диссертация «Идентификация человека в киберпространстве по фотографии лица»
Example
Windows
There are two options how to install Kivy:
First ensure python tools are up-to-date.
python -m pip install --upgrade pip wheel setuptools
Then install the basic dependencies.
python -m pip install docutils pygments pypiwin32 kivy.deps.sdl2 kivy.deps.glew
Although Kivy already has providers for audio & video, GStreamer is required for more advanced stuff.
python -m pip install kivy.deps.gstreamer --extra-index-url https://kivy.org/downloads/packages/simple/
To make it simpler, <python> in the following text means a path to the directory with python.exe file.
-
Wheel
The wheel package provides compiled Kivy, but with removed
cythonsource components, which means the core code can’t be recompiled using this way. Python code, however, is editable.The stable version of Kivy is available on pypi.
python -m pip install kivyThe latest version from the official repository is available through nightly-built wheels available on google drive. Visit the link in docs matching your python version. After a proper wheel is downloaded, rename it to match the formatting of this example and run the command.
python -m pip install C:Kivy-1.9.1.dev-cp27-none-win_amd64.whl -
Source
There are more required dependencies needed to install Kivy from source than using the wheels, but the installation is more flexible.
Create a new file in
<python>Libdistutilsdistutils.cfgwith these lines to ensure a proper compiler will be used for the source code.[build] compiler = mingw32Then the compiler is needed. Either use some you already have installed, or download
mingwpy. The important files such asgcc.exewill be located in<python>Scripts.python -m pip install -i https://pypi.anaconda.org/carlkl/simple mingwpyDon’t forget to set environment variables to let Kivy know what providers it should use.
set USE_SDL2=1
set USE_GSTREAMER=1
Now install the additional dependencies required for the compilation.
python -m pip install cython kivy.deps.glew_dev kivy.deps.sdl2_dev
python -m pip install kivy.deps.gstreamer_dev --extra-index-url https://kivy.org/downloads/packages/simple/
Check
Pathssection to ensure everything is set properly and install Kivy. Choose one of these options:python -m pip install C:master.zip python -m pip install https://github.com/kivy/kivy/archive/master.zip
Paths
Kivy needs an access to the binaries from some dependencies. This means the correct folders have to be on the environment’s PATH variable.
set PATH=<python>Tools;<python>Scripts;<python>sharesdl2bin;%PATH%
This way Python IDLE IDE can be included to the path with <python>Libidlelib;. Then write idle into console and IDLE will be ready to use Kivy.
Simplify it
To avoid repetitive setting of environment variables either set each necessary path this way or make a batch(.bat) file with these lines placed into <python>:
set PATH=%~dp0;%~dp0Tools;%~dp0Scripts;%~dp0sharesdl2bin;%~dp0Libidlelib;%PATH%
cmd.exe
To run Kivy project after installation run cmd.exe or the batch file and use python <filename>.py
installation on Ubuntu
For install kivy on ubuntu with kivy example open terminal and run following command
First add ppa
sudo add-apt-repository ppa:kivy-team/kivy
For install kivy
sudo apt-get install python-kivy
For install kivy examples
sudo apt-get install python-kivy-example
Watch Now This tutorial has a related video course created by the Real Python team. Watch it together with the written tutorial to deepen your understanding: Build Cross-Platform GUI Apps With Kivy
These days, developers are highly likely to be working on a mobile or web application. Python doesn’t have built-in mobile development capabilities, but there are packages you can use to create mobile applications, like Kivy, PyQt, or even Beeware’s Toga library.
These libraries are all major players in the Python mobile space. However, there are some benefits you’ll see if you choose to create mobile applications with Kivy. Not only will your application look the same on all platforms, but you also won’t need to compile your code after every change. What’s more, you’ll be able to use Python’s clear syntax to build your applications.
In this tutorial, you’ll learn how to:
- Work with Kivy widgets
- Lay out the UI
- Add events
- Use the KV language
- Create a calculator application
- Package your application for iOS, Android, Windows, and macOS
This tutorial assumes you’re familiar with object-oriented programming. If you’re not, then check out Object-Oriented Programming (OOP) in Python 3.
Let’s get started!
Understanding the Kivy Framework
Kivy was first released in early 2011. This cross-platform Python framework can be deployed to Windows, Mac, Linux, and Raspberry Pi. It supports multitouch events in addition to regular keyboard and mouse inputs. Kivy even supports GPU acceleration of its graphics, since they’re built using OpenGL ES2. The project uses the MIT license, so you can use this library for free and commercial software.
When you create an application with Kivy, you’re creating a Natural User Interface or NUI. The idea behind a Natural User Interface is that the user can easily learn how to use your software with little to no instruction.
Kivy does not attempt to use native controls or widgets. All of its widgets are custom-drawn. This means that Kivy applications will look the same across all platforms. However, it also means that your app’s look and feel will differ from your user’s native applications. This could be a benefit or a drawback, depending on your audience.
Installing Kivy
Kivy has many dependencies, so it’s recommended that you install it into a Python virtual environment. You can use either Python’s built-in venv library or the virtualenv package. If you’ve never used a Python virtual environment before, then check out Python Virtual Environments: A Primer.
Here’s how you can create a Python virtual environment:
$ python3 -m venv my_kivy_project
This will copy your Python 3 executable into a folder called my_kivy_project and add a few other subfolders to that directory.
To use your virtual environment, you need to activate it. On Mac and Linux, you can do that by executing the following while inside the my_kivy_project folder:
The command for Windows is similar, but the location of the activate script is inside of the Scripts folder instead of bin.
Now that you have an activated Python virtual environment, you can run pip to install Kivy. On Linux and Mac, you’ll run the following command:
$ python -m pip install kivy
On Windows, installation is a bit more complex. Check out the official documentation for how to install Kivy on Windows. (Mac users can also download a dmg file and install Kivy that way.)
If you run into any issues installing Kivy on your platform, then see the Kivy download page for additional instructions.
Working With Kivy Widgets
A widget is an onscreen control that the user will interact with. All graphical user interface toolkits come with a set of widgets. Some common widgets that you may have used include buttons, combo boxes, and tabs. Kivy has many widgets built into its framework.
Running a “Hello, Kivy!” Program
To see how Kivy works, take a look at the following “Hello, World!” application:
from kivy.app import App
from kivy.uix.label import Label

class MainApp(App):
    def build(self):
        label = Label(text='Hello from Kivy',
                      size_hint=(.5, .5),
                      pos_hint={'center_x': .5, 'center_y': .5})

        return label

if __name__ == '__main__':
    app = MainApp()
    app.run()
Every Kivy application needs to subclass App and override build(). This is where you’ll put your UI code or make calls to other functions that define your UI code. In this case, you create a Label widget and pass in its text, size_hint, and pos_hint. These last two arguments are not required.
size_hint tells Kivy the proportions to use when creating the widget. It takes two numbers:
- The first number is the
xsize hint and refers to the width of the control. - The second number is the
ysize hint and refers to the height of the control.
Both of these numbers can be anywhere between 0 and 1. The default value for both hints is 1. You can also use pos_hint to position the widget. In the code block above, you tell Kivy to center the widget on the x and y axes.
To make the application run, you instantiate your MainApp class and then call run(). When you do so, you should see the following on your screen:
Kivy also outputs a lot of text to stdout:
[INFO   ] [Logger      ] Record log in /home/mdriscoll/.kivy/logs/kivy_19-06-07_2.txt
[INFO   ] [Kivy        ] v1.11.0
[INFO   ] [Kivy        ] Installed at "/home/mdriscoll/code/test/lib/python3.6/site-packages/kivy/__init__.py"
[INFO   ] [Python      ] v3.6.7 (default, Oct 22 2018, 11:32:17)
[GCC 8.2.0]
[INFO   ] [Python      ] Interpreter at "/home/mdriscoll/code/test/bin/python"
[INFO   ] [Factory     ] 184 symbols loaded
[INFO   ] [Image       ] Providers: img_tex, img_dds, img_sdl2, img_gif (img_pil, img_ffpyplayer ignored)
[INFO   ] [Text        ] Provider: sdl2(['text_pango'] ignored)
[INFO   ] [Window      ] Provider: sdl2(['window_egl_rpi'] ignored)
[INFO   ] [GL          ] Using the "OpenGL" graphics system
[INFO   ] [GL          ] Backend used <sdl2>
[INFO   ] [GL          ] OpenGL version <b'4.6.0 NVIDIA 390.116'>
[INFO   ] [GL          ] OpenGL vendor <b'NVIDIA Corporation'>
[INFO   ] [GL          ] OpenGL renderer <b'NVS 310/PCIe/SSE2'>
[INFO   ] [GL          ] OpenGL parsed version: 4, 6
[INFO   ] [GL          ] Shading version <b'4.60 NVIDIA'>
[INFO   ] [GL          ] Texture max size <16384>
[INFO   ] [GL          ] Texture max units <32>
[INFO   ] [Window      ] auto add sdl2 input provider
[INFO   ] [Window      ] virtual keyboard not allowed, single mode, not docked
[INFO   ] [Base        ] Start application main loop
[INFO   ] [GL          ] NPOT texture support is available
This is useful for debugging your application.
Next, you’ll try adding an Image widget and see how that differs from a Label.
Displaying an Image
Kivy has a couple of different image-related widgets to choose from. You can use Image to load local images from your hard drive or AsyncImage to load an image from a URL. For this example, you’ll stick with the standard Image class:
from kivy.app import App
from kivy.uix.image import Image

class MainApp(App):
    def build(self):
        img = Image(source='/path/to/real_python.png',
                    size_hint=(1, .5),
                    pos_hint={'center_x':.5, 'center_y':.5})

        return img

if __name__ == '__main__':
    app = MainApp()
    app.run()
In this code, you import Image from the kivy.uix.image sub-package. The Image class takes a lot of different parameters, but the one that you want to use is source. This tells Kivy which image to load. Here, you pass a fully-qualified path to the image. The rest of the code is the same as what you saw in the previous example.
When you run this code, you’ll see something like the following:
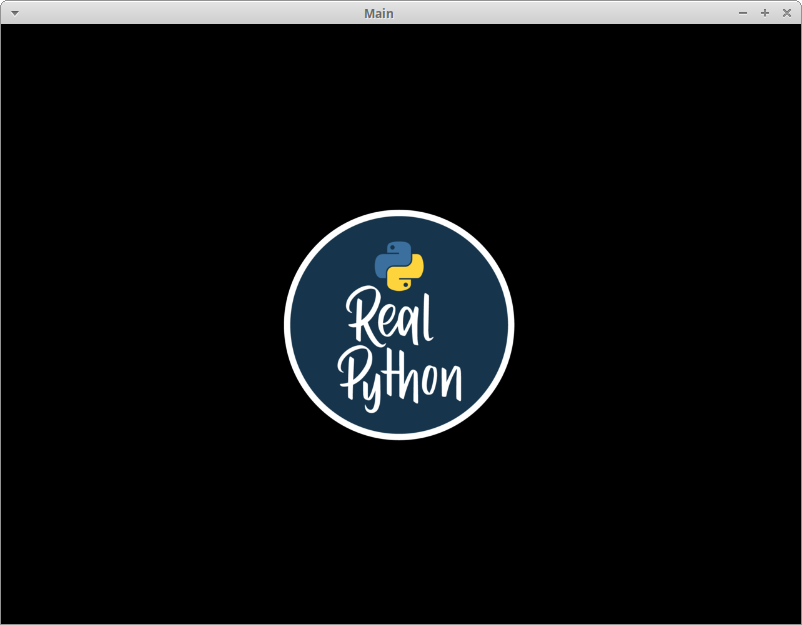
The text from the previous example has been replaced with an image.
Now you’ll learn how to add and arrange multiple widgets in your application.
Laying Out the UI
Each GUI framework that you use has its own method of arranging widgets. For example, in wxPython you’ll use sizers, while in Tkinter you use a layout or geometry manager. With Kivy, you’ll use Layouts. There are several different types of Layouts that you can use. Here are some of the most common ones:
BoxLayoutFloatLayoutGridLayout
You can search Kivy’s documentation for a full list of available Layouts. You can also look in kivy.uix for the actual source code.
Try out the BoxLayout with this code:
import kivy
import random

from kivy.app import App
from kivy.uix.button import Button
from kivy.uix.boxlayout import BoxLayout

red = [1,0,0,1]
green = [0,1,0,1]
blue =  [0,0,1,1]
purple = [1,0,1,1]

class HBoxLayoutExample(App):
    def build(self):
        layout = BoxLayout(padding=10)
        colors = [red, green, blue, purple]

        for i in range(5):
            btn = Button(text="Button #%s" % (i+1),
                         background_color=random.choice(colors)
                         )

            layout.add_widget(btn)
        return layout

if __name__ == "__main__":
    app = HBoxLayoutExample()
    app.run()
Here, you import BoxLayout from kivy.uix.boxlayout and instantiate it. Then you create a list of colors, which are themselves lists of Red-Blue-Green (RGB) colors. Finally, you loop over a range of 5, creating a button btn for each iteration. To make things a bit more fun, you set the background_color of the button to a random color. You then add the button to your layout with layout.add_widget(btn).
When you run this code, you’ll see something like this:
There are 5 randomly-colored buttons, one for each iteration of your for loop.
When you create a layout, there are a few arguments you should know:
padding: You can specify thepaddingin pixels between the layout and its children in one of three ways:- A four-argument list: [
padding_left,padding_top,padding_right,padding_bottom] - A two-argument list: [
padding_horizontal,padding_vertical] - A singular argument:
padding=10
- A four-argument list: [
spacing: You can add space between the children widgets with this argument.orientation: You can change the defaultorientationof theBoxLayoutfrom horizontal to vertical.
Adding Events
Like most GUI toolkits, Kivy is mostly event-based. The framework responds to user keypresses, mouse events, and touch events. Kivy has the concept of a Clock that you can use to schedule function calls for some time in the future.
Kivy also has the concept of Properties, which works with the EventDispatcher. Properties help you do validation checking. They also let you fire events whenever a widget changes its size or position.
Let’s add a button event to your button code from earlier:
from kivy.app import App
from kivy.uix.button import Button

class MainApp(App):
    def build(self):
        button = Button(text='Hello from Kivy',
                        size_hint=(.5, .5),
                        pos_hint={'center_x': .5, 'center_y': .5})
        button.bind(on_press=self.on_press_button)

        return button

    def on_press_button(self, instance):
        print('You pressed the button!')

if __name__ == '__main__':
    app = MainApp()
    app.run()
In this code, you call button.bind() and link the on_press event to MainApp.on_press_button(). This method implicitly takes in the widget instance, which is the button object itself. Finally, a message will print to stdout whenever the user presses your button.
Using the KV Language
Kivy also provides a design language called KV that you can use with your Kivy applications. The KV language lets you separate your interface design from the application’s logic. This follows the separation of concerns principle and is part of the Model-View-Controller architectural pattern. You can update the previous example to use the KV language:
from kivy.app import App
from kivy.uix.button import Button

class ButtonApp(App):
    def build(self):
        return Button()

    def on_press_button(self):
        print('You pressed the button!')

if __name__ == '__main__':
    app = ButtonApp()
    app.run()
This code might look a bit odd at first glance, as it creates a Button without setting any of its attributes or binding it to any events. What’s happening here is that Kivy will automatically look for a file that has the same name as the class in lowercase, without the App part of the class name.
In this case, the class name is ButtonApp, so Kivy will look for a file named button.kv. If that file exists and is properly formatted, then Kivy will use it to load up the UI. Go ahead and create this file and add the following code:
 1<Button>:
 2    text: 'Press me'
 3    size_hint: (.5, .5)
 4    pos_hint: {'center_x': .5, 'center_y': .5}
 5    on_press: app.on_press_button()
Here’s what each line does:
- Line 1 matches the
Buttoncall in your Python code. It tells Kivy to look into the instantiated object for a button definition. - Line 2 sets the button’s
text. - Line 3 sets the width and height with
size_hint. - Line 4 sets the button’s position with
pos_hint. - Line 5 sets the
on_pressevent handler. To tell Kivy where the event handler is, you useapp.on_press_button(). Here, Kivy knows will look in theApplicationclass for a method called.on_press_button().
You can set up all of your widgets and layouts inside one or more KV language files. The KV language also supports importing Python modules in KV, creating dynamic classes, and much more. For full details, check out Kivy’s guide to the KV Language.
Now you’re ready to create a real application!
Creating a Kivy Application
One of the best ways to learn a new skill is by creating something useful. With that in mind, you’ll use Kivy to build a calculator that supports the following operations:
- Addition
- Subtraction
- Multiplication
- Division
For this application, you’ll need a series of buttons in some kind of layout. You’ll also need a box along the top of your app to display the equations and their results. Here’s a sketch of your calculator:
Now that you have a goal for the UI, you can go ahead and write the code:
 1from kivy.app import App
 2from kivy.uix.boxlayout import BoxLayout
 3from kivy.uix.button import Button
 4from kivy.uix.textinput import TextInput
 5
 6class MainApp(App):
 7    def build(self):
 8        self.operators = ["/", "*", "+", "-"]
 9        self.last_was_operator = None
10        self.last_button = None
11        main_layout = BoxLayout(orientation="vertical")
12        self.solution = TextInput(
13            multiline=False, readonly=True, halign="right", font_size=55
14        )
15        main_layout.add_widget(self.solution)
16        buttons = [
17            ["7", "8", "9", "/"],
18            ["4", "5", "6", "*"],
19            ["1", "2", "3", "-"],
20            [".", "0", "C", "+"],
21        ]
22        for row in buttons:
23            h_layout = BoxLayout()
24            for label in row:
25                button = Button(
26                    text=label,
27                    pos_hint={"center_x": 0.5, "center_y": 0.5},
28                )
29                button.bind(on_press=self.on_button_press)
30                h_layout.add_widget(button)
31            main_layout.add_widget(h_layout)
32
33        equals_button = Button(
34            text="=", pos_hint={"center_x": 0.5, "center_y": 0.5}
35        )
36        equals_button.bind(on_press=self.on_solution)
37        main_layout.add_widget(equals_button)
38
39        return main_layout
Here’s how your calculator code works:
- In lines 8 to 10, you create a list of
operatorsand a couple of handy values,last_was_operatorandlast_button, that you’ll use later on. - In lines 11 to 15, you create a top-level layout
main_layoutand add a read-onlyTextInputwidget to it. - In lines 16 to 21, you create a nested list of lists containing most of your
buttonsfor the calculator. - In line 22, you start a
forloop over thosebuttons. For each nested list you’ll do the following:- In line 23, you create a
BoxLayoutwith a horizontal orientation. - In line 24, you start another
forloop over the items in the nested list. - In lines 25 to 39, you create the buttons for the row, bind them to an event handler, and add the buttons to the horizontal
BoxLayoutfrom line 23. - In line 31, you add this layout to
main_layout.
- In line 23, you create a
- In lines 33 to 37, you create the equals button (
=), bind it to an event handler, and add it tomain_layout.
The next step is to create the .on_button_press() event handler. Here’s what that code looks like:
41def on_button_press(self, instance):
42    current = self.solution.text
43    button_text = instance.text
44
45    if button_text == "C":
46        # Clear the solution widget
47        self.solution.text = ""
48    else:
49        if current and (
50            self.last_was_operator and button_text in self.operators):
51            # Don't add two operators right after each other
52            return
53        elif current == "" and button_text in self.operators:
54            # First character cannot be an operator
55            return
56        else:
57            new_text = current + button_text
58            self.solution.text = new_text
59    self.last_button = button_text
60    self.last_was_operator = self.last_button in self.operators
Most of the widgets in your application will call .on_button_press(). Here’s how it works:
-
Line 41 takes the
instanceargument so you can access which widget called the function. -
Lines 42 and 43 extract and store the value of the
solutionand the buttontext. -
Lines 45 to 47 check to see which button was pressed. If the user pressed
C, then you’ll clear thesolution. Otherwise, move on to theelsestatement. -
Line 49 checks if the solution has any pre-existing value.
-
Line 50 to 52 check if the last button pressed was an operator button. If it was, then
solutionwon’t be updated. This is to prevent the user from having two operators in a row. For example,1 */is not a valid statement. -
Lines 53 to 55 check to see if the first character is an operator. If it is, then
solutionwon’t be updated, since the first value can’t be an operator value. -
Lines 56 to 58 drop to the
elseclause. If none of the previous conditions are met, then updatesolution. -
Line 59 sets
last_buttonto the label of the last button pressed. -
Line 60 sets
last_was_operatortoTrueorFalsedepending on whether or not it was an operator character.
The last bit of code to write is .on_solution():
62def on_solution(self, instance):
63    text = self.solution.text
64    if text:
65        solution = str(eval(self.solution.text))
66        self.solution.text = solution
Once again, you grab the current text from solution and use Python’s built-in eval() to execute it. If the user created a formula like 1+2, then eval() will run your code and return the result. Finally, you set the result as the new value for the solution widget.
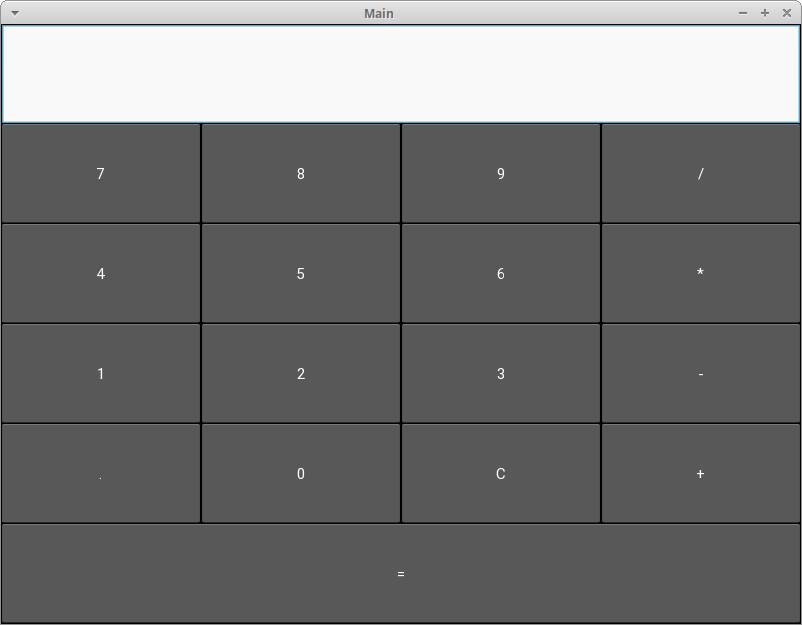
When you run this code, your application will look like this on a desktop computer:
To see the full code for this example, expand the code block below.
Here’s the full code for the calculator:
from kivy.app import App
from kivy.uix.boxlayout import BoxLayout
from kivy.uix.button import Button
from kivy.uix.textinput import TextInput

class MainApp(App):
    def build(self):
        self.operators = ["/", "*", "+", "-"]
        self.last_was_operator = None
        self.last_button = None
        main_layout = BoxLayout(orientation="vertical")
        self.solution = TextInput(
            multiline=False, readonly=True, halign="right", font_size=55
        )
        main_layout.add_widget(self.solution)
        buttons = [
            ["7", "8", "9", "/"],
            ["4", "5", "6", "*"],
            ["1", "2", "3", "-"],
            [".", "0", "C", "+"],
        ]
        for row in buttons:
            h_layout = BoxLayout()
            for label in row:
                button = Button(
                    text=label,
                    pos_hint={"center_x": 0.5, "center_y": 0.5},
                )
                button.bind(on_press=self.on_button_press)
                h_layout.add_widget(button)
            main_layout.add_widget(h_layout)

        equals_button = Button(
            text="=", pos_hint={"center_x": 0.5, "center_y": 0.5}
        )
        equals_button.bind(on_press=self.on_solution)
        main_layout.add_widget(equals_button)

        return main_layout

    def on_button_press(self, instance):
        current = self.solution.text
        button_text = instance.text

        if button_text == "C":
            # Clear the solution widget
            self.solution.text = ""
        else:
            if current and (
                self.last_was_operator and button_text in self.operators):
                # Don't add two operators right after each other
                return
            elif current == "" and button_text in self.operators:
                # First character cannot be an operator
                return
            else:
                new_text = current + button_text
                self.solution.text = new_text
        self.last_button = button_text
        self.last_was_operator = self.last_button in self.operators

    def on_solution(self, instance):
        text = self.solution.text
        if text:
            solution = str(eval(self.solution.text))
            self.solution.text = solution


if __name__ == "__main__":
    app = MainApp()
    app.run()
It’s time to deploy your application!
Packaging Your App for Android
Now that you’ve finished the code for your application, you can share it with others. One great way to do that is to turn your code into an application that can run on your Android phone. To accomplish this, first you’ll need to install a package called buildozer with pip:
Then, create a new folder and navigate to it in your terminal. Once you’re there, you’ll need to run the following command:
This will create a buildozer.spec file that you’ll use to configure your build. For this example, you can edit the first few lines of the spec file as follows:
[app]

# (str) Title of your application
title = KvCalc

# (str) Package name
package.name = kvcalc

# (str) Package domain (needed for android/ios packaging)
package.domain = org.kvcalc
Feel free to browse the rest of the file to see what else you can change.
At this point, you’re almost ready to build your application, but first, you’ll want to install the dependencies for buildozer. Once those are installed, copy your calculator application into your new folder and rename it to main.py. This is required by buildozer. If you don’t have the file named correctly, then the build will fail.
Now you can run the following command:
$ buildozer -v android debug
The build step takes a long time! On my machine, it took 15 to 20 minutes. Depending on your hardware, it may take even longer, so feel free to grab a cup of coffee or go for a run while you wait. Buildozer will download whatever Android SDK pieces it needs during the build process. If everything goes according to plan, then you’ll have a file named something like kvcalc-0.1-debug.apk in your bin folder.
The next step is to connect your Android phone to your computer and copy the apk file to it. Then you can open the file browser on your phone and click on the apk file. Android should ask you if you’d like to install the application. You may see a warning since the app was downloaded from outside Google Play, but you should still be able to install it.
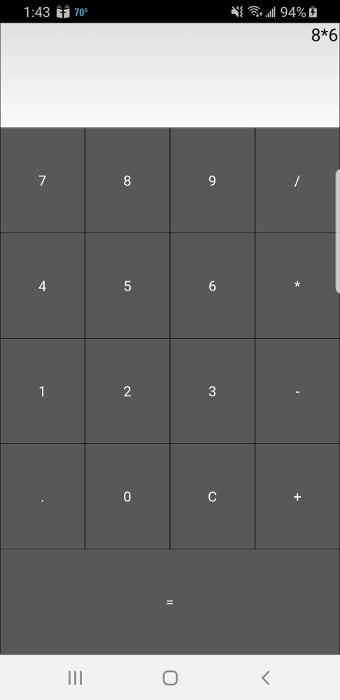
Here’s the calculator running on my Samsung S9:
The buildozer tool has several other commands you can use. Check out the documentation to see what else you can do.
You can also package the app using python-for-android if you need more fine-grained control. You won’t cover this here, but if you’re interested, check out the project’s quickstart.
Packaging Your App for iOS
The instructions for building an application for iOS are a bit more complex than Android. For the most up-to-date information, you should always use Kivy’s official packaging documentation. You’ll need to run the following commands before you can package your application for iOS on your Mac:
$ brew install autoconf automake libtool pkg-config
$ brew link libtool
$ sudo easy_install pip
$ sudo pip install Cython==0.29.10
Once those are all installed successfully, you’ll need to compile the distribution using the following commands:
$ git clone git://github.com/kivy/kivy-ios
$ cd kivy-ios
$ ./toolchain.py build python3 kivy
If you get an error that says iphonesimulator can’t be found, then see this StackOverflow answer for ways to solve that issue. Then try running the above commands again.
If you run into SSL errors, then you probably don’t have Python’s OpenSSL setup. This command should fix that:
$ cd /Applications/Python 3.7/
$ ./Install Certificates.command
Now go back and try running the toolchain command again.
Once you’ve run all the previous commands successfully, you can create your Xcode project using the toolchain script. Your main application’s entry point must be named main.py before you create the Xcode project. Here is the command you’ll run:
./toolchain.py create <title> <app_directory>
There should be a directory named title with your Xcode project in it. Now you can open that project in Xcode and work on it from there. Note that if you want to submit your application to the App Store, then you’ll have to create a developer account at developer.apple.com and pay their yearly fee.
Packaging Your App for Windows
You can package your Kivy application for Windows using PyInstaller. If you’ve never used it before, then check out Using PyInstaller to Easily Distribute Python Applications.
You can install PyInstaller using pip:
$ pip install pyinstaller
The following command will package your application:
This command will create a Windows executable and several other files. The -w argument tells PyInstaller that this is a windowed application, rather than a command-line application. If you’d rather have PyInstaller create a single executable file, then you can pass in the --onefile argument in addition to -w.
Packaging Your App for macOS
You can use PyInstaller to create a Mac executable just like you did for Windows. The only requirement is that you run this command on a Mac:
$ pyinstaller main.py -w --onefile
This will create a single file executable in the dist folder. The executable will be the same name as the Python file that you passed to PyInstaller. If you’d like to reduce the file size of the executable, or you’re using GStreamer in your application, then check out Kivy’s packaging page for macOS for more information.
Conclusion
Kivy is a really interesting GUI framework that you can use to create desktop user interfaces and mobile applications on both iOS and Android. Kivy applications will not look like the native apps on any platform. This can be an advantage if you want your application to look and feel different from the competition!
In this tutorial, you learned the basics of Kivy including how to add widgets, hook up events, lay out multiple widgets, and use the KV language. Then you created your first Kivy application and learned how to distribute it on other platforms, including mobile!
There are many widgets and concepts about Kivy that you didn’t cover here, so be sure to check out Kivy’s website for tutorials, sample applications, and much more.
Further Reading
To learn more about Kivy, check out these resources:
- Kivy Programming Guide
- Kivy Packaging Documentation
- Build Desktop GUI Apps Using Python
To see how you might create a desktop application with another Python GUI framework, check out How to Build a Python GUI Application With wxPython.
Watch Now This tutorial has a related video course created by the Real Python team. Watch it together with the written tutorial to deepen your understanding: Build Cross-Platform GUI Apps With Kivy
замечания
Kivy — это библиотека Python с открытым исходным кодом для быстрой разработки межплатформенных пользовательских интерфейсов. Приложения Kivy могут быть разработаны для Linux, Windows, OS X, Android и iOS с использованием той же кодовой базы.
Графика создается через OpenGL ES 2, а не через собственные виджеты, что приводит к довольно равномерному появлению в разных операционных системах.
Разработка интерфейсов в Kivy необязательно включает использование kvlang, небольшого языка, который поддерживает выражения, подобные python, и взаимодействие python. Использование kvlang может значительно упростить разработку пользовательского интерфейса по сравнению с использованием исключительно Python.
Kivy может свободно пользоваться (в настоящее время под лицензией MIT) и профессионально поддерживаться.
Установка и настройка
Windows
Есть два варианта установки Kivy:
Сначала убедитесь, что инструменты python обновлены.
python -m pip install --upgrade pip wheel setuptools
Затем установите основные зависимости.
python -m pip install docutils pygments pypiwin32 kivy.deps.sdl2 kivy.deps.glew
Хотя у Kivy уже есть поставщики аудио и видео, GStreamer требуется для более продвинутых материалов.
python -m pip install kivy.deps.gstreamer --extra-index-url https://kivy.org/downloads/packages/simple/
Чтобы упростить, <python> в следующем тексте означает путь к каталогу с файлом python.exe .
-
Рулевое колесо
Колесный пакет предоставляет скомпилированный Kivy, но с удаленными
cythonисточникаcython, что означает, что основной код нельзя перекомпилировать с помощью этого способа. Код Python, однако, доступен для редактирования.Стабильная версия Kivy доступна на pypi.
python -m pip install kivyПоследняя версия официального репозитория доступна через ночные колеса, доступные на диске Google. Перейдите по ссылке в документах, соответствующих вашей версии python. После загрузки правильного колеса переименуйте его в соответствии с форматированием этого примера и запустите команду.
python -m pip install C:Kivy-1.9.1.dev-cp27-none-win_amd64.whl -
Источник
Для установки Kivy из источника требуется больше требуемых зависимостей, чем использование колес, но установка более гибкая.
Создайте новый файл в
<python>Libdistutilsdistutils.cfgс этими строками, чтобы обеспечить правильный компилятор для исходного кода.[build] compiler = mingw32Тогда нужен компилятор. Либо используйте некоторые, которые вы уже установили, либо загрузите
mingwpy. Важные файлы, такие какgcc.exeбудут расположены в<python>Scripts.python -m pip install -i https://pypi.anaconda.org/carlkl/simple mingwpyНе забудьте указать переменные окружения, чтобы Kivy знал, какие провайдеры он должен использовать.
set USE_SDL2=1
set USE_GSTREAMER=1
Теперь установите дополнительные зависимости, необходимые для компиляции.
python -m pip install cython kivy.deps.glew_dev kivy.deps.sdl2_dev
python -m pip install kivy.deps.gstreamer_dev --extra-index-url https://kivy.org/downloads/packages/simple/
Check
Pathsчтобы убедиться, что все установлено правильно и установите Kivy. Выберите один из следующих вариантов:python -m pip install C:master.zip python -m pip install https://github.com/kivy/kivy/archive/master.zip
пути
Kivy нуждается в доступе к двоичным файлам из некоторых зависимостей. Это означает, что правильные папки должны находиться в PATH среды.
set PATH=<python>Tools;<python>Scripts;<python>sharesdl2bin;%PATH%
Таким образом, <python>Libidlelib; Python может быть включен в путь с помощью <python>Libidlelib; , Затем запустите idle в консоли, а IDLE будет готово к использованию Kivy.
Упростите это
Чтобы избежать повторной установки переменных среды, либо задайте каждый необходимый путь таким образом, либо создайте пакетный ( .bat ) файл с этими строками, помещенными в <python> :
set PATH=%~dp0;%~dp0Tools;%~dp0Scripts;%~dp0sharesdl2bin;%~dp0Libidlelib;%PATH%
cmd.exe
Чтобы запустить проект Kivy после установки, запустите cmd.exe или пакетный файл и используйте python <filename>.py
установка на Ubuntu
Для установки kivy на ubuntu с помощью kivy example open terminal и выполните следующую команду
Сначала добавьте ppa
sudo add-apt-repository ppa:kivy-team/kivy
Для установки kivy
sudo apt-get install python-kivy
Для установки примеров kivy
sudo apt-get install python-kivy-example
Прикоснитесь, захватите и переместите
В следующем примере создается холст с 2 точками и 1 строка между ними. Вы сможете перемещать точку и линию вокруг.
from kivy.app import App
from kivy.graphics import Ellipse, Line
from kivy.uix.boxlayout import BoxLayout


class CustomLayout(BoxLayout):

    def __init__(self, **kwargs):
        super(CustomLayout, self).__init__(**kwargs)

        self.canvas_edge = {}
        self.canvas_nodes = {}
        self.nodesize = [25, 25]

        self.grabbed = {}

        #declare a canvas
        with self.canvas.after:
            pass

        self.define_nodes()
        self.canvas.add(self.canvas_nodes[0])
        self.canvas.add(self.canvas_nodes[1])
        self.define_edge()
        self.canvas.add(self.canvas_edge)


    def define_nodes(self):
        """define all the node canvas elements as a list"""

        self.canvas_nodes[0] = Ellipse(
            size = self.nodesize,
            pos =  [100,100]
            )

        self.canvas_nodes[1] = Ellipse(
            size = self.nodesize,
            pos =  [200,200]
            )

    def define_edge(self):
        """define an edge canvas elements"""


        self.canvas_edge = Line(
            points =  [
                self.canvas_nodes[0].pos[0] + self.nodesize[0] / 2,
                self.canvas_nodes[0].pos[1] + self.nodesize[1] / 2,
                self.canvas_nodes[1].pos[0] + self.nodesize[0] / 2,
                self.canvas_nodes[1].pos[1] + self.nodesize[1] / 2
                ],
            joint = 'round',
            cap = 'round',
            width = 3
            )


    def on_touch_down(self, touch):

        for key, value in self.canvas_nodes.items():
            if (value.pos[0] - self.nodesize[0]) <= touch.pos[0] <= (value.pos[0] + self.nodesize[0]):
                if (value.pos[1] - self.nodesize[1]) <= touch.pos[1] <= (value.pos[1] + self.nodesize[1]):
                    touch.grab(self)
                    self.grabbed = self.canvas_nodes[key]
                    return True

    def on_touch_move(self, touch):

        if touch.grab_current is self:
            self.grabbed.pos = [touch.pos[0] - self.nodesize[0] / 2, touch.pos[1] - self.nodesize[1] / 2]
            self.canvas.clear()
            self.canvas.add(self.canvas_nodes[0])
            self.canvas.add(self.canvas_nodes[1])
            self.define_edge()
            self.canvas.add(self.canvas_edge)
        else:
            # it's a normal touch
            pass

    def on_touch_up(self, touch):
        if touch.grab_current is self:
            # I receive my grabbed touch, I must ungrab it!
            touch.ungrab(self)
        else:
            # it's a normal touch
            pass

class MainApp(App):

    def build(self):
        root = CustomLayout()
        return root

if __name__ == '__main__':
    MainApp().run()
Привет, мир в киви.
Следующий код иллюстрирует, как сделать приложение «hello world» в kivy. Чтобы запустить это приложение в ios и android, сохраните его как main.py и используйте buildozer.
from kivy.app import App
from kivy.uix.label import Label
from kivy.lang import Builder

Builder.load_string('''
<SimpleLabel>:
    text: 'Hello World'
''')


class SimpleLabel(Label):
    pass


class SampleApp(App):
    def build(self):
        return SimpleLabel()

if __name__ == "__main__":
    SampleApp().run()
Простой пример в Киви.
Следующий код иллюстрирует, как делать простые всплывающие окна с Kivy.
from kivy.app import App
from kivy.uix.popup import Popup
from kivy.lang import Builder
from kivy.uix.button import Button

Builder.load_string('''
<SimpleButton>:
    on_press: self.fire_popup()
<SimplePopup>:
    id:pop
    size_hint: .4, .4
    auto_dismiss: False
    title: 'Hello world!!'
    Button:
        text: 'Click here to dismiss'
        on_press: pop.dismiss()
''')


class SimplePopup(Popup):
    pass

class SimpleButton(Button):
    text = "Fire Popup !"
    def fire_popup(self):
        pops=SimplePopup()
        pops.open()

class SampleApp(App):
    def build(self):
        return SimpleButton()

SampleApp().run()
RecycleView
from kivy.app import App
from kivy.lang import Builder
from kivy.uix.button import Button


items = [
    {"color":(1, 1, 1, 1), "font_size": "20sp", "text": "white",     "input_data": ["some","random","data"]},
    {"color":(.5,1, 1, 1), "font_size": "30sp", "text": "lightblue", "input_data": [1,6,3]},
    {"color":(.5,.5,1, 1), "font_size": "40sp", "text": "blue",      "input_data": [64,16,9]},
    {"color":(.5,.5,.5,1), "font_size": "70sp", "text": "gray",      "input_data": [8766,13,6]},
    {"color":(1,.5,.5, 1), "font_size": "60sp", "text": "orange",    "input_data": [9,4,6]},
    {"color":(1, 1,.5, 1), "font_size": "50sp", "text": "yellow",    "input_data": [852,958,123]}
]


class MyButton(Button):

    def print_data(self,data):
        print(data)


KV = '''

<MyButton>:
    on_release:
        root.print_data(self.input_data)

RecycleView:
    data: []
    viewclass: 'MyButton'
    RecycleBoxLayout:
        default_size_hint: 1, None
        orientation: 'vertical'

'''


class Test(App):
    def build(self):
        root = Builder.load_string(KV)
        root.data = [item for item in items]
        return root


Test().run()
Различные способы запуска простого приложения и взаимодействия с виджетами
Большинство приложений kivy начинаются с этой структуры:
from kivy.app import App

class TutorialApp(App):
    def build(self):
        return
TutorialApp().run()
Существует несколько способов:
Все коды, приведенные ниже (кроме примеров 1 и 3), имеют один и тот же виджетов и аналогичные функции, но показывают другой способ создания приложения.
Пример 1: возврат одного виджета (простого приложения Hello World)
from kivy.app import App
from kivy.uix.button import Button
class TutorialApp(App):
    def build(self):
        return Button(text="Hello World!")
TutorialApp().run()
Пример 2: возврат нескольких виджетов + кнопка печатает текст метки
from kivy.app import App
from kivy.uix.boxlayout import BoxLayout
from kivy.uix.label import Label
from kivy.uix.button import Button

class TutorialApp(App):
    def build(self):
        mylayout = BoxLayout(orientation="vertical")
        mylabel = Label(text= "My App")
        mybutton =Button(text="Click me!")
        mylayout.add_widget(mylabel)
        mybutton.bind(on_press= lambda a:print(mylabel.text))
        mylayout.add_widget(mybutton)
        return mylayout
TutorialApp().run()
Пример 3: использование класса (одиночный виджет) + кнопка печатает «Моя кнопка»
from kivy.app import App
from kivy.uix.button import Button

class Mybutton(Button):
    text="Click me!"
    on_press =lambda a : print("My Button")

class TutorialApp(App):
    def build(self):
        return Mybutton()
TutorialApp().run()
Пример 4: это то же самое, что и ex. 2, но он показывает, как использовать класс
from kivy.app import App
from kivy.uix.boxlayout import BoxLayout
from kivy.uix.label import Label
from kivy.uix.button import Button

class MyLayout(BoxLayout):
    #You don't need to understand these 2 lines to make it work!
    def __init__(self, **kwargs):
        super(MyLayout, self).__init__(**kwargs)

        self.orientation="vertical"
        mylabel = Label(text= "My App")
        self.add_widget(mylabel)
        mybutton =Button(text="Click me!")
        mybutton.bind(on_press= lambda a:print(mylabel.text))
        self.add_widget(mybutton)

class TutorialApp(App):
    def build(self):
        return MyLayout()
TutorialApp().run()
С языком .kv
Пример 5: то же самое, но показывая, как использовать язык kv в python
from kivy.app import App
from kivy.uix.boxlayout import BoxLayout
# BoxLayout: it's in the python part, so you need to import it

from kivy.lang import Builder
Builder.load_string("""
<MyLayout>
    orientation:"vertical"
    Label: # it's in the kv part, so no need to import it
        id:mylabel
        text:"My App"
    Button:
        text: "Click me!"
        on_press: print(mylabel.text)
""")
class MyLayout(BoxLayout):
    pass
class TutorialApp(App):
    def build(self):
        return MyLayout()
TutorialApp().run()
** Пример 6: то же самое с частью kv в файле Tutorial.kv **
В .py:
from kivy.app import App
from kivy.uix.boxlayout import BoxLayout

class MyLayout(BoxLayout):
    pass
class TutorialApp(App):
#the kv file name will be Tutorial (name is before the "App")
    def build(self):
        return MyLayout()
TutorialApp().run()
В Tutorial.kv:
<MyLayout> # no need to import stuff in kv!
    orientation:"vertical"
    Label:
        id:mylabel
        text:"My App"
    Button:
        text: "Click me!"
        on_press: print(mylabel.text)
** Пример 7: ссылка на конкретный файл kv + a def в python, получающий label.text **
В .py:
from kivy.app import App
from kivy.uix.boxlayout import BoxLayout

class MyLayout(BoxLayout):
    def printMe(self_xx, yy):
        print(yy)
class TutorialApp(App):
    def build(self):
        self.load_kv('myapp.kv')
        return MyLayout()
TutorialApp().run()
В myapp.kv: ориентация: «вертикальная» Ярлык: id: mylabel text: кнопка «Мое приложение»: текст: «Нажмите меня!» on_press: root.printMe (mylabel.text)
Пример 8: кнопка печатает текст метки (с помощью def в python с использованием ids («ID»))
Заметить, что:
-
self_xxиз примера 7 заменяется наself
В .py:
from kivy.app import App
from kivy.uix.boxlayout import BoxLayout

class MyLayout(BoxLayout):
    def printMe(self):
        print(self.ids.mylabel.text)
class TutorialApp(App):
    def build(self):
        self.load_kv('myapp.kv')
        return MyLayout()
TutorialApp().run()
В myapp.kv:
<MyLayout>
    orientation:"vertical"
    Label:
        id:mylabel
        text:"My App"
    Button:
        text: "Click me!"
        on_press: root.printMe()
Пример 9: кнопка печатает текст метки (с помощью def в python с использованием StringProperty)
В .py:
from kivy.app import App
from kivy.uix.boxlayout import BoxLayout
from kivy.properties import StringProperty
class MyLayout(BoxLayout):
    stringProperty_mylabel= StringProperty("My App")
    def printMe(self):
        print(self.stringProperty_mylabel)

class TutorialApp(App):
    def build(self):
        return MyLayout()
TutorialApp().run()
В Tutorial.kv:
<MyLayout>
    orientation:"vertical"
    Label:
        id:mylabel
        text:root.stringProperty_mylabel
    Button:
        text: "Click me!"
        on_press: root.printMe()
Пример 10: кнопка печатает текст метки (с помощью def в python с использованием ObjectProperty)
В .py:
from kivy.app import App
from kivy.uix.boxlayout import BoxLayout
from kivy.properties import ObjectProperty
class MyLayout(BoxLayout):
    objectProperty_mylabel= ObjectProperty(None)
    def printMe(self):
        print(self.objectProperty_mylabel.text)

class TutorialApp(App):
    def build(self):
        return MyLayout()
TutorialApp().run()
В Tutorial.kv:
<MyLayout>
    orientation:"vertical"
    objectProperty_mylabel:mylabel
    Label:
        id:mylabel
        text:"My App"
    Button:
        text: "Click me!"
        on_press: root.printMe()
Python обладает большим набором библиотек для разработки графического интерфейса. Ранее мы уже знакомились с TKinter, а также PyQT5. Сейчас мы рассмотрим принцип работы с библиотекой Kivy.
Зачем изучать Kivy?
Разрабатывать программы можно на разных языках программирования. Даже при помощи JavaScript и библиотеки Electron это также можно делать. В то же время, создавать крупные ПК проекты на JS не охота, ибо язык медленный и не столь удобный. Использовать Swift или C# тоже не хочется, так как в этом случае разработка будет вестись лишь под одну операционную систему.
Можно делать проекты на Java, React Native или на Flutter. Все они хороши, но все же еще хорошим и крупным игроком является Python вместе со своими библиотеками. Он обеспечивает разработку кроссплатформенных программ с хорошей скоростью выполнения. И еще приятным бонусом является само написание программы, ведь синтаксис языка Python хороший.
Для языка Python сфера полноценных проектов не первостепенно важна, но все же язык предоставляет отличные возможности для разработки полноценных программ под разные операционные системы.
Информация относительно Kivy
Фреймворк Kivy разрабатывается с 2011 года. С момента релиза на его основе было построено много проектов под платформу Андирод.
Если сравнивать Kivy с другими библиотеками языка Питон по набору функций, то среди крупных конкурентов можно выделить PyQT. Все прочие библиотеки явно будут уступать по функционалу.
Также смотрите наш курс по изучению PyQT
Важно отметить, что Kivy имеет большой набор уже готовых проектов, которые вы можете использовать для построения своих программ.
Установка Kivy
Для установки Kivy вам потребуется стандартный пакетный менеджер pip и программа для написания кода. Для получения пакетного менеджера выполните установку Python на ваш компьютер, при чем установите Питон именно версии 3.7. Он лучше остальных подходит под Kivy.
Чтобы выполнить установку пропишите в терминале команду pip install kivy и далее библиотека будет готова к использованию.
Создание проекта
Ниже представлен код готового приложения на Kivy. Полная информация относительно Питон Киви находится в обучающем видео в конце этой статьи.
Код программы:
# Импорт всех классов
from kivy.app import App
from kivy.uix.label import Label
from kivy.uix.textinput import TextInput
from kivy.uix.boxlayout import BoxLayout

from kivy.core.window import Window

# Глобальные настройки
Window.size = (250, 200)
Window.clearcolor = (255/255, 186/255, 3/255, 1)
Window.title = "Конвертер"


class MyApp(App):

	# Создание всех виджетов (объектов)
	def __init__(self):
		super().__init__()
		self.label = Label(text='Конвертер')
		self.miles = Label(text='Мили')
		self.metres = Label(text='Метры')
		self.santimetres = Label(text='Сантиметры')
		self.input_data = TextInput(hint_text='Введите значение (км)', multiline=False)
		self.input_data.bind(text=self.on_text) # Добавляем обработчик события

	# Получаем данные и производит их конвертацию
	def on_text(self, *args):
		data = self.input_data.text
		if data.isnumeric():
			self.miles.text = 'Мили: ' + str(float(data) * 0.62)
			self.metres.text = 'Метры: ' + str(float(data) * 1000)
			self.santimetres.text = 'Сантиметры: ' + str(float(data) * 100000)
		else:
			self.input_data.text = ''

	# Основной метод для построения программы
	def build(self):
		# Все объекты будем помещать в один общий слой
		box = BoxLayout(orientation='vertical')
		box.add_widget(self.label)
		box.add_widget(self.input_data)
		box.add_widget(self.miles)
		box.add_widget(self.metres)
		box.add_widget(self.santimetres)

		return box


# Запуск проекта
if __name__ == "__main__":
	MyApp().run()
Видео на эту тему
Детальный разбор Python Kivy вы можете просмотреть на видео ниже. В видеоуроке показан разбор библиотеки и её возможностей.
Видеоурок:
Дополнительный курс
На нашем сайте также есть углубленный курс по изучению языка Питон. В ходе огромной программы вы изучите не только язык Питон, но также научитесь создавать веб сайты за счёт веб технологий и фреймворка Джанго. За курс вы изучите массу нового и к концу программы будете уметь работать с языком Питон, создавать на нём полноценные приложения на основе библиотеки Kivy, а также создавать веб сайты на основе библиотеки Джанго.

Introduction
Kivy can build applications for desktop and mobile including Android and iOS.
The same code base can be used for both desktop and mobile, depending
on what hardware devices you are trying to access.
This guide will walk through the basics of installing Kivy,
building simple applications, building and packaging them for
desktop and Android.
For an example of a complete project, check out my
Bitcoin Price Checker example
with the Live Stream on YouTube.
Alternatives for desktop application programming with Python are
PyQt5, Tkinter, and wxPython.
Those packages have a more traditional desktop UI but lack the Android and iOS
build capabilities the same way Kivy has. Qt technically supports Android
but it is not easy to build with PyQt5.
Important concepts
There are a few concepts to understand in mind when building a Kivy application:
- Layouts — Screen layouts are defined in a
.kvtemplate file using a special Kivy language - Widgets — The UI elements that get packed in to layout elements. Buttons, for example.
- A layout is just another type of widget
To create a Kivy application in Python, there are a few easy steps:
- Create a class that inherits the Kivy main app class
kivy.app.App - Define a
build()method in the class that returns a root widget; anything from a single Button (kivy.uix.button.Button) to a complex GridLayout (kivy.uix.gridlayout.GridLayout)). - Create an instance of your class and call the
.run()method.
That is all there is to a Kivy app at a high level.
Installation
You will need to install the Python package kivy at a minimum.
There is also an optional package called plyer that contains a number
of cross-platform APIs for accessing device features like notifications
and GPS. Another package used for building Android and iOS is named buildozer.
You have a few options for installing Kivy:
- From source: https://github.com/kivy/kivy
- Download it from the Kivy website
- Use
pipto install the packages
To use pip to install Kivy:
# The core package
python -m pip install kivy

# For additional cross-platform APIs like notifications, GPS, and vibrator
python -m pip install plyer
# For Android/iOS building (Linux only)
python -m pip install buildozer

# You probablyalso need cython for the Android builds
python -m pip install cython
# Or use your system package like this for Fedora:
sudo dnf install python3-Cython
On Fedora, I needed to install ncurses-compat-libs to resolve the error:
$HOME/.buildozer/android/platform/android-ndk-r17c/toolchains/llvm/prebuilt/linux-x86_64/bin/clang: error while loading shared libraries: libtinfo.so.5: cannot open shared object file: No such file or directory.
# For Fedora might be needed
dnf install ncurses-compat-libs
In Ubuntu, others report similar: https://github.com/kivy/buildozer/issues/841
# Ubuntu fixes
sudo apt-get install libncurses5-dev libncursesw5-dev
sudo apt-get install libtinfo5
In Windows, you may need to install other dependencies.
Official instrucations: Installation in Windows
# Other pip packages to install
python -m pip install pypiwin32
python -m pip install kivy_deps.glew
# One of the backends:
python -m pip install kivy_deps.sdl2
python -m pip install kivy.deps.angle
# If needed for video
python -m pip install kivy.deps.gstreamer
Check installed version
Once Kivy is installed, you can verify it is installed
properly and check what version you have installed.
To check what version of Kivy you have, you run pip list to check
the Kivy package version, or just open your Python interpreter and
import kivy and inspect kivy.__version__.
>>> import kivy
[INFO   ] [Kivy        ] v1.11.1
[INFO   ] [Kivy        ] Installed at "/usr/local/lib64/python3.7/site-packages/kivy/__init__.py"
[INFO   ] [Python      ] v3.7.4 (default, Jul  9 2019, 16:32:37)
[GCC 9.1.1 20190503 (Red Hat 9.1.1-1)]
[INFO   ] [Python      ] Interpreter at "/usr/bin/python3"
>>> kivy.__version__
'1.11.1'
Start a new project
A Kivy application can be as simple as a single .py file.
This is an example of a minimal application that loads a window with one widget, a button:
# main.py
# Modified from https://kivy.org/doc/stable/guide/basic.html
import kivy
kivy.require('1.11.1')  # Set to your Kivy version
from kivy.app import App
from kivy.uix.button import Button


class MyApp(App):
    def build(self):
        return Button(text='This is a button.')


MyApp().run()
Run the application by executing the Python file:
python main.py
Use the Kv language
In the first example we just returned a single root widget, the button.
You can use methods like .add_widget() to pack in nested widgets,
but it can be tedious to do all the layout building programmatically.
This is why Kivy created the Kv language for defining widget trees.
It is similar to YAML but defines the heirarchy of widgets.
It is easier to work with visually and creates separation between the
view layer and the controller code.
While the Kv language is optional, and you don’t have to use it,
it is the preferred way to build layouts and worth
getting familiar with.
Read more about the KV language in the official Kv language guide
You can provide KV templates as separate .kv files or as hard-coded
strings inside your Python code.
When building a user interface, you first need to understand the layouts.
The layouts will allow you to organize the screen.
For example, do you want to stack up
a list of buttons vertically, or do you want to have a main
frame with a top and bottom bar, or do you want a 3×3 grid of buttons?
Read more about layouts.
These are some of the common layout types:
- kivy.uix.boxlayout.BoxLayout
- kivy.uix.gridlayout.GridLayout
- kivy.uix.stacklayout.StackLayout
- kivy.uix.pagelayout.PageLayout
Once you have a layout (which you can nest inside other layouts),
you can start putting widgets in it.
Widgets are things like buttons, text fields, and checkboxes.
Read more about widgets in the official Widget Guide.
Here is an example .kv file that uses a box layout to hold
two buttons. This creates two buttons side-by-side with no text.
While it is valid and demonstrates the simplest case, it’s
not very useful.
# example.kv
BoxLayout:
    Button:
    Button:
Once you have a .kv file ready, you need to load it in your application.
By default, it tries to map your app class to a .kv based off of the name.
For example, if your app is named PracticeApp it will look for a file named
practice.kv. I prefer to be more explicit and use kivy.lang.builder.Builder.load_file()
to load a specific file. Alternatively, if you don’t want to use a file at all, you can use
kivy.lang.builder.Builder.load_string() to load a string with the Kv contents.
Here is an example of how to load the simple example.kv file we created a few lines above.
# main.py
import kivy
kivy.require('1.11.1')  # Set to your Kivy version
from kivy.app import App
from kivy.lang.builder import Builder


class MyApp(App):
    def build(self):
        return Builder.load_file('example.kv')


MyApp().run()
A button generally needs some text and and a callback function to be useful though.
We can modify the .kv file to look more like this:
# example.kv
BoxLayout:
    Button:
        id: btn1
        text: "Button 1"
        on_press: print("%s was pressed" % btn1.text)
    Button:
        text: "Button 2"
        on_press: print(8 * 8)
You can reference other methods from the on_press and other events.
For example in the Button object, referencing self would reference
the Button object, and referencing root would reference the root
widget in the heirarchy (BoxLayout in this case).
A more powerful way to do this would be to create a custom class
that inherits the BoxLayout so we can extend its behavior.
We can swap out the BoxLayout in the .kv file and replace it with our
CustomBoxLayout widget.
# example.kv
MyCustomBoxLayout:
    Button:
        text: "Press me"
        on_press: root.custom_callback()
    Button:
We haven’t actually created the CustomBoxLayout class though.
We need to add one in our .py file like this:
# main.py
import kivy
kivy.require('1.11.1')  # Set to your Kivy version
from kivy.app import App
from kivy.lang.builder import Builder
from kivy.uix.boxlayout import BoxLayout


class MyCustomBoxLayout(BoxLayout):
    def custom_callback(self):
        print('Custom callback called.')


class MyApp(App):
    def build(self):
        return Builder.load_file('example.kv')


MyApp().run()
Running the above example would load the .kv file and hook up the callback specified
in the .kv file with the method defined in the .py file.
Use Plyer to access mobile device hardware
Plyer is a Kivy package that provides an API to hardware devices
like accelerometer, screen brightness, camera, compass, and GPS.
It also provides access to some utilities like notifications,
which work across desktop and mobile. It’s a very ambitious
library that has some cool features. Refer to
the Plyer documentation
for the latest information.
You can also find code examples at:
https://github.com/kivy/plyer/tree/master/examples
As of September 2019, I found several of the examples did not work
on my Android device. The compatibility still seems to be a
bit questionable. Be sure to test out of a module works on device.
python -m pip install plyer
Then you can try building some of the Plyer examples.
See the section further down about how to use buildozer to build an .apk file for Android.
Build and package
Now that we have looked at installing Kivy and building a simple application,
let’s look at how to run and package a Kivy application for distribution.
We’ll look at desktop applications and then Android. I don’t cover
iOS because I don’t have any experience with it, but Kivy does support it.
Build for desktop
You can share your app in a few ways, starting from simplest to most complex packaging:
- As source code — let people download your source, install Python and Kivy, and run your script themselves.
- As a Python package — Package it with distutils and a
setup.pythat users can install withpython setup.py install - Push the Python package to pypi.org so others can install it with
pip install - Use PyInstaller to package a .exe or Mac/Linux equivalent. This can create a directory with the .exe and supporting
files or a standalone .exe (slower to startup). Distribute this as a .zip for others to download and run.
Check out my PyInstaller Tutorial to learn more about how to use it. - Create an system-specific installer package (e.g. MSI installer with InnoSetup for Window, or a
.debpackage for Ubuntu/Debian)
that install the package created with PyInstaller. Check out my Debian Package Tutorial to learn how to make a .deb.
For more details on packaging, refer to the official documentation for Windows packaging and OSX packaging.
PyInstaller notes
If using PyInstaller to package the application,
there is a special step needed in order to ensure the SDL and glew DLLs are included in the final package.
These notes are taken from the official instructions at:
https://kivy.org/doc/stable/guide/packaging-windows.html#pyinstaller-default-hook.
To use PyInstaller to get a properly built package with the right DLLs,
modify the PyInstaller .spec file to have at the top:
from kivy_deps import sdl2, glew
And in the coll object, after the last positional argument, add:
*[Tree(p) for p in (sdl2.dep_bins + glew.dep_bins)],
This will allow it to find and include the right dependencies since they are included in the code.
This helps with errors like unable to get window.
If you want to create an installer, you need to build an installer for each platform.
For example, you can use Inno Setup to build
Windows installer wizards.
Build for Android
Let’s look at the basic steps for building an Android .apk with a Python Kivy application.
For more in-depth details on building for Android, check out the official documentation pages:
- Packaging for Android
- Android guide
Test adb
The adb tool is crucial to Android tooling. Buildozer has a way
to use adb. The one special thing to remember when calling adb
through the buildozer command is that you need to add two dashes (--)
before passing the actual command for adb.
To verify everything is working, check the adb version.
Running the version command will also output the full path
to the adb executable that it is using if you want to run it directly yourself.
python -m buildozer -v android adb -- version
# adb path will be something like:
# $HOME/.buildozer/android/platform/android-sdk/platform-tools/adb
You can also use adb to list devices like this:
python -m buildozer -v android adb -- devices
Configure the buildozer.spec file
The buildozer.spec file has all the configuration for
the Android and iOS build parameters.
Generate a template buildozer spec file using init command:
# Generates a `buildozer.spec` file
python -m buildozer init
With the generated buildozer.spec file, edit it to specify things like:
- Project name
- Version
- Source directory
- Files to include and exclude
- Required Python packages
- Icon image —
icon.filenamea 512×512 PNG - Splash loading image —
presplash.filenamea 512×512 PNG - Change allowed orientations —
orientation = all - Log level (
log_level = 2) - Android Permissions
- Android API level
Build the APK file
Once you have your Python Kivy application
and a buildozer.spec file for your project.
You can build a debug APK that does not require signing
or a release app that is signed and ready for the Google Play Store.
Build the debug APK
To build the debug APK which doesn’t require any app signing,
runthe android debug command for buildozer.
python3 -m buildozer -v android debug
This will generate an APK file in the bin/ directory with a name like:
myapp-0.1-debug.apk.
Build the release APK
To build the release APK there is more involved than the debug one.
You need to first have a keystore with a key ready to sign the app.
See my Java Keytool Tutorial to
learn how to generate and manage keystores. Once you have a keystore,
come back and the rest will make sense here.
Also refer to the Kivy Wiki: Creating a Release APK.
The main thing Buildozer needs to have is your keystore information.
You can set these values as environment variables.
You need to provide the keystore path, keystore password,
key alias, and key password.
export P4A_RELEASE_KEYSTORE=$HOME/.keystore
export P4A_RELEASE_KEYSTORE_PASSWD=s3cr3t
export P4A_RELEASE_KEYALIAS_PASSWD=s3cr3t
export P4A_RELEASE_KEYALIAS=mykey
Once your keystore environment variables are set, you can run the release build command:
# Requires the buildozer.spec file
python3 -m buildozer -v android release
Release app on the Google Play Store
Once you have a signed release APK from the previous step, you can publish it to the Google Play Store.
I have a dedicated tutorial about this topic.
Check out How to Publish Android Apps to Google Play Store.
Install the app
Install the application to a device (physical or virtual)
by running android debug deploy. This will install it
to all connected devices.
python -m buildozer -v android debug deploy
You can also use buildozer to serve the current directory with
an HTTP server. This is useful so any Android device on the network
can open the HTTP URL in a web browser and download the .apk and install
it on the device without the need to be connected via USB.
# Serve the current HTTP directory on port 8000
python -m buildozer serve
# Essentially the same as Python 3's http.server
python -m http.server
You’d then visit http://<your-hostname-or-ip>/ and navigate to the .apk file.
Run the app
You can build, install, and run the app all in one step with:
python -m buildozer -v android debug deploy run
- The built .apk file is about 13MB.
- The RAM consumption of simple example in debug is about 60MB.
The stats did not change much between release and debug mode.
View debug log
Use logcat to view the device logs
python -m buildozer -v android logcat
If you run with multiple devices attached it won’t tail the logs.
If you have one device then you will get the stream of log messages.
You can build, install, run, and dump logs in a single step.
You will get a ton of log messages so it’s best to output it to a file like this:
python -m buildozer -v android debug deploy run logcat 2>log.txt
Other common tasks
Now that we have looked at installing Kivy,
creating simple applications,
and how to package them for distribution,
we have all the knowledge needed to create
an app.
At this point you should understand how to
get everything installed, create an application from scratch,
creating custom widgets and callbacks with the Kv language,
and how to build the app in to a .exe for desktop and a .apk for Android.
All that information should be enough to continue exploring Kivy
and building your own applications.
Kivy also includes packages for many things, including:
- animation
- async
- audio
- canvas drawing
- shaders
- 3D rendering
Refer to the official Kivy documentation
for the latest and most accurate information.
For code references, check out the collection of official
Kivy examples.
To learn more, follow the official Pong game tutorial.
It shows you how to build a Pong game using Rectangle and Ellipse widgets
on a canvas widget, and use the built-it collide_widget() method
available on widgets to detect collisions like the ball hitting the paddle.
Also check out the Paint app tutorial which shows you how to detect touches and respond by
drawing an Ellipse (circle) at the touch location.
Conclusion
After reading this, you should have a good understanding of what Kivy is
and how you can use it. You should understand how to create desktop apps
and mobile apps by building layouts using the .kv language. Additionally,
you should know how to use the plyer package to access cross-platform
features and hardware devices.
References
- Official Kivy documentation
- Kivy Source
- Kv language guide
- Kivy examples
- Paint app tutorial
- Pong game tutorial
- Widget Guide
- Plyer documentation
- Plyer examples
- PyInstaller Tutorial
- InnoSetup
- Windows packaging
- OSX packaging
- Android packaging
- Android Kivy guide
- Buildozer source
- Inno Setup Installer
- PyQt5 Tutorial
- Python Tkinter Tutorial
- wxPython
- Bitcoin Price Checker
- Live Stream making Bitcoin Price Checker
- Java Keytool Tutorial
- Kivy Wiki: Creating a Release APK
- How to Publish Android Apps to Google Play Store