Введение
Бывают ситуации, когда очень хочется использовать любимый редактор, но под рукой нету *nix операционных систем, либо разработка ведётся на Windows.
Первое что приходит на ум — использование Windows версии gVim, но в этом случае возникает куча проблем с установкой плагинов, переносом конфигов и адаптации всего и вся. Что-то не будет компилироваться без бубна (например Ctrl-p), а что-то падать во время работы.
Cygwin и Mintty спешат на помощь
Качаем с сайта и устанавливаем последнюю версию Cygwin.
При установке выбираем любое зеркало из списка доступных.
Выбираем следующие пакеты:
- git
- Vim
- ruby
- libsasl2
- ca-certificates
Пока пакеты качаются и ставятся, самое время добыть удобный терминал. Мой выбор пал на mintty. Установка осуществляется копированием mintty.exe в папку bin Cygwin-а.
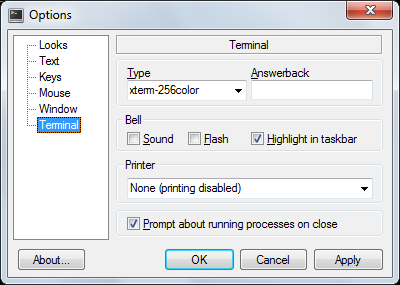
Для того, чтобы всё выглядело прилично — его нужно поднастроить. Запускаем mintty, тыкаем правой кнопкой на иконку в левом верхнем углу консольки и выбираем «Options…».
Выключаем опцию Blinking, чтобы не отвлекало, выбираем привычный Block в качестве курсора.

Выбираем шрифт по вкусу, ставим сглаживание в Full, Locale — C, Character Set — UTF-8.

Очень важно поставить тип терминала в xterm-256color.
VIM
Одно несомненное преимущество данного подхода это то, что теперь можно использовать ту же самую конфигурацию Vim, что и в *nix системе. А так же мы получаем в своё распоряжение полноценную консоль и можем работать с Windows файлами с помощью утилит grep, find, ack.
Рекомендую создать приватный репозиторий со всеми конфигами совершенно бесплатно на каком-нибудь Bitbucket. Такие подборки обычно называют dotfiles.
Одним приятным открытием в плане конфигурации Vim-а для меня стал Vimified, который базируется на Vundle.
Его лучше ставить по шагам, а то мало-ли что-то пропустили во время установки Cygwin. Шаги установки подробно расписаны в описании к репозиторию.
cd
git clone git://github.com/zaiste/vimified.git
ln -sfn vimified ~/.vim
ln -sfn vimified/vimrc ~/.vimrc
cd vimified
Затем
mkdir bundle
mkdir -p tmp/backup tmp/swap tmp/undo
Клонируем Vundle
git clone https://github.com/gmarik/vundle.git bundle/vundleПервый запуск Vim может пройти с ошибками из-за того, что предусмотренные конфигурацией пакеты ещё не установлены, но это не страшно.
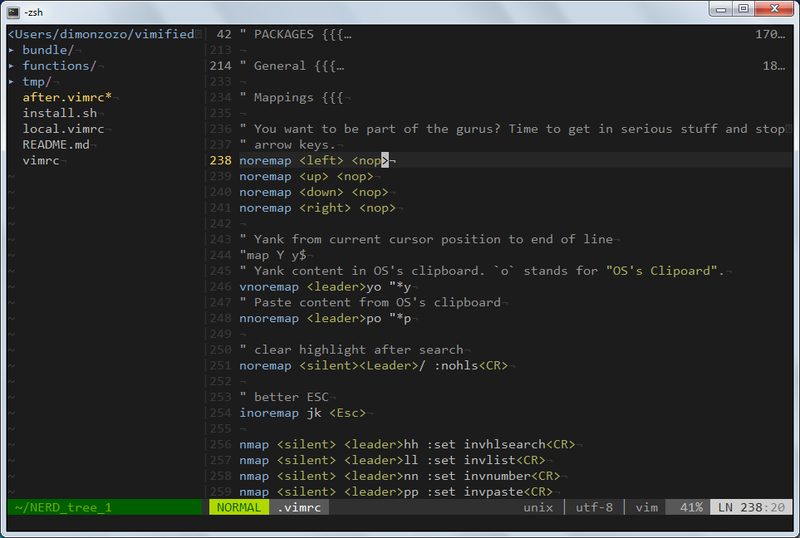
vim +BundleInstall +qallПерезапускаем Vim. И вот что у нас должно получится после небольших корректировок и правок.
Заключение
В итоге мы получили:
- Полноценный рабочий Vim
- Приятная цветовая схема и палитра, которая радует глаз
- Работает прокрутка колесом мыши (для любителей)
- Работает изменение размера панелей простым кликом и перетаскиванием
Спасибо за внимание. Надеюсь кому-нибудь пригодится.
Извещения об ошибках — хабрапочтой.
Только зарегистрированные пользователи могут участвовать в опросе. Войдите, пожалуйста.
Каким VIM-ом вы пользуетесь?
61.13%
Консольный vim
346
Проголосовали 566 пользователей.
Воздержались 302 пользователя.

Vim is a powerful code editor. So powerful that both Linux and Mac have it installed by default.
But if you are using Windows as your operating system, you will need to install Vim separately.
Fortunately, Microsoft makes it very easy to install Vim and get it running on your PC.
How to Download Vim
You can download the latest version of the Vim Text Editor straight from Vim themselves.
They have built a special self-executing installer that walks you through the process of installing Vim in the right location on your hard drive.
Note that for Windows you will technically download something called gVim, which is a version of Vim that includes a basic graphic user interface (GUI). You can install it by downloading this executable installer.
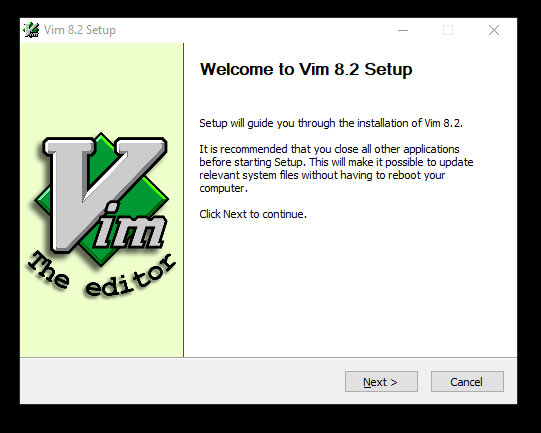
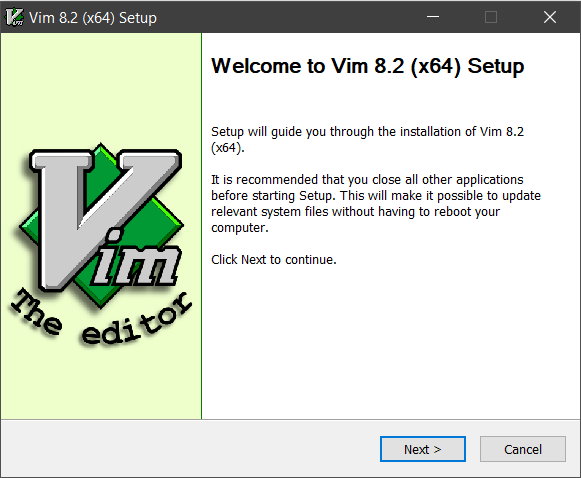
Once you’ve downloaded the file, you just need to run it, and you’ll see a nice installation wizard that looks like this:
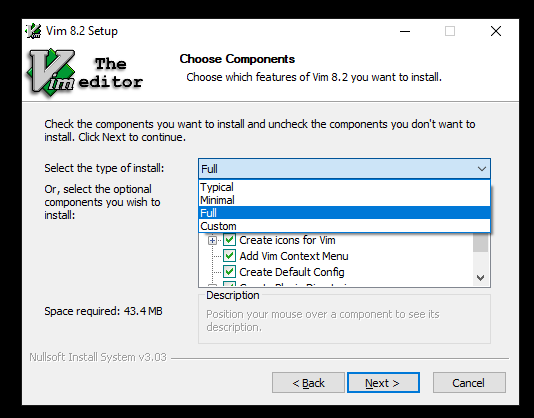
They have a recommended «typical» installation. but if you have a reasonably large hard drive, there’s no harm in going ahead with installing everything by choosing the «full» option:
How to Run Vim in PowerShell
Then, once you’ve installed Vim, you should be able to launch it from your Windows command prompt.
Note that as of 2020, PowerShell has all of the same functionality as CMD, plus a whole lot more. I recommend using PowerShell for everything.
You can open PowerShell from the Windows menu bar by typing «powershell» in the search field on the start bar.
Windows will open PowerShell, and you’ll get a command prompt that looks something like this:
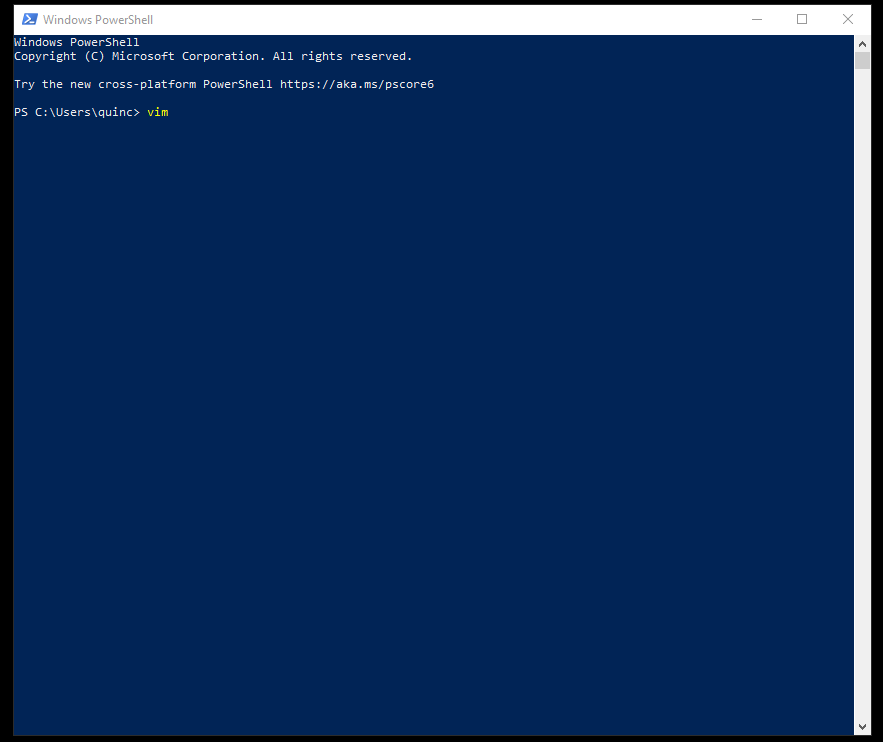
Once you’re in PowerShell, here’s how to run Vim itself. All you have to do is type «vim» and press enter. This will open up Vim. Once Vim is open, this is what you should see:
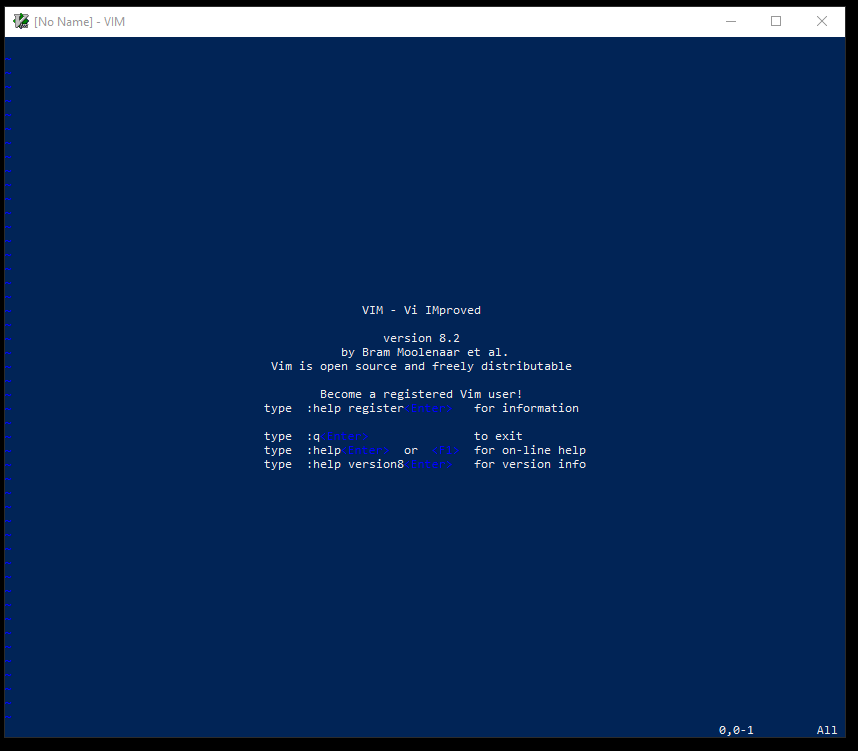
Congratulations – you now have Vim installed.
How to run Vim inside VS Code
If you are already using VS Code, and want a lot of the speed of Vim without losing the functionality of VS Code, I have good news. It is possible to run a Vim-like experience right within VS Code.
Here is a Vim plugin for VS Code that will help you do this. At the time of me writing this, this plugin has been installed nearly 2 million times.
How to Learn How to Use Vim Properly
Vim is a powerful code editor, and it will take you a lot of practice to get comfortable with it.
Here are a few Vim tutorials that will really help you quickly grasp the basics and get your fingers flying in no time.
For starters, one way Vim is different from other code editors is that Vim has «modes». Here are all of Vim’s modes explained, with examples.
Vim can be intimidating. There is so much to learn. But this guide will show you how not to be afraid of Vim anymore.
If you’re already using VS Code and want to switch completely to Vim, this article will explain how you can do so.
And here are 7 Vim Tips That Changed #100DaysOfCode founder Alex Kallaway’s life. In this article, he not only explain these, but shows demos of these tips in action.
Vim: Learn it, live it, love it.
In the 30 years since Bram Moolenaar first created Vim, its influence has spread far and wide. And even today, the Vim project is actively maintained and constantly improving.
I’ve met so many developers over the years who swear by Vim.
I hope this guide has helped you get running Vim on your Windows PC. And I hope these other tutorials I’ve shared with you here will help you go from zero-to-sixty within the coming months.
The key is to keep practicing and not get discouraged by how many Vim shortcuts there are to remember. Eventually, all of these will become muscle memory, and you’ll be flying from one file to another, banging out code like a terminator.
There is no feeling quite as cool as being able to drop into a codebase and immediately start making changes without ever even reaching for a mouse or trackpad. That is the power that Vim promises, and delivers in spades.
Learn to code for free. freeCodeCamp’s open source curriculum has helped more than 40,000 people get jobs as developers. Get started
Vim is a powerful code editor. So powerful that both Linux and Mac have it installed by default.
But if you are using Windows as your operating system, you will need to install Vim separately.
Fortunately, Microsoft makes it very easy to install Vim and get it running on your PC.
How to Download Vim
You can download the latest version of the Vim Text Editor straight from Vim themselves.
They have built a special self-executing installer that walks you through the process of installing Vim in the right location on your hard drive.
Note that for Windows you will technically download something called gVim, which is a version of Vim that includes a basic graphic user interface (GUI). You can install it by downloading this executable installer.
Once you’ve downloaded the file, you just need to run it, and you’ll see a nice installation wizard that looks like this:
They have a recommended «typical» installation. but if you have a reasonably large hard drive, there’s no harm in going ahead with installing everything by choosing the «full» option:
How to Run Vim in PowerShell
Then, once you’ve installed Vim, you should be able to launch it from your Windows command prompt.
Note that as of 2020, PowerShell has all of the same functionality as CMD, plus a whole lot more. I recommend using PowerShell for everything.
You can open PowerShell from the Windows menu bar by typing «powershell» in the search field on the start bar.
Windows will open PowerShell, and you’ll get a command prompt that looks something like this:
Once you’re in PowerShell, here’s how to run Vim itself. All you have to do is type «vim» and press enter. This will open up Vim. Once Vim is open, this is what you should see:
Congratulations – you now have Vim installed.
How to run Vim inside VS Code
If you are already using VS Code, and want a lot of the speed of Vim without losing the functionality of VS Code, I have good news. It is possible to run a Vim-like experience right within VS Code.
Here is a Vim plugin for VS Code that will help you do this. At the time of me writing this, this plugin has been installed nearly 2 million times.
How to Learn How to Use Vim Properly
Vim is a powerful code editor, and it will take you a lot of practice to get comfortable with it.
Here are a few Vim tutorials that will really help you quickly grasp the basics and get your fingers flying in no time.
For starters, one way Vim is different from other code editors is that Vim has «modes». Here are all of Vim’s modes explained, with examples.
Vim can be intimidating. There is so much to learn. But this guide will show you how not to be afraid of Vim anymore.
If you’re already using VS Code and want to switch completely to Vim, this article will explain how you can do so.
And here are 7 Vim Tips That Changed #100DaysOfCode founder Alex Kallaway’s life. In this article, he not only explain these, but shows demos of these tips in action.
Vim: Learn it, live it, love it.
In the 30 years since Bram Moolenaar first created Vim, its influence has spread far and wide. And even today, the Vim project is actively maintained and constantly improving.
I’ve met so many developers over the years who swear by Vim.
I hope this guide has helped you get running Vim on your Windows PC. And I hope these other tutorials I’ve shared with you here will help you go from zero-to-sixty within the coming months.
The key is to keep practicing and not get discouraged by how many Vim shortcuts there are to remember. Eventually, all of these will become muscle memory, and you’ll be flying from one file to another, banging out code like a terminator.
There is no feeling quite as cool as being able to drop into a codebase and immediately start making changes without ever even reaching for a mouse or trackpad. That is the power that Vim promises, and delivers in spades.
Learn to code for free. freeCodeCamp’s open source curriculum has helped more than 40,000 people get jobs as developers. Get started
Let’s start by getting it out on the table: Sublime Text is great, and version 3 should no longer be considered «abandonware» as of build 3065. Sublime Text served me very, very well over the years. That said, trying out new things is a major part of leveling-up, and in that vein Vim deserves a go. (And have you seen some of those thoughtbot guys flying around in Vim? It’s awesome!)
Getting Vim up-and-running on your Windows machine doesn’t have to be an all-day project. In this post, we’ll walk through:
- Installing gVim, which gives us both the «classic» command line version as well as the graphical version
- Installing Vundle, the best way to handle Vim-enhancing packages
- Installing ConEmu, a supercharged command line emulator for Windows
Let’s get after it!
Quick note before we get started: whenever you see text that looks like this:
> something
That means we’re executing «something» from the command line. ConEmu is my recommended tool for doing command line work on Windows, but since getting ConEmu up-and-running is part of this walkthrough I’ll be using regular-ol’ cmd.exe.
End of the notes section. NOW let’s get after it!
1. Download the gVim installer
As of this writing, the latest-n-greatest is version 7.4, so that’s what we’ll get from the Vim download page:
http://www.vim.org/download.php
Download the MS-Windows version and you’ll wind up with a nice executable.
2. Run the gVim installer as an administrator and get through the basics
If you’re an admin on your machine, go ahead and double-click on your recently-acquired gVim74.exe file and you’ll see a very familiar set of wizard-style screens. If you are NOT an admin, right-click the gVim74.exe file and select «Run as Administrator» — this will ensure all the necessary files are installed. (This means that if you aren’t an admin, stop! Go get yourself admin status right now!)
[vim-install-01.png]
You bet! Click «Yes» y’all
[vim-install-02.png]
Of course «I Agree» ya dingus
The first time we’re actually going to adjust the defaults is on the «Select the type of install:» screen. We want the full installation, so select «Full» before clicking «Next».
[vim-install-03.png]
Pick the «Full» option here
The next step is another step away from the default. You’re going to want to install to your User directory (often referred to as your home directory) rather than the typical «Program Files» destination. On my laptop, that means:
C:Usersdanie_000Vim
Once you’ve selected your User directory, click «Install» and BOOM!
[vim-install-04.png]
Pick that home directory and then let it rip!
Now, for the moment of truth. Open up a command window (you can type «cmd» into the Search Everywhere box if you’re using the Metro interface), navigate to a directory with a text-ish file and try gvim the_text_file.txt:
> cd C:SomeDirectory
> gvim the_text_file.txt
Are you looking at the file in gVim? If so, congrats — let’s keep the streak going by starting on the Vundle install. But what if you’re greeted with this pain-in-the-ass message?
'gvim' is not recognized as an internal or external command, operable program or batch file.
WTF, right? You walked through the FULL install, the window said «Happy Vimming», this is bullshit. Why isn’t ‘gvim’ recognized? Read on for the culprit…
Remember way back at the start of this guide? Way up in step #2, where you needed to run the installer as an administrator? Are you absolutely, 1,000% sure you did that? Because the gVim installer code attempts to put some very, VERY important batch files into your C:Windows directory, and adding files to that folder is an admin-only joint.
These batch files, cleverly-named «vim.bat», «gvim.bat» and even «vimtutor.bat» (recognize the pattern?) are the secret sauce here. They are essentially shortcuts that enable the Windows command line to behave like a Unix or Linux terminal, and that’s the name of the game with Vim. Long story short: if you want to be flying around the command line with Vim, you’re going to need those batch files. Get in touch with your admin, get access and re-run the installer with administrative priviledges.
3. Clean up your Vim subfolders
Before we get to the magic of Vundle, let’s do a little housekeeping on our Vim directory to make sure the install and setup is smooth like butter.
After following the Vim installation instructions above in steps #1 and #2, open up Windows Explorer and navigate your Vim directory. In my case, that means going here:
C:Usersdanie_000Vim
Inside that directory, you should see 3 things:
- A folder named «vim74»
- A folder named «vimfiles»
- A file named _vimrc
[vundle-install-01.png]
Vim directory pre-cleanup
Navigate into the «vimfiles» folder and delete everything except the folder itself. (Yes, seriously — if you’re feeling skittish, go ahead and check out some of those default folders, like «colors» for example… you’ll find that they’re all empty.)
Next, jump into the «vim74» folder. Inside «vim74», cut the folder named «autoload» and paste it into the «vimfiles» directory. At this point, «vimfiles» should have exactly one folder inside, the «autoload» directory you just cut from neighboring folder «vim74».
[vundle-install-02.png]
«vimfiles» looking so fresh and so clean (clean)
Finally, you’re going to create one last directory inside the «vimfiles» folder — call this one «bundle», and you’re done.
[vundle-install-03.png]
«bundle» folder created
4. Install Git via mysisgit
Strictly-speaking, Git is a version control system, but Vundle uses Git to pull in the plugins from your _vimrc. Let’s get it installed! Grab the super-easy installer from mysisgit first:
http://msysgit.github.io/
Once the installer downloads, double-click it and walk through the wizard (like so many before it). In this case, the version I am installing is 1.9.4-preview20140929, but regardless of the version the process should be super similar.
Right off the top, let’s get this sucker into our User directory to keep it nice and portable, exactly how we did above with the Vim install. So, on the installer screen where you are asked to choose a destination, go ahead and put everything into a Git folder in your User directory:
C:Users<your_user_name>Git
In my case, this path will look like this:
C:Usersdanie_000Git
[vundle-install-04.png]
Install Git to the top-level of your User directory
After that tweak, the defaults are all golden until until you land on the «Adjusting Your PATH environment» window:
[vundle-install-06.png]
Install Git to run from the command prompt
Selecting the middle option, for «Use Git from the Windows Command Prompt«, is critical here. Down the line we’re going to want to clone from trusty old cmd.exe — so make sure you pick that option.
After that, the remaining defaults are all A-OK, so go ahead and «Next» through them too, and before you know it you’ll have git installed. Whammy!
[image of champ kind saying Whammy]
Bet you didn’t think I would throw it all the way back to 2004, did you?
You can verify the install by opening up cmd.exe and typing git --version from any directory:
> git --version
git version 1.9.4.msysgit.2
You should be greeted by a courteous one-liner listing, you guessed it, the version.
[vundle-install-07.png]
«git —version» at work
5. Configure cURL to work from the command line
We’re getting so close — I promise!
Vundle requires a program called cURL work properly, but don’t trip — it came along for the ride when you installed Git in the last step. Unfortunately, cURL is very *nix-y and does not play nice with the Windows command line out-of-the-box, so we’re going to need to make a one-time adjustment.
Go to this gist (written by Vundle’s author gmarik) and copy the text onto your clipboard:
https://gist.github.com/gmarik/912993
Here’s the gist direct in case you don’t want to go all the way to github for it:
[wpgist id=»912993″]
Next, open up a text editor (Notepad will do just fine) and paste in what you just copied.
[vundle-install-08.png]
The modification info from gmarik of Vundle fame
Save this file as «curl.cmd» inside the ..Gitcmd directory that was installed as part of step #4 above. So, if you’re following my recommendations, the full save path will look like this:
C:Usersyour_user_nameGitcmdcurl.cmd
Here’s what that looks like on my laptop:
[vundle-install-09.png]
Making sure Curl will work from the Windows command line
Let’s confirm that Curl is working by checking its version the same way we did for Git above:
> curl --version
curl 7.30.0 (i386-pc-win32)
[vundle-install-10.png]
Curl working like a champ
6. Install Vundle
We’re finally to the actual Vundle install!
Open up a new command line and navigate to the «bundle» folder created in step #5 above. On my laptop, that command looks like this:
> cd C:Usersdanie_000Vimvimfilesbundle
[vundle-install-11.png]
Navigate to your freshly-created «bundle» folder
Then, run this command to clone the Vundle files into the «bundle» folder:
> git clone https://github.com/gmarik/Vundle.vim.git
You’ll see some updates from Git regarding the status of the clone, and then you’ll land on a new line. You can verify that the clone was successful by running Dir like so:
[vundle-install-12.png]
Whaddup, now you’ve got a folder named «Vundle.vim» inside the «bundle» folder
All that’s left to do now is update that juicy _vimrc file… and admittedly, this one was a bit of a challenge.
After working through the recommended guide (including the Windows-specific steps), I kept getting this error:
E492: Not an editor command: PluginInstall
Argh! But after hours spent slogging through a wasteland of «my .vimrc is broken, halp!» questions around the web, a solution was finally found. Save yourself the headache and the hours and check out my fully-functional _vimrc file, start-to-finish, which will work like gangbusters:
[wpgist id=»5c56158314bc7957e661″]
Naturally, if any of those plugins are not to your liking, comment them out. When you’d like to pull down those vim add-ins, simply write vim +PluginInstall +qall at the command prompt from any directory (or :PluginInstall from inside Vim in normal mode). Check it:
> vim +PluginInstall +qall
[vundle-install-13.png]
Let it rip!
Boom! Look at that glorious install go!
[vundle-install-14.png]
Sweet berry wine!
If you were to stroll on over to your bundle directory, you’d see that those folders are now in place… damn it feels good to be a gangster. Quit Vim by hitting Esc to get into normal mode, then typing :q and hitting Enter.
7. Download the ConEmu installer
ConEmu is the command prompt you NEED to be using on Windows. Besides supporting tabs and being super-customizable, it’s actively developed and supported by Maximus directly on Super User. The dude WILL answer your question, real talk. Did I mention it’s also free ninety-nine?
http://www.fosshub.com/ConEmu.html
Download the ConEmu Preview Installer (32-bit and 64-bit) and you’ll soon have another executable.
8. Run the installer as an administrator
No admin worries here — the ConEmu installer has added it as a checkbox to the initial screen! Naturally, you want to run this one as an admin. Pick the x64 version if you’re running a 64-bit version of Windows: otherwise pick x86.
[conemu-install-01-1.png]
Pick the right install for your version of Windows
After putting in your admin password you’ll find yourself at another wizard, and fortunately this time defaults are ALMOST perfect. The only recommended change is to install to your User directory, which for me is C:Usersdanie_000. This can be a little tricky considering what you see immediately after launching the installer! (Take a look at the last screenshot if you forgot… it TELLS you that the destination is inside Program Files!)
Don’t worry though, you can still make your user directory the resting place for ConEmu by clicking the «Browse» button on the «Custom Setup» page.
[conemu-install-01-2.png]
Let’s get this little guy installed into our User directory instead
Inside the window that opens after clicking «Browse», you’ll be able to navigate to your User directory (again, it’ll look something like C:Users<Your User Name>) and create a new folder called «ConEmu» there as the destination. Easy as pie…
[conemu-install-01-3.png]
Get a nice folder all set up for the install
And boom, you’re done! Let’s get into the fun stuff.
9. Open up that freshly-installed ConEmu app
[conemu-install-02.png]
So fresh and so clean (clean)
JACKPOT. Let’s go ahead and set up some super-handy shortcuts to make ConEmu the terminal we want AND need.
10. Set ConEmu to default into a different folder (that you pick)
First up, on initial open ConEmu will drop you into your Users folder… Not a bad place to start, but we can do better. Suppose that you keep your Git repos in a folder you created as C:github like your boy does — it would make the most sense to have ConEmu default to that directory, since you’re undoubtedly using the terminal as part of your development process.
Go ahead and click the icon with three small blue lines, then select the «Settings…» option.
[conemu-install-03.png]
Getting to ConEmu’s «Settings…» pane
The Settings window will pop up momentarily. Now, click the «Tasks» option underneath «Startup» and you should see a window called «Predefined tasks (command groups)» with 7 options already built in, like this:
[conemu-install-04.png]
Check out the already-created default tasks that come standard with ConEmu
Click the «+» button to add a new predefined task. «Group8» doesn’t tell you much about what’s actually going on here, so let’s call it «github» instead:
[conemu-install-05.png]
Rename this task to «github»
Now for the secret sauce. Inside the «Task parameters» field, add:
/dir "C:github"
Then, inside the «Commands» field, add:
cmd.exe
Once you’ve made your modifications, your settings should look like this:
[conemu-install-06.png]
Make sure you’ve got the /dir "C:github" and cmd.exe options configured
Finally, this predefined task is something you’re probably going to use on the regular, so go ahead and click the «Up» button until it gets into the first position.
[conemu-install-07.png]
«I, am, number one.» -Nelly
Click «Save settings» and BOOM, you’ve got your first Predefined task set up.
«But Dan», you’re probably asking, «we were supposed to set up the start directory! Why do we care about adding this task?» That’s a great question my friend. Now that we have our favorite folder stored as a task, getting ConEmu to load it up by default is easy cheesy!
Get to the Settings window again (by clicking the three blue bars icon again or using keyboard shortcut Win + Alt + p) and this time select «Startup» from the hierarchy on the left:
[conemu-install-08.png]
Get to the «Startup» section
Now, instead of leaving the «Command line» option checked, click the «Specified named task» radio button and select your recently-added task («github») from the dropdown:
[conemu-install-09.png]
Choose «github» as the Startup option instead of the original setting
Click «Save settings» again and you’re golden! You can verify that ConEmu now defaults into the folder you chose by restarting the app… you’ll be in the right directory for sure.
[conemu-install-10.png]
$traight ca$h…
Not only do we start in the right directory, but now we’ve got a super-easy shortcut for opening a new ConEmu tab into the C:github directory. Go ahead and try it! Hit Win + n to open the predefined tasks window, then hit 1 to open a new ConEmu tab inside C:github.
[conemu-install-11.png]
DAMN that’s a handy shortcut!
11. Set a Predefined Task for your _vimrc
Chances are, especially in the beginning, you’re going to be tweaking your _vimrc A LOT… new Vundle packages, new settings, adjusting the colorscheme, whatever. A ConEmu predefined task that cues up your _vimrc file in gVim will save you lots of energy, so let’s take what we learned in step 10 above and build out this tasty treat.
Create a new predefined task, and this time name it «vimrc». The «Task parameters» field should look like this, as we want to start in the Vim directory: /dir "C:Usersdanie_000Vim". Finally, we want to pass the console an argument, which can be done from the «Commands» field. It should look like this: cmd.exe /k gvim _vimrc. In the screenshot below, the «vimrc» task has been moved to position #2:
[conemu-install-12.png]
Gimme that sweet _vimrc editing
And that’s it! Now, whenever you want to adjust your _vimrc, you can simply type Win + n then hit 2 from ConEmu. How simple is that!?
[conemu-install-13.png]
Fugg yeah!
And with that, you have installed Vim, Vundle and ConEmu like a champ — congratulations! Check yourself out in a mirror right now, because you are looking strong as an ox.
[Stevie and Kenny Powers image]
These days, Vim becomes
more and more popular on Windows. Today, let’s learn how to install Vim on
Windows, including:
- gVim
-
WSL
(our preferred option) - Cygwin
Installing gVim on Windows
gVim is a Vim GUI for Windows. For sometime, this and the Cygwin alternative
(discussed below) were the main ways to run Vim on Windows.
Installing gVim is
simple and follows the standard way to install applications on Windows. So go ahead and download your installer from
Vim’s official download page, run the installation and follow the instructions.
 |
| Initial Setup |
Choose the components you want to install:
 |
| Choosing your components |
Choose your vimrc settings:
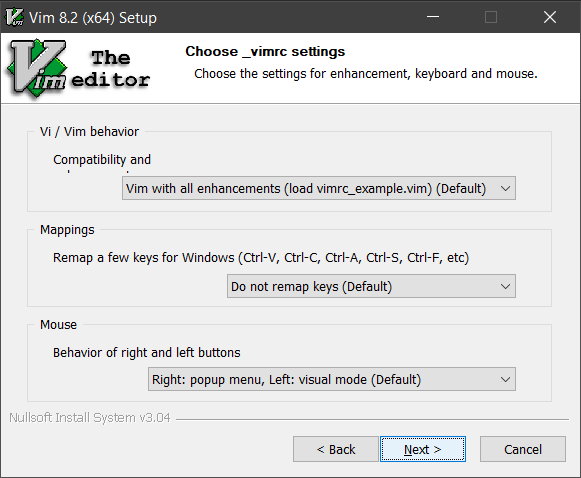 |
| Choosing your .vimrc settings |
Specify the install location:
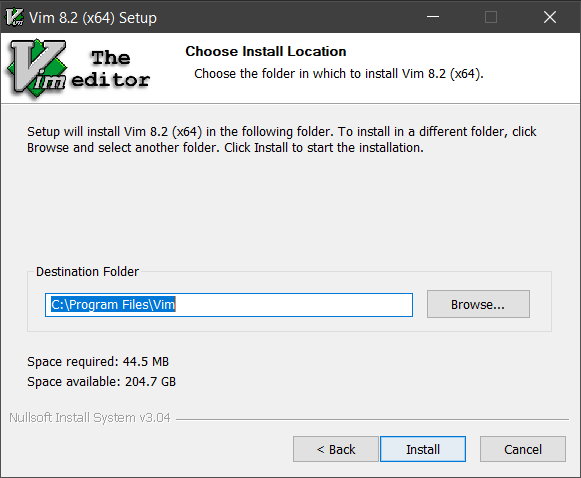 |
| Specifying your install location |
And that’s it! Vim is now installed on your system. Start it from the Start Menu.
Installing Vim on WSL
Despite installing Vim using the installer above feel more natural to Windows users, we’d like to suggest a different approach: installing Vim on WSL. Since it’s really simple, follows the same setup described by
us in our Linux tutorial and is the way you will probably do when using Linux.
For this setup we
assume you have a
Ubuntu WSL instance
and
WSL installed in your system. Installing Vim on Ubuntu under WSL is done by opening a WSL terminal and
typing these commands:
sudo apt-get update
sudo apt-get install vim
Once you install it, open a new WSL terminal and run vim with the vim command from the command line:
Installing Vim using Cygwin
Installing Vim with
Cygwin (a
POSIX-compatible runtime for Windows) may be the least recommended way to do so
these days. However, if you have Cygwin installed already and is comfortable
with it, installing Vim on it simply requires running Cygwin’s setup.exe again
and selecting Vim.
If you don’t have Cygwin installed,
install it and select
Vim from your install screen.
Testing the Install
With Vim installed, next step is to test if it’s running with the command
below:
vim
Exiting Vim
In case it’s your first time with
Vim, to exit press:
<Esc> :q!
Listing installed features
It’s also possible to list which features are installed in your setup by
running from the terminal:
vim —version
The enabled features will be marked with (+) while the disabled should have
the (-) symbol aside.
Conclusion
One this post we reviewed three different ways to install
Vim, with WSL being our recommendation. We hope it helps!
See Also
- How to get started with Vim
- Why use Vim
- Installing Vim on Linux
- Installing Vim on Mac
- Vimtutor — Your first Vim tutorial
- Learn to learn Vim
- Fundamental concepts of Vim
- Vim Modes — All you need to know
Install vim editor on Window.
This tutorial explains how to install Vim Editor on Windows, Linux, and macOS
How to Install and setup VIM editor on Windows
Following are the steps required to install on Windows.
- Go to vim.org
- Click on the Download link on the left side for navigation
- Download the stable version or old version for the link
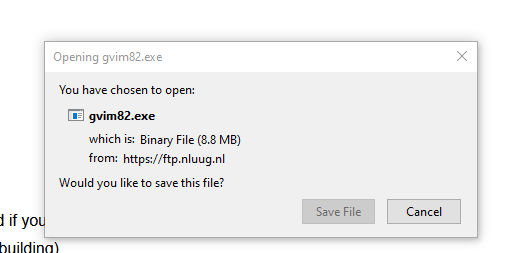
PC: MS-DOS and MS-Windows - It downloads the
gvim82.exefile to the local system - Double click on this file and follows the installation instructions
- Select language
- privacy policy
- Choose components
Click on Next to finish the installation
How to run and open vim editor from PowerShell
there are several ways to open vi editors in windows.
- Powershell
- Open windows run by Windows +R command
- type PowerShell
- It opens the PowerShell window
- Windows Terminal
- Open the command prompt and type vim editor
- or you can open the file with
vim filename.
Fixing vim is not recognized as an internal or external command
Once you installed vim on windows, It will not run vim from the command line by default and gives the following error.
vim is not recognized as an internal or external command, operable program, or batch file
The reason vim is not a recognized command to execute and it does not found in the environment path
So, you have to set environment variables to vim location.
- Go to Control Panel > System — It opens the System properties window
- Edit System environment variables
- VIM is installed on
c:Program Files (x86)vimin my windows - Edit PATH environment variable, check vim path is added, if not add this to a PATH environment variable and save it.
Now, the vim command works in terminal and PowerShell windows.
Just to supplement, I’m on a fairly highly controlled Windows workstation right now, and don’t have access to much. Downloading the «executable installer» that I usually use did not create the bat files nor, for some reason, vim.exe, though gvim.exe was installed in the vim74 dir for me and worked fine. So though I also needed to set the PATH, that there was no bat file in C:WiNDOWS nor any command line executable in my VIm runtime folder to call meant that callingvim from the command line (or Powershell) didn’t work.
I’m guessing some portion of the install that’s creating the command-line related stuff, apparently including vim.exe, isn’t recovering gracefully when you don’t have admin permissions.
Either way, the «right» thing to do appears to be to set your PATH to your vim executable folder as usual (note that this might be a little more difficult than usual if you don’t have admin privs), then download the «Win32 console executable» from the usual download page that matches the version of gvim that you’ve already installed, dig vim.exe out of that zip you just downloaded, and place that into the same folder as gvim.exe.
Looking on another box where the executable installer did work «fully», there’s some jive in the vim.bat file that wasn’t installed for me about «collect the arguments in VIMARGS for Win95» and if .%OS%==.Windows_NT goto ntaction, etc etc, but not having any of that doesn’t seem to be a problem on Win7, at least. ;^)
Вы не можете вернуться в школу вовремя из-за эпидемии. Вам необходимо установить vim на свой домашний компьютер с Windows и настроить среду, которая записана здесь.
1 Загрузите vim для windows
Загрузите версию vim для Windows с github:https://github.com/vim/vim-win32-installer/releases

2 Установите vim
- Дважды щелкните загруженный файл gvim_8.2.0539_x64.exe, чтобы начать установку, сначала выберите язык, затем войдите в интерфейс приветствия, нажмите «Далее»

- Получение согласия
- Выберите содержимое для установки, нажмите значение по умолчанию без особых требований, а затем нажмите кнопку «Далее».
- Выберите настройки vim, по умолчанию без особых требований, а затем нажмите Далее
- Выберите путь установки
- Процесс установки следующий, нужно немного подождать
- Отображается следующий интерфейс, указывающий на то, что установка прошла успешно. Нажмите Готово, чтобы завершить установку.


3 Добавить переменные среды
Чтобы запустить vim непосредственно из cmd или терминала Windows, добавьте путь установки vim в переменную окружения.
- Сначала найдите vim.exe или gvim.exe в пути установки (оба находятся в одной папке), скопируйте путь, как показано ниже.
- Щелкните правой кнопкой мыши этот компьютер-> Свойства-> Расширенные настройки системы-> Переменные среды, выберите Путь и нажмите Изменить, как показано ниже.
- Нажмите New и вставьте сюда путь к папке, в которую только что скопировал vim.exe, как показано ниже:
- Наконец, нажмите три подтверждения (всего в описанном выше процессе появится три окна, и каждое окно будет подтверждено один раз) для успешного добавления.


3 Настройте vim
Есть один в установленной папке vim_vimrcФайл, эквивалентный vim под Linux.vimrcFile, настройте в нем vim, в большинстве случаев так же, как Linux.
- Базовая конфигурация выглядит следующим образом
"базовая конфигурация
"
"
" Установить номер строки
set number
"Подсветка синтаксиса. Автоматическое распознавание кодов и использование нескольких цветов для обозначения
syntax enable
" Выберите цветовую тему(Он был загружен и помещен в папку ~ / .vim / colors.)
colorscheme badwolf
"Поддержите использование мыши
set mouse=a
" После нажатия клавиши Enter отступ следующей строки будет автоматически соответствовать отступу предыдущей строки.
set autoindent
"После нажатия клавиши Tab количество пробелов, отображаемых vim
set tabstop=4
" В нормальном режиме>>Увеличьте один уровень отступа,<<Отменить один уровень отступа,==При отмене всех отступов количество пробелов для каждого уровня отступа
set shiftwidth=4
«Автоматически преобразовывать табуляцию в пробел (чтобы отступы клавиши табуляции в разных редакторах не вызывали проблем)
set expandtab
" Сколько пробелов превращается в Tab
set softtabstop=4
"Строка, в которой выделен курсор
set cursorline
highlight CursorLine cterm=NONE ctermbg=black guibg=NONE guifg=NONE
" Отключить автоматический перенос строк
set nowrap
"При вертикальной прокрутке расстояние между курсором и верхом / низом (единица измерения: строка)
set scrolloff=5
" При горизонтальной прокрутке расстояние между курсором и началом или концом строки (единица измерения: символ)
set sidescrolloff=30
"Установите ширину линии, то есть сколько символов отображается в строке
set textwidth=1000
" Отображать ли строку состояния: 0 означает отсутствие отображения, 1 означает отображение только в нескольких окнах, 2 означает отображение
set laststatus=2
"Задайте информацию, отображаемую в строке состояния: имя файла, код ASCII символа, на котором находится курсор, шестнадцатеричный код ASCII символа, на котором находится курсор, положение курсора, процент содержимого выше. строка, где находится курсор во всем файле, общая строка файла Номер
set statusline= %F%m%r%h%w ASCII=%03.3b HEX=%02.2B POS=%04l,%04v %p%% NumOfLine=%L
" Показать пробел в конце строки
highlight WhitespaceEOL ctermbg=red guibg=red
match WhitespaceEOL /s+$/
"Когда курсор встречает скобку, другая половина скобки автоматически выделяется.
set showmatch
" В режиме командной строки текущая набранная команда отображается внизу. Например, при вводе dd для удаления строки введите первый d, и в правом нижнем углу отобразится d. Когда dd полностью введен, операция завершена, и нижний дисплей исчезнет.
set showcmd
"При поиске выделите результат поиска
set hlsearch
" При поиске каждый раз, когда вы вводите символ, он автоматически переходит к первому совпадающему результату.
set incsearch
"Игнорировать регистр при поиске
set ignorecase
" Не создавать файл подкачки
set noswapfile
"Сохранять историю отмены операций
set undofile
" Задайте место сохранения файла истории операций
" set undodir=
" Сколько исторических операций необходимо запомнить vim
set history=1000
"В командном режиме нижняя инструкция по эксплуатации автоматически завершается нажатием клавиши Tab. При первом нажатии Tab отображается список всех соответствующих инструкций по выполнению операций; при втором нажатии клавиши Tab каждая инструкция будет выбрана по очереди.
set wildmenu
set wildmode=longest:list,full
" Определите сочетание клавиш F1 для переключения окна vim
map <F1> <C-w>w
"Установить код формы файла utf8
set encoding=utf-8
set termencoding=utf-8
set fileencoding=utf-8
set fileencodings=ucs-bom,utf-8,chinese,cp936
- Установите плагин vundle
git clone https://github.com/VundleVim/Vundle.vim.git C:Program FilesVimvimfilesbundle
Если git не установлен, повторно выполните указанную выше команду после установки самостоятельно.
- в
_vimrcДобавьте следующий контент, чтобы установить каждый общий плагин один за другим. Подробнее см. В блоге, который я написал при настройке vim в Linux:https://blog.csdn.net/qyhaill/article/details/99701566
"Управление плагинами
set rtp+=$VIMvimfilesbundleVundle.vim
call vundle#begin()
Plugin 'VundleVim/Vundle.vim'
Plugin 'tpope/vim-fugitive'
Plugin 'airblade/vim-gitgutter'
Plugin 'jiangmiao/auto-pairs'
Plugin 'tpope/vim-surround'
Plugin 'scrooloose/nerdcommenter'
Plugin 'scrooloose/nerdtree'
Plugin 'jistr/vim-nerdtree-tabs'
Plugin 'zxqfl/tabnine-vim'
call vundle#end()

"  Конфигурация различных плагинов
"
"
"Конфигурация комментатора NERD
"  Сменить лидера с"" к ","
let mapleader = ","
"  Автоматически добавлять пробелы после комментария
let g:NERDSpaceDelims = 1
"Используйте компактный синтаксис для уточненных многострочных комментариев: используйте компактный синтаксис, чтобы украсить многострочные комментарии.
let g:NERDCompactSexyComs = 1
"  Выровнять построчные разделители комментариев по левому краю вместо следующего отступа кода: Выровнять построчные разделители комментариев по левому краю вместо следующего отступа кода:
let g:NERDDefaultAlign = 'left'
"Разрешить комментирование и инвертирование пустых строк (полезно при комментировании региона): разрешить комментирование и инвертирование пустых строк (полезно при комментировании региона)
let g:NERDCommentEmptyLines = 1
"  Включить обрезку конечных пробелов при раскомментировании: удалить пробел в конце текущей строки при раскомментировании
let g:NERDTrimTrailingWhitespace = 1
"Включите NERDCommenterToggle, чтобы проверять, прокомментированы все выбранные строки или нет: я пока не знаю, что это означает и для какой цели
" let g:NERDToggleCheckAllLines = 1
"
"
"Конфигурация NERDTree
"  Установите F2 как горячую клавишу для переключения NERDTree
map <F2> :NERDTreeToggle<cr>
"Измените значок отображения дерева
" let g:NERDTreeDirArrowExpandable = '+'
" let g:NERDTreeDirArrowCollapsible = '-'
"  Автоматически открывать NERDTree, если при открытии vim нет файла
" autocmd vimenter * if !argc()|NERDTree|endif
"  Автоматически закрывать, когда NERDTree остается единственным окном
autocmd bufenter * if (winnr("$") == 1 && exists("b:NERDTree") && b:NERDTree.isTabTree()) | q | endif
"
"
"nerdtree-git-plugin конфигурация
let g:NERDTreeIndicatorMapCustom = {
     "Modified"  : "✹",
     "Staged"    : "✚",
     "Untracked" : "✭",
     "Renamed"   : "➜",
     "Unmerged"  : "═",
     "Deleted"   : "✖",
     "Dirty"     : "✗",
     "Clean"     : "✔︎",
     'Ignored'   : '☒',
     "Unknown"   : "?"
     }
- Откройте vim в cmd и выполните
:PluginInstallУстановите плагин.